A Windows Explorer reboot is often the fastest solution
by Ivan Jenic
Passionate about all elements related to Windows and combined with his innate curiosity, Ivan has delved deep into understanding this operating system, with a specialization in drivers and… read more
Updated on August 27, 2022
Reviewed by
Vlad Turiceanu

Passionate about technology, Windows, and everything that has a power button, he spent most of his time developing new skills and learning more about the tech world. Coming… read more
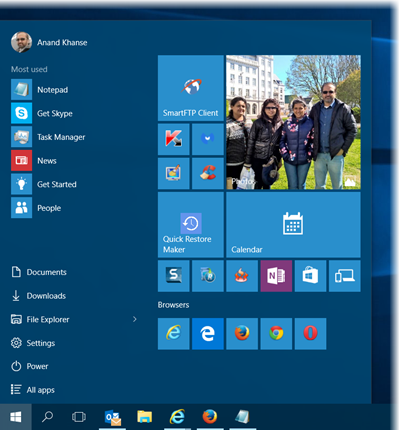
- The Start button is one of the most recognizable UI components that has been with Windows since the very beginning.
- It is important to look for alternative ways to reboot your PC to get rid of the Start button error.
- The guide below will show you what to do when you encounter issues using the Start button.
XINSTALL BY CLICKING THE DOWNLOAD FILE
- Download Restoro PC Repair Tool that comes with Patented Technologies (patent available here).
- Click Start Scan to find Windows 10 issues that could be causing PC problems.
- Click Repair All to fix issues affecting your computer’s security and performance
- Restoro has been downloaded by 0 readers this month.
Your Start menu button not working can be a genuine concern, and we understand you may be panicking right now, but calm down, and we will show you all you need to know.
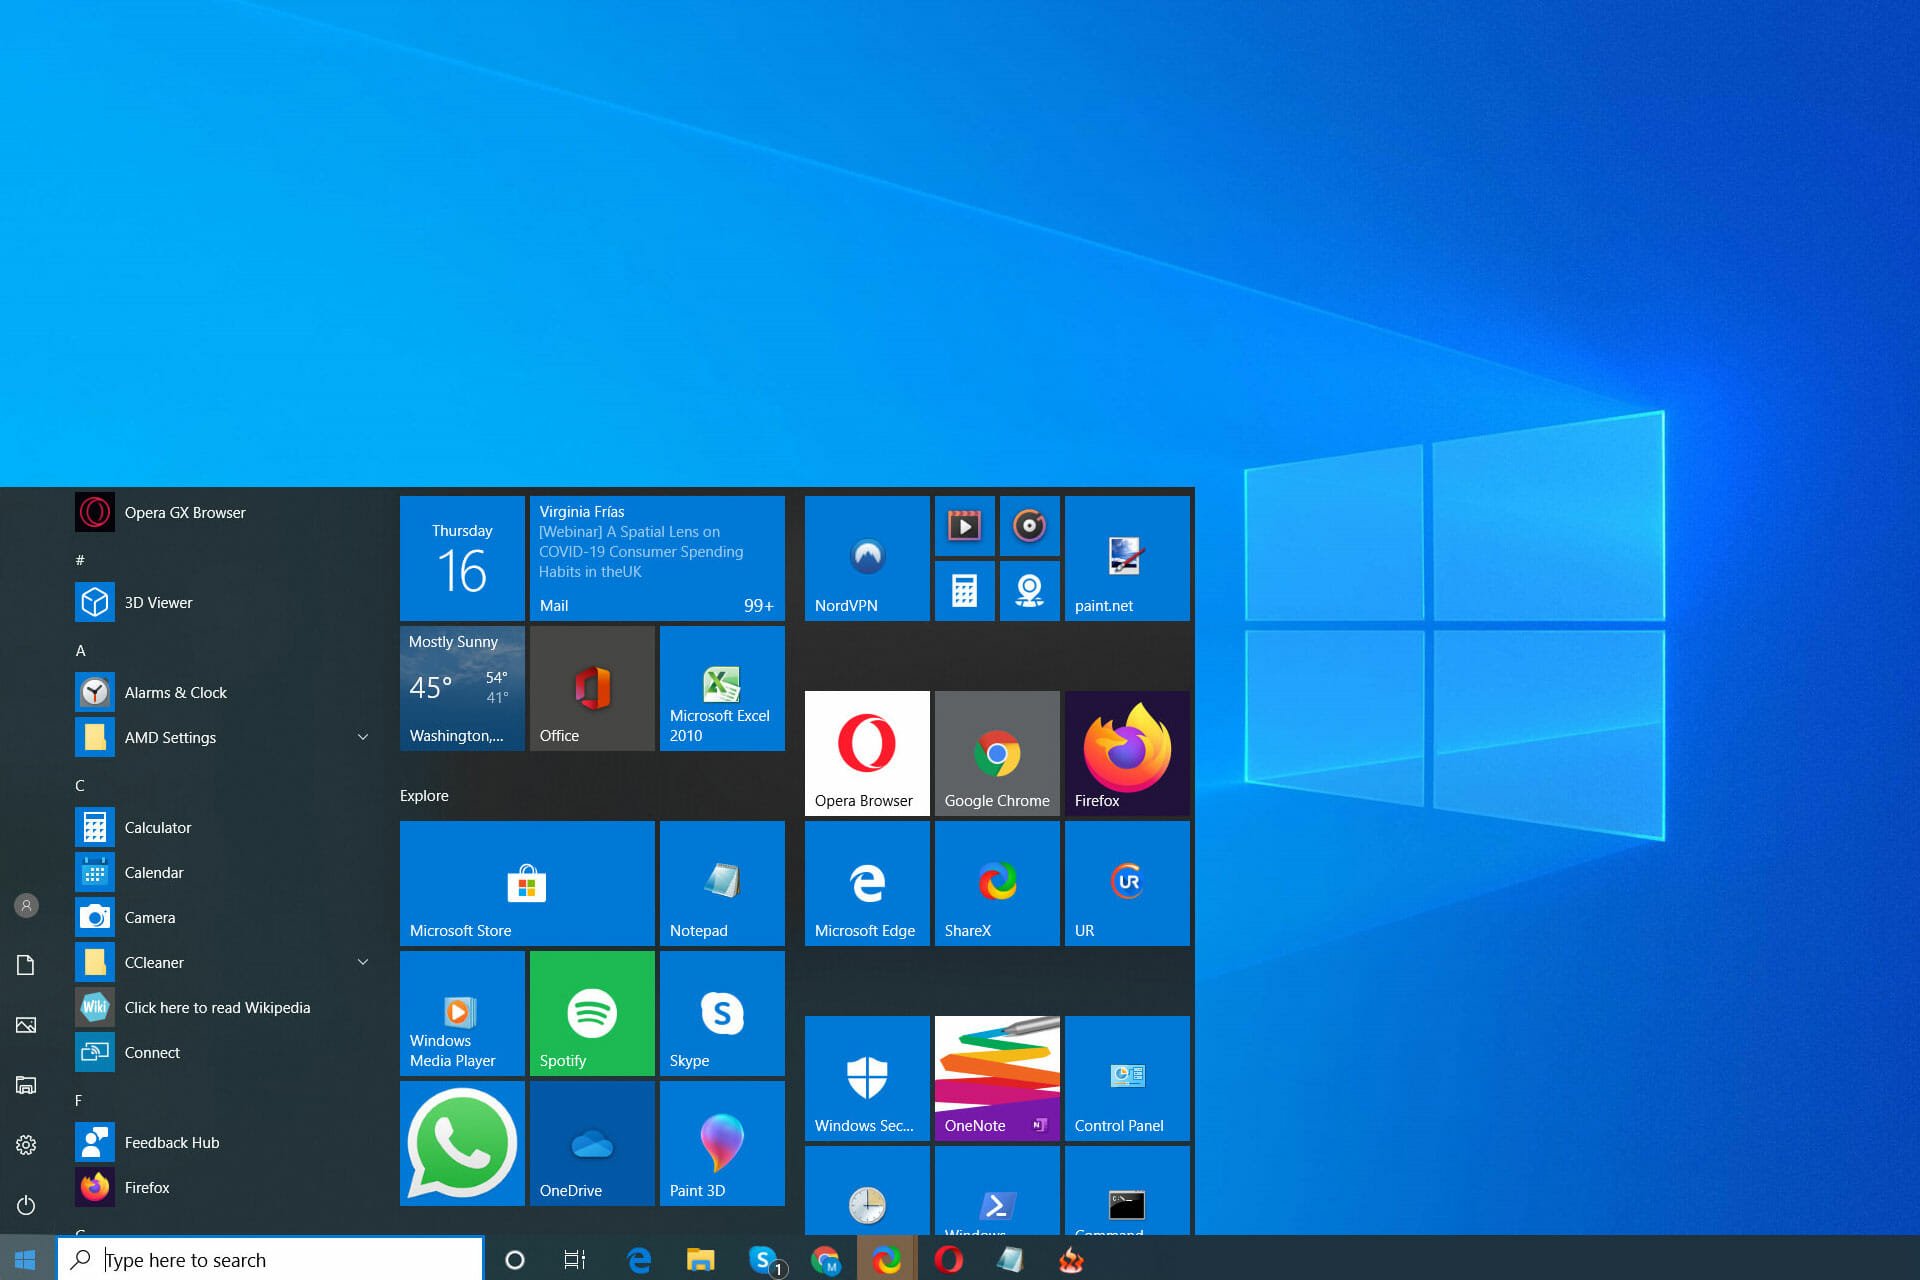
When Windows 8 was released, many people were disappointed by the lack of a Start Menu, an integral part of Windows. Windows 10 fixed that because it brought back the Start Menu.
Users worldwide were excited to see Start Menu back, but sadly, some users report that the Start button doesn’t work on Windows 10, so today, we’re going to explore this issue.
The reasons behind this problem vary. Sometimes, it is simple settings that have been misconfigured; other times, you may have had your computer compromised by malware.
Additionally, there are random times when a glitch in your Windows user profile may make the Start menu disappear.
Furthermore, corrupted computer files may trigger the error, and you should have the Start button restored by deleting them.
Whatever the case is, you do not have to consult a technician, as in a few clicks, you should be able to get the Start button back in Windows 10 and 11.
Start Menu is integral to Windows, but many users reported various issues. Speaking of issues, here are some common problems that users reported:
- Windows 10: Start Menu and Cortana not working
- Start Menu and Cortana are closely related, and if one of those features isn’t working, try installing the latest updates and check if that helps.
- Windows Start button not working on Windows 10, quit working on Windows 10
- Many users reported that the Start button stopped working on their Windows 10 PC.
- To fix this problem, you might have to use Powershell and re-register all preinstalled applications.
- Start Menu button is frozen, won’t open on Windows 10
- This is another common problem with Start Menu; a temporary glitch usually causes it.
- Sign out of your account and log back in to fix the problem.
- Start Menu crashing in Windows 10, missing in Windows 10
- According to users, sometimes Start Menu could be crashing or even missing on your PC.
- You might have to create a new user account and switch to it to fix the problem.
What to do if Start Menu and Taskbar are not working on Windows 10?
There are all sorts of issues that can occur with the Start Menu, and many reported an unresponsive Taskbar in Windows 10. However, a few users even reported that the whole Start Menu doesn’t work.
This can be a problem, but it can be fixed by restarting the Windows Explorer process.
In some rare instances, you might get a Critical error in Start Menu, and if this happens, it’s advised to repair your profile or installation.
Luckily for you, fixing these issues isn’t hard, and in today’s guide, we’ll show you how to do it.
What can I do when the Start button is not working in Windows 10?
1. Check for Windows updates
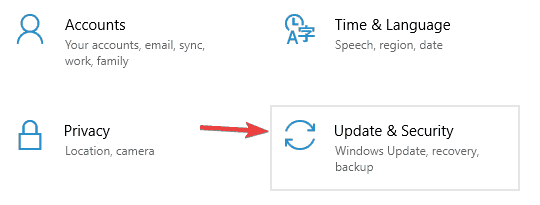
- Press Windows Key + I to open the Settings app.
- Now go to the Update & Security section.

- In the right pane, click the Check for updates button.

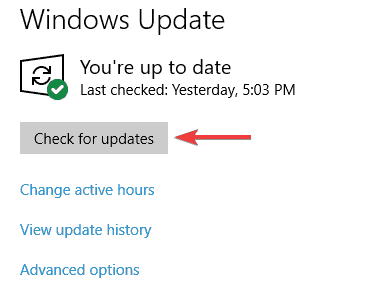
Updates will be downloaded automatically in the background if any updates are available. Once your system is up to date, the issue should be resolved entirely, and your Start Menu should start working again.
Microsoft is aware of this issue, and if there is a fix available, it will be released via Windows Update; therefore, make sure that you keep your Windows 10 up to date, and if there are any updates available, download them.
Windows 10 usually downloads the missing updates automatically, but sometimes, issues can prevent updates from downloading. So a manual check, as mentioned above, is a valid option.
2. Use the PowerShell to fix this issue
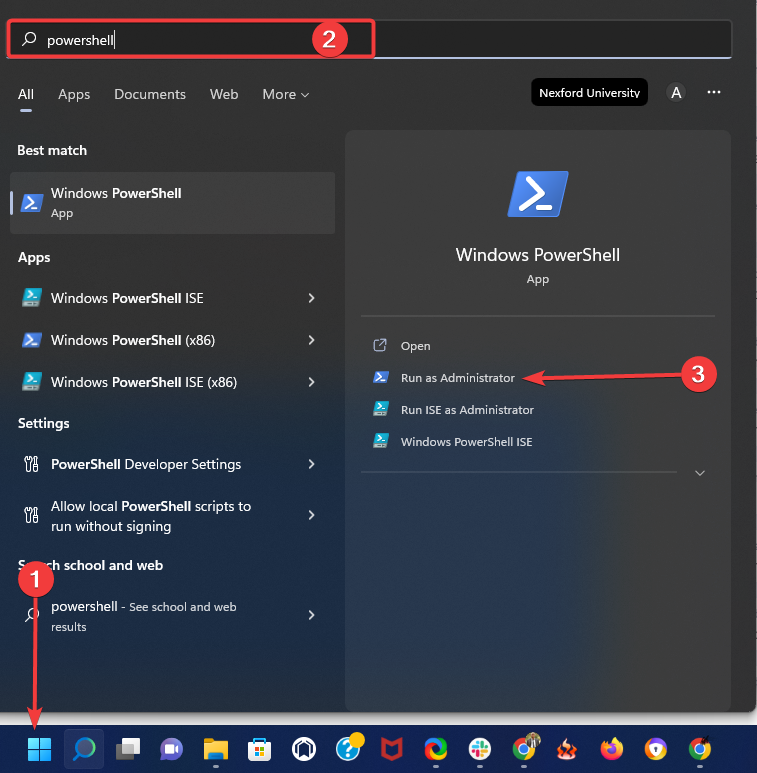
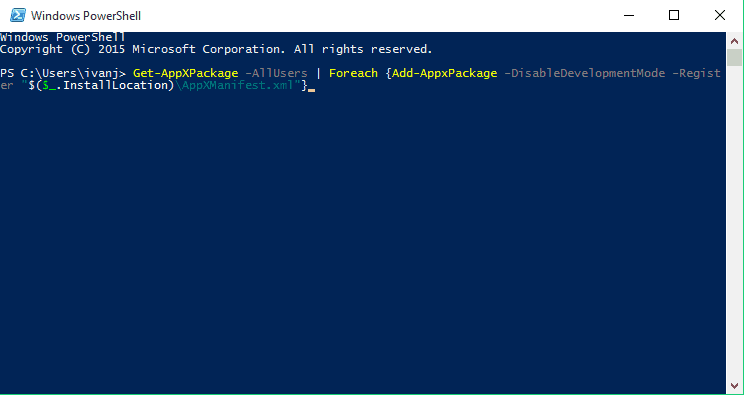
- Press the Windows button, type Powershell, and click the Run as administrator option.

- Paste this into PowerShell:
Get-AppXPackage -AllUsers | Foreach {Add-AppxPackage -DisableDevelopmentMode -Register "$($_.InstallLocation)AppXManifest.xml"}
- Press Enter to execute it.
That would be all, and your Start button should be working now.
You can try this workaround if you don’t want to wait for the official patch. This isn’t a permanent solution, but it gets the job done and fixes the issue temporarily, so if the problem manifests itself again, you might need to repeat this process.
For the permanent solution, make sure that you check for the latest Windows 10 updates regularly.
3. Sign out of your account
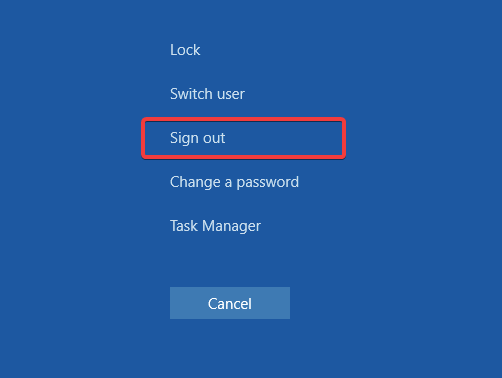
- Press Ctrl + Shift + Del.
- Now click the Sign out button.

- Wait for a few moments and sign back into your account.
After signing back in, check if the problem is still there.
Some PC issues are hard to tackle, especially when it comes to corrupted repositories or missing Windows files. If you are having troubles fixing an error, your system may be partially broken.
We recommend installing Restoro, a tool that will scan your machine and identify what the fault is.
Click here to download and start repairing.
Sometimes, the Start Menu button won’t work if there’s a glitch with your user account. But, according to users, the simplest way to fix this problem is to sign out of your account and log back in.
Since your Start Menu and Start button aren’t working, you’ll need to sign out using the steps we mentioned
4. Restart Windows Explorer
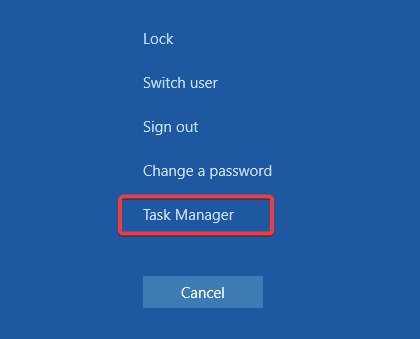
- Press Ctrl + Shift + Del to open Task Manager.

- Locate Windows Explorer on the list.
- Right-click it and choose Restart from the menu.


Once Windows Explorer restarts, the issue should be gone, and your Start Menu will start working again. Remember that this is a temporary solution, so you’ll have to repeat it once the problem reappears.
Many users reported that you could fix the problem with the Start Menu button simply by restarting Windows Explorer.
The Start Menu is a part of Windows Explorer, and by restarting Windows Explorer, you’ll force Start Menu to restart as well.
5. Use Command Prompt
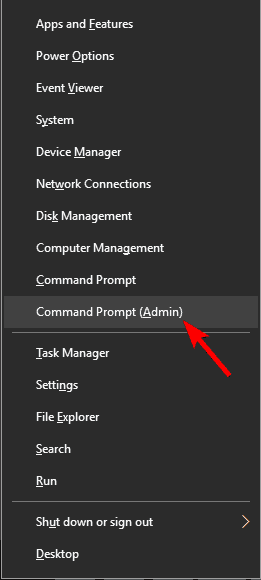
- Press Windows Key + X and choose Command Prompt (Admin) from the menu.

- When Command Prompt starts, run the command below and hit Enter.
CD/d "%LOCALAPPDATA%PackagesMicrosoft.Windows.Cortana_cw5n1h2txyewy" - Next, type the following two commands and hit Enter after each one.
Taskkill /F /IM SearchUI.exeRD /S /Q Settings
After the commands execute, the damaged files will be rebuilt, and you should be able to use Start Menu again without issues.
Sometimes problems with the Start Menu button can be caused by specific Cortana files. According to users, you can fix this problem simply by deleting these files from the Command Prompt.
These are just some temporary files; your PC will recreate them, so there’s no need to worry.
- Windows 10/11 taskbar not working / responding
- Windows 11’s Start menu is not working? Here’s what to do
- PC Not Detecting GPU: These 5 Methods Will Surely Help
- Windows 10 Won’t Boot on My PC: 5 Simple Solutions
- Windows 10 Brightness Slider not Working: 6 Fixes to Use
- WHEA Internal Error: Fix it Using These 9 Quick Methods
6. Modify your registry
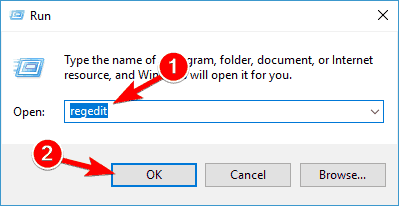
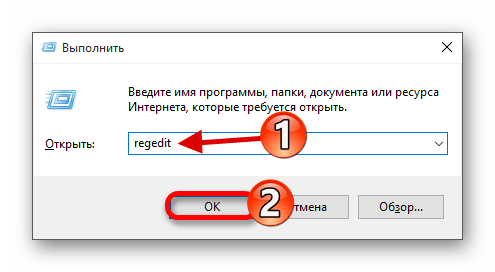
- Press Windows Key + R and enter regedit. Press Enter or click OK.

- In the left pane, navigate to this key:
HKEY_LOCAL_MACHINESYSTEMCurrentControlSetServicesWpnUserService
- In the right pane, double-click Start DWORD, set Value data to 4, and click OK.

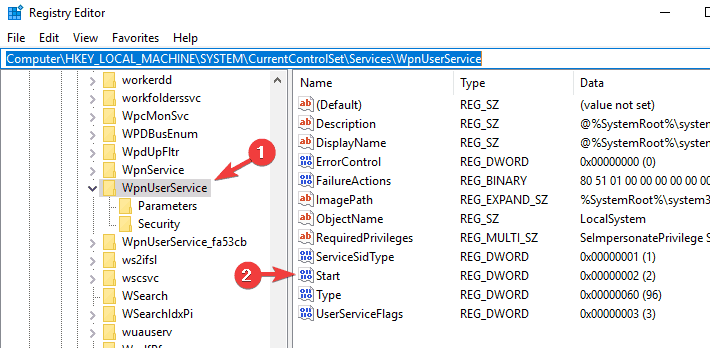

After making these changes, restart your PC and check if the problem is resolved.
Occasionally, issues with the Start Menu button can occur due to Dropbox. Note that Dropbox can sometimes interfere with Windows processes, leading to this and many other problems.
However, you should be able to fix this problem by making a few changes to your registry.
7. Create new values in your registry
- Start Registry Editor.
- In the left pane, navigate to this key:
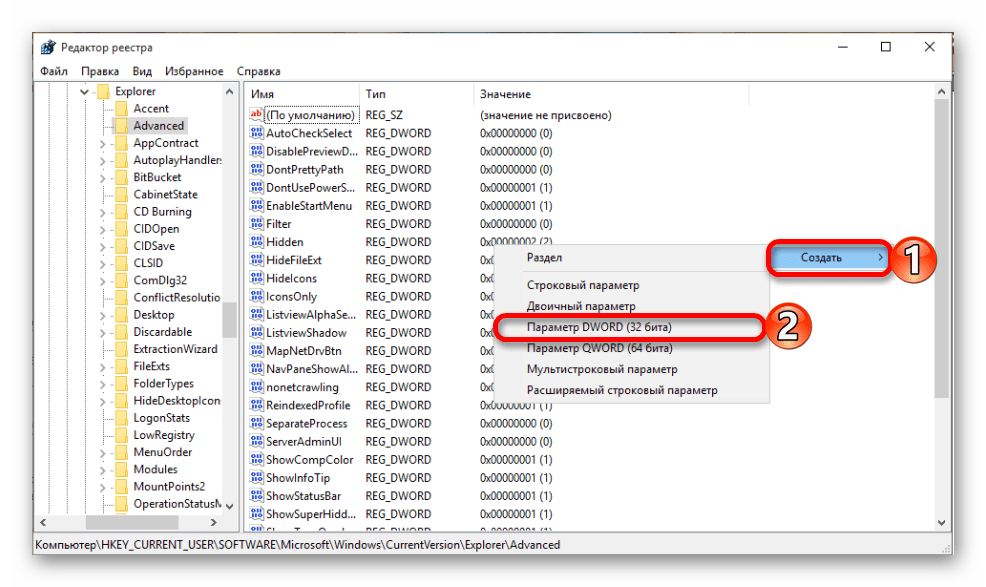
HKEY_CURRENT_USERSoftwareMicrosoftWindowsCurrentVersionExplorerAdvanced
- In the right pane, right-click the empty space and choose New > DWORD (32-bit) value.

- Enter EnableXamlStartMenu as the name of the new DWORD.

After doing that, close Registry Editor and restart Windows Explorer from the Task Manager. Once the Explorer restarts, your Start Menu should be working again.
The problem might be related to your registry if you’re having issues with the Start Menu button. According to users, they managed to fix this problem simply by creating new value in their registry.
8. Enter Safe Mode
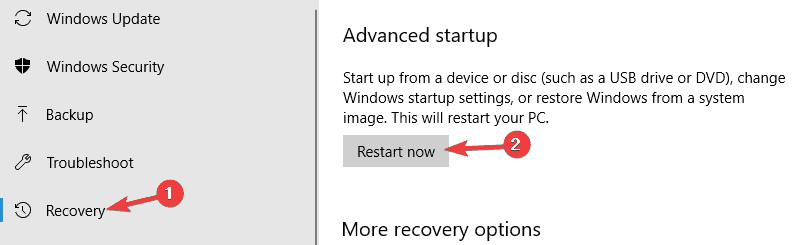
- Open the Settings app and go to the Update & Security section.
- From the menu on the left, choose Recovery.
- In the right pane, click Restart now button in the Advanced startup section.

- A list of options will appear. Choose Troubleshoot > Advanced options > Startup Settings. Click the Restart button.
- Once your PC restarts, select any version of Safe Mode by pressing the appropriate key.
Once you enter Safe Mode, check if everything is working. If so, restart your PC, boot back to your account, and check if the issue is resolved.
According to users, you might be able to solve this problem simply by entering Safe Mode. This is quite simple to do, following the above steps.
9. Create a new user account
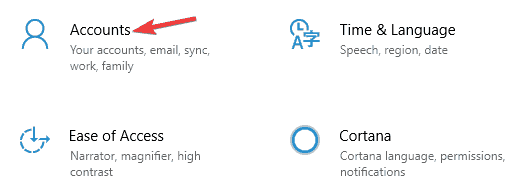
- Open the Settings app and go to the Accounts section.

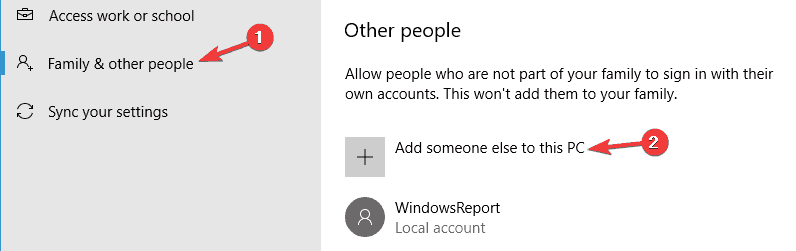
- Navigate to Family & other people in the left pane. In the right pane, click Add someone else to this PC.

- Choose I don’t have this person’s sign-in information, then Add a user without a Microsoft account.
- Enter the desired user name and click Next.


After creating a new user account, switch to it, and check if that solves your problem.
If the problem doesn’t appear on the new account, you’ll need to move your files to the new account and check if that solves your problem.
We believe you must have repaired the start menu button not working issue by now. Note that these solutions are not written in any particular order, and we recommend starting with whatever solution looks most appropriate to your situation.
If you have any comments, suggestions, or maybe some other solutions for this problem, write them down in the comments section.
![]()
Newsletter
Содержание
- Исправляем проблему нерабочей кнопки «Пуск» в Windows 10
- Способ 1: Использование официальной утилиты от Microsoft
- Способ 2: Перезапуск графического интерфейса
- Способ 3: Использование PowerShell
- Способ 4: Использование редактора реестра
- Способ 5: Создание новой учётной записи
- Вопросы и ответы

Разработчики Windows 10 стараются оперативно исправлять все недочёты и добавлять новые возможности. Но пользователи всё равно могут столкнуться с проблемами на данной операционной системе. Например, ошибка функционирования кнопки «Пуск».
Исправляем проблему нерабочей кнопки «Пуск» в Windows 10
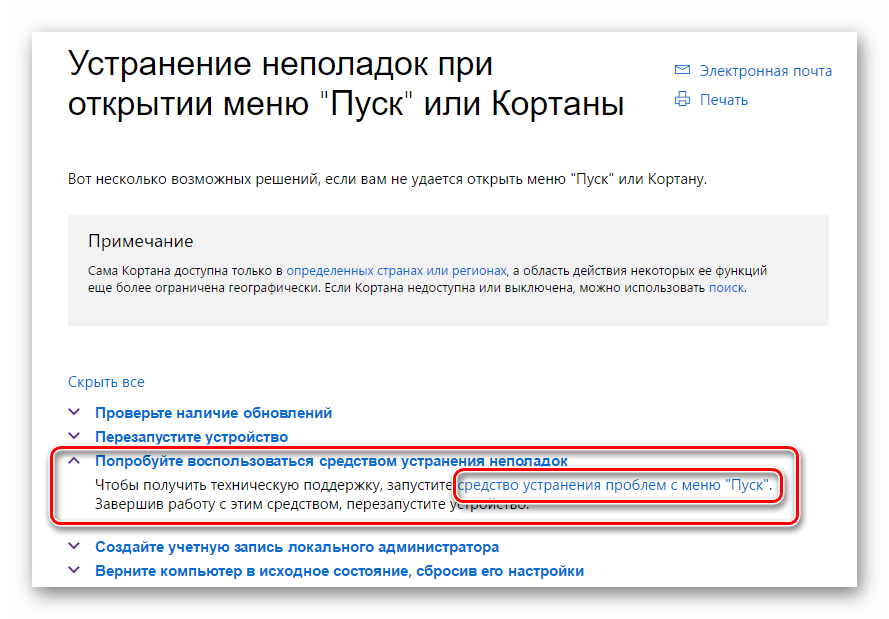
Есть несколько способов исправления данной ошибки. Microsoft, например, даже выпустил утилиту для поиска причин неполадки кнопки «Пуск».
Способ 1: Использование официальной утилиты от Microsoft
Данное приложение помогает найти и автоматически устранить возникшие неполадки.
- Скачайте официальную утилиту от Microsoft, выбрав для этого пункт, показанный на скриншоте ниже, и запустите ее.
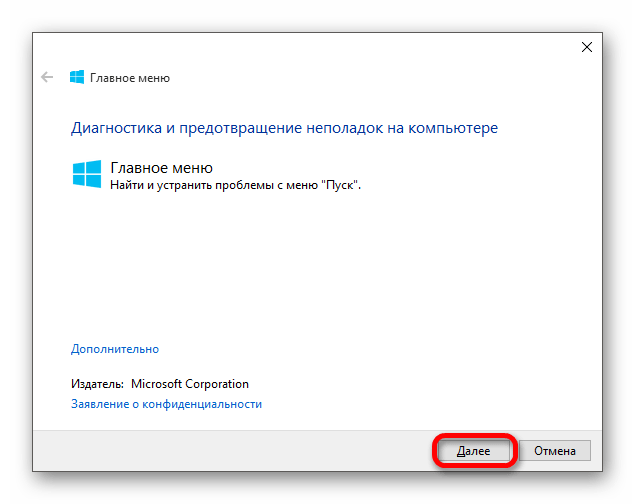
- Нажмите кнопку «Далее».
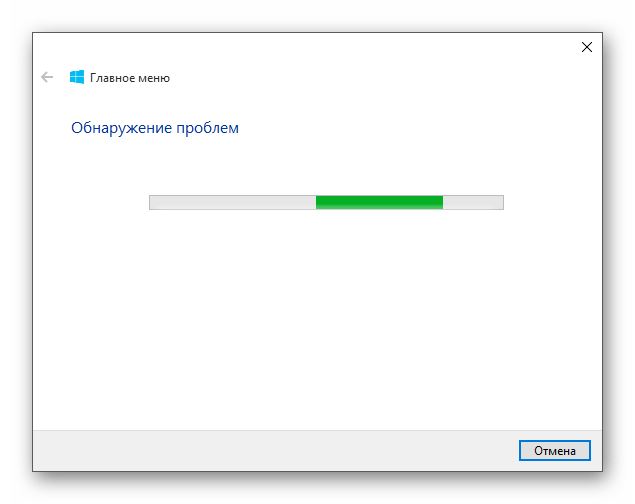
- Пойдёт процесс поиска ошибки.
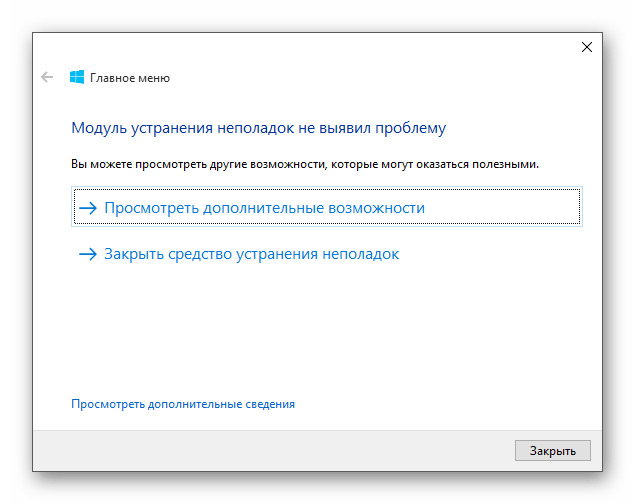
- После вам будет предоставлен отчёт.
- Ознакомиться подробнее можно в разделе «Просмотреть дополнительные сведения».

Если кнопка по прежнему не нажимается, то перейдите к следующему способу.
Способ 2: Перезапуск графического интерфейса
Перезапуск интерфейса может решить проблему, если она незначительна.
- Выполните сочетание Ctrl+Shift+Esc.
- В «Диспетчере задач» найдите «Проводник».
- Перезапустите его.

В том случае, если «Пуск» не открывается, попробуйте следующий вариант.
Способ 3: Использование PowerShell
Данный метод довольно действенный, но он нарушает правильную работу программ из магазина Windows 10.
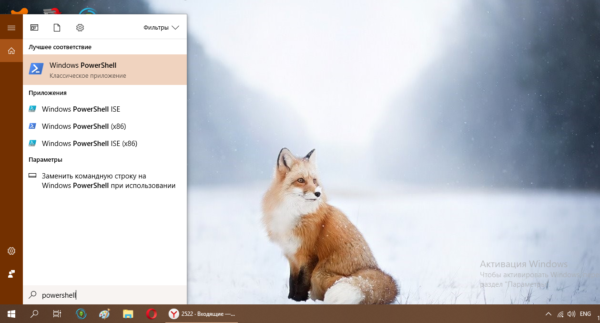
- Чтобы открыть PowerShell, перейдите по пути
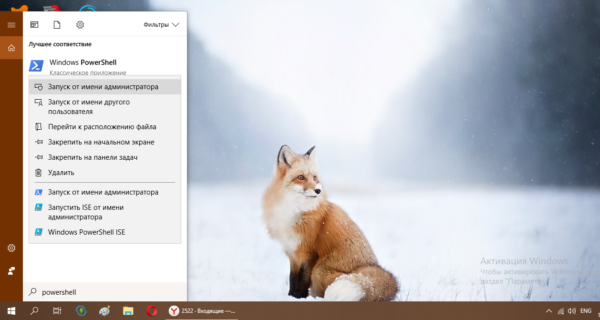
Windows System32 WindowsPowerShell v1.0 - Вызовите контекстное меню и откройте программу от имени администратора.

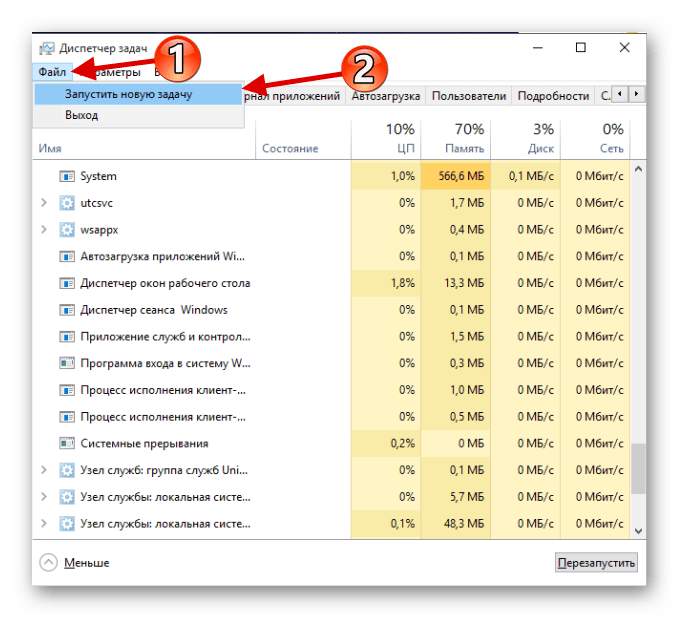
Или создайте новую задачу в «Диспетчере задач».


Напишите «PowerShell».
- Введите такую команду:
Get-AppXPackage -AllUsers | Foreach {Add-AppxPackage -DisableDevelopmentMode -Register “$($_.InstallLocation)AppXManifest.xml”} - После нажмите Enter.

Способ 4: Использование редактора реестра
Если ничего из вышеперечисленного вам не помогло, то попробуйте воспользоваться редактором реестра. Данный вариант требует внимательности, ведь если вы сделаете что-то не так, то это может перерасти в большие проблемы.
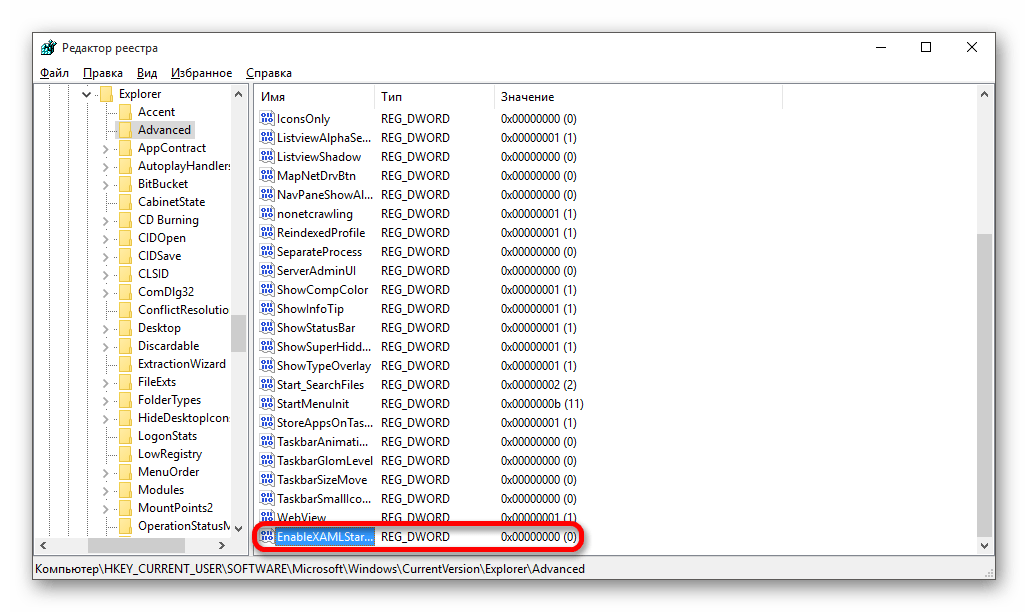
- Выполните сочетание Win+R и впишите regedit.
- Теперь перейдите по пути:
HKEY_CURRENT_USERSoftwareMicrosoftWindowsCurrentVersionExplorerAdvanced - Кликните правой клавишей по пустому месту, создайте указанный на скриншоте параметр.
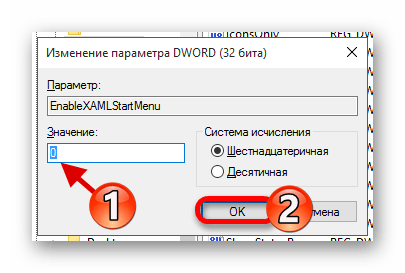
- Назовите его EnableXAMLStartMenu, а после откройте.
- В поле «Значение» введите «0» и сохраните.
- Перезагрузите устройство.
Способ 5: Создание новой учётной записи
Возможно вам поможет создание новой учётной записи. Она не должна содержать в своем имени кириллические символы. Старайтесь использовать латиницу.
- Выполните Win+R.
- Введите control.
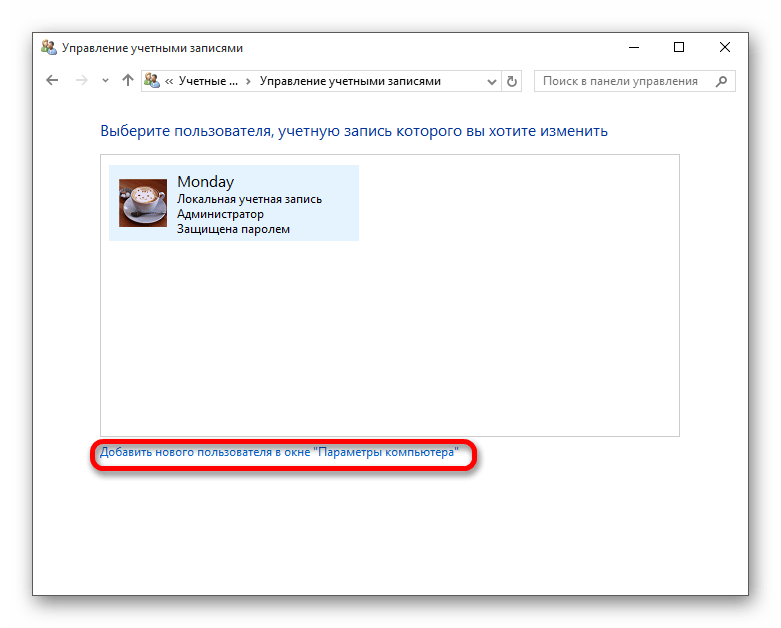
- Выберите «Изменения типа учётной записи».
- Теперь перейдите к ссылке, указанной на скриншоте.
- Добавьте учётную запись другого пользователя.
- Заполните нужные поля и нажмите «Далее» для завершения процедуры.
Здесь были перечислены основные способы восстановления работы кнопки «Пуск» в Виндовс 10. В большинстве случаев они должны помочь.
Еще статьи по данной теме:
Помогла ли Вам статья?
Часто после очередного апдейта «десятки» юзер замечает, что панель «Пуск» не открывается — ни через иконку в левой части «Панели задач», ни с помощью кнопки Windows на клавиатуре. Главная проблема в этом случае заключается в том, что пользователь лишается возможности быстро и корректно отключить свой ПК с помощью функции завершения работы. Как быть в данной ситуации?
Проблема может появиться не только из-за обновления «Виндовс», но и ввиду какого-либо сбоя в системе, поэтому первым банальным, но при этом эффективным шагом будет перезапуск «операционки». Для этого достаточно перезагрузить оконный интерфейс, за который отвечает служба «Проводник» (по-другому, explorer.exe). Сделать это можно через любое из двух стандартных системных окон — «Диспетчер задач» и «Командная строка».
Через «Диспетчер задач»
Все работающие на ПК процессы отображены в «Диспетчере задач» — окне, в котором можно управлять данными процессами: отключать, включать, перезапускать и т. д. Следуем такой инструкции:
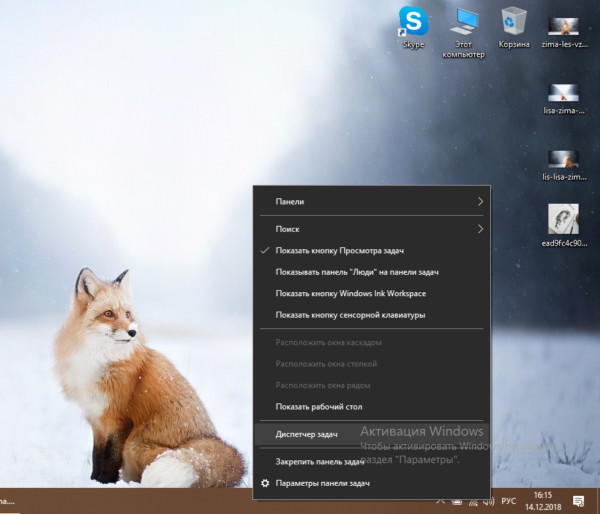
- «Десятка» позволяет раскрыть меню диспетчера довольно быстро — кликаем по свободной области «Панели задач» правой клавишей и щёлкаем по строчке с диспетчером.

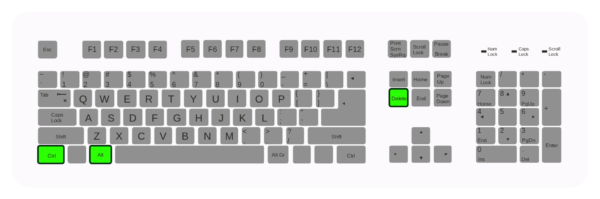
Открываем «Диспетчер задач» через контекстное меню «Панели задач» - Если такой способ не сработал (контекстное меню так и не появилось), берём на вооружение «старый» метод — зажимаем в одну секунду три горячие кнопки на клавиатуре: Delete + Alt + Ctrl.

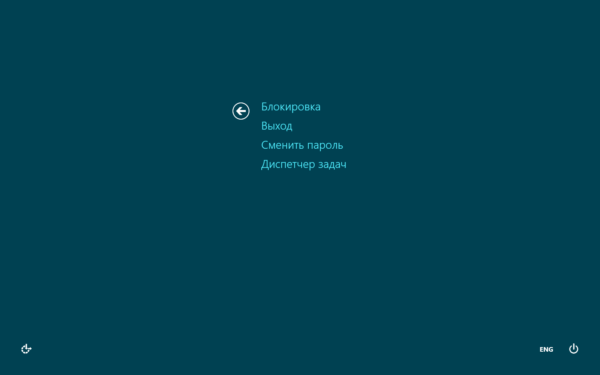
Зажимаем три кнопки Delete + Alt + Ctrl - Загрузится синее меню, в котором щёлкаем по последнему пункту — диспетчеру. Если у вас английский интерфейс, выбираем Task Manager. Через это меню вы также можете полностью выключить свой ПК — нажмите на знакомую кнопку питания справа в нижнем углу и выберите перезагрузку либо завершение работы. Если выбрали последний вариант, секунд через 15 просто нажмите самостоятельно на уже физическую кнопку питания. Этот способ перезагрузки также будет эффективным, как и простой перезапуск explorer.exe.

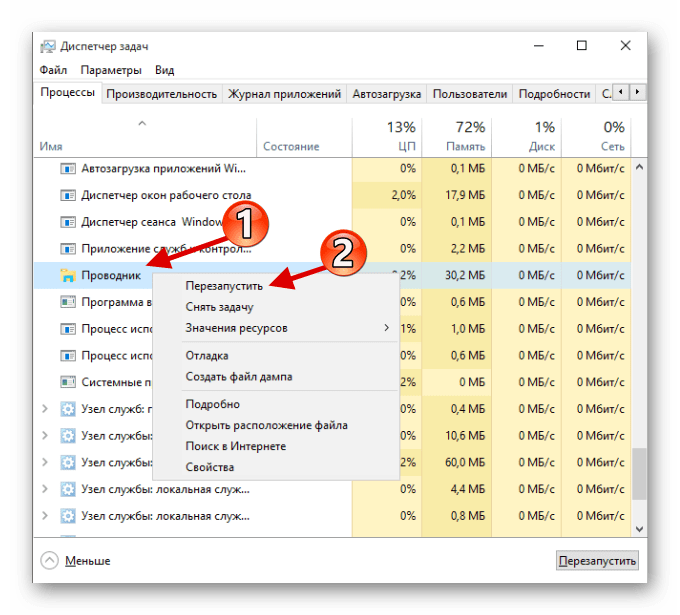
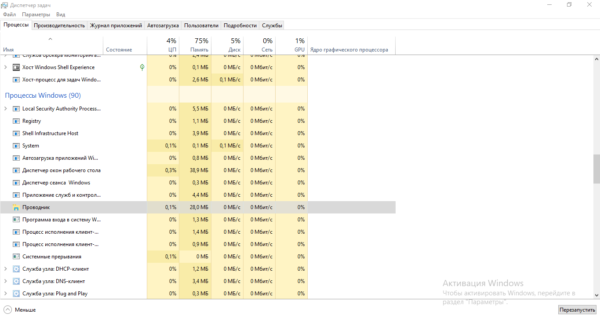
Выберите в появившемся меню «Диспетчер задач» - В первом блоке с перечнем всех активных на данный момент процессов, находим меню «Процессы Виндовс», а в нём уже искомый пункт «Проводник».

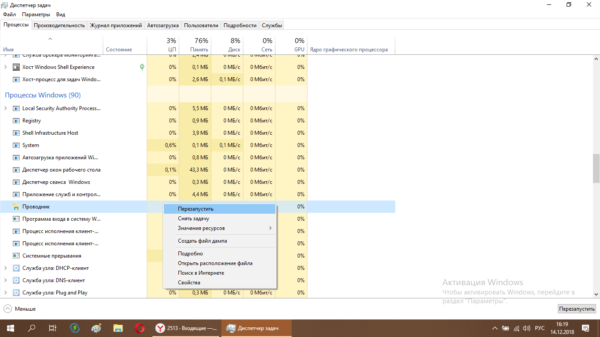
В системных процессах отыщите пункт «Проводник» - Кликаем по данному пункту правой клавишей и жмём на первую опцию «Перезапуск». Ждём, когда оконный интерфейс закроется и вновь загрузится и проверяем работу панели «Пуск».

Перезапустите процесс «Проводник»
Через введение команды
Если не получилось сделать перезапуск через диспетчер, воспользуйтесь альтернативным методом:
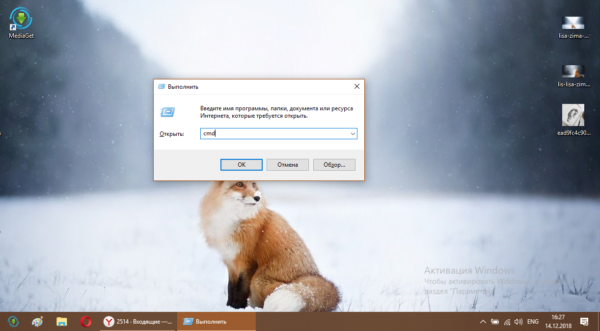
- Выводим на экран редактор «Командная строка», который будет действовать от имени администратора. Сразу жмём на R и Windows на своей «клаве» и набираем простой ключ cmd, который соответствует редактору. Чтобы выполнить этот ключ правильно, зажимаем уже три клавиши: Ctrl + Shift + Enter. Если в системе стоит защита, появится окошко, в котором будет запрашиваться разрешение — кликаем по «Да».

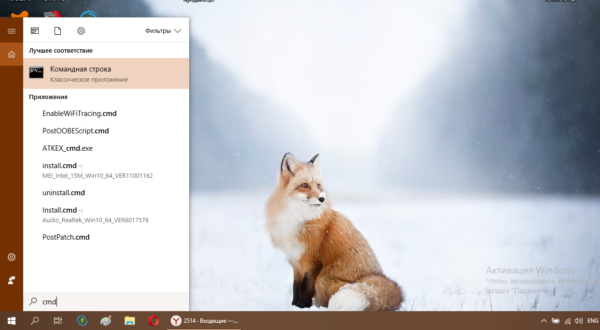
Введите команду cmd и кликните по ОК - Если открывается панель «Поиск» (поисковая строка рядом с «Пуском» или иконка в виде увеличительного стекла), вводим тот же запрос cmd туда.

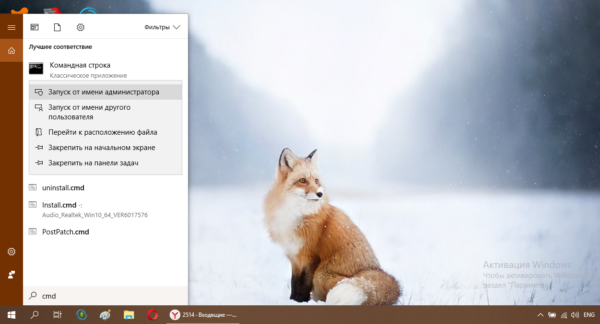
Если открывается панель «Поиск», вы можете ввести ключ cmd на ней - В появившихся результатах кликаем правой кнопкой по строчке с классическим приложением — делаем выбор в пользу первого пункта.

Запустите консоль с правами администратора - В редакторе самостоятельно вбиваем либо вставляем (рекомендуется, чтобы не сделать ошибку) формулу taskkill /f /im explorer.exe. Жмём на «Энтер» и ожидаем завершение процедуры перезагрузки оконного интерфейса.

Выполните команду taskkill /f /im explorer.exe в консоли

Проверяем наличие апдейта для системы
Панель может не отвечать не только из-за единичного сбоя в системе или после обновления «операционки», но и при отсутствии важного апдейта. В этой ситуации ПК в целом начинает медленно работать, поэтому есть смысл вручную запустить поиск апгрейда:
- Раскройте меню «Параметры» через сочетание из двух клавиш I и Windows. Если метод не срабатывает, вызываем с помощью R и Win окно «Выполнить» и вводим ключ ms-settings:.

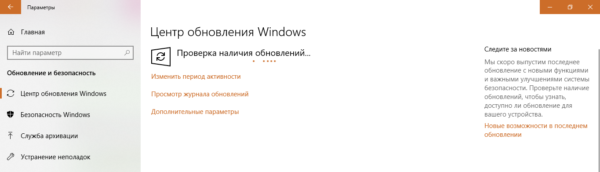
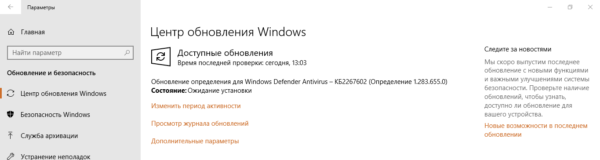
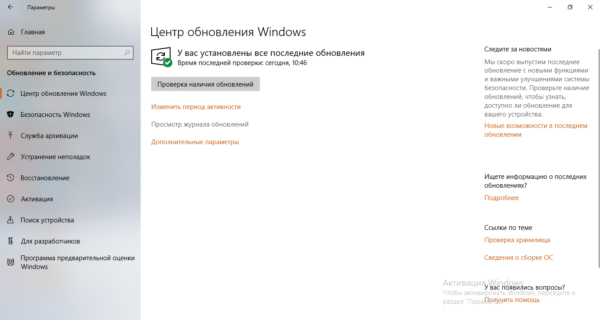
Выполните в окне команду ms-settings: для запуска меню с параметрами - Переходим в раздел для апдейта и настройки безопасности. В первом разделе для центра апгрейда жмём на кнопку «Проверить наличие».

В «Центре обновления» запустите проверку наличия апдейта - Ждём, когда система проведёт поиск.

Подождите, пока закончится поиск обновлений - Если будет апдейт, начнётся его скачивание и установка. После инсталляции «операционке» потребуется перезапуск, чтобы окончательно внедрить обновления в систему. Когда апгрейд завершится, проверьте панель «Пуск».

Подождите, пока скачаются и установятся обновления системы


Исправление кириллического имени юзера
Панель «Пуск» может перестать открываться, если пользователь изменил своё имя, добавив к нему русские буквы. Данный формат названия профиля недопустим в «операционке» Windows, поэтому «учётку» необходимо переименовать обратно:
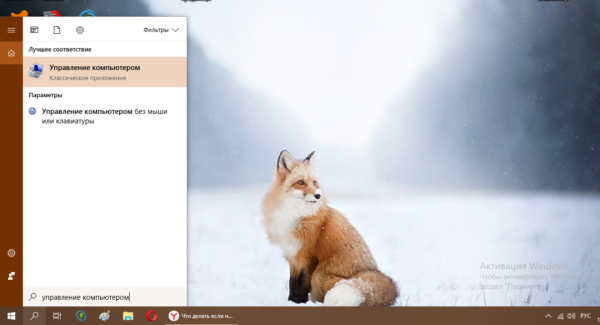
- Изначально открываем управление компьютером через «Поиск Windows». Для этого кликните по значку увеличительного стекла на «Панели задач» и введите запрос в поисковую строку. Когда появится результат, жмите по нему.

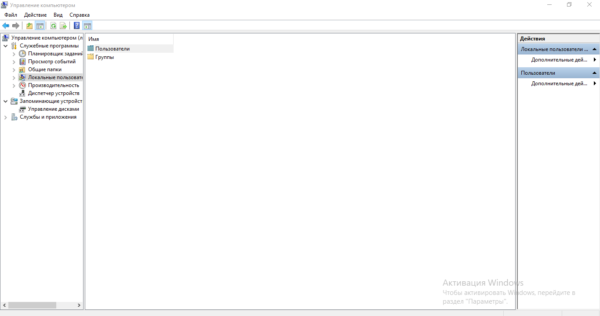
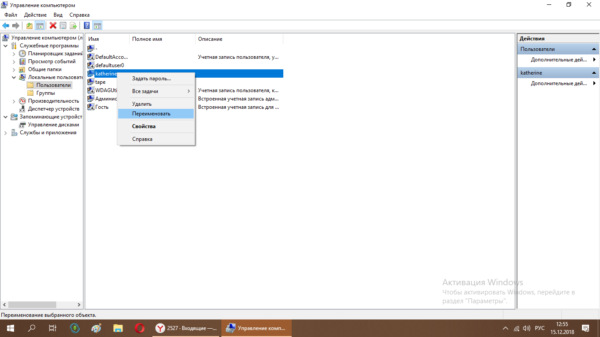
Введите в поисковую строку запрос «Управление компьютером» - В левой части окна открываем раздел «Служебные программы», переходим в «Локальные пользователи и группы» и жмём по папке «Пользователи».

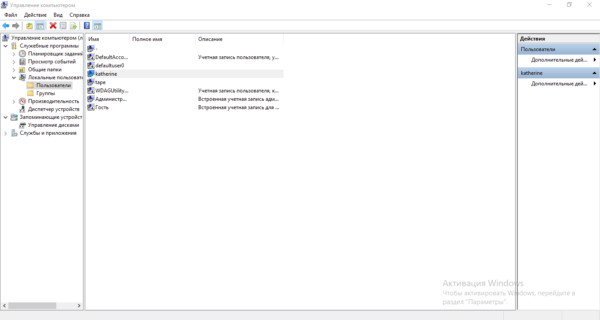
Откройте папку «Пользователи в служебных программах» - В правой части окна находим имя, которое нужно переименовать.
В списке пользователей выберите свою «учётку» - Кликаем по его имени правой клавишей мыши. Тут будет пункт «Переименовать» – он нам и нужен. Введите новое имя, закройте инструмент и перезапустите ПК.
Кликните по «Переименовать» и дайте другое имя аккаунту
Решаем проблему с помощью создания новой учетной записи в Windows 10
Вы можете воспользоваться следующим трюком: создать новую учётную запись и начать пользоваться «Виндовс» уже через неё, если в этом аккаунте «Пуск» заработает. Рассмотрим подробно процедуру создания:
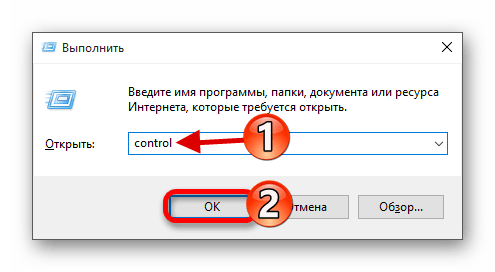
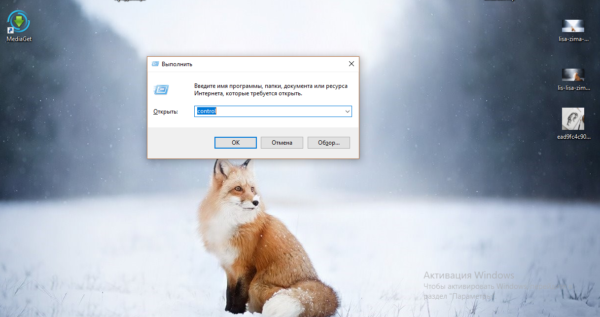
- В мастер создания аккаунтов можно попасть через «Панель управления» — вызываем её на дисплее через окно «Выполнить» (R и Windows) и ключ control выполненный через Enter.

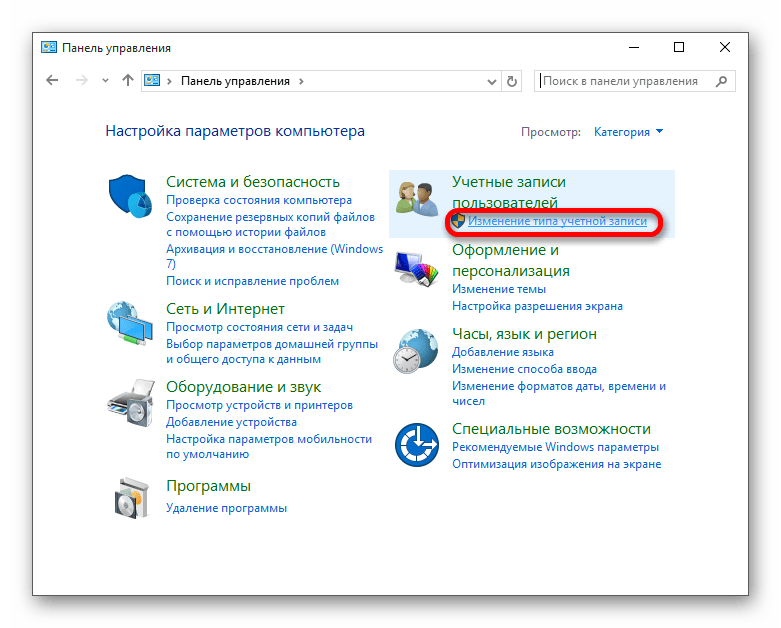
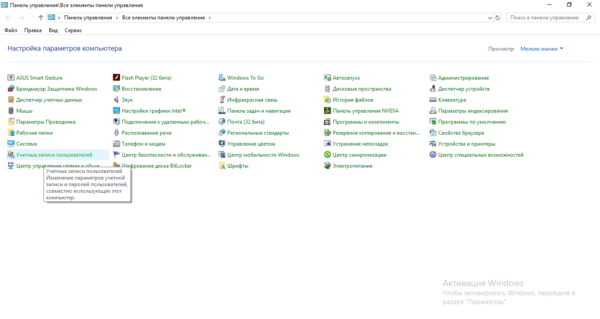
Чтобы открыть «Панель управления», выполните команду control - Переключаемся на блок для учётных записей юзеров.

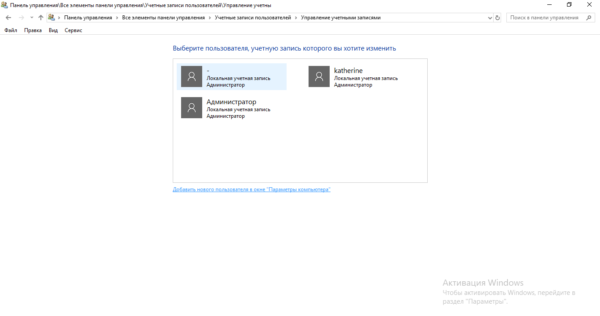
На «Панели управления» отыщите раздел «Учётные записи пользователей» - В центре раздела переходим по ссылке, ведущей на страницу управления другой учётной записью.

Щёлкните по ссылке «Управление другой учётной записью» - На новой странице щёлкаем по ссылке внизу для перехода в окно «Параметры» для создания другого аккаунта.
Перейдите по ссылке, расположенной под таблицей - Вы можете открыть панель «Параметры» и сразу, но велика вероятность, что она тоже у вас не будет не работать вместе с панелью «Пуск». Тем не менее пробуем: зажимаем I и Windows и переходим в блок для учётных записей.
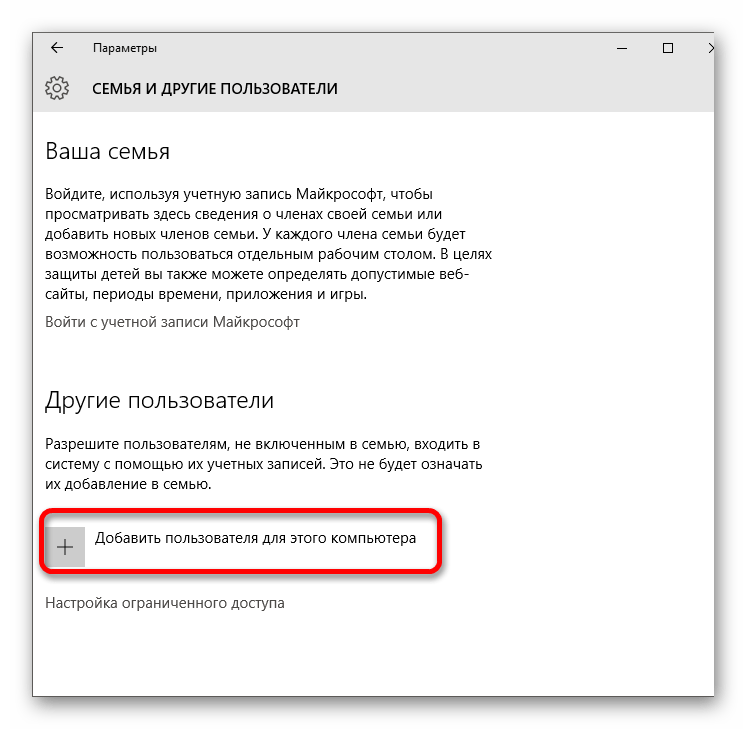
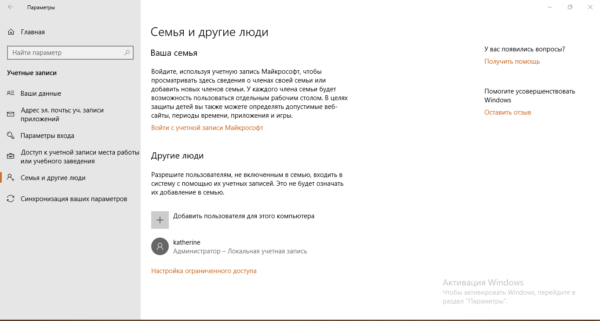
В «Параметрах» откройте раздел «Учётные записи» - Раскрываем предпоследнюю вкладку «Семья и другие люди». Щёлкаем по плюсу для добавления другого виртуального юзера.
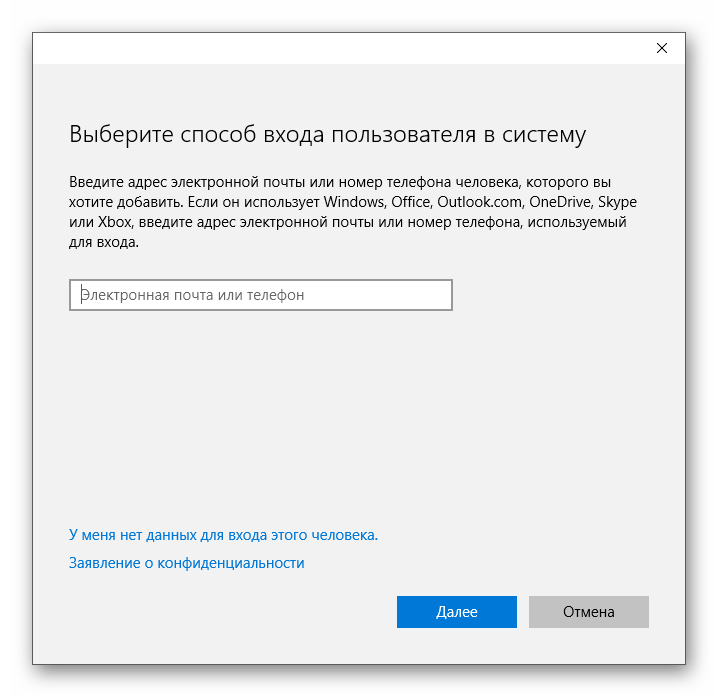
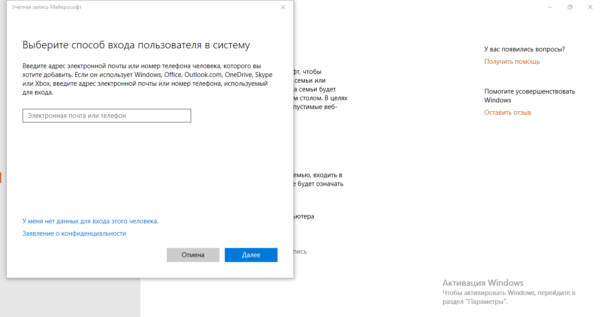
Чтобы добавить учётную запись, кликните по плюсу - Сначала «операционка» попросит вас набрать адрес электронной почты либо номер телефона текущего пользователя. Мы не обладаем данной информацией, поэтому жмём на ссылку внизу «У меня нет данных».
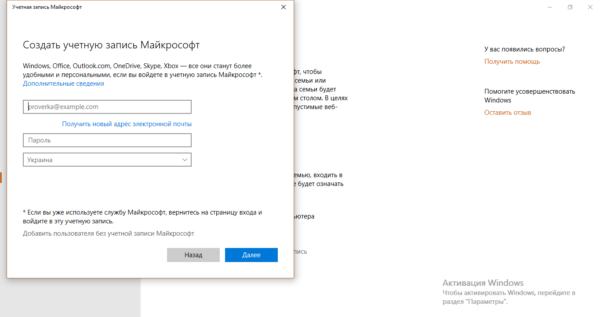
Нажмите на «У меня нет данных для входа этого человека» - Теперь мастер вам предложит сделать новую учётную запись «Майкрософт». Можете создать и её, но мы перейдём всё же к странице для получения нового локального аккаунта — щёлкаем по ссылке для добавления юзера без аккаунта Microsoft.
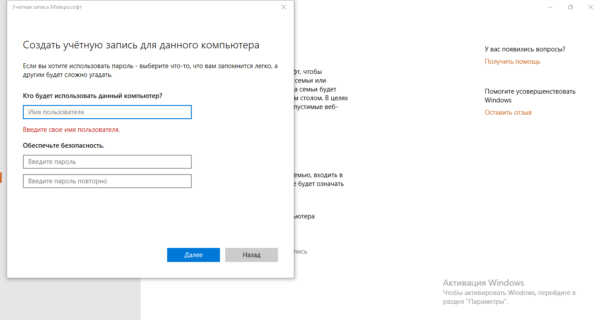
Если хотите локальную «учётку», кликните по «Добавить пользователя без учётной записи Microsoft» - Набираем название (логин) «учётки» и при необходимости пароль (два раза для подтверждения корректности ввода). Жмём на «Далее». Во вкладке появится новая «учётка» рядом с вашей старой.
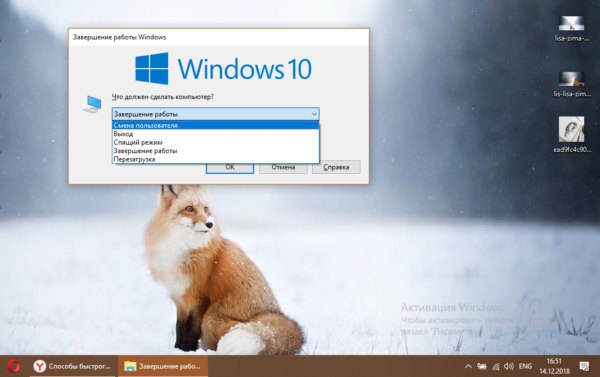
Введите имя пользователя и при необходимости пароль - Теперь чтобы выйти из старой «учётки», и зайти в новую, зажимаем горячую комбинацию F4 и любой Alt. В появившемся окошке в меню ставим значение «Смена пользователя». Жмём на ОК — загрузится экран для входа. Выбираем слева новую «учётку», вводим при необходимости пароль (если ставили) и входим — проверяем работу «Пуск».

Нажмите на «Смена пользователя» в выпадающем меню - Попасть на дисплей входа можно также с помощью знакомой комбинации Delete + Ctrl + Alt — только выбираем уже не диспетчер, а пункт «Сменить пользователя» или «Выйти» («Выход»).

Нажмите на «Сменить пользователя» и зайдите в новую «учётку» - Если панель «Пуск» заработала, сделайте импорт всех настроек и файлов из старой «учётки», если у вас они были, а затем смело удалите старый аккаунт.


Вносим изменения в «Редактор реестра»
Заставить панель «Пуск» снова открываться можно путём редактирования реестра. Однако выполнять данное действие нужно аккуратно и ответственно. Перед внесением изменений обязательно сделайте резервную копию базы данных:
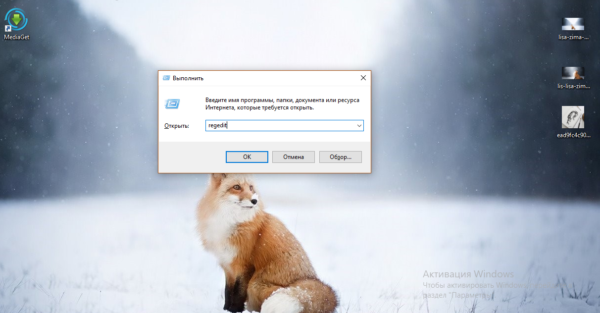
- Запускаем окошко «Выполнить» через горячее сочетание R и Windows — печатаем слово regedit и запускаем выполнение команды. При необходимости разрешаем редактору менять параметры на ПК (если появится системное окно).

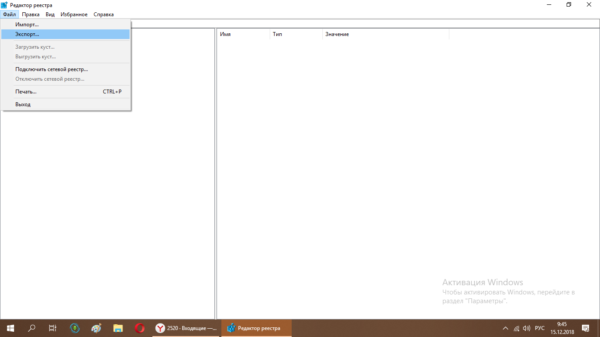
Вставьте и выполните команду regedit - Сразу переходим в меню «Файл», где жмём на опцию экспорта.
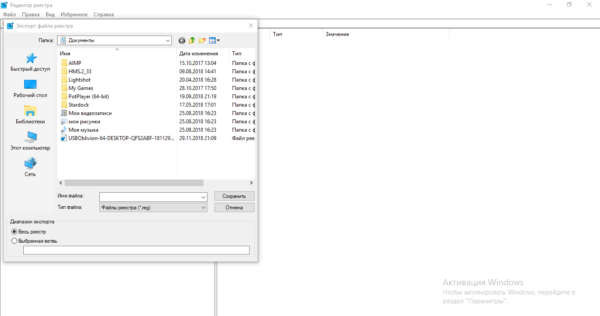
Нажмите на функцию «Экспорт» - В окне, похожем на «Проводник», выбираем место для хранения копии и имя для неё. С помощью специальной кнопки в правом нижнем углу сохраняем файл реестра.
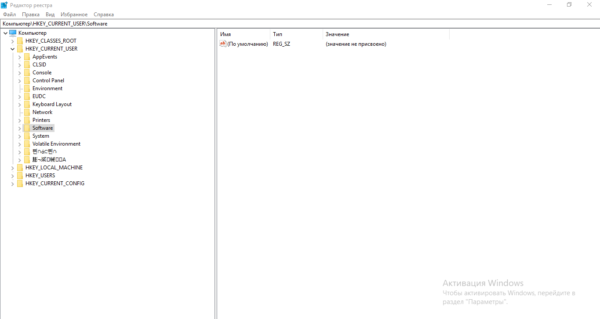
Сохраните копию в любой папке - Теперь переходим к самому редактированию: щёлкаем дважды по второй главной ветке в левом меню HKEY_CURRENT_USER, а в ней раскрываем папку Software.
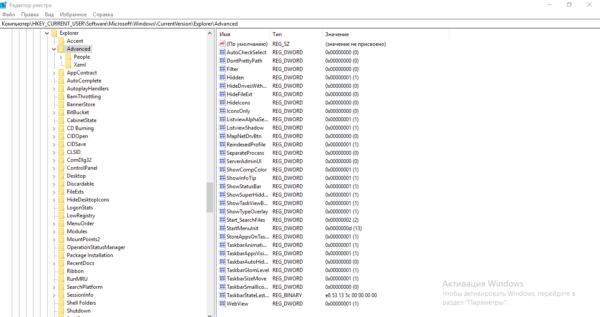
Во вкладке HKEY_CURRENT_USER откройте каталог Software - Таким же образом последовательно выводим на экран содержимое таких каталогов: Microsoft — Windows — CurrentVersion — Explorer — Advanced.
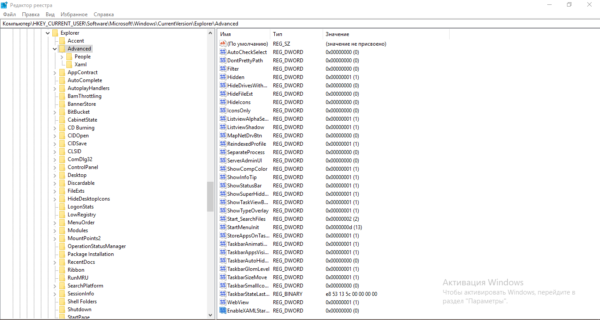
Конечной папкой должна быть Advanced - Когда мы дошли до конечной точки директории (открыли папку Advanced), прокручиваем до конца список в правой части экрана и щёлкаем правой клавишей по свободному полю внизу — выбираем действие создания, а в меню — параметр в формате DWORD.
Создайте новую запись DWORD в папке Advanced - В качестве названия для новой записи берём фразу EnableXAMLStartMenu.
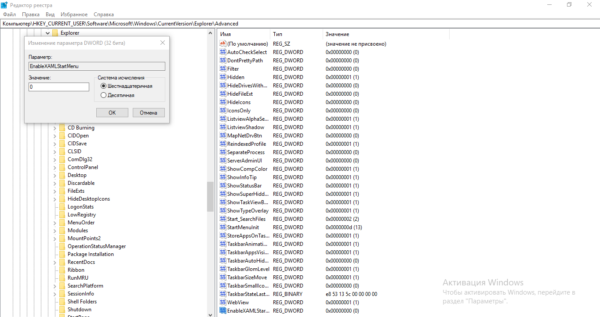
Назовите запись EnableXAMLStartMenu - Щёлкаем дважды по созданному пункту — убеждаемся, что в поле значения стоит 0. Закрываем редактор и все ранее открытые окна. Перезапускаем ПК с помощью окна, которое вызывается комбинацией Alt + F4 — выбираем в меню «Завершение работы».
Поставьте значение 0

Используем автоматическое обслуживание
«Десятка» и другие варианты «Виндовс» оснащены специальным средством отладки, которое работает в фоновом режиме, устраняя бо́льшую часть найденных неполадок. Обычно отладка запускается автоматически по расписанию, но вы можете дать ей команду работать и вручную:
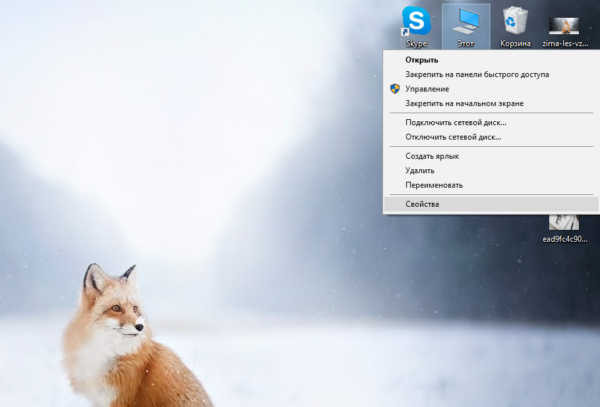
- Находим на «Рабочем столе» знак под названием «Этот компьютер» (с помощью него обычно запускают «Проводник») — кликаем по нему правой клавишей и выбираем в перечне строчку для запуска свойств.

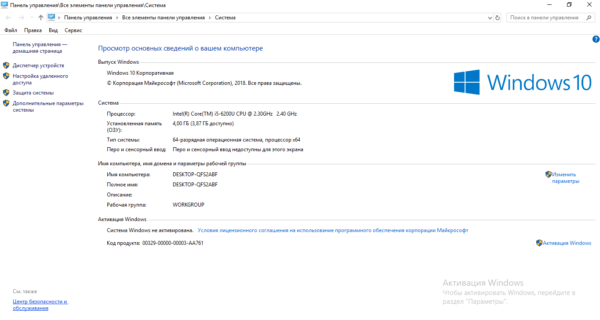
Откройте свойства компьютера через меню ярлыка - В свойствах системы переводим взгляд на левый нижний угол — щёлкаем по ссылке, ведущей в «Центр обслуживания».
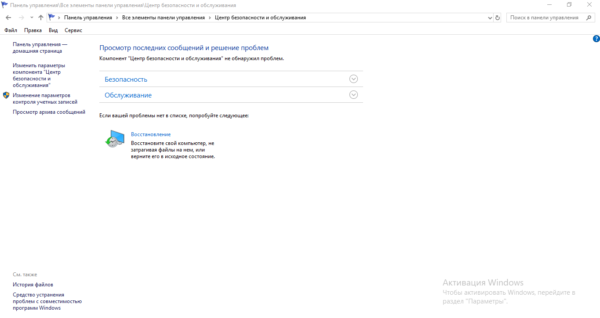
Перейдите в раздел «Центр безопасности и обслуживания» - Раскрываем второе выпадающее меню «Обслуживание».

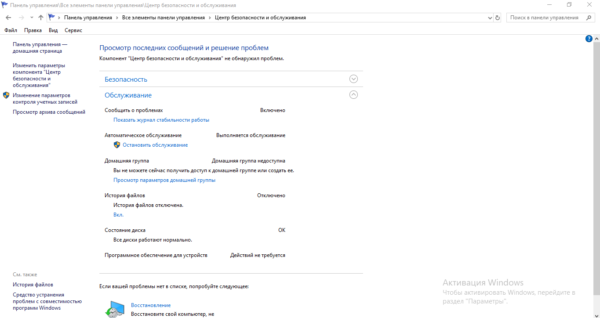
Раскройте пункт «Обслуживание» - В блоке «Автоматическое…» жмём на ссылку «Начать…».
Запустите обслуживание с помощью соответствующей ссылки - На дисплее появится фраза о том, что выполняется автоматическое обслуживание. Учтите, что данный процесс будет отнимать ресурсы у ПК («оперативка», процессор и т. д.). Чтобы обслуживание завершилось как можно раньше, рекомендуется не выполнять в этот период никаких действий на ПК либо свести их к минимуму. Иначе ПК может начать тормозить. После проверки проверяем работоспособность панели «Пуск».
Подождите, пока завершится фоновое обслуживание

Восстановим работу «Пуска» с помощью консоли PowerShell
Решить проблему можно с помощью выполнения команд в консоли «десятки» PowerShell. Тем не менее этот способ имеет минус: он может повлиять на работу некоторых утилит, которые были инсталлированы через «Виндовс Стор». Если вы пользуетесь такими приложениями, используйте данный метод только в том случае, если все предыдущие не дали результат. Также крайне рекомендуется создать точку восстановления перед выполнением следующих действий:
- Попробуем открыть новую консоль в «десятке» с помощью «Поиска» — набираем запрос в виде названия утилиты.

Введите запрос PowerShell - В контекстном меню, вызванном правой клавишей, выбираем, конечно же, открытие с правами администратора системы.
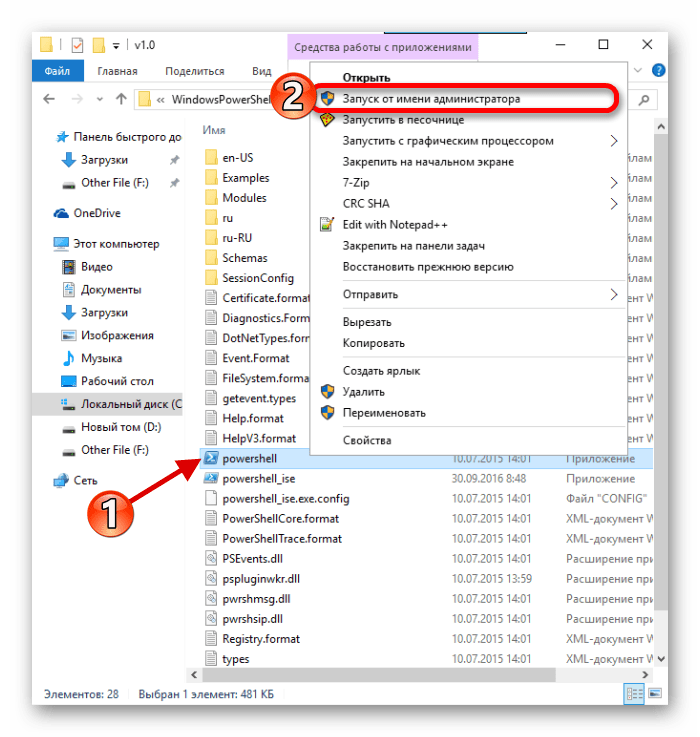
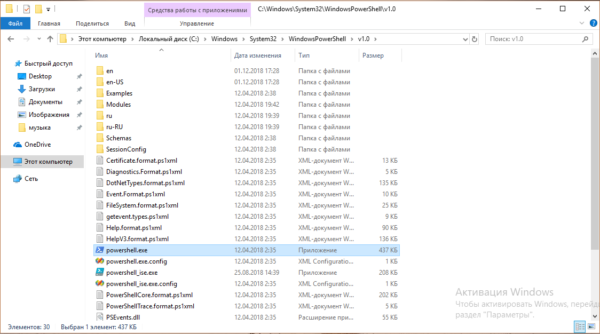
Запустите консоль PowerShell от имени администратора - Если панель «Поиск» у вас также не работает, заходим на главный экран «Проводника» через ярлык компьютера. Открываем содержимое системного диска. Там переходим сначала в каталог Windows, а затем в System32 и Windows PowerShell. Во вложенном блоке v1.0 находим исполняемый документ синей консоли с расширением exe.

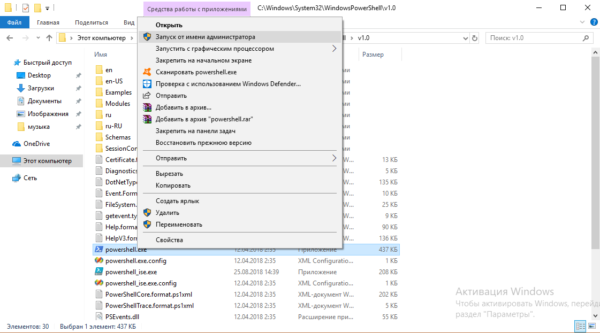
Отыщите на системном диске приложение PowerShell - Кликаем по нему правой кнопкой и также щёлкаем по запуску от имени администратора.

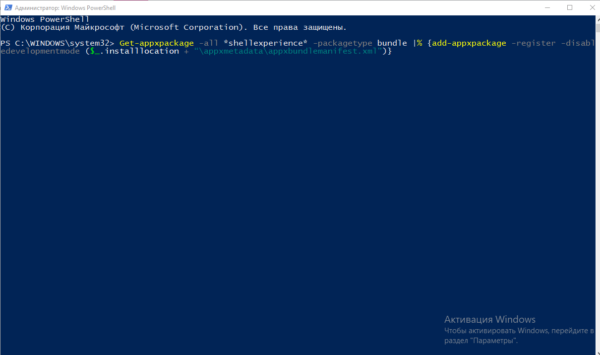
Запустите программу от имени администратора - В консоли вставляем через горячую комбинацию V + Ctrl длинную формулу: Get-appxpackage -all *shellexperience* -packagetype bundle |% {add-appxpackage -register -disabledevelopmentmode ($_.installlocation + “appxmetadataappxbundlemanifest.xml”)}. Для последующего её выполнения жмём на «Энтер».

Выполните команду в синем редакторе - Когда процедура будет успешно завершена, перезагружаем устройство и смотрим, исправлена ли неполадка.
Откатываем «операционку» до предыдущего состояния
Если панель «Пуск» перестала появляться после щелчка по иконке после установки очередного апдейта системы в «Центре обновления», возможно, инсталляция апгрейда прошла не самым лучшим образом — с ошибками. В этом случае рекомендуется сделать откат до точки восстановления. Система «Виндовс» автоматически делает точку перед установкой обновлений на случай возникновения неполадок. Воспользуемся ей:
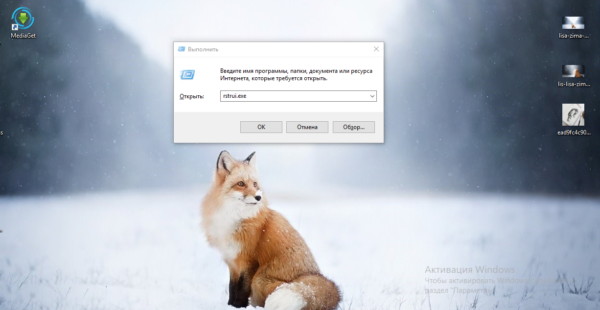
- Раскрываем меню «Выполнить» через горячие клавиши Windows и R и набираем в пустом поле rstrui.exe. После этого кликаем по ОК — появляется мастер по восстановлению.

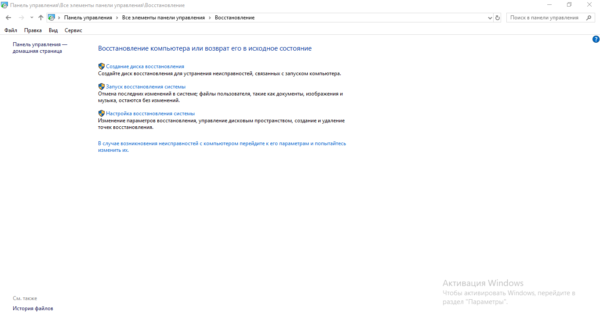
Выполните ключ rstrui.exe для запуска мастера по восстановлению - Его можно вызвать на дисплее через «Панель управления» — открываем её через то же окошко «Выполнить» и ключ для ввода control и запускаем блок «Восстановление». Щёлкаем по ссылке, которая открывает окно мастера.
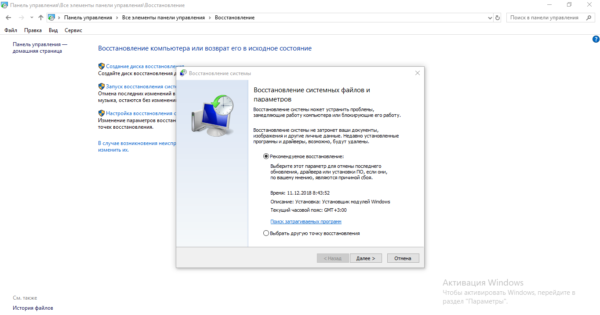
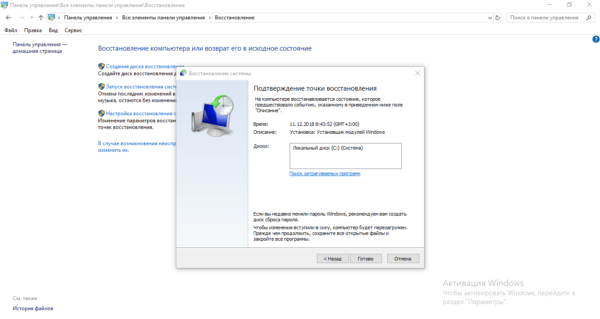
Перейдите по ссылке «Запуск восстановления системы» - На главном экране выбираем первый рекомендованный пункт, если «Пуск» перестал функционировать именно после последнего апдейта. В ином случае ставим отметку рядом со вторым вариантом и жмём на ОК.

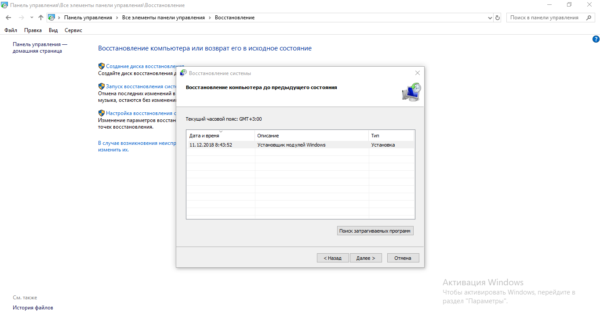
Выберите рекомендованное восстановление, если проблема появилась после последнего обновления - Во втором случае у вас откроется список со всеми имеющимися точками. Смотрим на дату создания и выбираем нужное состояние. Главное, чтобы создателем был «Установщик модулей Виндовс». Выделяем строчку и жмём на «Далее».
Выберите точку и нажмите на «Далее» - Запускаем выполнение отката через клавишу внизу.
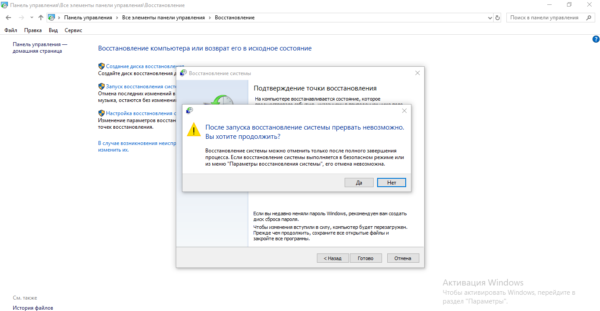
Дайте старт восстановлению - В небольшом окне кликаем по «Да», чтобы подтвердить процедуру. Ждём, когда операция завершится и проверяем работоспособность клавиши «Пуск».

Кликните по «Да» для подтверждения
Если вы не нашли по каким-то причинам точку восстановления, которую создал «Установщик модулей», удалите обновление вручную:
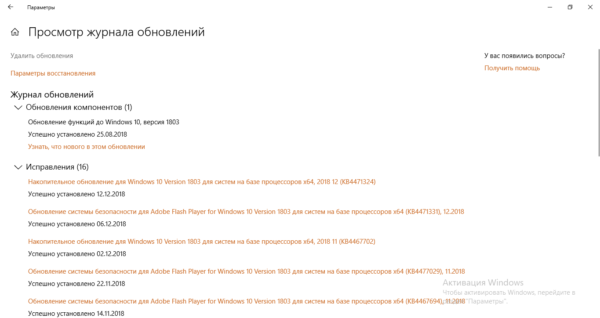
- Зайдите в меню «Параметры Виндовс» через Windows и I и раскройте плитку для обновления. В первой вкладке центра кликните по ссылке, ведущей в журнал.
Запустите поиск обновлений - На новой странице перейдите по ссылке для удаления апдейта.
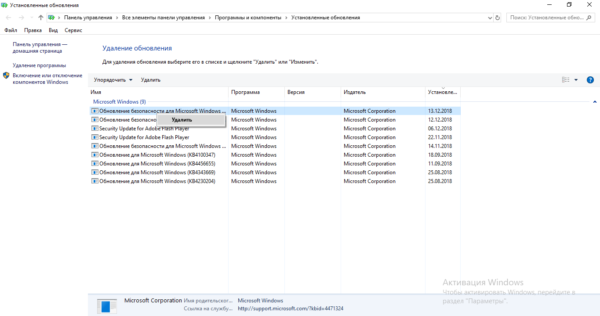
Щёлкните по строчке «Удалить обновления» - На дисплее будет вызвано окно с перечнем установленных ранее апгрейдов «операционки». Щёлкните по первому пункту правой клавишей и выберите единственную в меню опцию удаления.
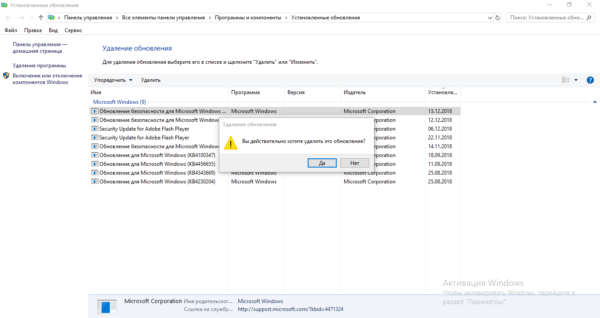
Выберите удаление в контекстном меню - Подтвердите своё намерение. Перезапустите девайс. Через некоторое время центр снова найдёт удалённый ранее апдейт и попытается установите его, но уже корректно. Если не помогло, но вы уверены, что проблема именно в обновлении, свяжитесь со службой поддержки «Майкрософт» и сообщите о своей проблеме.
Подтвердите, что хотите удалить апдейт
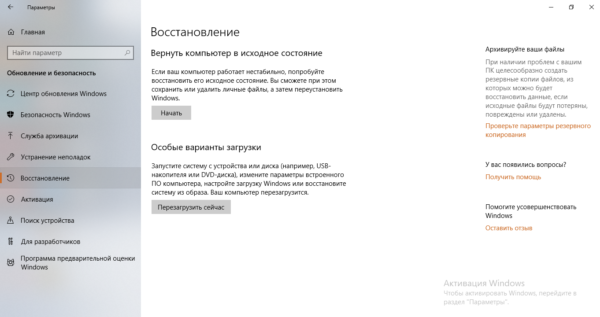
Вы можете также воспользоваться опцией «Виндовс» под названием «Возврат компьютера в исходное состояние». Запустите её выполнение можно в окне параметров «операционки», в разделе «Безопасность и обновление».
Видео: несколько способов вернуть в строй панель «Пуск»
Отзывы: другие способы решения проблемы
Если панель «Пуск» перестала внезапно появляться на дисплее, первым делом перезапустите сам ПК через меню, которое вызывается с помощью комбинации F4 + Alt, либо процесс «Проводник» в «Диспетчере задач». Далее переходите к поиску доступных обновлений, созданию нового локального профиля на ПК, добавлению новой записи в реестре. Также может помочь автоматическое фоновое обслуживание «десятки» и консоль PowerShell. Если неполадка возникла сразу после апдейта системы, сделайте откат с помощью точки либо вручную удалите последнее обновление.
- Распечатать
Оцените статью:
- 5
- 4
- 3
- 2
- 1
(12 голосов, среднее: 4 из 5)
Поделитесь с друзьями!
If, after upgrading to Windows 10 and Windows 11 or installing Windows Updates, you find that your Start Menu is not working or Start Menu does not open or Start Button is not working, then this post will help you. If your Start Menu is not working, here are a few troubleshooting steps you may want to try out.

Before you proceed, you may want to restart the Start Menu process or restart the explorer.exe process and see if that helps. If it doesn’t, create a system restore point first, so that you can revert back, if you find that the results are not what you expected. Having done that, follow these suggestions:
- Restart Start process and see
- Run Windows Start Menu Troubleshooter
- Run System File Checker
- Re-register the Shell experience
- Register all app packages
- Repair Windows System Image
- Toggle Full Screen Start Menu
- Check with a new user account
- Uninstall the problematic Update and then hide it
- Other suggestions.
You will need admin permission to resolve this.
Fix Start Menu not working in Windows 11/10
1] Restart Start process and see
There is a separate process available for Start Menu — StartMenuExperienceHost.exe. Restart Start Menu and see if that helps.
2] Run Windows Start Menu Troubleshooter
Download and run the Windows 11/10 Start Menu Troubleshooter from Microsoft. It should fix all the related problems.
3] Run System File Checker
Run the following command in an elevated command prompt, to run the System File Checker.
sfc /scannow
Restart after the scan is over and see if it helped. The command will replace any corrupt file with a new one, which will ensure that the Start menu works again.
4] Re-register the Shell experience
Open an elevated PowerShell window and execute the following command:
Get-appxpackage -all *shellexperience* -packagetype bundle |% {add-appxpackage -register -disabledevelopmentmode ($_.installlocation + “appxmetadataappxbundlemanifest.xml”)}
See if this has helped.
5] Register all app packages
To open an elevated PowerShell prompt, type PowerShell in taskbar Search, and in the result ‘Windows Powershell’ which appears, right-click and select Run as administrator. Type the following and press Enter:
Get-AppXPackage -AllUsers | Foreach {Add-AppxPackage -DisableDevelopmentMode -Register "$($_.InstallLocation)AppXManifest.xml"}
You may do this, to open a Command Prompt or Powershell window. Press Ctrl+Shift+Esc to open the Task Manager. Click on File menu > Run new task. To open a command prompt window, type cmd. To open a PowerShell prompt, type powershell. Remember to check the Create this task with the administrative privileges check-box. Then hit Enter.
6] Repair Windows System Image
Open an elevated CMD copy-paste the following and hit Enter
Dism /Online /Cleanup-Image /RestoreHealth
Restart after the scan is over and see if it helped. This will Repair the Windows Image.
7] Toggle Full Screen Start Menu
Make Start full screen and back. Enable Tablet Mode and Start Screen and then go back. See if this toggling has helped.
8] Check with a new user account
Create a new user and see if it helps. To do this, open an elevated command prompt window, type the following, and hit Enter:
net user username /add
Here username is your new user name. You will see The command completed successfully message. Log into your new account and see if it has resolved your issue.
9] Uninstall Problematic Update
Windows allows you to uninstall the problematic Update and then hide it.
19] Other Suggestions
This post will help you if Windows 11/10 Start Menu Tile Database is corrupt. If Cortana or Taskbar search is not working, open Task Manager > File menu > Run new task. Type powershell and select the Create this task with administrative privileges checkbox and click OK. See this post if your Taskbar is not working in Windows 11/10.
Let us know if anything worked for you or if you have any suggestions to make for the benefit of others.
TIP: This post will help you if your WinX Menu is not working in Windows 11/10.
Nothing happens when I press the Start Button
Some keyboards come with a lock button that disables the Start button i.e. nothing will happen no matter how many times you press it. They are usually available on the gaming keyboard. So look for a button that has a lock icon on it, and press it once.
Related: Windows Start Menu does not close and remains frozen
I am not able to click on the apps on Start Menu
The easy way to fix this is using the Task Manager, which can restart the Windows File Explorer. Use Ctrl + Shift + Esc to launch Task Manager. Then locate the File Explorer, right-click on it and kill the process. It should relaunch the File Explorer. If not, Click on File > Run new Task > Type explorer.exe, and press the Enter key.
Windows 10 has come a long way since it was first launched in 2015. Each update brings a lot of new features, and Microsoft has embraced the open source community in a way that was once thought impossible.
Still, like with any operating system, there are bugs. And one of the more common bugs people running Windows 10 have faced is that the Start Menu suddenly stops working.
Sometimes the open Start Menu freezes up and is unresponsive, and other times it won’t open at all when you click the Start Menu button.
Whatever specific issue you’re having with the Windows 10 Start Menu, we’ll go over some quick and not so quick fixes in this article.
How to restart Windows Explorer
Windows Explorer, which is now called File Explorer, is the application you use to browse your file system and open programs and files. But it also controls things like the Start Menu, the taskbar, and other applications.
If you have an issue with the Start Menu, the first thing you can try to do is restart the “Windows Explorer” process in the Task Manager.
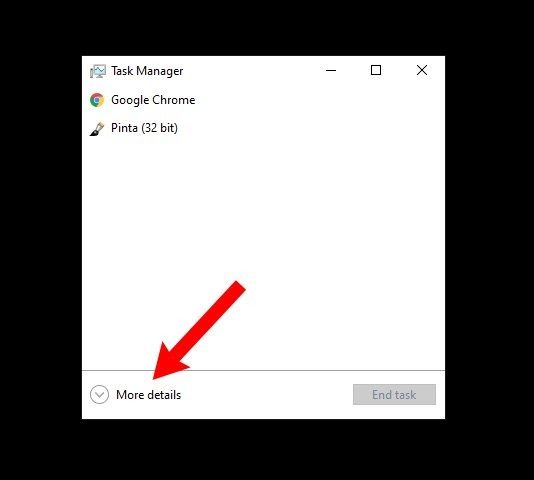
To open the Task Manager, press Ctrl + Alt + Delete, then click the “Task Manager” button.
Click “More details” to see a full list of open programs and background processes you’re running:
Scroll through the list until you find the “Windows Explorer” process. Then right click on “Windows Explorer” and select “Restart”:
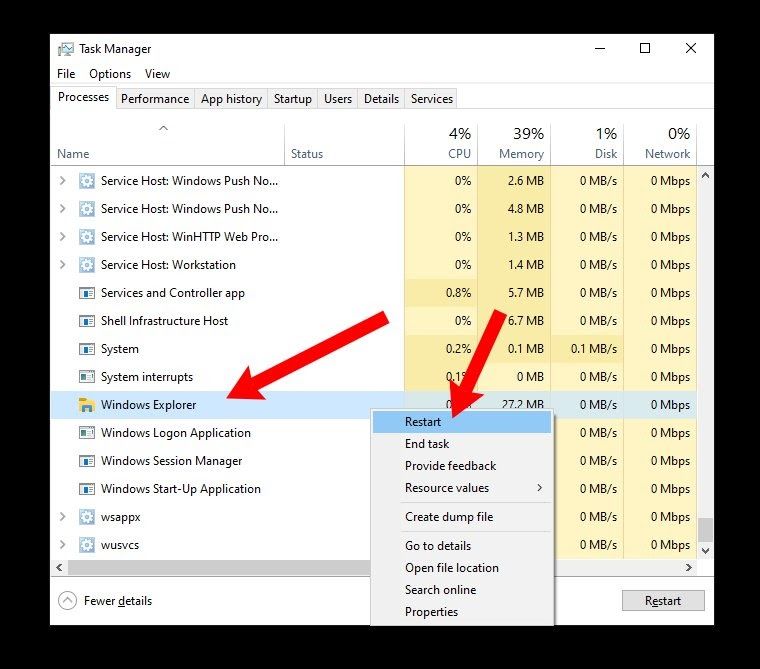
There will be a brief flash while Windows restarts Windows Explorer/Finder, along with the taskbar and Start Menu.
After that, try to open the Start Menu. If it’s still not working normally, try one of the other fixes below.
How to repair corrupt or missing Windows system files
Sometimes an update goes awry, or you accidentally deleted an important file while digging around the filesystem.
If the Start Menu is still giving you trouble, or other core Windows apps are crashing, then you can try to restore any missing or corrupt Windows system files.
To do this, you’ll need to open the Windows Command Prompt as an administrator and run the System File Checker program.
Once you open Command Prompt as an administrator, run the command sfc /scannow:
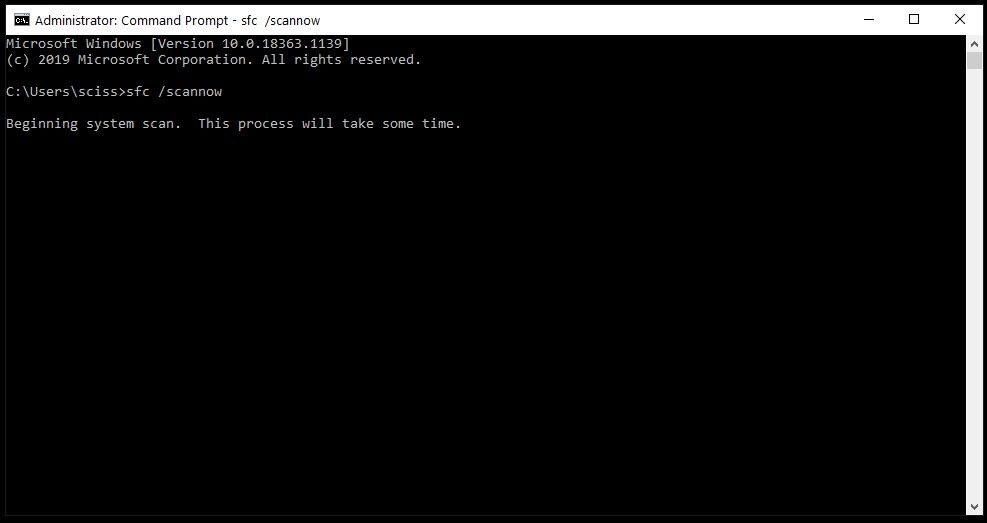
System File Checker will start going through all your system files and replace any corrupt or missing files with a cached copy.
This process can take a little while, so feel free to do something else for 5-10 minutes. Just be careful not to close the window while sfc is doing its thing.
Once System File Checker is finished, you’ll either see a report of all the files it replaced, or if everything was fine, you’ll see a message like this:
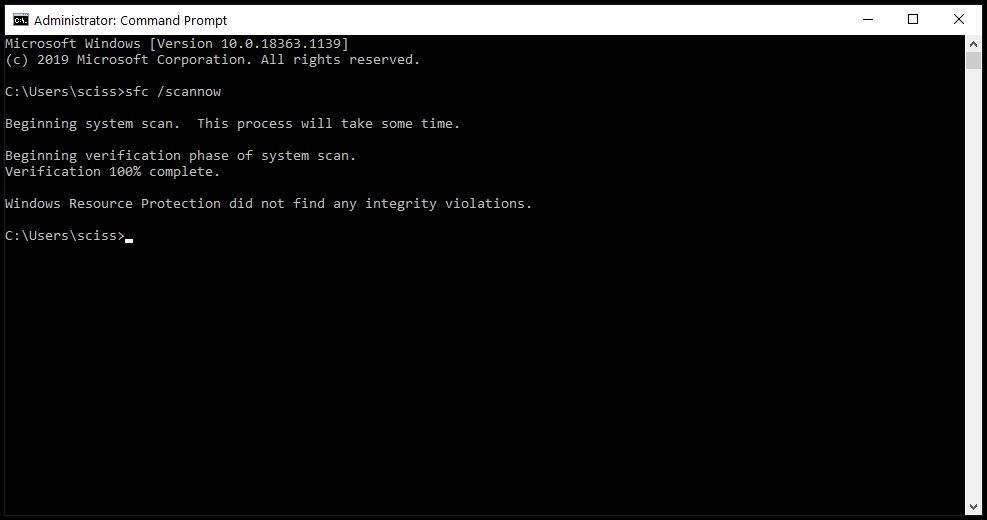
If System File Checker replaced any corrupt or missing system files, save all of your open work and restart your computer. Once you log back in, try to open the Start Menu to see if that fixed your issues.
Note: You could also use Powershell to run the sfc /scannow command, but remember that you’ll need to open an elevated Powershell terminal.
The next thing you can try is to reset the Start Menu entirely, along will all the Windows 10 apps that were preinstalled or installed from the Microsoft Store.
To do this, you’ll need to open PowerShell as an administrator – Command Prompt won’t work for the command you’ll run.
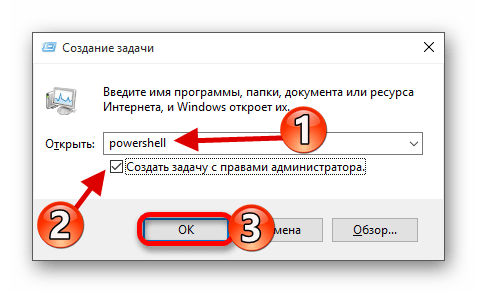
There are many ways to open PowerShell, but one of the fastest ways is to use the Run program.
Use the shortcut Windows Key + R to open the Run program, enter «powershell», then hold down «Ctrl + Shift» and click the «OK» button:
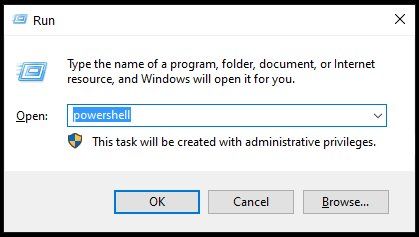
This should open up a PowerShell terminal with administrative privileges.
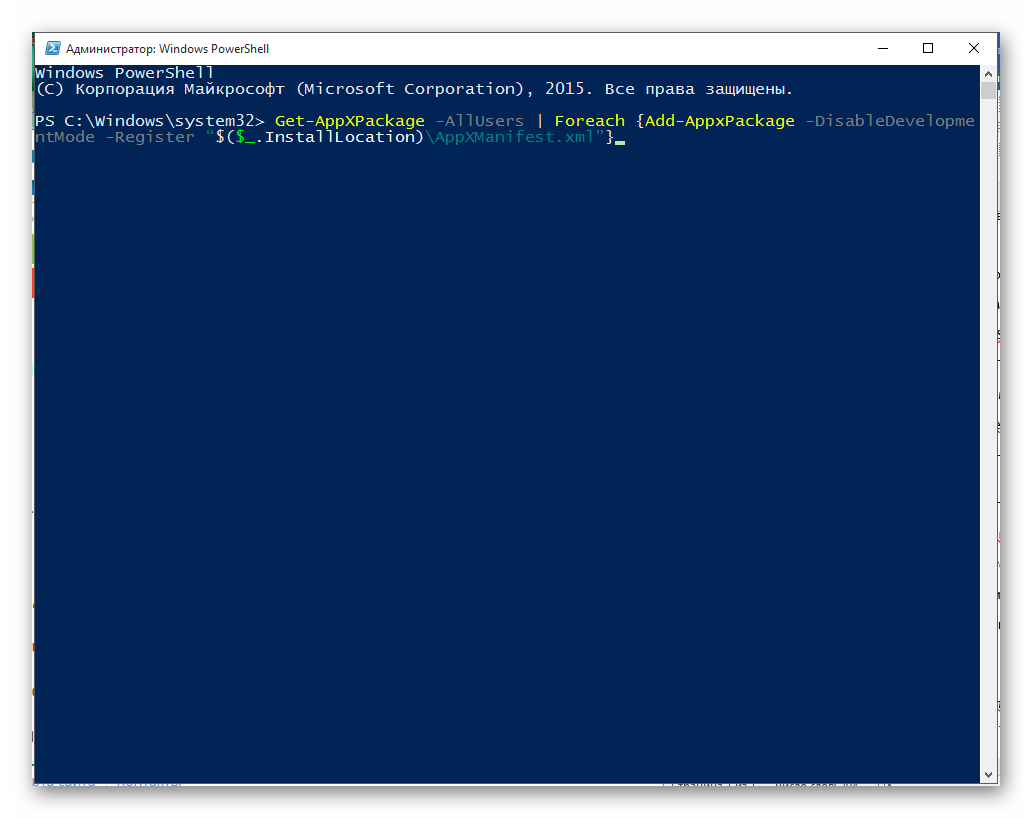
In the PowerShell terminal, run the following command:
Get-AppXPackage -AllUsers | Foreach {Add-AppxPackage -DisableDevelopmentMode -Register "$($_.InstallLocation)AppXManifest.xml"}
The Get-AppXPackage command will attempt to reinstall all the default Windows apps, including the Start Menu and search bar.
It will also register a manifest file for each program it reinstalls. You don’t need to worry about the manifest files, though – it’s just something Windows needs to run each program.
Give it 5-10 minutes, and make sure you don’t close the PowerShell window until it’s finished.
Note: You may see some scary looking errors pop up as the Get-AppXPackage command is running. Don’t worry about them – most are just warnings about why a program can’t be reinstalled:
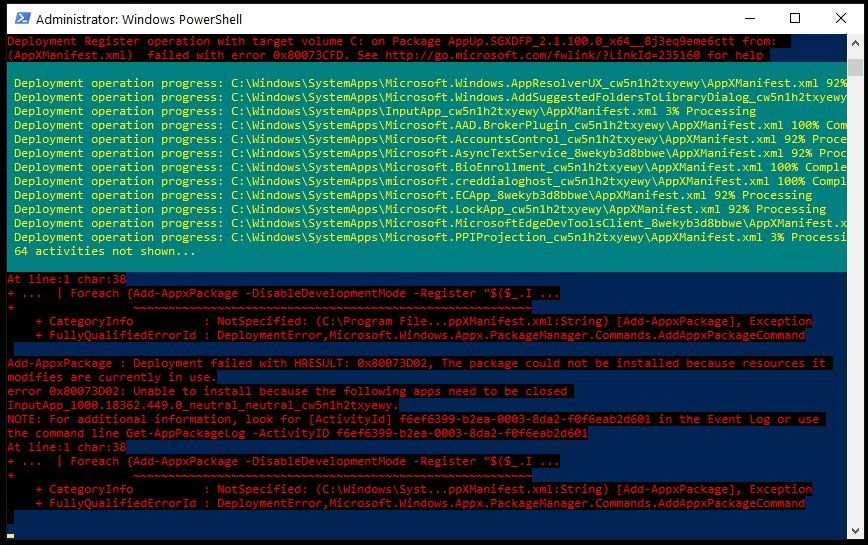
When the Get-AppXPackage command is finished, restart your computer, log in, and try to open the Start Menu.
How to reset your Windows 10 installation
If none of the above methods fixed the Start Menu, the last thing you can try is to do a factory reset of your Windows 10 installation. But keep in mind that this is an «almost-scorched-earth» method, and should only be used as a last resort.
Resetting your Windows 10 installation should keep all of your personal files intact (documents, pictures, videos, and so on), but will uninstall all the other drivers and programs you’ve installed. Basically this resets your computer to the state it was in when you first turned it on.
Before going any further, make backups of all your important files using a flash drive, external HDD/SSD, and/or an online file host like Google Drive or Dropbox.
In fact, make two backups. You probably won’t need them, but it doesn’t hurt.
When you’ve finished backing up all your files, open a PowerShell terminal – use the shortcut Windows Key + R, enter «powershell», then click the «OK» button.
In the PowerShell terminal, run the command systemreset to bring up the Windows reset wizard.
Next, click the «Keep my files» button:
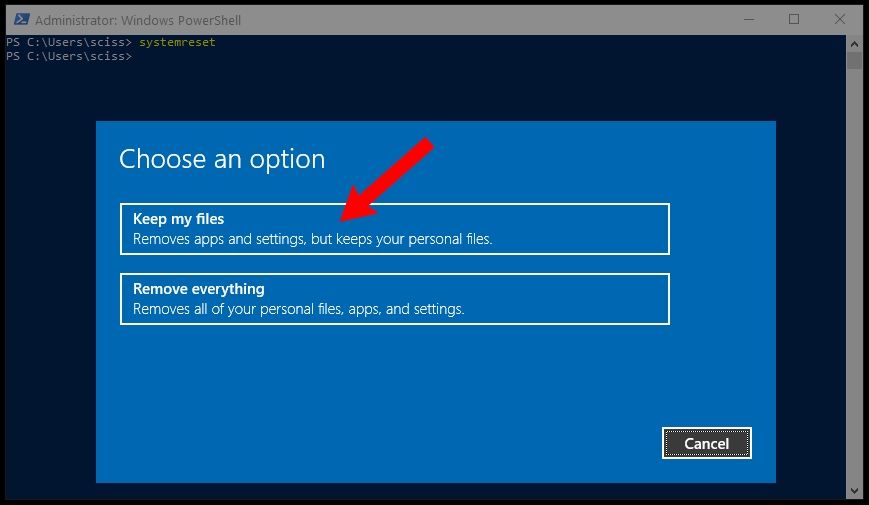
Wait a moment while the wizard analyzes your system. Then, you’ll see a list of all the programs that’ll be removed:
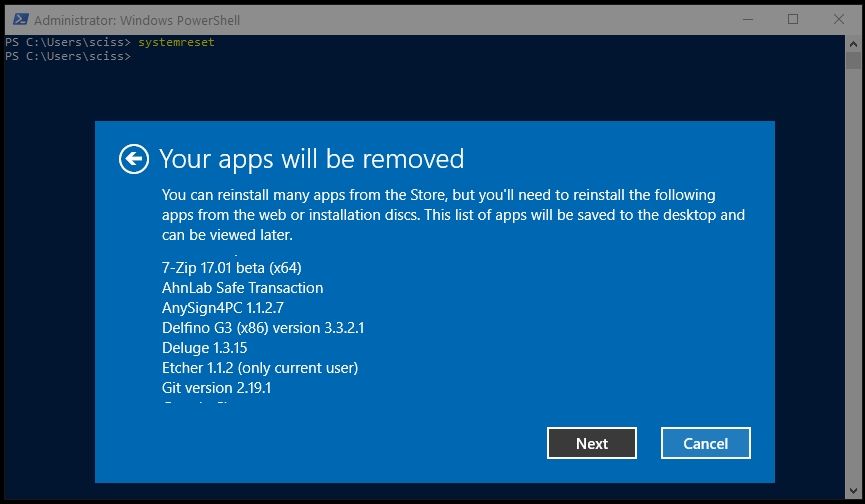
Click the «Next» button, and follow the instructions to reset your Windows 10 installation.
Once you’re finished resetting Windows and creating a new user, the Start Menu should be working again.
So those are all the ways to fix the Windows 10 Start Menu, listed from easiest to hardest.
Did any of these methods work for you? Is there another way to open the Start Menu that I missed? Let me know about it on Twitter.
Learn to code for free. freeCodeCamp’s open source curriculum has helped more than 40,000 people get jobs as developers. Get started
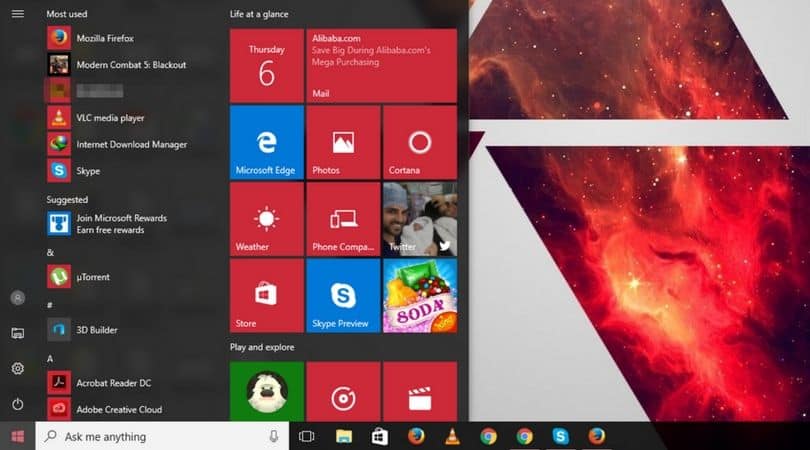
The long ignorant “Start Menu” is back on Windows 10, but a number of users are having issues, and it isn’t working properly. I am part of very popular Windows forums and noticed that a lot of people have been complaining about misbehaving of the Start button on Windows 10, and if you are one of them, here’s how you can fix the issue.
Since Windows 10 is pretty new on the market, there are many updates available for it. Before moving to the fixes below, I advise you to make sure the Windows is updated on your device. Also, you might lose important data while fixing because there might be a virus or a serious issue with your PC, so better prepare a backup.
Here is How to Fix Start button not Working on Windows 10
 Now, have a look at the ways to fix the “Windows 10 Star Button not Working” issue.
1. Restart a few Times
First and foremost, let’s start with a simple yet best solution. It might seem useless to you, but believe me, sometimes the problem is just that your PC is overcrowded. Turn it on and off a few times and see if the issue is fixed. Of course, it’s the one time solution, so if it doesn’t work the first time, move to the next options.
2. Repair Corrupt Files by Powershell
Powershell will fix corrupt files on your PC. You can reach Powershell through the following three ways.
- Go to the search bar, type “Power Shell,” and select “Run as Administrator.”
- Well, the search bar may not be working anymore on your PC. If that’s the case, press Windows key-R, type “Power shell” and press Enter. As soon as you press Enter, you will find the PowerShell icon on the taskbar. Right click on that icon and choose “Pin to Taskbar.” Now, shut down the PowerShell program and right click again, but this time you have to hold the “Shift” and “Ctrl” buttons. Finally, select “Run as Administrator.”
Now, the Powershell command window will appear on your screen. Type “sfc/scannow” command and hit Enter. After that, you have to wait a few minutes and do not disturb your PC in the middle.
Once the process is done, there are two possible results. First, there are no corrupt files which mean there were, but the program fixed them all. Second, there are problematic files that are unfixed. If you have got the second result, type “dism /online /cleanup-image /restorehealth” command. It downloads the substitute files.
Try the easiest way to use Powershell. Right click on the Start menu icon and select “Command Prompt (Admin).” A command window will appear as soon as you select it. First, type “Powershell” and hit Enter. Then, type the following command and press Enter.
Get-AppXPackage –AllUsers | Foreach {Add-AppxPackage -DisableDevelopmentMode -Register “$($_.InstallLocation)AppXManifest.xml”}
Once you have pressed Enter, wait a few minutes for the Windows to process. It is an easy way, but since it involves the startup menu itself, it might get disabled sometimes. If so, try the above options.
3. Install latest Windows Updates
 Microsoft is in a constant state of change and improvement, so it’s important to keep your system updated. Most of the times, Windows 10 automatically install the latest versions, but if it doesn’t, you can do it yourself.
Since the Startup button won’t be working, here’s how you can reach settings without it.
- Hold the Windows key on the bottom left and press i.
- If the above option doesn’t work, hold the Windows key and press R to launch the “Run” command. Type “ms-settings” in the box and click “OK.” It will open Settings application; select “Updates & Security” in the main pane. Once opened, you will find “Check for updates” option from where you can install the latest updates. You need to restart once the installation is done.
4. Uninstall Anti-Virus Program
 Anti-viruses sometimes create hindrance in the smooth performance of a system. Some users have reviewed that uninstalling or disabling the anti-virus programs from their PCs fixed the start menu problem for them. Give it a try!
5. Sign out of Your Current Account
 Your current account might be a reason of the problem. Follow the following two steps for signing out.
- Press Delete+Ctrl+Alt and select sign-out.
- Then, sign back again to check whether the issue has been solved. If not, try making a new local admin account.
6. Try the Application Identity
Another solution of the Start-button-not-working problem lies in the following steps
- Go the start button and right-click. Then, select “Run.”
- Type “SERVICES.MSC” and hit Enter.
- Then, you will find an option “Application Identity.” Right click on that option and select “Start.” Hopefully, it will fix your problem, and there’s no need of rebooting.
7. Reset Your Windows
 Well, if none of the above options works for you then try resetting the Windows. To do so, try the following steps.
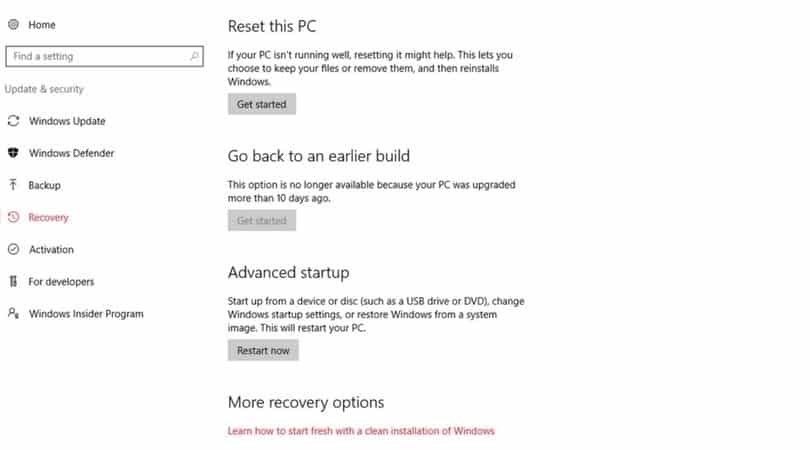
- Go to settings as you reached in step 3 and select “Update & Security.”
- Select “Recovery” from the left-hand bar.
Remember, resetting should be your last option, only when nothing else works. That’s it for now. Don’t forget to share your feedback with us and let us know which option fixed the start button problem for you.