To troubleshoot the following problems, select any heading to see more info. Next, follow the steps to try to get things working again.
If you can’t see Start or your taskbar, the taskbar may be hidden. To see it, try these steps.
-
Press the Windows logo key + I, then select Personalization > Taskbar .
-
Select Taskbar behaviors to expand it.
-
Clear the Automatically hide the taskbar box.
-
Press the Windows logo key + I to open Settings.
-
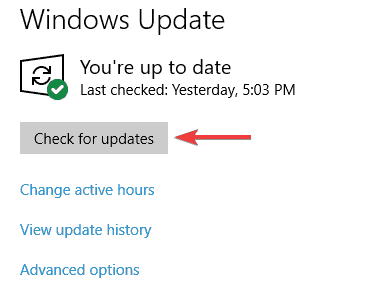
Select Windows Update, then select Check for updates. Install any available updates and restart your computer if required.
Check for updates
Note: Need another way to get to Settings? Press the Windows logo key + R, then type ms-settings: (note the colon) in the Open box. Select OK to open Settings.
If you didn’t have any updates that required a restart, it’s still a good idea to restart your device to make sure any pending updates are installed.
To restart your device when you can’t access Start , press Ctrl + Alt + Delete, select Power and then select Restart .
Note: You can also manually shut down your device by pressing and holding the power button. Shutting down this way risks losing unsaved data, so first be sure to save and close everything you’re working on. If you shut down this way, you can restart your device by pressing the power button again.
While it’s likely you have the most recent drivers, if you’re still having trouble with the Start menu, you can try fixing it by manually updating your graphics or audio drivers. For more info, see Update drivers manually in Windows.
-
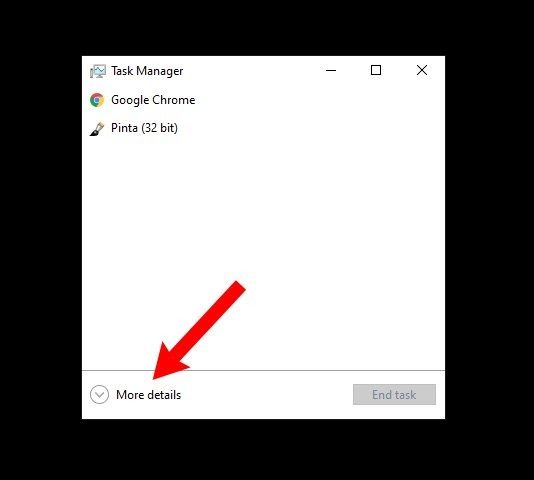
Press Ctrl + Shift + Esc to open Task Manager. You may need to select More details at the bottom of the window to see everything.
Note: If you tapped or selected a browser window before you pressed Ctrl + Shift + Esc, you’ll get the browser task manager. Close the browser task manager, tap or select a non-browser window, and then continue with the steps below.
-
Select the Processes tab.
-
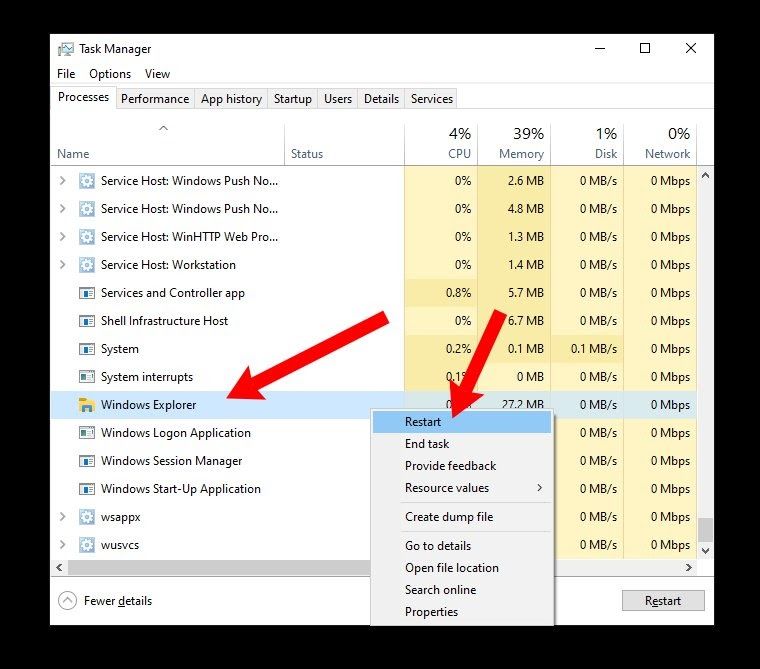
Scroll down to Windows Explorer, select it, then select Restart.
The process may take a few seconds, and your taskbar and Start menu may not be visible while Windows Explorer restarts. You can close Task Manager when the process is complete.
If you still can’t fix your problem with the Start menu, try signing in with an administrator account. To see which account you’re signed in with:
-
Select Start .
-
Right-click your profile image or name.
-
Select Change account settings. If you see «Administrator» near your name, then you’re using an administrator account.
If you aren’t using an administrator account and you don’t have one, you can create an account and set it as an administrator account.
Create the new administrator account
-
Press the Windows logo key + I.
-
Select Accounts > Family & other people (or Other users , if you’re using Windows 11 Enterprise).
-
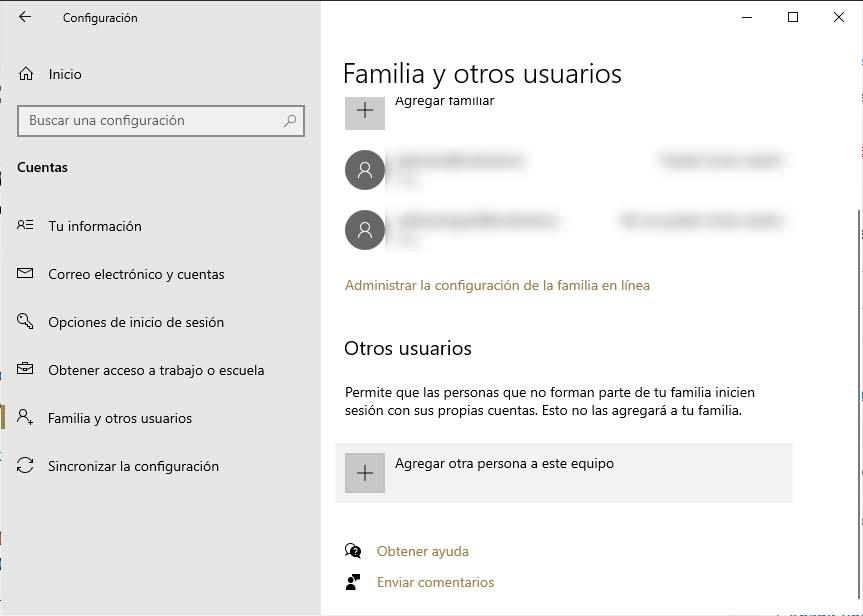
Under Other users , select Add someone else to this PC or Add account.
-
Provide the requested info and follow the prompts to create the account.
Make the new account an administrator account
-
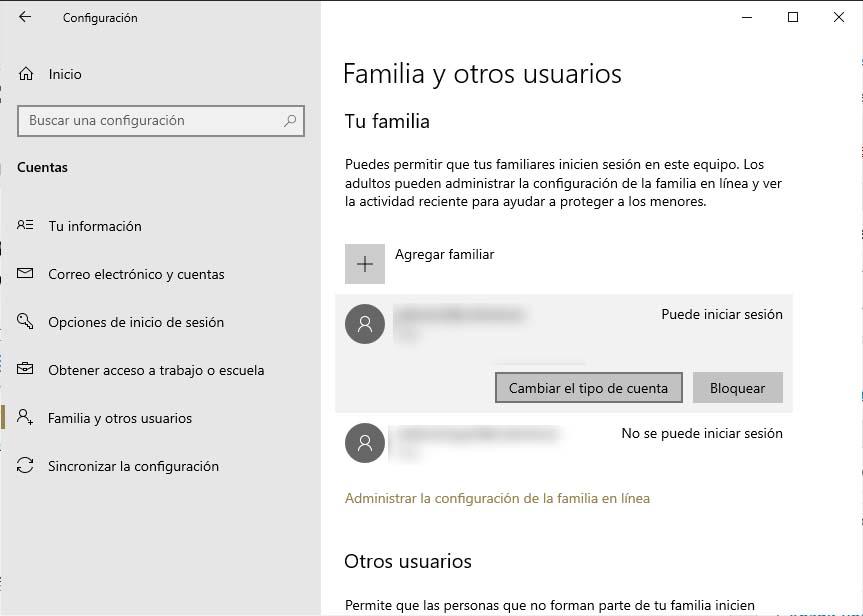
Under Family & other people (or Other users , if you’re using Windows 11 Enterprise), choose the account you created, and then select Change account type.
-
Under Account type, select Administrator > OK.
Sign out of your account and then sign in to your new account. If everything is fixed, move your personal data and files to the new account.
To move your personal files from your old account to your new account, try opening File Explorer, expanding This PC, selecting OSDisk (C:), and looking in the Users folder, where you should see folders for both accounts. You can then copy and paste your files from the old account folder to similar locations in the new account folder. Or if you prefer, you can upload your files from your old account to OneDrive, and then sign into the new account and download the files from OneDrive.
If the problem still isn’t fixed, try deleting your old administrator account
Warning: If you delete an administrator account that’s associated with a Microsoft account and you don’t have a backup copy of your BitLocker key, you’ll be locked out the device and you’ll lose all data. You won’t be able to use the device until you do a clean install.
-
Press the Windows logo key + I.
-
Select Accounts > Family & other people (or Other users , if you’re using Windows 11 Enterprise).
-
Under Other users, select the old administrator account, then select Remove > Delete account and data.
-
After the old account is removed, restart your device and sign in with the new account again.
Associate the Microsoft account with the new administrator account (if you were using a local account to sign in):
-
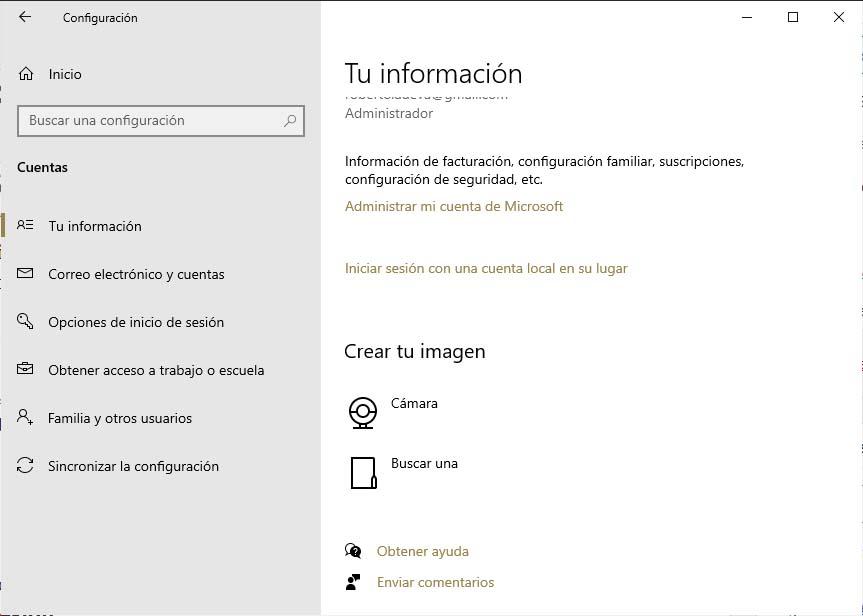
In Settings , select Accounts > Your info .
-
Select Sign in with a Microsoft account instead and enter your account info. You’ll see this link only if you’re using a local account, and you may not see it if your device is on a network.
Note: Need another way to get to Settings? Press Windows logo key + R, then type ms-settings: (include the colon) in the Open box. Select OK to open Settings.
If you can’t see Start or your taskbar, the taskbar may be hidden. To see it, try these steps.
-
Press the Windows logo key + I to get to Settings, then select Personalization > Taskbar .
-
Turn on Lock the taskbar.
-
Turn off Automatically hide the taskbar in desktop mode or Automatically hide the taskbar in tablet mode.
-
Press the Windows logo key + I to open Settings.
-
Select Update & security > Windows Update , and then select Check for updates. Install any available updates and restart your computer if required.
Check for updates
Note: Need another way to get to Settings? Press the Windows logo key + R, then type ms-settings: (note the colon) in the Open box. Select OK to open Settings.
If you didn’t have any updates that required a restart, it’s still a good idea to restart your device to make sure any pending updates are installed.
To restart your device when you can’t access Start , press Ctrl + Alt + Delete, select Power and then select Restart .
Note: You can also manually shut down your device by pressing and holding the power button. Shutting down this way risks losing unsaved data, so first be sure to save and close everything you’re working on. If you shut down this way, you can restart your device by pressing the power button again.
While it’s likely you have the most recent drivers, if you’re still having trouble with the Start menu, you can try fixing it by manually updating your graphics or audio drivers. For more info, see Update drivers manually in Windows.
-
Press Ctrl + Shift + Esc to open Task Manager. You may need to select More details at the bottom of the window to see everything.
-
Select the Processes tab.
-
Scroll down to Windows Explorer, select it, then select Restart.
The process may take a few seconds, and your taskbar and Start menu may not be visible while Windows Explorer restarts. You can close Task Manager when the process is complete.
If you still can’t fix your problem with the Start menu, try creating a new local administrator account.
If you’re signed in with your Microsoft account, remove the link to that account first by doing the following (if that’s not how you’re signed in, skip to creating a new administrator account):
-
Press the Windows logo key + I.
-
In Settings, select Accounts > Your info (in some versions, it may be under Email & accounts instead).
-
Select Sign in with a local account instead. You’ll see this link only if you’re using a Microsoft account, and you may not see it if your device is on a network.
-
Type your Microsoft account password and select Next.
-
Choose a new account name, password, and password hint, then select Finish and sign out.
Create the new administrator account
-
Press the Windows logo key + I.
-
In Settings, select Accounts > Family & other users (or Other users , if you’re using Windows 10 Enterprise).
-
Under Other users , select Add someone else to this PC.
-
On Windows 10 Home and Windows 10 Professional, provide a name for the user and a password, and then select Next. On Windows 10 Enterprise, select I don’t have this person’s sign-in information, and then select Add a user without a Microsoft account.
-
Set a user name, password, and password hint. Then select Next > Finish.
Make the new account an administrator account
-
Press the Windows logo key + I.
-
In Settings, select Accounts , then select Family & other users.
-
Under Your family (or Other users , if you’re using Windows 10 Enterprise), choose the account you created, and then select Change account type.
-
Under Account type, select Administrator > OK.
Sign out of your account and then sign in to your new account. If everything is fixed, move your personal data and files to the new account.
To move your personal files from your old account to your new account, try opening File Explorer, expanding This PC > OSDisk (C:), and looking in the Users folder, where you should see folders for both accounts. You can then copy and paste your files from the old account folder to similar locations in the new account folder. Or if you prefer, you can upload your files from your old account to OneDrive, and then sign into the new account and download the files from OneDrive.
If the problem still isn’t fixed, try deleting the old administrator account
Warning: If you delete an administrator account that’s associated with a Microsoft account and you don’t have a backup copy of your BitLocker key, you’ll be locked out the device and you’ll lose all data. You won’t be able to use the device until you do a clean install.
-
Press the Windows logo key + I.
-
In Settings, select Accounts , then select Family & other users.
-
Under Other users, select the old administrator account, then select Remove > Delete account and data.
-
After the old account is removed, restart your device and sign in with the new account again.
If you were using a Microsoft account to sign in before, associate the Microsoft account with the new administrator account.
-
In Settings , select Accounts > Your info (in some versions, it may be under Email & accounts instead).
-
Select Sign in with a Microsoft account instead and enter your account info. You’ll see this link only if you’re using a local account, and you may not see it if your device is on a network.
Note: Need another way to get to Settings? Press Windows logo key + R, then type ms-settings: (include the colon) in the Open box. Select OK to open Settings.
Need more help?
 После обновления до Windows 10 многие (судя по комментариям) столкнулись с проблемой, заключающейся в том, что новое меню Пуск не открывается, также не работают и некоторые другие элементы системы (например, окно «Все параметры»). Что делать в этом случае?
В этой статье я собрал способы, которые могут помочь если у вас не работает кнопка Пуск после обновления до Windows 10 или установки системы. Надеюсь, они помогут решить возникшую проблему.
Обновление (июнь 2016): Майкрософт выпустила официальную утилиту для исправления работы меню Пуск, рекомендую начать именно с неё, а если не поможет, вернуться к этой инструкции: Утилита исправления меню Пуск Windows 10.
Перезапуск explorer.exe
Первый способ, которые иногда помогает — простой перезапуск процесса explorer.exe на компьютере. Чтобы проделать это, сначала нажмите клавиши Ctrl+Shift+Esc чтобы открыть диспетчер задач, а затем нажмите кнопку «Подробнее» внизу (при условии, что она там есть).
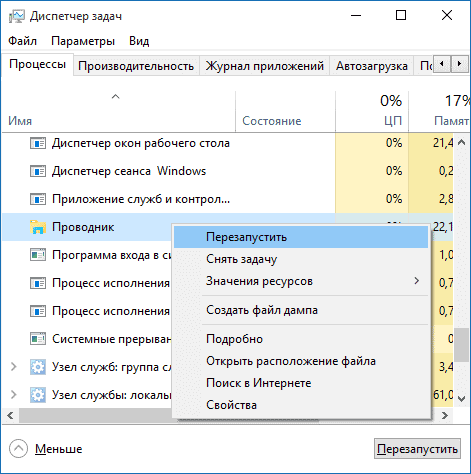
На вкладке «Процессы» найдите процесс «Проводник» (Windows Explorer), кликните по нему правой кнопкой мыши и нажмите «Перезапустить».

Возможно, после перезапуска меню Пуск заработает. Но срабатывает это далеко не всегда (только в тех случаях, когда особой проблемы на самом деле нет).
Заставляем меню Пуск открываться с помощью PowerShell
Внимание: этот способ одновременно помогает в большинстве случаев при проблемах с меню пуск, но так же может нарушить работу приложений из магазина Windows 10, учитывайте это. Рекомендую сначала использовать следующий вариант исправить работу меню Пуск, а если он не поможет, вернуться к этому.
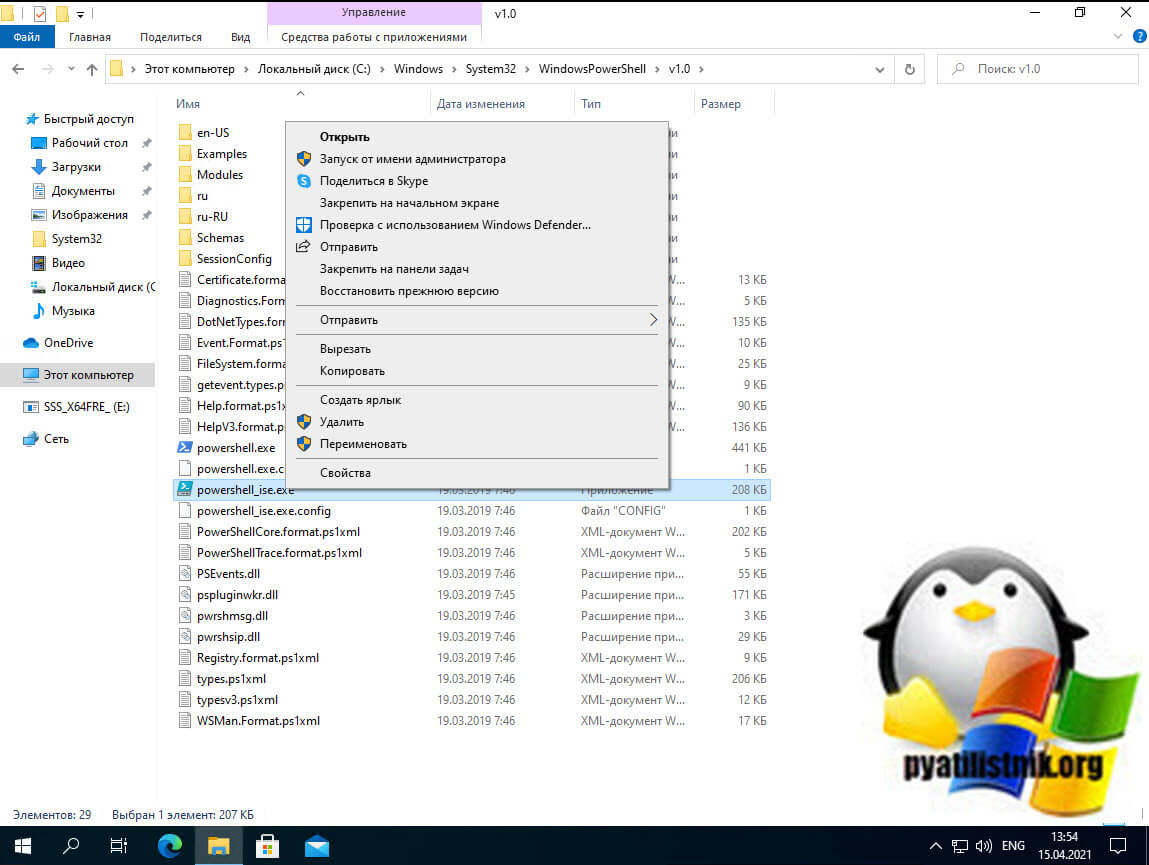
Во втором способе будем использовать PowerShell. Поскольку Пуск и, вероятно, поиск у нас не работают, для того, чтобы запустить Windows PowerShell, зайдите в папку Windows System32 WindowsPowerShell v1.0
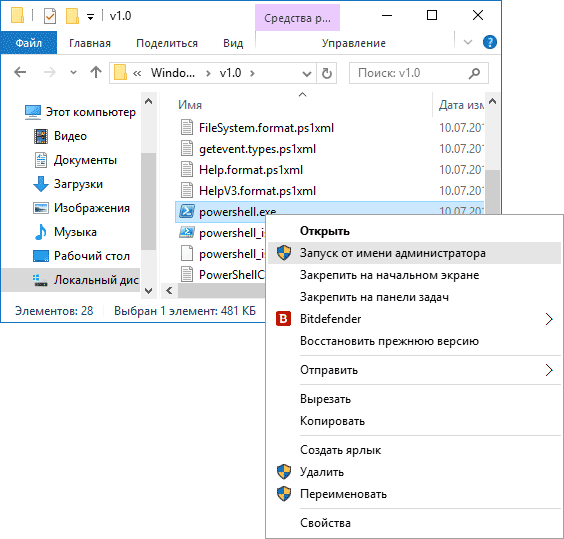
В этой папке найдите файл powershell.exe, кликните по нему правой кнопкой мыши и выберите запуск от имени Администратора.
Примечание: еще один способ запустить Windows PowerShell от имени Администратора — кликнуть правой кнопкой мыши по кнопке «Пуск», выбрать «Командная строка (администратор)», а в командной строке набрать «powershell» (при этом отдельное окно не откроется, команды можно вводить прямо в командной строке).
После этого, запустите следующую команду в PowerShell:
Get-AppXPackage -AllUsers | Foreach {Add-AppxPackage -DisableDevelopmentMode -Register “$($_.InstallLocation)AppXManifest.xml”}
По завершении ее выполнения, проверьте, получается ли открыть меню Пуск теперь.
Еще два способа исправить проблему, когда Пуск не работает
В комментариях также были предложены следующие решения (они могут помочь, в случае если после исправления проблемы одним из первых двух способов, после перезагрузки кнопка Пуск снова не работает). Первое из них — использование редактора реестра Windows 10, для его запуска, нажмите клавиши Win+R на клавиатуре и введите regedit затем выполните следующие шаги:
- Зайдите в раздел HKEY_CURRENT_USER Software Microsoft Windows CurrentVersion Explorer Advanced
- Кликните в правой части правой кнопкой мыши — Создать — DWORD и задайте имя параметра EnableXAMLStartMenu (если только этот параметр уже не присуствует).
- Дважды кликните по данному параметру, задайте значение 0 (ноль для него).
Также, по имеющейся информации, проблема может быть вызвана русским именем папки пользователя Windows 10. Тут поможет инструкия Как переименовать папку пользователя Windows 10.
И еще один способ из комментариев от Алексея, по отзывам тоже у многих срабатывающий:
Была подобная проблема (меню Пуск — это сторонняя программа которая требует часть производительности для своей работы). решил проблему просто: свойства компьютера, снизу слева безопасность и обслуживание, по центру экрана «обслуживание», и выбрать начать. через полчаса все проблемы которые были у Windows 10 были исчезли. Примечание: чтобы зайти быстро в свойства компьютера можно нажать правой кнопкой по Пуск и выбрать пункт «Система».
Создание нового пользователя
Если ничто из описанного выше не помогло, вы можете также попробовать создать нового пользователя Windows 10, через панель управления (Win+R, затем ввести Control, чтобы попасть в нее) или командную строку (net user Имя_пользователя /add).
Обычно, для вновь созданного пользователя меню пуск, настройки и рабочий стол работают как положено. Если вы использовали этот способ, то в дальнейшем вы можете перенести файлы предыдущего пользователя в новую учетную запись и удалить «старый» аккаунт.
Что делать, если указанные способы не помогают
Если ни один из описанных способов не решил проблемы, то могу предложить лишь воспользоваться одним из методов восстановления Windows 10 (возврат в исходное состояние), либо, если вы недавно обновились — выполнить откат до предыдущей версии ОС.

Use the following tips to get the Start menu on Windows 10 working quickly for you again.
Have you ever clicked on the Windows 10 Start menu and nothing happens? The Windows 10 Start menu, not opening is a common occurrence for many users.
Most people just tolerate this annoyance, since eventually, the Start menu will begin working again. However, you don’t have to tolerate it any longer. Use the following tips to get the Start menu working quickly for you again.
Windows 10 Start Menu Not Opening: Why It Happens
There are two main behaviors that can start happening with the Windows 10 Start menu. It either won’t open at all, or it takes more than 5 seconds to finally open. It’s the second behavior that’s the most common, and it’s especially annoying because past versions of Windows always had instantaneous Start menus.
Why does this even happen? There are numerous causes, including:
- Temporary data files that the Start menu uses are corrupt or out of date
- Cortana temporary files are corrupt or out of date
- A known glitch in Windows 10 that causes the Start menu to freeze
- The Start menu under your specific Windows account is crashing or missing
- Windows Explorer on your system is out of date or includes corrupted files
Now to get to the fixes and tweaks that will resolve this issue. We’ll work down this list from the easiest quick fixes to the more complex and involved ones.
1. Sign Out of Your Microsoft Account
As each user signs in to their Microsoft account on a Windows 10 computer, many of the apps and other things listed on the Start menu get cached. If you stay logged in for long periods of time (as is usually the case with a computer that only has one user), this cache can eventually get very large or corrupted.
When you log out and then back into your account, many of these things are cleared and refreshed. So a great quick fix for Windows 10 Start menu issues is simply logging out and back in.
To log out, click on your Desktop (not on an app) and press the keyboard shortcut ALT+F4. The Windows 10 Shut down menu will appear and you can choose to either Sign out or do a full Restart.
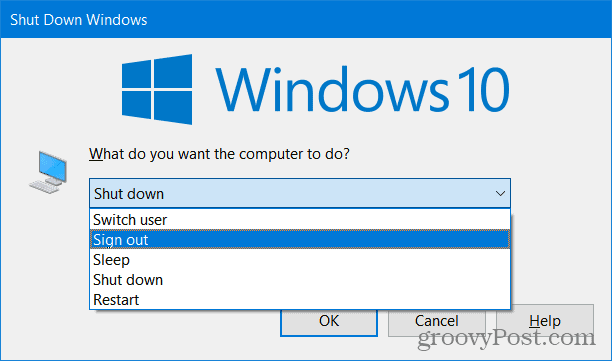
We mention a full Restart because, for many of us, we don’t restart our computers very often. By restarting the system, everything will get closed out, memory and cache flushed, etc. It’s good to do this from time to time to keep your system running at peak performance.
Once you log back into your, test the Start menu to see if the lag is gone.
2. Restart Windows Explorer
Another issue that happens when you use a Windows 10 computer for a long time is that Windows Explorer can get glitchy. This is also the software that serves the Start menu, so restarting it can resolve a lot of Start menu issues.
To restart Windows Explorer, press Ctrl + Shift + Esc to open the Task Manager. Select the Name field to sort apps and processes by name. Then scroll down to Windows Explorer under the Windows Processes section. Right-click Windows Explorer and select End task.
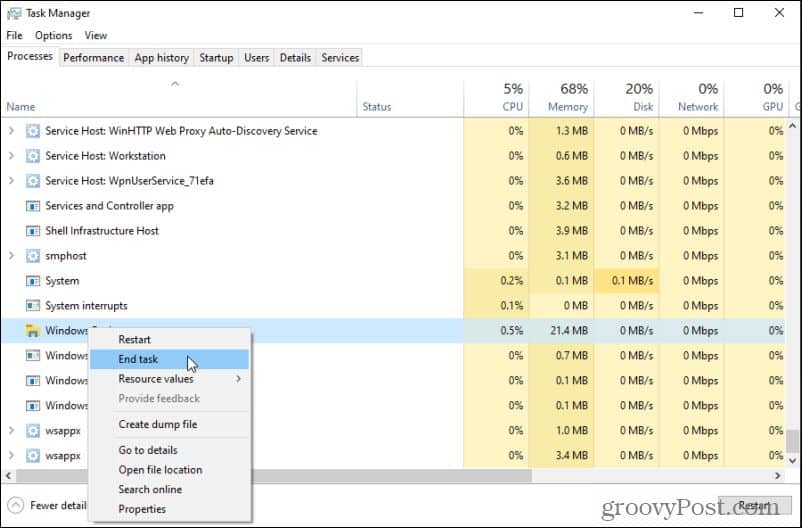
You will see your desktop blink a few times, and the taskbar may actually disappear. Give the computer a few moments to automatically restart the Windows Explorer process. After this, select the Windows 10 Start menu and see if the issues you were having are now resolved.
3. Check for Windows Updates
If the problem is still happening, it’s very possible your version of Windows 10 is out of date and buggy. A good quick-fix for this is just to make sure you have all of the latest critical Windows updates.
Select the Start menu and select the Settings icon. If your Start menu isn’t working, use Windows Key + I to open Settings. Select Update & Security.
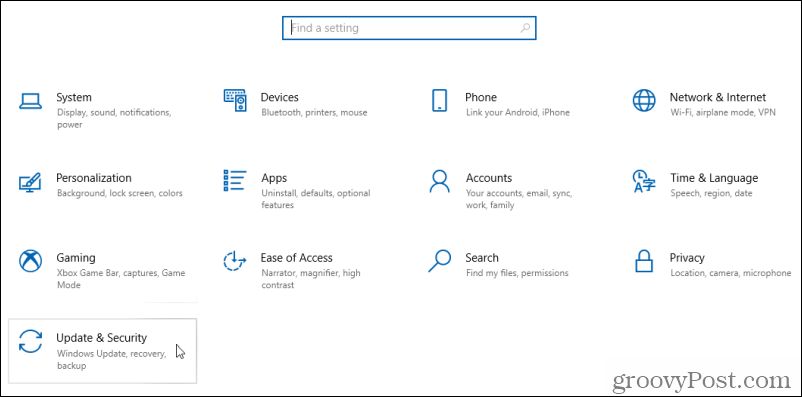
In the Windows Update window, check for and install all critical Windows updates. Under any optional Windows 10 updates, it wouldn’t hurt to select Download and install for any related to Security or Quality.
Once all of the latest updates are installed, restart your computer and test the Windows Start menu again.
4. Scan for Corrupt System Files
One of the most common causes for a misbehaving Start menu is corrupted or damaged system files. You can do your Windows 10 system a lot of good by running a system file scan and repairing all of those system files.
To do this, press Windows Key + R, type “cmd” and press Ctrl + Shift + Enter to open the command prompt as administrator.
There are two commands you should use in sequence to fully scan and repair your system: DISM and SFC.
In the command prompt window, type the following command and press Enter.
DISM.exe /Online /Cleanup-image /Restorehealth
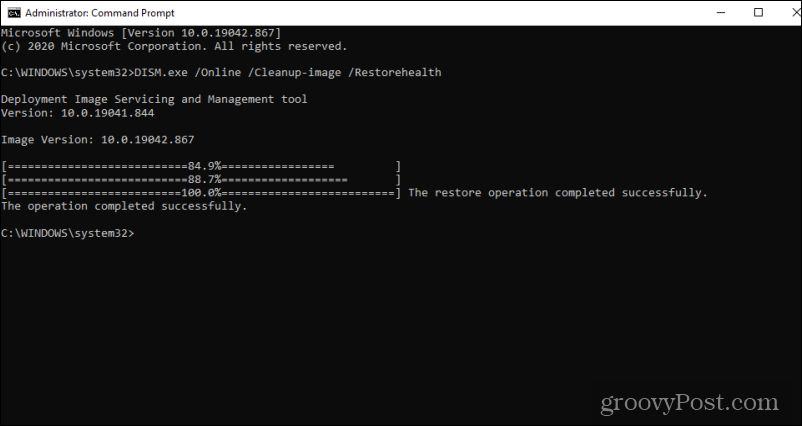
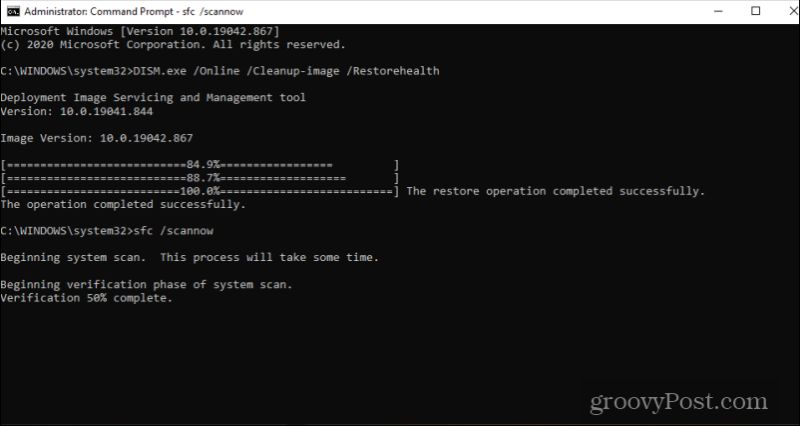
This can take up to 30 minutes, so be patient. When this is finished and you see the message that it’s completed successfully, type the following command and press Enter.
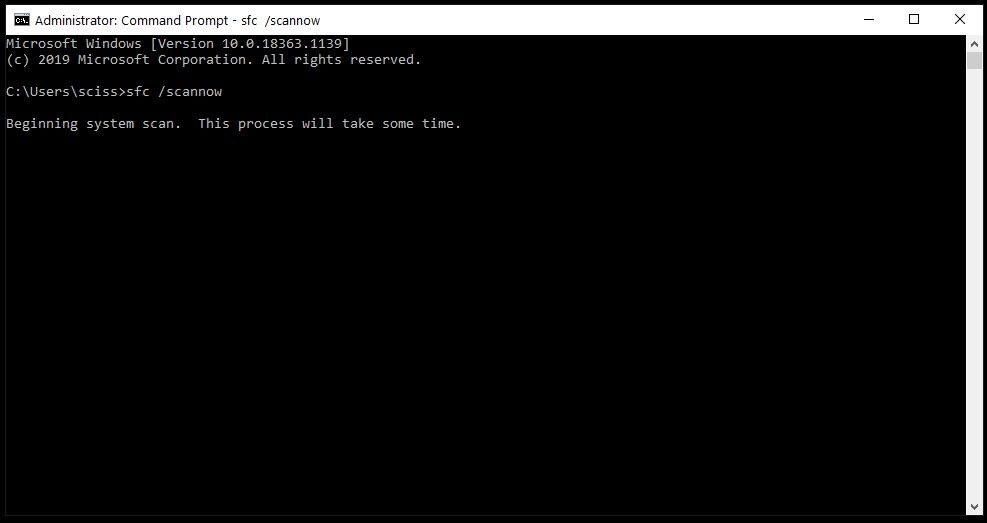
sfc /scannow
When this is finished you’ll see the message “Verification 100% complete”. Type exit to close the Command Prompt.
Restart your computer and test the Start menu again to see if the problems are now gone.
5. Clear Cortana Temporary Files
Many people don’t realize that Cortana is well integrated into the Windows Start menu. Issues with Cortana can actually affect the performance of the Start menu itself.
The most common Cortana issue is temporary Cortana files getting corrupted and causing lag every time you select the Start menu. Clear these temporary files and you could quickly resolve the lag issue.
To clear Cortana temporary files, press Windows Key + R, type “cmd” and press Ctrl + Shift + Enter to open the command prompt as administrator. Type the following commands in order, and press Enter after each.
Note: These commands must be run in this order. They will switch to the Cortana directory, kill the Cortana process, and remove the Cortana directory. Once Cortana restarts, this directory will be recreated and rebuilt fresh.
CD /d "%LOCALAPPDATA%PackagesMicrosoft.Windows.Cortana_cw5n1h2txyewy"
Taskkill /F /IM SearchUI.exe
RD /S /Q Settings
You don’t have to restart the Cortana task manually because Windows will do it automatically. It wouldn’t hurt to restart your computer after running these commands as well.
Test the Start menu again to see if the issues you were experiencing are resolved.
6. Uninstall or Fix Dropbox
There is a known issue with the Windows 10 Dropbox application that causes conflicts and unusual behaviors with the Windows Start menu. If you don’t use the Dropbox app, then uninstall it from your system and you should see the issues disappear.
However, if you want to keep Dropbox, you’ll need to make a tweak to the Windows Registry to fix these conflicts.
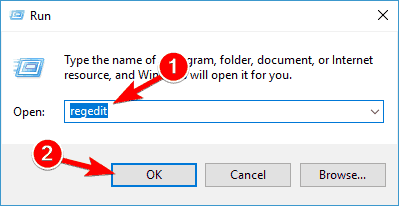
To do this, press Windows + R, type regedit and select OK. This will open the registry editor.
Navigate to:
HKEY_LOCAL_MACHINESYSTEMCurrentControlSetServicesWpnUserService
Double-click the Start Dword in the right pane. The default setting here is 2. Update this to 4 and select OK.
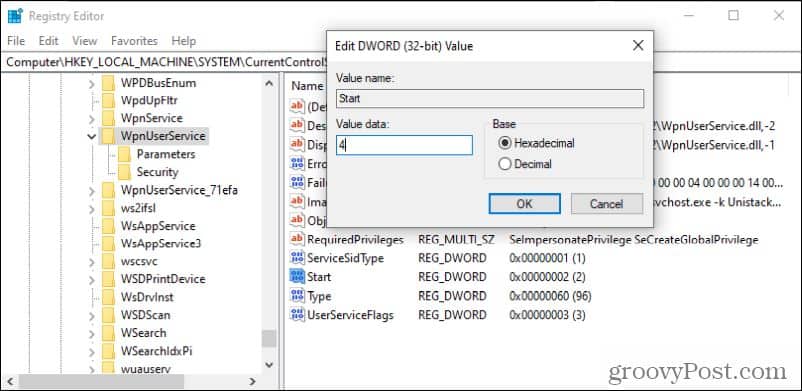
You should restart your computer for the new registry settings to take effect.
For Dropbox users, this is a very common complaint and most users report that this fix nearly always resolves the problems their seeing with their Start menu.
7. Xaml Start Menu Registry Entry
When Microsoft switched to the new Windows 10 Start menu, it included launching the Xaml process that ran it. There are known conflicts that arise when you disable User Access Control (UAC) that cause the new Windows Start menu to not work properly.
Ensure the Xaml Start Menu is enabled to creating and setting the EnableXamlStartMenu in the Windows registry. Press Windows + R, type regedit and select OK to open the registry editor.
Navigate to:
HKEY_CURRENT_USERSoftwareMicrosoftWindowsCurrentVersionExplorerAdvanced
Right-click on the empty space in the right pane, choose New > DWORD (32-bit).
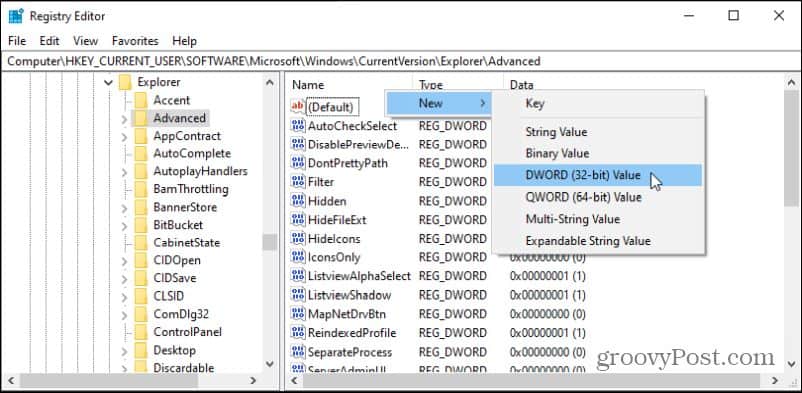
Name this new entry EnableXamlStartMenu and leave the value set to 0.
Now, reset the computer and test the Start menu again.
Windows 10 Start Menu Problems
Problems using the Windows 10 Start menu can be especially annoying because everything you want to use – apps, settings, and more – are all found there. Hopefully one of the solutions above resolved your issue and this annoying problem won’t plague you anymore.
![]()
If, after upgrading to Windows 10 and Windows 11 or installing Windows Updates, you find that your Start Menu is not working or Start Menu does not open or Start Button is not working, then this post will help you. If your Start Menu is not working, here are a few troubleshooting steps you may want to try out.

Before you proceed, you may want to restart the Start Menu process or restart the explorer.exe process and see if that helps. If it doesn’t, create a system restore point first, so that you can revert back, if you find that the results are not what you expected. Having done that, follow these suggestions:
- Restart Start process and see
- Run Windows Start Menu Troubleshooter
- Run System File Checker
- Re-register the Shell experience
- Register all app packages
- Repair Windows System Image
- Toggle Full Screen Start Menu
- Check with a new user account
- Uninstall the problematic Update and then hide it
- Other suggestions.
You will need admin permission to resolve this.
Fix Start Menu not working in Windows 11/10
1] Restart Start process and see
There is a separate process available for Start Menu — StartMenuExperienceHost.exe. Restart Start Menu and see if that helps.
2] Run Windows Start Menu Troubleshooter
Download and run the Windows 11/10 Start Menu Troubleshooter from Microsoft. It should fix all the related problems.
3] Run System File Checker
Run the following command in an elevated command prompt, to run the System File Checker.
sfc /scannow
Restart after the scan is over and see if it helped. The command will replace any corrupt file with a new one, which will ensure that the Start menu works again.
4] Re-register the Shell experience
Open an elevated PowerShell window and execute the following command:
Get-appxpackage -all *shellexperience* -packagetype bundle |% {add-appxpackage -register -disabledevelopmentmode ($_.installlocation + “appxmetadataappxbundlemanifest.xml”)}
See if this has helped.
5] Register all app packages
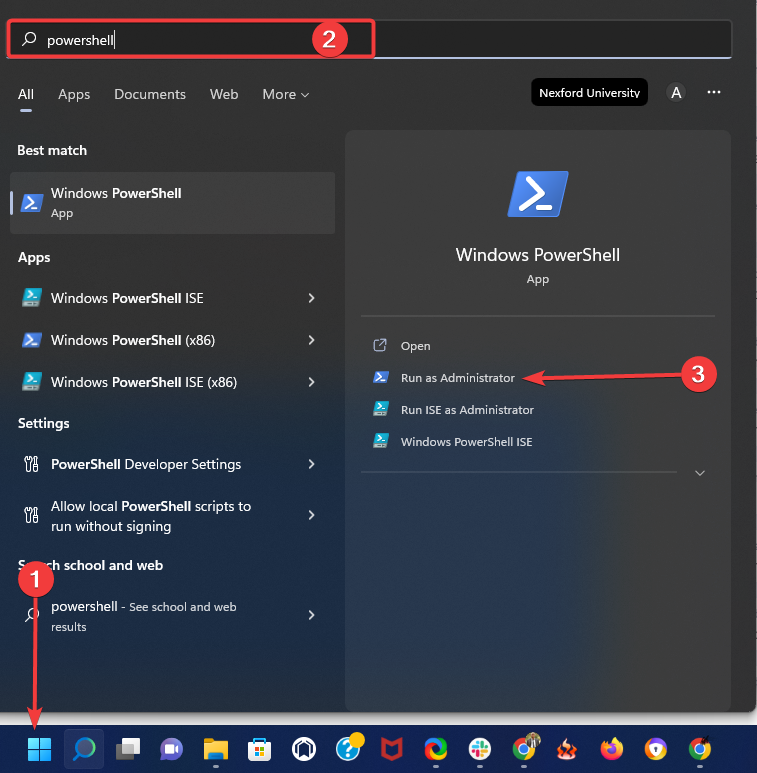
To open an elevated PowerShell prompt, type PowerShell in taskbar Search, and in the result ‘Windows Powershell’ which appears, right-click and select Run as administrator. Type the following and press Enter:
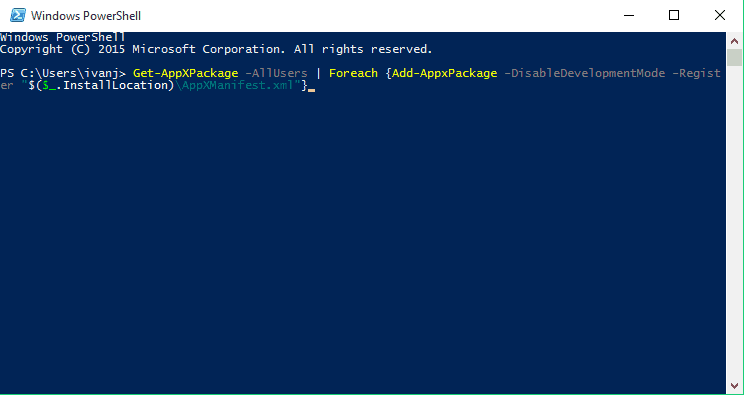
Get-AppXPackage -AllUsers | Foreach {Add-AppxPackage -DisableDevelopmentMode -Register "$($_.InstallLocation)AppXManifest.xml"}
You may do this, to open a Command Prompt or Powershell window. Press Ctrl+Shift+Esc to open the Task Manager. Click on File menu > Run new task. To open a command prompt window, type cmd. To open a PowerShell prompt, type powershell. Remember to check the Create this task with the administrative privileges check-box. Then hit Enter.
6] Repair Windows System Image
Open an elevated CMD copy-paste the following and hit Enter
Dism /Online /Cleanup-Image /RestoreHealth
Restart after the scan is over and see if it helped. This will Repair the Windows Image.
7] Toggle Full Screen Start Menu
Make Start full screen and back. Enable Tablet Mode and Start Screen and then go back. See if this toggling has helped.
8] Check with a new user account
Create a new user and see if it helps. To do this, open an elevated command prompt window, type the following, and hit Enter:
net user username /add
Here username is your new user name. You will see The command completed successfully message. Log into your new account and see if it has resolved your issue.
9] Uninstall Problematic Update
Windows allows you to uninstall the problematic Update and then hide it.
19] Other Suggestions
This post will help you if Windows 11/10 Start Menu Tile Database is corrupt. If Cortana or Taskbar search is not working, open Task Manager > File menu > Run new task. Type powershell and select the Create this task with administrative privileges checkbox and click OK. See this post if your Taskbar is not working in Windows 11/10.
Let us know if anything worked for you or if you have any suggestions to make for the benefit of others.
TIP: This post will help you if your WinX Menu is not working in Windows 11/10.
Nothing happens when I press the Start Button
Some keyboards come with a lock button that disables the Start button i.e. nothing will happen no matter how many times you press it. They are usually available on the gaming keyboard. So look for a button that has a lock icon on it, and press it once.
Related: Windows Start Menu does not close and remains frozen
I am not able to click on the apps on Start Menu
The easy way to fix this is using the Task Manager, which can restart the Windows File Explorer. Use Ctrl + Shift + Esc to launch Task Manager. Then locate the File Explorer, right-click on it and kill the process. It should relaunch the File Explorer. If not, Click on File > Run new Task > Type explorer.exe, and press the Enter key.
Windows 10 has come a long way since it was first launched in 2015. Each update brings a lot of new features, and Microsoft has embraced the open source community in a way that was once thought impossible.
Still, like with any operating system, there are bugs. And one of the more common bugs people running Windows 10 have faced is that the Start Menu suddenly stops working.
Sometimes the open Start Menu freezes up and is unresponsive, and other times it won’t open at all when you click the Start Menu button.
Whatever specific issue you’re having with the Windows 10 Start Menu, we’ll go over some quick and not so quick fixes in this article.
How to restart Windows Explorer
Windows Explorer, which is now called File Explorer, is the application you use to browse your file system and open programs and files. But it also controls things like the Start Menu, the taskbar, and other applications.
If you have an issue with the Start Menu, the first thing you can try to do is restart the “Windows Explorer” process in the Task Manager.
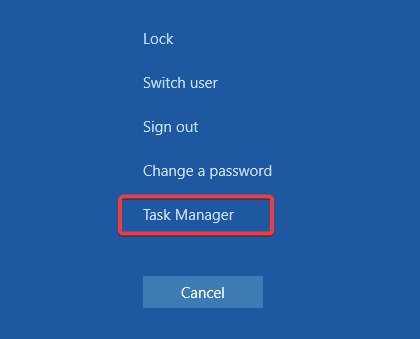
To open the Task Manager, press Ctrl + Alt + Delete, then click the “Task Manager” button.
Click “More details” to see a full list of open programs and background processes you’re running:
Scroll through the list until you find the “Windows Explorer” process. Then right click on “Windows Explorer” and select “Restart”:
There will be a brief flash while Windows restarts Windows Explorer/Finder, along with the taskbar and Start Menu.
After that, try to open the Start Menu. If it’s still not working normally, try one of the other fixes below.
How to repair corrupt or missing Windows system files
Sometimes an update goes awry, or you accidentally deleted an important file while digging around the filesystem.
If the Start Menu is still giving you trouble, or other core Windows apps are crashing, then you can try to restore any missing or corrupt Windows system files.
To do this, you’ll need to open the Windows Command Prompt as an administrator and run the System File Checker program.
Once you open Command Prompt as an administrator, run the command sfc /scannow:
System File Checker will start going through all your system files and replace any corrupt or missing files with a cached copy.
This process can take a little while, so feel free to do something else for 5-10 minutes. Just be careful not to close the window while sfc is doing its thing.
Once System File Checker is finished, you’ll either see a report of all the files it replaced, or if everything was fine, you’ll see a message like this:
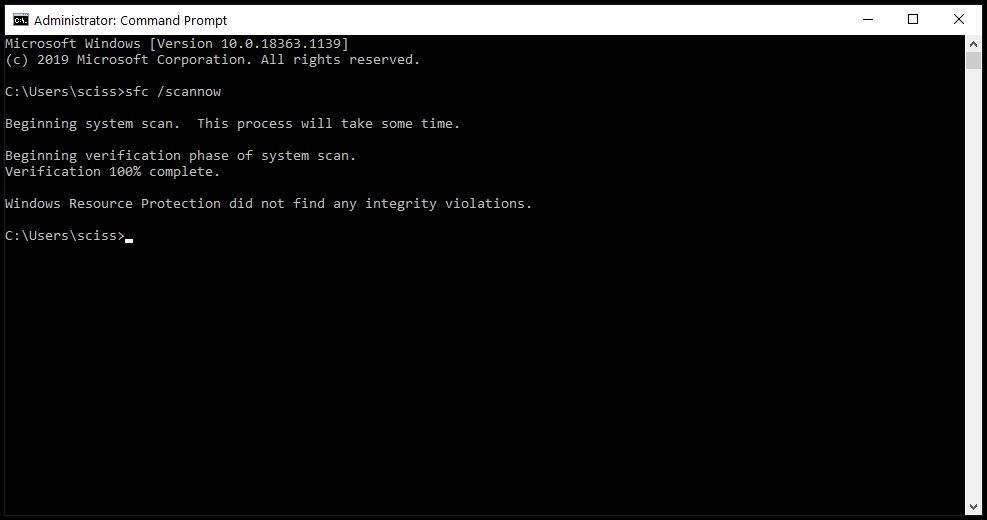
If System File Checker replaced any corrupt or missing system files, save all of your open work and restart your computer. Once you log back in, try to open the Start Menu to see if that fixed your issues.
Note: You could also use Powershell to run the sfc /scannow command, but remember that you’ll need to open an elevated Powershell terminal.
The next thing you can try is to reset the Start Menu entirely, along will all the Windows 10 apps that were preinstalled or installed from the Microsoft Store.
To do this, you’ll need to open PowerShell as an administrator – Command Prompt won’t work for the command you’ll run.
There are many ways to open PowerShell, but one of the fastest ways is to use the Run program.
Use the shortcut Windows Key + R to open the Run program, enter «powershell», then hold down «Ctrl + Shift» and click the «OK» button:
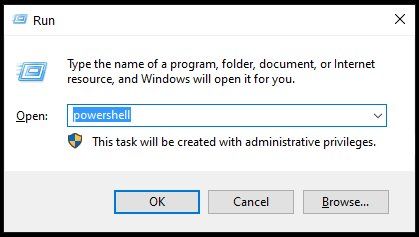
This should open up a PowerShell terminal with administrative privileges.
In the PowerShell terminal, run the following command:
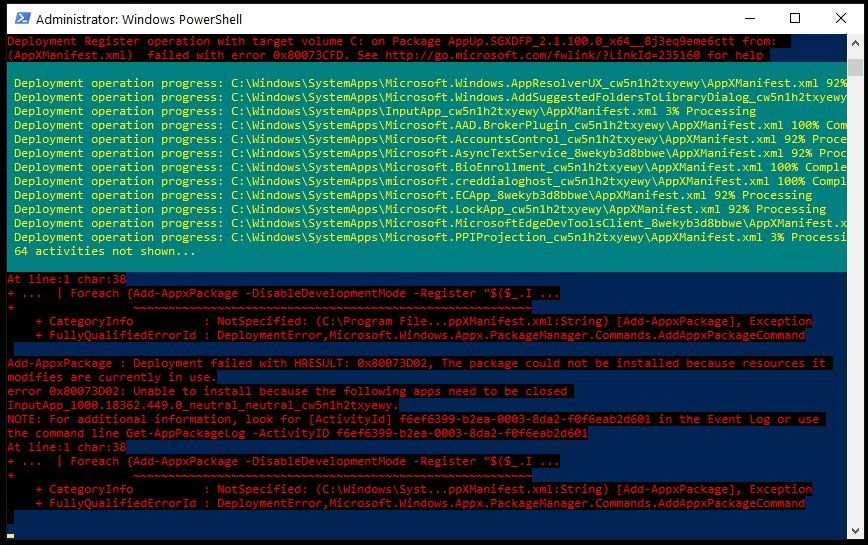
Get-AppXPackage -AllUsers | Foreach {Add-AppxPackage -DisableDevelopmentMode -Register "$($_.InstallLocation)AppXManifest.xml"}
The Get-AppXPackage command will attempt to reinstall all the default Windows apps, including the Start Menu and search bar.
It will also register a manifest file for each program it reinstalls. You don’t need to worry about the manifest files, though – it’s just something Windows needs to run each program.
Give it 5-10 minutes, and make sure you don’t close the PowerShell window until it’s finished.
Note: You may see some scary looking errors pop up as the Get-AppXPackage command is running. Don’t worry about them – most are just warnings about why a program can’t be reinstalled:
When the Get-AppXPackage command is finished, restart your computer, log in, and try to open the Start Menu.
How to reset your Windows 10 installation
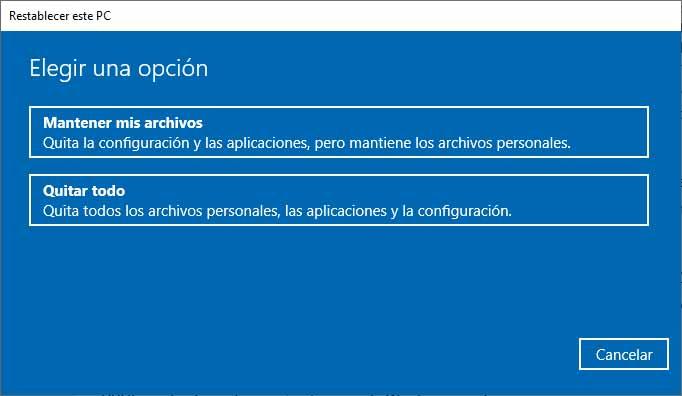
If none of the above methods fixed the Start Menu, the last thing you can try is to do a factory reset of your Windows 10 installation. But keep in mind that this is an «almost-scorched-earth» method, and should only be used as a last resort.
Resetting your Windows 10 installation should keep all of your personal files intact (documents, pictures, videos, and so on), but will uninstall all the other drivers and programs you’ve installed. Basically this resets your computer to the state it was in when you first turned it on.
Before going any further, make backups of all your important files using a flash drive, external HDD/SSD, and/or an online file host like Google Drive or Dropbox.
In fact, make two backups. You probably won’t need them, but it doesn’t hurt.
When you’ve finished backing up all your files, open a PowerShell terminal – use the shortcut Windows Key + R, enter «powershell», then click the «OK» button.
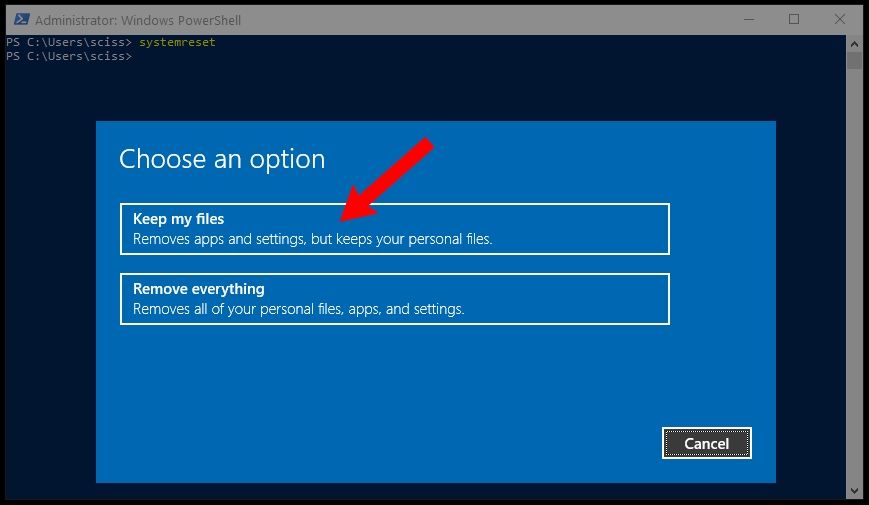
In the PowerShell terminal, run the command systemreset to bring up the Windows reset wizard.
Next, click the «Keep my files» button:
Wait a moment while the wizard analyzes your system. Then, you’ll see a list of all the programs that’ll be removed:
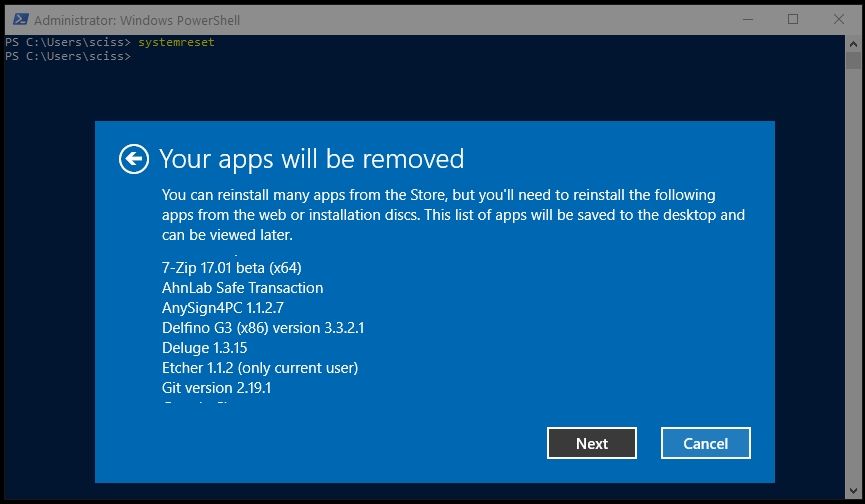
Click the «Next» button, and follow the instructions to reset your Windows 10 installation.
Once you’re finished resetting Windows and creating a new user, the Start Menu should be working again.
So those are all the ways to fix the Windows 10 Start Menu, listed from easiest to hardest.
Did any of these methods work for you? Is there another way to open the Start Menu that I missed? Let me know about it on Twitter.
Learn to code for free. freeCodeCamp’s open source curriculum has helped more than 40,000 people get jobs as developers. Get started
A Windows Explorer reboot is often the fastest solution
by Ivan Jenic
Passionate about all elements related to Windows and combined with his innate curiosity, Ivan has delved deep into understanding this operating system, with a specialization in drivers and… read more
Updated on August 27, 2022
Reviewed by
Vlad Turiceanu

Passionate about technology, Windows, and everything that has a power button, he spent most of his time developing new skills and learning more about the tech world. Coming… read more
- The Start button is one of the most recognizable UI components that has been with Windows since the very beginning.
- It is important to look for alternative ways to reboot your PC to get rid of the Start button error.
- The guide below will show you what to do when you encounter issues using the Start button.
XINSTALL BY CLICKING THE DOWNLOAD FILE
- Download Restoro PC Repair Tool that comes with Patented Technologies (patent available here).
- Click Start Scan to find Windows 10 issues that could be causing PC problems.
- Click Repair All to fix issues affecting your computer’s security and performance
- Restoro has been downloaded by 0 readers this month.
Your Start menu button not working can be a genuine concern, and we understand you may be panicking right now, but calm down, and we will show you all you need to know.
When Windows 8 was released, many people were disappointed by the lack of a Start Menu, an integral part of Windows. Windows 10 fixed that because it brought back the Start Menu.
Users worldwide were excited to see Start Menu back, but sadly, some users report that the Start button doesn’t work on Windows 10, so today, we’re going to explore this issue.
The reasons behind this problem vary. Sometimes, it is simple settings that have been misconfigured; other times, you may have had your computer compromised by malware.
Additionally, there are random times when a glitch in your Windows user profile may make the Start menu disappear.
Furthermore, corrupted computer files may trigger the error, and you should have the Start button restored by deleting them.
Whatever the case is, you do not have to consult a technician, as in a few clicks, you should be able to get the Start button back in Windows 10 and 11.
Start Menu is integral to Windows, but many users reported various issues. Speaking of issues, here are some common problems that users reported:
- Windows 10: Start Menu and Cortana not working
- Start Menu and Cortana are closely related, and if one of those features isn’t working, try installing the latest updates and check if that helps.
- Windows Start button not working on Windows 10, quit working on Windows 10
- Many users reported that the Start button stopped working on their Windows 10 PC.
- To fix this problem, you might have to use Powershell and re-register all preinstalled applications.
- Start Menu button is frozen, won’t open on Windows 10
- This is another common problem with Start Menu; a temporary glitch usually causes it.
- Sign out of your account and log back in to fix the problem.
- Start Menu crashing in Windows 10, missing in Windows 10
- According to users, sometimes Start Menu could be crashing or even missing on your PC.
- You might have to create a new user account and switch to it to fix the problem.
What to do if Start Menu and Taskbar are not working on Windows 10?
There are all sorts of issues that can occur with the Start Menu, and many reported an unresponsive Taskbar in Windows 10. However, a few users even reported that the whole Start Menu doesn’t work.
This can be a problem, but it can be fixed by restarting the Windows Explorer process.
In some rare instances, you might get a Critical error in Start Menu, and if this happens, it’s advised to repair your profile or installation.
Luckily for you, fixing these issues isn’t hard, and in today’s guide, we’ll show you how to do it.
What can I do when the Start button is not working in Windows 10?
1. Check for Windows updates
- Press Windows Key + I to open the Settings app.
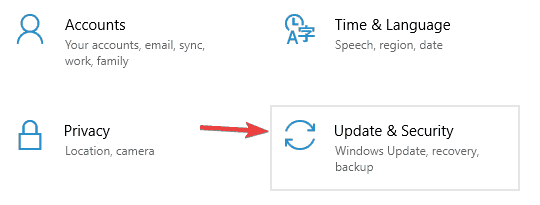
- Now go to the Update & Security section.

- In the right pane, click the Check for updates button.

Updates will be downloaded automatically in the background if any updates are available. Once your system is up to date, the issue should be resolved entirely, and your Start Menu should start working again.
Microsoft is aware of this issue, and if there is a fix available, it will be released via Windows Update; therefore, make sure that you keep your Windows 10 up to date, and if there are any updates available, download them.
Windows 10 usually downloads the missing updates automatically, but sometimes, issues can prevent updates from downloading. So a manual check, as mentioned above, is a valid option.
2. Use the PowerShell to fix this issue
- Press the Windows button, type Powershell, and click the Run as administrator option.

- Paste this into PowerShell:
Get-AppXPackage -AllUsers | Foreach {Add-AppxPackage -DisableDevelopmentMode -Register "$($_.InstallLocation)AppXManifest.xml"}
- Press Enter to execute it.
That would be all, and your Start button should be working now.
You can try this workaround if you don’t want to wait for the official patch. This isn’t a permanent solution, but it gets the job done and fixes the issue temporarily, so if the problem manifests itself again, you might need to repeat this process.
For the permanent solution, make sure that you check for the latest Windows 10 updates regularly.
3. Sign out of your account
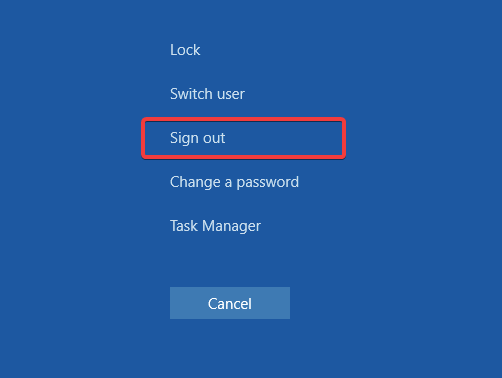
- Press Ctrl + Shift + Del.
- Now click the Sign out button.

- Wait for a few moments and sign back into your account.
After signing back in, check if the problem is still there.
Some PC issues are hard to tackle, especially when it comes to corrupted repositories or missing Windows files. If you are having troubles fixing an error, your system may be partially broken.
We recommend installing Restoro, a tool that will scan your machine and identify what the fault is.
Click here to download and start repairing.
Sometimes, the Start Menu button won’t work if there’s a glitch with your user account. But, according to users, the simplest way to fix this problem is to sign out of your account and log back in.
Since your Start Menu and Start button aren’t working, you’ll need to sign out using the steps we mentioned
4. Restart Windows Explorer
- Press Ctrl + Shift + Del to open Task Manager.

- Locate Windows Explorer on the list.
- Right-click it and choose Restart from the menu.


Once Windows Explorer restarts, the issue should be gone, and your Start Menu will start working again. Remember that this is a temporary solution, so you’ll have to repeat it once the problem reappears.
Many users reported that you could fix the problem with the Start Menu button simply by restarting Windows Explorer.
The Start Menu is a part of Windows Explorer, and by restarting Windows Explorer, you’ll force Start Menu to restart as well.
5. Use Command Prompt
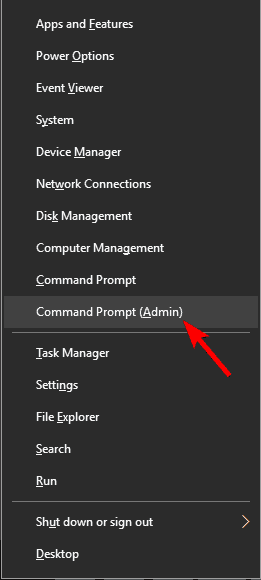
- Press Windows Key + X and choose Command Prompt (Admin) from the menu.

- When Command Prompt starts, run the command below and hit Enter.
CD/d "%LOCALAPPDATA%PackagesMicrosoft.Windows.Cortana_cw5n1h2txyewy" - Next, type the following two commands and hit Enter after each one.
Taskkill /F /IM SearchUI.exeRD /S /Q Settings
After the commands execute, the damaged files will be rebuilt, and you should be able to use Start Menu again without issues.
Sometimes problems with the Start Menu button can be caused by specific Cortana files. According to users, you can fix this problem simply by deleting these files from the Command Prompt.
These are just some temporary files; your PC will recreate them, so there’s no need to worry.
- Windows 10/11 taskbar not working / responding
- Windows 11’s Start menu is not working? Here’s what to do
- PC Not Detecting GPU: These 5 Methods Will Surely Help
- Windows 10 Won’t Boot on My PC: 5 Simple Solutions
- Windows 10 Brightness Slider not Working: 6 Fixes to Use
- WHEA Internal Error: Fix it Using These 9 Quick Methods
6. Modify your registry
- Press Windows Key + R and enter regedit. Press Enter or click OK.

- In the left pane, navigate to this key:
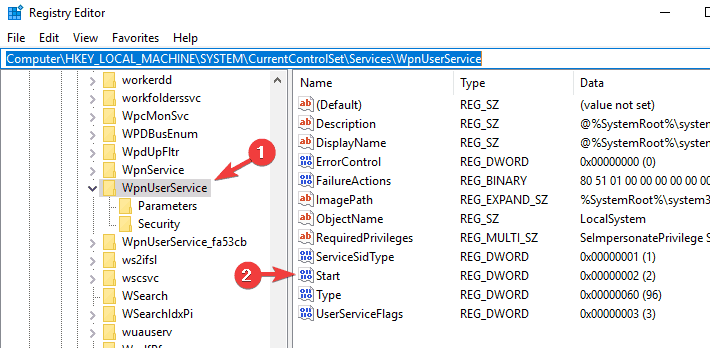
HKEY_LOCAL_MACHINESYSTEMCurrentControlSetServicesWpnUserService
- In the right pane, double-click Start DWORD, set Value data to 4, and click OK.


After making these changes, restart your PC and check if the problem is resolved.
Occasionally, issues with the Start Menu button can occur due to Dropbox. Note that Dropbox can sometimes interfere with Windows processes, leading to this and many other problems.
However, you should be able to fix this problem by making a few changes to your registry.
7. Create new values in your registry
- Start Registry Editor.
- In the left pane, navigate to this key:
HKEY_CURRENT_USERSoftwareMicrosoftWindowsCurrentVersionExplorerAdvanced
- In the right pane, right-click the empty space and choose New > DWORD (32-bit) value.

- Enter EnableXamlStartMenu as the name of the new DWORD.

After doing that, close Registry Editor and restart Windows Explorer from the Task Manager. Once the Explorer restarts, your Start Menu should be working again.
The problem might be related to your registry if you’re having issues with the Start Menu button. According to users, they managed to fix this problem simply by creating new value in their registry.
8. Enter Safe Mode
- Open the Settings app and go to the Update & Security section.
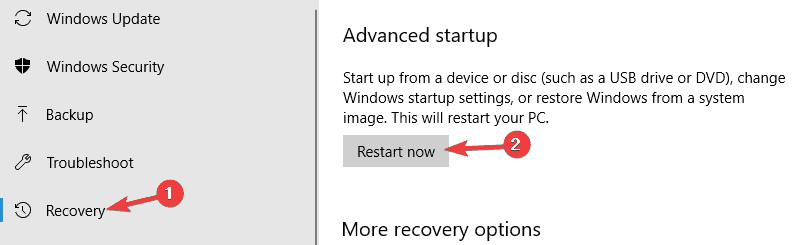
- From the menu on the left, choose Recovery.
- In the right pane, click Restart now button in the Advanced startup section.

- A list of options will appear. Choose Troubleshoot > Advanced options > Startup Settings. Click the Restart button.
- Once your PC restarts, select any version of Safe Mode by pressing the appropriate key.
Once you enter Safe Mode, check if everything is working. If so, restart your PC, boot back to your account, and check if the issue is resolved.
According to users, you might be able to solve this problem simply by entering Safe Mode. This is quite simple to do, following the above steps.
9. Create a new user account
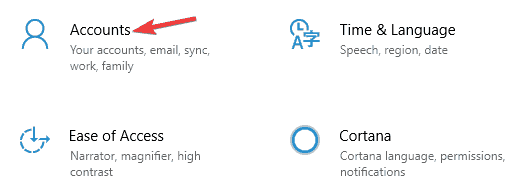
- Open the Settings app and go to the Accounts section.

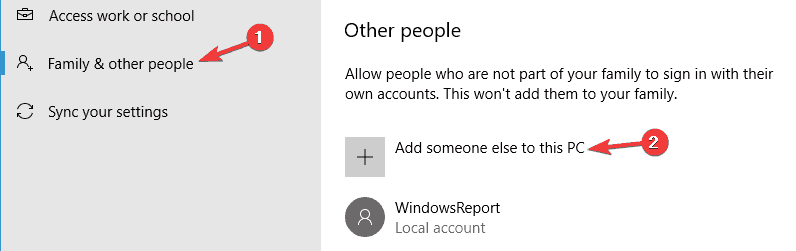
- Navigate to Family & other people in the left pane. In the right pane, click Add someone else to this PC.

- Choose I don’t have this person’s sign-in information, then Add a user without a Microsoft account.
- Enter the desired user name and click Next.


After creating a new user account, switch to it, and check if that solves your problem.
If the problem doesn’t appear on the new account, you’ll need to move your files to the new account and check if that solves your problem.
We believe you must have repaired the start menu button not working issue by now. Note that these solutions are not written in any particular order, and we recommend starting with whatever solution looks most appropriate to your situation.
If you have any comments, suggestions, or maybe some other solutions for this problem, write them down in the comments section.
![]()
Newsletter
Обновлено 05.08.2021
Всем привет! Сегодня хочу рассказать, как решается проблема, когда не открывается меню пуск в Windows 10. Не успели мы установить Windows 10 и победили постоянную перезагрузку Windows 10, как появилась новая напасть с кнопкой пуск. Вообще удручает тот факт, что Microsoft не учится на своих ошибках, при выпусках свежих операционных систем, такое ощущение, что на пользователей ей просто по барабану, но будем надеяться, что они одумаются и сделают разворот на 180 градусов в нашу сторону.
Причины поломки кнопки пуск в Windows 10
Если описать основные причины из-за которых у вас не будет открываться кнопка пуск в вашей Windows 10, то это повреждение файловой системы, в следствии чего у вас повредятся встроенные компоненты и второе это отсутствие прав на те или иные элементы:
- У вас завис процесс explorer.exe
- У вас завис процесс Microsoft.Windows.ShellExperienceHost
- Повреждены компоненты Microsoft.Windows.ShellExperienceHost
- Отсутствуют права на папки и ветки реестра отвечающие за работу кнопки пуск
- Поврежден профиль пользователя
- Отсутствие прав на контейнер {316CDED5-E4AE-4B15-9113-7055D84DCC97}
1 Способ Перезапуск explorer.exe
Первый способ, которые иногда помогает — простой перезапуск процесса explorer.exe на компьютере. Чтобы проделать это, сначала нажмите клавиши Ctrl+Shift+Esc чтобы открыть диспетчер задач, а затем нажмите кнопку «Подробнее» внизу (при условии, что она там есть). На вкладке «Процессы» найдите процесс «Проводник» (Windows Explorer), кликните по нему правой кнопкой мыши и нажмите «Перезапустить» или можете запомнить крутую комбинацию клавиш CRTL+Shift+ESC, которая тоже откроет Диспетчер задач
Не открывается меню пуск в Windows 10-02
Возможно, после перезапуска меню Пуск заработает. Но срабатывает это далеко не всегда (только в тех случаях, когда особой проблемы на самом деле нет).
2 Способ перезапуск процесса Microsoft.Windows.ShellExperienceHost
Хочу отметить, что данный процесс Microsoft.Windows.StartMenuExperienceHost появился в версии Windows 10 1903 и выше, поэтому не удивляйтесь, если вы его не обнаружите у себя в диспетчере задач. В диспетчере задач вы его можете увидеть в двух вкладках:
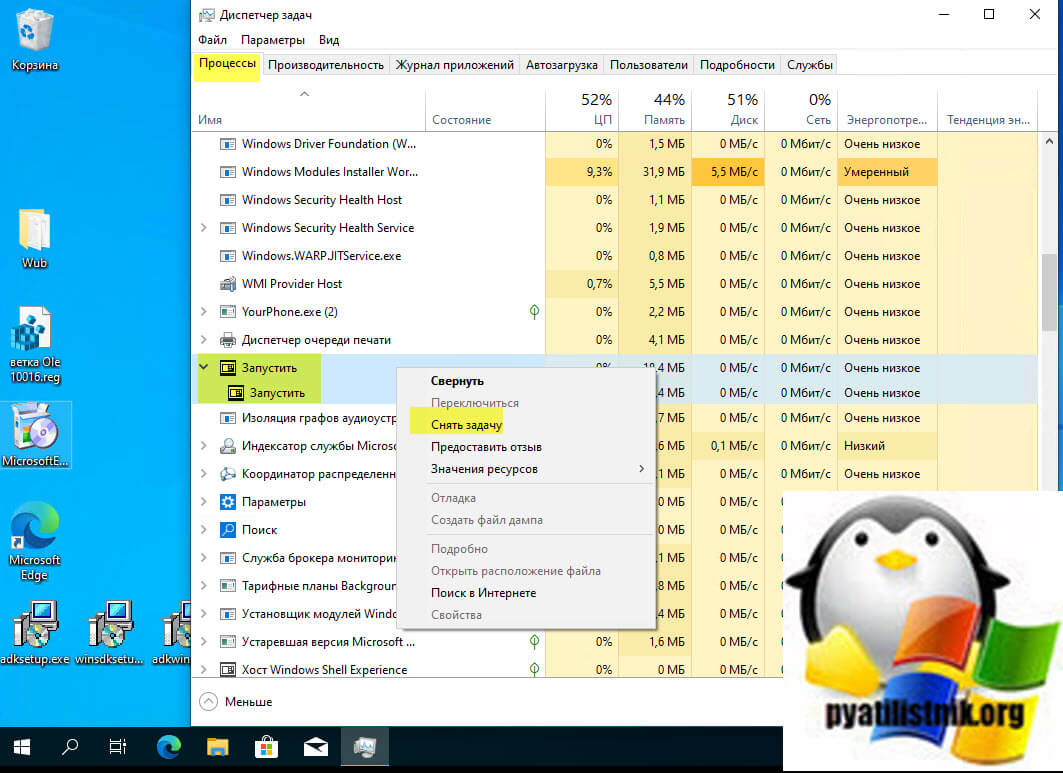
- Во первых вы можете на вкладке «Процессы» найти процесс «Запустить (Start)«, через правый клик вызовите контекстное меню и выберите пункт «Снять задачу». После этого процесс отвечающий за работу кнопки пуск, будет пере запущен и все должно заработать.
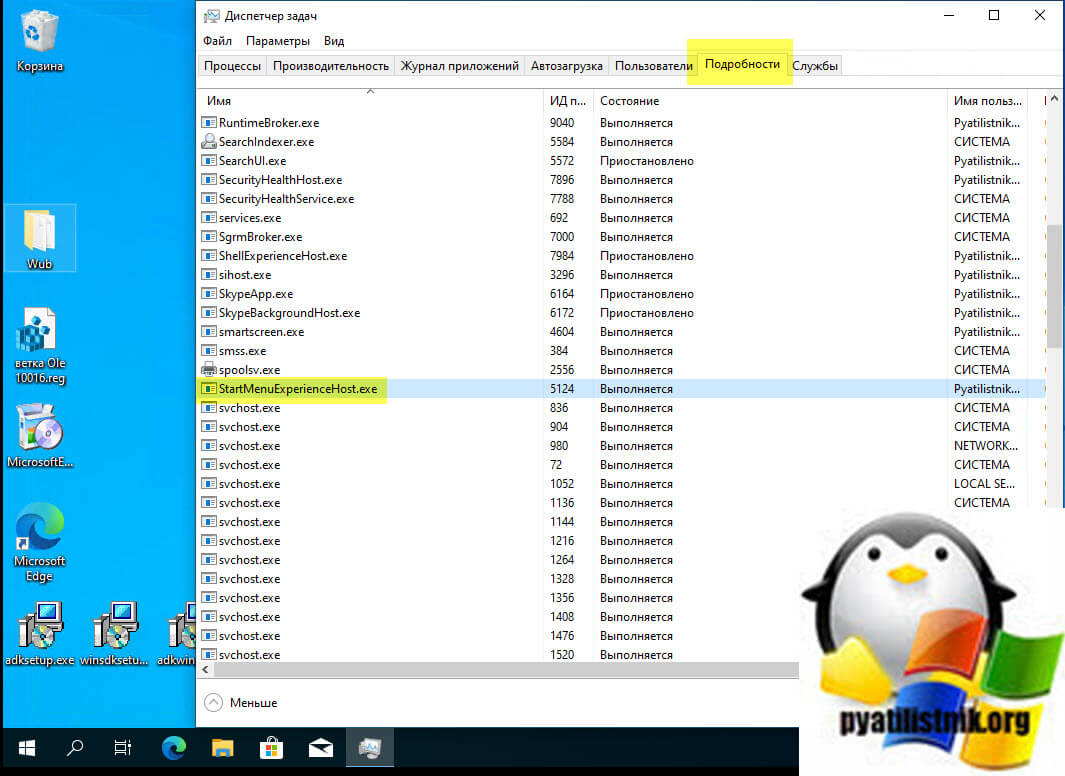
- Второй вариант, это зайти на вкладку «Подробности», где найдите имя процесса «StartMenuExperienceHost.exe«, так же снимите с него задачу. Система ее сама перезапустит, после чего проверьте, как открывается меню пуск.
3 Способ исправить когда не открывается меню пуск в Windows 10 это Power Shell
Во втором способе будем использовать PowerShell. Поскольку Пуск и, вероятно, поиск у нас не работают, для того, чтобы запустить Windows PowerShell, зайдите в папку Windows System32 WindowsPowerShell v1.0. В этой папке найдите файл powershell.exe, кликните по нему правой кнопкой мыши и выберите запуск от имени Администратора.

Не открывается меню пуск в Windows 10-03
Примечание: еще один способ запустить Windows PowerShell от имени Администратора — кликнуть правой кнопкой мыши по кнопке «Пуск», выбрать «Командная строка (администратор)», а в командной строке набрать «powershell»
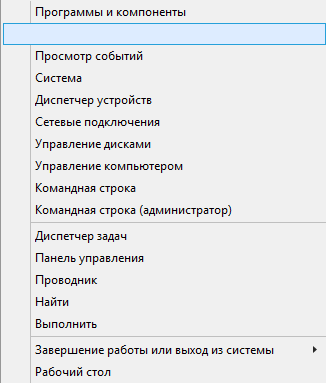
Не открывается меню пуск в Windows 10-05
(при этом отдельное окно не откроется, команды можно вводить прямо в командной строке). После этого, запустите следующую команду в PowerShell:
Get-AppXPackage -AllUsers | Foreach {Add-AppxPackage -DisableDevelopmentMode -Register “$($_.InstallLocation)AppXManifest.xml”}

Не открывается меню пуск в Windows 10-04
По завершении ее выполнения, проверьте, получается ли открыть меню Пуск теперь. Данный метод помогает в 10% случаев, возможно и вам повезет, но если у вас по прежнему не открывается меню пуск, то идем к другим алгоритмам действия.
Еще один способ создание нового пользователя.
Если ничто из описанного выше не помогло и не открывается меню пуск, то вы можете также попробовать создать нового пользователя Windows 10, через панель управления (Win+R, затем ввести Control, чтобы попасть в нее) или командную строку (net user Имя_пользователя /add).
Не открывается меню пуск в Windows 10-06
Не открывается меню пуск в Windows 10-07
Обычно, для вновь созданного пользователя меню пуск, настройки и рабочий стол работают как положено. Если вы использовали этот способ, то в дальнейшем вы можете перенести файлы предыдущего пользователя в новую учетную запись и удалить «старый» аккаунт.
4 Способ удалить Dropbox
Еще одним фактором, который признал Microsoft это стала программа Dropbox, облачный клиент, который каким то образом блокирует какие то файлы в Windows 10, если вы его удалите то у вас пуск будет нормально открываться. DropBox пока не прокомментировала это.
Не открывается пуск в Windows 10 из-за отсутствия прав на контейнер
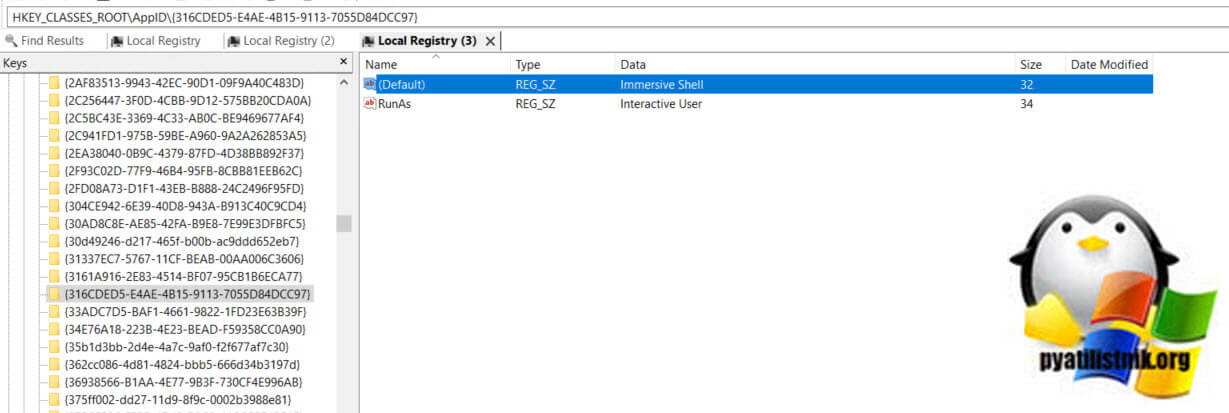
В огромном количестве случаев бывает так, что причиной по которой вас не открывается и вообще ни как не реагирует меню псу, это отсутствие прав на компонент {316CDED5-E4AE-4B15-9113-7055D84DCC97}. Ранее мы уже встречались с вами с компонентом {316CDED5-E4AE-4B15-9113-7055D84DCC97}, когда устраняли ошибку ID 10016. Просто если кто не в курсе, то Windows видит все функции, компоненты в виде GUID номеров, и вот панель «Пуск» имеет вид {316CDED5-E4AE-4B15-9113-7055D84DCC97}, тут нет ничего сложного. Если посмотреть реестр Windows, то вы обнаружите запись:
HKEY_CLASSES_ROOTWOW6432NodeAppID{316CDED5-E4AE-4B15-9113-7055D84DCC97}
Immersive Shell — это и есть интерфейс Metro в Windows. Понимая это нужно удостовериться, есть ли у вас права на его использование или нет.
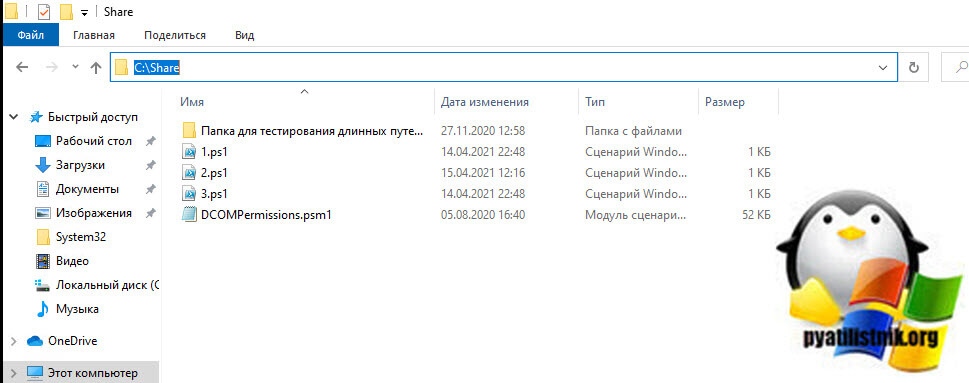
Для этого я использую скрипт DCOMPermissions.psm1.
Поместите его в доступную папку, у меня это будет C:Share.
Далее я вам советую запустить оболочку PowerShell ISE в режиме администратора, она находится по пути:
C:WindowsSystem32WindowsPowerShellv1.0
Щелкаем по значку powershell_ise.exe правым кликом и выбираем пункт «Запуск от имени администратора».
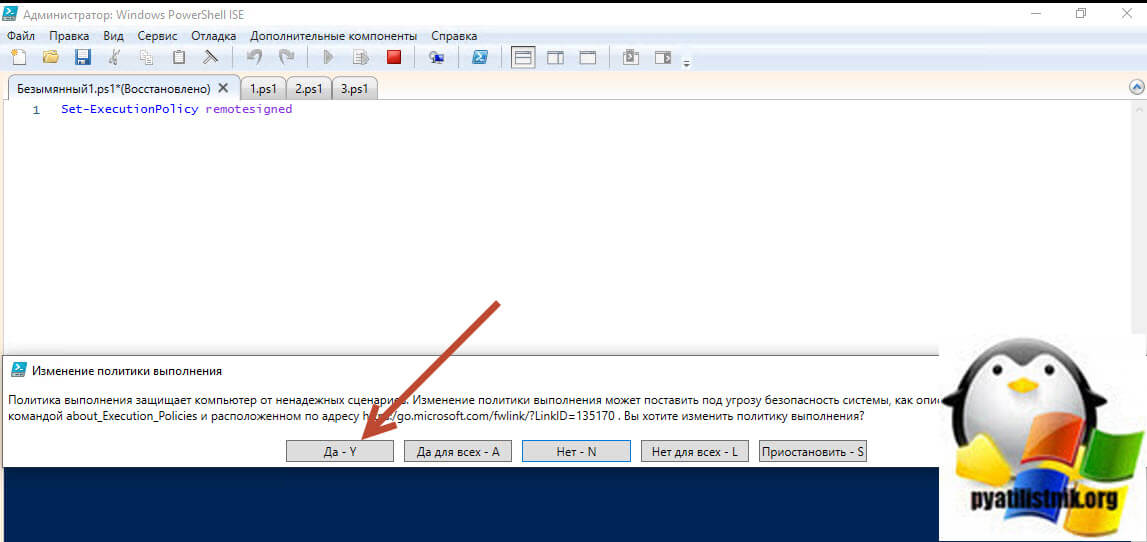
выполните команду, которая позволит запускать неподписанные скрипты:
Выберите пункт «Y».
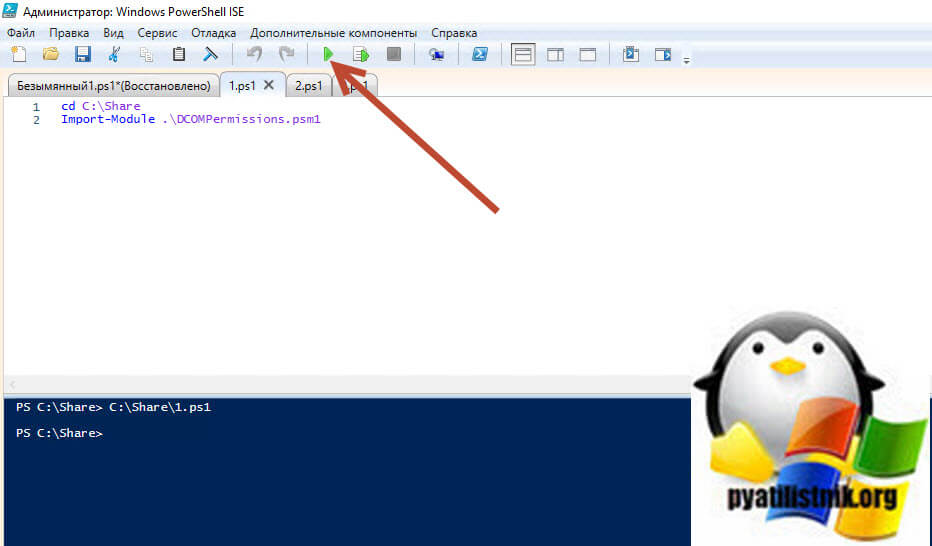
Далее переходим в нашу папку, где лежит скрипт и импортируем данный модуль.
cd C:Share
Import-Module .DCOMPermissions.psm1
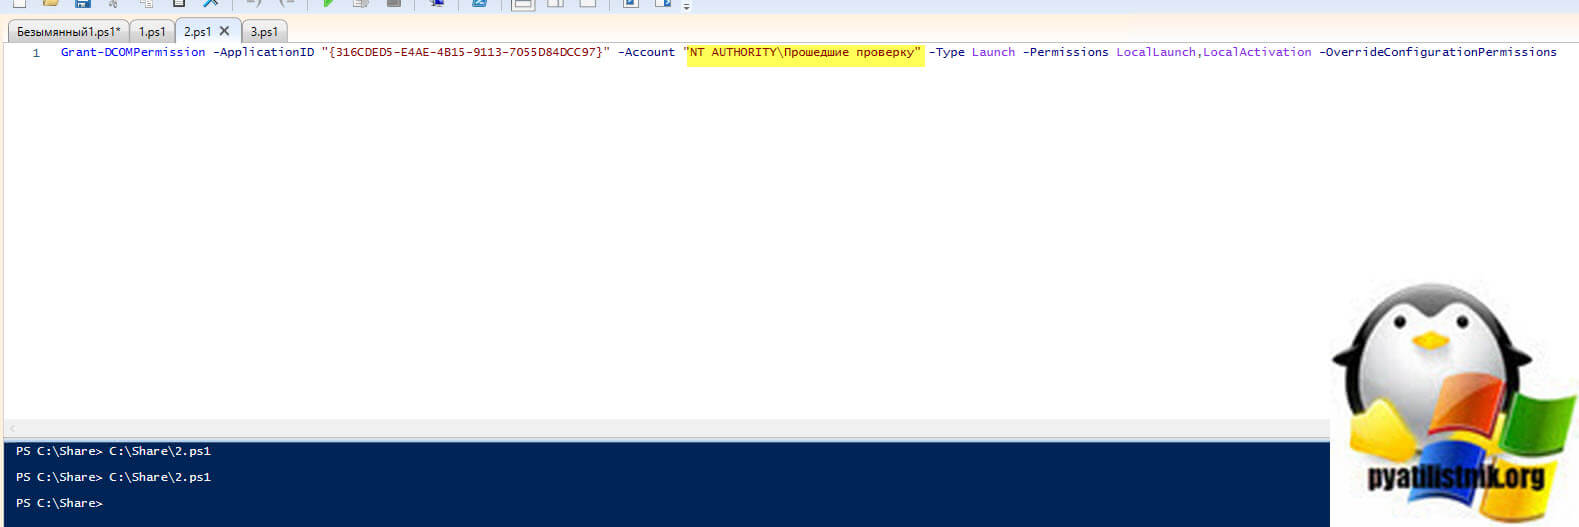
Далее даем права для группы «NT AUTHORITYПрошедшие проверку»
Grant-DCOMPermission -ApplicationID «{316CDED5-E4AE-4B15-9113-7055D84DCC97}» -Account «NT AUTHORITYПрошедшие проверку» -Type Launch -Permissions LocalLaunch,LocalActivation -OverrideConfigurationPermissions
Далее проверим, что на контейнер {316CDED5-E4AE-4B15-9113-7055D84DCC97} на значились наши права, для этого выполните:
Get-DCOMPermission -ApplicationID «{316CDED5-E4AE-4B15-9113-7055D84DCC97}» -Type Launch
Очистка веток реестра от мусорных записей, когда не открывается пуск
Одной из причин, по которой у вас может не работать и не открываться кнопка пуск в Windows 10, это проблема с реестром. Есть некоторые ветки реестра, которые со временем накапливают огромное количество записей, которые по сути уже не нужны системе, например этим грешит брандмауэр Windows. Так же в логах Windows вы можете наблюдать ошибку:
Сбой CreateAppContainerProfile для AppContainer Microsoft.Windows.Cortana_cw5n1h2txyewy из-за ошибки 0x800705AA

Вот вам пример нормального содержимого, количество записей свыше 7000

А вот пример, где количество записей превышает свыше 250 00 и это не нормально, и может спокойно ломать кнопку пуск.
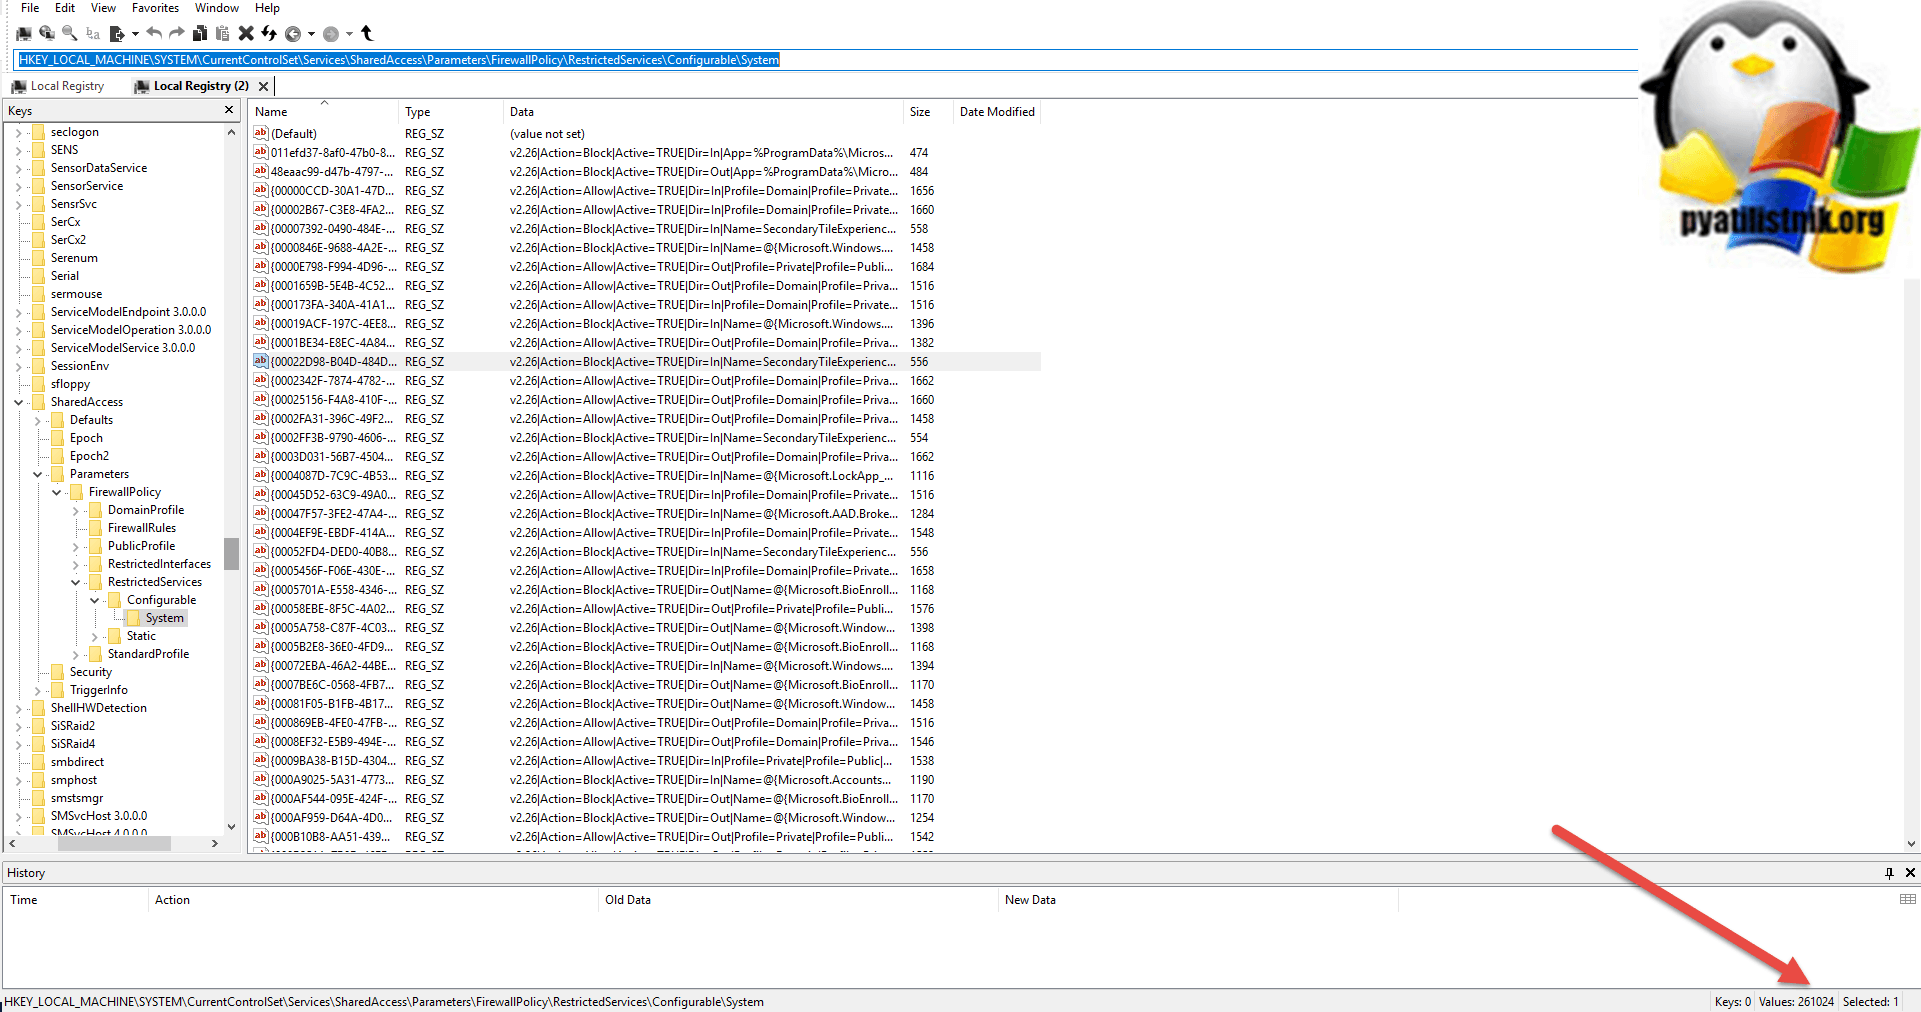
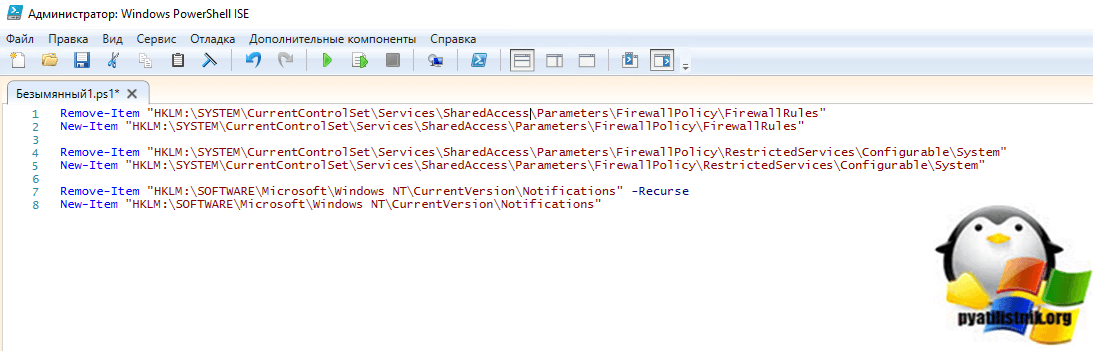
Чтобы это исправить вам необходимо произвести чистку реестра, именно конкретных веток. Ниже я приведу команды в PowerShell, которые помогут полностью удалить ветку и воссоздать ее. PowerShell нужно запускать в режиме администратора.
Remove-Item «HKLM:SYSTEMCurrentControlSetServicesSharedAccess ParametersFirewallPolicyFirewallRules»
New-Item «HKLM:SYSTEMCurrentControlSetServicesSharedAccess ParametersFirewallPolicyFirewallRules»
Remove-Item «HKLM:SYSTEMCurrentControlSetServicesSharedAccess ParametersFirewallPolicyRestrictedServicesConfigurableSystem»
New-Item «HKLM:SYSTEMCurrentControlSetServicesSharedAccess ParametersFirewallPolicyRestrictedServicesConfigurableSystem»
Remove-Item «HKLM:SOFTWAREMicrosoftWindows NTCurrentVersion Notifications» -Recurse
New-Item «HKLM:SOFTWAREMicrosoftWindows NT CurrentVersionNotifications»
не забываем потом перезагрузить сервер.
Как видим NT AUTHORITYПрошедшие проверку есть в списке, по идее кнопка пуск у вас сразу должна заработать, но если не заработает, то нужно перезагрузиться или сделать выход из системы (logoff). Вот так решается ошибка когда не открывается меню пуск в Windows 10.Материал сайта pyatilistnik.org
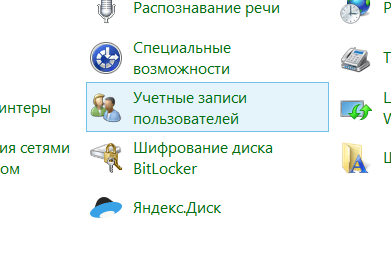
Чтобы открыть меню «Пуск», просто нажмите значок Windows, показанный в левой части панели задач системы, или нажмите клавишу с иконкой Windows на нашей клавиатуре. Однако существует множество причин, по которым мы можем обнаружить, что меню «Пуск» не открывается или даже значок Windows кнопки меню не отображается
Содержание
- Что делать, если меню «Пуск» не открывается в Windows 10
- Показать скрытую панель задач
- Перезагрузить систему
- Перезагрузка Windows Explorer
- Поиск обновлений
- Создать новую учетную запись локального администратора
- Перезагрузить компьютер
Далее мы покажем некоторые рекомендации, которым необходимо следовать в случае возникновения проблем с меню «Пуск», оно не отображается или после нажатия на кнопку не открывается и не позволяет нам получить доступ к его параметрам.
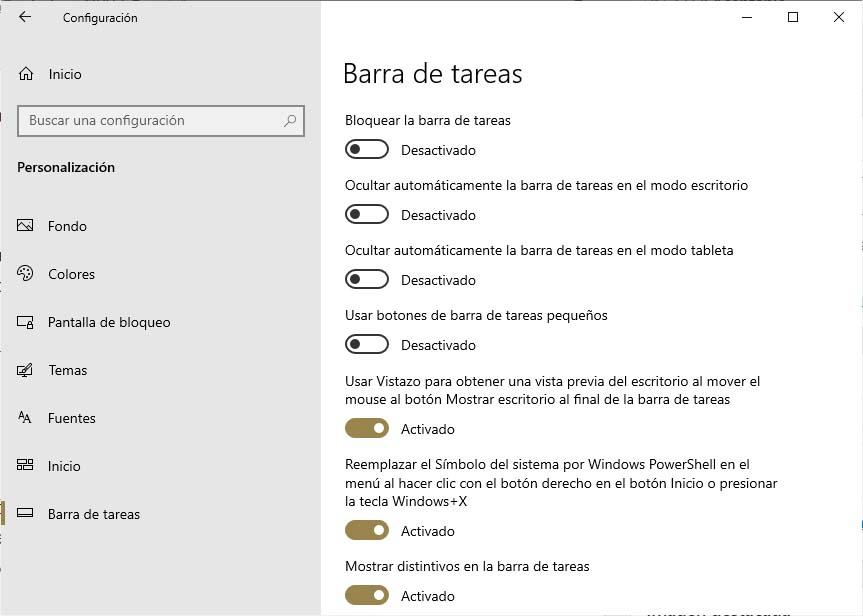
Показать скрытую панель задач
Если кнопка «Пуск» не появляется на панели задач, вероятно, сама панель скрыта или мы скрыли ее, не осознавая этого. В этом случае, чтобы показать панель, мы должны выполнить следующие шаги:
- Открываем Windows 10 Конфигурация страница, Win + I.
- Мы идем к Персонализация> Панель задач вариант .
- Сдвигаем переключатель для Блокировка панели задач вариант для On позиции.
- Мы делаем то же самое, но перемещаемся в положение Off в опции Автоматически скрывать панель задач в рабочем режиме.
- Мы также отключили опцию Автоматически скрывать панель задач в режиме планшета.
Перезагрузить систему
Возможно, это то, что в первую очередь приходит на ум многим в момент возникновения проблемы в команде. Перезапуск системы может решить определенные специфические проблемы с помощью этого простого жеста, поэтому никогда не повредит попытаться перезагрузить компьютер, чтобы увидеть, решаются ли наши проблемы с помощью меню «Пуск» Windows 10 перед выполнением других процессов.
Перезагрузка Windows Explorer
Если это не решит нашу проблему, то следующее, что мы можем сделать, это перезапустить браузер, чтобы посмотреть, решит ли это нашу проблему с меню «Пуск» Windows 10. Сделать это:
- Мы открываем Диспетчер задач , Ctrl+Shift+Esc.
- Нажмите на Подробнее если полный экран не отображается.
- Мы выбираем Процессы меню.
- Мы ищем для проводника Windows .
- Мы выбираем его и нажимаем на Перезагрузка кнопка, которая появляется в правом нижнем углу окна администратора.
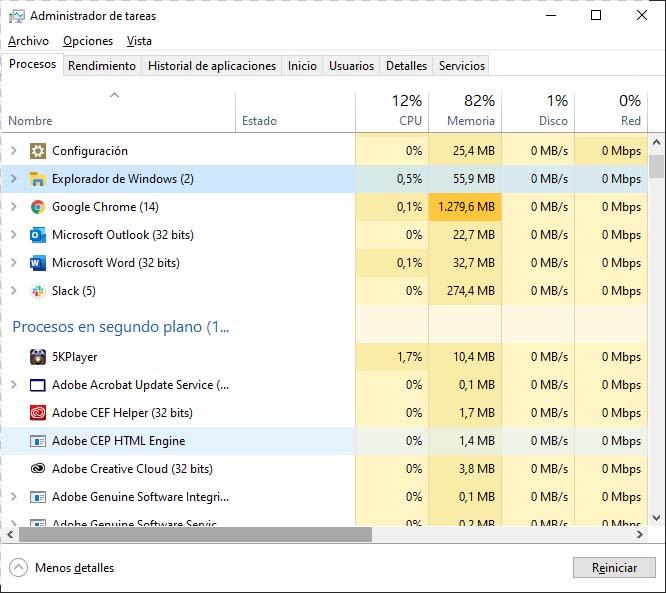
Процесс перезапуска браузера может занять несколько минут, поэтому панель задач и меню «Пуск» могут не отображаться в течение этого времени. Когда процесс завершится, мы уже можем проверить, решены ли наши проблемы с меню «Пуск» в Windows 10.
Поиск обновлений
Другая рекомендация или совет, чтобы попытаться решить проблему, это проверить, есть ли ожидающие обновления для установки в системе. Для этого:
- Открываем систему конфигурация страница, Win + I.
- Мы идем к варианту Обновление и безопасность> Центр обновления Windows.
- Нажмите на опцию Проверьте наличие обновлений.
- Мы устанавливаем все, что ожидает.

После установки может потребоваться перезагрузить систему, чтобы изменения вступили в силу. В этом случае после перезагрузки компьютера мы уже можем проверить, была ли устранена проблема с меню «Пуск» в Windows 10.
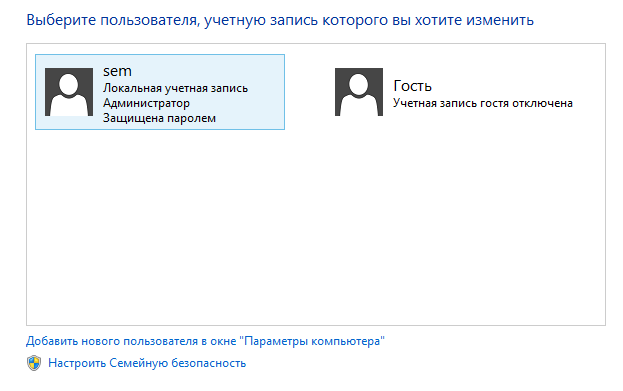
Создать новую учетную запись локального администратора
Если мы продолжим работу, не решая проблемы с меню «Пуск», мы можем попытаться создать новую учетную запись локального администратора. Теперь, если мы вошли в нашу учетную запись Microsoft, нам сначала нужно будет удалить ссылку на эту учетную запись из конфигурация страница > Учетные записи> Ваша информация > Вместо этого войдите в систему с локальной учетной записью.
Мы сможем увидеть эту опцию, только если будем использовать учетную запись Microsoft, хотя также возможно, что мы не увидим ее, если наш ПК подключен к сети.
Далее мы пишем пароль нашей учетной записи Microsoft и нажимаем Далее, мы выбираем имя нашей новой учетной записи и пароль и нажимаем на Завершить и закрыть сеанс .
Как только это будет сделано, мы готовы создать новую учетную запись локального администратора:
- Заходим на страницу конфигурации Win + I.
- Мы идем в Аккаунты> Семьи и другие люди вариант .
- Нажимаем на Добавить еще одного человека на этот компьютер.
- Мы выбираем имя пользователя и пароль и нажимаем Далее .
- Нажимаем Завершить .
Теперь мы конвертируем эту учетную запись в учетную запись администратора:
- В рамках Family и других мы выбираем только что созданную учетную запись.
- Мы выбираем вариант Изменить тип аккаунта.
- В типе счета мы выбираем Администратор .
- Нажмите на Принять в конце.
Наконец, мы закрываем текущий сеанс и входим в систему с новой учетной записью и проверяем, решены ли проблемы с меню «Пуск» Windows 10. В этом случае нам остается только перенести все наши личные файлы в новую учетную запись.
Если проблема все еще сохраняется, мы можем попытаться удалить предыдущую учетную запись администратора:
- У других пользователей мы выбираем предыдущую учетную запись администратора.
- Нажмите на Удалить> Удалить учетную запись и данные.
- Перезагружаем компьютер и авторизируемся с новой учетной записью.
Перезагрузить компьютер
Если мы доберемся до этого варианта, то это потому, что все предыдущие не помогли нам решить проблему. В этом случае, если мы хотим сбросить оборудование, это то, что мы должны сделать:
- Открываем страницу конфигурации Win + I.
- Переходим к варианту Обновление и безопасность> Восстановление.
- В разделе Сброс PC вариант, выбираем Начать .
- Мы выбираем, хотим ли мы сохранять файлы и приложения предустановленными, или же мы предпочитаем удалять все и ждать завершения процесса.
Если мы не можем открыть страницу конфигурации системы, также можно перезагрузить компьютер с экрана входа в систему:
- Нажмите Win + L, чтобы перейти к экрану входа.
- Мы выбираем вариант Пуск / Завершение работы> Перезагрузка удерживая нажатой клавишу Shift.
- Мы войдем в среду восстановления Windows (WinRE).
- Мы выбрали Устранение неполадок> Сбросить этот компьютер вариант .
- Мы ждем завершения процесса.