Applies to Windows 10 Home and Windows 10 Professional.
-
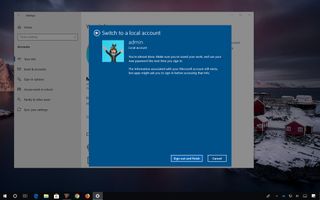
Save all your work.
-
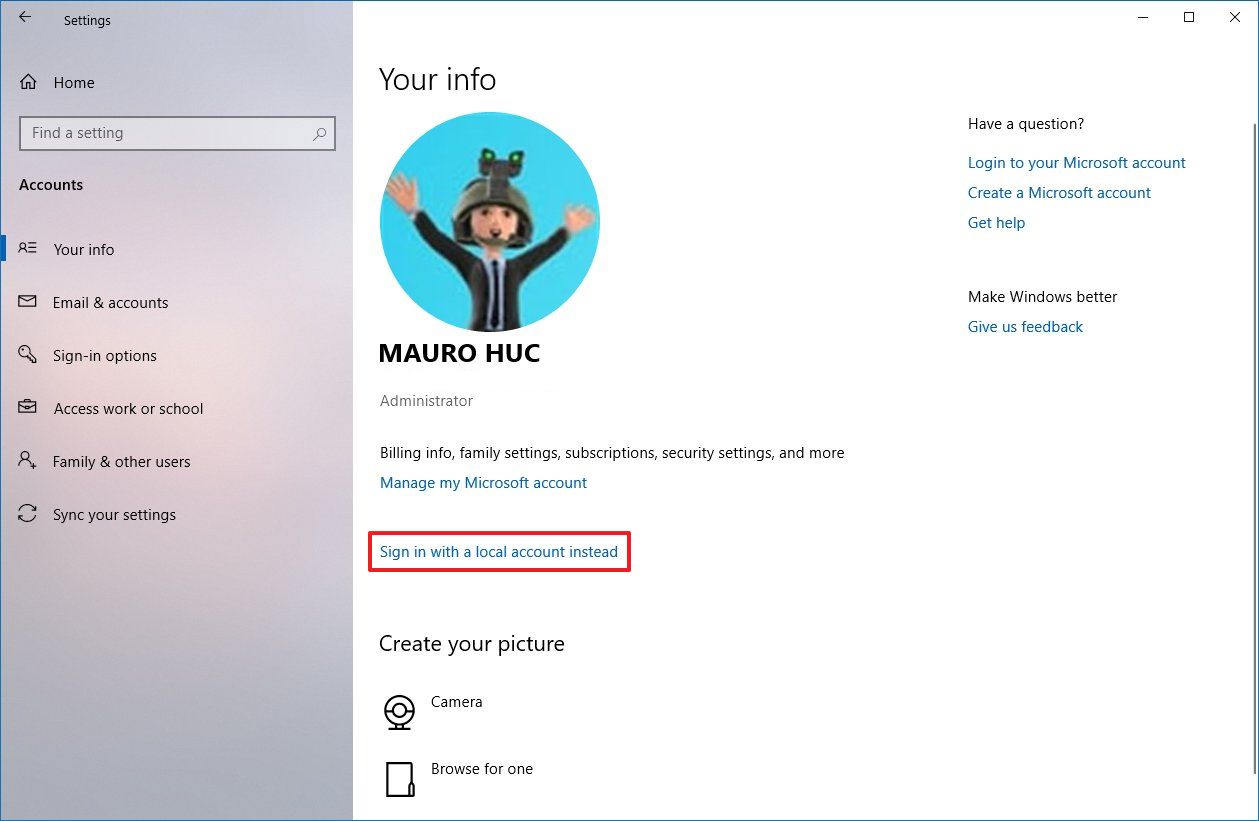
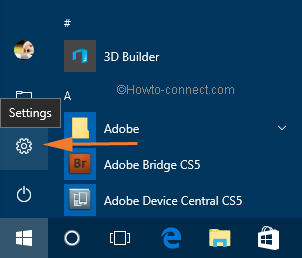
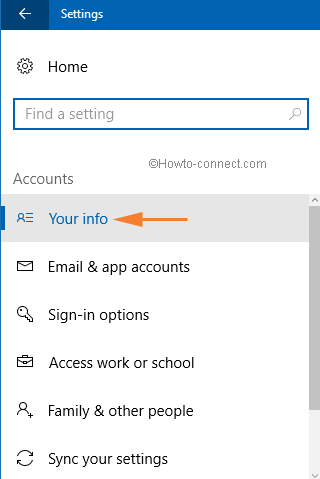
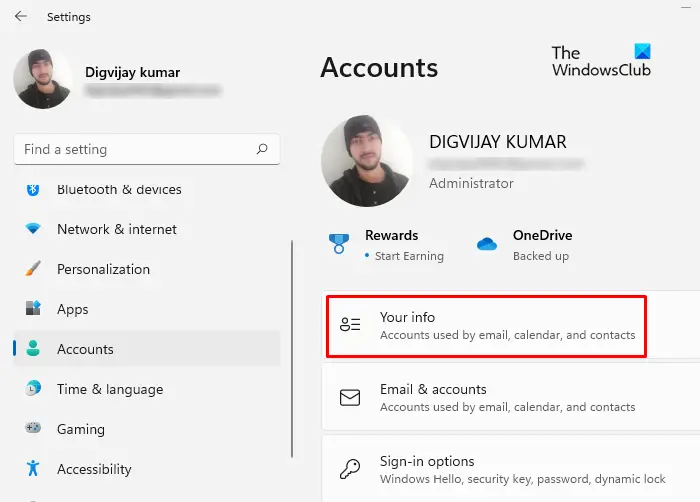
In Start , select Settings > Accounts > Your info.
-
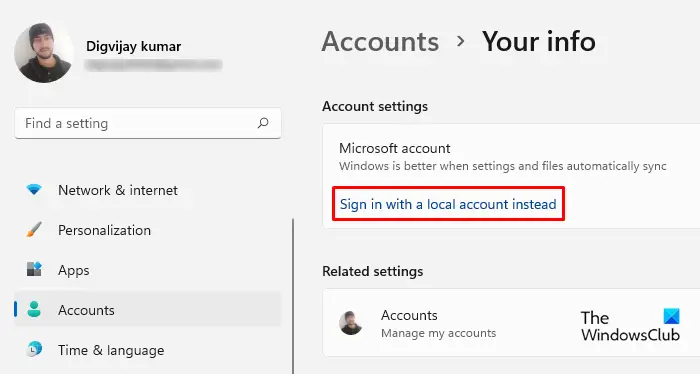
Select Sign in with a local account instead.
-
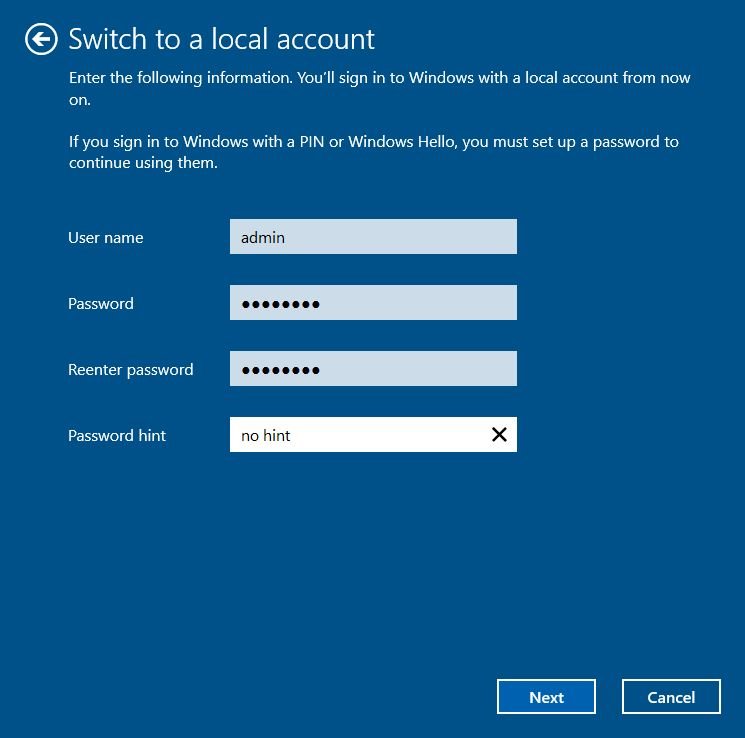
Type the user name, password, and password hint for your new account. The user name must be different than any others on the device. Note: If you’re using Windows 10, version 1803, you can add security questions—instead of a hint—to your local account to help you reset your password in case you forget it. Check your version of Windows 10
-
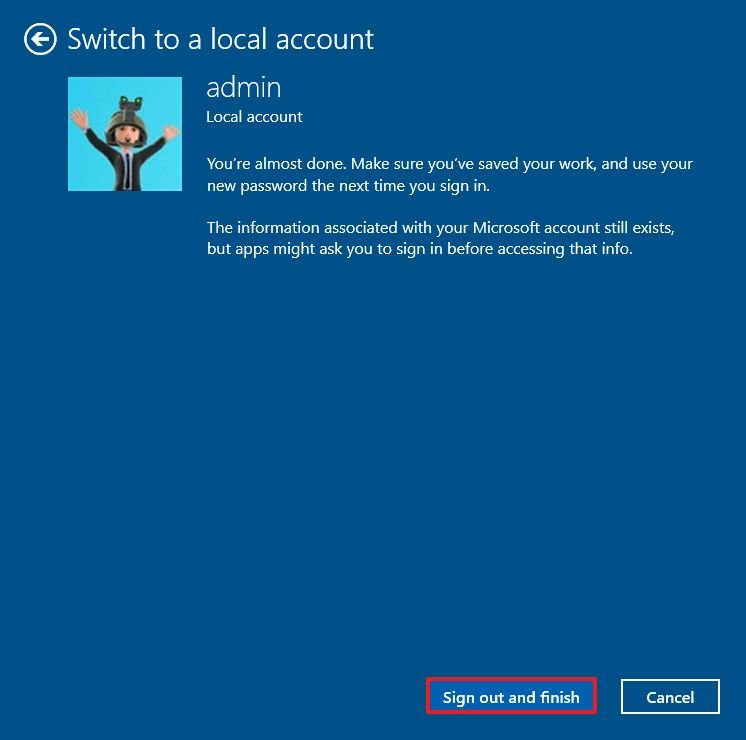
Select Next,then select Sign out and finish. Sign back in with your new local account.
-
If you didn’t add security questions to help you reset your password, it’s a good idea to create a password reset disk. If you don’t do this and then forget your password, you won’t be able to recover it.
Need more help?
Although Windows 10 allows you to choose from a Microsoft account or traditional local account through the out-of-box experience (OOBE) or Settings app, the experience has been designed to lure users into selecting the Microsoft account option.
The reason behind this approach is that using a Microsoft account lets you access additional benefits, including the ability to sync settings, passwords, themes, and files across devices. You can manage various aspects of your computer, such as update personal information, reset the account password, and find a device if it’s lost or stolen.
However, this is not an account type that everyone wants to use. If you mistakenly created a Microsoft account on Windows 10, or you just don’t want to use one, there’s an option within the Settings app to switch to a local account without having to start from scratch.
In this Windows 10 guide, we walk you through the steps to switch to a local account from a Microsoft account using the Settings app.
- How to switch to local account using Settings
- How to remove Microsoft account data from Windows 10
How to switch to local account using Settings
To switch to a local account from a Microsoft account on Windows 10, use these steps:
- Open Settings.
- Click on Accounts.
- Click on Your info.
- Click the Sign in with a local account instead option.
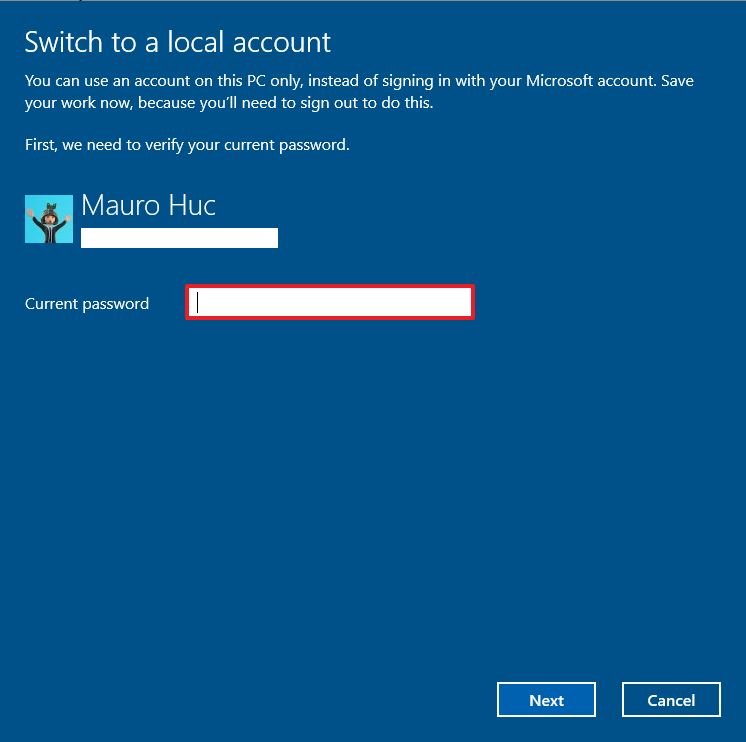
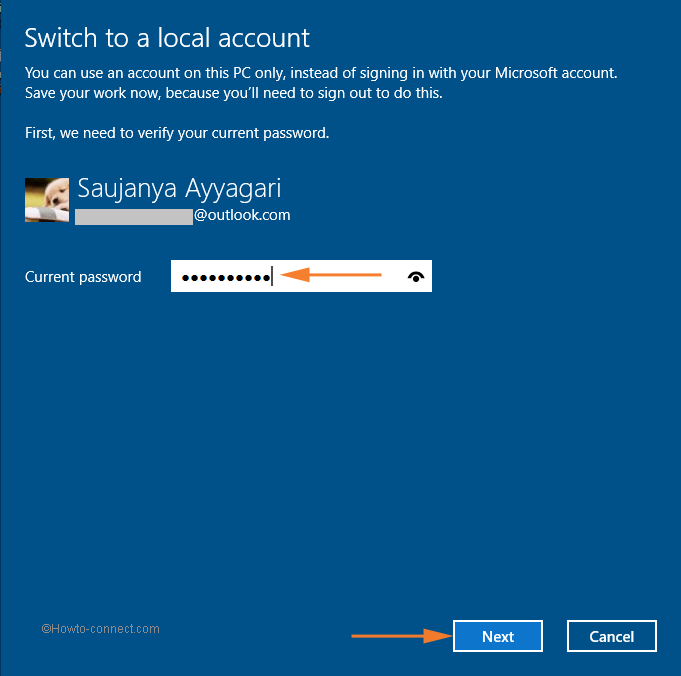
- Type your current Microsoft account password.
- Click the Next button.
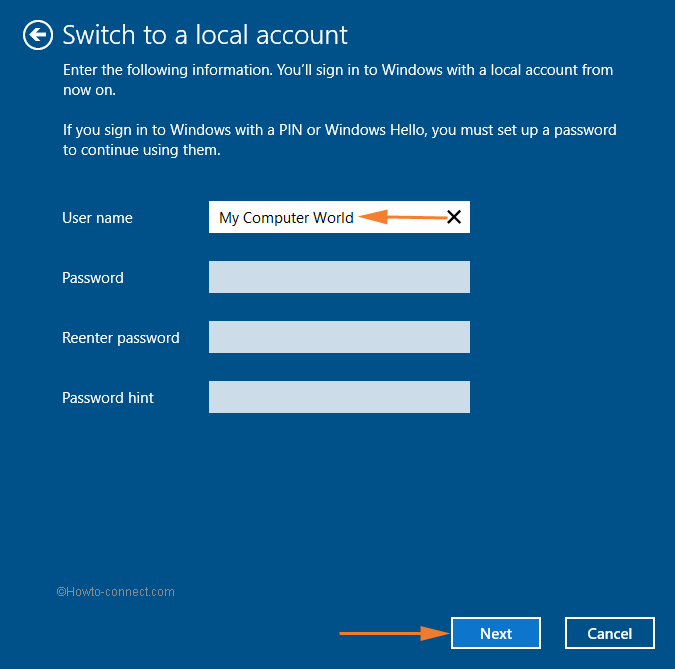
- Type a new name for your account.
- Create a new password.
- Type a hint that will help you to remember your password in case you forget it.
- Click the Sign out and finish button.
- Sign back into your account.Quick tip: If you had a PIN previously configured, you can still use it to sign in without having to enter a complex password.
Once you complete these steps, your Windows 10 account will be disconnected from your Microsoft account, and it will switch to the traditional local account style. Using this method, your Microsoft account credentials will continue to be available on the device to sign you into various services as required automatically.
How to remove Microsoft account data from Windows 10
If you’re switching to a local account, and you don’t want to keep your Microsoft account information on your computer, use these steps:
- Open Settings.
- Click on Accounts.
- Click on Email & accounts.
- Under the «Accounts used by other apps» section, select the Microsoft account that you want to delete.
- Click the Remove button.
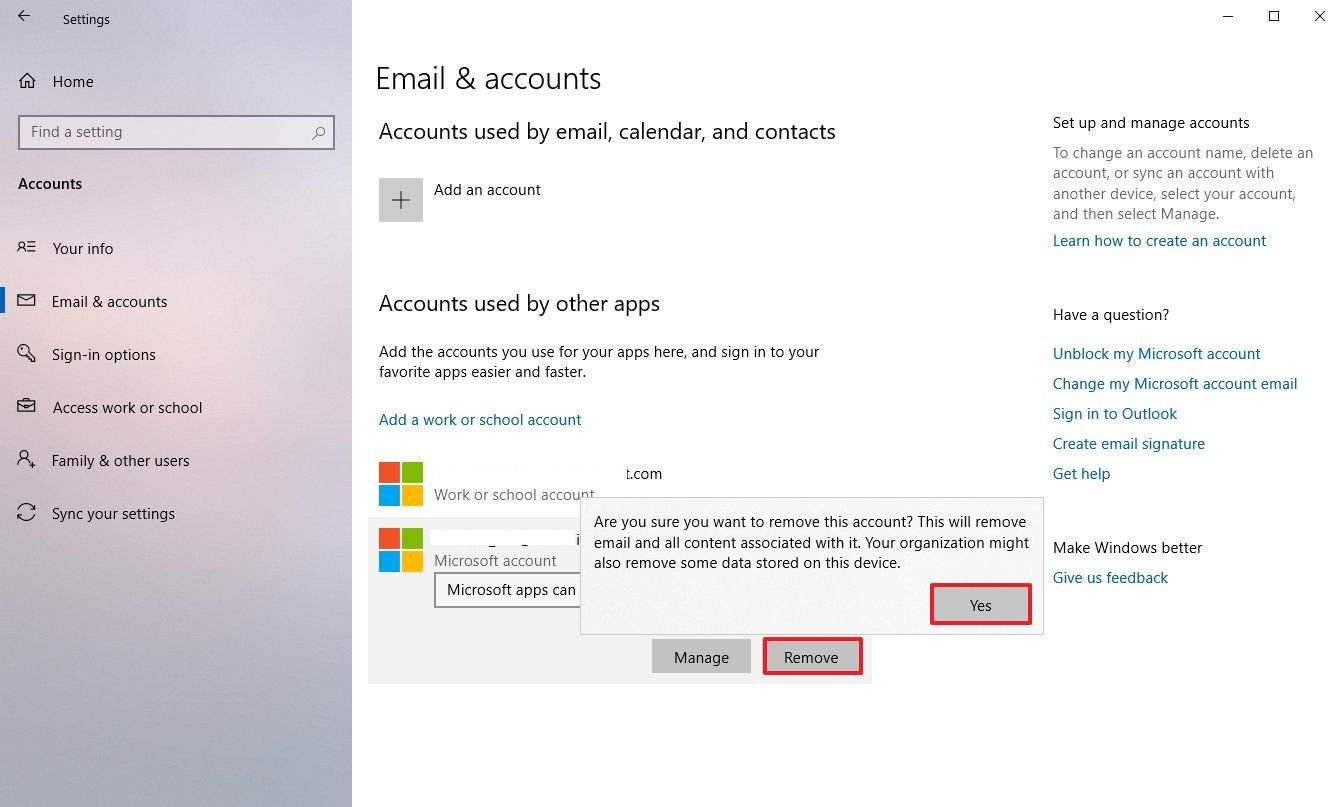
- Click the Yes button.
After completing these steps, restart your computer to completely remove your Microsoft account information from your device.
More Windows 10 resources
For more helpful articles, coverage, and answers to common questions about Windows 10, visit the following resources:
- Windows 10 on Windows Central – All you need to know
- Windows 10 help, tips, and tricks
- Windows 10 forums on Windows Central
Get the best of Windows Central in in your inbox, every day!
Mauro Huculak is technical writer for WindowsCentral.com. His primary focus is to write comprehensive how-tos to help users get the most out of Windows 10 and its many related technologies. He has an IT background with professional certifications from Microsoft, Cisco, and CompTIA, and he’s a recognized member of the Microsoft MVP community.
If you are among the users who have the intent to experience Windows 10 but being a local account holder, we bring this article for you showing how to switch to Local Account from Microsoft Account in Windows 10.
In the recent search, it has been found out that all are discussing switching to the Microsoft Account from the Local Account in Windows 10. To download and install any app from the Windows Store you have to get through the Windows 10 system from your Microsoft Account only.
Apart from this, there are certain other tasks for which you have to log in with your Microsoft Account. But we found many users asking for the opposite method. Now, you might think what is need to sign in with a Local Account? Make a local account and allow your children to make their projects in Windows 10. Or you can also allow other users to log in with a Local account as you don’t want to lose your privacy. So, keeping their urge in mind, we bought you the steps of In Windows 10 How to Switch to Local Account from Microsoft Account to sustain Privacy, tutelage on other users, assent children to make their projects..
Note: Logging into Windows 10 with a Local account will not provide you any authority to download or install Store apps and also you will lose all the administrative authorities.
- To make a switch to your Local Account, the prime step is to bring the Settings app window on your screen. You will easily get it from the glassy Start Menu.
- The above action will lead to the opening of Settings app windows on your screen. Look for the Accounts section and open it.
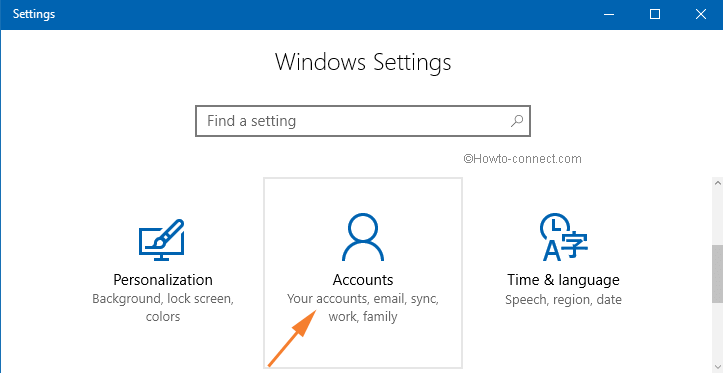
- The left bar reveals a different set of settings. You need to click Your info.
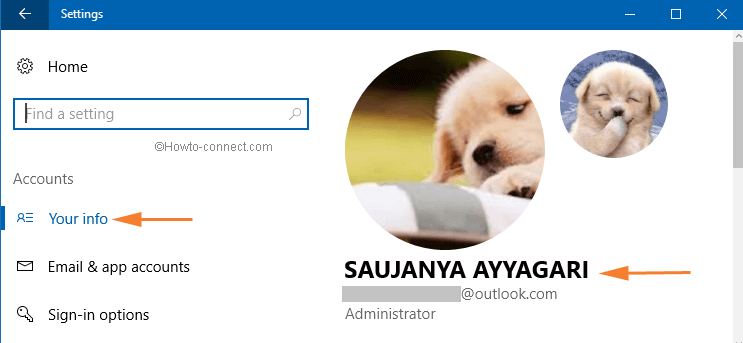
- On the right pane of Your account, you will be shown your account’s information, your Microsoft Account name and email id.
- A link of Sign in with a local account instead can be seen. So, to switch to a Local account, you need to take help of the same link. So, make a hit on Sign in with a local account instead link.

- From this spot, Windows 10 will guide you till the end. For safety reasons, you will be asked to enter your Microsoft Accounts password. Provide your current password in the concerned field. Click Next button.
- Now in the following screen, you will be asked to provide a Username for the Local Account along with the password. You can even provide a hint of your password in the Password hint box. Enter the required information properly and click Next to proceed.
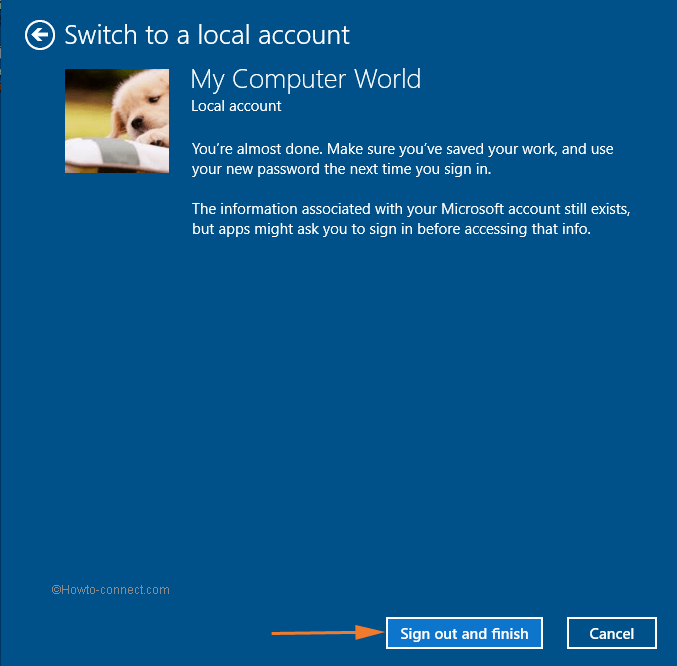
- The next screen will tell you that you are almost done with the switching process. Before you wrap up with the process, ensure that you have saved your active works. To complete the process click on Sign out and finish button.
Now, as you have signed out, to get into Windows 10 select your Local Account and get into the system. You can happily carry out your work in your Local Account just as you used to do it before in the older versions of Windows. The steps are just too easy!!!
Conclusion
If you are afraid that you won’t be able to access those apps which need Microsoft Account to work, don’t worry at all. You can use your Microsoft Account credentials to those apps which require it to unlock them. You can again easily Switch to Local Account from Microsoft Account after providing your Microsoft Account credentials for certain applications to open. Switch to your Local Account and tell us in case you face any difficulty in the process or post switching. Take help of the comments form and don’t hesitate to share with us.
Let’s take a look at how to login with a local account instead of domain account on Windows. By default, when the user enters a username on the Welcome Screen of a domain-joined computer, and there is also a local account with the same name, the domain account will take precedence. We keep coming across people that don’t know this little trick, so we thought it would be worthwhile sharing.
Logging to Local Account on Domain Computer
After the computer is joined to the Active Directory domain, you can sign in under the domain or local user account. On the login screen in Windows XP and Windows Server 2003, there was a drop-down list “Log on to“. Here you could choose whether you want to log in under the domain account or use a local user (select “this computer”).

However, in newer versions of Windows, this drop-down menu no longer exists. If you enter a username here, Windows assumes that you have specified a user account from an Active Directory domain. However, there is no button in the GUI on the Windows logon screen to log under a local user account.
Instead of this, a user is faced with a small button How to log on to another domain which appears near on the domain-joined computers’ Welcome Screen. If you click this button, the following tip will appear:
Type domain namedomain user name to sign in to another domain.
Type NY-FS01local user name to sign in to this PC only (not a domain)

As you can see, the message contains the name of your computer/server (NY-FS01 in our case). If you want login to local account (for example, Administrator), type in NY-FS01Administrator in the User name field and type the password. Of course, if your computer name is quite long, the input can be a real challenge!
Fortunately, there is a simple trick that allows you to sign into local account.
How to Login Local Account without Typing Computer Name?
Windows uses the dot as the alias symbol for the local computer:
- In the username field simply enter .. The domain below will disappear, and switch to your local computer name without typing it;
- Then specify your local username after the .. It will use the local account with that username.

You can also type the computer name followed by a backslash and the username, and it will do the same thing.
This way you can login to local account on a domain-joined computer on all Windows versions.
Please note that you won’t be able to log in with your local Windows account to a domain controller. After promoting the member-server to DC (using dcpromo command), the local SAM database becomes unavailable. The only local account on the Active Directory domain controller is the DSRM Administrator.
Tip. You can use the same trick when you need to use the local user credential to access the shared folder over the network (using SMB protocol).
Show All Local Users on Sign-in Screen in Windows
You can also make it easier for your users to login to local account on domain computer by allowing them to display a list of enabled local users on the Windows sign-in screen. You can enable this feature via the Group Policy.
In order to enumerate all local users on Windows Logon Screen:
- Open the local Group policy editor – gpedit.msc;
- Expand the following GPO section: Computer Configuration > Administrative Templates > System > Logon;
- Enable the policy “Enumerate local users on domain-joined computers”;

- Update local policy settings on your computer using the gpupdate command;
- Logoff, press Ctrl+Alt+Delete on your Windows Welcome Screen, and check the local account list.

As a result, you don’t need to type the user name manually, but simply select it from the local accounts list and enter its password.
This will work on all supported versions including Windows 10/11 and Windows Server 2016/2019/2022.
If your account is not a member of Administrators. Backup Operators, or Users local security group, you will receive an error when you try to login with local account:
The sign-in method you’re trying to use isn’t allowed. For more info, contact your network administrator
This means that this user or group is not allowed to log on locally. You can configure the list of users and/or groups that are allowed to log on locally using the allow log on locally GPO option.
Switch from a Microsoft Account to a Local Account in Windows 10/11
In the latest builds of Windows 10 and 11 (21H2, 22H1, 22H2), you cannot create a local account when installing Windows. Microsoft recommends using Microsoft accounts instead of local Windows accounts. In order for Windows Setup to prompt you to create a local account, you must disable your Internet connection (Wi-Fi or Ethernet) when you install Windows.
In Windows, you can use three types of accounts to sign in to the device:
- Local account — these accounts are stored in the local Windows security account database (Security Account Manager, SAM). You can list local users on a computer with the command:
net user

- Domain user — accounts are stored on the Active Directory domain controllers;
- Microsoft account — the account is stored in the Microsoft cloud. Its advantage is that you can use it on any computer, and the basic user settings with a Microsoft account will be the same on any Windows computer. For the Microsoft account, as well as for local users, a separate profile is created in the C:Users directory (%UserProfile%). Any local account can be linked to a Microsoft account.

Hint. Can you sign in with a Microsoft account without an Internet connection? Of course! You just need to stay connected to the Internet when creating a Microsoft account or switching to a local account. After the first login, the credentials of that account are cached locally, and subsequent logins don’t require an Internet connection.
If you do not want to use the Microsoft account on Windows, you can switch to a traditional local Windows account.
- Open the menu Settings > Accounts > Your info;

- Click on the button Sign in with a local account instead;

- Enter your current Microsoft account password or PIN;
- Specify a username, password, and a password hint for your new local Windows account;
- Press the Sign out and finish button;
- Now you can sign in to local account on this Windows computer.


Once you complete these steps, your Windows account will be disconnected from your Microsoft account.
How to Login Windows via Remote Desktop (RDP) with a Local Account?
The above trick for logging into a domain-joined Windows device under a local account using the .Administrator account format does not work if you logging into a remote computer over RDP.
When you specify .administrator in the Remote Desktop Connection client window (mstsc.exe), your RDP client resolves that to <your_current_computername>Administrator, and not to <remote_server _name>Administrator.

Accordingly, you will not be able to RDP into a remote computer if the passwords of the local and remote users are different.
To connect to a remote domain computer via RDP with a local Windows account, you can use one of the following formats for specifying the username:
- Specify the host name of the remote computer, eg:
wks323221sadministrator
- Specify the IP address of the remote computer:
192.168.100.221administrator
- Use shorthand local instead of remote machine name:
local administrator

In all of these cases, the RDP client will understand that it needs to use the local Windows user on the remote computer to authenticate.
In order for a local user to be able to connect to a domain computer via RDP, he must be a member of the Remote Desktop Users group, or added to the local policy Allow Log on through Remote Desktop Services in the following section of the GPO editor (Computer Configuration > Policies > Windows Settings > Security Settings > Local Policies > User Rights).
Otherwise, you will see an error:
To sign in remotely you need the right to sign in through Remote Desktop Services. By default, members of the Administrators group have this right, or if the right has been removed from the Administrators group, you need to be granted this right manually.

By default, RDP login is allowed only for members of the local Administrators group.
- About
- Latest Posts

I enjoy technology and developing websites. Since 2012 I’m running a few of my own websites, and share useful content on gadgets, PC administration and website promotion.
Download PC Repair Tool to quickly find & fix Windows errors automatically
While installing Windows 11/10 or setting up your computer for the first time, Windows may have persuaded you to log in using a Microsoft Account. Microsoft Account is generally the one you’ve been using to log in to your email on Outlook, Hotmail, or Live. There was an option to sign in using a local account too, but it usually goes unnoticed. So, now if for some reason you want to switch to a Local Account from a Microsoft Account, this tutorial will guide you. You can create a separate local account or you can convert your existing account to a local account.
In order to change the Microsoft Account to a Local Account in Windows 11, follow the below suggestions:
- Press the Windows+I keyboard shortcut to open the Settings app.
- Now click on the Accounts tab in the left pane.
- Then go to the right side of the page and click on the Your info option.
- Under Account settings, click on the link Sign in with a local account instead.
- You will now be asked to confirm that if you really want to switch to a local account. Click on the Next button to continue.
- Thereafter, a password for the Microsoft account that is currently logged in will be asked. You may also enter your PIN or another form of sign-in you previously set up.
- So, the next step requires you to enter your local account details. Here, a password should be added.
- Once you have created or renewed a local account using the username and password, Windows will now ask you to use this account to log in.
- Click Next once you’ve finished entering your information.

- Now click on the Sign out and finish button. After signing out, you’ll be able to log into your local account.
Change Microsoft Account to Local Account in Windows 10
Step 1: Hit ‘Start’ and then go to ‘Settings’.

Step 2: Go to ‘Accounts’ and then go to ‘Your Info’. Verify that you are logged in using a Microsoft Account.
Step 3: Click on “Sign in with a local account instead”. Enter your current Microsoft Account password to authenticate and hit ‘Next’.
Step 4: Select a new username and password for your local account and you are almost done. Click ‘Sign out and finish’ and that is it.

Now you just need to log out and log in with new credentials. None of your files or programs will be affected. The account will remain as it is, only the login procedure changes. You can easily access the files through the library folders as they were before switching your account. Any data associated with the Windows Store applications also remains as it is. But you need to log in again with your original account so that the apps can access that data.
So, this was how you can change your Microsoft Account to a local one. The local account does not synchronize your data and settings. And to download Windows Store apps, you need to log in again. To regain your access to the services, you can log in again with your Microsoft Account. Stuck on anything? Comment down your queries and we will be happy to help.
As I mentioned earlier, the local account does not synchronize your data and settings. And to download Windows Store apps, you need to log in again. To regain your access to the services, you can log in again with your Microsoft Account.
Stuck on anything? Comment down your queries and we will be happy to help.
What is a Local Account?
A local account lets you log into a home computer running the Windows 10 or Windows 11 operating system. It controls access to one specific computer. Credentials for local accounts such as usernames and passwords are stored locally on the computer’s hard drive, and it obtains authentication from its own files.
What is the difference between Microsoft Account to Local Account?
There are several benefits of using a Microsoft Account over a Local Account. A Microsoft Account enables all the cloud services and lets you sync your settings across devices. Also, it lets you access the Windows Store and download/install applications to your computer. You can access some of the other services by only using the Microsoft Account. But a local account is a simple offline account with no synchronization capabilities. You need to separately log in to Windows Store to download an application and most of the cloud services are disabled.
It is good to have your settings and files synced over devices but for some reason, you may not want to do that. Maybe you have a common computer at home and you don’t want to login using your personal Microsoft Account. Or you just simply want to have a local account instead. Follow the steps to convert your existing Microsoft Account to a Local account.
Is a Local account better than Microsoft account?
Unlike Microsoft accounts, Local Accounts do not have many Microsoft features such as Microsoft App Stores OneDrive, etc. In this way, Microsoft’s data access is faster and easier than that of the local account

Lavish loves to follow up on the latest happenings in technology. He loves to try out new Windows-based software and gadgets and is currently learning JAVA. He loves to develop new software for Windows. Creating a System Restore Point first before installing a new software is always recommended, he feels.

Windows 10’s setup process now forces you to sign in with a Microsoft account. If you’d rather use a local user account, Microsoft says you should switch from Microsoft to a local user account afterward. Here’s how.
What You Need to Know
There is a way to set up Windows 10 without using a Microsoft account. If you disconnect your system from the internet, you’ll be able to sign in with a local user account. This works whether you’re going through the setup process on a new PC or installing Windows 10 from scratch.
But, if you’ve already set up. Windows 10 and created or used an existing Microsoft account, this won’t be much help.
This process will keep all your installed files and programs. You won’t lose anything. However, Windows 10 will no longer synchronize your settings between your PCs and use other Microsoft account-linked features. You can still sign into some individual apps with a Microsoft account without signing into your PC with that Microsoft account.
We’re not saying everyone needs to use a local account. The choice is up to you! We’re providing these instructions because Microsoft is making using a local account much more confusing.
RELATED: How to Create a Local Account While Setting Up Windows 10
Switch to a Local Account From a Microsoft Account
You’ll do this from Windows 10’s settings app. To open it, click the Start button and click the “Settings” gear icon on the left or press Windows+i (that’s a lower-case “i”).

Click the “Accounts” icon in the Settings window.
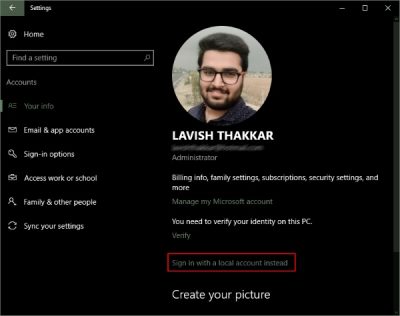
Click “Sign in with a local account instead.” This option is on the “Your info” tab, which will be selected by default. Your Microsoft account details are displayed here.
Windows 10 will ask if you’re sure you want to continue, warning you that you’ll lose Microsoft account features like the ability to synchronize your Windows 10 settings between your PCs. To continue, click “Next.”
When Windows 10 asks, enter your PIN or password to verify your identity.
You’ll be prompted to enter a username, password, and password hint for your local user account. The hint will be shown when someone tries to sign in with an incorrect password.
Enter the details you want to use and click “Next.”
You’re almost done. Click “Sign out and finish.” The next time you sign in, you’ll have to provide your new password.
If you want to use a Microsoft account in the future, return to the Settings > Accounts > Your Info screen. You’ll be able to link your local account to a Microsoft account by providing a Microsoft account’s username and password.
READ NEXT
- › How to Revert Your Windows 10 Account to a Local One (After the Windows Store Hijacks It)
- › How to Uninstall and Reinstall Cortana on Windows 10
- › The New HP Pro x360 Fortis Is a 2-In-1 Laptop Under $500
- › PSA: You Can Email Books and Documents to Your Kindle
- › This Huge Curved Ultrawide Monitor From LG Is $337 Today
- › How to Screen Record on iPhone
- › How to Change Your Age on TikTok
- › Get PC Power With Tablet Portability in the Surface Pro 9 for $200 Off
How-To Geek is where you turn when you want experts to explain technology. Since we launched in 2006, our articles have been read billions of times. Want to know more?