Sign in with Microsoft
Sign in or create an account.
Hello,
Select a different account.
You have multiple accounts
Choose the account you want to sign in with.
-
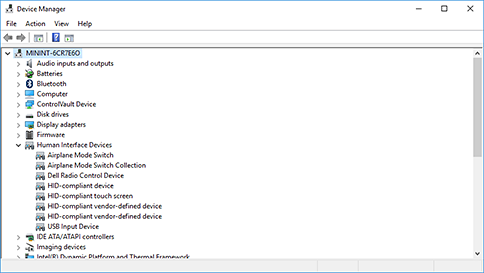
In the search box on the taskbar, type Device Manager, then select Device Manager.
-
Select the arrow next to Human Interface Devices and then select HID-compliant touch screen. (There may be more than one listed.)
-
Select the Action tab at the top of the window. Select Disable device or Enable device, and then confirm. If there’s more than one HID-compliant touchscreen device listed, perform steps 2–3 for that one too.
Touchscreen doesn’t work? Troubleshoot here.
Need more help?
Thank you for your feedback!
×

If your computer comes with a touch screen functionality, it is enabled by default. You can disable touch screen feature if you don’t need it. It will save your battery power and some extra memory resources.
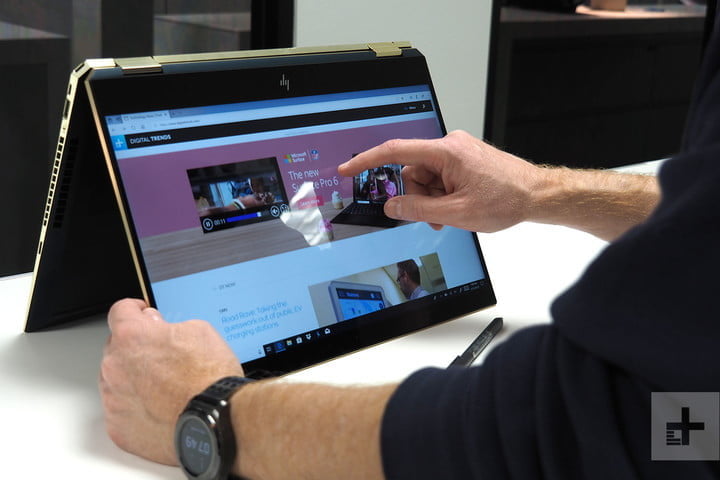
Nowadays, a lot of laptops come with a touch screen display and Windows 10. This gives the best of both worlds as you can use both the touch screen like in a tablet and a keyboard/mouse on a laptop.
Table of contents
- Why disable or turn off touch screen in Windows 10?
- How to disable touch screen in Windows 10
- Disable touch screen using Device Manager
- Permanently Disable touch screen using Windows Registry
Why disable or turn off touch screen in Windows 10?
While there are certain advantages of a touch-enabled display, there are times when you would like to simply turn off touch screen in Windows 10. Some scenarios include the following:
- You have damaged the laptop LCD and the touch screen is actually interfering in your work.
- You want to boost the battery life of your system.
- It’s a good idea to disable touch screen in Windows 10 while you are presenting something and may end up messing up your presentation by touching on the wrong slide.
- The computer is having a ghost touch or phantom touch problems.
A ghost touch or phantom touch is an event when the touch screen reacts as if it has been touched by an invisible finger or stylus. This can be caused by a hardware issue or even a dirty screen.
There are two ways to disable or turn off the touch screen in Windows 10. We will discuss both of them here:
Disable touch screen using Device Manager
To turn off the touch screen immediately but temporarily, you can disable the touch screen device from the Device Manager. Here is how:
- Open the Device Manager (Windows key + X + M)
- Expand Human Interface Devices
- Right-click HID-compliant touch screen
- Select Disable


To enable the touch screen again:
- Open the Device Manager (Windows key + X + M)
- Expand Human Interface Devices
- Right-click HID-compliant touch screen
- Select Enable.
Many people complain that this method only works temporarily and the touch screen is enabled again when they restart the system. If you want to permanently disable the touch screen, please follow the next method.
Permanently Disable touch screen using Windows Registry
If you want to permanently disable touch screen in Windows 10, you should follow the steps below:
- Open Windows Registry Editor (Run –> regedit)
- Go to the following registry key:
ComputerHKEY_CURRENT_USERSoftwareMicrosoftWispTouch - In the right-hand pane, create a new DWORD 32-bit entry with the name TouchGate.
- Make sure the value of this entry is 0.

- Restart the system.

The touch screen will stop working after restart. If you want to enable the touch screen again, change the TouchGate value from 0 to 1 or simply delete the TouchGate entry.
If you are using Microsoft Surface laptop and your touch screen is not working, you can follow this guide from Microsoft to troubleshoot your touch screen issues.
Does this article help you in disabling the touch screen of your device? If yes then which method did you use? What are your overall experiences with Windows 10 touch screen or tablet mode?
Also see:
Usman Khurshid is a seasoned IT Pro with over 15 years of experience in the IT industry. He has experience in everything from IT support, helpdesk, sysadmin, network admin, and cloud computing. He is also certified in Microsoft Technologies (MCTS and MCSA) and also Cisco Certified Professional in Routing and Switching.
(Image credit: Future)
On Windows 10, the ability to use a touch screen has been around for a long time, and it’s quite a useful feature, especially on tablets.
However, if you have a laptop or tablet that includes a touch-enabled display, and it’s not a feature you like to use, or touch doesn’t work as advertised, you can disable the feature with a few steps from Device Manager. In addition, disabling the touch screen may give you a little extra boost of battery life when you’re on the go.
This guide will walk you through the steps to disable the touch capability on a laptop or desktop display.
How to disable touch screen feature on Windows 10
To disable the touch screen on Windows 10, use these steps:
- Open Start.
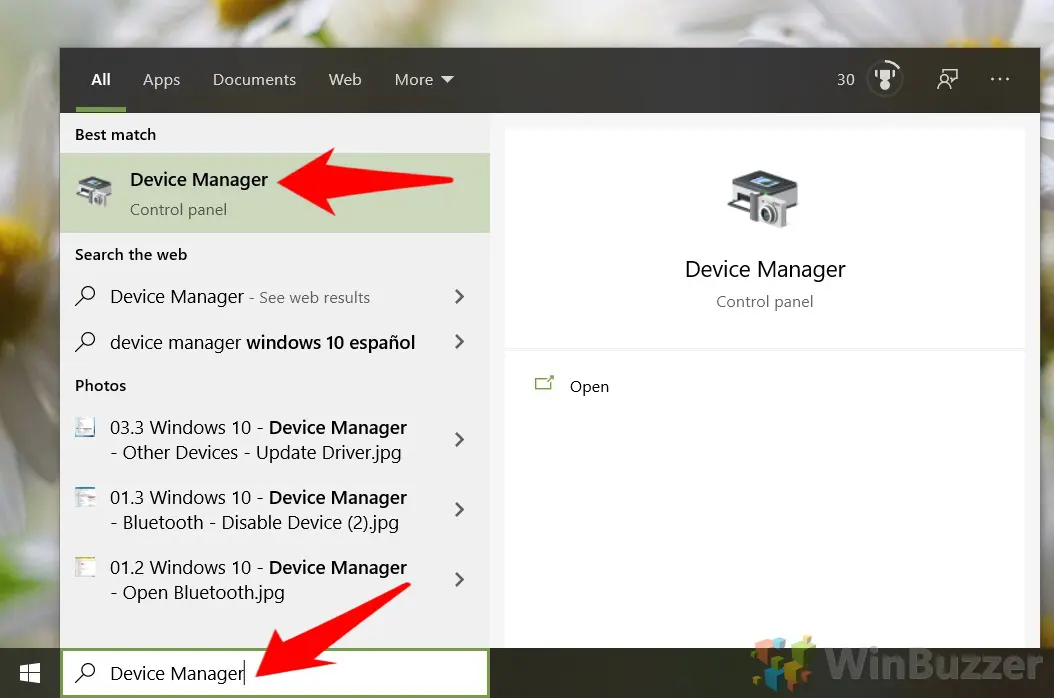
- Search for Device Manager and click the top result to open the app.
- Expand the «Human Interface Devices» branch.
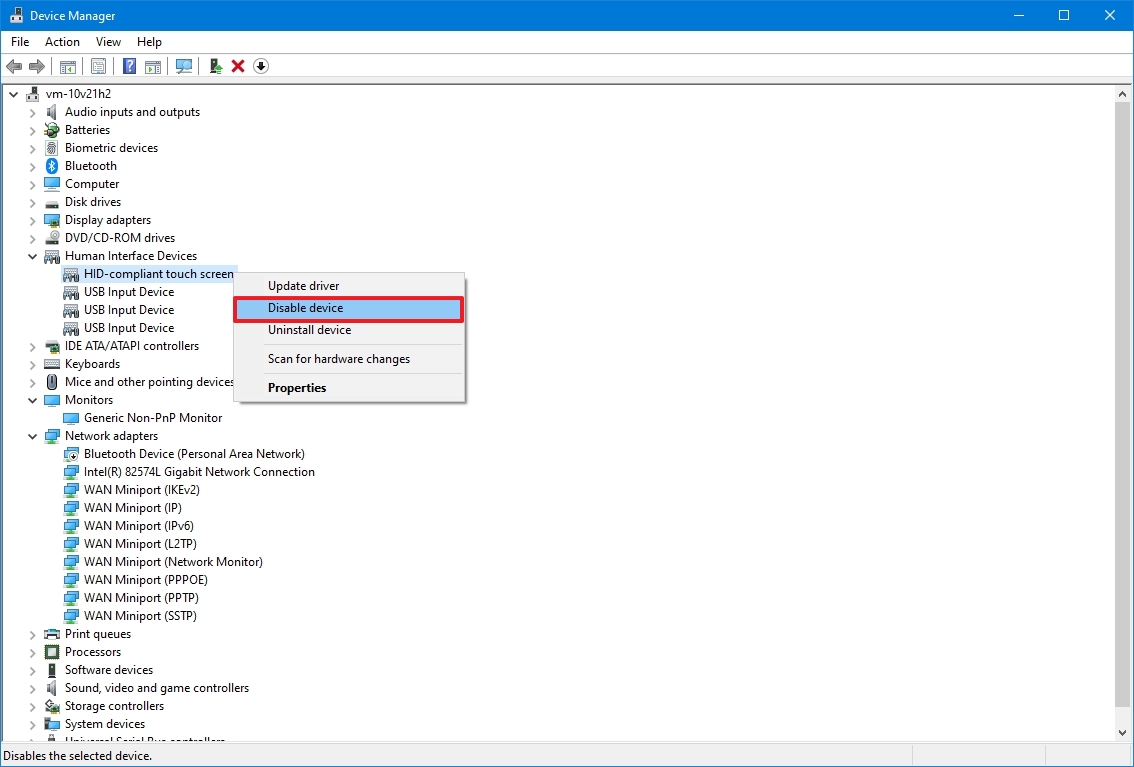
- Right-click the «HID-compliant touch screen» item, and select the Disable device option.
- Click the Yes button.
Once you complete the steps, the screen will no longer respond to touch gestures.
If you change your mind, you can always enable the touch screen again using the same instructions outlined above, but in step 4, make sure to use the Enable device option. In the rare case that touch is still not working, you can try restarting your computer.
We’re focusing this guide on disabling the feature, but you can also use these steps to disable and re-enable touch to troubleshoot and fix related problems with the screen.
More resources
For more helpful articles, coverage, and answers to common questions about Windows 10, visit the following resources:
- Windows 11 on Windows Central — All you need to know
- Windows 10 on Windows Central — All you need to know

(opens in new tab)
Cutting-edge operating system
A refreshed design in Windows 11 enables you to do what you want effortlessly and safely, with biometric logins for encrypted authentication and advanced antivirus defenses.
Get the best of Windows Central in in your inbox, every day!
Mauro Huculak is technical writer for WindowsCentral.com. His primary focus is to write comprehensive how-tos to help users get the most out of Windows 10 and its many related technologies. He has an IT background with professional certifications from Microsoft, Cisco, and CompTIA, and he’s a recognized member of the Microsoft MVP community.
A lot of laptops including HP, Acer, Dell, Surface, Lenovo, tablets, and 2-in-1 devices come with a touch screen display with Windows 10. However, a touch screen is a great addition you can use both the touch screen like in a tablet and a keyboard/mouse on a laptop. So, in this guide, you will 3 different ways to turn off touch screen in Windows 10 devices.
However, Windows 10 works well on the touch screen, and a lot of Windows 10 laptops, tablets, and 2-in-1 devices are designed to have touch-screens. The touchscreen can act as the only input, as on a tablet, or as a secondary input on a laptop, desktop, or 2-in-1 device.
You Might Also Like: Windows 10: How to Enable the Ultimate Performance Power Plan Using PowerShell
What You Will Learn Here:
- Reasons To Turn Off Touch Screen in Windows 10 Devices
- How To Disable Touch Screen in Windows 10 Devices
- Method #1. Disable Touch Screen in Windows 10 Devices via Device Manager
- Method #2. Permanently Disable Touch Screen via Services
- Method #3. Permanently Disable Touch Screen in Windows via Registry Editor
Reasons To Turn Off Touch Screen in Windows 10 Devices
As I said earlier many laptops, tablets, and 2-in-1 devices are equipped with touch screens. Sometimes, people don’t like to use the built-in touch screen on Windows 10 devices specifically laptops while on 2-in-1 devices and tablets it’s common to use the touch screen.
Although a touch-enabled display provides certain advantages, sometimes you just want to turn off a touch-display in Windows 10. Here are the reasons:
- Kids who can not stop reaching the screen when you’re trying to watch a video or do some work.
- The laptop LCD has been damaged, and the touch screen actually interferes with your work.
- You want your system’s battery life boosted.
- To prevent accidental touches while presenting a presentation.
How To Disable Touch Screen in Windows 10 Devices
These days, laptops with touch screen capabilities are very popular but not everyone considers them useful or appropriate, so some people prefer to disable the touch screen of their laptop.
Precautions: if touch screen is the only input method for your laptops and 2-in-1 devices then do not disable it. Because you will not be able to deactivate it without connecting some other type of input device.
Method #1. Disable Touch Screen in Windows 10 Devices via Device Manager
The most common way to deactivate touchscreen is using Device Manager. For Windows 10, touchscreens can be disabled via the System Manager, which can be reached from the Control Panel or directly from the search box on the taskbar.
Step 1. Right-click on the Start menu button and select Device Manager from the list.

Step 2. Find Human Interface Devices and double-click on it to expand or simply click the arrow next to it.

Step 3. Find the HID-Compliant Touch Screen option and right-click on it and from the list select Disable device.

Turn Off Touch Screen in Windows 10
Step 4. After that a pop-up window appears saying that ” Disabling this device will cause it to stop functioning. Do you really want to disable it?” click Yes. Your touch screen will then be disabled.

To enable it again: follow the above-mentioned steps but on step No. 3 make sure to select Enable device option.

Method #2. Permanently Disable Touch Screen via Services
Many people say using Device Manager to turn off the touch screen in Windows 10 only works momentarily, and when they restart the device, the touch screen is activated again. If you want to disable the touch screen permanently, then please follow this method.
Step 1. Click the Start menu button, type services, and click to open it.
Step 2. Now, search for Touch Keyboard and Handwriting Panel Service, and after that double-click on it.

Step 3. Select Disabled from the drop-down menu next to the Startup type.
Step 4. In the Service status menu click Stop, when stopped, click Apply and OK.

Turn Off Touch Screen in Windows 10
To enable it again go to Services > double-click Touch Keyboard and Handwriting Panel Service > Select Manual/Automatic from the drop-down menu next to Startup type > click Apply, Start, and OK.

Method #3. Permanently Disable Touch Screen in Windows via Registry Editor
Step 1. Press Windows + R to open Run. Type regedit and click OK.
Step 2. Go to the following registry:
ComputerHKEY_CURRENT_USERSoftwareMicrosoftWispTouch
Step 3. In the right-hand pane, create a new DWORD 32-bit entry with the name TouchGate.
Step 4. Make sure the value of this entry is 0.

Turn Off Touch Screen in Windows 10
Step 5. Restart your device.
After the restart, the touch-screen will stop working. Adjust the TouchGate value from 0 to 1 or simply delete the TouchGate entry if you want to activate the touchscreen again.
Wrapping Up
This is how you can turn off the touch screen in Windows devices including HP, Acer, Dell, Lenovo laptops, and also on tablets and 2-in-1 devices. However, if the first method which is disabling touch screen in Windows 10 via Device Manager doesn’t work for or it only works temporarily then you have to follow the other 2 methods which will disable permanently until you enable it back.
Tell me which method works best for you? You can share your thoughts and comments in the comments section below.
Related Posts:
-
How to Enable On-Screen Keyboard in Windows 10: 6 Best Methods
-
How to Customize, Enable and Disable Tablet Mode on Windows 10
-
How to Disable Touchpad in an HP Laptop (Windows 10)

ShaadLife Team
We are professional How-to content writers. As a tech enthusiast and geek, we love to write and share articles about different operating systems such as Android, Windows, macOS, iOS, and some other products like a smartwatch and smart TV.

Contents
- 1 How to Enable or Disable a Touchscreen on Windows 10 via the Registry Editor
- 2 How to Turn on/Turn off a Touch Screen in Device Manager
- 3 How to Enable a Touchscreen in Windows 10
- 4 How to Turn off a Touchscreen in Windows 10 with PowerShell
Touchscreens have recently reached mass-market appeal in laptops and desktops. However, while Being able to interact directly with your screen can be extremely useful at times, it can also cause accidental clicks or other issues.
As a result, if you have an HP, Dell, or Lenovo touchscreen computer, you’ll probably want to enable or disable it at various times. Unfortunately, however, many Windows 10 touch screen laptops don’t make this easy. There’s no Windows 10 touchscreen settings menu, meaning the exact process can vary depending on the manufacturer. To make things even more difficult, some OEMs don’t provide a straightforward way to turn it off.
Thankfully, through some tweaks, you can turn off the touch screen no matter your device. Today we’re going to show you how to disable a touchscreen on Windows 10. We’ll also show you to enable it if you wish, which may help if your HP laptop touch screen is not working, the touch screen is not working on your Lenovo laptop, or you’re having problems with any other brand. Let’s get started.
How to Enable or Disable a Touchscreen on Windows 10 via the Registry Editor
Though the registry editor can be dangerous if you don’t use it correctly, you’ll be just fine if you read our safe editing guide first. The bottom line is that this is a nice and quick way to disable or enable a touchscreen in Windows 10.
- Open the Registry Editor
Press the Windows button to open the Start menu, then type “Registry Editor”. Click the top result.

- Find and change the TouchGate registry key
In your Registry Editor search bar, paste the following:
ComputerHKEY_LOCAL_MACHINESOFTWAREMicrosoftWispTouch
If that doesn’t work, navigate using the folder menu in the sidebar. Once you’re in the right place, double-click the “TouchGate” DWORD in the main pane and change its “Value data” to “0” When you’re done, click OK and restart your computer.
If you don’t see the TouchGate DWORD, right-click in the main pane to create a new DWORD (32-bit) and name it TouchGate. Then, follow the steps above.


How to Turn on/Turn off a Touch Screen in Device Manager
If the registry is a bit too intimidating for you, Device Manager is your friend. It will give you a nice, readable interface from which you can easily enable or disable your touch screen in Windows 10.
- Open Device Manager
Press start and type “Device Manager”, then click the top result.

- Disable the touch screen
Scroll down the “Human Interface Devices” section of Device Manager and click it to open the full list. Find the device named “HID-compliant touch screen”, right-click it, and select “Disable device”.

- Accept the touchscreen disable prompt
Device Manager will surface a warning dialog that says “Disabling this device will cause it to stop functioning. Do you really want to disable it?”. In our case, that’s exactly what we want, so click “Yes”.

- Enable your touchscreen in Windows 10 Device Manager
If your touch screen is not working on your HP or Lenovo laptop, it may have been automatically disabled in Device Manager. This can happen if it runs into a driver issue, for example, or there’s a resource conflict.
To enable it again, find the “Human Interface Devices” section in Device Manager, scroll until you see “HID-compliant touch screen”, right-click it, and select “Enable device”.


If your touch screen won’t stay enabled via the above method, you may need to turn it on via the Device Manager properties menu instead. This will give you a wizard to follow.
- Open Device Manager
Press Start and type “Device Manager”. Click the top result to open it.
- Press ‘Enable Device’ in the properties menu
Find the “Human Interface Devices” section in Device Manager and press the arrow to expand its list. Double-click “HID-compliant touch screen” to open its properties, then press “Enable Device” at the bottom of the “General” tab.

- Press ‘Next >’ in the troubleshooting wizard

- Click ‘Finish’

- Close the device properties


How to Turn off a Touchscreen in Windows 10 with PowerShell
If you prefer the command-line or you’re on a GUI-less server install, you can use PowerShell to modify your Windows 10 touchscreen settings.
- Open PowerShell as an administrator
Press “Windows + X” to open the advanced Start menu, then click “Windows PowerShell (Admin)”. It’s important that you start it as an admin or Windows may not have the permissions to make this change.

- Run the touchscreen disable commands
Paste the following command into your PowerShell window by right-clicking or enabling copy/paste shortcuts:
Get-PnpDevice | Where-Object {$_.FriendlyName -like '*touch screen*'} | Disable-PnpDevice -Confirm:$falseIf you need to enable it again, you can just switch out “Disable” for “Enable”:
Get-PnpDevice | Where-Object {$_.FriendlyName -like '*touch screen*'} | Enable-PnpDevice -Confirm:$false


With hope, this tutorial helped resolve your issue if your touchscreen is not working. If it didn’t, leave a comment, otherwise, consider moving on to our tutorial to enable the touch-friendly File Explorer.
Итак, без дальнейших задержек, давайте рассмотрим три различных способа отключить или отключить функцию сенсорного экрана на вашем компьютере с Windows 10.
Метод 1: Использование диспетчера устройств
Использование диспетчера устройств — это самый простой способ включить или отключить сенсорную функцию вашего устройства с Windows 10. Вы можете сделать это несколькими простыми щелчками мыши, не используя командную строку или копаясь в реестре Windows.
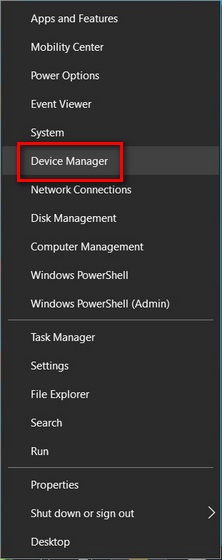
- Во-первых, кликните правой кнопкой мыши кнопку «Пуск» (или одновременно нажмите клавиши Windows + X) и выберите «Диспетчер устройств» во всплывающем меню.
Примечание. Вы также можете получить доступ к диспетчеру устройств Windows из командной строки и диалогового окна «Выполнить». Для этого введите devmgmt.msc (без кавычек) и нажмите Enter.
Другой способ получить доступ к диспетчеру устройств — через панель управления.
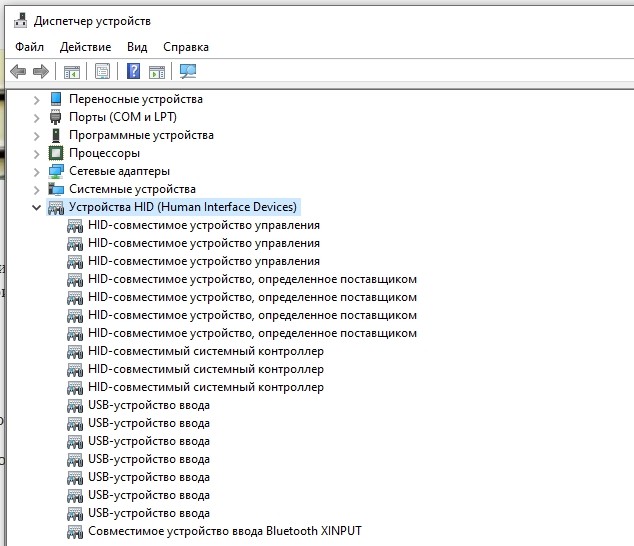
- В окне диспетчера устройств дважды щелкните «Устройства с человеческим интерфейсом», чтобы развернуть его.
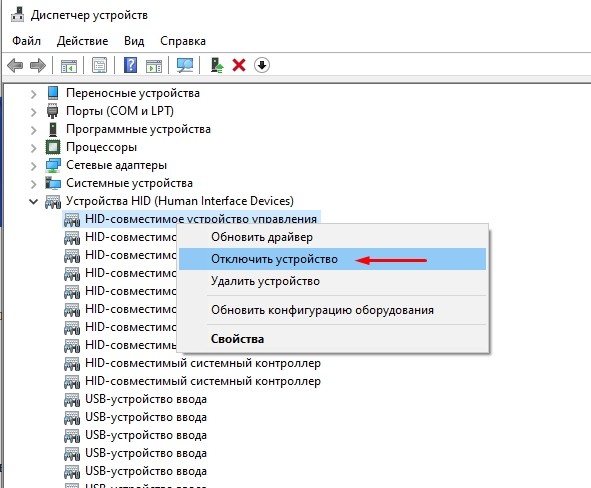
- Теперь кликните правой кнопкой мыши «HID-совместимый сенсорный экран» и выберите «Отключить устройство». Подтвердите, когда вас спросят. Функциональность сенсорного экрана будет отключена, и вы можете нажать на дисплей, чтобы подтвердить это.
- Чтобы снова включить функцию, просто щелкните правой кнопкой мыши ту же запись и выберите «Включить устройство». Эта функция будет повторно включена, и на этот раз вы не получите предупреждения.
Вот и все! Так просто включить или отключить функцию сенсорного экрана в ноутбуках с Windows 10 с помощью диспетчера устройств.
Метод 2: Использование PowerShell
PowerShell, представленный в Windows 8, представляет собой оболочку командной строки, которая позволяет выполнять целый ряд настроек и изменений в Windows 10, включая возможность включать и отключать сенсорный экран. Вы можете получить к нему доступ из того же меню, что описано в способе 1.
- Кликните правой кнопкой мыши кнопку «Пуск» (или одновременно нажмите клавиши Windows + X) и выберите «Windows PowerShell (Admin)» во всплывающем меню.
- В окне PowerShell введите следующую команду: Get-PnpDevice | Where-Object {$ _. FriendlyName -like ‘* touch screen *’} | Disable-PnpDevice -Confirm: $ false. Теперь нажмите Enter.
- Чтобы снова включить функцию сенсорного экрана, выполните следующую команду в PowerShell: Get-PnpDevice | Where-Object {$ _. FriendlyName -like ‘* touch screen *’} | Enable-PnpDevice -Confirm: $ false
Теперь вы знаете не только, как отключить функцию сенсорного экрана на устройствах с Windows 10 с помощью PowerShell, но и как включить его с помощью мощного инструмента командной строки.
Метод 3: использование реестра Windows (постоянный метод)
Наконец, вы также можете использовать старый добрый реестр Windows для включения или отключения сенсорного экрана в Windows 10.
На данный момент это единственный постоянный способ отключить сенсорный экран на вашем ПК с Windows 10.
Это связано с тем, что Microsoft, как известно, повторно включает эту функцию при каждом крупном обновлении, если она была отключена другими методами.
- Откройте редактор реестра Windows. Для этого выполните поиск «regedit» на панели поиска Windows и кликните первый результат.
- Используя левую панель окна редактора реестра, перейдите к следующему ключу: Computer HKEY_Current_USER Software Microsoft Wisp Touch
Примечание. Вышеупомянутый параметр отключит (отключит) функцию сенсорного экрана только для текущего пользователя. Чтобы отключить эту функцию для всех учетных записей пользователей на этом ПК, выберите «HKEY_LOCAL_MACHINE» вместо «HKEY_CURRENT_USER» в качестве верхней папки.
- Кликните правой кнопкой мыши в любом месте открытого пространства на правой панели и выберите «Создать> Значение DWORD (32-разрядное)» на правой панели и назовите его TouchGate (без кавычек).
Примечание. Если на предыдущем шаге вы выбрали LOCAL_MACHINE вместо CURRENT_USER, вы найдете существующую запись TouchGate. В таком случае просто переходите к следующему шагу.
- Новый ключ (в случае CURRENT_USER) по умолчанию должен иметь шестнадцатеричное значение «0». [Data=0x00000000 (0)].
- В случае LOCAL_MACHINE дважды кликните существующий ключ, чтобы изменить значение на 0. В обоих случаях перезагрузите компьютер, чтобы изменение вступило в силу.
- Вы можете повторно включить функцию сенсорного экрана, изменив шестнадцатеричное значение на 1 (0 = сенсорный экран отключен, 1 = сенсорный экран включен). Перезапустите, чтобы изменения вступили в силу.
Вот оно. Теперь вы знаете три различных способа отключения и включения функции сенсорного экрана на устройствах с Windows 10.
Ноутбуки с сенсорным экраном какое-то время были обычным явлением на рынке ноутбуков премиум-класса, и теперь все больше таких устройств попадает в сегмент среднего уровня. Однако даже если Microsoft, кажется, очень увлечена этим, не все считают эту функцию полезной.
Действительно, некоторые люди действительно считают, что это создает ненужные проблемы с обычными ноутбуками и ультрабуками. Так что, если вы принадлежите к этой группе, мы надеемся, что вы нашли это руководство полезным.
Ноутбуки с сенсорным экраном, такие как Microsoft Surface и другие устройства, в наши дни довольно распространены. Однако не все считают сенсорную функцию необходимой или полезной для повседневных задач.
На устройстве Windows функция сенсорного экрана обычно включена сразу же, так что вы можете использовать свой палец для навигации по операционной системе ноутбука.

Если экран треснул, вы находите эту функцию слишком отвлекающей или просто не используете сенсорный дисплей на своем ноутбуке, вы можете легко отключить его и продолжить работу.
В этом руководстве мы покажем вам, как отключить сенсорный экран в Windows 10.
Хотя функция сенсорного экрана весьма полезна для пользователей с планшеты, такие как Surface Pro, это может не всегда работать так, как рекламируется. В определенных случаях вы можете выключить его, чтобы увеличить время автономной работы вашего ноутбука когда вы в пути или решаете что-то.
Какой бы ни была причина, вы можете отключить сенсорный экран, выполнив несколько действий с помощью диспетчера устройств, командной строки, Windows PowerShell в Windows 10 или отредактировав реестр Windows.
Отключите сенсорный экран с помощью диспетчера устройств (Windows 10)
Диспетчер устройств Windows — это централизованная утилита в Windows 10, которая предлагает организованный просмотр всего оборудования, установленного на вашем ПК. Как расширение консоли управления Microsoft, диспетчер устройств управляет такими устройствами, как звуковые карты, жесткие диски, USB-устройства, клавиатуры и многое другое.
Вы можете использовать диспетчер устройств для управления, Обновить откатить драйверы, изменить параметры конфигурации оборудования, выявить конфликты аппаратных устройств, а также включить или отключить оборудование.
Диспетчера устройств нет в списке ваших обычных программ, но вы можете получить к нему доступ разными способами, чтобы отключить сенсорный экран вашего ноутбука.
- Чтобы начать, щелкните правой кнопкой мыши «Пуск» и выберите «Диспетчер устройств» или введите «Диспетчер устройств» в поле поиска и выберите его в результатах поиска.
Примечание. В зависимости от вашей версии Windows вы можете открыть диспетчер устройств с помощью панели управления. Для этого выберите Панель управления на экране приложений или в меню «Пуск», а затем выберите «Оборудование и звук».
В разделе «Устройства и принтеры» выберите Диспетчер устройств, чтобы открыть его.
- Выберите раздел «Устройства с человеческим интерфейсом», чтобы развернуть его.
- Затем выберите сенсорный экран, совместимый с HID.
- Выберите вкладку «Действие», а затем выберите «Отключить устройство». Появится всплывающее окно с уведомлением о том, что отключение сенсорного экрана помешает ему работать. Подтвердите действие по отключению сенсорного экрана.
Сенсорный экран теперь отключен, и вы можете нажать на дисплей, чтобы проверить его.
Чтобы снова включить сенсорный экран, вернитесь в Диспетчер устройств и щелкните правой кнопкой мыши параметр HID-совместимого сенсорного экрана. Выберите параметр «Включить устройство» и подтвердите свой выбор.
Примечание. Если после включения сенсорный экран не работает, перезагрузите ноутбук и посмотрите, снова ли он работает.
Как отключить сенсорный экран с помощью командной строки
Вы также можете отключить сенсорный экран в Windows 10 с помощью командной строки.
Командная строка, иногда называемый командной строкой CMD, cmd.exe или командной оболочкой, представляет собой интерпретатор командной строки в Windows 10, который выполняет любые команды, которые вы вводите в него. Команды используют сценарии и пакетные файлы для автоматизации задач, диагностики или решения определенных проблем Windows, а также для выполнения сложных административных задач.
Если ваша мышь не работает или ваш ноутбук не работает должным образом, вы можете использовать командную строку, чтобы отключить сенсорный экран на ПК с Windows 10.
- Для этого введите CMD в поле поиска и выберите Запуск от имени администратора в результатах поиска командной строки.
- Введите команду: devmgmt.msc и нажмите Enter.
Откроется экран диспетчера устройств, и вы можете отключить сенсорный экран, выполнив те же действия, что и в методе диспетчера устройств.
Используйте Windows PowerShell для отключения сенсорного экрана
Windows PowerShell — это кроссплатформенная оболочка командной строки и язык сценариев, представленный в Windows 8, который предлагает простой способ автоматизации задач и доступа к системе и инструментам управления.
- Чтобы отключить сенсорный экран с помощью Windows PowerShell, щелкните правой кнопкой мыши Пуск и выберите Windows PowerShell (администратор). Кроме того, вы можете использовать сочетание клавиш WIN + X, чтобы быстро открыть PowerShell, если ваша мышь не работает.
- Затем введите команду: Get-PnpDevice | Where-Object {$ _. FriendlyName -like ‘* touch screen *’} | Disable-PnpDevice -Confirm: $ false
Сенсорный экран будет отключен, и вы можете проверить его, чтобы подтвердить.
Отключите сенсорный экран с помощью реестра Windows
Другой способ выключить сенсорный экран на вашем ПК — через реестр Windows, выполнив следующие действия.
Предупреждение о редактировании реестра Windows: если вы никогда раньше не редактировали реестр Windows, найдите специалиста, который сделает это за вас, потому что одна неправильная запись может сделать ваш компьютер непригодным для использования или невозможности загрузки. Если вам нравится этот метод, резервное копирование реестра сначала, а затем выполните следующие действия:
- Выберите «Пуск»> «Выполнить» и введите команду regedit в диалоговом окне «Выполнить».
- Перейдите в раздел реестра: Computer HKEY_CURRENT_USER Software Microsoft Wisp Touch
Изображение: 14-how-to-disable-touch-screen-in-windows-10-registry-key
- Щелкните правой кнопкой мыши, чтобы создать новую 32-разрядную запись DWORD на правой панели и присвоить ей название TouchGate.
- Дважды щелкните созданный вами новый DWORD, затем измените значение записи на 0 и перезагрузите компьютер.
Чтобы включить сенсорный экран, вернитесь к разделу реестра и измените значение TouchGate на 1 или полностью удалите запись TouchGate.
Отключить Touch Off за несколько быстрых шагов
Мы надеемся, что это руководство помогло вам отключить сенсорный экран на вашем устройстве с Windows 10. Ознакомьтесь с другими ненужными службами Windows 10, которые вы можете безопасно отключить, и нашими руководствами по как отключить индексацию для экономии ресурсов ЦП и ОЗУ или как отключить Кортану для защиты вашей конфиденциальности и личных данных.

Windows 10 поддерживает возможность сенсорного ввода информации. Эта опция актуальна для мобильных устройств и ноутбуков или компьютеров, оснащаемых дисплеем с таким функционалом. Но, как и другие процессы, данный периодически перестает работать. В зависимости от причины возникновения сбоя применяются разные варианты решения проблемы. Узнаем, как можно включить сенсорный экран на Windows 10.
Причины выключения
Сенсорный ввод на Windows 10 не работает по следующим причинам:
- экран потрескался или загрязнился;
- ошибки при установке последних обновлений и драйверов;
- конфликт между системными процессами.
Часто проблемы с работой сенсора на Windows 10 можно решить с помощью встроенной функции калибровки «Digitiser». Этот инструмент располагается в разделе «Оборудование и звук» – «Параметры планшетного ПК».
Также для устранения рассматриваемой неисправности нередко достаточно скачать новые драйверы с официального сайта производителя компьютера. Но если эта процедура не восстанавливает сенсорный ввод, то необходимо откатить Windows 10 до последней точки сохранения.

Отключение сенсорного экрана Windows 10
Функция сенсорного ввода, реализованная в Windows 10, который установлен на компьютере или ноутбуке, используется редко. При этом данная опция потребляет часть энергии, что уменьшает срок автономной работы устройства. В подобных обстоятельствах рекомендуется отключить тачскрин на ноутбуке.
Сделать это можно, воспользовавшись следующим алгоритмом:
- Запустить через основное меню Пуск Диспетчер устройств.

- Открыть ветку «Human Interface Devices».
- Выбрать раздел «HID-совместимый сенсорный экран» и с помощью правой кнопки включить параметр «Отключить устройство».
Включается сенсорный экран в обратном порядке. Но после каждой процедуры может потребоваться перезагрузка компьютера.
Автоматизируете процесс переключения
В связи с тем, что включение/выключение сенсорного ввода на Windows 10 занимает определенное время, данный процесс можно автоматизировать. Для упрощения понимания данная процедура была разделена на несколько этапов.
Настройка консоли для автоматизации процесса
Для автоматизации процесса переключения потребуется запустить Visual Studio Express, через который нужно подключить Windows Device Console. Однако данная процедура, которую обычно используют для выполнения поставленной задачи, занимает много времени. Чтобы упростить этот процесс, можно воспользоваться приложением с сайта joequery.me.
Далее нужно:
- Скачать и разархивировать приложение в подходящую для этого папку.
- Открыть папку Windows 8.1 и выбрать тип установленной на компьютере операционной системы (32 или 64bit).
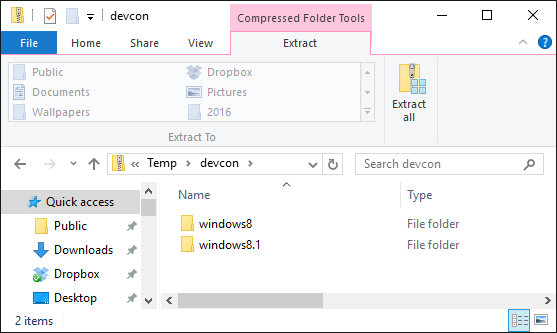
- Сочетанием клавиш «Win» и «R» открыть окно «Выполнить» и прописать путь «C:WindowsSystem32».

- Исполняемый файл «Devcon», расположенный по тому адресу, по которому была разархивирована загрузка, переместить в открывшуюся папку.
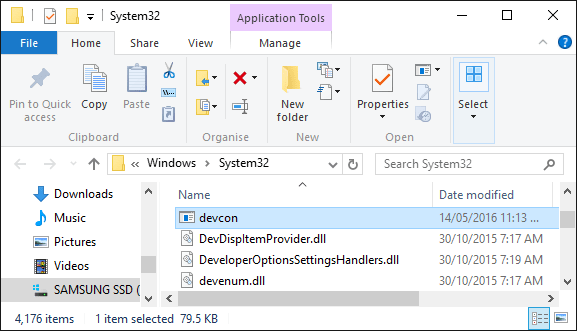
В завершение нужно при помощи правой кнопки мыши открыть раздел «Свойства» у исполняемого файла devcon.exe. Далее через раздел «Совместимость» необходимо запустить приложение от имени Администратора.
Настройка идентификатора
На втором этапе необходимо запустить Диспетчер устройств. Сделать это можно через «Пуск» или сочетанием клавиш «Win» и «X». Затем следует запустить правой кнопкой мыши меню настройки «HID-совместимый сенсорный экран» и открыть в выпавшем списке раздел «Свойства».
В новом окне необходимо перейти на вкладку «Подробности» и выбрать «Аппаратные идентификаторы». Данный раздел нужно на время оставить. Позднее открытое окно потребуется для завершения автоматизации процесса переключения.
Создание файла исполнения
В текстовом редакторе (подойдет даже «Блокнот») нужно прописать следующий код:
set «touchscreenid=ID_HERE»
devcon status «%touchscreenid%» | findstr «running»
if %errorlevel% == 0 (
devcon disable «%touchscreenid%»
) else (
devcon enable «%touchscreenid%»
)

В оставшемся открытом окне со свойствами нужно нажать правой кнопкой мыши на соответствующий идентификатор оборудования и скопировать название. Последнее затем необходимо вставить в приведенный выше код вместо строчки «ID_HERE».
Текстовый файл следует сохранить как «touchscreen.bat» в любой папке на компьютере. В ином случае придется вносить изменения в приведенный выше код. Место размещения не влияет на работу процесса.

Перенос ярлыка
Ярлык позволяет быстро включать и выключать сенсорный ввод. Для этого потребуется выполнить следующие действия:
- Правой кнопкой мыши нажать на созданный ранее файл и создать ярлык.
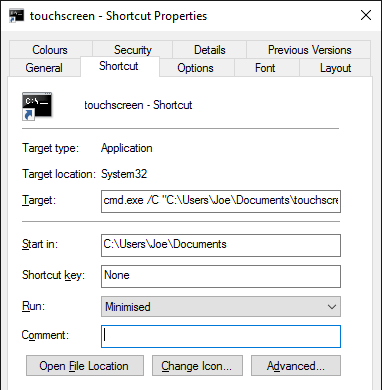
- Нажать правой кнопкой мыши на ярлык и перейти во вкладку со свойствами.
- В строчке напротив «Цели» необходимо прописать «exe/C» перед тем текстом, что здесь был ранее введен.
- В строке «Run» выбрать «Минимизация». Это делается для того, чтобы после каждого запуска процесса автоматического переключения не открывалось окно с Командной строкой. В ином случае данная процедура будет занимать больше времени.
- Открыть раздел «Дополнительно» и проставить галочку, чтобы приложение каждый раз запускалось от имени Администратора.
Размещать созданный ярлык также можно в любой папке на компьютере. Но удобнее, если файл будет находиться на Рабочем столе. Компьютер после выполнения описанных действий перезапускать не потребуется.
Автор: , 11.12.2021
Рубрики: Windows 10, Windows 11, Ноутбуки

Вопрос от пользователя
Здравствуйте.
Не так давно купил новый ноутбук. Вроде с ним все хорошо, но у него сенсорный экран — поначалу думал будет полезно, но по факту — только мешается (случайно иногда задеваешь, когда переносишь со стола на диван…).
Просмотрел все функциональные кнопки на клавиатуре и корпусе — нет функции отключения сенсорного экрана! Можно ли его как-нибудь отключить (программно), т.е. сделать так, чтобы изображение на дисплее было, а касания он не воспринимал. И важно, чтобы в случае чего — можно было обратно вернуть все как было!
Заранее спасибо!
Здравствуйте.
Данный вопрос относительно-легко решается. Ниже приведу неск. способов (сам рекомендую первый — он наиболее быстрый).
Примечание: часто на ноутбуках может «мешаться» еще и тачпад (и его тоже иногда называют «сенсором»). Если вам нужно отключить и его — 📌ознакомьтесь вот с этой заметкой.
📌 Примечание!
Если вы подключили к ноутбуку внешний монитор — то его собственный можно откл. Для этого нажмите сочетание Win+P и настройте режим проецирования.
*
Содержание статьи
- 1 Варианты откл. сенсора у дисплея ноутбука
- 1.1 Способ 1
- 1.2 Способ 2
- 1.3 Способ 3
- 1.4 Способ 4

→ Задать вопрос | дополнить
Варианты откл. сенсора у дисплея ноутбука
Способ 1
Универсальный, подходит для большинства ноутбуков/моноблоков, работающих на Windows 7/8/10/11.
Что нужно сделать:
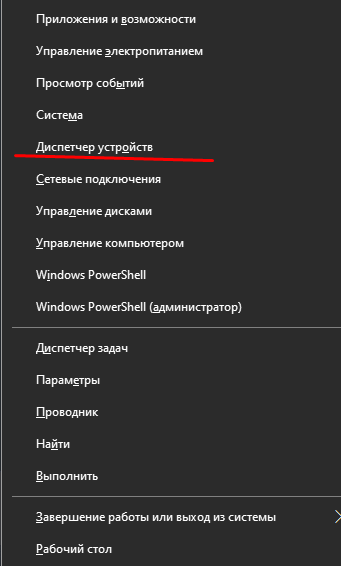
- запустить диспетчер устройств (самый простой способ — нажать правой кнопкой мышки по кнопке ПУСК, и в появившемся меню найти одноименную ссылку…);
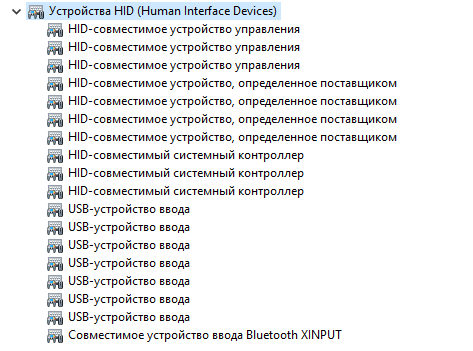
- далее раскрыть вкладку «Устройства HID (Human Interface Devices)»;
- кликнуть правой кнопкой мыши по устройству «HID-совместимый сенсорный экран» (если у вас англ. версия Windows — ищите вариант с «…touch screen»);
- в меню выбрать опцию «Отключить». См. скриншот ниже. 👇
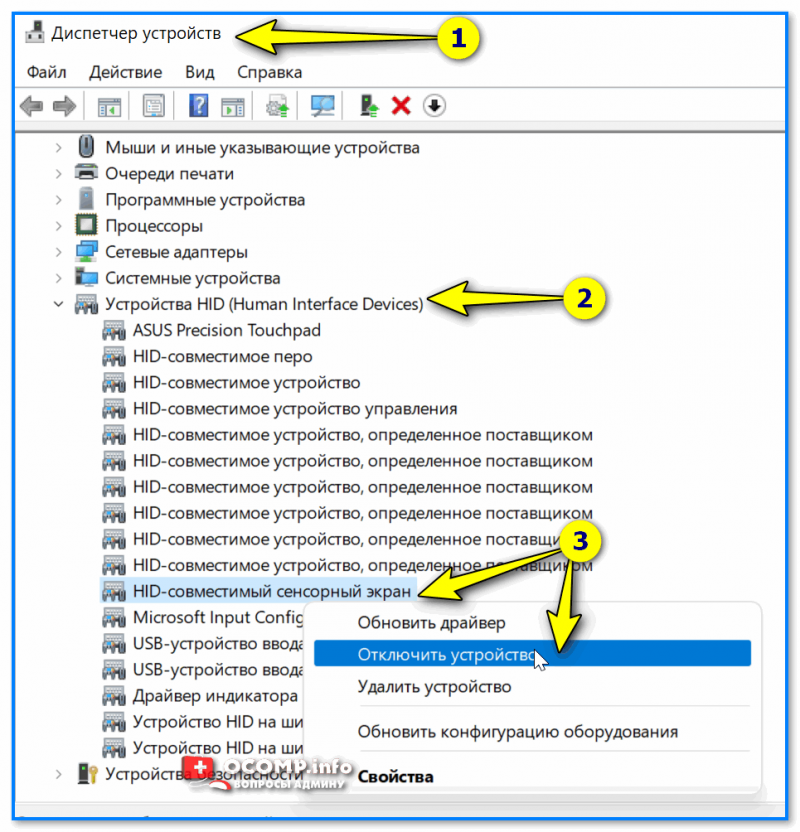
HID-совместимый сенсорный экран
Сразу после этого ваш экран перестанет воспринимать нажатия (будет только показывать изображение!). Задача решена! 😉👌
Чтобы снова включить сенсор — нужно еще раз кликнуть ПКМ по тому же устройству (обратите внимание, что значок у него будет со стрелочкой, значит, что оно выкл.) и в меню выбрать опцию «Включить». См. пример ниже. 👇
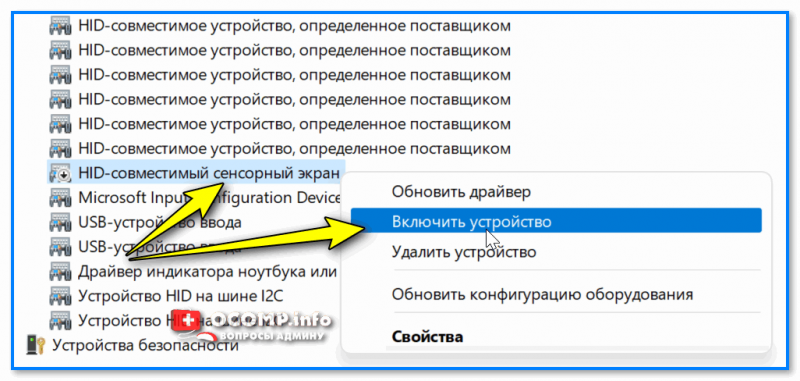
Включить устройство
*
Этот вариант хорош своей универсальностью. Однако, есть и минус — после «больших» обновлений Windows, драйверов, при откате к точке восстановления (и ряда др. операций) — сенсорный экран может включиться самостоятельно… (т.е. снова придется вручную заходить в диспетчер устройств и отключать его).
*
Способ 2
Решить «нашу» задачу можно через настройки реестра (этот вариант более «долго-живуч»).
Для этого потребуется:
- 👉 либо запустить редактор реестра, перейти в ветку «HKEY_Current_USERSoftwareMicrosoftWispTouch» и создать параметр DWORD с именем «TouchGate» (присвоив ему значение «0»);
- 👉 либо запустить командную строку от имени администратора и выполнить нижеприведенную команду! 👇👌
*
1) Откл. сенсор экрана: reg add «HKEY_Current_USERSoftwareMicrosoftWispTouch» /v TouchGate /t REG_DWORD /d 00000000 /f
2) Вкл. сенсор экрана: reg add «HKEY_Current_USERSoftwareMicrosoftWispTouch» /v TouchGate /t REG_DWORD /d 00000001 /f
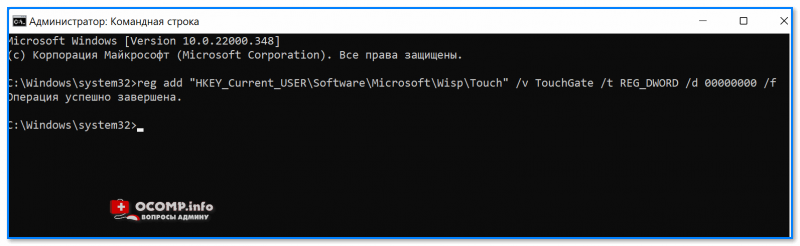
Добавляем параметр в реестр
Далее перезагрузите ноутбук (это обязательное условие)!
*
Способ 3
Этот способ актуален только для Windows 10/11
Сначала необходимо запустить 📌PowerShell от имени админа и ввести одну из нижеприведенных команд (первая — отключает сенсорный экран, вторая -включает):
Get-PnpDevice | Where-Object {$_.FriendlyName -like ‘*touch screen*’} | Disable-PnpDevice -Confirm:$false
-//-//-//-
Get-PnpDevice | Where-Object {$_.FriendlyName -like ‘*touch screen*’} | Enable-PnpDevice -Confirm:$false
*
Далее требуется перезагрузить ноутбук — по завершении загрузки Windows, вы заметите, что сенсор отключен, и не реагирует на ваши нажатия (протестировано на ноутбуках от Asus TP420, UX 501).
*
Способ 4
Только для устройств, в которых разработчик предусмотрел данную опцию.
Если у вас установлен центр управления ноутбуком («идет» вместе с драйверами на устройство) — проверьте все вкладки в нем. У некоторых устройств есть спец. опции по «тонкой» настройки режимов перекл. планшета/ноутбука (что и позволяет откл. сенсор).
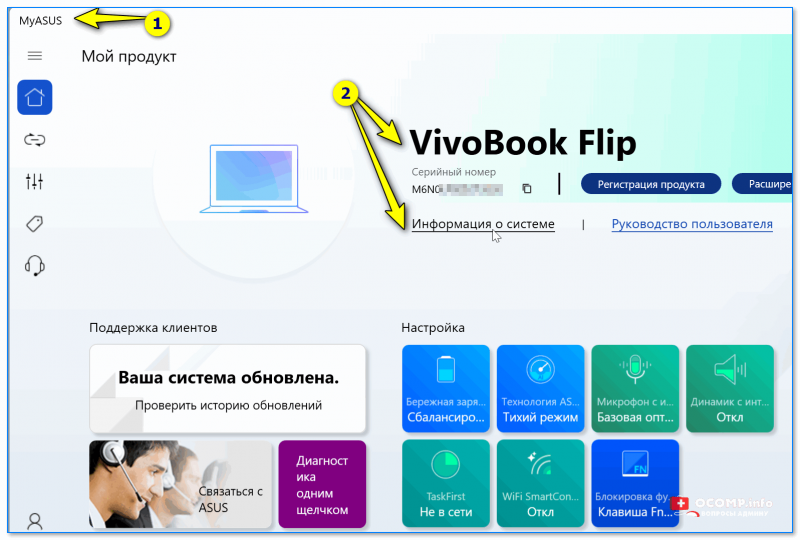
Центр управления MyAsus — показывает основные сведения о системе и позволяет настроить ноутбук под-себя!
*
Дополнения по теме — приветствуются в комментариях!
Успехов!
👋


Полезный софт:
-

- Видео-Монтаж

Отличное ПО для создания своих первых видеороликов (все действия идут по шагам!).
Видео сделает даже новичок!
-
- Ускоритель компьютера

Программа для очистки Windows от «мусора» (удаляет временные файлы, ускоряет систему, оптимизирует реестр).
On certain occasions, disabling the touchscreen bring some advantages. In this article, you’ll learn how to turn off the touch screen in Windows 10.
Today, a lot of computers and laptops are equipped with touch screen displays. You can use a touch screen on a laptop as an input device, just like you do on a regular tablet or cellphone.
Windows 10 design interface works well with a touchscreen in laptop or tablet mode.
It is up to your preference to use the screen as a primary or secondary input device on your laptop computer. Windows 10 allows using touch screen display as both keyboard and mouse device.
But what if we want to disable the touch screen? A touchscreen can be a hindrance if you’re displaying a presentation or working on your laptop while your kids are around.
You can also increase the battery time of your device by disabling the touchscreen feature.
In this article, we’ll show you a set of accessible and awesome methods on how you can disable your touch screen functionality in Windows 10.
So, if you want to turn off that feature on your computer, you have come to the right place.
Table of Contents
- How to turn off the touch screen in Windows 10
- Using Services
- Using Windows Registry
- Using Device Manager
- How to calibrate touch screen in Windows 10
- Wrap up
Using Services
If you want to disable the touch screen for a permanent or more extended period of time, you need to perform the following steps:
- Open the Start Menu and type “Services“. Open it;

- Now search for “Touch keyboard and handwriting panel service” and double click on it;

- Click on Startup type and choose “Disabled” from the drop-down menu;

- Next, navigate to “Services” status and click “Stop“;
- Now when it is stopped, click on Apply and Ok.
Note: This method permanently disables your touch screen display.
To enable touch screen display, navigate to the same “Touch keyboard and handwriting panel service” through services.
Click again on Startup type and select “manual/automatic” from the drop-down menu. Now click on Apply and Ok.
Using Windows Registry
Another method to permanently disable touch screens is through Windows 10 Registry. To disable the touch screen using Windows Registry, perform the following steps:
- Press the “Windows key + R” to open the Run prompt;
- Type “Regedit ” in the search bar next to open registry editor and press Enter;

- Double click on “Computer” to expand and again double click on “HKEY_CURRENT_USER“;

- A new list of options expands. Navigate to the following path by double-clicking on each option as explained above:
HKEY_CURRENT_USER🡪Software🡪Microsoft🡪Wisp🡪 Touch

- Now right click on “Touch” in the left window pane and go to “New🡪 DWORD (32-bit) value“;

- A new DWORD (32-bit) entry appears in your right window pane. Rename it to “Touchgate“;
- Now double click on this entry to open the edit dialogue box. Here you can edit both name and value for this entry. Enter “0” (zero) in the Value data box and keep the base as hexadecimal;

- Now click “Ok” and restart your device.
Note: As your device restarts after the change, you will notice that the touch input will be disabled. To enable it again, you need to repeat the same process. Simply open registry editor on your laptop and navigate to the path
Computer🡪 HKEY_CURRENT_USER🡪Software🡪Microsoft🡪Wisp🡪 Touch.
Now you can take two actions to enable touchscreen. First, you can either change the value of Touchgate entry from 0 to 1 by double-clicking on it. Otherwise, you can simply delete the Touchgate entry and enable touchscreen again.
Using Device Manager
- Open the Start Menu and type Device Manager. Open it;
- The Device Manager window opens. Now locate the Human Interface Devices option and click on an arrow on its left side to expand;
- Then, find the HID-compliant touch screen device option from expanded options and right-click on it;
- A pop-up window appears. Click on “Disable“:
- A new pop-up window appears with the message “disabling this device will cause it to stop functioning. Do you really want to disable it?” Click “Yes” to proceed with disabling the touchscreen.
Note: You can enable the touch screen feature by repeating the same process and selecting the “Enable “option by right-clicking your touch screen name.
Another important thing is that this disabling method sometimes works momentarily and will disable the touchscreen only when you are using the device.
It means that if you shut down your device, it will reverse your setting and again enable the touch screen.
If your touch screen is enabled but not working correctly, you can try two methods.
The first is to clean your touchscreen and remove any sort of impurities or dirt. Dirt particles or dust may disturb the touch feature.
Another possible reason behind touch screen lagging could be an old touchscreen driver software.
To solve this, keep updating your touchscreen driver through your computer manufacturer’s website. Sometimes, Windows Updates also update drivers.
How to calibrate touch screen in Windows 10
If the above methods didn’t work for you, you can try to calibrate your touch screen. To perform it on Windows 10, take the following steps:
- Open the Start Menu and type “Control Panel” and then open it;
- In the Control Panel window, type “Tablet PC settings” in the find bar and click it;
- In the Tablet PC settings dialogue box, go to the “Display” tab, and under “Display options“, you can find the “Calibrate” option. Click on it;
- Now follow the lead and instructions that appear on your screen. It would be best to press the crosshair icon on the screen whenever it displays on your screen.
Note: If any of these methods do not work and your touch screen is still lagging, it may be due to a physical issue and need to be addressed by a good computer or laptop technician.
Wrap up
To disable the touchscreen feature, it does not matter which device you use.
Whether it is a laptop or desktop computer, tablet, or a 2-in-1 device; Windows 10 allows to disable touch input in all models ranging from Dell to Lenovo.
However, all these methods are manual and need to be performed all over again when you want to enable the touch screen again.
Note that many users report that the Device Manager method works once only.
If you want to disable the touchscreen feature permanently, you need to either use the services method or edit the touch registry through Windows Registry.
Check out some of our other awesome articles:
- Creating a restore point in Windows 10. How to do it?
- How to protect a folder with a password in Windows 10?
- Remove a Microsoft account from Windows 10: how to do it?
- Changing the DNS in Windows 10
- How can I flush DNS in Windows 10?
- Finding and changing IP address in Windows 10
- How can I clear the clipboard contents in Windows 10?
- How can I open Task Manager in Windows 10?
- Changing the language in Windows 10
- How to show the battery percentage in Windows 10?