КДПВ. Бут-менеджер rEFInd с темой оформления Regular.
На сегодняшний день практически все уже слышали про технологию UEFI. Говорить о том, что это такое и зачем оно нужно, я не собираюсь. Сегодня я бы хотел описать простейший сценарий установки Dual Boot системы с полной поддержкой UEFI, а также рассмотреть отдельно установку и настройку бут-менеджера rEFInd. Возможно вы уже видели подобные мануалы и гайды, но я постараюсь донести весьма доходчиво суть того, что мы будем делать и зачем. В других мануалах вы лишь смотрите за «магией» картежника и пытаетесь её повторить, делая, зачастую, элементарные ошибки. Кому эта тема интересна — прошу под кат.
В целом UEFI призвана наоборот упросить процесс загрузки, а не усложнить его. К примеру, посредством этой технологии компьютер можно загружать ОС и вовсе без прослойки в лице GRUB / LILO / etc, загрузчиком может выступать сама UEFI. Однако этот метод имеет свои недостатки, например, вам придется повозиться после обновления ядра, можно, разумеется, написать скрипт, но в целом этим и занимается grub2-efi
Итак, давайте сформируем примерный список наших действий, некоторым хватит прочесть его и уже взяться за дело. Собственно тут будет всего четыре пункта. Пятый и шестой пункт опционален.
- Запись образа Windows 10 (8/8.1) на диск/флешку.
- Установка Windows 10 на часть диска.
- Запись образа Linux-дистрибутива с поддержкой EFI (большинство) на диск/флешку.
- Установка Linux-дистрибутива на оставшуюся часть диска.
- Установка и конфигурация rEFInd.
- Удаление GRUB и полный переход на rEFInd.
На первый взгляд всё очень просто, всего 4 базовых пункта, но тут есть огромное количество нюансов.
Ошибки делают на всех этапах: входят в режим Legacy-bios, указывают не тот загрузочный раздел, просто не понимают, что делают и т.д. В конечном итоге всё это приводит к массе боли и страданиям на форумах, в чатах, и т.д. На деле же всё нереально просто, нужно просто понимать, что ты делаешь на каждом этапе и проверять себя.
Сначала немного теории
UEFI видит только один специальный ESP-раздел, обычно он имеет размер 100-200 мегабайт и форматирован в FAT32 (бывает в FAT16), в нем содержаться папки с названиями а-ля Boot, Microsoft, Fedora, Ubuntu и т.д. Если вы перепробовали достаточное количество ОС и никогда не форматировали этот раздел, то там могло набраться приличное количество папок. К примеру, у меня было 2 живых оси и лежало около 6 папок.
P.S. CodeRush подсказал, что поддерживаются все FS, если на них есть соответствующие драйверы:
Это неверно. UEFI видит все разделы, для ФС которых в конкретной реализации прошивки имеются драйверы. ESP же отличается от остальных разделов только тем, что а) для FAT драйвер иметь обязательно и б) на разделе ESP осуществляется поиск загрузчиков и автоматическое создание соответсвующих переменных BootXXXX, если загрузчики нашлись.
В самих папках лежат исполняемые файлы .efi которые и выступают в роли загрузчиков ОС. В папке debian вы наверняка обнаружите файл grubx64.efi, а в папке Microsoft – bootmgr.efi.
Большинство Linux-дистрибутивов монтируют ESP-раздел к /boot/efi, то есть загрузчик Debian будет лежать примерно на таком пути: /boot/efi/EFI/debian/grubx64.efi
C директорией разобрались, а что дальше?
А дальше нужно понимать, что существует ещё порядок загрузки, которым можно руководить с помощью утилиты efibootmgr, если у вас её нет, то можете скачать через свой пакетный менеджер, во всех стандартных репозиториях она присутствует. Для начала можете просто ввести эту команду и увидеть список порядка загрузки, а также все UEFI-записи. Если хотите разобраться с утилитой, то курите ман и читайте интернеты, в целом она весьма простая. Злой Windows как раз-таки тут и затирает наш GRUB и ставит Windows Boot Manager первым приоритетом, поэтому его приходится восстанавливать. Скажу лишь как редактировать записи:
efibootmgr -b <номер записи> -<модификатор редактирования> <параметр модификатора>
К примеру, efibootmgr -b 0 -B означает удалить запись 0.
P.S. CodeRush и другие комментаторы заметили, что efibootmgr является весьма опасной утилитой и отмечают, что гораздо безопасней пользовать EFI Shell.
По факту GRUB можно вообще не трогать, потому что он наверняка так и лежит в папке EFI/<название дистрибутива>, нужно лишь восстановить запись и выставить первый приоритет, но зачем что-то копать если можно chroot’нуться и ввести grub-install? В большинстве случаев он сделает всё сам.
Кстати, стоит не забывать, что базовым функционалом efibootmgr обладает и сам, собственно, UEFI, он умеет читать эти записи и выстраивать приоритеты. Но сам просматривать ESP-разделы и добавлять новые записи он не умеет, эти обязанности возложены на EFI Shell и операционные системы.
P.S. CodeRush
Еще как умеет, и это умение требуется спецификацией начиная с UEFI 2.2 (SecureBoot появился в UEFI 2.3.1C).
И на последок: Все ваши действия в efibootmgr записываются в NVRAM! В большинстве случае UEFI умеет восстанавливать битый NVRAM каждый раз проверяя его и перезаписывая, в случая неполадок. Однако некоторые недобросовестные производители выпускают сырые прошивки и можно получить самый настоящий кирпич. К примеру ноутбуки с UEFI на базе Phoenix SCT окирпичиваются! Так что перед тем как продолжить читать, удостоверьтесь, что ваша модель материнской карты или ноутбука, устойчива к таким экспериментам.
P.S. Уже после написания большей части статьи я вспомнил про Secure Boot. Обычно UEFI тянет его за собой, но в большинстве случаев его можно весьма просто отключить в настройках UEFI. Многие Linux-дистрибутивы поддерживают его, но я всё же рекомендую его отключить, так как он может потянуть за собой массу проблем.
Базовый экскурс в теорию закончен.
Теперь можно перейти к практике
Дисклеймер: Сразу оговорю, что я предпочитаю стерильные условия и сам делаю полную переустановку с помощью проверенных лично мной утилит. Если вы будете использовать другие утилиты, то, пожалуйста, не пишите почему у вас что-то не получается на том или ином этапе. Мой вариант проверен сотнями переустановок друзьям и коллегам.
Первым делом нам нужно записать Windows
Потому что если поставить Windows второй, то она затрет загрузчик. Восстановить? Без проблем. Но зачем возня, если можно сразу сделать всё по уму? Впрочем я всё равно обговорю нюансы восстановления чуть позже в конце статьи.
В отличии от Linux, Windows записать гораздо проще, на мой взгляд. Первый способ до возможно многим знаком, нужно просто зайти в cmd.exe от имени администратора и ввести эти команды. Не сложно заметить, то тут нет абсолютно никакой магии. Мы просто форматируем флешку в FAT32:
diskpart

list disk

select disk <номер флешки>

clean

create partition primary

select partition 1

active

format fs fat32 quick

assign

exit
После этого нужно просто открыть ISO-файл архиватором и перекинуть содержимое на чистую флешку. Всё, UEFI-флешка готова. На Linux можно сделать всё аналогичным образом, просто форматируем в FAT32 и копируем содержимое.
Полученную флешка должна отлично загружаться любым ПК с поддержкой UEFI.
Кстати, обратимся к теории: наш образ с Windows 10 содержит папочку efi, в ней как раз лежит всё добро для начала загрузки, которое должен увидеть наш UEFI. Поэтому простого форматирования и копирования в большинстве случаев хватает для большинства ПК.
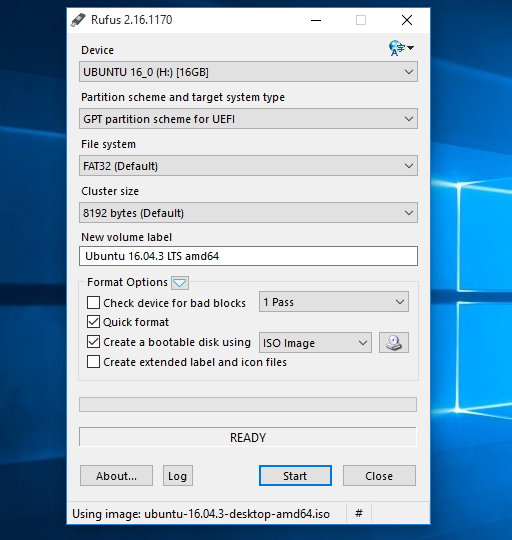
Однако я предпочитаю второй способ с использованием утилиты Rufus. Он меня никогда не подводил. Однако это Windows-only способ. На Linux-системах использование ddresque для создания загрузочной флешки Windows НЕ РАБОТАЕТ. Так что пробуйте другие утилиты, если первый способ с простым форматирование не помог.
Всё что вам будет нужно: выбрать вашу флешку, выставить параметр «Схема раздела и тип системного интерфейса» на «GPT для компьютеров с UEFI», и нажать старт. Остальные параметры трогать не нужно. Лучше использовать флешки помельче (на 8-16 гигабайт).
Наверняка один из способов должен был прокатить, лично я ни разу с проблемами на этом этапе не встречался, главное чтобы компьютер поддерживал UEFI.
Поэтому перейдем к этапу установки
После загрузки в UEFI-режиме делаем всё по стандартной схеме, но на этапе выбора типа установки выбираем «экспертную», то есть мы разметим раздел сами. Размечать рекомендую аккуратно, особенно если дисков много. Наконец, выбрав диск, удалите все существующие разделы. Создайте один раздел с нужным вам размером, к примеру, 150 гигабайт. (Если вы предпочитаете создавать два и более разделов для ОС и файлов — без проблем, создавайте). Выберете этот раздел кликом мышки и нажмите «Далее». И если вы всё сделали верно, то Windows попросит вас создать дополнительные. Обязательно отвечайте «Да». Система создаст три раздела. Два своих для системных нужд и один тот самый нужный нам EFI-раздел. У меня он по нумерации всегда второй, всего получится 4 раздела, включая пользовательский NTFS. Если установщик не предложил создать разделы или создал всего один, то значит вы загрузились в Legacy-режиме и нужно перезаписывать флешку, что-то пошло не так. К сожалению редактор разделов Windows-установщика крайне слаб по возможностям, поэтому пробовать размечать разделы под будущий Linux тут смысла нет, оставляем это место попросту свободным. Дальше устанавливаем всё в штатном режиме.
Кстати, один из признаков правильной установки Windows в UEFI-режиме, появление логотипа производителя материнской карты / ноутбука / планшета при загрузке. Во многих UEFI (к примеру от ASUS и ASRock) есть отдельная настройка для этого. Так что если логотипа нет, но всё остальное прошло как по маслу, то ничего страшного в этом нет.
Тонко настраивать Windows на данный момент не рекомендую, так как если что-то пойдет не так, то возможно придется переустановить.
Записываем Linux?
Ага. После входа в Windows рекомендую сразу скачать образ выбранного вами дистрибутива и записать его аналогичным образом через Rufus. Правда в случае с Linux-дистрибутивами Rufus может спросить массу вопросов, к примеру он может попросить подгрузить загрузчик syslinux с интернета или выбрать режим записи образа: ISO или DD. На все вопросы отвечаем «Да.», то есть да, скачиваем последнюю версию syslinux и записываем в режиме ISO. Проверено на Ubuntu (и её вариациях Server, Mate, GNOME), Fedora, RHEL7, Debian и других.
До Dual Boot буквально один шаг
В отличии от Windows большинство дистрибутивов имеют отличную индикацию UEFI-режима. К примеру Debian в своем установщике черным по белому пишет, что система запущенна в UEFI-mode. Другие дистрибутивы проявляют это странным grub-загрузчиком, который выглядит «как-то не так».
Думаю если вы собрались ставить Linux, то вы наверняка сами знаете как ставить ваш любимый дистрибутив, поэтому я не буду заострять внимание на подробностях установки отдельно взятого дистрибутива. Потому что этот этап до боли прост. Если вы уже действительно прогрузились в UEFI-режиме и установили Windows как надо, то Dual Boot уже практически в кармане.
Итак всё что вам потребуется сделать при установке Linux:
Выбрать раздел /dev/sda2 (в вашем случае это может быть другой раздел) и указать точку монтирования — /boot/efi. Всё. Нет, правда, всё. Разумеется не забудьте разметить ext4 / Btrfs / ReiserFS / XFS / JFS раздел, примонтировать его в корень /. Кому нужен swap (если нужен) создайте и его. Дальше установщик вашего дистрибутива сделает всё сам, установит в директорию EFI/<название дистрибутива> свой GRUB и найдет запись Windows (EFI/microsoft).
Данная логика была проверена во всех вышеозначенных дистрибутивах. То есть повторюсь ещё раз: Главное показать вашему дистрибутиву где у вас этот заветный ESP-раздел и куда надо ему кидать загрузчик. Он его не форматирует, а просто добавляет GRUB. А вот уже сам GRUB вершит магию, изменяет приоритеты загрузки и т.д. Замечу, что некоторые дистрибутивы сами монтируют этот раздел куда надо, так как видят флаги ESP и BOOT. К примеру в установщике Debian нужно просто создать пользовательский раздел и всё.
Наводим красоту, ставим rEFInd
К сожалению счастью я болею сильной формой перфекционизма. И простой GRUB2 меня не устраивал, больно он страшный и не красивый. Беглый гуглинг рассказал мне о BURG, «красивом» форке GRUB, но он был заброшен и на данный момент скорее мертв, чем жив. К счастью для UEFI-машин есть отличная альтернатива — rEFInd. rEFInd является форком, заброшенного ныне rEFIt, а также его логическим продолжением. Первый создавался в первую очередь для Mac’ов и работы рядом с Boot Camp, нынешний форк такой узкой специализации не имеет и подходит практически для любых конфигураций.
Стоит сразу заметить, что rEFInd НЕ является загрузчиком. Это так называемый Boot Manager, он вызвает другие .efi-бинарники к исполнению, а также может направить UEFI на запуск ядра прямо с раздела
/boot. Другими словами то есть систему загружает не он, а сам UEFI. Для Multi-Boot машин является отличным решением. Сам по себе rEFInd является .efi-приложением, собранным средствами UEFI Shell. Сам находится в директорииEFI/refind/refind_x64.efi
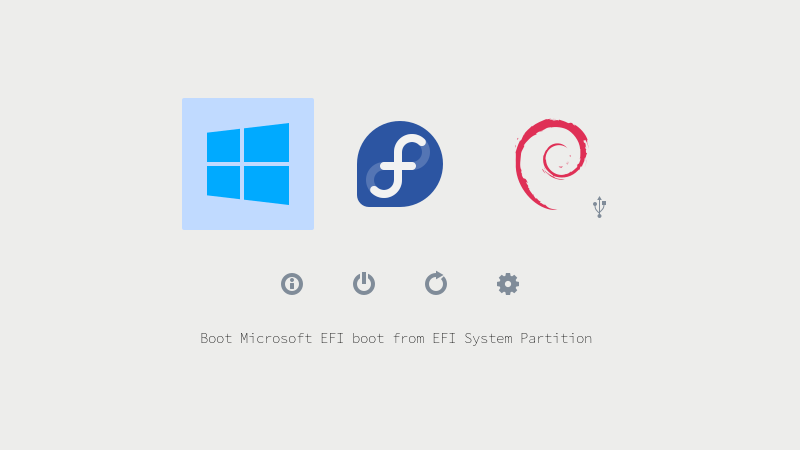
Помимо того, что можно выбирать между уже установленными системами на ПК, приятным плюсом можно выделить автоматическое обнаружение загрузочных флешек и дисков. На КПДВ это можно увидеть. У меня имеется загрузочная флешка с Debian (не установщиком, а полноценной ОС) и можно увидеть удобную индикацию того, что это именно флешка, а не что-то другое. Если у вас имеется несколько ядер, то их список можно увидеть по нажатию клавиши F2. Помимо этого в файле /boot/refind_linux.conf можно задать несколько вариантов с разными параметрами ядра (например первый — стандартный для загрузки GUI, второй — безопасный режим без видеодрайвера и т.д, можно сделать дюжину вариантов, по умолчанию всего три). Также в папку EFI/tools можно накидать различных .efi-бинарников, к примеру UEFI Shell или memtest86+. rEFInd их автоматически подхватит и покажет в нижнем ряду как утилиты.
Хотите также?
Процесс установки из под Linux необычайно прост. Все способы описаны на официальном сайте, устанавливать можно практически из любой ОС. Для начала посетите эту страничку и скачайте .deb- или .rpm-пакет.
Если у вас редкий дистрибутив вроде Slackware или Gentoo, то лично я вам помочь не смогу, но на сайте есть обычный .zip-архив и другие варианты установки, так что если уж вы работаете в подобных дистрибутивах, то наверняка поставить своими силами вы сможете без проблем.
Сделайте бэкап EFI-директории:
cp -r /boot/efi/EFI /boot/EFI.bkp
После загрузки пакета, выполните:
cd Downloads или cd Загрузки
И установите пакет:
sudo dpkg -i <имя пакета>.deb или sudo dnf install <имя пакета>.rpm
В моем случае dpkg не мог иногда подтянуть зависимости, если у вас возникнут такие же трудности, то установите gdebi (sudo apt-get install gdebi) и выполните sudo gdebi <имя пакета>.deb.
Если у вас RHEL или CentOS, то используйте yum вместо dnf.
В логах установки пакета можно отследить лог установки rEFInd, в котором возможно будут ошибки их надо сразу отследить. Однако по моему опыту ошибок не возникает, если всё сделать правильно. Проверить результат работы установщика rEFInd можно, воспользовавшись утилитой efibootmgr, там первым приоритетом должна должен быть именно rEFInd Boot Manager.
Установить rEFInd повторно, если пакет уже установлен, можно с помощью команды:
refind-install
Установку rEFInd первым приоритетом можно произвести в ручную, с помощью команды:
refind-mkdefault
Перезагружаемся.
Всё очень страшно и откуда у меня столько ОС?
Да, всё страшно, пока. На самом деле ОС у вас всего две. Просто rEFInd собрал все .efi-бинарники и ещё отобразил ОС с возможностью загрузки напрямую. Для исправления этого недоразумения мы удалим лишнее, напишем свой конфиг и поставим красивую тему на rEFInd.
Первым делом зайдите в Linux, выбрав один из рабочих пунктов загрузки. В меню должен быть пункт для загрузки БЕЗ использования grubx64.efi! В разделе /boot проще работать из под администратора (потому у команду cd не хватает привелегий, а sudo она не работает), так что su и вводим пароль root’а.
Этот пункт не зря опциональный, потому что если у вас недостаточно опыта, то можно очень просто что-то сломать и не заметить. Рекомендую подготовить флешку с рабочим LiveCD, чтобы проводить восстановление, в случае неожиданностей.
Наша первая задача — удалить лишние директивы загрузки, их запросто может быть штук 6, а системы всего две.
Заходим в директорию:
cd /boot/efi/EFI && ls
Вероятно тут будет пять папок:
BOOT, microsoft, <ваш дистрибутив>, refind и tools.
Если будет что-то лишнее — смело удаляйте.
Способ 1 (через очищение, опаснее):
Убедившись что вы загрузились через rEFInd (!) и НЕ использовали для этого GRUB можете смело удалить папку вашего дистрибутива. Перезагрузитесь и проверьте, можете ли вы загрузиться в ваш Linux. Если можете, то вероятно в меню загрузки осталось 4 директивы: Windows, Linux и два странных пункта, которые приводят (скорее всего) к загрузке Linux. Можно было догадаться, что это .efi-бинарники из папки EFI/BOOT. Папку можно удалить полностью. НО! Убедитесь, что у вас есть бэкап. Перазагружаемся. Всё отлично?
Удаляем GRUB:
sudo apt-get remove grub2 grub2-efi grub grub-efi
Или:
sudo dnf remove grub2
Теперь можно ставить тему.
Некоторые UEFI другие директории вовсе не видят. Поэтому небольшой work around для таких систем существует. Удаляем папку BOOT, переименовываем папку refind в папку BOOT, а также сам файл refind_x64.efi в bootx64.efi. Перезагружаемся.
Способ 2 (через конфиг rEFInd, безопаснее):
Этот способ гораздо безопаснее, потому что удалять и что либо трогать мы не будем, мы добьемся результата правильной настройкой конфига. Сам конфиг лежит тут: /boot/efi/EFI/refind/refind.conf
Чтобы настроить свой набор директив загрузки нужно использовать два параметра scanfor и menuentry, после настройки должен получится примерно такой конфиг:
# Сканируем записи созданные ручкуами, флешки и оптически приводы

scanfor manual,external,optical

# Пункт для загрузки Linux

menuentry Linux {

 loader /EFI/ubuntu/grubx64.efi

 icon /EFI/refind/icons/os_linux.png

}

# Пункт для загрузки Windows 10

menuentry "Windows 10" {

 loader EFIMicrosoftBootbootmgr.efi

 icon /EFI/refind/icons/os_win.png

}
Разумеется это только часть конфига, другие параметры можно взять из примера
Мой конфиг на базе первого способа с комментариями
# Ожидание в секундах перед авто-выбором ОС

timeout 20

# Скринсервер через 300 секунд, если ничего не выбрали,

# но нажали любую клавишу и отменили автовыбор

screensaver 300

# Разрешение бут-менеджера

resolution 1280 1024

# Использовать графику при загрузке Linux. Этот параметр позволит загружать ОС с красивой Plymouth

# заставкой в разрешении указанном выше

use_graphics_for linux

scanfor internal,external,optical,netboot,biosexternal

# Подключение темы

include themes/refind-theme-regular/theme.conf
Отдельно про Plymouth можно почитать здесь.
Включение красивой темы
С этим всё просто, чуть выше последняя строчка конфига указывает на .conf-файл темы. Сами темы желательно класть в папку /boot/efi/EFI/refind/themes. По-умолчанию её нет, создайте через mkdir.
Заходим в директорию themes и просто пишем git clone https://github.com/munlik/refind-theme-regular.git. В конфиге прописываем строку include themes/refind-theme-regular/theme.conf
Другие темы можно посмотреть на оф. сайте.
Там же можно посмотреть подробные процессы установки, параметры для тонкой настройки конфига и многое другое.
Пожалуй на этом всё. Мы получили красивый бут-менеджер для выбора нужной ОС с полной поддержкой UEFI. Пункт с установкой rEFInd наиболее сложный, а поэтому опциональный, большинству хватит grub2-efi.
Напоследок небольшое видео от меня:
Наверняка закралось приличное количество ошибок в тексте, буду рад, если вы отпишите о них мне ЛС.
UPD 28.10.2022: Друзья, статье уже 6 лет, несмотря на то, что rEFInd технически до сих пор актулен, я перешёл на systemd-boot, на мой взгляд он проще и удобней в настройке.

Доброго здравия!
Иметь 2 опер. системы на компьютере в некоторых случаях архи-удобно: повышает надежность (если ошибка с одной — загрузится другая); можно учиться чему-то новому; открывать файлы, которые в одной из систем недоступны; использовать более разнообразный софт, и т.д.
Ну и т.к. тема эта интересна и периодически по ней вижу вопросы — решил сегодня привести небольшой пример, как относительно легко можно установить Ubuntu 22 рядом с Windows 10 (11) на одном компьютере (так, чтобы можно было работать с любой из них — достаточно просто на этапе загрузки устройства выбрать нужную).
*
Заранее предупреждаю всех читателей, кто воспользуется советами из этой заметки: несмотря на то, что ничего очень сложного мы делать не будем, — 📌 сделайте БЭКАП всех нужных данных с диска, т.к. всё предугадать нельзя (никто не отменял сбои и ошибки, плюс у всех разное железо, уровень админ.-я, возможно использование др. версий софта и т.д.).
Кстати, в заметке рассмотрен случая, когда на компьютере используется UEFI и разметка диска в формате GPT. Прим.: большинство современных ПК/ноутбуков это и использует…
*
Теперь к теме…
📌 По теме!
Лучшие дистрибутивы Linux для новичка: какую версию выбрать, с чего начать (образы с загрузкой в режиме LiveCD + с поддержкой русского языка!) — https://ocomp.info/vyibor-linux.html
*
Содержание статьи
- 1 Пример установки Ubuntu (на ПК с Windows)
- 1.1 ШАГ 1: загрузочная флешка
- 1.2 ШАГ 2: подкл. флешки и загрузка с нее
- 1.3 ШАГ 3: установка Windows
- 1.4 ШАГ 4: установка Ubuntu

→ Задать вопрос | дополнить
Пример установки Ubuntu (на ПК с Windows)
ШАГ 1: загрузочная флешка
Итак…
Первое, что нам нужно сделать — подготовить установочную флешку (ее еще называют загрузочной). В своем примере я сделаю универсальную флешку, на которую запишу и Windows, и Linux (а затем с нее произведу установку).
Для создания такой флешки нам нужно:
- загрузить образ ISO-файл с Windows 10/11 (📌вот тут рассказал, как это сделать);
- загрузить ISO-файл с Ubuntu 22 (ссылка ниже 👇);
- загрузить 📌программу Ventoy (она легко создаст мульти-загрузочную флешку);
- 👉👉 далее: форматируете флешку в Ventoy и просто копируете на нее образы ISO с Windows и Linux (никак не изменяя их).
- Всё, флешка будет готова! 👌
***
Ubuntu
📌Офиц. страница: https://ubuntu.com/download/desktop
![]()
Скрин. Лого «Убунту»
Наиболее популярная версия Linux для дом. пользователя (встроено куча софта: офис, торрент, плееры, разметка диска, браузеры и т.д.). В данный момент версия Ubuntu 22.04 LTS). Для этой версии есть свои тех. требования:
- процессор: 1,5 ГГц, двухъядерный;
- ОЗУ: 4 ГБ;
- место на диске: 25 ГБ (лучше чуть больше);
- доступ к Интернет;
- наличие исправного DVD-привода или USB-порта 2.0/3.0+ (для установки системы).
***
📌 В помощь!
Как создать загрузочную флешку с Linux (при работе в Windows). Cкрины настроек из бесплатных программ — https://ocomp.info/sozdanie-zagr-fleshek-s-linux.html
*
ШАГ 2: подкл. флешки и загрузка с нее
Далее подключаем созданную в ШАГЕ 1 уст. флешку к исправному USB-порту и включаем компьютер/ноутбук.
Флешка подключена к USB-порту!
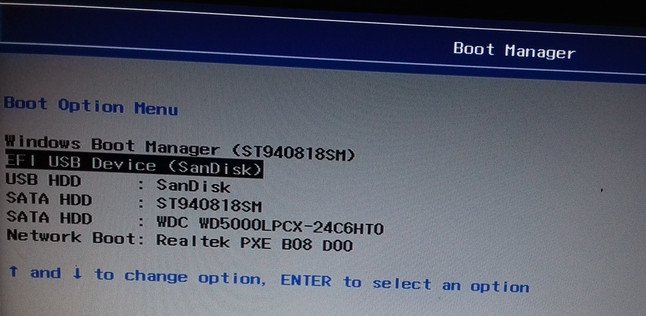
Следом сразу же нужно нажать 📌спец. кнопку для входа в загрузочное меню |Boot Menu (на каждом устройстве она своя — зависит от версии BIOS, и его производителя). Чаще всего это кнопки: F8, Esc, F12, F9.
Если загрузочное меню откроется — вы должны увидеть в нем «нашу» подготовленную флешку (в моем случае «UEFI: Kingston Data Traveler…» 👇) — именно эту строку нужно выбрать и нажать Enter.
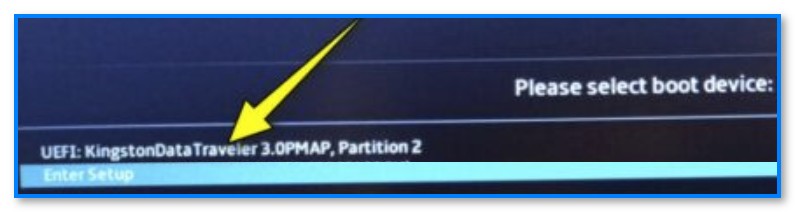
Фото. Пример загрузочного меню — выбираем флешку
Если с флешкой всё в порядке — должно появиться меню Ventoy (со списком всех ISO-образов, доступных для установки). Следует также выбрать нужный и нажать Enter.
Примечание: в своем примере я установлю сначала Windows 10 (+ удалю все данные на диске, т.к. они мне не нужны), а затем Linux Ubuntu 22.04. В принципе, если у вас уже есть Windows — следующий шаг можете пропустить…
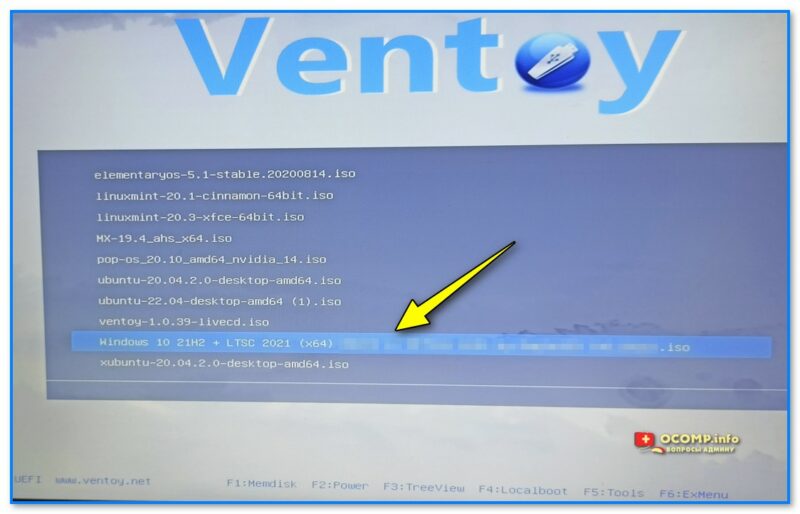
Фото. Ventoy — меню загрузочной флешки — установка ОС Windows 10
*
ШАГ 3: установка Windows
📌 Дополнение: полная установка Windows 10 описана в этой инструкции — https://ocomp.info/ustanovka-windows-10.html
*
1) Установка Windows начинается (в большинстве случаев) с выбора языка. Разумеется, лучше выбрать сразу «Великий и Могучий»… 👇
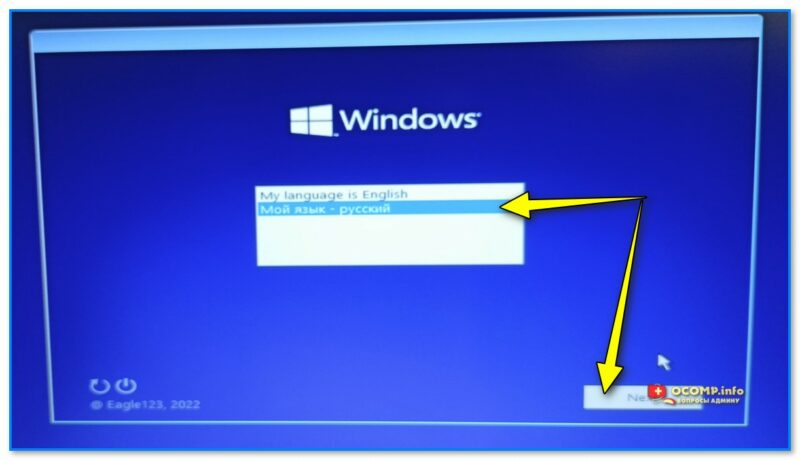
Фото. Выбор языка — уст. Windows
2) Далее подтверждаем свое намерение и начинаем установку…
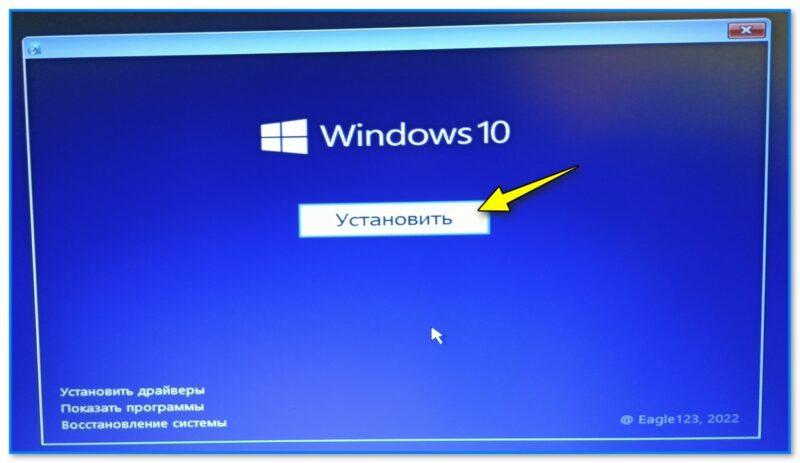
Фото экрана. Установить
3) Как правило, следуем нужно будет прочитать соглашение и нажать по кнопке OK, а затем подождать 1-2 мин., пока произойдет первичная загрузка… См. скрин ниже — окно «Начало установки»…
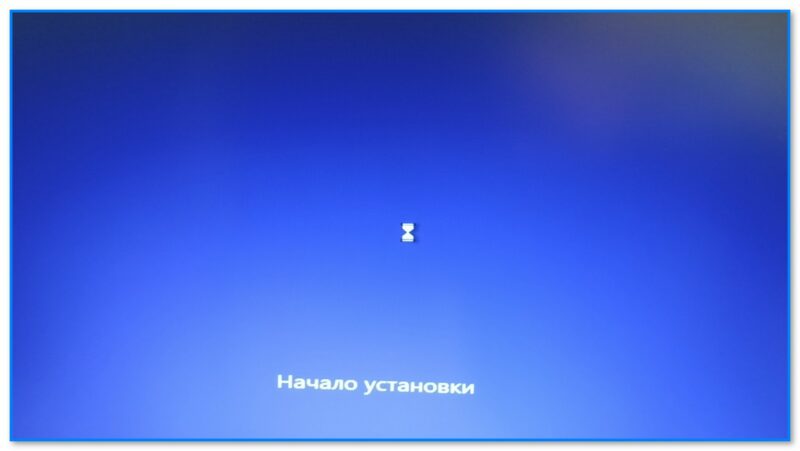
Фото. Начало установки
4) В своем примере я выбрать вариант установки Windows для опытных пользователей (чего рекомендую и вам).
В этом случае у вас появится меню «Где вы хотите установить Windows» — а в нем можно удалить и отформатировать все диски (чего я и сделал, чтобы не осталось никаких старых данных).
Примечание: для удаления раздела диска — просто выберите его в этом окне и нажмите кнопку «Удалить». 👇
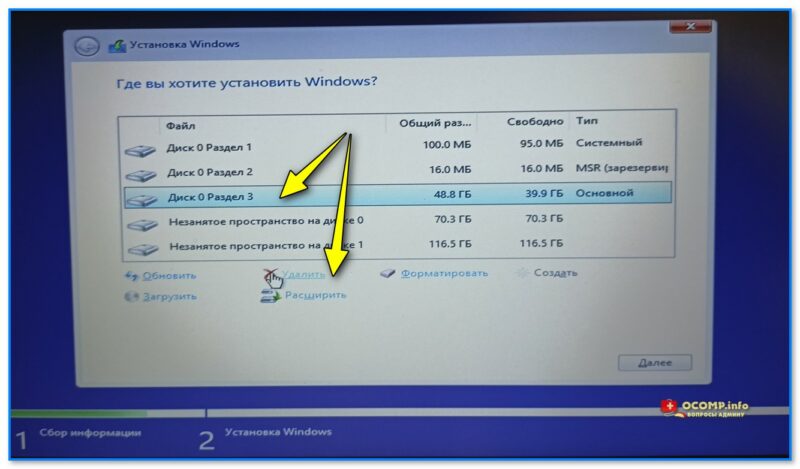
Фото. Удаляем все лишние разделы
5) Затем (если вы всё также удалите, как и я) у вас будут отображаться столько строк, сколько подключено дисков.
Для создания раздела под Windows — нажмите по нужному диску/строке, нажмите кнопку «Создать», введите размер (можно оставить по умолчанию) и нажмите «Применить». 👇
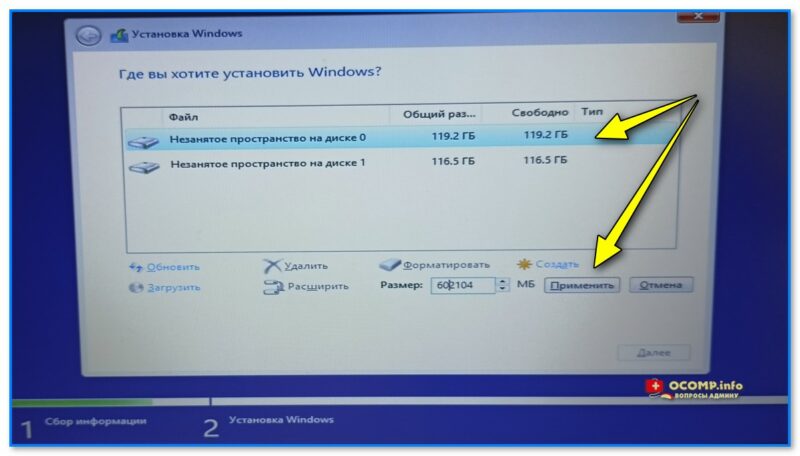
Фото. У меня на этом примере 2 диска. На одном из них я создаю раздел и в него устанавливаю Windows
6) После выбираем созданный раздел и нажимаем «Далее». 👇
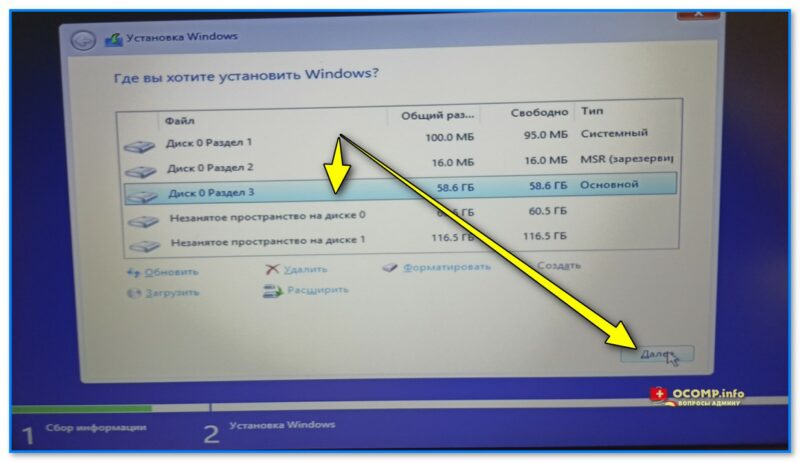
Фото. Выбор раздела и кнопка далее
7) Дожидаемся пока скопируются все файлы. Когда устройство уйдет на перезагрузку — установочную флешку лучше откл. от USB-порта (чтобы компьютер с нее не стал снова грузиться… чего нам уже не нужно).
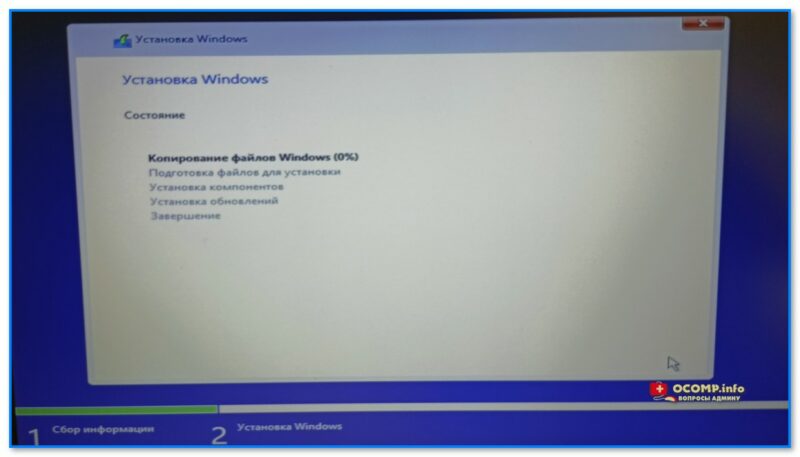
Фото. Дожидаемся завершения копирования
 Далее, после перезагрузки, Windows попросит нас указать время, задать пароль, имя учетной записи и прочие параметры (с которыми, обычно, сложностей не возникает // поэтому я их опустил).

Фото. Это может занять неск. минут (после этого окна потребуется установить время, задать пароль и пр.)
9) В итоге появится рабочий стол — первая задача решена?! Осталось «добить» еще Ubuntu… 👌
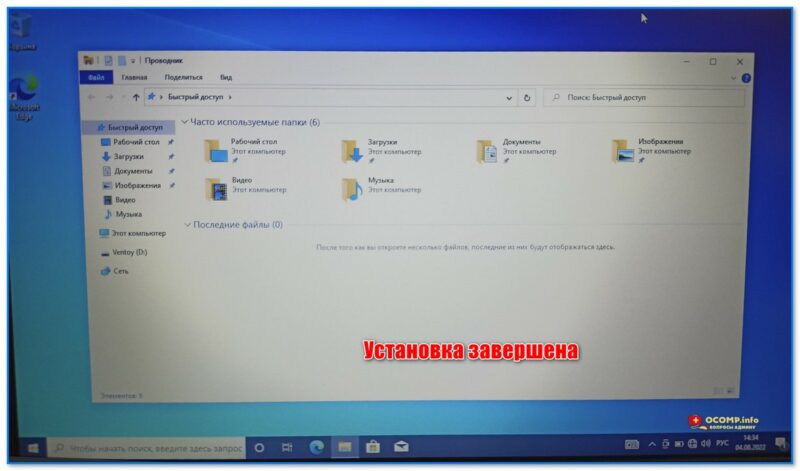
Фото. Установка завершена
*
ШАГ 4: установка Ubuntu
1) Снова подключаем «нашу» подготовленную в ШАГЕ 1 флешку к USB-порту, включаем компьютер и 📌заходим в Boot Menu. Выбираем в нем флешку и нажимаем Enter.
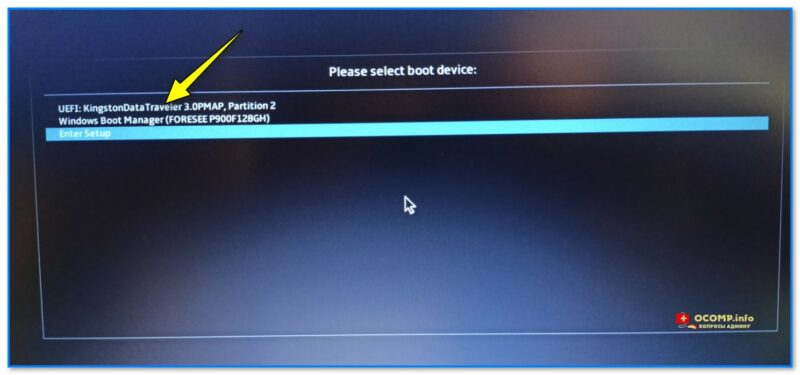
Фото. Открываем в загрузочном меню установочную флешку
2) В меню Ventoy (если вы в этой утилите подготавливали флешку) выбираем строку с Ubuntu 22.04 и нажимаем клавишу Enter… 👇
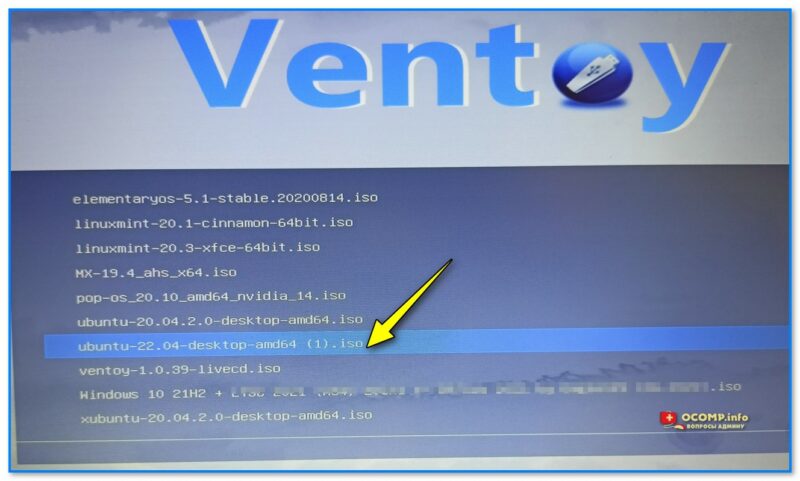
Фото. Ventoy — выбор ОС Ubuntu для установки на диск
3) В появившемся меню GRUB нужно выбрать первый пункт — «Try or Install Ubuntu» (т.е. попробовать или установить Ubuntu).
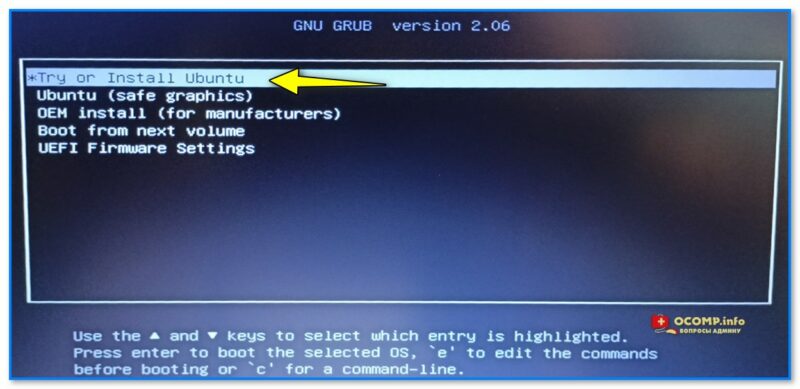
Фото. Инсталляция то бишь установка системы
4) Затем нужно будет подождать 2-3 мин., пока система загрузится.

Фото. Asus Ubuntu
5) Установка системы начинается с окна приветствия: рекомендую сразу же указать русский язык и выбрать вариант «Установить Ubuntu». См. пример на скрине ниже. 👇
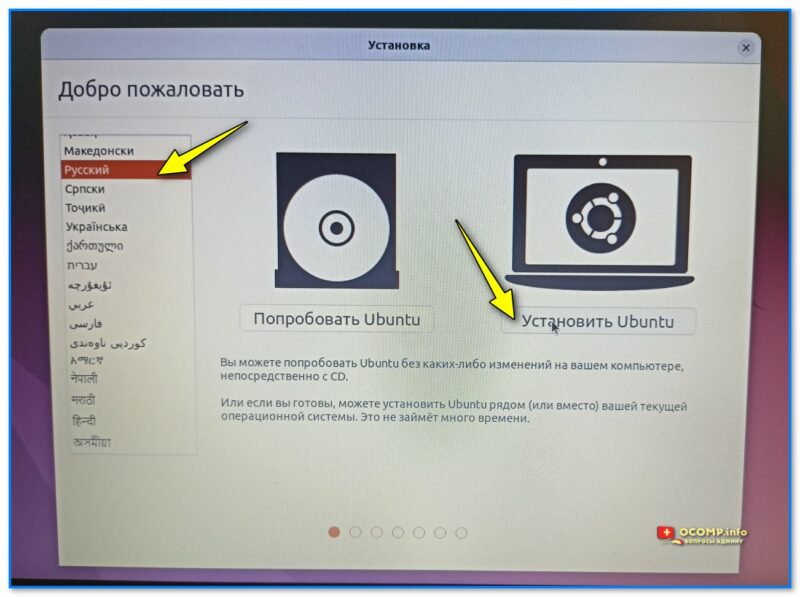
Фото. Выбор языка — русский, установить Ubuntu
6) Раскладка клавиатуры — также рекомендуется вариант «Russian» (англ. будет добавлен автоматически).
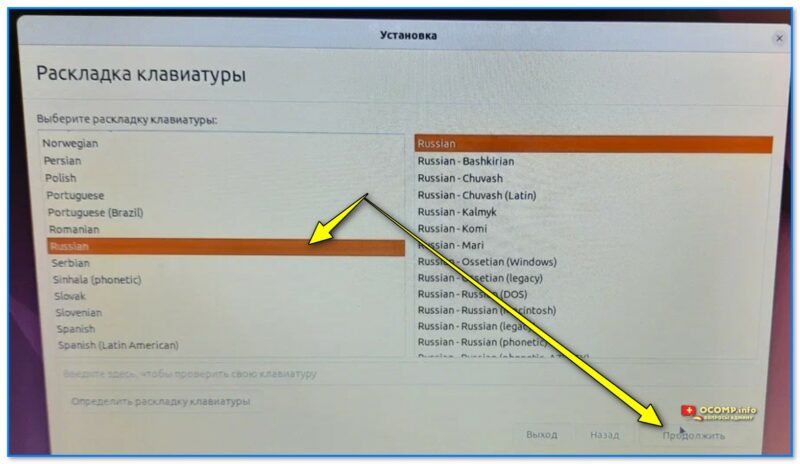
Фото. Раскладка клавиатуры — русская
7) Насчет комплектации — посоветовал бы выбрать вариант «Обычная» (чтобы были все приложения, которые могут понадобиться: плееры, браузеры, офис и т.д.!).
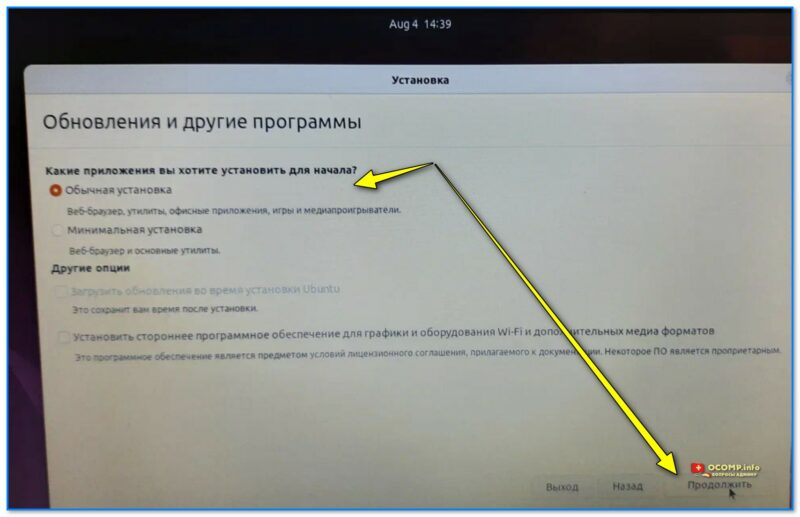
Фото. Установка обычная
📌 Тип установки — самый важный шаг!
В своем примере я выбрал пункт:
«Установить Ubuntu рядом с Windows Boot Manager (Документы, музыка и другие личные файлы будут сохранены. Вы сможете выбирать, какая операционная система будет запускаться при включении компьютера)»
В этом случае установщик автоматически подберет схему раздела, диск под установку Ubuntu и пр. В моей работе и тестах этот способ ни разу не испортил данные на диске, но ручаться я за него не могу… (если вы хотите сделать это вручную — то 📌ознакомьтесь с этим примером, там я показал на Elementary OS, у нее такой же установщик…).
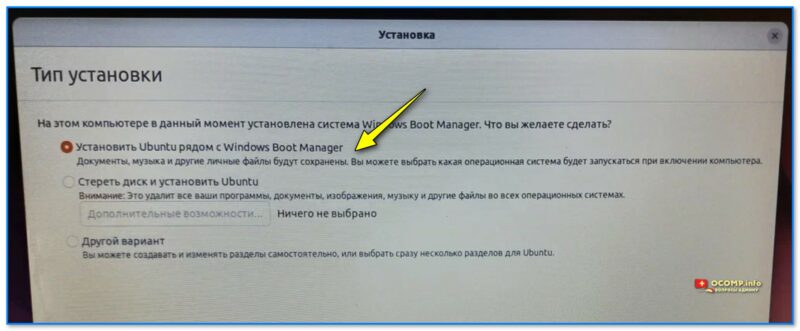
Фото. Установить Ubuntu рядом с Windows Boot Manager (первый пункт)
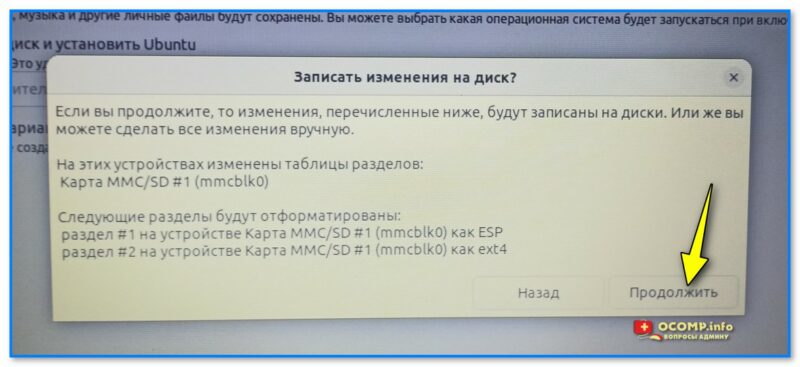
Фото. Соглашаемся с установкой
9) В следующем шаге нужно правильно указать часовой пояс (кстати, если вашего города нет — можно пока выбрать любой из доступных поясов, а затем после установки в настройках Ubuntu этот момент поправить…)

Фото. Где вы находитесь — указать часовой пояс
10) Имя пользователя, ПК, и пароль рекомендую задавать на латинице!
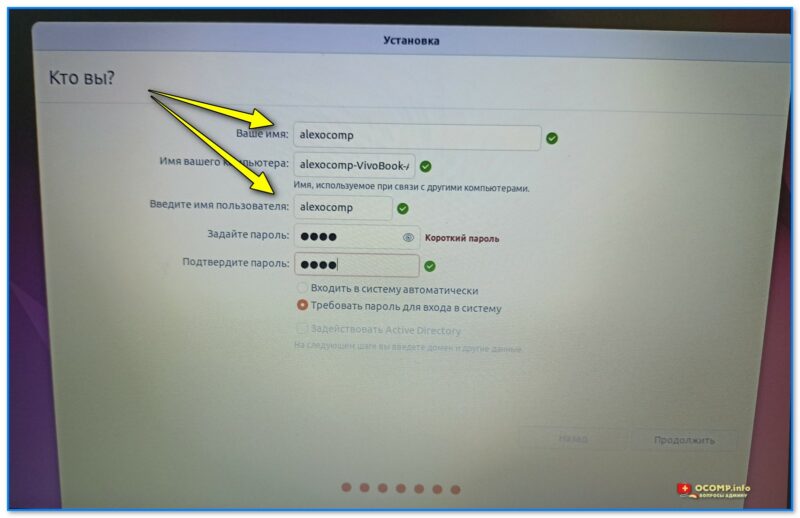
Фото. Имя ПК, пользователя, и задание пароля
11) Далее дожидаемся пока будут скопированы все файлы установщика… На это требуется 5-10 мин. времени на современном устройстве.
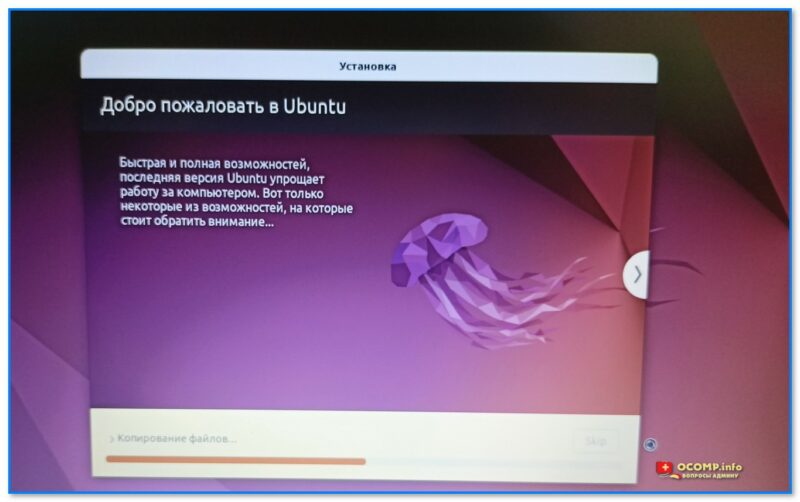
Фото. Процесс установки — не мешаем
12) Если установка прошла успешно — увидите соответствующее окно.👇 Загрузочную флешку можно отключать и перезагружать компьютер.
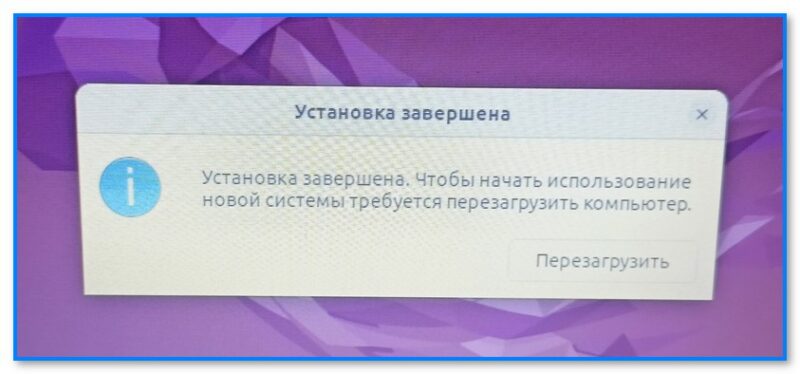
Фото. Дожидаемся окна об успешном завершении
13) После перезагрузки вы увидите меню GRUB — в нем можно выбрать нужную ОС: Windows или Ubuntu (оно теперь всегда будет появляться при вкл. компьютера).
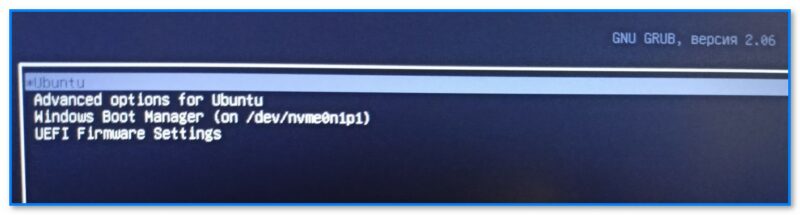
Фото. После включения ноутбука — появл. меню GRUB
14) Как видите на фото ниже — система грузится, работает (в меню слева у Ubuntu представлены быстрые ссылки: браузер, проводник, почтовая программа, офис, магазин приложений, справка и пр.). Задача решена?! 👀👍
Фото. Ubuntu установлена — можно пользоваться!
*
За сим откланяюсь…
Дополнения по теме — приветствуются во комментариях ниже.
Успехов!
🙂


Полезный софт:
-

- Видео-Монтаж

Отличное ПО для создания своих первых видеороликов (все действия идут по шагам!).
Видео сделает даже новичок!
-
- Ускоритель компьютера

Программа для очистки Windows от «мусора» (удаляет временные файлы, ускоряет систему, оптимизирует реестр).
Rather than doing a step-by-step how-to guide to configuring your system to dual boot, I’ll highlight the important points. As an example, I will refer to my new laptop that I purchased a few months ago. I first installed Ubuntu Linux onto the entire hard drive, which destroyed the pre-installed Windows 10 installation. After a few months, I decided to install a different Linux distribution, and so also decided to re-install Windows 10 alongside Fedora Linux in a dual boot configuration. I’ll highlight some essential facts to get started.
Firmware
Dual booting is not just a matter of software. Or, it is, but it involves changing your firmware, which among other things tells your machine how to begin the boot process. Here are some firmware-related issues to keep in mind.
UEFI vs. BIOS
Before attempting to install, make sure your firmware configuration is optimal. Most computers sold today have a new type of firmware known as Unified Extensible Firmware Interface (UEFI), which has pretty much replaced the other firmware known as Basic Input Output System (BIOS), which is often included through the mode many providers call Legacy Boot.
I had no need for BIOS, so I chose UEFI mode.
Secure Boot
One other important setting is Secure Boot. This feature detects whether the boot path has been tampered with, and stops unapproved operating systems from booting. For now, I disabled this option to ensure that I could install Fedora Linux. According to the Fedora Project Wiki Features/Secure Boot Fedora Linux will work with it enabled. This may be different for other Linux distributions —I plan to revisit this setting in the future.
In short, if you find that you cannot install your Linux OS with this setting active, disable Secure Boot and try again.
Partitioning the boot drive
If you choose to dual boot and have both operating systems on the same drive, you have to break it into partitions. Even if you dual boot using two different drives, most Linux installations are best broken into a few basic partitions for a variety of reasons. Here are some options to consider.
GPT vs MBR
If you decide to manually partition your boot drive in advance, I recommend using the GUID Partition Table (GPT) rather than the older Master Boot Record (MBR). Among the reasons for this change, there are two specific limitations of MBR that GPT doesn’t have:
- MBR can hold up to 15 partitions, while GPT can hold up to 128.
- MBR only supports up to 2 terabytes, while GPT uses 64-bit addresses which allows it to support disks up to 8 million terabytes.
If you have shopped for hard drives recently, then you know that many of today’s drives exceed the 2 terabyte limit.
The EFI system partition
If you are doing a fresh installation or using a new drive, there are probably no partitions to begin with. In this case, the OS installer will create the first one, which is the EFI System Partition (ESP). If you choose to manually partition your drive using a tool such as gdisk, you will need to create this partition with several parameters. Based on the existing ESP, I set the size to around 500MB and assigned it the ef00 (EFI System) partition type. The UEFI specification requires the format to be FAT32/msdos, most likely because it is supportable by a wide range of operating systems.
Operating System Installation
Once you accomplish the first two tasks, you can install your operating systems. While I focus on Windows 10 and Fedora Linux here, the process is fairly similar when installing other combinations as well.
Windows 10
I started the Windows 10 installation and created a 20 Gigabyte Windows partition. Since I had previously installed Linux on my laptop, the drive had an ESP, which I chose to keep. I deleted all existing Linux and swap partitions to start fresh, and then started my Windows installation. The Windows installer automatically created another small partition—16 Megabytes—called the Microsoft Reserved Partition (MSR). Roughly 400 Gigabytes of unallocated space remained on the 512GB boot drive once this was finished.
I then proceeded with and completed the Windows 10 installation process. I then rebooted into Windows to make sure it was working, created my user account, set up wi-fi, and completed other tasks that need to be done on a first-time OS installation.
Fedora Linux
I next moved to install Linux. I started the process, and when it reached the disk configuration steps, I made sure not to change the Windows NTFS and MSR partitions. I also did not change the EPS, but I did set its mount point to /boot/efi. I then created the usual ext4 formatted partitions, / (root), /boot, and /home. The last partition I created was Linux swap.
As with Windows, I continued and completed the Linux installation, and then rebooted. To my delight, at boot time the GRand Unified Boot Loader (GRUB) menu provided the choice to select either Windows or Linux, which meant I did not have to do any additional configuration. I selected Linux and completed the usual steps such as creating my user account.
Conclusion
Overall, the process was painless. In past years, there has been some difficulty navigating the changes from UEFI to BIOS, plus the introduction of features such as Secure Boot. I believe that we have now made it past these hurdles and can reliably set up multi-boot systems.
I don’t miss the Linux LOader (LILO) anymore!
 This work is licensed under a Creative Commons Attribution-Share Alike 4.0 International License.
This is an article detailing different methods of Arch/Windows coexistence.
Important information
Windows UEFI vs BIOS limitations
Microsoft imposes limitations on which firmware boot mode and partitioning style can be supported based on the version of Windows used:
Note: The following points only list configurations supported by the Windows Setup even though Windows itself may still work on these unsupported configurations. A good example of this is Windows 11 which still works on a BIOS/MBR configuration once the Windows Setup check is bypassed.
- Windows XP both x86 32-bit and x86_64 (also called x64) (RTM and all Service Packs) versions do not support booting in UEFI mode (IA32 or x86_64) from any disk (MBR or GPT) OR in BIOS mode from GPT disk. They support only BIOS boot and only from MBR disk.
- Windows Vista or 7 x86 32-bit (RTM and all Service Packs) versions support booting in BIOS mode from MBR disks only, not from GPT disks. They do not support x86_64 UEFI or IA32 (x86 32-bit) UEFI boot. They support only BIOS boot and only from MBR disk.
- Windows Vista RTM x86_64 (only RTM) version support booting in BIOS mode from MBR disks only, not from GPT disks. It does not support x86_64 UEFI or IA32 (x86 32-bit) UEFI boot. It supports only BIOS boot and only from MBR disk.
- Windows Vista (SP1 and above, not RTM) and Windows 7 x86_64 versions support booting in x86_64 UEFI mode from GPT disk only, OR in BIOS mode from MBR disk only. They do not support IA32 (x86 32-bit) UEFI boot from GPT/MBR disk, x86_64 UEFI boot from MBR disk, or BIOS boot from GPT disk.
- Windows 8/8.1 and 10 x86 32-bit support booting in IA32 UEFI mode from GPT disk only, OR in BIOS mode from MBR disk only. They do not support x86_64 UEFI boot from GPT/MBR disk, x86_64 UEFI boot from MBR disk, or BIOS boot from GPT disk. On market, the only systems known to ship with IA32 (U)EFI are some old Intel Macs (pre-2010 models?) and Intel Atom System-on-Chip (Clover trail and Bay Trail) Windows Tablets, which boot ONLY in IA32 UEFI mode and ONLY from GPT disk.
- Windows 8/8.1 and 10 x86_64 versions support booting in x86_64 UEFI mode from GPT disk only, OR in BIOS mode from MBR disk only. They do not support IA32 UEFI boot, x86_64 UEFI boot from MBR disk, or BIOS boot from GPT disk.
- Windows 11 only supports x86_64 and a boot in UEFI mode from GPT disk.
In case of pre-installed Systems:
- All systems pre-installed with Windows XP, Vista or 7 32-bit, irrespective of Service Pack level, bitness, edition (SKU) or presence of UEFI support in firmware, boot in BIOS/MBR mode by default.
- MOST of the systems pre-installed with Windows 7 x86_64, irrespective of Service Pack level, bitness or edition (SKU), boot in BIOS/MBR mode by default. Very few recent systems pre-installed with Windows 7 are known to boot in x86_64 UEFI/GPT mode by default.
- ALL systems pre-installed with Windows 8/8.1, 10 and 11 boot in UEFI/GPT mode. Up to Windows 10, the firmware bitness matches the bitness of Windows, ie. x86_64 Windows boot in x86_64 UEFI mode and 32-bit Windows boot in IA32 UEFI mode.
The best way to detect the boot mode of Windows is to do the following[1]:
- Boot into Windows
- Press
Win+Rkeys to start the Run dialog - In the Run dialog type
msinfo32.exeand press Enter - In the System Information windows, select System Summary on the left and check the value of BIOS mode item on the right
- If the value is
UEFI, Windows boots in UEFI/GPT mode. If the value isLegacy, Windows boots in BIOS/MBR mode.
In general, Windows forces type of partitioning depending on the firmware mode used, i.e. if Windows is booted in UEFI mode, it can be installed only to a GPT disk. If Windows is booted in Legacy BIOS mode, it can be installed only to an MBR disk. This is a limitation enforced by Windows Setup, and as of April 2014 there is no officially (Microsoft) supported way of installing Windows in UEFI/MBR or BIOS/GPT configuration. Thus Windows only supports either UEFI/GPT boot or BIOS/MBR configuration.
Tip: Windows 10 version 1703 and newer supports converting from BIOS/MBR to UEFI/GPT using MBR2GPT.EXE.
Such a limitation is not enforced by the Linux kernel, but can depend on which boot loader is used and/or how the boot loader is configured. The Windows limitation should be considered if the user wishes to boot Windows and Linux from the same disk, since installation procedure of boot loader depends on the firmware type and disk partitioning configuration. In case where Windows and Linux dual boot from the same disk, it is advisable to follow the method used by Windows, ie. either go for UEFI/GPT boot or BIOS/MBR boot. See https://support.microsoft.com/kb/2581408 for more information.
Install media limitations
Intel Atom System-on-Chip Tablets (Clover trail and Bay Trail) provide only IA32 UEFI firmware without Legacy BIOS (CSM) support (unlike most of the x86_64 UEFI systems), due to Microsoft Connected Standby Guidelines for OEMs. Due to lack of Legacy BIOS support in these systems, and the lack of 32-bit UEFI boot in Arch Official Install ISO (FS#53182), the official install media cannot boot on these systems. See Unified Extensible Firmware Interface#UEFI firmware bitness for more information and available workarounds.
Bootloader UEFI vs BIOS limitations
Most of the linux bootloaders installed for one firmware type cannot launch or chainload bootloaders of the other firmware type. That is, if Arch is installed in UEFI/GPT or UEFI/MBR mode in one disk and Windows is installed in BIOS/MBR mode in another disk, the UEFI bootloader used by Arch cannot chainload the BIOS installed Windows in the other disk. Similarly if Arch is installed in BIOS/MBR or BIOS/GPT mode in one disk and Windows is installed in UEFI/GPT in another disk , the BIOS bootloader used by Arch cannot chainload UEFI installed Windows in the other disk.
The only exceptions to this are GRUB in Apple Macs in which GRUB in UEFI mode can boot BIOS installed OS via appleloader command (does not work in non-Apple systems), and rEFInd which technically supports booting legacy BIOS OS from UEFI systems, but does not always work in non-Apple UEFI systems as per its author Rod Smith.
However if Arch is installed in BIOS/GPT in one disk and Windows is installed in BIOS/MBR mode in another disk, then the BIOS boot loader used by Arch CAN boot the Windows in the other disk, if the boot loader itself has the ability to chainload from another disk.
Note: To dual-boot with Windows on same disk, Arch should follow the same firmware boot mode and partitioning combination used by the Windows installation.
Windows Setup creates a 100 MiB EFI system partition (except for Advanced Format 4K native drives where it creates a 300 MiB ESP), so multiple kernel usage is limited. Workarounds include:
- Mount ESP to
/efiand use a boot loader that has file system drivers and is capable of launching kernels that reside on other partitions. - Expand the EFI system partition, typically either by decreasing the Recovery partition size or moving the Windows partition (UUIDs will change).
- Backup and delete unneeded fonts in
esp/EFI/Microsoft/Boot/Fonts/[2]. - Backup and delete unneeded language directories in
esp/EFI/Microsoft/Boot/(e.g. to only keepen-US). - Use a higher, but slower, compression for the initramfs images. E.g.
COMPRESSION="xz"withCOMPRESSION_OPTIONS=(-9e).
UEFI Secure Boot
All pre-installed Windows 8/8.1, 10 and 11 systems by default boot in UEFI/GPT mode and have UEFI Secure Boot enabled by default. This is mandated by Microsoft for all OEM pre-installed systems.
Arch Linux install media does not support Secure Boot yet. See Secure Boot#Booting an installation medium.
It is advisable to disable UEFI Secure Boot in the firmware setup manually before attempting to boot Arch Linux. Windows 8/8.1, 10 and 11 SHOULD continue to boot fine even if Secure boot is disabled. The only issue with regards to disabling UEFI Secure Boot support is that it requires physical access to the system to disable secure boot option in the firmware setup, as Microsoft has explicitly forbidden presence of any method to remotely or programmatically (from within OS) disable secure boot in all Windows 8/8.1 and above pre-installed systems
Note:
- If Windows used Bitlocker and stored the key in the TPM for automatic unlock on boot, it fails to boot when Secure Boot is disabled, instead showing a Bitlocker recovery screen. This is not permanent however, and you can easily boot Windows again by simply re-enabling Secure Boot.
- On Windows 11, disabling Secure Boot prevents Windows Hello, WSM (Windows Subsystem for Android) and Windows Updates from working
Fast Startup and hibernation
There are two OSs that can be hibernated, you can hibernate Windows and boot Linux (or another OS), or you can hibernate Linux and boot Windows, or hibernate both OSs.
Warning: Data loss can occur if Windows hibernates and you dual boot into another OS and make changes to files on a filesystem (such as NTFS) that can be read and written to by Windows and Linux, and that has been mounted by Windows [3]. Similarly, data loss can occur if Linux hibernates, and you dual boot into another OS etc. Windows may hibernate even when you press shutdown, see section #Windows settings.
For the same reason, if you share one EFI System Partition between Windows and Linux, then the EFI System Partition may be damaged if you hibernate (or shutdown with Fast Startup enabled) Windows and then start Linux, or hibernate Linux and then start Windows.
ntfs-3g added a safe-guard to prevent read-write mounting of hibernated NTFS filesystems, but the NTFS driver within the Linux kernel has no such safeguard.
Windows cannot read filesystems such as ext4 by default that are commonly used for Linux. These filesystems do not have to be considered, unless you install a Windows driver for them.
Windows settings
Fast Startup is a feature in Windows 8 and above that hibernates the computer rather than actually shutting it down to speed up boot times.
There are multiple options regarding the Windows settings for Fast Startup and hibernation that are covered in the next sections.
- disable Fast Startup and disable hibernation
- disable Fast Startup and enable hibernation
- enable Fast Startup and enable hibernation
The procedure of disabling Fast Startup is described in the tutorials for Windows 8, Windows 10 and Windows 11. In any case if you disable a setting, make sure to disable the setting and then shut down Windows, before installing Linux; note that rebooting is not sufficient.
Disable Fast Startup and disable hibernation
This is the safest option, and recommended if you are unsure about the issue, as it requires the least amount of user awareness when rebooting from one OS into the other. You may share the same EFI System Partition between Windows and Linux.
Disable Fast Startup and enable hibernation
This option requires user awareness when rebooting from one OS into the other.
If you want to start Linux while Windows is hibernated, which is a common use case, then
- you must use a separate EFI System Partition (ESP) for Windows and Linux, and ensure that Windows does not mount the ESP used for Linux. As there can only be one ESP per drive, the ESP used for Linux must be located on a separate drive than the ESP used for Windows. In this case Windows and Linux can still be installed on the same drive in different partitions, if you place the ESP used by linux on another drive than the Linux root partition.
- you can not read-write mount any filesystem in Linux, that is mounted by Windows while Windows is hibernated. You should be extremely careful about this, and also consider Automount behaviour.
- If you shut down Windows fully, rather than hibernating, then you can read-write mount the filesystem.
Note: You can avoid this issue for a drive by mounting a drive as an external drive in Windows and ejecting the drive in Windows before hibernating.
Enable Fast Startup and enable hibernation
The same considerations apply as in case «Disable Fast Startup and enable hibernation», but since Windows can not be shut down fully, only hibernated, you can never read-write mount any filesystem that was mounted by Windows while Windows is hibernated.
Note: Windows updates may re-enable Fast Startup, as reported in [4].
Windows filenames limitations
Windows is limited to filepaths being shorter than 260 characters.
Windows also puts certain characters off limits in filenames for reasons that run all the way back to DOS:
<(less than)>(greater than):(colon)"(double quote)/(forward slash)(backslash)|(vertical bar or pipe)?(question mark)*(asterisk)
These are limitations of Windows and not NTFS: any other OS using the NTFS partition will be fine. Windows will fail to detect these files and running chkdsk will most likely cause them to be deleted. This can lead to potential data-loss.
NTFS-3G applies Windows restrictions to new file names through the windows_names option: ntfs-3g(8) § Windows_Filename_Compatibility (see fstab).
Installation
The recommended way to setup a Linux/Windows dual booting system is to first install Windows, only using part of the disk for its partitions. When you have finished the Windows setup, boot into the Linux install environment where you can create and resize partitions for Linux while leaving the existing Windows partitions untouched. The Windows installation will create the EFI system partition which can be used by your Linux boot loader.
Windows before Linux
BIOS systems
Using a Linux boot loader
You may use any multi-boot supporting BIOS boot loader.
Using the Windows Vista/7/8/8.1 boot loader
This section explains how to : install a linux bootloader on a partition instead of the MBR ; copy this bootloader to a partition readable by the windows bootloader ; use the windows bootloader to start said copy of the linux bootloader.
Note: Some documents state that the partition being loaded by the Windows boot loader must be a primary partition but usage of an extended partition has been documented as working.
- When installing the boot loader, install it on your
/bootpartition rather than the MBR. For details on doing this with GRUB, see GRUB/Tips and tricks#Install to partition or partitionless disk, for Syslinux, see the note at Syslinux#Manual install, for LILO see LILO#Install to partition or partitionless disk.
- Make a copy of the VBR:
dd if=/dev/disk of=/path/to/linux.bin bs=512 count=1
where
/dev/diskis the path of the partition on which your bootloader is installed and/path/to/is the mounted filesystem on which you want the copy to be readable by the Windows bootloader.
- On Windows, the linux.bin file should now be accessible. Run cmd with administrator privileges (navigate to Start > All Programs > Accessories, right-click on Command Prompt and select Run as administrator):
bcdedit /create /d "Linux" /application BOOTSECTOR
BCDEdit will return a UUID for this entry. This will be refered to as
UUIDin the remaining steps.bcdedit /set UUID device partition=c: (or the drive letter on which linux.bin is kept) bcdedit /set UUID path pathtolinux.bin bcdedit /displayorder UUID /addlast bcdedit /timeout 30
On reboot, both Windows and Linux should now show up in the Windows bootloader.
Note: On some hardware, the Windows boot loader is used to start another OS with a second power button (e.g. Dell Precision M4500).
For more details, see https://www.iceflatline.com/2009/09/how-to-dual-boot-windows-7-and-linux-using-bcdedit/
UEFI systems
If you already have Windows installed, it will already have created some partitions on a GPT-formatted disk:
- a Windows Recovery Environment partition, generally of size 499 MiB, containing the files required to boot Windows (i.e. the equivalent of Linux’s
/boot), - an EFI system partition with a FAT32 filesystem,
- a Microsoft Reserved Partition, generally of size 128 MiB,
- a Microsoft basic data partition with a NTFS filesystem, which corresponds to
C:, - potentially system recovery and backup partitions and/or secondary data partitions (corresponding often to
D:and above).
Using the Disk Management utility in Windows, check how the partitions are labelled and which type gets reported. This will help you understand which partitions are essential to Windows, and which others you might repurpose. The Windows Disk Management utility can also be used to shrink Windows (NTFS) partitions to free up disk space for additional partitions for Linux.
Warning: The first 4 partitions in the above list are essential, do not delete them.
You can then proceed with partitioning, depending on your needs. The boot loader needs to support chainloading other EFI applications to dual boot Windows and Linux. An additional EFI system partition should not be created, as it may prevent Windows from booting.
Note: It only appears when Linux is installed on the second hard disk and a new EFI system partition is created on the second hard disk.
Simply mount the existing partition.
Tip:
- rEFInd and systemd-boot will autodetect Windows Boot Manager (
EFIMicrosoftBootbootmgfw.efi) and show it in their boot menu automatically. For GRUB follow either GRUB#Windows installed in UEFI/GPT mode to add boot menu entry manually or GRUB#Detecting other operating systems for a generated configuration file. - To save space on the EFI system partition, especially for multiple kernels, increase the initramfs compression.
Computers that come with newer versions of Windows often have Secure Boot enabled. You will need to take extra steps to either disable Secure Boot or to make your installation media compatible with secure boot (see above and in the linked page).
Linux before Windows
Even though the recommended way to setup a Linux/Windows dual booting system is to first install Windows, it can be done the other way around. In contrast to installing Windows before Linux, you will have to set aside a partition for Windows, say 40GB or larger, in advance. Or have some unpartitioned disk space, or create and resize partitions for Windows from within the Linux installation, before launching the Windows installation.
UEFI firmware
Windows will use the already existing EFI system partition. In contrast to what was stated earlier, it is unclear if a single partition for Windows, without the Windows Recovery Environment and without Microsoft Reserved Partition, will not do.
Follows an outline, assuming Secure Boot is disabled in the firmware.
- Boot into windows installation. Watch to let it use only the intended partition, but otherwise let it do its work as if there is no Linux installation.
- Follow the #Fast Startup and hibernation section.
- Fix the ability to load Linux at start up, perhaps by following #Cannot boot Linux after installing Windows. It was already mentioned in #UEFI systems that some Linux boot managers will autodetect Windows Boot Manager. Even though newer Windows installations have an advanced restart option, from which you can boot into Linux, it is advised to have other means to boot into Linux, such as an arch installation media or a live CD.
Windows 10 with GRUB
The following assumes GRUB is used as a boot loader (although the process is likely similar for other boot loaders) and that Windows 10 will be installed on a GPT block device with an existing EFI system partition (see the «System partition» section in the Microsoft documentation for more information).
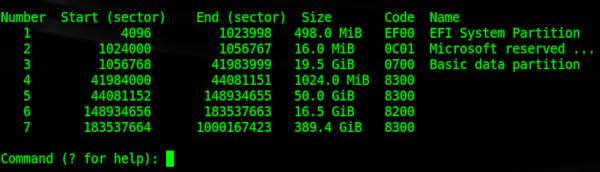
Create with program gdisk on the block device the following three new partitions. See [5] for more precise partition sizes.
| Min size | Code | Name | File system |
|---|---|---|---|
| 16 MB | 0C01 | Microsoft reserved | N/A |
| ~40 GB | 0700 | Microsoft basic data | NTFS |
| 300 MB | 2700 | Windows RE | NTFS |
Create NTFS file systems on the new Microsoft basic data and Windows RE (recovery) partitions using the mkntfs program from package ntfs-3g.
Reboot the system into a Windows 10 installation media. When prompted to install select the custom install option and install Windows on the Microsoft basic data partition created earlier. This should also install Microsoft EFI files in the EFI partition.
After installation (set up of and logging into Windows not required), reboot into Linux and generate a GRUB configuration for the Windows boot manager to be available in the GRUB menu on next boot.
Troubleshooting
Couldn’t create a new partition or locate an existing one
See #Windows UEFI vs BIOS limitations.
Cannot boot Linux after installing Windows
See Unified Extensible Firmware Interface#Windows changes boot order.
Restoring a Windows boot record
By convention (and for ease of installation), Windows is usually installed on the first partition and installs its partition table and reference to its bootloader to the first sector of that partition. If you accidentally install a bootloader like GRUB to the Windows partition or damage the boot record in some other way, you will need to use a utility to repair it. Microsoft includes a boot sector fix utility FIXBOOT and an MBR fix utility called FIXMBR on their recovery discs, or sometimes on their install discs. Using this method, you can fix the reference on the boot sector of the first partition to the bootloader file and fix the reference on the MBR to the first partition, respectively. After doing this you will have to reinstall GRUB to the MBR as was originally intended (that is, the GRUB bootloader can be assigned to chainload the Windows bootloader).
If you wish to revert back to using Windows, you can use the FIXBOOT command which chains from the MBR to the boot sector of the first partition to restore normal, automatic loading of the Windows operating system.
Of note, there is a Linux utility called ms-sys (package ms-sysAUR in AUR) that can install MBR’s. However, this utility is only currently capable of writing new MBRs (all OS’s and file systems supported) and boot sectors (a.k.a. boot record; equivalent to using FIXBOOT) for FAT file systems. Most LiveCDs do not have this utility by default, so it will need to be installed first, or you can look at a rescue CD that does have it, such as Parted Magic.
First, write the partition info (table) again by:
# ms-sys --partition /dev/sda1
Next, write a Windows 2000/XP/2003 MBR:
# ms-sys --mbr /dev/sda # Read options for different versions
Then, write the new boot sector (boot record):
# ms-sys -(1-6) # Read options to discover the correct FAT record type
ms-sys can also write Windows 98, ME, Vista, and 7 MBRs as well, see ms-sys -h.
Restoring an accidentally deleted EFI partition
If you have a GPT-partitioned disk and erased (e.g. with mkfs.fat -F32 /dev/sdx) the EFI partition, you will notice that Windows Boot Manager will either disappear from your boot options, or selecting it will send you back to the UEFI.
To remedy it, boot with a Windows installation media, press Shift+F10 to open the console (or click NEXT > Repair Computer > Troubleshoot… > Advanced > Command Prompt), then start the diskpart utility:
X:Sources> diskpart
DISKPART> list disk
Select the appropriate hard drive by typing:
DISKPART> select disk number
Make sure that there is a partition of type system (the EFI partition):
DISKPART> list partition
Select this partition:
DISKPART> select partition number
and assign a temporary drive letter to it:
DISKPART> assign letter=G:
DiskPart successfully assigned the drive letter or mount point.
To make sure that drive letter is correctly assigned:
DISKPART> list vol
 Volume ###  Ltr  Label        Fs     Type        Size     Status     Info
 ----------  ---  -----------  -----  ----------  -------  ---------  --------
 Volume 0     E                       DVD-ROM         0 B  No Media
 Volume 1     C                NTFS   Partition    195 GB  Healthy    Boot
 Volume 2         WINRE        NTFS   Partition    400 MB  Healthy    Hidden
 Volume 3     G                FAT32  Partition    499 MB  Healthy    System
Close diskpart:
DISKPART> exit
Navigate to C: (or what your system drive letter is):
X:Sources> cd /d C:
Next is the «magic» command, which recreate the BCD store (with /s for the mount point, /f for firmware type, optionally add /v for verbose):
C:> bcdboot C:Windows /s G: /f UEFI
Tip: If it hangs up after a minute, hit Ctrl+c. This happens sometimes, but you will get a message like boot files successfully created and it will have worked just fine.
You should now have Windows Boot Manager working as a boot option, and thus have access to Windows. Just make sure to never format your EFI partition again!
Note: Remove the drive letter G assigned to the EFI partition to keep it from showing up in My Computer.
See [6], [7] and [8].
The EFI system partition created by Windows Setup is too small
Windows Setup creates a 100 MiB EFI system partition (except for Advanced Format 4K native drives where it creates a 300 MiB ESP). This is generally too small to fit everything you need. You can try different tools to resize this partition, but there are usually other partitions in the way, making it, at the very least, difficult. One option is to use the Arch install media to create a single EFI system partition of your preferred size before you install Windows on the drive. Windows Setup will use the EFI system partition you made instead of creating its own.
Unable to install Windows Cumulative Update on BIOS system
On BIOS systems, Windows cumulative updates may fail with the error We couldn’t complete the updates. Undoing changes. Don’t turn off your computer. In such case, while in Windows, you need to set the Windows partition as active.
C:> diskpart
DISKPART> list disk
DISKPART> select disk number
DISKPART> list partition
DISKPART> select partition number
DISKPART> active
DISKPART> exit
After successfully installing the Windows update, mark back your Linux partition as active, using commands above.
Time standard
- Recommended: Set both Arch Linux and Windows to use UTC, following System time#UTC in Microsoft Windows. Some versions of Windows revert the hardware clock back to localtime if they are set to synchronize the time online. This issue appears to be fixed in Windows 10.
- Not recommended: Set Arch Linux to localtime and disable all time synchronization daemons. This will let Windows take care of hardware clock corrections and you will need to remember to boot into Windows at least two times a year (in Spring and Autumn) when DST kicks in. So please do not ask on the forums why the clock is one hour behind or ahead if you usually go for days or weeks without booting into Windows.
Bluetooth pairing
When it comes to pairing Bluetooth devices with both the Linux and Windows installation, both systems have the same MAC address, but will use different link keys generated during the pairing process. This results in the device being unable to connect to one installation, after it has been paired with the other. To allow a device to connect to either installation without re-pairing, follow Bluetooth#Dual boot pairing.
See also
- Booting Windows from a desktop shortcut
- One-time boot into Windows partition from desktop shortcut
- Windows 7/8/8.1/10 ISO to Flash Drive burning utility for Linux (MBR/GPT, BIOS/UEFI, FAT32/NTFS)
No doubt Ubuntu is the best Linux distro for beginners. So many Linux beginners prefer to dual boot Windows 10 and Ubuntu , instead of completely removing Windows.
Here in this tutorial you will learn how to install linux and windows alongside on a UEFI based system with GPT partition table.
This tutorial is specially for UEFI based systems, you don’t need to disable UEFI secure boot or enable the legacy boot support.
We’ll assume that Windows 10 is pre-installed on the computer. The hard disk partition type, i.e. GPT or MBR doesn’t matter much.
Contents
Get Ubuntu and Create the bootable USB
As you’re going to install Ubuntu, so first you need to get the ISO file, get it from the official ubuntu website, link here.
After downloading the Ububtu ISO, you need to create a bootable USB to install from it.
There’s many way to do that, in windows 10, you can use the Rufus USB creator, download Rufus from here.
Alternatively you can use MultibootUSB tool from here.
Analyze the system
Although this step is optional, but it’s to know your system before altering anything. First check the hard disk partition type.
You can use the diskpart command on windows to check the HDD, first open up the CMD as administrator and type the command below one by one.
diskpart

list disk
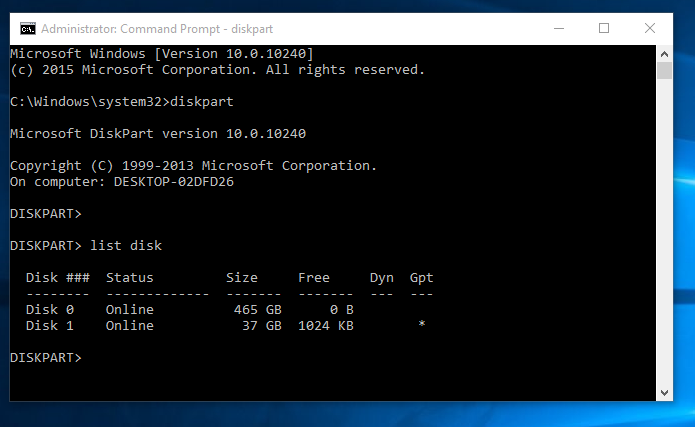
If your HDD has GPT partition table by default, then almost certainly it’s a UEFI system.
Partition the disk on windows 10
You need to free up some HDD space to dual boot ubuntu and windows 10 , at least 6 GB is required to install.
However you can go with 8 GB, but about 20 GB for the linux filesystem root / partition is highly recommended.
You can install Ubuntu without a dedicated /home partition, but it’s always recommended to use a separate home.
Most probably you don’t need a swap partition, as there’s plenty of RAM on any modern system, swap space is rarely used. If you desperately need a swap space, you can you a swap file instead.
Let’s partition the disk,
I’m using a 40 GB HDD for testing, and there’s around 12.7 GB free space to dual boot windows 10 and ubuntu.
Reboot the computer and boot from USB
Now reboot the PC and boot it from the USB drive. You need to tap the F12 , F10 or F8 key many times to select the boot device.
On Dell, Acer, Lenovo or Toshiba laptops, it’s the F12 key in most cases.
Note: On many laptops with the Fn key, you need to press Fn + F12 key combo to select the boot device option.
You can select any of the Try Ubuntu without installing or Install Ubuntu on the GRUB boot menu entry.
If you’ve not selected the first option, then just click on the Install Ubuntu shortcut on the desktop, else the system will start the installer directly.
There’s 7 total step, excluding the sub steps and disk partitioning to install Ubuntu.
The first step is to select the language, choose your preferred language and press the continue button.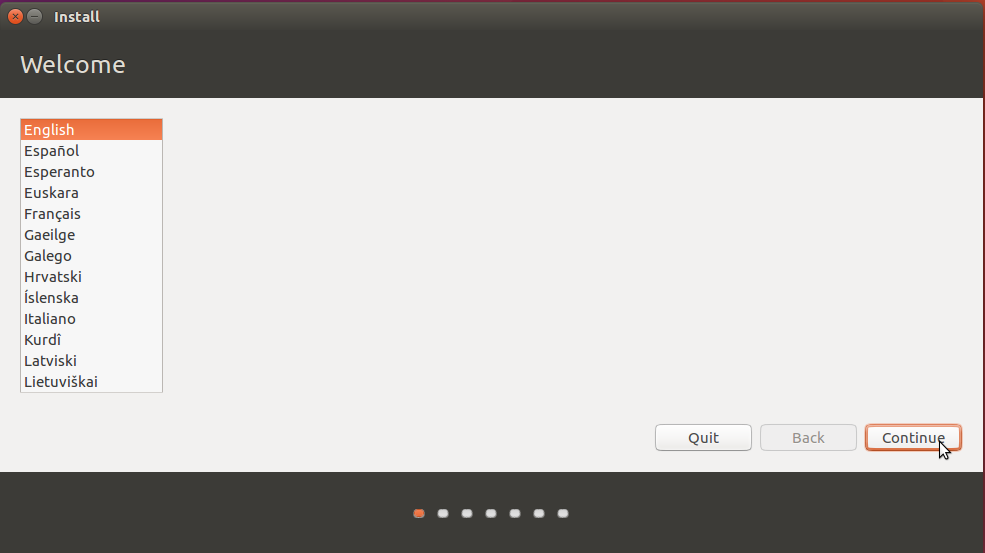
Next you’ll be asked to connect to internet if not connected, this step is optional, you can skip this step by selecting the first ubuntu install option.
Now the installer will ask you to install the updates and third party software like graphics drivers or multimedia codecs. You can skip this step as well, just press Continue.

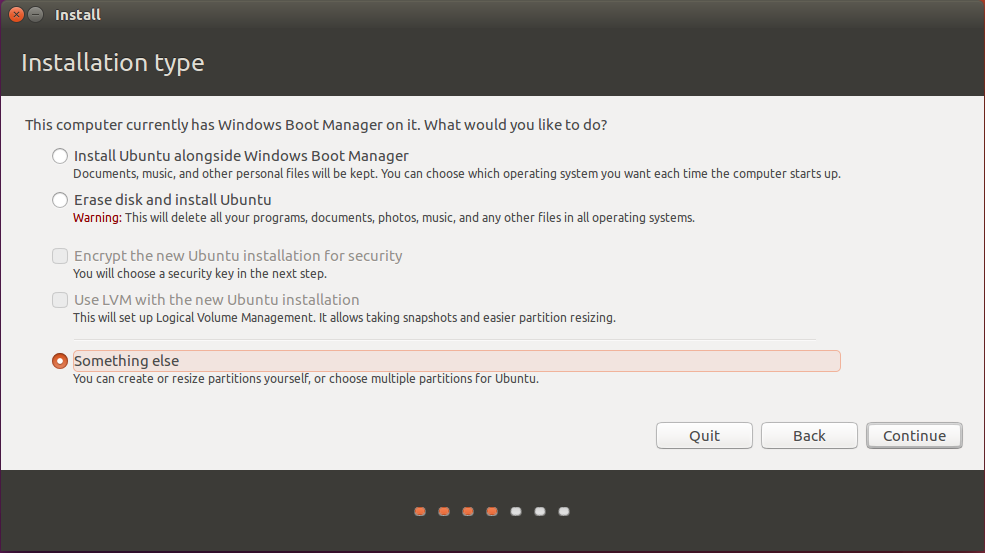
The next step is Installation type, important to dual boot windows 10 and ubuntu . As the PC already has windows 10, you must select the Something else option, highlighted on the screen shot below.
Now you have to partition the hard disk for installation, that’s the most important step. You must be very careful, you could lose important data if anything goes wrong. First select the proper HDD to partition and device to install the boot loader. In my case it’s /dev/sdb , as there’s two HDD in my laptop.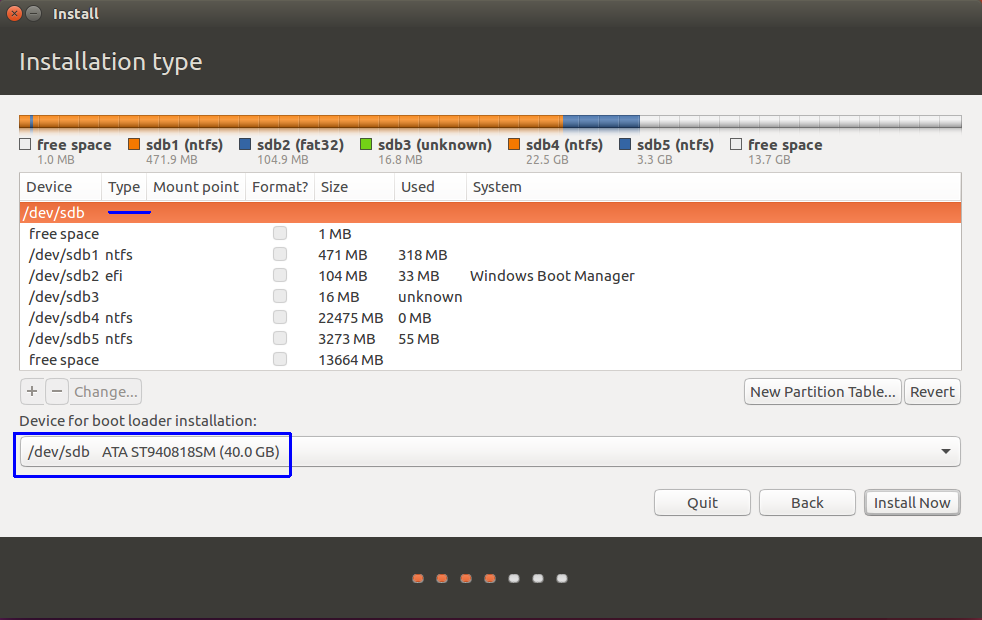
After selecting the proper HDD, you’ve to the select the free space to create the /root partition. Press the + button to create a a new disk partition. I’m creating a 8 GB root partition, which is 8192 MB.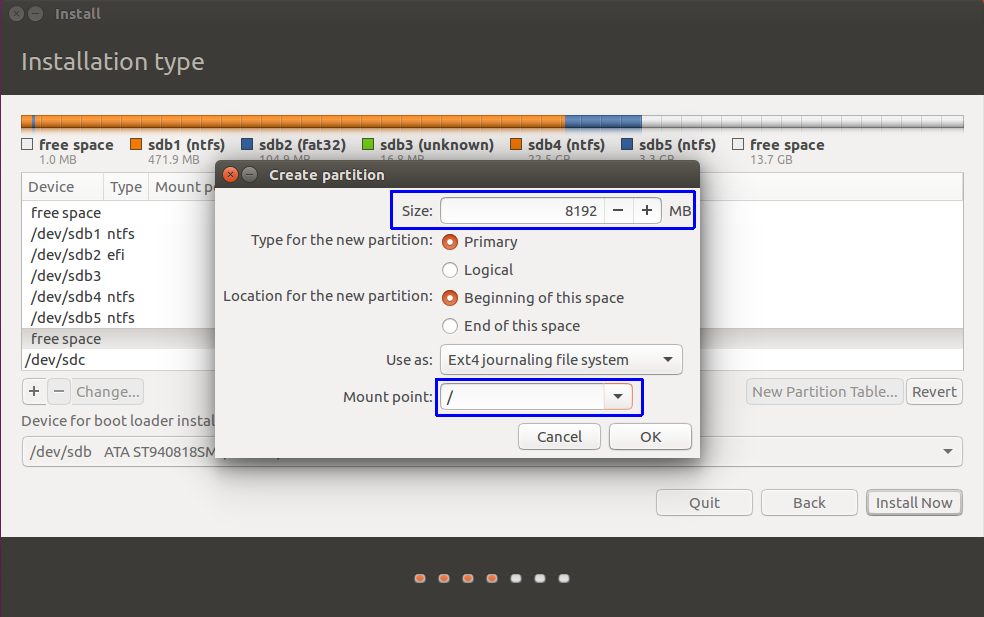
Now you’ve to create the home partition just like above, but the mount point will be /home this time, assign all the free space available to that partition. 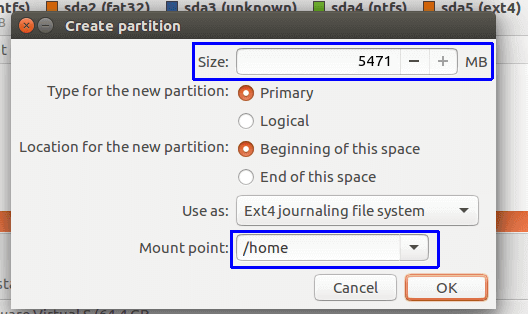
How the final partitioned disk looks like, a screenshot below.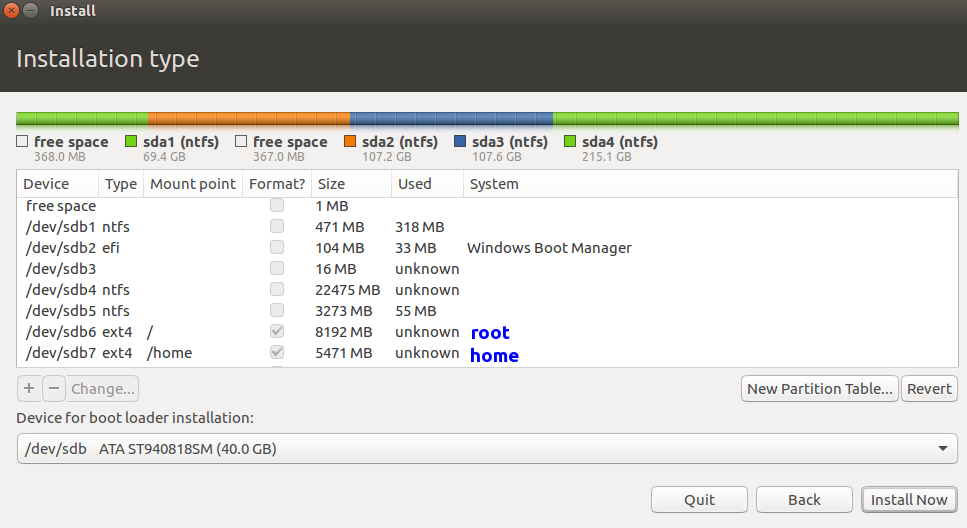
Next the installer will ask you, Do you want to return to the partitioning menu? Of course you don’t, just press continue button.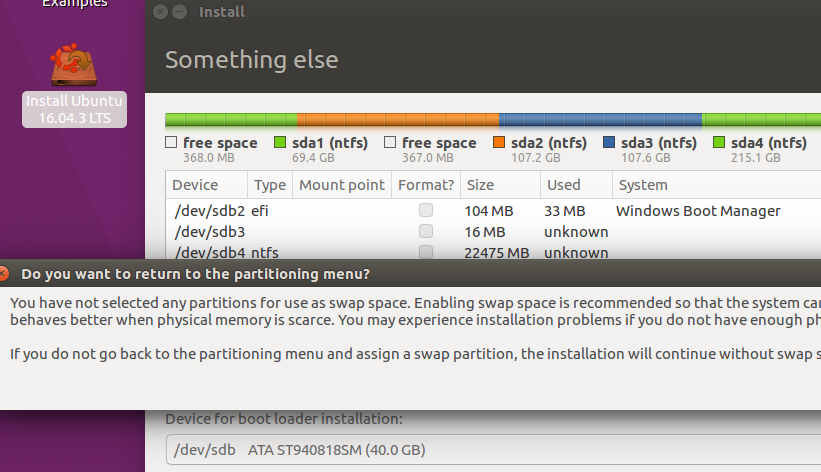
The ubuntu installer will ask you again, Write the changes to the disk? Ironically you have to, just press the continue button again.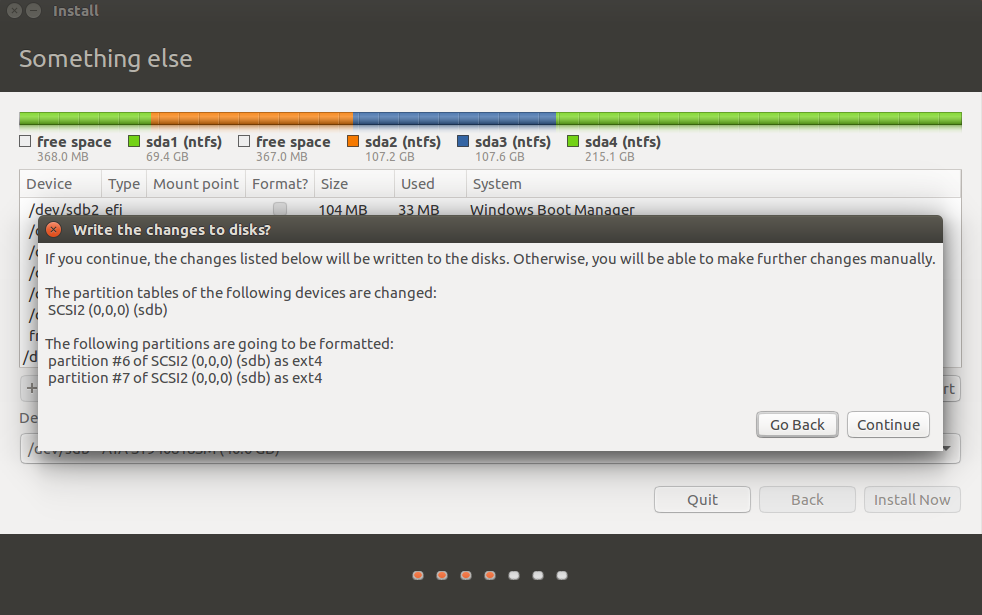
Next you’ve to fill some basic information about you and your computer name, password and so on, a screenshot below.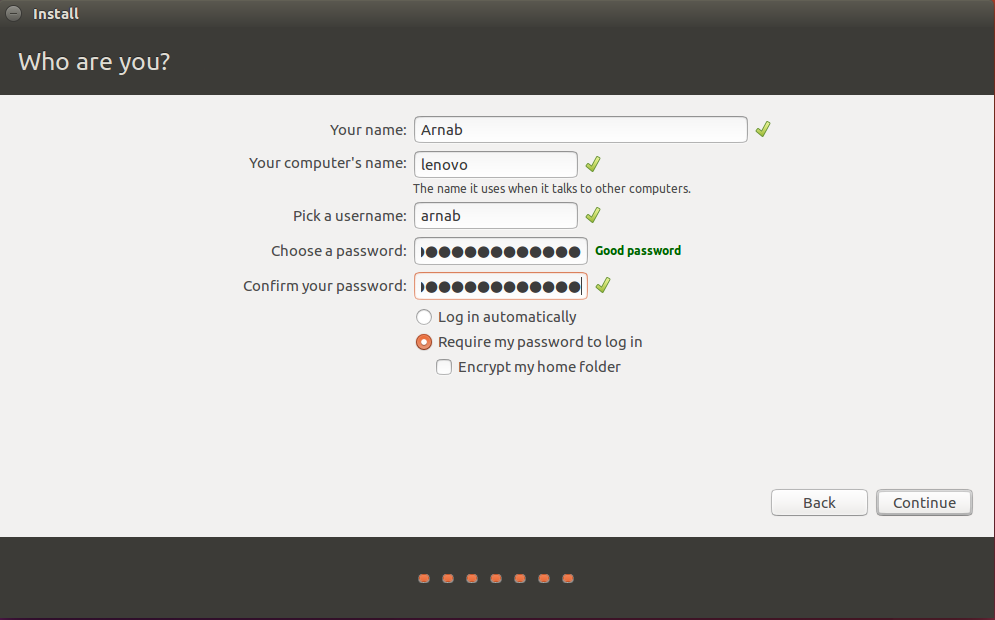
Tip: You might want to change Your computer’s name to something shorter than the default one and choose a long password with special characters. If you’re a linux beginner then you might not want to encrypt home folder right now.
You have to press the Continue button again, and you’re almost done. The installation process will take some time, between 10 to 20 minute, till then watch the slide show.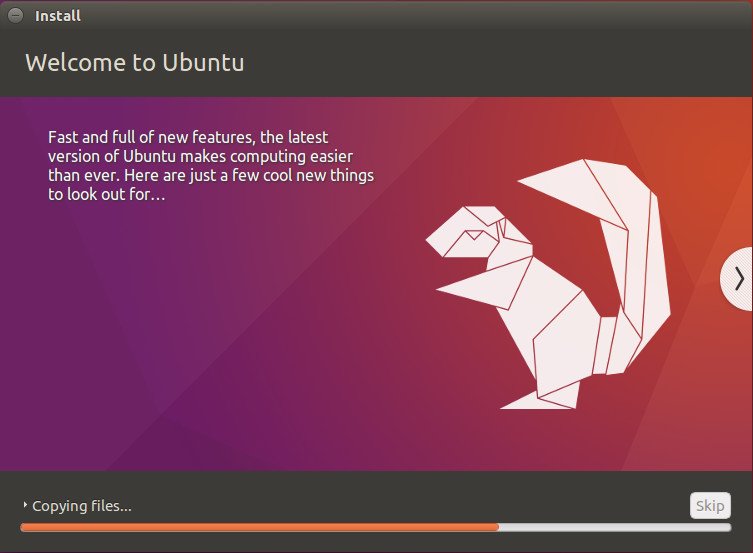
If everything was done properly, then you’ll be asked to reboot your computer.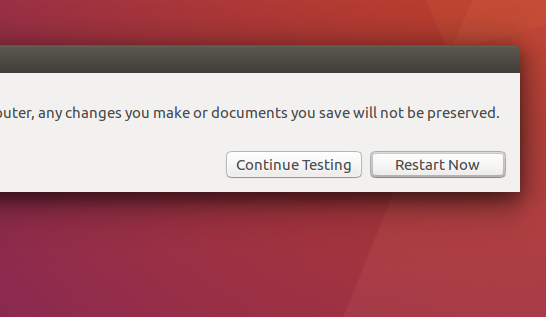
Reboot now and draw out the installation USB drive right after seeing the OEM logo on the screen.
Testing the new dual boot Ubuntu installation
After rebooting, you can see the GRUB boot menu, listing Ubuntu and windows.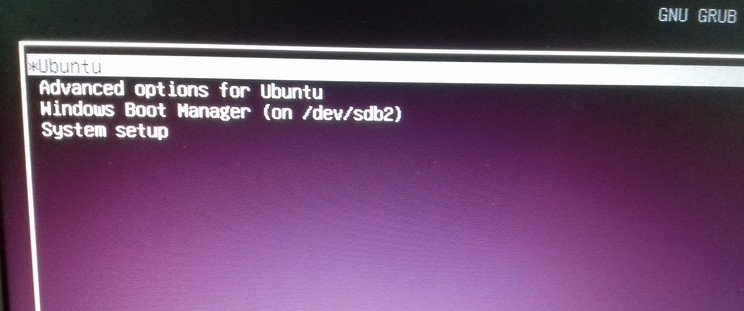
You should be able dual boot windows 10 and ubuntu without any problem from the grub menu.
So, that’s all how you can dual boot ubuntu, hope that’s simple enough to understand. I’ll be soon making a video about dual booting stay tuned.
If you have any question or suggestion, please feel free to ask or suggest through the comments.
Допустим, вы прочитали в интернете несколько статей и заинтересовались свободной операционной системой Linux. Возможно, даже поставили ее себе на виртуальную машину или загрузились в Live-режиме и попробовали, как все выглядит и работает. Вам понравилось, и теперь вы хотите установить ее себе на компьютер и начать пользоваться. Но при этом терять уже установленную Windows не желаете, чтобы в случае непредвиденной ситуации можно было вернуться в полностью рабочую систему, да и любимые игры и нужные программы всегда будут под рукой. Есть возможность установить Linux и Windows 10 на одном компьютере. В свое время для меня, как и для многих других пользователей, это было идеальным вариантом.
В этой инструкции мы рассмотрим, как установить Linux рядом с Windows 10. Я говорю Windows 10 потому, что это самая новая операционная система от Microsoft, но эти инструкции также подойдут для более ранних версий, таких как Windwos 7, 8 и 8.1.
Я предполагаю, что у вас уже есть установленная Windows, вы нашли и определились, от какого диска отделить немного места для Linux, только не знаете, как правильно это сделать. Здесь вы получите подробный ответ на этот вопрос. Затронем еще одну важную тему — UEFI. Эта технология используется на всех новых ноутбуках с Windows, и многих пользователей интересует, как установить Linux на UEFI и какие при этом могут возникнуть проблемы.
Немного теории
Для установки операционной системы Linux рядом с Windows 10 вам понадобится создать несколько дополнительных разделов диска. Минимальное количество — три раздела. Linux не принято устанавливать на один раздел как Windows, хотя такой вариант возможен. Linux настолько гибок, что позволяет разместить систему, файлы пользователя и настройки на разных разделах. Это очень выгодно во время переустановки. Вы переустанавливаете систему в системном разделе, а все ваши файлы на рабочем столе и настройки рабочего окружения останутся на месте.
Вот эти три раздела:
- Системный;
- Домашний;
- Раздел подкачки.
Минимальные требования объема под системный раздел в различных дистрибутивах варьируются от семи до двадцати Гигабайт. Но этого хватит для установки самой системы и нескольких дополнительных программ. Если же вы собираетесь использовать много программ и игр, особенно если они занимают много места, необходимо взять еще пару десятков Гигабайт про запас. Я рекомендую использовать под системный раздел Linux так же, как и для диска C Windows, 30-40 Гигабайт.
Раздел подкачки используется, когда системе не хватает оперативной памяти. При определенном проценте заполнения Linux понемногу начинает скидывать неиспользуемые данные в этот файл. Поэтому для данного раздела подойдет объем в два раза меньше, чем размер вашей ОЗУ. Но если вы планируете использовать спящий режим или гибернацию, то под раздел подкачки нужно выделить объем дискового пространства, равный размеру ОЗУ, потому что в этих режимах все содержимое оперативной памяти компьютера переносится на диск. Домашний раздел — это раздел с вашими файлами, фильмами, музыкой, загрузками. Прикиньте, сколько вам нужно.
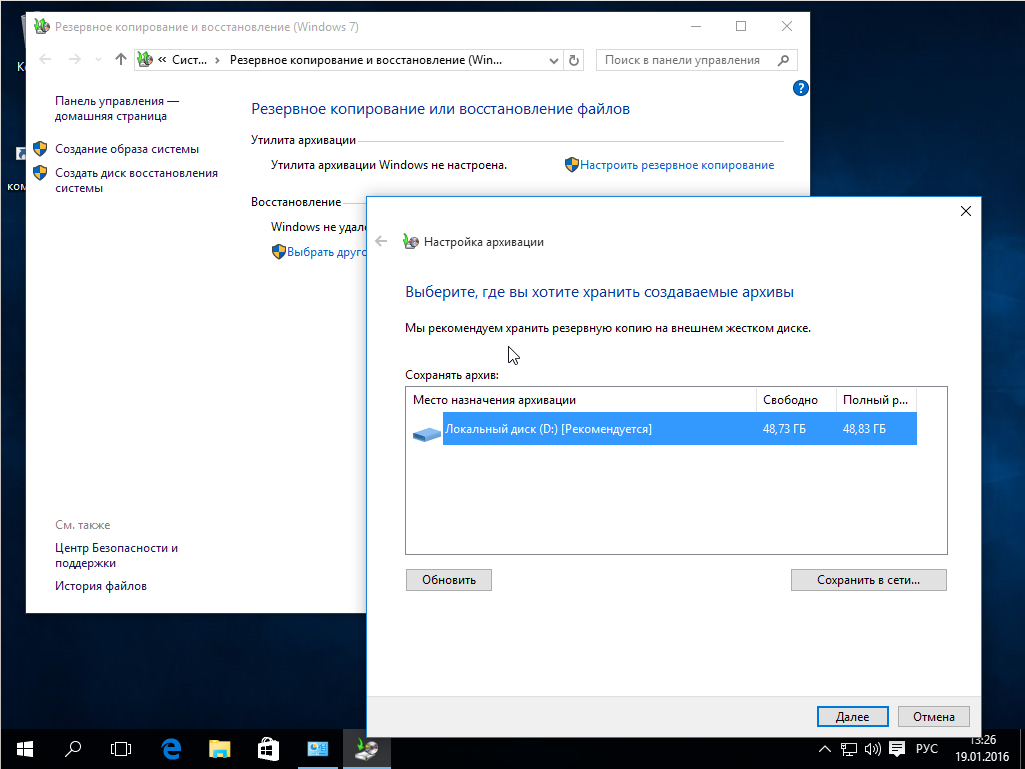
Чтобы установить Linux рядом с уже использующейся Windows 10, нужно будет «отрезать» пространство от системного диска. Поэтому перед решительными действиями важно создать резервную копию системы или хотя бы важных файлов. Если все пройдет хорошо, ничего страшного не случится ни с файлами, ни с системой, но из-за какого-либо сбоя, например, отключения электричества, файловая система может быть повреждена. Вы и сами по невнимательности можете сделать что-то не так и удалить не то, что нужно.
Поэтому, если будете работать с системным диском, скопируйте важные файлы на внешний носитель, и, если есть возможность, создайте резервную копию операционной системы с помощью соответствующего пункта панели управления:
При работе с не системным разделом, например, D, E, F и т д, достаточно просто скопировать файлы оттуда.
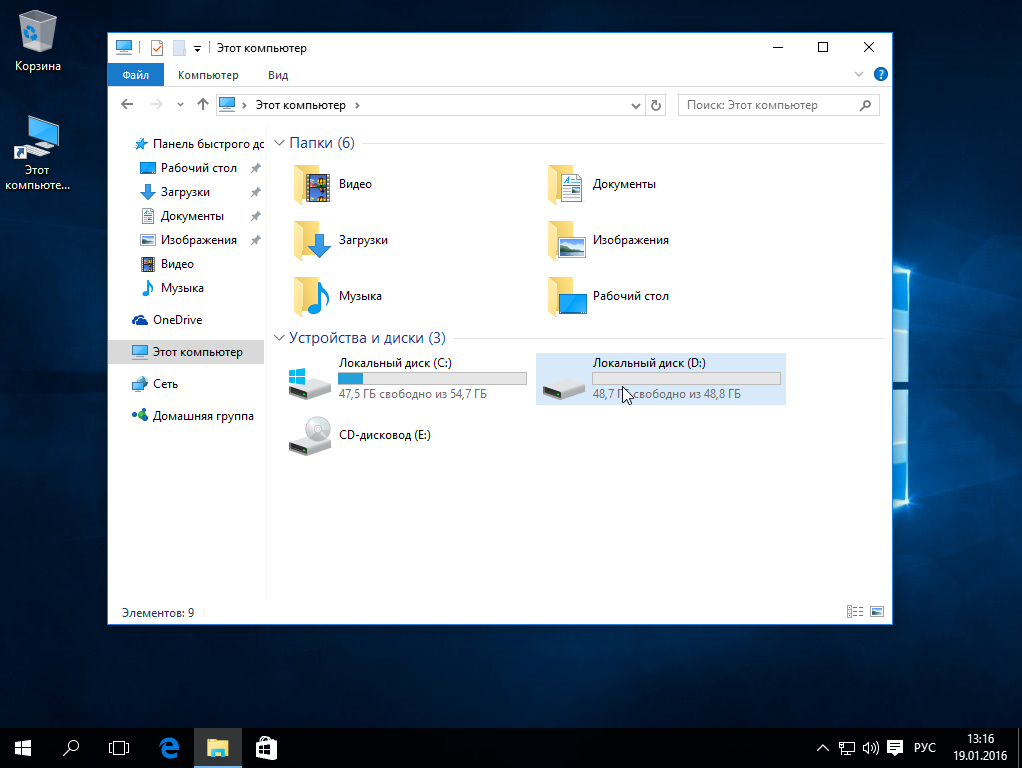
Теперь переходим непосредственно к подготовке диска для установки Windows 10 и Linux. Проще всего это сделать с помощью стандартной утилиты управления дисками в Windows. Кликните правой кнопкой по значку «Этот компьютер» на рабочем столе и откройте пункт «Управление«:
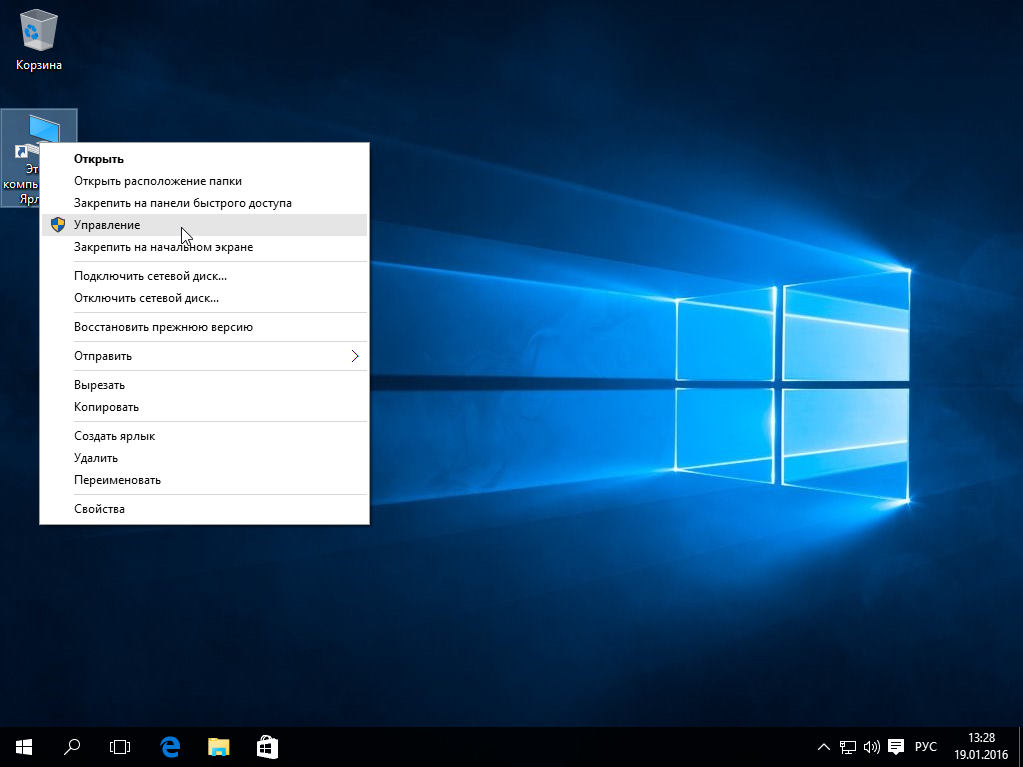
Дальше нам нужна утилита Управление дисками:
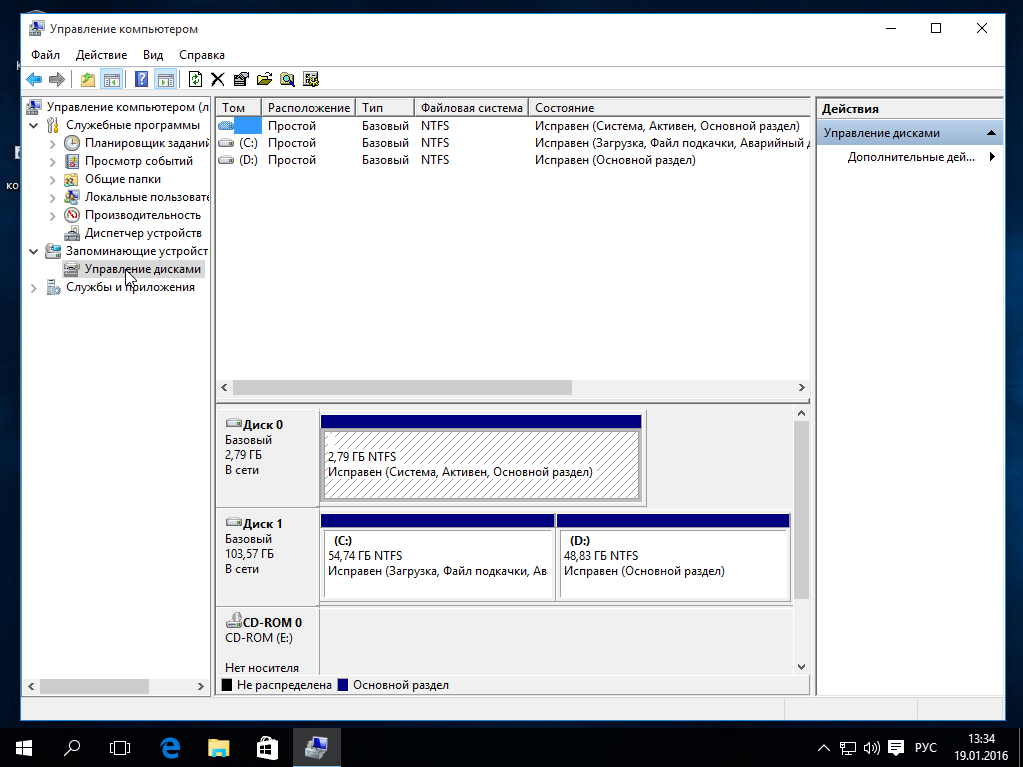
Здесь внизу окна мы видим два диска: C (системный) и D (обычный). Я приведу пример, как изменить размер диска D. Для диска C все действия аналогичны.
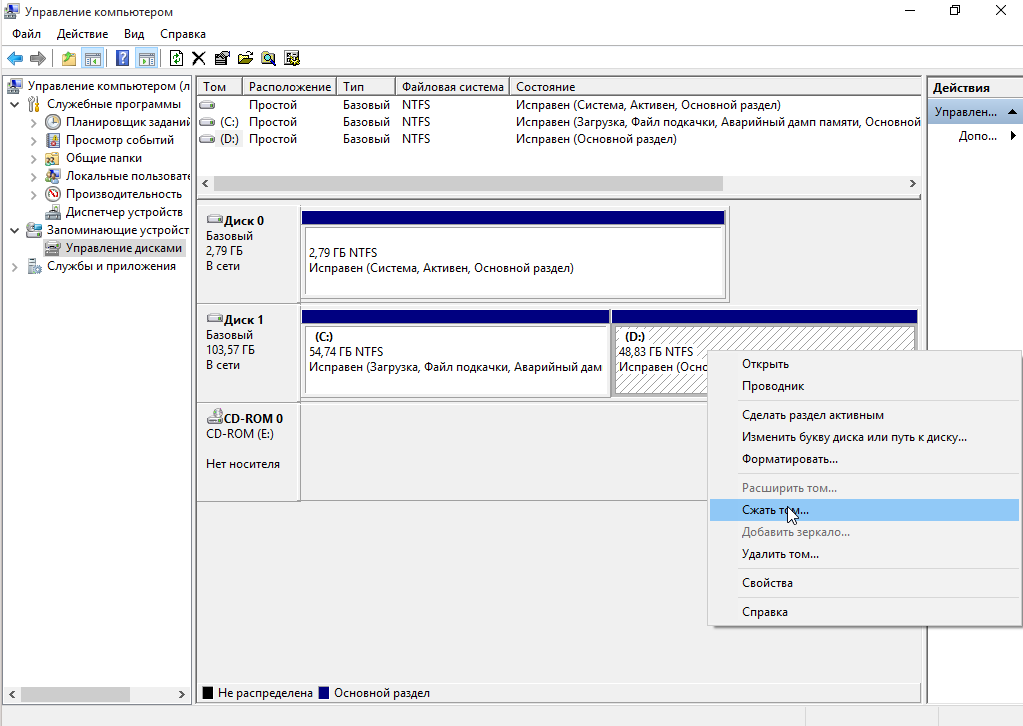
Кликните по нужному диску правой кнопкой и выберите опцию Сжать том:
Откроется вот такое окно, в котором нужно ввести размер создаваемого тома в поле размер сжимаемого пространства:
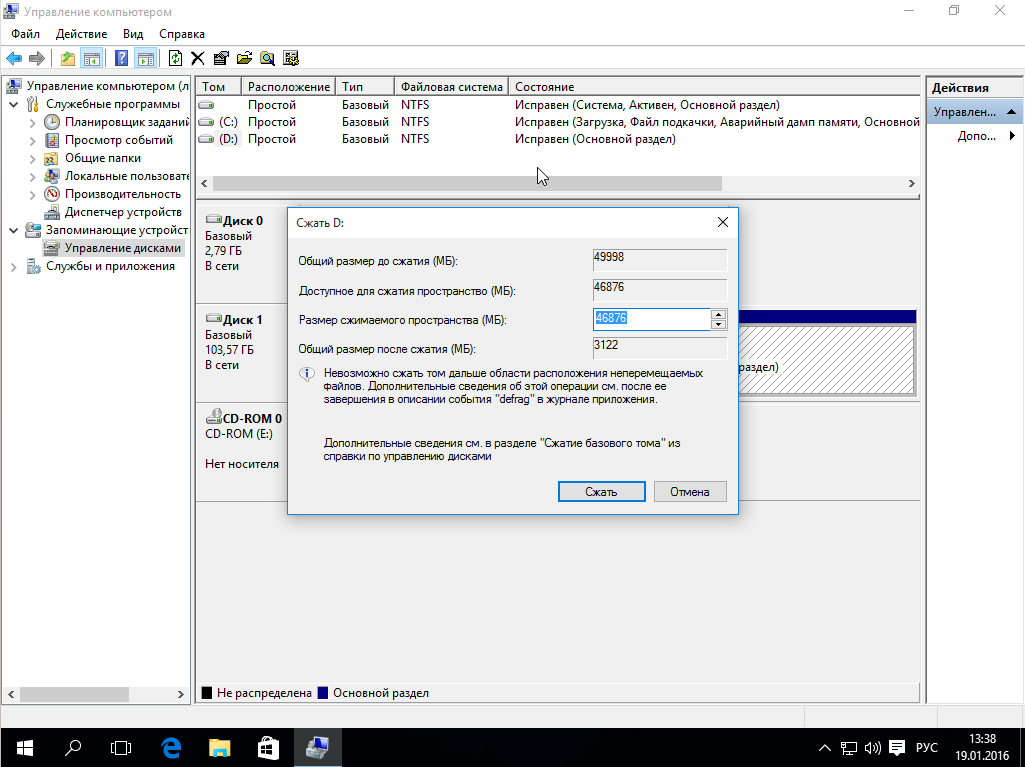
Обратите внимание, вы не можете указать размер больше, чем количество свободного места на диске. Поэтому сначала освободите место, если еще этого не сделали. Кликаем на кнопку сжать. После этого появится неразмеченное пространство, из которого можно создать нужные разделы:
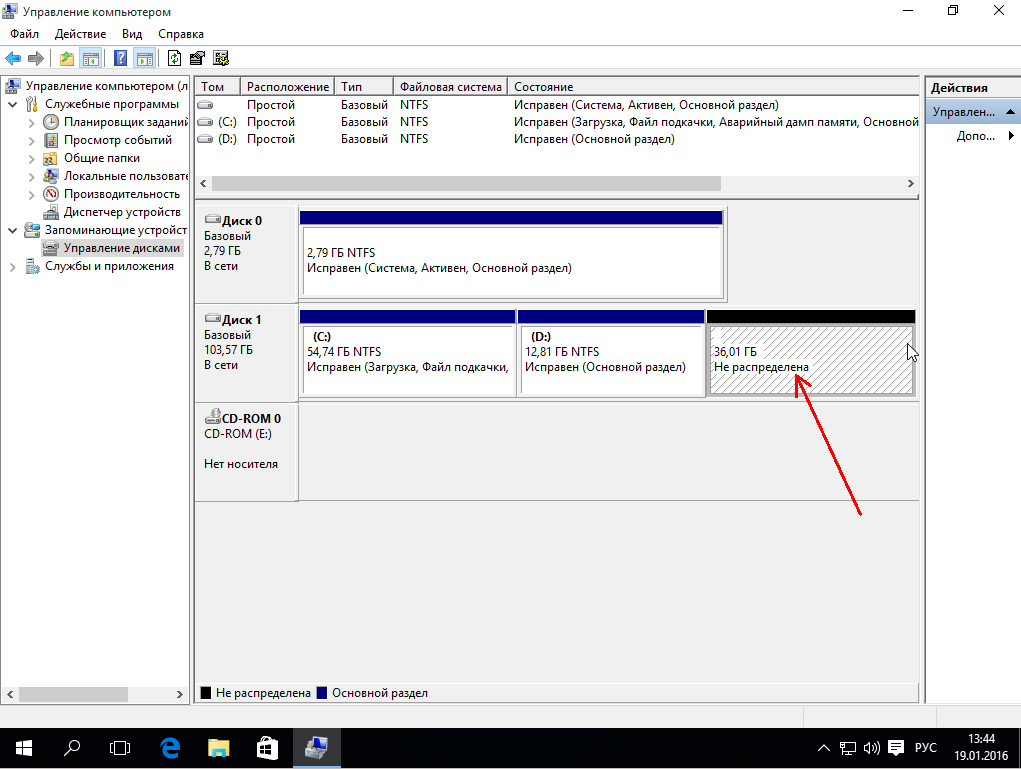
Вот и все. Теперь у вас есть место для установки Linux рядом с Windows 10. Выполнять дальнейшую разметку диска в утилите Windows не вижу смысла, поскольку все опасные операции, которые могли повредить систему, мы уже сделали, а разделы для Linux лучше всего и настраивать средствами Linux.
Подготовка диска в Linux
Это не следующий пункт установки Linux вместе с Windows 10. Это альтернативный вариант разметки диска без использования Windows. Если вы по каким-либо причинам не хотите использовать стандартную утилиту Windows для выделения нужного пространства, это также можно сделать с помощью любого LiveCD дистрибутива Linux с предустановленной программой для управления дисками Gparted. Например, того же Ubuntu.
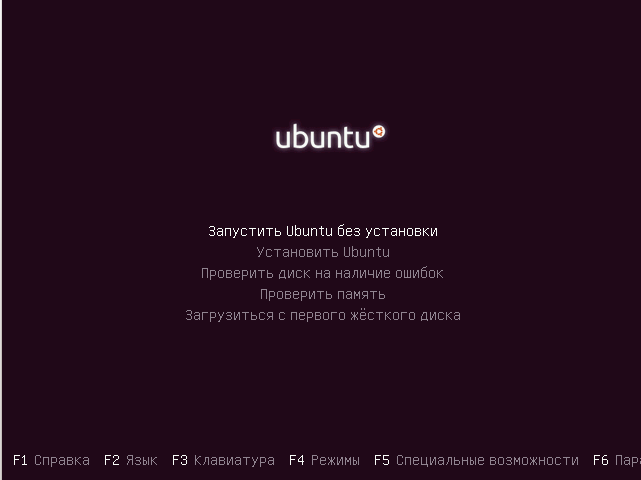
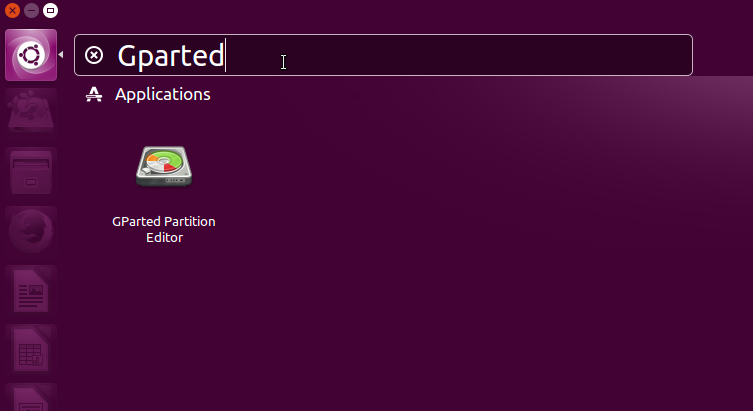
Загрузитесь с диска Ubuntu, в поиске Dash наберите Gparted:
Откроется вот такое окно программы для управления дисками в Linux:
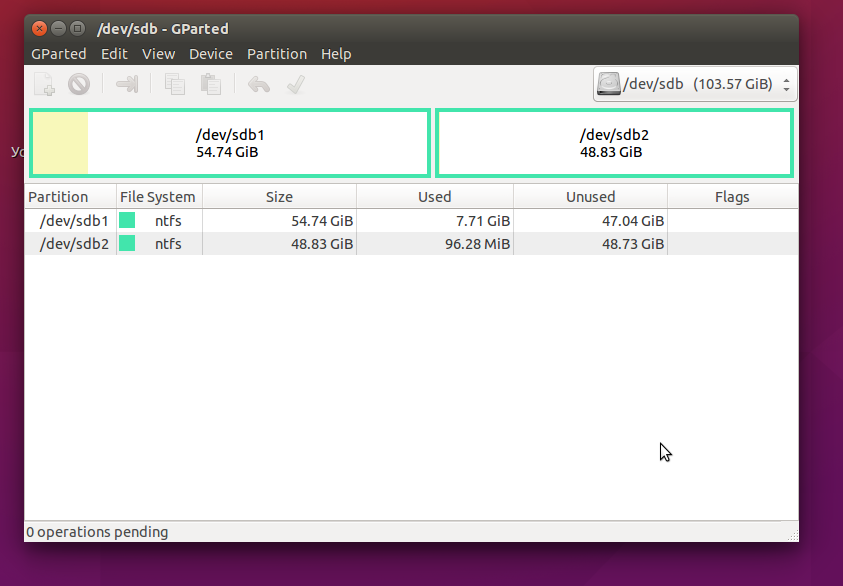
Здесь важно заметить, что разделы диска в Linux называются иначе чем в Windows. Здесь диски — это просто адреса файлов в виртуальной файловой системе dev. Позже вы поймете, что это такое, а сейчас важно только, что имя каждого раздела начинается с /dev/sd. Дальше идет буква, означающая физический диск (sda, sdb, sdc, sdd и так далее). За ней цифра, что обозначает номер раздела на диске, например: sda1, sda2.
В окне утилиты, кроме имени раздела диска, мы можем видеть файловую систему, размер и свободное место на диске. Теперь по размеру и файловой системе мы можем понять на каком диске у нас расположена система.
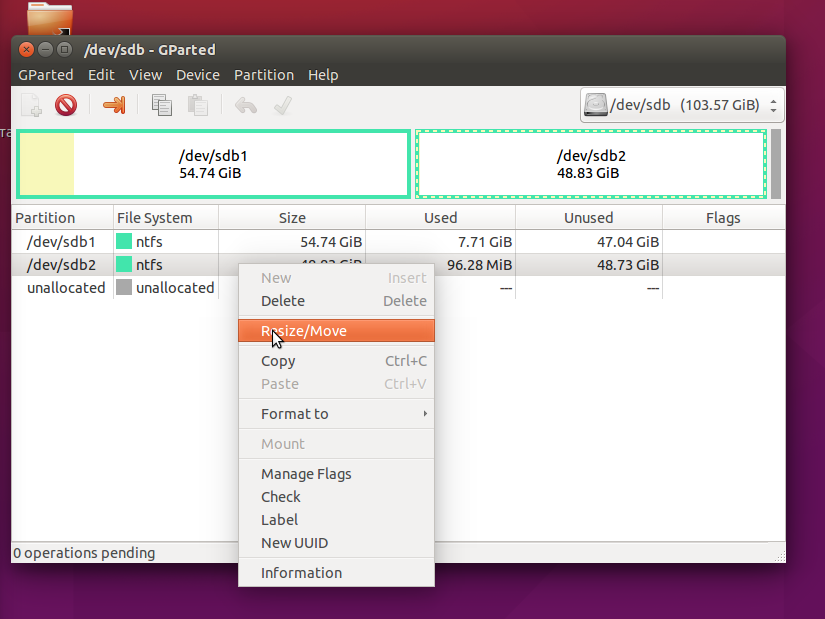
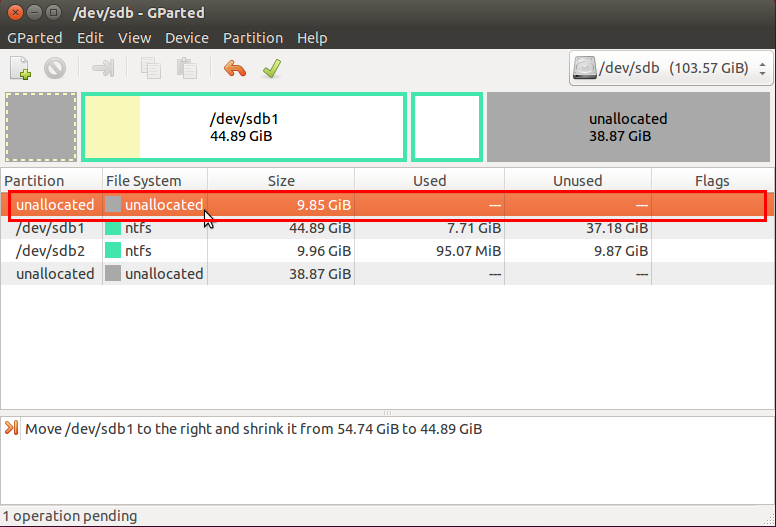
В моем примере /dev/sdb1 — это диск С в Windows, а /dev/sdb2 — D. Мы будем делать то же, что и в предыдущем примере. Давайте уменьшим размер раздела /dev/sdb2 (D) до 10 Гигабайт чтобы на освободившимся пространстве выполнить установку Linux на Windows 10. Для этого кликните по разделу правой кнопкой и выберите пункт Resize/Move:
В открывшемся окне можно ввести нужный размер вручную в поле New size или воспользоваться ползунком:
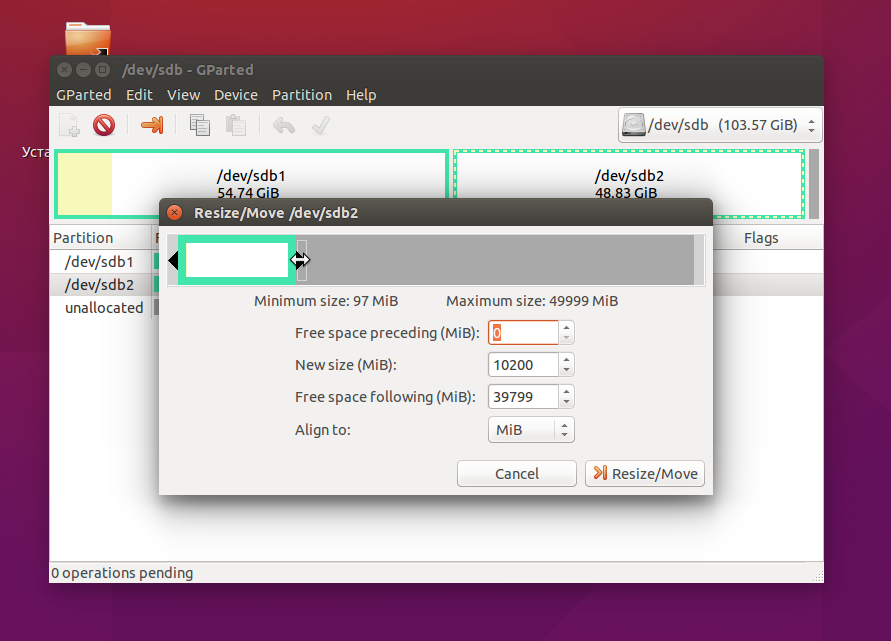
Затем нажмите кнопку Resize/Move.
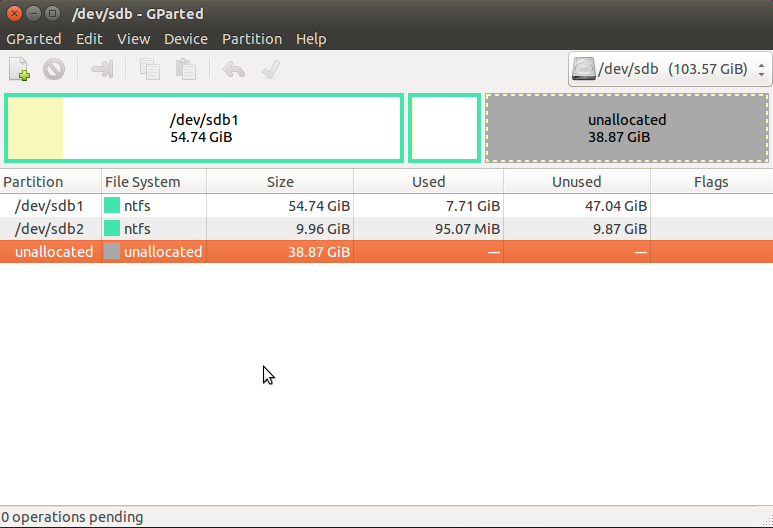
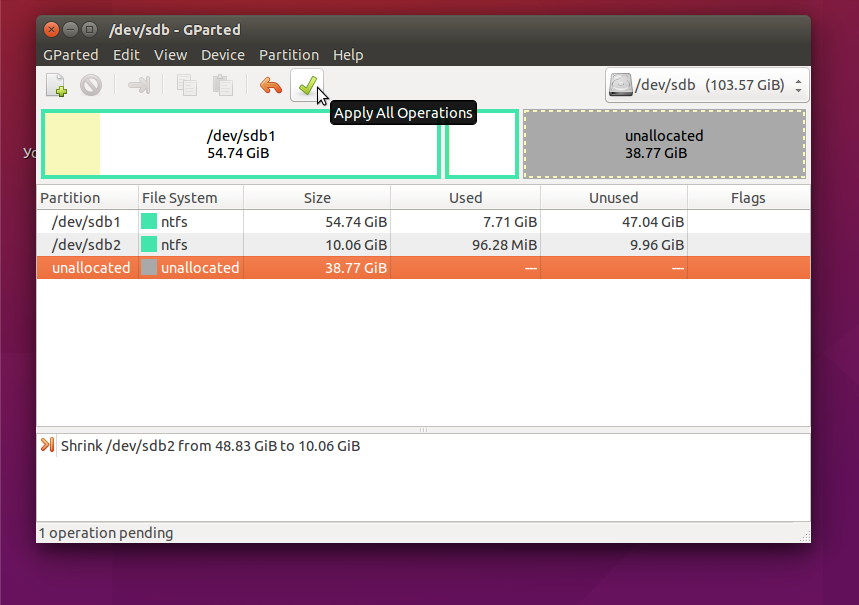
Как видите, появилось свободное пространство, но реальных изменений на диске еще нет. Для того чтобы записать все на диск, нажмите зеленую галочку, или в меню Edit выберите пункт Apply All Operations:
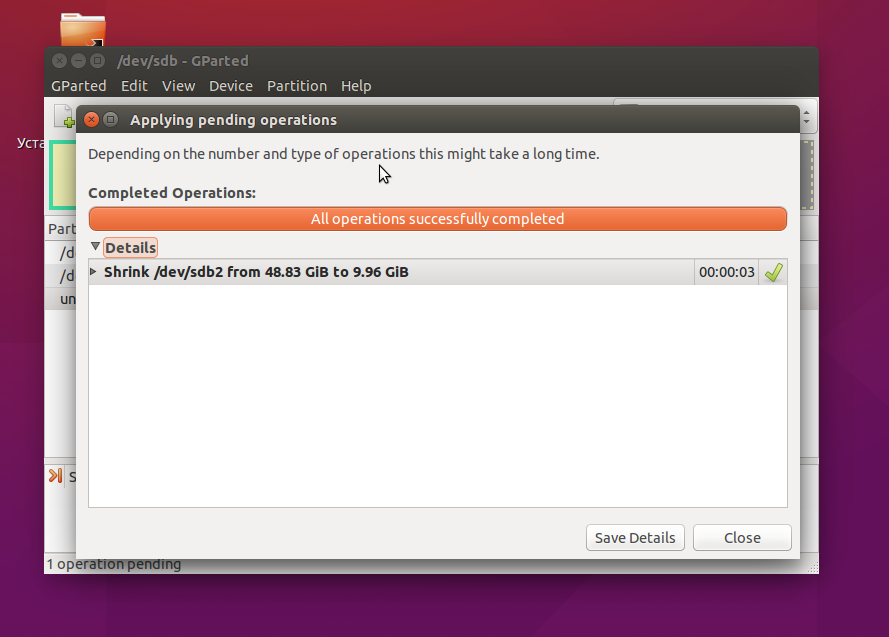
Процесс изменения размера файловой системы может занять немного времени:
Теперь вы можете видеть, что раздел /dev/sdb2 уменьшился, и появилось свободное место:
Для системного раздела операции те же, только есть одно замечание: не трогайте начало раздела. Вы можете спокойно уменьшать размер раздела, добавляя свободное пространство после него, но не пытайтесь это сделать до него, вот так:
Так делать не нужно, иначе будет поврежден загрузчик Windows, его очень легко восстановить, но решать эти проблемы в самом начале знакомства с Linux вам, думаю, незачем.
Создавать разделы для Linux здесь мы тоже не будем, лучше все это сделать во время установки, специально предназначенной для этого утилитой.
Установка Linux рядом с Windows 10
Я не буду здесь подробно рассматривать, как установить Linux, все это уже подробно рассмотрено в моих статьях отдельно для разных дистрибутивов. Рассмотрим только несколько аспектов разметки диска. Возьмем Ubuntu, как самую популярную ОС для новичков, но в других дистрибутивах все почти так же.
На этапе выбора способа разметки я советую брать ручной вариант. Поскольку так вы лучше разберетесь, как устанавливать систему:
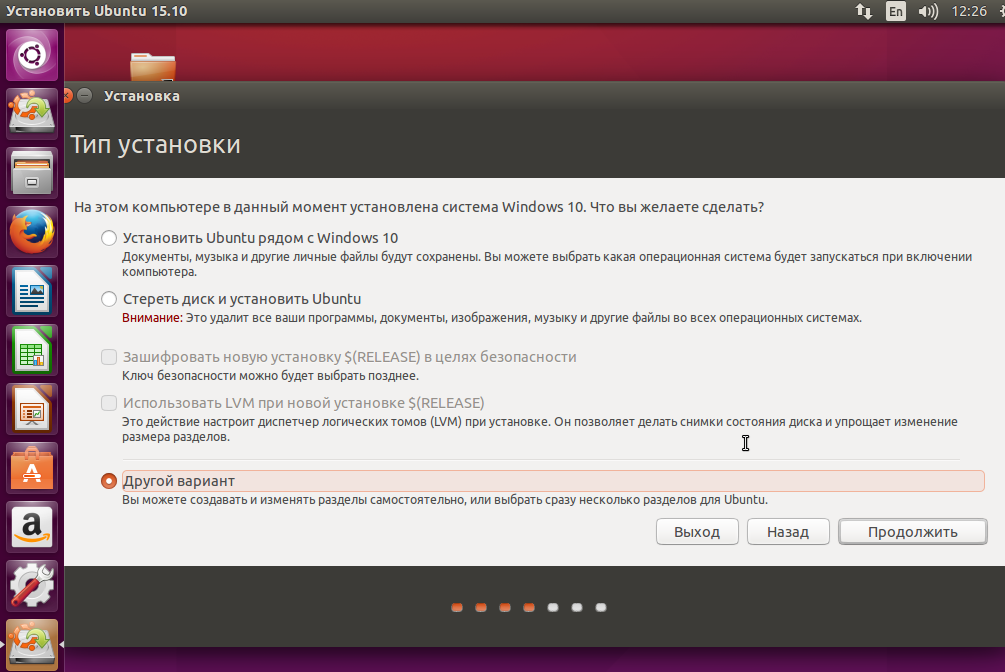
Здесь вы из освобожденного ранее места создаете те разделы, о которых мы говорили в самом начале статьи. Для корневого раздела точку монтирования нужно выбрать /, для домашнего — /home, а для раздела подкачки точка монтирования не указывается.
Дальше действуем все как обычно — по инструкции для определенного дистрибутива, и установка Linux рядом с Windows 10 будет выполнена успешно.
Установка Linux рядом с Windows 10 UEFI
На всех современных ноутбуках, выпускаемых с Windows 8, 8.1, 10 используется технология UEFI. Это новая прогрессивная технология, которая пришла на смену устаревшей BIOS. Первое важное и самое заметное изменение — использование таблицы разделов GPT, вместо устаревшей MBR, а также создание отдельного раздела диска для загрузчиков операционных систем. Многие пользователи боятся, что UEFI усложнит установку Linux с Windows 10 на их ноутбук. И зря — в большинстве случаев нет ничего сложного. Если у вас уже установлена Windows, то, скорее всего, раздел efi уже был создан, и во время разметки диска нужно просто выбрать его для установки загрузчика. Раздел efi, как правило, создается с файловой системой fat32 и занимает около 30 Мегабайт памяти:
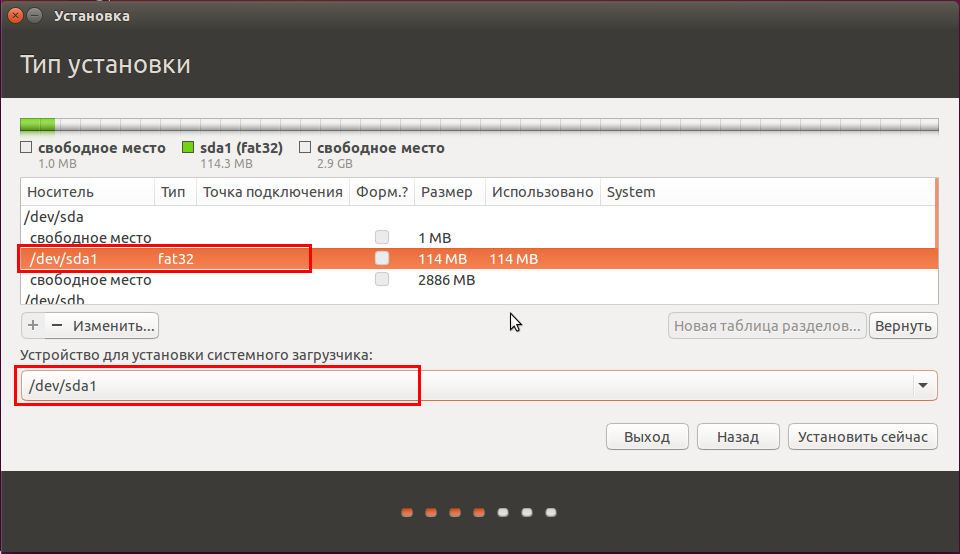
Если же у вас чистый винчестер, нужно создать таблицу разделов GPT. Это можно сделать с помощью той же Gparted, открыв меню Devices -> Create Partition Table:
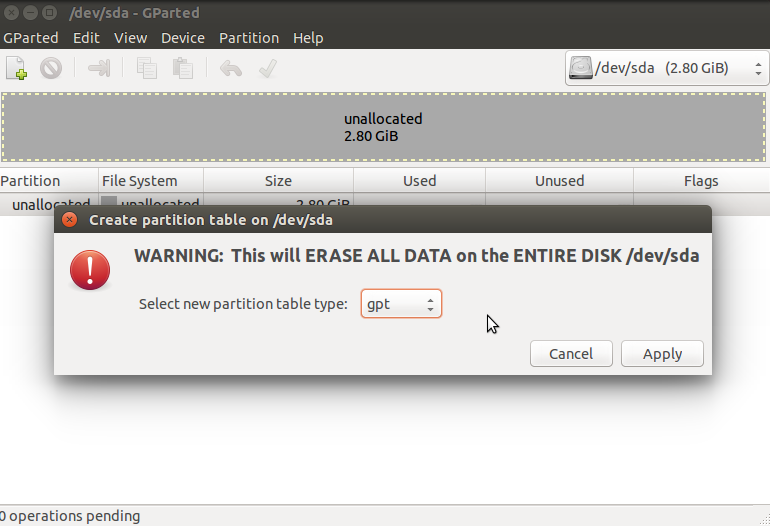
Дальше необходимо создать efi раздел, делаем тоже с помощью Gparted, создаем обычный раздел, с файловой системой fat32 и меткой EFI:
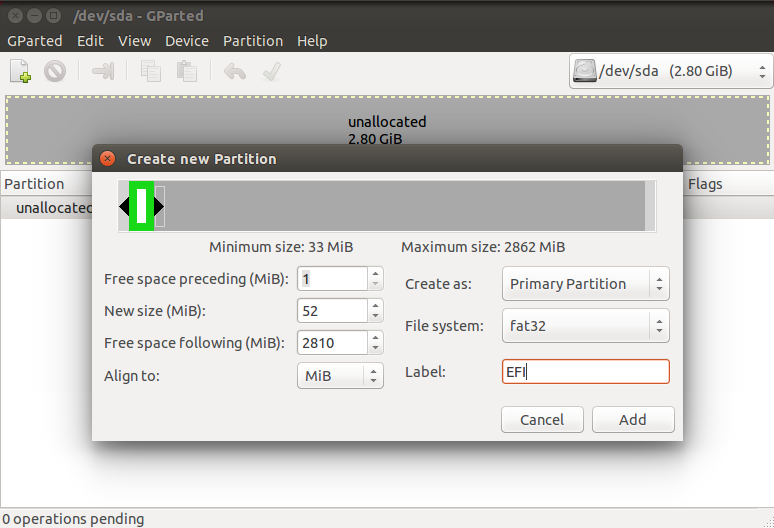
Потом указываем этот раздел во время установки Linux вместе с windows 10, для него нужно указать точку монтирования /boot/EFI. Вот и все сложности с установкой в UEFI. Вообще, установку в UEFI поддерживают все дистрибутивы, работающие в Grub2.
Завершение установки
Многих новых пользователей интересует: «Как же загрузить потом мою Windows?» Не беспокойтесь, загрузчик Grub автоматически найдет загрузчик Windows и перед запуском компьютера предложит вам меню, где вы сможете выбрать операционную систему:
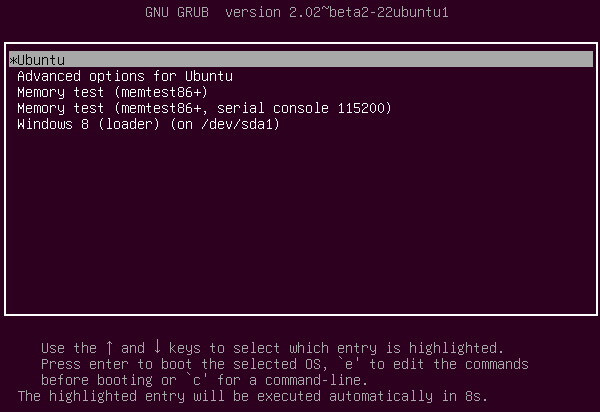
Таким образом, двойная загрузка Windows 10 и Linux будет настроена автоматически.
Если что-то пойдет не по плану, хотя такое вряд ли случиться, все очень легко настроить. Так что, если все сделано правильно, вы обязательно получите доступ к своей Windows после установки Linux.
Выводы
Сегодня мы рассмотрели, как установить Linux на Windows 10. Разобрались, как выполнить разметку, как выбрать разделы и что делать, если на вашем ноутбуке используется UEFI. Об установке какого-либо определенного дистрибутива Linux вместе Windows 10, говорить бессмысленно, так как, во-первых, все действия похожи, и, во-вторых, вы можете найти подробные инструкции в соответствующих статьях. Еще хотелось бы заметить: для комфортной работы Windows 10 с Linux на одном компьютере нужно отключить Windows FastBoot, иначе вы не сможете подключить системный раздел Windows в Linux. Если остались вопросы, спрашивайте в комментариях!

Статья распространяется под лицензией Creative Commons ShareAlike 4.0 при копировании материала ссылка на источник обязательна .

Приветствую, друзья!
Двойная загрузка Linux с Windows — один из самых удобных способов использования двух операционных систем на одном компьютере.
Обе ОС установлены на диске, на реальном оборудовании, и при включении системы вы можете выбрать, какую операционную систему использовать.
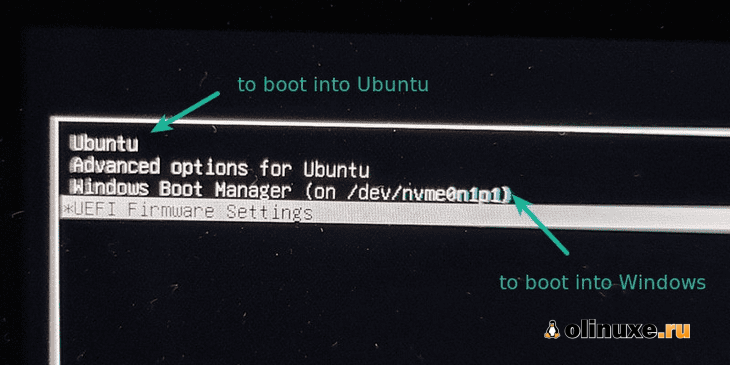
В режиме двойной загрузки вы можете выбрать операционную систему для загрузки
В этом руководстве я покажу вам, как установить Ubuntu с уже установленной в системе Windows 10.
Прежде чем вы начнете следовать руководству, я советую сначала полностью его прочитать.
Посмотрите, что вам нужно и что вы должны делать в этом уроке.
Как только вы получите хорошее представление о процедуре и у вас все необходимое будет под рукой, приступайте к процессу.
Двойная загрузка — не сложный процесс. Просто нужно время и терпение.
Упомянутые здесь шаги применимы к другим версиям Ubuntu, таким как Lubuntu, Kubuntu, Xubuntu и дистрибутивам Linux на основе Ubuntu, таким как Linux Mint, elementary OS и т. д.
Двойная загрузка Ubuntu Linux с Windows 10
Это руководство подходит для систем с предустановленной Windows 10 с безопасной загрузкой UEFI и системой разбиения GPT.
Пожалуйста, проверьте, использует ли ваша система GPT или MBR?
Проверки совместимости
Убедитесь, что ваша система использует UEFI: это руководство применимо только для систем с загрузкой UEFI.
Если вы купили свою систему в последние 5-6 лет, скорее всего, у вас уже должна быть система UEFI в разделе GPT.
Однако нет ничего плохого в том, чтобы убедиться, что ваша система использует UEFI.
Если в вашей системе используется устаревшая версия BIOS с системой разбиения на разделы MBR, следуйте этому руководству по двойной загрузке.
Процесс шифрования Bitlocker отличается: в новых системах с Windows 10 Pro диск зашифрован с помощью Bitlocker.
Система с SSD и HDD: если у вас есть система с SSD и HDD, то есть с двумя дисками, процесс будет почти таким же.
Предпосылки: что вам нужно?
Для простой и безопасной установки Linux вместе с Windows вам понадобятся следующие вещи:
- Компьютер с предустановленной Windows 10;
- USB-ключ (флэш-накопитель или USB-накопитель) размером не менее 4 ГБ и без данных на нем;
- Подключение к интернету (для загрузки ISO-образа Ubuntu и инструмента для создания Live USB). Вы можете сделать это в любой системе, не обязательно в системе с двойной загрузкой.
- Необязательно: внешний USB-диск для резервного копирования существующих данных;
- Необязательно: восстановление Windows или загрузочный диск (если у вас возникнут серьезные проблемы с загрузкой, их можно будет исправить).
Давайте посмотрим, как установить Ubuntu вместе с Windows 10.
Шаг 1. Сделайте резервную копию вашей системы Windows [необязательно]
Всегда приятно иметь резервную копию ваших данных, на всякий случай, если вы испортите систему при работе с разделами диска.
Я советую скопировать все важные данные, которые вы не можете позволить себе потерять, на внешний USB-диск.
Вы можете использовать внешний жесткий диск (медленнее, но дешевле) или SSD (быстрее, но дороже) и копировать на него важные файлы и папки.
Шаг 2. Загрузите Ubuntu (или любой другой дистрибутив Linux, который вы будете использовать)
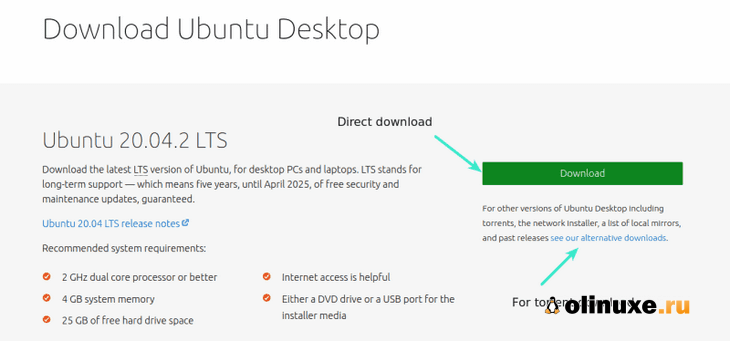
Перейдите на сайт Ubuntu и загрузите файл ISO.
Размер файла должен быть около 2,5 ГБ. Если вам нужно загрузить Ubuntu через торрент, вы можете нажать «Альтернативные загрузки».
Шаг 3: Создайте live USB / диск Ubuntu
Я предполагаю, что вы используете Windows для создания Live USB.
Есть несколько бесплатных приложений, которые позволяют создать Live Ubuntu USB.
Вы можете использовать любой из этих инструментов.
Поскольку я не могу показать их все, я буду все делать с Rufus.
Загрузите Rufus бесплатно с его веб-сайта. Он загрузит файл с расширением .exe.
Подключите USB.
Это устройство будет отформатировано, поэтому убедитесь, что на нем нет важных данных.
Запустите только что загруженный инструмент Rufus.
Он автоматически определяет подключенный USB-порт, но все равно дважды проверьте его.
Теперь перейдите к местоположению загруженного образа ISO и убедитесь, что он использует схему разделения GPT и целевую систему UEFI.
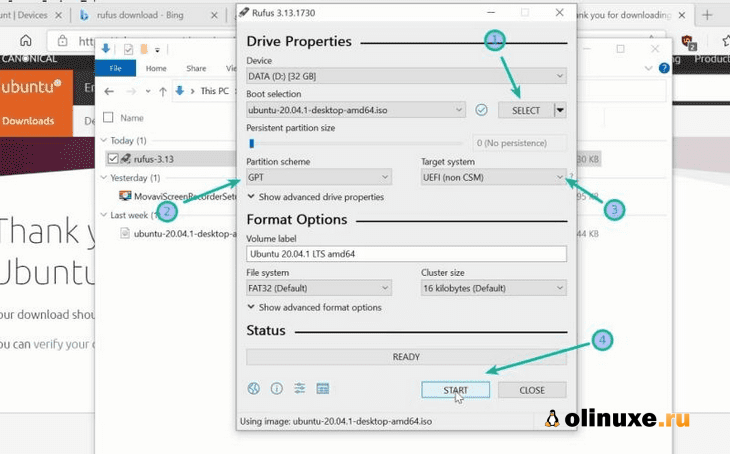
Нажмите кнопку «Пуск» и дождитесь завершения процесса. Ваш Live Linux USB готов.
Примечание. Установить Ubuntu и создать действующий USB-процесс Ubuntu можно на любом компьютере.
Но остальная часть процесса берет на себя система, в которой вы выполняете двойную загрузку.
Шаг 4. Освободите место на диске для установки Ubuntu
Во многих системах при установке Ubuntu предоставляется возможность сделать раздел диска для Ubuntu.
Однако это не гарантия.
Поэтому перед установкой лучше освободить необходимое место на диске.
В меню Windows найдите «разделы диска» и выберите «Создать и отформатировать разделы жесткого диска».
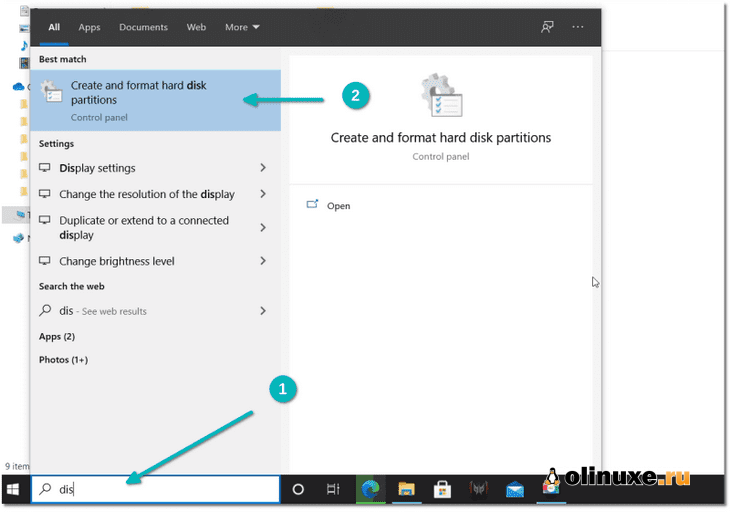
В инструменте управления дисками щелкните правой кнопкой мыши диск, который вы хотите разделить, и выберите «Сжатый том».
Если у вас всего один такой раздел, вам нужно освободить на нем немного свободного места для Linux.
Если у вас есть несколько разделов значительного размера, используйте любой из них, кроме диска C, поскольку он может стереть данные.
На 256 ГБ в моей системе уже было несколько разделов от производителя, но в основном для резервного копирования и других целей.
Основным разделом был диск C объемом около 220 ГБ, на котором установлена Windows 10.
В моем случае я уменьшил диск C, чтобы освободить место для установки Linux.
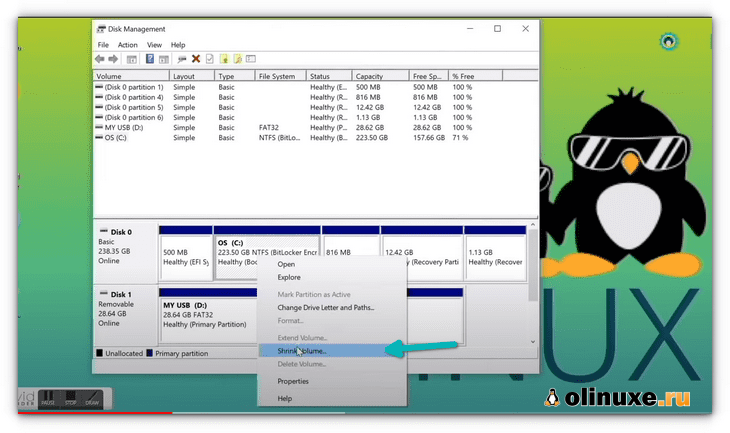
Сколько места вам нужно для Linux при двойной загрузке?
Это зависит от того, сколько у вас общего дискового пространства.
Вы можете установить Ubuntu на 15 или 20 ГБ, но скоро у вас начнется нехватка места на диске.
В наши дни у вас должно быть не менее 120 ГБ на диске.
В этом случае выберите для Linux 30-40 ГБ диска.
Если у вас диск на 250 ГБ, выделите ему 60-80 ГБ или даже больше.
Если у вас больше места на диске, выделите ему еще больше свободного места, если хотите.
Что делать, если у вас есть диски D, E или F?
Это обычная путаница для многих людей, поскольку они думают, что Ubuntu можно установить только на диск C.
Это не правда.
Понимаете, у меня был только один диск C, поэтому я его сжал.
Если у вас есть диск D, E или F, вы можете сжать один из этих дисков.
Вы также можете удалить диск D, E или F.
НИКОГДА НЕ УДАЛЯЙТЕ ДИСК С.
Шаг 5: Загрузитесь с Live Ubuntu USB
Вы создали действующий USB-накопитель Ubuntu на шаге 3.
Подключите его к системе.
Прежде чем вы загрузитесь с Live USB-накопителя, давайте вкратце расскажем о печально известной безопасной загрузке.
Нужно ли мне отключать безопасную загрузку для установки Linux?
6-8 лет назад безопасная загрузка UEFI не поддерживалась Linux, и поэтому вам пришлось отключить безопасную загрузку перед установкой Linux.
К счастью, в наши дни Ubuntu и многие другие дистрибутивы Linux очень хорошо поддерживают безопасную загрузку.
Обычно с этим ничего делать не нужно.
Однако, если ваша система не позволяет загружаться с Live USB или если вы видите какие-либо другие связанные проблемы, вы можете отключить безопасную загрузку в Windows.
Хорошо! Посмотрим, как загрузиться с USB.
Вы можете перейти к настройкам загрузки, нажав F2 / F10 или F12 во время запуска системы, и выбрать загрузку с USB.
Однако некоторым это трудно.
Более длинный, но простой шаг — получить доступ к настройкам загрузки UEFI из Windows.
В меню Windows найдите UEFI и нажмите «Изменить дополнительные параметры запуска»:
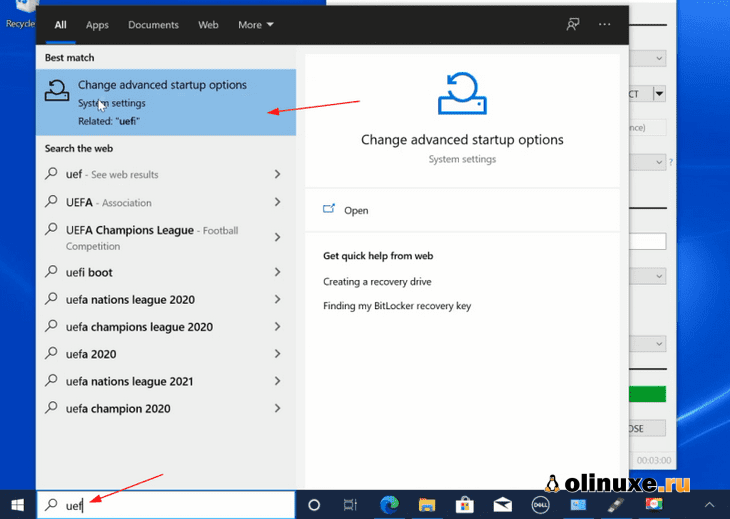
Перейдите к параметру «Расширенный запуск» и нажмите кнопку «Перезагрузить сейчас».
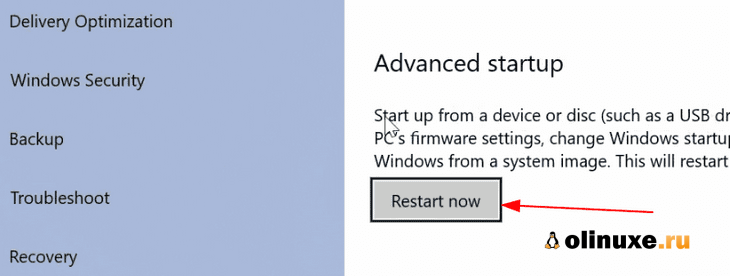
На следующем экране нажмите «Использовать устройство»:
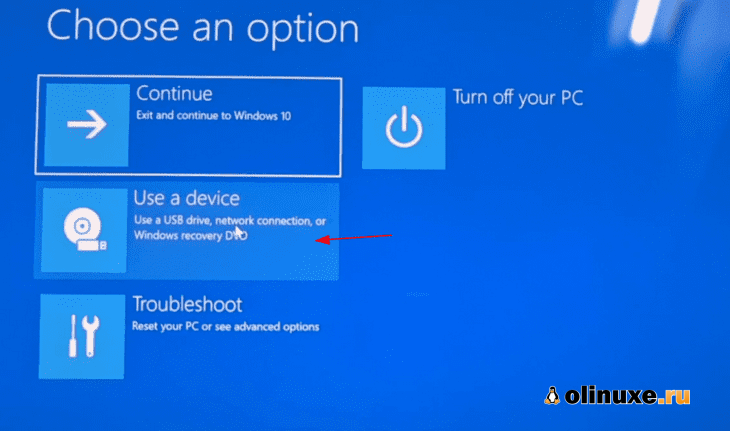
Распознайте USB-диск по его имени и размеру.
Он также может отображаться как USB-устройство EFI.
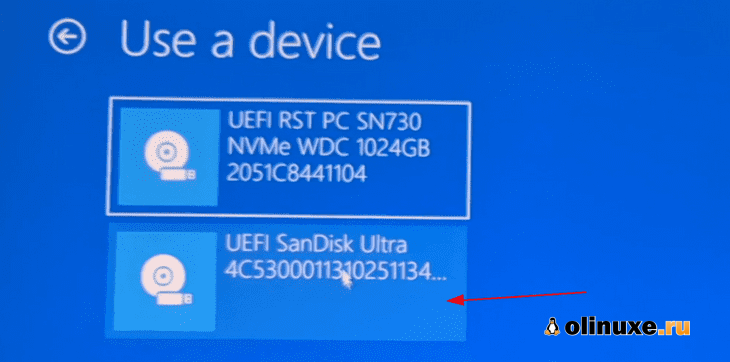
Теперь он выключит вашу систему и перезагрузится на выбранный вами диск, который должен быть активным USB-диском.
Через несколько секунд вы должны увидеть такой экран:
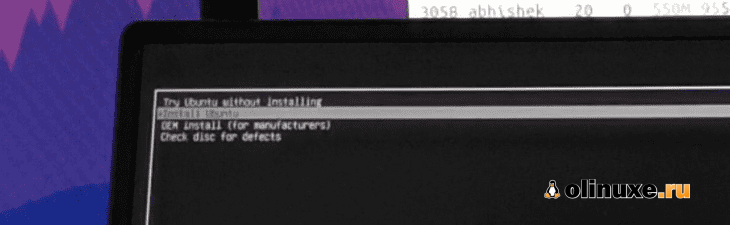
Опция «Попробовать Ubuntu без установки» позволяет вам испытать Ubuntu с Live диска.
Вариант установки Ubuntu можно найти на рабочем столе.
Опция «Установить Ubuntu» немедленно запустит установку Ubuntu.
Вы можете выбрать любой вариант в зависимости от ваших предпочтений.
Шаг 6: Установка Ubuntu вместе с Windows 10
Запустите процедуру установки.
Первые несколько шагов просты.
Вы выбираете язык и раскладку клавиатуры.
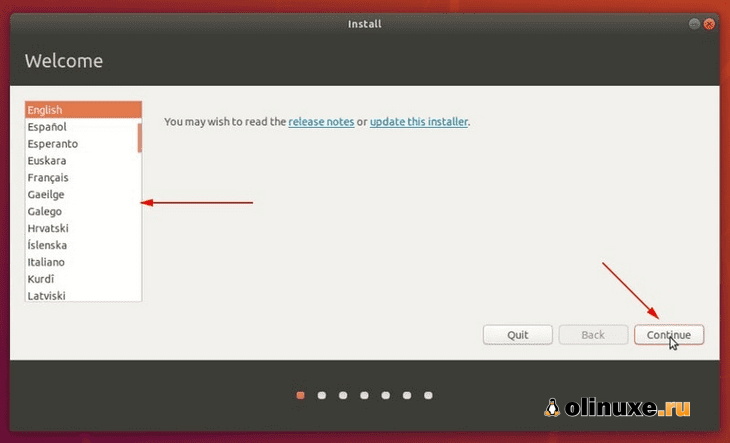
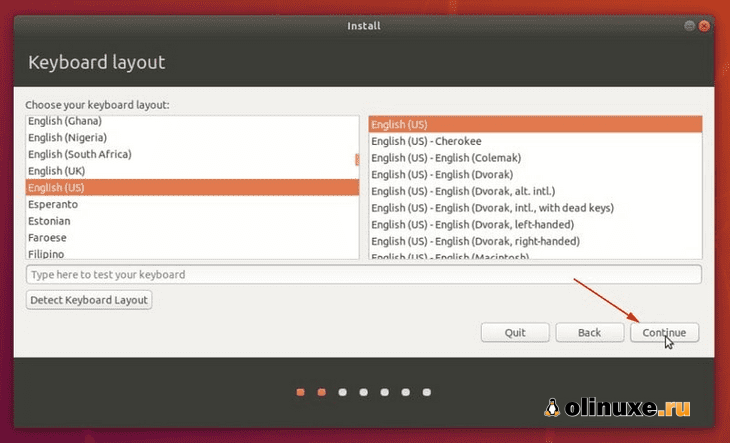
На следующем экране выберите «Обычная установка».
Пока не нужно загружать обновления или устанавливать стороннее программное обеспечение.
Вы можете сделать это после завершения установки.
Нажмите «Продолжить».
Переход к следующему шагу может занять некоторое время.
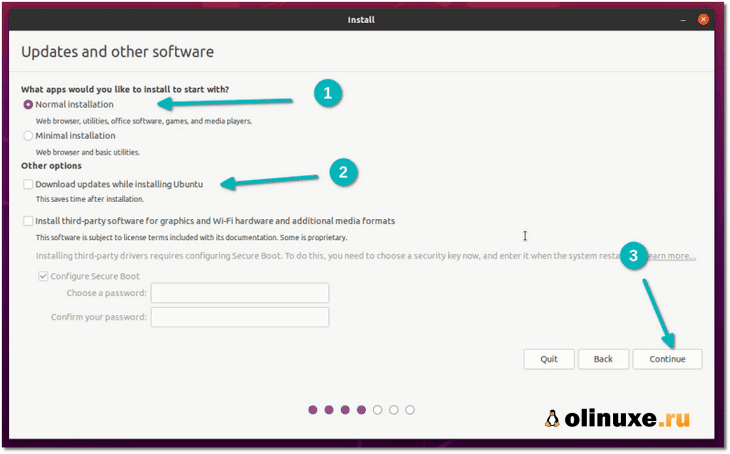
Примечание. Некоторые люди пытаются загрузить обновления и установить медиа-кодеки во время установки.
По моему опыту, это иногда создает проблемы во время установки, а также может привести к сбою установки.
По этой причине я не советую их использовать.
Важно: установка требует двух подходов в зависимости от того, что вы видите на следующем экране.
Поскольку это подробное руководство, я рассмотрю оба аспекта.
Подход 1. Вы видите «Установить Ubuntu вместе с Windows Boot Manager».
Если вы видите «Установить Ubuntu вместе с Windows Boot Manager» на экране установки, вам повезло.
Вы можете выбрать этот метод и нажать «Продолжить».
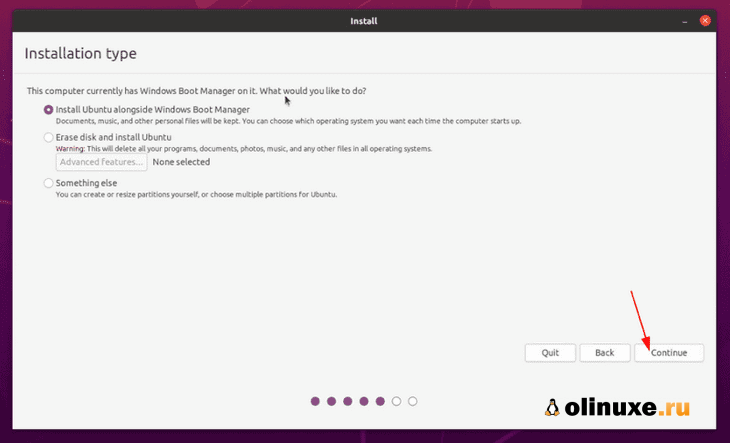
Если вы видите «Установить Ubuntu вместе с диспетчером загрузки Windows», выберите его
На следующем экране вы сможете создать раздел для Ubuntu, перетащив разделитель.
Вы можете выделить соответствующее дисковое пространство для Linux здесь.
Ubuntu создаст один раздел из выделенного дискового пространства, и у него будет root с home и swap (файл подкачки) размером 2 ГБ под root.
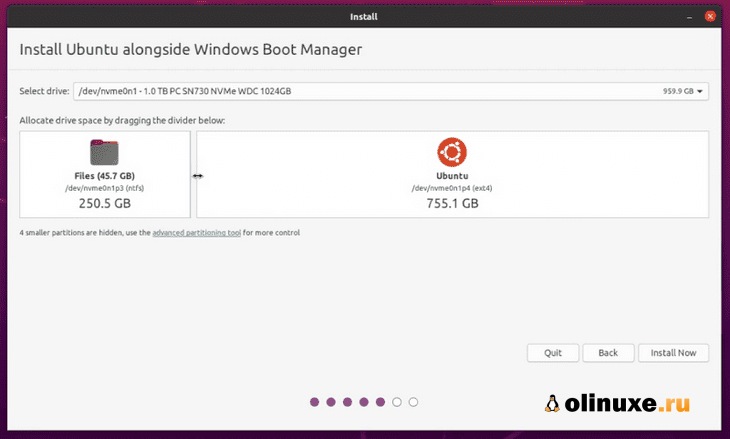
Подход 2: Вы не видите параметр «Установить Ubuntu вместе с диспетчером загрузки Windows» или он неактивен
Но если вы один из тех, кому не повезло, вам не о чем беспокоиться.
Для вас дела обстоят не так уж и плохо.
Вы все еще можете установить Ubuntu с Windows.
На экране «Тип установки» выберите «Что-нибудь еще».
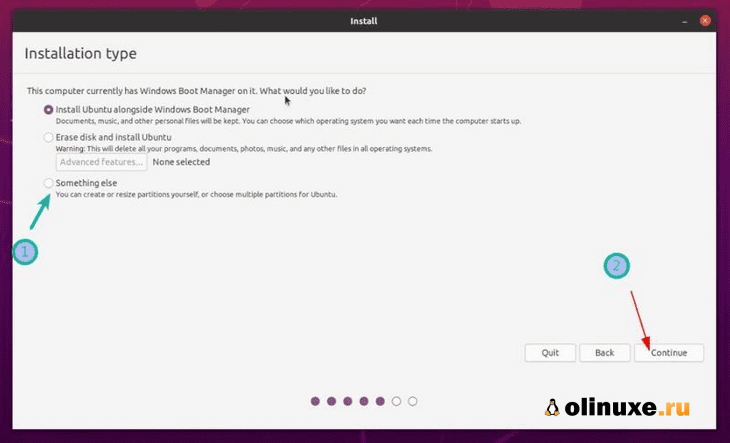
Вы перейдете к экрану разбиения на разделы.
Помните, вы заранее создали свободное место?
Вы можете выделить все свободное пространство для root (файл подкачки и домашняя страница будут созданы автоматически под root) или вы можете разделить разделы root, swap и home.
Оба метода хороши.
Я показываю шаги для создания разделов root, swap и home по отдельности.
Но не стесняйтесь использовать один раздел для всех из них.
Выберите свободное место и нажмите на знак «+».
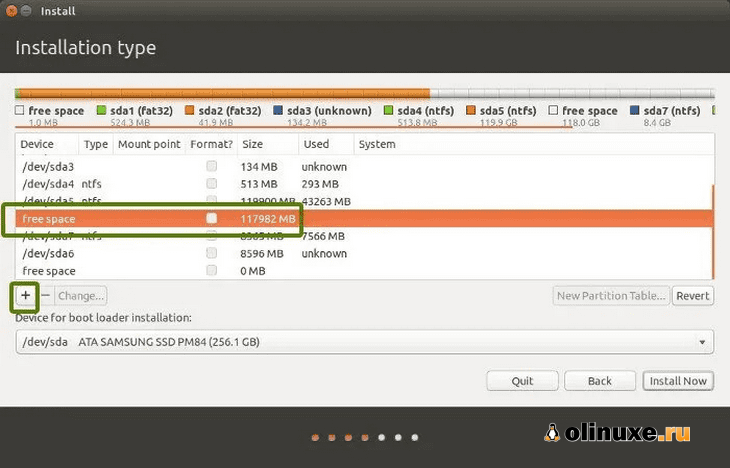
Он предоставит вам возможность создать раздел Linux.
Вы создаете корневой (root) раздел.
Для этого более чем достаточно всего, что превышает 25 ГБ.
Выберите размер, выберите «Ext4» в качестве типа файла и / (означает root) в качестве точки монтирования.
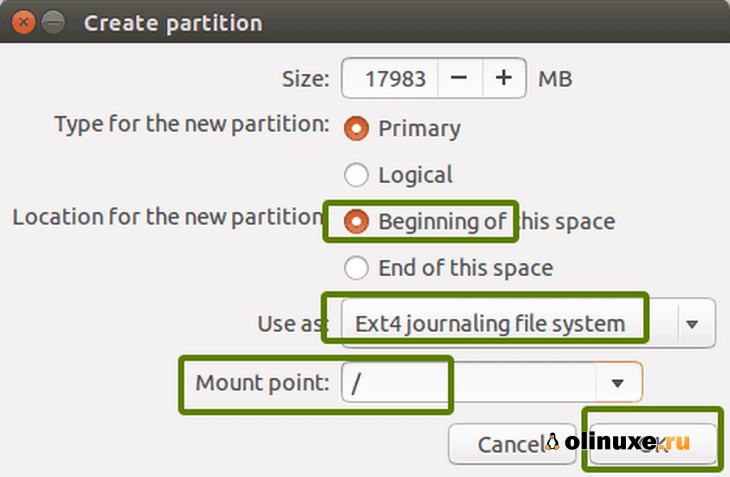
Щелкнув «OK» на предыдущем шаге, вы перейдете к экрану раздела.
Затем создайте swap.
Как и раньше, снова нажмите на знак «+».
На этот раз используйте тип файла как область подкачки.
Вопрос об идеальном размере подкачки в Linux остается спорным.
Если у вас 2 ГБ или меньше ОЗУ, используйте подкачку, вдвое превышающую размер ОЗУ.
А если у вас 3-6 ГБ ОЗУ, используйте подкачку того же размера, что и ОЗУ.
Если у вас 8 ГБ или более ОЗУ, вы можете использовать подкачку, равную половине размера ОЗУ (если у вас не достаточно места на диске, и вы хотите использовать спящий режим, и в этом случае используйте подкачку не менее того же размера, что и ОЗУ).
Если вы чувствуете, что в вашей системе меньше swap, не волнуйтесь.
Вы можете легко создать файл подкачки и добавить больше места подкачки в свои системы.
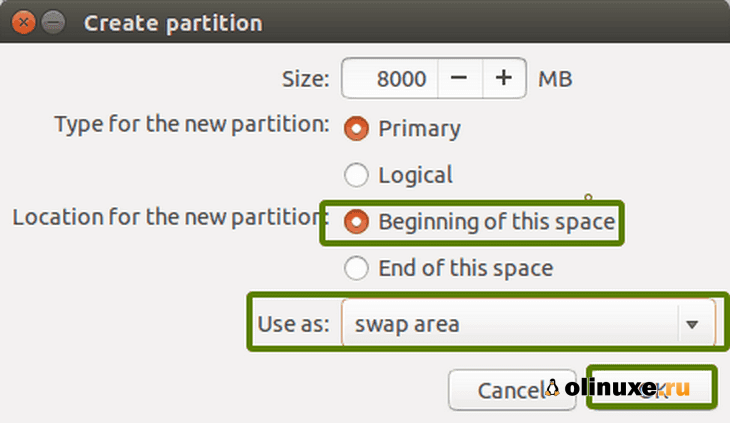
Таким же образом создайте домашний раздел.
Выделите ему максимальное пространство (фактически выделите ему остальное свободное пространство), потому что именно здесь вы будете сохранять музыку, изображения и загруженные файлы.
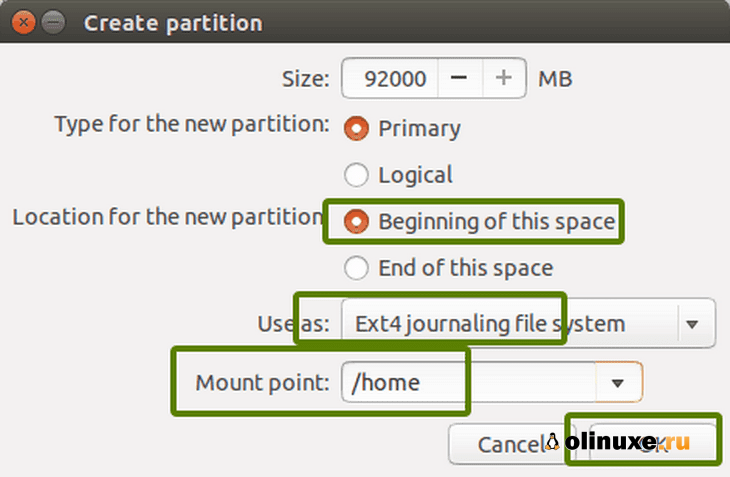
Когда вы будете готовы с root, swap и home, нажмите «Install Now»:
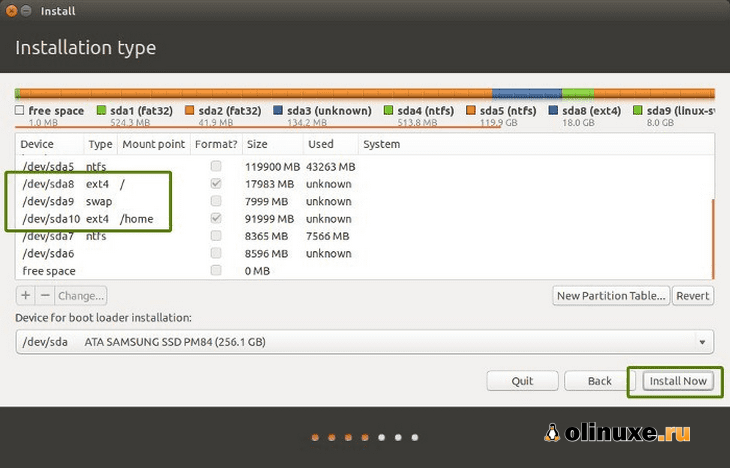
Что ж, вы почти выиграли битву.
Теперь вы чувствуете запах победы.
По запросу выберите часовой пояс.

Затем вам будет предложено ввести имя пользователя, имя хоста (имя компьютера) и пароль.
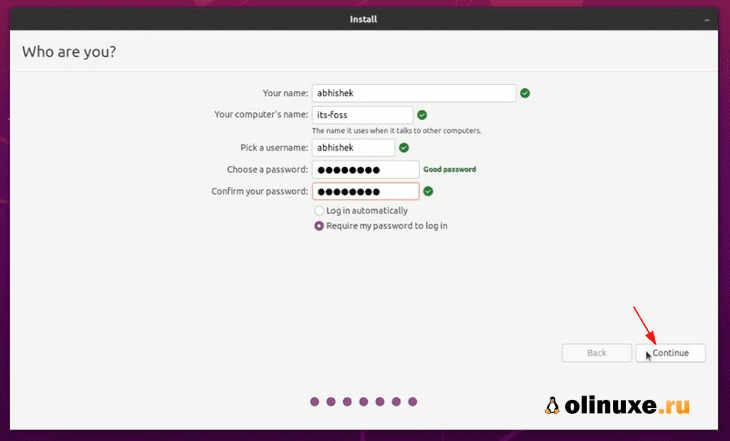
Теперь осталось только подождать.
Для завершения установки потребуется 8-10 минут.
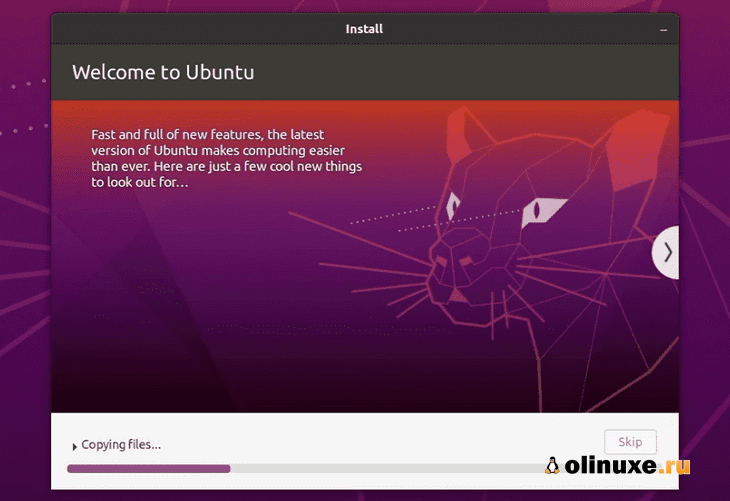
После завершения установки перезагрузите систему.
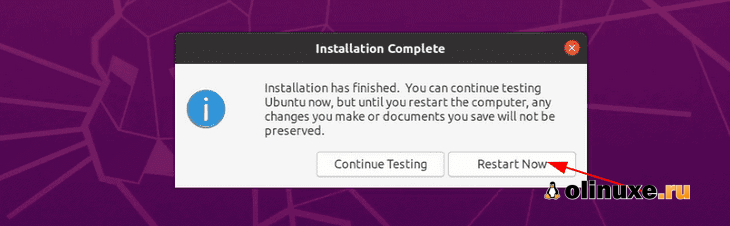
Перезагрузите компьютер после завершения установки
Вам будет предложено извлечь USB-диск.
На этом этапе вы можете удалить диск, не беспокоясь.
После этого система перезагрузится.

Удалите USB и нажмите ENTER
Для использования Linux вам больше не нужен Live USB-диск.
Вы установили Ubuntu на диск своего компьютера.
Удалите USB-накопитель и оставьте его на потом, если вы хотите использовать его для установки Linux в другой системе.
Вы также можете отформатировать его и использовать для обычного хранения или передачи данных.
Если все прошло гладко, вы должны увидеть экран «grub» после включения системы.
Здесь вы можете выбрать Ubuntu для загрузки в Ubuntu и диспетчер загрузки Windows для загрузки в Windows.
Довольно круто, правда?
Вы можете выбрать операционную систему на экране «grub»
Двойная загрузка не удалась? Вот несколько советов по устранению неполадок
Для некоторых двойная загрузка может пока не работать.
Однако вместо того, чтобы сдаваться, вы можете следовать нескольким советам и повторить процедуру установки.
Попробуйте сменить порт USB
Это может показаться смешным, но иногда некоторые порты USB вызывают проблемы с загрузкой USB или установкой Linux.
Изменение USB-порта может быть хитростью.
Старайтесь не использовать интернет при установке Linux
Я испытал, что иногда установка Linux выдает ошибку, если он подключен к интернету.
Если вы столкнулись с ошибкой «’grub-efi-amd64-signed’ package failed to install into /target», попробуйте установить Ubuntu без интернета.
Отключите безопасную загрузку и / или быструю загрузку
В некоторых редких случаях безопасная загрузка не позволит вам загрузиться с Live USB или установить Linux.
Отключите безопасную загрузку.
В некоторых случаях вы также можете отключить быструю загрузку.
Двойная загрузка завершена, но вы не видите экран «grub» для загрузки в Ubuntu
Пожалуйста, проверьте порядок загрузки в настройках UEFI.
Вы видите Ubuntu / UEFI под диспетчером загрузки Windows?
Если да, переместите его вверх по порядку.
Надеюсь, это руководство помогло вам выполнить двойную загрузку Ubuntu с Windows 10 UEFI.
Я здесь слишком подробно остановился на деталях, но я хотел ответить на все распространенные заблуждения и показать все необходимые шаги.
Если у вас все еще есть сомнения или возникла странная ошибка, оставьте комментарий, и я постараюсь вам помочь.
До скорых встреч!
До скорых встреч! Заходите!
Подписаться на обновления блога!

You don’t have to have two different computers to use Linux and Windows 10. It’s possible to have a Linux distro installed on a computer with Windows 10 preinstalled.
In this article, I will show you how to dual boot Windows 10 and the popular Ubuntu Linux distro. But before that, you have to install Ubuntu on your Windows 10 PC.
Before you go through this process, you must backup your files. That’s because installing an OS is a risky process. Sometimes it can overwrite the existing OS and delete all your files.
N.B.: Most of the processes in this article take time to get done, so you need to be patient.
What We’ll Cover – A step-by-step Guide to Dual-Booting Windows 10 and Linux
- Prerequisites
- How to Partition your Hard Drive for Ubuntu
- How to Optimize your Hard Drive for More Partition Space (Optional)
- How to Download Ubuntu in ISO Image Format
- How to Make an Ubuntu (Linux) Bootable USB Drive
- How to Install Ubuntu Linux Distro along with Windows 10
- Now You Can Dual Boot Ubuntu and Windows 10
- Conclusion
Prerequisites
Most importantly, there are some things you must have in place if you want to use (and dual boot) Ubuntu and Windows 10 on the same PC:
- A computer preinstalled with Windows 10
- A partitioned hard drive
- A BIOS in UEFI mode (Unified Extensible Firmware Interface)
- An empty USB drive of at least 4Gig for creating a bootable disk
- An internet connection to download Ubuntu ISO image (the Linux distro) and Rufus (a bootable drive creation tool)
How to Check If Your PC BIOS is in UEFI Mode
To check if your PC BIOS comes in UEFI mode, search for “system information” and hit ENTER.
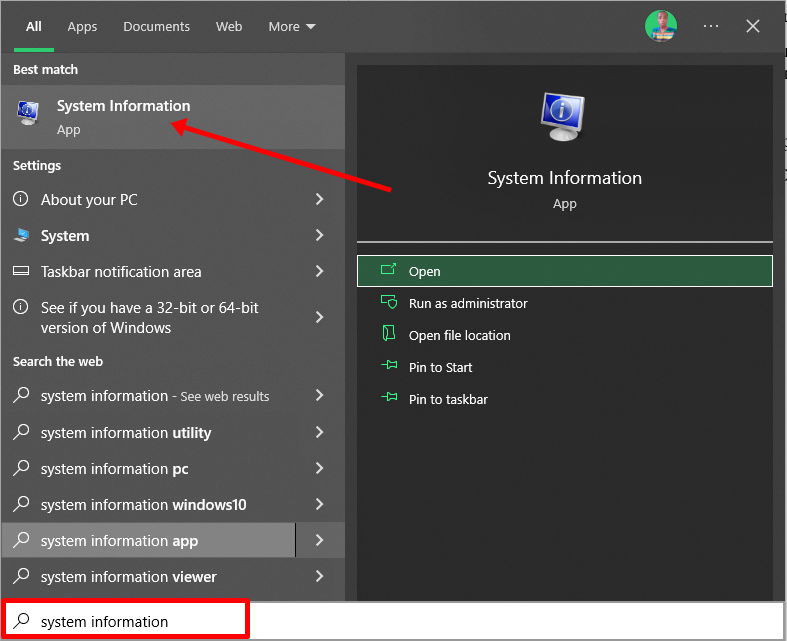
Look under BIOS mode to confirm that your PC BIOS mode comes as UEFI.
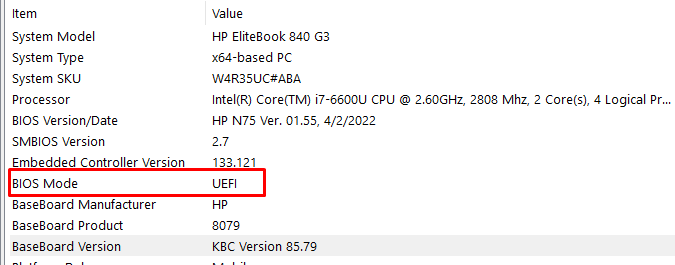
If your PC BIOS is not in UEFI mode, the two operating systems won’t see each other. You can learn more about the difference between these two modes here.
How to Partition your Hard Drive for Ubuntu
You have to partition your hard drive because you must set aside at least 20Gig for Ubuntu to live in and boot from.
To partition your hard drive, follow the steps below:
Step 1: Right-click on Start and select “Disk Management”.
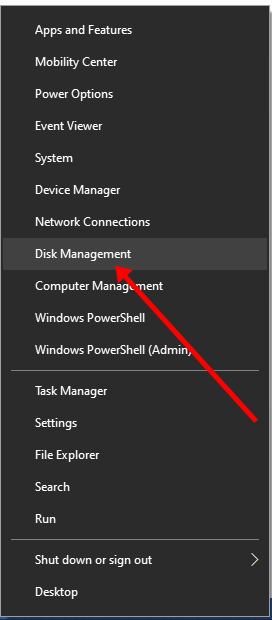
Step 2: Right-click on your C drive and select shrink volume.
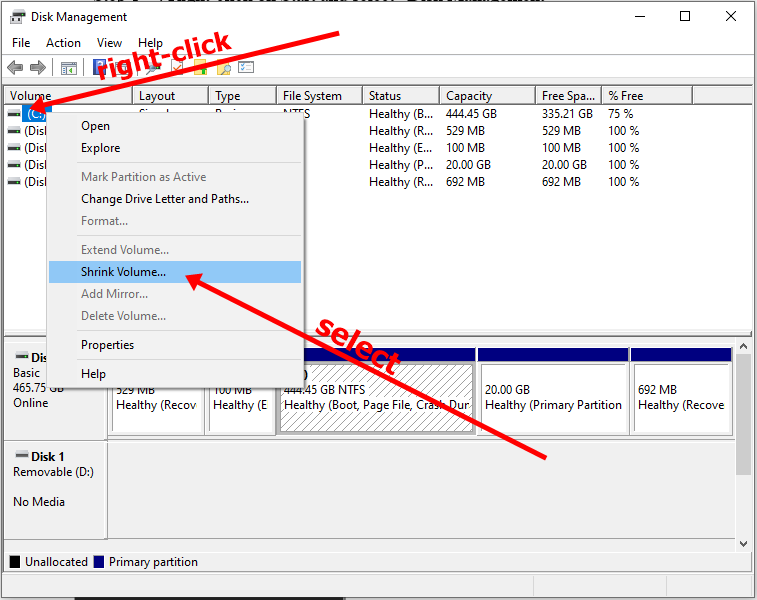
Step 3: Select at least (20000) 20Gig for Ubuntu and click “Shrink”. IT can take some time to complete, so be patient.
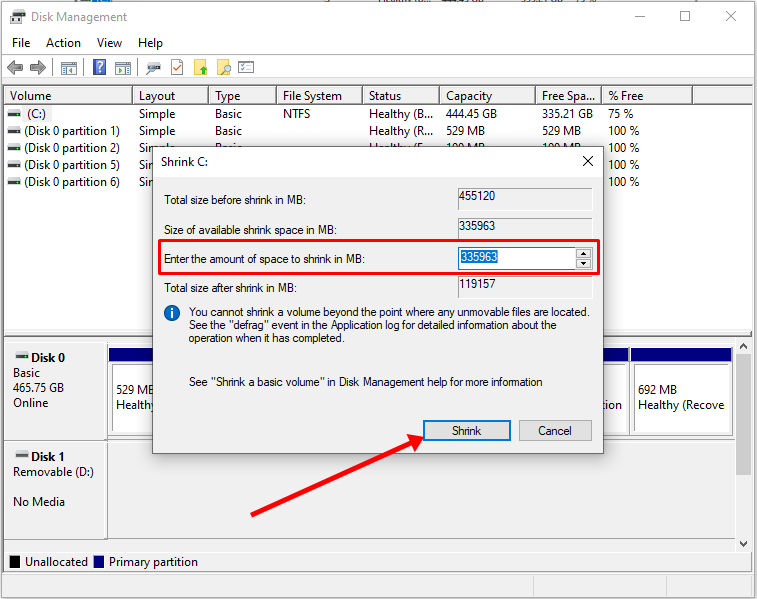
Step 4 (optional): You can go ahead and assign a letter to the new volume. Right-click on the unallocated space and select “New Simple Volume”.
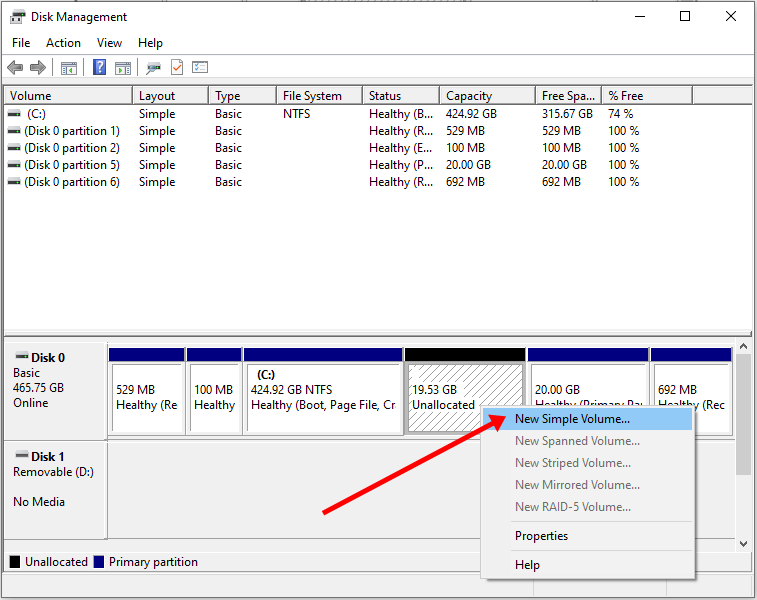
Step 5: Follow the wizard and assign a letter to the drive, then follow the rest of it.
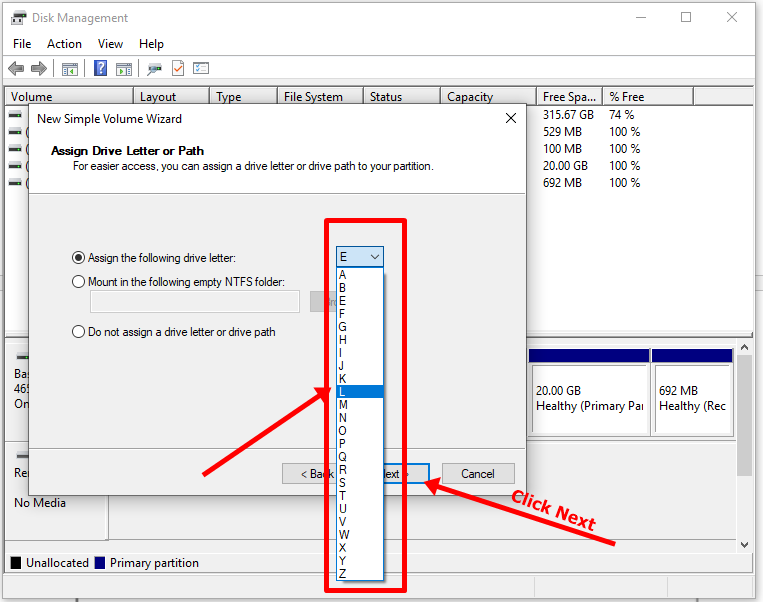
After completing the wizard, the drive should be listed on your computer.
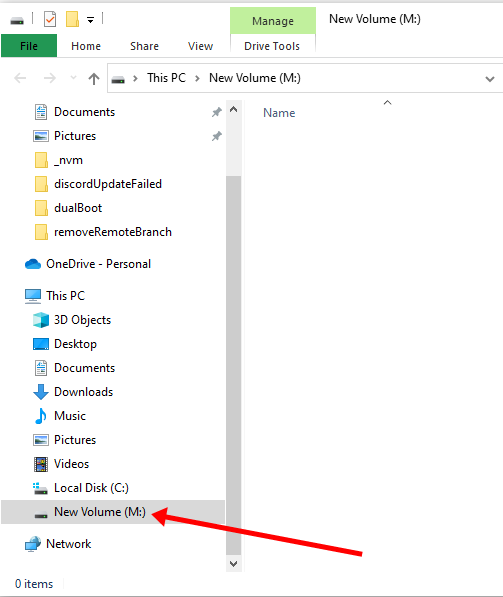
Congrats! You’ve successfully partitioned your hard drive.
N.B.: If you have a lot of free space in your hard drive but your PC still didn’t give you up to 20Gig partition space, then you need to optimize your PC’s hard drive. Proceed to the next section of this article to do that.
How to Optimize your Hard Drive for More Partition Space (Optional)
The common purpose of hard disk optimization is to speed up your computer during boot time and make it run smoother.
At the same time, the process will defragment the hard disk and make free space more available for partitioning.
To optimize your hard drive, click Start (Windows logo key), search for “defrag” and select “Defragment and Optimize Drives”.
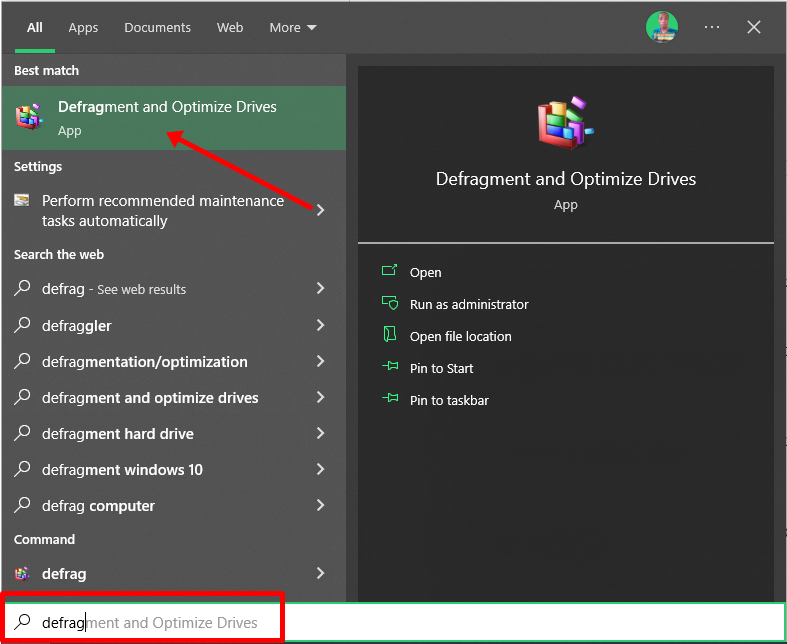
Make sure your C drive is highlighted, then click “Optimize”.
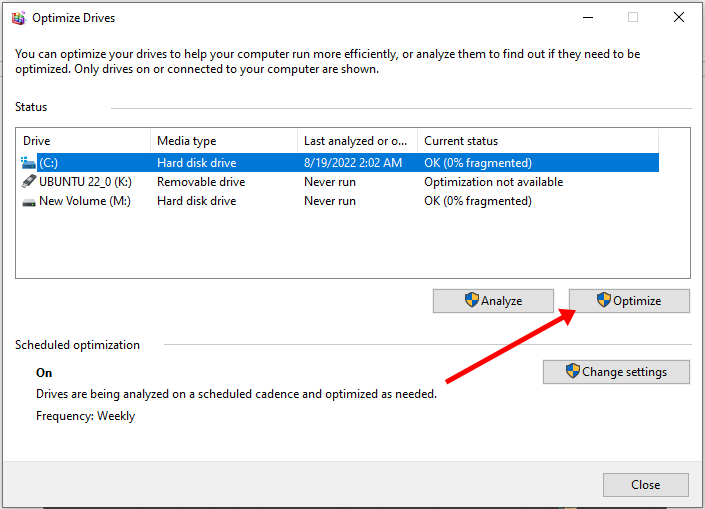
After you’ve been able to set aside at least 20Gig for Ubuntu by partitioning your hard drive, then it’s time to download Ubuntu and make a bootable USB.
How to Download Ubuntu in ISO Image Format
The next thing is to download Ubuntu in ISO image format so you can install Ubuntu. You can download it from the Ubuntu distro website.
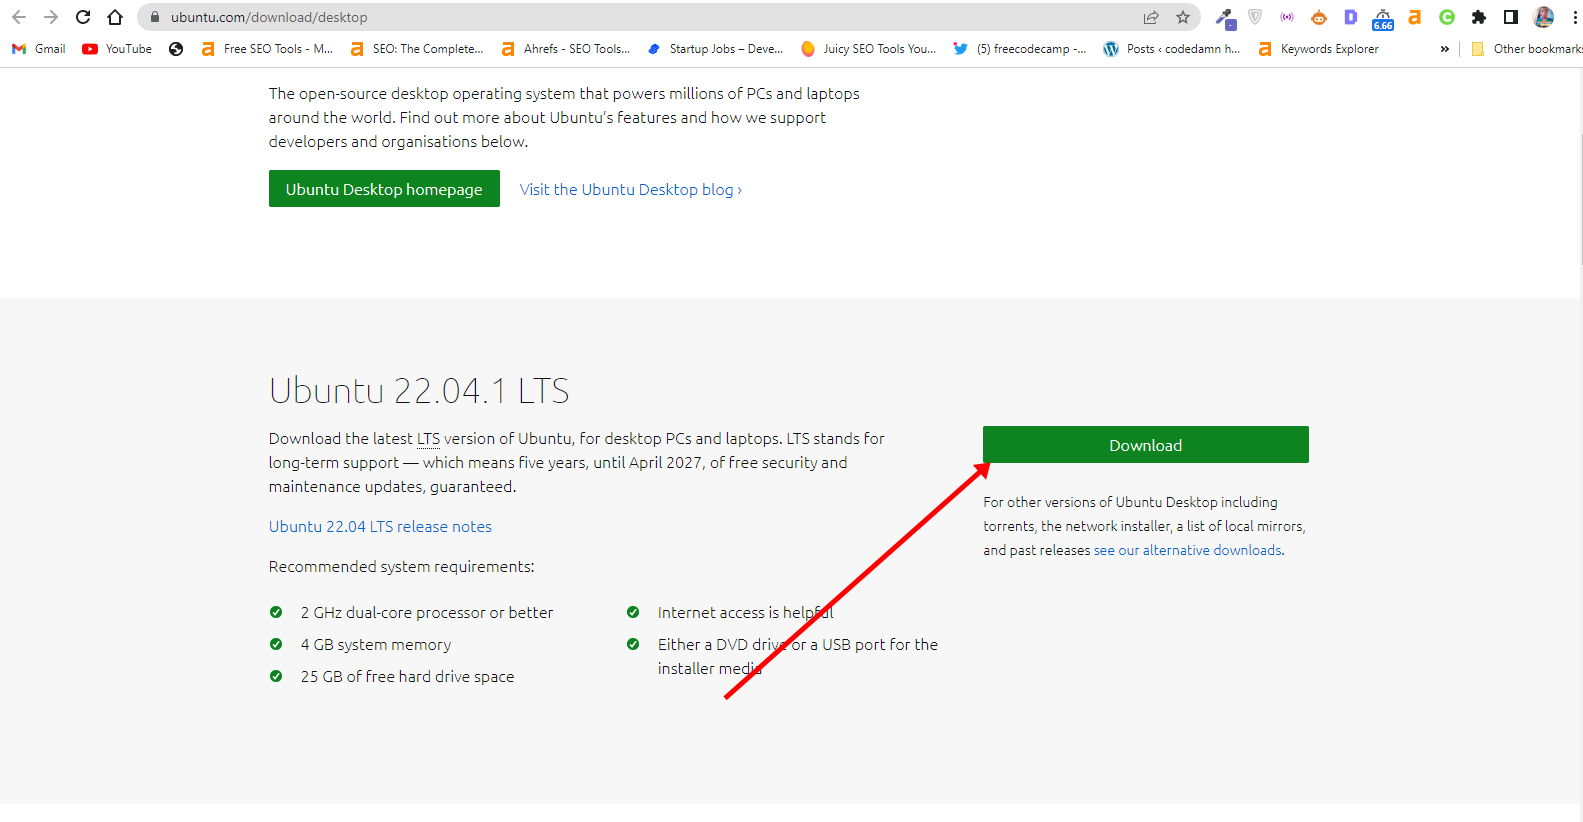
After downloading Ubuntu, don’t do anything with it yet. You need to make a bootable USB and put it in there. That’s how you’ll be able to use it.
The reason you can’t install Ubuntu just like that is that it doesn’t come as an executable. It comes in form of ISO (optical disk image). That means you have to find a disk to put it in before it can work.
The next part of this guide shows how you can put the downloaded Ubuntu ISO on a USB stick.
How to Make an Ubuntu (Linux) Bootable USB Drive
You won’t be able to make a bootable USB drive for Ubuntu by just placing the downloaded ISO image in it. Follow these steps to get it done:
Step 1: You need to download a bootable USB drive creation tool like Rufus. You can download Rufus from their website.
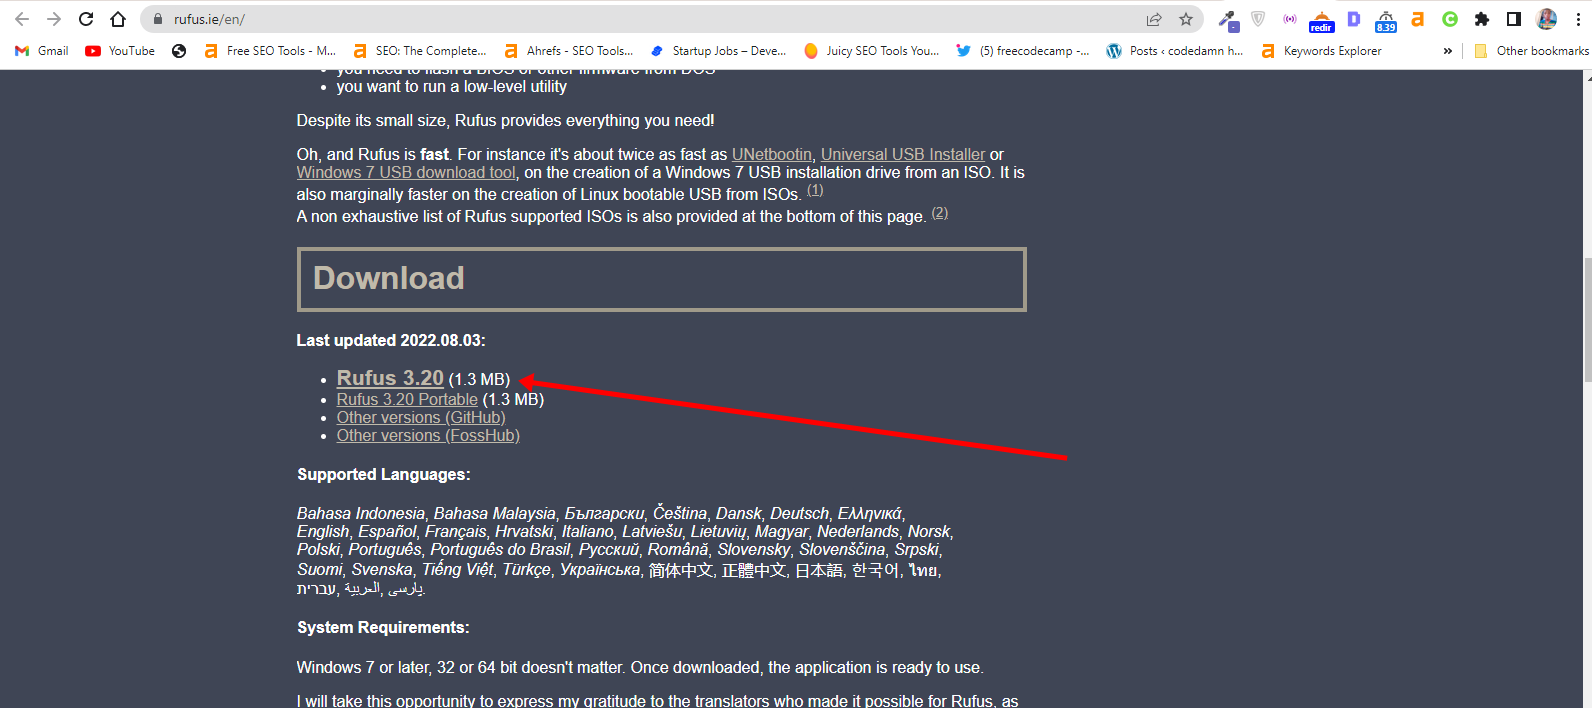
Step 2: Insert the empty USB drive into your Windows 10 PC. Right-click on Rufus and select “Open”.
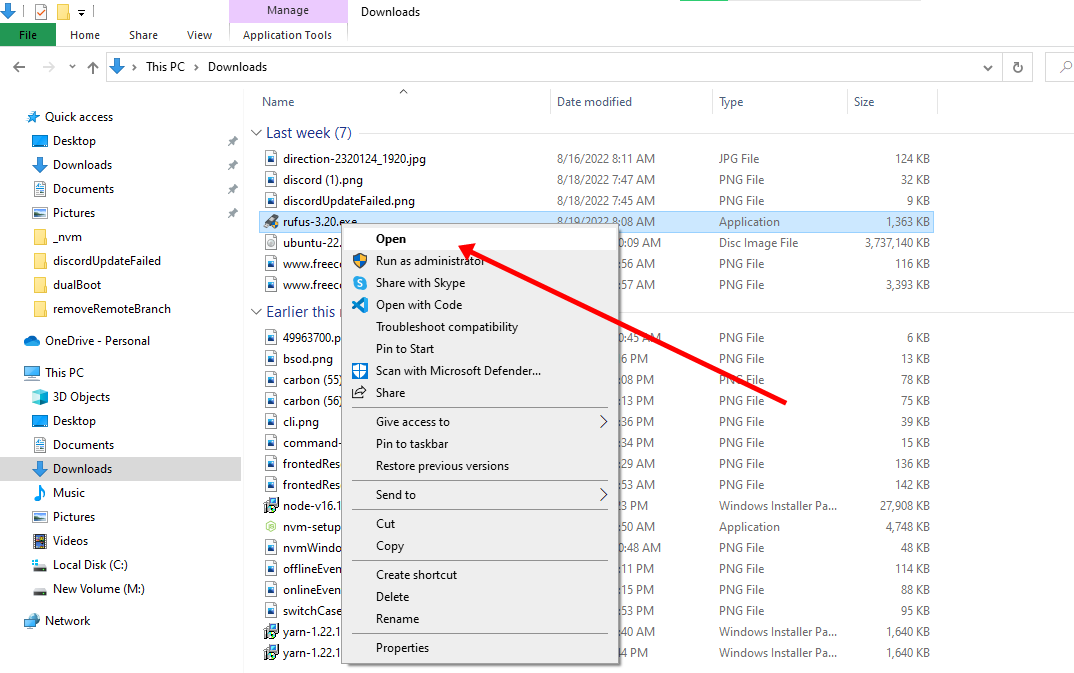
Step 3: Under “Device”, select your USB drive. And under “Boot selection”, click the “Select” button and select the Ubuntu ISO file you downloaded
Step 4: Leave every other thing as default and click the “START” button to start burning the Ubuntu distro to the drive.

Step 5: Click OK to start the process.
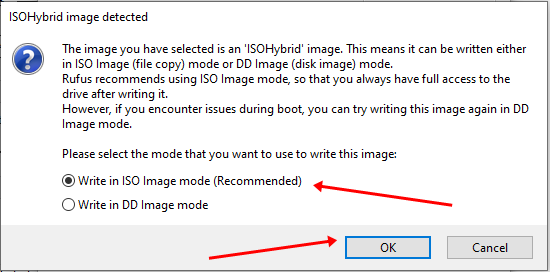
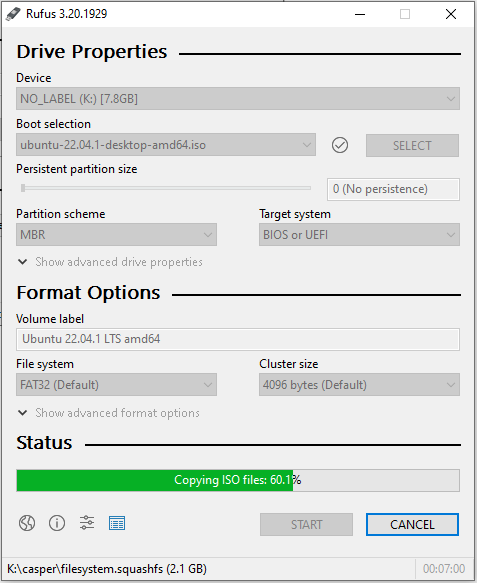
Once the process is done, you should see “READY” on a green background. Click the Close button. Its time to install Ubuntu.
Congrats! Now you have a bootable drive with which you can install Linux.
The next step is to install the Ubuntu distro on your Windows 10 PC. To do this, you have to boot your PC from the bootable USB drive you created.
How to Install Ubuntu Linux Distro along with Windows 10
Step 1: Ensure the bootable drive is inserted into your Windows 10 PC
Step 2: Right-click on Start, hold SHIFT, and select Restart.
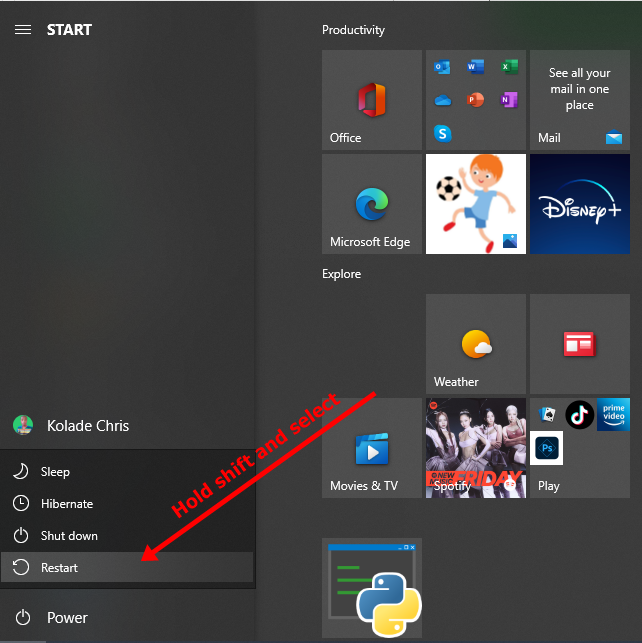
Step 2: Select “Use a Device”.
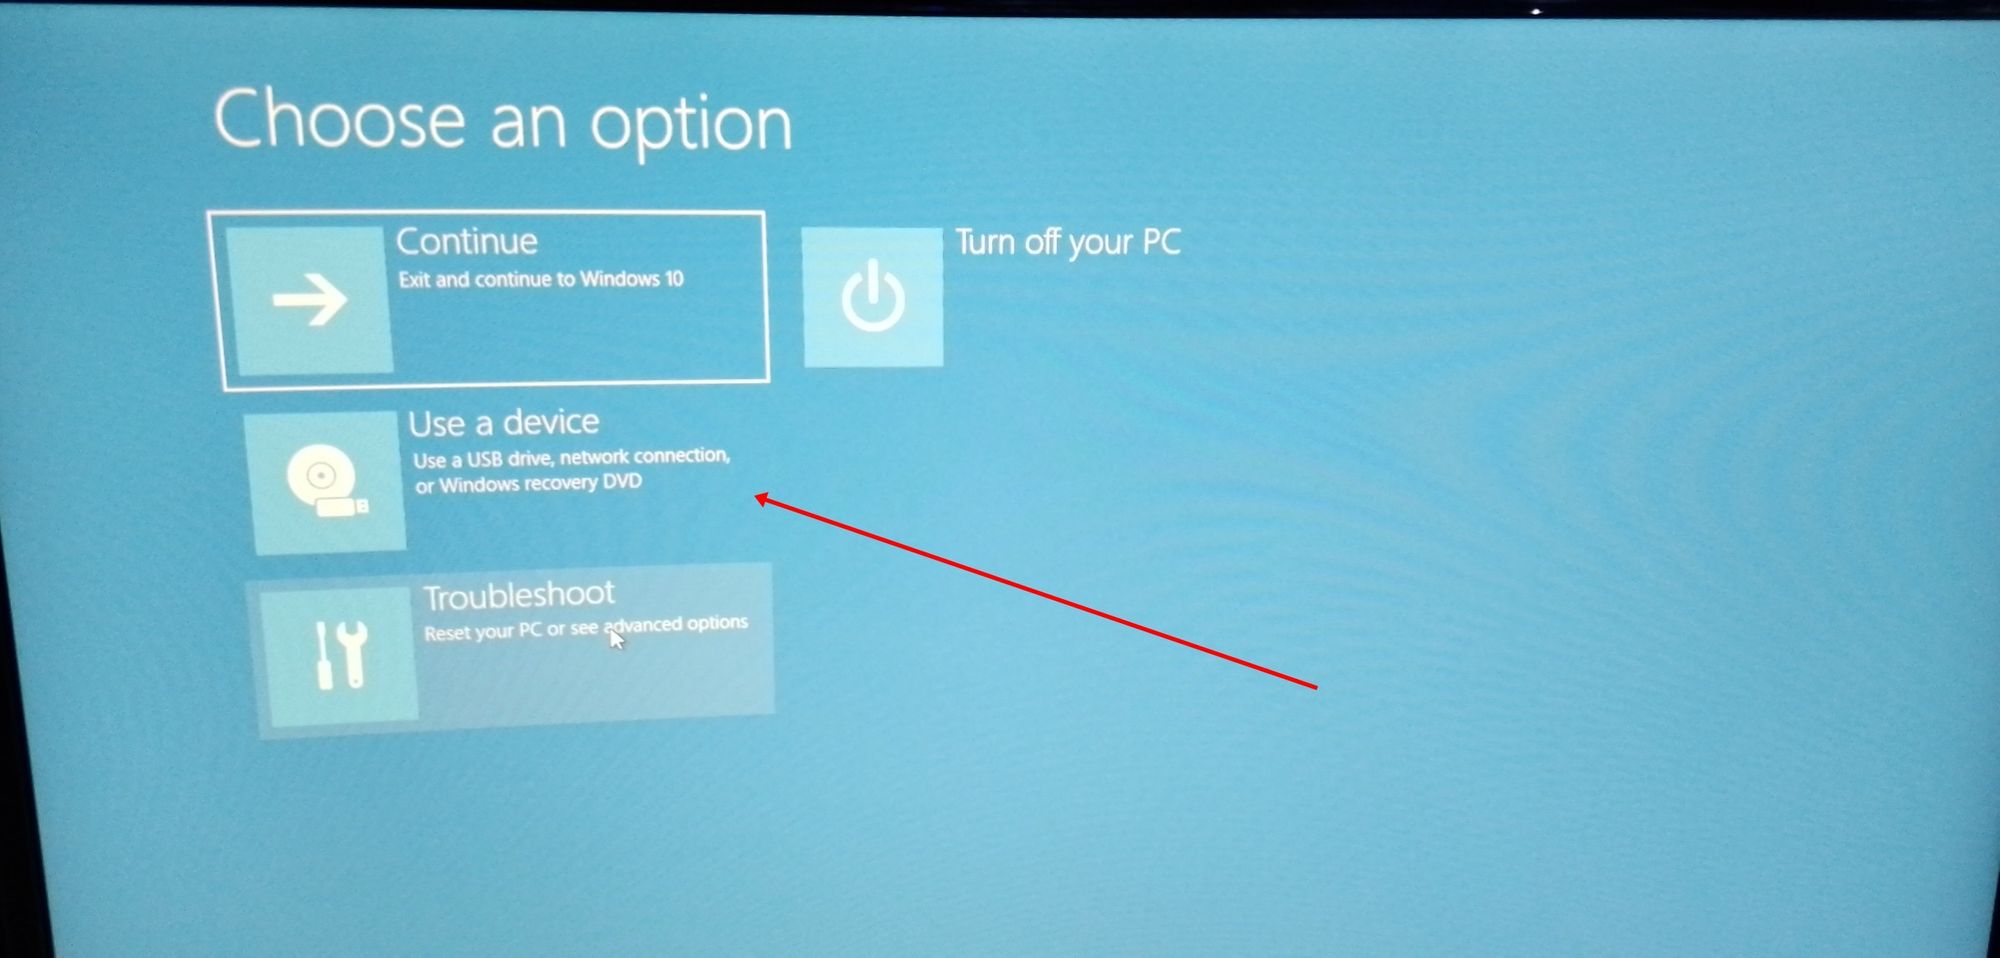
Step 3: On the next screen, you should see several devices you can boot from.
You may see the bootable drive as the name of the USB brand.
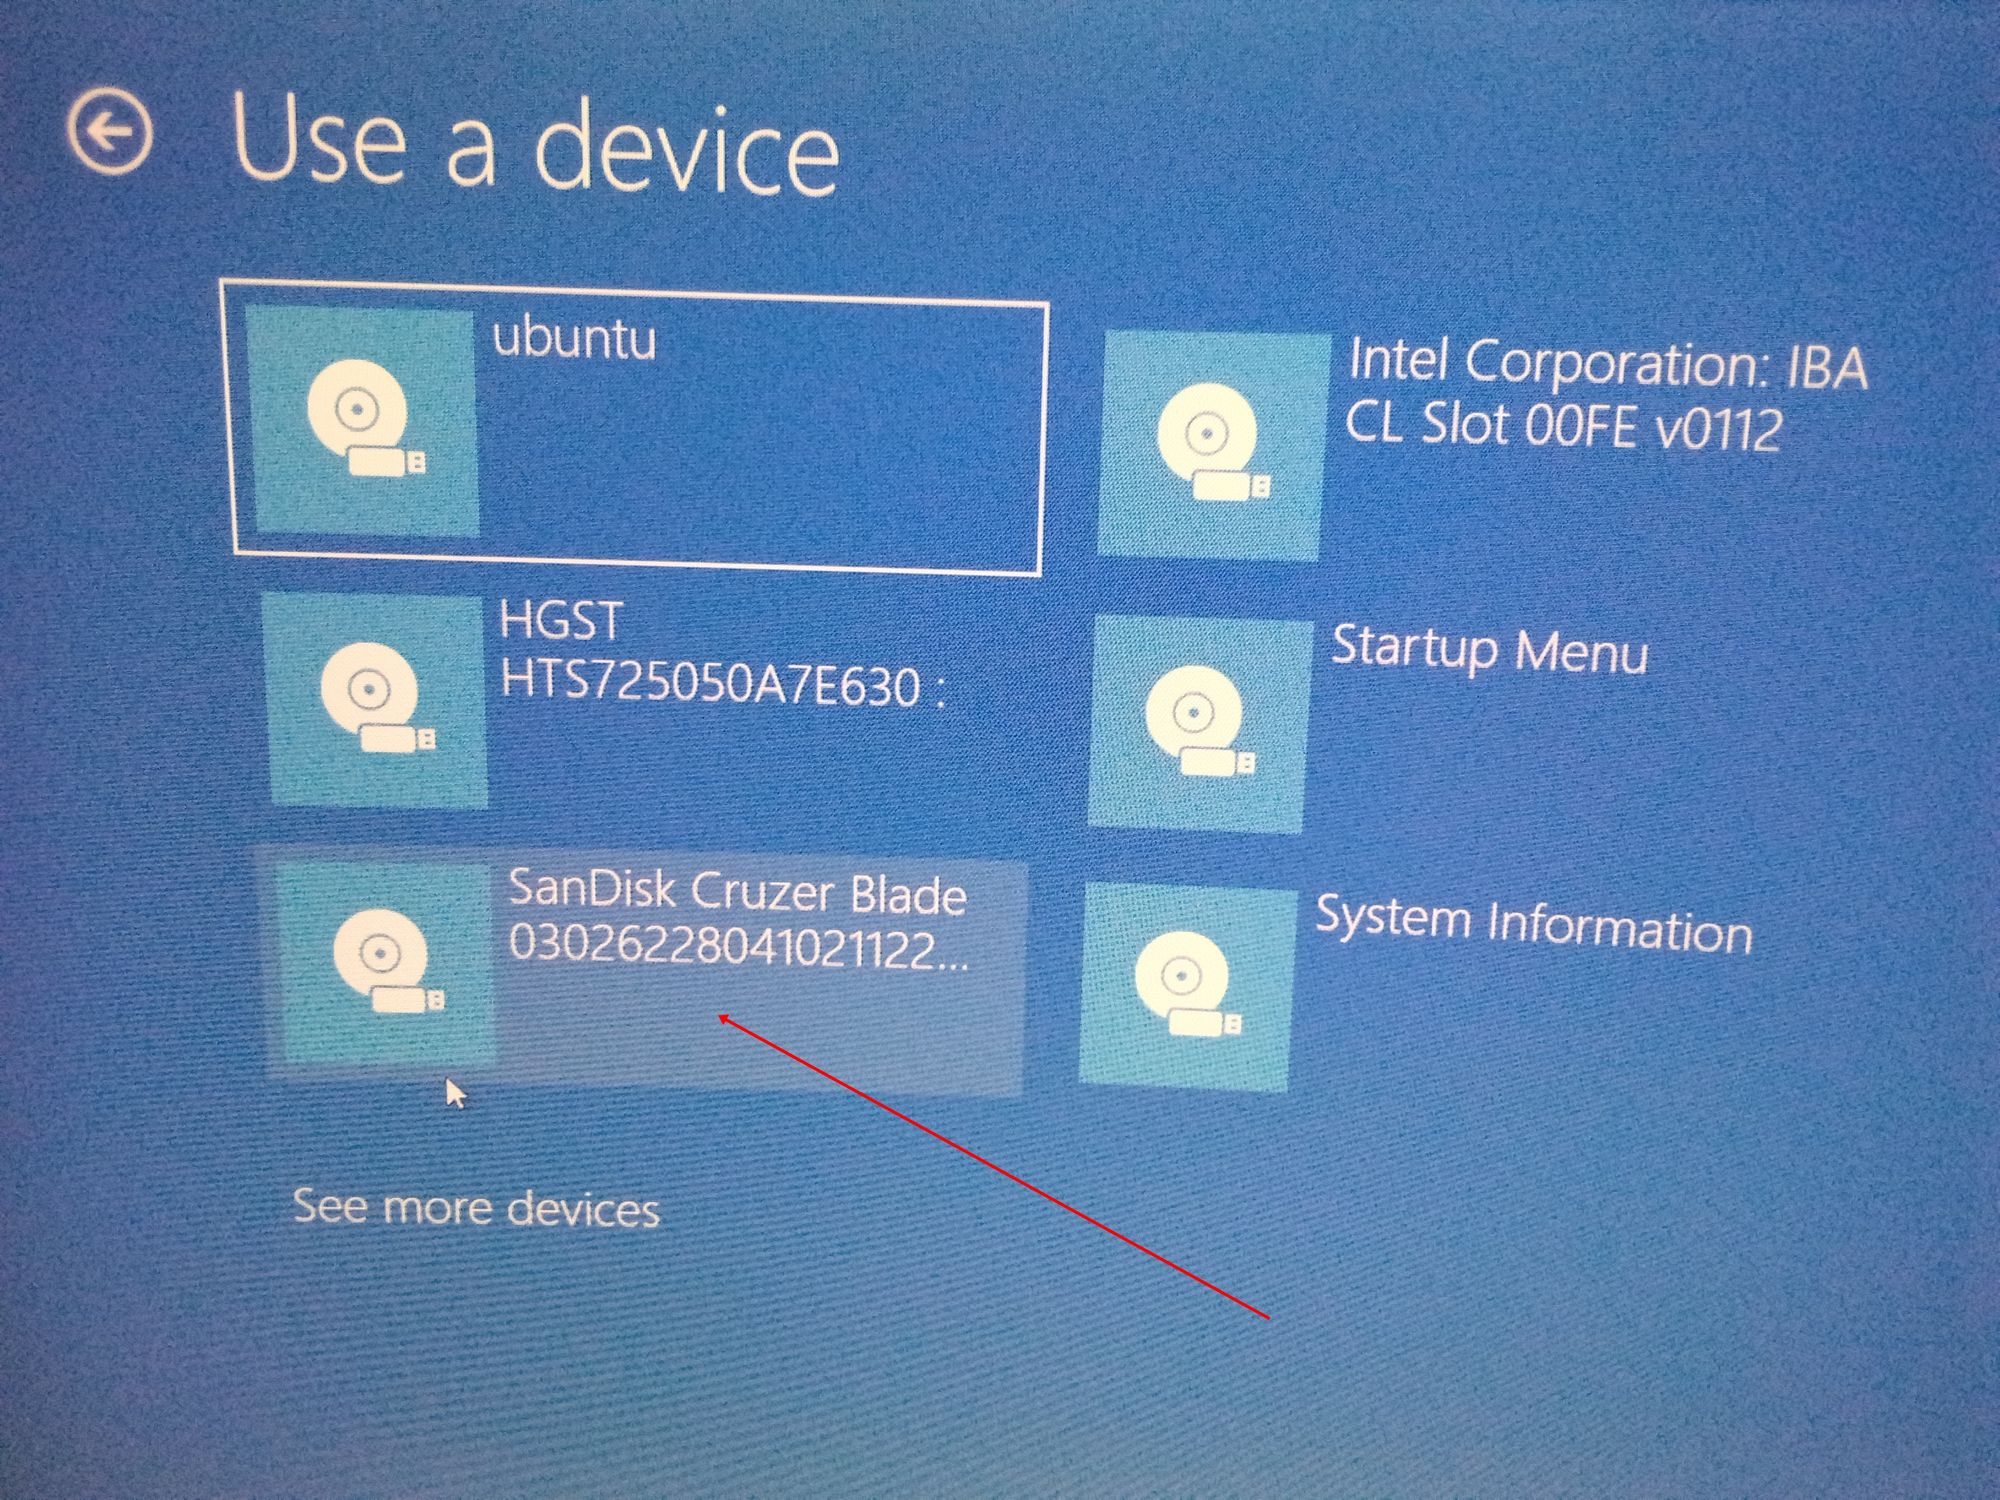
It’s possible to see it as “Ubuntu” too. Some other times, you might not see it, so you need to click on “See more devices».
If you still cannot see your bootable drive, head over to your boot menu by getting into BIOS. You will see it there.
N.B.: You should be very careful while making changes in BIOS. Whatever you do there has a lasting effect on your computer. If you are not sure of what you’re doing there, you should contact an IT professional.
Step 4: Choose «Install Ubuntu». You can also try it before installing it.
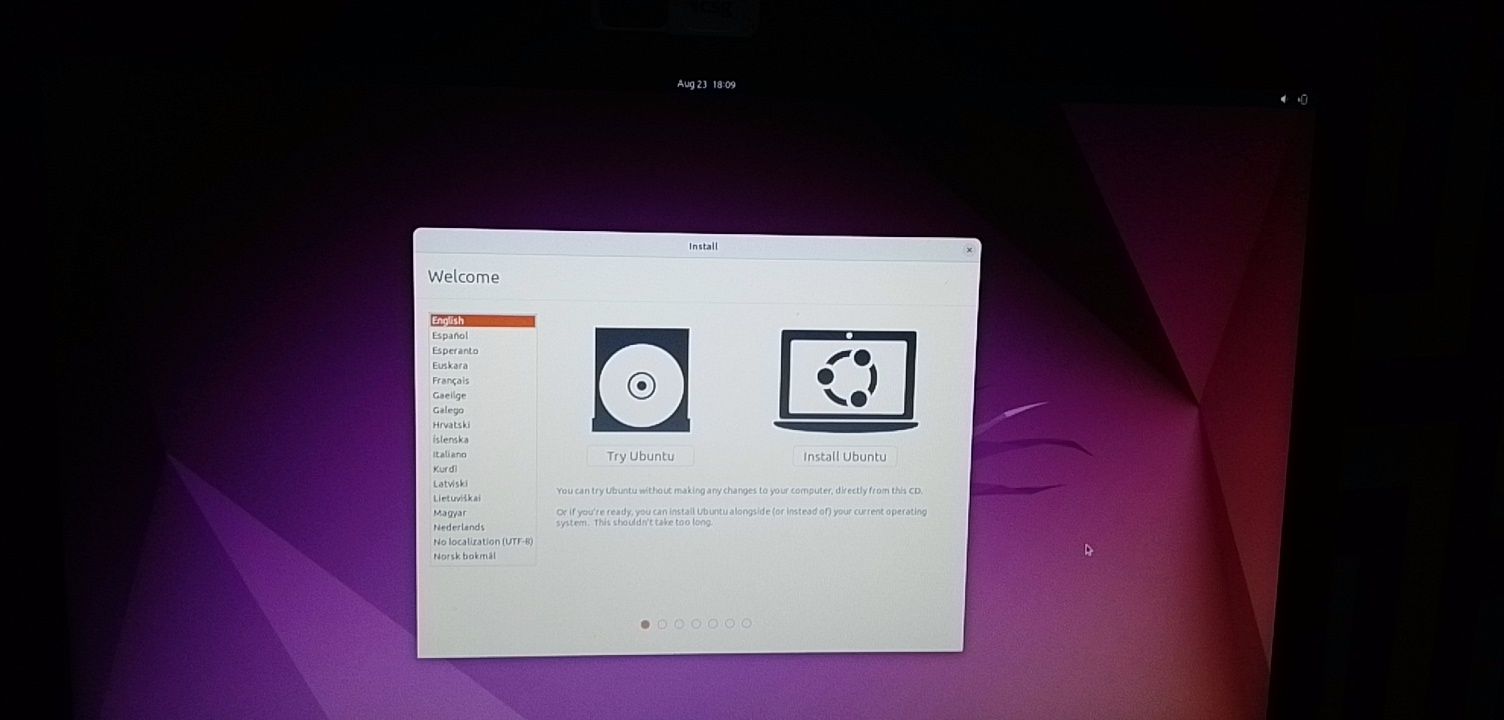
Follow other prompts of the installation wizard and make sure you don’t replace your Windows 10 OS installation with Ubuntu. This is why I suggested you back up all your files.
When you get to the point to select the partition you made, scroll to the partition you made earlier and press ENTER.
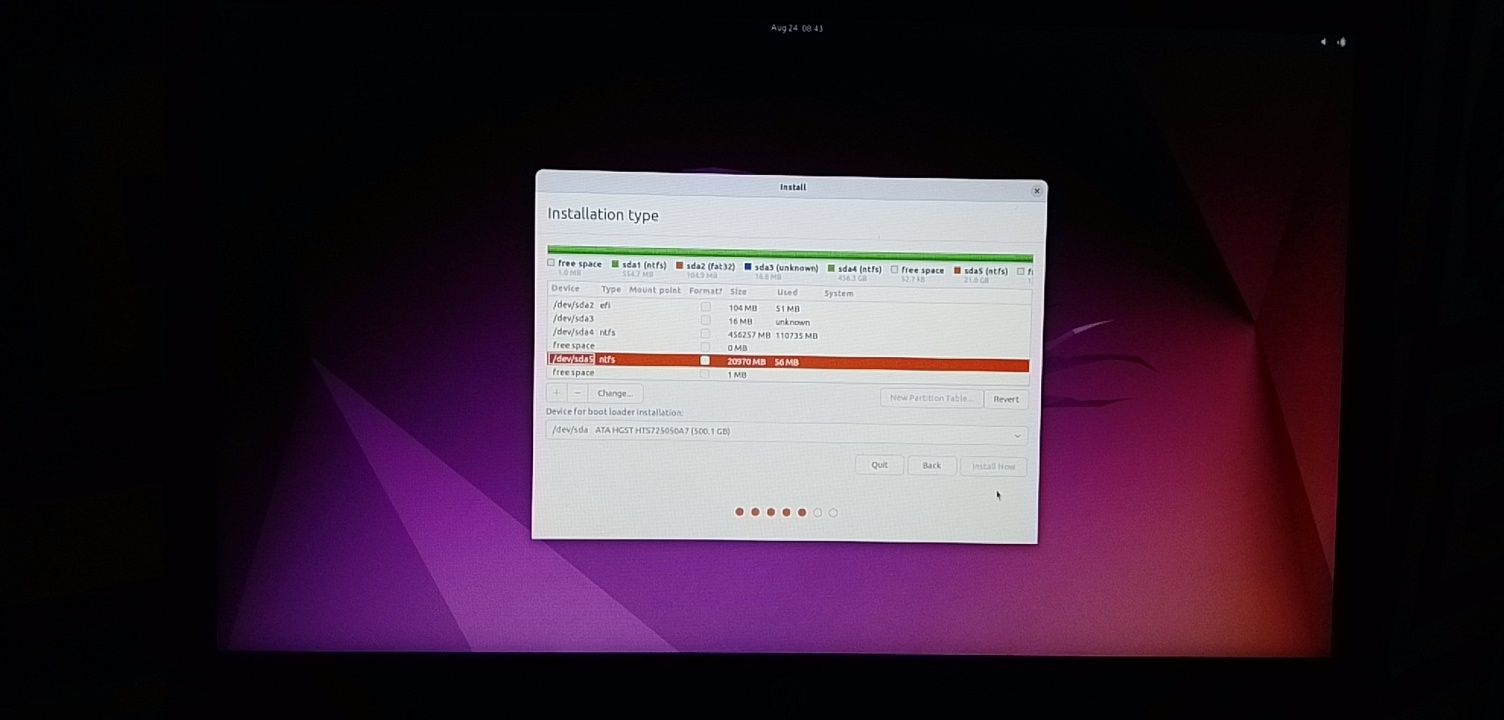
Click OK to select all the space in the partition.
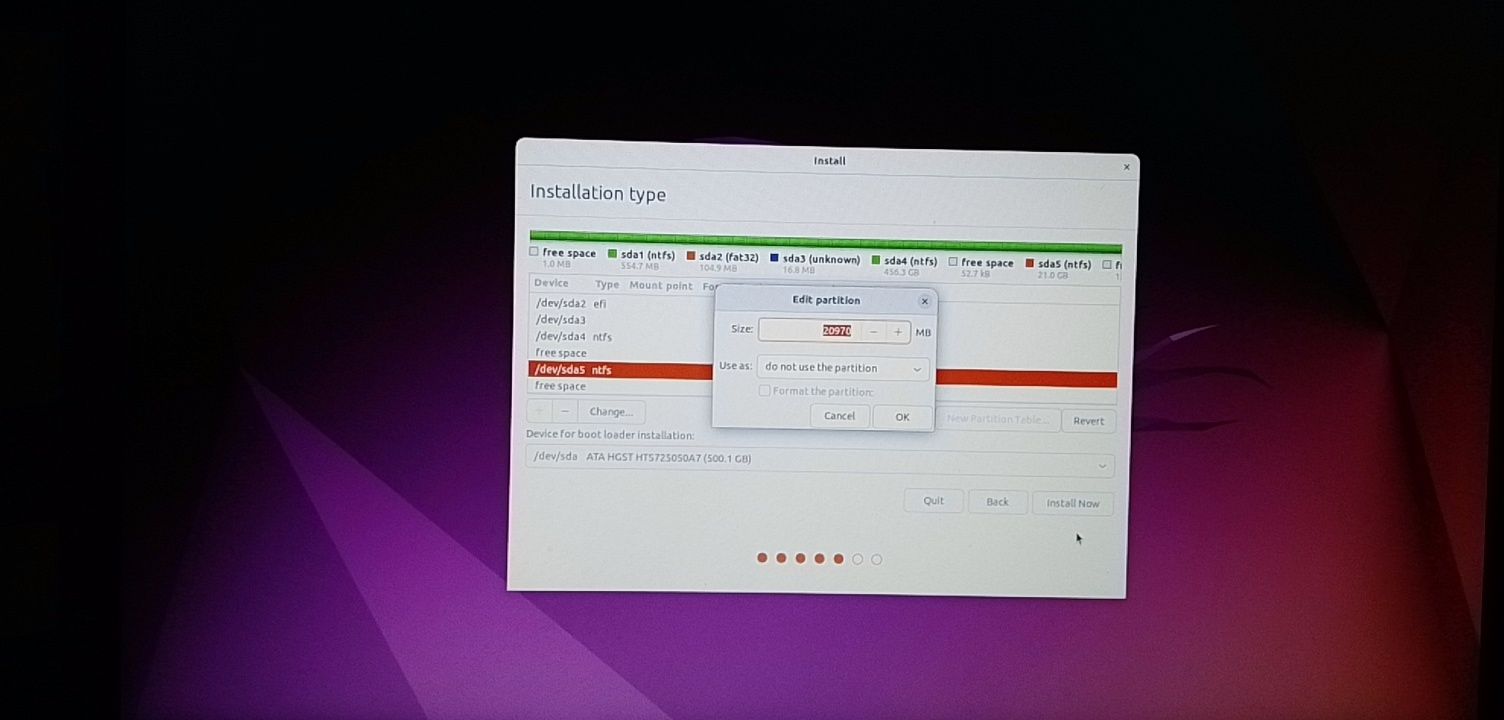
This time around, the “Install now” button will not be greyed out anymore.
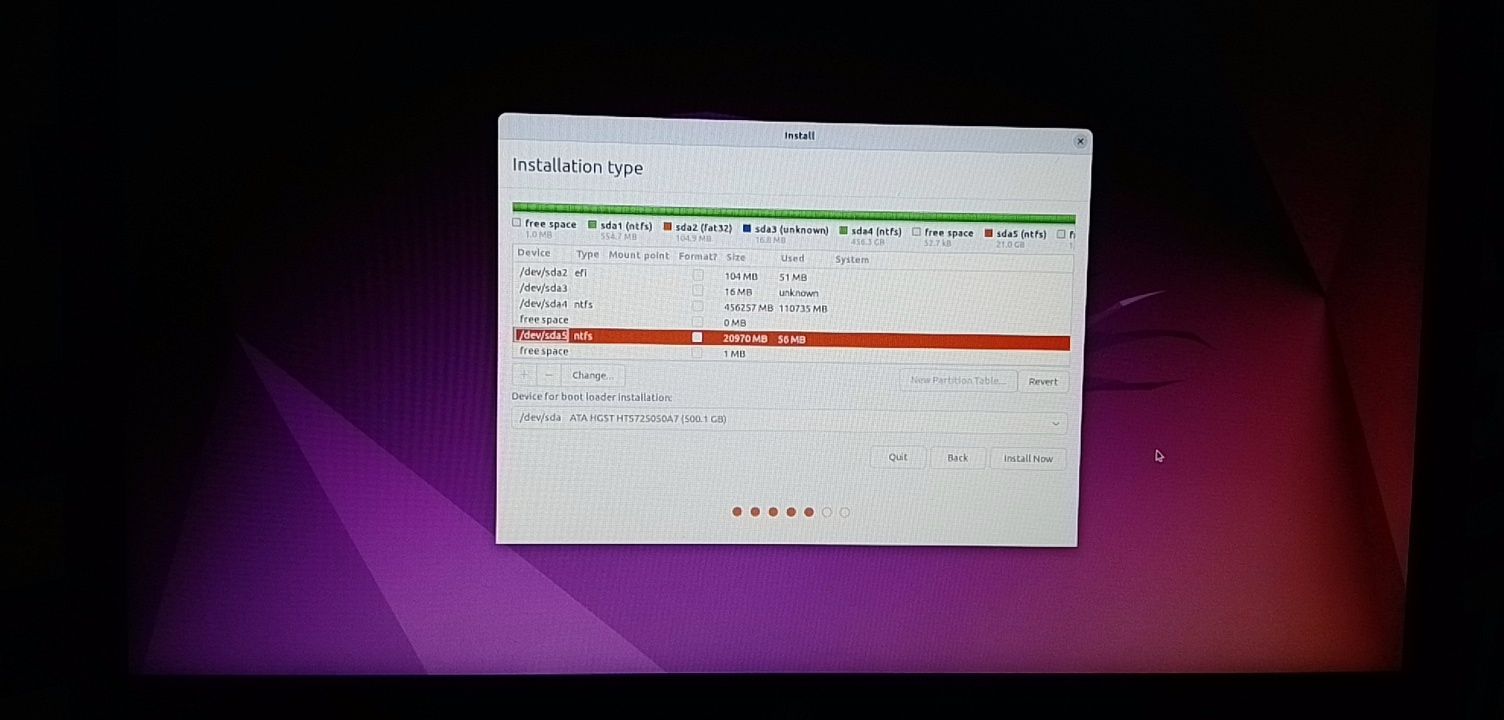
Follow other prompts until Ubuntu starts installing.
After the installation is done, Ubuntu will prompt you to remove the bootable drive and press ENTER to reboot your Computer.
Now You Can Dual Boot Ubuntu and Windows 10
Immediately after you reboot the computer, you should see a screen that looks as shown below:
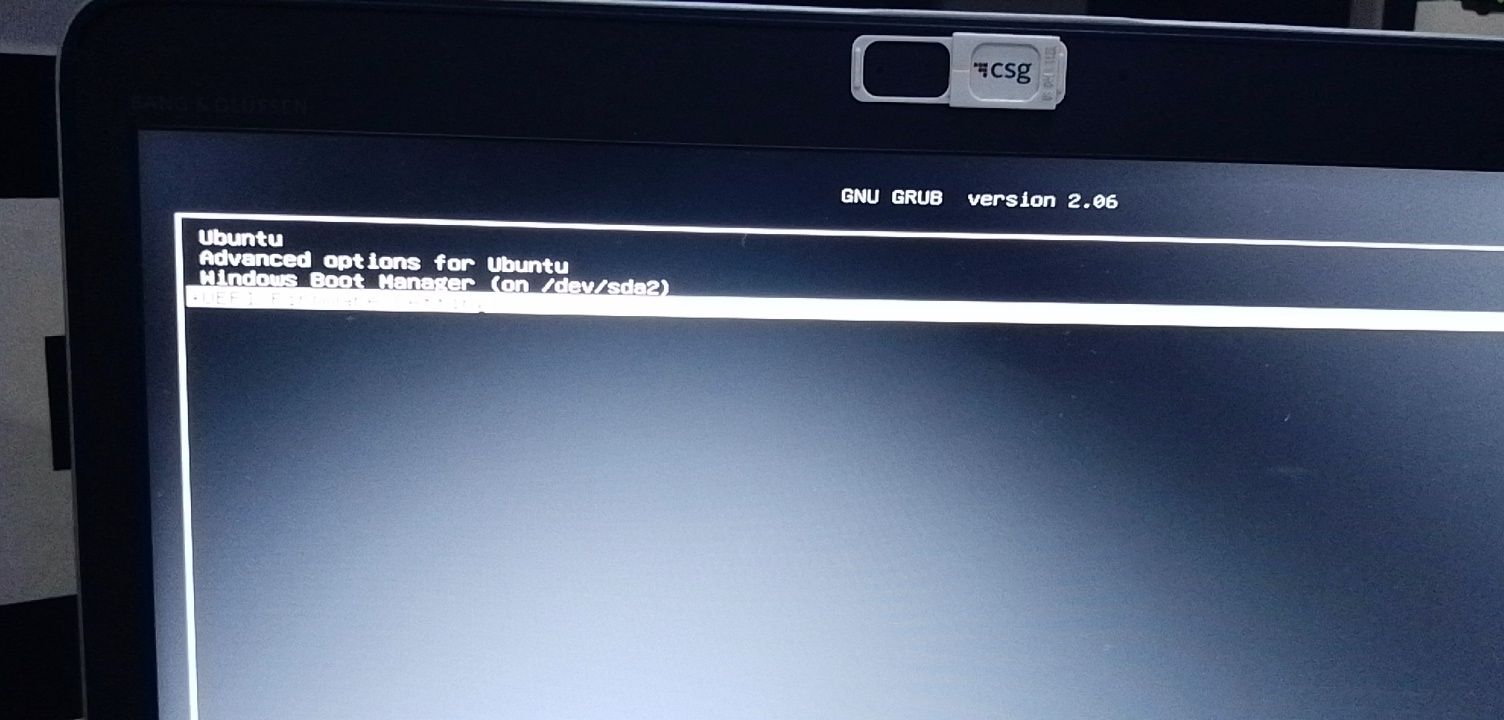
Now, you can select which one to boot into between Ubuntu and Windows 10.
To boot into Ubuntu, select Ubuntu. And to boot into Windows 10, select Windows boot manager.
You can also get into your BIOS from the same place by choosing UEFI Firmware Settings.
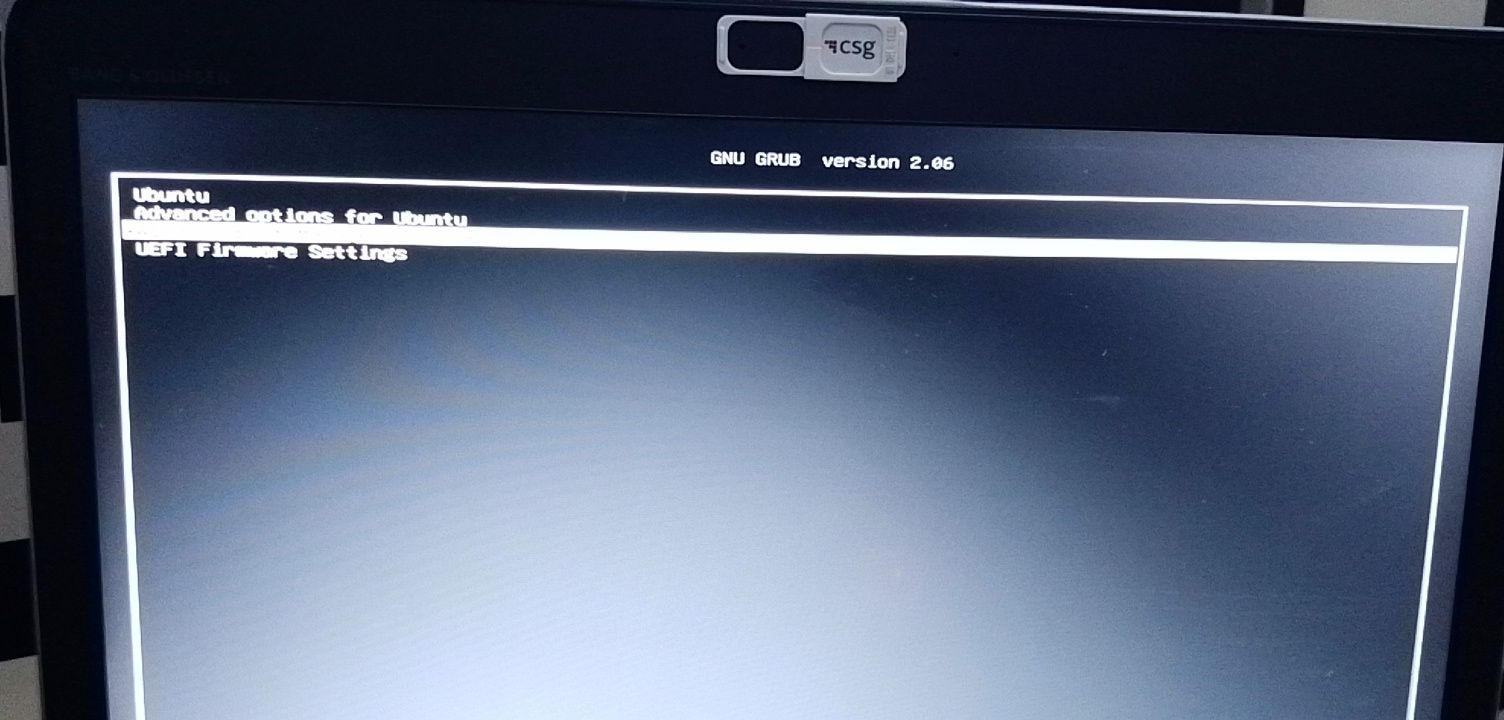
Conclusion
I hope this article helps you dual boot Ubuntu and Windows 10 on your computer.
The ultimate aim of this article was to show you how to dual boot Ubuntu and Windows 10.
But the article went beyond that to show you how to:
- check if your PC’s BIOS is in UEFI mode
- partition your hard drive
- optimize your hard drive
- make a bootable USB drive
- install Ubuntu Linux Distro along with Windows on your Windows 10 PC.
If you find this article helpful, kindly share it with your friends and family.
Learn to code for free. freeCodeCamp’s open source curriculum has helped more than 40,000 people get jobs as developers. Get started
In this guide, you will learn how to Dual boot Arch Linux with Windows 10 on UEFI system. This guide assumes that you already have Windows 10 installed on your system.
Prerequisites
Before you begin configuring the dual-boot setup, ensure that the following requirements are met:
- A bootable installation medium of Arch Linux (Either USB or DVD). To download the latest Arch Linux ISO, proceed to the official Arch Linux download page. Once you have downloaded the ISO image, grab an 8GB USB drive and make it bootable using Rufus tool or any other application that can create a bootable USB drive.
- A fast and stable internet connection for downloading and installing software packages.
Step 1) Create a separate partition for installation of Arch Linux
For the dual boot setup to work, we need to create a separate partition on the hard drive on which Arch Linux will be installed. To do so, head over to the disk management utility by pressing Windows Key + R. In the dialogue box, type diskmgmt.msc and hit ENTER.
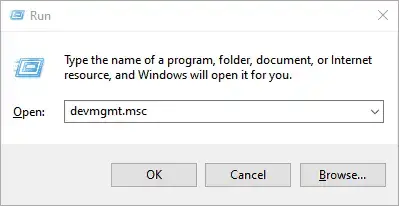
This launches the disk management utility displaying the various disk partitions on your hard drive. We are going to create an unallocated partition by shrinking the C drive. If you have a bigger partition than the C drive, feel free to use it for creating the separate partition,
So, we are going to right-click on drive C and select the ‘Shrink Volume’ option as shown
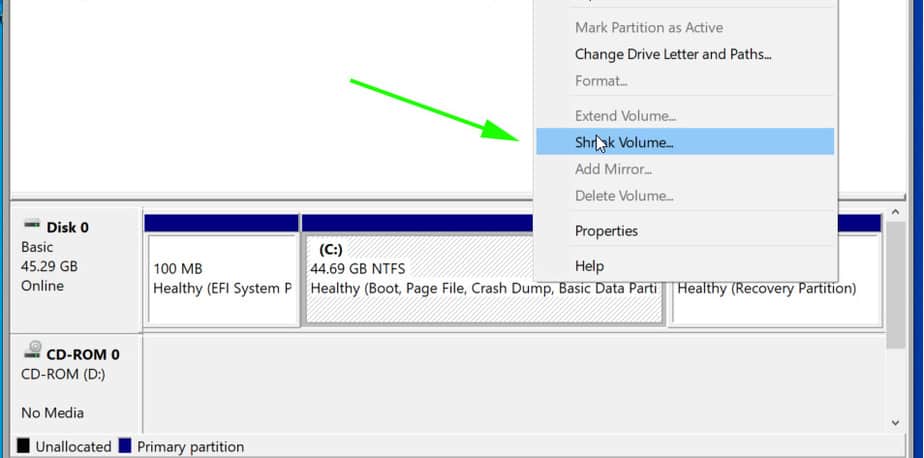
On the pop-up dialogue box that appears, we are going to specify the amount to shrink as shown. This is the amount that will be designated for the installation of Arch Linux. In our example, we have shrunk 20 GB of hard disk space will serve as the unallocated space.
Once you are satisfied, click on the ‘Shrink’ button.

Your unallocated space will be indicated as shown below. In our case, we have set aside approximately 20G for the installation of Arch Linux.
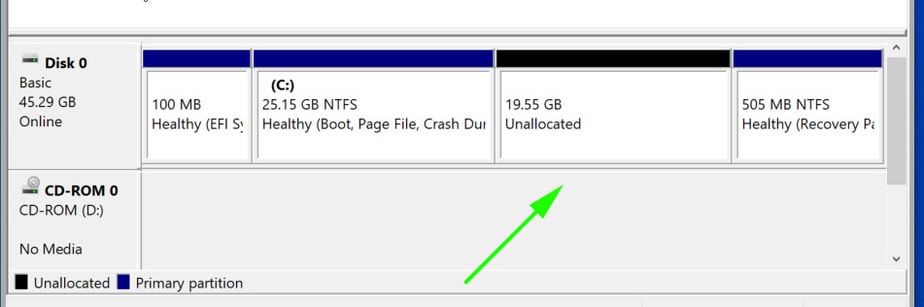
With the unallocated partition in place, plug in your bootable USB and reboot your PC.
Step 2) Configure BIOS to boot from bootable medium
Before you begin with the installation process, it’s prudent to set the boot priority in the BIOS to select your bootable medium as the most preferred option. Depending on your vendor, you can press the Esc, or F10 key to enter the BIOS and navigate to the boot priority Menu.
Also note that we are using the UEFI mode for installation.

Once you have selected your boot medium, press the ESC button to continue with the booting process.
Step 3) Begin the installation of Arch Linux
On the bootup screen, you will be presented with options as shown below. Select the first option – Arch Linux install medium (x86_64, UEFI) and hit ENTER.
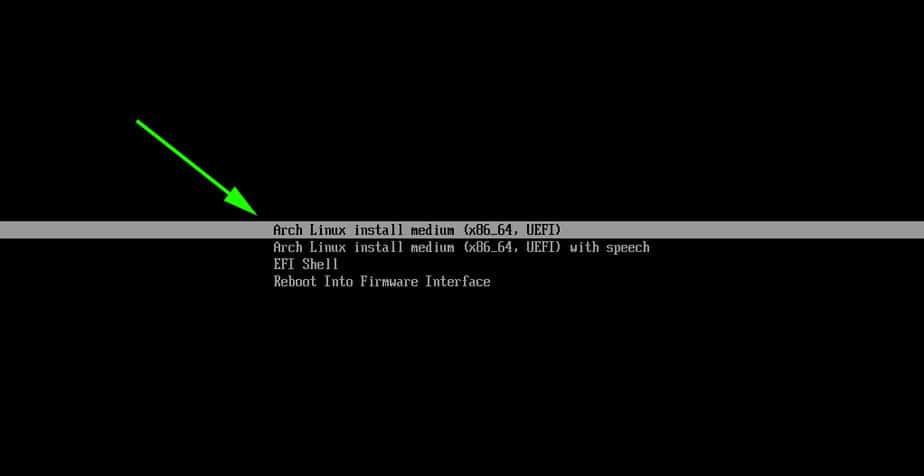
This initialize Arch Linux as evidenced by the boot messages on the screen.
After a few seconds, this ushers you to the prompt as shown below.

To confirm that you have EFI support, run the command:
# ls /sys/firmware/efi/efivars
You should get some entries on the screen as shown. If nothing is listed on your screen, then it means you are using MBR and this guide won’t work for you in configuring up a dual boot setup.
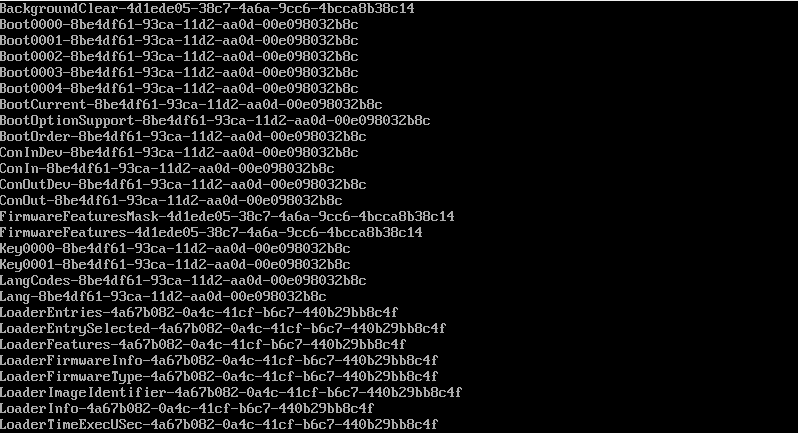
As you begin the installation, you might want to ensure that you have internet connectivity. Internet connectivity is crucial in setting time and date.
You can ping Google’s DNS as shown:
# ping 8.8.8.8 -c 4
You should get a positive reply as shown.
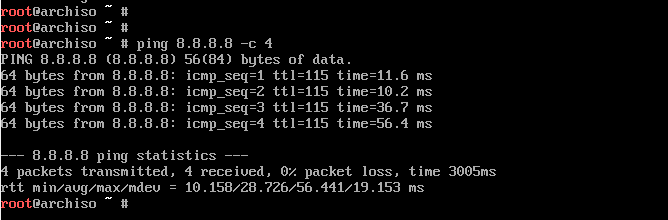
Step 4) Update time and date
Next, we are going to update the system time and date using the timedatectl command as shown.
# timedatectl set-ntp true
You can thereafter confirm the time and date using the command
# timedatectl status
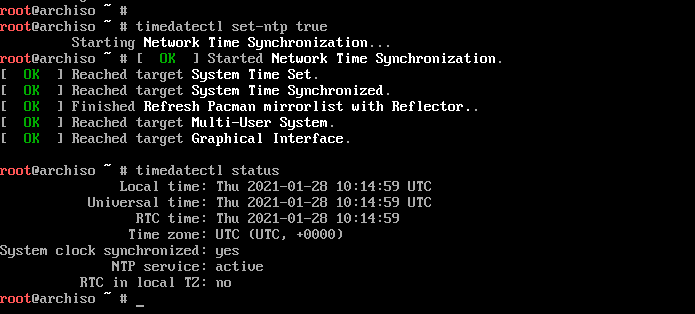
Step 5) Create & format Linux partitions
Next, we are going to partition our hard drive and create some Linux partitions. An easy way of doing this is using the cfdisk utility. Run the command:
# cfdisk
This displays all the partitions available including Windows partitions.
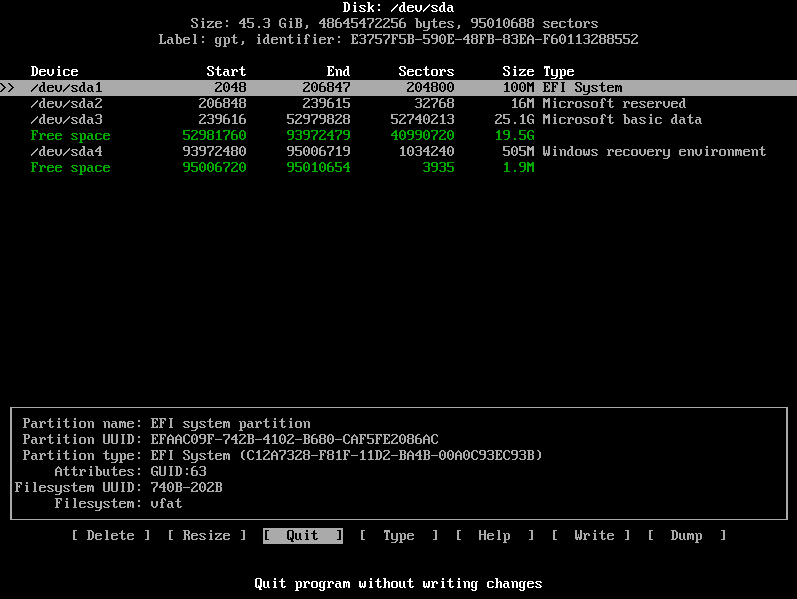
As you can see, we have some free space of 19.5G that we created earlier in step 1 from shrinking drive C on the Windows side. Using this partition, we shall create the following Linux partitions :
- Root partition / 12G
- swap partition 4G
To achieve this, we will navigate to the free space with 19.5G just after /dev/sda3 volume and hit ENTER. We will then specify the volume as 12G for the root partition as shown below. Then hit ENTER.
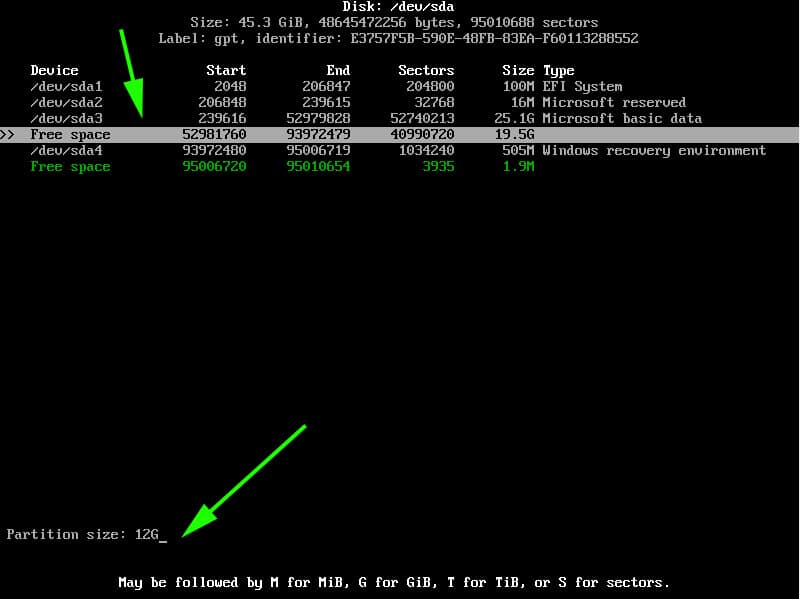
The root partition will be created with the Linux filesystem type as shown.
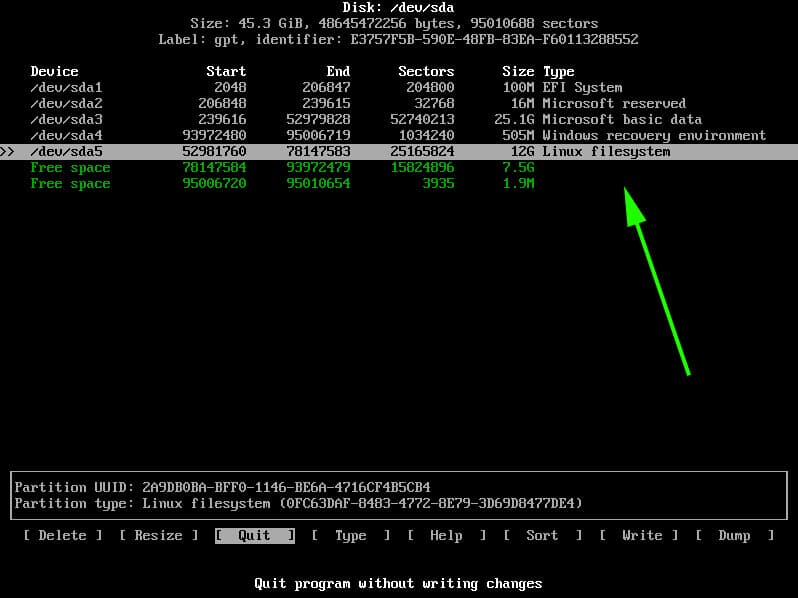
Next, we will create another partition for swap. Using the same method, we will proceed to the remaining free partition of 7G and select the ‘New’ option.
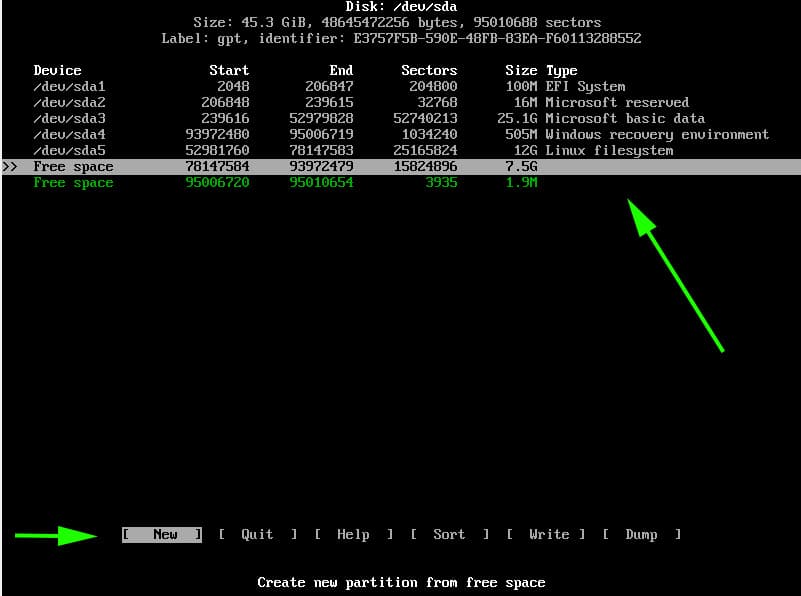
Specify the partition size as 4G
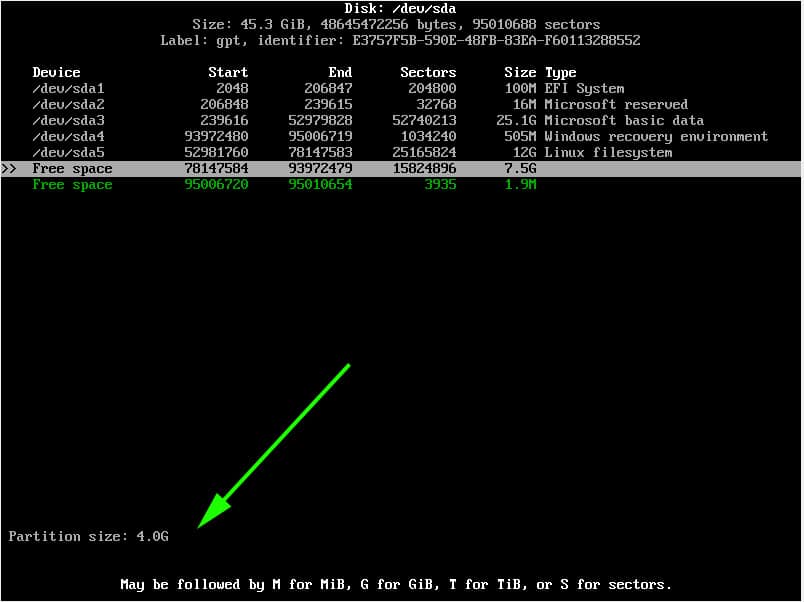
Since this will be our swap partition, we need to go the extra step and modify the partition type. Therefore, we will select the ‘type’ option and hit ENTER.
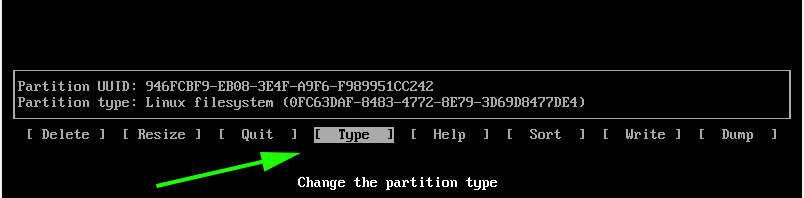
In the list that appears, select ‘Linux Swap’ and hit ENTER.
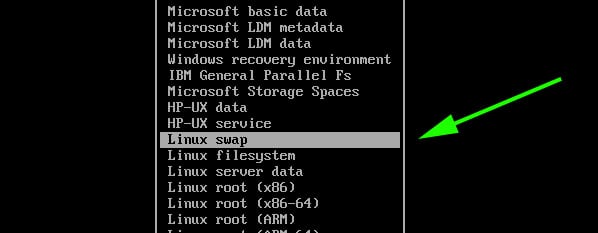
At this point, both the root and Linux swap partitions are created as seen from the partition table below.
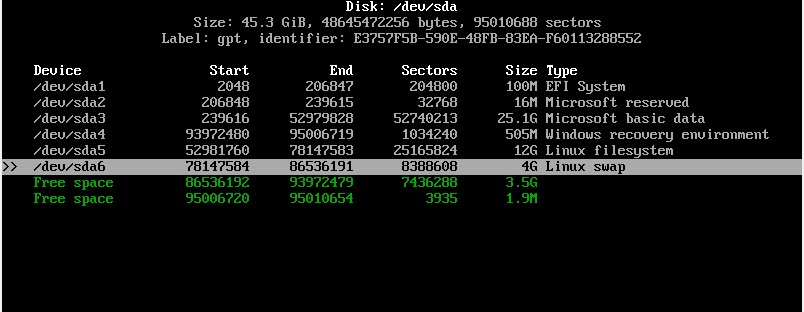
To save the partitions, select the ‘Write’ option and hit ENTER.
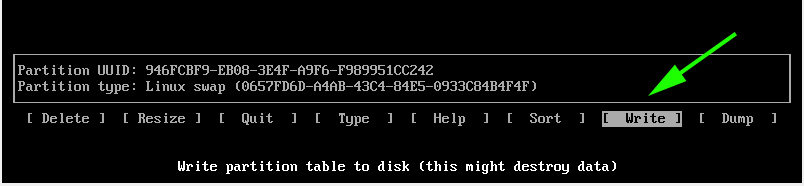
When prompted if you want to write the partition to disk, simply type ‘yes’ and hit ENTER.
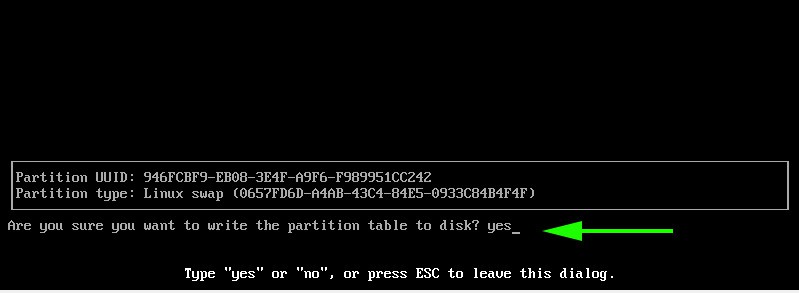
To exit cfdisk utility, select the ‘Quit’ option and hit ENTER.
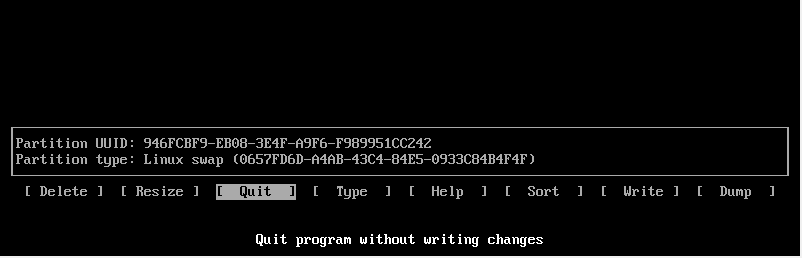
Step 6) Format and mount the partitions
For the partitions to become usable and available for use, we need to format them and later mount them.
To format the root partition, run the command:
# mkfs.ext4 /dev/sda5
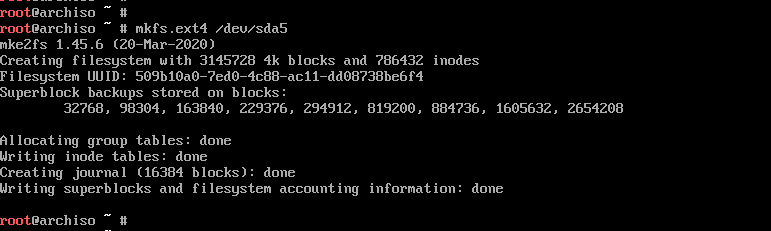
For swap partition, use the command:
# mkswap /dev/sda6
Then enable swap using the swapon command shown:
# swapon /dev/sda6
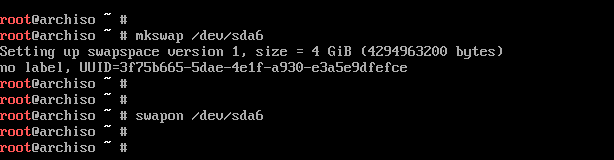
Next, mount the root partition to the /mnt directory
# mount /dev/sda5 /mnt
Additionally, we are going to create a directory for the EFI partition on which we will mount the Windows EFI system which , in our case is located on the /dev/sda1 partition.
# mkdir /mnt/efi
Then mount the EFI partition on the EFI mount point.
# mount /dev/sda1 /mnt/efi

Step 7) Install base system and other required Linux firmware packages
Next, we are going to install the central packages for our Linux system including the base and Linux-firmware packages.
# pacstrap /mnt base linux linux-firmware

This is going to take quite some time. At this point, you can take a much-deserved break and head out for a stroll and grab some coffee. When the installation is successful, you should get the following output.
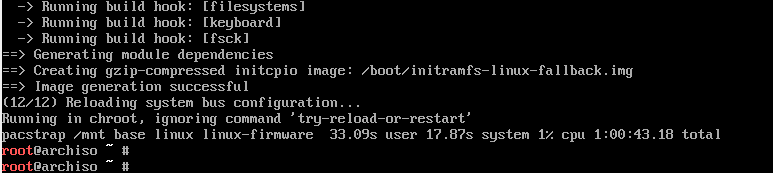
Step Generate fstab file
The next step will be to generate the fstab file on the /mnt directory as follows.
# genfstab -U /mnt >> /mnt/etc/fstab
Step 9) Setup timezone
After generating the ftab file, navigate to the newly created root filesystem
# arch-chroot /mnt
You can verify that you are in the root filesystem using the command as shown.
# ls
Time zone information is found in the /usr/share/zoneinfo/ directory. To set your timezone, create a symbolic link to the /etc/localtime
Path.
# ln -sf /usr/share/zoneinfo/US/Pacific /etc/localtime
Next, sync the hardware clock using the command:
# hwclock --systohc
Step 10) Set up locale
The locale determines the system language, currency format, numbering and date on your system. This information is contained in the /etc/locale.gen file. So, open the file using the vim editor.
# vim /etc/locale.gen
NOTE: To install the vim editor, use the pacman command as follows:
# pacman -Sy vim
Once you have accessed the file, scroll and uncomment your preferred locale. In this case, we have decided to go with en_US.UTF-8 UTF-8
Save and exit the file. Next generate the locale configuration using the command.
# locale-gen
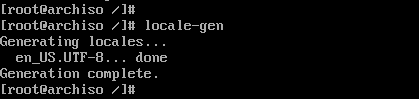
Next, create a new locale configuration file and save the locale as shown.
# echo "LANG=EN_US.UTF-8" > /etc/locale.conf
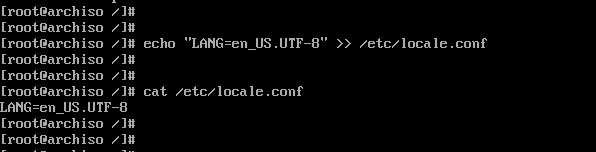
Step 11) Set up hostname
Next, we are going to configure the hostname of our Arch System. First, create a new file and specify the hostname as shown.
# echo linuxtechi > /etc/hostname

Afterwards, modify the /etc/hosts file as follows.
# echo "127.0.1.1 linuxtechi" >> /etc/hosts
Step 12) Install netctl Network Manager
To use the internet once the installation is complete and upon a reboot, we need to install a network manager. In this example we wil install the netctl network manager as follows
# pacman -Sy netctl
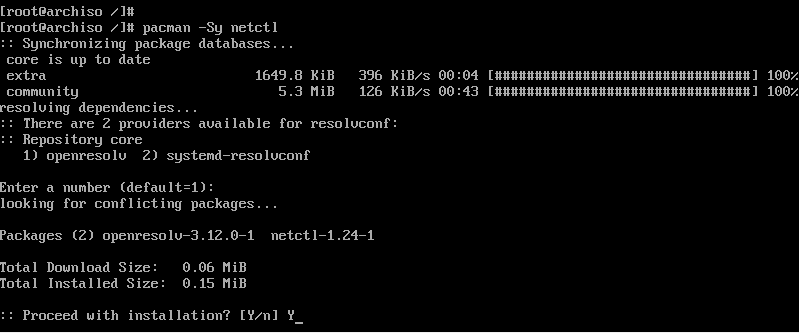
During the installation some optional dependencies for netctl are listed. We are going to install the following dependencies. These are:
- dhcpcd – For DHCP support
- wpa-supplicant – For wireless networking
- ifplugd – For wired connections networking
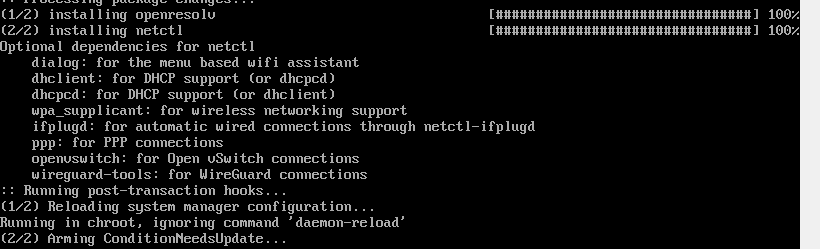
These dependencies will help you set up networking without a problem when you next boot in to Arch Linux.
To install the optional dependencies, run the command below:
# pacman -Sy dhcpcd wpa-supplicant ifplugd
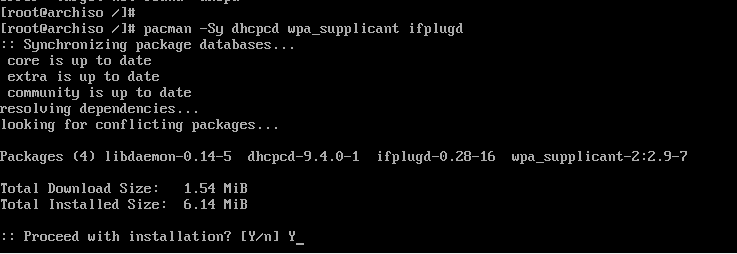
Step 13) Create a regular user
Next, we will create a regular user called linuxtechi and place him in the wheel group as follows.
# useradd -G wheel -m linuxtechi
The next step will be to assign a password to the user.
# passwd linuxtechi
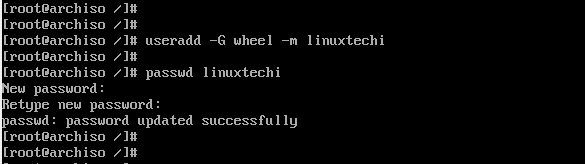
Step 14) Install GRUB bootloader
We are getting close to the finish line. In this step, we will install the grub bootloader to enable us boot into our Arch Linux system upon a reboot.
We will install the grub bootloader package alongside the efi boot manager package since we are using the UEFI mode.
# pacman -S grub efibootmgr
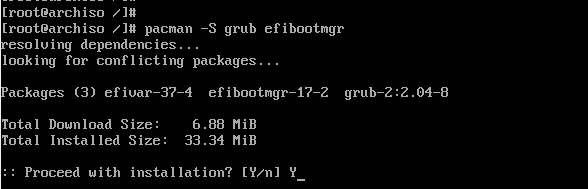
Next, install the os-prober package which will enable Arch Linux to detect the Windows operating system.
# pacman -S os-prober
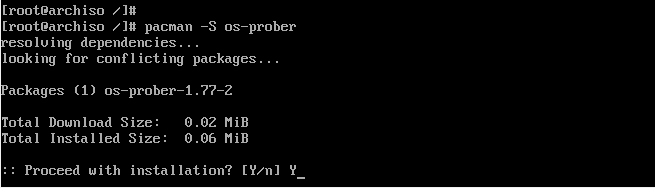
Then install grub on the EFI directory as shown.
# grub-install --target=x86_64-efi --efi-directory=/efi --bootloader-id=GRUB

And install a grub configuration file as shown.
# grub-mkconfig -o /boot/grub/grub.cfg
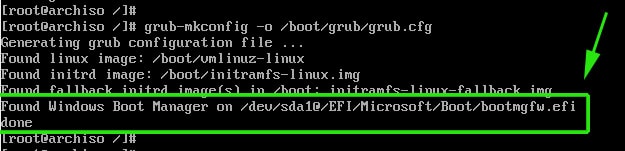
The last line is an indication that Arch has detected the presence of Windows Boot manager on /dev/sda1 partition. Perfect!
The finally, set a password for the root user as shown.
# passwd
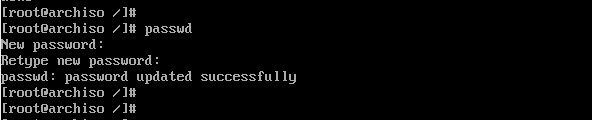
Then exit and reboot your system.
# exit
# reboot
Step 15) Boot into Arch Linux
When booting, the GRUB bootloader will display various options including booting into Arch Linux, which is the first option, and also booting into Windows which is the last option in my case.
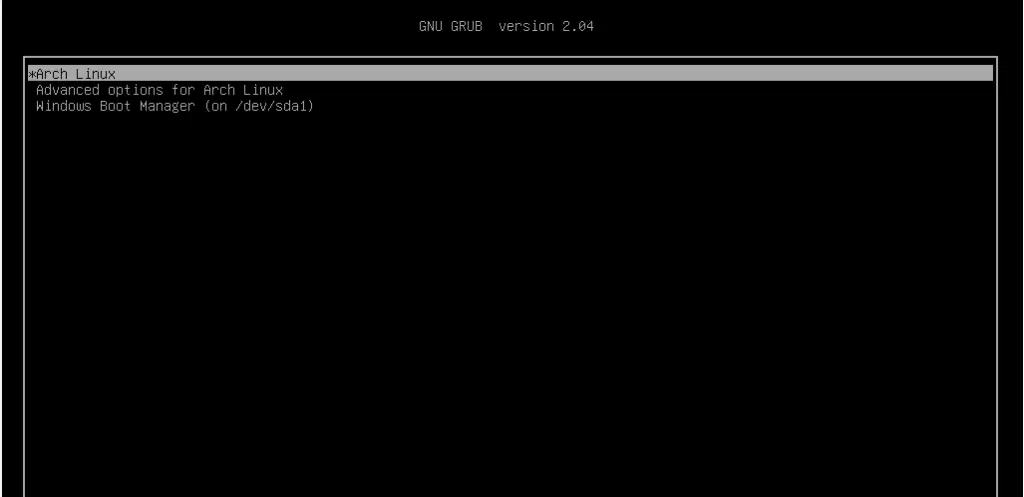
Log in as your regular user as shown
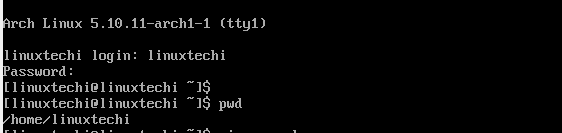
Step 16) Post Installation tasks
One of the things I noted when I logged in is that I do not have any internet connection. This is an issue caused by the default dhcp profile settings which need to be modified to accommodate the network interface attached to the Arch Linux system.
To find the interfaces attached run the command:
$ ip link
The output confirms that our network interface is enp0s3
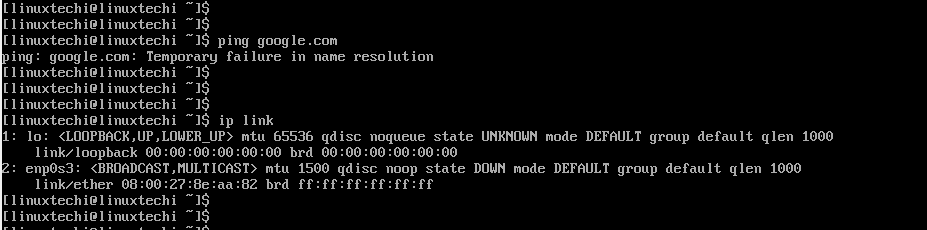
We need to modify the ethernet-dhcp file in the /etc/netctl/examples/ path and edit out network interface.
But first, lets copy the file to the /etc/netctl directory.
Switch to the root user
# su
Copy the ethernet-dhcp file to the /etc/netctl directory.
# cp /etc/netctl/examples/ethernet-dhcp /etc/netctl/custom-dhcp-profile
Next, navigate to the /etc/netctl directory.
# cd /etc/netctl
Use the vim editor to edit the file.
# vim custom-dhcp-profile
The interface attribute is set to eth0.
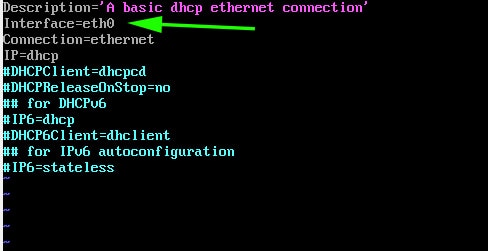
However, as we saw earlier, our network interface is enp0s3. Therefore, modify it to enp0s3. Additionally, uncomment the line starting with the DHCPClient parameter.
DHCPClient=dhcpcd
This enables the system to accept IP addresses using the dhcp service.
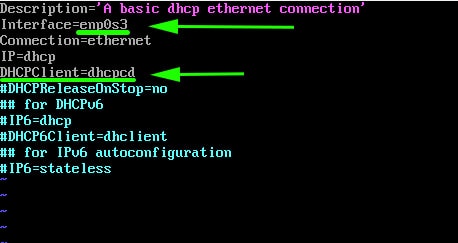
Save and exit the configuration file. Next, enable the custom dhcp profile.
# netctl enable custom-dhcp-profile

And finally enable the dhcp service.
# systemctl enable dhcpcd.service

Your interface should now pick an IP address from the router and you should have an internet connection.
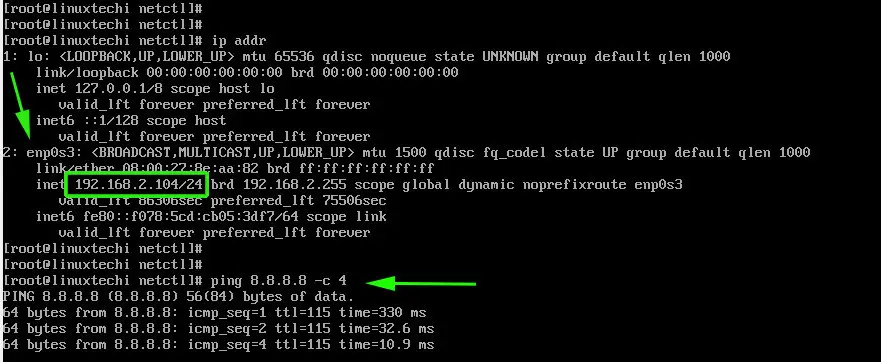
You can install an X windows system as shown,
$ sudo pacman -S xorg xorg-server
Then install a display manager. For example, to install GNOME, run:
$ sudo pacman -S gnome
Then start and enable gdm service
$ sudo systemctl start gdm
$ sudo systemctl enable gdm
This brings us to the end of this lengthy topic. Hopefully, you are now in a position to Dual boot Arch Linux with Windows on UEFI system.
Read Also : How to Create and Configure Sudo User on Arch Linux