Содержание
- Методы установки ПО видеокарты в Windows 10
- Способ 1: Официальные сайты и программы
- Способ 2: Сторонние программы
- Способ 3: Идентификатор оборудования
- Способ 4: Диспетчер устройств
- Способ 5: Служба обновлений Windows 10
- Вопросы и ответы

Независимо от того, какой версией ОС вы пользуетесь, крайне важно время от времени обновлять ПО для устройств. Подобные действия позволят работать оборудованию корректно и без ошибок. Сегодня мы поговорим о том, как обновить драйвера для видеокарты на операционных системах Windows 10.
Методы установки ПО видеокарты в Windows 10
На сегодняшний день существует множество способов, которые позволяют с легкостью обновить драйвер адаптера. В некоторых случаях придется прибегнуть к сторонним программам, а иногда желаемого эффекта можно добиться с помощью официальных ресурсов. Все доступные методы мы рассмотрим далее.
Способ 1: Официальные сайты и программы
На сегодняшний день существует три основных производителя графических адаптеров: AMD, NVIDIA и Intel. У каждого из них есть официальные ресурсы и специализированные программы, с помощью которых можно обновить драйвер видеокарты.
NVIDIA
Для того чтобы обновить ПО для адаптеров данного производителя, следует выполнить следующие действия:
- Переходим по ссылке на страницу загрузки драйвера.
- Указываем в соответствующих полях версию используемой операционной системы, ее разрядность и модель устройства. Затем жмем кнопку поиска.
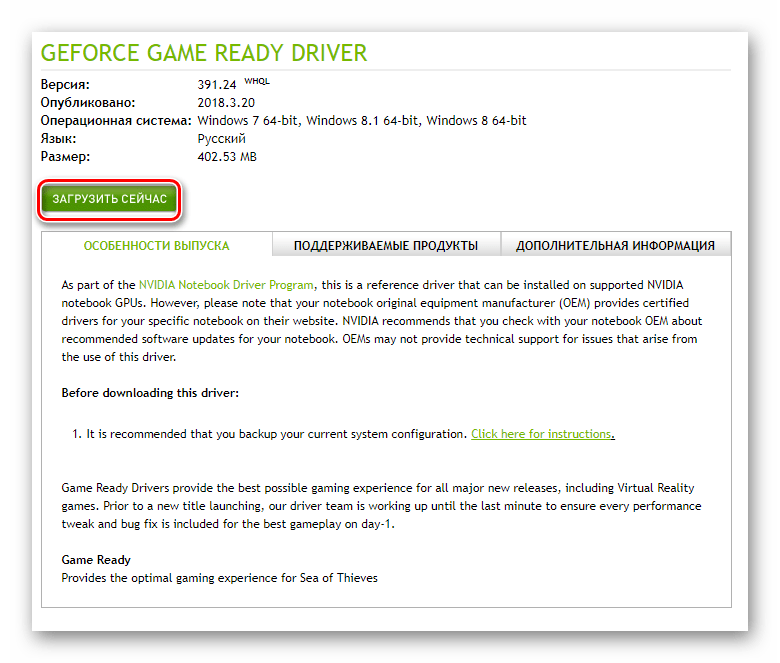
- На следующей странице можете ознакомиться с особенностями программного обеспечения, которое автоматически будет вам предложено. По умолчанию это последняя подходящая версия ПО. Жмем кнопку «Загрузить сейчас» для продолжения.
- Последним шагом является принятие лицензионного соглашения. При этом читать сам текст необязательно. Достаточно нажать кнопку «Принять и скачать».
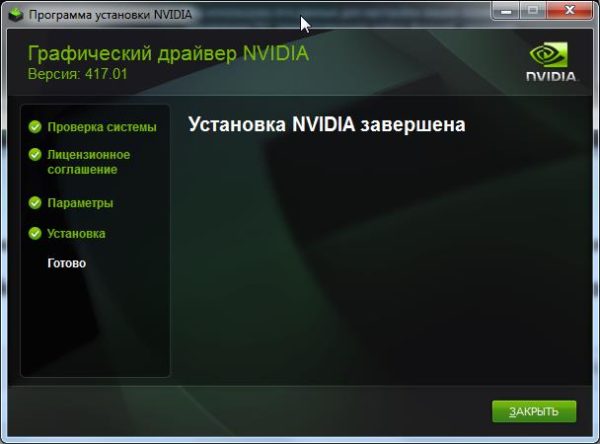
- Далее последует загрузка установочного файла на компьютер. Ждем окончания процедуры и запускаем скачанный установщик. Все дальнейшие действия вам подскажет сам Мастер инсталляции. Необходимо лишь следовать его советам и подсказкам. В результате вы получите обновленную версию драйвера.
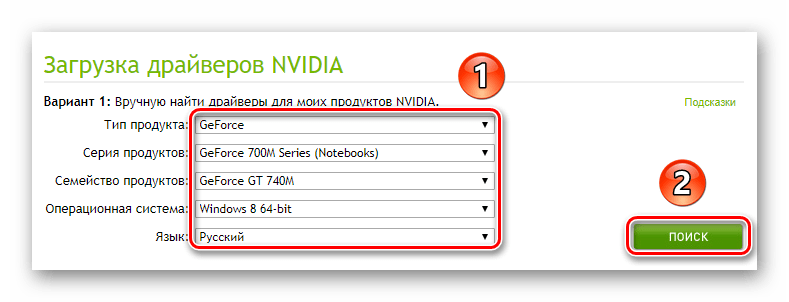
Обратите внимание, что указывать версию ОС и разрядность нужно крайне внимательно. На данном этапе многие пользователи допускают ошибки, которые приводят к дальнейшим трудностям.
Подробнее: Варианты решения проблем при установке драйвера NVIDIA

Кроме того, новейшую версию ПО можно установить с помощью официальной программы NVIDIA GeForce Experience. О том, как это сделать, мы детально рассказывали в отдельной статье.
Подробнее: Установка драйверов с помощью NVIDIA GeForce Experience
AMD
Для обладателей видеокарт от AMD действия по обновлению программного обеспечения будут выглядеть следующим образом:

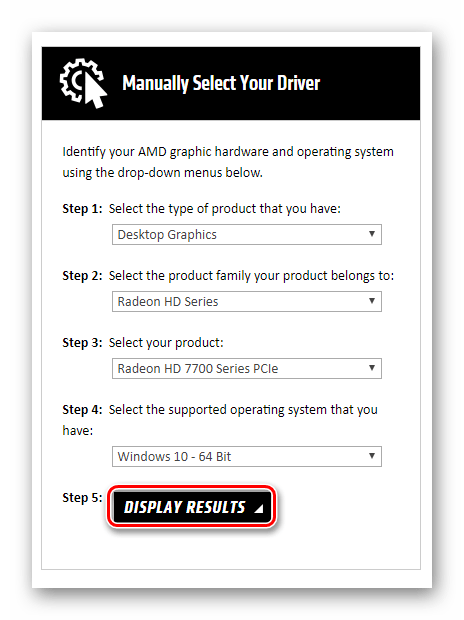
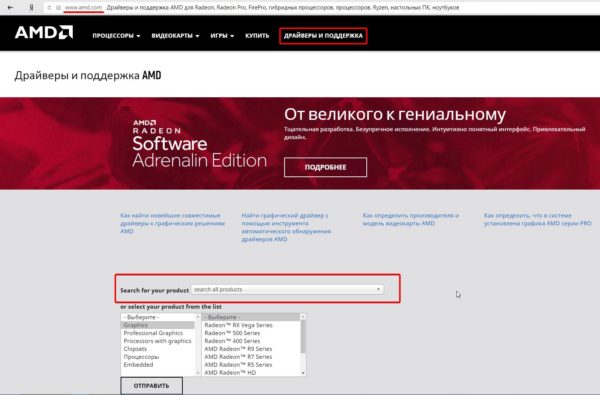
- Заходим на специальную страницу сайта компании-производителя.
- С правой стороны выбираем из выпадающих списков нужные параметры – тип адаптера, его серию и модель. После этого жмем кнопку «Display Results».
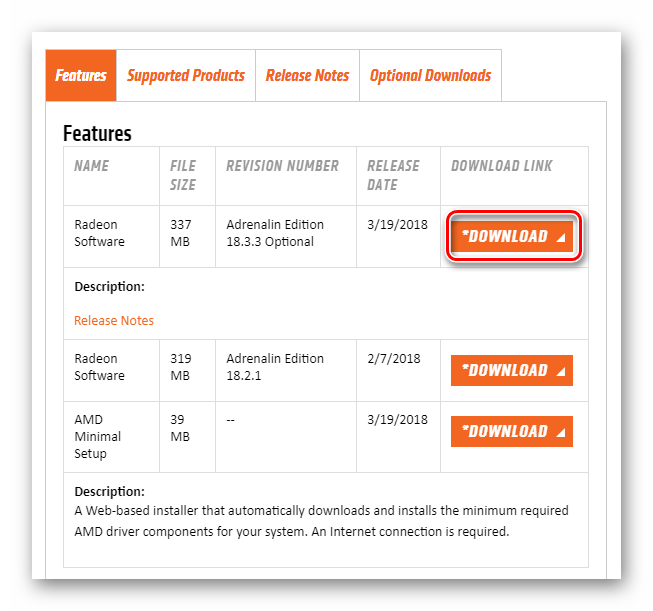
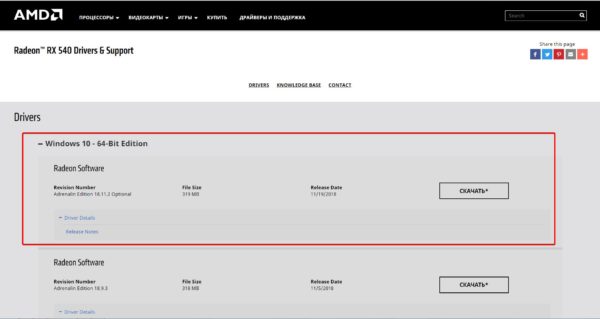
- На следующей странице выбираем нужную версию драйвера и жмем кнопку «Download»
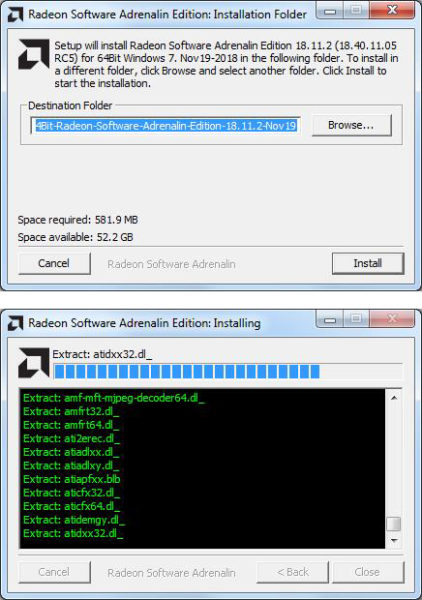
- За этим последует процесс сохранения установочного файла на компьютер. Вам необходимо подождать, пока он будет скачан, а после этого запустить его. Следуя пошаговым подсказкам и советам Мастера установки, вы сможете нужным образом обновить ПО своего адаптера.
Если у вас ранее была установлена программа AMD Radeon Software или AMD Catalyst Control Center, то можно использовать ее для установки новых файлов конфигурации. Мы уже публиковали подробные инструкции о том, как работать с этим ПО.
Подробнее:
Установка драйверов через AMD Radeon Software Crimson
Установка драйверов через AMD Catalyst Control Center
Intel
Обладатели встроенных видеокарт Intel могут обновить программное обеспечение с помощью следующих манипуляций:
- Переходим по ссылке на страничку загрузки ПО.
- В первом выпадающем меню следует указать продукт, для которого требуется установить новое программное обеспечение. В самом последнем поле выбираем используемую операционную систему с разрядностью.
- Сайт автоматически подберет подходящие драйвера и отобразит их в виде списка. Кликаем по тому названию, которое соответствует выбранному софту.
- На следующей странице следует выбрать формат загружаемого файла – архив или исполняемый. Нажимаем по нужному названию для начала загрузки.
- Скачав выбранный ранее файл, следует запустить его. На экране появится Мастер установки драйвера. Каждый ваш последующий шаг будет сопровождаться подсказками. Просто следуйте им, и вы без труда инсталлируете свежее ПО для видеокарты Intel.


Аналогом описанного выше процесса является утилита Intel Driver & Support Assistant. Она в автоматическом режиме подберет драйвер, который вам следует использовать.
Скачать Intel Driver & Support Assistant
- Заходим на страницу загрузки ПО и жмем кнопку «Загрузить сейчас».
- Сохраняем установочный файл на ПК и запускаем его.
- Следуя простым подсказкам, устанавливаем утилиту. В процессе вам необходимо будет лишь согласиться с условиями использования. Остальной процесс инсталляции пройдет автоматически.
- По окончании установки необходимо запустить софт. Учтите, что на рабочем столе ярлык не появится. Найти приложение можно по следующему пути:
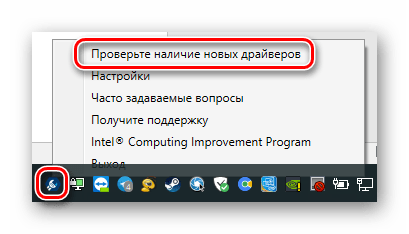
- В трее появится иконка утилиты. Нажмите на ее изображении ПКМ и выберите пункт «Проверить наличие новых драйверов».
- В браузере, который назначен по умолчанию, откроется новая вкладка. Запустится процесс сканирования вашего ПК.
- Если утилита найдет устройства от Intel, требующие обновления драйвера, вы увидите следующее сообщение:

Жмем кнопку «Загрузить все обновления».
- По окончании загрузки следует нажать «Установите загруженные файлы».
- Запустится Мастер установки. С его помощью вам необходимо инсталлировать драйвер на компьютер. Ничего сложного на данном этапе нет. Необходимо лишь несколько раз нажать кнопку «Далее».
- В результате новое ПО будет инсталлировано на устройство. Останется перезагрузить компьютер, после чего можно приступить к использованию оборудования.

C:Program Files (x86)Intel Driver and Support AssistantDSATray


Способ 2: Сторонние программы
В интернете можно найти не только официальный софт для обновления драйверов видеокарты, но и программы от сторонних разработчиков. Отличительной чертой подобного ПО является возможность инсталлировать софт для любых устройств, а не только графических адаптеров.
В отдельной статье мы рассматривали самые популярные утилиты такого типа. Перейдя по ссылке ниже, вы сможете ознакомиться с каждой из них и выбрать для себя наиболее подходящую.
Подробнее: Лучшие программы для установки драйверов
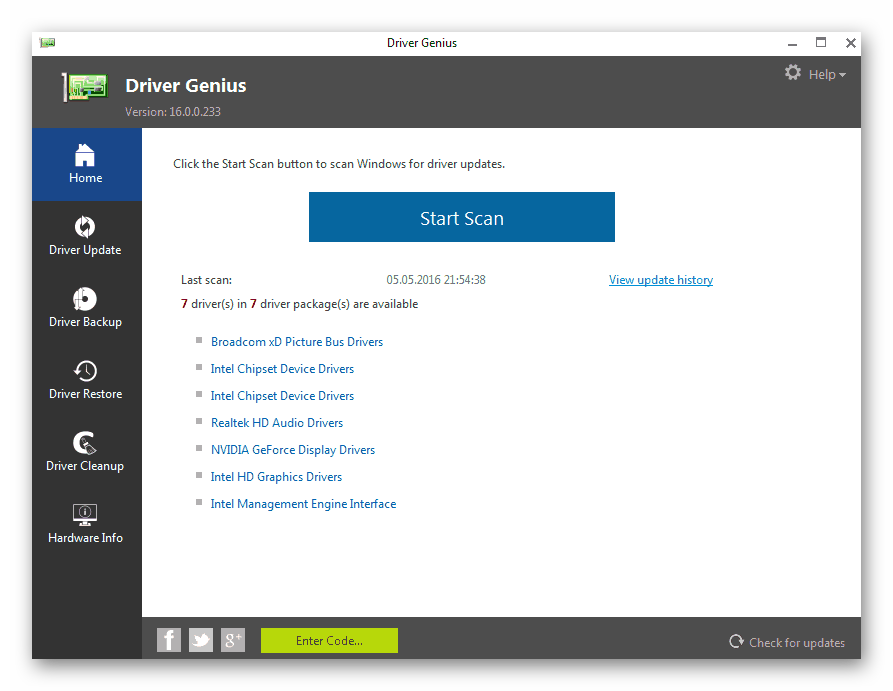
Мы лишь можем порекомендовать вам использовать DriverPack Solution или DriverMax. Оба решения зарекомендовали себя крайне положительно и обладают внушительной базой данных устройств. В случае необходимости вы можете ознакомиться с руководством по каждой из упомянутых программ.
Подробнее:
Как обновить драйвера на компьютере с помощью DriverPack Solution
Обновляем драйвера для видеокарты с помощью DriverMax
Способ 3: Идентификатор оборудования
У каждого устройства в компьютере есть свой уникальный идентификатор (ID). Зная этот самый ИД можно без труда найти в интернете нужный драйвер. Для этого существуют специализированные онлайн-сервисы. Существенным минусом подобного способа является тот факт, что предлагаемое ПО далеко не всегда актуально. Этот факт напрямую зависит от того, как часто владельцы таких сайтов обновляют базу данных ПО.
Ранее мы публиковали детальное руководство по процессу поиска идентификатора. Там же вы найдете список самых эффективных онлайн-сервисы, которые по ID подберут нужный софт.
Подробнее: Поиск драйверов по ID оборудования
Способ 4: Диспетчер устройств
В арсенале Windows 10 есть встроенные функции, которые позволяют инсталлировать драйвера. Речь пойдет об использовании стандартных библиотек драйверов ОС. Выполняется подобное обновление через «Диспетчер устройств».
Используя руководство, ссылку на которое найдете немного ниже, вы установите основные файлы конфигурации видеокарты. Это значит, что дополнительные компоненты в некоторых случаях инсталлированы не будут. Тем не менее система корректно определит адаптер и его можно будет использовать. Но для максимальной производительности ему все же потребуется полный набор ПО.
Подробнее: Установка драйверов стандартными средствами Windows
Способ 5: Служба обновлений Windows 10
Операционная система Windows 10 намного умнее своих предшественниц. Она может автоматически устанавливать и обновлять драйвера для устройств с помощью встроенной службы. В целом это очень даже полезная функция, однако у нее есть один изъян, о котором мы поведаем далее. Вот что вам потребуется сделать для использования данного способа:
- Откройте «Параметры» системы путем одновременного нажатия клавиш «Windows» и «I» либо же используйте любой другой способ.
- Далее перейдите в раздел «Обновление и безопасность».
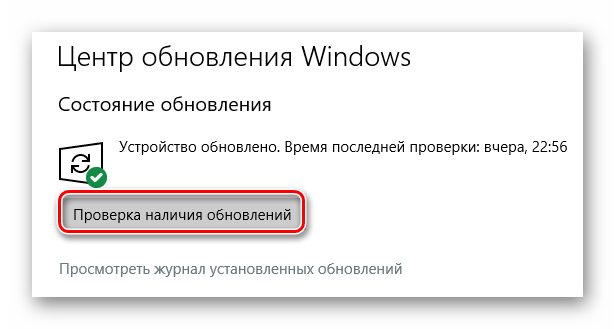
- В правой части нового окна будет находиться кнопка «Проверка наличия обновлений». Нажимайте на нее.
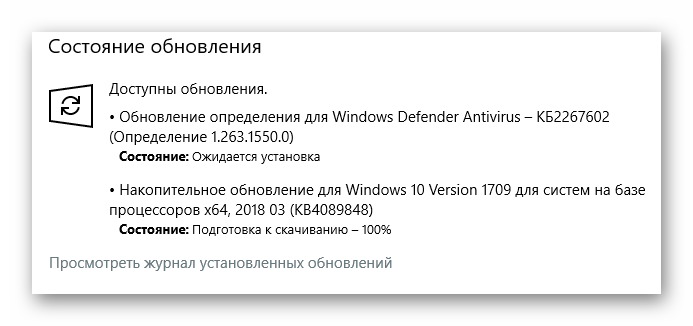
- Если необходимые обновления будут найдены, система начнет сразу же их загружать. Если вы не меняли настройки системы, то после этого они будут автоматически инсталлированы. В противном случае необходимо будет нажать кнопку с соответствующим названием.
- По завершении предыдущей операции необходимо перезагрузить компьютер. Для этого нажмите кнопку «Перезагрузить сейчас» в этом же окне. Она появится после завершения всех операций.

После перезапуска компьютера все программное обеспечение будет установлено. Обратите внимание, что в данном случае у вас не получится обновить драйвер одной только видеокарты. Обновление ПО выполнится полностью для всех устройств. Также стоит отметить, что Windows 10 не всегда устанавливает последнюю версию софта. Чаще всего инсталлируется тот, что по мнению ОС является самым стабильным для вашей конфигурации.
На этом наша статья подходит к концу. Мы рассказали обо всех существующих методах, которые помогут обновить драйвера как для видеокарты, так и для других устройств. Вам остается лишь выбрать для себя наиболее удобный.
Your graphics drivers control what you see on your screen. It helps your computer’s hardware interact with the operating system, including Windows 10. If you have a new PC and cannot find your dedicated GPU or everything appears in lower resolution, it could be due to outdated or missing graphics drivers.
So, how do you update your GPU? There are multiple ways to update your graphics drivers, and this guide covers them in detail.
Why Should You Update Your Graphics Driver?

Updating your graphics driver allows you to benefit from your GPU manufacturer’s latest performance improvements. AMD and Nvidia keep pushing new updates that include performance improvements, bug fixes, and new features.
Intel’s update for its integrated GPUs may not be as substantial due to the significant difference between a dedicated and integrated GPU. However, new laptops with integrated graphics usually don’t have up-to-date display drivers, resulting in lower resolution output. Missing updates for integrated graphics can also result in errors during gameplay.
Fortunately, for Intel UHD or Xe graphics users, Microsoft bundles a newer version of its display drivers with Windows updates. After setting up your new PC, make sure to install pending Windows updates to fix issues with a lower resolution display or integrated graphics failing to work.
To summarize, if you play games on your PC, perform graphics-intensive tasks, or experience lower FPS in games, installing the latest graphics drivers for your GPU can help you make the most out of your resources and improve the overall graphics performance.
How to Identify the Graphics Card

Laptop manufacturers usually put a sticker near the trackpad to highlight the hardware configuration. If you are using a desktop or the sticker is not available, you can use system information to view all the information about your computer’s hardware and software.
To open System Information:
- In the Start menu search bar, type System Information and select the Best match.
- In the System Information window, expand the Display section.
- In the right pane, check the Adapter Description.
If you have dedicated or integrated graphics, both bits of hardware will have separate sections. In this case, I have AMD Radeon integrated graphics and an Nvidia dedicated GPU.
Once you have the information on the graphics card installed on your computer, follow the steps below to update the graphics driver in Windows 10.
How to Update a Graphics Driver via Windows Updates
As discussed earlier, you can install a stable graphics driver through Windows Update if you use integrated graphics.
The drivers in a Windows Update are certified by Windows Hardware Quality Labs (WHQL). While the Windows updates may not contain the latest drivers (compared to what is available on OEM’s website), they will help your new PC get started.
To download a Windows Update:
- Go to Start > Settings > Updates & Security.
- Open the Windows Update tab. If there are no pending updates listed, click on Check for Update.
- The update manager will scan for available updates. Go through the list and click on the Download button to download and install the updates.
While it is a convenient feature, Windows Update doesn’t let you pick and choose the updates to download and defer. Use this option if you want to install all the pending updates for your new PC.
How to Update Your Graphics Drivers Manually Using the Device Manager
Device Manager is a Windows utility for managing hardware components such as peripherals, graphics drivers, and other internal hardware. You can also use it for manually updating your graphics driver.
Here’s how to update the graphics driver in Windows 10 using Device Manager.
- Press Windows key + R to open the Run box.
- Type devmgmt.msc and click OK to open Device Manager.
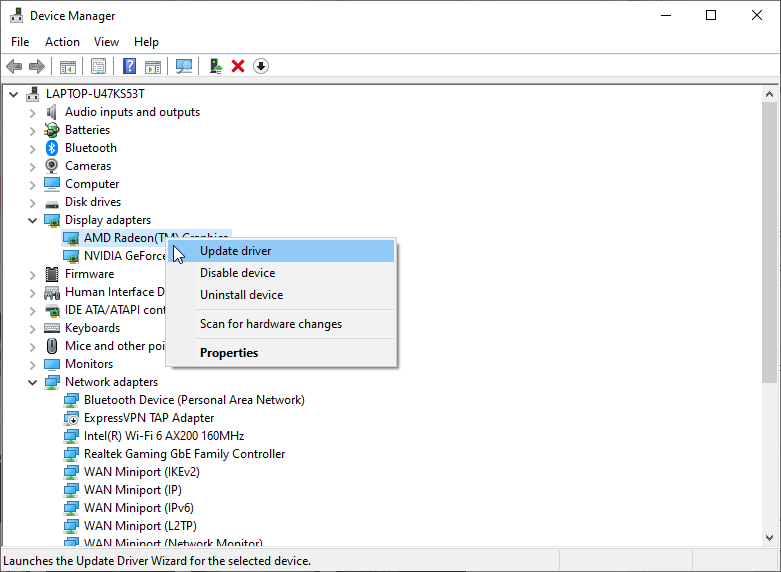
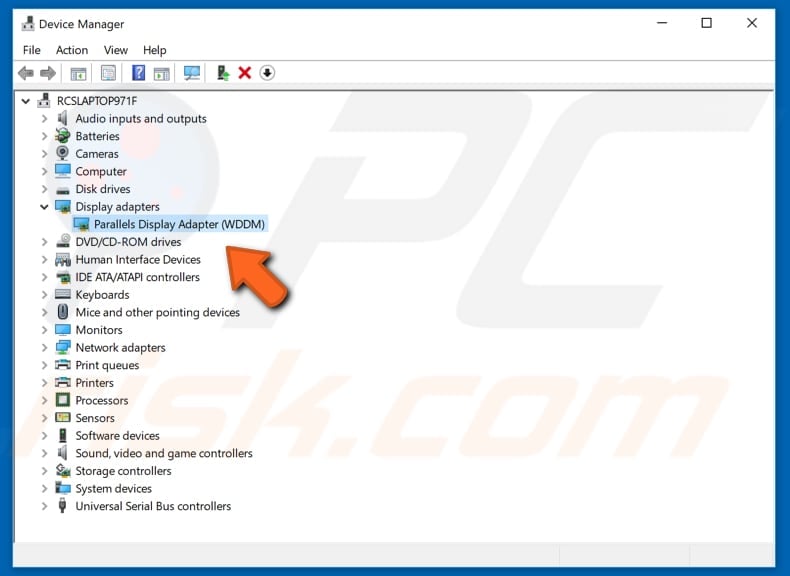
- In the Device Manager window, expand the Display adapters section. It will list all the integrated and dedicated graphics drivers installed on your computer.
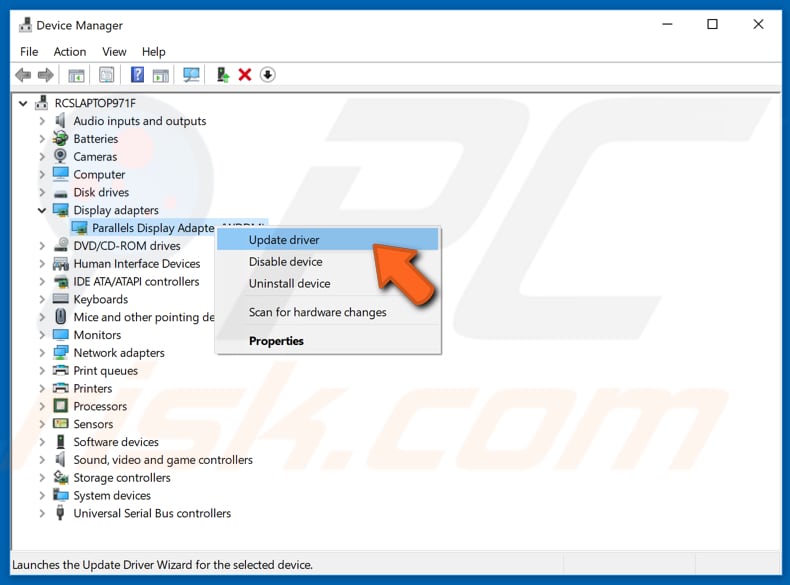
- Right-click on the display driver you want to update and choose Update Driver.
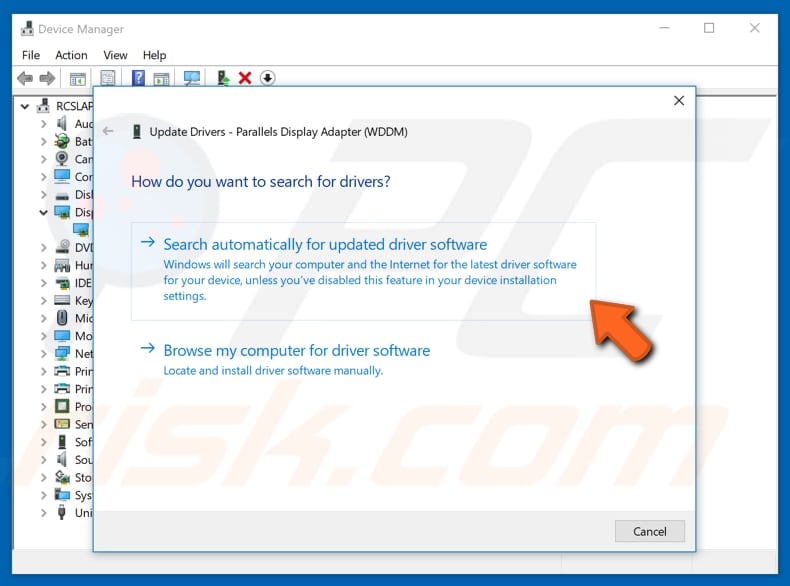
- Select Search automatically for drivers. Windows will scan for available driver updates and download them.
Restart your PC to apply the changes. If something goes wrong after installing new drivers, you can roll back the driver using the Device Manager to undo the changes.
How to Update Graphics Drivers via Nvidia GeForce Experience or AMD Radeon Software
Nvidia offers its GeForce Experience, a supplemental tool for its GTX and RTX cards. AMD has its own Radeon Software, which works similarly by offering driver updates, game optimization settings, and more. You can use these tools to check for available driver updates and install them.
How to Update Nvidia Graphics Drivers via GeForce Experience
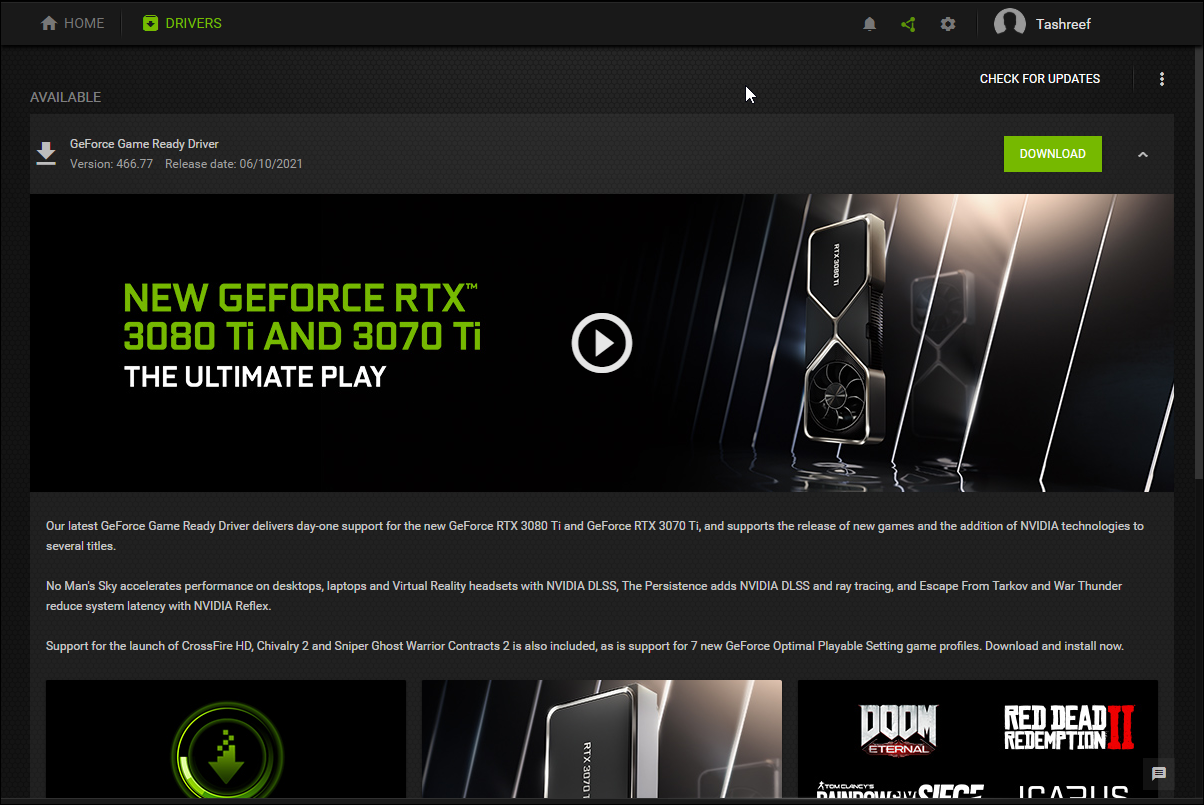
- Launch the Nvidia GeForce Experience software. On newer machines, it comes pre-installed.
- In the GeForce Experience window, open the Drivers tab. It will scan and show if any update is available.
- Click the Check for Update option in the top-right corner to perform a manual scan. If available, download and install the updates. To reinstall the existing driver, click the More icon (three dots) and choose Reinstall Driver.
Disable/Enable Automatic Updates on GeForce Experience
GeForce Experience allows you to download and install newer drivers as they become available automatically. Unfortunately, while the new drivers bring performance improvements and fixes, they can be buggy.
Users who are not facing any graphics issues can disable automatic updates and install them after minor issues have been ironed out.
Here’s how to disable automatic updates for Nvidia graphics.
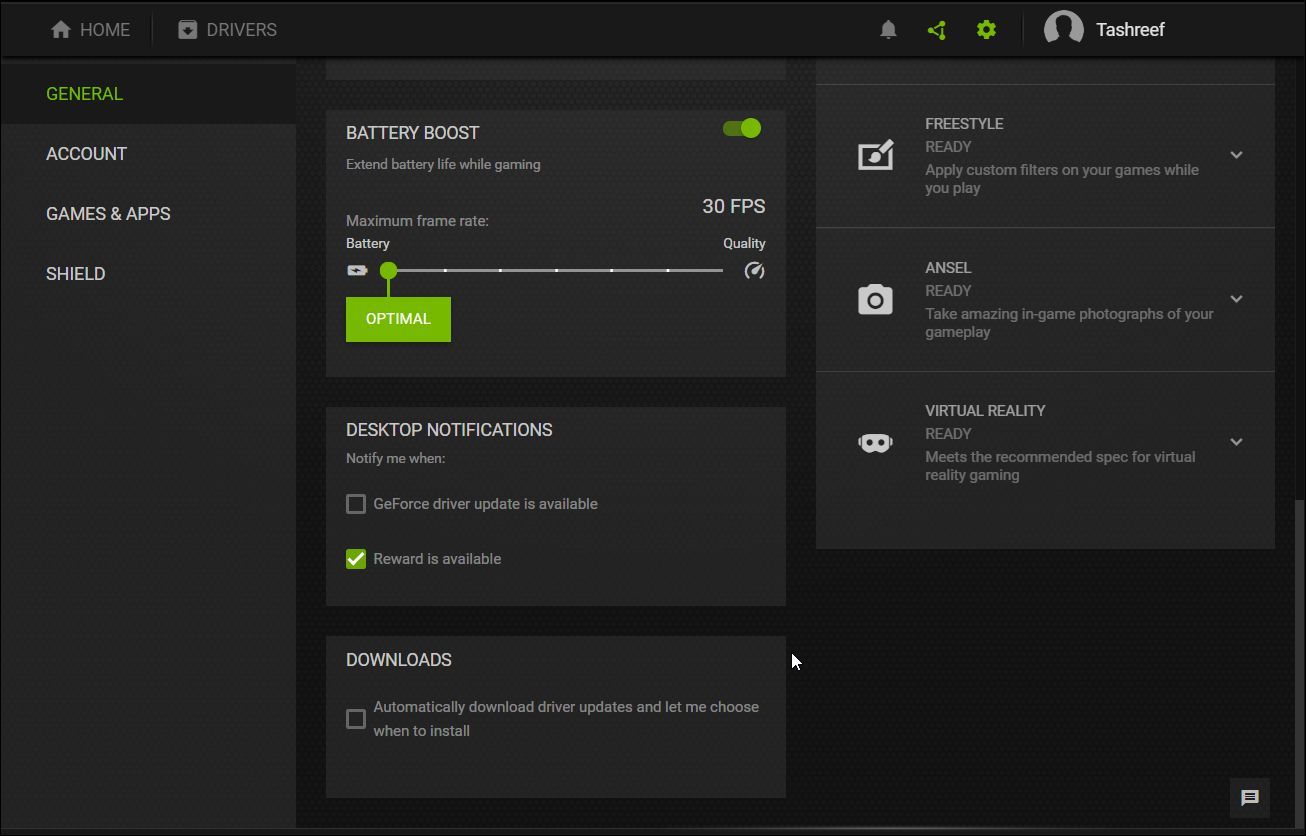
- In GeForce Experience, go to Settings and open the General tab.
- Scroll down to the Downloads section and uncheck Automatic download driver updates and let me choose when to install.
Check the option again if you want to enable automatic updates on your PC.
How to Update AMD Graphics Drivers via Radeon Software
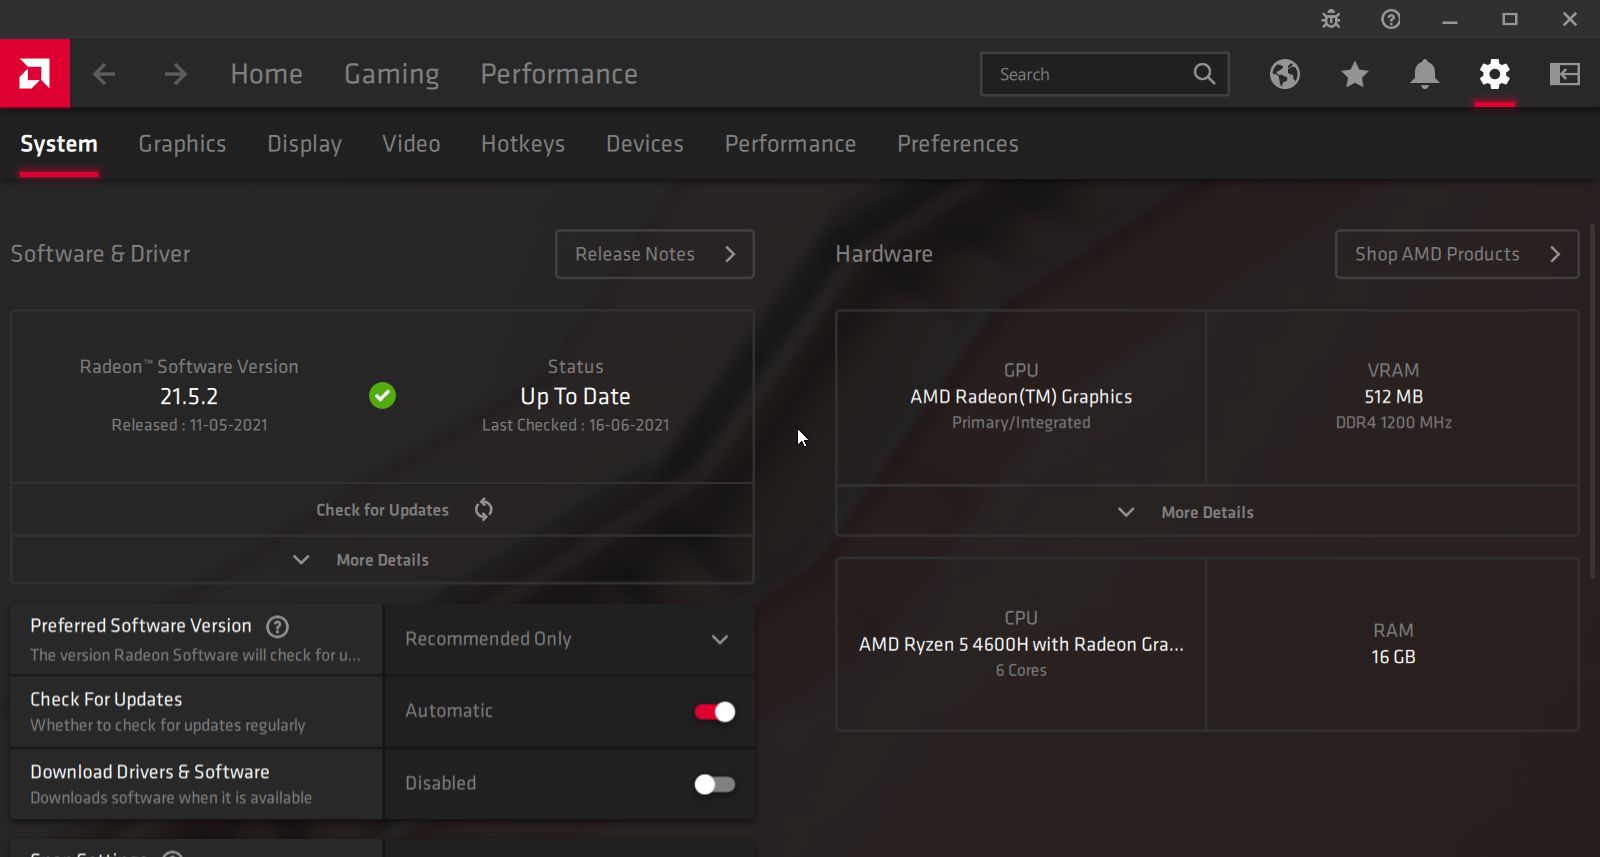
- Launch AMD Radeon Software.
- In the Radeon Software window, click on Settings (Gear icon).
- Under the Software & Driver section, click Check for Updates. It will scan for pending updates and prompt you to install if available.
You often don’t find this setting on newer AMD PCs. In that case, manually download and install the latest available Radeon Software from the official website.
Disable/Enable Automatic Updates on Radeon Software
If you want to disable automatic updates for your Radeon graphics, do the following.
- Launch Radeon Software and open Settings.
- In the System tab, go to Software & Driver section.
- Scroll down to Download Software & Driver and toggle the switch to disable automatic updates.
Update Your Graphics Driver Direct From the Hardware Manufacturer
Generally, the hardware manufacture has all the latest graphics updates available for download on its official website. Depending on your configuration, you can download compatible graphics drivers from here:
- Download Intel Drivers
- Download AMD Drivers
- Download Nvidia Drivers
Each GPU manufacturer’s website prompts you to enter your hardware details and recommends compatible drivers automatically. Download the drivers for your computer and run the installer to install the drivers. A reboot may be required to apply the changes.
Get the Latest Driver Updates From Your Laptop Manufacturer
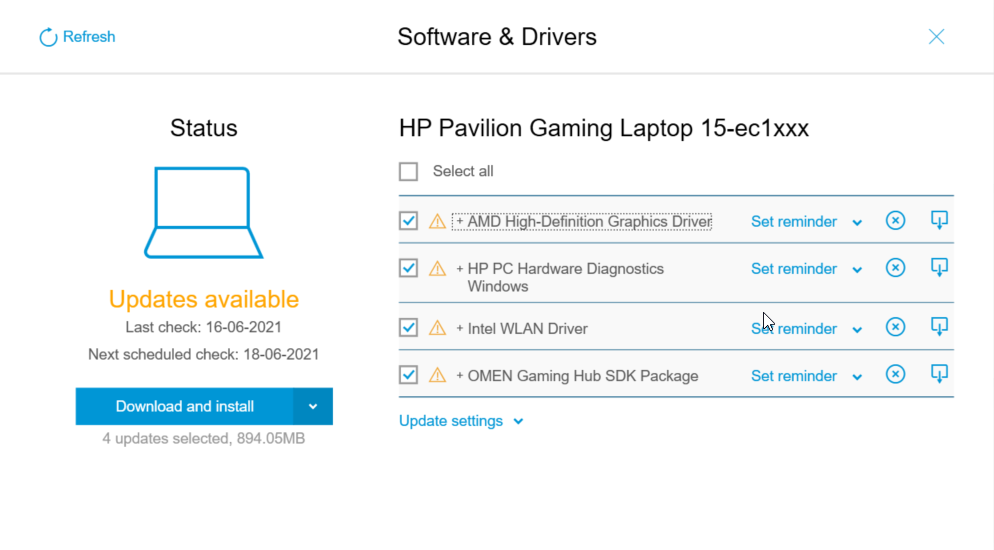
Laptop manufacturers like HP, Dell, and Lenovo include proprietary applications with their devices.
For example, on an HP laptop, you can use the Support Assistant Tool to check for pending driver updates. While you may not get the latest updates, these are certified downloads found to be stable.
Similarly, on Lenovo laptops, the Vantage app offers similar functionality. Apart from updating graphics and system drivers, these apps show laptop health, offer customization features to extend laptop lifespan and warranty information.
Visit your laptop manufacturer’s website if you don’t find the drivers you need on the app.
Update Your Graphics Driver for Performance Improvements and New Features
Updating your graphics driver, especially on your new gaming rig, is essential to get the best out of your hardware. Without the latest driver, you might be limited to low resolution, blurry display output, reduced color depth, and throttled performance.
Apart from updating the graphics driver, make sure to check and update other outdated drivers on your computer to extract maximum performance out of your system and keep it problem-free.
How to Update Graphics Driver on Windows 10
Updated graphics drivers are essential and often deliver better performance. This article will show you the three main methods for updating the graphics card drivers. Choose the method that suits you, but note that not every method is guaranteed to work.
A graphics (video) driver is the software that allows your operating system and programs to use your computer graphics hardware. Driver updates typically provide bug fixes and compatibility with newer software.
Most drivers that come with your computer or Windows (through Windows Update) are good enough, and there is no need to install or update other drivers. There is, however, an exception for graphic drivers. The most common graphics cards are made by NVIDIA and AMD. Both manufacturers frequently release new graphics drivers with considerable performance improvements.
Therefore, you may need to manually update NVIDIA or AMD drivers, especially if you are a gamer, playing the latest games, or using newer graphics hardware.
Video Tutorial on How to Update Graphics Driver
Table of Contents:
- Introduction
- Update Your Graphics Driver With Snappy Driver Installer
- Update Your Graphics Driver Through Windows System
- Update Your Graphics Driver by Downloading It From the Manufacturer
- Video Tutorial How on to Update Graphics Driver
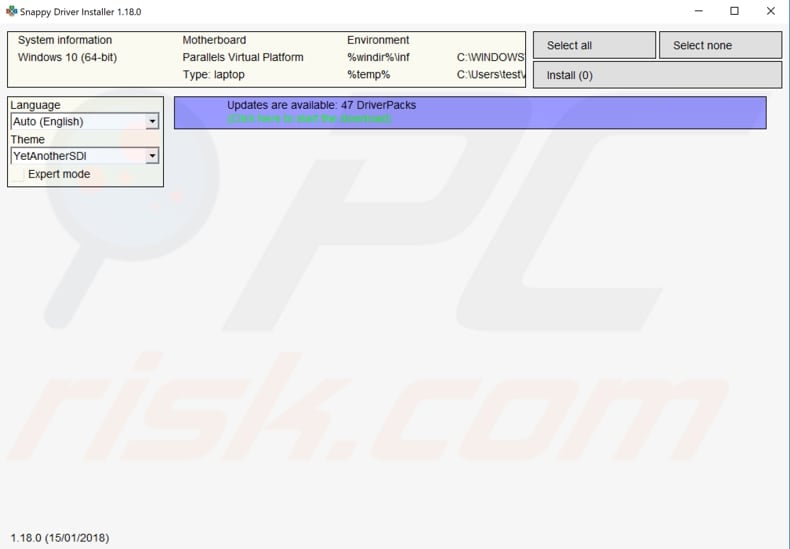
Update Your Graphics Driver With Snappy Driver Installer
One way to update or install new device drivers is by using third-party software such as Snappy Driver Installer. You will need a computer with a working internet connection to download it.
Snappy Driver Installer (SDI) is a powerful free driver updater tool for Windows that can store its entire collection of drivers offline. Snappy Driver works with 32-bit and 64-bit versions of Windows 10, Windows 8, Windows 7, Windows Vista, and XP. Drivers are downloaded through Snappy Driver Installer in DriverPacks, which are packs of drivers for various hardware. It can also show duplicate and invalid drivers, and it separates the updates that require you to restart your computer so it would be easier to distinguish them from the rest. You can download Snappy Driver Installer from here.
[Back to Table of Contents]
Update Your Graphics Driver Through Windows System
To update your graphic driver through the Windows system, go to Device Manager. To open Device Manager, go to Search, type «device,» and then choose «Device Manager» from the results.

Double-click «Display adapters» (or click the arrow) in the Device Manager window to expand that section. This will show the model and manufacturer of your graphics card.
Right-click the graphics card model name and choose the «Update driver» option.
Windows will ask how you wish to search for drivers. Click «Search automatically for updated driver software.» Windows will now find and install the drivers for you.
[Back to Table of Contents]
Update Your Graphics Driver by Downloading it From the Manufacturer
For some types of graphics hardware integrated into laptops, you may not be able to get drivers straight from the manufacturer. In this case, you may have to get updated drivers from your laptop manufacturer.
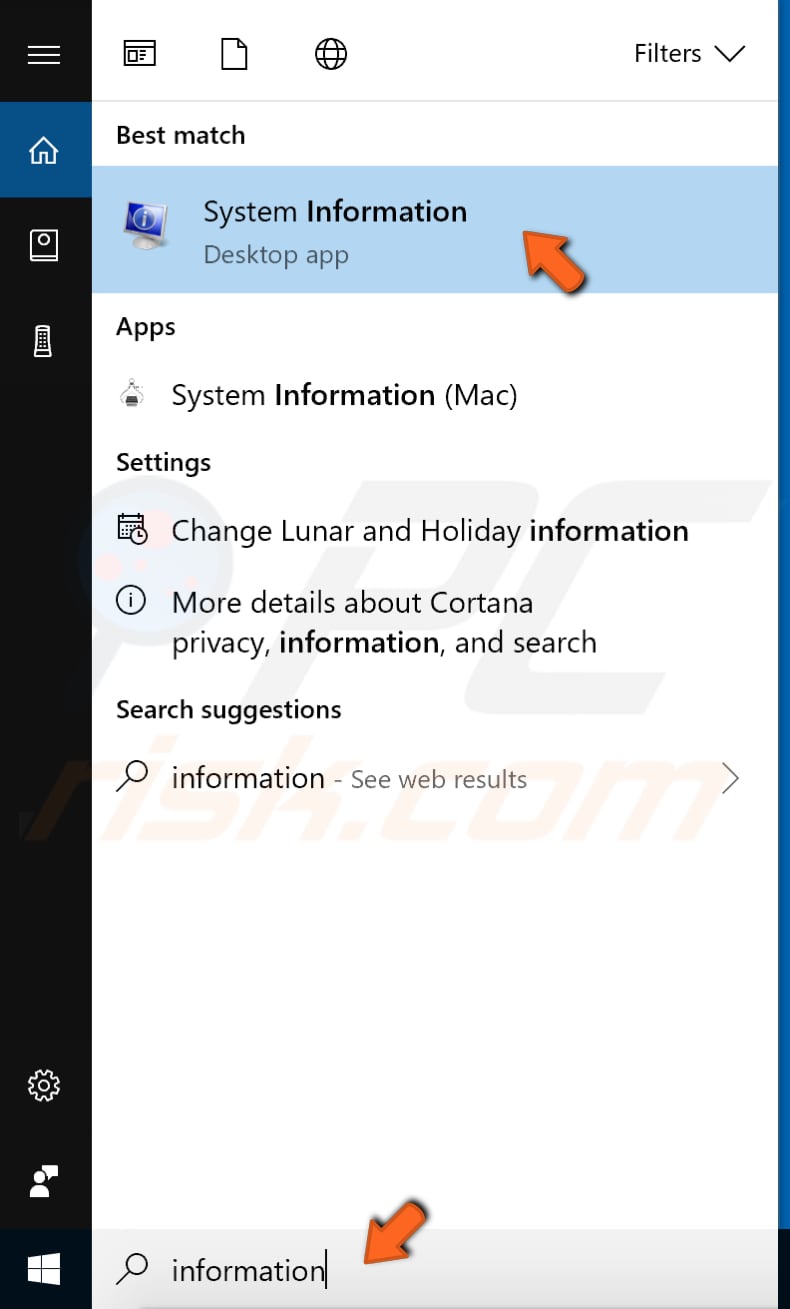
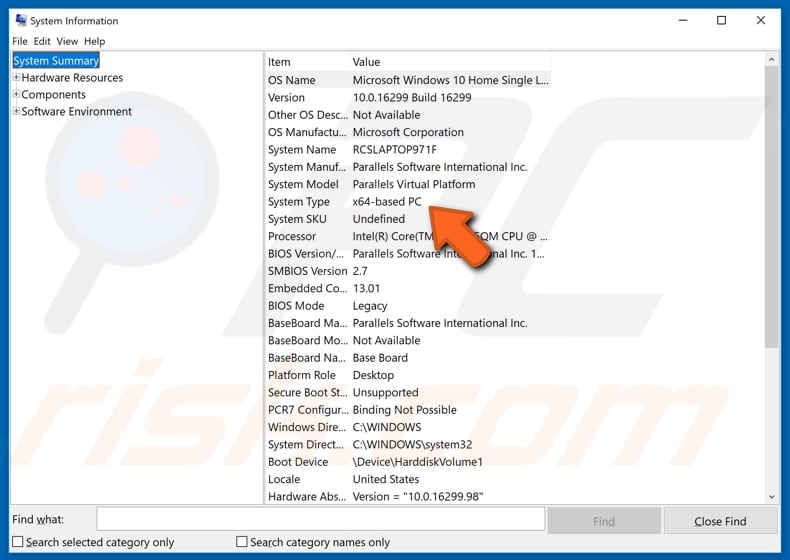
If you know your card manufacturer and model, you might also need to know your system type to download the correct driver. To get information about your system type, enter «information» in Search and click «System Information.»
In the System Information window, look beside «System Type» for the details. You might need this information when looking for the correct driver on your manufacturer’s webpage. If you do not know your PC card manufacturer and model, go to Device Manager to find out (shown in a previous method).
Now that you have all the information you need, go to your video card (or PC) manufacturer’s webpage and look for the correct driver for your graphics card. Download it directly from your graphics card manufacturer. Some manufacturers have update-checking utilities that automatically check for new graphics driver versions and alert you so that you do not have to do this manually.
We hope this article helped you to update your drivers successfully.
[Back to Top]
If you are facing problems like a black screen, pixels appearing on the screen, RGB color tint, or white noise, follow the troubleshooting guide & learn how to update video drivers.
The device driver holds the information required for hardware devices to communicate with the software or operating system. However, issues with the display, sound, Wi-Fi, Bluetooth, etc., occur after updating Windows or reinstalling it. In such cases, updating the drivers listed below is the best solution as it helps fix video issues, Wi-Fi, and other problems.
There are 3 best ways to update video drivers. You can choose any to install the update for video drivers on Windows 10.
3 Reliable Ways to Update Video Drivers
Video drivers can be updated automatically and manually. If you are short on time and don’t like lengthy processes, we recommend trying – Advanced Driver Updater. This professional driver updating tool automatically detects outdated drivers and shows the most compatible and recent updates.
However, if you are the DIY type and want to do everything independently, go with manual ways.
Note : Updating drivers manually involves risk. Therefore, when doing so manually, ensure the right driver is downloaded based on the operating system’s version and device details.
Once you decide how you want to update video drivers on Windows 10, proceed further.
1. Automatic Way to Update Video Card driver
Various third-party driver updating tools are available in the market, but not all are safe to use. Therefore, using a trusted and reliable driver updating tool that provides a large database & the option to backup and restore drivers is the best option.
You need to understand only the best driver updating tool can automatically detect problematic drivers and install compatible updates. An incorrect driver update can cause frequent freezes, lags, and other issues.
Therefore, to avoid such issues, we recommend using Advanced Driver Updater.
Follow these steps to learn how to update Video Card Drivers On Windows 10
1. Download and Install Advanced Driver Updater

2. Run the application and click Start Scan Now

3. The driver updating tool will scan the system for faulty, corrupt, and outdated drives.

4. Wait for the scan to finish.
5. Click the Update Driver button next to Graphics or video card to install the update. If you are using the registered version, take advantage of the Update All button to update all outdated driver.

6. Let the process finish.
7. Restart Windows and apply changes.
2. Manual Ways to Update Drivers
If you want to download and install the driver manually, follow the steps below:
1. Updating video drivers via Windows Update
The latest video drivers can be downloaded and installed through Windows Update. Follow the steps to learn how to do it.
1. Press Windows + R to open the Run window. Type devmgmt.msc and press Enter key.
2. In the Device Manager window, go to Display adapters. Double-click on it > select the graphics card > right-click > Update driver.
Note : Depending on the version of Windows, on some machines, it might appear as Update Driver Software.
3. Select Search automatically for updated driver software from the pop-up window. Windows will now look for video driver updates.
4. If an update is available, it will be installed automatically.
Note : This process can be repeated to update multiple graphics card drivers.
Tip : If you get the message “The best drivers for your device are already installed,” click Search for updated drivers on Windows update. Check for available Windows updates if any are available). However, if you are running the latest version of Windows, click View options updates > double click Driver Updates > see if an update for the Video card driver is available or not. If it is there, selects it and click Download and install.


3: Download and Install New Drivers from the Manufacturer’s site
You can try this method if you have time and computer skills.
To know about the version of Windows 10, you are using press Windows + R > msinfo32 > ok.

Get details about the PC model number from the new window that opens. In my case, Lenovo 34921F4 > below it, you can see system type X64 and OS Name.

After collecting this information, let’s gather information about graphics cards and manufacturers. To do so, follow the steps below:
1. Press Windows + R to open the Run window
2. Type devmgmt.msc > Enter
3. This will open Device Manager
4. Look for the Display adapters section; double-click to expand it.
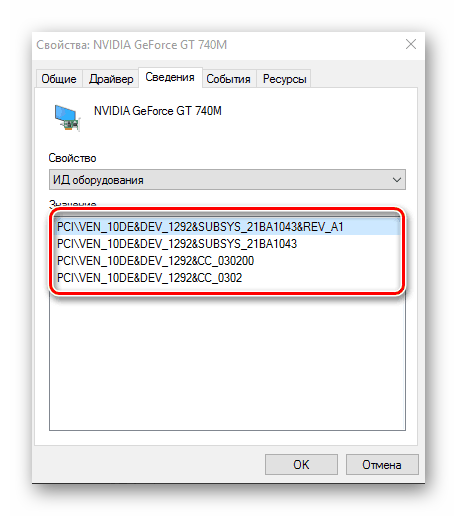
5. Select the graphic driver you wish to update > right-click > Properties

6. Click the Driver tab followed by the Details tab to collect all the driver information

Following the above steps will give all the driver-related information.
Once you have all the information visit the manufacturer’s site or the support page to download the driver update. After that, double-click the .exe file to install the update. However, if the update is in the form of a zip file, extract it and install the driver update. Restart your PC after updating the video driver.
Solution – How To Update Video Drivers on Windows 10
We hope you got the answer to How to Update Video Card Drivers on Windows 10. You can use any of the above methods to update the video drivers. However, if you don’t have enough time and patience, the automatic way is a smart decision. Advanced Driver Updater automatically identifies outdated drivers and shows the most compatible updates. If you have any questions, please drop that in the comments sections. Moreover, for any product-related queries, you can contact our support team at support@systweak.com.
Для поддержания стабильной производительности компьютера (быстродействия) рекомендуется проводить не только плановые чистки жёстких дисков от ненужных скопившихся файлов и загружать актуальные пакеты обновлений для ОС Windows, но и также периодически обновлять драйверы для всех встроенных ПК-комплектующих. По статистике, чаще всего пользователям приходится обновлять ПО для своих видеокарт, при этом сам процесс апгрейда графического адаптера не ограничивается одним способом.
Зачем регулярно обновлять видеодрайверы
Любые приложение или игра, работающие с использованием 3D-технологий, тесно связаны с видеокартой. Если программное обеспечение графического адаптера не соответствует уровню рекомендуемых системных требований программы, то ею пользоваться не получится (или при использовании будут возникать ошибки и сбои). А если учесть тот факт, что разработчики постоянно совершенствуют свои приложения, выпуская новые версии, то задача по обновлению видеодрайверов становится не просто обязательной для выполнения, но и остро необходимой.
Способы обновления видеодрайверов до актуальной версии в Windows 10
Пользователь может выполнить процесс обновления тремя способами:
- в автоматическом режиме благодаря встроенному в Windows 10 «Мастеру обновлений»;
- в полуавтоматическом режиме с помощью сторонних утилит;
- вручную (для этого потребуется скачать специальный инсталлятор с официального сайта разработчика видеокарты).
Любой из перечисленных вариантов не потребует от пользователя каких-либо узкопрофильных знаний в программировании или других информационных науках. Но перед началом обновления драйверов необходимо узнать название модели установленной видеокарты, в частности для обновления вручную.
Как узнать название модели видеодрайвера
Чтобы узнать полное название видеоадаптера:
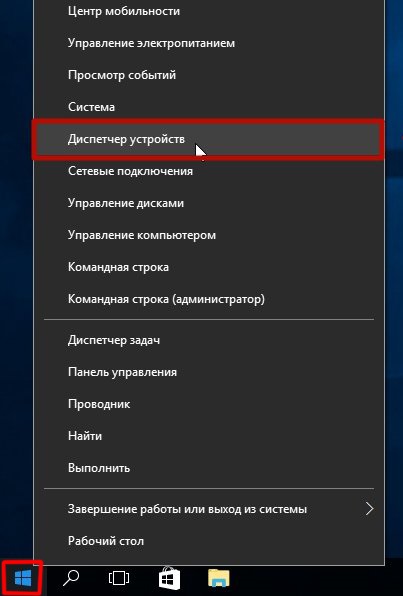
- Щёлкните правой кнопкой мыши по значку «Пуска» и запустите приложение «Диспетчер устройств».

Вы также можете найти «Диспетчер устройств» через функцию поиска, прописав соответствующий запрос (поисковая строка располагается рядом с кнопкой «Пуск») - Найдите категорию «Видеоадаптеры» и раскройте её. Найдите название своей видеокарты.

Чтобы убедиться в точности названия модели видеокарты, вы можете щёлкнуть дважды левой кнопкой мыши по названию карты (в появившемся окне также будет доступна точная информация об оборудовании)

Видео: как узнать всю необходимую информацию о видеокарте с помощью программы TechPowerUp GPU-Z
Обновление видеодрайвера в автоматическом режиме
Автоматическое обновление драйвера видеокарты осуществляется благодаря встроенному в Windows 10 «Мастеру обновлений». Чтобы запустить его, необходимо:
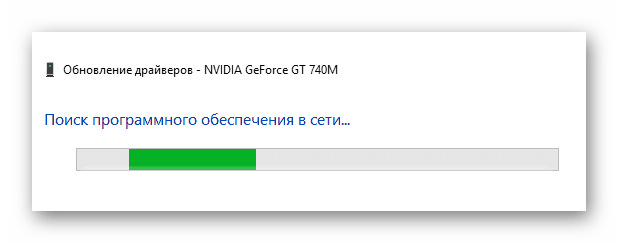
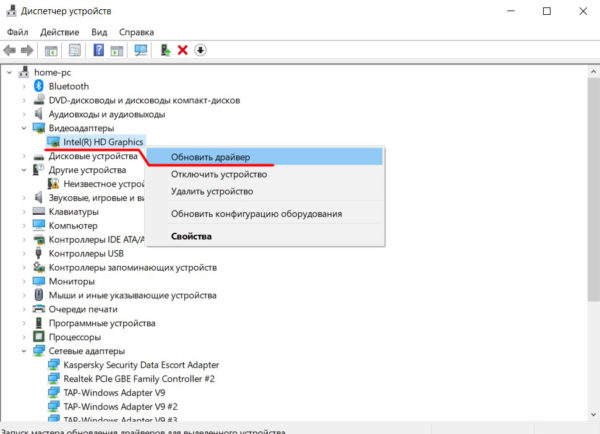
- В «Диспетчере устройств» найти подключенный к ПК видеоадаптер, кликнуть правой кнопкой мыши по его названию и выбрать пункт «Обновить драйвер».

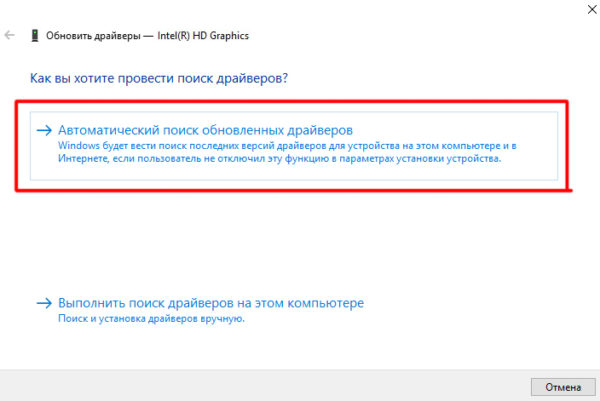
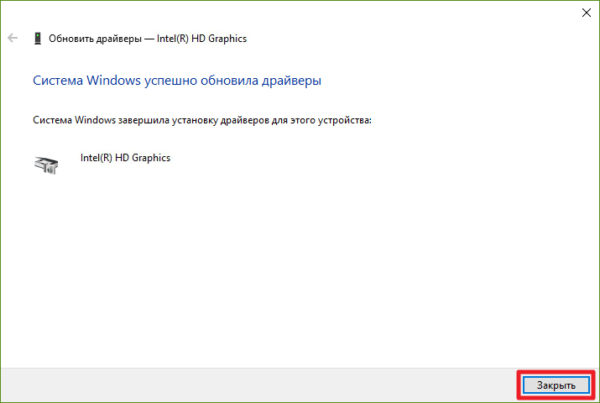
Процесс обновления также можно запустить через меню «Свойства» - В появившемся окне «Мастера обновлений» выбрать вариант «Автоматический поиск обновлённых драйверов».

Для автоматического поиска обновлений потребуется обязательное наличие интернет-соединения - Дождаться окончания автоматического процесса поиска, скачивания и установки актуальной версии драйвера, после чего нажать кнопку «Закрыть».

После обновления видеодрайвера желательно перезагрузить ПК
Видео: как автоматически обновить видеодрайвер с помощью «Мастера обновлений» Windows 10
Обновление видеодрайвера вручную
Чтобы провести обновление ПО для видеоадаптера в ручном режиме, необходимо скачать с официального сайта разработчика видеокарты пакет обновления.
Nvidia GeForce
Если у вас видеокарта марки Nvidia GeForce, то следует:
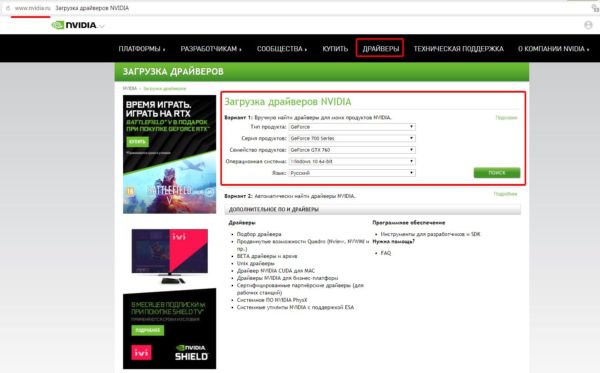
- Перейти по адресу www.nvidia.ru и выбрать раздел «Драйверы». На загрузившейся странице заполнить информационную форму данными и нажать «Поиск».

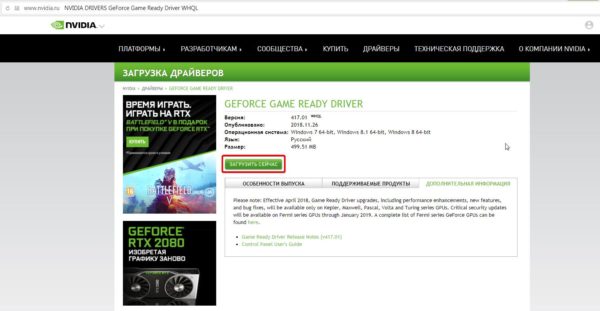
Не забудьте также перед поиском выбрать актуальную версию операционной системы Windows - Дождаться, пока сервис Nvidia найдёт подходящую (актуальную) версию драйвера, после чего кликнуть по кнопке «Загрузить сейчас».

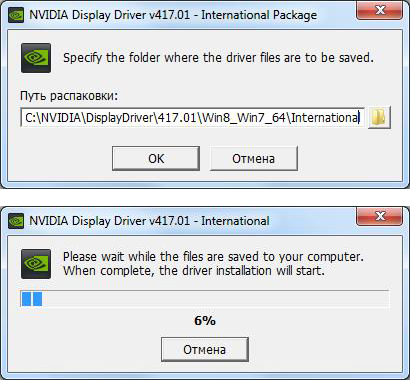
Во вкладке «Дополнительная информация» можно найти интересующие данные о скачиваемом драйвере (например, о дате его выпуска) - Скачав exe-файл пакета обновлений, запустить его, указать папку распаковки инсталлятора и нажать «ОК».

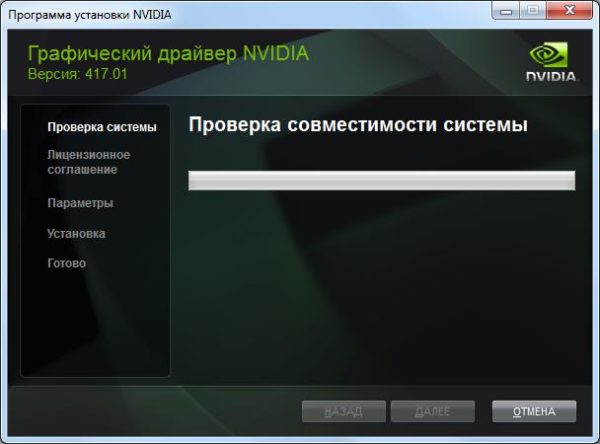
Путь распаковки может быть абсолютно любым (удобным для пользователя) - По окончании процесса распаковки автоматически запустится «Мастер установки» Nvidia. Нужно дождаться окончания предварительного сканирования ОС.

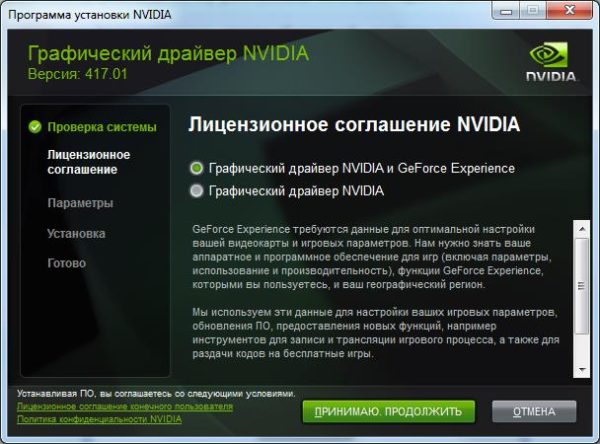
Проверка обычно длится несколько секунд - После успешной проверки выбрать вариант установки драйвера и нажать «Принимаю. Продолжить».
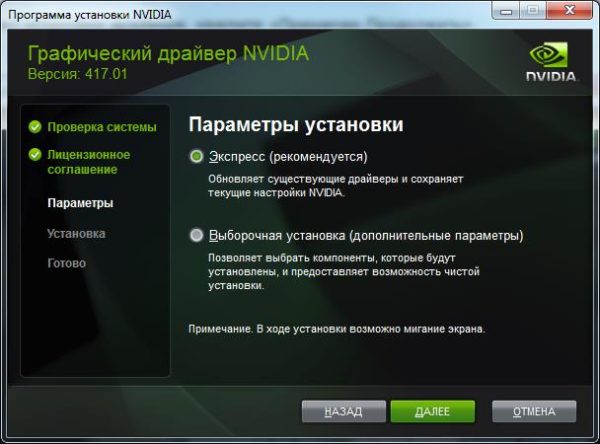
GeForce Experience представляет собой специальную утилиту от Nvidia для работы с настройками видеокарты - Выбрать желаемые параметры установки и нажать «Далее».
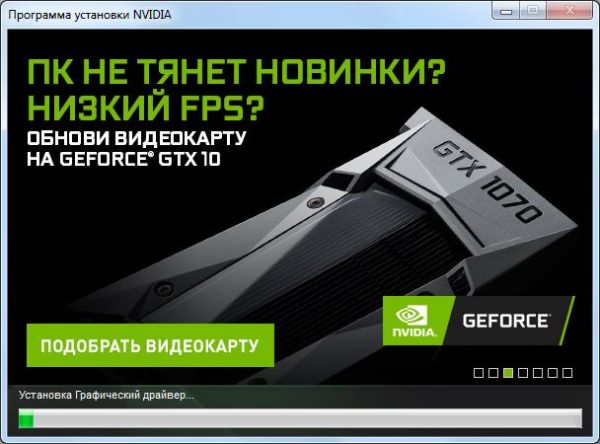
Параметр «Выборочная установка» позволит выбрать отдельные компоненты для установки - Дождаться окончания процесса установки.
Во время процесса установки драйвера у вас может погаснуть на несколько секунд экран монитора (это нормально) - Закрыть окно «Мастера установки» видеодрайвера.
После установки драйвера не обязательно перезагружать ПК
AMD Radeon
Если у вас установлена видеокарта марки Radeon, то в таком случае необходимо:
- Перейти на сайт AMD, открыть вкладку «Драйверы и поддержка», выбрать модель своего видеоадаптера (строка Search for your product) и нажать «Отправить».

Вы также можете найти свою видеокарту в таблице оборудования, представленной чуть ниже поисковой строки - Выбрать подходящую для вашей ОС Windows версию пакета драйвера и скачать его.

Самые актуальные версии драйверов всегда располагаются вверху списка - После скачивания запустить инсталлятор и распаковать пакет в любую папку на ПК.

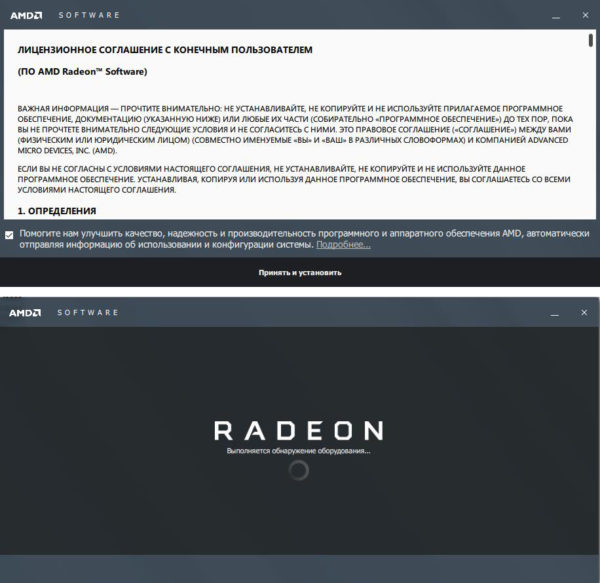
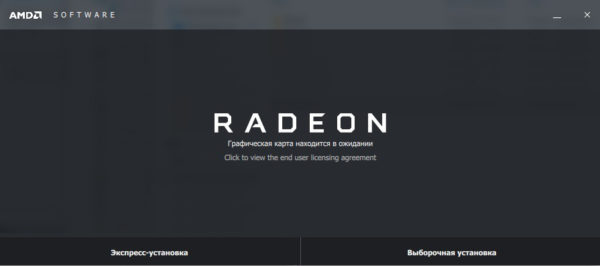
Чтобы полностью видеть процесс распаковки файлов, нужно нажать на кнопку Show Details - По окончании процесса распаковки автоматически запустится «Мастер установки» драйвера Radeon. Нужно принять «Лицензионное соглашение» и подождать, пока утилита выполнит сканирование системы.

Процесс сканирования зависит от степени загруженности процессора - Затем выбрать один из способов установки видеодрайвера.

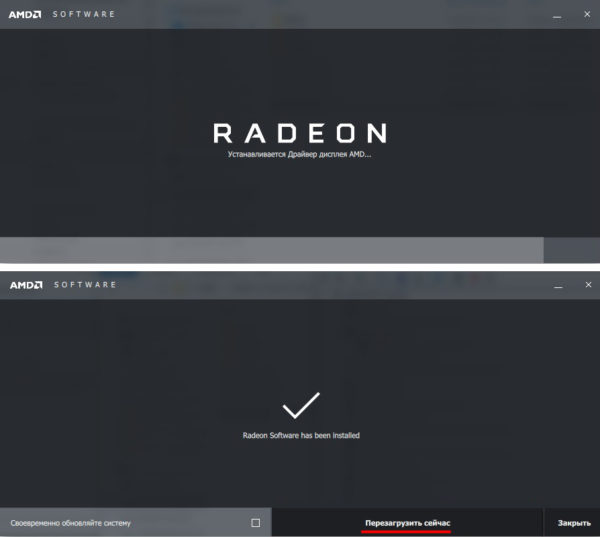
По умолчанию лучше выбирать режим «Экспресс-установка» - Дождаться окончания процесса инсталляции, после чего кликнуть «Перезагрузить сейчас».

Если вы хотите, чтобы ваш драйвер всегда обновлялся автоматически, то перед перезагрузкой ПК поставьте маркер напротив «Своевременно обновляйте систему» - Готово, после перезагрузки ПК драйвер для видеоадаптера будет окончательно обновлён.
Обновление/установка видеодрайвера в полуавтоматическом режиме
Такое обновление подразумевает использование сторонних утилит, предназначенных для упрощения поиска и установки драйверов для всех комплектующих ПК, в том числе и видеоадаптера. Чтобы облегчить поиск такого специализированного ПО, рассмотрим наиболее востребованные из них.
Display Driver Uninstaller
Утилита предназначена для полного удаления всех версий установленных ранее видеодрайверов. Скачать её можно на официальном сайте разработчика. Пользоваться ей рекомендуется в том случае, если вам необходимо (например, при обновлении текущей версии драйвера появляется ошибка) заново установить «чистый» драйвер последней версии для видеоадаптера. Всё, что от вас потребуется, — это скачать/запустить программу, указать в стартовом окне модель установленной видеокарты и выбрать один из трёх режимов деинсталляции.
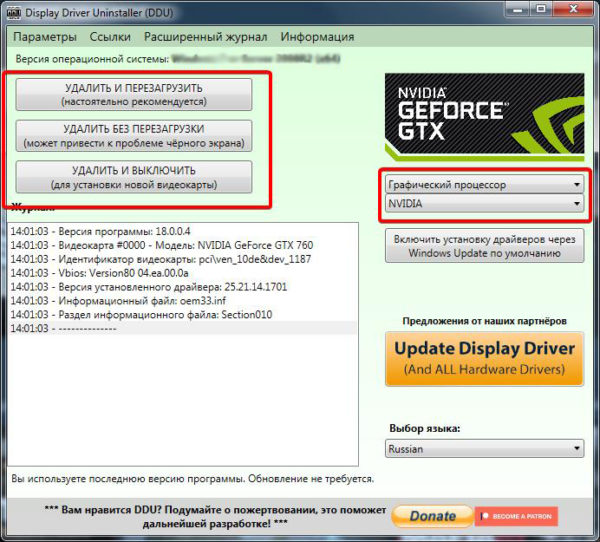
После деинсталляции можете переходить к повторной установке драйвера.
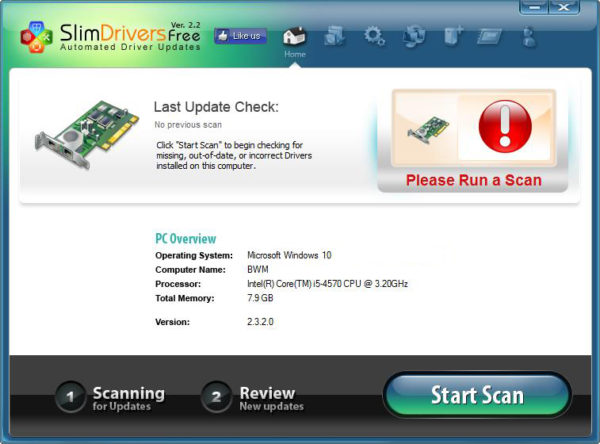
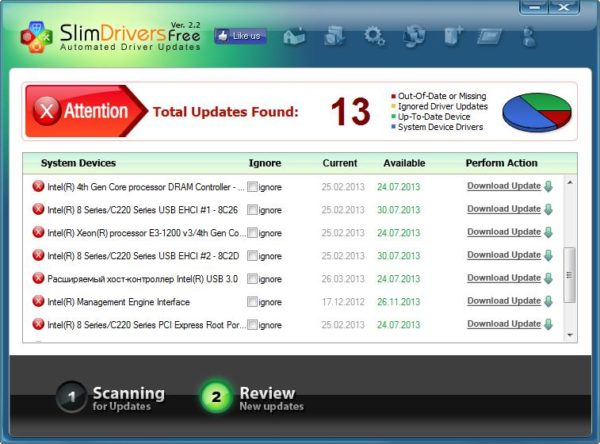
SlimDrivers
Найти и скачать программу можно на сайте разработчика. SlimDrivers не только способна проводить автоматический поиск, скачивание и установку самых последних версий драйверов для комплектующих, но и создавать «точки откатов» (полезно в случае, если возникнут проблемы при обновлении). Чтобы обновить видеодрайвер, необходимо:
- Скачать и запустить программу. Нажать кнопку Start Scan.
Утилита не поддерживает русский язык - Дождаться окончания процесса сканирования, найти в списке результатов название видеокарты и нажать Download Update.
Обновление драйвера будет возможно только в том случае, если в сети имеется его более новая версия
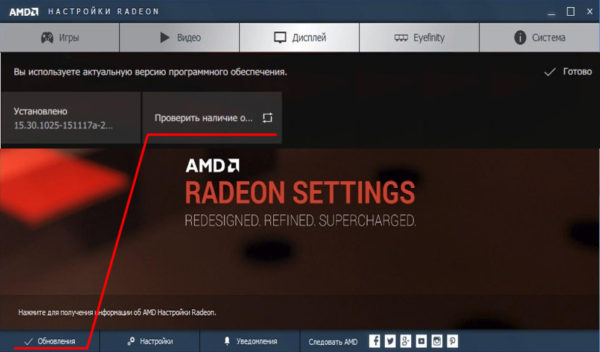
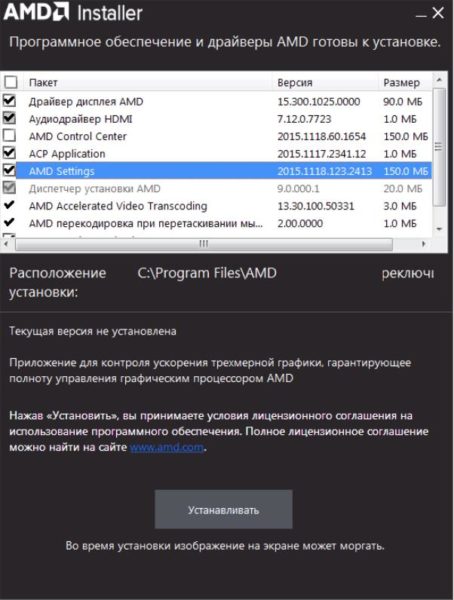
Radeon Software Crimson Edition
Является специализированной комплексной программой для обладателей видеокарт AMD Radeon, которая способна не только обновить видеодрайвер, но и улучшить (повысить) производительность самой карты. Для обновления драйвера следует:
- Установить и запустить программу. Щёлкнуть по вкладке «Обновления» и выбрать пункт «Проверить наличие обновлений».

Установочный файл программы весит ~ 500 МБ - По окончании проверки отметить маркером комплектующие, которые нуждаются в обновлении, и нажать «Устанавливать».

Чтобы обновить ПО видеокарты, необходимо выбрать «Драйвер дисплея AMD» - Готово, после установки следует выполнить перезагрузку системы.
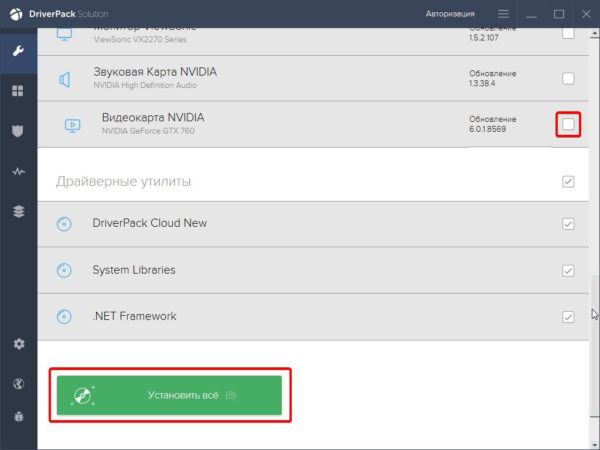
DriverPack Solution
Отличный менеджер обновлений драйверов от российских разработчиков. Утилита не требует установки на жёсткий диск, запускается в автономном режиме. Способна автоматически производить поиск и установку драйверов для всех ПК-комплектующих:
- Запустите менеджер и нажмите кнопку «Сканирование системы».

Менеджер корректно работает на всех операционных системах и с любыми моделями комплектующих - После этого найдите в списке устройств свою видеокарту, поставьте напротив неё маркер и нажмите «Установить всё». Далее программа проведёт автоматическое обновление.
Если вы хотите обновить драйвер только для видеокарты, то снимите все остальные маркеры

Лично протестировав работу вышеперечисленных утилит, могу сказать, что наиболее удобными, простыми в обращении и эффективными оказались SlimDrivers и DriverPack Solution, которые полностью справляются с обновлением драйвера видеоадаптера. Утилита Display Driver Uninstaller не всегда корректно удаляет старые версии видеодрайверов (для минимизации технических сбоев рекомендуется запускать программу и проводить процесс деинсталляции в «Безопасном режиме Windows»). Если же у вас установлена видеокарта Radeon (от компании AMD), то вместо Radeon Software Crimson Edition я бы посоветовал пользоваться Radeon Software Adrenalin Edition, так как данная утилита является своего рода улучшенной версией Crimson Edition.
Возможные ошибки обновления и способы их устранения на ОС Windows 10
Во время (или даже после) обновления драйверов у пользователя могут возникнуть технические ошибки и сбои, способные привести к серьёзным проблемам в их работе. На компьютере могут перестать запускаться программы, приложения, игры. Рассмотрим распространённые проблемы и способы их решения.
Ошибка «Видеодрайвер перестал отвечать»
Ошибка возникает после обновления и появляется в нижней части «Рабочего стола».
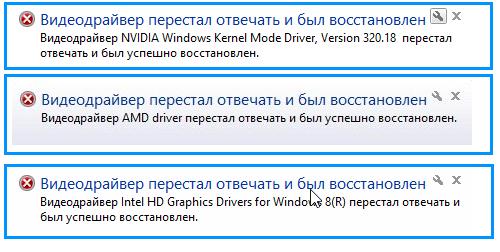
Решением будет откат видеодрайвера до предыдущей версии с его последующим повторным обновлением. Чтобы выполнить откат, необходимо:
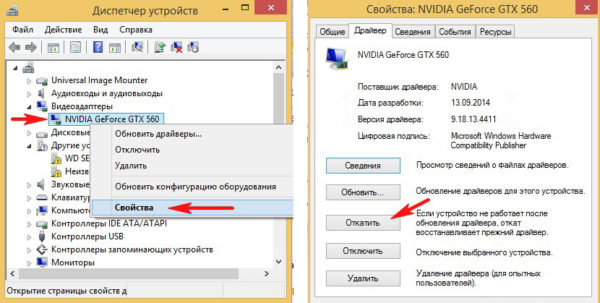
- Через поисковую строку Windows найти «Диспетчер устройств» и открыть его. В каталоге «Видеоадаптеры» выбрать видеокарту, щёлкнуть по её названию правой кнопкой мыши и нажать на «Свойства». Во вкладке «Драйвер» нажать кнопку «Откатить».

После отката обязательно перезагрузите ПК - После этого можете вновь обновить видеодрайвер.
Ошибка Could not download file
Ошибка появляется исключительно при попытке автообновления драйвера через функцию «Мастера обновлений» ОС Windows 10.
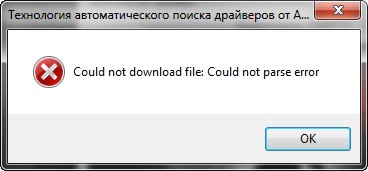
Решение довольно простое — необходимо отключить на время автообновления драйвера антивирус.
Ошибка «Сбой программы установки» (актуально для видеокарт Nvidia GeForce)
Ошибка возникает при попытке обновления видеодрайвера от Nvidia.

Причина такого сбоя — несовместимость разрядности пакета драйверов с разрядностью ОС Windows. Скачайте с официального сайта Nvidia соответствующую версию видеодрайвера. Чтобы узнать разрядность системы, откройте меню «Пуск» и пройдите по пути: «Параметры»/«Система»/«О системе».
Опираясь на личный опыт, могу сказать, что при возникновении абсолютно любой ошибки при обновлении драйвера видеоадаптера наилучшим решением будет полное удаление старой версии драйвера и «чистая» установка актуальной версии вручную. Предварительно скачать её можно с официального сайта поставщика Nvidia или AMD. При этом для полного удаления драйвера лучше всего подойдут специализированные утилиты: RegOrganizer, CCleaner и им подобные. Если же удалять видеодрайвер через встроенные инструменты ОС Windows, то в дальнейшем могут возникнуть сбои и ошибки в работе видеокарты из-за оставшихся неудалённых отдельных файлов или архивных записей в системном реестре.
Обновление драйверов для видеоадаптера необходимо для поддержания эффективной и стабильной работы ПК и ОС Windows 10. Своевременное обновление способствует корректному запуску программ, игр, приложений, использующих технологию 3D. Существует три способа обновления драйверов: автоматический (через встроенный в ОС Windows «Мастер обновлений»), полуавтоматический (с использованием сторонних утилит) и вручную (с необходимостью скачивания пакета обновлений с официального сайта разработчика видеоадаптера).
- Распечатать
Оцените статью:
- 5
- 4
- 3
- 2
- 1
(9 голосов, среднее: 4.6 из 5)
Поделитесь с друзьями!
How to Update Video Drivers in Windows 10
Windows 10 is the latest and greatest offering from Microsoft, and incorporates a new appearance, additional features, and many updates in software technology.
Along with these upgrades, some computer users may find that hardware devices no longer function in the same manner, or may not be supported at all. If you’ve recently updated
Video displays are often one of the casualties of system upgrades, with the multitude of graphics cards offered even by leading manufacturers not matching up with the new operating system.
Often the solution is simple – change your system settings or software parameters to sync with Windows 10, and you’re back in business.
This may not solve all your problems with video displays with WIN 10. It frequently calls for updates to the small programs that communicate between the operating system and your devices.
When To Update Your Video Drivers in Windows 10?
If you have an older graphics card or other video device, Windows 10 may not fully support it. Windows 10 users reported a number of issues including a “stretched” screen appearance with fuzzy or broken-looking pixels.
This can sometimes be resolved simply by changing your display settings from your Windows desktop, using the Advanced Settings option.
Other more extreme display problems include:
- Game programs don’t render properly on your display, but did before your Windows 10 installation or update
- Screen displays are slow, portions of the display don’t appear, or clarity suffers
- Lines appear on the monitor – either intermittently or constantly
- Games, streaming movies, or videos simply will not display properly
When symptoms such as these are prevalent on your computer, it’s likely time to update the Windows 10 video drivers.
Three Ways to Update Video Drivers in Windows 10
To update the drivers on your system, you have multiple options:
- Use Windows Update to get the updated versions of drivers for your system
- Access your video card manufacturer’s web site and search for a current Windows 10 driver to download and install
- Use an automated method or service to search your system for the drivers it needs, letting this process find and install your drivers
Updating your video drivers may not be a perfect science when taking the first two options. These processes may not result in finding the best or most current driver for your system. If you try one method without resolving your problem, try another of these approaches.
1. Using Windows Update
Windows 10 provides the functionality to update drivers. The benefit of using Windows Update is that you’re assured that any updates or drivers retrieved have been verified by Microsoft to be compatible with WIN 10.
To access updates through this method:
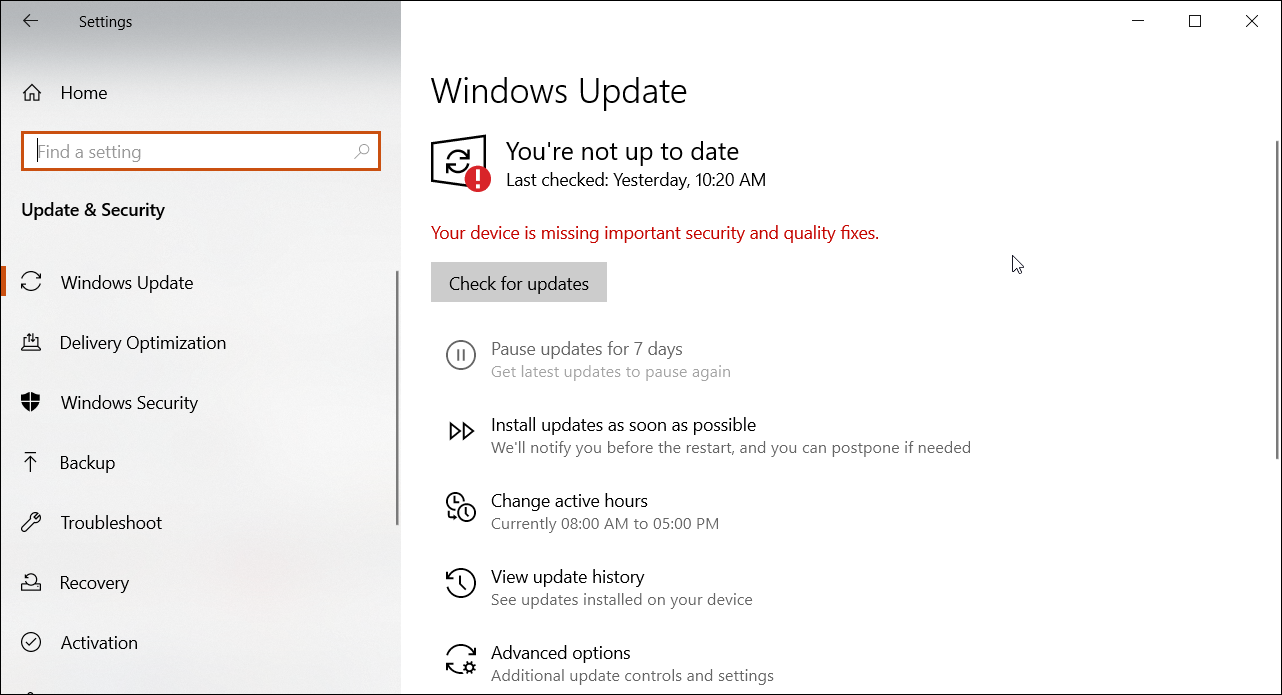
Open Settings > Click Update & Security > Click on Windows Update
On the Window Update screen, simply click the “Check for updates” option.

Windows Update will scan your system for the drivers and other updates that apply to your system, and download them.
The downside of this method is that not all manufacturers release new software or drivers through the Microsoft channel, so you may not find the updates that you’re looking for.
Another method of retrieving drivers from Microsoft is to access the Device Manager. You can get to Device Manager in a couple of ways:
Select Start > Search for and select Device Driver.
You will see a list of devices. You may need to expand a category to see the exact device whose driver you’re looking for. Right-click the device you want, and select the Update Driver option.

Note: in this screenshot, you would expand the sound, video, and game controllers icon, then right-click your video card.
You can also initiate the Device Manager by pressing the Windows key and R at the same time, which opens the Windows ‘Run’ box, and key the function “devmgmt.msc” and press enter.
Device Manager will open, the same as if you followed the above commands. Device Manager will then give you options for how you would like to search for your driver:

Your best bet is to let the system search automatically for the best driver. As with Windows Update, if device manager locates a suitable driver for your device, it will download and install automatically.
2. Download from Your Manufacturer’s Website
Another alternative in updating your video drivers in Windows 10 is to log into the website of your video card’s manufacturer. You can then search for their latest driver updates for your particular card and operating system.
This can sometimes require a little discovery, depending on the manufacturer, the number of devices they offer, and versions supported, as with this example from the popular NVIDIA website:

If you’re unable to identify your exact model or version, you can always try calling their technical support number or online chat, if available.
3. Use An Automated Solution
If you’re looking for a better, easier way to find the drivers you need, there are sophisticated programs that will do the job for you such as Driver Support.
Advantages to using such software to keep your system up-to-date include:
- Driver updates are automated
- Automation frees you from the manual efforts in finding the right drivers for your system
- One program does it all
- Scanning your system
- Finding the drivers
- Download
- Installation
- No more frustration searching for multiple vendors or websites
Putting technology to use for updating your drivers safely and securely saves time over trial-and-error update methods. Just download and install the software, and let it do the work for you.
For only $9.99 a month Driver Support | ONE can help you save time and frustration dealing with common Windows device issues as well as added optimization and safety features.
Give Driver Support a Try Today
Your Best Solution for Updating Your Video Drivers
Automated processes are your best option to keep your video drivers in Windows 10 current and functioning properly.
Driver Support is the easy and reliable method for scanning your system for the video drivers you need, downloading, and installing them automatically. Give Driver Support | ONE a try today! to find out how to keep all your drivers updated and maximize performance from your system.
Was this article helpful?
Search for solutions
Page load link
Download PC Repair Tool to quickly find & fix Windows errors automatically
Insufficient system resources exist to complete the requested service. Very often we are required to update our Graphics Drivers manually. While Windows Update will update your computer system including the Device Drivers automatically, or the software updaters of your graphics hardware will inform you when updates are available, there may be a time when you may have to, on your own, update your systems video and graphic drivers, if you are facing issues like Laptop screen brightness flickering or if you wish to get better performance out of your Windows 11/10/8/7 system.
While Windows Update delivers all driver updates too that are required by your system, you may want to chack the Optional Updates too to see if any specific display drivers are offered.
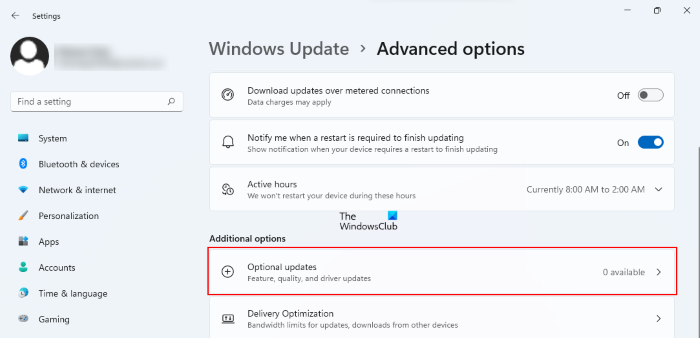
In Windows 11, to update Graphics Drivers, do the following:
- Launch Windows 11 Settings
- Select Windows Update from the left side
- Click on Advanced options on the right side
- Select Optional updates on the right side
- Expand Driver updates to see if any Graphics or other driver updates are available.
In Windows 10 too you can run Windows Updates and see if any Driver updates are available under Optional Updates. It’s a quicker and easier way:

- Open Settings (Win + I)
- Navigate to Settings > Update & Security > Windows Update
- Right under it, look for a clickable link View optional updates.
- Under Driver Updates, a list of updates will be available
- You can choose to install if you are facing an issue manually.
To use the Device Manager to update Drivers:
- Click on the Start button to open the WinX Menu
- Select Device Manager.
- Expand Display adapters to see your graphics card details.
- You can right-click on them and select Update Driver Software to update the drivers.
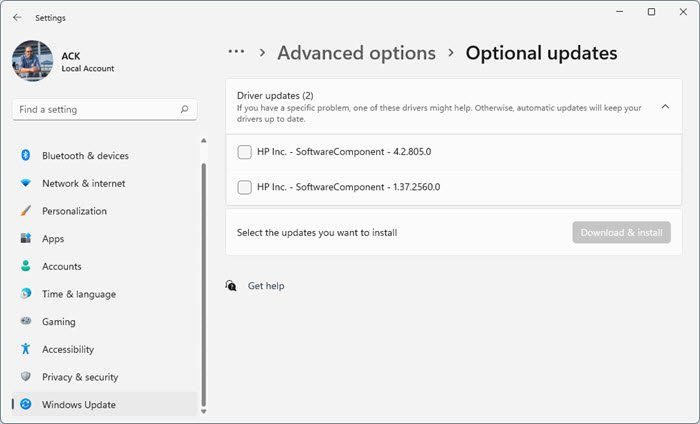
In my case below, you will see an Intel as well as an NVIDIA GeForce entry. This means that my laptop switches between these two hardware depending on the need.
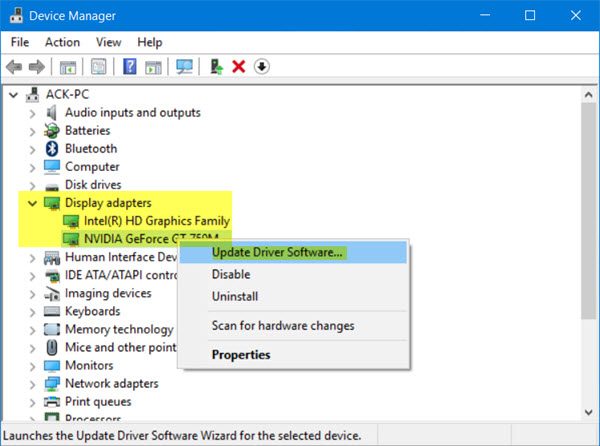
So I need to update Inter(R) HD Graphics family as well as NVIDIA GeForce card drivers.
This post will show you in detail how to uninstall, disable, roll-back or update Device Drivers.
Once you select Update Driver Software. your computer will scan for available updates and download and install them automatically.
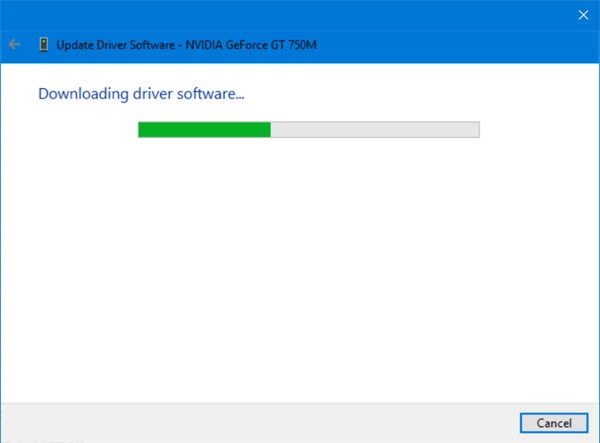
Once the Graphic Driver is installed, you will be informed and ask to restart your PC.
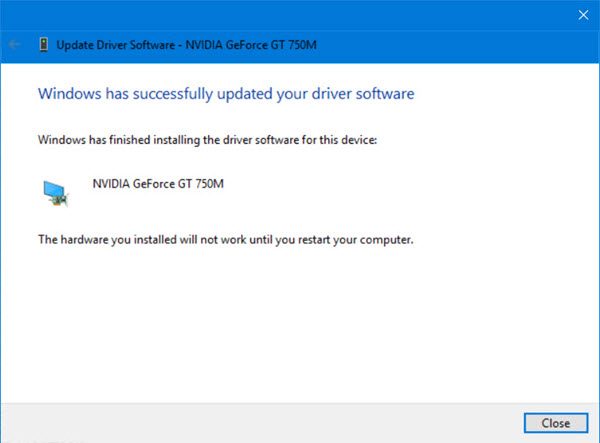
Restart your computer, and your driver will be updated!
There is another way to update NVIDIA GeForce drivers.
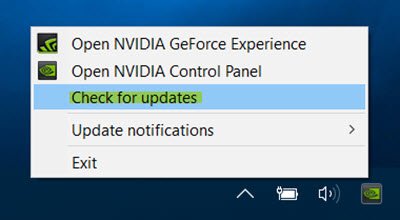
Type GeForce in Start search and select GeForce experience.
After this NVIDIA GeForce experience app is launched
- You can right-click on its system tray icon and select Check for updates.
- If updates are available, you will see a popup notification to this effect.
- Click on it, and NVIDIA GeForce experience UI will open.
- Clicking on the green Download driver button will commence its download and installation.

Restart your computer once it is installed.

This should give you a smooth experience.
NOTES:
- In Windows 10, version 1909 and earlier, Windows installs the highest-ranking driver from Windows Update, regardless of whether it is classified as Automatic or Manual.
- Starting in Windows 10 version 2004, and in Windows 11, Windows only searches the local computer. When it fails to find a driver, Device Manager shows a button labeled Search for updated drivers on Windows Update, which opens the Settings app to the Windows Update page. To find this button, right-click a device and select Properties. On the Driver tab, select Update Driver and then Search automatically for drivers.
Note: If you are using the latest version of NVIDIA GeForce experience then you may be asked to log in with your Facebook or Google account which can be pretty irritating and time-consuming as they ask for additional information, access to your Facebook/Google account and email verification.
There is yet another way, and that is to search for driver downloads for your system on the internet and then search for the driver’s name on the site. I have given a few links below for your ready reference. You may visit your computer manufacturer’s website, or you may visit the graphics hardware manufacturers site:
HP | Dell | AMD | Intel | NVIDIA | GeForce.
Some of you may want to use free Driver Update software or tools like AMD Driver Autodetect, Intel Driver Update Utility or Dell Update utility to update your device drivers. NV Updater will keep NVIDIA Graphic Card Driver updated.
Related: NVIDIA drivers not installing or loading.
How do I find my graphics driver Windows 10?
Go to “Control Panel”, open “Device Manager”. Open Windows Device Manager and click on “Display adapters”. This will show you the installed graphics card(s) on your Windows PC.
Read: How to check the Driver Version in Windows.
Do I need to update the graphics driver?
You need to update your graphics driver if you are experiencing a graphics-related problem with your computer. Driver updates primarily provide bug fixes and compatibility with newer software. However, it is recommended that you update your graphic card drivers regularly to ensure the best performance from your Windows PC.
Hope this helps!
Read next: Where to download drivers for Windows 11/10.

Anand Khanse is the Admin of TheWindowsClub.com, a 10-year Microsoft MVP (2006-16) & a Windows Insider MVP (2016-2022). Please read the entire post & the comments first, create a System Restore Point before making any changes to your system & be careful about any 3rd-party offers while installing freeware.