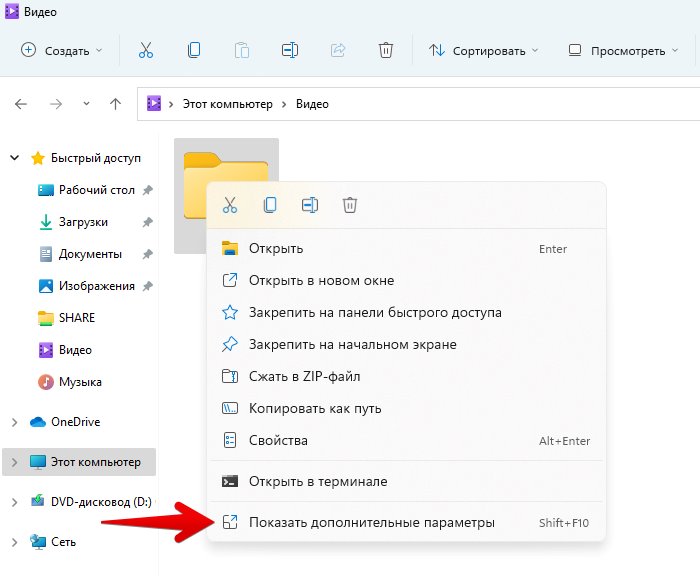
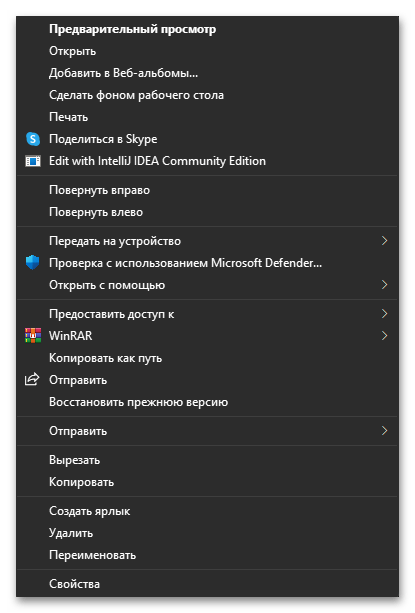
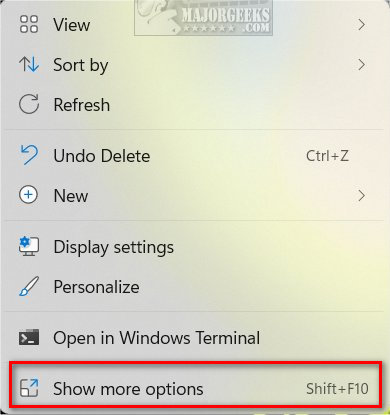
As more and more people get to experience Windows 11, some are nostalgic and some are outright angry at some of Microsoft’s decisions. One UI choice that seems to bother a lot of users is the fact that the old right-click menu is now hidden under Show more Options.

You could argue that the new context menu helps bring consistency to Windows 11. On Windows 10, the fact that each application had its own context menu elements created a mess, often producing screen-longs context menus.
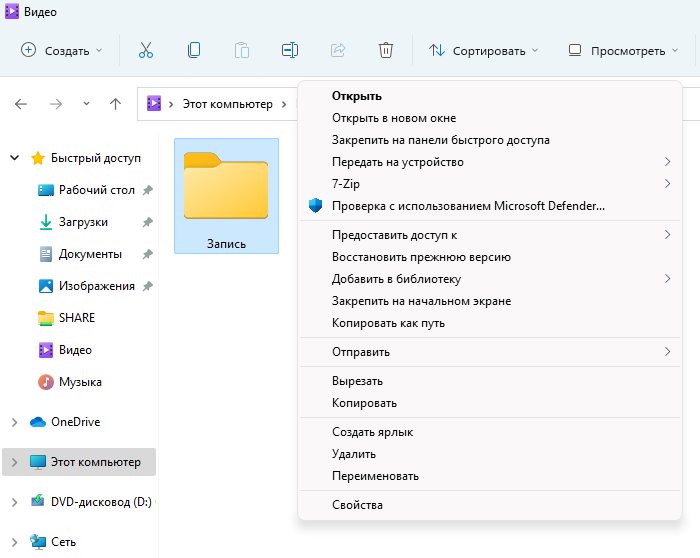
While the new context menu aesthetic on Windows 11 has a cleaner look, it’s understandable why it’s also confusing for many users. For example, familiar options like Refresh or New (create folders) are entirely missing when you right-click on your desktop on Windows 11.
Alternatively, you can use Shift + right-click to access the old classic menu, but it is not a permanent solution. You will have to apply the following steps to disable the new context menu.
1. Disable ‘Show More Options’ from Registry Editor Using CMD
By using the registry editor, you can make changes to all of your Windows components, including right-click context menu. Before moving down to the steps, you can make a registry backup which will allow you to bring the old context menu back.
If you don’t want to use commands, download the bat files, then run as administrator to enable or disable the old classic context menu.
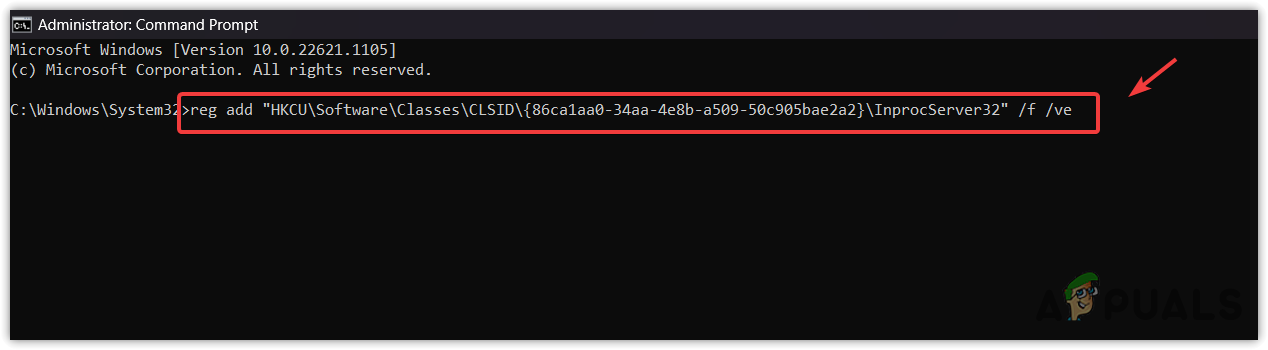
- To do so, press the Windows key and type Command Prompt.

Opening Command Prompt - Press Ctrl + Shift + 10 simultaneously to prompt UAC ( User Account Control ) or right-click and select Run as administrator.
- Click Yes to open with administrator privileges.
- Then, enter the following command and hit Enter.
reg add "HKCUSoftwareClassesCLSID{86ca1aa0-34aa-4e8b-a509-50c905bae2a2}InprocServer32" /f /ve
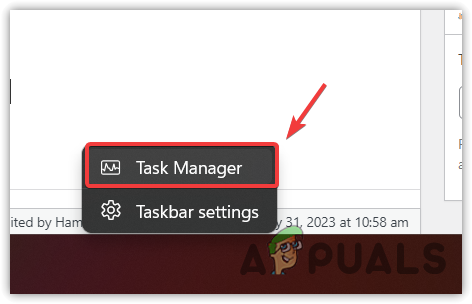
Adding a Registry Key to enable the old classic menu via command prompt - Right-click the taskbar, and click Task Manager.

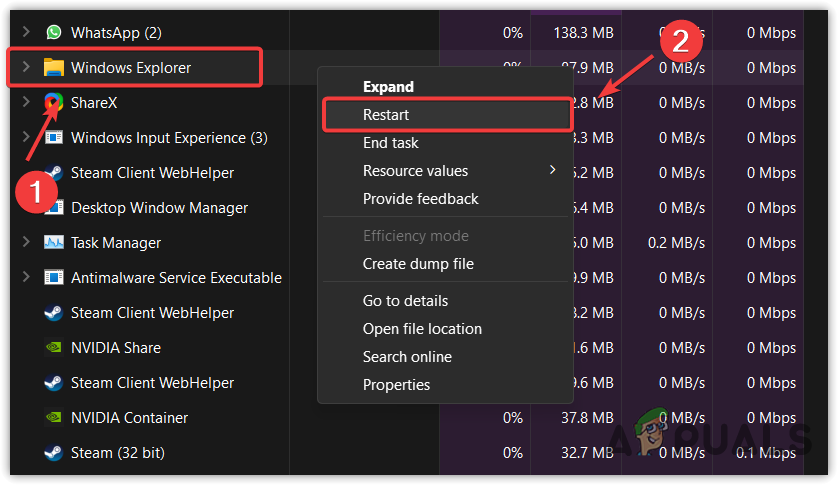
Opening Task Manager from the taskbar - Once it is opened, right-click the Windows Explorer and click Restart.

Restarting Windows Explorer - Once done, right-click on the desktop, and you will see the old context menu, like in Windows 10.
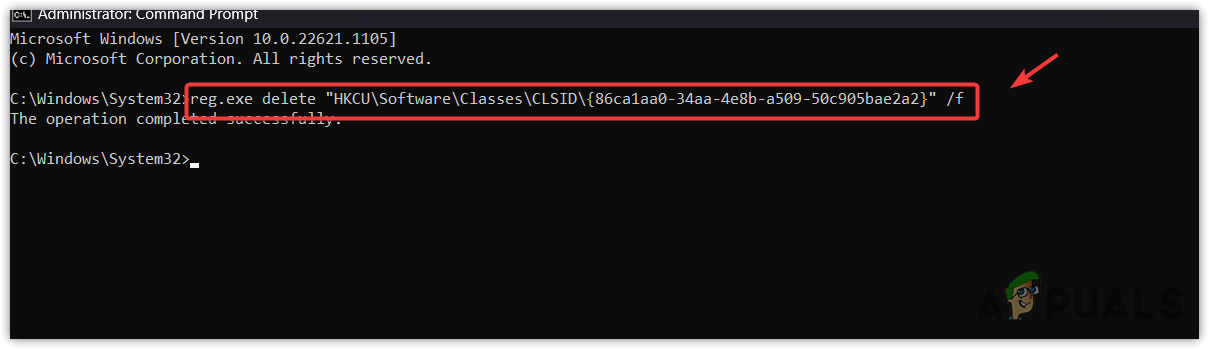
- In the future, if you want the Show More Options context menu back, you can either restore the registry backup or use the following command to delete the registry entry that you used to disable the new context menu.
reg.exe delete "HKCUSoftwareClassesCLSID{86ca1aa0-34aa-4e8b-a509-50c905bae2a2}" /f
Enabling Show More Options context menu - Make sure to restart Windows Explorer.

2. Disable ‘Show More Options’ Using WinAero Tweaker
WinAero Tweaker is a Windows application that allows users to customize their Windows according to them. You use this application to disable the show more options context menu.
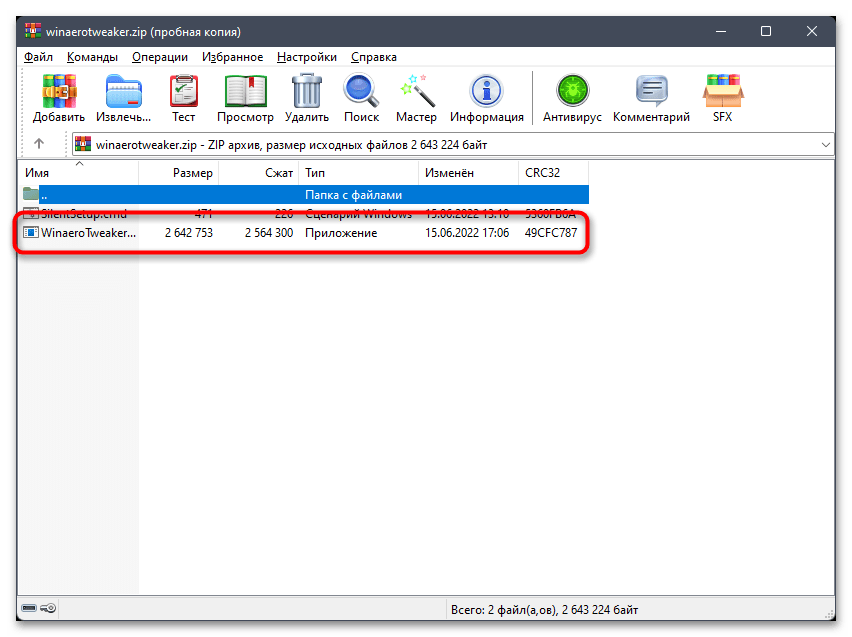
- To do so, download WinAero Tweaker from the website.

Downloading WinAero Tweaker - Once done, install it by following the on-screen instructions.
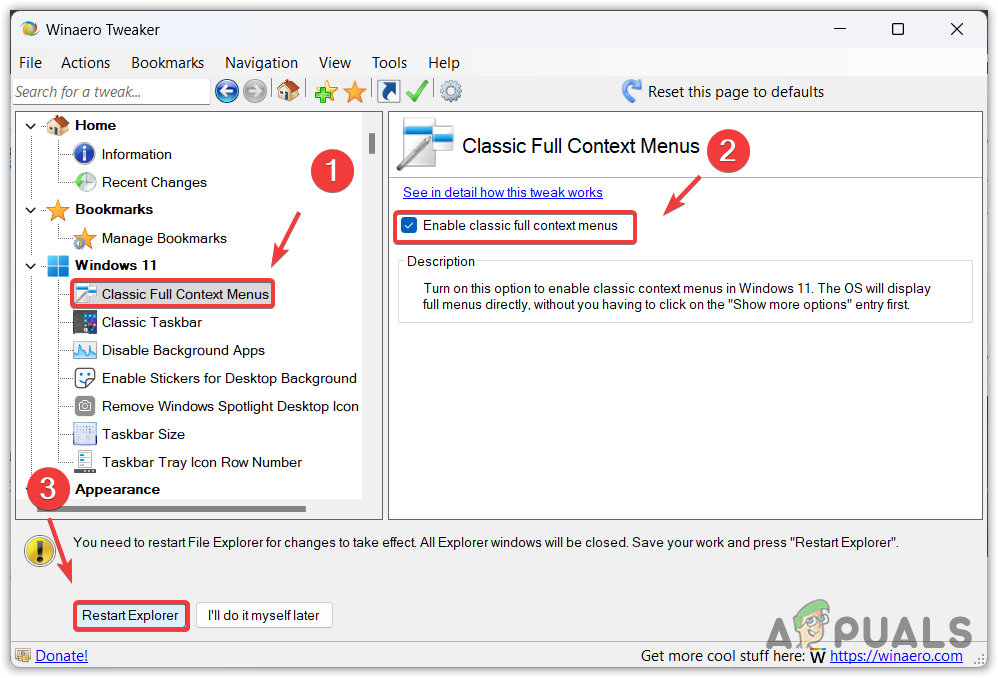
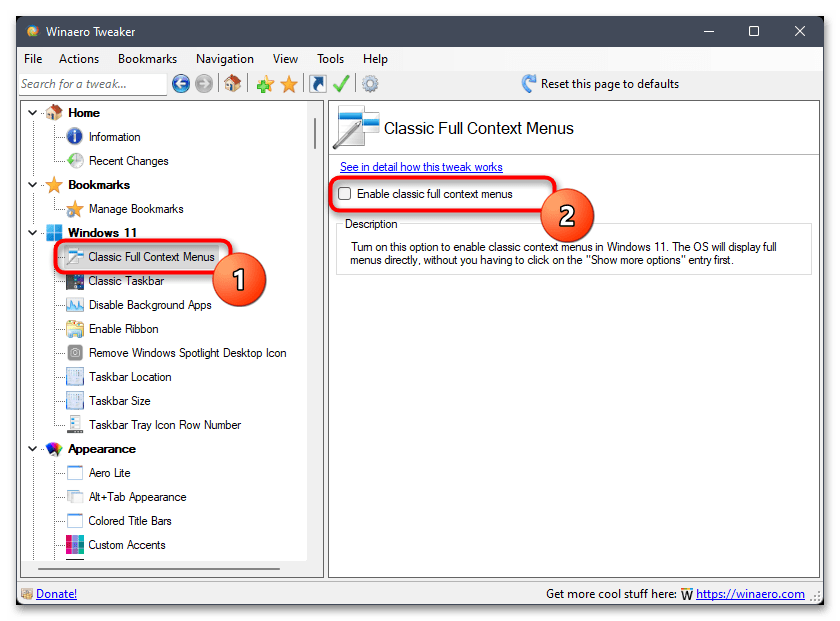
- Once done, launch it. Then click Classic Context Menus from the left pane.
- Check the option Enable classic full context menus.
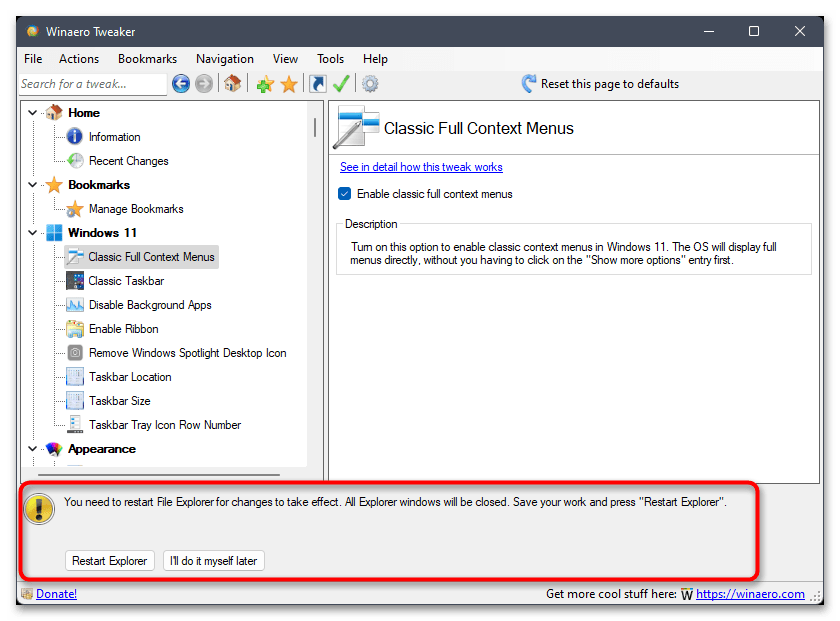
- Then, click Restart Explorer from the bottom and enjoy the old classic context menu.

Enabling the old classic context menu on Windows 11 - If you want the show more options context menu back, uncheck Enable classic full context menus and restart Windows Explorer.


Kamil Anwar
Kamil is a certified MCITP, CCNA (W), CCNA (S) and a former British Computer Society Member with over 9 years of experience Configuring, Deploying and Managing Switches, Firewalls and Domain Controllers also an old-school still active on FreeNode.
Back to top button
Версия за версией ОС Windows совершенствуется, предлагая всё больше функциональных возможностей. Но не все обновления системы, включая модернизированные опции, могут похвастать удобством и радуют пользователей. Одно из таких решений – обновлённое контекстное меню, вызываемое кликом правой кнопки мышки.

В Windows 11 полный список опций перекочевал в пункт «Показать дополнительные параметры», раскрывающий перечень функций и отображающий их в скользящей анимации. Поддерживая стилизацию, разработчики внедрили новое контекстное меню в проводнике, на рабочем столе и в общем в ОС Windows. Решение было неизбежным в рамках обновления и модификации системы, но не все пользователи оценили идею разработчиков и многие предпочли бы вернуть прежний вариант, как в Windows 10.
Почему в «Показать дополнительные параметры» Windows 11 много функций
В новой версии ОС при нажатии по элементу ПКМ открывается новое меню, имеющее первый ряд команд – «Вырезать», «Копировать», «Переименовать», «Поделиться» и «Поместить в корзину». Прочие команды наличествуют в зависимости от выбранного объекта. Чтобы открыть вариант с многочисленными функциями, как в старом меню, нужно нажать пункт «Показать дополнительные параметры».
Многие установленные приложения интегрируются в контекстное меню для удобства работы с ними, например, архиваторы, плееры, облачные сервисы и прочий полезный (и не только) софт. Это облегает взаимодействие с приложениями, поскольку пользователь получает быстрый доступ к необходимым опциям и может выполнять различные задачи всего лишь в пару кликов мыши.
Другое дело, когда функционал программы не используется или используется редко, а таких забытых и невостребованных инструментов может быть установлено на компьютере немало. Тогда наличие лишних строк в меню уже никак не помогает и может раздражать. А в старых версиях ОС многочисленные неактуальные строчки – достаточно распространённая проблема, если для управления контекстным меню не использовать специальный софт, такой как ShellExView. В Windows 11 реализовано принципиально новое меню, позволяющее отделить главные элементы от связанных с определёнными приложениями, что решает вышеописанную проблему.
Как на Windows 11 убрать «Показать дополнительные параметры»
Поскольку многие желают избавиться от нового меню, вернув ему более традиционный вид и прежнюю функциональность, рассмотрим, как это можно реализовать.
Есть несколько действенных методов, как убрать подраздел «Показать дополнительные параметры» в Windows 11, предполагающих применение штатных инструментов системы и стороннего софта.
Посредством командной строки
Для возвращения контекстного меню из «десятки» можно применить системную оснастку Cmd с правами администратора. Выполняем следующие действия:
- открываем PowerShell или Terminal, запустив оснастку от имени администратора;

- в терминале набираем команду
regadd “HKCUSoftwareClassesCLSID{86ca1aa0-34aa-4e8b-a509-50c905bae2a2}InprocServer32” /f /veи жмём клавишу ввода;

- после перезагрузки привычное старое контекстное меню будет возвращено.


Если потребуется отменить внесённые правки, вернув модернизированную версию Windows 11, в терминале всегда можно использовать команду reg delete “HKCUSoftwareClassesCLSID{86ca1aa0-34aa-4e8b-a509-50c905bae2a2}InprocServer32” /f и после перезагрузки девайса вы снова будете наблюдать обновлённый вариант.
Используя файловый менеджер
Проще всего избавиться от нового меню путём применения старого Проводника, где увидеть тот или иной параметр можно не открывая дополнительный раздел с этими опциями.
Восстановить Проводник Windows 10 просто:
С помощью реестра
Выполнение задачи предполагает наличие у пользователя навыков работы с системным реестром, поскольку неправильные действия могут повлечь за собой неприятные последствия, в том числе крах системы. Перед началом работ рекомендуем воспользоваться возможностью резервного копирования.
Способ 1
Чтобы убрать скрывающий опции пункт «Показать дополнительные параметры», вернув прежнюю версию, потребуется сделать следующее:
Способ 2
Для восстановления классического контекстного меню на рабочем столе проделываем следующие шаги:
Использование стороннего софта
Вернуть классическое контекстное меню можно также с помощью специальных утилит, например, Winaero Tweaker:
После этих манипуляций Проводник по нажатию ПКМ по объектам будет отображать полное контекстное меню, как в Windows 10. Аналогичным образом работает и другой софт, восстанавливающий классические элементы системы.
Download PC Repair Tool to quickly find & fix Windows errors automatically
Do you want to get the old classic desktop context menu back in Windows 11? Now when a user right-clicks, he sees an option – Show more options. It expands and displays other options in sliding-down animation. If you don’t like this new change in windows 11, you can disable it. Follow the instructions given in this post to remove the entry from Windows 11 Context menu.

Context menu in Windows gives you added functionality by offering you actions you can take with the item. However, it can get stuffed or overloaded with some unwanted entries. If you have little use for them, you can get rid of them. Here’s how you can disable the Show More Options entry from Windows 11 Context menu.
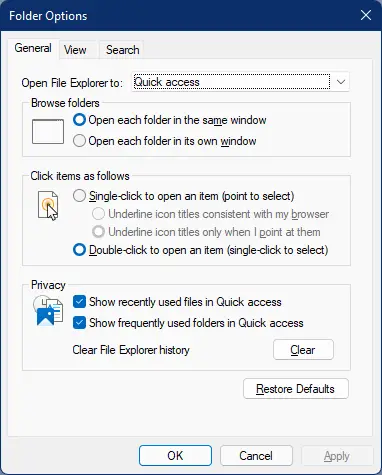
- Launch File Explorer.
- Go to Menu.
- Choose Options from the drop-down list.
- Switch to the View tab.
- Go to Advanced Settings section.
- Scroll down to Launch folder windows in a separate process.
- Check the box next to it.
- Hit OK and restart your computer.
Let’s explore the above steps in a bit more detail!
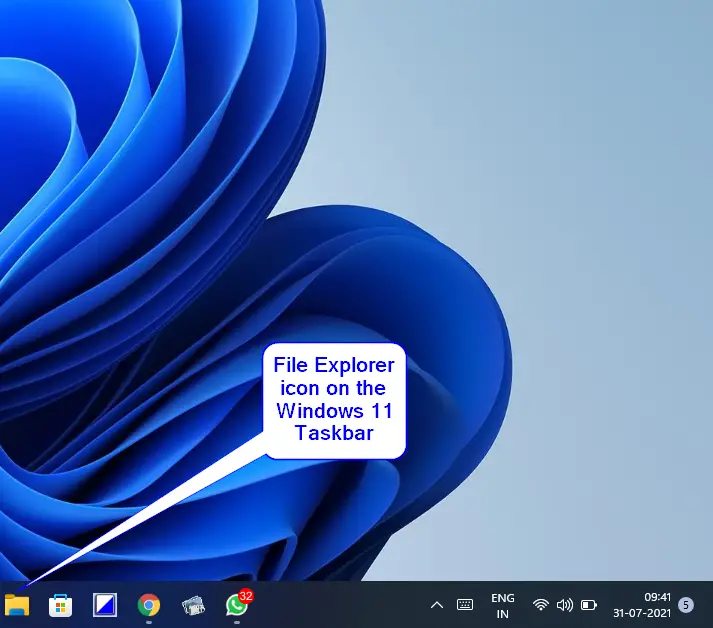
Launch File Explorer by hitting the folder icon on the Taskbar.
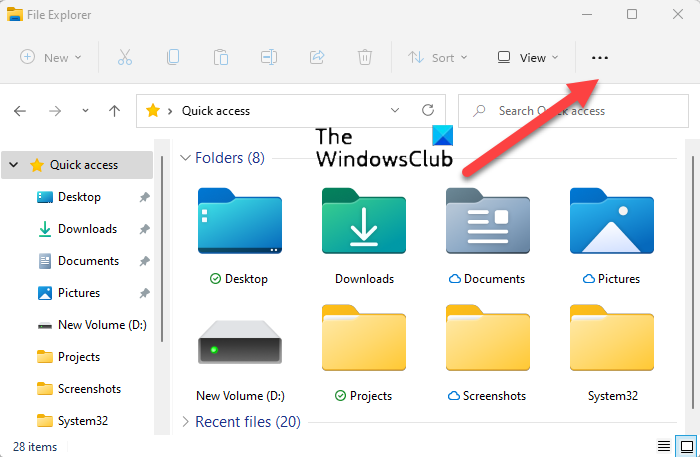
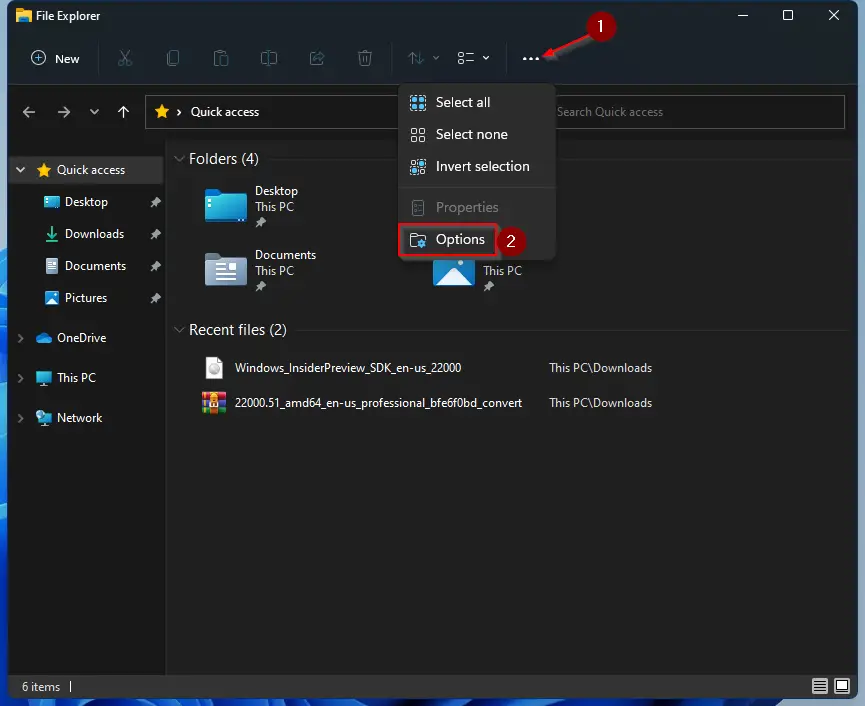
When the Explorer window opens, navigate to the Menu section visible as 3 horizontal dots.
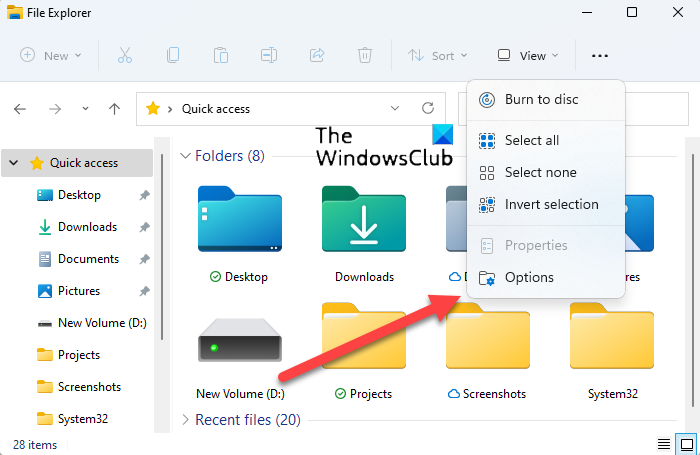
Next, choose Options entry from the drop-down list.
Next, switch to the View tab of the Folder Options window. Move to the Advanced Settings section.

Here, scroll down to Launch folder windows in a separate process entry.
Check the box next to this entry, hit the Ok button and restart your computer to allow the changes to take effect.
Once done, you will experience the older File Explorer with the traditional right-click context menu options.
An alternative way to remove Show More Options entry from Windows 11 Context menu is via Registry Editor.
Read: How to get Old Right-click Context Menu back on Windows 11.
Remove Show More Options entry via Registry Editor
Create a system restore point first and then open the Registry Editor and navigate to the following path address –
HKEY_LOCAL_MACHINESOFTWAREMicrosoftWindowsCurrentVersionShellUpdatePackages
Next right-click on an empty space on the right side and choose New > Dword (32-Bit) Value.
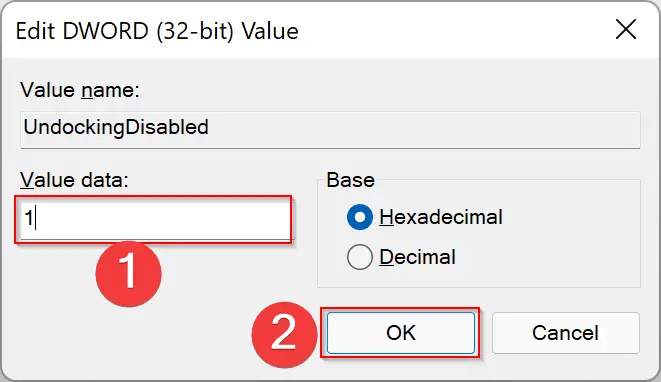
Name the new key as UndockingDisabled and hit Enter key.
Double-click the above reg value to set its Base to Hexadecimal and keep the Value as 1.
Click Ok to save the changes.
Restart your computer.
Related: How to Cut, Copy, Paste, Rename, Delete, Share Files and Folders in Windows 11.
How do I get rid of right-click menu options?
The simplest way to get rid of right-click menu options in Windows 11 is to switch back to the traditional right-click context menu by restoring the older File Explorer back to your computer. You could use a Context Menu Editor as well for more options.
Hope that makes sense!

A post-graduate in Biotechnology, Hemant switched gears to writing about Microsoft technologies and has been a contributor to TheWindowsClub since then. When he is not working, you can usually find him out traveling to different places or indulging himself in binge-watching.
В данной статье рассмотрим несколько способов возвращения классического меню — меню, вызываемое щелчком правой кнопкой мыши в операционной системе Windows 11.
Компания Microsoft изменила дизайн и представила новое контекстное меню в последней версии ОС, теперь дополнительные параметры скрыты, а для того, чтобы отобразить их, приходится нажимать на пункт меню «Показать дополнительные параметры» (или клавиши «Shift+F10»).
Хотя новое контекстное меню кажется проще и понятнее, многих пользователей по прежнему это сбивает с толку. Основные параметры, такие как копирование, вырезание, переименование и удаление, теперь представляют собой только значки, что затрудняет навигацию для новых пользователей ОС.
Итак, как же вернуть классическое (старое) меню? В Windows нет специального параметра, который вернет старое контекстное меню Windows 10 в Windows 11. Вместо этого нам придется внести изменения в редакторе реестра.
Способ 1. Настройка через редактор реестра
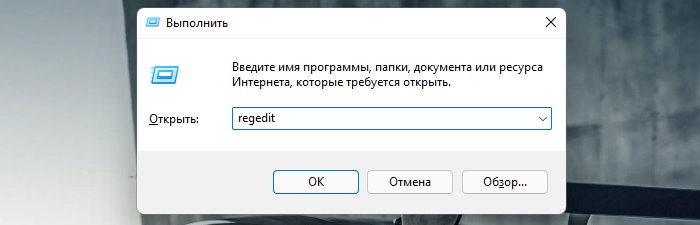
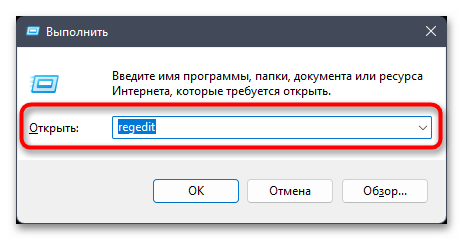
Нажимаем на клавиатуре «Win+R», вводим команду «regedit» и нажимаем «Enter».
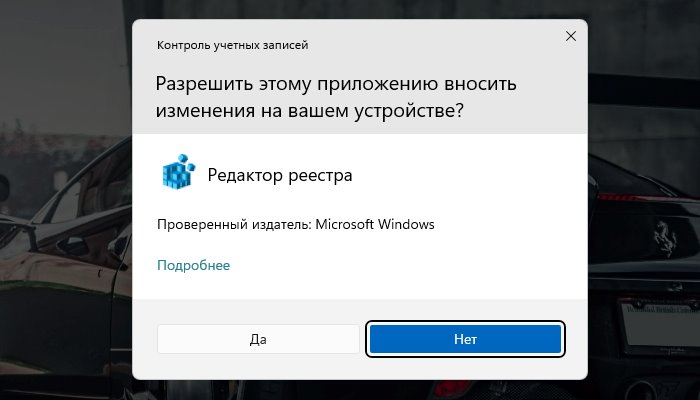
Нажимаем «Да» в окне контроля учетных записей, чтобы разрешить вносить приложению изменения в системе.
Но прежде, чем вносить изменения в реестр Windows 11, в качестве меры предосторожности следует создать резервную копию реестра. Если мы случайно изменим или удалим важные параметры реестра, мы всегда сможем восстановить их с помощью резервной копии.
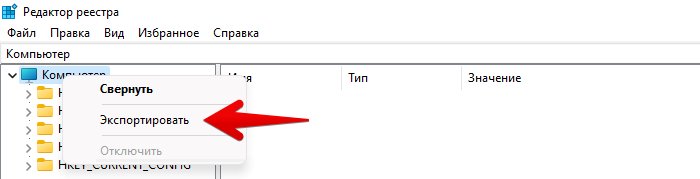
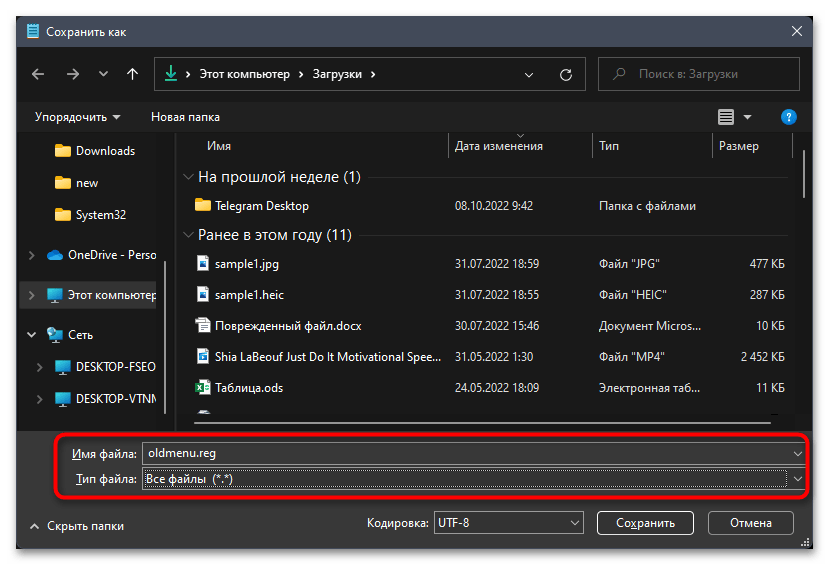
В окне «Редактор реестра» Windows нажимаем в меню «Файл», щелкаем по разделу «Компьютер» правой кнопкой мыши и выбираем в меню пункт «Экспортировать».
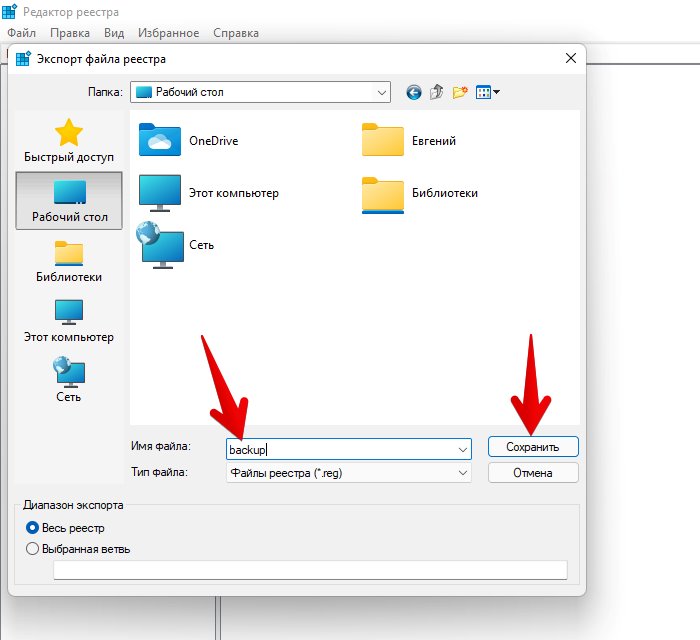
Появится окно «Экспорт файла реестра». Здесь выбираем путь, куда будем сохранять резервную копию (бэкап), указываем имя файла с расширением «.reg» и нажимаем кнопку «Сохранить».
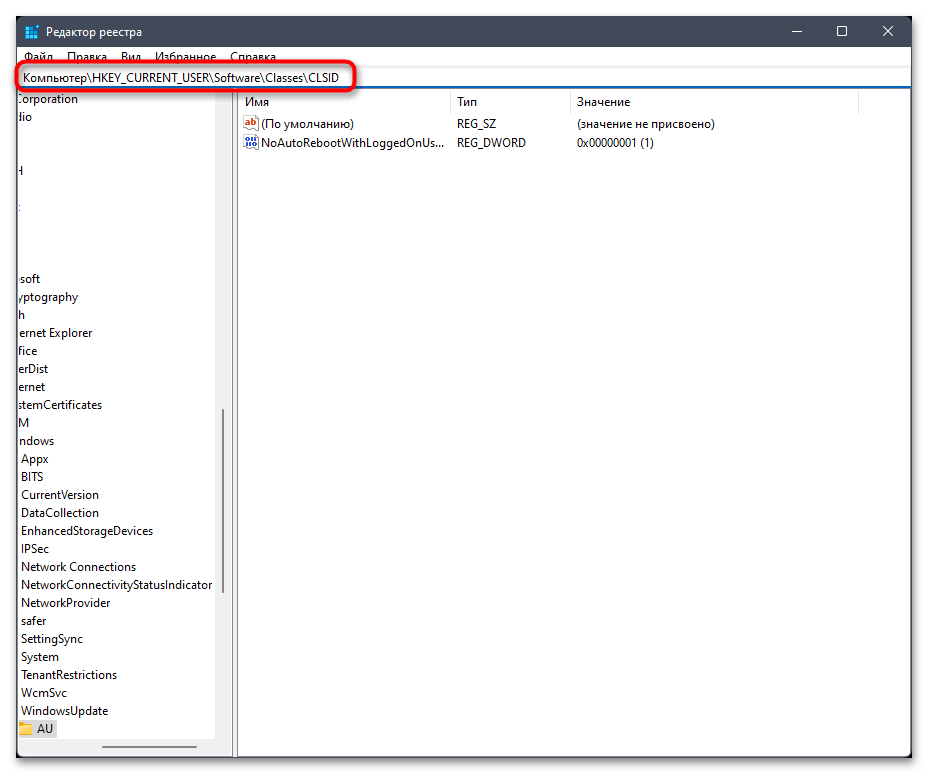
В редакторе реестра перейдем в следующий раздел:
HKEY_CURRENT_USERSOFTWARECLASSESCLSID
Или можно просто скопировать и вставить указанный выше путь в адресной строке редактора реестра. После вставки нажимаем клавишу «Enter», чтобы перейти к разделу «CLSID».
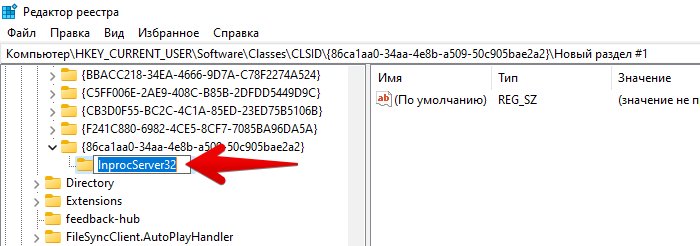
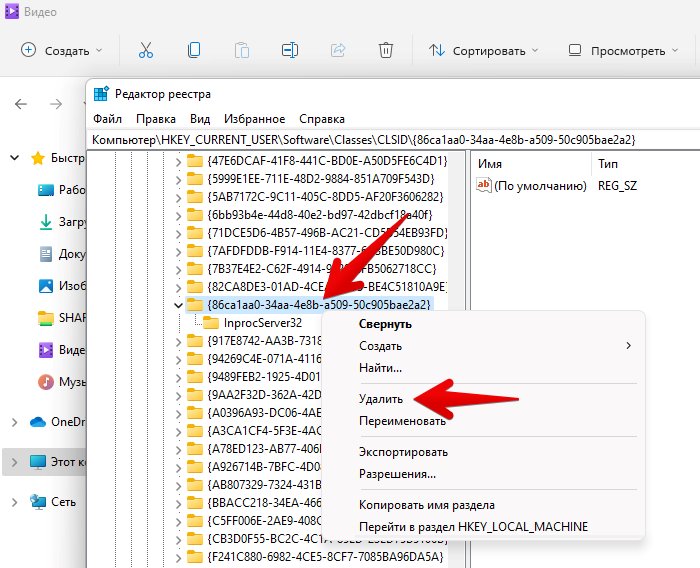
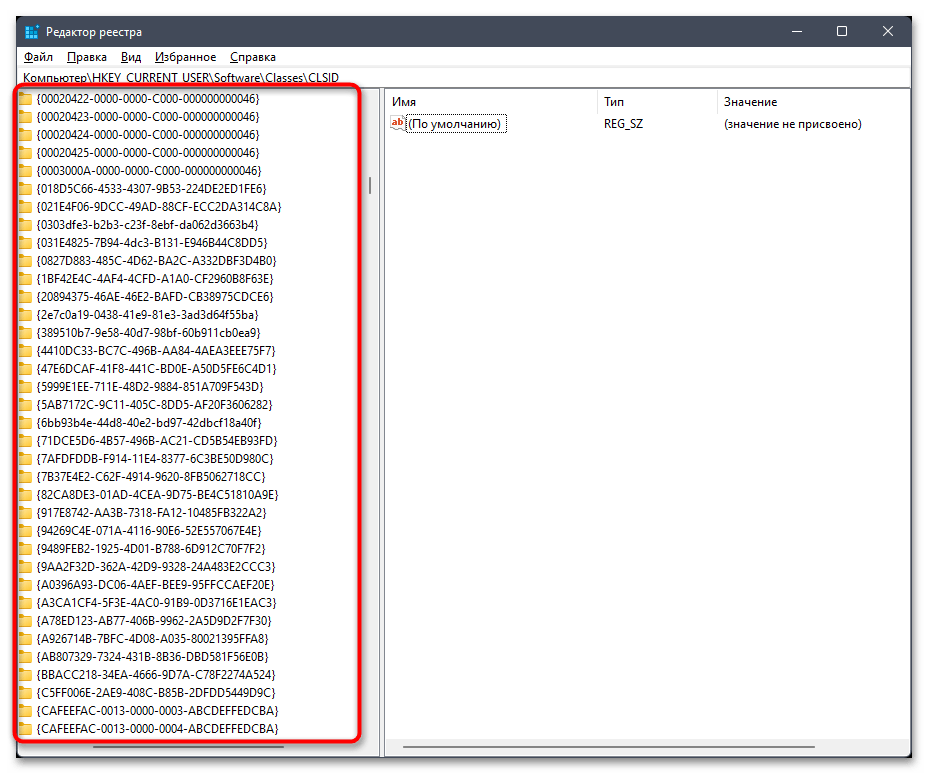
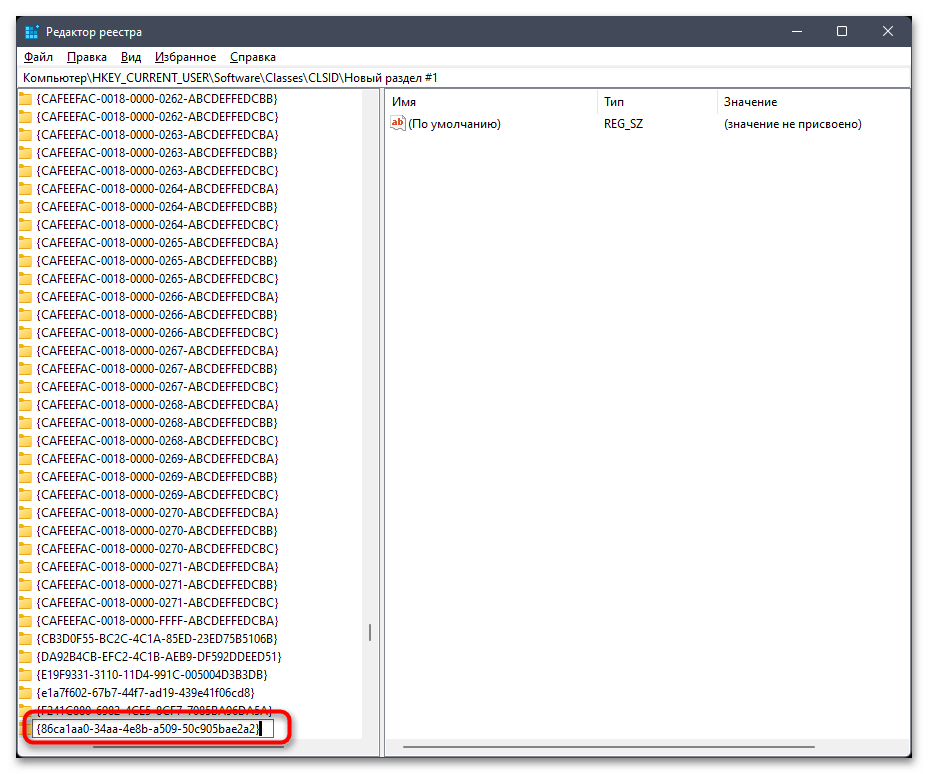
Далее, щелкаем правой кнопкой мыши по разделу «CLSID» и в появившемся контекстном меню выбираем «Создать» — «Раздел», чтобы создать новый вложенный раздел.
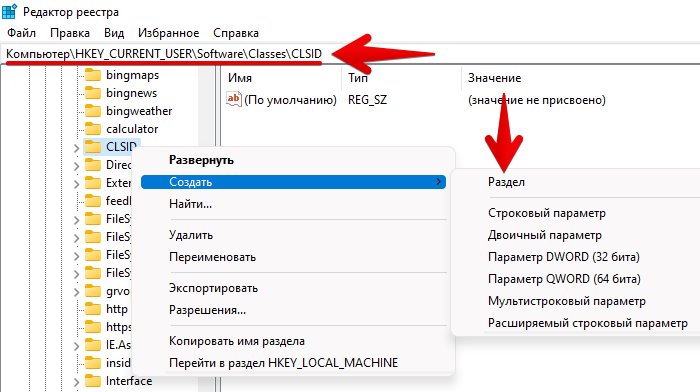
Называем новый раздел следующим именем:
{86ca1aa0-34aa-4e8b-a509-50c905bae2a2}
Готово, новый раздел раздел создан внутри «CLSID».

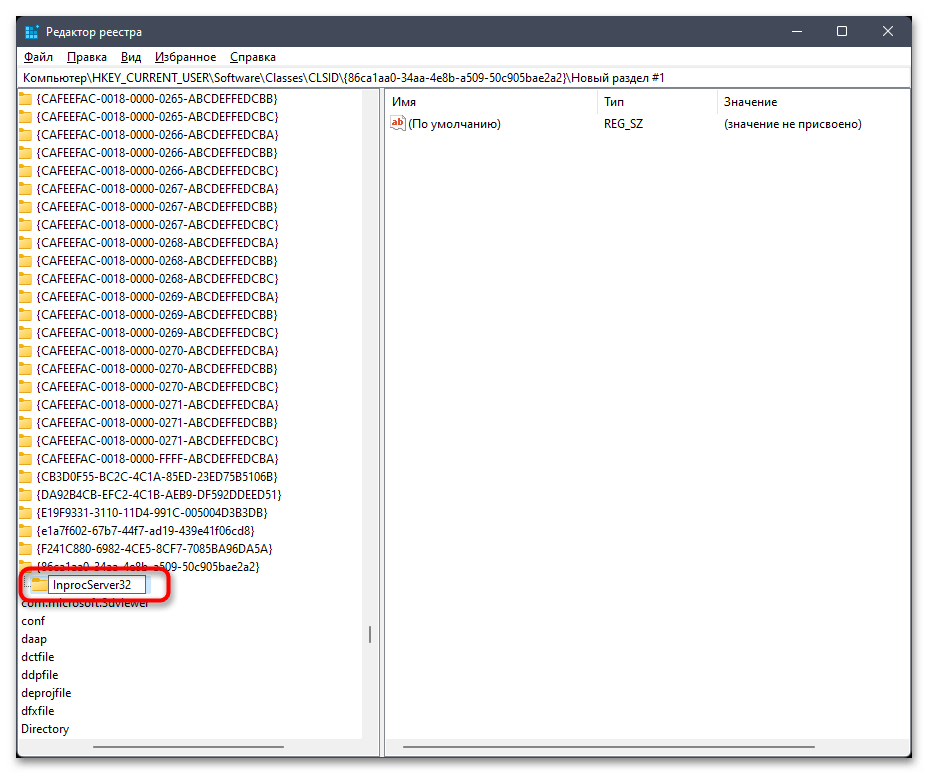
Теперь создаем еще один раздел «InprocServer32» внутри только что созданного раздела. Повторяем предыдущие действия с новым разделом (пункты меню
«Создать» — «Раздел»).
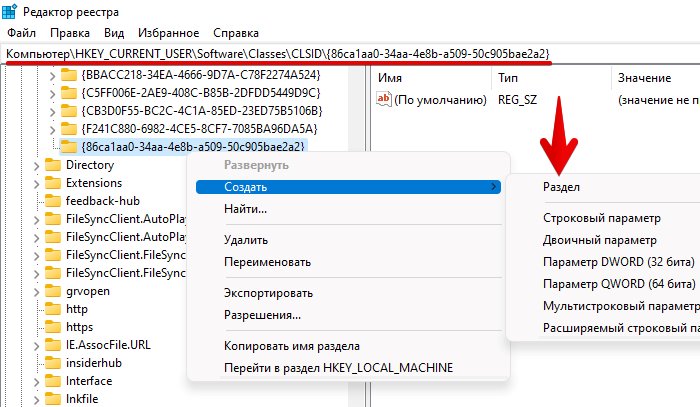
Должно получиться так (см. скриншот):
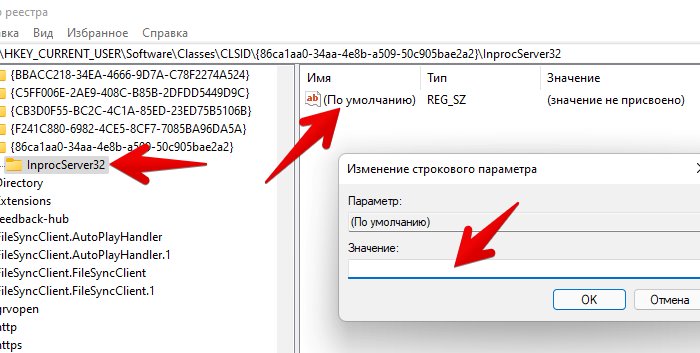
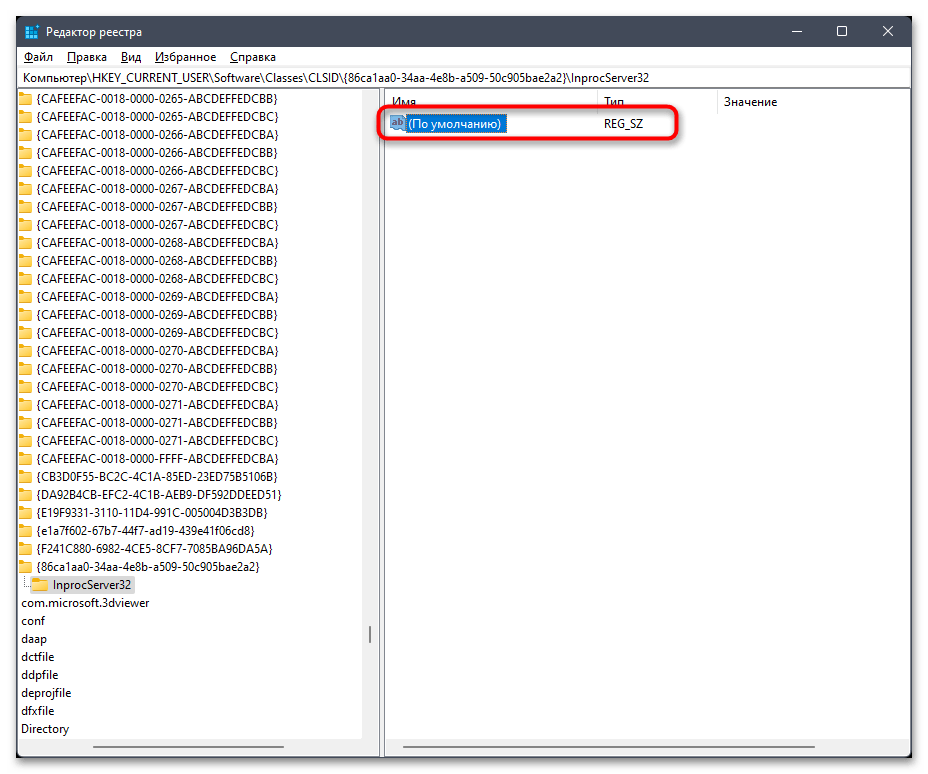
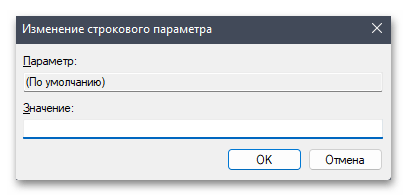
После создания «InprocServer32» мы увидим внутри строковый параметр с именем «По умолчанию». Дважды щелкаем по параметру «По умолчанию», чтобы открыть его. В открывшемся окне «Изменение строкового параметра» убеждаемся, что поле «Значение» пустое и нажимаем кнопку «ОК» или «Enter» на клавиатуре. Важно! Поле значение должно быть пустым, а не 0.
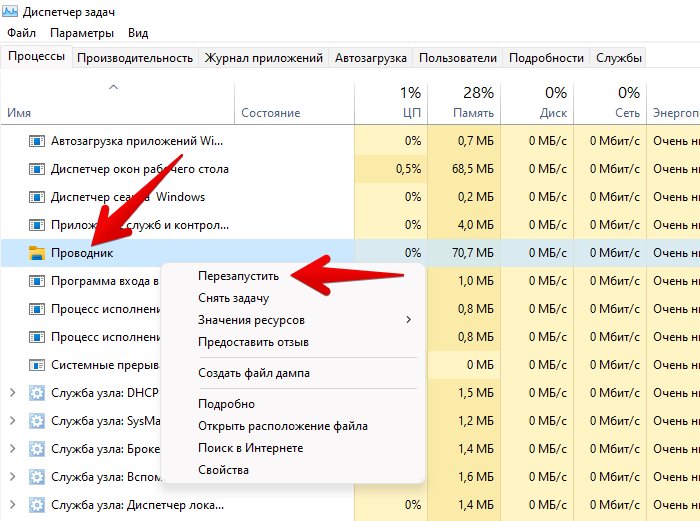
Настройки сделаны, можно закрывать редактор реестра, но это еще не конец. Для того, чтобы изменения вступили в силу, необходимо перезагрузить компьютер. Или вместо этого перезапустить проводник Windows 11 из диспетчера задач — нажимаем клавиши «Ctrl+Shift+Esc», чтобы запустить приложение «Диспетчер задач», находим во вкладке «Процессы» процесс «Проводник» и щелкаем по нему правой кнопкой мыши, затем выбираем в контекстном меню пункт «Перезапустить».
После этого щелкаем правой кнопкой мыши по папке или файлу, чтобы увидеть классическое контекстное меню.
Для того, чтобы вернуть все в исходное значение, переходим в редактор реестра и удаляем созданные разделы. Не забываем после этого перезапустить проводник.
Способ 2. Настройка через командную строку (cmd) или через Терминал Windows 11
Этот способ еще проще и быстрее, в отличие от первого способа, т.к. состоит из пары шагов.
Сначала копируем следующую команду:
reg add HKCUSoftwareClassesCLSID{86ca1aa0-34aa-4e8b-a509-50c905bae2a2}InprocServer32 /ve /d "" /f
Затем открываем командную строку или терминал Windows и вставляем скопированную команду, далее нажимаем клавишу «Enter», чтобы ее применить.
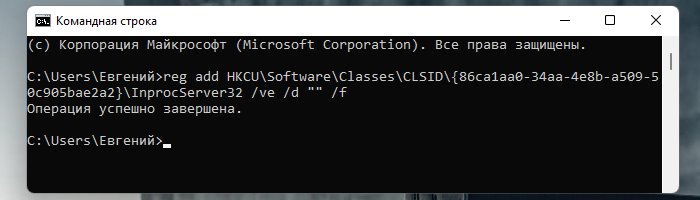
В окне «Командная строка» мы увидим фразу в новой строке «Операция успешно завершена», это означает, что настройки выполнены, т.е. все необходимы разделы в редакторе реестра созданы. Перезапускаем проводник и проверяем контекстное меню Windows 11.
Для отката изменений используем следующую команду:
reg.exe delete "HKCUSoftwareClassesCLSID{86ca1aa0-34aa-4e8b-a509-50c905bae2a2}" /f
Способ 3. Настройка через файл реестра
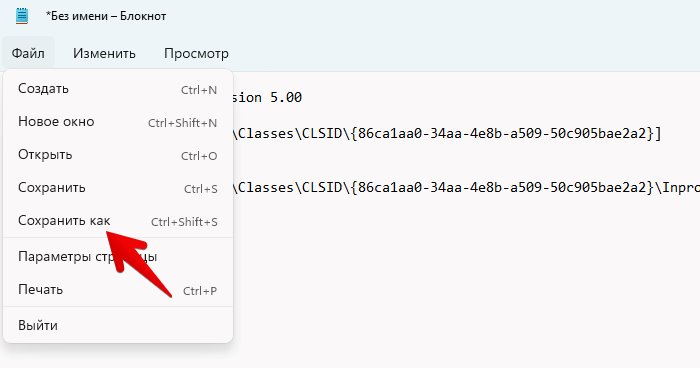
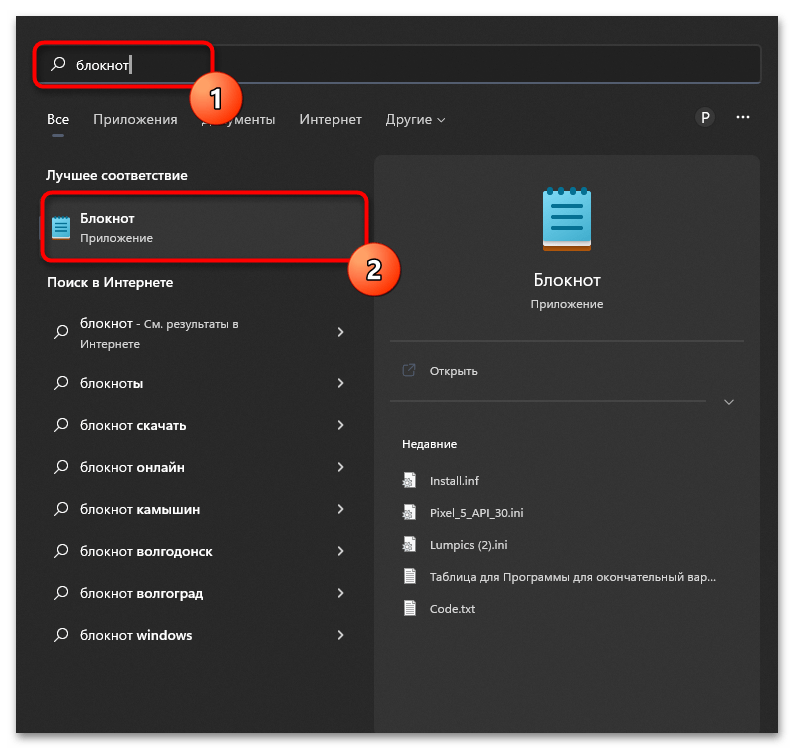
Этот способ подразумевает создание файла реестра, который можно сохранить для использования в новой ОС или передачи на другой ПК. Для начала нам нужно открыть новый текстовый документ в любом редакторе, например в блокноте.
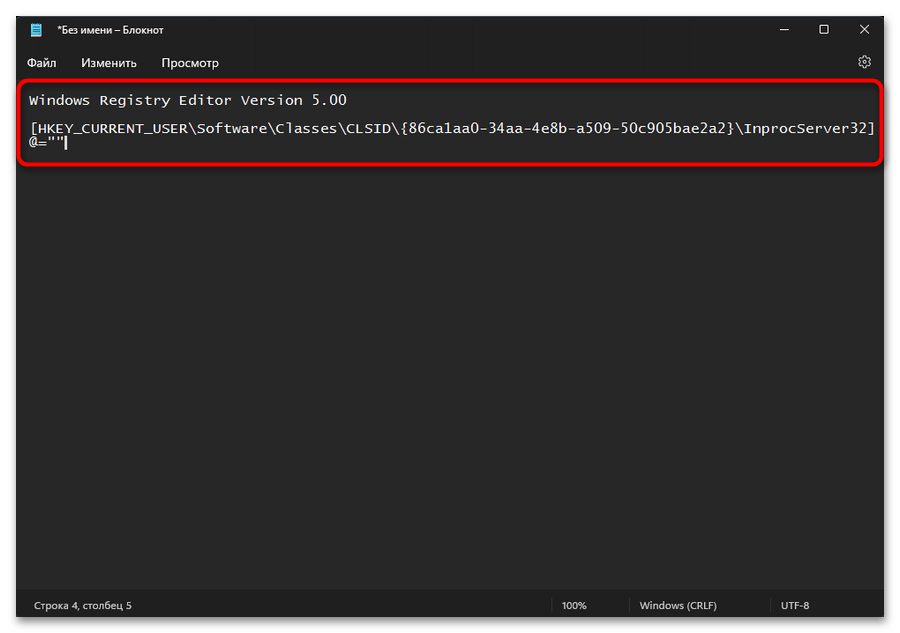
Вставляем в блокнот следующее содержимое:
Windows Registry Editor Version 5.00
[HKEY_CURRENT_USERSoftwareClassesCLSID{86ca1aa0-34aa-4e8b-a509-50c905bae2a2}]
@=""
[HKEY_CURRENT_USERSoftwareClassesCLSID{86ca1aa0-34aa-4e8b-a509-50c905bae2a2}InprocServer32]
@=""
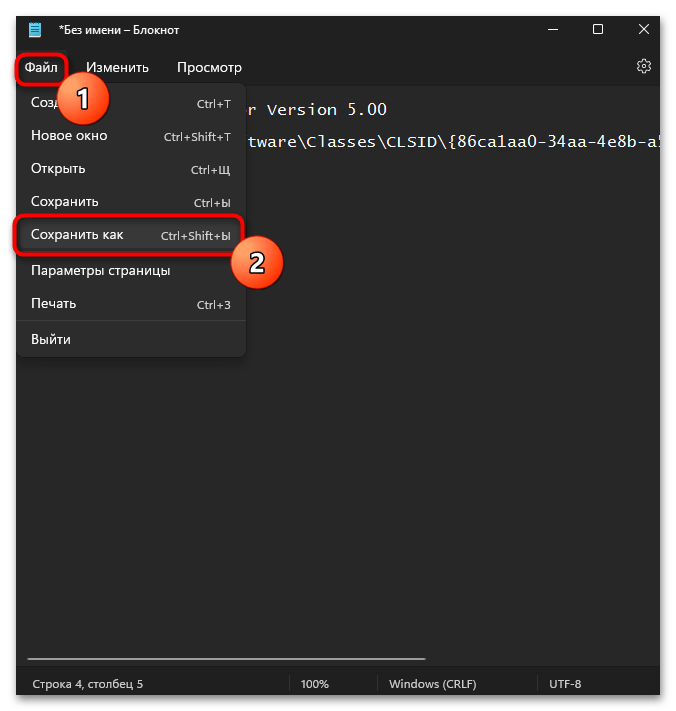
Затем нажимаем в меню «Файл» — «Сохранить как».
В появившемся окне «Сохранить как» выбираем путь для сохранения файла, указываем имя файла с расширением «.reg» и нажимаем кнопку «Сохранить».
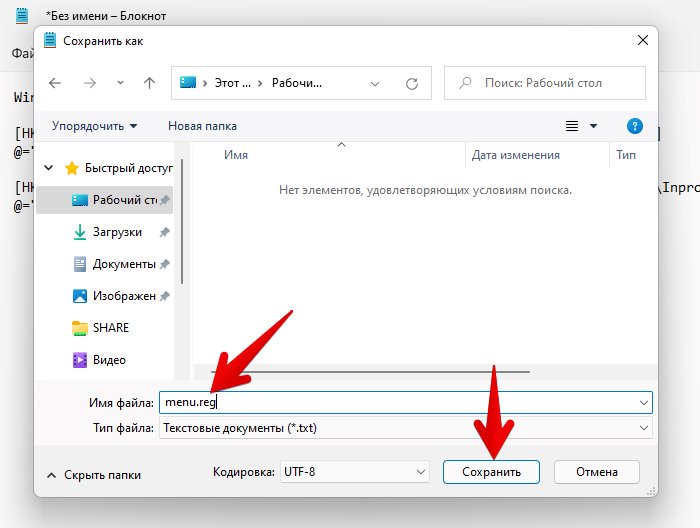
Файл создан. Теперь, запускаем его двойным кликом, появится окно «Вы действительно хотите продолжить?», нажимаем «Да».
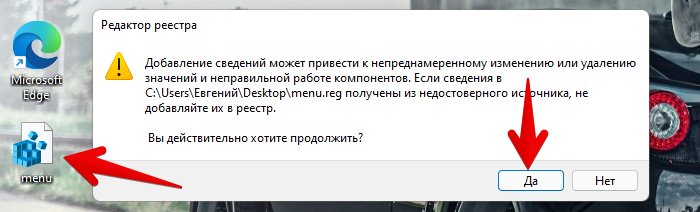
Остается перезапустить проводник.
When Windows 11 was first launched in October 2021, many people loved shifting from the old Windows 7, 8, and 10 to the new operating system with many interesting features and design enhancements. But some would rather switch back to their old operating systems due to one reason or the other.
One of the distinguished new elements in Windows 11 is the new right-click (contextual) menu.

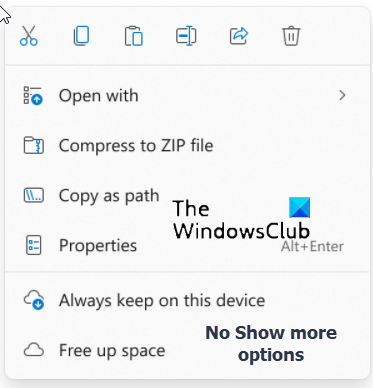
As you can observe from the image above, some options that were previously available in the older operating systems, such as “Give access to” and “Send to,” are missing from the menu. Moreover, the Copy, Paste, and Cut options have been shifted from the list view to tiny buttons at the top of the menu.
In Windows 11, if you want to view the complete options as you did in the older operating systems, you must either click on “Show more options” in the context menu or select an item and then use the Shift + F10 shortcut keys to open the complete menu.
That said, not everyone likes this additional step. You can now remove the “Show more options” button and access the old context menu (as in Windows 10) directly using the right-click button on your mouse.
In this article, we are going to show you multiple ways to restore the old content menu and set the “Show more options” menu as the default menu.
Table of contents
- Disable «Show More Options» using Windows Registry
- Disable «Show More Options» using Command Prompt
- Disable «Show More Options» using .REG File
- Final Thoughts
Disable “Show More Options” using Windows Registry
Previously, you could eliminate the Show more options button using a third-party tool. Now, you can also achieve the same without having to download any external tools or utilities.
Perform the following steps to disable the “Show more options” option in the context menu and open the expanded menu by default using Windows Registry:
Note: This process involves manual manipulation of the Windows Registry. Misconfiguration of critical values in the system’s registry could be fatal for your operating system. Therefore, we insist that you create a system restore point before proceeding forward with the process.
You can also use our top selection of disk imaging and backup software so you never lose your data or operating system again.
-
Open the Registry Editor by typing in “regedit” in the Run Command box.

Open the Registry Editor -
Paste the following in the navigation bar for quick navigation:
ComputerHKEY_CURRENT_USERSoftwareClassesCLSID

Quick navigation to CLSID -
Right-click CLSID, expand New, and then click Key. Name this key “{86ca1aa0-34aa-4e8b-a509-50c905bae2a2}”.
Create new key -
Right-click the “{86ca1aa0-34aa-4e8b-a509-50c905bae2a2}”, and create a sub-key named “InprocServer32”.
Create new key -
Ensure that the “Default” value inside the “InprocServer32” key has no value.
Confirm no value has been set for Default -
Restart the computer for the changes to take effect.


When the computer restarts, you can now right-click on any item or the desktop to see that you have restored the old contextual menu.

If you ever feel like bringing back the default Windows 11 menu again, all you need to do is delete the “InprocServer32” key from the Windows Registry.

Disable “Show More Options” using Command Prompt
If you are not a fan of creating keys or playing inside the Windows Registry, you can also achieve the same task using the Command Prompt.
Perform the following steps to configure the “Show more options” menu as the default context menu using the command line:
-
Launch an elevated Command Prompt.
-
Paste the following cmdlet to add a Windows Registry and hit Enter.
reg add HKCUSoftwareClassesCLSID{86ca1aa0-34aa-4e8b-a509-50c905bae2a2}InprocServer32 /ve /d "" /fDisable “Show more options” in Windows 11 context menu -
Restart the computer for the changes to take effect.

As the computer reboots, you can now right-click on any item or the desktop to see that you have restored the old contextual menu.
You now no longer need to click multiple buttons to reach the full-length context menu.
If you want to bring back the default Windows 11 context menu, all you need to do is run the following command in an elevated Command Prompt, which will delete the registry added, and then reboot the computer.
reg add HKCUSoftwareClassesCLSID{86ca1aa0-34aa-4e8b-a509-50c905bae2a2}InprocServer32When asked for a confirmation, enter Y for Yes.

Disable “Show More Options” using .REG File
If you are not a fan of the command line either, then all you need to do is download and run the Registry file from below and it will automatically create the necessary Registry keys and values to disable the “Show more option” in the Windows 11 context menu.
-
Download the .REG file by clicking on the link below:
Disable Show More Options In Windows11 Context Menu.zip (unknown, 2 hits)
-
Extract and run the downloaded Registry file.
-
On the confirmation dialog box, click Yes.
Confirm action -
When the task is executed successfully, click Ok.
Acknowledge -
Now restart the computer for the changes to take effect.


When the computer restarts, you will notice that the “Show more option” option has disappeared from the context menu, and the complete menu is now the default context menu.
If you wish to re-enable the “Show more option” option and bring back the Windows 11 default context menu, then you can choose either of the aforementioned methods to restore it (either from the Windows Registry or by running the cmdlet in the Command Prompt).
Final Thoughts
The older contextual menu, such as the one in Windows 10, was easier to use. Even if not, we had gotten used to it, and upgrading to Windows 11 had not made it easier. The design isn’t only different, but to access several options, an additional Show more options button needs to be clicked.
Therefore, we at Itechtics are sticking with the older ways for our Windows 11 PC.
That said, we came across another method to restore the old context menu in Windows 11. This involves selecting the “Launch folder windows in a separate process” in the Folder Options menu. However, after testing it out, we found that it does not work.
Therefore, the method discussed above, as well as the third-party tool are the only methods currently effective in restoring the old context menu.
Also see:
Subhan Zafar is an established IT professional with interests in Windows and Server infrastructure testing and research, and is currently working with Itechtics as a research consultant. He has studied Electrical Engineering and is also certified by Huawei (HCNA & HCNP Routing and Switching).
Содержание
- Способ 1: Ручное редактирование реестра
- Способ 2: Создание и запуск REG-файла
- Способ 3: Winaero Tweaker
- Вопросы и ответы

Способ 1: Ручное редактирование реестра
Постоянно нажимать кнопку «Показать дополнительные параметры» в Windows 11 для возвращения старого контекстного меню удобно далеко не всем пользователям. Специально для таких ситуаций, когда нужно отображать старую версию постоянно, мы и подготовили данную статью, и рассмотрим в ней все доступные методы изменения настроек. Начнем с ручного редактирования реестра, что не займет у вас много времени.
- Откройте утилиту «Выполнить», используя стандартное сочетание клавиш Win + R. В поле ввода укажите
regeditи нажмите Enter для перехода к «Редактору реестра». - В новом окне перейдите по пути
КомпьютерHKEY_CURRENT_USERSoftwareClassesCLSID, скопировав и вставив данный адрес в строку сверху. - Теперь вы увидите множество каталогов с разными идентификаторами. Среди них понадобится отыскать «{86ca1aa0-34aa-4e8b-a509-50c905bae2a2}».
- Если такая папка отсутствует, щелкните правой кнопкой мыши по последнему каталогу в данном пути, который называется «CLSID», в появившемся контекстном меню наведите курсор на «Создать» и выберите пункт «Раздел».
- Задайте для раздела то же самое название идентификатора, которое мы искали выше, а именно «{86ca1aa0-34aa-4e8b-a509-50c905bae2a2}».
- Перейдите в данный раздел и создайте в нем новую папку с названием «InprocServer32», затем выберите ее для редактирования.
- По умолчанию в ней создается один параметр со значением «Не задано», но такой вариант нас не устраивает, поскольку значение должно быть пустым. Для этого дважды нажмите левой кнопкой мыши по параметру.
- В окне «Изменение строкового параметра» просто оставьте поле «Значение» пустым и примените изменения.
- Обязательно перезагрузите компьютер или перезапустите «Проводник», завершив и создав его процесс заново через «Диспетчер задач». Теперь, когда вы будете вызвать контекстное меню, оно сразу отобразится в своем старом виде.

Способ 2: Создание и запуск REG-файла
Все описанные выше действия можно автоматизировать, но для этого понадобится создать REG-файл. В него будет записан скрипт с необходимыми изменениями, которые вносятся в реестр при запуске этого самого файла. Мы предоставим код скрипта, поэтому вам понадобится только создать файл и запустить его, что осуществляется следующим образом:
- Откройте «Пуск» и через поиск отыщите «Блокнот», после чего запустите данное приложение.
- Вставьте в него код:
Windows Registry Editor Version 5.00
[HKEY_CURRENT_USERSoftwareClassesCLSID{86ca1aa0-34aa-4e8b-a509-50c905bae2a2}InprocServer32] - Это весь скрипт, поэтому можно переходить к сохранению, для чего разверните меню «Файл» и выберите пункт «Сохранить как».
- В новом окне выберите место для сохранения скрипта, задайте для него любое название, но разрешение обязательно укажите как «.reg», а «Тип файла» выставьте как «Все файлы (*.*)».
- После сохранения остается только запустить данный файл, подтвердить внесение изменений и дождаться завершения. Обязательно перезагрузите «Проводник» или всю операционную систему, поскольку старое контекстное меню будет возвращено только после выполнения одного из этих действий.

Способ 3: Winaero Tweaker
Существует много сторонних программ, которые позволяют упростить внесение изменений в систему до нажатия по одной кнопке. Winaero Tweaker является одним из таких решений. В функциональность софта включено много разных параметров, однако в рамках этой статьи остановимся только на одном, который и позволяет показывать дополнительные параметры в контекстном меню всегда.
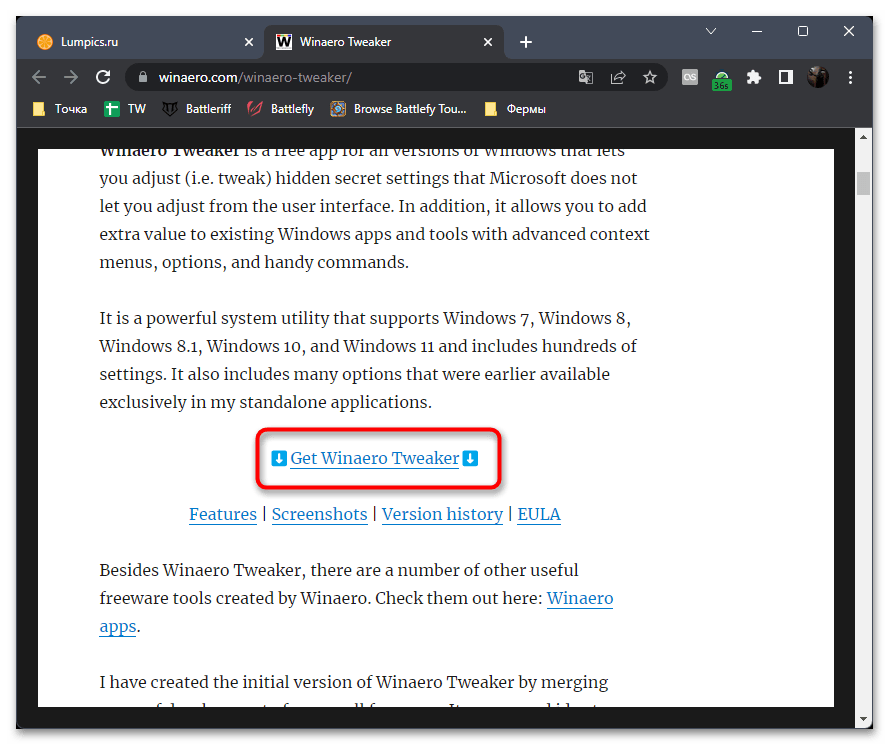
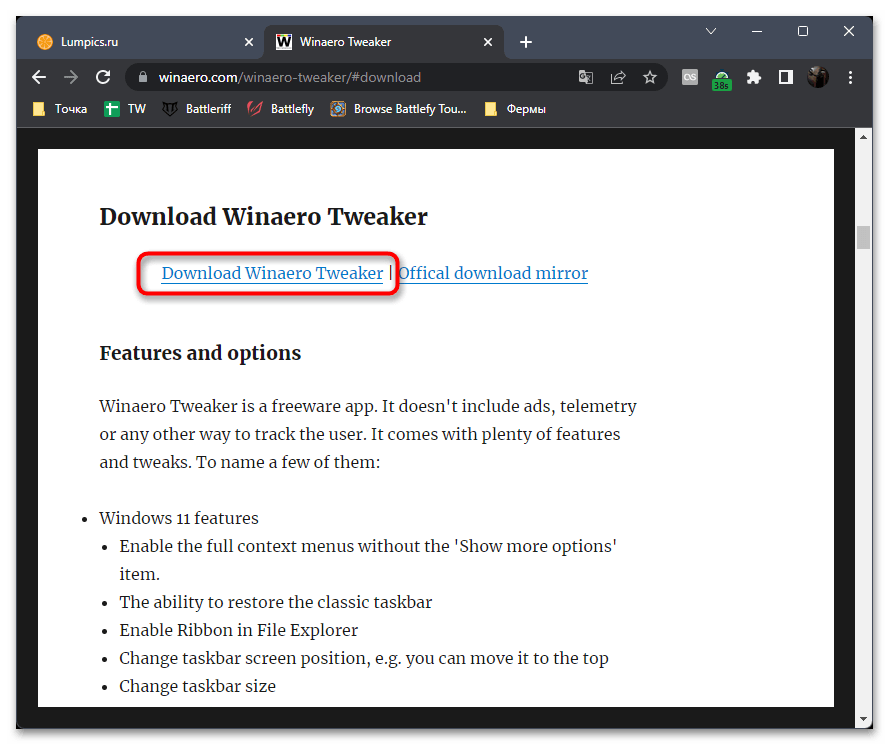
Скачать Winaero Tweaker с официального сайта
- Winaero Tweaker распространяется бесплатно, поэтому на официальном сайте понадобится только нажать кнопку «Get Winaero Tweaker».
- Скачивайте программу с официального сервера, а если он по каким-то причинам будет недоступен, используйте предложенные зеркала.
- Софт будет скачан в виде архива, где вы найдете исполняемый файл для запуска. Распакуйте его или запускайте прямо из архива.
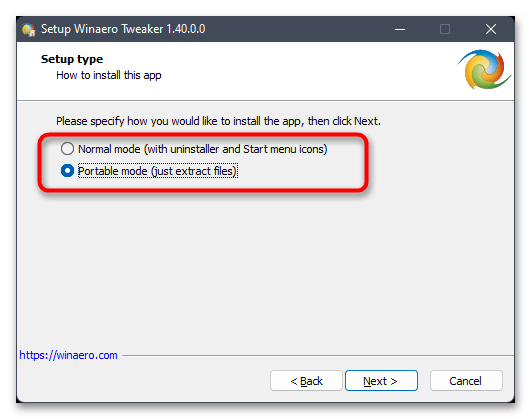
- В установщике вы можете выбрать, распаковать файлы для запуска Winaero Tweaker в портативном режиме, или установить полную версию со всеми необходимыми исполняемыми объектами и значками.
- По завершении инсталляции запустите программу и в разделе «Windows 11» выберите параметр «Classic Full Context Menu».
- Еще этот параметр можно выбрать в древовидном списке при развертывании категории. На панели справа появится строка для активации настройки, в которой нужно поставить галочку.
- Вы будете уведомлены, что изменения внесены, но вступят в силу только после перезапуска «Проводника». Сделать это можно прямо через Winaero Tweaker, щелкнув по «Restart Explorer».

Еще статьи по данной теме:
Помогла ли Вам статья?
By Timothy Tibbetts |
When you right-click in Windows 11, you will see a modern Context Menu. At the bottom, one of the options is Show more options, which is almost useless as it repeats the same options. If you prefer a condensed, organized Context Menu, you can easily remove Show more options.
-=- Advertisement -=-
You can remove ‘Show more options’ using our registry files or with the Command Prompt.
 Video tutorial:
How to Remove ‘Show More Options’ From the Windows 11 Context Menu — Registry Files
Download Remove or Restore ‘Show More Options’ From the Windows 11 Context Menu and extract the two files.
Double-click on Show More Options Context Menu — Disable.reg or Show More Options Context Menu — Enable.reg (Default).
Click Yes when prompted by User Account Control.
Click Yes when prompted by Registry Editor.
Click OK when prompted by the Registry Editor. Reboot.
This tweak is included as part of MajorGeeks Windows Tweaks, and donations to the project and MajorGeeks are accepted here.
How to Remove ‘Show More Options’ From the Windows 11 Context Menu — Command Prompt
Open Windows Terminal, Command Prompt, or PowerShell.
Disable:
reg add «HKCUSoftwareClassesCLSID{86ca1aa0-34aa-4e8b-a509-50c905bae2a2}InprocServer32» /f /ve
Enable:
reg delete «HKEY_CURRENT_USERSoftwareClassesCLSID{86ca1aa0-34aa-4e8b-a509-50c905bae2a2}» /f
Restart Explorer or reboot.
Similar:
comments powered by Disqus
Disable “Show More Options” Context Menu In Windows 11.
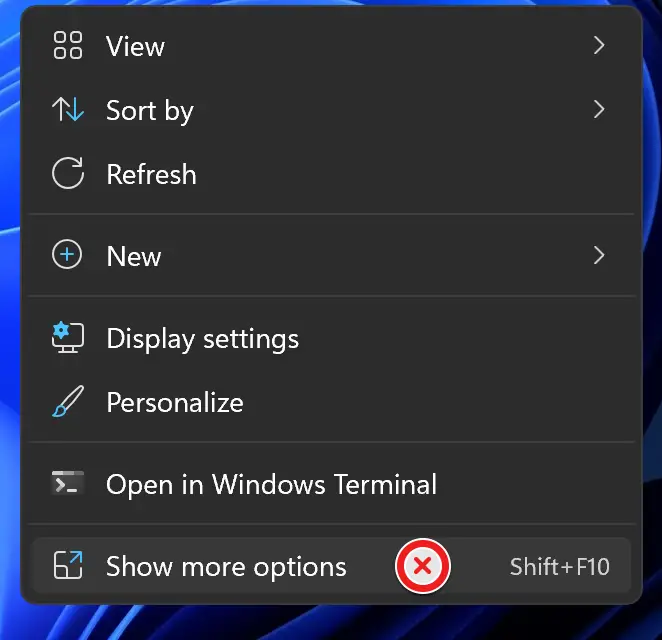
As more people get their hands on Windows 11, a few are nostalgic, while others are openly outraged with Microsoft’s actions. The fact that the former right-click menu is now buried under Show more Options appears to be a UI decision that annoys a lot of users.
One may say that the new context menu contributes to Windows 11’s uniformity. The fact that each program had its own context menu items in Windows 10 produced a jumble, resulting in screen-long context menus.
While the new Windows 11 context menu has a cleaner appearance, it’s clear why many people find it perplexing. When you right-click on the desktop, for example, common choices like Refresh and New (new folders) are completely absent in Windows 11 desktop.
To see them, first, click Show More Options, and then select the standard context menu that we’re all accustomed to.
Also Read: How To Remove Fingerprint Recognition Sign-in In Windows 11
How to Turn Off Windows 11’s ‘Show More Options’ Menu
If you’re among those who are perplexed by Microsoft’s decision and wish to return to Windows 10’s previous behavior, the great news is that it is possible.
You can take one of two techniques to replace the original context menu and reject the current version:
- Folder Explorer Options allows you to revert to the classic appearance of File Explorer. –This action will restore File Explorer to its previous appearance and feel. While this will damage the context menu and remove the Show more choices option, it will also restore the Windows 10 appearance to everything else.
- To get the full context menu, disable the ‘Show More Options’ context. – The most efficient option right now is to make a series of changes to the Overrides registry cluster if you’re not frightened of doing some registry alterations. This ensures that the standard right-click context menu is always shown, irrespective of the action you’re performing.
Revert File Explorer to its previous appearance.

- By hitting the Windows key + E, you may access File Explorer.
- Once within File Explorer, click the action button in the upper-right corner of the screen using the ribbon menu at the top.
- Select Options from the context menu that has just been shown.
- Click the View tab from the ribbon menu that appears once you’re finally within the Folder Options menu.
- Then, in a separate procedure, scroll down through the Advanced settings choices and click the box linked with Launch folder options.
- To make the changes take effect, click Apply, then restart your computer.
Note: When you restart your Windows 11 machine, you’ll see that File Explorer has returned to the previous UI. When you right-click, the classic context menu design appears. If you wish to go back to the previous ‘Show More Options’ context menu, reverse-engineer the procedures above and disable the Launch folder windows tick in a different process.
Also Read: How To Add Finger To Fingerprint Recognition In Windows 11
Using Command Prompt, disable the ‘Show More Options’ context menu.
By altering the registry, you can quickly restore the entire context menu on Windows 11 and eliminate the “Show More” option. However, because the procedure is a little convoluted, we’ve prepared a command line that you can use to quickly disable the Display More option on Windows 11.
Take the following steps:
Note – Open Command Prompt alone; this command will not function in PowerShell or Windows Terminal.

- Open the Start Menu and type “Command Prompt” into the search box.
- Under Command Line, select “Run as Administrator.”
- When the Command Prompt window opens, type the following command and hit Enter:-
reg add HKCUSoftwareClassesCLSID{86ca1aa0-34aa-4e8b-a509-50c905bae2a2}InprocServer32 /ve /d “” /f
4. Restart PC.
Also Read: Set Up Facial Recognition Sign-in For Account In Windows 11
Using a third-party programme, disable the ‘Show More Options’ option.
You may also use third-party software to activate the complete context menu. It will make adjustments to your PC with ease. That way, you won’t have to worry about any registry keys becoming corrupted, and you’ll save time. We’ll use WinAero Tweaker for this, so follow these steps:-
To begin, go to the official site and download the WinAero Tweaker for Windows 11 from there.
2. After you’ve downloaded the software. It should compress into a “.zip” file. To unzip these files, follow this procedure.
3. Once the application has been extracted from the zip file. You may install WinAero Tweaker by simply running the setup file.
4. After the software has been installed, open it using the shortcut file that was generated on your desktop.
5. Now, go to the “Windows 11” section of the WinAero Tweaker when it has been opened.
6. Select “Classic Full Context Menus”.

7. You should now see the option “Enable traditional full context menus” in the right pane.

8. After you’ve checked that option, click the “Restart Explorer” option that displays after you’ve done so.
That’s all, your Windows 11 should now have old complete context menus.
Closing Comments
This concludes our look at how to remove ‘Show additional choices’ from the right-click menu in Windows 11. We attempted to guide you through each step in detail, and we believe that one of the ways suggested in this post worked for you.
Also Read: How To Show Clock on Taskbars on All Displays in Windows 11

Harshaurya Kaur
Tech enthusiast, content writer but a wanderlust sufferer at heart. A good book along with a cup of coffee is her ideal happy place.
We all are familiar with the “Show more options” context menu item on Windows 11. When you click the “Show more options,” it expands and displays other options in sliding down animation. Every time we need to press an extra option to see all the context menu options. Most Windows 11 users may be happy with this feature, but a few don’t like it and want to disable it. If you are one of those Windows users, they want to remove the “Show More Options” entry from Windows 11 Context Menu, refer to this post.
To remove the “Show More Options” entry from Windows 11 Context menu and get an old context menu like Windows 10, you need to perform the following options:-
Step 1. Launch File Explorer by clicking on the folder icon on the Taskbar or by pressing Windows + E keys from the keyboard.
Step 2. When the File Explorer window opens, click on the 3-horizontal dots, and from the drop-down menu, select Options.
Step 3. Now, Folder Options opens.
Step 4. Navigate to the View tab in Folder Explorer.
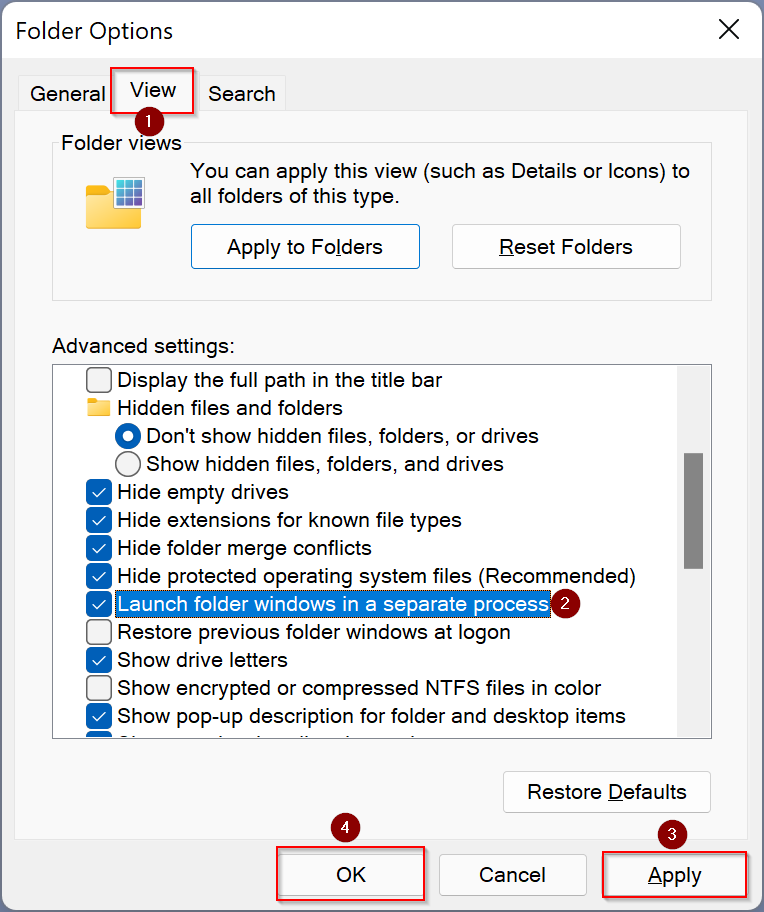
Step 5. Check the checkbox Launch folder windows in a separate process under the Advanced settings section.
Step 6. Click Apply.
Step 7. Click OK.
Step 8. Reboot your computer.
That’s it. Now when you right-click on File Explorer, you will notice traditional context menu options.
It is also possible to hide the “Show More Options” right-click menu entry from Windows 11 using Registry. To do that, perform the following steps:-
Step 1. Open Registry Editor.
Step 2. In the Registry Editor window that opens, navigate, or browse for the following key from the left sidebar:-
HKEY_LOCAL_MACHINESOFTWAREMicrosoftWindowsCurrentVersionShellUpdatePackages
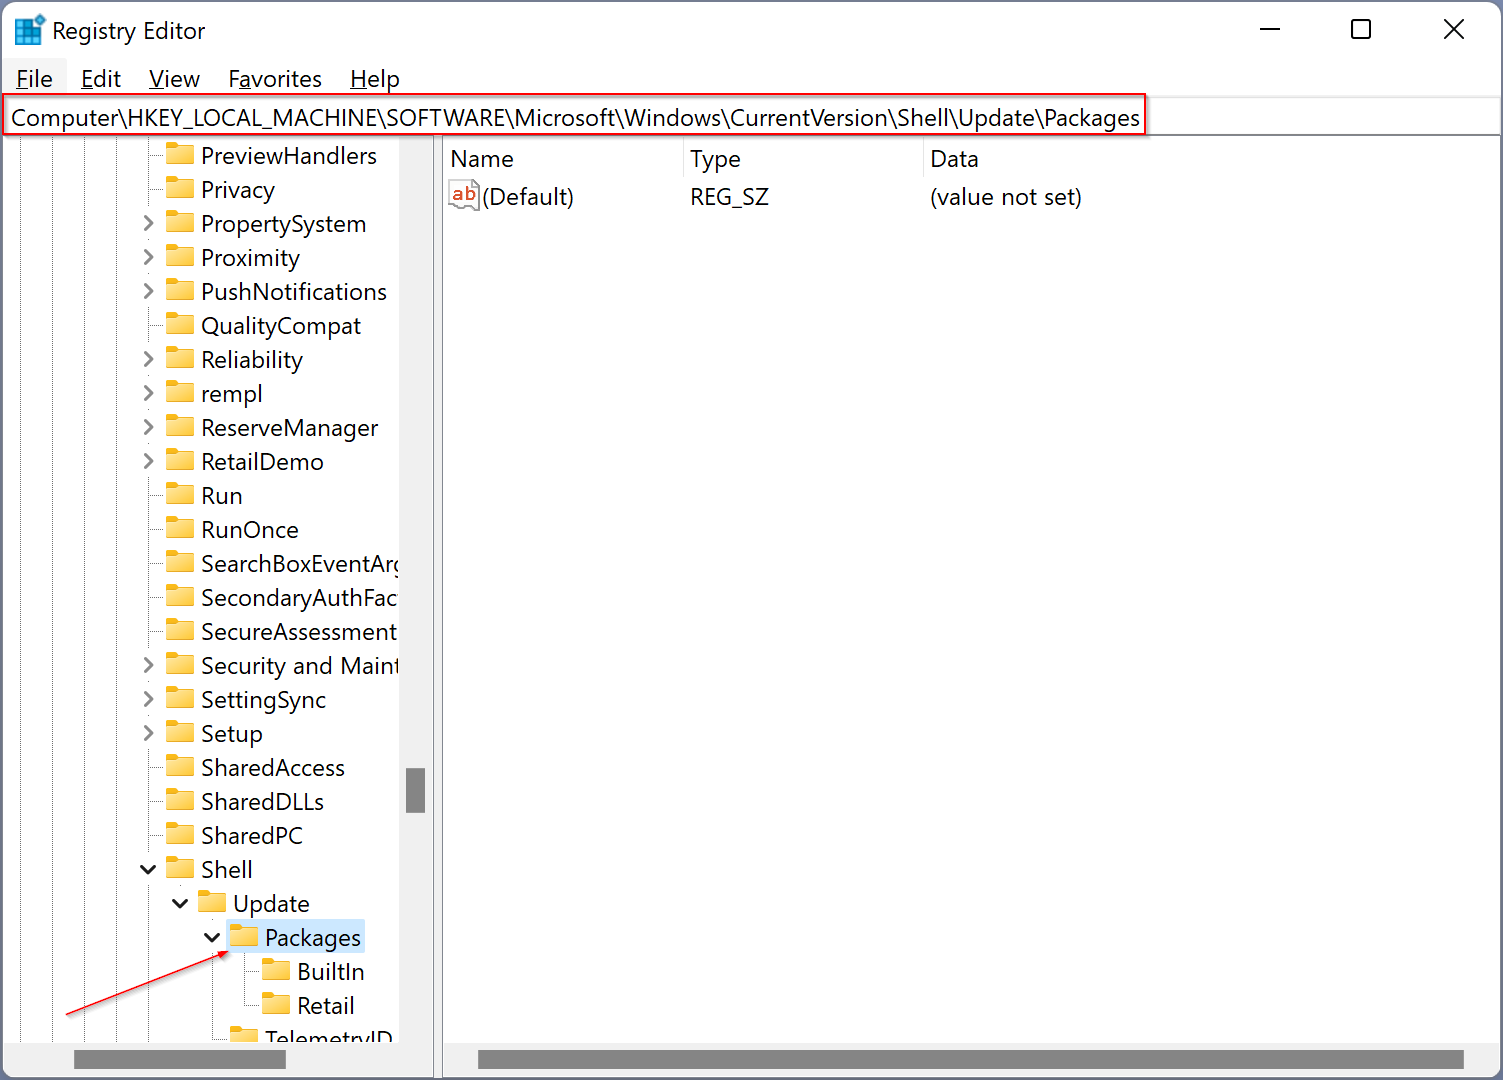
Step 3. On the right side of the Packages key, right-click on free space and select New and then Dword (32-Bit) Value options.

Step 4. Name the newly created DWORD as UndockingDisabled.
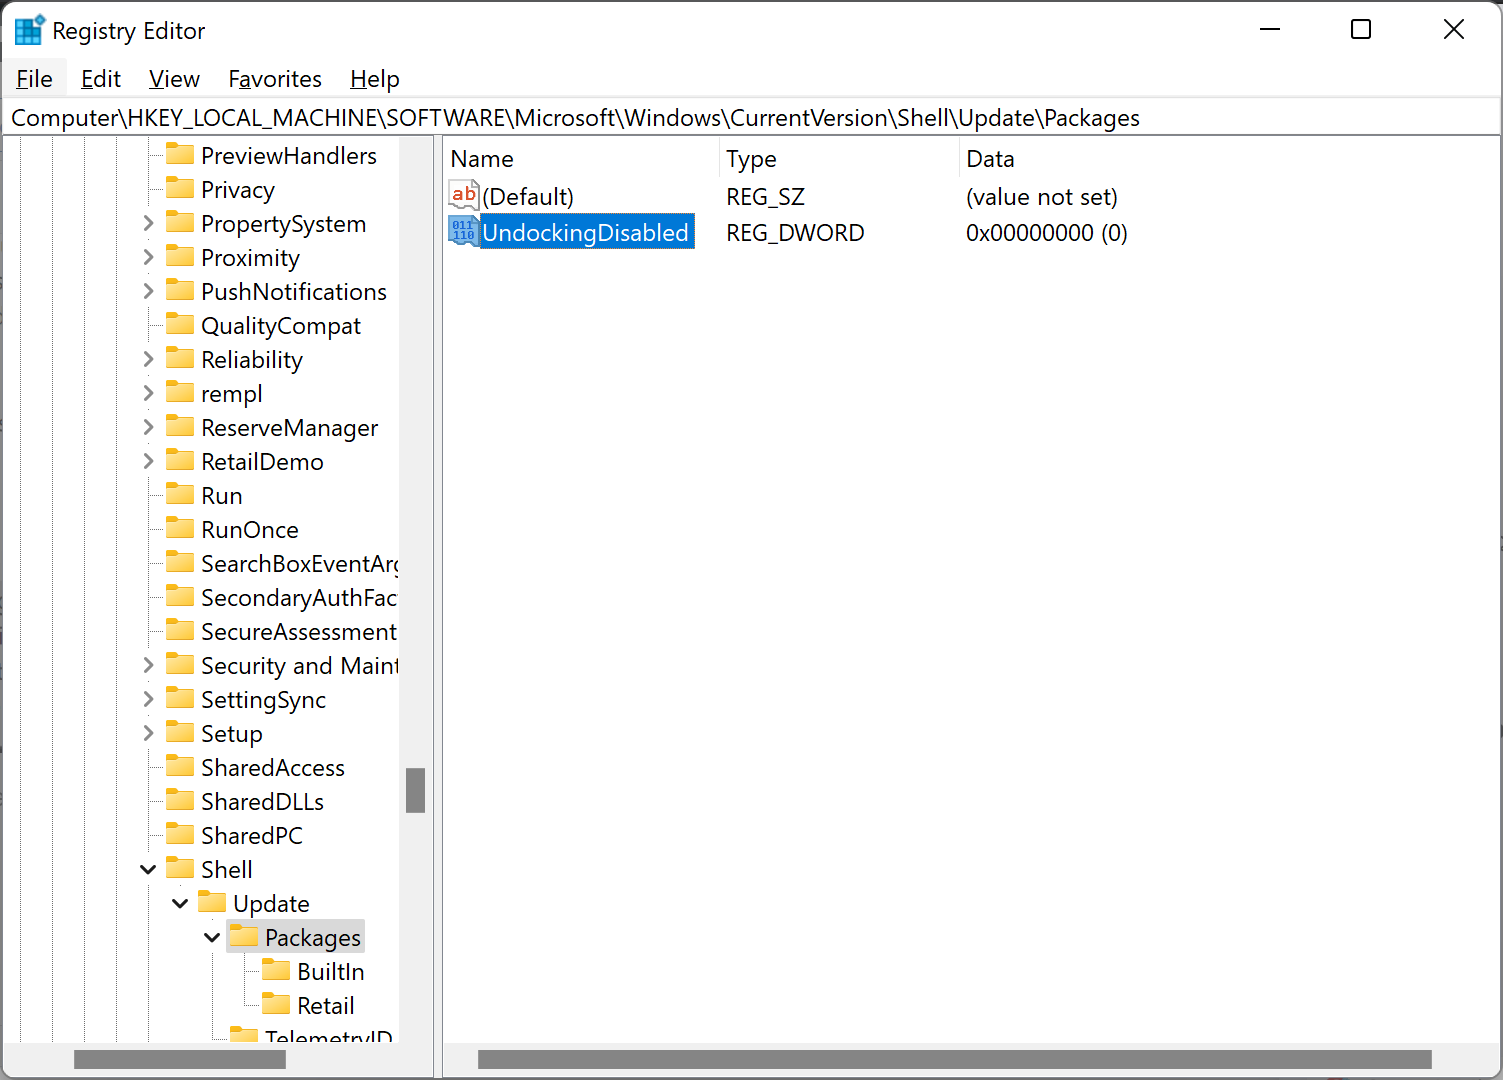
Step 5. Now, double-click on the UndockingDisabled to modify it. Enter 1 in the Value Data field.
Step 6. Click OK.
Step 7. Restart your computer.
That’s it.