Apart from the round-shaped corners and the multitasking functionality, what other major changes did you notice after upgrading to Windows 11? Yes, the new start menu.
To some users, the start menu should be covering the entire screen like we used to notice on previous Windows versions. And many users prefer alternatively — the present form of the start menu.
I’ll assume you belong in the earlier community that favors using a full-screen start menu on Windows 11. And trying to tweak every option in Windows settings to make that happen.
As you landed on this article, my responsibility is to supply adequate knowledge regarding Windows 11’s full-screen menu. Starting with answering your foremost query―
Check our latest post on how to Get Back Start Menu Tiles on Windows 11
Microsoft doesn’t allow you to resize Windows 11’s start menu as in previous versions. That means no longer dragging the menu screen to reshape to your desire. But, there are third-party applications that will help you to utilize the full-screen start menu.
However, I wouldn’t recommend you use any third-party applications. There was one particular method to set the Windows 11 start menu to full mask view. All you needed was to tweak some options in the registry editor. But that was for the earlier version.
With the updated version, there’s no method remaining to use the full-screen start menu in Windows 11.
Also read, Enable or Disable Startup Programs in Windows 11
Before you change anything on the Windows 11 start menu, let’s take a look at what the default version contains.
When you click on the start menu icon, the first thing you’ll notice is a search box at the very top. Followed by the pinned applications — you can access them within a second’s response. After that, you’ll notice the recommended section where recently installed applications/ most used applications will appear.
Furthermore, you’ll spot the account settings and shut down menu.
That’s pretty much it. No resizing of the app tiles, no group tiles in a folder; moreover, no reframing option to conclude.
But don’t be annoyed. I have managed some methods that may help you personalize your Windows 11 start menu by just a little bit. That’s even better than no customization option, right?
Check out our expert-recommended guide on How To Enable Telnet On Windows 11
Here’s the process of customizing the Windows 11 start menu:
The most noticeable change in the Windows 11 start menu is the location. In earlier Windows versions, it was in the left corner of the display. But now, it’s in the center.
You can change it to the conventional position with a simple alteration in the settings menu.
Here’s a complete guide on how to install VLC and Make it Default on Windows 11
Here are the steps to change the start menu location in Windows 11:
Your start menu icon will appear on the left side of the display, like Windows 10. Need another change on the start menu? Check out the following sections.
Check out our latest fix for Bluetooth Toggle Missing On Windows 11
If you want to be more selective about the applications in the start menu, Windows 11 has the exact feature.
Here’s the procedure to change application order in Windows 11:
- Open the start menu and right-click on the application you want to move.
- Select the option that you want to change with the application. E.g., select unpin to remove the application from the start menu.
- Drag around the application icon to move in between.
After right-clicking on the app icon, you’ll understand what’s there to change and how you can change them. So, don’t worry if you are not familiar with the Windows 11 interface.
You may like to check out our latest post on the Show Folder Size in Windows 11.
How to Resize Windows 11 Taskbar
Unlike Windows 10, you can’t just reshape the taskbar icons with a simple drag-drop strategy. You need to make certain changes if you prefer to modify the taskbar.
Here’s the procedure to resize Windows 11 taskbar:
Note: Here value for 0= small icons, 1=Medium icons, 2= Large icons. Click ok once you set the value.
Restart the computer after a successful registry edit. You’ll notice different taskbar icon sizes after a proper reboot.
Check our exclusive tutorial on How to Fix Blue Screen on Windows 11
Frequently Asked Questions
How do I enlarge the Start menu in Windows 11?
You can’t enlarge the start menu in Windows 11 unless you use any third-party applications.
Can I enable Windows 11 Full-screen with the F11 button?
Unfortunately, the F11 button doesn’t work in Windows 11 like it used to. So, you can’t enable full-screen view by just simply pressing the F11 key.
How do I change Windows 11 start menu appearance?
Go to settings > Personalization > Colors > Select your color > toggle on show accent color on start and taskbar.
Does Windows 11 have Start menu tiles?
No, Windows 11 start menu doesn’t have tiles like the previous versions.
Regardless of the customization options in the start menu, Windows 11 is not as boring as you’re thinking right now. A few customizable options in the start menu, such as changing the start menu alignment, and reshaping the taskbar to your preferred size, are pretty handy in my opinion.
After all, you did not install the Windows just to look at the start menu all day long!
So, get that detail out of your head and enjoy the clutter-free features. Contact us if you have any other queries.
You are here:
Home » Windows 11 » Can I Make The Start Menu Full Screen In Windows 11?
The new Start menu in Windows 11 looks very similar to the Start menu originally developed for Windows 10X. As you might have noticed by now, the Windows 11 Start menu replaces live tiles for app icons.
The Start menu displays a search bar at the top; pinned apps appear right below the search bar. At the bottom, the recommended section shows newly installed apps and recently opened files.
Although the Start menu looks much better than the one in the previous Windows version, it lacks a few features. One of them is the ability to resize it.
Many users who have upgraded to Windows 11 are now curious if it’s possible to make the Start menu full screen just like in Windows 11.
The answer is no. For reasons best known to Microsoft, the Windows 11 Start menu does not allow you to resize it. That is, you cannot resize the Start menu in Windows 11. Unlike in Windows 10, you cannot drag the edges of the Start menu to resize it as per your desire.
In the early builds of Windows 11, it was possible to restore the Windows 10 style Start menu with a minor registry edit, but it is no longer possible. So, we can conclude that there is no way out there to resize the Start menu in Windows 11.
If you do not like Windows 11’s Start menu, we suggest you downgrade to Windows 10. As you might know, Windows 10 will continue to receive updates, and Microsoft will support it until 2024.
Using the full screen shortcut key in Windows 11 is the easiest way
by Loredana Harsana
Loredana is a passionate writer with a keen interest in PC software and technology. She started off writing about mobile phones back when Samsung Galaxy S II was… read more
Published on December 22, 2022
Reviewed by
Vlad Turiceanu
Passionate about technology, Windows, and everything that has a power button, he spent most of his time developing new skills and learning more about the tech world. Coming… read more
- The Windows 11 full-screen mode will grant full outputs control and a better preview.
- We recommend using VirtualBox in full-screen mode.
- Remember that this option it’s not yet available for widgets, but their size is easily customizable.
- You can also choose to go full screen on your default browser.
XINSTALL BY CLICKING THE DOWNLOAD FILE
- Download Restoro PC Repair Tool that comes with Patented Technologies (patent available here).
- Click Start Scan to find Windows 11 issues that could be causing PC problems.
- Click Repair All to fix issues affecting your computer’s security and performance
- Restoro has been downloaded by 0 readers this month.
It is always a great idea to customize your work environment according to your own needs. Today, we’ll show you how to go full screen in Windows 11, so make sure you read this guide completely.
We will tell you about all the methods you have at your disposal, including the full screen shortcut key for Windows 11.
Many users complain about the default screen size of certain apps and/or features. Fortunately, the newest Microsoft OS allows you to maximize it in multiple ways.
How can I go full screen in Windows 11?
In order to go full screen on Windows 11, regardless of the app you are using, the easiest way to do it is with the full screen shortcut key, which is F11.
Simply press on it in order to open an app in full screen, and then toggle the mode off by pressing it again whenever you want to.
- How can I go full screen in Windows 11?
- 1. Use VirtualBox
- 2. Full screen Start menu in Windows 11
- 3. Full screen widgets in Windows 11
- 4. Full screen browsers in Windows 11
- 5. Full screen File Explorer in Windows 11
- 6. Full screen Microsoft Office in Windows 11
- 7. Streaming apps full screen
- What are the most common full screen issues?
- How does using full screen can help me?
1. Use VirtualBox
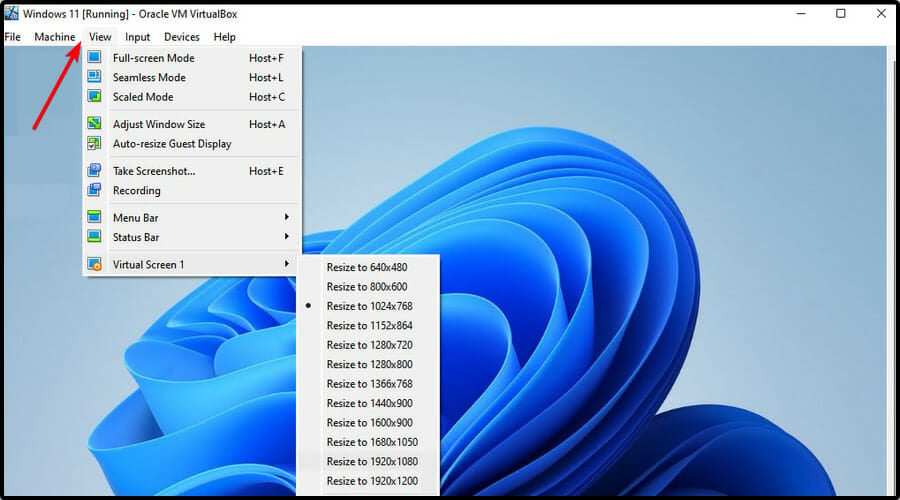
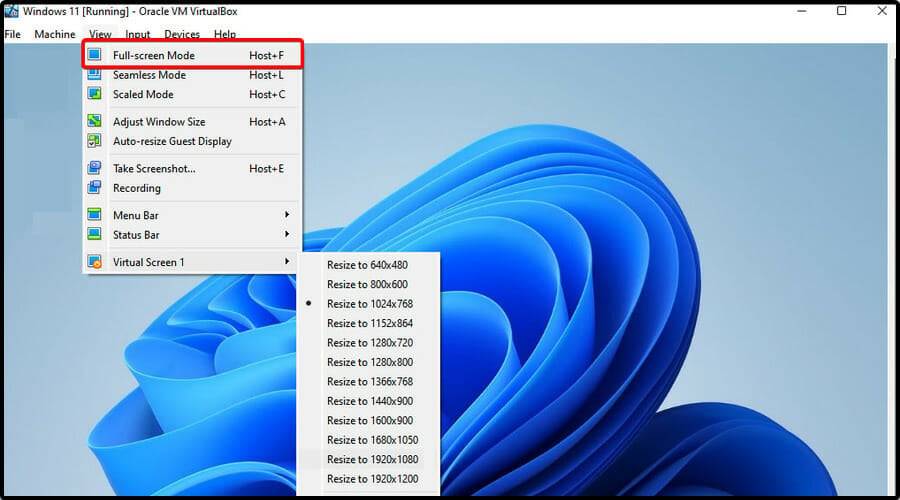
- Open VirtualBox on Windows 11.
- From the top menu, click on View.
- Select the Full-screen Mode.
- Click on Switch.
NOTE
Keep in mind that you can also use the following keyboard shortcut to go on full screen: Ctrl + F.
Unfortunately, unlike you were used to in Windows 10’s Start Menu, now you can not change the default height and width of it.
This feat is currently one size fits all with a visible group of pinned apps and also an area of recommended items that would most likely be recently used files, but sometimes other programs.
In the early builds of Windows 11, you were able to bring back the classic start menu. Unfortunately, now it is no longer possible.
So, there is no option to view Windows 11 Start Menu on full screen, even on touch devices. If you’re still not happy with the current appearance, we suggest rolling back from Windows 11 to Windows 10.
3. Full screen widgets in Windows 11
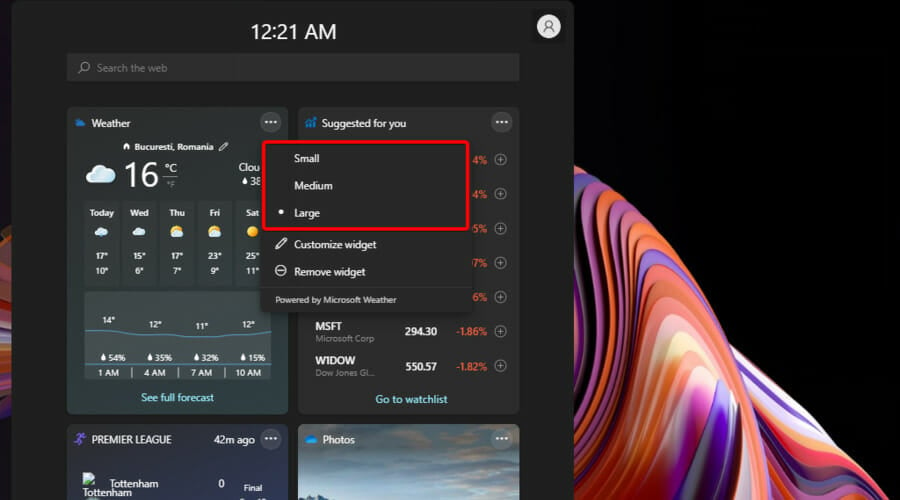
Microsoft producers say that you can also open the full-screen mode for Windows 11 widgets. However, it seems like they haven’t yet implemented this functionality.
But remember that you can quickly customize the size, by selecting the Settings options (marked as three dots) from your most wanted widget.
In case you find these features unnecessary, make sure you check how to disable widgets in Windows 11.
4. Full screen browsers in Windows 11
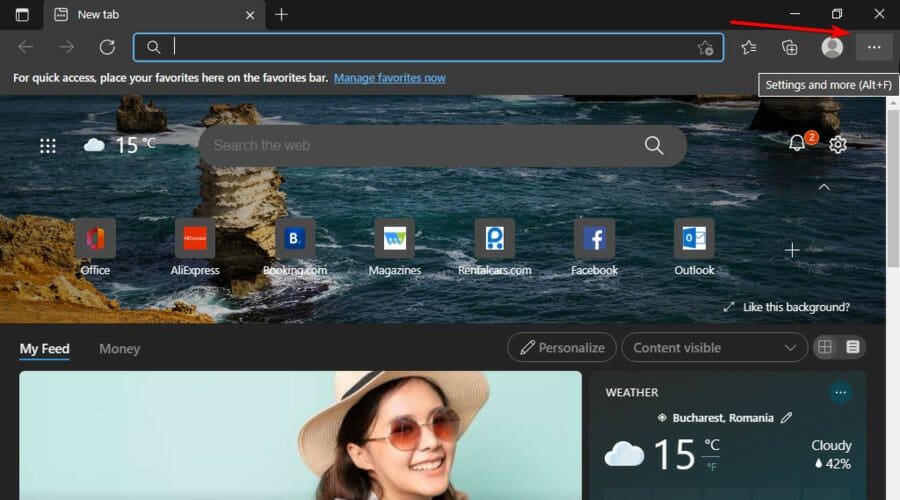
- Open the browser you need, then click on Settings and more options, usually marked as three dots.
- Look at the Zoom section, then click on the square heads icon.
- Now you’ll be able to see your browser on the full screen mode.
Some PC issues are hard to tackle, especially when it comes to corrupted repositories or missing Windows files. If you are having troubles fixing an error, your system may be partially broken.
We recommend installing Restoro, a tool that will scan your machine and identify what the fault is.
Click here to download and start repairing.
You can follow the same process for multiple browsers, like Chrome, Microsoft Edge, or Firefox.
The easiest way to get your browser in or out of the full screen is by using the F11 key. Remember that it also allows you to switch certain networking or chat apps views.
5. Full screen File Explorer in Windows 11
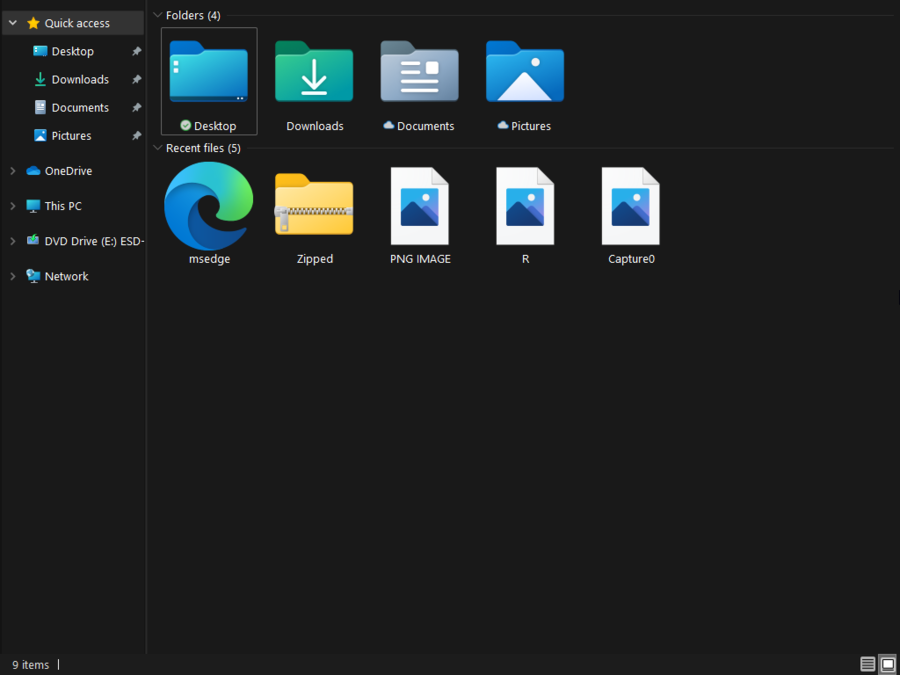
You can get your Windows 11 File Explorer into the screen mode by pressing on the already mentioned key (F11). Getting back to the normal preview will require using the same key.
6. Full screen Microsoft Office in Windows 11
You can either use the following keyboard shortcut: Alt + V, followed by the U key, or click on the Toggle Full Screen View command at the top of the window.

If you’re not able to see the required command, make sure you keep on reading to find out how you can easily add it.
Note that these two options work only for Microsoft Word and Excel. If you need to get the PowerPoint full-screen, you’ll have to hit the F5 key.
7. Streaming apps full screen
While many users prefer using the Full-screen icon, keep in mind that you can also apply the following keyboard shortcut: Windows + Shift + Enter. It would be much less time-consuming.
However, there might be times when this feature is acting weird. To find more about it, make sure you check the section below.
What are the most common full screen issues?
The full-screen mode is a great feature that will simplify your daily work on Windows 11. However, you might notice random related problems. From what we found, these are the most common ones:
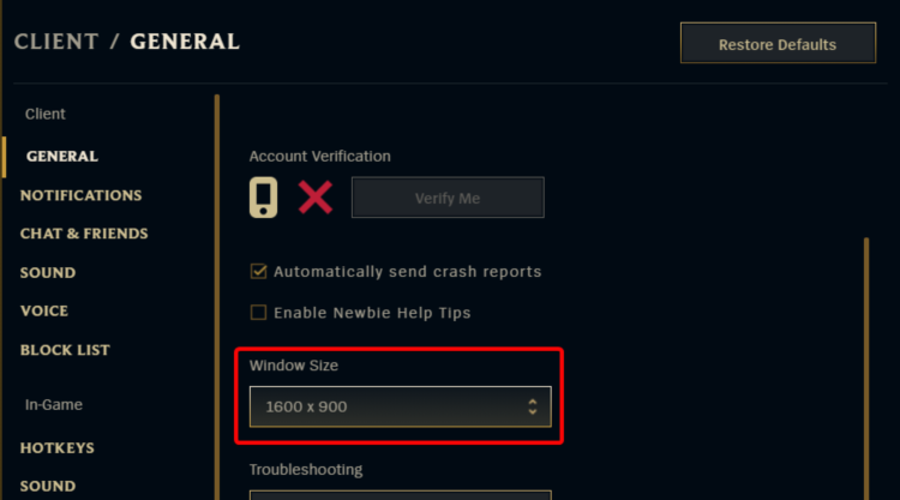
- Games won’t go full screen – From our researches, you can get into full screen troubles while playing games, and LoL is just one of them. If League of Legends won’t go full screen, it’s time to take action.
- Full screen sudden minimization – This is another annoying problem that might sometimes appear while playing games. Users often claim that full-screen game keeps minimizing but this issue can be fixed too.
- Streaming platforms won’t go full screen – Many users reported that Netflix won’t go full screen. But this is not the only case. It also seems like Disney Plus is not streaming full screen. We understand how annoying it can be, so don’t let things this way.
- Full screen can not work on browsers – We made some researches on browsers issues and we found out that full screen might not work on Chrome. Fortunately, there are always options to solve it.
If you’re still wondering how the full-screen mode can help you, take a look at the section below and find some valuable reasons.
How does using full screen can help me?
- A better view perspective – For enhanced clarity and minimal distraction, you might have to set your Windows 11 apps on full screen. This is a great way to keep focus during your daily activity.
- More clear screenshots – Some of you may need to take specific screenshots, that will capture any desktop detail. It will definitely require the full screen mode, so this is another reason to learn how to quickly do it. Also, we recommend taking a look at some of the easiest methods to take a screenshot on Windows 11.
- It hides specific details – If you choose to go full screen, unnecessary items will be hidden. So again, you’ll be able to focus on your main content.
Feel free to use this guide whenever you want to remember how to go full screen on Windows 11. Also, to get the best out of this feature, you should check our recommended articles.
If you have any questions on this topic, do not hesitate to notify us by leaving a comment in the dedicated section below.
Still having issues? Fix them with this tool:
SPONSORED
If the advices above haven’t solved your issue, your PC may experience deeper Windows problems. We recommend downloading this PC Repair tool (rated Great on TrustPilot.com) to easily address them. After installation, simply click the Start Scan button and then press on Repair All.
Newsletter
You can make Start full screen and see everything in one view.
-
Select Start , then select Settings > Personalization .
-
Select Start , and then turn on Use Start full screen.
The next time you open Start, the Start screen will fill the entire desktop. Select All apps in the Start screen for a full-screen view of all your apps and programs, or stick with Pinned tiles for a more dynamic view.

-
Menu (expands to show names for all menu items)
-
Pinned tiles
-
All apps
Note: If you just want to resize the Start menu a bit to make it taller or wider, select the top or side border and drag it.
Need more help?
Download PC Repair Tool to quickly find & fix Windows errors automatically
If you want to enable Windows Full-screen Start Menu, then you can do so using the Registry Editor and Local Group Policy Editor. We have already seen how to use the full-screen Start Menu in Windows 10 by making the changes from Windows Settings, now let us see these methods too
Before you begin, it is recommended to backup all Registry files and create a System Restore point.
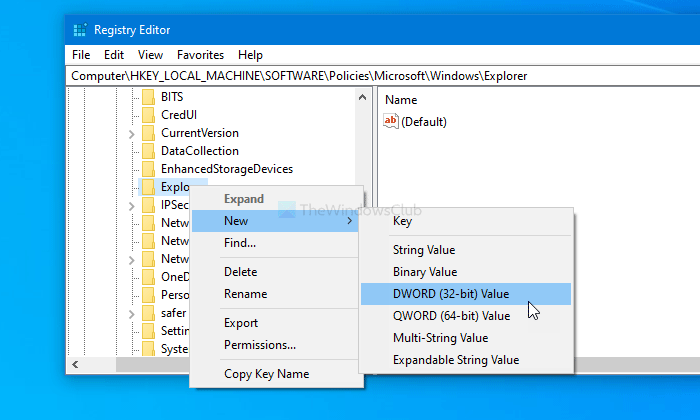
To turn on full-screen Start Menu in Windows 11/10 using Registry Editor, follow these steps-
- Press Win+R to open the Run prompt.
- Type regedit and hit the Enter button.
- Click the Yes button.
- Navigate to Explorer in HKLM.
- Right-click on Explorer > New > DWORD (32-bit) Value.
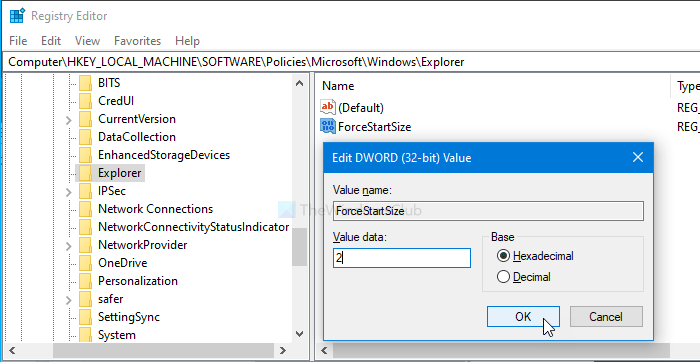
- Name it as ForceStartSize.
- Double-click on it to set the Value data as 2.
- Click OK to save the change.
Open the Registry Editor on your computer. For that, press Win+R to open the Run prompt, type regedit, and hit the Enter button. It opens the UAC prompt where you have to click the Yes button. After opening the Registry Editor, navigate to the following path-
HKEY_LOCAL_MACHINESOFTWAREPoliciesMicrosoftWindowsExplorer
However, if you want to make a full screen Start Menu only in the current user account, navigate to the same path inside HKEY_CURRENT_USER.
In case you cannot find Explorer, right-click on the Windows key, select New > Key, and name it as Explorer.
Following that, right-click on Explorer, select New > DWORD (32-bit) Value, and name it as ForceStartSize.
By default, it carries 0 as the Value data. Double-click on it to set the Value data as 2 (Full screen Start).
Click the OK button to save changes. After that, restart your computer to find the difference.
In case you want to revert the change, navigate to the same path, and delete the value.
Turn on full-screen Start Menu using Group Policy
To turn on full-screen Start Menu in Windows 11/10 using Group Policy, follow these steps-
- Press Win+R to open the Run prompt.
- Type gpedit.msc and hit the Enter button.
- Navigate to Start Menu and Taskbar in User Configuration.
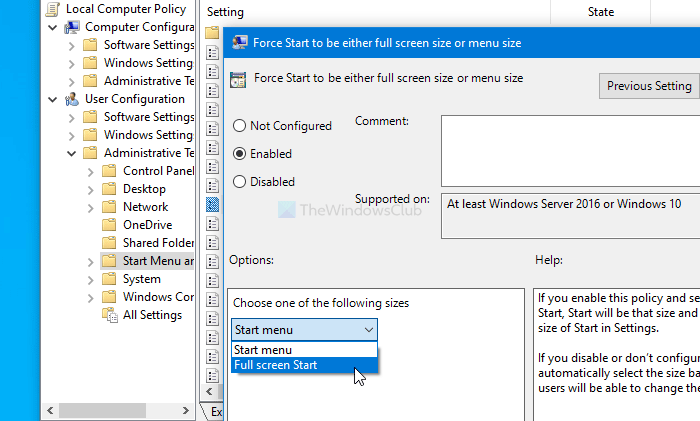
- Double-click on Force Start to be either full screen size or menu size.
- Select the Enabled option.
- Expand the drop-down list and choose Full screen Start.
- Click on the OK button.
Press Win+R to open the Run prompt on your computer. Type gpedit.msc and hit the Enter button. It will open the Local Group Policy Editor on your computer. After that, navigate to the following path-
User Configuration > Administrative Templates > Start Menu and Taskbar
In case you want to apply the setting to all users, navigate to the same path inside Computer Configuration.
Here you will see a setting called Force Start to be either full screen size or menu size.
Double-click on it and select the Enabled option.
Then, expand the Choose one of the following sizes drop-down list, and choose Full screen Start option.
Finally, click the OK button to save the change. You might have to restart your computer to get the difference.
If you want to revert the change, open the same setting and select Not Configured.
That’s all! Hope it helps.
Anand Khanse is the Admin of TheWindowsClub.com, a 10-year Microsoft MVP (2006-16) & a Windows Insider MVP (2016-2022). Please read the entire post & the comments first, create a System Restore Point before making any changes to your system & be careful about any 3rd-party offers while installing freeware.
10SM
Native Windows 10 Start Menu/Fullscreen Start for Windows 11
Tested on build 22000.652 & 22610
Now that I have a little more free time, I have started to revisit this project. Initally, I wanted to solve the exit delay issue before working on anything less important. Because of this, my first version of 10SM was done entirely with BAT scripting, before dropping that concept in favour of manual installation. I am also a novice at developing windows apps, although I know some HTML, CSS, Java, and PHP from when I was learning to make self hosted websites, so I’m not starting at 0 thankfully. Unfortunately, implementing a fix for the exit delay in 10SM is still beyond my level of understanding, so I still have some learning to do!
Going forward, I will release a GUI (coming soon) capable of installing and uninstalling the start menu and changing start menu settings as a learning experience. This will get me familiar with Visual Studio and creating GUI interfaces, but it wont be clean, ideal code yet, and it wont solve the exit delay, sorry. I’ll have to work up to that.
As well, due to multiple requests, I will integrate the windows 10 action center into 10SM for those running the stable releases shortly after the GUI is posted.
-bbmaster123
May 4 2022
*ExplorerPatcher has implemented the Windows 10 start menu as a feature in a recent update. I encourage both users and non users of 10SM to check it out here: https://github.com/valinet/ExplorerPatcher
Please remember to remove 10SM before doing so to avoid any potential issues
Manual Install Instructions
*Installing the files required to restore the start menu requires manually replacing system files, please proceed with caution
*While this works right now, it may or may not continue to work in future versions of Windows 11
- Take ownership of required files
- Backup and replace files with the ones in the «Files» directory; you will need to kill startmenuexperiencehost.exe to do this.
- Install registry entry
- Restart Explorer/sign out
*Be sure not to miss any files. The most common bugs when when failing to correctly replace all files are:
- Right click crashing the start menu
- Start Menu not working at all
- Tray icons not working
Known issues:
- Start menu is slow to exit
cheers everyone!
Далее в статье о различных программах, позволяющих вернуть «классическое» меню Пуск из старых ОС в новой Windows 11. К сожалению, полностью бесплатная только первая из них, остальные могут предложить лишь бесплатный пробный период. Также может быть полезным: Как вернуть старое контекстное меню в Windows 11.
ExplorerPatcher
Первый способ — бесплатная утилита ExplorerPatcher, имеющая множество функций изменения панели задач, параметров оформления Windows 11 и позволяющая, в том числе, вернуть полноценное меню из Windows 10 в новой системе.
Использование программы сравнительно простое:
- Скачайте последнюю версию ExplorerPatcher с официального сайта https://github.com/valinet/ExplorerPatcher/releases (в разделе Assets) и запустите установщик.
- На короткое время рабочий стол и панель задач может пропасть, а затем вновь появиться слегка измененным. Для доступа к настройкам ExplorerPatcher нажмите правой кнопкой мыши в пустом месте панели задач и выберите пункт «Свойства».
- В окне параметров присутствуют разнообразные возможности. Мы коснёмся именно возврата меню Пуск как в Windows В разделе «Taskbar» установите стиль панели задач «Windows 10» (верхний пункт).
- Перейдите в раздел «Start menu» и установите стиль меню «Пуск» как в Windows 10 (верхний пункт), а также поменяйте «Position on screen» на «At screen edge».
- Нажмите «Restart File Explorer» слева внизу окна программы для перезапуска проводника и применения изменений.
- Готово, вы получили меню Пуск из Windows 10, полностью функциональное и рабочее:
Это не все доступные настройки в ExplorerPatcher, рекомендую по возможности изучить их. К примеру, мы можем сделать меню пуск из Windows 10, но со скругленными углами, убрать список приложений из него и оставить лишь плитки, сделать полноэкранное меню «Пуск».
Если вам требуется поместить панель задач сверху, слева или справа экрана, используйте пункт «Primary taskbar location on screen» на вкладке «Taskbar» в Explorer Patcher.
StartAllBack
Программа StartAllBack (полностью на русском языке, в отличие от предыдущего варианта) позволяет гибко настроить панель задач, меню Пуск и вид кнопки Пуск, изменить расположение панели задач и параметры проводника.
В StartAllBack есть предустановленные темы для возврата оформления из Windows 10 или Windows 7, а далее настройки каждой из этих тем можно редактировать для получения того результата, который нужен именно вам.
Подробный обзор возможностей утилиты в отдельной статье: StartAllBack — классическое меню пуск для Windows 11, настройки панели задач и другие функции.
Start11
Если вы когда-либо интересовались вопросами изменения оформления Windows, вам, вероятно, известны программные продукты Stardock. Start11 — один из таких продуктов, специально предназначенный для изменения внешнего вида меню «Пуск» в Windows 11, с русским языком интерфейса.
Скачать пробную 30-дневную версию Start11 можно с официального сайта https://www.stardock.com/products/start11/download — на странице загрузки нажмите «Try free for 30 days», как указано на изображении ниже, затем установите программу.
Можно приступать к выполнению настроек:
- При первом запуске нажмите по кнопке начала ознакомительного периода, вам предложат ввести свой E-mail (вводим какой-либо реальный адрес, так как на него придет ссылка для активации). После активации Start11 вас спросят о предпочитаемом выравнивании панели задач (слева или по центру), а затем можно будет начать настройки меню Пуск.
- На первом экране можно выбрать стиль оформления меню «Пуск»: Windows 7, Windows 10, Modern или Windows 11.
- Выбранный вариант оформления меню «Пуск» можно дополнительно настроить: выбрать ярлыки, поменять цвет и фоновый рисунок, прозрачность, шрифты и другие настройки.
- В разделе «Кнопка Пуск» можно настроить свое изображение кнопки Пуск.
- Раздел «Панель задач» позволяет менять различные её параметры — включать или отключать группировку значков, фоновое размытие и прозрачность, менять размер и другие параметры.
- Вкладка «Поиск» служит для настройки поиска в панели задач и меню «Пуск».
- Раздел «Управление» позволяет настроить, что и как будет открываться при нажатии кнопки «Пуск», клавиши Windows на клавиатуре. Например, вы можете сделать так, чтобы в одном случае открывалось изменённое меню, а во втором — классическое меню Windows 11.
Доступные параметры в достаточной мере понятны и, если известно какого результата и внешнего вида меню «Пуск» требуется достичь, вероятнее всего это получится сделать с помощью Start11, а для многих пользователей могут оказаться подходящими и предустановленные стили.
Если тема изменения внешнего вида ОС вам близка, рекомендую к ознакомлению все статьи сайта на тему оформления Windows 11.


