Уже совсем скоро инсайдерам на канале Dev станет доступна первая предварительная сборка Windows 11, так что это отличный шанс лично оценить новую операционную систему и проверить её работу на своём устройстве.
Но из-за обновлённых минимальных системных требований такая возможность доступна не всем пользователям. Если ваш компьютер несовместим с Windows 11 и вы не использовали инсайдерские сборки с канала Dev, то при открытии раздела «Программа предварительной оценки Windows» в «Параметрах» вам будет доступен только канал Release Preview, где продолжится тестирование обновлений для Windows 10.
К счастью, энтузиасты уже нашли несколько способов принудительно перейти на канал Dev, даже если ваше устройство признано несовместимым. Оба способа связаны с редактированием реестра, а один уже в прошлом применялся инсайдерами для перехода на канал Skip Ahead, доступ в который был ограничен.
Способ 1
Этот способ связан с простым редактированием имеющихся значений от программы Windows Insider в реестре. Однако стоит отметить, что в любой момент настройка вновь может сброситься на значение по умолчанию, а значит процедуру придётся проделать заново.
- Откройте «Параметры» и перейдите в раздел «Обновление и безопасность» -> «Программа предварительной оценки Windows».
- Присоединитесь к программе Windows Insider, если не сделали это ранее, а затем убедитесь, что у вас выбран единственный доступный канал — Release Preview.
- Нажмите комбинацию WIN + R, введите regedit и нажмите Enter.
- Перейдите в ветку:
HKEY_LOCAL_MACHINESOFTWAREMicrosoftWindowsSelfHostUISelection - Двойным кликом нажмите по названию ключа UIBranch и измените его значение на Dev.

- Перейдите в ветку:
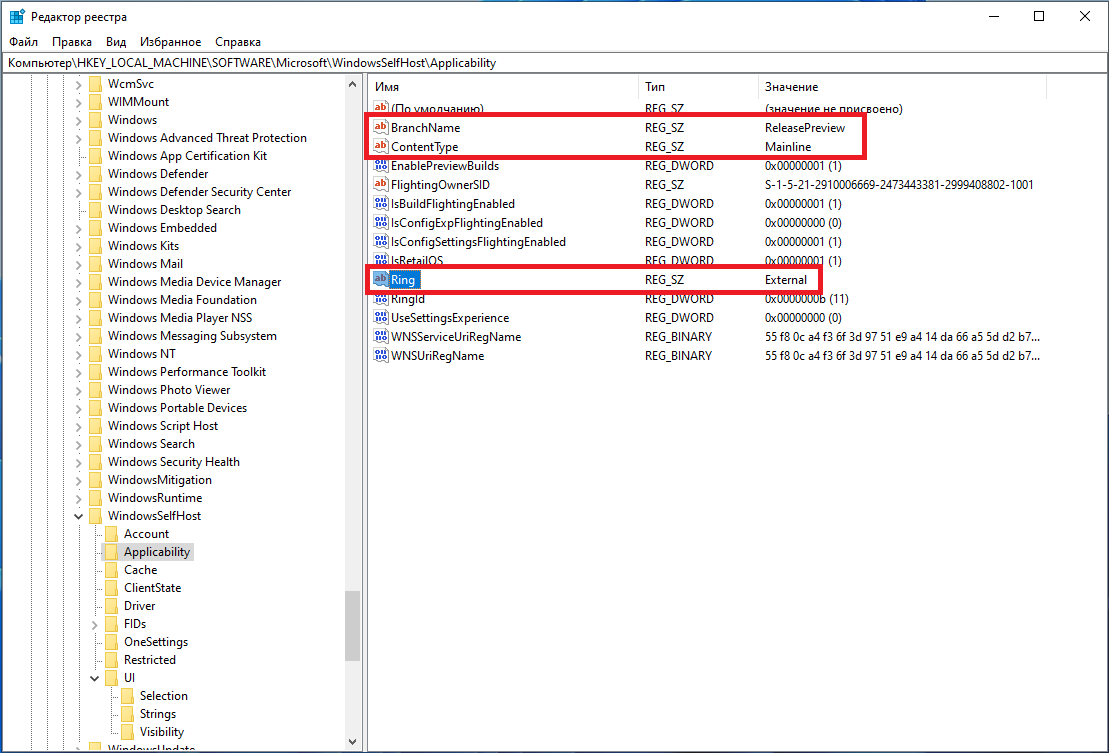
HKEY_LOCAL_MACHINESOFTWAREMicrosoftWindowsSelfHostApplicability - Установите для ключа BranchName значение Dev.
- Установите для ключа ContentType значение Mainline.
- Установите для ключа Ring значение External.
- Закройте редактор реестра и перезагрузите ПК.

Если всё прошло успешно, то в разделе «Обновление и безопасность» -> «Программа предварительной оценки Windows» должен отображаться канал Dev. Также вверху страницы будет отображаться сообщение о том, что ваш ПК несовместим с Windows 11, но его можно игнорировать. В «Центре уведомлений Windows» вы, вероятно, сможете увидеть обновление до инсайдерской сборки Windows 11.
Дополнение. Вы действительно сможете загрузить сборку Windows 11 через Windows Update, однако в процессе обновления появится окно, сообщающее о несовместимости вашего ПК с новой ОС. Для решения этой проблемы воспользуйтесь следующими шагами:
- Откройте папку C:$WINDOWS.~BTSources (она может быть скрытой).
- Скачайте архив appraiserres.zip [20.74 Kb] (cкачиваний: 3257)
(либо с Cloud.Mail.ru), откройте его и распакуйте файл appraiserres.dll в папку Sources, согласившись на замену.
- В свойствах файла установите галочку «Только для чтения».
- [Начиная со сборки 22000.132] Откройте папку C:$WINDOWS.~BTDUDownloadSetupWindows10.0-KB5005661-x64 и также поместите туда файл appraiserres.dll из архива, согласившись на замену.
- Нажмите кнопку «Повторить» в «Центр обновления Windows».
- После этого процесс обновления должен работать. Если это не помогло, то вы можете попробовать попросту удалить файл appraiserres.dll из обеих папок.
Данную процедуру придётся проводить при каждом крупном обновлении системы. Однако велика вероятность, что вплоть до релиза Microsoft будет присылать только накопительные обновления, а для их установки подмена DLL не нужна. Достаточно подключиться к каналу Dev.
Также прикладываем REG-файлы для быстрого переключения каналов Windows Insider:
- Переключение на Dev: windows-insider-dev.zip [364 b] (cкачиваний: 1551)
(или с Cloud.Mail.ru)
- Переключение на Release Preview: windows-insider-rp.zip [371 b] (cкачиваний: 832)
(или с Cloud.Mail.ru)
Способ 2
Второй способ заключается в использовании утилиты OfflineInsiderEnroll, которая использует недокументированные параметры программы Windows Insider. Причём этот метод будет работать даже с локальными учётными записями, так что входить в аккаунт Microsoft не придётся.
- Скачайте OfflineInsiderEnroll 2.6.1 от abbodi1406 с GitHub, перейдя по этой ссылке и нажав Ctrl + S.
- Запустите скачанный скрипт OfflineInsiderEnroll.cmd от имени администратора.
- В окне командной строки выберите канал Dev, введя число 1 и нажав Enter.
- Перезагрузите компьютер.
Дополнение. Вы действительно сможете загрузить сборку Windows 11 через Windows Update, однако в процессе обновления появится окно, сообщающее о несовместимости вашего ПК с новой ОС. Для решения этой проблемы воспользуйтесь следующими шагами:
- Откройте папку C:$WINDOWS.~BTSources (она может быть скрытой).
- Скачайте архив appraiserres.zip [20.74 Kb] (cкачиваний: 3257)
(либо с Cloud.Mail.ru), откройте его и распакуйте файл appraiserres.dll в папку Sources, согласившись на замену.
- [Начиная со сборки 22000.132] Откройте папку C:$WINDOWS.~BTDUDownloadSetupWindows10.0-KB5005661-x64 и также поместите туда файл appraiserres.dll из архива, согласившись на замену.
- Нажмите кнопку «Повторить» в «Центр обновления Windows».
- После этого процесс обновления должен работать. Если это не помогло, то вы можете попробовать попросту удалить файл appraiserres.dll из обеих папок.
Данную процедуру придётся проводить при каждом крупном обновлении системы. Однако велика вероятность, что вплоть до релиза Microsoft будет присылать только накопительные обновления, а для их установки подмена DLL не нужна. Достаточно подключиться к каналу Dev.
Written By
published
April 29, 2022
Hello Windows Insiders, today we are releasing Windows 11 Insider Preview Build 22610 to the Dev and Beta Channels.
TL;DR
- This build introduces some new group policies for IT administrators and an update to the Family Safety Widget.
- This build also includes another good set of fixes that will improve your overall experience.
- This build includes two new known issues that will impact Windows Insiders – please read the known issues list below. We have marked the new known issues as [NEW]. One of these known issues impacts the hidden icons flyout in the system tray.
- [UPDATE] There will be no matching SDK published for this build.
What’s new in Build 22610
Additional new MDM and group policies for IT administrators
We are introducing new policies so that IT administrators can simplify their Windows 11 experience across Start, taskbar, and the system tray. The following policies are available today:
- Disable Quick Settings flyout
- Disable Notification Center and calendar flyouts
- Disable all taskbar settings
- Disable search (across Start & taskbar)
- Hide Task View from taskbar
- Block customization of ‘Pinned’ in Start
- Hide ‘Recommended’ in Start
- Disable Start context menus
- Hide ‘All apps’ in Start
To configure these new group policies locally, open the group policy editor and navigate to User Configuration > Administrative Templates > Start Menu and Taskbar. You can also deploy these policies via Microsoft Endpoint Manager as well.
FEEDBACK: Please file feedback in Feedback Hub (WIN + F) under:
- Desktop Environment > Start menu for policies relating to Start.
- Desktop Environment > Taskbar for policies relating to the Taskbar.
- Desktop Environment > Quick Settings for policies relating to the Quick Settings.
- Desktop Environment > Notification Center for policies relating to the Notification Center.
Family Safety Widget Update
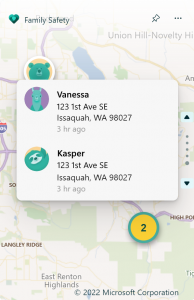
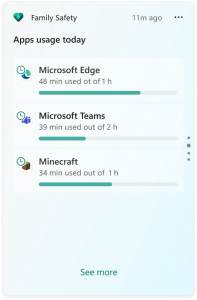
To help you and your loved ones stay safe and protected, we are rolling out an update to the Family Safety widget with improvements for all family members with a new location sharing view that shows where your family members are using the Family Safety app.
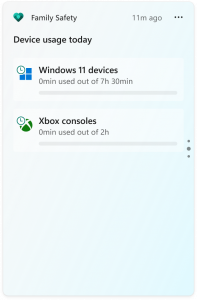
There’s also a new update for people in a member role, which includes an improved view of your screen time use across apps and devices.
To learn more about Microsoft Family Safety and to get the mobile app, visit https://aka.ms/microsoftfamilysafety. Be sure to also check out the Microsoft Family app too.
FEEDBACK: Please file feedback in Feedback Hub (WIN + F) under Desktop Environment > Widgets.
Changes and Improvements
[General]
- Windows 11 Home edition Dev and Beta Channel builds no longer enable the SMB1 client by default. If you have installed SMB1 manually or upgraded from a previous version of Windows where SMB1 was installed, upgrading to the latest Dev and Beta Channel build will not remove SMB1. For more information, check out this blog post here.
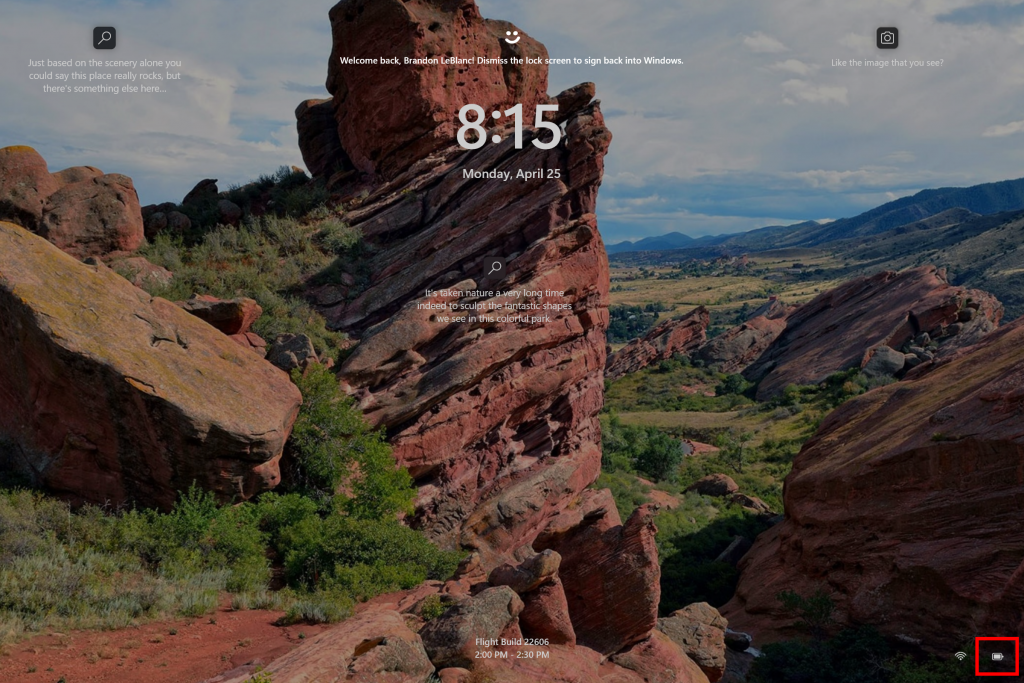
- We have updated the design of the battery icon on the Lock screen to be consistent with the one in the taskbar.
- If your PC supports it, we will now show estimated battery life timing in the tooltip for the battery icon in the system tray with the most recent Insider Preview builds.
- The build watermark at the lower right-hand corner of the desktop is no longer present in this build. This doesn’t mean we’re done, and the watermark will return to Insiders in a future build.
[Taskbar]
- As a result of feedback from Windows Insiders, we have disabled the tablet-optimized taskbar feature that first began rolling out to Windows Insiders in Build 22563 for now. We hope to bring this feature back in the future after further refinement of the experience. As we’ve mentioned previously, features we try out in the Dev or Beta Channels may not always ship.
[Widgets]
- The changes in Widgets that bring more dynamic content to your Widgets board announced with Build 22563 is rolling out to more Windows Insiders in the Dev and Beta Channels.
[Task Manager]
- We’ve updated the Processes page in Task Manager so that the colors used in the heatmap are now based on your accent color. Please note in certain cases we will use the default blue accent color to ensure readability. We did a demo of this during this month’s Windows Insider webcast featuring Claton Hendricks from the Task Manager Team – watch the webcast on-demand here.

[File Explorer]
- We have updated the rename, properties, and optimize icons used in the context menu and command bar to help with discoverability and consistency.
![]()
[Settings]
- Your Phone now shows as Phone Link under Settings > Bluetooth & devices. Your Phone is now Phone Link – read the announcement here.
[Other]
- Based on feedback from Windows Insiders, we are rolling back the change originally documented with Build 22557 where TKIP and WEP connections were no longer allowed. These connections are allowed again starting with this build as we go back to the previous behavior where a warning is given notifying you that these are not secured connections. As a reminder, TKIP and WEP are deprecated security standards and are planned for removal in a future release. We recommend updating your router or other devices to one that supports at least WPA2 (WPA3 is the current standard).
Fixes
[General]
- We fixed the issue causing Windows Insiders running Windows 10 who were trying to join the Dev or Beta Channels to encounter a download error code 0xc8000402 while trying to download the latest build. If you experienced this issue, please install KB5011831 and then try to download the latest build from either the Dev or Beta Channels. If you continue to see this issue – please file feedback in Feedback Hub.
- We’ve fixed an issue causing explorer.exe to crash repeatedly in a loop in the latest builds (and unable to successfully load) for a small percent of Insiders.
- Made a change to help address an issue causing some Insiders to experience a bugcheck with the error BAD_POOL_CALLER when opening Notification Center and some other actions after the last build.
- When opening Group Policy editor, an Administrative Template error will no longer pop up.
- Fixed an issue where Group Policy Editor was unexpectedly showing an error saying “mmc cannot initialize the snap-in” on ARM64 in some cases.
[Taskbar]
- Fixed an issue that was preventing Shift + Right-click on a taskbar icon from opening the expected context menu.
- Changing the resolution of a secondary display should no longer result in the taskbar app icons unexpectedly shifting to the right.
- Clicking the taskbar should close things like Quick Settings and Notification Center now if they’re open.
- Windows and taskbar icons that were being used on a secondary monitor will now transfer correctly to your primary monitor if you unplug the secondary one.
- Fixed an issue that was preventing taskbar icon animations on system icons like Start, Search, and Task view.
- Animations will now play correctly the first time you drag and drop to taskbar.
- If you drag to the taskbar in a right-to-left (RTL) language, the icon will now appear on the correct side.
- When you’re connected to Wi-Fi, the network icon in the taskbar will no longer incorrectly show as disconnected.
- Fixed a crash that was happening if the taskbar clock updated while transitioning to daylight savings time changes.
- The show hidden icons flyout will now dismiss when you click away from it again.
- There will no longer be an empty show hidden icons arrow showing in your system tray when you’ve set all your icons there to show.
- Fixed an issue causing Notification Center to be cut off when opened on small screens, hiding the do not disturb button.
- Fixed an issue for Arabic and Hebrew display languages, where the Notification Center would jump up unexpectedly when dismissed.
- If your microphone is in use but not your location, hovering over the microphone button in the taskbar should no longer show a location section with an empty app name in the tooltip.
[Start menu]
- App icons like Microsoft Edge will no longer be cut off on the bottom in Start’s all apps list.
- If you cancel while dragging icons to create a folder in Start, they will no longer be stuck in a broken folder with just one icon.
- The Windows Tools entry under All apps should be visible again now.
- Animations of folders in the Start menu will no longer start on the first pinned app instead of where the folder is located.
[Search]
- We did some work to help address an issue where sometimes you couldn’t search for an app you’d just installed, although it was showing in Start.
[File Explorer]
- Using the rename, copy, paste, delete, and other options context menu options in File Explorer or on the desktop should no longer cause explorer.exe to crash when the context menu dismisses.
- Right-clicking on a file now reflects the updated naming in File Explorer and shows “Add to Favorites”.
- Right-clicking on This PC in the Open or Save As dialog’s navigation pane should bring up the context menu again now.
- Addressed an issue believed to be the underlying cause for File Explorer freezing when selecting a large number of files in recent builds.
- We made some improvements to the performance of keyboard selection of images and zipped files in OneDrive folders.
- Fixed an issue which was causing File Explorer to freeze frequently when WSL was installed, and WSL files were opened via Home.
- To help with performance, when opening Home only images and videos will now show thumbnails.
- Updated the tooltip for the “Please sign in” button in File Explorer from “Sign in again to fix authentication issues.” to “One of your accounts needs attention to show files from Office.com in Home”, so that its purpose is clearer.
- We addressed an issue where the Sign In button in File Explorer might not work.
- Fixed an explorer.exe crash related to loading recently used Office files in Home.
- Addressed an issue where the Open option was unexpectedly showing a generic icon when right clicking on certain file types.
- Fixed an underlying issue believed to be the cause of some Insiders not seeing the This PC option in the “Open File Explorer to” dropdown in folder options.
[Input]
- Fixed a couple issues where under certain conditions the emoji panel, clipboard history, and voice typing would stop working after unlocking your PC or right after a Windows update.
- Fixed an issue where the text suggestions for physical keyboards might sometimes display with a transparent background.
- To ensure that text input is always available, if you use touch and tap a text field in OOBE, on the login screen, or in the UAC dialog, the touch keyboard will now always appear even if a physical keyboard is connected.
- When you lock your PC, if you have turned off “Play sounds as I type” under Settings > Time & Language > Typing > Touch keyboard, you should no longer hear key press sounds when using the touch keyboard on the login screen.
- Added typographic quotes as an option after a press and hold on the quote key when using the German touch keyboard layout.
- We did some work to address an issue where if you were using the docked touch keyboard on a tablet and tapped the text field of an app that didn’t have focus, the touch keyboard might appear and immediately disappear.
- Improved the performance going into the listening state after launching voice typing (WIN + H).
- Fixed a crash when deleting letters using a strikethrough gesture in the handwriting panel.
- Addressed an issue where if you had unchecked “leave touchpad on when a mouse is connected” under Settings > Bluetooth & Devices > Touchpad, the touchpad wasn’t re-enabled after connecting and disconnecting a mouse.
- Fixed an issue that could lead to the trail when sliding your finger around the screen being unexpectedly red or invisible in some cases.
- If you don’t have the Chinese (Simplified) IME installed, it should no longer display as an option to customize under Settings > Personalization > Text Input > Custom Theme.
- If an Xbox controller is connected, using it to interact with games should no longer result in an unexpected pop-up saying, “No supported apps in use for mic mute.”
[Widgets]
- Improved reliability of opening the widgets board on first login after an upgrade or after an app update.
- We did some work to help address an issue where the widgets board wouldn’t light dismiss and you had to use the Esc key to close it.
- As some Insiders have noticed, to help make the state clearer, if the weather status on the taskbar isn’t available, we will now show a greyed-out weather icon.
- Addressed an underlying issue leading to Widgets being missing from the taskbar and Settings after upgrading. This fix should stop future PCs from being impacted – if you are currently impacted, please try reinstalling this, which may resolve it for you.
[Settings]
- Fixed the Windows Update text for English (United Kingdom) so that it will say “last checked” and not “last ticked.”
- Addressed an underlying issue leading to not being able to activate the “Restart now” button in Windows Update when it had focus using Narrator in scan mode.
- Fixed an issue where if you opened the Bluetooth section of Quick Settings and went back, it could result in the scrollbar style changing in Quick Settings under certain conditions.
- Apps should no longer show up with the incorrect icon under Settings > Personalization > Taskbar > Other system tray icons.
- Fixed an issue that was causing the search icon in Settings > Personalization > Taskbar to be backwards and the wrong color in the Desert contrast theme.
- Fixed an issue preventing Quick Settings from taking touch input.
- Addressed an additional issue causing the media controls above Quick Settings to stay there after the media source was closed.
- Fixed a high hitting crash in recent flights when navigating to the page to pick a sound output option in Quick Settings.
[Windowing]
- Did some work to help address an issue related snap layouts at the top of the screen where a large invisible area could get stuck and would consume clicks in that area.
- When you drag down on the title bar of a maximized window, it should be easier to invoke snap layouts from the top of the screen now.
- If you have a window within a snap group that is set to display across all your Desktops, that setting should now persist if you drag and drop the snap group into a different Desktop in Task View.
- Fixed a couple issues leading to explorer.exe crashes when using and interacting with snap.
- Fixed a couple high hitting DWM crashes in recent flights.
- Addressed an issue where focus wasn’t being properly set when using the 3-finger touchpad gesture to bring up ALT + Tab.
- Fixed an issue where snap assist was unexpectedly appearing when you had only a single Microsoft Edge window open and tried to snap it.
- Reduced the likelihood of seeing an acrylic backdrop noticeably lagging when dragging a window around.
- Improved the reliability of using gestures from the edge of the screen (for example to open Start menu) when using an app full screen.
- Addressed an issue which could cause the screen to appear frozen after using a 3 finger on screen gesture to minimize open apps on top of certain full screen apps.
[Narrator]
- Fixed an issue when using Narrator and your keyboard to navigate the show hidden icons panel where focus was jumping out to taskbar at the end of the icons instead of looping back to the beginning.
- Narrator will now start reading from the beginning of the page on Edge even if a control on the page has focus by default, like Bing’s search box.
[Task Manager]
- Fixed an underlying issue leading to some apps not showing as suspended in Task Manager even though they should have been.
- Fixed an issue where expanding the child of a child process would result in the content of the Name column in Processes being significantly offset.
- Clicking “Show history of all processes” in settings should no longer hang or crash Task Manager.
- The Run New Task button should work on the Details and Services pages now.
- To address issues with text and UI clipping, Task Manager will no longer show accent color on the title bar.
[Networking]
- The issue causing internet connectivity issues for some Insiders recently when certain VPNs were connected should be addressed now.
[Lock screen and logging in]
- The login screen shouldn’t crash anymore if you click the Power button while a contrast theme is enabled.
- Fixed an issue where the network icon on the login screen could become clipped if you used the text scaling option in Settings > Accessibility.
- Did some work to address a high hitting login screen crash.
[Other]
- Addressed a few issues that were preventing the accessibility flyout from showing or from selecting items in it with your mouse in the device setup experience (OOBE) for Windows 11.
- The accessibility flyout will no longer be empty in RTL languages in the device setup experience (OOBE).
- Fixed an issue that was causing notification popups to get stuck as a transparent box on the side of your screen that blocked input.
- Addressed an underlying issue believed to be the root cause of the system thinking you were on battery when UPS was connected recently.
- The keyboard shortcut to launch Quick Assist (WIN + CTRL + Q) should be working again now.
- Addressed an issue where some signed apps were unexpectedly blocked by Smart App Control.
- If you use your keyboard to control your brightness or volume level, the flyout that appears with now respect if you’ve turned animation effects off in Settings > Accessibility > Visual Effects.
- Addressed an underlying issue that could result in a yellow border getting stuck around your game after taking a screenshot with the Xbox Game Bar.
- Fixed an underlying app registration issue leading to the Windows Security app not launching or showing a prompt saying there was no installed app for that protocol after upgrade.
- Made a change that should help address an issue where Insiders were seeing Windows Terminal failing to update in the Microsoft Store with error code 0x80073CFB.
- Fixed an issue which was causing certain apps relying on the .NET Framework to fail to launch in the last few flights.
- Did some work to address a leak in uxtheme.dll, leading to some performance degradation over time in certain apps.
- Addressed an issue causing defrag.exe to show an error saying “No such interface supported (0x80004002) recently.
- Fixed a bugcheck with error DPC_WATCHDOG_VIOLATION in recent builds that Insiders might have encountered when disconnecting Bluetooth devices or other Bluetooth scenarios.
- Improved the reliability of connecting Bluetooth devices like Apple AirPods.
- Fixed an issue leading to audio not playing immediately after resuming from hibernation when certain Bluetooth headsets were connected.
- Addressed an issue which could lead to a bugcheck with error PAGE_FAULT_IN_NONPAGED_AREA when connecting certain USB audio devices in recent builds.
- Fixed a crash in the previous flight related to cdp.dll.
- Fixed an underlying issue which was causing the Wireless Display app to not be able to receive content in the last couple flights.
Known issues
[General]
- [NEW] After upgrading to Build 22610, the “Show hidden icons” flyout in the system tray may disappear completely for some Insiders, even though it shows as “on” under Settings > Personalization > Taskbar and “Other system tray icons”. We are investigating the issue. As a workaround if you need access to the icons that would show in the “Show hidden icons” flyout, you can go right-click on taskbar to open the Taskbar settings page, navigate to the “Other system tray icons” and individuals toggle specific apps to “On” until the issue is resolved.
[Task Manager]
- [NEW] Enabling Efficiency mode from the command bar in Task Manager can cause the process list to fluctuate between the Apps and Background groups on the Processes page. As a workaround, right-click and use the context menu to enable/disable Efficiency mode then close and re-open Task Manager.
[Widgets]
- The widgets board may not open successfully when using the gesture from the side of the screen. If you are impacted, please tap the Widgets icon in the taskbar for now instead.
[Live captions]
- Certain apps in full screen (e.g., video players) prevent live captions from being visible.
- Certain apps positioned near the top of the screen and closed before live captions is run will re-launch behind the live captions window positioned at top. Use the system menu (ALT + Spacebar) while the app has focus to move the app’s window further down.
About the Dev & Beta Channels [Updated!]
As a reminder, we are evolving the way we develop and release to Insiders with the Dev and Beta Channels now representing parallel development paths from our engineers. The Dev Channel will be a place where we will try out different concepts, incubate new ideas, and work on long lead items that may not get released to general customers. The Beta Channel will be the place we preview experiences that are closer to what we will ship to our general customers. However, this does not mean every feature we try out in the Beta Channel will ship. We encourage Insiders to read this blog post from last month that outlines the ways we’ll try things out with Insiders in the Dev and Beta Channels.
Now that the Dev and Beta Channels are receiving the same builds, the limited window has opened for Insiders to switch channels if you wish to do so by following these simple steps:
- Open Settings > Windows Update > Windows Insider Program.
- Select Choose your Insider settings.
- Select Beta Channel.
- The next time you receive an update, it will be for your new channel.
IMPORTANT: This window will close once we release builds with higher build numbers to the Dev Channel. If your device stays on the Dev Channel and receives a build that is a higher build number than what is in the Beta Channel, you will have to do a clean installation of the released version of Windows 11 on your device to switch to the Beta Channel.
These aren’t always stable builds, and sometimes you will see issues that block key activities or require workarounds. It is important to make sure you read the known issues listed in our blog posts as we document many of these issues with each flight.
The desktop watermark you see at the lower right corner of your desktop is normal for these pre-release builds.
Important Insider Links
- Want to learn how we made Windows 11? Check out our Inside Windows 11 website to hear and meet our makers from Engineering, Design and Research to share their insights and unique perspectives throughout this journey.
- You can check out our Windows Insider Program documentation here.
- Check out Flight Hub for a complete look at what build is in which Insider channel.
Thanks,
Amanda & Brandon
If you want to switch from a Dev Insider build to a stable build of Windows 11 or switch from a Beta Insider build to a stable build of Windows 11, do you know how to do it? In this article, MiniTool Software shows you different methods to switch from Insider to a stable build of Windows 11 under different Channels.
Want to Switch to a Stable Build of Windows 11 from Insider?
Before the final release of Windows 11, Microsoft released many Insider preview builds for testing to Insiders in the Dev Channel, the Beta Channel, and the Release Preview Channel of the Windows Insider Program.
In the beginning, Microsoft only rolled out preview builds to the Dev Channel. When the Windows 11 preview builds became stable, the company gradually released preview builds to the Beta Channel and then the Release Preview Channel. Since Windows 11 preview build 22000.160, Microsoft began to prompt Insiders who want to use stable Windows 11 builds to switch to Dev Channel if they are still in the Dev Channel.
Now, Microsoft continues to release Windows 11 builds to the Dev Channel, the Beta Channel, and the Release Preview Channel. But the Windows 11 preview builds in the Dev Channel don’t match the official and stable Windows 11 builds any more. The preview builds in the Dev Channel are higher.
Windows 11 was official released on October 5, 2021. Since then, you can free upgrade from Windows 10 to Windows 11 as long as your device is Windows 11 eligible. But many users are still in the Windows Insider Program. If you are one of them, do you know how to switch from Insider to a stable build of Windows 11?
There are three different Channels in the Windows Insider Program. Different Channels have different methods to switch from Windows 11 preview to full. Now, we will show you how to switch from Insider to a stable build of Windows 11 under different Channels.
How to Switch from a Beta/Release Preview Insider Build to a Stable Build of Windows 11?
Since the Windows 11 preview builds in the Beta Channel and the Release Preview Channel still match Windows 11 full and official versions, it is easy to switch from Windows 11 Insider preview to full under these two Channels. You just need to leave the Windows Insider Program and then upgrade to the latest Windows 11 version via Windows Update in the Settings app.
Now, we will show you how to leave the Beta/Release Preview Channel and get the full version of Windows 11.
Step 1: Leave the Windows Insider Program
If you want to use a stable and official version of Windows 11, it’s time to leave the Windows Insider Program now.
1. Go to Start > Settings > Windows Update.
2. Click Windows Insider Program from the right panel.

3. Click Stop getting preview builds on the next page.
4. Here, you will see two options:
- Unenroll this device when the next version of Windows releases
- Unenroll this device immediately.
If you are in the Beta Channel or the Release Preview Channel, both of these two options are available. However, if you just want to switch from a Beta/Release Preview Insider build to a stable build of Windows 11, the first option is enough. You need to turn on the button next to this option (Unenroll this device when the next version of Windows releases) to stop getting Windows 11 preview builds.
5. Click the Leaving the Insider Program link at the bottom to continue.

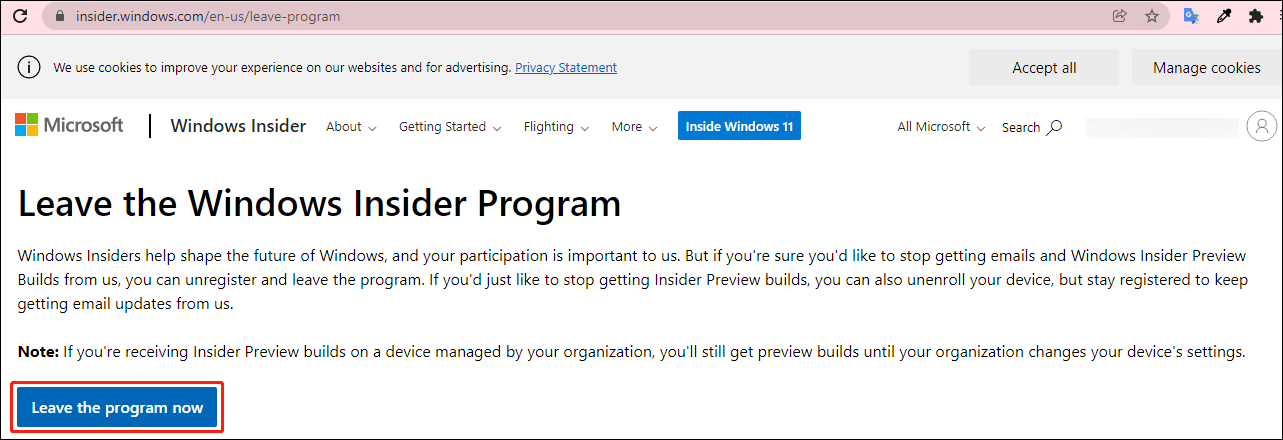
6. You will be guided to a webpage where you can click the Leave the program now button to opt out of the Windows Insider Program.
Now, you leave the Windows Insider Program. Your device will not receive Windows 11 preview builds. If you want to get a stable version of Windows 11, you need to continue with the next step.
Step 2: Upgrade to Windows 11
You are not in the Windows Insider Program. But currently you are still running a Windows 11 preview build. If you need to switch to a stable Windows 11 version, you need to check for updates on your computer.
It is easy to do this:
- Go to Start > Settings > Windows Update.
- Click the Check for updates button to get the latest version of Windows 11. Your system will automatically download and install Windows 11 full version on your computer. The whole process may last for even hours and your computer may restart several times. You should wait patiently until the whole process ends.
Another Choice: Reset This PC
After leaving the Windows Insider Program, you can also use the Reset This PC tool to reinstall the latest version of official Windows 11 on your computer.
- Go to Start > Settings > System > Recovery.
- Click the Reset PC button under Recovery options.
- On the pop-up interface, select Keep my files or Remove everything according to your requirements.
- Select Cloud download or Local reinstall to continue.
- Follow the on-screen guide to reset your computer and get the stable Windows 11 version.
TIP: Back up Your Data
If you choose to remove everything during the PC reset process, you should make a full back up of your important files in advance. You can use MiniTool ShadowMaker, professional data backup software, to do this job.
This software focuses on files/folders/partitions/disks/systems backup and restore. It even supports automatic backup, full backup, differential backup, and incremental backup. You can use the trial edition of this software to experience it for free within 30 days.
Free Download
To protect your data, you’d better back up your Windows 11 files to an external hard drive using MiniTool ShadowMaker. After resetting your computer, you can use this software to restore the backup files to your device.
If you want to switch from a Beta Insider build to a stable build of Windows 11, here is a guide.Click to Tweet
How to Switch from a Dev Insider Build to a Stable Build of Windows 11?
If you are still in the Dev Channel now, you will be unable to use the above method to switch to a stable version of Windows 11. The Windows 11 preview builds in the Dev Channel are higher versions. You can’t switch to the Dev Channel or the Release Preview Channel from the Dev Channel now. Besides, you can’t stop your device from receiving the preview builds unless you clean install Windows 11 on your computer.
How to confirm?
Now, you can go to Start > Settings > Windows Update > Windows Insider Program > Stop getting preview builds to see if the Unenroll this device when the next version of Windows releases option is available.
You can see the first option is greyed out. From the following explanation, you can see that this option is only available for the Beta and Preview Release Channels.
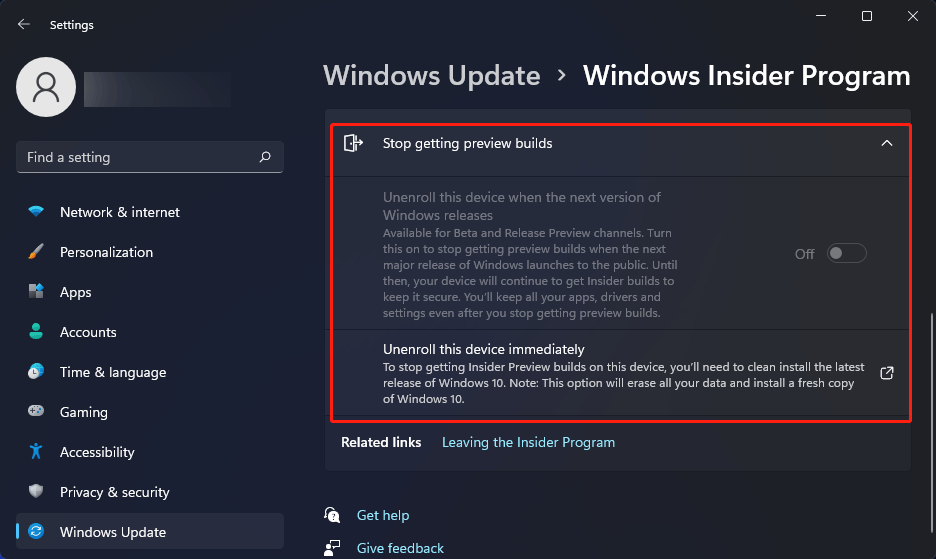
Then, you can continue to read the explanation of the second option:
To stop getting Insider Preview builds on this device, you’ll need to clean install the latest release of Windows 10. Note: This option will erase all your data and install a fresh copy of Windows 10.
However, if you want to use Windows 11, you can also choose to clean install Windows 11 on your computer.
Now, we will show you how to switch from a Dev Insider build to a stable build of Windows 11.
Step 1: Leave the Windows Insider Program
If you want to use the official Windows 11, you should leave the Windows Insider Program first. Likewise, you can go to Start > Settings > Windows Update > Windows Insider Program > Stop getting preview builds, click the Leave the Insider Program link, and then click the Leave the program now button on the pop-up webpage to opt out of the Windows Insider Program.
Step 2: Back up Your Files Using MiniTool ShadowMaker
Since a Windows 11 clean install will erase all files on your computer, you should back up your data in advance. As we have mentioned above, you can use MiniTool ShadowMaker to do the job.
Free Download
Step 3: Create a Windows 11 Installation USB Drive
You can use Windows 11 Media Creation Tool to create a Windows 11 Installation USB drive. Here is a guide:
- Go to Windows 11 software download page.
- Click the Download now button under Create Windows 11 Installation Media to download Windows 11 Media Creation Tool on your computer.
- Prepare a USB flash drive that has at least 8GB space and connect it with your computer. All files on the USB drive will be deleted during the creation process. So, you should make sure that there is no important data on it.
- Open the downloaded Windows 11 Media Creation Tool.
- If you see the User Account Control interface, click Yes to continue.
- Click Accept.
- Select the language and edition according to your requirements.
- Click Next.
- Select USB flash drive.
- Click Next.
- Select the connected USB flash drive from the next page.
- Click Next.
Windows 11 Media Creation Tool will begin to create a Windows 11 installation USB drive. You should wait until the whole process ends.
Step 4: Clean Install Windows 11 on Your PC
- Close your computer.
- Make sure the Windows 11 installation USB drive is connected to your computer.
- Boot your computer into BIOS and set the PC to start from the USB drive.
- You will see the Windows Setup interface. Select your needed language, time, and keyboard layout.
- Click Next.
- Click Install now on the next page.
- Click I don’t have a product key.
- Select the operating system you want to install.
- Click Next.
- Select I accept the Microsoft Software License Terms.
- Click Next.
- Click Custom: Install Windows only (advanced).
- Select the partition drive you want to install Windows 11 to. Usually, it is the Drive 0 Partition 1.
- Click Delete.
- Click OK to confirm the operation.
- Select the deleted drive and click Next.
- Windows 11 installing process starts. The process will last for some minutes. You should wait until the whole process ends.
After cleaning install Windows 11, you still need to continue with the Windows 11 out-of-box experience (OOBE) to complete the whole settings.
Step 5: Recover Your Lost Files Using MiniTool Power Data Recovery
If you lost your important files after cleaning install Windows 11 on your computer but there is no available backup, you can use MiniTool Power Data Recovery to get them back.
This software is a free file recovery tool. With it, you can recover data from all kinds of data storage devices including computer hard drives, memory cards, USB flash drives, SD cards , and more.
This software has a trial edition. You can first use it to scan the drive you want to recover data from. If this data recovery software can find the files you want to recover, you can use a full edition to recover all your needed files.
Free Download

Bottom Line
How to switch from Insider to a stable build of Windows 11 without data loss? After reading this article, you should know how to do it no matter you are in the Dev Channel, or the Beta/Preview Release Channel. Should you have any other related issues, you can let us know in the comments. You can also contact us via [email protected].
![]()

Microsoft выпустила предварительную сборку Windows 11 22000.160 (KB5005189) для участников программы Windows Insider, в каналах Dev и Beta.
Изменение и улучшение
- Microsoft начала распространять приложение «Часы» с функцией Продуктивной работы, которая позволяет улучшить вашу продуктивность вашей работы.
Основные функции обновлённого приложения: - Продуктивная работа: укажите сколько времени вы будете работать за компьютером, а приложение подготовит всё остальное.
- Интеграция со Spotify: подключите вашу учётную запись Spotify, выберите музыку, которая позволит вам максимально сосредоточиться.
- Задачи: создайте себе задачу, которую вы планируете выполнить во время сеанса «продуктивной работы», а после завершения работы, отметьте её как выполненную.
- Достижения дня: устанавливайте себе ежедневные цели и бросайте самому себе вызовы.

Исправления
- Панель задач: исправлена проблема, из-за которой значок об использовании вашего местоположения, иногда отображался на панели задач, даже в том случае, если приложениям запрещено использовать местоположение.
Известные проблемы
- Панель задач иногда мигает при переключении раскладок клавиатуры.
- После клика по иконке на панели задач может не открыться панель поиска. В этом случае перезапустите процесс «Проводник» и снова откройте поиск.
- Некоторые поисковые запросы, в поле поиска в настройках, могут приводить к сбою приложения.
- Доска виджетов может показаться пустой. Чтобы обойти эту проблему, вы можете выйти, а затем снова войти в систему.
- Microsoft работает над улучшением поиска в магазине. Ведётся работа над решением проблемы, из-за которой в некоторых случаях показ результатов поиска был неточным.
- Существует проблема, из-за которой у некоторых инсайдеров, могут отсутствовать некоторые переведённые строки в системе.
- Microsoft Teams доступен только на английском языке (США). Вскоре появится поддержка дополнительных языков.
В этой публикации, друзья, рассмотрим, как стать участником программы предварительного тестирования Windows 11 Insider, она же инсайдерская программа Windows 11. И как установить предварительную тестовую сборку Windows 11 Insider Preview. Не все могут сделать это беспрепятственно. Для участия в инсайдерской программе компьютер должен соответствовать системным требованиям Windows 11, в частности, иметь современный процессор и модуль TPM 2.0. Если ваш компьютер не соответствует, эти ограничения необходимо обходить. Плюс к этому, пользователи из России и Беларуси, из-за санкций не могут участвовать в инсайдерской программе Windows 11, и эти ограничения также нужно обходить. Но, давайте обо всём подробно.
Есть несколько способов, как установить Windows 11 Insider Preview.
Друзья, на отвечающем системным требованиям Windows 11 компьютере получить её инсайдерскую вы можете, обновившись до неё с текущей Windows 10, для этого необходимо подключиться к инсайдерской программе Windows Insider. Если вы хотите это сделать с основной вашей Windows 10, обязательно создайте бэкап, чтобы вы могли откатиться к стабильной системе в случае каких-то проблем. Либо клонируйте Windows 10 на другой диск компьютера.
В системных параметрах Windows 10 идите по пути:
Обновление и безопасность > Программа предварительной оценки
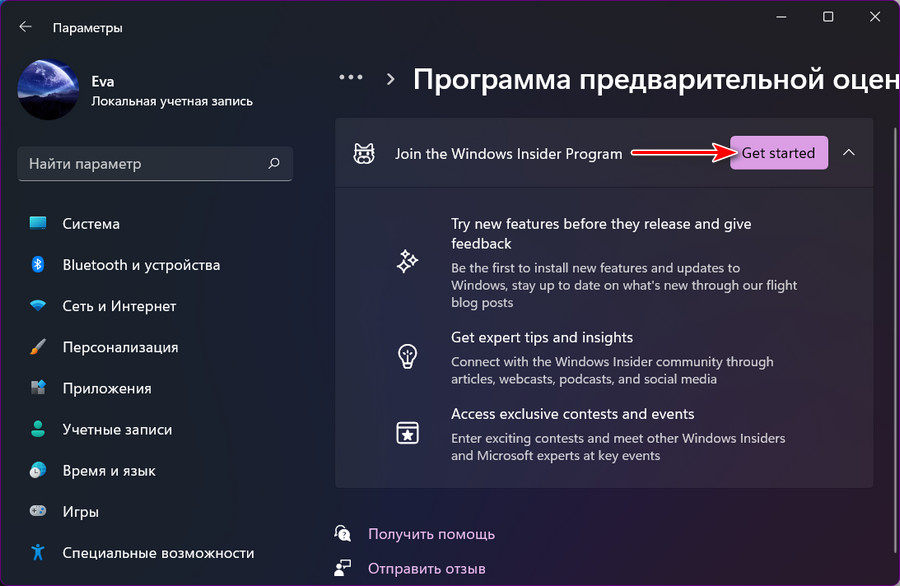
Жмите «Начать».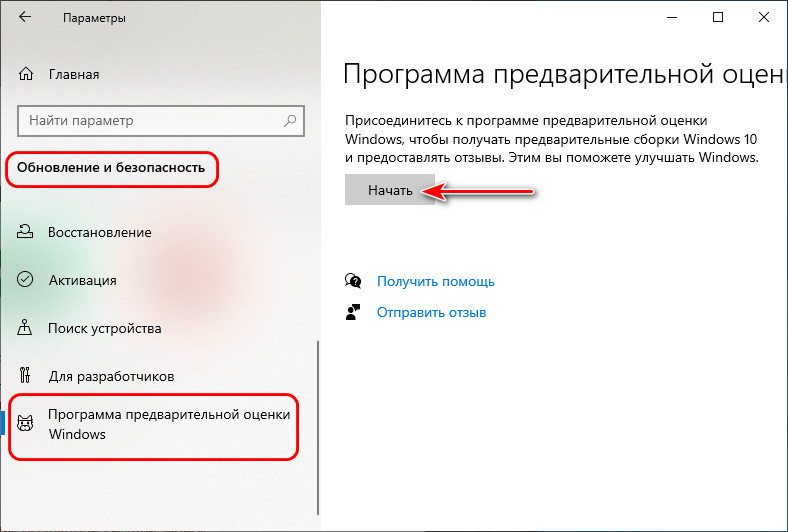
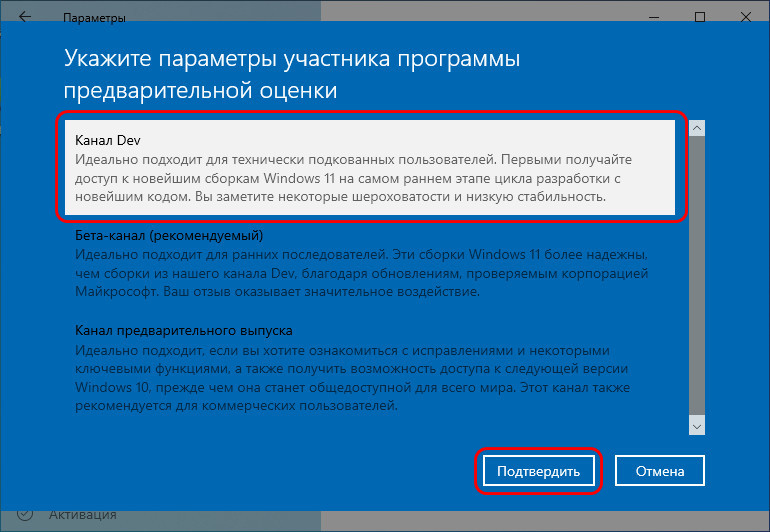
У инсайдерских Windows есть три канала поставки обновлений:
- Dev Channel – канал разработки, это первейшие сборки операционных систем, в них внедряются все новые наработки;
- Beta Channel – канал бета-тестирования, отлаженные сборки;
- Release Preview Channel – канал предварительных выпусков, ещё более отлаженные, но поздние сборки.
В контексте исследования первейших разработок Windows 11, конечно же, интересен канал Dev Channel. Или хотя бы Beta Channel.
Если вы ранее уже регистрировались в программе Windows Insider, подключите аккаунт Microsoft, связанный с программой.
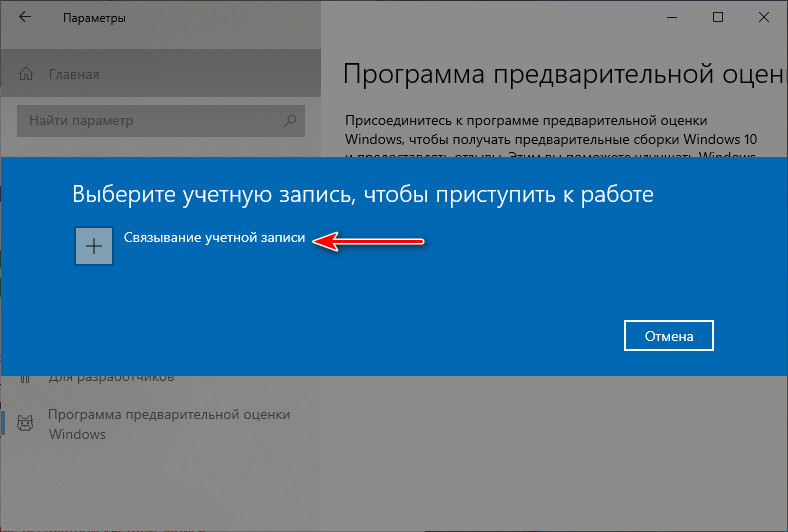
Если не регистрировались, выполните регистрацию прямо в приложении «Параметры».
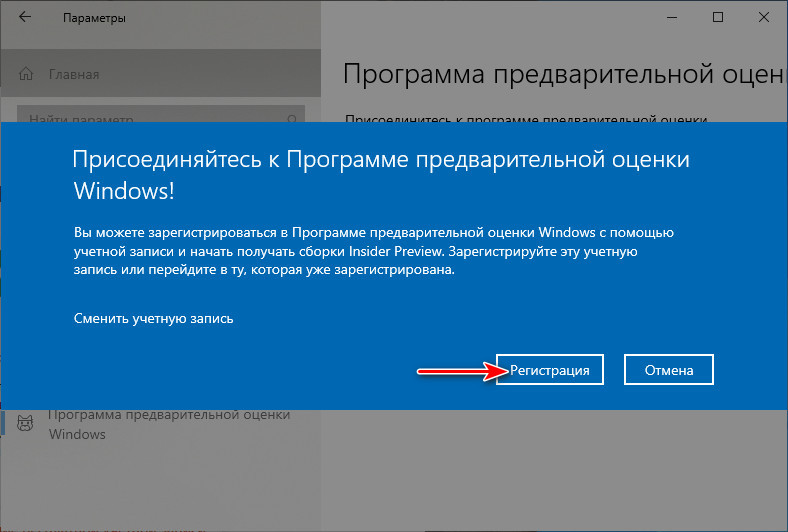
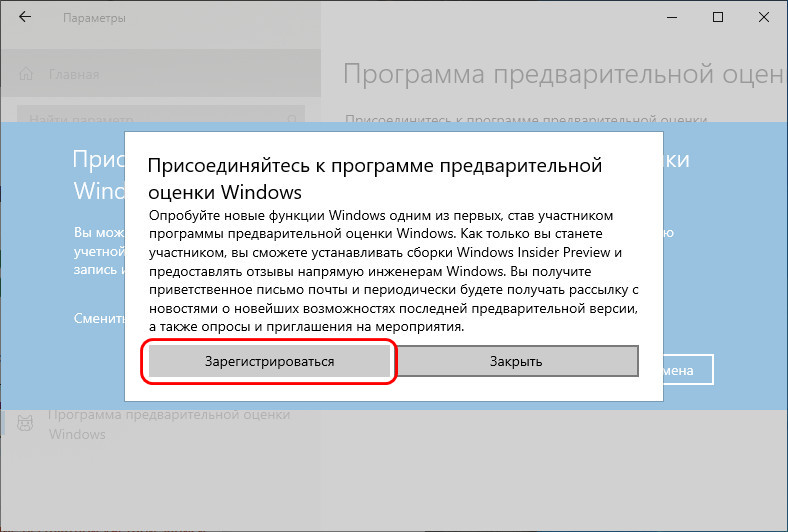
После авторизации выбираем предпочитаемый канал, например, в нашем случае ранний Dev.
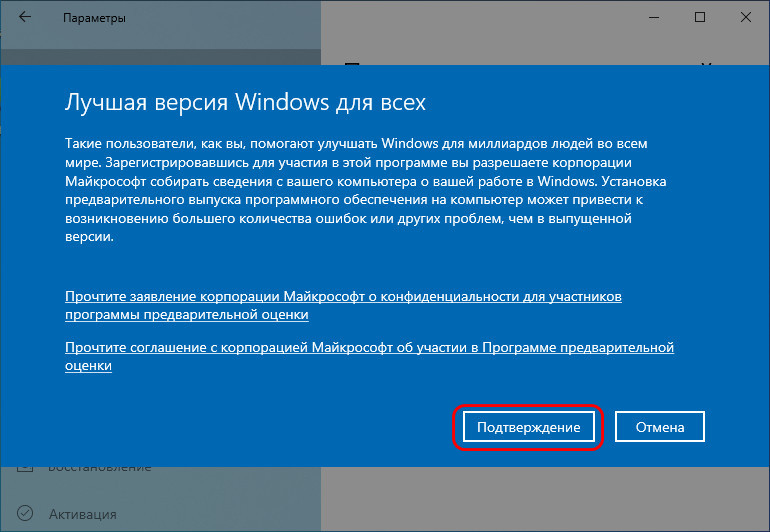
Затем подтверждаем переход на Windows Insider.
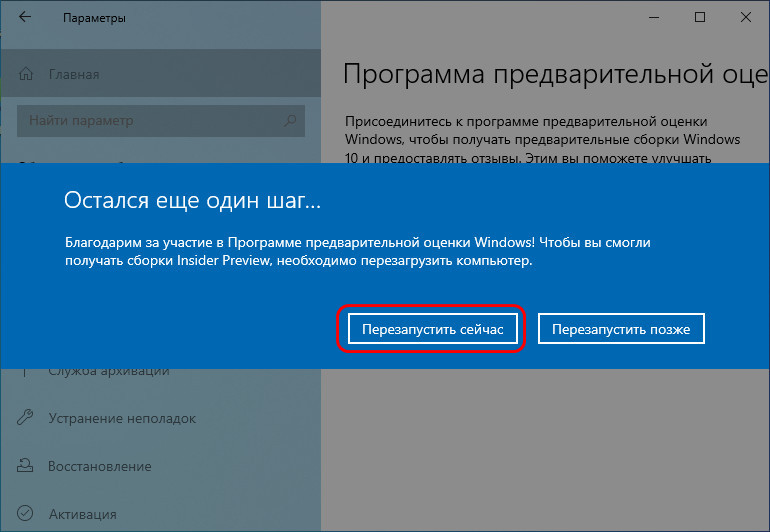
Перезагружаемся.
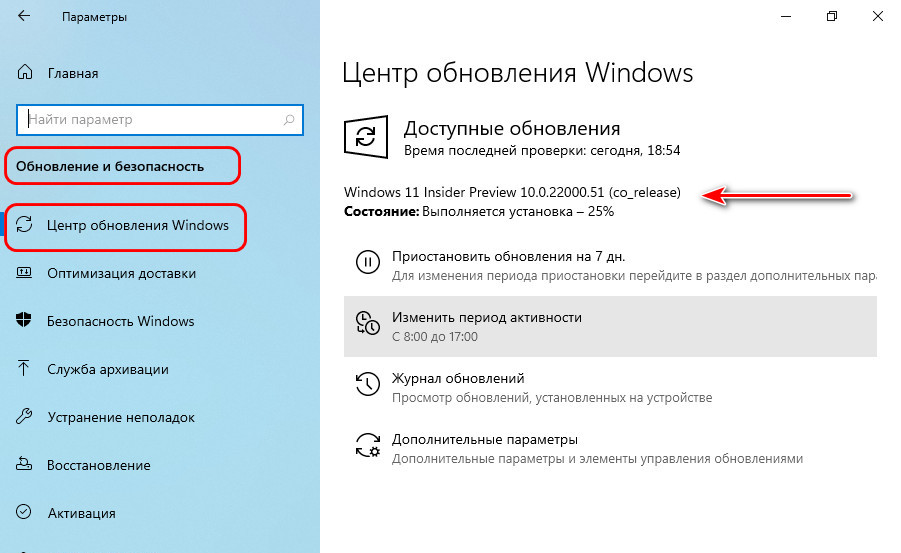
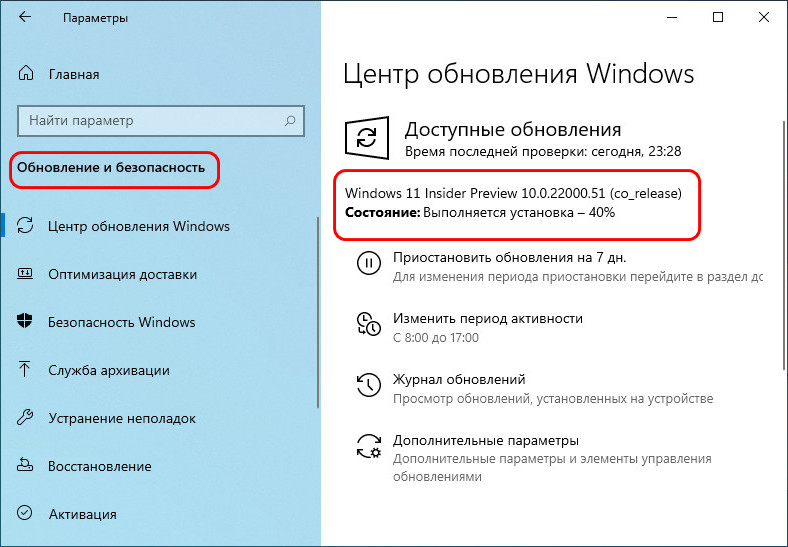
Идём в центр обновления Windows 10, жмём «Проверить наличие обновлений» и обновляем операционную систему до инсайдерской Windows 11.
На отвечающем системным требованиям Windows 11 компьютере можно перейти на инсайдерскую Windows 11 со стабильной Windows 11. Здесь будет тот же самый принцип и механизм, что при переходе на инсайдерскую Windows 11 с Windows 10. В системных параметрах Windows 11 идём по пути:
Центр обновления > Программа предварительной оценки Windows
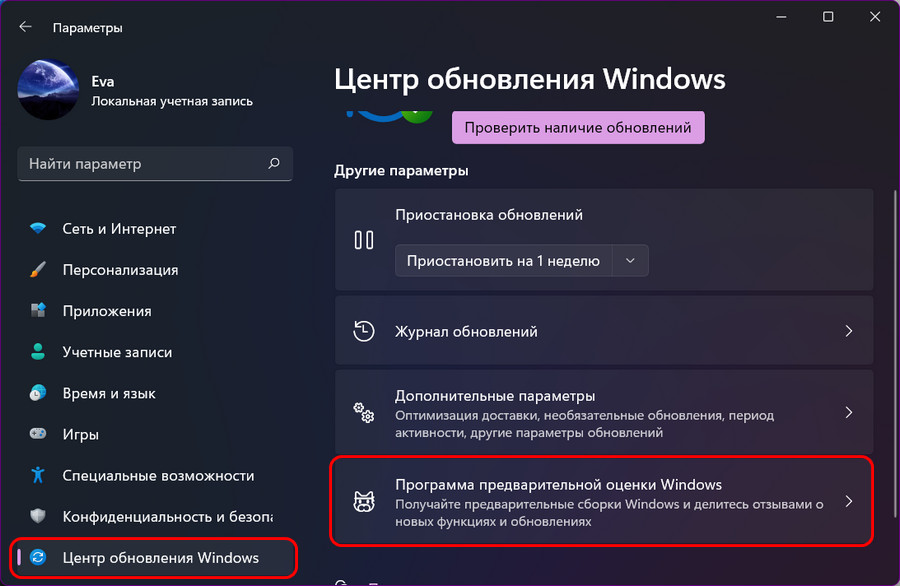
Запускаем присоединение к программе Windows 11 Insider и проходим те же этапы, что описаны в предыдущем пункте статьи.
Друзья, если ваш компьютер не соответствует системным требованиям Windows 11, вы не сможете официально участвовать в инсайдерской программе Windows 11. Но сможете неофициально или на виртуальных машинах. В целом можем предложить 3 способа решения вопроса.
Способ №1. Участвуйте в Windows Insider на виртуальной машине в программе VMware Workstation Pro или на виртуальной машине в Hyper-V. Эти два гипервизора предусматривают эмуляцию TPM 2.0. Установите на виртуальную машину со старта инсайдерскую сборку Windows 11. Потом зайдите в настройки инсайдерской программы в системном приложении «Параметры» по пути «Центр обновления Windows → Программа предварительной оценки». И подключите свой аккаунт Microsoft, привязанный к инсайдерской программе.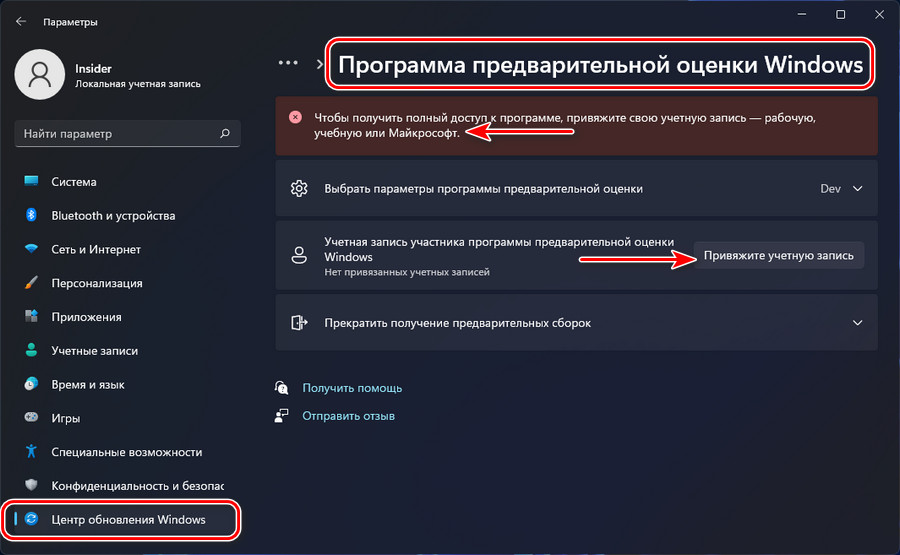
Это нужно для официального участия в программе Windows 11 Insider, т.е. для полноценного доступа к ней, в частности, для смены канала сборок, если вам это потребуется. Например, вы захотите перейти с более поздней ветви на раннюю, и вы сможете это сделать в том же в системном приложении «Параметры» по тому же пути «Центр обновления Windows → Программа предварительной оценки».
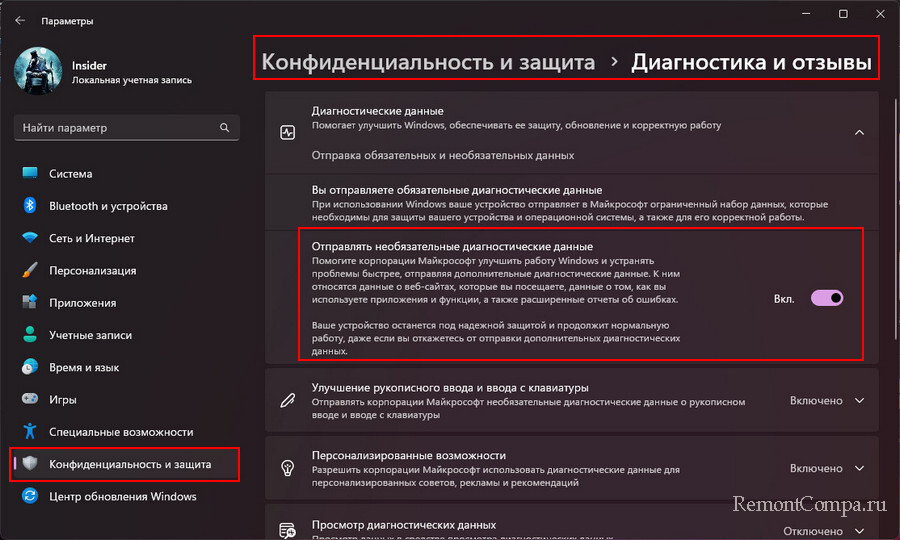
Способ №2. Попробуйте подключиться к инсайдерской программе на несовместимом с Windows 11 компьютере. Способ нестабильный, тем не менее. Включите отправку необязательных диагностических данных в приложении «Параметры».
Скачайте утилиту OfflineInsiderEnroll, выложенную на GitHub. Запустите её от имени администратора, выберите переключение на нужный канал путём ввода цифры канала. Например, на Dev Channel путём ввода цифры 1.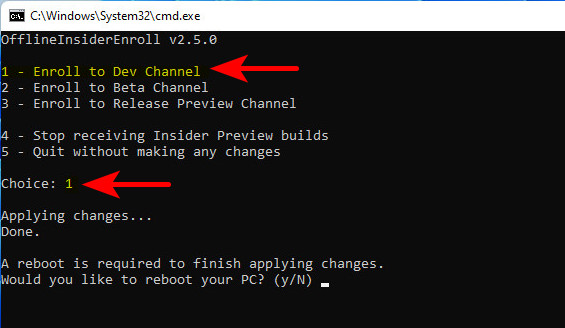 Перезагрузитесь. Далее запустите специальный скрипт пропуска проверки соответствия требованиям Windows 11. После чего попробуйте в центре обновления запустить обновления, возможно, вам будет доступно обновление до новой сборки Windows 11.
Способ 3. Обновляйтесь вручную до новых инсайдерских сборок. Для этого вам не нужно никакое участие в программе Windows 11 Insider. Вам просто нужно получить установочный образ новой сборки путём компиляции с помощью сайта UUP. Предлагаемый на этом сайте компилятор предусматривает снятие ограничений на установку операционной системы. Сам же процесс обновления до новой сборки инсайдерской Windows 11 точно такой же, как процесс обновления до стабильной Windows 11 с использованием ISO-образа установки. Детали смотрите в статье «Как обновить Windows 11 Insider на несовместимых компьютерах».
Наконец, как скачать инсайдерскую Windows 11, чтобы установить её с нуля? Скачать можно:
- На сайте инсайдерской программы Microsoft (требуется регистрация в инсайдерской программе);
- На сайтах типа платформ обновлений Windows методом компиляции установочного образа (ничего не требуется).
Важно: чтобы установить инсайдерскую Windows 11 на компьютер, который не отвечает её системным требованиям, либо на виртуальную машину без поддержки TPM 2.0, в частности, в программах VirtualBox и VMware Workstation Player, необходимы способы обхода блокировки установки операционной системы на неподдерживаемые устройства. Эти способы смотрим в статье «Как установить Windows 11 без TPM 2.0, Secure Boot и UEFI».
Если будете ставить систему на физический компьютер, вам пригодится статья сайта «Как создать загрузочную флешку Windows 11». Также, возможно, вам, друзья, пригодятся материалы сайта касаемо инсайдерской программы:
- «Что нового в сборках Windows 11 Insider Preview»;
- «Как в Windows 11 Insider Preview перейти на другой канал инсайдерской программы».
Наконец, друзья, ограничение на участие в Windows 11 Insider в России и Беларуси. Как обойти это ограничение, смотрим в статье «Как обойти ограничение на участие в Windows 11 Insider в России и Беларуси».