Though Windows has always placed its taskbar on the bottom of the screen by default, many users prefer to put it on the top or even on the left or right side. Windows 11 doesn’t provide a menu option for moving the taskbar anywhere, but with a simple registry tweak (or two), you can place it on top of the screen.
Note that, because Microsoft doesn’t support this taskbar move, there are some bugs associated with it. When you move the taskbar to the top, the Start menu shifts upward but aligns to the upper-left corner, even if the taskbar icons remain centered. The system tray is in the upper right where it belongs, but if you click on the clock, the speaker or on notifications, the pop-up menus for them appear in the lower right corner. The search menu, however, is still aligned to the center.
If you want the icons on the taskbar to appear above the Start menu, you can always choose to align them to the left (more on that below). If you can live with the odd placement of the flyout menus and want your taskbar on top, follow the steps below.
Note that, when we originally wrote this tutorial during the Windows 11 beta period, we thought that Microsoft might eventually disable this hack. However, as of the release build of Windows 11 (22000.194), it still works.
How to Move Your Taskbar to the Top on Windows 11
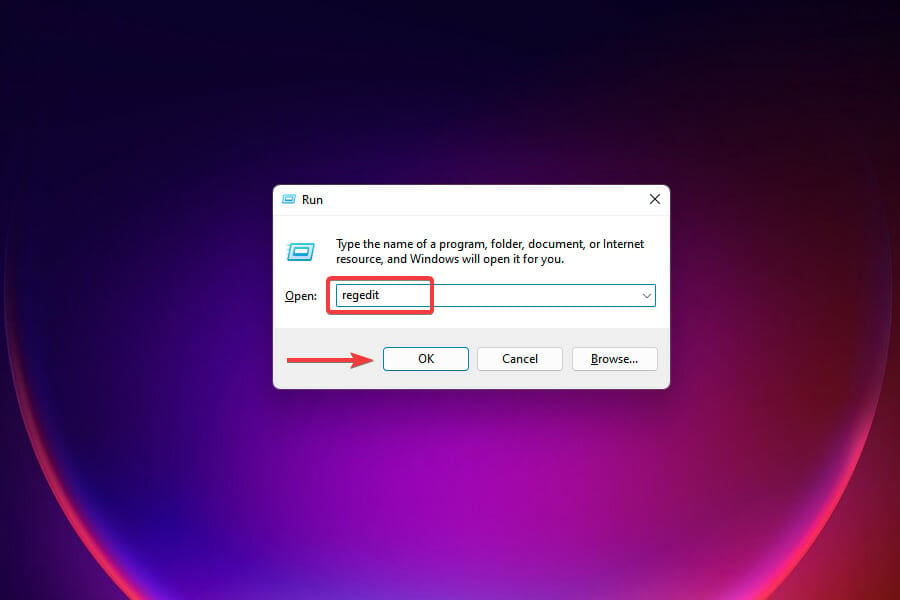
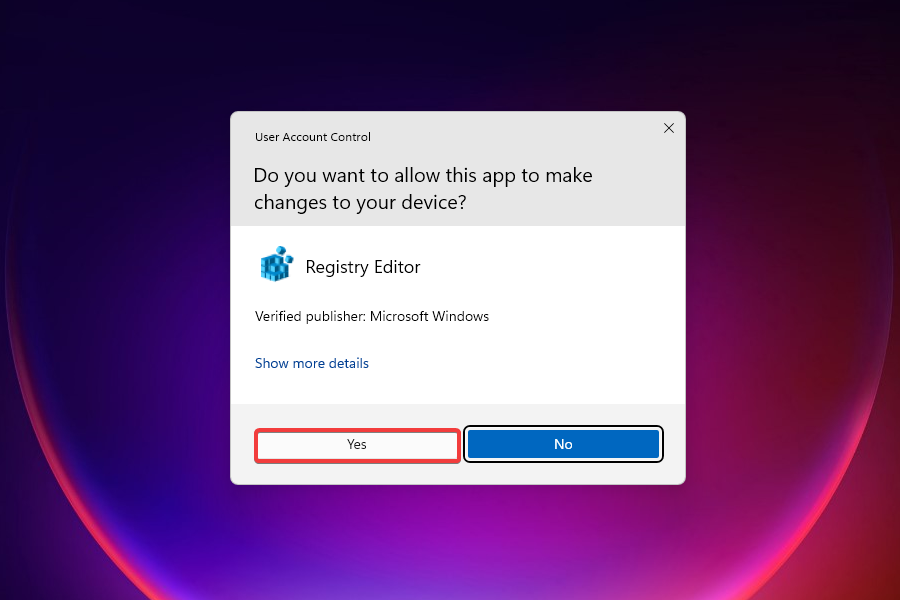
1. Open Regedit. You can get there by typing «regedit» into the Run menu (Windows + R) or searching for «regedit.» Say yes if prompted to confirm.
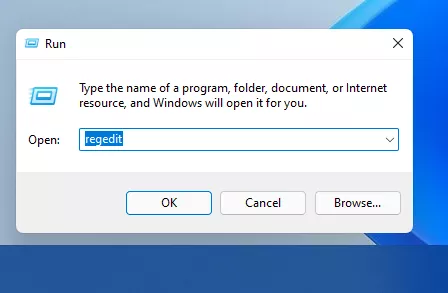
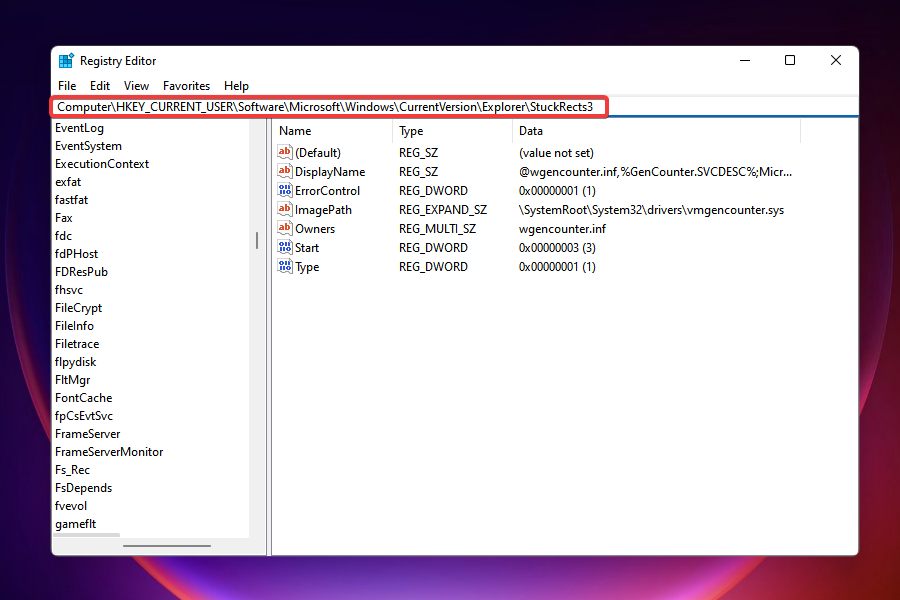
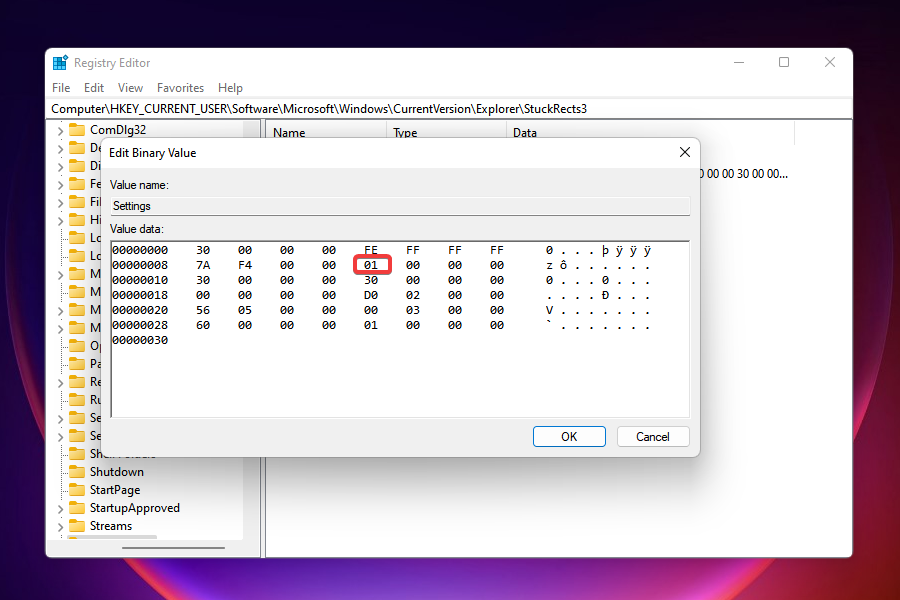
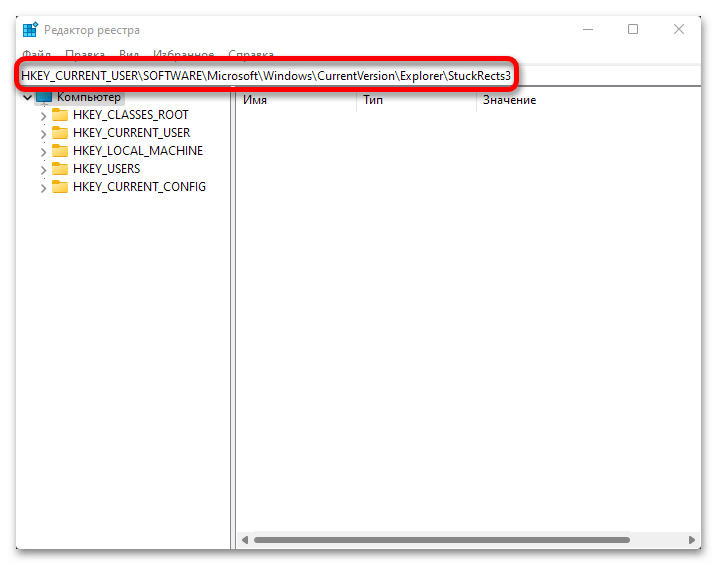
2. Navigate to HKEY_CURRENT_USERSoftwareMicrosoftWindowsCurrentVersionExplorerStuckRects3.
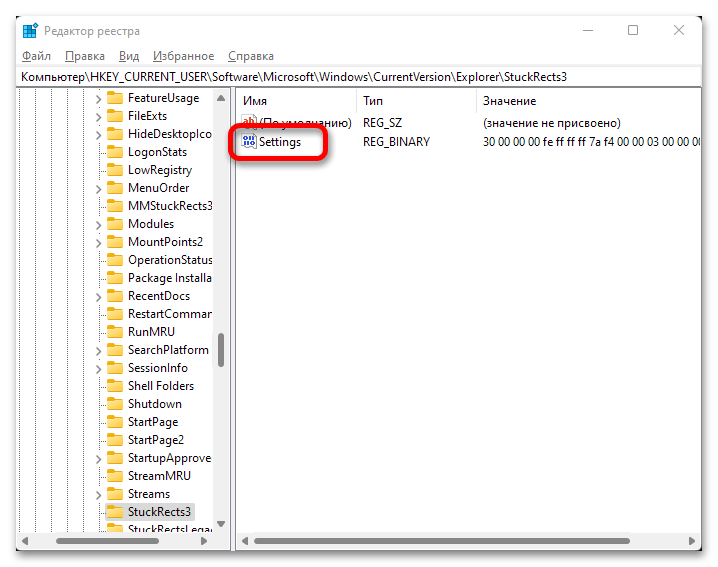
3. Open the Settings key for Editing by double-clicking it.

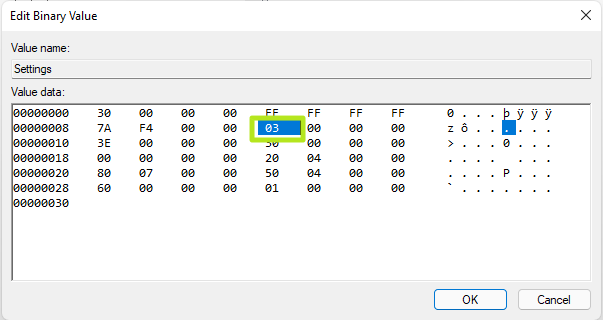
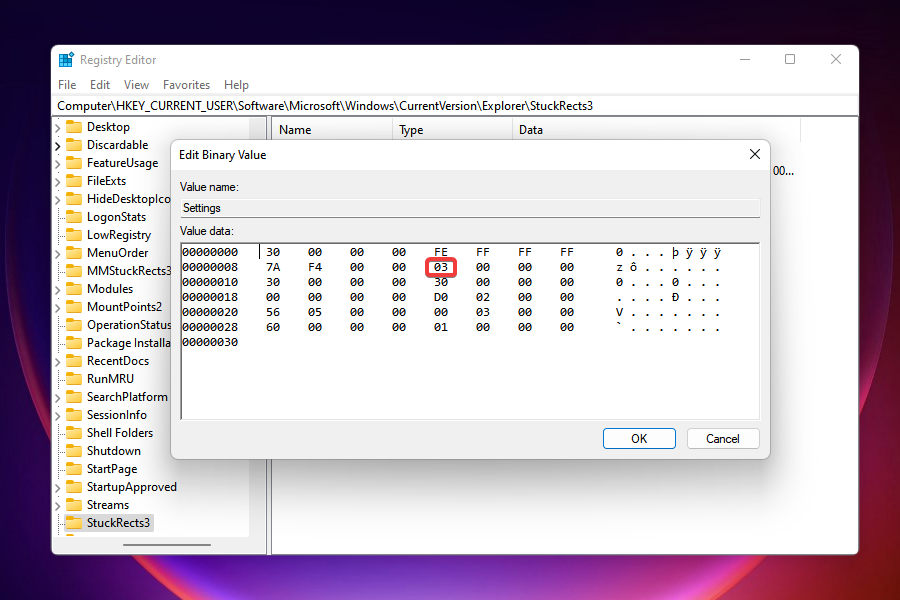
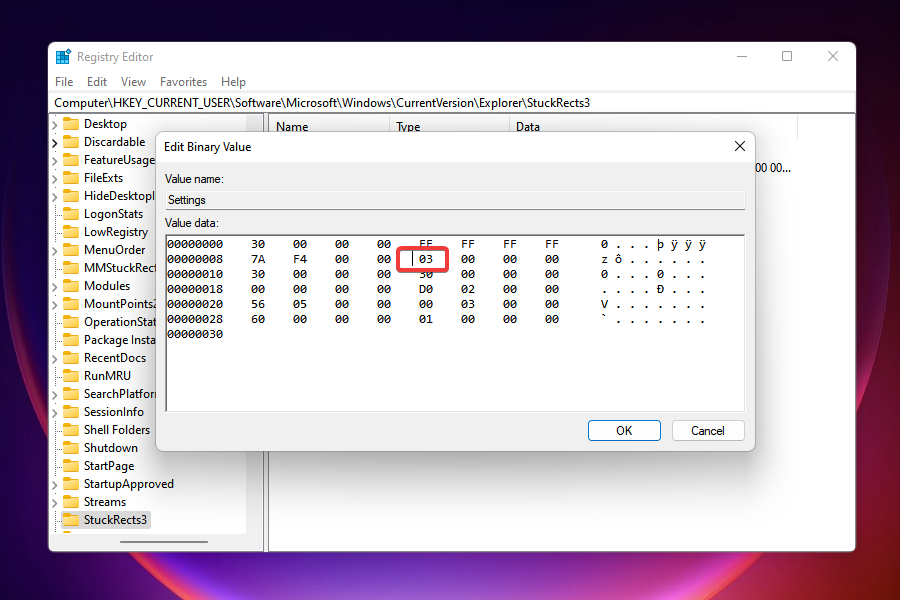
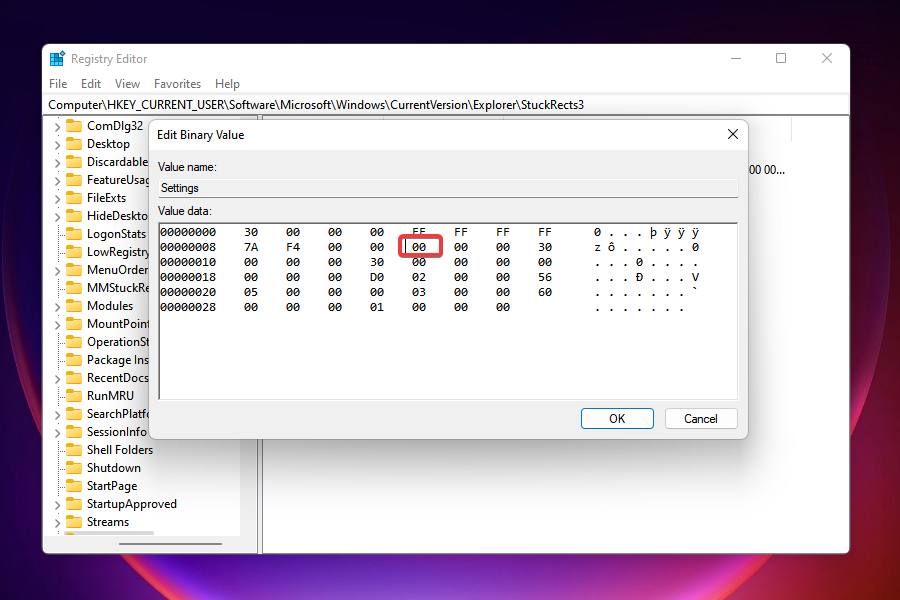
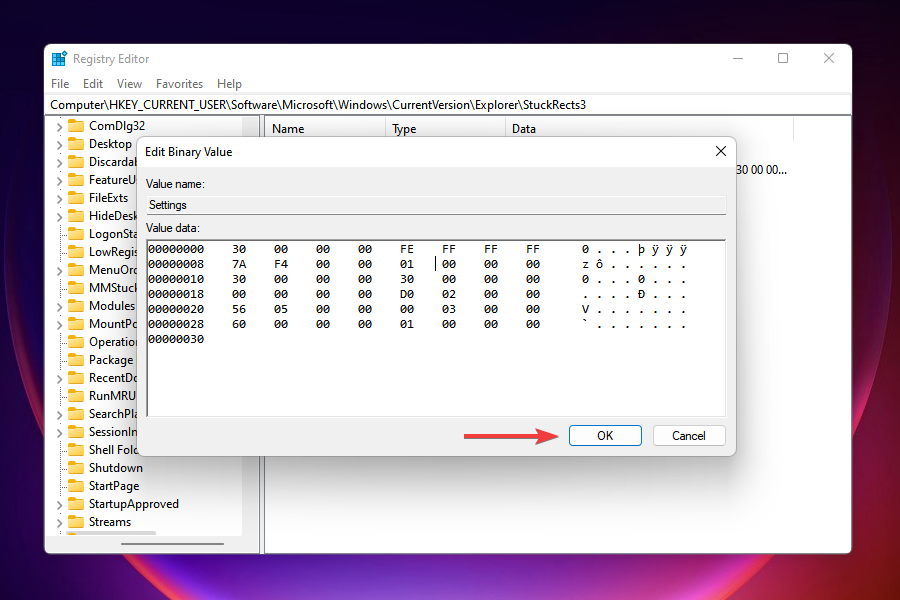
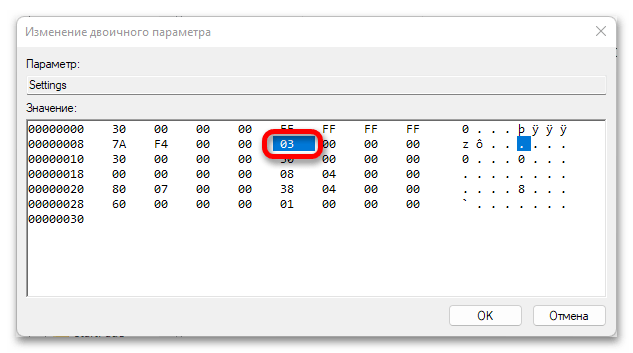
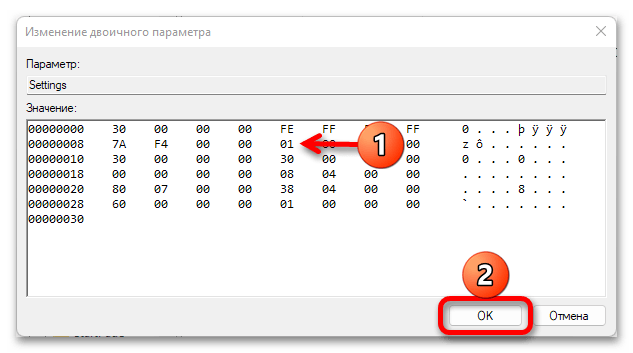
4. Change the fifth value in the second row from «03» to «01.» You can do this by deleting the 03 and then typing 01. Click Ok.
5. If you are using multiple monitors and want the taskbars on those screens to also be on top, you should change the same values to 01 for all registry keys in the HKEY_CURRENT_USERSoftwareMicrosoftWindowsCurrentVersionExplorerMMStuckRects3 folder. If you don’t have multiple monitors, this folder won’t exist.
6. Close Regedit.
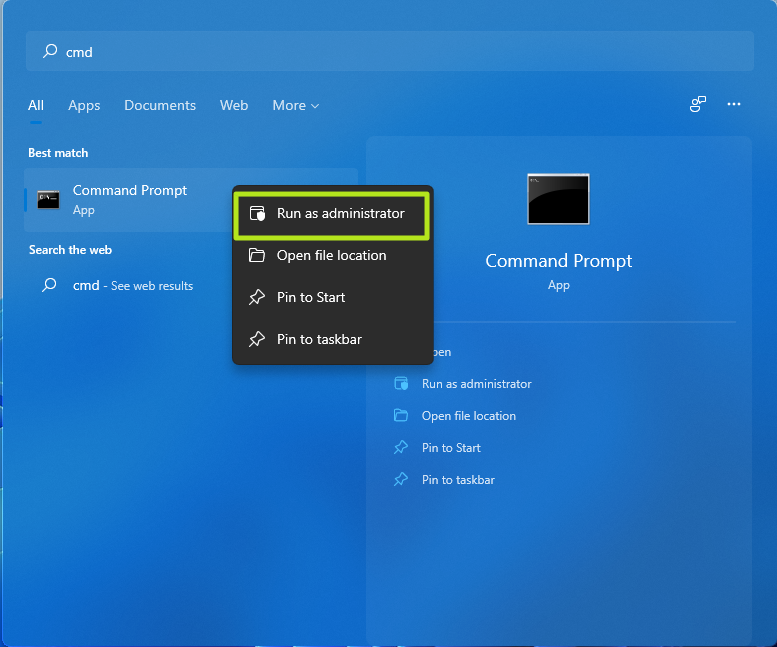
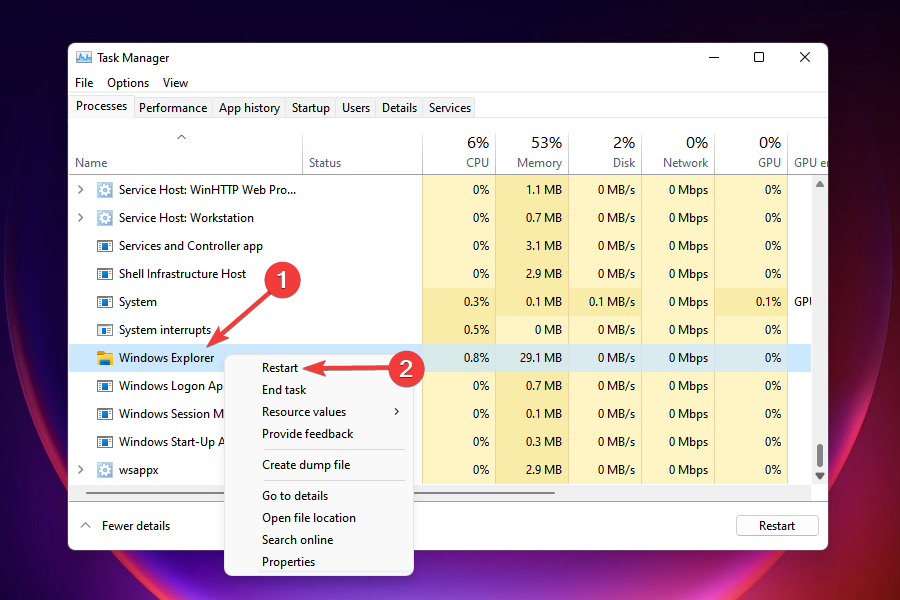
7. Launch the command prompt in administrative mode. You can do that by searching for «cmd,» right clicking the top result and selecting «Run as administrator.» Click Yes if prompted to confirm.
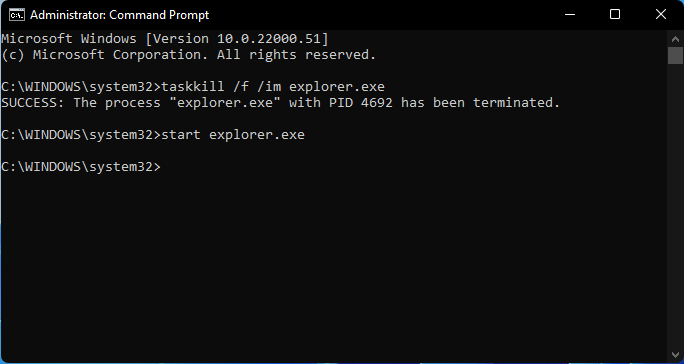
8. Stop and restart the explorer.exe process by entering taskkill /f /im explorer.exe and hitting Enter followed by start explorer.exe.
At this point you should see your taskbar at the top of the Windows 11 desktop and you can declare yourself done. However, if you want to align your Start button and other icons to the left so they match the location of the Start menu, follow the steps below.
How to Align the Taskbar Icons to the Left
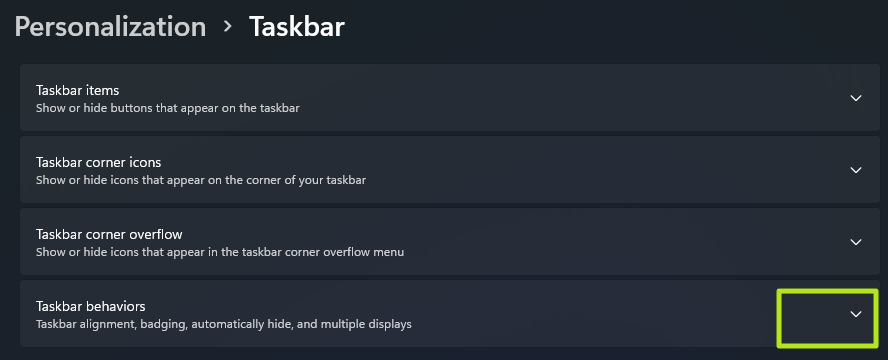
1. Right click on the taskbar and select Taskbar settings.

2. Expand Taskbar behaviors by clicking on it.
3. Select Left from Taskbar alignment.
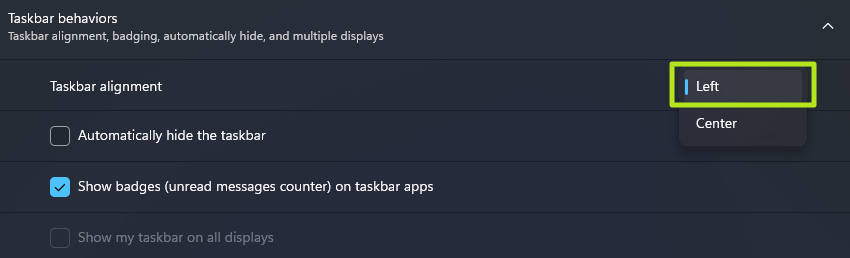
Now the icons should be on the left.
If you want to return to the bottom taskbar, just change the «01» back to «03» in HKEY_CURRENT_USERSoftwareMicrosoftWindowsCurrentVersionExplorerStuckRects3.
To make other tweaks to your UI, check out our tutorials on how to get the full context menus in Windows 11, how to replace the Start menu in Windows 11 and how to change the size of the taskbar in Windows 11.
Get instant access to breaking news, in-depth reviews and helpful tips.
Avram Piltch is Tom’s Hardware’s editor-in-chief. When he’s not playing with the latest gadgets at work or putting on VR helmets at trade shows, you’ll find him rooting his phone, taking apart his PC or coding plugins. With his technical knowledge and passion for testing, Avram developed many real-world benchmarks, including our laptop battery test.
Edit the taskbar’s binary values to change its position
by Kazim Ali Alvi
Kazim has always been fond of technology, be it scrolling through the settings on his iPhone, Android device, or Windows. And at times, unscrewing the device to take… read more
Updated on February 2, 2023
Reviewed by
Alex Serban

After moving away from the corporate work-style, Alex has found rewards in a lifestyle of constant analysis, team coordination and pestering his colleagues. Holding an MCSA Windows Server… read more
- You cannot move the taskbar in Windows 11 from the Settings app.
- However, there’s a known Registry hack that allows you to achieve this goal.
- By simply modifying some values, you can move the taskbar to the top, left, or right.
- The taskbar becomes inaccessible if you move it to the left or right, hence it’s not recommended that you make these changes.
XINSTALL BY CLICKING THE DOWNLOAD FILE
- Download Restoro PC Repair Tool that comes with Patented Technologies (patent available here).
- Click Start Scan to find Windows 11 issues that could be causing PC problems.
- Click Repair All to fix issues affecting your computer’s security and performance
- Restoro has been downloaded by 0 readers this month.
Windows 11 has been a complete revamp, and you will find a lot of changes from the previous OS. One of the changes that struck users the most was the inability to move the taskbar to the top or sides.
The jury is still out on whether these changes have been welcomed by the users, and we will come to know only after Windows 11 is rolled out for all.
With the option to move the taskbar missing from the Settings app, users were confused as to whether it was at all possible. But, there’s a registry hack that comes to our aid. Here’s how you can move the Windows 11 taskbar.
How can I move the Windows 11 taskbar?

NOTE
The following solution does not work anymore on Windows 11 after the recent update to 22H2. We also tried a few third-party tools, but none seem to work for now. If and when an option is available to reposition the Taskbar, we will update the article.
1. Move Windows 11’s taskbar to the top
By tweaking the registry using built-in Registry Editor, users can easily move their taskbars to the top of their screens. The taskbar’s location is set by binary values, and editing them helps move the taskbar wherever the user wants.
1. Press Windows + R to launch the Run command.
2. Type or paste regedit in the text field and either click on OK or hit Enter to launch the Registry Editor.
3. Click Yes on the UAC prompt that appears.
4. Paste the following path in the address bar at the top and hit Enter, or navigate to it via the pane on the left: ComputerHKEY_CURRENT_USERSoftwareMicrosoftWindowsCurrentVersionExplorerStuckRects3
5. Double-click on the Settings key.

6. Locate the value under the fifth column from the right and the second row from the top. It would be the one under entry FE.
7. Click on the value to place the cursor before it.
8. Now hit Del to remove the existing value (03). After you delete the value, 00, the next value in line would appear in the concerned entry and the last at the bottom will now be empty.
9. There are three different values that can be entered here to move the taskbar across various locations on the desktop. Identify the position you want to move it to and enter the corresponding value.
10. To move the Windows 11 taskbar to the top, enter 01.
11. Click on OK to save the changes.
12. Close the Registry Editor.
13. Now you need to restart the File Explorer. This can be done either by restarting the Windows itself or merely the program. We will go with the latter.
Some PC issues are hard to tackle, especially when it comes to corrupted repositories or missing Windows files. If you are having troubles fixing an error, your system may be partially broken.
We recommend installing Restoro, a tool that will scan your machine and identify what the fault is.
Click here to download and start repairing.
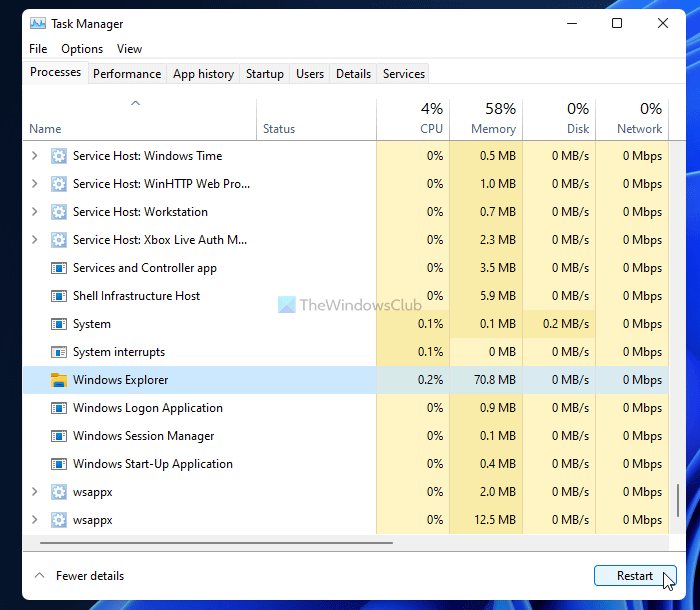
14. Press Ctrl + Shift + Esc to launch Task Manager.
15. Locate the Windows Explorer entry, right-click on it, and select Restart from the context menu.
16. The taskbar will now be moved according to the value you entered earlier.
2. Move the taskbar to the side
The steps to move your taskbar to the left or the right sides are mostly identical to the ones for moving it to the top. However, when editing the FE values in Registry Editor in step 10, you need to do the following:
After you edit the values, you just need to restart File Explorer, and that’s it.
This solution might not be as simple as the Settings method that we used to have, but it’s still quick and effective.
You now know how to move the taskbar in Windows 11 easily. But how about moving it back to its original position, i.e., the bottom? Simply revert the changes that you made earlier, save them, and restart Windows Explorer.
Should I move the taskbar to the sides in Windows 11?
Although you can move the taskbar to the left and right sides of the desktop in Windows 11, the icons are no more accessible, and it’s just the taskbar that’s visible. So, it’s not recommended that you make the change.
Let’s understand it with an example. When you move the taskbar to the right, here’s how it appears:
You will notice that the icons are not visible, and it makes executing tasks simply impossible. Hence, for now, you can drop the idea of moving Windows 11’s taskbar to the sides.
If and when it becomes possible to make changes, we will update the article. Keep checking this page to stay up-to-date.
Can I move the Start menu and other taskbar icons to the left?
Yes, you can move easily move the Start menu along with other taskbar icons to the left by modifying the taskbar’s alignment in the Personalization settings.
With the icons aligned to the left instead of the default center position, it gives us a Windows 10 vibe. So, if you have recently upgraded to the latest iteration and are still not completely acquainted with the changes, moving the icons may be a good idea.
That’s all there’s to know on the topic. You can now move the taskbar across the desktop in Windows 11 with a few minor changes in the Registry.
If you have just upgraded, check out our comparison of Windows 10 and Windows 11. Also, if you are not comfortable with the latest OS and want to revert to the previous one, here’s how you can roll back to Windows 10.
Let’s know your experience in the comments section below and your thoughts on the inability to the taskbar via Settings.
![]()
Newsletter
Некоторым пользователям необходимо в операционной системе Windows 11 переместить панель задач в другое место на экране компьютера. По умолчанию на ПК панель задач располагается в нижней части экрана монитора.
В Windows 11 переработали панель задач, в частности, установили выравнивание по центру для меню «Пуск» и значков приложений, изменили область уведомлений, добавили новые визуальные эффекты и анимацию, а также применили некоторые другие улучшения. Несмотря на добавление новых функций, из операционной системы были удалены некоторые устаревшие возможности, такие как возможность перемещать панель задач.
Содержание:
- Как переместить панель задач с помощью StartAllBack
- Как переместить панель задач Windows 11 (видео)
- Как изменить положение панели задач Windows 11 с помощью ExplorerPatcher
- Выводы статьи
- Как перенести панель задач в Windows 11 (видео)
Вы могли в предыдущих версиях Windows переместить панель задач в разные стороны экрана своего компьютера: вверх, влево или вправо. Если вам не понравилось новое расположение этого элемента интерфейса системы, то всегда можно было вернуть панель задач вниз на свое место по умолчанию.
Сейчас вы не можете в Windows 11 переместить панель задач вверх, влево или вправо, потому что в операционной системе используется совершенно новый дизайн, а перемещение ее по экрану довольно сложный процесс. Microsoft объяснила, что только перемещение панели задач вправо меняет весь дизайн, включая меню «Пуск» и приложения, а текущий интерфейс и анимация предназначены для нижнего размещения.
По заявлению представителей корпорации Майкрософт, изменения дизайна потребовали бы много усилий по переработке интерфейса системы, а это того не стоило, потому что на это не было достаточного спроса пользователей.
Ранее до выхода версии Windows 11 22H2 существовала возможность поменять положение панели задач на экране с помощью внесения изменений в системный реестр. Но, затем Майкрософт отключила эту недокументированную возможность. Сейчас параметры реестра сразу возвращаются к значениям по умолчанию после выполнения перезагрузки компьютера.
Часть пользователей желает знать, как переместить панель задач на Виндовс 11. Если вы относитесь к числу тех пользователей, кому нравится расположение панели задач в другом месте, например, вверху, слева или справа, то вы сможете поместить панель задач на разных сторонах экрана.
Из этого руководства вы узнаете, как переместить панель задач на экране в Windows 11 несколькими способами. Для решения этой задачи вам потребуется использовать стороннее программное обеспечение.
Перед началом изменения настроек внешнего вида Windows 11 создайте точку восстановления, чтобы у вас была возможность откатить состояние операционной системы, которое она имела до предстоящего изменения параметров, если что-то пошло не так.
Как переместить панель задач с помощью StartAllBack
StartAllBack — программа для изменения интерфейса Windows, возвращающая классический внешний вид операционной системе. С помощью программы можно улучшить меню «Пуск», Проводник и панель задач, контекстное меню, тему оформления в стиле предыдущих версий Windows.
В приложении доступны три варианта оформления в стилях Windows 11, Windows 10 или Windows 7 с тонкой настройкой внешнего вида системы.
Это платная программа c 30-дневной бесплатной пробной версией, которая имеет поддержку русского языка.
Выполните следующие действия:
- Скачайте StartAllBack с официального сайта: https://www.startallback.com/.
- Запустите установочный файл приложения.
- В процессе инсталляции в окне конфигурации StartAllBack сначала выберите одного или для всех пользователей, чтобы использовать программу на компьютере, а затем тему Windows 11 (она указана, как «Правильная 11»). Эти настройки потом можно поменять из окна программы.
- После установки приложения на компьютер, щелкните правой кнопкой по меню «Пуск», а в открывшемся меню выберите «Свойства».
- В окне «Настройки StartAllBack» войдите во вкладку «Панель задач».
- В разделе «Настройте поведение и сверх-способности» перейдите к опции «Положение панели задач на экране:».
- В раскрывающемся списке выберите предпочтительное расположение панели задач:
- Снизу.
- Слева.
- Сверху.
- Справа.

В случае необходимости вы можете вернуть панель задач на прежнее место, выбрав местоположение по умолчанию «Снизу».
Как переместить панель задач Windows 11 (видео)
Как изменить положение панели задач Windows 11 с помощью ExplorerPatcher
Если вы пользователь Windows 11 и ищите ответы на вопросы о том, как переместить панель задач наверх или как переместить панель задач в бок экрана, вы можете использовать сторонние инструменты для изменения положения этого элемента интерфейса.
ExplorerPatcher — бесплатное приложение от разработчика valinet, которое возвращает классический дизайн панели задач с некоторыми устаревшими функциями, например, такими как возможность переместить панель задач вправо, влево или наверх. Хотя это не идеальное решение, но, если вы хотите изменить настройки системы, это лучший бесплатный вариант.
В программе ExplorerPatcher имеются много других функций, которые изменяют различные системные параметры. После открытия окна «Свойства» (ExplorerPatcher), название активного раздела с настройками будет подчеркнуто.
Пройдите несколько шагов, чтобы перенести панель задач Windows 11 в нужное расположение на экране:
- Скачайте программу ExplorerPatcher на странице GitHub: https://github.com/valinet/ExplorerPatcher/releases/latest/download/ep_setup.exe.
- Дважды щелкните по файлу «ep_setup.exe», чтобы установить приложение на компьютер.
- Установка приложения проходит с перезапуском Проводника. Вы ненадолго увидите белый экран, а затем откроется рабочий стол Windows
- Щелкните правой кнопкой мыши по панели задач и выберите параметр «Свойства». Вы также можете открыть свойства ExplorerPatcher, используя меню «Пуск» войдя во «Все приложения», а там выбрать «Свойства (ExplorerPatcher)».
- В разделе «Taskbar» (Панель задач), в параметре «Taskbar style» (Стиль панели задач) выберите опцию «Windows 10».

В программе ExplorerPatcher вы можете решить задачу, как переместить панель задач вверх Виндовс 11 или в другое место на экране, двумя методами.
1 способ (действия после 5 шага):
- Нужно щелкнуть правой кнопкой мыши по панели задач.
- В контекстном меню снимите флажок с пункта «Закрепить панель задач».

- Зажмите левую кнопку мыши и вручную перетащите панель задач вверх, влево или вправо на новое место.
2 способ (выполните после 5 шага этой инструкции):
- В опции «Primary taskbar location on screen» (Основное расположение панели задач на экране) выберите подходящий вариант размещения.

В выпадающем списке вам доступны следующие расположения:
- Bottom (default) — снизу (по умолчанию).
- Top — сверху.
- Left — слева.
- Right — справа.

- Выберите нужное положение панели задач на экране компьютера, а затем нажмите на «Restart File Explorer» (Перезапустить Проводник), чтобы применить эти изменения в операционной системе Windows.

На этом изображении панель задач Windows 11 расположена по левому краю экрана.

Используйте настройку «Start button style» (Стиль кнопки «Пуск»), чтобы выбрать вариант «Windows 11». В этом случае кнопка меню «Пуск» примет стандартный вид, который похож на используемый в установленной операционной системе по умолчанию.
Если вам потребовалось отменить изменения, сделанные с помощью утилиты ExplorerPatcher, проделайте следующее:
- Нажмите на раздел «About» (О программе).
- Выберите опцию «Restore Default Setting» (Восстановить настройки по умолчанию).
- В открывшихся окнах с предупреждениями согласитесь на внесение изменений в реестр для отката настроек ExplorerPatcher.
- Перезагрузите ПК, чтобы вернуть настройки Windows 11 по умолчанию.
Выводы статьи
Некоторая часть пользователей операционной системы Windows 11 желает знать, как переместить панель задач влево, вверх или в правую часть экрана. В новом интерфейсе ОС Windows 11 не поддерживается изменение положения панели задач. В связи с этим у пользователей возникают вопросы о том, как в Win 11 переместить панель задач. Для решения этого вопроса вы можете использовать сторонние программы: StartAllBack или ExplorerPatcher, которые меняют расположение панели задач на экране компьютера.
Как перенести панель задач в Windows 11 (видео)
Похожие публикации:
- Как изменить цвет меню «Пуск» и панели задач Windows 11
- Как поменять разрешение экрана в Windows
- Как установить редактор групповой политики в Windows 11 Home
- Виджеты в Windows 11: как включить, отключить или удалить
- Как создать папки в меню «Пуск» Windows 11

Способ 1: Системные средства
В предыдущей версии Windows расположение панели задач (ПЗ) на экране можно было менять в параметрах персонализации, но в 11 такая возможность отсутствует. На сегодняшний день переместить ПЗ в любое место, отличное от заданного по умолчанию, системными средствами можно только путем редактирования реестра. Алгоритм действий следующий:
- Вызовите окно «Выполнить» и вставьте в его строку указанный ниже запрос. Нажмите «ОК» или «Enter» для его выполнения.
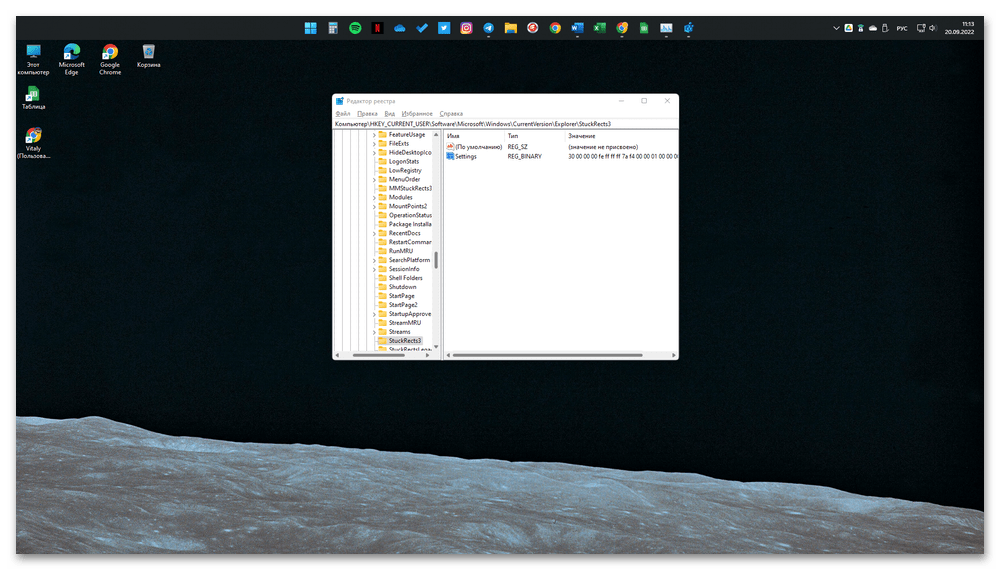
regedit - Скопируйте указанный ниже путь, вставьте его в адресную строку открывшейся системной оснастки и нажмите «Enter» для быстрого перехода. Вместо этого вы можете самостоятельно перейти к нужной директории, последовательно открывая каждый из каталогов.
HKEY_CURRENT_USERSOFTWAREMicrosoftWindowsCurrentVersionExplorerStuckRects3 - Двойным нажатием левой кнопки мышки (ЛКМ) откройте параметр «Settings».
- Кликните по значению, указанному в строке 00000008 и столбце FE, – по умолчанию это 03.

Замените его на 01 и нажмите «ОК» для подтверждения.
- Перезапустите «Проводник». Для этого сочетанием клавиш «Ctrl+Shift+Esc» вызовите «Диспетчер задач» (вместо этого можно воспользоваться соответствующим пунктом в меню кнопки «Пуск», вызываемым нажатием правой кнопки мышки (ПКМ).

Найдите в списке активных процессов «Проводник», кликните по нему для выделения и воспользуйтесь расположенной в правом нижнем углу кнопкой «Перезапустить».

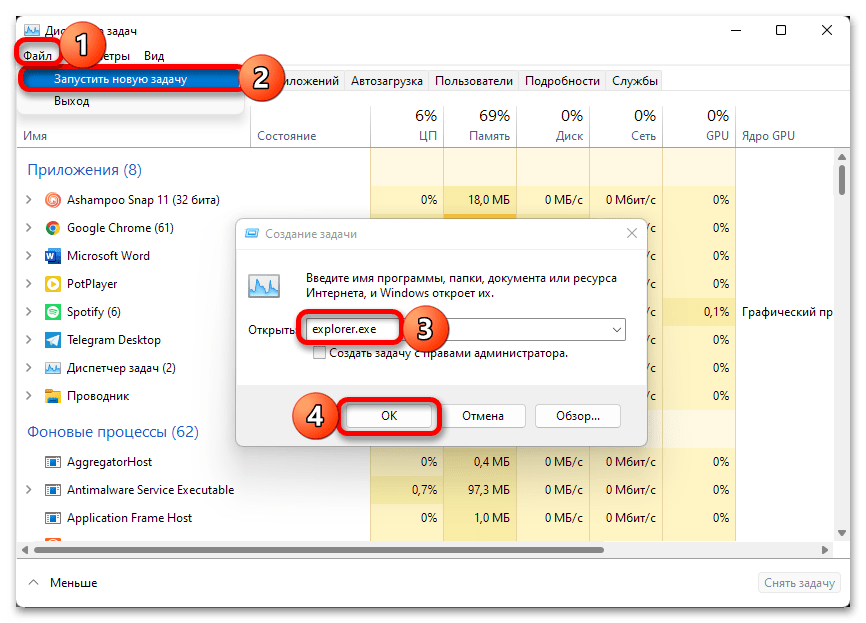
Примечание: Если «Проводник» в настоящий момент не запущен, то есть отсутствует в продемонстрированном выше перечне, откройте его самостоятельно клавишами «Win+E» либо через «Диспетчер задач»: вызовите меню «Файл», выберите в нем пункт «Запустить новую задачу», затем в открывшемся окне введите
explorer.exeи кликните «ОК» для подтверждения. Повторно выполните действия, описанные в предыдущем абзаце.


Изображение на экране ПК обновится, а панель задач будет перемещена вверх. Если потребуется вернуть ей прежнее расположение, выполните действия, противоположные тому, что описано в пунктах №3-4 настоящей инструкции – откройте параметр «Settings» системного реестра, в строке 00000008 и столбце FE замените значение 01 на 03.
Читайте также: Как изменить размер панели задач в Виндовс 11
Способ 2: Сторонние утилиты
Для каждой версии Windows, и 11 не стала исключением, сторонними разработчиками выпускается множество программ, позволяющих в той или иной степени персонализировать интерфейс и делать то, что изначально недоступно в системных параметрах. С помощью одного из таких решений можно буквально в несколько кликов переместить панель задач в верхнюю часть экрана.

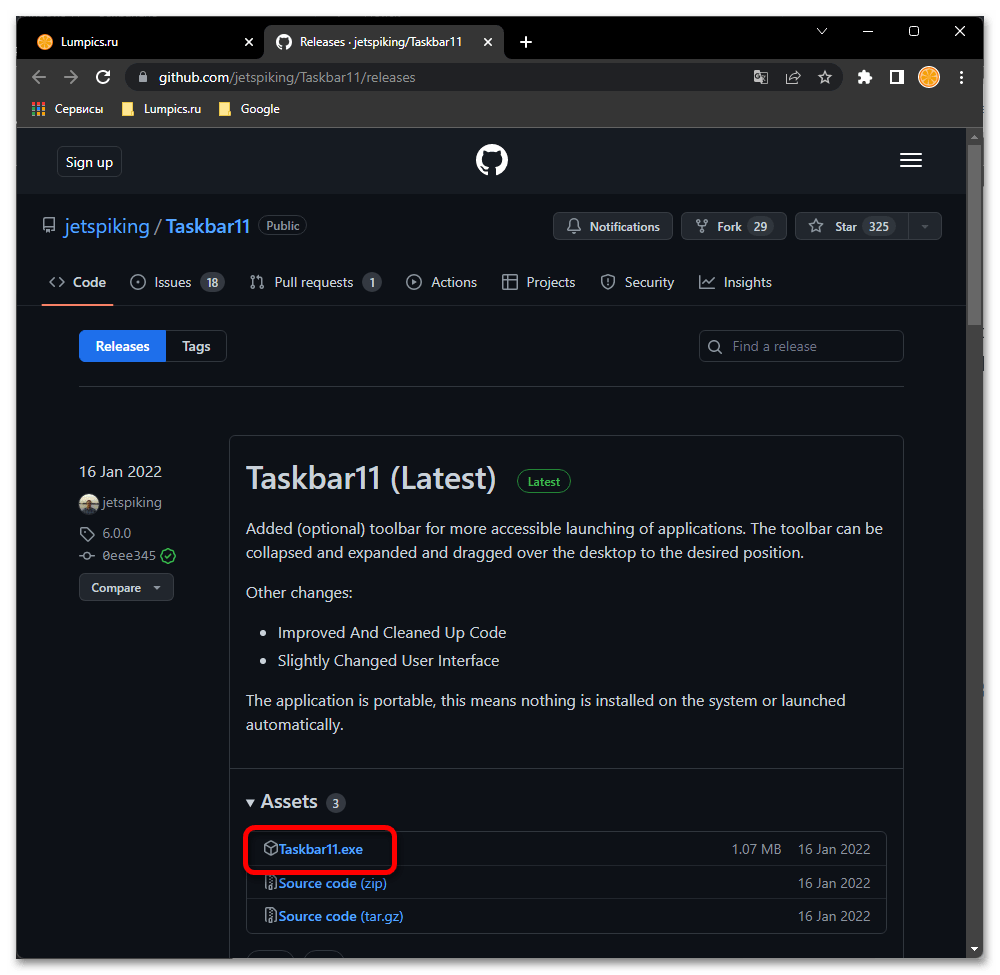
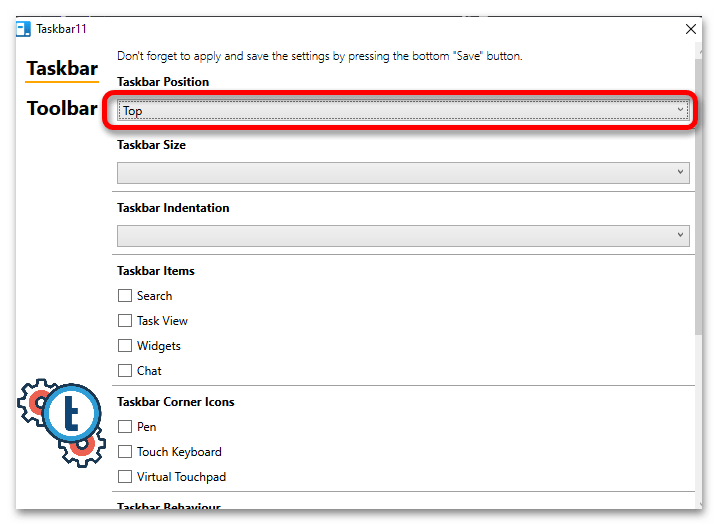
Скачать Taskbar11 на GitHub
- Откройте сайт по указанной выше ссылке и кликните по строке «Taskbar11.exe» в блоке «Assets».

Подтвердите сохранение установочного файла на ПК, если это потребуется.
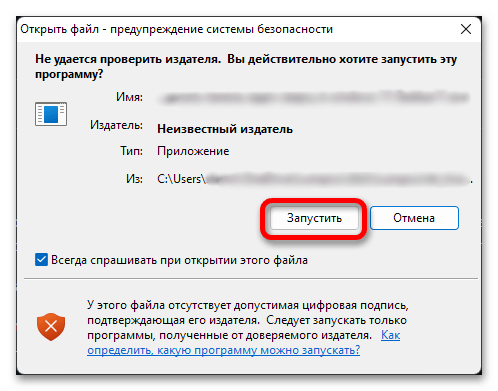
- Запустите скачанное приложение. Если появится предупреждение от системы безопасности, подтвердите выполнение данной процедуры.
- Taskbar11 не требует установки, а потому сразу будет открыт его интерфейс. Разверните выпадающий список под строкой «Taskbar Position»

и выберите в нем значение «Top».
Пролистайте окно приложения вниз и воспользуйтесь кнопкой «Save» для того, чтобы внесенные изменения вступили в силу.
Как и в предыдущем случае, панель задач переместится из нижней части экрана вверх.

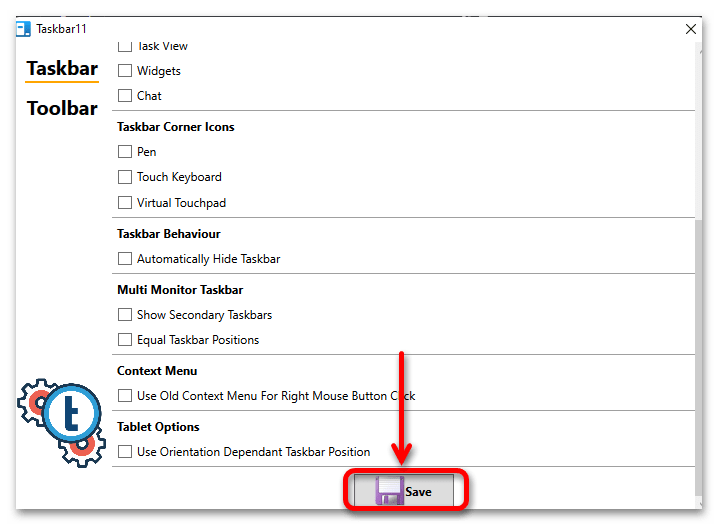
Для того чтобы восстановить ее прежнее расположение, измените значение опции «Taskbar Position» на «Bottom».

Читайте также: Как восстановить работоспособность панели задач в Виндовс 11
Еще статьи по данной теме:
Помогла ли Вам статья?
- On Windows 11, to move the Taskbar, edit the “Settings” binary key in the “StuckRects3” Registry key.
- The 01 value moves Taskbar to the top.
- The 02 value moves Taskbar to the right.
- The 00 value moves Taskbar to the left.
- The 03 value moves Taskbar to the bottom.
Windows 11 has a redesigned Taskbar with a center alignment for the Start menu and app buttons, a new notification area, new effects and animations, and more. Although it introduces many welcome improvements, it also removes some legacy capabilities, such as the ability to move the Taskbar around.
You can’t move the Taskbar on Windows 11 because this is an entirely new design, and moving it around the screen is challenging. Microsoft has explained that only moving the Taskbar to the right side suddenly changes the entire design (including the Start menu and apps), and the current interface and animations are designed for the bottom placement. As a result, the work that implicates it was not worth the effort since there was not enough demand.
If you are among those who like the Taskbar on another location (such as at the top, left, or right side), it’s still possible to move it. The only caveat is that you can only complete this task by editing the Registry.
In this guide, you will learn the steps to change the Taskbar position to the different sides of the screen on Windows 11. (See also the video tutorial explaining these instructions.)
- Move Taskbar position on Windows 11
- Move Taskbar to top with third-party tool
Warning: Modifying the Windows Registry can cause serious problems if not used properly. It’s assumed you know what you’re doing and has created a full backup of your system before proceeding. Also, I’ve received reports from users that this may or may not work after upgrading to version 22H2. As always, use these instructions at your own risk.
To move the Taskbar to the top, left, right, or bottom of the screen on Windows 11, use these steps:
-
Open Start on Windows 11.
-
Search for regedit and click the top result to open the Registry Editor.
-
Browse the following path:
HKEY_CURRENT_USERSoftwareMicrosoftWindowsCurrentVersionExplorerStuckRects3
-
Double-click the Settings binary key.
-
Under the “Value data” section, in the second row and the sixth column, click the 03 value, press the Delete key, and replace the value with 01 to move the Windows 11 Taskbar at the top of the screen.

-
Change the 03 value to 02 to move the Taskbar on the right side of the screen.
-
Change the 03 value to 00 to move the Taskbar on the left side of the screen.
-
Change the value to 03 to move the Taskbar at the bottom of the screen.
-
Click the OK button.
-
Right-click the Start button and select the Task Manager option.
-
Click the Processes tab.
-
Select the Windows Explorer process.

-
Click the Restart button.


Once you complete the steps, the Windows 11 Taskbar will move to the top or either side of the screen as specified in the binary key.
While you can still change the Taskbar position, this is not a supported feature on Windows 11, which means that this behavior may not work as expected.
Alternatively, if you can’t use the Registry settings, you may be able to use third-party tools to move the Taskbar to the top of the screen. For example, ExplorerPatcher is a free solution that brings back the classic design of the Taskbar with the legacy functionalities, such as the ability to change the bar position. It’s not a perfect solution, but if you want to reposition settings, this might be the best free option.
To move the Taskbar to the top of the screen with ExplorerPatcher, use these steps:
-
Open EplorerPatcher GitHub page.
-
Under the “Assets” section, click the ep_setup.exe link to download the app.

-
Confirm you want to keep the file in the web browser (if applicable).
-
Double-click the file to install the app. (It might take a while to apply.)
-
Right-click the Taskbar and select the Properties option.
-
Click on Taskbar.
-
Use the “Taskbar style” setting and select the “Windows 10” option.
-
Use the “Primary taskbar location on screen” setting and select the Top option to move the Taskbar to the top of the screen. (You also have the option to move it to the left or right side.)

-
(Optional) Use the “Start button style” setting and select the “Windows 11” option.
-
(Optional) Use the “Combine taskbar icons on primary taskbar” setting and select the Always combine option.
-
Click on Start menu.
-
Use the “Start menu style” setting and select the “Windows 11” option.
-
Click the Restart File Explorer option in the bottom-left corner (if you don’t see the changes).


After you complete the steps, you can start using the Taskbar from the top of the screen.
Панель задач вместе с меню «Пуск» подверглась значительным изменениям в Windows 11. Привычные элементы кардинально переделали, поэтому, например, от живых плиток почти спустя 10 лет окончательно отказались, календарь и быстрые настройки полностью преобразились, а в панели задач поменялись значки и всё переместилось в центр. Кроме того, расположение панели задач на экране больше нельзя изменять — это смутило огромное количество пользователей Windows 10. Но, как оказалось, изменения не означают, что подобное теперь стало невозможным.
- В тему: Всё о Windows 11 — секреты, инструкции, лайфхаки и полезные статьи
Установить панель задач Windows 11 в верхнюю часть экрана получится с помощью редактора реестра (по крайней мере в текущей тестовой сборке 22000.51). Делается всё довольно легко.
Как переместить панель задач Windows 11 в верхнюю часть экрана
- Используйте сочетание клавиш Windows + R для открытия утилиты «Выполнить» и введите в поле запуска «regedit.exe», после чего нажмите «OK». Или найдите через поиск «Редактор реестра».
- Перейдите по следующему пути:
HKEY_CURRENT_USERSoftwareMicrosoftWindowsCurrentVersionExplorerStuckRects3.
- Найдите параметр типа REG_BINARY под названием «Settings».
- Дважды нажмите на него — откроется окно изменения двоичного параметра.
- В столбце FE для параметра 00000008 (второй по списку) установите значение 01 — поместите на него курсор, удалите текущее значение и пропишите нужные цифры. По умолчанию он должен быть установлен на 03.
- Нажмите «OK» и перезапустите «Проводник» через «Диспетчер задач».
Чтобы отменить изменение, необходимо открыть тот же параметр в редакторе реестра и вернуть стандартное значение 01. Учтите, что другие значения (02 или 04) не работают, поэтому переместить панель задач на левую или правую сторону не выйдет.
⚠️ Важно: следует знать, что при перемещении панели задач в верхнюю часть экрана меню «Пуск» станет автоматически открываться только с левой стороны.
- 10 приложений, которые нужно сразу установить на новый компьютер
- Windows 11 должна была быть такой сразу: обзор крупнейшего обновления 22H2
- Сделал Linux из Windows 11. 10+1 тема, меняющая систему до неузнаваемости

As of October 2021, Windows 11 doesn’t let you move your taskbar to the top of the screen with an official setting (unlike Windows 10). But we’ve figured out a way to make it happen by editing the Registry—and you can do it with just a few clicks. Here’s how.
RELATED: 5 Ways Windows 11’s Taskbar Is Worse Than Windows 10’s
Edit the Registry Yourself
To move your Windows 11 taskbar to the top of the screen, you can either change your Windows Registry manually or download our one-click hack in the section below. First, we’ll show you how to do it yourself.
Warning: The Registry Editor is a powerful tool. Misusing it can render your system unstable or even inoperable. Still, this is a simple hack, and if you follow the instructions completely, you shouldn’t have any problems. If you haven’t used the Registry Editor before, consider reading about how to use it before getting started. We also recommend backing up the Registry (and your computer) before making any changes.
To manually make the taskbar appear at the top of the screen, first open Registry Editor. To do so, click the Start button, type “regedit”, then select “Registry Editor” in the results.

When Registry Editor opens, navigate to this key using the sidebar, or paste it in the address line near the top of the window:
ComputerHKEY_CURRENT_USERSoftwareMicrosoftWindowsCurrentVersionExplorerStuckRects3
Once you’ve navigated to the “StuckRects3” key, double click the “Settings” key within it.
When the “Edit Binary Value” window opens, you’ll see a table of values. This is a somewhat tricky part. Locate the second row of values from the top, then count to the fifth value from the left. By default, this value is set to “03.” Place the cursor just to the right of the “03” (click with the mouse then press the right arrow key if necessary), press Backspace once, then type 01 .
To recap, you’ve replaced the “03” value (which means taskbar on the bottom) with “01” (which means taskbar on the top). When you’re done, click “OK.”
Close Registry Editor, and restart Windows Explorer.
To restart Explorer, press Ctrl+Shift+Esc to open Task Manager, click “More Details” to view the full interface if necessary, and select the “Processes” tab. Locate “Windows Explorer” in the list, right-click it, and select “Restart.”
Note: Your change will not take effect unless you restart Explorer. Unlike with changing many Windows settings, simply restarting your PC or signing out and signing back in will likely not work.
Afterward, the taskbar will be at the top of the screen. If your taskbar icons are centered and you click Start, you’ll notice that the Start menu will appear on the left side of the screen, not in the center.
If you’d like to make your Start button location match the location of the Start menu at the top of the screen, open Settings (press Windows+i) and navigate to Personalization > Taskbar > Taskbar Behaviors and set “Taskbar Alignment” to “Left.”
If you change your mind and want to go back to having your taskbar at the bottom of the screen, edit the “Settings” key shown in the step above, changing the “01” value with “03.” Or you can use the “win11_taskbar_bottom.reg” file in the section below.
You might be thinking: Is it possible to move the Windows 11 taskbar to the left or right side of the screen? Yes, by changing the “Settings” key value to “00” (for left) or “02” (for right). Unfortunately, the taskbar becomes unusable (as of October 2021) because the taskbar icons don’t show up properly.
RELATED: How to Move the Taskbar Icons to the Left on Windows 11
Download Our One-Click Registry Hack
If you’d rather not risk editing your Registry by hand, you can download our one-click registry hack files. Within the ZIP linked below, you’ll find two files that will position your Windows 11 taskbar on the top or bottom of the screen (after you reboot).
Download the Windows 11 Taskbar Location Hack Files
After you download the file, unzip it to any location, and you’ll have two files:
- win11_taskbar_top.reg: This moves the taskbar to the top of the screen.
- win11_taskbar_bottom.reg: This moves the taskbar to the bottom of the screen.
Typically, you shouldn’t trust registry files that you find on the internet, but we have prepared and tested these ourselves. You can verify their contents by using Notepad if you wish. (Right-click a REG file, select “Show More Options,” then choose “Edit.”)
To use the REG files, double click the one you want to use, and you’ll see a warning about adding information to the Registry. Click “Yes.”
After that, click “OK” in the confirmation pop-up, and restart Windows Explorer.
To restart Explorer, press Ctrl+Shift+Esc to open Task Manager, click “More Details” to view the full interface if necessary, and select the “Processes” tab. Locate “Windows Explorer” in the list of running processes, right-click it, and select “Restart.”
Note: Be sure to restart Explorer rather than restarting your PC or logging out and logging back in.
Your taskbar will now be either on the top or bottom of the screen, depending on which REG file you used.
Warning: Bear in mind that this Registry hack is not officially supported by Microsoft. It may break in a future update to Windows 11, or it may not work perfectly on every PC out there.
While right now we’re forced to use Registry hacks to change the taskbar location, we’re hoping that Microsoft will eventually make the option official in the Settings app. Until then, happy tasking!
RELATED: Windows 11’s Taskbar Won’t Be Finished Before Release
READ NEXT
- › Windows 11 Lets You Move the Taskbar to the Left or Right, But It’s Broken
- › The 7 Best Registry Hacks for Windows 11
- › 10 Windows 11 Taskbar Features You Should Be Using
- › 5 Ways Windows 11’s Taskbar Is Worse Than Windows 10’s
- › Windows 11 vs. Windows 10: Should You Upgrade to Windows 11?
- › What’s New in Windows 11’s 2022 Update: Top 10 New Features (22H2)
- › Steam Now Sells a New Start Menu for Windows 11
- › The New HP Pro x360 Fortis Is a 2-In-1 Laptop Under $500
Download PC Repair Tool to quickly find & fix Windows errors automatically
Although PC users can change the Windows 10 Taskbar location using Windows Settings, Windows 11 users need to use the Registry Editor to move Taskbar to the top. Here is how you can do that on Windows 11 PC.
Although icons are center-aligned, Windows 11 displays the Taskbar at the bottom of your screen like Windows 10/8/7. However, there could be times when you might want to move the Taskbar or change your Taskbar location for any reason. Earlier, it was possible to move the Taskbar to the top, left, or right using Windows Settings. However, that particular option is no longer available in Windows 11 Settings panel. That is why you have to use the Registry Editor to get the job done.
Before changing any value in Registry Editor, don’t forget to create a System Restore point.
To move the Taskbar to the Top on Windows 11 you need to tweak the Registry as follows:
- Press Win+R to open the Run dialog.
- Type regedit and press the Enter button.
- Click on the Yes option.
- Go to MMStuckRects3 in HKKCU.
- Double-click on the Settings REG_BINARY value.
- Set the Value data of 00000008 in the FE column to 01.
- Click the OK button.
- Restart Explorer.
One thing to know that, when you move the Taskbar to the top, the Start Menu will automatically open from the top-left side.
Anyway, to get started, you have to open Registry Editor on your computer. For that, press Win+R to display the Run dialog, type regedit, and press the Enter button.
If you find the UAC prompt, click on the Yes option. Next, navigate to the following path:
HKEY_CURRENT_USERSOFTWAREMicrosoftWindowsCurrentVersionExplorerMMStuckRects3
In the MMStuckRects3 key, you can see a REG_BINARY value named Settings. Double-click on it.
Here you can find some rows and columns full of different values. You have to look for 00000008 row and FE column.
By default, it should be set to 03. You have to put your cursor after that value, use the Delete key to remove it, and enter 01.
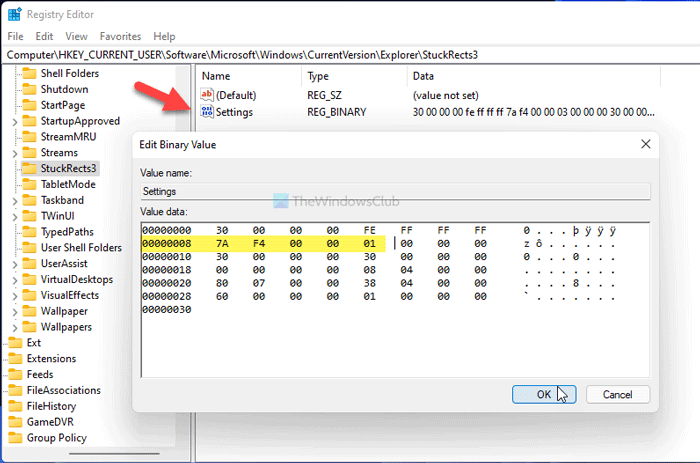
By entering 01, you are moving the Taskbar from the bottom to the top of your screen. However, it doesn’t work if you enter 02 or 04.
Click the OK button to save the change. Then, press Ctrl+Alt+Del, and select the Task Manager option. In the Task Manager, choose Windows Explorer, and click the Restart button to restart Explorer on Windows 11.
After that, you can find the Taskbar at the top of your screen.
You can also set up a Vertical Taskbar in Windows 11.
Read: How to switch back to the Classic Start Menu in Windows 11.
To revert the change, you have to open the same REG_BINARY in Registry Editor and set the Value data as 01.
That’s all! Hope this guide helped.
Read: How to change Taskbar size on Windows 11.

Sudip loves to engage with the latest technology & gadgets. Apart from writing about all things technology, he is a Photoshop junkie and a football enthusiast.