Специалисты портала Windows Latest рассказали, как обновить текущую версию Windows 10 до предварительной версии Windows 11 Insider Preview или установить превью новой ОС с образа диска на ПК, который не удовлетворяет аппаратным требованиям Windows 11. Для этого необходимо выполнить некоторые действия с реестром ОС.
Многие пользователи после анонса Windows 11 были удивлены, узнав, что их относительно новые ПК не подходят для Windows 11. Необходимость наличия нового процессора и модуля TPM 2.0 практически отсекает достаточно большое количество компьютеров, на которых штатно работает Windows 10.
Минимальные требования по установке ОС Windows 11:
- 64-битный двухъядерный процессор с тактовой частотой не менее 1 ГГц (32-битные приложения будут поддерживаться ОС);
- 4 ГБ ОЗУ;
- место на диске: 64 ГБ;
- монитор с разрешением 1366×768 и более с размером от 9-дюймов и больше;
- совместимость с UEFI, Secure Boot и поддержка TPM 2.0;
- видеокарта, совместимая с DirectX 12 / WWDM 2.x.
Поддерживаемые Windows 11 процессоры AMD (Ryzen 2000 и выше), Intel (Intel Core 8 и выше) и ARM (Qualcomm).
Если аппаратные требования пользовательского ПК не соответствуют вышеозначенным запросам, то Windows 11 устанавливаться не будет.
Как установить Windows 11 Insider Preview на ПК с Windows 10:
- сделать бэкап реестра;
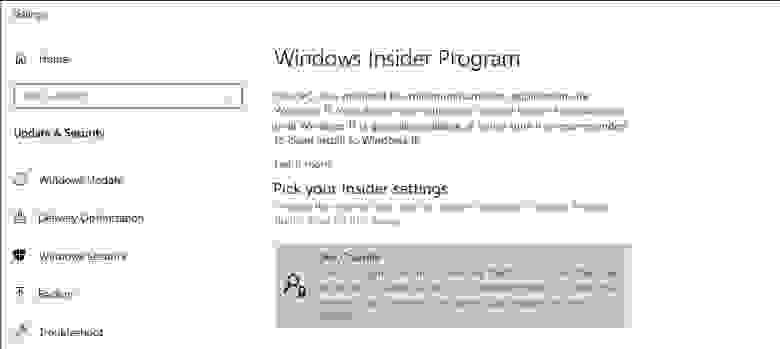
- зайти в меню Settings -> далее в Update & Security -> далее в Windows Insider Program;
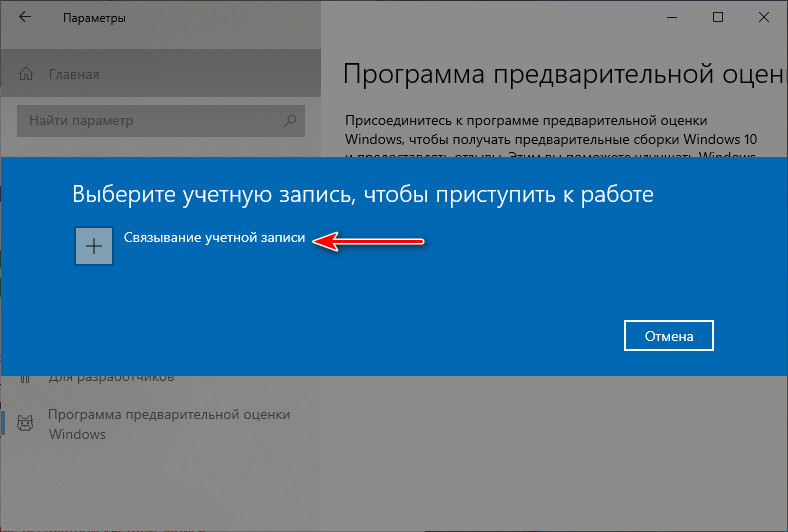
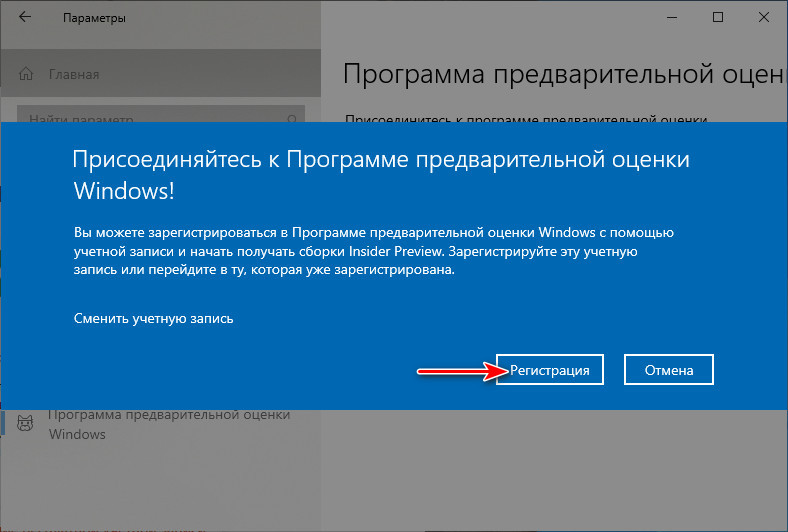
- выбрать «Get Started» и подключить свой аккаунт Microsoft к участие в программе предварительной оценки Windows;
- выбрать в качестве доступного канала Release preview;
- перезагрузить ПК путем клика в меню в настройках;
- зайти в меню программы Windows Insider и проверить доступность опции Dev Channel;
- если она недоступна, то зайти в редактор реестра по пути «HKEY_LOCAL_MACHINESOFTWARE
MicrosoftWindowsSelfHostUISelection»; - поменять значение параметра UIBranch с ReleasePreview на Dev;
- поменять значение параметра UIContentType на Mainline;
- поменять значение параметра UIRing на External;
- зайти в ветку реестра «HKEY_LOCAL_MACHINESOFTWAREMicrosoftWindowsSelfHostApplicability»;
- поменять значение параметра BranchName на Dev;
- убедиться, что значение параметра ContentType — Mainline, а Ring — External;
- закрыть редактор реестра;
- перезагрузить ПК;
- зайти в меню программы Windows Insider и проверить доступность опции Dev Channel;
- зайти в меню Windows Update, где появится возможность установить Windows 11 Insider Preview build 22000.51.
Для ускорения переключения на Windows Insider Program в автоматическом режиме и без использования аккаунта Microsoft можно использовать скрипт «OfflineInsiderEnroll 2.5.0» с GitHub. Его нужно запускать в Windows 10 под администратором и выбрать там пункт 1 “Dev Channel”, а потом перезагрузить ПК.
При установке образа Windows 11 можно обойти требование по наличию на ПК TPM 2.0 таким образом:
- дойти до пункта в меню установки с ошибкой «This PC can’t run Windows 11»;
- нажать в этом окне «Shift+F10», чтобы запустить командную строку, где можно запустить редактор реестра с помощью команды regedit;
- зайти в ветку реестра «HKEY_LOCAL_MACHINESYSTEMSetup»;
- создать там новый раздел “LabConfig”;
- в ней создать параметры DWORD (32-bit) «BypassTPMCheck», «BypassRAMCheck» и «BypassSecureBootCheck» со значением «1»;
- закрыть редактор реестра и нажать стрелочку назад в верхнем левом угле страницы установки, система вернется к окну с галочкой лицензионного соглашения и продолжит нормальную установку.
Не факт, что такие действия с реестром смогут обмануть установщик после выхода релизной версии Windows 11. Вероятно, что в момент ее выхода в октябре этого года умельцы найдут еще способы по борьбе с аппаратными требованиями новой ОС.
Первая предрелизная сборка Windows 11 build 21996.1 появились в Сети 15 июня.
24 июня Microsoft представила Windows 11.
28 июня 2021 года Microsoft выпустила первую официальную предварительную версию Windows 11 Insider Preview build 22000.51 в рамках программы предварительной оценки Windows. Также Microsoft объяснила, зачем Windows 11 нужен модуль TPM 2.0 — чтобы обеспечить более высокий уровень защиты от различных атак.
Содержание
- Шаг 1: Включение программы предварительной оценки через «Параметры»
- Шаг 2: Регистрация в программе предварительной оценки Windows
- Шаг 3: Ручная загрузка обновления сборки Insider
- Шаг 4: Скачивание ISO с Insider-сборками
- Вопросы и ответы
Шаг 1: Включение программы предварительной оценки через «Параметры»
В первую очередь вам необходимо убедиться в том, что вы можете принять участие в программе предварительной оценки Windows 11, а также активировать функциональность, нажав по соответствующей кнопке. Осуществляется это через одну из категорий в разделе с обновлениями для операционной системы, а выглядит следующим образом:
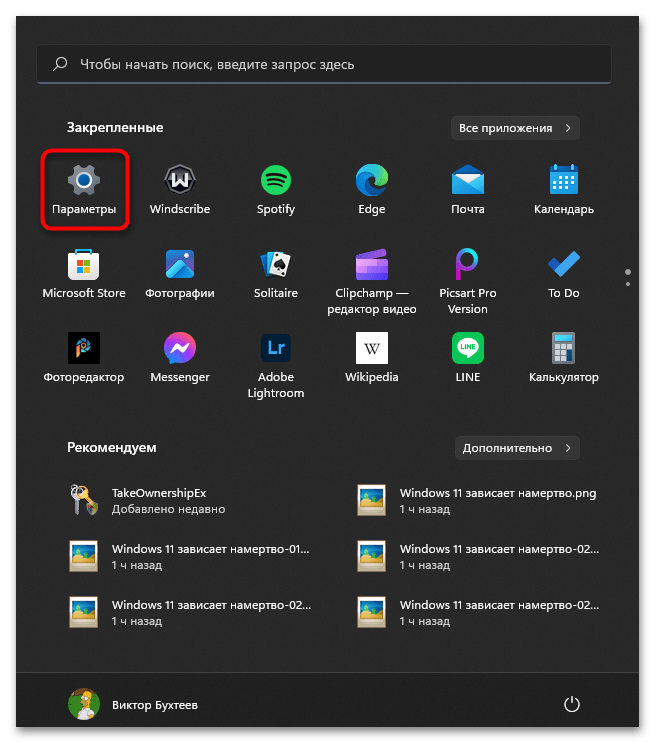
- Откройте меню «Пуск» и перейдите в «Параметры», кликнув по значку с изображением шестеренки.
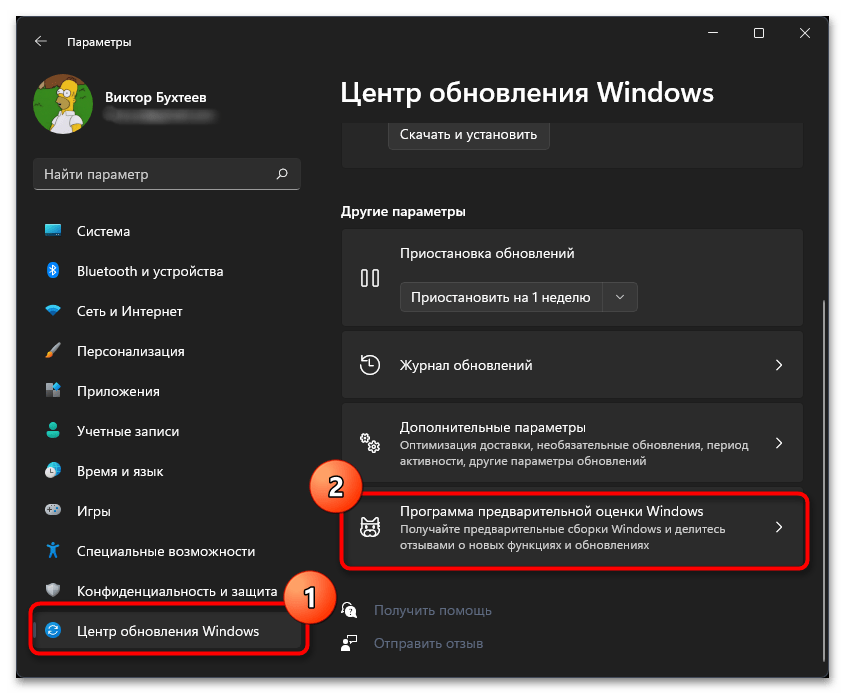
- На панели слева выберите раздел «Центр обновления Windows» и перейдите в «Программа предварительной оценки Windows».
- Теперь понадобится подождать немного, пока ОС проведет сканирование вашего устройства на совместимость со всеми требованиями.
- Если на экране появилось уведомление о том, что вы не можете принять участие в тестировании, поскольку компьютер не соответствует минимальным требованиям, скорее всего, ситуацию исправить не получится и версии Insider вам будет недоступны. Если же все нормально, на экране отобразится кнопка «Начать», после нажатия по которой вы должны стать участником программы предварительной оценки.
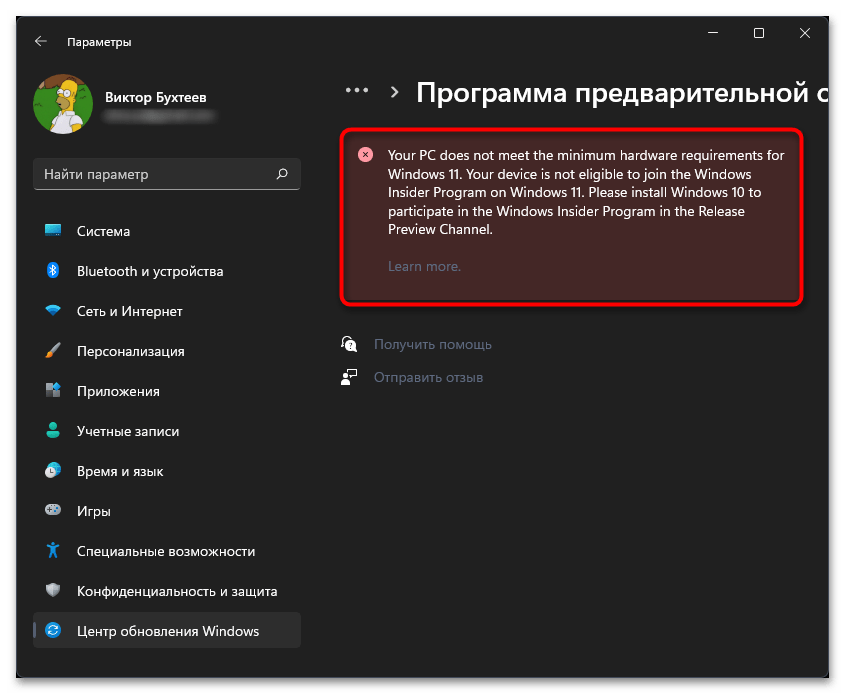
Понадобится немного разобраться в теме участия в программе предварительной оценки в Windows 11. У вас обязательно должна быть лицензионная версия операционной системы, а также зарегистрирована учетная запись, к которой привязан текущий компьютер. Вместе с этим сама установка должна была происходить без обхода ограничений, которые есть у Виндовс 11, то есть ваш ПК обязательно должен поддерживать TPM 2.0 и удовлетворять минимальным системным требованиям. Если во всем этом вы уверены, но кнопки для начала принятия участия в программе предварительной оценки так и не появилось, попробуйте решить ситуацию при помощи методов, описанных в статье по ссылке ниже.
Подробнее: Решение проблем с работой программы предварительной оценки в Windows 11
Возможно, в вашей ситуации этот шаг окажется не обязателен для выполнения, поскольку форма для регистрации появляется сразу при включении программы предварительной оценки в Windows 11. Однако она отображается не всегда, поэтому мы рекомендуем вручную привязать учетную запись, чтобы не только получать обновления и необходимые уведомления, но и иметь возможность скачать ISO с любой сборкой Insider Windows 10 или 11.
Регистрация в программе предварительной оценки Windows
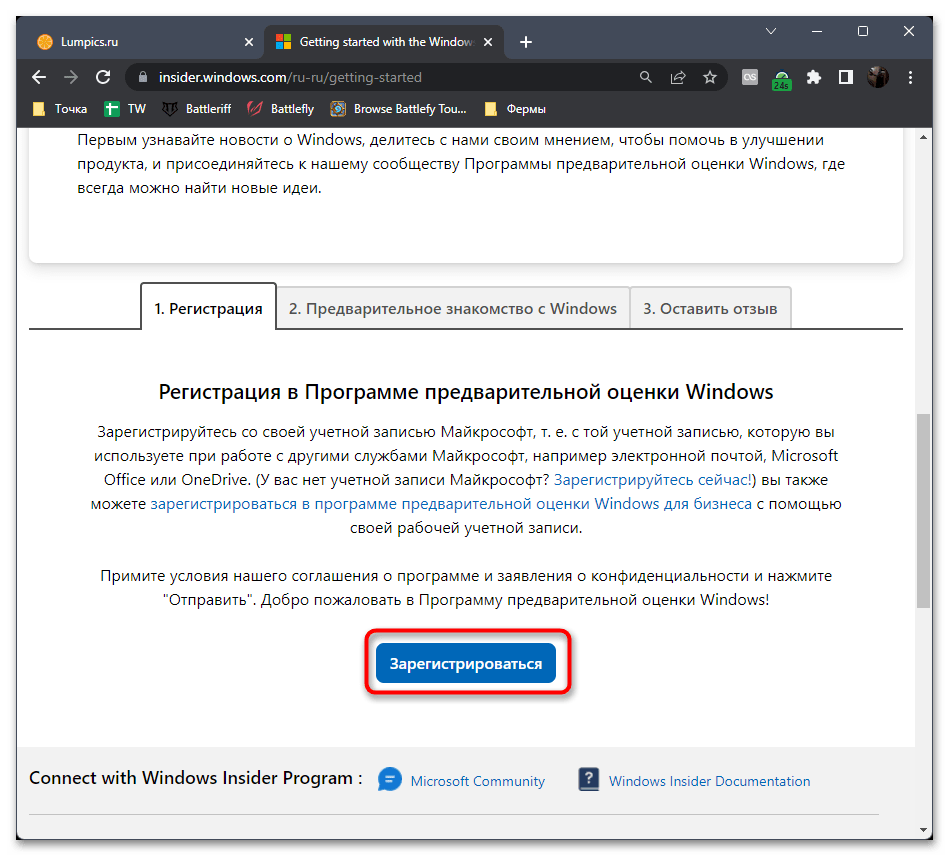
- Перейдите по ссылке выше, чтобы попасть на необходимую страницу для регистрации, где нажмите кнопку с соответствующим названием.
- Далее нажмите «Войти сейчас», чтобы авторизоваться с той учетной записью, которой вы пользуетесь в операционной системе на своем компьютере.
- После успешного входа примите условия соглашения и нажмите «Зарегистрироваться».
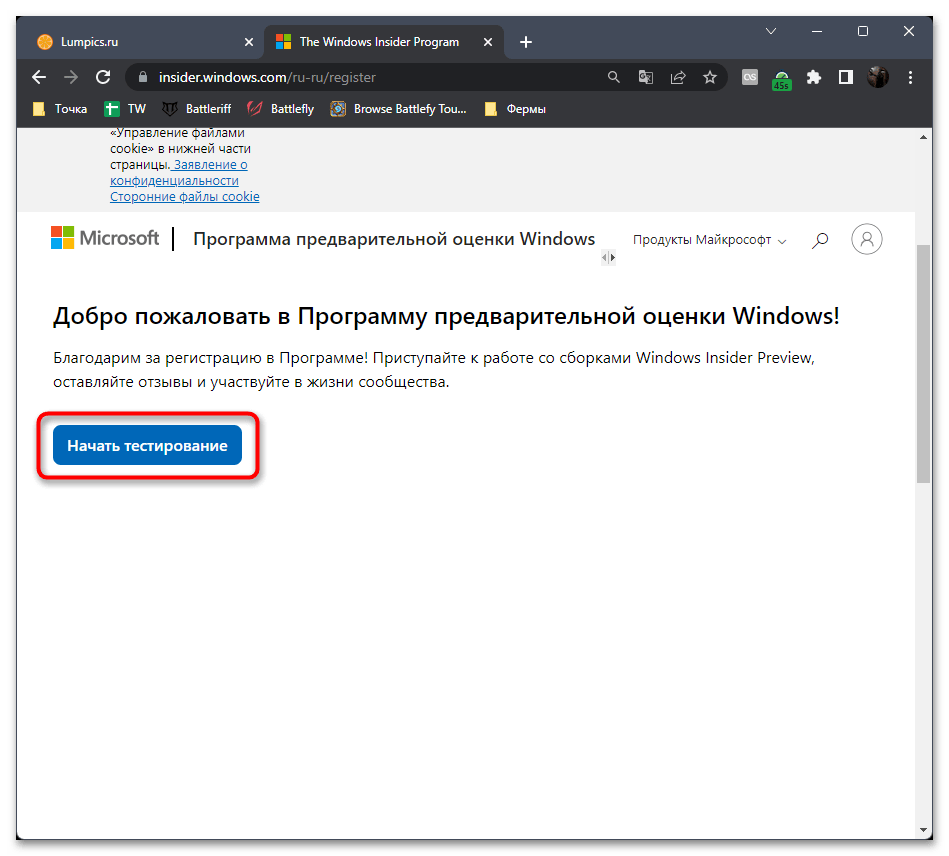
- Вы будете уведомлены о том, что регистрация выполнена успешно, нажмите «Начать тестирование» для перехода к следующему шагу.
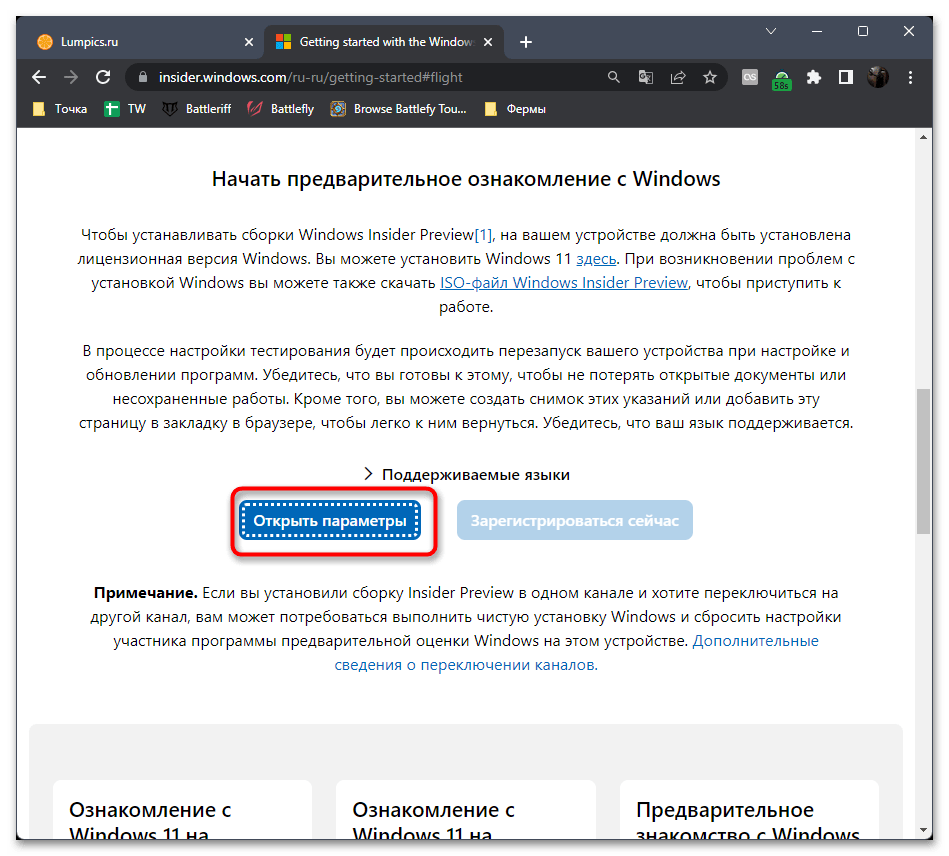
- Будет предложено сразу открыть приложение «Параметры», чтобы через него завершить все подготовительные действия. Компьютер перезагрузится несколько раз, а также вам понадобится читать сообщения от разработчиков на экране и выбирать оптимальные для себя настройки.
Шаг 3: Ручная загрузка обновления сборки Insider
Если после произведения всех настроек, отображающихся на экране после регистрации, вы перезагрузили компьютер и все еще обнаруживаете стандартную сборку Windows 11, понадобится самостоятельно запустить проверку обновлений, чтобы найти последнюю сборку Insider на серверах Майкрософт и установить ее на свой компьютер.
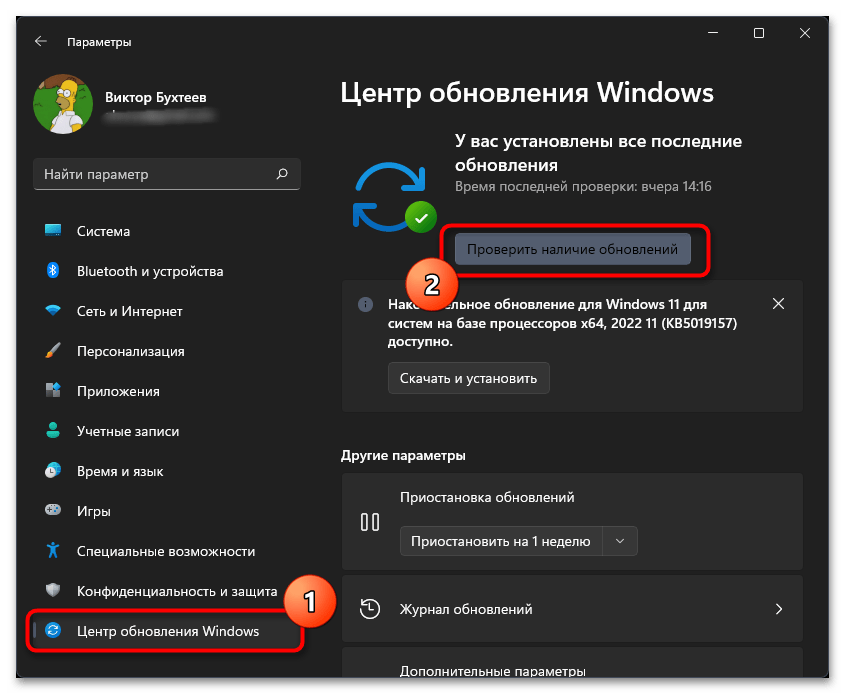
- Для этого в «Параметрах» на панели слева выберите «Центр обновления Windows» и нажмите кнопку «Проверить наличие обновлений».
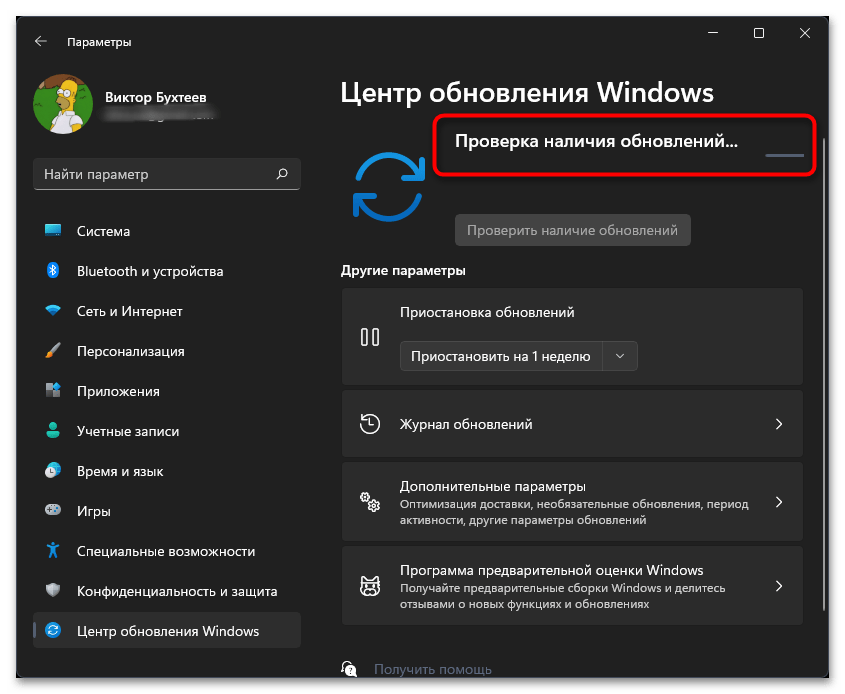
- Ожидайте окончания поиска апдейтов и ознакомьтесь с тем, какие файлы вам предлагают установить. Если среди них будет сборка с названием «Insider», скачивайте и инсталлируйте ее, чтобы после перезагрузки ПК перейти к тестированию.
- Дополнительно обратите внимание на то, что в категории «Программа предварительной оценки» вы сможете управлять каналами, чтобы получать определенные сборки раньше или скачивать технические версии, если такие вам требуются.

Шаг 4: Скачивание ISO с Insider-сборками
Данный шаг стоит выполнять только в том случае, если после подключения программы предварительной оценки Windows 11 вы хотите не просто получать обновления, а загрузить полноценные сборки со многими новыми функциями. У вас будет возможность скачивать как ISO с Windows 10, так и с Виндовс 11, выбирая ревизии на свое усмотрение.
Открыть страницу Windows Insider Preview Downloads
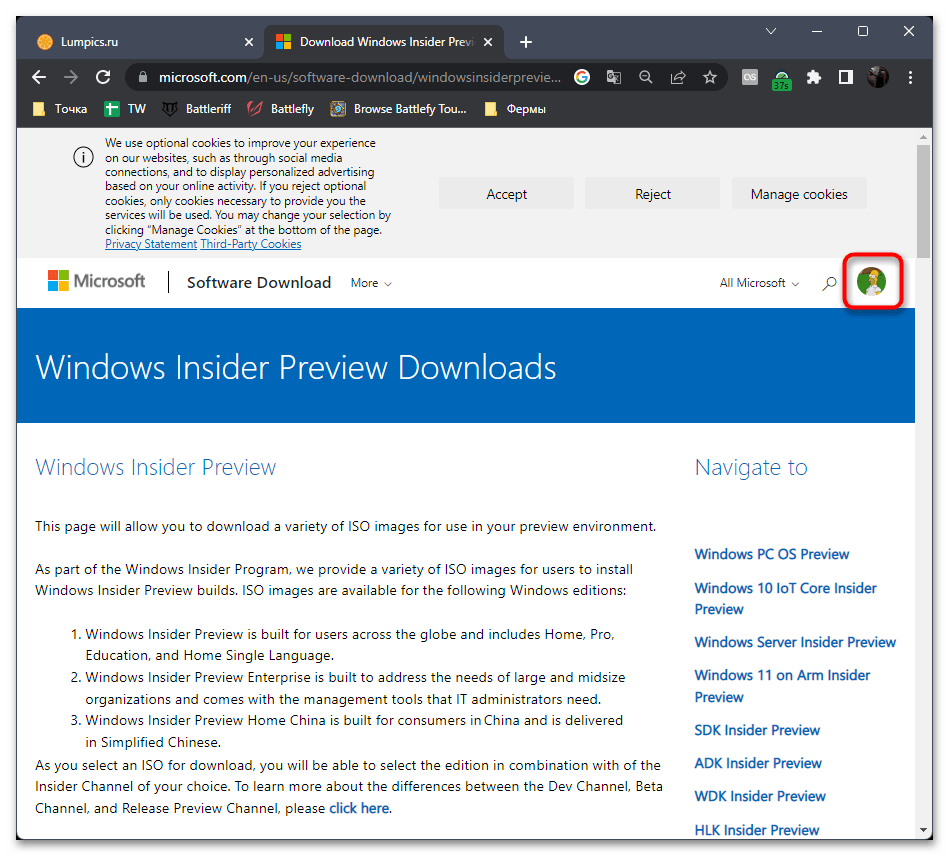
- Нажмите по ссылке выше, чтобы перейти на страницу со сборками. Обязательно войдите на ней в свою учетную запись, с которой регистрировались в программе предварительной оценки, иначе загрузки будут недоступны.
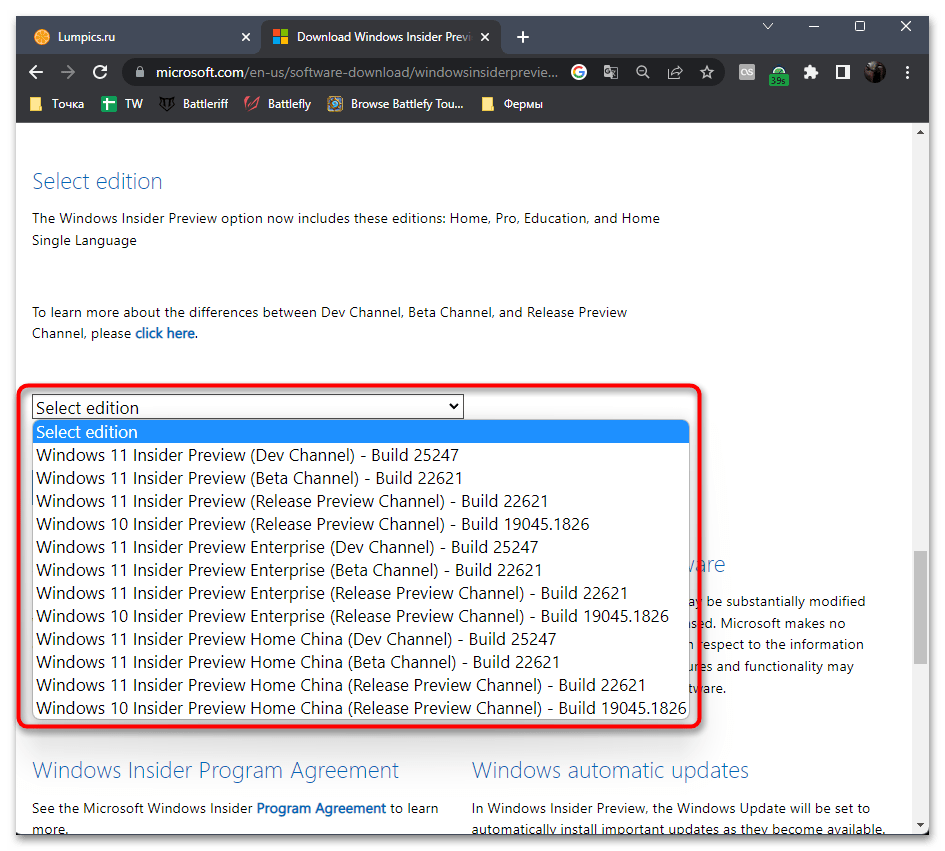
- Разверните список с редакциями и найдите подходящую для себя. Каждый номер сборки имеет свою страницу на официальном сайте, где на английском языке перечислены все тестируемые функции. В этом же списке вы найдете и версии для Китая, если вас интересуют именно такие.
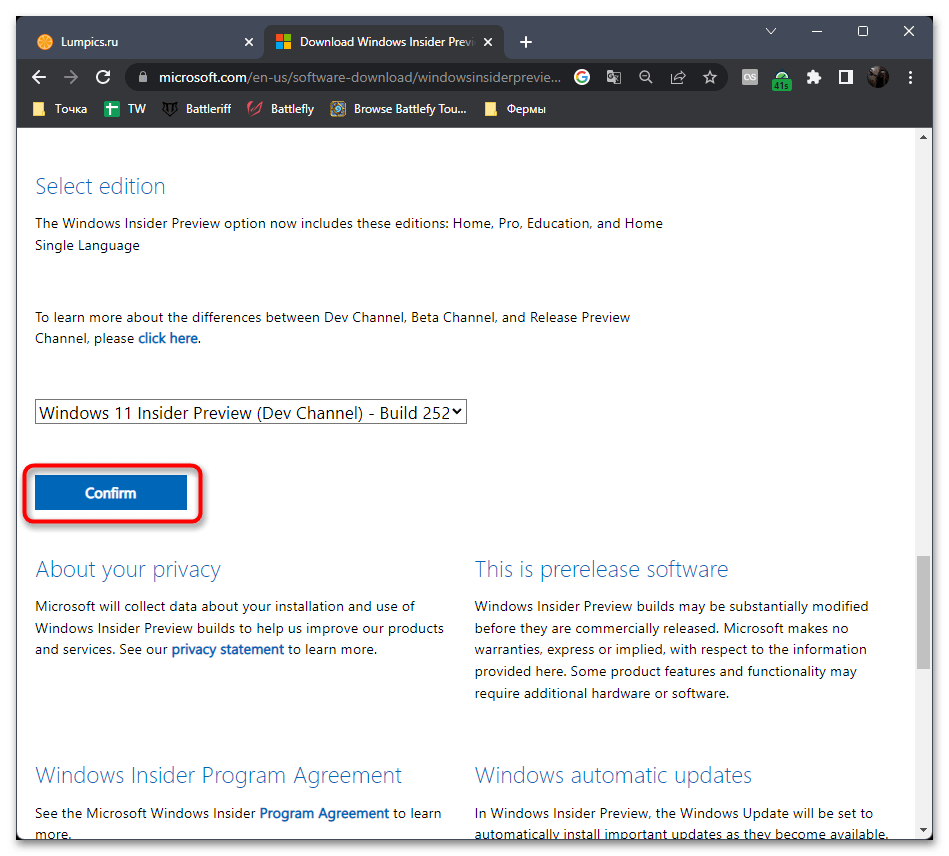
- После выборка сборки щелкните по «Confirm» для перехода к следующему шагу.
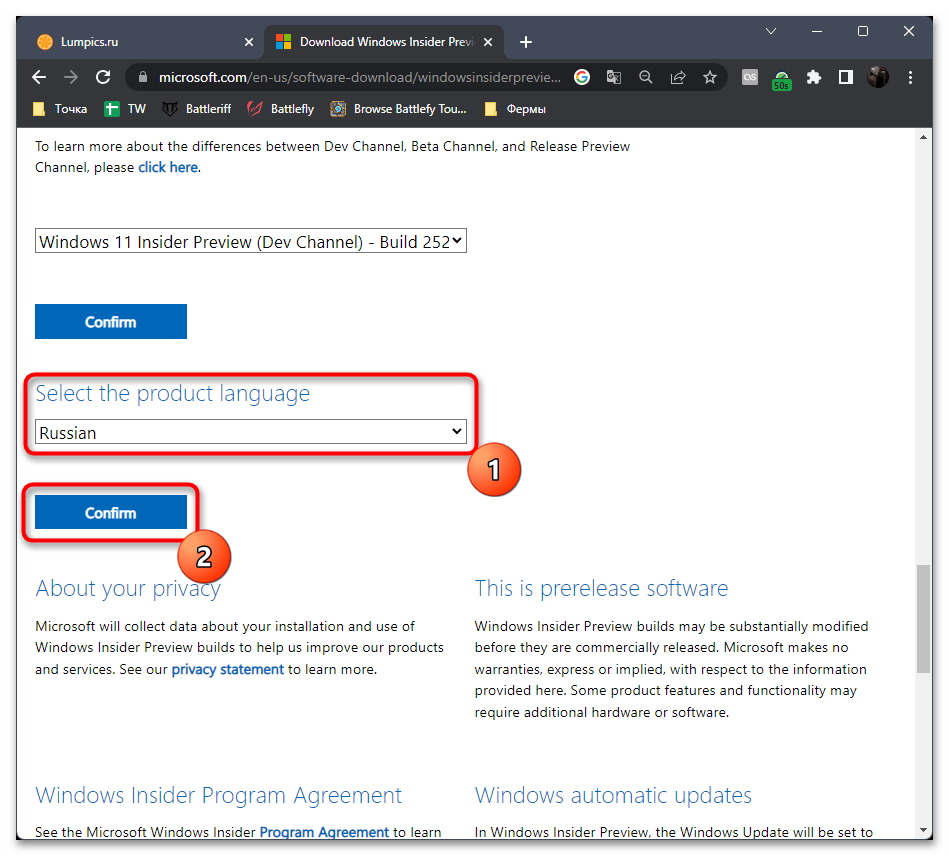
- Укажите язык для установки и снова подтвердите действие.
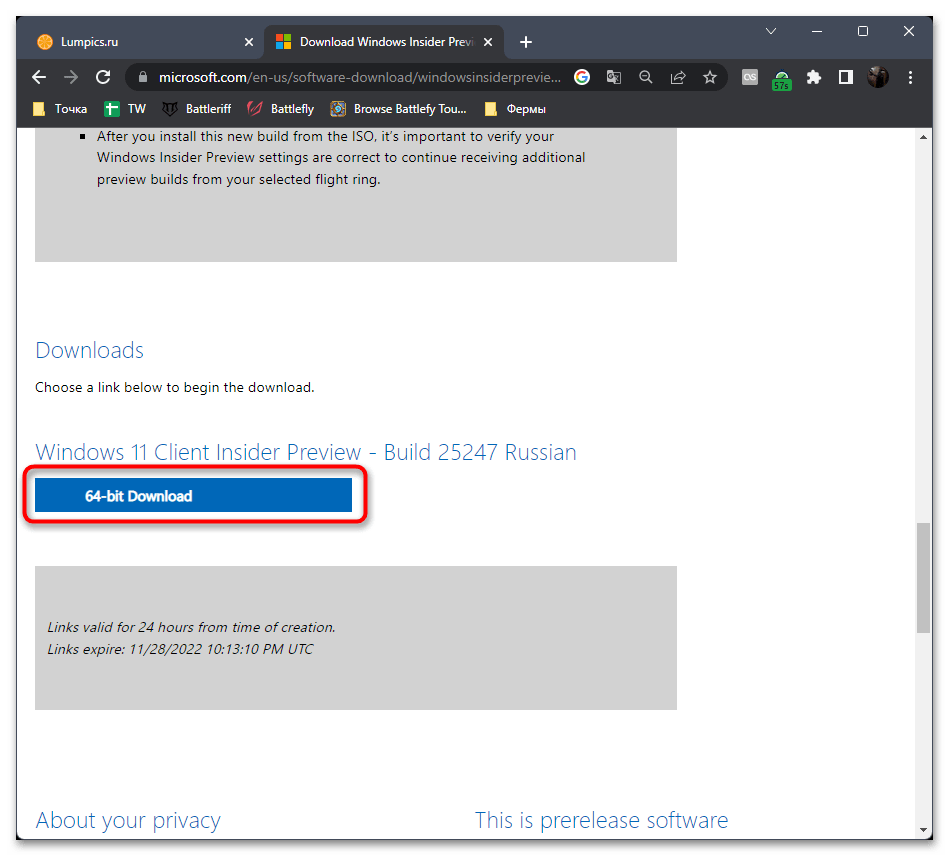
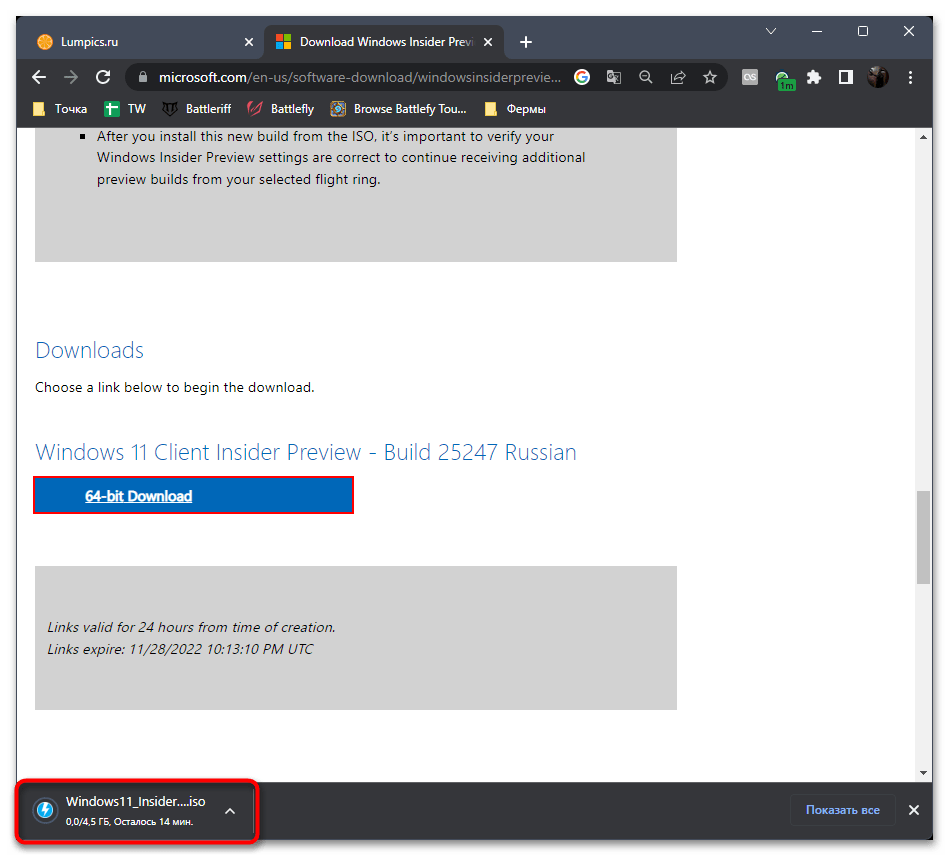
- Ссылка для скачивания сборки будет сформирована, поэтому нажмите «64-bit Download» для скачивания ISO.
- Ожидайте завершения загрузки, и можете запускать полученный файл прямо через встроенное средство монтирования образов. Далее процесс инсталляции ничем не отличается от стандартного.
Еще статьи по данной теме:
Помогла ли Вам статья?
Written By
published
June 24, 2021
UPDATE 6/28 at 12:30pm PDT: See this blog post on an update on Windows 11 minimum system requirements.
Today, we unveiled Windows 11 to the world, and we know Windows Insiders are super excited to get their hands on it! As Panos mentions here, we plan to release the first Insider Preview build for Windows 11 next week. However ahead of that release – we wanted to let Insiders know of a few changes we are making to how they will receive Windows 11 Insider Preview builds going forward.
Since launching Windows 10 six years ago, a lot of hardware innovation has happened in the PC space. For Windows to move forward and take better advantage of the latest innovations, we need to update the baseline system requirements for modern PCs. As a result, Windows 11 has updated hardware requirements which will be reflected in the Windows Insider Program. This blog post will outline what this means for Insiders new to flighting as well as Insiders who have already been flighting Insider Preview builds.
If you are new to flighting Insider Preview builds:
Welcome! After registering for the Windows Insider Program on the web or directly via Settings > Update & Security > Windows Insider Program, opt-in your PC to flight Insider Preview builds via Settings and it will guide you through what options are available based on the hardware specifications for your PC.
We invite PCs that do not meet the new hardware requirements for Windows 11 to join the Release Preview Channel to preview updates for Windows 10.
If you are already flighting Insider Preview builds:
If you are already flighting Insider Preview builds, please take a look at the below chart to understand your PC’s eligibility for Windows 11 Insider Preview builds.
In support of the Windows 11 hardware requirements, we’re setting the minimum requirements for flighting to match what is enforced within our media install experience (ISOs), but we recommend that PCs meet the full hardware requirements for the best experience when using Windows 11 Insider Preview builds. You can use the PC Health Check app here to see if your PC meets these requirements. UPDATE 6/28 at 12:30pm PDT: See this blog post on an update on Windows 11 minimum system requirements.
| MeetingWindows 11 Hardware Requirements | Not MeetingWindows 11 Hardware Requirements, but Meeting Minimum Requirements for the Windows Insider Program | Not MeetingMinimum Hardware Requirements for the Windows Insider Program | |
|---|---|---|---|
| Dev Channel(Existing) | Eligible for Windows 11 Insider Preview Builds | Eligible for Windows 11 Insider Preview Builds.
Warning: Installation on PCs below Windows 11 hardware requirements can result in a degraded experience & some features may not work properly. |
Limited Exception: PCs will be allowed to preview Windows 11 updates only via flighting until General Availability. PCs will then need to take action to go back to Windows 10 and will not be eligible for future Windows 11 Preview builds. |
| Beta Channel (Existing) | Eligible for Windows 11 Insider Preview Builds | PCs will be moved to the Release Preview Channel, with an option to rejoin Dev & Beta Channels.
Warning: Installation on PCs below Windows 11 hardware requirements can result in a degraded experience & some features may not work properly. |
N/A for Windows 11 Insider Preview Builds |
| Release Preview Channel (Existing & New) | Eligible for Windows 11 Insider Preview Builds as an optional upgrade at a later date | N/A for Windows 11 Insider Preview Builds | N/A for Windows 11 Insider Preview Builds |
While we recommend that all PCs meet the full hardware requirements for Windows 11, we are allowing some limited exceptions as we apply these new restrictions. All Windows Insiders who have already been installing builds from the Dev Channel on their PCs up through June 24, 2021 will be allowed to continue installing Windows 11 Insider Preview builds even if their PC does not meet the minimum hardware requirements. Insiders with PCs already in the Dev Channel have been installing and giving feedback on builds with Windows 11 features since last year. Our way of saying thanks is to go ahead and give them the opportunity to see everything come together. However, this comes with some important tradeoffs we want to call attention to:
- Because these devices do not meet the new hardware requirements, there may be issues and bugs that impact the experience of Windows 11 on these PCs that may not get fixed.
- If at any point something goes wrong on one of these PCs that requires having to go back to Windows 10, you can use the media creation tool here to go back to the Windows 10. These PCs will not be given another exception and not allowed to upgrade to Windows 11 Insider Preview builds again. They will be treated as a new PC and the minimum hardware requirements will be enforced as highlighted above.
- Once Windows 11 is generally available, these PCs will be opted out of flighting and will not be able to receive future Windows 11 Insider Preview builds. These PCs must clean install back to Windows 10 with the media (ISOs) that we provide and can then join the Release Preview Channel to preview Windows 10 updates.
Preparing the Beta Channel for Insider Preview builds of Windows 11
In preparation for releasing Windows 11 Insider Preview builds to the Beta Channel later this summer, we are moving PCs that do not meet the hardware requirements for Windows 11 in the Beta Channel to the Release Preview Channel. Some of these PCs may be able to move back to the Beta Channel, but at their own risk. See the above chart for details.
We realize this is a bit of a change, but this will ensure Windows Insiders have the best possible experience with Windows 11 Insider Preview builds on their PCs. We have set up a Microsoft Answers forum post here to address any questions Insiders might have.
We can’t tell you how excited we are to finally share the first full preview with our Insiders next week!
Thanks,
Amanda and Brandon
In this guide, you’ll learn about the Windows Insider Program, Insider Channels, and how to join Windows Insider Program on a Windows 11 PC. It’s free to join the Windows Insider Program.
The Windows Insider Program lets you test the latest Windows 11 updates and features before they’re made available to the public. Microsoft has announced that Windows 11 is now available to everyone, and if you are running Windows 10, you can upgrade Windows 10 to Windows 11 using multiple methods.
Compared to Windows 10, Windows 11 has different system requirements. It is recommended that you run the Windows 11 PC health check app to determine whether your PC running Windows 10 can be upgraded to Windows 11 or not.
You must also read the minimum system requirements for installing Windows 11 on your PC. If your PC doesn’t meet the requirements for Windows 11, you cannot install it. Once Windows 11 has been installed on your computer, you can sign up for the Windows Insider Program to receive the newest features and updates.
As a Windows 11 Insider, you can use corporate credentials to deploy Windows 11 Insider Preview Builds and provide feedback to Microsoft. Before we examine the procedures for joining the Windows 11 Insider Program, let’s go over some fundamentals and comprehend what the “Windows Insider Program” is and how to join it.
Learn: Guide on Windows 11 Activation Methods
The Windows Insider Program is a community of Microsoft enthusiasts who get to see the latest updates and features. There is no cost to join the Insider program as joining the program is free. The “Windows Insider Program” lets you test new Windows 11 updates and features before they’re available to the public. As a Windows Insider, you can provide feedback to Microsoft.
Windows Insiders run previews of the platform, called Windows Insider Preview Builds, then provide feedback and engage directly with Microsoft engineers to help shape the future of Windows. As a Windows Insider, the new builds you get are based on your chosen insider channel. Please keep in mind that Insider builds aren’t as stable as the public release versions of Windows. So don’t install Windows 11 insider preview builds on your work laptop or production workstations.
Read: Getting started with the Windows Insider Program
Windows Insider Channels
Let’s take a brief look at the available Windows Insider Channels. There are three Windows Insider Channels namely.
- Dev Channel – This channel is for highly technical users. Opting this channel for insider program will give you access to the latest Windows 11 builds. You’ll get builds earliest in the development cycle. That’s the reason this build has more bugs and overall stability issues.
- Beta Channel – Microsoft recommends selecting the beta channel for Insiders. This channel is ideal for early adopters. The Windows 11 insider preview builds that you get here is more stable and reliable than Dev Channel. If you want to provide feedback on latest Windows 11 builds, this channel is for you as your feedback has the greatest impact here.
- Release Preview Channel – The Release Preview Channel is an ideal choice for those who want new features, advanced quality updates, and relatively few bugs.
Note: To join the Windows Insider Program on Windows 11, you must select one of the channels listed above. You can later switch to other channels from the Windows 11 insider options.
Recommended: Windows 11 taskbar Alignment options
SKU Languages for Windows Insider Builds
The Windows Insider Preview Builds are available in the following SKU languages:
- Arabic (Saudi Arabia)
- Bulgarian (Bulgaria)
- Chinese (Simplified, China)
- Chinese (Traditional, Taiwan)
- Croatian (Croatia)
- Czech (Czech Republic)
- Danish (Denmark)
- Dutch (Netherlands)
- English (United Kingdom)
- English (United States)
- Estonian (Estonia)
- Finnish (Finland)
- French (Canada)
- French (France)
- German (Germany)
- Greek (Greece)
- Hebrew (Israel)
- Hungarian (Hungary)
- Italian (Italy)
- Japanese (Japan)
- Korean (Korea)
- Latvian (Latvia)
- Lithuanian (Lithuania)
- Norwegian Bokmål (Norway)
- Polish (Poland)
- Portuguese (Brazil)
- Portuguese (Portugal)
- Romanian (Romania)
- Russian (Russia)
- Serbian (Latin, Serbia)
- Slovak (Slovakia)
- Slovenian (Slovenia)
- Spanish (Mexico)
- Spanish (Spain, International Sort)
- Swedish (Sweden)
- Thai (Thailand)
- Turkish (Turkey)
- Ukrainian (Ukraine)
Steps to Join the Windows Insider Program on Windows 11
We will now look at the steps to join the Windows Insider Program on Windows 11. If you haven’t already, signing up for the Insider program is simple.
Step 1. Install the latest Windows 11 updates
Before you register for the Windows Insider Program, install the latest Windows 11 updates.
- On Windows 11 PC, click Start and open Settings app.
- Select Windows Update option from the left menu.
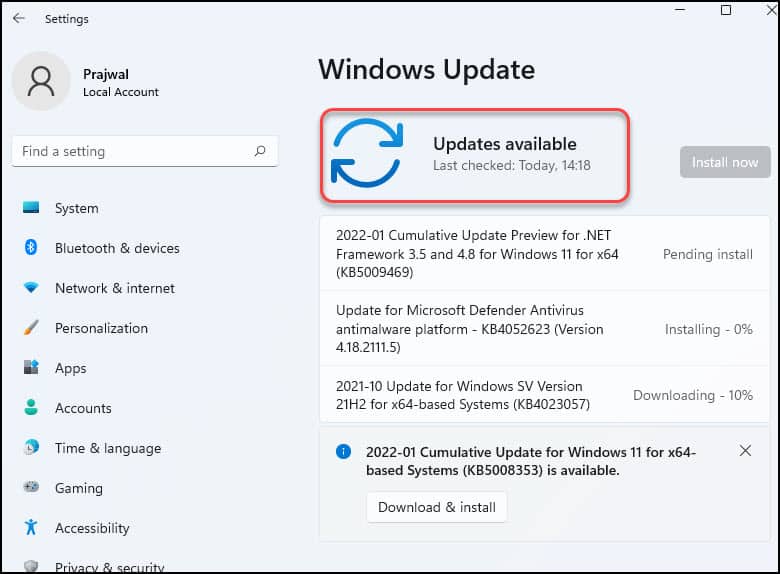
- Click Check for Updates to see if there are any applicable updates.
- Install all the updates and restart Windows 11 PC.
Read: How to deploy Windows 11 updates using ConfigMgr ADR
Step 2. Register for the Windows Insider Program
This is an important step where you enroll or register for the Windows Insider Program. You need a Microsoft account to register for the Windows Insider Program. To accomplish that, launch the Microsoft Edge browser on your Windows 11 PC and visit the Join the Windows Insider Program link.
To register, you must sign in with your Microsoft account or work account in the Azure Active Directory. Click “Sign in now.” Enter the Microsoft account credentials and complete the registration.
Once the registration is complete, in the next step, you can begin to start flighting. Microsoft gives clear instructions on what should be done before you set up flighting.
Note: To install Windows Insider Preview Builds on Windows 11, you must be running a licensed version of Windows on your device.
Step 3. Link your Microsoft Account in Windows 11
Perform the below steps on your Windows 11 PC to link your Microsoft account.
- On your Windows 11 PC, click Start and open the Settings app.
- In the Settings window, from the left pane, click Accounts.
- To add a new Microsoft account, select Email & Accounts.
On the Email & Accounts window, click Add a Microsoft account. If you have registered to Windows Insider Program with work or school account, use that option.
You must sign in with the same account that was used to register to Windows Insider Program. On the next screen, sign in and complete the process.
If the account sign in is successful, you should see the newly added Microsoft account on the Email & Accounts screen. Now that you have linked a Microsoft account on Windows 11, this will make it easier to join the Windows Insider program.
Step 4. Join the Windows Insider Program on Windows 11
In this step, we will join Windows Insider Program on Windows 11 PC. Click Start and launch the Settings app. Click Windows Update option and under more options, select Windows Insider Program.
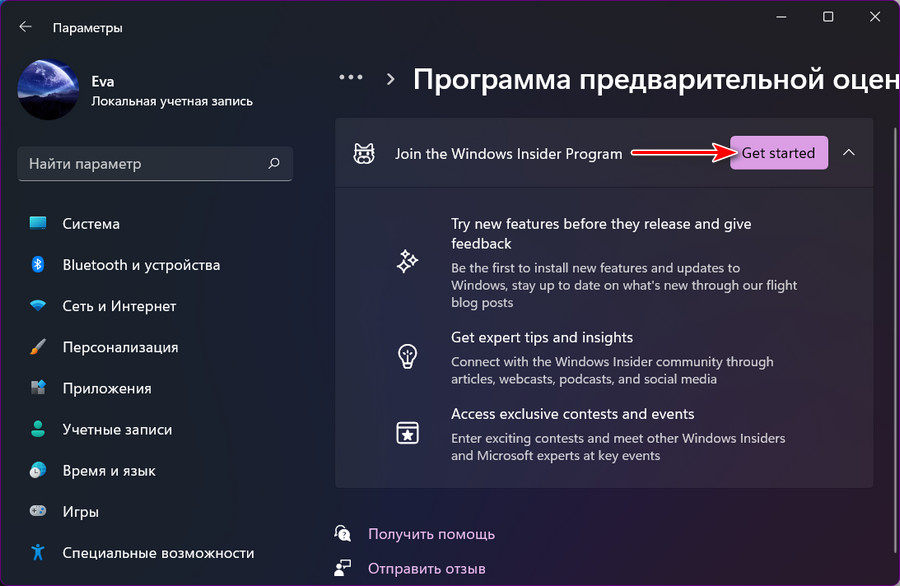
On Join the Windows Insider Program box, click Get Started.
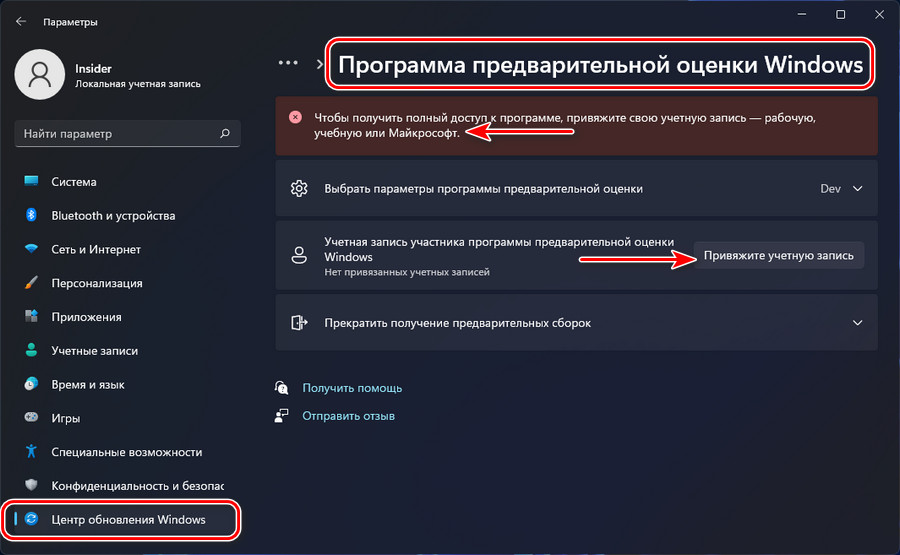
You must link an account to join the program. To associate a Windows Insider account, click Link an account.
Now you will be prompted to sign in with your Microsoft account or Work/School account. Sign in with the same account that used while registering to Windows Insider Program.
Now choose an Insider Channel. You can select Dev, Beta, or Release Preview. The Beta channel is recommended for early adopters of preview builds. Compared to Dev Channel, Beta channel builds are stable.
Read: Download Microsoft Chromium Edge on Windows 10
Click Continue.
Click Continue to agree to the terms of service for the Insider program.
You must restart the device to finish the process. Click Restart Now.
After the restart, sign in to your PC and manually update Windows 11 by pressing Start > Settings > Windows Update > Check for Updates. Certain updates might require another Windows 11 restart.
Note: If you have selected Insider channel as Beta, it may take some time to download the latest Windows 11 insider preview. If you have selected Dev channel, the insider preview builds download sooner.
To speed up the update download process, I have changed the release channel from Beta to Dev.
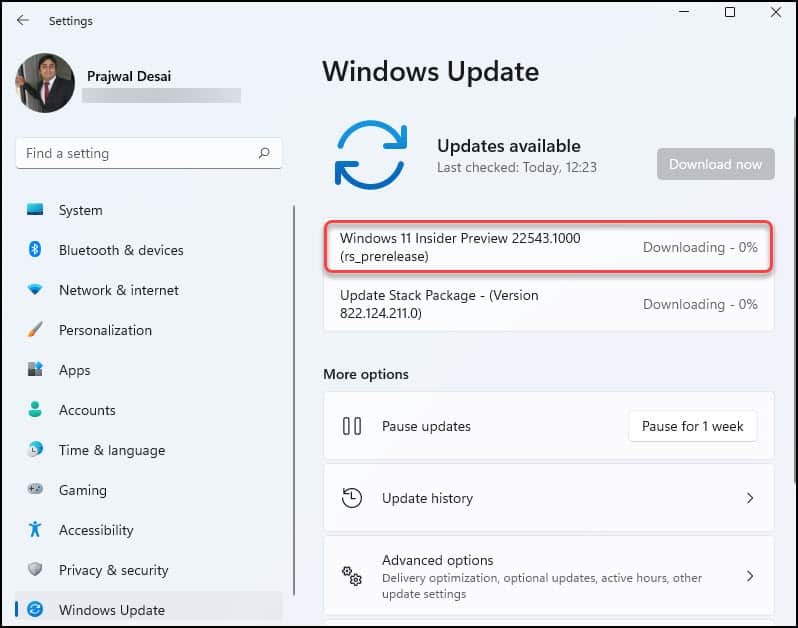
Now we see that the latest Windows 11 Insider preview 22543.1000 builds is downloading via Windows Update.
After the download is complete, the Windows 11 Insider Preview build installs, and it should prompt for a PC restart. Restart your computer and in the next step we will verify the build number of Windows 11.
Step 5. Verify Windows 11 Insider Preview Build
We will now check the Windows 11 build number after installing the insider preview build. On your Windows 11 PC, click Start > Settings > System > About.
Under Windows Specifications, check the Edition and Version. The edition here shows it’s a Windows 11 Pro Insider Preview and Version as Dev.
You can also check the build number of Windows 11 Insider preview build by going to Settings > Windows Update > Windows Insider Program. You can see the installed build: 22543.1000 rs_prerelease.
The final method to check the Windows 11 Insider Preview build is by running “winver” command. On Windows 11, right-click Start > Run. Enter the command winver and press enter key.
The About Windows shows the insider channel and build number of Windows 11 insider preview.
Windows 11 Insider Program FAQ’s
Some frequently asked questions related to Windows Insider program for Windows 11.
Is Windows 11 available in Windows Insider Program?
Yes, Windows 11 is now available for everyone and a part of Windows Insider Program.
What happens when you join Windows Insider Program on Windows 11?
Once you join Windows Insider Program on Windows 11, you get the latest Windows 11 features and updates before they’re ready for the public.
Is Windows Insider Program free?
Yes, Windows Insider program is free.

Prajwal Desai is a Microsoft MVP in Enterprise Mobility. He writes articles on SCCM, Intune, Configuration Manager, Microsoft Intune, Azure, Windows Server, Windows 11, WordPress and other topics, with the goal of providing people with useful information.
В этой публикации, друзья, рассмотрим, как стать участником программы предварительного тестирования Windows 11 Insider, она же инсайдерская программа Windows 11. И как установить предварительную тестовую сборку Windows 11 Insider Preview. Не все могут сделать это беспрепятственно. Для участия в инсайдерской программе компьютер должен соответствовать системным требованиям Windows 11, в частности, иметь современный процессор и модуль TPM 2.0. Если ваш компьютер не соответствует, эти ограничения необходимо обходить. Плюс к этому, пользователи из России и Беларуси, из-за санкций не могут участвовать в инсайдерской программе Windows 11, и эти ограничения также нужно обходить. Но, давайте обо всём подробно.
Есть несколько способов, как установить Windows 11 Insider Preview.
Друзья, на отвечающем системным требованиям Windows 11 компьютере получить её инсайдерскую вы можете, обновившись до неё с текущей Windows 10, для этого необходимо подключиться к инсайдерской программе Windows Insider. Если вы хотите это сделать с основной вашей Windows 10, обязательно создайте бэкап, чтобы вы могли откатиться к стабильной системе в случае каких-то проблем. Либо клонируйте Windows 10 на другой диск компьютера.
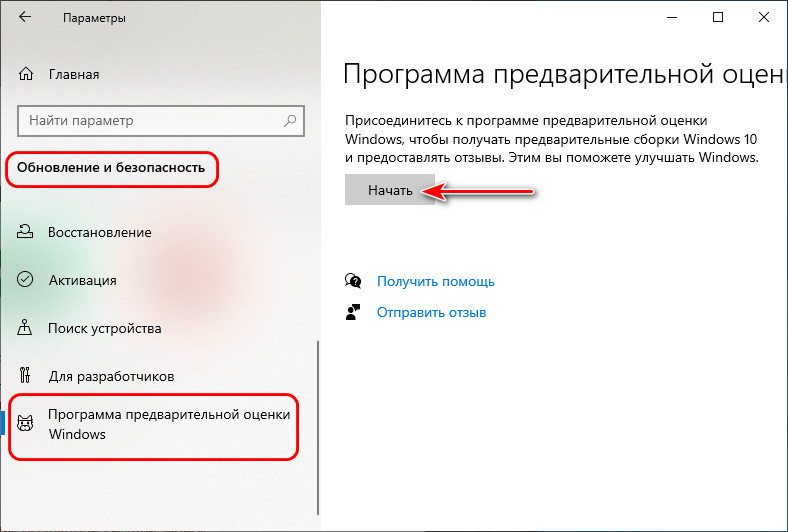
В системных параметрах Windows 10 идите по пути:
Обновление и безопасность > Программа предварительной оценки
Жмите «Начать».
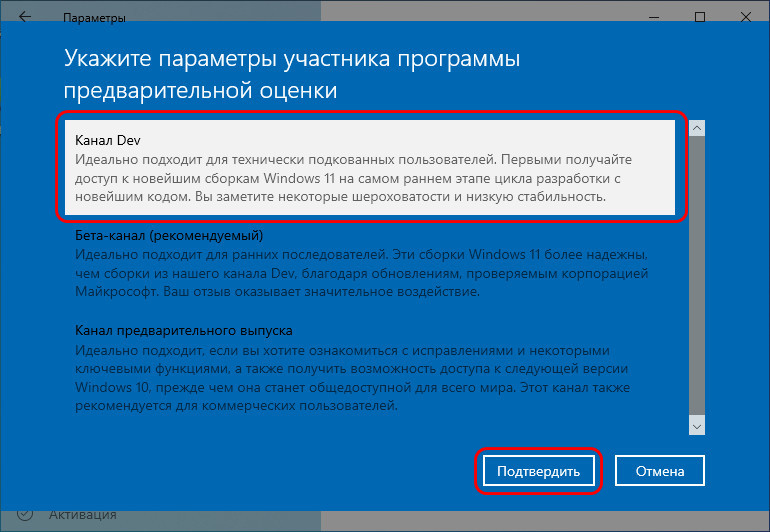
У инсайдерских Windows есть три канала поставки обновлений:
- Dev Channel – канал разработки, это первейшие сборки операционных систем, в них внедряются все новые наработки;
- Beta Channel – канал бета-тестирования, отлаженные сборки;
- Release Preview Channel – канал предварительных выпусков, ещё более отлаженные, но поздние сборки.
В контексте исследования первейших разработок Windows 11, конечно же, интересен канал Dev Channel. Или хотя бы Beta Channel.
Если вы ранее уже регистрировались в программе Windows Insider, подключите аккаунт Microsoft, связанный с программой.
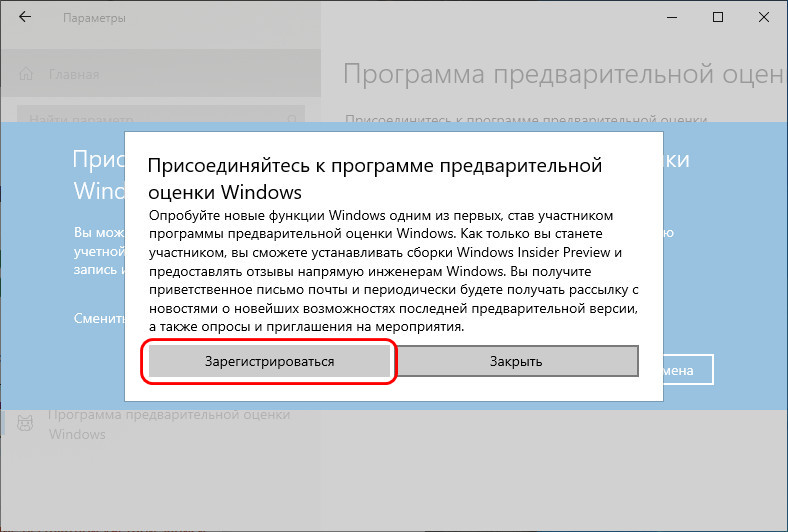
Если не регистрировались, выполните регистрацию прямо в приложении «Параметры».
После авторизации выбираем предпочитаемый канал, например, в нашем случае ранний Dev.
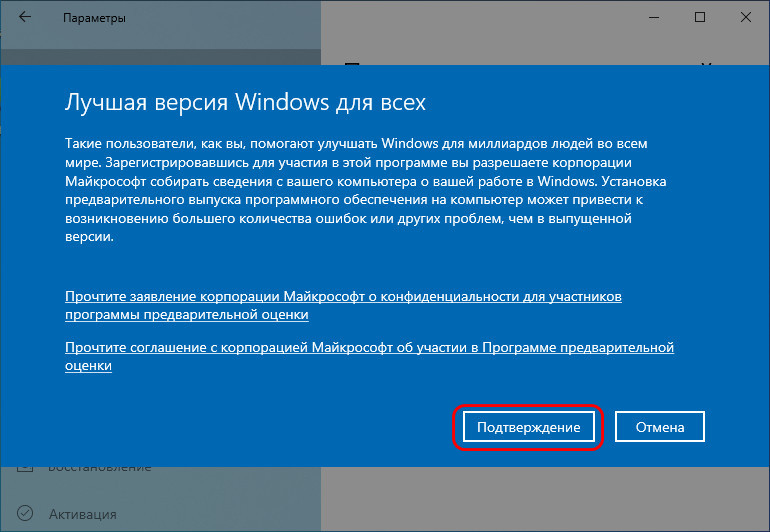
Затем подтверждаем переход на Windows Insider.
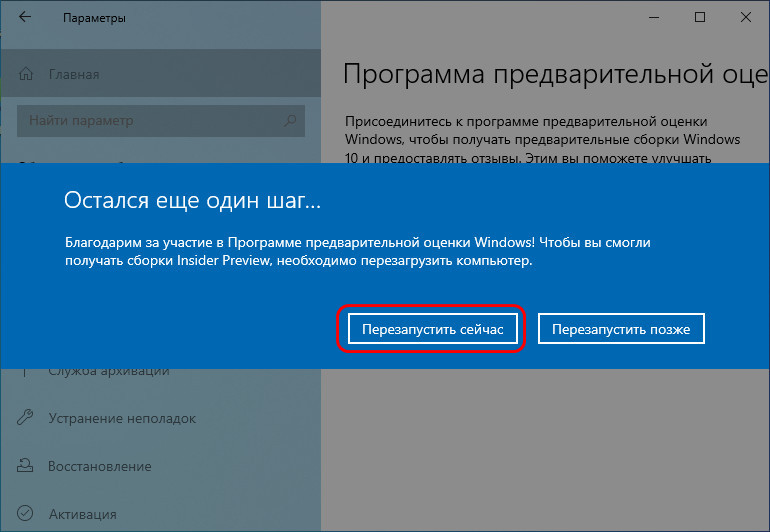
Перезагружаемся.
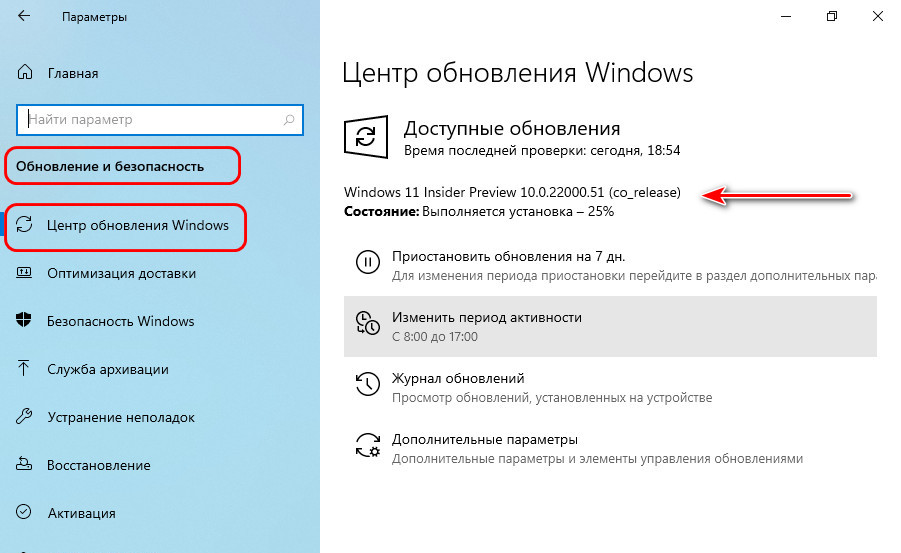
Идём в центр обновления Windows 10, жмём «Проверить наличие обновлений» и обновляем операционную систему до инсайдерской Windows 11.
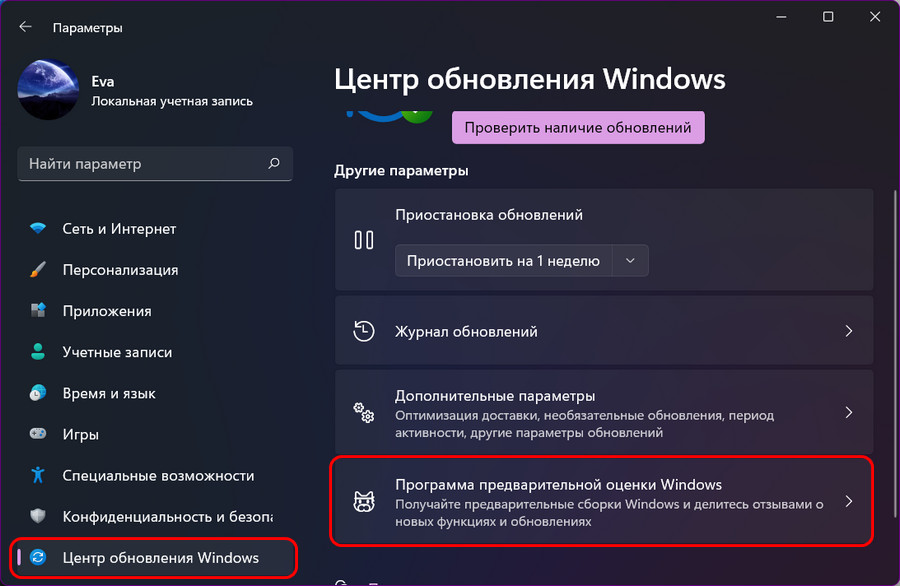
На отвечающем системным требованиям Windows 11 компьютере можно перейти на инсайдерскую Windows 11 со стабильной Windows 11. Здесь будет тот же самый принцип и механизм, что при переходе на инсайдерскую Windows 11 с Windows 10. В системных параметрах Windows 11 идём по пути:
Центр обновления > Программа предварительной оценки Windows
Запускаем присоединение к программе Windows 11 Insider и проходим те же этапы, что описаны в предыдущем пункте статьи.
Друзья, если ваш компьютер не соответствует системным требованиям Windows 11, вы не сможете официально участвовать в инсайдерской программе Windows 11. Но сможете неофициально или на виртуальных машинах. В целом можем предложить 3 способа решения вопроса.
Способ №1. Участвуйте в Windows Insider на виртуальной машине в программе VMware Workstation Pro или на виртуальной машине в Hyper-V. Эти два гипервизора предусматривают эмуляцию TPM 2.0. Установите на виртуальную машину со старта инсайдерскую сборку Windows 11. Потом зайдите в настройки инсайдерской программы в системном приложении «Параметры» по пути «Центр обновления Windows → Программа предварительной оценки». И подключите свой аккаунт Microsoft, привязанный к инсайдерской программе.
Это нужно для официального участия в программе Windows 11 Insider, т.е. для полноценного доступа к ней, в частности, для смены канала сборок, если вам это потребуется. Например, вы захотите перейти с более поздней ветви на раннюю, и вы сможете это сделать в том же в системном приложении «Параметры» по тому же пути «Центр обновления Windows → Программа предварительной оценки».
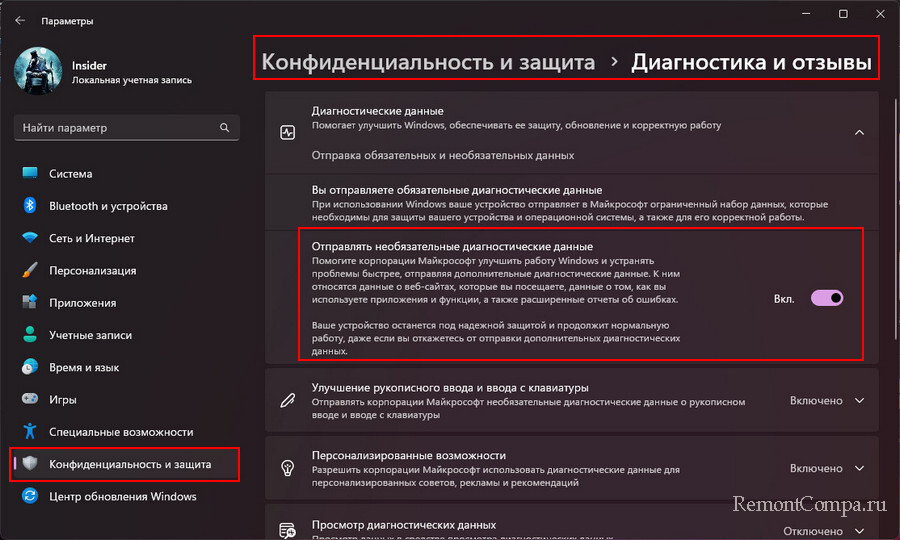
Способ №2. Попробуйте подключиться к инсайдерской программе на несовместимом с Windows 11 компьютере. Способ нестабильный, тем не менее. Включите отправку необязательных диагностических данных в приложении «Параметры».
Скачайте утилиту OfflineInsiderEnroll, выложенную на GitHub. Запустите её от имени администратора, выберите переключение на нужный канал путём ввода цифры канала. Например, на Dev Channel путём ввода цифры 1.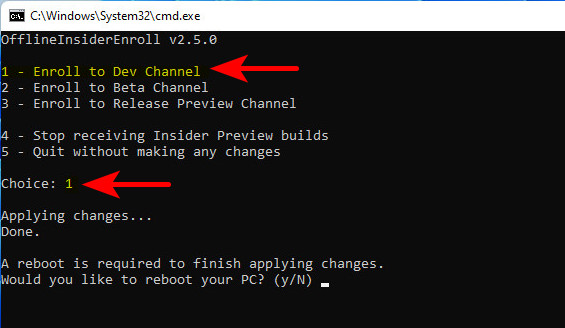
Способ 3. Обновляйтесь вручную до новых инсайдерских сборок. Для этого вам не нужно никакое участие в программе Windows 11 Insider. Вам просто нужно получить установочный образ новой сборки путём компиляции с помощью сайта UUP. Предлагаемый на этом сайте компилятор предусматривает снятие ограничений на установку операционной системы. Сам же процесс обновления до новой сборки инсайдерской Windows 11 точно такой же, как процесс обновления до стабильной Windows 11 с использованием ISO-образа установки. Детали смотрите в статье «Как обновить Windows 11 Insider на несовместимых компьютерах».
Наконец, как скачать инсайдерскую Windows 11, чтобы установить её с нуля? Скачать можно:
- На сайте инсайдерской программы Microsoft (требуется регистрация в инсайдерской программе);
- На сайтах типа платформ обновлений Windows методом компиляции установочного образа (ничего не требуется).
Важно: чтобы установить инсайдерскую Windows 11 на компьютер, который не отвечает её системным требованиям, либо на виртуальную машину без поддержки TPM 2.0, в частности, в программах VirtualBox и VMware Workstation Player, необходимы способы обхода блокировки установки операционной системы на неподдерживаемые устройства. Эти способы смотрим в статье «Как установить Windows 11 без TPM 2.0, Secure Boot и UEFI».
Если будете ставить систему на физический компьютер, вам пригодится статья сайта «Как создать загрузочную флешку Windows 11». Также, возможно, вам, друзья, пригодятся материалы сайта касаемо инсайдерской программы:
- «Что нового в сборках Windows 11 Insider Preview»;
- «Как в Windows 11 Insider Preview перейти на другой канал инсайдерской программы».
Наконец, друзья, ограничение на участие в Windows 11 Insider в России и Беларуси. Как обойти это ограничение, смотрим в статье «Как обойти ограничение на участие в Windows 11 Insider в России и Беларуси».
Windows 11 has finally been announced by Microsoft! The new operating system has undergone a major UI and performance overhaul. While there are new icons and a revamped settings app, Windows 11 sounds to be one of the best Windows operating systems for the decade. Now that the insider update is officially available, here is a guide on how to join Windows Insider Program to get Windows 11 Insider Builds on Windows 10.
While there are a few days left for the Windows 11 insider preview builds to be released, you can take a look at all the new features by heading here. You can also rock the new Windows 11 wallpapers by heading here. While the update to Windows 11 will be free to all Windows 10 users, we could see the official rollout of the OS sometime in October – November this year. Without further ado, let’s take a deep on how to get Windows 11 Insider builds.
How to get Windows 11 Beta through Windows Insider Program
What is the Windows Insider Program
The Windows Insider Program is a whole community of people who wish to test and try out the latest builds from Microsoft. These builds usually are previews of what one could expect as a final release which later rolls out as a major update. The builds have experimental features so you can expect a lot of bugs as well as an insatiable device. With Microsoft one just being announced, the only way to get your hands on the brand-new operating system is by registering and becoming a Windows Insider.
Types of Build Channels
As a Windows Insider, you have an option to choose between the Dev Channel, Beta Channel, and the Release Preview Channel. Depending on the channel that you opt-in, the updates will defer based on stability as well a few features that may or may not make it to the other and final builds.

The Dev Channel
The Dev Channel is where you will be getting access to the newest features and updates that may break or fix a few things. These updates are usually the most unstable ones and contain a large number of bugs The channel is recommended if you are fine living with most of the issues and are willing to provide feedback to Microsoft.
The Beta Channel
Here is where you will get a bit more stable and reliable updates. Now, you might sometimes not see updates that were in the Dev Channel over in the Beta Channel It could be that the feature or function was removed because it could be breaking a lot of things or the feature needs some more working out. Also, feedback is taken by Microsoft from testers in the Beta Channel.
The Release Preview Channel
Here is where you get the most stable updates which you can expect to be later rolled out to the public. The updates in this channel are safety install and many people who don’t want to mess around with various system issues usually opt for this channel. This channel doesn’t require you to send any feedback whatsoever.
Check System eligibility for Windows 11
This is an important step that you need to perform as Windows 11 has a set of minimum requirements as well as additional hardware requirements to get the update to Windows 11. You can check if your system is eligible to update to Windows 11 by downloading Microsoft’s PC Health Checker app that will determine if your system is eligible to receive the update. If you are eligible to receive the update, you can then apply to be a Windows Insider and get the beta update to Windows 11 right away.
Register as a Windows Insider for Windows 11 Beta updates
To register as a Windows Insider to get the latest developer updates, do the following
- Open the Settings app and click on Update and Security.
- Click on the Windows insider Program that is on the left pane.
- Now click on Get Started.
- Here you will have to sign in with your Microsoft Account.
- Once signed in it will ask you to select a channel (Developer, Beta, or Release Preview) to join.
- Choose the one you prefer.
- That’s it.

Now that you have joined the Windows insider program to receive Insider Preview updates for Windows 11. Microsoft has pushed the first insider preview build of Windows 11, if you’re running on Windows 10 and your PC is eligible for upgrade then you can opt the insider preview program to update your system to the new Windows 11 insider build.
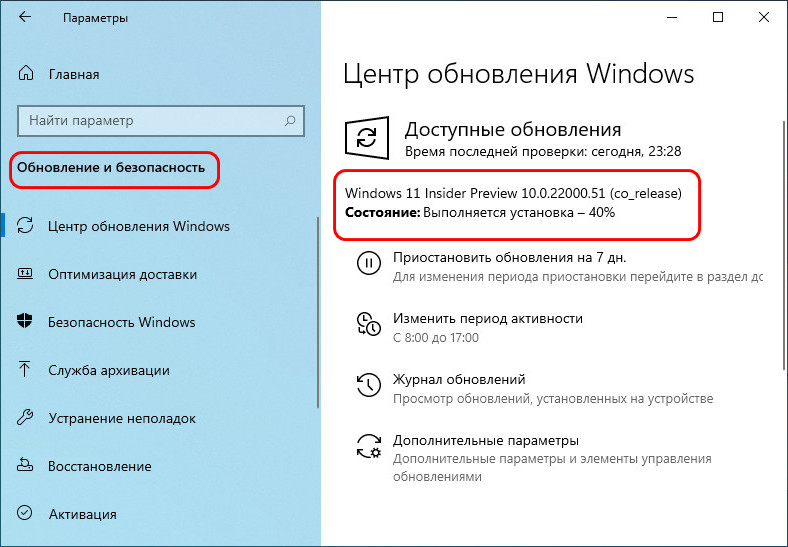
To get the update, all you need to do is, head over to the Settings app > Update & Security > check for updates > you’ll see Windows 11 Insider Preview 10.0.22000.51 (co_release) build. The installation may take a while (it takes more than an hour for me).
However, systems that only meet the minimum hardware requirements will be receiving updates a bit slower as compared to those systems that have the perfect hardware to receive all the test builds of Windows 11.
Conclusion
If you wish, you can always opt-out of the Insider program for Windows 11, but, do keep in mind that if you wish to do so, you will need to have the Windows 10 ISO file as it requires you to perform a clean install to go back to Windows 10.
You May Also Like – Can my PC run Windows 11? Find Now!
If you have any queries, you can drop the comments in the comment box. Also, share this article with your friends.
More Related Articles:
- How to Create Windows 11 Bootable USB Drive
- Here’s the new Windows 11 Start Sound
- How to get Windows 11 style taskbar on Windows 10
What to do if you can’t switch Windows Insider Channel from the Dev Channel to Beta or leave the Windows Insider Program? MiniTool Solution tells you the reason for this issue. If you insist on switching the Windows Insider Channel or leaving the Windows Insider Program, you can try the methods mentioned in this post.
Have You Ever Joined the Windows Insider Program to Get Windows 11 Insider Preview Builds
Timeline of Windows 11
- On June 15, 2021, someone leaked the screenshots of Windows 11 new Start Menu, UI (user interface), and more on the internet. This caused an uproar. At that time, users were guessing whether Windows 11 was real. They looked forward to an official response from Microsoft.
- On June 24, Microsoft confirmed that Windows is “a re-imagining of the operating system”.
- On June 28, Microsoft released the first Windows 11 preview build 22000.51 and SDK (Software Development Kit) of Windows 11 to Windows Insiders in the Dev Channel.
- On October 5, 2021, Microsoft rolled out the official Windows 11 to the public.
Which Insider Channel Are You In Now?
Before the official release, if you wanted to try Windows 11 on your supported device, you needed to first join the Windows Insider Program. In the beginning, only Windows Insiders in the Dev Channel can get Windows 11 preview build. Due to this, many users chose to participate in the Dev Channel.
As Windows 11 became more and more stable, Microsoft began to release the preview builds to the Beta Channel (since Windows 11 preview build 22000.100) and then to commercial PCs in the Release Preview Channel (since Windows 11 preview build 22000.176). Since Windows 11 preview build 22000.176, only Insiders in the Beta Channel and commercial PCs in the Release Preview Channel can get Windows 11 Insider preview builds that match Windows 11 experience to be released on October 5th. Insiders in the Dev Channel began to get higher versions of Windows 11.
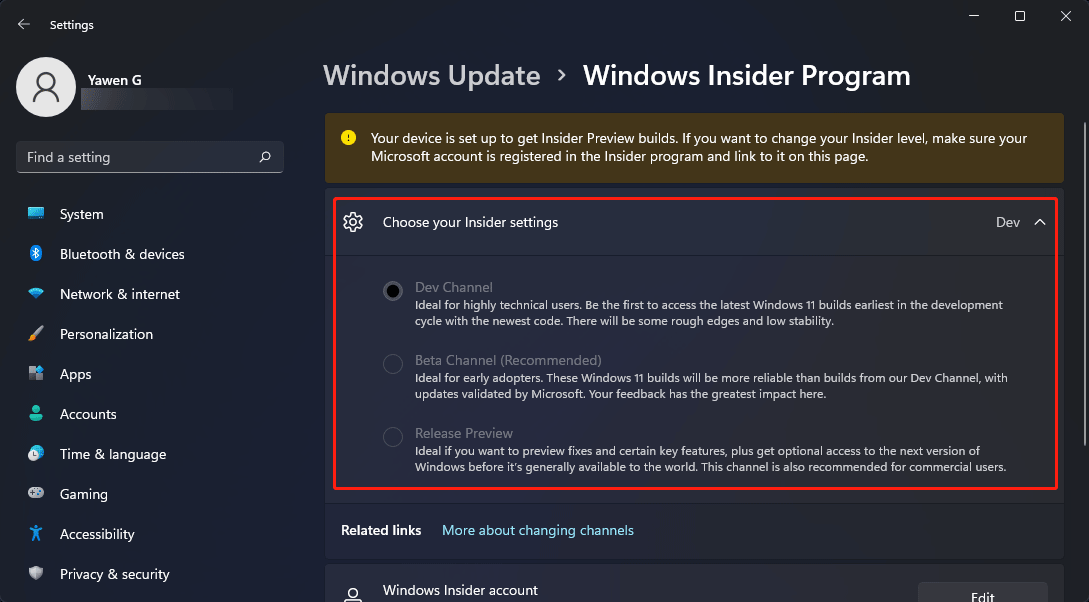
You can go to Start > Settings > Windows Update > Windows Insider Program > Choose your Insider Settings to see which Channel you are in.
Can’t Switch Windows Insider Channel on Windows 11! Why?
Since Windows 11 preview build 22000.160, Microsoft began to remind the Insiders who want to use stable Windows 11 builds to switch to Dev Channel if they are still in the Dev Channel.
For some reason, you may miss this opportunity and still stay in the Dev Channel. If so, now you can’t switch from Insider Dev Channel to Beta or leave the Windows Insider Program using the universal method.
Let’s see the detail:
Go to Windows Update > Windows Insider Program > Choose your Insider settings to check your Insider settings. If you are in the Dev Channel and all the three Channels are grey out, it usually means that you can’t switch Windows Insider Channel or can’t change Windows Insider settings through the universal method because the Windows 11 build you are using is not tied to a specific release.
Well then, how about leaving the Windows Insider Program?
You can click Stop getting preview builds and then click the leaving the Insider Program link to navigate to the Leave the Windows Insider Program page.
After you click the Leave the program now button on that page, the button will become unavailable and there is a message saying This email address is not registered as a Windows Insider. Is it successful? No.
Even after rebooting your Windows 11 computer, you can still see you are in the Dev Channel. When a new Windows 11 Insider preview build rolls out to the Dev Channel, your computer can still receive it.
Here is the reason why you can’t switch from Insider Dev Channel to Beta:
Switching between the Dev Channel and the Beta Channel is only available when the builds in these two Channels are equal. If you have already upgraded to a higher version of Windows 11 through the Dev Channel (Windows 11 Insider preview build 22449 or higher versions), you can’t change Windows Insider Channel using the normal way because the build you are running in the Dev Channel is not tied to a specific release.
Does this mean you can’t change your Insider level/settings forever? Of course not.
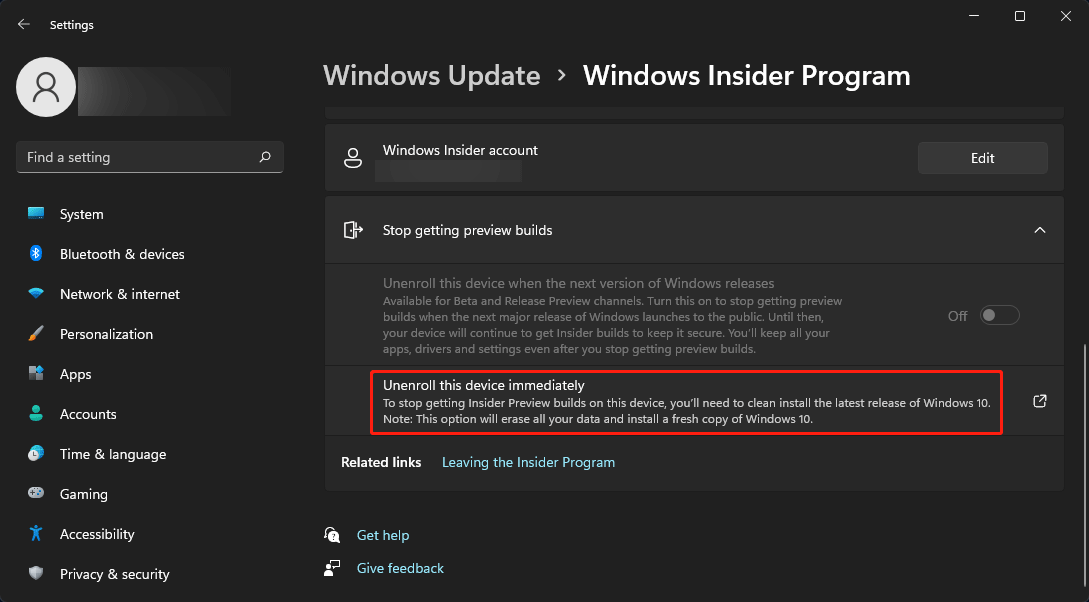
You can check Unenroll this device immediately (the only available option under Stop getting preview builds) to get some useful information:
To stop getting Insider Preview builds on this device, you’ll need to clean install the latest release of Windows 10. Note: this will erase all your data and install a fresh copy of Windows 10.
But can you only choose to clean install Windows 10 to exit the Windows Insider Program? Of course not, you can also use Windows 11 Media Creation Tool or Windows 11 ISO file to install Windows 11 on your computer to leave the Windows Insider Program.
If you still want to join the Beta Channel of the Windows Insider Program, you can do it after a Windows 10/11 clean install.
How to Leave the Dev Channel (if You Can’t Switch Windows Insider Channel on Windows 11)?
Since your can’t change your Windows Insider Channel level from the Dev Channel now, the only thing you can do is to leave the Windows Insider Program by performing a clean install of Windows 10/11. After that, you can choose to participate in your needed Channel or not according to your requirements.
Preparation: Back up Your Windows 11 Data
Windows 11/10 clean install will remove all your files, settings, and apps from your computer. To avoid data loss, you should use professional Windows data backup software to back up your data to an external hard drive.
You can use MiniTool ShadowMaker to do the job. This software is specially designed to back up your files, folders, partitions, disks, or Windows operating system to keep them safe or for other reasons.
Recommended: How to Back up Windows to Safeguard Your Computer?
You can first try the trial edition of this software to back up your Windows data because you can use it for free within 30 days.
Free Download
Choice 1: Clean Install Windows 11
Windows 11 has been officially released to all users. But since you are in the Dev Channel, you can’t get it via Windows Update. You can use two other tools from Microsoft to clean install Windows 11 without using Windows Update in the Settings app. They are:
1. Windows 11 Media Creation Tool
You can use Windows 11 Media Creation Tool to create a Windows 11 installation media. Then, you can install Windows 11 from USB.
2. Windows 11 Disk Image (ISO) Download
You can directly download a proper Windows 11 ISO from Microsoft and then use it to install Windows 11 on your computer.
Method 1: Clean Install Windows 11 from USB
Move 1: Download Windows 11 Media Creation Tool
Step 1: Go to the software download for Windows 11 from Microsoft.
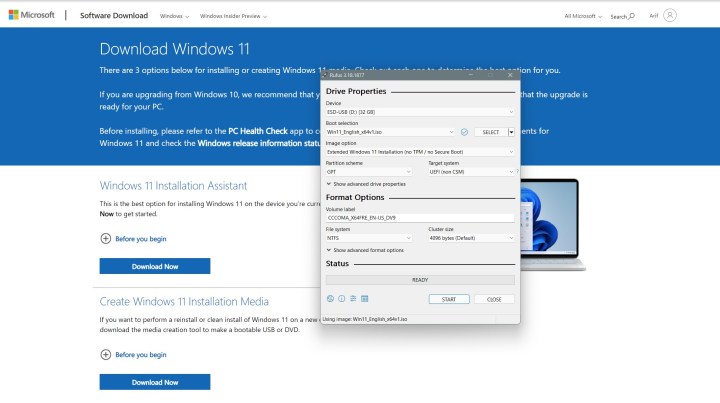
Step 2: Click the Download Now button under Create Windows 11 Installation Media to download Windows 11 Media Creation Tool on your PC.
Move 2: Create a Windows 11 Installation USB Drive
Tip: You need to prepare a USB drive that has at least 8 GB of storage space. The creation process will remove all files in the USB drive. So you need to make sure that there are no important files in it.
Step 1: Connect the USB drive to your computer.
Step 2: Open the downloaded Windows 11 Media Creation Tool.
Step 3: If User Account Control pops up, click Yes to continue.
Step 4: Click Accept to accept the applicable notices and license terms to continue.
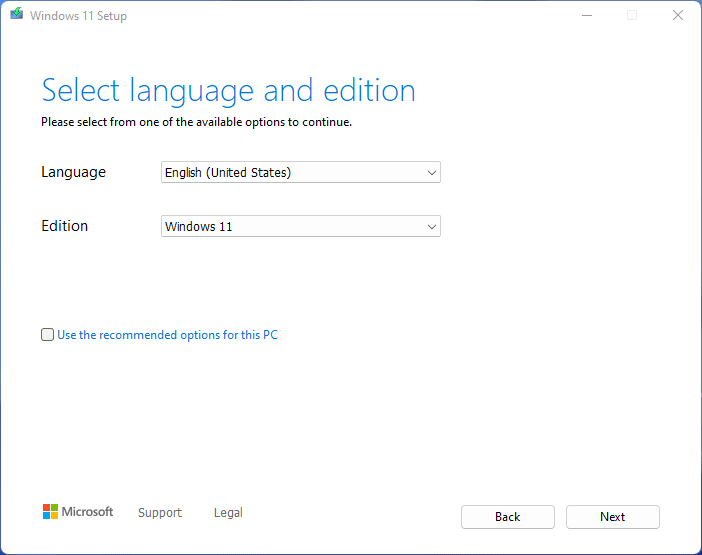
Step 5: Select the language and edition you want to use for Windows 11.
Step 6: Click Next.
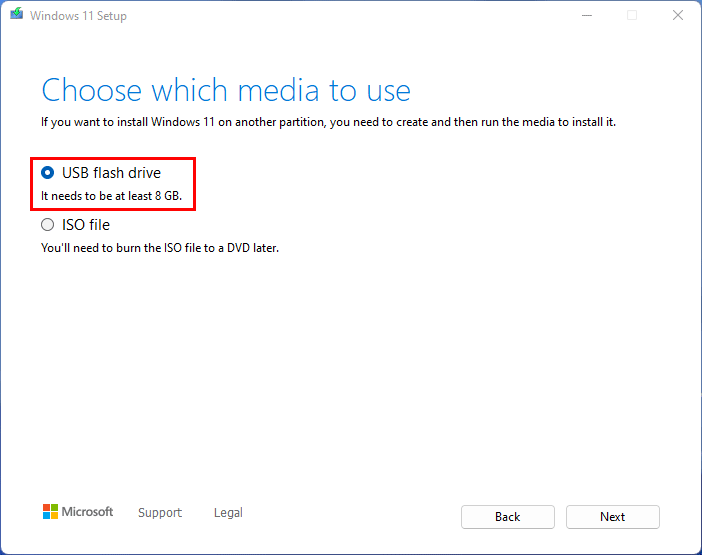
Step 7: Make sure USB flash drive is selected (it is selected by default) and click Next to continue.
Step 8: Windows 11 Setup shows you the connected USB drive. Select it and click Next.
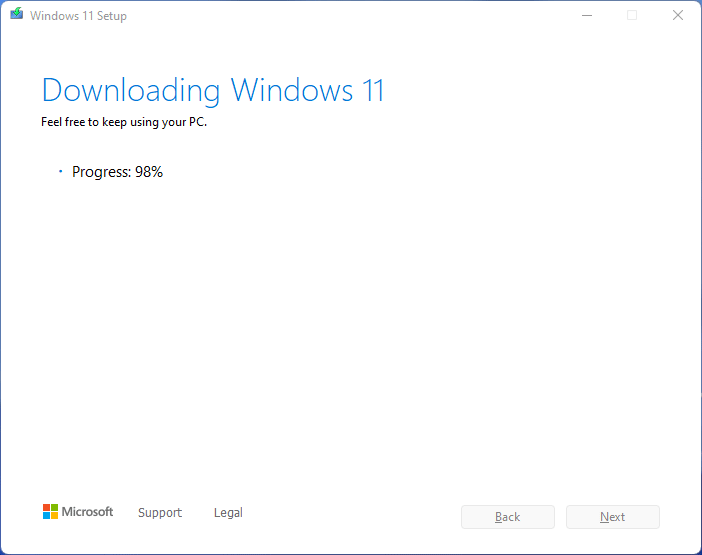
Step 9: Windows 11 Setup begin to download Windows 11 on your USB drive.
Step 10: When the process ends, a Windows 11 installation USB drive is prepared. Click Finish to close Windows 11 Setup.
Move 3: Clean Install Windows 11 from USB
Step 1: Shut down your computer.
Step 2: Boot your computer into BIOS.
Step 3: Change the boot settings to make your device boot from the Windows 11 bootable USB drive.
Step 4: When seeing the Windows Setup interface, click the Next button to continue.
Step 5: Click Install now.
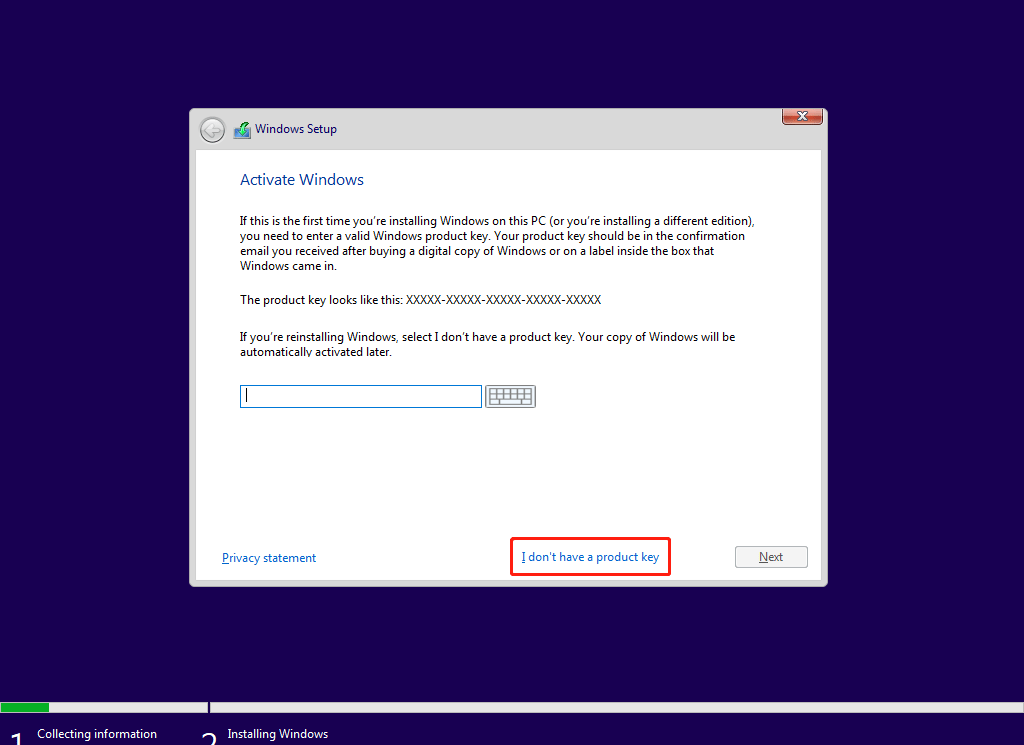
Step 6: Click I don’t have a product key.
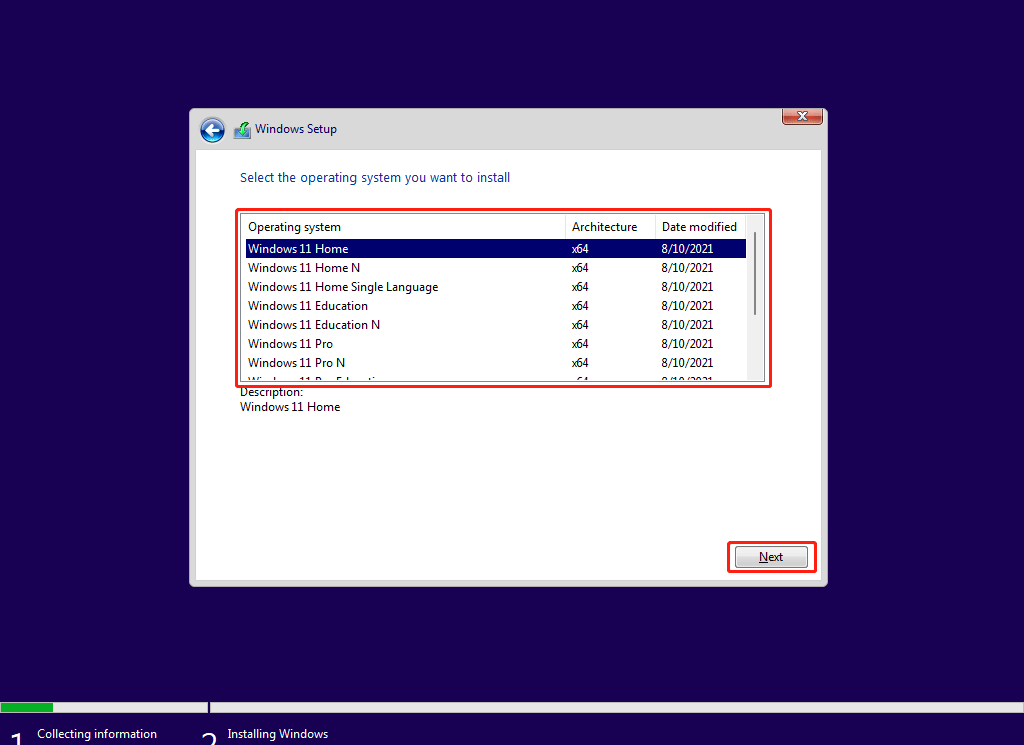
Step 7: Select the Windows 11 edition you want to install.
Step 8: Click Next.
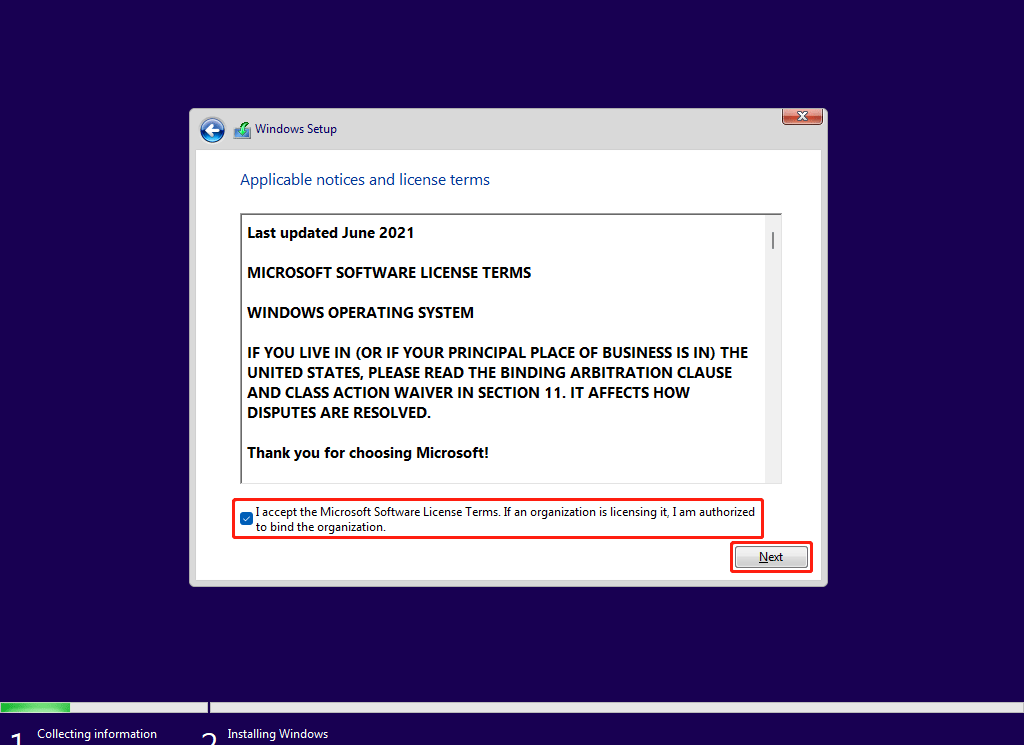
Step 9: Select I accept the Microsoft Software License Term.
Step 10: Click Next.
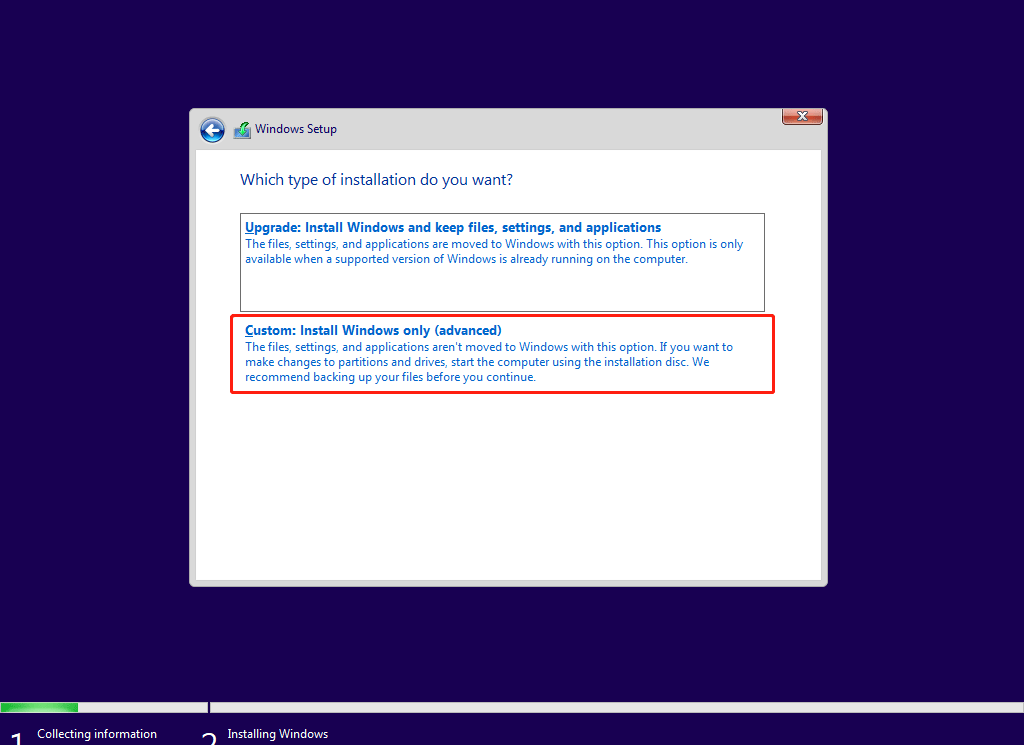
Step 11: Select Custom: Install Windows only (advanced).
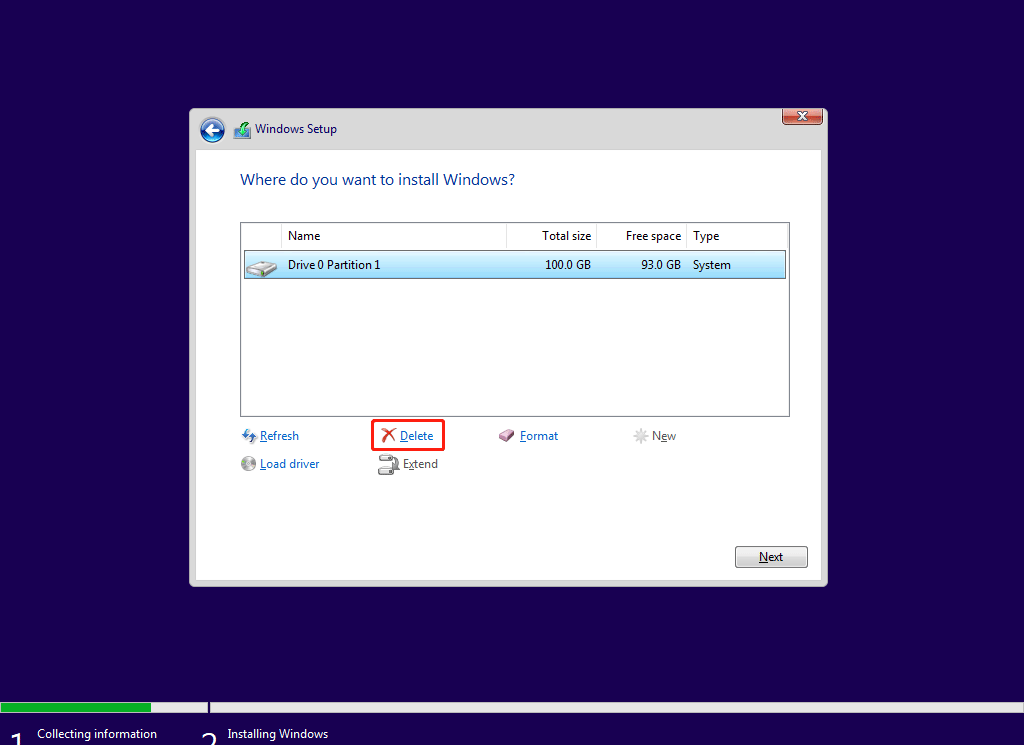
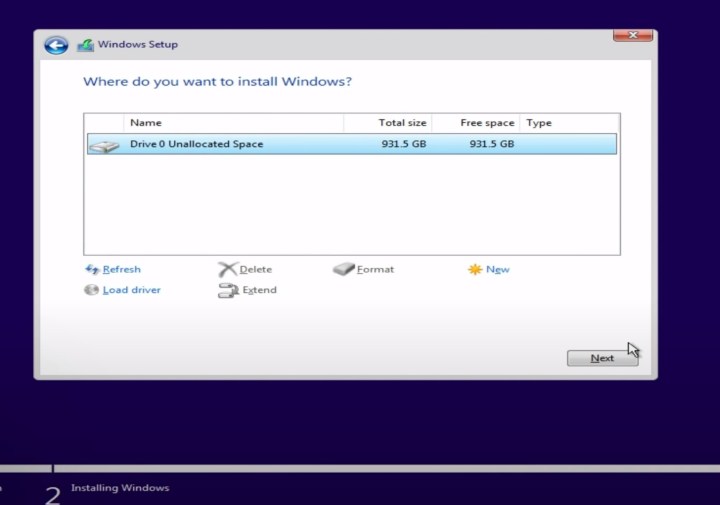
Step 12: Select the partition you want to install Windows. Usually, it is the system partition in Drive 0.
Step 13: Click Delete to delete that partition.
Step 14: Click OK to confirm the deletion.
Step 15: Select the deleted partition (Drive 0 Unallocated Space) and click Next.
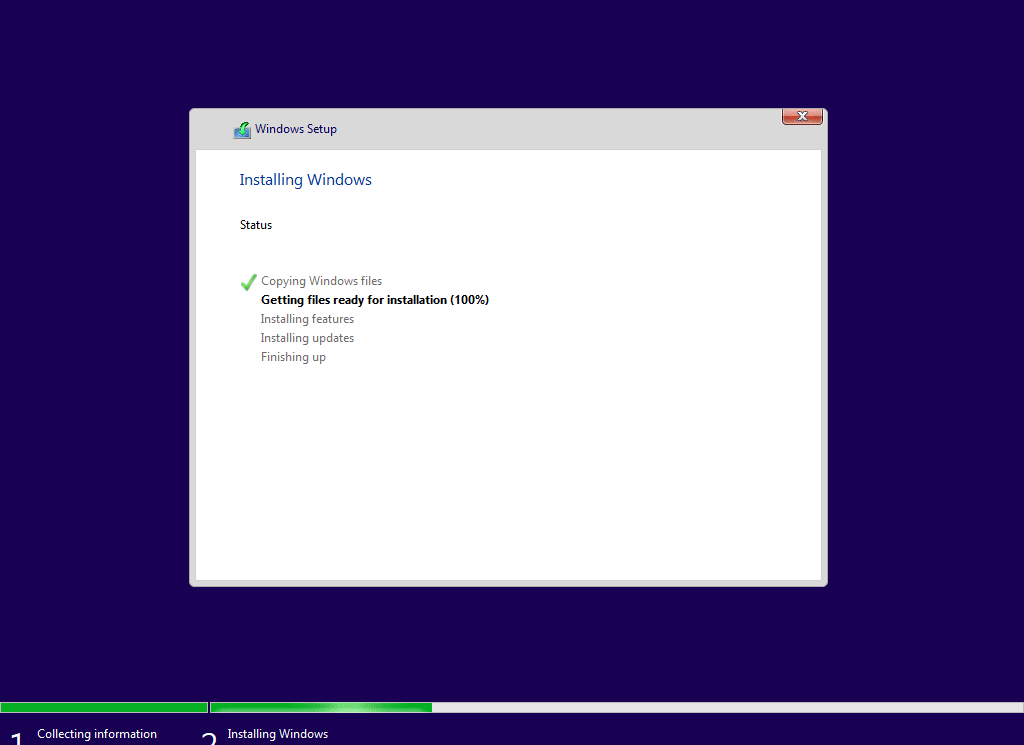
Step 16: Windows Setup begins installing Windows 11 on your computer. The whole process will last for a while. When the process ends, your computer will restart automatically. After that, you need to continue with Windows 11 out-of-box experience.
Method 2: Clean Install Windows 11 Using ISO
Move 1: Download or Create a Windows 11 ISO File
Download a Windows 11 ISO file: you can go to the Windows 11 software download page to select a proper Windows 11 ISO file to download.
Create a Windows 11 ISO file: You can also use the Windows 11 Media Creation Tool to create a Windows 11 ISO file. When you reach this step, you need to select ISO file instead to create Windows 11 ISO file.
Move 2: Install Windows 11 Using ISO
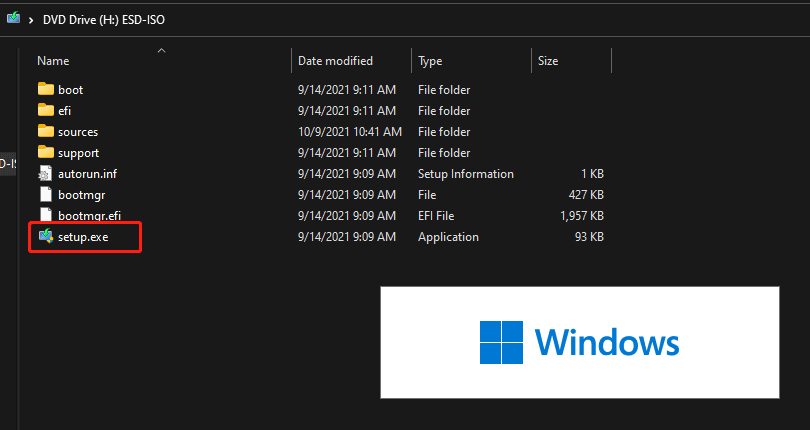
Step 1: Double-click the Windows 11 ISO file you get to mount it.
Step 2: Click the setup.exe file.
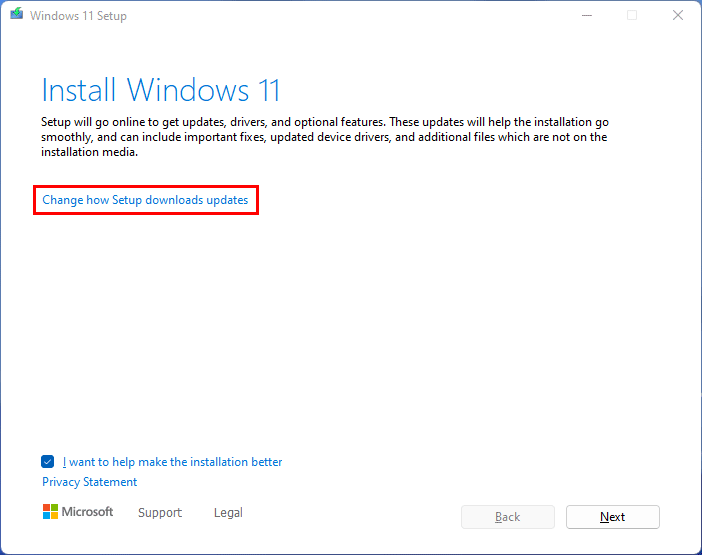
Step 3: When you see the following interface, click Next to continue. However, you can click the change how Setup downloads updates link to modify the updates settings if necessary.
Step 4: Click Accept.
Step 5: Now, you see only Nothing is available on the Choose what to keep interface. That’s why it is important to back up your files in advance. Then, click Next.
Tip: The above situation only happens in the Dev Channel. In other situations, another two options (Keep personal files and app and Keep personal files only) are still available when you install Windows 11 using the ISO file.
Step 6: Follow the onscreen guide to complete the Windows 11 installation process.
Choice 2: Clean Install Windows 10
If you don’t want to use Windows 11 temporarily, you can choose to go back to Windows 10. Since you can’t change your Windows Insider Channel level now, you need to clean install Windows 10.
You can go to the Windows 10 software download page from Microsoft to download the Windows 10 Media Creation Tool and use it to create a Windows 10 installation USB drive. Then, you can clean install Windows 10 from USB. The operation is similar to Windows 11. We will not repeat the steps here.
Now, you leave the Windows Insider Program. If needed, you can join the Windows Insider Program again. This time, remember to select your needed Channel.
When your Windows 11 installation and setup are complete, you can install some necessary software on your computer for further use.
Here are some useful tools from MiniTool Software:
1. To recover your lost and deleted files on Windows 11, you can try MiniTool Power Data Recovery, a professional data recovery software. This software can recover data from all kinds of data storage devices like internal hard drives, external hard drives, memory cards, SD cards, USB flash drives, etc. You can first use the trial edition of this software to scan your drive and check if it can find your needed files. If you need to use it to recover all your needed files, you need to use a full edition.
Free Download
2. If you need a partition manager to manage your computer hard drive or other storage devices, you can use MiniTool Partition Wizard.
Free Download
3. As we have mentioned above, if you want to back up your Windows and files, you can use MiniTool ShadowMaker.
Free Download
Of course, some other tools from MiniTool are also worth trying, such as MiniTool MovieMaker (a video edit software), MiniTool Video Converter (a video format converter), MiniTool uTube Download (a free YouTube video downloader), and so forth.
Wrapping Things up
Can’t switch Windows Insider Channel from the Dev Channel to Beta? You need to leave the Windows Insider Program by cleaning install Windows 11/10 on your computer. After that, you can join your needed Channel using the universal method.
Should you have other related issues that need to be fixed or other suggestions, you can let us know in the comments. You can also contact us via [email protected]
It’s been quite a while since Windows 11 first launched, but Microsoft is still offering the new operating system as a free update for Windows 10 users. Windows 11 is no small release, either, as there are tons of new features in the operating system that make it worth downloading when compared to Windows 10. But if you’re stuck and don’t know how to download Windows 11, we have your back.
Contents
- How to install from Windows Update
- How to install through the Installation Assistant
- How to install through Windows Insider Program
- How to clean install with Windows 11 Installation Media
- How to clean install with Windows 11 ISO file manually (not recommended)
There are currently five major ways to download and install Windows 11. The best way is to wait to get it free via Windows Update on your PC. With the second way, you can force your PC to download it via the Installation Assistant. The third way involves using Windows Insider Program. These three ways involve no loss of files or data.
You also can try the media creation tool as the fourth way to get Windows 11, or try using a Windows 11 ISO file and manually clean install the OS on your PC as the fifth way. These two methods involve a clean install, so you’ll end up losing files. They’re the last resort.
Just keep in mind that to get Windows 11, you’ll need to meet the system requirements. If you don’t, there are ways you can tweak your installation to get it working, but doing so can mean your PC won’t get updates from Microsoft. We advise checking the PC Health Check app to confirm your system works with Windows 11 before proceeding.
How to install from Windows Update
The simplest way to get Windows 11 is via Windows Update. You’ll know that it’s ready for your PC because you’ll see messaging for it in Windows Update. Follow these instructions to proceed with the installation. You won’t lose any data or files on your PC with this option.
Step 1: Head over to Settings > Update & security. From there, click Check for updates.
Step 2: You should notice a prompt for Upgrade to Windows 11 is ready, and it’s free. Click the blue Download and install button and agree to the terms with the Accept and install button.
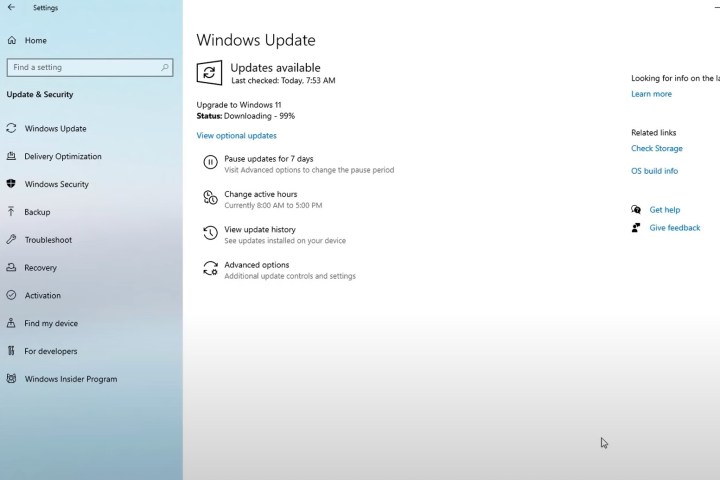
Step 3: You should then see the Upgrade to Windows 11 appear under Windows Update, with a percentage and download status. Wait for it to complete.
Step 4: When finished, you’ll get a prompt to restart your PC. It’ll show up in a blue box. Choose the Restart now option. Your PC will proceed with Windows 11 installation and will restart a few times. When finished, you’ll be taken to the Windows 11 desktop!
How to install through the Installation Assistant
If you’re not seeing Windows 11 in Windows Update, you can use the Windows 11 Installation Assistant instead. This manually will upgrade you from Windows 10 to the new OS. Again, using this method, you’ll have to ensure your PC meets Microsoft’s minimum specs. You won’t lose any files, either. Here’s how.
Step 1: Visit Microsoft’s Windows 11 download website. Look at the top for the Windows 11 Installation Assistant option and click the blue Download now button.
Step 2: Wait for the tool to download. When complete, launch it. Click Yes when prompted.
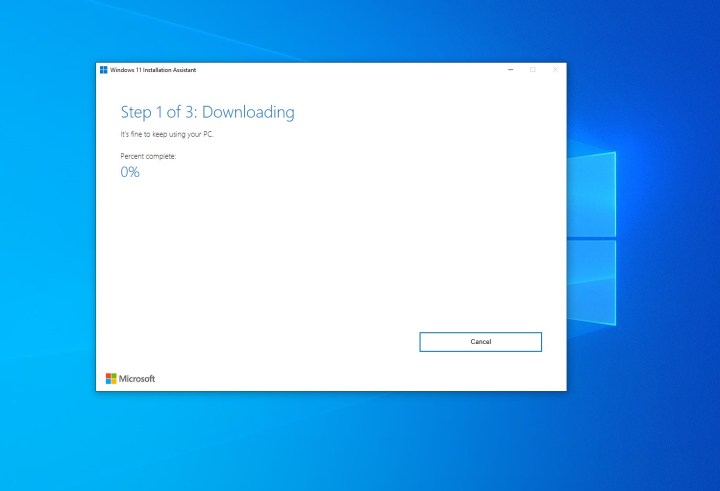
Step 3: In the pop-up box, you’ll have to choose Accept and install. From here on out, it will be a three-step process. Wait for Windows 11 to download as part of the first step. It could take a while depending on your connection speed. You might be prompted to agree to the Microsoft terms and service.
Step 4: In the second step, Windows 11 will verify the integrity of your download. It should take a few seconds.
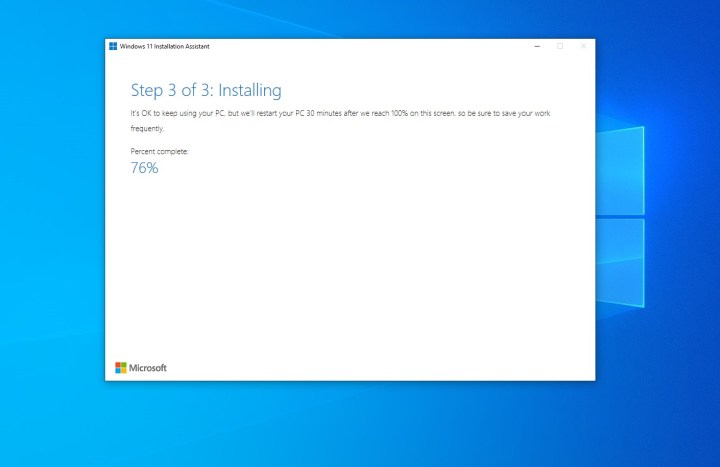
Step 5: In the third step, you’ll get a prompt about Windows 11 installing in the background. Let it install and wait it out. Depending on the speed of your PC, it could take a while — usually 30 minutes, tops.
Step 6: Once the third phase is finished, click the Restart now button. You’ll be prompted that you are about to be signed out. Wait while your PC restarts and installs Windows 11. It could take up to 30 minutes or an hour based on the speed and age of your PC and your CPU.
Step 7: While Windows 11 is installing, you’ll see Working on updates on your screen. A percentage will indicate the progress. Your PC will restart a few times, so be patient. Once complete, you’ll be taken to the sign-in page, and then the Windows 11 desktop.
How to install through Windows Insider Program
If the above two methods don’t work for you, then you can install Windows 11 through the Windows Insider Program. This is the last-resort effort, as the Windows Insider Program will install unstable, still in preview versions of Windows 11 on your PC.
Step 1: Head over to Settings > Update & security > Windows Insider Program. Then, link your Microsoft Account.
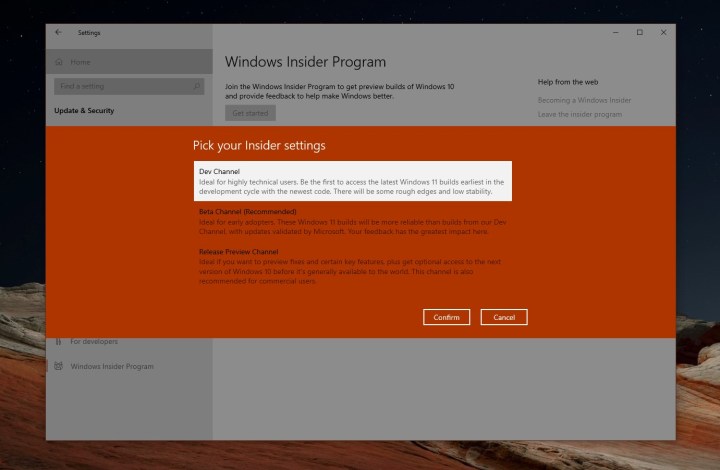
If it’s your first experience with the Windows Insider Program, you’ll notice that there are multiple channels: Dev, beta, and release preview. Currently, Windows 11 is being tested on the Beta and Dev Chanel. Pick one that’s right for you.
Step 2: The beta channel is one of the most stable experiences to test Windows 11. If you opt to join this channel, you won’t experience as many bugs and issues. Keep in mind, though, that beta channel releases only happen every few weeks.
If you want the latest and greatest versions of Windows 11 from Microsoft, you’ll need to join the dev channel, which has weekly releases and all the new features. The Release Preview, meanwhile, is where you can preview the upcoming Windows 10 update.
Step 3: Once you choose a respected channel, confirm your choice. You’ll be prompted to sign in with a Microsoft Account, if you weren’t already. And your PC will restart.
Step 4: Once your PC restarts, head to Head over to Settings > Update & security. From there, check again for updates. You’ll see Windows 11 listed. Choose Download and install and wait while the OS installs on your device!
How to clean install with Windows 11 Installation Media
Another way to install Windows 11 is with Installation Media. This is a way to create a bootable USB drive that you can use to clean install Windows 11 on your current Windows 10 PC or on another device. Doing so will remove all of your files, so we advise against this method. If you’re aware of this risk, you can get to this option by going to the Windows 11 Download Page. From there, choose the Create Windows 11 Installation Media option. Then, follow the steps below.
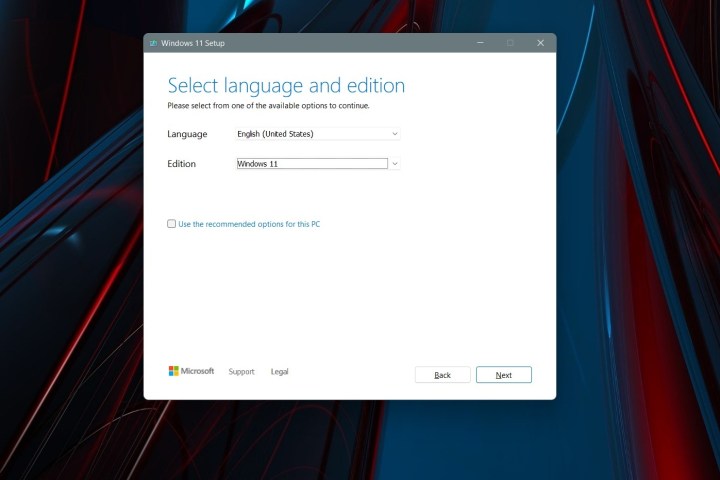
Step 1: Agree to the terms and choose Accept. Let the Setup tool run, and choose Use the recommended options for this PC. Click Next, and choose USB flash drive.
Step 2: Choose your USB flash drive from the list and then click Next. You’ll be prompted and Windows 11 will download to it. Once finished, the installer will switch to Creating Windows 11 Installation media. You’ll know when it’s finished, as you’ll get a prompt that the drive is ready.
Step 3: Once your USB drive is ready, close the installer with the Finish button. Keep the USB drive plugged into your PC.
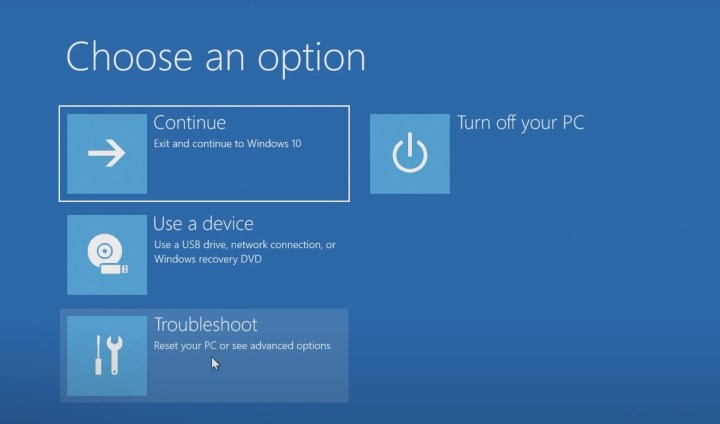
Step 4: Head back to the Windows 10 settings app, and choose Update & security. Then choose Recovery on the left side. Under Advanced startup, choose the Restart now option.
Step 5: In the pop-up prompt, choose Use a device. Your USB drive should appear listed. Choose it, and Windows will restart to your USB drive and Windows 11 installer. If you don’t see this option, you’ll need to head into your BIOS or UEFI to manually boot from the USB drive. Usually, you can do this by pressing F12 on boot as soon as you turn on your PC. Contact your PC maker for more information on this or consult online guides.
Step 6: Once in the Windows 11 installer, select a language, and click Next. Pick the version of Windows 11 that matches the version of Windows 10 on your PC. and click Next.
Step 7: Choose the Custom option and choose the drive to install Windows 11 on. You might have to click the Format button to erase all your files on the drive. When done, select the drive again and click Next.
Step 8: Windows 11 will install to your PC, and you can sit back. You’ll then be taken to the out-of-box experience, and will be prompted to set up your PC again.
How to clean install with Windows 11 ISO file manually (not recommended)
The final and most extreme way of installing Windows 11 involves using an ISO file. This is for methods where the steps mentioned in the section above do not work. Keep in mind, though, that using this file means you’ll have to erase everything on your PC and clean install Windows 11. So make sure you have everything backed up. This ISO option is also how you can install Windows 11 on a virtual machine. We have a separate guide on that.
Step 1: First, visit the Windows 11 download page, and choose the Download Windows 11 Disk Image option. Choose Windows 11 multi-edition ISO from the list, and then the blue Download button. Pick English as your option, followed by the blue Confirm button.
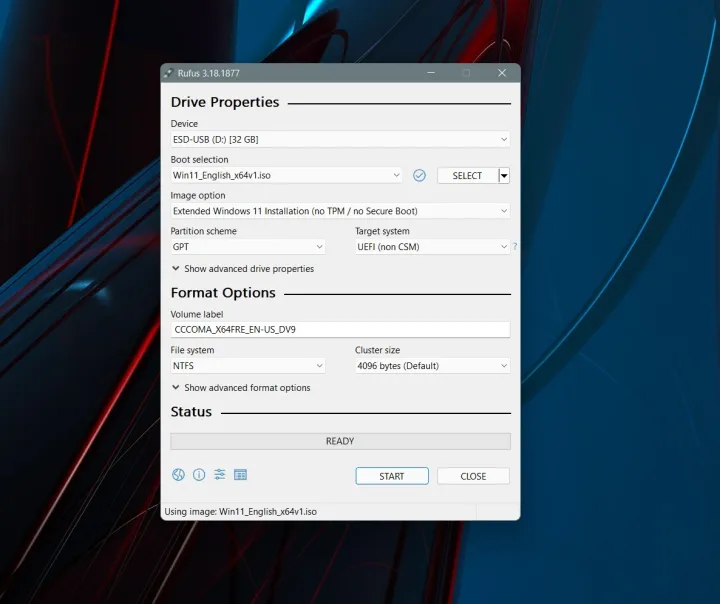
Step 2: Once the file is downloaded, you’ll need to download some extra software to continue with a clean install on Windows 11. We suggest installing Rufus, a great way to create a bootable Windows 11 installation drive.
Step 3: Download Rufus from the website. Run the file and select Yes. Then, under where it says Device, plug in an empty USB drive and choose it. Make sure the device is bigger than 8GB.
Step 4: Under Boot selection, choose Disk or ISO image. Then, click the Select button. Navigate to where you saved the Windows 11 ISO file and click Open.
Step 5: Be sure to choose either Standard Windows 11 installation, or Extended Windows 11 installation. The Standard Windows 11 Installation is best if your PC meets specs. If it doesn’t, you can try the extended option to bypass Microsoft’s restrictions. Leave everything else as is, and then click the Start button to create the drive.
Step 6: Wait a while and the USB drive will be ready. Close Rufus when complete, and reboot your PC to install Windows 11 using the steps we mentioned in the previous section.
We hope our guide was helpful for you. Now that you’re up and running with Windows 11, you might want to check out our other how-to guides. We’ve covered plenty of topics related to the new Microsoft operating system.

Today’s tech news, curated and condensed for your inbox
Check your inbox!
Please provide a valid email address to continue.
This email address is currently on file. If you are not receiving newsletters, please check your spam folder.
Sorry, an error occurred during subscription. Please try again later.
Editors’ Recommendations
-
LastPass vs. 1Password: should you switch?
-
How to sync your Outlook calendar with an iPhone
-
Ranking all 12 versions of Windows, from worst to best
-
Wi-Fi not working? Here’s how to fix the most common problems
-
Microsoft Word vs. Google Docs

