
With a registry hack, it’s possible to move your Windows 11 taskbar to the left or right side of the screen, but the buttons don’t show up. Could this mean Microsoft is planning to bring back a moveable taskbar in a future update? We explore the possibilities.
Borrowing From Windows 10
As of October 2021, Windows 11 doesn’t let you move your taskbar (or even resize it). But through a Windows Registry hack, it’s possible to make the taskbar appear on the top of your screen and still be functional.
In the process of experimenting with the taskbar on the top of the screen, we also discovered that it’s possible to position the Windows 11 taskbar on the left or right side of the screen, but the taskbar becomes unusable.
Interestingly, Windows 11 uses the same internal Registry key values as Windows 10 to determine which side of the screen to place the taskbar on. This means that positioning the taskbar in Windows 11 could just be a vestigial feature left in from Windows 10. But the fact that it still works leaves room for Microsoft to fix the Windows 11 taskbar to support these other positions (left and right) in the future.
RELATED: Windows 11 Won’t Let You Move the Taskbar (But It Should)
Try It Yourself (If You Like Risk)
If you’d like to try moving your taskbar to the left or right side of your screen, we’ll show you how—even though it’s broken and none of the icons will show up properly.
Warning: The Registry Editor is a powerful tool. Misusing it can render your system unstable or even inoperable. Still, this is a simple hack, and if you follow the instructions completely, you shouldn’t have any problems. If you haven’t used the Registry Editor before, consider reading about how to use it before getting started. We also recommend backing up the Registry (and your computer) before making any changes.
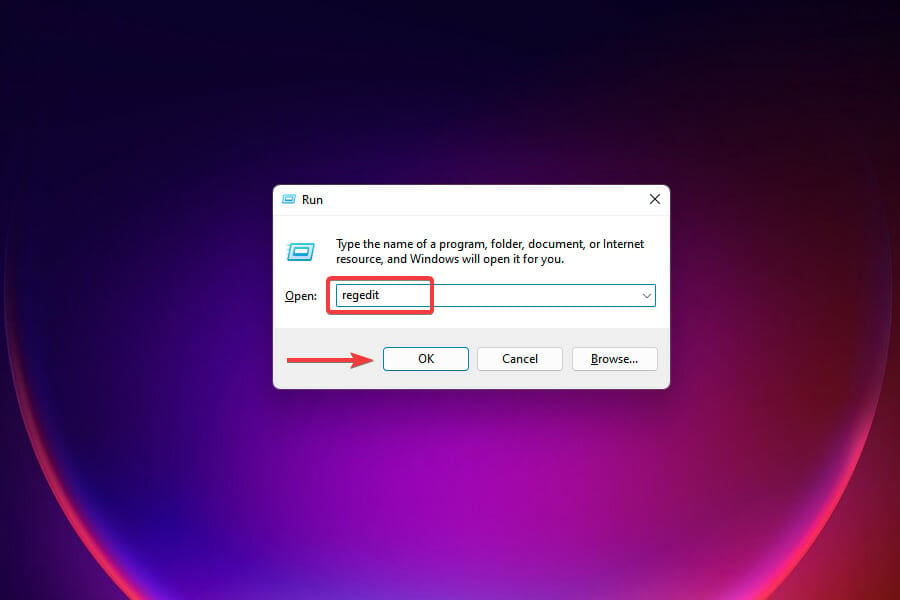
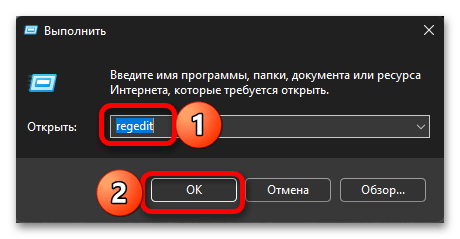
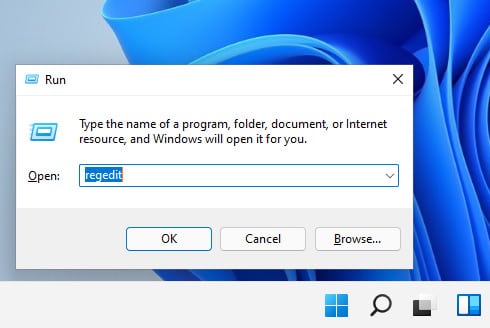
First, open the Registry Editor. You can do it by pressing Windows+R, typing “regedit”, and pressing Enter, or by searching for “registry” in the Start menu and clicking “Registry Editor.”
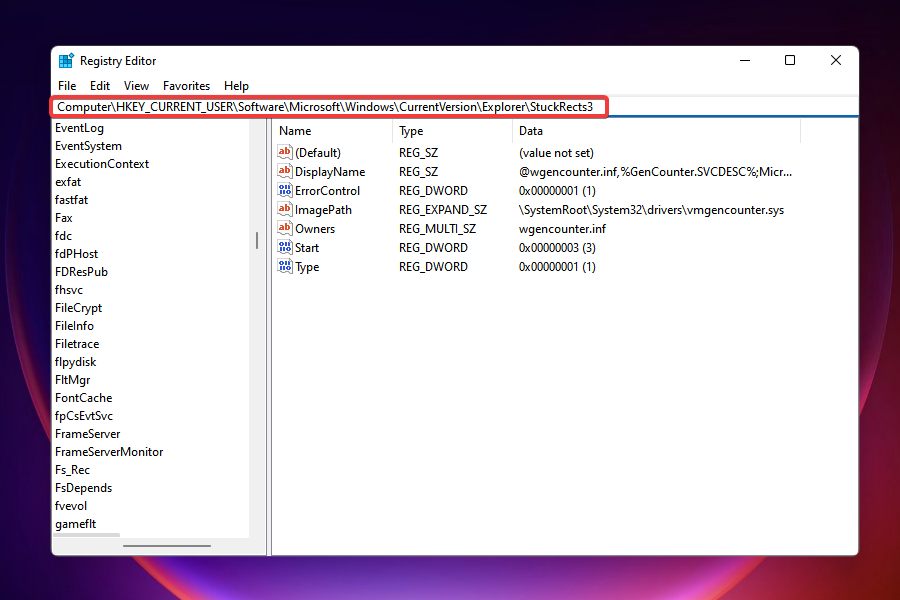
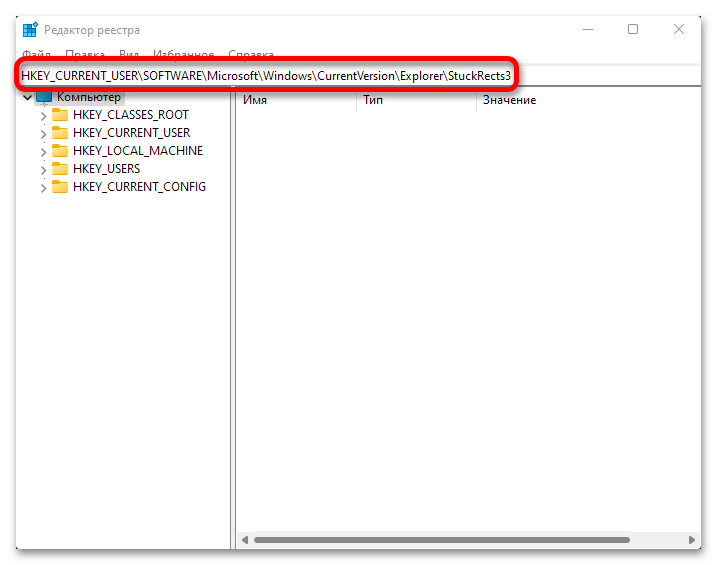
In the Registry Editor, navigate to this key using the sidebar, or paste it in the address line near the top of the window:
ComputerHKEY_CURRENT_USERSoftwareMicrosoftWindowsCurrentVersionExplorerStuckRects3
(Note that these instructions only apply to single-monitor setups. To change the taskbar position on multiple monitors, you’ll need to edit the same values in every key listed under HKEY_CURRENT_USERSoftwareMicrosoftWindowsCurrentVersionExplorerMMStuckRects3.)
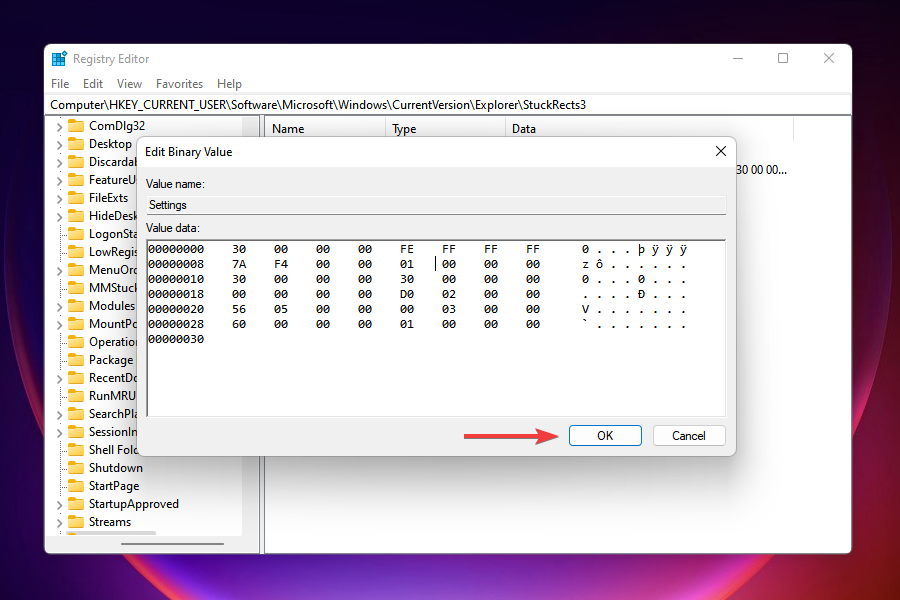
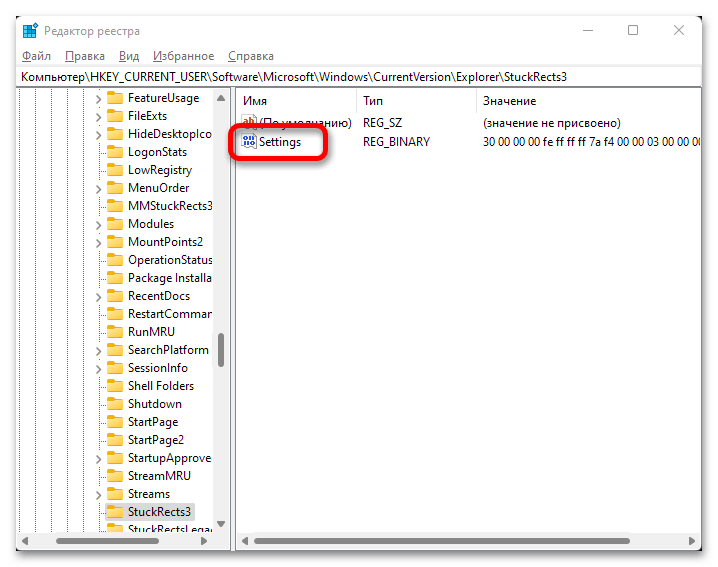
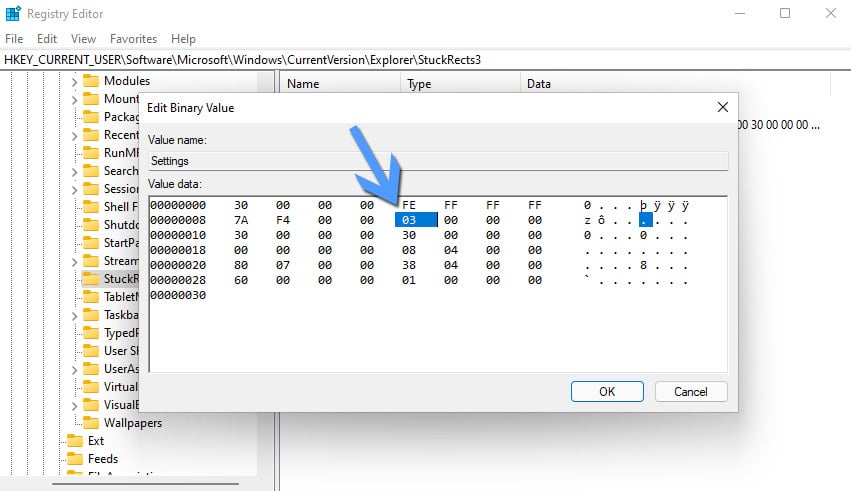
Double click the “Settings” key within “StuckRects3.”

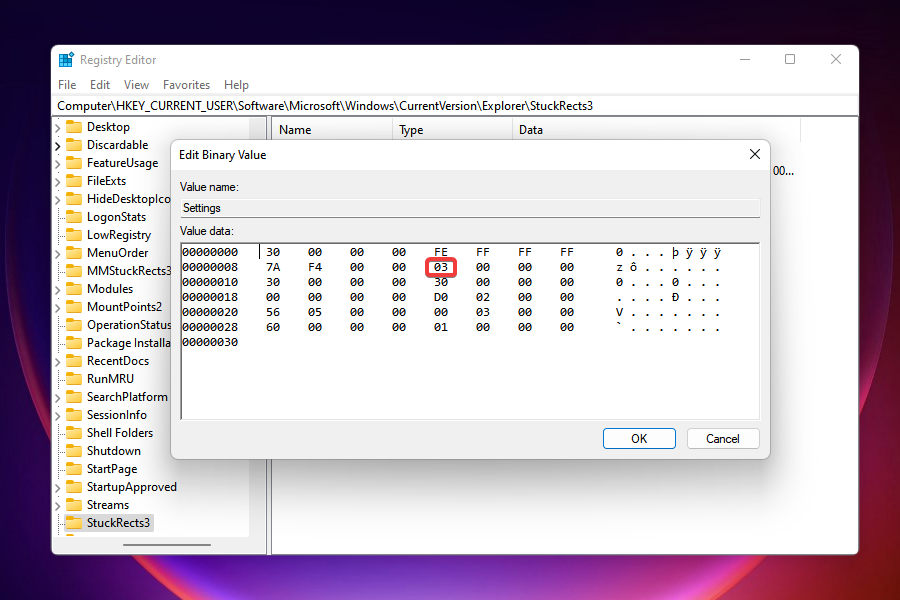
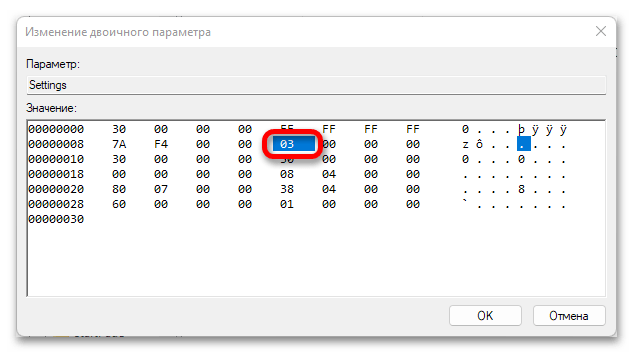
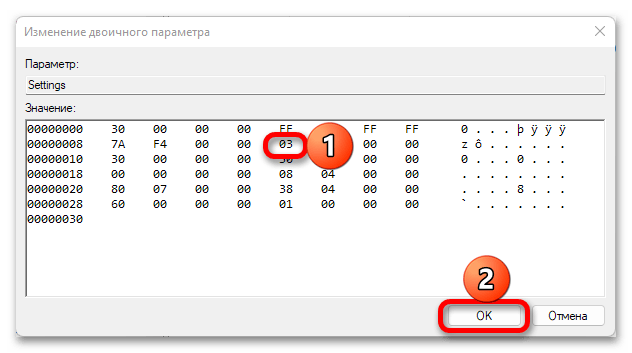
When the “Edit Binary Value” window opens, locate the fifth value from the left on the second row from the top. Usually, this value is set to “03.” By changing this number, you can determine which side of the screen your taskbar shows up on. Here’s what each number does:
- 00: Taskbar on the left side of the screen.
- 01: Taskbar on the top of the screen.
- 02: Taskbar on the right side of the screen.
- 03: Taskbar on the bottom of the screen.
To change it, place the cursor just to the right of the “03”, press Backspace once, then type in the number corresponding to the taskbar position in the list above (such as “02” for moving the taskbar to the left side, for example). When you’re done, click “OK.”
Close Registry Editor, and then restart Windows Explorer.
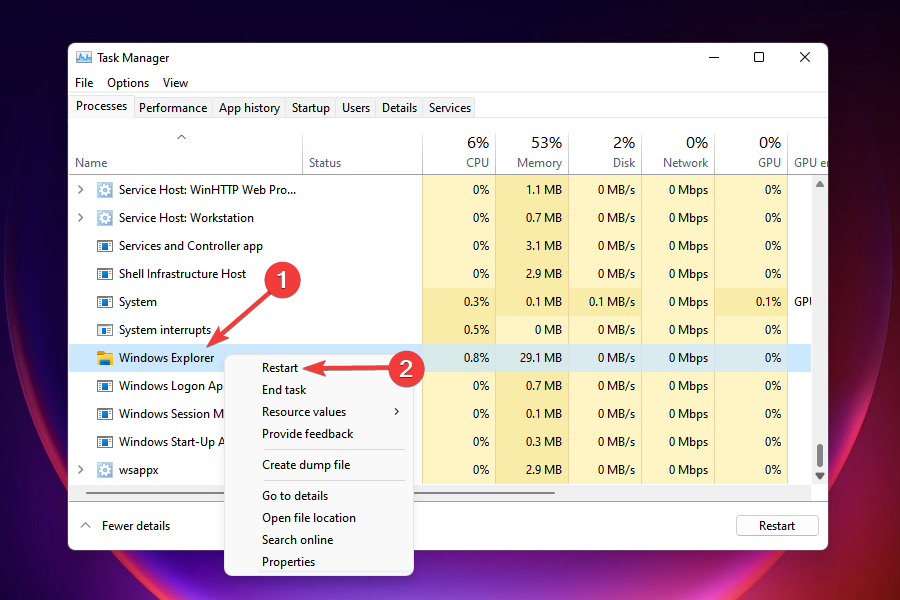
To restart Explorer, press Ctrl+Shift+Esc to open Task Manager, click “More Details” to expand the window if necessary, and select the “Processes” tab. Locate “Windows Explorer” in the list, right-click it, and select “Restart.”
Note: You must restart Explorer. In our experience, you can’t simply restart your PC. If you do, the change will not take effect.
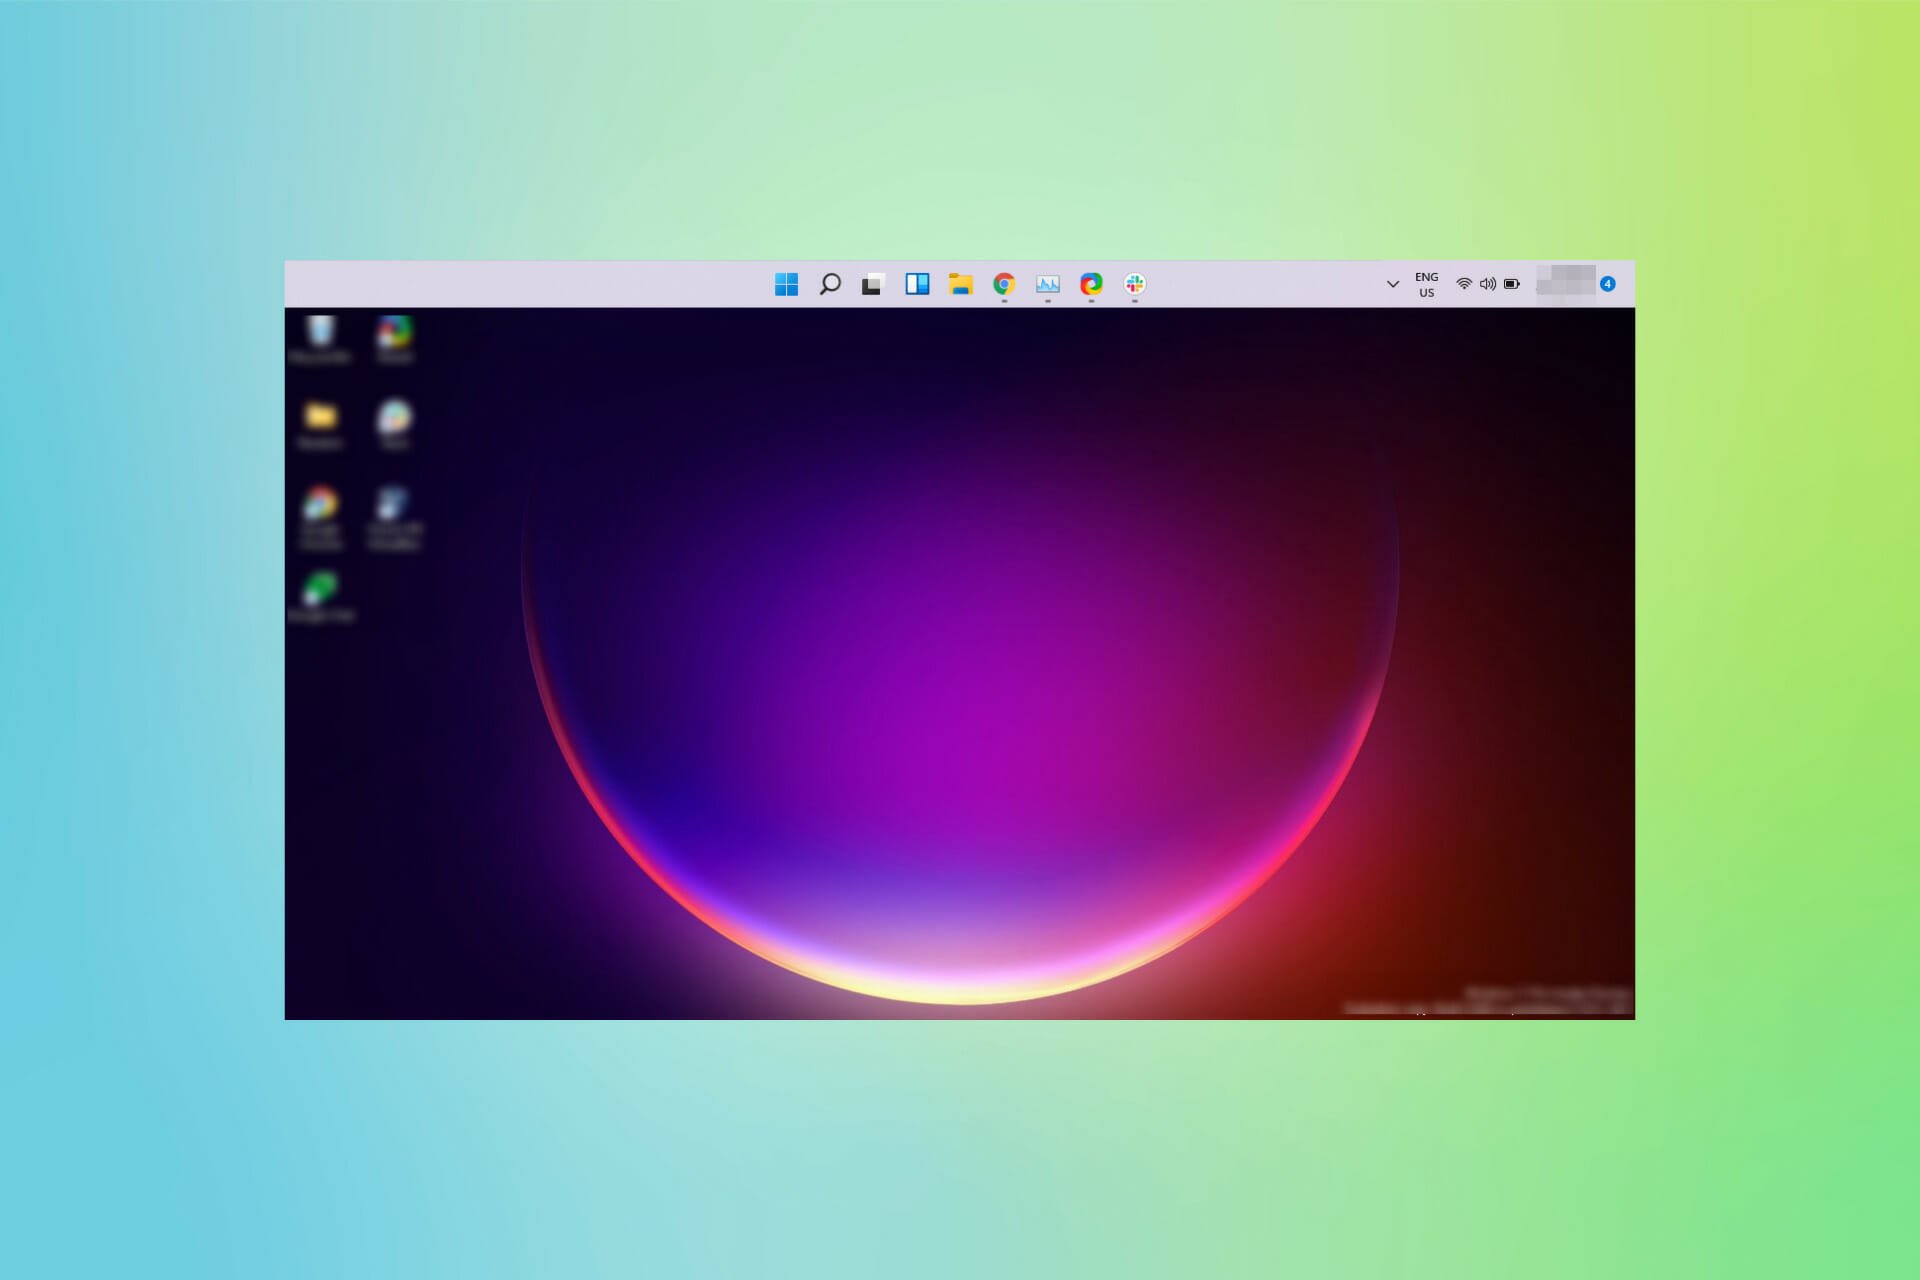
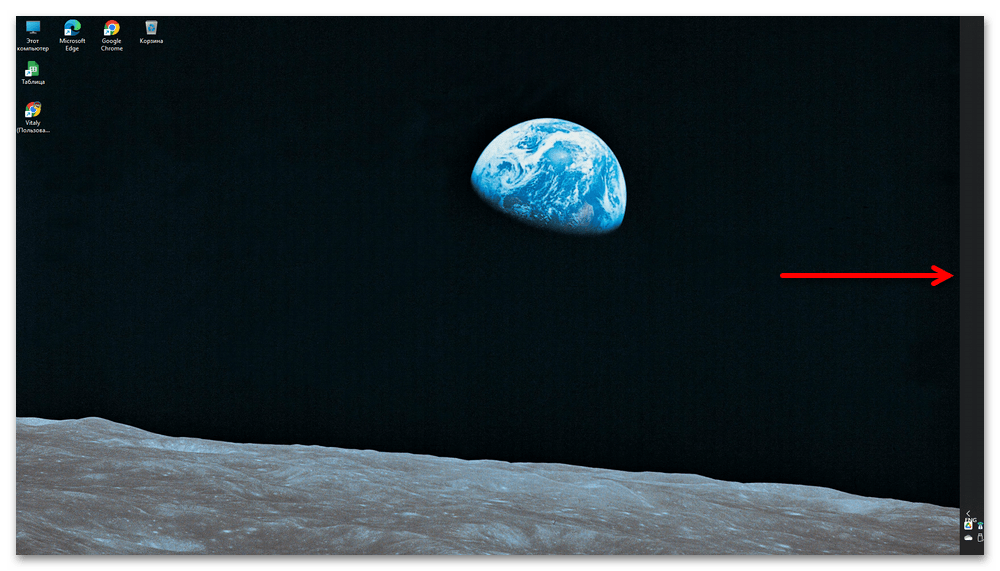
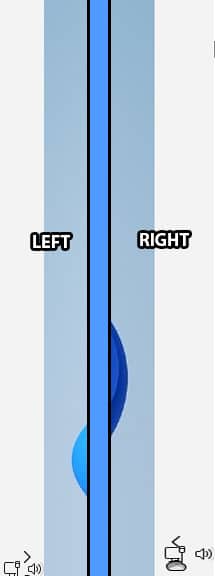
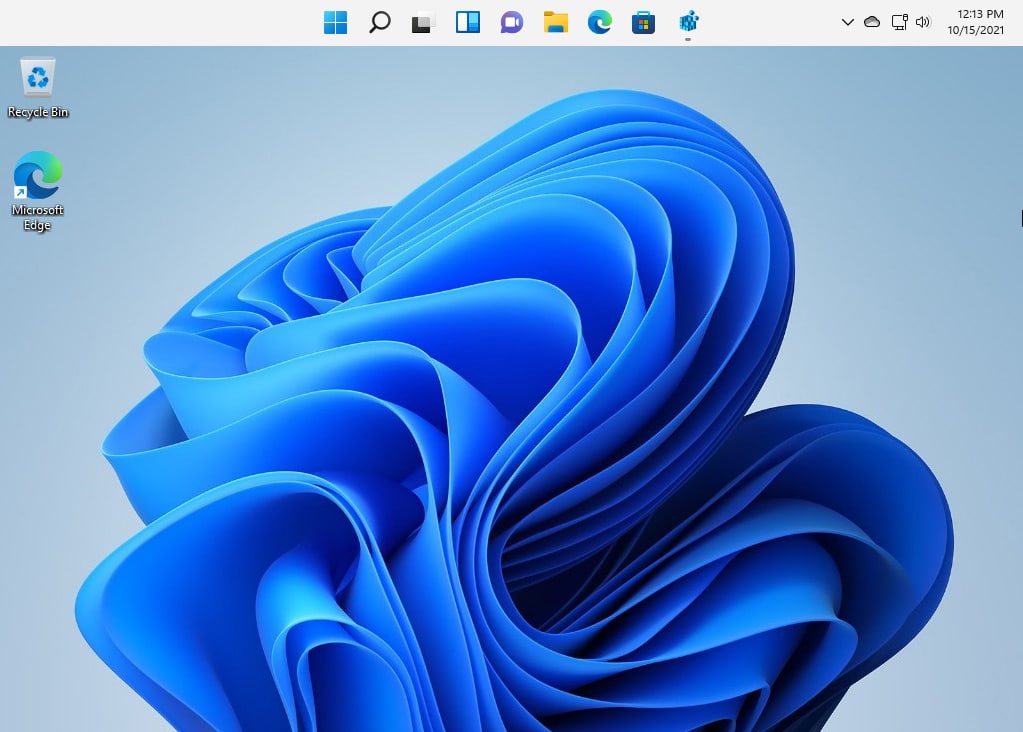
You’ll now see something like this. The taskbar will be almost entirely blank, but you’ll see some of the system tray status icons and the Quick Settings button jumbled in the corner. If you click the speaker and Wi-Fi icons, the Quick Settings menu will open as usual, but nothing else works.
Likewise, if you’d like to try moving your taskbar to the left, change the registry value mentioned above to “00” then restart your PC or restart explorer.exe. You’ll see a similar situation, with a blank taskbar and no icons.
When you’re done, hit Windows+R to open the run menu, then type “regedit.exe.” From there you can edit the “Settings” key value back to “03” (for taskbar at the bottom of the screen), then restart, and you’ll be back to normal. Or you can download our registry hack files and run “win11_taskbar_bottom.reg” (then reboot) to restore your taskbar to its proper location. Be sure to restart Explorer after running them.
As you can see, at the moment, moving the taskbar to the left or right serves no useful purpose, but we’re hopeful that Microsoft is working on making these options official soon.
RELATED: 5 Ways Windows 11’s Taskbar Is Worse Than Windows 10’s
READ NEXT
- › Windows 11 Might Get the Search Bar From Windows 10
- › 5 Ways Windows 11’s Taskbar Is Worse Than Windows 10’s
- › How to Screen Record on iPhone
- › How to Change Your Age on TikTok
- › This Huge Curved Ultrawide Monitor From LG Is $337 Today
- › Get PC Power With Tablet Portability in the Surface Pro 9 for $200 Off
- › PSA: You Can Email Books and Documents to Your Kindle
- › The New HP Pro x360 Fortis Is a 2-In-1 Laptop Under $500
Edit the taskbar’s binary values to change its position
by Kazim Ali Alvi
Kazim has always been fond of technology, be it scrolling through the settings on his iPhone, Android device, or Windows. And at times, unscrewing the device to take… read more
Updated on February 2, 2023
Reviewed by
Alex Serban

After moving away from the corporate work-style, Alex has found rewards in a lifestyle of constant analysis, team coordination and pestering his colleagues. Holding an MCSA Windows Server… read more
- You cannot move the taskbar in Windows 11 from the Settings app.
- However, there’s a known Registry hack that allows you to achieve this goal.
- By simply modifying some values, you can move the taskbar to the top, left, or right.
- The taskbar becomes inaccessible if you move it to the left or right, hence it’s not recommended that you make these changes.
XINSTALL BY CLICKING THE DOWNLOAD FILE
- Download Restoro PC Repair Tool that comes with Patented Technologies (patent available here).
- Click Start Scan to find Windows 11 issues that could be causing PC problems.
- Click Repair All to fix issues affecting your computer’s security and performance
- Restoro has been downloaded by 0 readers this month.
Windows 11 has been a complete revamp, and you will find a lot of changes from the previous OS. One of the changes that struck users the most was the inability to move the taskbar to the top or sides.
The jury is still out on whether these changes have been welcomed by the users, and we will come to know only after Windows 11 is rolled out for all.
With the option to move the taskbar missing from the Settings app, users were confused as to whether it was at all possible. But, there’s a registry hack that comes to our aid. Here’s how you can move the Windows 11 taskbar.
How can I move the Windows 11 taskbar?

NOTE
The following solution does not work anymore on Windows 11 after the recent update to 22H2. We also tried a few third-party tools, but none seem to work for now. If and when an option is available to reposition the Taskbar, we will update the article.
1. Move Windows 11’s taskbar to the top
By tweaking the registry using built-in Registry Editor, users can easily move their taskbars to the top of their screens. The taskbar’s location is set by binary values, and editing them helps move the taskbar wherever the user wants.
1. Press Windows + R to launch the Run command.
2. Type or paste regedit in the text field and either click on OK or hit Enter to launch the Registry Editor.
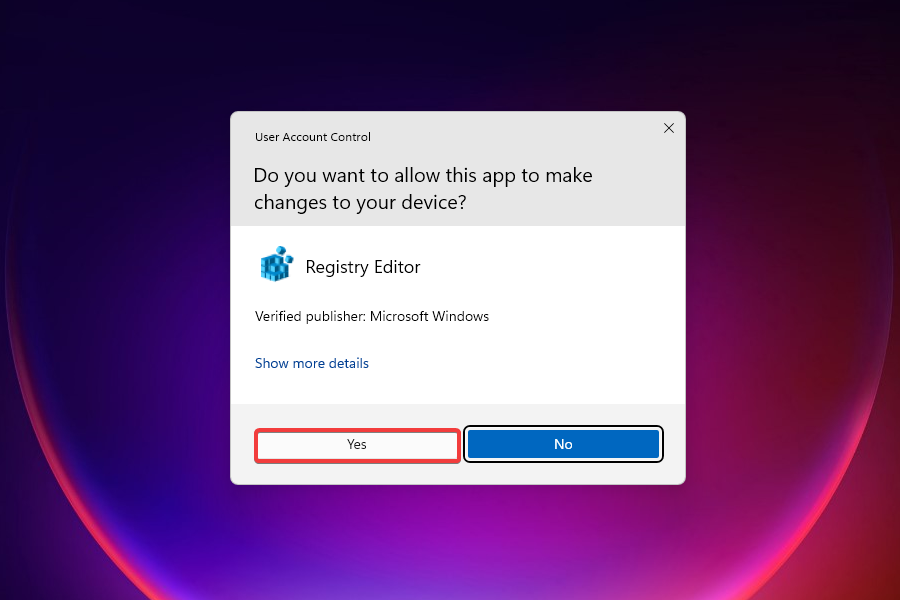
3. Click Yes on the UAC prompt that appears.
4. Paste the following path in the address bar at the top and hit Enter, or navigate to it via the pane on the left: ComputerHKEY_CURRENT_USERSoftwareMicrosoftWindowsCurrentVersionExplorerStuckRects3
5. Double-click on the Settings key.

6. Locate the value under the fifth column from the right and the second row from the top. It would be the one under entry FE.
7. Click on the value to place the cursor before it.
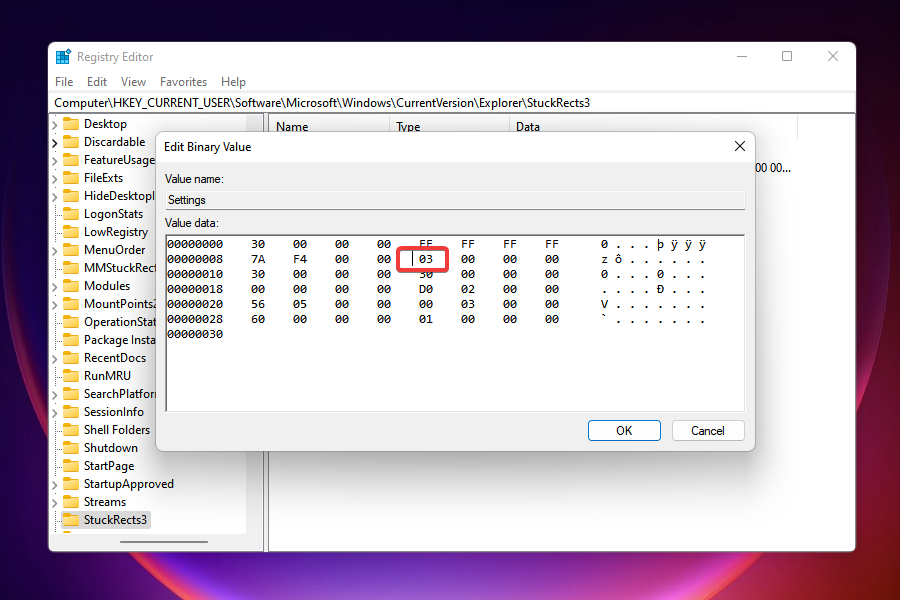
8. Now hit Del to remove the existing value (03). After you delete the value, 00, the next value in line would appear in the concerned entry and the last at the bottom will now be empty.
9. There are three different values that can be entered here to move the taskbar across various locations on the desktop. Identify the position you want to move it to and enter the corresponding value.
10. To move the Windows 11 taskbar to the top, enter 01.
11. Click on OK to save the changes.
12. Close the Registry Editor.
13. Now you need to restart the File Explorer. This can be done either by restarting the Windows itself or merely the program. We will go with the latter.
Some PC issues are hard to tackle, especially when it comes to corrupted repositories or missing Windows files. If you are having troubles fixing an error, your system may be partially broken.
We recommend installing Restoro, a tool that will scan your machine and identify what the fault is.
Click here to download and start repairing.
14. Press Ctrl + Shift + Esc to launch Task Manager.
15. Locate the Windows Explorer entry, right-click on it, and select Restart from the context menu.
16. The taskbar will now be moved according to the value you entered earlier.
2. Move the taskbar to the side
The steps to move your taskbar to the left or the right sides are mostly identical to the ones for moving it to the top. However, when editing the FE values in Registry Editor in step 10, you need to do the following:
After you edit the values, you just need to restart File Explorer, and that’s it.
This solution might not be as simple as the Settings method that we used to have, but it’s still quick and effective.
You now know how to move the taskbar in Windows 11 easily. But how about moving it back to its original position, i.e., the bottom? Simply revert the changes that you made earlier, save them, and restart Windows Explorer.
Should I move the taskbar to the sides in Windows 11?
Although you can move the taskbar to the left and right sides of the desktop in Windows 11, the icons are no more accessible, and it’s just the taskbar that’s visible. So, it’s not recommended that you make the change.
Let’s understand it with an example. When you move the taskbar to the right, here’s how it appears:
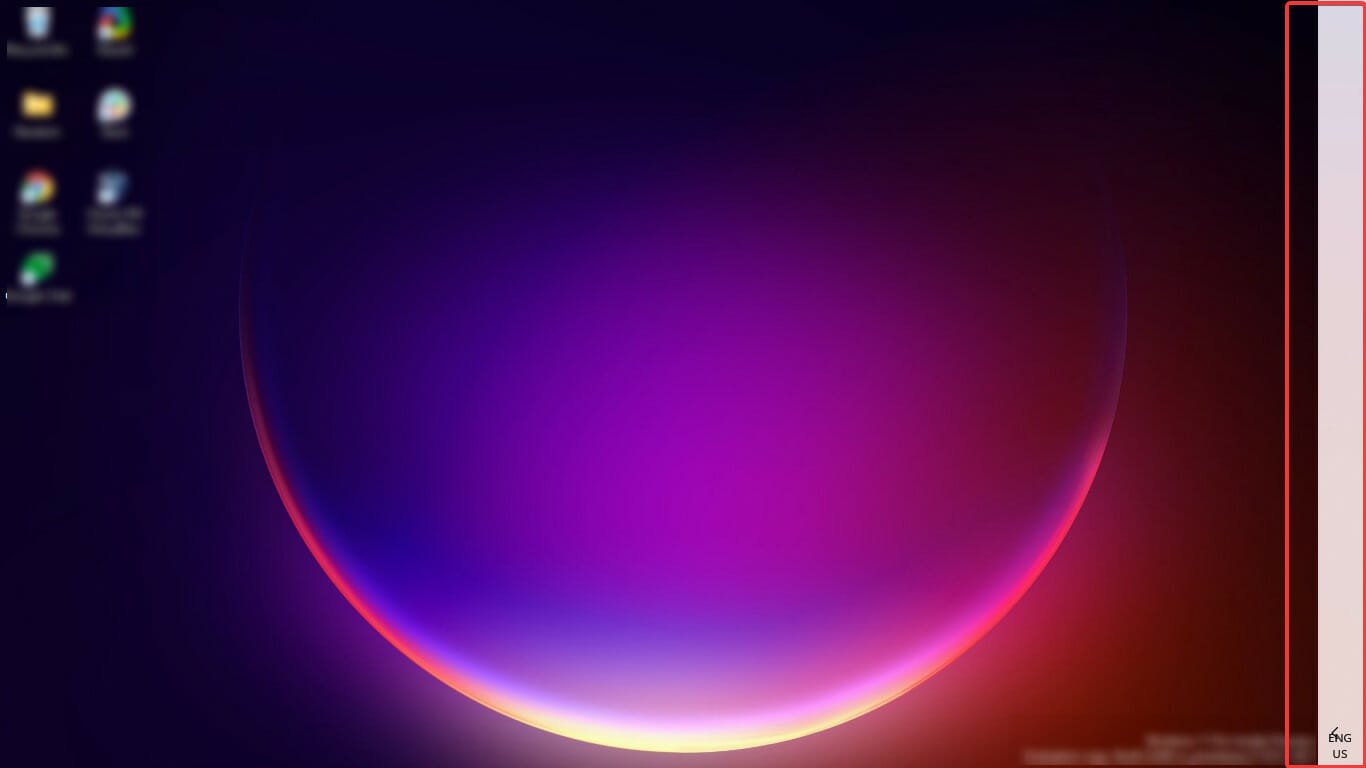
You will notice that the icons are not visible, and it makes executing tasks simply impossible. Hence, for now, you can drop the idea of moving Windows 11’s taskbar to the sides.
If and when it becomes possible to make changes, we will update the article. Keep checking this page to stay up-to-date.
Can I move the Start menu and other taskbar icons to the left?
Yes, you can move easily move the Start menu along with other taskbar icons to the left by modifying the taskbar’s alignment in the Personalization settings.
With the icons aligned to the left instead of the default center position, it gives us a Windows 10 vibe. So, if you have recently upgraded to the latest iteration and are still not completely acquainted with the changes, moving the icons may be a good idea.
That’s all there’s to know on the topic. You can now move the taskbar across the desktop in Windows 11 with a few minor changes in the Registry.
If you have just upgraded, check out our comparison of Windows 10 and Windows 11. Also, if you are not comfortable with the latest OS and want to revert to the previous one, here’s how you can roll back to Windows 10.
Let’s know your experience in the comments section below and your thoughts on the inability to the taskbar via Settings.
![]()
Newsletter
Обратите внимание! На момент написания настоящей статьи (сентябрь 2022 года) существует всего один способ перемещения панели задач (ПЗ) в Windows 11 вправо. Важно отметить, что у него есть критический недостаток: элементы панели задач (кнопка «Пуск», поиск, закрепленные папки и ярлыки) перестанут отображаться, а основная функциональность данного компонента ОС будет недоступна полностью или частично. Единственное, что по-прежнему останется видимым и активным – это системный трей и расположенные рядом с ним значки (индикаторы языковой раскладки, сетевого соединения, управления громкостью, время и дата).
Читайте также: Как переместить ПЗ влево в Виндовс 11
Переместить панель задач в левую или правую часть экрана можно только путем редактирования системного реестра. В отличие от десятой версии Windows, такая возможность недоступна не только в «Параметрах», но и в специализированных приложениях от сторонних разработчиков. Вполне возможно, что со временем ситуация изменится.
- Откройте «Редактор реестра». Проще всего это сделать через поиск или окно «Выполнить» (вызывается сочетанием клавиш «Win+R»). В обоих случаях потребуется ввести и подтвердить команду следующего вида:
regedit - Используя представленные слева каталоги, последовательно перейдите в указанное ниже расположение. Вы также можете скопировать этот путь, вставить его в адресную строку редактора и нажать «Enter».
HKEY_CURRENT_USERSOFTWAREMicrosoftWindowsCurrentVersionExplorerStuckRects3 - Дважды кликните левой кнопкой мышки (ЛКМ) по параметру «Settings», чтобы открыть его для редактирования.
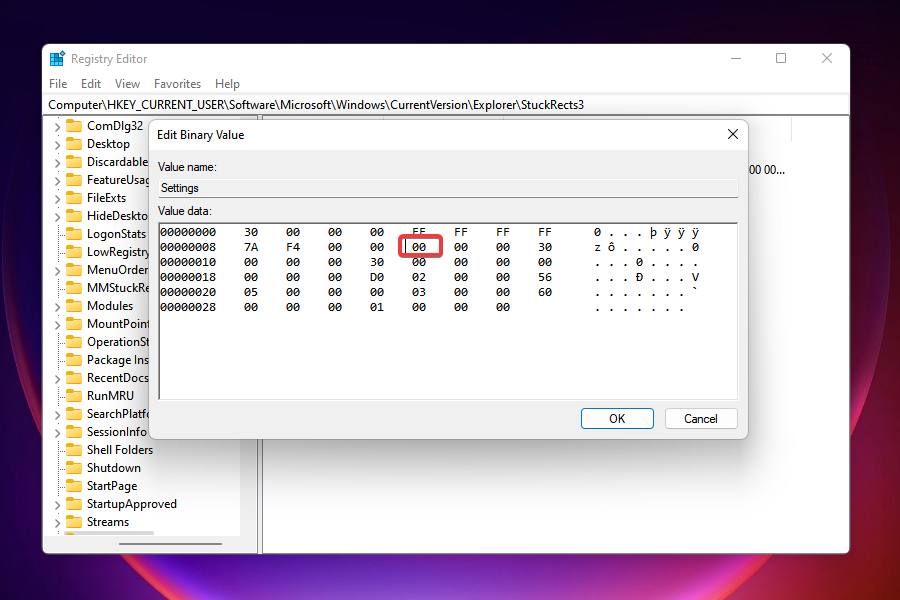
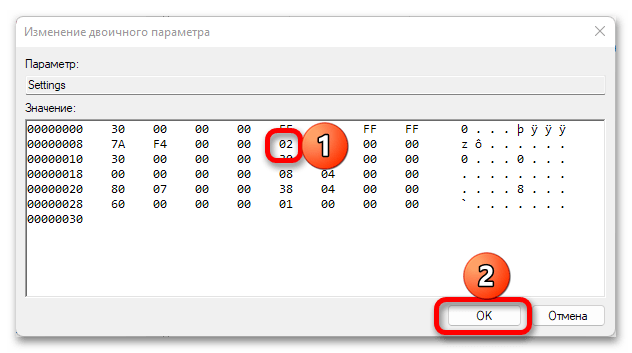
- Выделите значение, расположенное в столбце FE строки 00000008 – для этого дважды нажмите по нему ЛКМ.

Вместо указанного там 03 введите 02, после чего воспользуйтесь кнопкой «ОК» для подтверждения внесенных изменений.
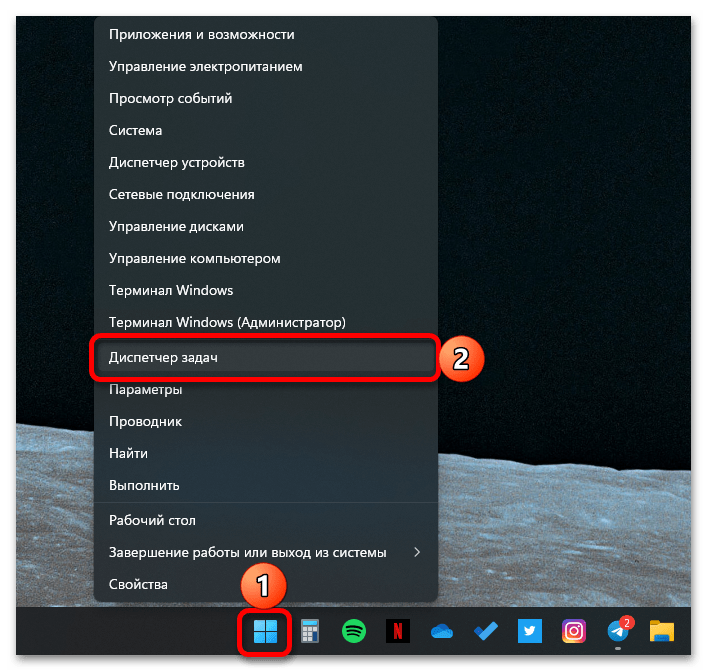
- Откройте «Диспетчер задач» (ДЗ). Для этого можете воспользоваться поиском по системе, контекстным меню кнопки «Пуск» или горячими клавишами «Ctrl+Shift+Esc».

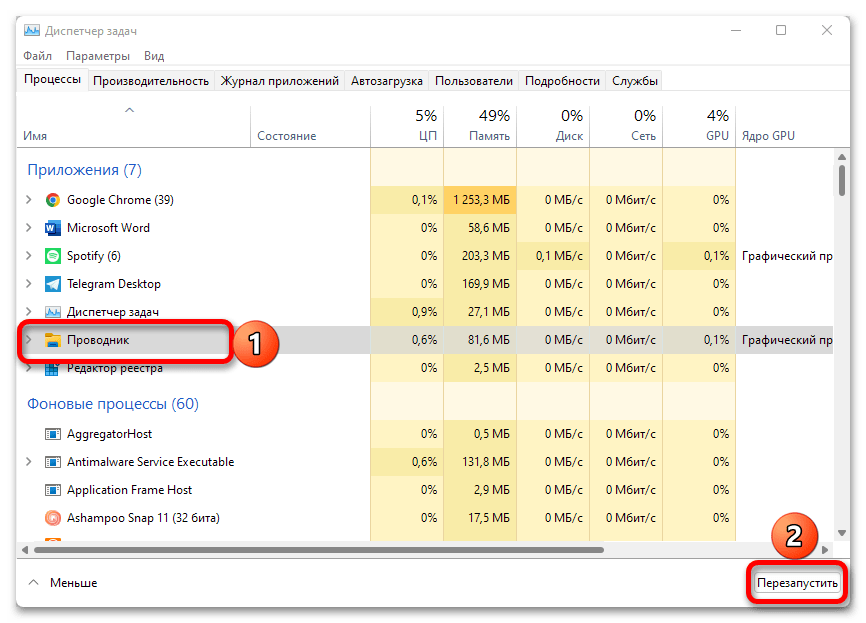
Найдите и выделите в списке запущенных процессов «Проводник», после чего нажмите на кнопку «Перезапустить», расположенную в правом нижнем углу.

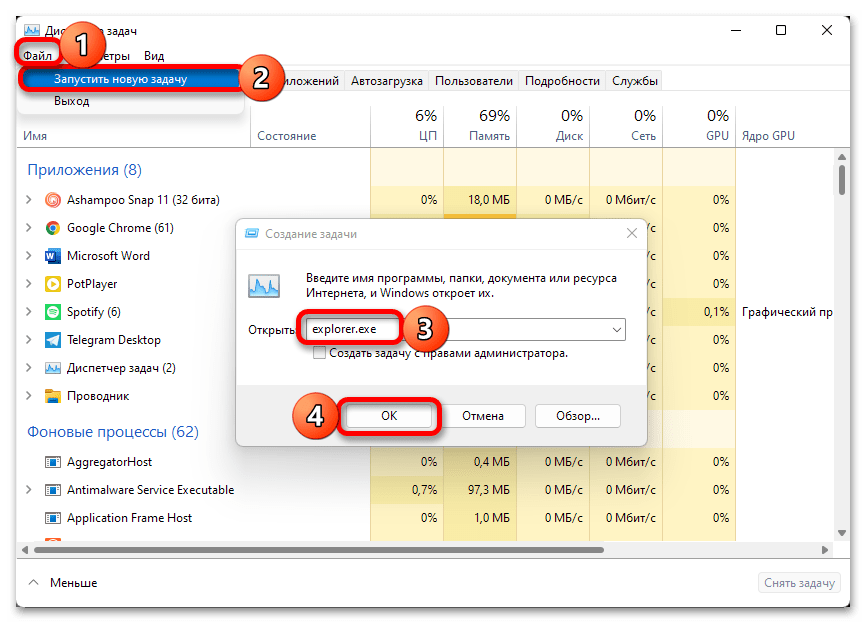
Примечание: Если «Проводник» в настоящий момент не запущен, то есть отсутствует в ДЗ, откройте его. Для этого вызовите меню «Файл», выберите в нем пункт «Запустить новую задачу», введите команду
explorer.exeи нажмите «ОК». После этого выполните действия из предыдущего абзаца инструкции.Панель задач будет перемещена вправо, но по внешнему виду можно понять, что пользоваться ею практически невозможно.

Восстановить расположение ПЗ по умолчанию можно путем повторного выполнения всей представленной выше инструкции. Единственный нюанс заключается в том, что указанное в столбце FE строки 00000008 значение 02 потребуется заменить на изначальные 03.
Читайте также: Как восстановить работоспособность панели задач в Windows 11
Еще статьи по данной теме:
Помогла ли Вам статья?
- On Windows 11, to move the Taskbar, edit the “Settings” binary key in the “StuckRects3” Registry key.
- The 01 value moves Taskbar to the top.
- The 02 value moves Taskbar to the right.
- The 00 value moves Taskbar to the left.
- The 03 value moves Taskbar to the bottom.
Windows 11 has a redesigned Taskbar with a center alignment for the Start menu and app buttons, a new notification area, new effects and animations, and more. Although it introduces many welcome improvements, it also removes some legacy capabilities, such as the ability to move the Taskbar around.
You can’t move the Taskbar on Windows 11 because this is an entirely new design, and moving it around the screen is challenging. Microsoft has explained that only moving the Taskbar to the right side suddenly changes the entire design (including the Start menu and apps), and the current interface and animations are designed for the bottom placement. As a result, the work that implicates it was not worth the effort since there was not enough demand.
If you are among those who like the Taskbar on another location (such as at the top, left, or right side), it’s still possible to move it. The only caveat is that you can only complete this task by editing the Registry.
In this guide, you will learn the steps to change the Taskbar position to the different sides of the screen on Windows 11. (See also the video tutorial explaining these instructions.)
- Move Taskbar position on Windows 11
- Move Taskbar to top with third-party tool
Warning: Modifying the Windows Registry can cause serious problems if not used properly. It’s assumed you know what you’re doing and has created a full backup of your system before proceeding. Also, I’ve received reports from users that this may or may not work after upgrading to version 22H2. As always, use these instructions at your own risk.
To move the Taskbar to the top, left, right, or bottom of the screen on Windows 11, use these steps:
-
Open Start on Windows 11.
-
Search for regedit and click the top result to open the Registry Editor.
-
Browse the following path:
HKEY_CURRENT_USERSoftwareMicrosoftWindowsCurrentVersionExplorerStuckRects3
-
Double-click the Settings binary key.
-
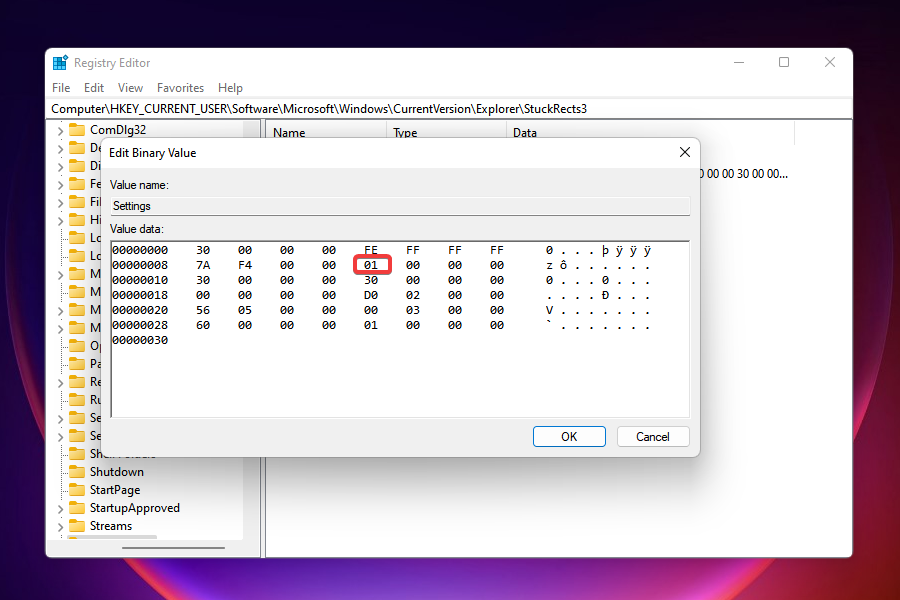
Under the “Value data” section, in the second row and the sixth column, click the 03 value, press the Delete key, and replace the value with 01 to move the Windows 11 Taskbar at the top of the screen.

-
Change the 03 value to 02 to move the Taskbar on the right side of the screen.
-
Change the 03 value to 00 to move the Taskbar on the left side of the screen.
-
Change the value to 03 to move the Taskbar at the bottom of the screen.
-
Click the OK button.
-
Right-click the Start button and select the Task Manager option.
-
Click the Processes tab.
-
Select the Windows Explorer process.

-
Click the Restart button.


Once you complete the steps, the Windows 11 Taskbar will move to the top or either side of the screen as specified in the binary key.
While you can still change the Taskbar position, this is not a supported feature on Windows 11, which means that this behavior may not work as expected.
Alternatively, if you can’t use the Registry settings, you may be able to use third-party tools to move the Taskbar to the top of the screen. For example, ExplorerPatcher is a free solution that brings back the classic design of the Taskbar with the legacy functionalities, such as the ability to change the bar position. It’s not a perfect solution, but if you want to reposition settings, this might be the best free option.
To move the Taskbar to the top of the screen with ExplorerPatcher, use these steps:
-
Open EplorerPatcher GitHub page.
-
Under the “Assets” section, click the ep_setup.exe link to download the app.

-
Confirm you want to keep the file in the web browser (if applicable).
-
Double-click the file to install the app. (It might take a while to apply.)
-
Right-click the Taskbar and select the Properties option.
-
Click on Taskbar.
-
Use the “Taskbar style” setting and select the “Windows 10” option.
-
Use the “Primary taskbar location on screen” setting and select the Top option to move the Taskbar to the top of the screen. (You also have the option to move it to the left or right side.)

-
(Optional) Use the “Start button style” setting and select the “Windows 11” option.
-
(Optional) Use the “Combine taskbar icons on primary taskbar” setting and select the Always combine option.
-
Click on Start menu.
-
Use the “Start menu style” setting and select the “Windows 11” option.
-
Click the Restart File Explorer option in the bottom-left corner (if you don’t see the changes).


After you complete the steps, you can start using the Taskbar from the top of the screen.
Through the decades of Windows, we always had the ability to move the taskbar at our whim. You could right-click on the taskbar, untick the lock the taskbar button, and drag it to place it on the other three sides of the screen.
Some prefer the classic left side or right side, similar to distros like Ubuntu. It often helped in taking full advantage of the wide-screen monitors that have become commonplace.
You cannot do that on the latest Windows installment, and then lock the taskbar option has disappeared from the taskbar menu.
To our luck, there is a registry tweak that can help you move the taskbar in Windows 11 on either of the sides of the screen. It takes under five minutes for a beginner to do and is straightforward when you follow the steps.
Before moving forward with the tutorial, remember that Windows 11 is still in development and has several underlying bugs.
It often breaks the user interface and the taskbar in this case. You will get the gist as we move the taskbar to the left or right of the screen.
Table Of Contents
- How To Move the Taskbar in Windows 11
- Move or Align The Taskbar Icons to the left
1. We head to the Registry editor first. Press Ctrl+R together on the keyboard to open the RUN prompt. Type in regedit and press ENTER. A prompt asking for administrator permission may appear. Accept it from a primary account or ask the administrator to allow it.
The alternative and the standard way is to search for it from the Start Menu by typing regedit and selecting the first app result.
2. Now we are inside the Registry editor. Paste this in address in the address bar and press ENTER as denoted by A. The other way is to manually browse to the address.
HKEY_CURRENT_USERSoftwareMicrosoftWindowsCurrentVersionExplorerStuckRects3
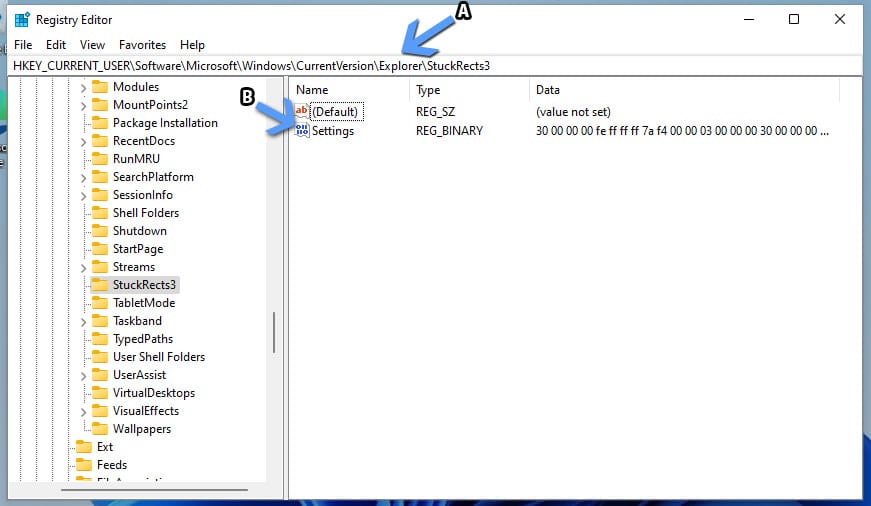
3. You will land in the StuckRect3 registry. Open the settings, denoted by B, through a double-click. A table of binary numbers in different rows will appear.
In here, head to the second row and the fifth column as denoted by the arrow. Double click on the number and change it from 03 to 01 by simply typing the numbers. Press OK (or ENTER on the keyboard) to save the settings.
Press the pause button – You can move the taskbar in Windows 11 to any of the compass directions. Replace the numbers with reference to the table.
| Number | Taskbar Position |
| 00 | Left |
| 01 | Top |
| 02 | Right |
| 03 | Bottom (default) |
Before moving to the left or the right position, we must tell you that it will break the taskbar with no icons or time-date appearing. The only usable thing is the volume-rocker laden quick-access bar which barely functions.
4. The first part is done, now head to the command prompt for restarting the explorer process.
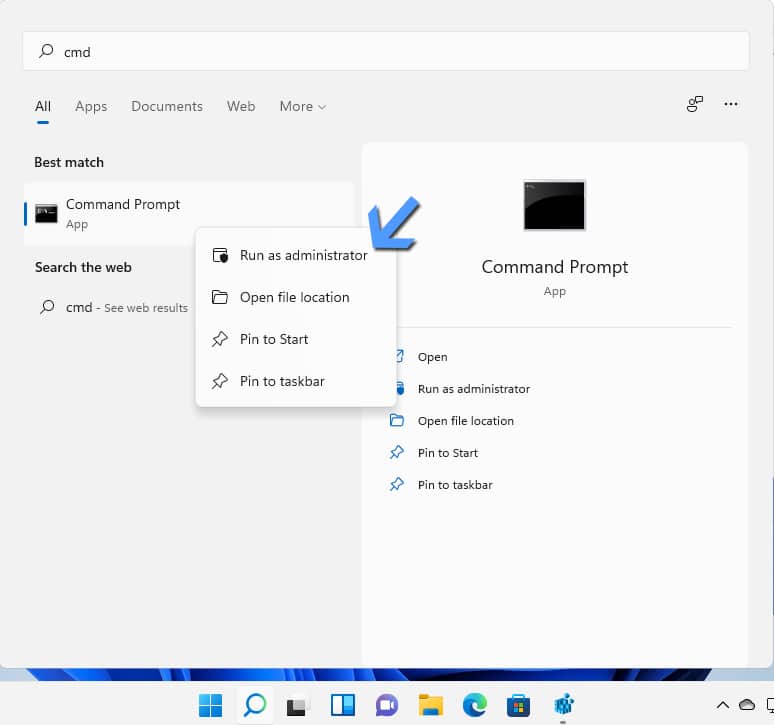
Head to start menu search and search for command prompt or the acronym “cmd“—Right-click on the Command Prompt icon and select Run as Administrator to run it with full powers.
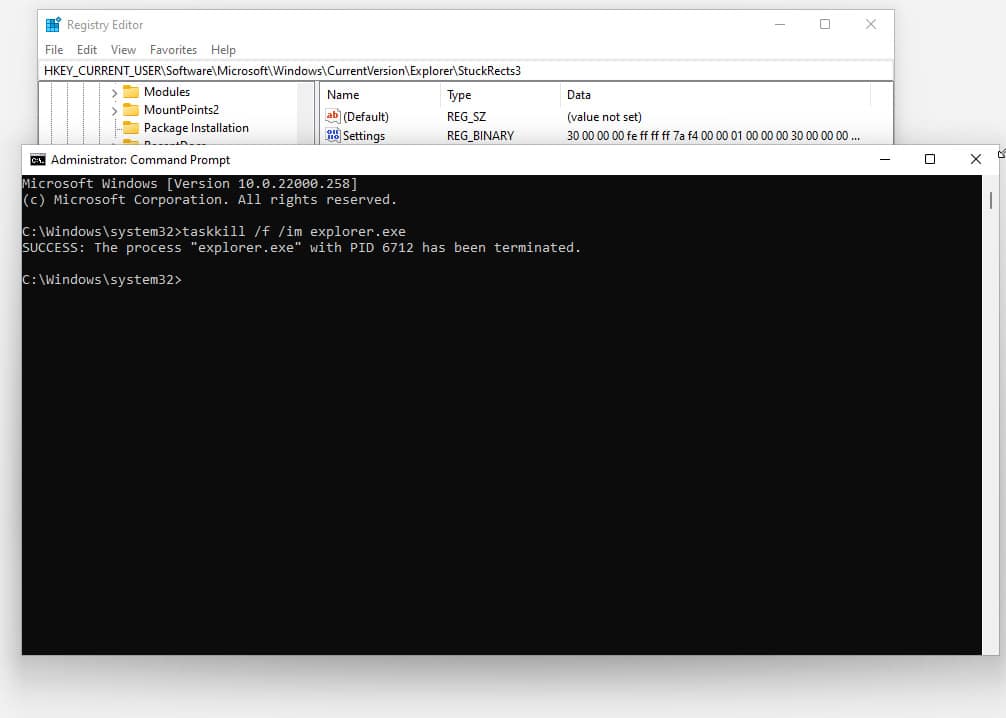
5. This step will be in two sub-parts. First, we will kill the explorer process and then restart it to the change in effect.
Here at FIRST, we will kill the explorer.exe process to stop the entire process tree. Type in the follow and press ENTER.
taskkill /f /im explorer.exe
Entering this command will make your desktop, wallpaper, and taskbar disappear. There is no need to panic; keep the seatbelt on, and keep going.
Now comes the SECOND part, where will restart the explore process and bring the taskbar in the new position. Type the following command and press ENTER.
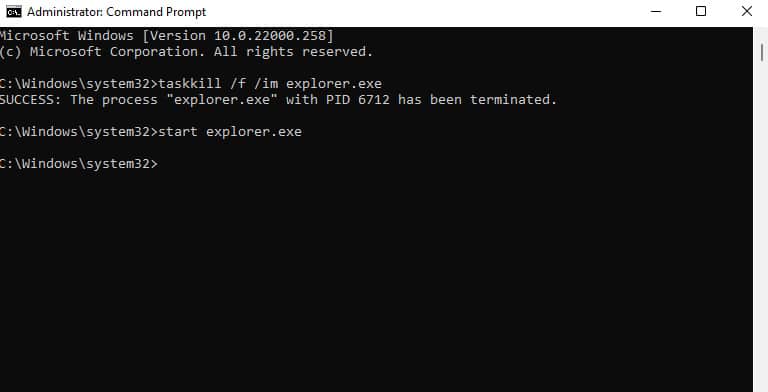
This will move the task on Windows 11 to the top, and the icons will be centered as there were in the default position.
You Must Know – You can always revert to the Default bottom taskbar by changing the value back to 03 from 01 of the settings in the registry we discussed above.
Also Read – Best Windows 11 Themes and Skins to Download
Move or Align The Taskbar Icons to the left
The macOS-inspired center taskbar icons are an eyesore to the religious Windows users who have been used to seeing it on the left or close to the start menu button. You can bring some normalcy back by moving the icons to the left.
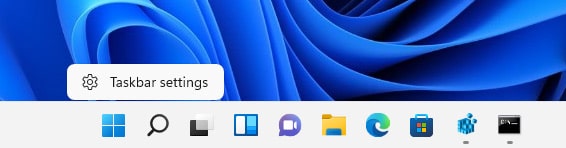
1. Right-click anywhere on the empty taskbar space and head to the taskbar settings.
2. Now, expand the Taskbar Behaviors section by clicking on it.

3. Find the Taskbar Alignment column and click on the drop-drop menu with center set by default. Select the Left option from there to apply.
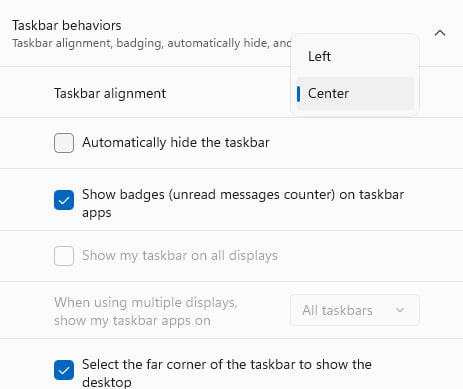
The taskbar icons will be aligned to the left side of the screen, resembling the old look for now.
Over to You
This is how you move the taskbar in Windows 11 using a simple registry tweak. A paid third-party app is already available in the market that can bring the old taskbar to Windows 11. You can give it a try or wait like most of us and let Microsoft bring more changes to it.
It will be a couple of months before even the features promised at the official unveiling make it the official version. Let us keep our fingers crossed and wait for Microsoft to move the taskbar back or, at a bare minimum, provide an option for veteran users.
Некоторым пользователям необходимо в операционной системе Windows 11 переместить панель задач в другое место на экране компьютера. По умолчанию на ПК панель задач располагается в нижней части экрана монитора.
В Windows 11 переработали панель задач, в частности, установили выравнивание по центру для меню «Пуск» и значков приложений, изменили область уведомлений, добавили новые визуальные эффекты и анимацию, а также применили некоторые другие улучшения. Несмотря на добавление новых функций, из операционной системы были удалены некоторые устаревшие возможности, такие как возможность перемещать панель задач.
Содержание:
- Как переместить панель задач с помощью StartAllBack
- Как переместить панель задач Windows 11 (видео)
- Как изменить положение панели задач Windows 11 с помощью ExplorerPatcher
- Выводы статьи
- Как перенести панель задач в Windows 11 (видео)
Вы могли в предыдущих версиях Windows переместить панель задач в разные стороны экрана своего компьютера: вверх, влево или вправо. Если вам не понравилось новое расположение этого элемента интерфейса системы, то всегда можно было вернуть панель задач вниз на свое место по умолчанию.
Сейчас вы не можете в Windows 11 переместить панель задач вверх, влево или вправо, потому что в операционной системе используется совершенно новый дизайн, а перемещение ее по экрану довольно сложный процесс. Microsoft объяснила, что только перемещение панели задач вправо меняет весь дизайн, включая меню «Пуск» и приложения, а текущий интерфейс и анимация предназначены для нижнего размещения.
По заявлению представителей корпорации Майкрософт, изменения дизайна потребовали бы много усилий по переработке интерфейса системы, а это того не стоило, потому что на это не было достаточного спроса пользователей.
Ранее до выхода версии Windows 11 22H2 существовала возможность поменять положение панели задач на экране с помощью внесения изменений в системный реестр. Но, затем Майкрософт отключила эту недокументированную возможность. Сейчас параметры реестра сразу возвращаются к значениям по умолчанию после выполнения перезагрузки компьютера.
Часть пользователей желает знать, как переместить панель задач на Виндовс 11. Если вы относитесь к числу тех пользователей, кому нравится расположение панели задач в другом месте, например, вверху, слева или справа, то вы сможете поместить панель задач на разных сторонах экрана.
Из этого руководства вы узнаете, как переместить панель задач на экране в Windows 11 несколькими способами. Для решения этой задачи вам потребуется использовать стороннее программное обеспечение.
Перед началом изменения настроек внешнего вида Windows 11 создайте точку восстановления, чтобы у вас была возможность откатить состояние операционной системы, которое она имела до предстоящего изменения параметров, если что-то пошло не так.
Как переместить панель задач с помощью StartAllBack
StartAllBack — программа для изменения интерфейса Windows, возвращающая классический внешний вид операционной системе. С помощью программы можно улучшить меню «Пуск», Проводник и панель задач, контекстное меню, тему оформления в стиле предыдущих версий Windows.
В приложении доступны три варианта оформления в стилях Windows 11, Windows 10 или Windows 7 с тонкой настройкой внешнего вида системы.
Это платная программа c 30-дневной бесплатной пробной версией, которая имеет поддержку русского языка.
Выполните следующие действия:
- Скачайте StartAllBack с официального сайта: https://www.startallback.com/.
- Запустите установочный файл приложения.
- В процессе инсталляции в окне конфигурации StartAllBack сначала выберите одного или для всех пользователей, чтобы использовать программу на компьютере, а затем тему Windows 11 (она указана, как «Правильная 11»). Эти настройки потом можно поменять из окна программы.
- После установки приложения на компьютер, щелкните правой кнопкой по меню «Пуск», а в открывшемся меню выберите «Свойства».
- В окне «Настройки StartAllBack» войдите во вкладку «Панель задач».
- В разделе «Настройте поведение и сверх-способности» перейдите к опции «Положение панели задач на экране:».
- В раскрывающемся списке выберите предпочтительное расположение панели задач:
- Снизу.
- Слева.
- Сверху.
- Справа.

В случае необходимости вы можете вернуть панель задач на прежнее место, выбрав местоположение по умолчанию «Снизу».
Как переместить панель задач Windows 11 (видео)
Как изменить положение панели задач Windows 11 с помощью ExplorerPatcher
Если вы пользователь Windows 11 и ищите ответы на вопросы о том, как переместить панель задач наверх или как переместить панель задач в бок экрана, вы можете использовать сторонние инструменты для изменения положения этого элемента интерфейса.
ExplorerPatcher — бесплатное приложение от разработчика valinet, которое возвращает классический дизайн панели задач с некоторыми устаревшими функциями, например, такими как возможность переместить панель задач вправо, влево или наверх. Хотя это не идеальное решение, но, если вы хотите изменить настройки системы, это лучший бесплатный вариант.
В программе ExplorerPatcher имеются много других функций, которые изменяют различные системные параметры. После открытия окна «Свойства» (ExplorerPatcher), название активного раздела с настройками будет подчеркнуто.
Пройдите несколько шагов, чтобы перенести панель задач Windows 11 в нужное расположение на экране:
- Скачайте программу ExplorerPatcher на странице GitHub: https://github.com/valinet/ExplorerPatcher/releases/latest/download/ep_setup.exe.
- Дважды щелкните по файлу «ep_setup.exe», чтобы установить приложение на компьютер.
- Установка приложения проходит с перезапуском Проводника. Вы ненадолго увидите белый экран, а затем откроется рабочий стол Windows
- Щелкните правой кнопкой мыши по панели задач и выберите параметр «Свойства». Вы также можете открыть свойства ExplorerPatcher, используя меню «Пуск» войдя во «Все приложения», а там выбрать «Свойства (ExplorerPatcher)».
- В разделе «Taskbar» (Панель задач), в параметре «Taskbar style» (Стиль панели задач) выберите опцию «Windows 10».

В программе ExplorerPatcher вы можете решить задачу, как переместить панель задач вверх Виндовс 11 или в другое место на экране, двумя методами.
1 способ (действия после 5 шага):
- Нужно щелкнуть правой кнопкой мыши по панели задач.
- В контекстном меню снимите флажок с пункта «Закрепить панель задач».

- Зажмите левую кнопку мыши и вручную перетащите панель задач вверх, влево или вправо на новое место.
2 способ (выполните после 5 шага этой инструкции):
- В опции «Primary taskbar location on screen» (Основное расположение панели задач на экране) выберите подходящий вариант размещения.

В выпадающем списке вам доступны следующие расположения:
- Bottom (default) — снизу (по умолчанию).
- Top — сверху.
- Left — слева.
- Right — справа.

- Выберите нужное положение панели задач на экране компьютера, а затем нажмите на «Restart File Explorer» (Перезапустить Проводник), чтобы применить эти изменения в операционной системе Windows.

На этом изображении панель задач Windows 11 расположена по левому краю экрана.

Используйте настройку «Start button style» (Стиль кнопки «Пуск»), чтобы выбрать вариант «Windows 11». В этом случае кнопка меню «Пуск» примет стандартный вид, который похож на используемый в установленной операционной системе по умолчанию.
Если вам потребовалось отменить изменения, сделанные с помощью утилиты ExplorerPatcher, проделайте следующее:
- Нажмите на раздел «About» (О программе).
- Выберите опцию «Restore Default Setting» (Восстановить настройки по умолчанию).
- В открывшихся окнах с предупреждениями согласитесь на внесение изменений в реестр для отката настроек ExplorerPatcher.
- Перезагрузите ПК, чтобы вернуть настройки Windows 11 по умолчанию.
Выводы статьи
Некоторая часть пользователей операционной системы Windows 11 желает знать, как переместить панель задач влево, вверх или в правую часть экрана. В новом интерфейсе ОС Windows 11 не поддерживается изменение положения панели задач. В связи с этим у пользователей возникают вопросы о том, как в Win 11 переместить панель задач. Для решения этого вопроса вы можете использовать сторонние программы: StartAllBack или ExplorerPatcher, которые меняют расположение панели задач на экране компьютера.
Как перенести панель задач в Windows 11 (видео)
Похожие публикации:
- Как изменить цвет меню «Пуск» и панели задач Windows 11
- Как поменять разрешение экрана в Windows
- Как установить редактор групповой политики в Windows 11 Home
- Виджеты в Windows 11: как включить, отключить или удалить
- Как создать папки в меню «Пуск» Windows 11
Как закрепить в Windows 11 панель задач сверху? Жмите Win+R, введите команду regedit, перейдите по ссылке HKEY_CURRENT_USERSOFTWAREMicrosoftWindowsCurrentVersionExplorerStuckRects3. Жмите на Settings, в строке 0000008 в разделе FE остановите «01» и перезапустите ПК / ноутбук. Как вариант, используйте программу Taskbar11. Ниже рассмотрим, как правильно разместить панель задач Windows 11 слева, сверху, справа, а при необходимости вернуть вниз. Отдельно разберемся с особенностями, как закрепить этот элемент операционной системы.
Как переместить
В Виндовс 10 пользователи могли сдвинуть панель задач в любом направлении. Ее можно было сместить влево, вправо или вверху. В этом отношении Windows 11 не дает такой возможности и позволяет выбрать только одно из трех положений — стандартное внизу, слева или сверху. Смещение в правую сторону пока недоступно, но ситуация может исправиться вместе с очередным обновлением. Зато всегда можно поменять цвет под свое настроение.
Сверху
Для начала разберемся, как переместить панель задач Windows 11 наверх, ведь именно с этим вопросом чаще всего обращаются пользователи. Здесь можно воспользоваться командной строкой или специальным приложением. Рассмотрим каждый из методов подробнее.
Командная строка
Наиболее простой способ, как изменить положение панели задач Windows 11 и поставить ее сверху — применение командной строки. Чтобы подвинуть этот элемент в нужном направлении, сделайте такие шаги:
- Жмите Win+R, чтобы вызвать командную строку.
- Введите в появившееся поле команду regedit.
- Перейдите по следующему пути HKEY_CURRENT_USERSOFTWAREMicrosoftWindowsCurrentVersionExplorerStuckRects3, чтобы добраться до нужного файла.
- С правой стороны кликните на пункт Settings.
- Найдите строчку 00000008 и столбец FE, где должен быть установлен параметр «03».
- Поменяйте это число на «01».
- Перезапустите компьютер / ноутбуке и убедитесь, что панель задач Windows 11 вверху.

Таскбар
Существует еще один способ, как перенести панель задач Windows 11 наверх — реализовать это с помощью программы Taskbar11. Официальную версию софта можно найти по ссылке github.com/HerMajestyDrMona/Windows11DragAndDropToTaskbarFix/releases/. Учтите, что при загрузке файла могут возникнуть трудности из-за фильтра Smart Screen, который предусмотрен в веб-проводнике Майкрософт Эдже. Причиной является небольшая известность, но по факту проблем быть не должно.
Разобраться, как сделать панель задач сверху в Windows 11, не составляет труда. Просто установите приложение по рассмотренной выше ссылке и войдите в окно настроек. Здесь можно задать следующие характеристики Taskbar:
- Position — позиция: сверху или снизу;
- Size — размер: стандартный, большой, маленький (могут обрезаться часы);
- Indentation — позиция кнопки «Пуск»: слева или в центре.
- Icons — включение / выключение значков: поиск, чат и т. д;
- Corner Icons — системные значки в разделе уведомлений: ручной / сенсорный ввод, виртуальная сенсорная панель;
- Behavior — скрытие инструмента с экрана.
После изменения положения панели задач Windows 11 вверх остается нажать на кнопку Save для сохранения изменений. В результате можно будет сразу увидеть результат работы. Если все сделано правильно, интересующий инструмент должен оказаться сверху.

Влево
Следующий вопрос, который может возникнуть — перемещение панели задач в Windows 11 влево. Это означает, что расположение инструмента возможно не только сверху, но и с одной из сторон. Здесь также имеется два варианта.
Стандартный путь
Наиболее простой способ, как добиться расположения панели задач в Windows 11 слева, сделать это с помощью встроенных возможностей. Алгоритм действий имеет следующий вид:
- Войдите в настройки Виндовс. Для этого жмите «Пуск» или «Настройки» / «Параметры». Как вариант, используйте комбинацию Win+I.

- Выберите «Персонализация» с левой стороны.
- Прокрутите вниз и зайдите в «Панель задач».

- Выберите «Поведение …».
- Укажите «Влево».
- Закройте настройки и убедитесь, что вам удалось поставить в Windows 11 панель задач сбоку.

После выполнения рассмотренных выше шагов остается закрыть настроечный раздел.
Через командную строку
Следующий метод переноса панели задач Windows 11 на левую сторону — через командную строку. Здесь нужно действовать по похожему принципу, как и при размещении сверху. Алгоритм такой:
- Кликните на Win+R.
- Введите Regedit.
- Перейдите по адресу HKEY_CURRENT_USERSoftwareMicrosoftWindowsCurrentVersionExplorerAdvanced.
- Найдите значение TaskbarAl. Если такой параметр отсутствует, кликните правой кнопкой мышки с правой стороны редактора реестра и сделайте новый файл DWORD32 с таким именем.
- Поставьте для него параметр «0» вместо «1».
- Закройте редактор реестра. Чаще всего изменения вступают в силу после выполнения рассмотренных выше шагов.
Справа
Часто звучат вопросы, как разместить в Windows 11 панель задач справа. Сделать это не получится. Единственное, что можно реализовать — разместить этот инструмент слева или сверху. Как это сделать правильно, рассмотрено выше.
Внизу
По умолчанию интересующий раздел со значками Windows 11 находится именно внизу. Если вы поставили его сверху или слева, необходимо вернуть все на место с учетом рассмотренной выше схемы. К примеру, если вы ставили отображение сверху через, тогда в строчке 00000008 и столбце FE должен быть установлен параметр «03».
Учтите, что перезапуск оболочки проводника является обязательным. Нельзя просто войти-выйти из учетной записи, ведь такой путь не даст результата. Чтобы правильно поменять расположение, сделайте следующее:
- Войдите в диспетчер задач с помощью Ctrl+Shift+Esc.
- Жмите «Подробнее» для отображения вкладок с приложениями / службами.
- В разделе «Процессы» найдите Проводник Виндовс и жмите его.
- Кликните «Перезагрузить».

Что делать, если сместилось
Бывают ситуации, когда пуск и панель задач не по центру в Windows 11. Если она съехала, проверьте правильность настройки персонализации. Для этого войдите в «Параметры» и разверните блок «Поведение …». Там выберите значение «Слева» или выравнивание «По центру». Изменения должны произойти мгновенно
Как закрепить
В Сети часто встречается вопрос, как в Windows 11 открепить панель задач или закрепить ее. В случае с Виндовс 10 нужно было нажать на пустом месте панели и выбрать в области задач «Параметры …». Здесь можно было поставить флажок возле «Закрепить …», а в дальнейшем отменить закрепление. В Виндовс 11 такой опции нет. Здесь можно закрепить приложение, изменить цвет, поменять расположение (в том числе кнопок), показать эмблемы на кнопках, автоматически скрывать информацию и т. д.
Зная, как в Windows 11 установить панель задач сверху или сбоку, вы сможете настроить удобное для себя расположение и избежать случайных нажатий. В комментариях расскажите, какой способ вы использовали и поделись своим опытом, какое еще метод может подойти.
Отличного Вам дня!