После анонса операционной системы следующего поколения было много волнений и замешательств. Пользователи не уверены в минимальных требованиях к оборудованию для установки Windows 11, и Microsoft пытается прояснить ситуацию, обновляя свою документацию.
Microsoft удалила «мягкие» и «жесткие» требования к минимальному уровню, которые изначально предполагали, что все устройства с TPM 1.2 и более ранние ПК будут официально поддерживаться. Microsoft также незаметно обновила свою документацию по поддержке совместимости с Windows, подтвердив, что TPM 2.0 является минимальным требованием к оборудованию наряду с новыми процессорами.
Помимо документов, официальные лица Microsoft также независимо подтвердили, что для установки Windows 11 на существующее оборудование Windows 10 требуется микросхема TPM версии 2.0.
Независимо от того, установлена ли у вас TPM версии 2.0 или микросхема TPM отсутствует, у нас есть решение. Внося изменения в реестр Windows или установочный носитель, вы можете обойти любые ограничения TPM и разблокировать Windows 11, в основном позволяя любому обновить свой существующий компьютер до новой операционной системы.
Помимо TPM, вы также можете обойти ограничение SecureBoot.
Метод 1: изменить реестр
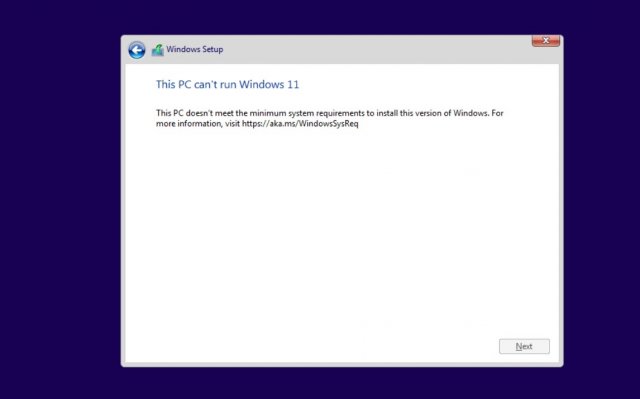
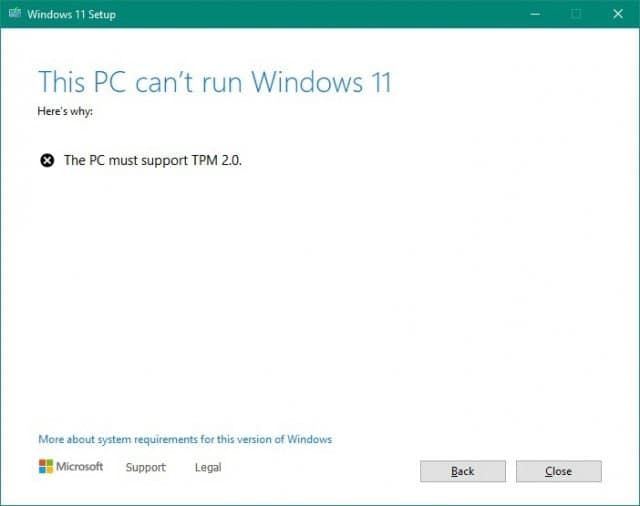
Первый метод заключается в простом редактировании реестра Windows в процессе установки новой операционной системы. На неподдерживаемых устройствах, если вы попытаетесь установить новую ОС, на вашем экране появится сообщение о том, что компьютер несовместим.
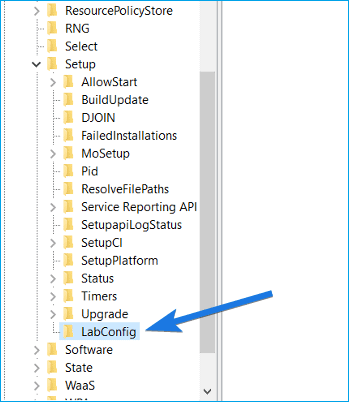
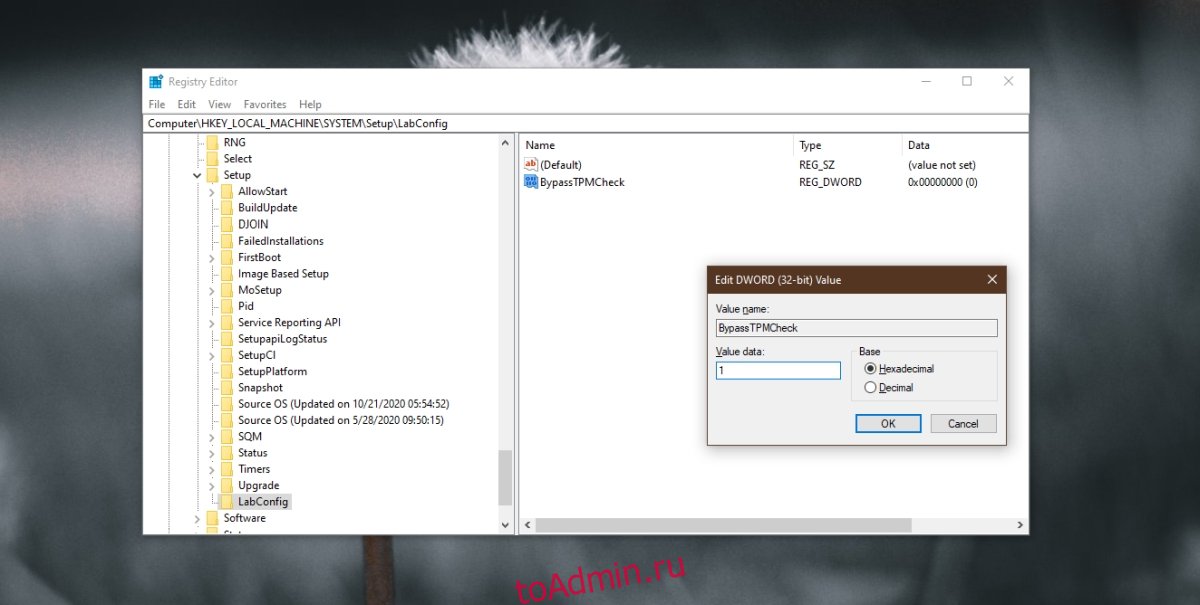
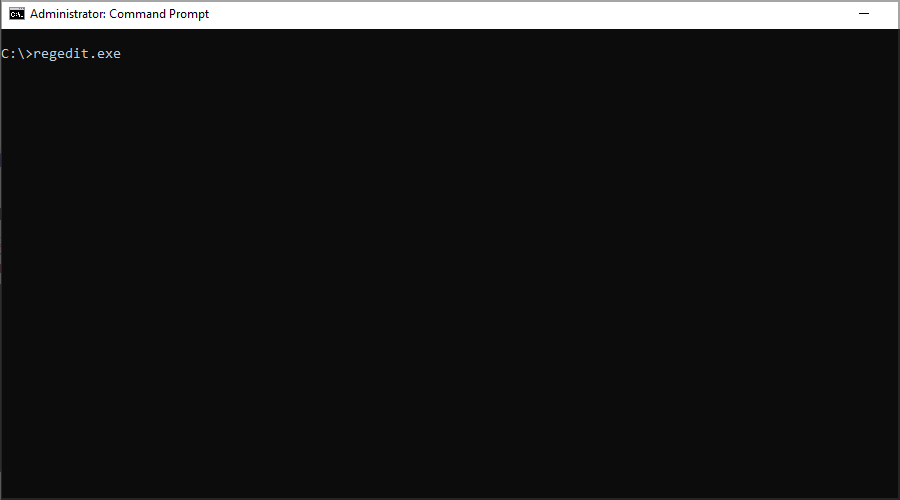
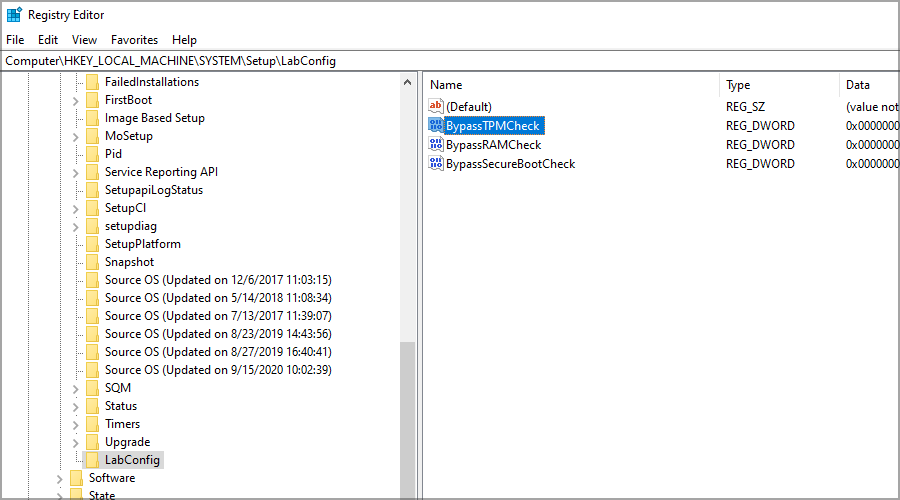
Здесь вам нужно нажать Shift + F10, чтобы открыть окно Командной строки и изменить реестр. В Командной строке вам нужно запустить regedit.exe и создать новый ключ «LabConfig» в HKEY_LOCAL_MACHINESYSTEMSetup. В ключе «LabConfig» создайте две новые записи:
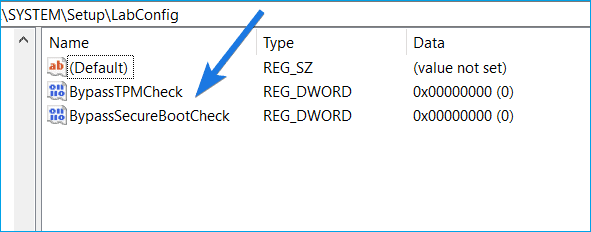
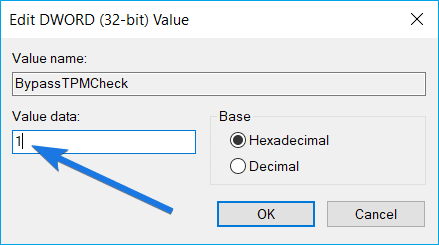
BypassTPMCheck=dword:00000001
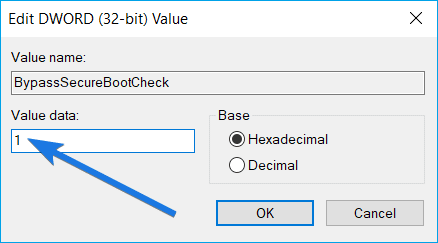
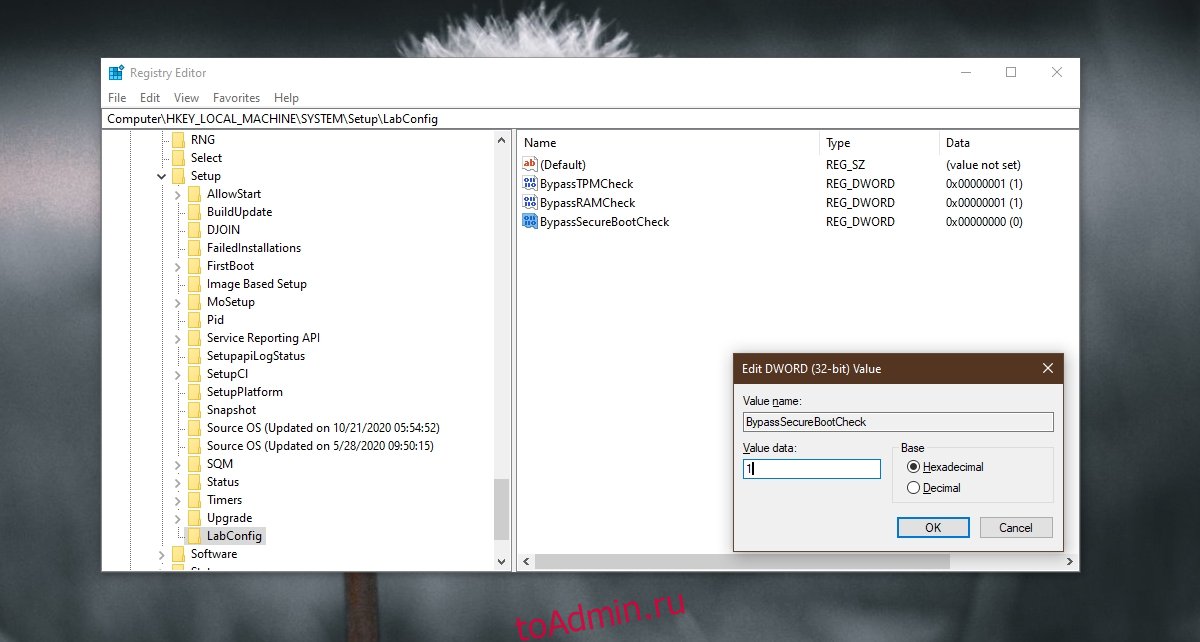
BypassSecureBootCheck=dword:00000001
Сохраните изменения и ошибки совместимости исчезнут.
В противном случае вы также можете создать файл .reg со следующей строкой кода:
Windows Registry Editor Version 5.00 [HKEY_LOCAL_MACHINESYSTEMSetupLabConfig] “BypassTPMCheck”=dword:00000001 “BypassSecureBootCheck”=dword:00000001
Сохраните этот reg-файл на USB-накопителе и выполните чистую установку Windows 11, когда она будет официально выпущена. В процессе установки нажмите Shift + F10, введите «notepad и нажмите Enter.
В Блокноте нажмите на меню Файл (File), найдите и примените созданный вами файл .reg. Это позволит обойти требования TPM + SecureBoot.
Метод 2: создайте собственный установочный носитель
Второй метод предполагает изменение файла ISO.
Если вы хотите обновить операционную систему, запустив setup.exe непосредственно из образа Windows 11, есть еще одно простое решение.
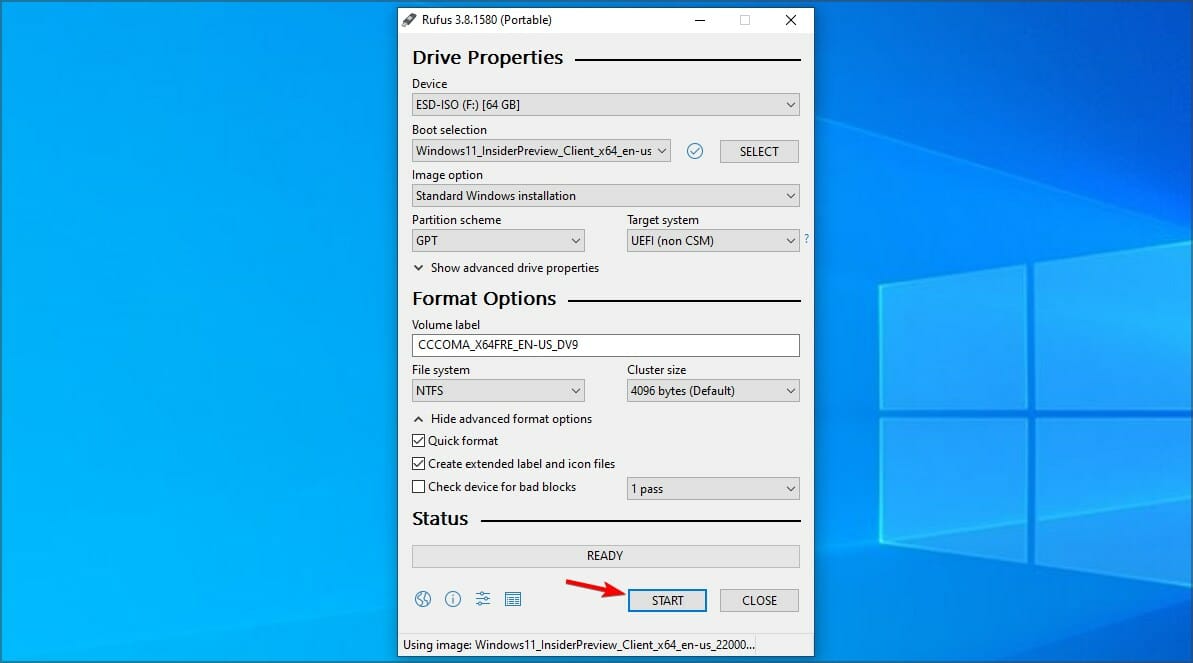
Вам необходимо заменить appraiserres.dll в папке источников на установочном носителе версией этого файла из ISO-образа Windows 10. После этого вам необходимо воссоздать ISO-образ с помощью стороннего инструмента, такого как Rufus или AnyBurn, и снова запустить установочный файл.
Если вы хотите развернуть новую ОС на нескольких машинах для чистой установки, вы всегда можете использовать Windows ADK для автоматизации процесса и создания собственного ISO.
Также стоит отметить, что эти обходные пути были протестированы с просочившейся сборкой Windows, и они могут работать, а могут и не заработать, когда ОС будет выпущена в конце этого или в начале следующего года. На данный момент, похоже, можно было бы обойти эти ограничения, внеся изменения в процесс установки по умолчанию.
Также довольно очевидно, что TPM не является чем-то принципиально необходимым для Windows 11.
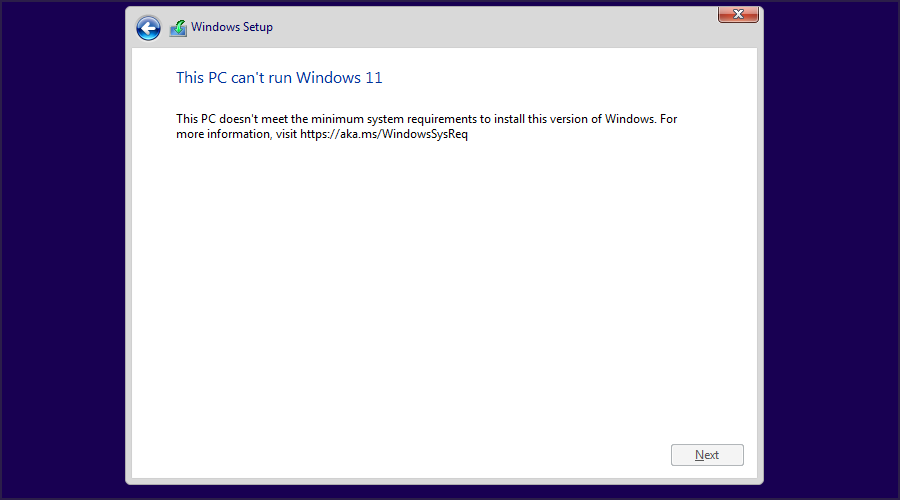
Microsoft has some strict hardware requirements that your PC must meet to install Windows 11, including TPM 2.0 support. This means that not only older computers, but virtual machines will refuse to upgrade from Windows 10, giving you a message that «this PC doesn’t currently meet Windows 11 system requirements.»
Fortunately, there are several simple ways you can get bypass Windows 11’s TPM, RAM and other requirements. If you’re doing a clean install with a Windows 11 ISO, you can edit the registry in the middle of the setup process and tell it to skip requirement checks. We’ll show you how to modify the registry in the first section below.
If you don’t want to have to modify the registry mid-install, you can create a Windows 11 USB install disk that will bypass Windows 11’s TPM requirement, and its need for 8GB of RAM and a supported CPU. Using a free tool called Rufus and at least a 16GB Flash drive, you can either perform an in-place upgrade of Windows 10 to 11 or a Windows 11 clean install while getting around these minimums. In the second section of our tutorial below, we’ll show you how to use Rufus to create a requirement-free Windows 11 install disc.
If you have Windows 10 or an earlier build of Windows 11 installed on a PC that didn’t meet the requirements (perhaps a VM), you try to update to a new build with Windows Update and you get the «doesn’t meet requirements» error message, there’s a workaround for that. As we’ll detail in the third section below, a script from AveYo’s Media Creation tool github page will allow you to bypass Windows 11’s TPM requirement even with Windows Update.
Note that Microsoft also has also created an official registry hack to bypass TPM 2.0 and CPU requirements for an in-place upgrade. However, this method still requires at least TPM 1.2 so, if you have no TPM at all, it’s worthless. We’ll talk about this at the bottom, in case you want to try it.
Also note that, by default, Microsoft’s OS wants you to set it up with a Microsoft account. However, we have another tutorial on how to install Windows 11 without a Microsoft Account by using a few tricks.
How to Bypass Windows 11’s TPM Requirement Using Registry Hacks
If you just have a regular Windows 11 install disk or ISO, you can bypass the Windows TPM and RAM requirements by making some registry changes during the install. Note that this method only works on a clean install and does not allow you to bypass the requirement for at least a dual-core CPU.
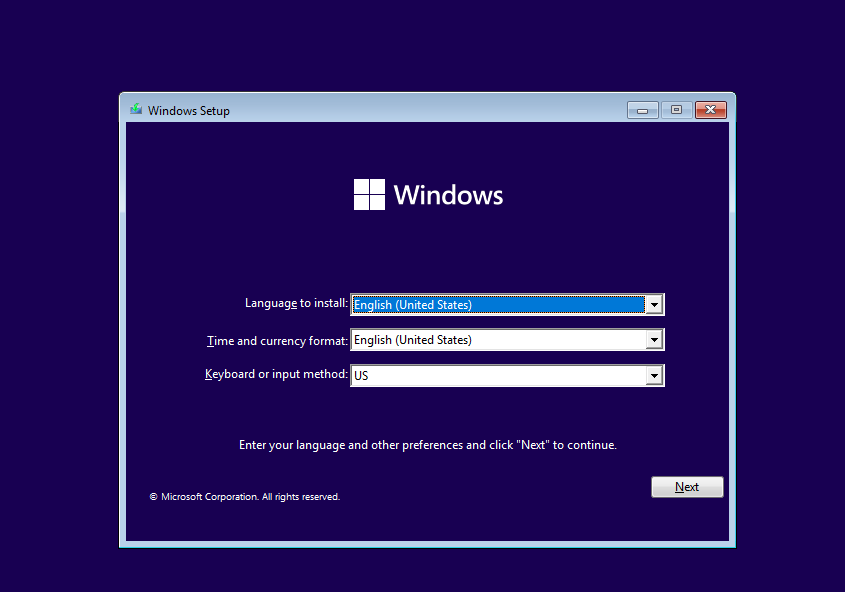
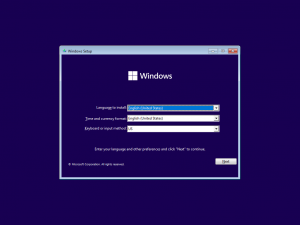
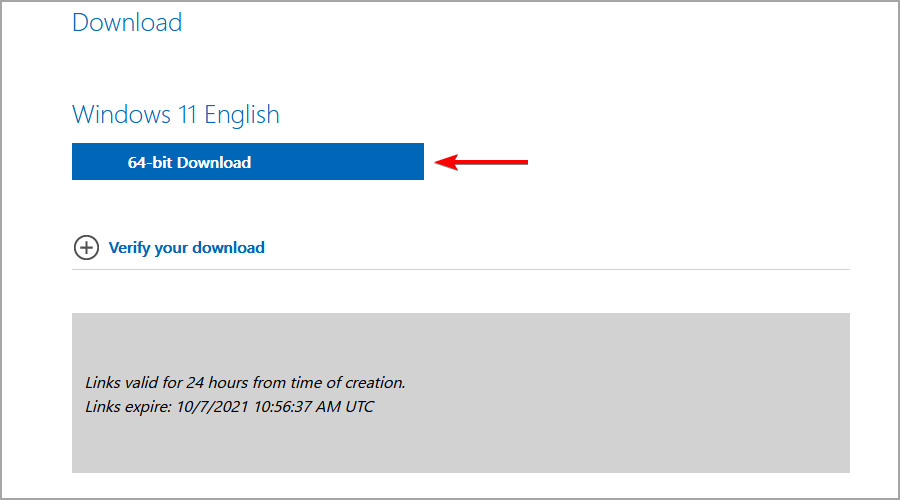
1. Boot off of your Windows 11 install disk. If you don’t have one, see our story on how to download Windows 11. The first screen should ask you to choose the language of your install (which will probably be correct).
2. Hit SHIFT + F10 to launch the command prompt.
3. Type regedit and hit Enter to launch registry editor.

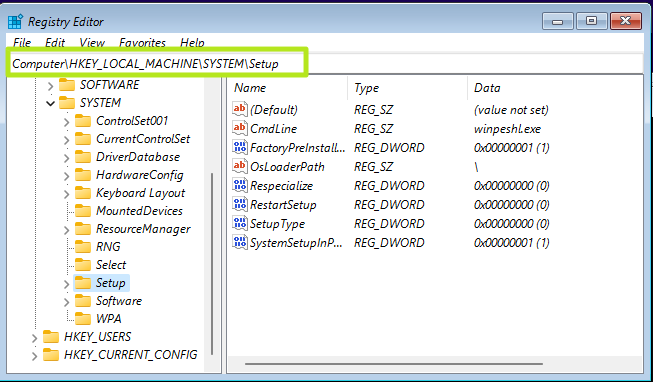
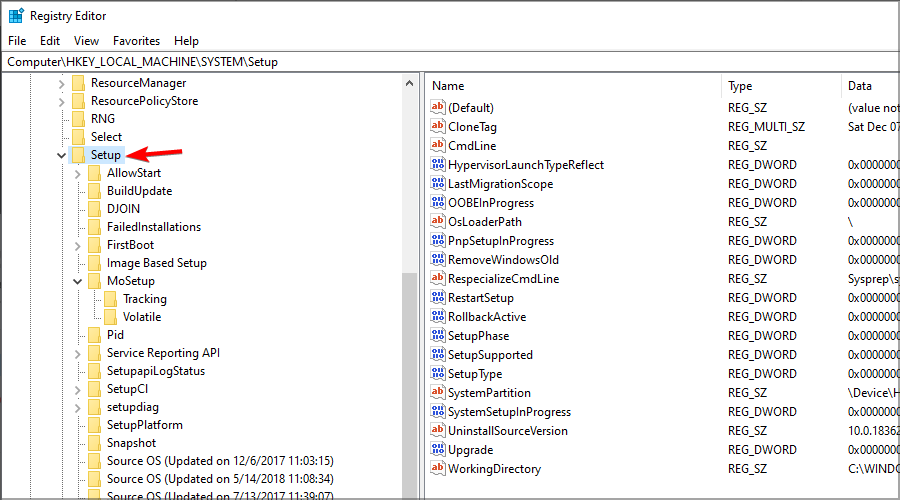
4. Navigate to HKEY_LOCAL_MACHINESYSTEMSetup.
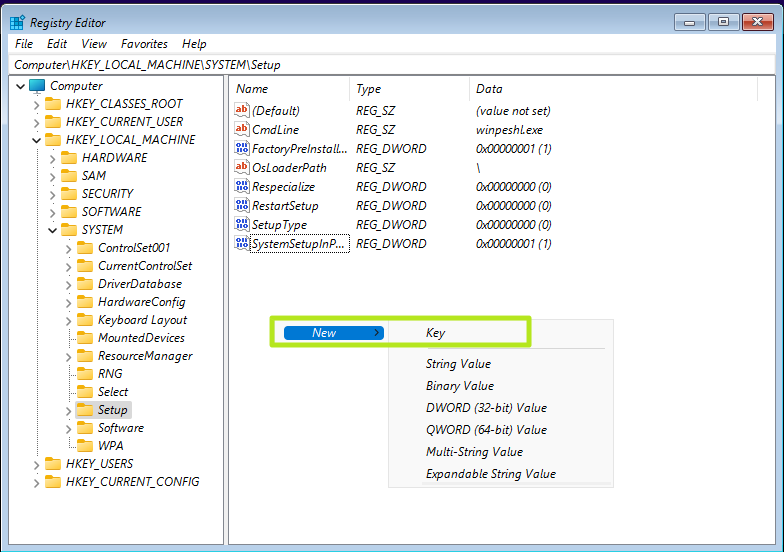
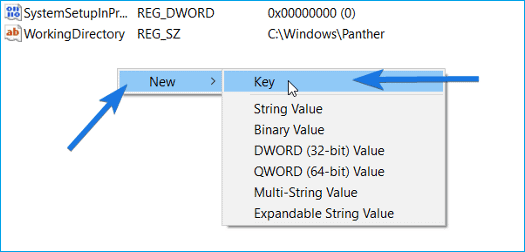
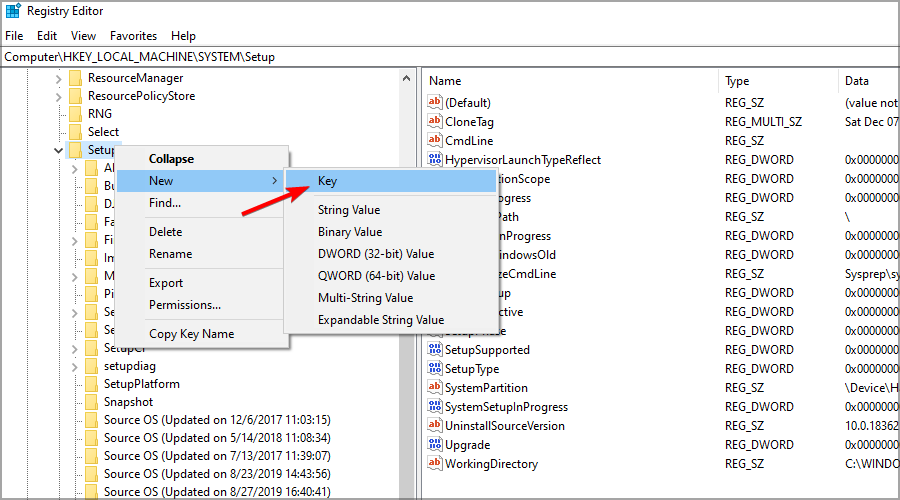
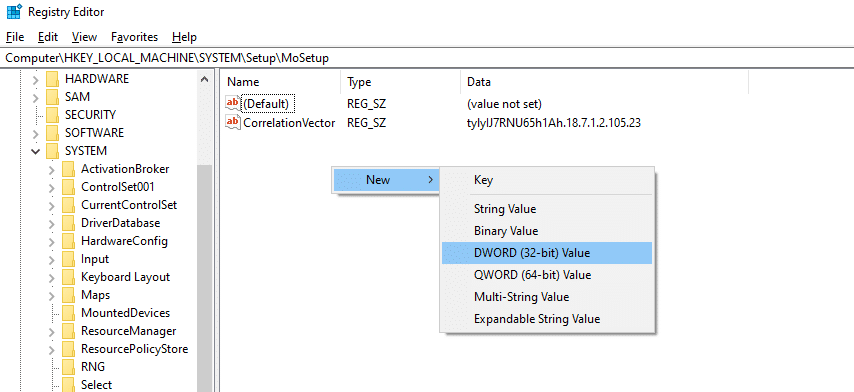
5. Create a new registry key under Setup and name it LabConfig. To create a registry key, right click in the right window pane and select New->Key. Then enter the key name.
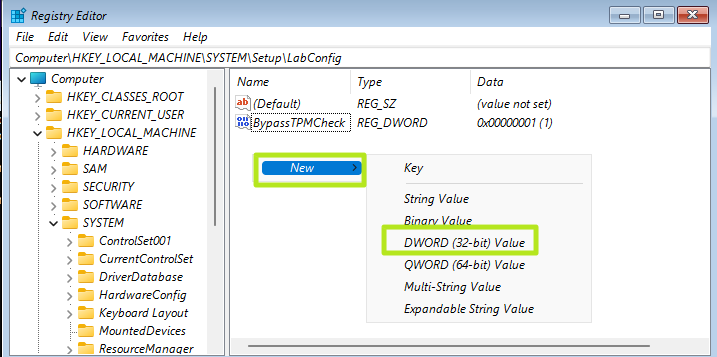
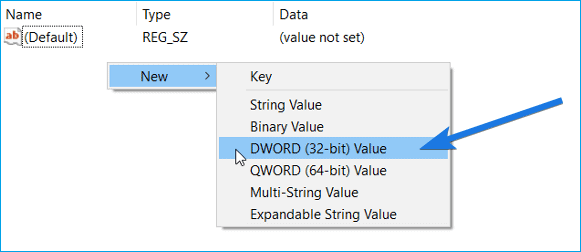
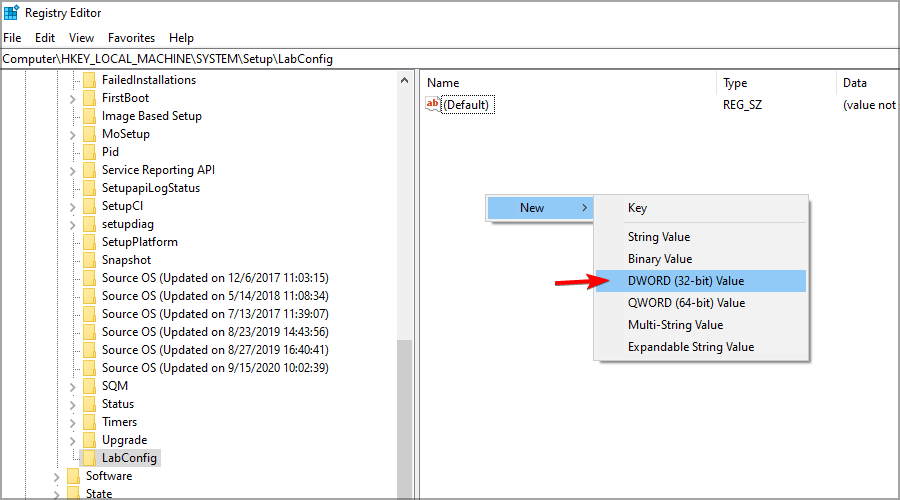
6. WIthin LabConfig, create DWORDs values called BypassTPMCheck and BypassSecureBoot and set each to 1. To create a new DWORD value, right click in the right window and select new DWORD (32-bit) Value then name the key, double click to open it and set it to 1.
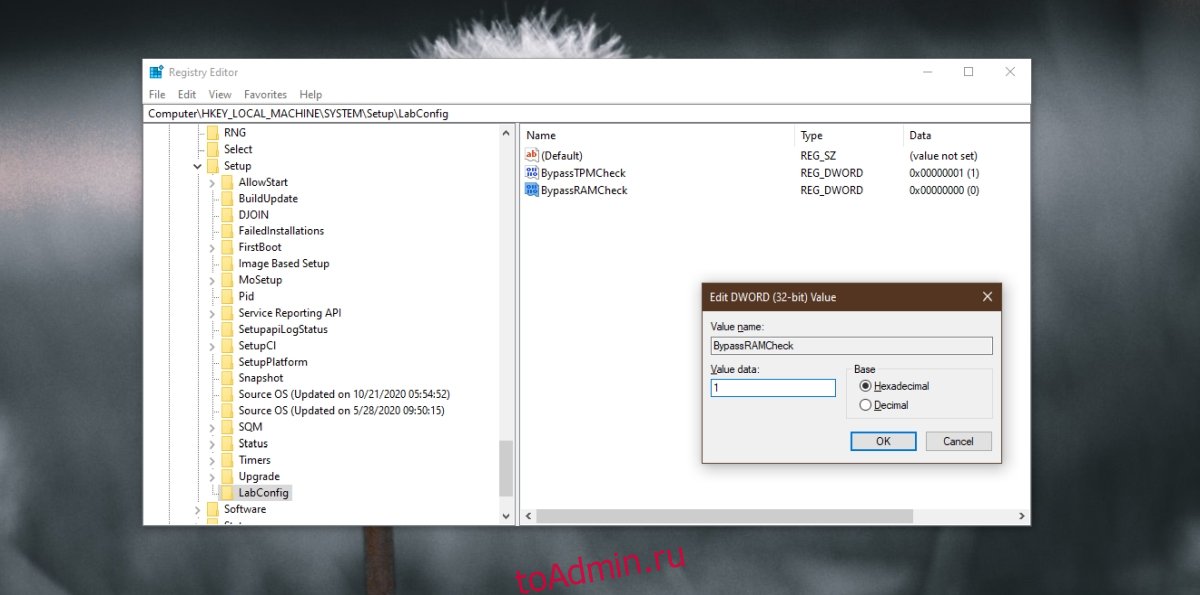
If you also want to bypass the RAM requirement, add a DWORD values for BypassRAMCheck.
7. Close regedit and the command prompt.
You should be able to continue with your Windows 11 installation as normal.
How to Bypass Windows 11’s TPM Requirement Using Rufus
With Rufus, a free utility, you can create a Windows 11 install disk on a USB Flash drive with settings that disable the TPM, RAM and CPU requirements. You can either boot off of this USB Flash drive to do a clean Windows 11 install or run the setup file off of the drive from within Windows 10 to do an in-place upgrade.
For most people, this method is ideal, but there are a couple of disadvantages. First, it requires a 16GB or larger USB Flash drive. Second, because it’s on a Flash drive, it’s more difficult to use for installing Windows 11 on a virtual machine where an ISO file would be ideal.
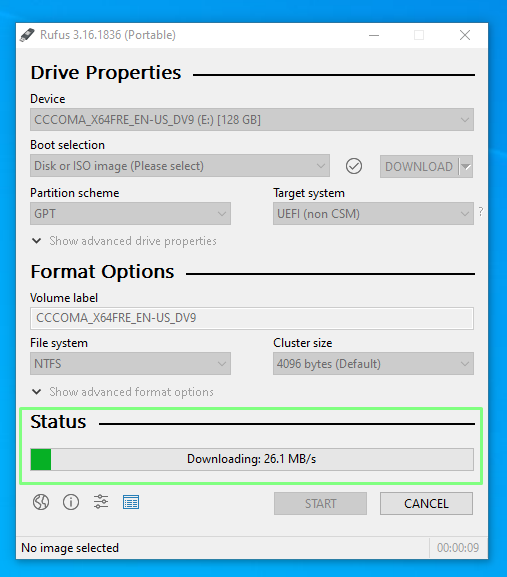
1. Download the latest version of Rufus and install it on your machine. At the time of writing the latest version is 3.19 which includes the Extended Windows 11 Image support.
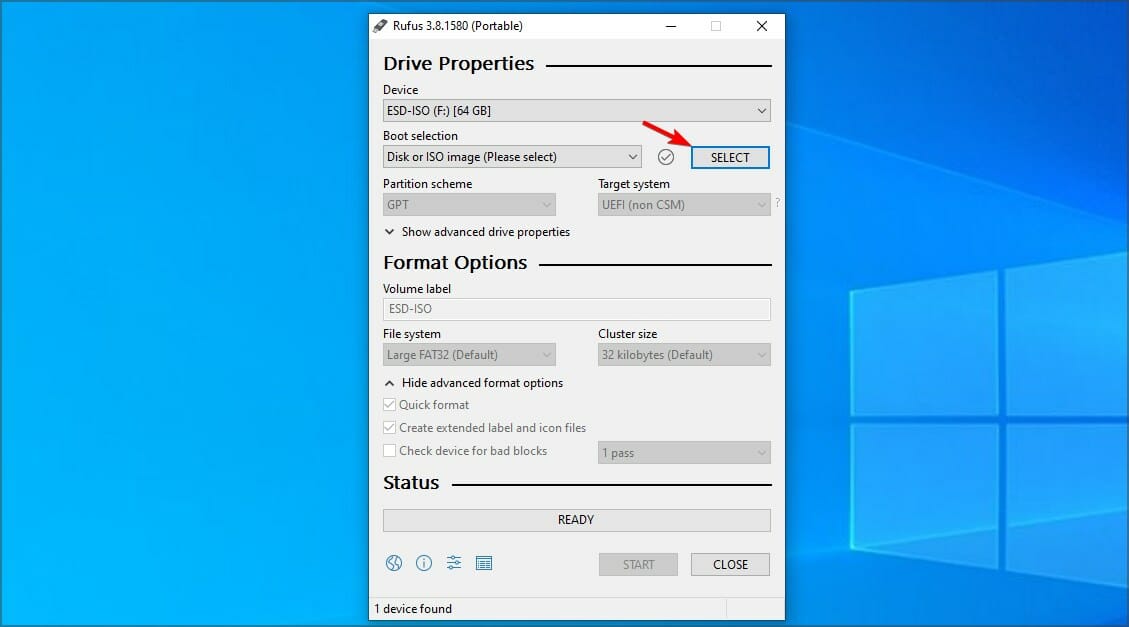
2. Insert a blank 16GB or larger USB stick then open Rufus.
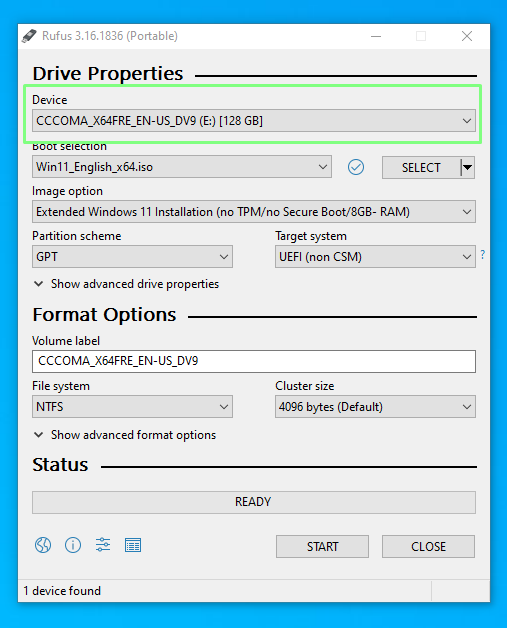
3. Select the USB device that you want to install Windows 11 to.
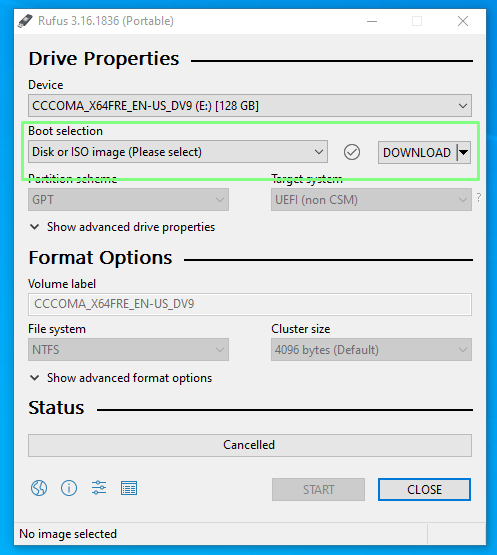
4. Ensure that Boot Selection shows “Disk or ISO image” and click DOWNLOAD.
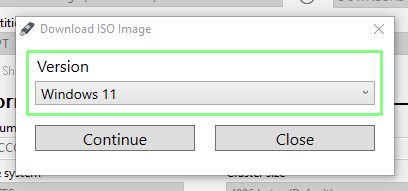
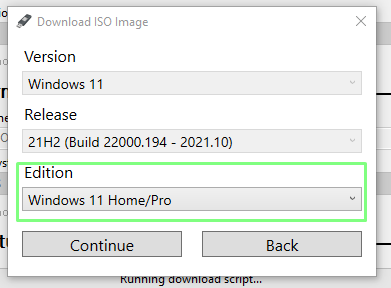
5. Select Windows 11 and click Continue.
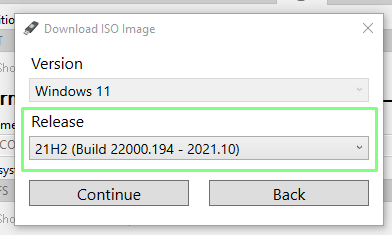
6. Select the latest release and click Continue.
7. Select the edition and click Continue.
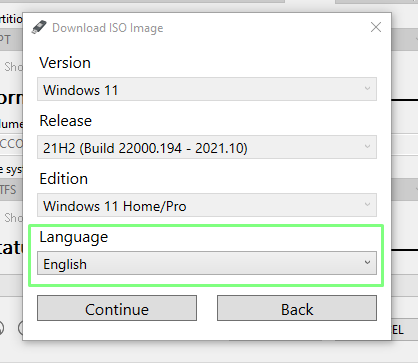
8. Select your preferred language and click Continue.
9. Select the architecture (most likely x64) and click Download. A new window will open asking where to save the ISO image. Save it to your Downloads folder. You can also download the image using a browser if you wish.
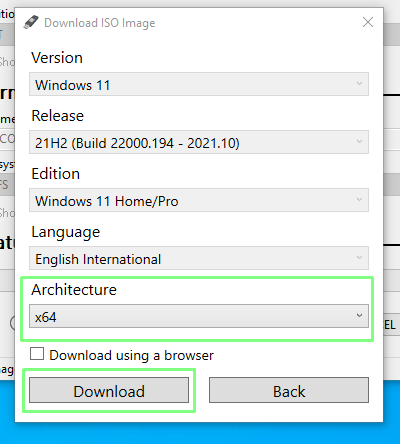
The download will take several minutes to complete.
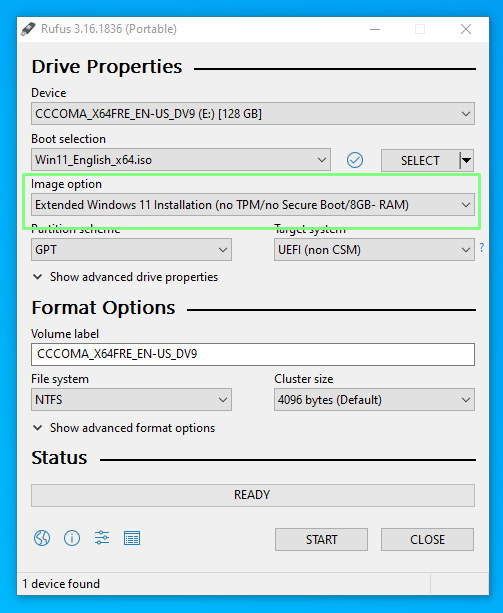
10. Click on the Image option drop down and select Extended Windows 11 Installation to disable TPM, Secure Boot and the 8GB of RAM requirement.
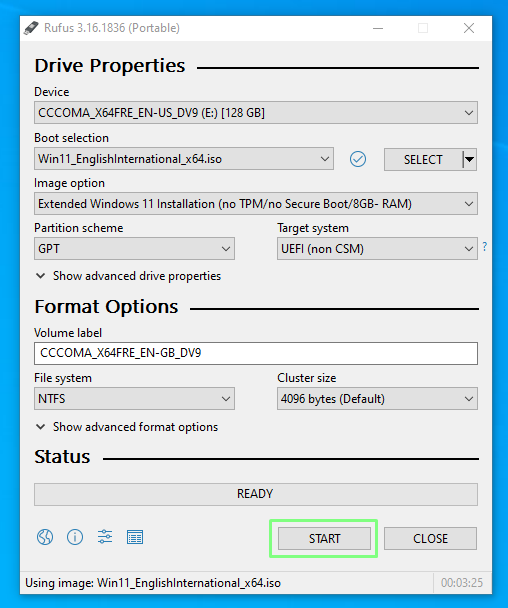
11. Double check that the correct drive has been selected and click on Start to begin the installation.
The write process can take some time, depending on the USB drive being used, but when done the drive can be removed and used to install Windows 11 on an older computer or even in a virtual machine.
12. Install or upgrade to Windows 11. Run setup on the USB drive, if you ware doing an in-place install from an existing Windows 10 installation. Boot off of the drive if you are doing a clean install. Note that you may need to disable secure boot in your BIOS (see how to enter your BIOS) if it gives you a problem.
How to Bypass Windows 11 TPM Check From Windows Update
If you want to use Windows Update rather than creating an install disk, you’ll need a method that runs in Windows and fools the updater into thinking you meet the requirements. This may be more important if you are trying to use Windows Update to upgrade to a new build of Windows 11, perhaps an Insider Build, on a computer that already bypassed the requirement.
For example, when we joined the Windows Insider program on one of our Windows 11 VMs (which clearly did not have TPM), we got the dreaded «Your PC doesn’t meet the requirements» error. But using AveYo’s Media Creation Tool workaround script solved the problem. Here’s how to make it happen.
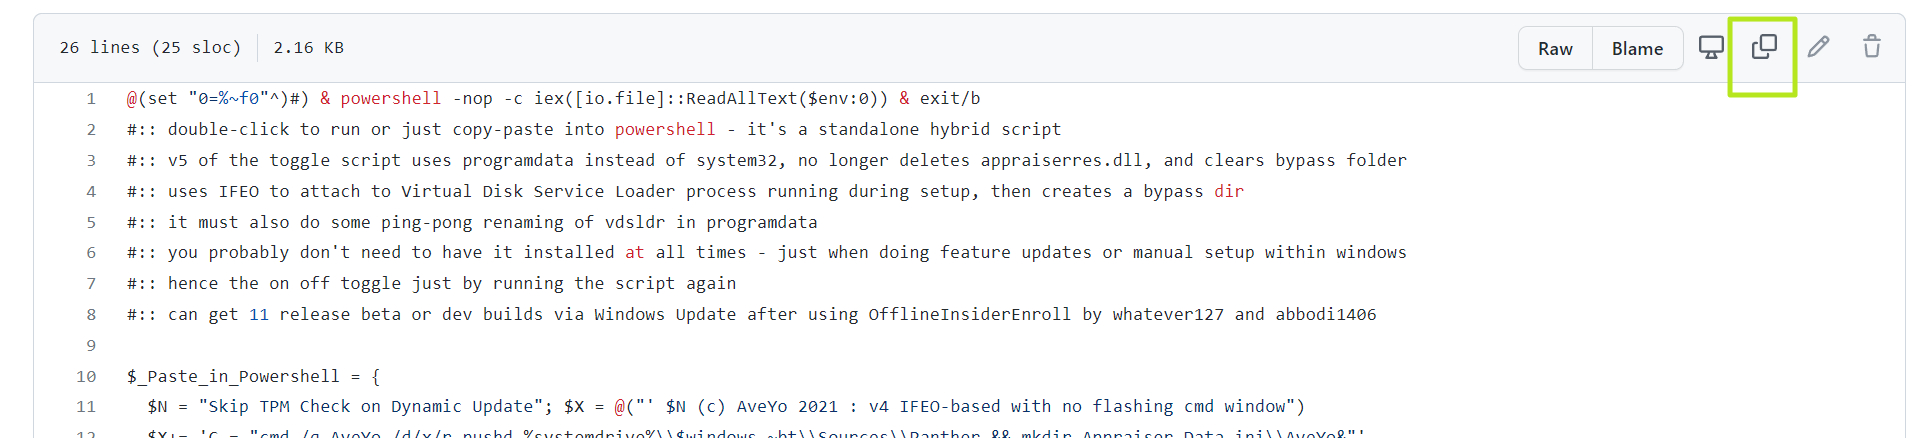
1. Navigate to the Skip_TPM_Check_on_Dynamic_Update.cmd source code on AveYo’s Media Creation Tool Github.
2. Click the «Copy raw contents» button in the upper right corner of the code box.
3. Create a new file on your desktop and name it skip_tpm_check.cmd. Make sure that you are able to view file extensions and the file extension is really .cmd, not .txt or else it won’t run.
4. Open skip_tpm.cmd for editing, using notepad or another text editor.
5. Paste in the code you copied from github.
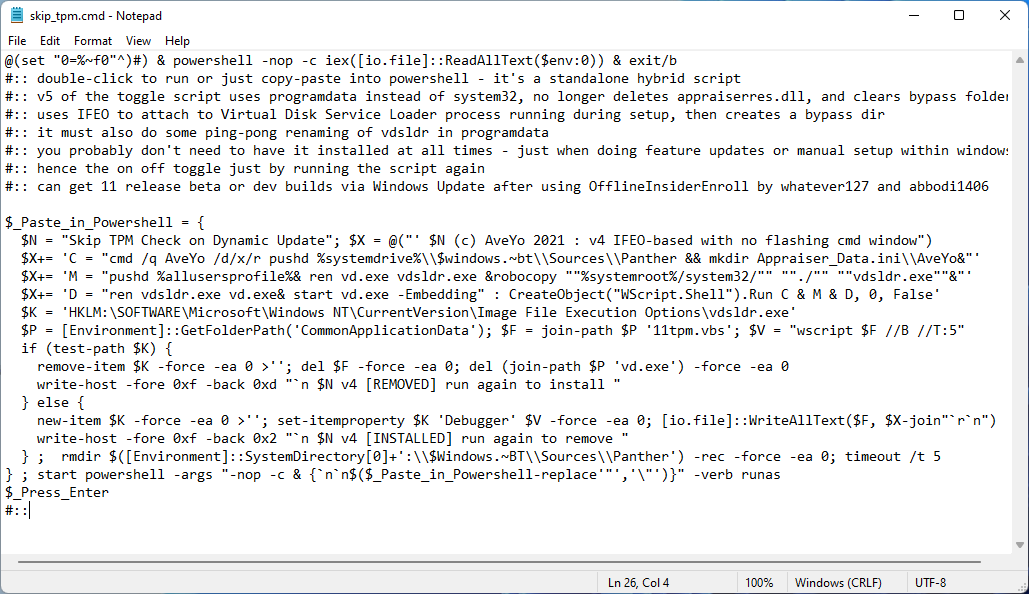
6. Save and run the skip_tpm.cmd file.
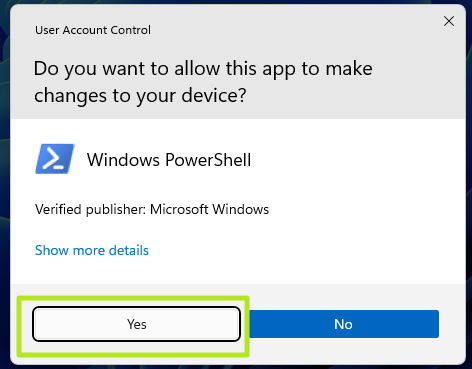
7. Click Yes if prompted by User Account Control.
You will now see a message saying «Skip TPM on Dynamic Update» has been installed. If you run the program again, it will disable the utility.

Windows Update should now be able to either update your existing Windows 11 Build or even perhaps upgrade you from Windows 10 to 11.
How to Bypass Windows 11 TPM the Official Microsoft Way
Knowing that some users will want to install Windows 11 on systems that don’t meet all of its hardware requirements, Microsoft has provided a registry hack that loosens them up somewhat. Using this hack, you can install on a system that has at least TPM 1.2 and has an unsupported CPU. That said, we recommend the scripts above because they don’t require you to have TPM of any kind.
1. Open Regedit.
2. Navigate to HKEY_LOCAL_MACHINESYSTEMSetupMoSetup.
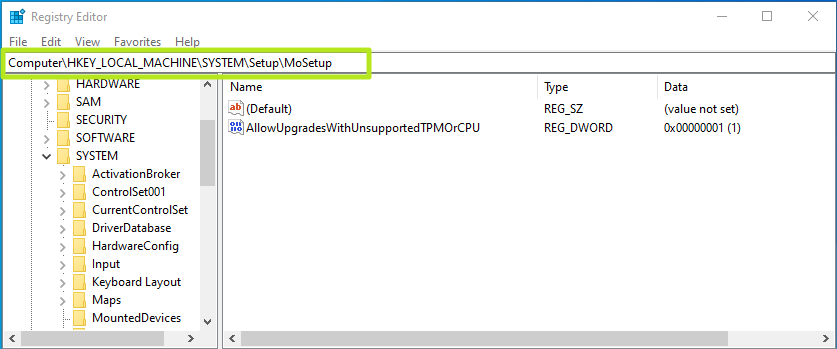
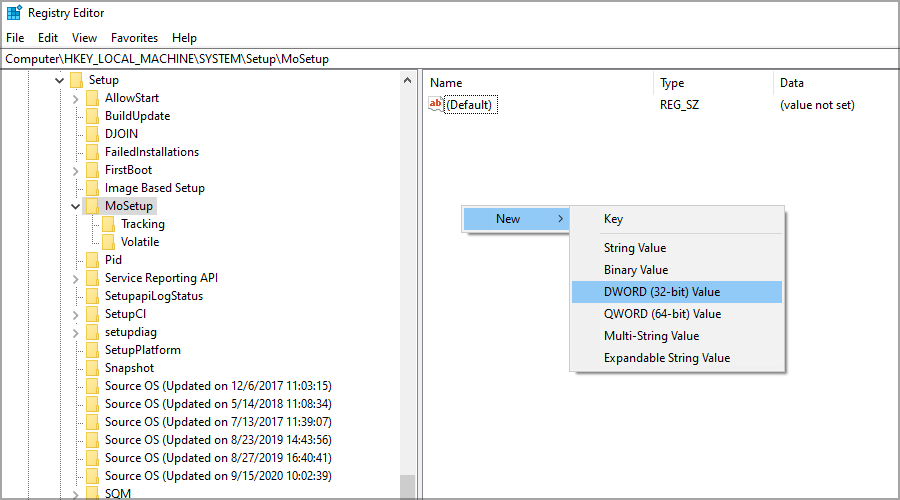
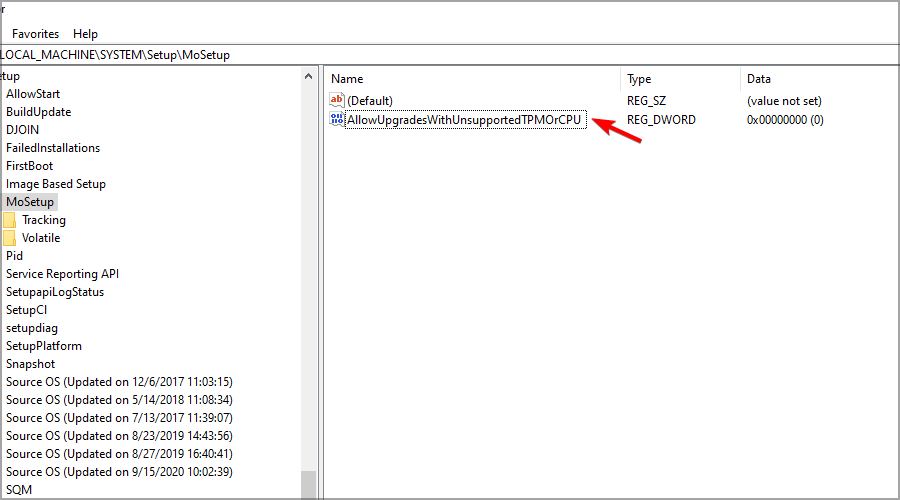
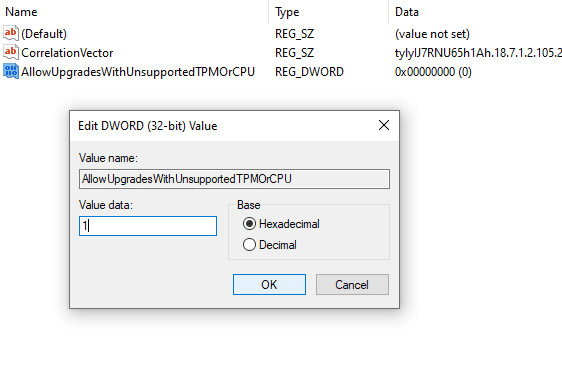
3. Create a DWORD (32-bit) Value called AllowUpgradesWithUnsupportedTPMOrCPU if it doesn’t already exist.
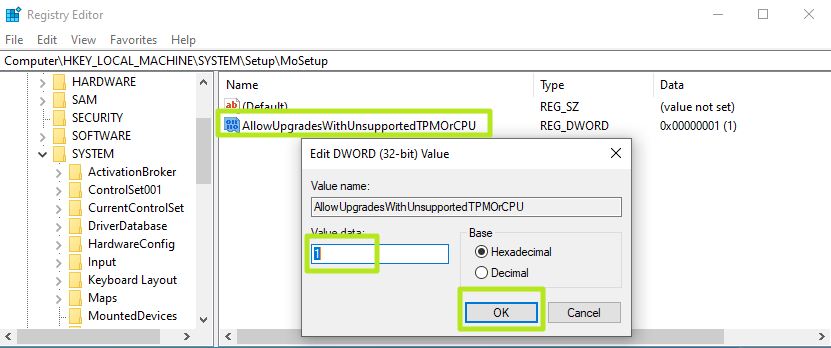
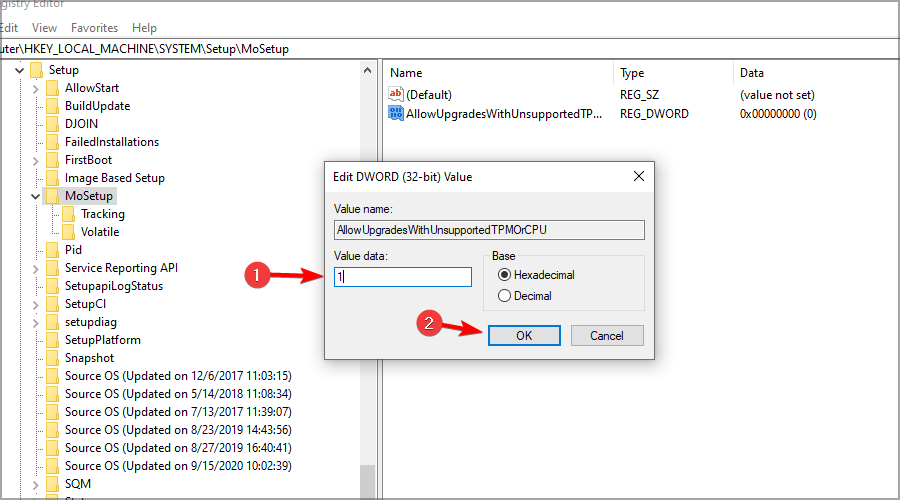
4. Set AllowUpgradesWithUnsupportedTPMOrCPU to 1.
5. Close regedit and restart your PC. You should now be able to upgrade to Windows 11 from within Windows 10 by using installation media (provided you created it).
More Windows 11 Tutorials:
- How to Get a Windows 11 ISO File and Do a Clean Install
- How to Enable God Mode in Windows 11 or 10
- How to Uninstall Windows 11 and Return to 10
- How to Clean Install Windows 11, No Product Key Required
- How to Install Windows 11 in a Virtual Machine
Get instant access to breaking news, in-depth reviews and helpful tips.
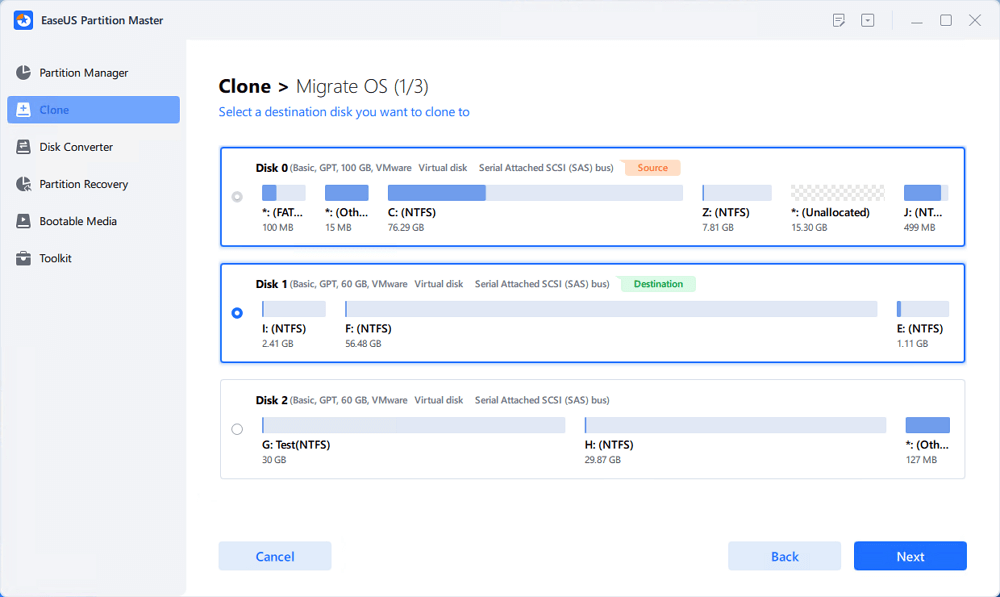
| Workable Solutions | Step-by-step Troubleshooting |
|---|---|
| Bypass Secure Boot and TPM 2.0 on Windows 11 | Step 1: Go to the Start Menu, search for Run and then press the Enter…Full steps |
| Download and Install Windows 11- OS2Go | Step 1: The Win11 builder is integrated with the EaseUS OS2Go software…Full steps |
| Additional Information: Manage Disk After Windows 11 Installation | Once you have successfully downloaded Windows 11 on your computer, your work isn’t done here…Full steps |
Are you excited to install Windows 11 on your computer?
Yes!
But all your excitement is flushed out when you encounter a series of problems while installing Windows 11 on your old computer. One such issue is the requirement of ‘Secure Boot’ along with ‘TPM 2.0’ enabled computers.
However, if you are using a UEFI BIOS Mode machine, you can pretty straightforwardly bypass TPM on Windows 11. You simply have to go to BIOS settings and enable the ‘Secure Boot’ and ‘TPM 2.0’ options.
Unfortunately, if you have an old Legacy BIOS Mode, it is impossible for you to bypass Secure Boot on Windows 11 computer.
Now, there’s no need to dishearten. That’s because thanks to the vast Windows community and software development teams, it is possible to bypass Secure Boot and TPM options while installing Windows 11.
Let’s not waste any more time and see how to bypass Secure Boot and TPM settings on Windows 11.
Limits of Windows 11 — Seucre Boot and TPM 2.0
Windows 11 has taken the graphic-rich user interface to the next level. It has further added many new features to entice the Windows experience, such as touch controls, widgets, Android apps, and more.
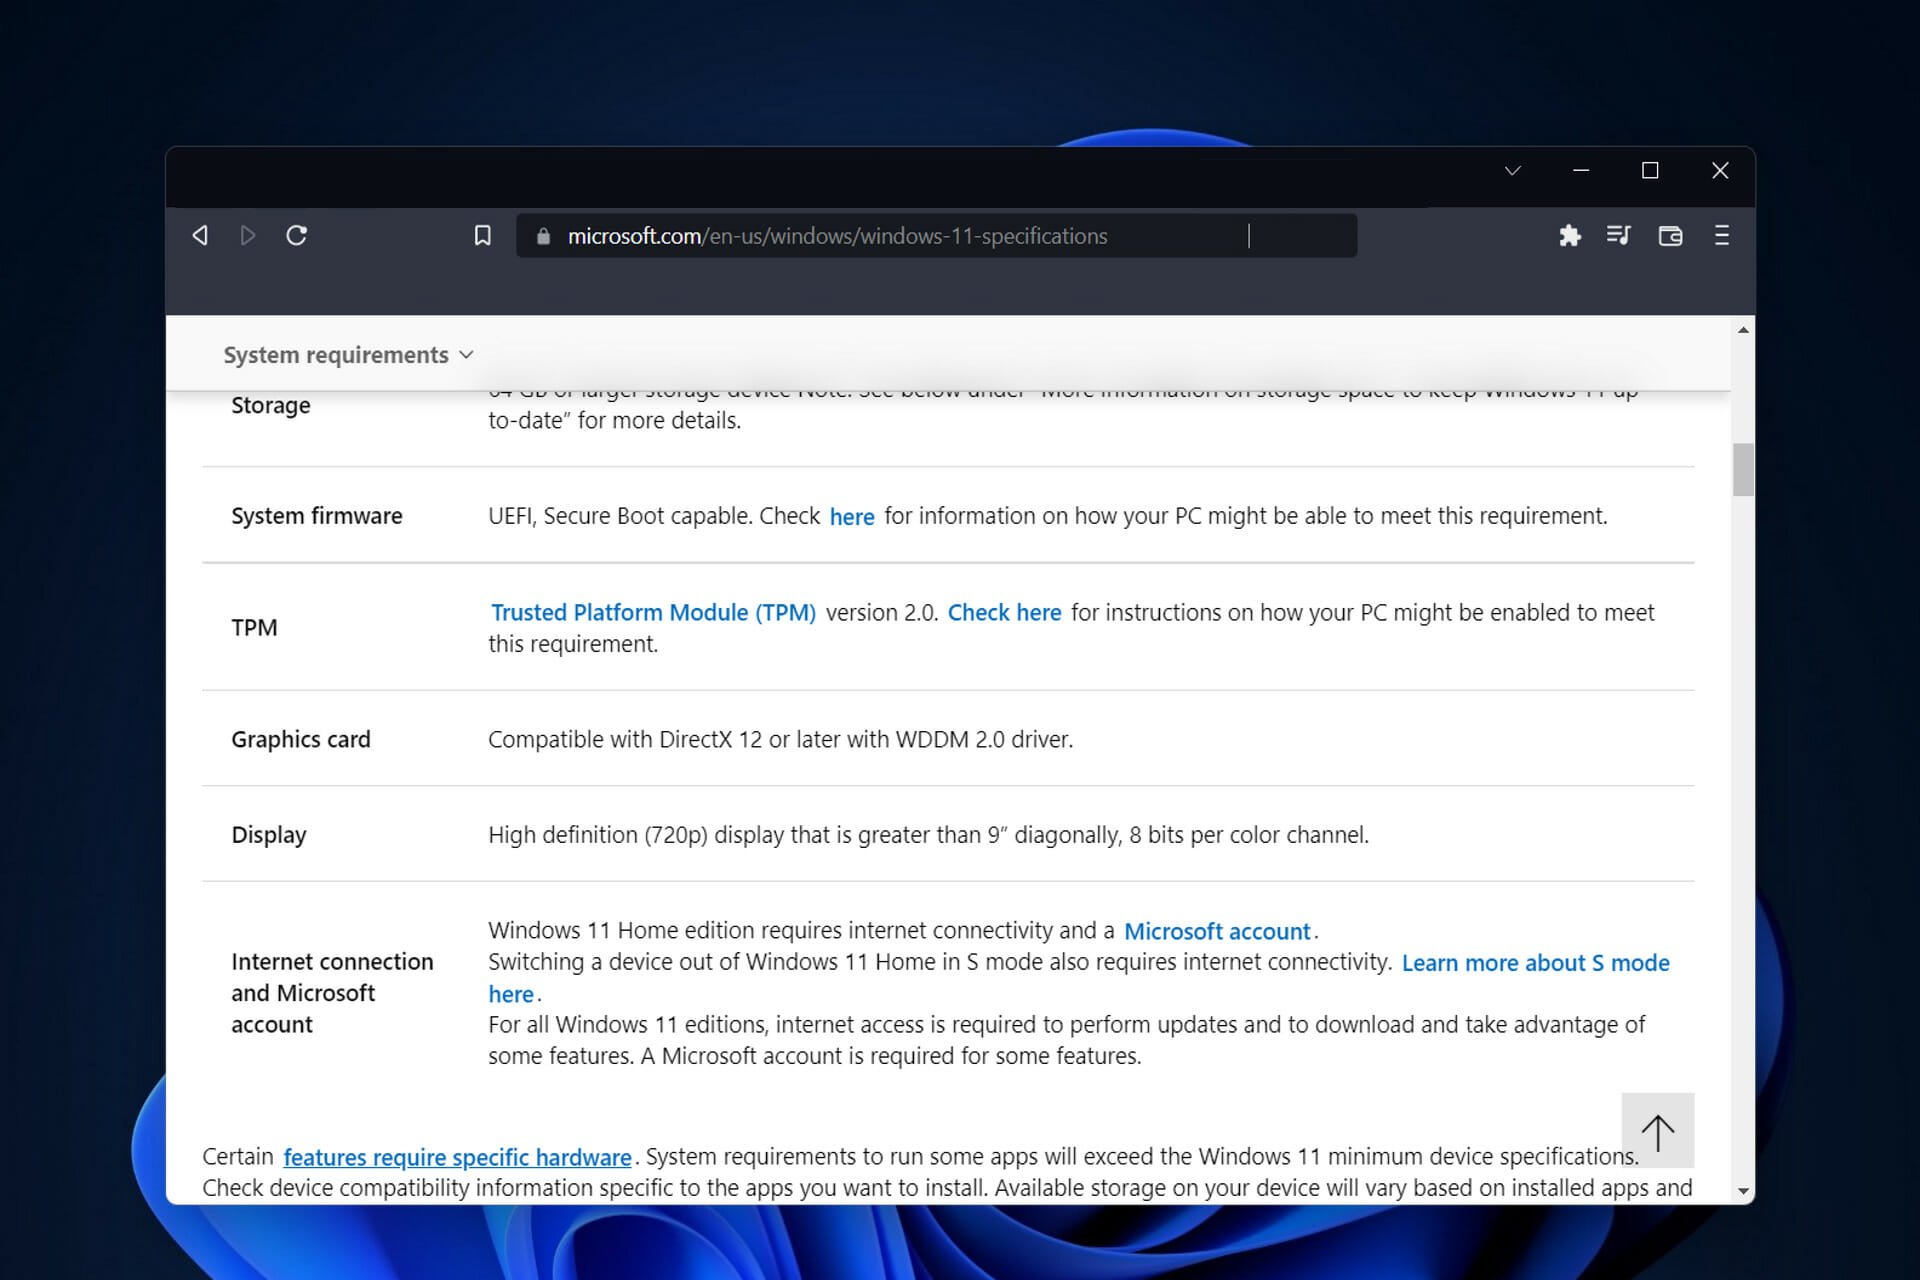
To support all these powerful features, Windows 11 required some basic system requirements, such as:
- 1 GHz or faster core processor
- 4 GB RAM
- 64 GB storage space
- Secure Boot
- Trusted Platform Module (TPM) 2.0
- Internet connectivity and more
Now, internet connectivity and storage space are something that you can easily manage on your old Windows computers. But Secure Boot and TPM isn’t something that you can get with your Legacy BIOS Mode devices.
So what to do?
How to Bypass Secure Boot and TPM 2.0 on Windows 11
You can use the technical Registry way to bypass Secure Boot and TPM settings on Windows 11. Using registry, you can bypass Secure Boot and TPM requirements as follows:
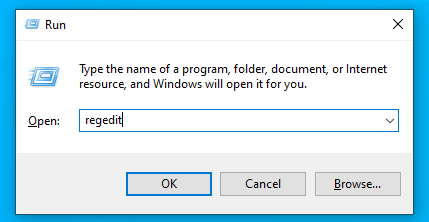
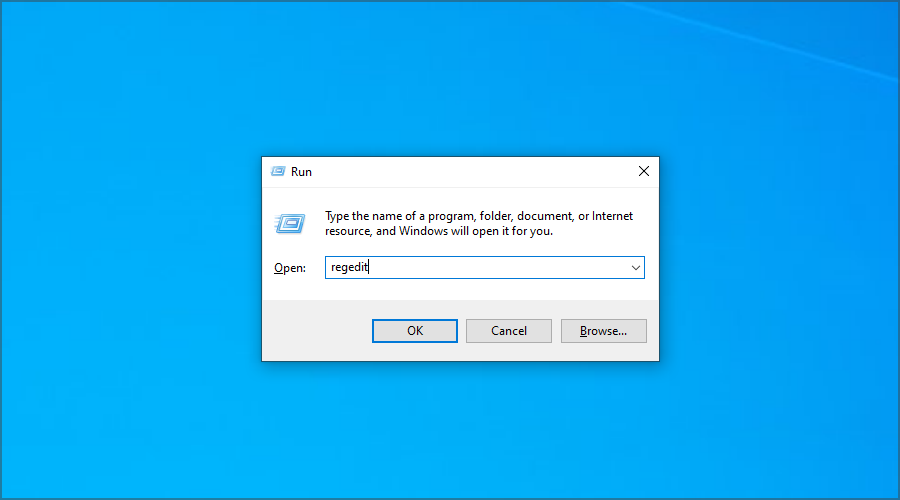
Step 1. Go to the Start Menu, search for Run and then press the Enter. You now have to type regedit in the command box and again press «Enter».
Step 2. Once the Registry Editor opens on your screen, go to this path:
ComputerHKEY_LOCAL_MACHINESYSTEMSetup
Step 3. When you are in the Setup folder, simply right-click there and then select «New». After that, choose «Key».
Step 4. The new Registry Key file will be added under the Upgrade folder. You have to rename this folder to LabConfig.
Step 5. Navigate to the right side section, look for the file named Default. Here you have to create a new DWORD registry file. Once again, right-click there, choose «New» and then select «DWORD (32-bit) Value».
Step 6. When the file is created, you can now rename it to BypassTPMCheck. Similarly, create another DWORD registry file with the BypassSecureBootCheck name.
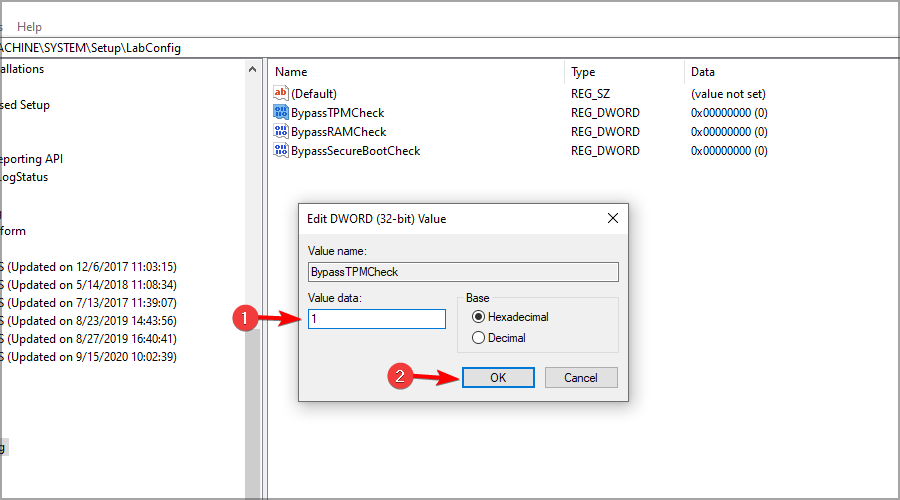
Step 7. Now, double-click to open «BypassTPMCheck» file you have just created. You have to change its Value data to 1 and then hit on «OK».
Step 8. Next, do the same with the BypassSecureBootCheck folder and change its Value data to 1.
Step 9. Finally, close the Registry Editor and restart your computer to save all these new settings. Now, you have successfully bypassed Secure Boot and TPM 2.0 requirements on Windows 11.
Bonus Tip: If you are also interested in how to download and install Windows 11 on a computer without TPM, follow this guide here for help.
![]()

Download and Install Windows 11
EaseUS Windows 11 Builder is an upgraded Troubleshooting Toolkit that can fix all the problems you face while installing Windows 11. It is also a professional upgrade and download tool of Windows 11. You can directly download the latest version of official Windows 11 System.
Wow! On top of all, it is very easy to install Windows 11 without TMP on your computer by following these steps on EaseUS Windows 11 Builder:
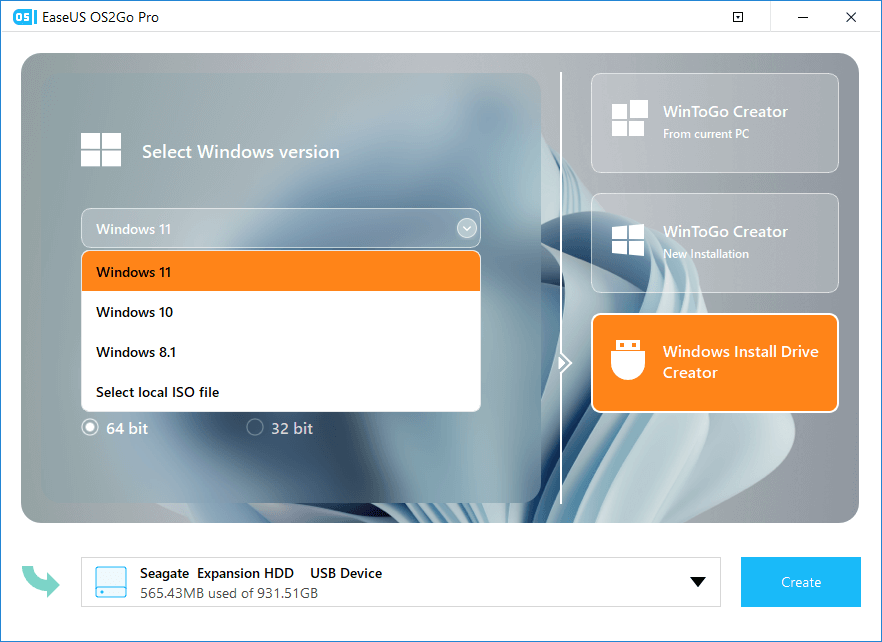
Step 1. The Windows11 builder is integrated with the EaseUS OS2Go software. Click the download button and launch the program after installation.
Step 2. Switch WinToGo Creator to Windows Install Drive Creator. The obtained system information is available on the home screen, and it keeps updating all the time. Apart from Windows 11, Win11 builder also supports you to download Windows 10/8.1.
Step 3. Connect your USB flash drive to the computer. Win11 builder will automatically detect your USB device, so all you need to do is click the Create button.
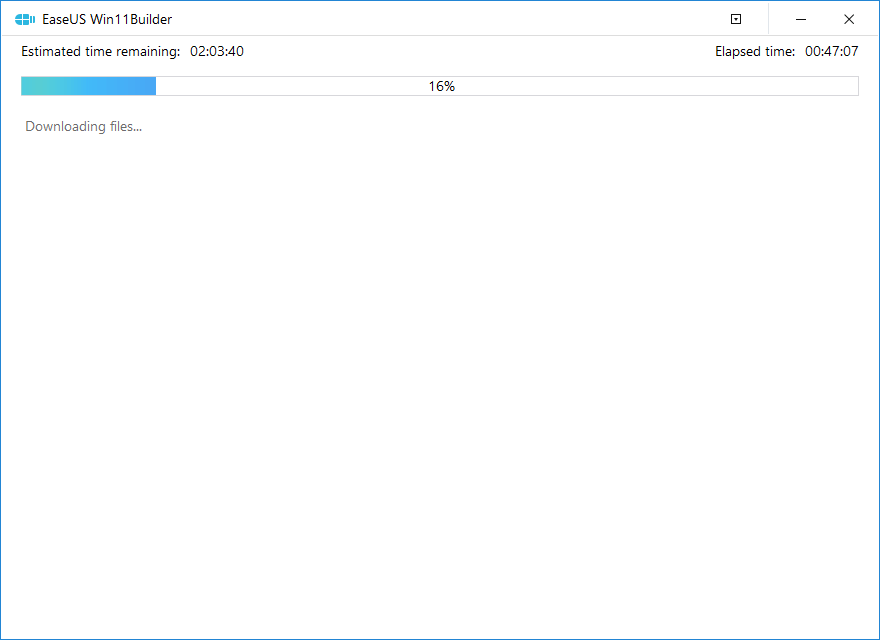
Step 4. The software will empty your USB drive data if it’s a used one. Once the downloading process begins, wait there until it finished or leave for a while to do you own job.
Step 5. After successfully downloading the Windows 11 iso image file on the USB drive, start to install Windows 11 from the bootable USB drive on your computer by following the installation wizard step by step.
To complete Windows 11 installation, see Method 2 in this page to install Windows 11 from USB drive.
Additional Information: Manage Disk After Windows 11 Installation
Once you have successfully downloaded Windows 11 on your computer, your work isn’t done here. You have to make sure that the disk is properly managed after Windows 11.
If your disk partitioning isn’t accurate, you will face many errors while running programs on your Windows 11. Thus, you need to get disk partition software that can systematically allocate space on your Windows 11 disk.
Here if you select the easy EaseUS Windows 11 Builder way to bypass Secure Boot and TPM, you will get EaseUS Partition Master Pro. Using this tool, you can effortlessly manage your Windows 11 partitions.
EaseUS Partition Master Pro can offer you numerous disk management features:
- Modify partition size as per your need.
- Merge small partitions into a larger one and merge two ssd drives into one without losing data.
- Organize hard disks in many ways, including cloning, creating, deleting and formating.
- Helps to migrate disk or partitions to the unallocated space.
- Move OS to SSD so you can run your operations faster.
- Easy to shrink, create, extend or customize disks in any way.
- Convert MBR to GPT disk without data loss and vice versa.
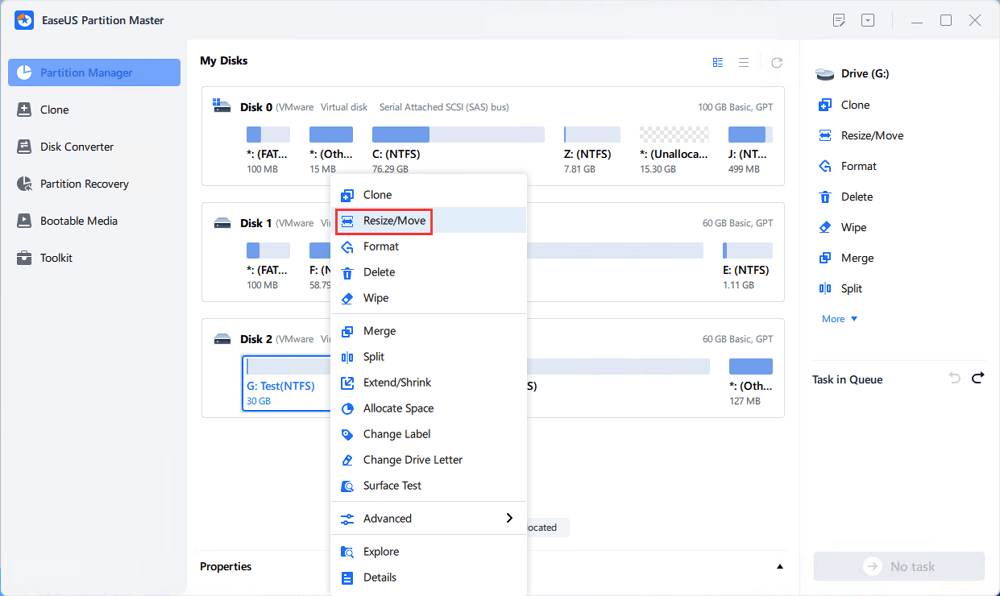
[1] «Resize/Move» enables you to adjust space of a selected disk partition as wish. Right-lick «Resize/Move», you can shrink a volume, extend the other one, or create unallocated space for special use.
[2] «Clone» aims to make two identical hard disks or partitions with the same layout and content. You can use the «Clone» feature to upgrade a hard disk, replace a failing one, backup the drive data and so on.

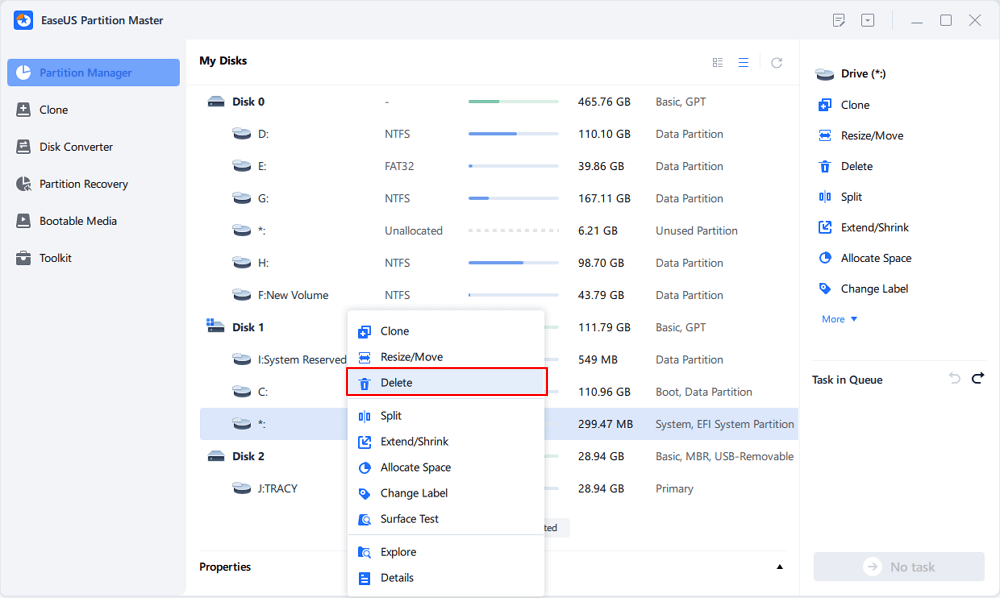
[3] «Delete» is a common method to remove an unwanted disk partition, turning it into unallocated space.
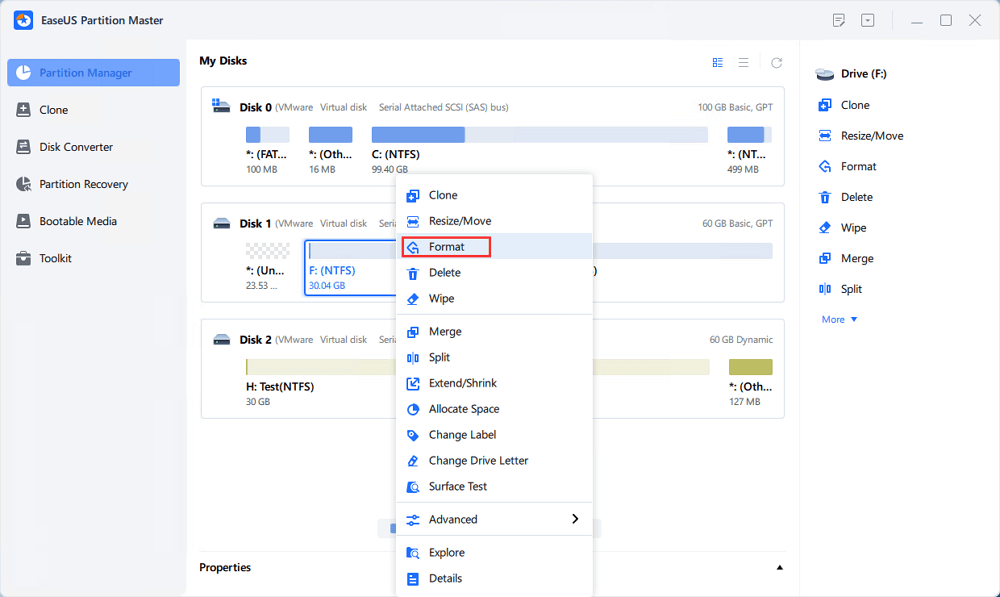
[4] «Format» is frequently used in many situations. By formatting a drive partition, you can alter the file system, fix some corruption issues, and sometimes remove viruses and malware.
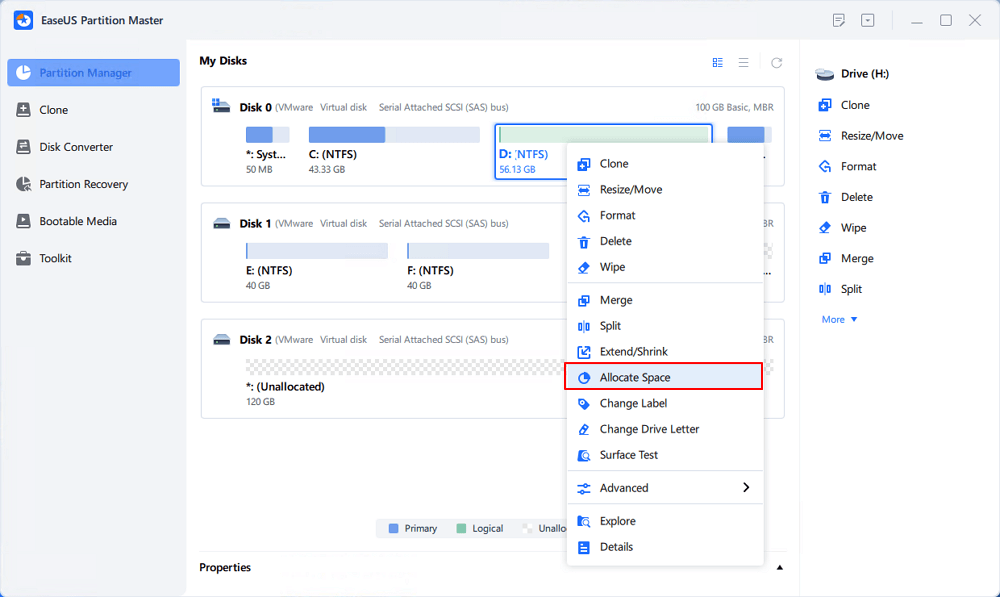
[5] «Allocate space» is very useful when one drive partition space is too much while the other is inadequate.
[6] «Migrate OS» makes it easy to transfer a Windows installation drive to the other without reinstalling.
[7] Conversion between GPT and MBR, NTFS and FAT32, and Basic to Dynamic is getting more and more popular among EaseUS Partition Master customers. Besides all the listed benefits, there are so many functional yet practical features are waiting you to explore.

Final remarks
Yes, it is possible to run Windows 11 on your Legacy BIOS Mode device. You can’t directly bypass Secure Boot and TPM on old computers like UEFI Mode devices.
But fortunately, you have easy EaseUS Windows 11 Builder and technical Registry methods to bypass Secure Boot on Windows 11.
However, if you aren’t comfortable with Registry files, don’t use this method as you might corrupt your system or damage it for good.
On the contrary, EaseUS Windows 11 Builder can seamlessly bypass all Windows 11 requirements according to your device’s technical specifications. Plus, you will get EaseUS Partition Master Pro for free to optimize your Windows 11 disk.
All in all, getting EaseUS Windows 11 Builder is a win-win option for you. To make your mind better, you can try EaseUS Windows 11 Builder’s free trial today.
main
{{ refName }}
default
Name already in use
A tag already exists with the provided branch name. Many Git commands accept both tag and branch names, so creating this branch may cause unexpected behavior. Are you sure you want to create this branch?
1
branch
1
tag
Code
-
Clone
Use Git or checkout with SVN using the web URL.
-
Open with GitHub Desktop
-
Download ZIP
Latest commit
Git stats
-
7
commits
Files
Permalink
Failed to load latest commit information.
Type
Name
Latest commit message
Commit time
README.md
Create README.md
June 28, 2021 16:16
Windows-11-bypass-TPM.reg
Update Windows-11-bypass-TPM.reg
October 10, 2021 16:46
README.md
Windows 11 Bypass TPM
Step 1. Download this reg file. https://github.com/quickfever/Windows-11-Bypass-TPM/releases/download/1.0/Windows-11-bypass-TPM.reg
Step 2. Paste it to the USB drive with Windows 11 bootable installation media.
During the installation process, press Shift + F10 and type notepad, and hit enter.
In Notepad, open the file menu and locate and apply the reg file. This will bypass the TPM+SecureBoot requirements.

Windows 11 предъявляет определенные требования к оборудованию. Для операционных систем нет ничего необычного в определении требований к оборудованию, но Microsoft всегда разрабатывала свою операционную систему для совместимости со старым оборудованием. Требования к оборудованию для Windows 11 привели к тому, что довольно много старых устройств теперь не подлежат обновлению.
TPM обычно не является требованием к оборудованию, на которое люди обращают внимание при покупке нового ноутбука или настольного компьютера. Это чип, который добавляет важный уровень безопасности. Для установки Windows 11 на вашем компьютере должен быть установлен TPM 2.0. В противном случае проверка совместимости завершится неудачно, и вы не сможете установить Windows 11 через Центр обновления Windows или с установочного диска.
Вы можете обойти требования TPM 2.0 при обновлении на месте до Windows 11 или при выполнении чистой установки. Процесс будет таким же. Убедитесь, что у вас под рукой есть установочный диск Windows 11. Ознакомьтесь с нашим руководством, чтобы узнать, как его сделать.
Обход TPM 2.o — обновление до Windows 11
Если вы планируете выполнить обновление на месте до Windows 11, то есть обновить Windows 10 до Windows 11, обойти требование TPM 2.0 будет намного проще, чем при новой установке Windows 11.
Нажмите сочетание клавиш Win + R, чтобы открыть окно запуска.
В поле запуска введите regedit и нажмите клавишу Enter.
Перейдите к этому ключу: HKEY_LOCAL_MACHINESYSTEMSetup
Щелкните правой кнопкой мыши раздел «Настройка» и выберите «Создать»> «Раздел» в контекстном меню.
Назовите этот новый ключ: LabConfig
Щелкните правой кнопкой мыши раздел LabConfig и выберите в контекстном меню «Создать»> «Значение DWORD (32-разрядное)».
Назовите это значение: BypassTPMCheck
Дважды щелкните BypassTPMCheck и установите для него значение 1.
Щелкните правой кнопкой мыши раздел LabConfig и выберите в контекстном меню «Создать»> «Значение DWORD (32-разрядное)».
Назовите это значение: BypassRAMCheck
Дважды щелкните BypassRAMCheck и установите для него значение 1.
Щелкните правой кнопкой мыши LabConfig и выберите в контекстном меню «Создать»> «Значение DWORD (32-бит)».
Назовите это значение: BypassSecureBootCheck
Дважды щелкните BypassSecureBootCheck и установите для него значение 1.
Закройте редактор реестра.
Подключите установочный USB / диск Windows 11 к вашей системе.
Запустите установочный файл.
Следуйте инструкциям на экране для обновления до Windows 11.
Обход TPM 2.o — Свежая установка Windows 11
Для чистой установки Windows 11 в системе, которая не соответствует требованиям TPM, вам необходимо внести те же изменения в реестр Windows. Хитрость заключается в том, чтобы редактировать его вне среды Windows.
Подключите USB-диск Windows 11 к компьютеру.
Загрузите систему в BIOS.
Измените первое загрузочное устройство на USB.
Перезагрузите систему, и она загрузится с установочного диска.
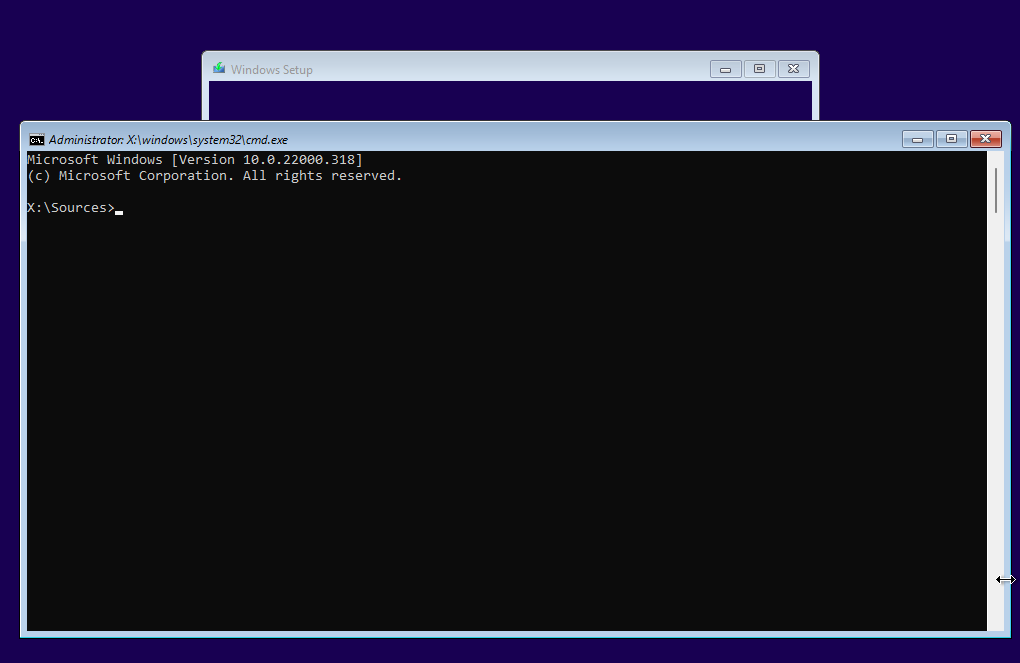
Когда вы увидите сообщение о том, что Windows 11 не может работать на ПК, нажмите сочетание клавиш Shift + F10.
Откроется командная строка.
В командной строке введите regedit и нажмите клавишу Enter.
После открытия редактора реестра выполните действия, описанные в предыдущем разделе, и отредактируйте реестр, чтобы обойти требования TPM 2.0.
Снова запустите установку Windows 11.
Заключение
Микросхема TPM предназначена для обеспечения безопасности, поэтому вы не упустите ни одной функции Windows 11. Если вы опасаетесь обновления до Windows 11 без микросхемы TPM, вы мало что можете сделать. Вы можете попробовать обновить или установить чип, но в большинстве случаев вам придется покупать новую систему, на которой установлен чип.
Что вы думаете об этой статье?
![]()
5 октября 2021 года состоялся официальный релиз Windows 11, а значит система начала распространяться в качестве бесплатного обновления для Windows 10. Но если вы хотите опробовать новую систему на своём компьютере, то с этим могут возникнуть сложности из-за новых минимальных системных требований.
Ключевая проблема заключается в том, что поддержка Secure Boot и наличие включённого TPM 2.0 проверяется как при попытке обновления системы, так и при чистой установке Windows 11. За время тестирования Microsoft несколько раз подтверждала приверженность новым системным требованиям, так что с момента начала тестирования они почти не изменились.
К счастью, энтузиасты нашли целый ряд способов, позволяющих обойти проверку на соответствие требованиям при установке или обновлении до Windows 11. Кстати, отсутствие Secure Boot и TPM 2.0 сейчас никак не влияет на работоспособность системы, так что можете смело использовать все описанные методы.
P. S. Статья была обновлена 5 октября 2021 года в связи с релизом Windows 11. Первая версия публикации датируется 28 июня.
Метод 1: Universal MediaCreationTool
Энтузиасты подготовили неофициальный инструмент под названием Universal MediaCreationTool, который создаёт ISO-образ любой версии Windows 10 или 11. Сами файлы загружаются с сервера Microsoft, так что беспокоиться по этому поводу не стоит.
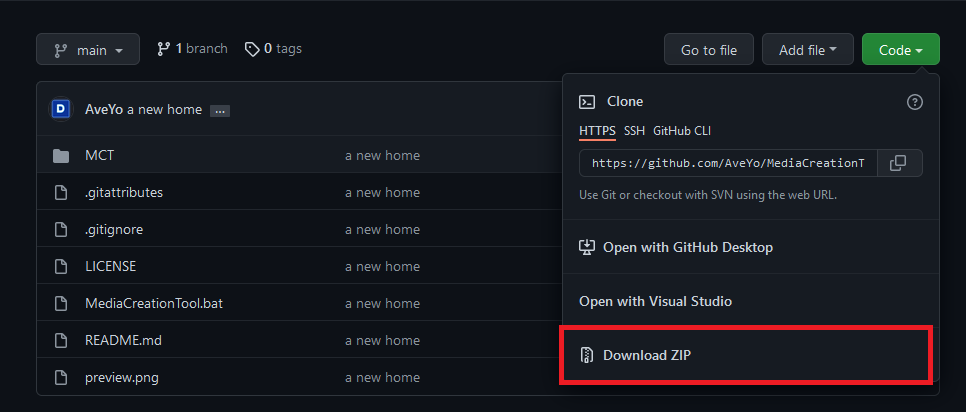
- Скачайте Universal MediaCreationTool, перейдя по по этой ссылке и нажав на кнопку «Code» -> «Donwload ZIP».

- Распакуйте скачанный архив в любую папку на вашем компьютере.
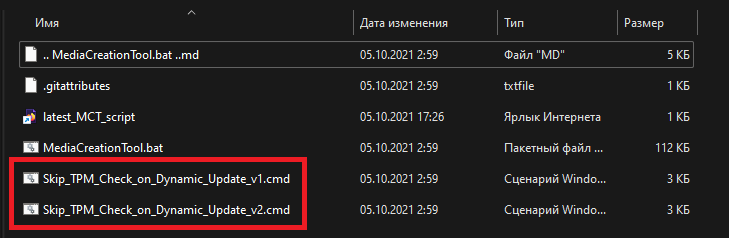
- [Только для обновления] Перейдите в папку MCT, нажмите правой кнопкой мыши по файлу
Skip_TPM_Check_on_Dynamic_Update_v1.cmdи выберите «Запустить от имени администратора».
Этот скрипт внесёт изменения в вашу текущую систему, чтобы при обновлении до Windows 11 не производилась проверка наличия TPM 2.0, UEFI, Secure Boot и так далее.
- Если в дальнейшем программа обновления сообщит о несовместимости, то запустите от имени администратора файл
Skip_TPM_Check_on_Dynamic_Update_v2.cmd, после чего повторите попытку.
- Если в дальнейшем программа обновления сообщит о несовместимости, то запустите от имени администратора файл
- Запустите файл
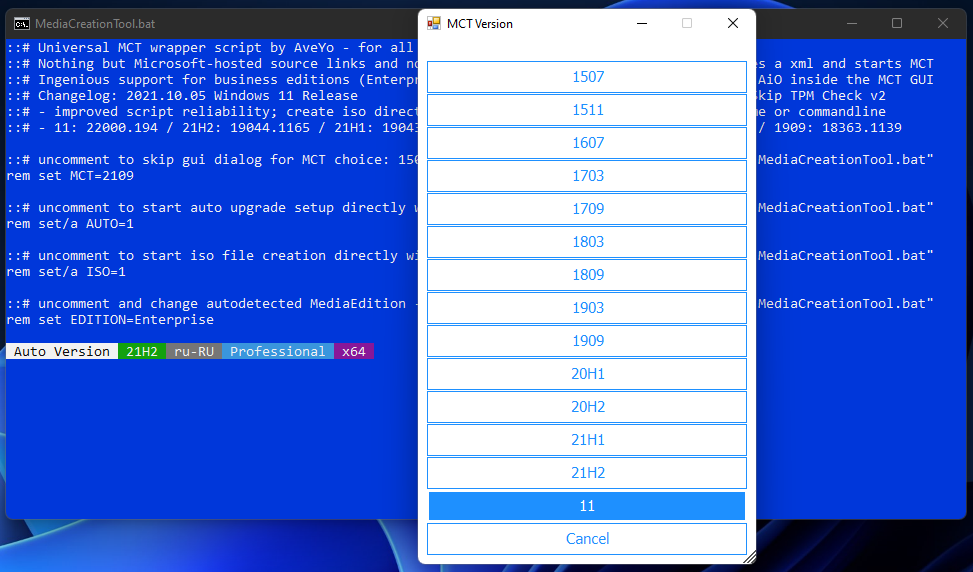
MediaCreationTool.bat. - В появившемся окне выберите Windows 11.
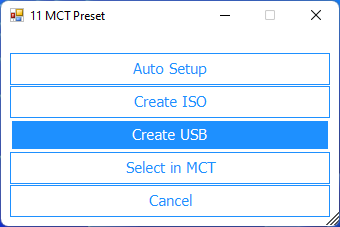
- В следующем окне выберите один из следующих пунктов:
- Auto Setup — предназначен для обновления системы без каких-либо запросов.
- Create ISO — создаёт ISO-образ с интегрированным DIR2ISO, включающим в себя кастомные OEM-настройки.
- Create USB — создаёт загрузочный USB-накопитель через MCT, включающий в себя кастомные OEM-настройки.
- Select in MCT — запускает инструмент Media Creation Tool. Образ будет создан без каких-либо модификаций. Если выбрать этот пункт, то работа скрипта автоматически завершится.
Метод 2: Удаление файла appraiserres.dll для обновления
- Скачайте ISO-образ Windows 11.
- Создайте загрузочную флешку (например, с помощью UltraISO или Rufus) или просто распакуйте ISO-образ как обычный архив (например, с помощью 7-Zip) в любую папку на жёстком диске.
- Перейдите к файлам установщика Windows 11 либо на флешке, либо в папке на жёстком диске.
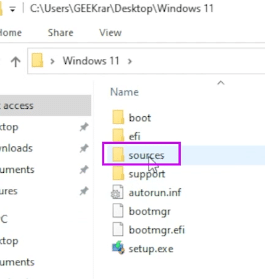
- Откройте папку Sources.
- Найдите и удалите файлы с названиями appraiserres.dll и appraiser.sdb.
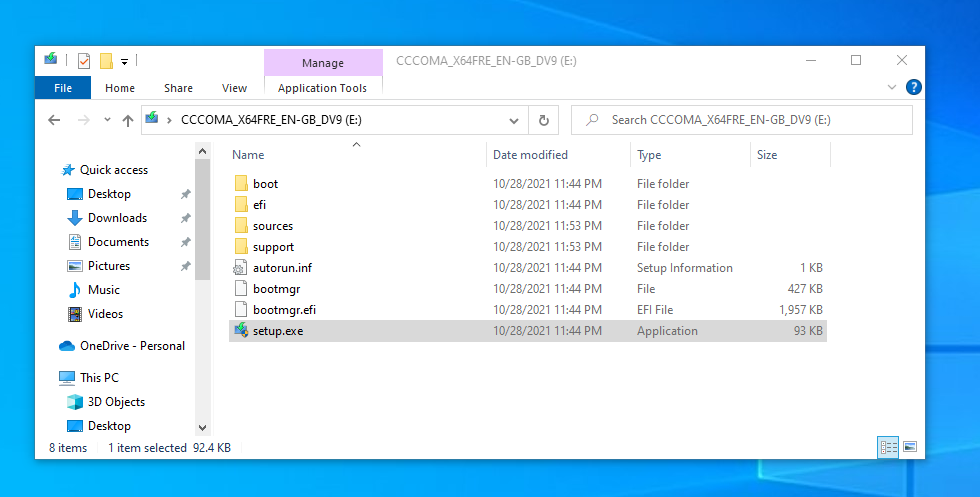
- Вернитесь в корневую папку установщика Windows 11 (там, где находятся файлы setup.exe, autorun.inf и пр.).
- Запустите Setup.exe, чтобы начать обновление до Windows 11.
- Если всё сделано правильно, то при обновлении проверки TPM 2.0 и Secure Boot не будет, так что процесс должен завершиться корректно.
Прежде всего хотелось бы сказать отдельное спасибо St1ckys, который нашёл этот способ обхода проверки TPM 2.0 и Secure Boot при чистой установке ОС. До этого наилучшим вариантом было использование утилиты DISM.
- Скачайте ISO-образ и создайте загрузочную флешку (например, с помощью UltraISO или Rufus).
- Перейдите к файлам на вашем флеш-накопителе.
- Скачайте архив windows_11_bypass.zip [303 b] (cкачиваний: 5102)
(либо с Cloud.Mail.ru), откройте его и поместите файл Windows_11_Bypass.reg в корень флеш-накопителя (рядом с файлами setup.exe, autorun.inf и пр.). Можно поместить и в любое другое место, но в корне его будет проще найти.
- Перезагрузите ПК, выставите в BIOS загрузку с флешки и начните стандартную установку системы.
- Для начала выбираем язык и регион.
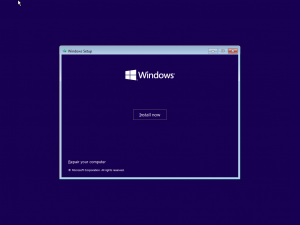
- После этого нажимаем «Установить сейчас».
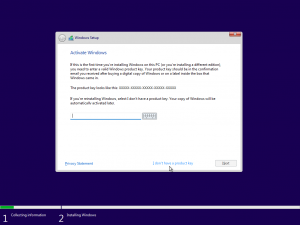
- Нажимаем на кнопку «У меня нет ключа продукта».
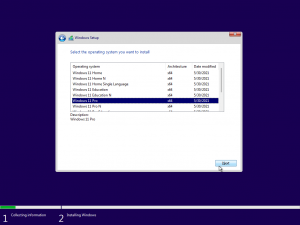
- Выбираем нужную редакцию операционной системы.
- Если на этом этапе появляется сообщение «Windows 11 не может быть запущена на этом ПК», то переходим к следующему шагу. Если ошибки нет, то просто продолжайте установку.
- Если вы увидели ошибку, то в окне установщика нажмите «Далее». Вы вернётесь на этап выбора редакции системы.
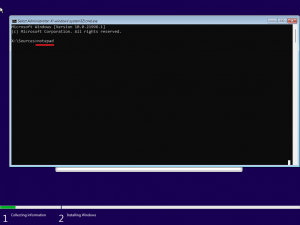
- После этого нажмите комбинацию Shift + F10 для запуска «Командной строки».
- В открывшемся окне введите notepad.
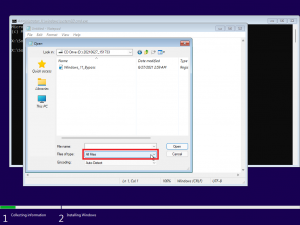
- В окне блокнота нажмите «Файл» -> «Открыть…».
- В нижней части диалогового окна установите «Все файлы», как показано на скриншоте ниже.
- В левой части нажмите на «Этот компьютер», найдите и откройте свой флеш-накопитель.
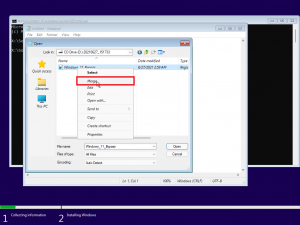
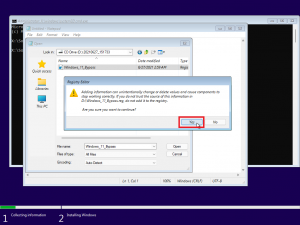
- Щелкните правой кнопкой мыши по файлу Windows_11_Bypass.reg (из шага 3) и выберите «Слияние».
- В диалоговом окне подтвердите внесение изменений в реестр (это коснётся только этапа установки и никак не повлияет на установленную систему).
- Закройте «Блокнот» и «Командную строку».
- Вновь сделайте выбор редакции Windows 11 и нажмите «Далее».
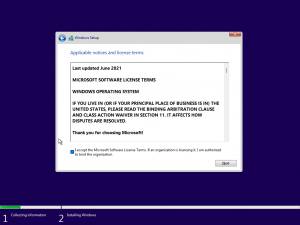
- Если всё прошло успешно, то вы должны увидеть лицензионное соглашение. Далее проверка на TPM 2.0 и Secure Boot проводиться не будет. Продолжайте установку системы.


Метод 4: Программа Windows Insider
Также обновиться до Windows 11 можно по программе Windows Insider, выбрав в ней канал Beta. Однако на неподдерживаемых устройствах в «Параметрах» такой опции не будет, поэтому нам потребуется утилита OfflineInsiderEnroll от abbodi1406 и aleks242007, которая задействует недокументированные параметры программы Windows Insider. Кстати, этот способ будет работать даже с локальными учётными записями.
- Скачайте ORM-Insider 2.8.7 от aleks242007 по этой ссылке.
- Распакуйте скачанный архив.
- Запустите скрипт OfflineInsiderEnroll.cmd от имени администратора.
- В окне командной строки выберите нужный канал:
- Для канала Dev введите цифру 1.
- Для канала Beta введите цифру 2.
- Для канала Release Preview введите цифру 3.
- Нажмите Enter.
- Для полного отключения проверки совместимости введите цифру 1.
- Нажмите Enter.
- Перезагрузите компьютер.
Не исключено, что Microsoft в будущем изменит систему проверки и сделает её более жёсткой, но даже в этом случае энтузиасты скорее всего найдут способ обойти ограничения. Пока что все указанные способы работают, что не может не радовать.
You can bypass TPM 2.0 requirements by modifying the registry
by Milan Stanojevic
Milan has been enthusiastic about technology ever since his childhood days, and this led him to take interest in all PC-related technologies. He’s a PC enthusiast and he… read more
Updated on January 31, 2023
Reviewed by
Alex Serban

After moving away from the corporate work-style, Alex has found rewards in a lifestyle of constant analysis, team coordination and pestering his colleagues. Holding an MCSA Windows Server… read more
- TPM is a security feature, but did you know that you can install Windows 11 without TPM?
- Modifying your registry is one way to do so, and it’s even approved by Microsoft.
- You can also bypass it simply by using third-party tools to create bootable media.
XINSTALL BY CLICKING THE DOWNLOAD FILE
- Download Restoro PC Repair Tool that comes with Patented Technologies (patent available here).
- Click Start Scan to find Windows 11 issues that could be causing PC problems.
- Click Repair All to fix issues affecting your computer’s security and performance
- Restoro has been downloaded by 0 readers this month.
Windows 11 was recently released, and according to the official hardware requirements, to use it, you’ll need to have a TPM chip.
As a result, this requirement has already caused many problems with early adopters, and many have reported TMP 2.0 errors when trying to install Windows 11.
Many users don’t have this feature available, especially on older computers, and don’t want to upgrade to try this OS.
However, there are ways to install Windows 11 without a TPM chip, and in this article, we’re going to show you how to do so on unsupported hardware.
What does TPM do?
Firstly, TPM stands for Trusted Platform Module, and it’s a small chip on your PC. This leads us to the next question, is TPM on the motherboard or CPU?
Secondly, there are several versions available, and some are on your motherboard. In contrast, others are integrated into your processor, as a physical chip, or in form of code that runs in a dedicated environment.
Moreover, for practical purposes, TPM is used for file encryption, such as BitLocker, for example, bootloader protection, and it can be used to protect your passwords against hackers.
Where can I buy a TPM chip?
If you’re looking to buy a TMP 2.0 chip, you should be able to get it from most major PC hardware retailers.
We expect the demand for TPM chips to go up soon, so you might have to hurry and get your TPM chip before others.
Furthermore, remember that many processors have a TPM built-in, so be sure to check if your CPU supports this feature before buying a dedicated chip.
Before moving on to the list of ways to install Windows 11 without TPM, take a look at our guide on how to install Windows 11 without TPM 2.0 and Secure Boot step by step.
Alternatively, check out our guide on how to install Windows 11 on an unsupported CPU.
How can I install Windows 11 without TPM 2.0?
1. Create a new DWORD in the Registry
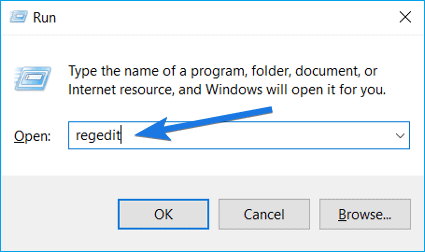
1. Press the Windows key + R to open the Run dialog.
2. Type regedit and press Enter o open the Registry Editor.
3. In the Registry Editor, navigate to the following path: ComputerHKEY_LOCAL_MACHINESYSTEMSetupMoSetup

4. Right-click anywhere in the window and expand the New menu. Select DWORD 32-bit Value or QWORD (64-bit) Value depending on which system you have.
Some PC issues are hard to tackle, especially when it comes to corrupted repositories or missing Windows files. If you are having troubles fixing an error, your system may be partially broken.
We recommend installing Restoro, a tool that will scan your machine and identify what the fault is.
Click here to download and start repairing.
5. Enter AllowUpgradesWithUnsupportedTPMOrCPU as the name of the new value.
6. Double-click the value that you just created.
7. Set the Value data to 1 and click OK to save changes.
The first method we recommend to use to install Windows 11 without a TPM chip is to create a DWORD in the Registry Editor. This DWORD will allow you to allow upgrades with an unsupported TPM, thus fixing your issue.

NOTE
This method is approved by Microsoft, which makes it the best solution if you want to disable the TPM requirement.
2. Modify your registry from the installation media
- Start the Windows 11 installation and follow the installation steps until you reach This PC can’t run Windows 11 screen.

- Press Shift + F10 on your keyboard. That should open Command Prompt.
- When the Command Prompt starts, type regedit.exe, and press Enter.
- Navigate to the following location:
ComputerHKEY_LOCAL_MACHINESYSTEMSetup - Right-click on Setup, expand the New section, and select Key from the list. Name the new key LabConfig.
- Navigate to the LabConfig key that you just created. Right-click anywhere in the window, expand the New section, and click on DWORD (32-bit) Value or QWORD (64-bit) Value.
- Create three values:
- BypassTPMCheck
- BypassRAMCheck
- BypassSecureBootCheck
- Double-click the first value you created and set its Value data to 1. Now repeat the same steps for the other entries.
- Once you’ve made these changes, exit the Registry Editor, and the installation should continue without problems.
- FIX: Corrupt registry in Windows 10/11
- 5 best registry cleaner applications for Windows 11
- 7+ best registry cleaner tools for Windows [2022 Guide]
3. Use Rufus
- Download the Windows 11 ISO from Microsoft’s website.
- Download Rufus and run it.
- Select your USB flash drive and click the Select button.

- Choose the Windows 11 ISO file that you just created.
- Now click on Start and wait for the process to finish.

- Make sure you check Remove requirement for 4GB+ RAM, Secure Boot and TPM 2.0. Click OK and wait for the process to finish.
By completing the above procedure, you’ll have a Windows 11 ISO ready that won’t check for TPM during the installation.
What do I do if the PC Health Check app is bugged?
If the PC Health Check App is crashing, there might be an issue with the installation. You should be able to fix that by starting the installation again.
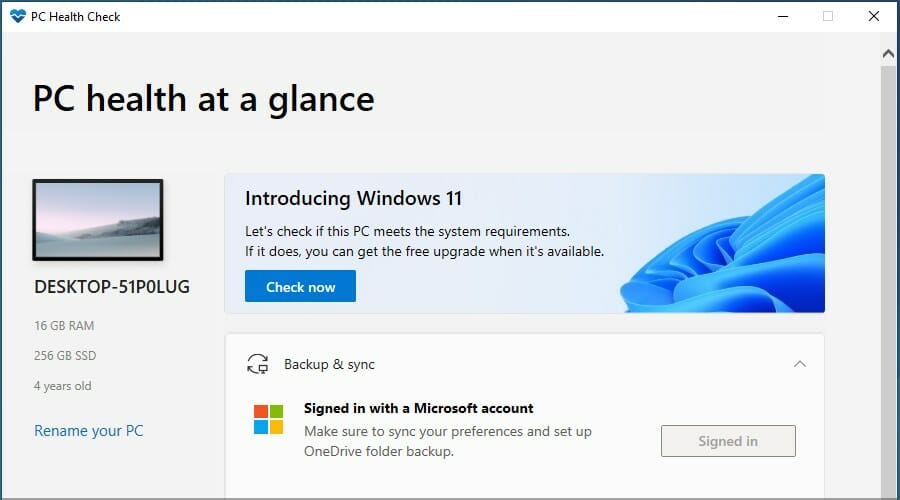
Alternatively, you can wait for Microsoft to release the updated version of the software. If this app isn’t working, you won’t be able to install Windows 11 on an unsupported PC.
What motherboards are Windows 11 ready?
Most newer motherboards support TPM, so if you’re looking for one having this feature, you should consider these gaming motherboards.
Moreover, it’s not mandatory to use a gaming motherboard, but since these are high-end models, they have all the latest features.
However, if you don’t want to buy a gaming motherboard, most newer motherboards have support for TPM, so feel free to pick any model that works for you.
Why should I use TPM?
Windows TPM provides a layer of hardware security to your device, and it can help you protect your login credentials from hackers.
This feature is also used for file encryption, so if you want to ensure that your files are safe from unauthorized access, you need to use it.
As you can see, it’s possible to install Windows 11 without TPM, but it might require that you modify the registry or modify the ISO file.
Furthermore, if you still plan to disable this feature, we recommend using the method approved by Microsoft since it will cause the least problems to your PC.
However, if you wish to buy a TPM 2.0 chip, look at our post on where to buy them and price comparisons.
Alternatively, check out the five best Windows 11 business laptops that won’t need to skip the TPM verification.
Have you found a different way to install Windows 11 on an unsupported device, or did you decide to buy a TMP 2.0 chip? Let us know in the comments below.
![]()
Newsletter
Недавно стала доступной официальная релизная версия Windows 11. Но, для того чтобы ее установить необходим компьютер с поддержкой TPM 2.0 и Secure Boot (Безопасная загрузка), а установка на несовместимый ПК будет завершаться ошибкой «Windows 11 не может быть запущена на этом ПК», «Запуск Windows 11 на этом компьютере не возможен» или «This PC can’t run Windows 11».
В данной статье мы рассмотрим несколько способов, как можно обойти данную проверку и установить Windows 11 на несовместимый компьютер без TPM 2.0 и Secure Boot. Первый способ является официальным, так как предложен самой Майкрософт. Он предполагает редактирование реестра и обновление до Windows 11 из установленной Windows 10. Остальные способы не официальные и предложены сообществом, их можно использовать для установки на новый ПК или для обновления.
Обновление до Windows 11 без TPM 2.0 и требований к процессору
После выхода финальной версии Windows 11, компания Майкрософт опубликовала официальный способ обхода некоторых системных требований для установки Windows 11 на несовместимый ПК. Этот способ позволяет обойти проверку на наличие совместимого процессора и TPM 2.0. При этом требуется наличие на компьютере как минимум TPM 1.2, а также соответствие остальным системным требованиям, таким как наличие Secure Boot.
Чтобы воспользоваться этим способом обновления до Windows 11 нужно внести изменения в реестр на рабочей Windows 10. Для этого нажмите комбинацию клавиш Win-R и выполните команду «regedit».

После открытия «Редактора реестра» нужно перейти в следующий раздел:
HKEY_LOCAL_MACHINESYSTEMSetupMoSetup

Создать там ключ REG_DWORD с таким названием:
AllowUpgradesWithUnsupportedTPMOrCPU
И присвоить ему значение «1».

После этого можно запускать обновление с помощью загрузочной флешки с Windows 11. Самый простой способ создать такую флешку это воспользоваться утилитой «MediaCreationToolW11». Скачать данную утилиту можно на странице загрузки Windows 11 в блоке «Создание установочного носителя Windows 11».
- Ссылка: https://www.microsoft.com/ru-ru/software-download/windows11

После запуска «MediaCreationToolW11» нужно согласиться с лицензией, выбрать язык для Windows 11 и начать запись на флешку (пункт «USB flash drive»). Обратите внимание, в процессе с флешки удаляются все имеющиеся на ней файлы, поэтому перед началом нужно скопировать важные данные.

В результате вы получите загрузочную флешку с Windows 11. Теперь нужно ее открыть, запустить файл «setup.exe» и следовать дальнейшим инструкциям для обновления до Windows 11.

Установщик Windows 11 проверит совместимость вашего компьютера и позволит выполнить обновление, даже несмотря на неподдерживаемый процессор и отсутствие TPM 2.0.

Также возможно этот ключ можно будет использовать и для установки Windows 11 с нуля. В этом случае его нужно добавить в реестр во время установки, так как это описано ниже для других способов обхода ограничений. Но, этот вариант пока не проверен.
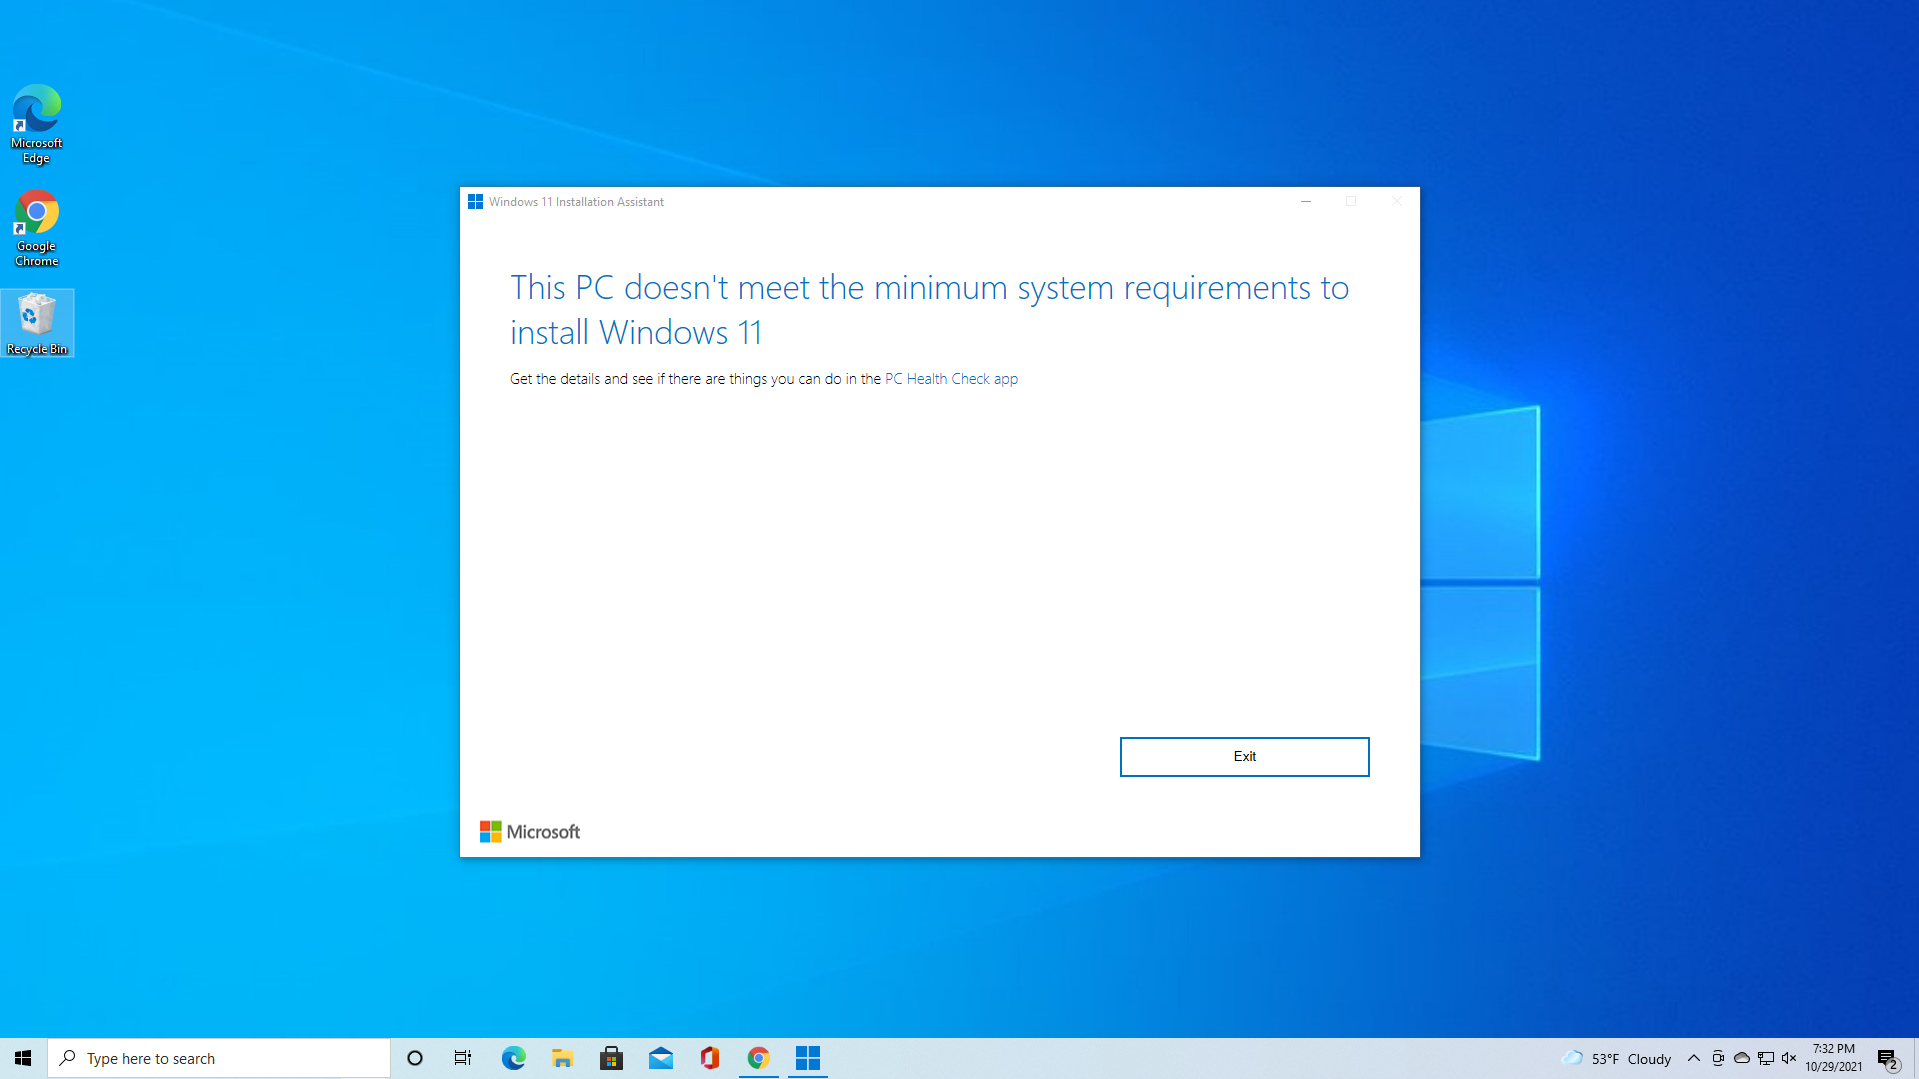
Обновление через Помощник по установке Windows 11 в режиме совместимости
Еще один способ обновления до Windows 11 на несовместимом или старом компьютере — это приложение «Помощник по установке Windows 11» или «Windows 11 Installation Assistant», которое также можно скачать на странице загрузки Windows 11.
- Ссылка: https://www.microsoft.com/ru-ru/software-download/windows11

Как и другие способы установки Windows 11, данный помощник выполняет проверку на совместимость компьютера с системными требованиями. И в случае несовместимости выдает ошибку. Но, данную проверку можно обойти, если запустить помощник в режиме совместимости с Windows 7.
Для того чтобы сделать это нужно открыть свойства скачанного exe-файла и перейти на вкладку «Совместимость». Здесь нужно включить опцию «Запустить программу в режиме совместимости», выбрать операционную систему Windows 7 и сохранить настройки.

После этого нужно запустить «Помощник по установке Windows 11» и начать обновление.

К сожалению, работоспособность этого способа пока не однозначная. У некоторых пользователей он срабатывает, а у некоторых — нет.
Обновление до Windows 11 с помощью Universal Media Creation Tool
Universal Media Creation Tool — это скрипт от стороннего разработчика, который позволяет скачивать старые версии Windows 10. Кроме этого, данный скрипт также позволяет скачивать Windows 11 и выполнять обновление до Windows 11 даже на несовместимых компьютерах.
Для того чтобы скачать Universal Media Creation Tool нужно перейти на его страницу на GitHub, нажать на кнопку «Code» и выбрать «Download ZIP».
Ссылка:
- https://github.com/AveYo/MediaCreationTool.bat

После этого нужно распаковать скачанный архив в любую папку и запустить из этой папки файл «MediaCreationTool.bat».

После этого может появится предупреждение системы SmartScreen. В этом случае нужно нажать на кнопку «Подробнее» и потом «Выполнить в любом случае»

В результате появится командная строка и меню со списком версий Windows 10, которые можно скачать с помощью Universal Media Creation Tool. Здесь нужно выбрать пункт под номером «11«, который обозначает Windows 11.

После этого появится меню со списком действий.
- Auto Setup — автоматическая установка выбранной версии;
- Create ISO — создание iso-файла в папке C:ESD;
- Create USB — создание загрузочной USB флешки;
- Select in MCT — ручной выбор в интерфейсе утилиты Media Creation Tool.
Для того чтобы выполнить автоматическое обновление до Windows 11 выберите пункт «Auto Setup».

Дальше запустится утилита Media Creation Tool и начнется скачивание Windows 11, создание носителя и проверка обновлений.

После того как все файлы будут подготовленны, начнется установка Windows 11. Все это выполняется автоматически, участие пользователя не требуется.

В процессе установки обновления компьютер несколько раз перезагрузится, а в конце начнется подготовка к первому запуску Windows 11.

После завершения обновления вы получите готовую Windows 11.
Установка Windows 11 с нуля без TPM 2.0 и Secure boot с помощью редактирования реестра
Для того чтобы выполнить установку без поддержки TPM 2.0 и Secure Boot (безопасная загрузка) понадобится специальный REG-файл, который нужно будет запустить во время процесса установки.
Данный REG-файл добавит в реестр ключи, отвечающие за прохождения проверки TPM 2.0 и Secure Boot. После чего установщик позволит установить Windows 11 на несовместимый компьютер.
Скачать REG-файл можно по этой ссылке:
- windows_11_bypass.zip
Также вы можете создать этот REG-файл самостоятельно. Содержимое REG-файла выглядит так:
Windows Registry Editor Version 5.00

[HKEY_LOCAL_MACHINESYSTEMSetupLabConfig]
"BypassTPMCheck"=dword:00000001
"BypassSecureBootCheck"=dword:00000001
Обновленно. Как подсказали в комментариях, с помощью редактирования реестра можно обойти и другие проверки на совместимость оборудования. Например, ниже можно скачать REG-файл, который обходит проверку TPM 2.0, Secure Boot, оперативной памяти, накопителя и процессора.
- Win11.zip
Содержимое данного REG-файла выглядит так:
Windows Registry Editor Version 5.00

[HKEY_LOCAL_MACHINESYSTEMSetupLabConfig]
"BypassTPMCheck"=dword:00000001
"BypassSecureBootCheck"=dword:00000001
"BypassRAMCheck"=dword:00000001
"BypassStorageCheck"=dword:00000001
"BypassCPUCheck"=dword:00000001
Чтобы воспользоваться этим способом скачайте ISO-образ с Windows 11, создайте загрузочную флешку и скопируйте на нее созданный ранее REG-файл. Данный файл можно разместить просто в корне флеш-накопителя, там где лежат файлы «setup.exe», «autorun.inf» и др.
Дальше перезагружаем компьютер, включаем загрузку с флешки и запускаем установку Windows 11. Начинается установка как обычно, выбираем язык, регион, нажимаем «У меня нет ключа продукта», выбираем редакцию операционной системы и т. д. Продолжаем установку до тех пор, пока не появится сообщение «Windows 11 не может быть запущена на этом ПК» или «This PC can’t run Windows 11».

После появления этого сообщения нажимаем на кнопку «Далее/Next» чтобы вернуться к предыдущему шагу, где выбиралась редакция Windows 11. Здесь нужно запустить командную строку при помощи комбинации клавиш Shift-F10 и выполнить команду «notepad».

В результате появится окно программы «Блокнот». Здесь отрываем меню «Файл» и выбираем пункт «Открыть».

В появившемся окне переходим на установочный диск и выбираем «Все файлы», для того чтобы увидеть созданный нами REG-файл.
Дальше кликаем по REG-файлу правой кнопкой мышки и выбираем «Слияние/Merge».

В окне с предупреждением нажимаем на кнопку «Да/Yes».

После внесения изменений в реестр, дальнейшая установка должна пройти нормально, без проверки на TPM 2.0 и Secure Boot. Нужно будет еще раз выбрать редакцию Windows 11, после чего установка пройдет в штатном режиме.
Также вы можете не создавать REG-файл, а внести изменения в реестр самостоятельно. В этом случае, вместо команды «notepad» нужно выполнить «regedit.exe». После этого с помощью редактора реестра нужно перейти в раздел:
HKEY_LOCAL_MACHINESYSTEMSetup
Создать там папку «LabConfig» и создать в ней парамтеры для обхода проверок. Например, для обхода проверки на TPM 2.0 и Secure Boot нужно создать следующие ключи:
- BypassTPMCheck=dword:00000001
- BypassSecureBootCheck=dword:00000001
После этого нужно закрыть редактор реестра и продолжить установку Windows 11 без проверки на TPM 2.0 и Secure Boot
Установка Windows 11 с нуля без TPM 2.0 и Secure boot с помощью AutoUnattend.xml
AutoUnattend.xml — это файл, который используется для автоматизации установки Windows. С его помощью можно задать ответы на вопросы установщика, которые задаются пользователю во время инсталяции, тем самым автоматизировав установку Windows.
Также данный файл можно использовать для того чтобы во время установки внести описанные выше изменения в реестр и тем самым обойти проверку TPM 2.0, Secure Boot и остальных требований Windows 11.
Чтобы воспользоваться этим способом создайте текстовый файл с именем «AutoUnattend.xml» и вставьте в него код приведен ниже. Также вы можете скачать уже готовый файл:
- AutoUnattend.xml
<?xml version="1.0" encoding="utf-8"?>
<unattend xmlns="urn:schemas-microsoft-com:unattend">
<settings pass="windowsPE">
<component name="Microsoft-Windows-Setup" processorArchitecture="amd64" publicKeyToken="31bf3856ad364e35" language="neutral" versionScope="nonSxS" xmlns:wcm="http://schemas.microsoft.com/WMIConfig/2002/State" xmlns:xsi="http://www.w3.org/2001/XMLSchema-instance">
<RunSynchronous>
<RunSynchronousCommand wcm:action="add">
<Order>1</Order>
<Path>reg add HKLMSystemSetupLabConfig /v BypassTPMCheck /t reg_dword /d 0x00000001 /f</Path>
</RunSynchronousCommand>
<RunSynchronousCommand wcm:action="add">
<Order>2</Order>
<Path>reg add HKLMSystemSetupLabConfig /v BypassSecureBootCheck /t reg_dword /d 0x00000001 /f</Path>
</RunSynchronousCommand>
<RunSynchronousCommand wcm:action="add">
<Order>3</Order>
<Path>reg add HKLMSystemSetupLabConfig /v BypassRAMCheck /t reg_dword /d 0x00000001 /f</Path>
</RunSynchronousCommand>
<RunSynchronousCommand wcm:action="add">
<Order>5</Order>
<Path>reg add HKLMSystemSetupLabConfig /v BypassCPUCheck /t reg_dword /d 0x00000001 /f</Path>
</RunSynchronousCommand>
<RunSynchronousCommand wcm:action="add">
<Order>4</Order>
<Path>reg add HKLMSystemSetupLabConfig /v BypassStorageCheck /t reg_dword /d 0x00000001 /f</Path>
</RunSynchronousCommand>
</RunSynchronous>
</component>
</settings>
</unattend>
Дальше получившийся xml-файл нужно поместить в корень загрузочной флешки с Windows 11 или в корень ISO-файла, если вы планируете установку на виртуальную машину.
В результате, при использовании такой загрузочной флешки или ISO-файла, изменения в реестр будут внесены автоматически, что вынудит установщик пропустить проверку TPM 2.0, Secure Boot и установить Windows 11 на несовместимый компьютер.
Установка Windows 11 с нуля без TPM 2.0 и Secure boot с помощью Rufus
Rufus — это популярная бесплатная программа для создания загрузочных флешек. В последних версиях данной программы появилась функция обхода проверки на совместимость компьютера с Windows 11. Данная функция позволяет встроить обход проверки прямо в загрузочную флешку буквально в 2 клика.
Обратите внимание, чтобы воспользоваться этим способом вам нужна программа Rufus версии 3.16 или более новая, в старых версиях этой функции нет.
Ссылка:
- https://rufus.ie/
После запуска программы Rufus 3.16 нужно открыть меню «Device» и выбрать USB-флешку, на которую будет записываться Windows 11.

Дальше нужно нужать на кнопку «Select» и выбрать ISO-образ с операционной системой Windows 11.

После этого нужно открыть меню «Image Option» и выбрать вариант «Extenteded Windows 11 Installation (noTPM 2.0/no Secure Boot/8Gb- RAM)». Эта опция включает обход проверки на наличие TPM 2.0, Secure boot и 8 гб оперативной памяти.

Остальные настройки можно оставить по умолчанию. Для того чтобы запустить запись ISO-образа на флешку нужно нажать на кнопку «Start».

В результате вы получите загрузочную флешку с помощью которой можно выполнить установку Windows 11 на несовместимый компьютер без проверки TPM 2.0, Secure boot и оперативной памяти.
Обновление до Windows 11 без TPM 2.0 и Secure boot с помощью замены файлов
Если вы хотите обновиться до Windows 11 из уже установленной Windows 10, то вы можете выполнить замену одного из файлов в установочном образе. Так вы сможете обойти обшибку«Windows 11 не может быть запущена на этом ПК» или «This PC can’t run Windows 11» и установить Windows 11 на несовместимый компьютер.

Для этого создайте из ISO образа Windows 11 загрузочную флешку или просто распакуйте ISO-файл в любую папку на жестком диске. После этого перейдите к файлам Windows 11 на флешке или в папке, откройте папку «Sources» и замените в ней файл «appraiserres.dll» на тот, что лежит в этом архиве:
- appraiserres.zip
После выполнения замены можно начинать обновление до Windows 11. Для этого запустите файл «Setup.exe» и следуйте инструкциям. Если все было сделано правильно, то обновление до Windows 11 должно пройти без проверки на наличие TPM 2.0 и Secure Boot.
Возможно вам будет интересно:
- Что такое TPM 2.0 для Windows 11
- Что такое Secure Boot для Windows 11
Посмотрите также:
- Как проверить совместимость компьютера с Windows 11
- Программа для проверки совместимости с Windows 11
- Запуск Windows 11 на этом компьютере невозможен
- Как записать Windows на диск
- Как установить Windows 10
This post will show how to bypass TPM 2.0 requirement for Windows 11 using Microsoft’s provided workaround for TPM 1.2 systems.
The message “This PC doesn’t currently meet Windows 11 system requirements” is what users will receive when they do not meet the TPM 2.0 requirement for Windows 11. By default, you will not be able to proceed without the required hardware. However, if your system is at least TPM 1.2, Microsoft briefly mentioned a bypass method in their beta support site.
We will walk you through the bypass TPM 2.0 steps so that you can proceed with the installation for Windows 11.
- Related: How to Get Windows 11 Officially
What is TPM 2.0?
TPM stands for Trusted Platform Module, and its purpose is to guard the data used to authenticate the PC. TPM is an international standard for secure crypto processors. It secures the hardware by a series of cryptographic keys and uses an integrated microcontroller. TPMs are available on many different hardware devices included PC CPUs.
Want to know more? Here’s more on TPM 2.0.
Method 1 – Registry Edit
As mention by Microsoft, users with hardware that have TPM 1.2 or higher can bypass it by editing the registry of Windows. However, if you are going to proceeding without the minimin requirements, Microsoft states, “We do not recommend installing Windows 11 on a device that doesn’t meet requirements.”
**Warning – Before proceeding, be sure to create a System Restore point. Registry edits can cause system issues for users.**
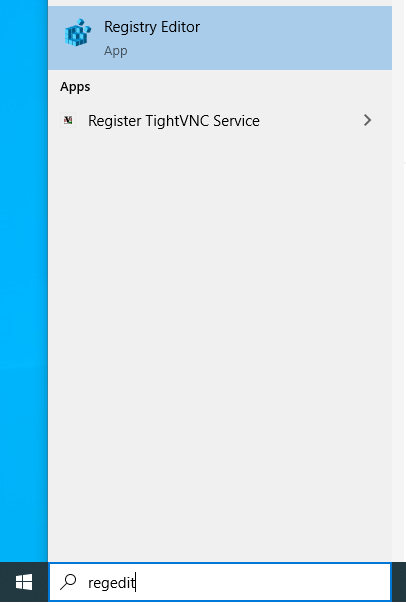
1. Open Registry Editor
Begin by clicking on Start, in search type ‘regedit.’
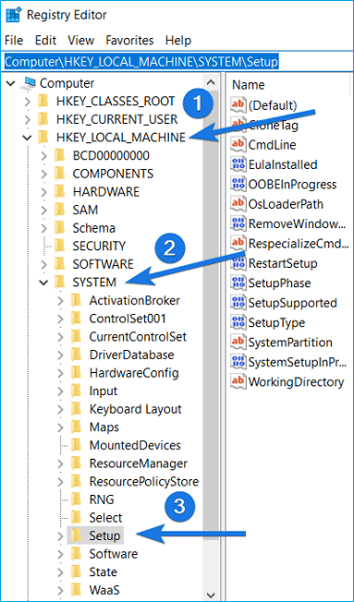
2. Locate Directory
On the left expand directories HKEY_LOCAL_MACHINE, SYSTEM, Setup, and MoSetup
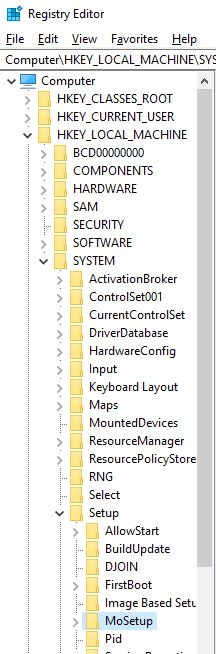
The path at the top should look like this:
ComputerHKEY_LOCAL_MACHINESYSTEMSetupMoSetupIf it does not exist, you can create one by right-clicking on the MoSetup folder and select New, then KEY. Enter the name ‘MoSetup‘
3. Add New Key
On the left, ensure the MoSetup is selected. Now, on the right, right-click on the open space, and choose New, then DWORD (32-bit) Value.
Set the name as AllowUpgradesWithUnsupportedTPMOrCPU
4. Open Key
Now that we have created a new key, we need to set the value. Double-click to open, and set the value to 1.
Click OK to close.
You have completed all the steps. Close out all the windows, and begin the Windows 11 installation.
Method 2 – Overwrite Source file
To complete this method you will need to download the below dll file. You will also need to have the Windows 11 ISO file. If you have already follow the How to get Windows 11 officially guide.
TPM FIX Download
TPM fix file DOWNLOAD
Once you have it download, extract the contents, which should only be a file called ‘appraiserres.dll’.
1. Create Folder
Create a new folder called Windows 11 somewhere you can easily find it.
2. Extract ISO
Find the Windows 11 ISO, double-click and open it up. Highlight all the contents in the main directory and copy it.
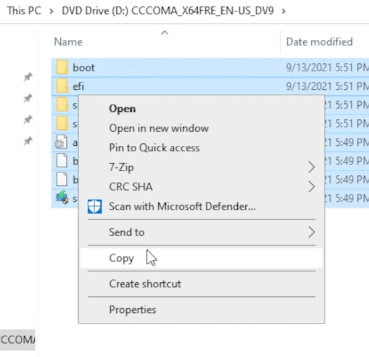
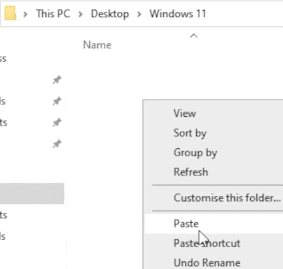
3. Paste contents
Navigate back to the new Windows 11 folder, and paste the files copied from the Windows ISO.
4. Copy the TPM Fix
Locate the TPM Fix file you downloaded, and copy the file in it called ‘appraiserres.dll’.
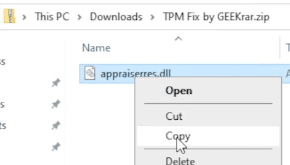
5. Find Source Folder
Go back to your newly created Windows 11 folder, open up the ‘sources’ folder and paste the file.
Windows will prompt you during the file transfer. Select ‘Replace the file in the destination’.
Move back to the main folder of Windows 11, and double-click on ‘setup.exe’, and now you can begin the full Windows 11 installation.
Video: How to bypass TPM
Both methods above are completed in this video tutorial.