- Remove From My Forums
-
Question
-
Hello everybody,
Is Windows 2000 Service Pack 4 supported on Hyper-V RC1 ? is there any way to make at least nework work ?
I have Hyper-V RC1 running but none of the integration tools will install on Windows 2000 SP4. I even tried manually using all these (besides the automatic method):
C:Windowswinsxsamd64_microsoft-hyper-v-vstack_31bf3856ad364e35_6.0.6001.18010_none_c0d13e99ac82f541vmguest.iso
C:Windowswinsxsamd64_microsoft-hyper-v-vstack_31bf3856ad364e35_6.0.6001.18004_none_c0e00fadac773eacvmguest.iso
C:Windowswinsxsamd64_microsoft-hyper-v-vstack_31bf3856ad364e35_6.0.6001.18000_none_c0dc0e85ac7ad950vmguest.isobut the message is always the same (Windows 2000 is not supported) and the tools won’t install.
Net result, no video driver and no nework.
Is there any workaround for this ?
Thank you.
Answers
-
You cannot install the Integration Services components in Windows 2000. However, you can add a legacy network adapter to your virtual machine.
- On the Network Adapter page, click Remove.
-
You have one more option. You can create a Windows 2003 or 2008 virtual machine and install Virtual Server. If you install it on Windows 2008, you’ll need this: http://www.microsoft.com/downloads/details.aspx?FamilyID=a79bcf9b-59f7-480b-a4b8-fb56f42e3348&displaylang=en. You can install Windows 2000 inside the virtual machine running Virtual Server and you’ll be able to take advantage of Virtual Server’s Virtual Machine Additions.
We have need for a temporary legacy setup here at the shop.
We used a Windows Server 2000 Standard SP2 CD ISO to install the base OS.
We have an ISO based DVD with every conceivable Microsoft service pack and needed critical update on it that we use to service our VMs. We needed to mount that ISO and update to Service Pack 4 before we could get the Hyper-V Integration Services installed.
Once we had the Integration Services installed, we were able to configure the new VM on our SBS network.
After a few minutes, we saw this:

Windows 2000 Server with 72 Updates Waiting
WSUS picked up on all of the needed updates and the downloads began!
One of the updates in that list was Update Rollup 1 for Windows 2000 SP4 and known issues (KB891861). In the description for the Rollup, it was indicated that the update was a pre-package of previous Windows 2000 updates.
So, we ran the Rollup first to see what was left over. It turns out that there were still 68 updates waiting for us after what was an extended reboot and subsequent logon procedure.
Note that the logon procedure took quite a bit of time after the Rollup was applied so there will be a need to be patient.
When the new Win2K VM was connected to the domain and its needed services and LoB (Line of Business) applications were installed, the VM ran flawlessly.
Philip Elder
MPECS Inc.
Microsoft Small Business Specialists
Co-Author: SBS 2008 Blueprint Book
*All Mac on SBS posts will not be written on a Mac until we replace our now missing iMac!
Windows Live Writer
This article provides a mirrored download to the Hyper-V Integration Services ISO for Windows NT 10.0 and newer.
Microsoft Windows 10 and Microsoft Windows Server 2016 no longer include the Hyper-V Integration Services ISO, vmguest.iso. The rationale behind this change is that the latest supported Windows and Linux operating systems provide their own Hyper-V integration.
This means that there is no built-in way to install Hyper-V Integration Services into legacy operating systems such as Windows XP (Windows Embedded POSReady 2009).
Fortunately, there is a direct download link mirror to the Hyper-V Integration Services 6.3.9300.16384 ISO, which came from Windows 8.1 / Windows Server 2012 R2. You can download this file and mount it as a CD in your legacy Hyper-V guest to install Hyper-V Integration Services.

Downloads
- Direct from Internet Archive: vmguest.iso
- Direct from Internet Archive Wayback Machine: vmguest.iso
Checksums
- vmguest.iso, size: 27590656 bytes (27 MiB)
- vmguest.iso, MD5: e36d4976a4fa8b38726670eb332c4fea
- vmguest.iso, SHA1: 415d62038cf28c39af2ca63076a7df91a4524314
- vmguest.iso, SHA256: d1037fd8e788ce8ed0df16ec21f057e74512d5b3d551cc9396c7ae95dccba10f
In this article, we will examine how to set up Windows 2000 Pro on a new virtual machine using Microsoft’s HyperV virtualization software on the Windows 10 64 Bit operating system.

How to Run Windows 2000 on Windows 10 using Hyper-V
Windows NT 5.0, which started to be developed after Microsoft’s 9x versions, was named Windows 2000 on February 17, 2000, and released.
Supporting x86 (32 Bit) architecture, Windows 2000 was developed for both desktop computers and business computers. This system offers better ease of use, enhanced USB connections support, Internet Explorer 5, hardware support, Media Player, improved energy management, and system security and stability over Windows 98.
With the full support of Windows 2000, APM, and ACPI technologies, it is an operating system suitable for use on laptops as well. It also supports VPN (Virtual Private Network) and IPSec (Internet Protocol Security) technologies to access remote corporate networks, facilitate remote work, and transfer files more securely.
Microsoft discontinued the Windows 2000 system, which it had developed as a transition to Windows NT 5.0, on July 13, 2010. Therefore, installing an old operating system on a physical and up-to-date computer causes both unsupported programs and security vulnerabilities of the system.
Therefore, you can install, run and experience this system, whose support has been terminated, on a virtual machine using one of the Hyper-V, VMware, or VirtualBox programs.
How to Create a New Virtual Machine for Windows 2000
When you decide to install this old system of Windows with Hyper-V, you must configure the network adapter and virtual disk settings according to the old hardware. VHDX virtual disk type is supported for Windows 8 and later systems, but you can still install with this disk type. However, installing on a VHD disk is recommended for system stability.
Step 1
First, you need to create an External Switch to include the virtual machine in your local network. With this adapter, you can get an automatic IP address from the DHCP server in your local network.
Open the Virtual Switch Manager from the Actions section and select the External type while the New Virtual Network Switch option is selected, and then click the Create Virtual Switch button.

Step 2
After creating the External Switch, select the network adapter of your host computer from the External Network section and confirm the changes after clicking OK.

Step 3
For Windows 2000 virtual PC, you need to create a fixed size virtual disk with VHD type. If you configure the size of the virtual disk as a Fixed Size in old systems, you will ensure that the system works more stable and performance.
Click Action / New / Hard Disk in the Hyper-V Manager tool menu and open the wizard.

Step 4
You can create one of the VHD, VHDX, and VHDS virtual disk types on your physical disk in the virtual disk creation wizard.

Step 5
After clicking Next in the previous window, select the VHD disk type in the Choose Disk Format window.

Step 6
You can set the size of the virtual disk you want to create as fixed-size or dynamically expanding. With dynamically expanding disk type, the disk space required by the VM will automatically increase during the process, which can reduce performance on older systems. So, check Fixed Size and click Next to create a 2GB fixed size virtual disk.

Step 7
Change the name of the virtual disk and store the disk storage location to the location where you will install the VM.

Step 8
Specify the size of the virtual hard disk as 2 GB and continue.

Step 9
After checking the settings you have made in the summary window of the virtual HDD, click Finish.

Step 10
Now, click Action / New / Virtual Machine from the tool menu to create a new virtual machine in Hyper-V.

Step 11
When the virtual computer creation wizard opens, click Next to prepare a manual VM.

Step 12
After typing the name of the operating system, tick the relevant option to store the VM on an external storage device and specify the location via the Browse button.

Step 13
Since Windows 2000 supports BIOS-based firmware type, select Generation 1 in the Generation window and continue.

Step 14
Configure the dynamic memory size for the virtual machine as 1024 MB (1 GB) and click Next.

Step 15
In the network settings window, leave the connection type as Not Connected and click Next.

Step 16
To add the virtual hard disk with the VHD extension you created to the VM, check the Use an existing virtual hard disk option and then specify the location of the VHD disk.

Step 17
Check the changes you have made in the summary window showing the settings of the virtual computer and close the window.

Step 18
After creating the virtual machine, it will appear in the Virtual Machines section. Right-click on the VM and open the Settings window and select the existing Network Adapter and click the Remove button and confirm the operation.

Step 19
Since Windows 2000 is an older operating system, you need to add a legacy-equipped network adapter. Select Add Hardware, and then select Legacy Network Adapter from the hardware listed on the right and click the Add button.

Step 20
After adding the Legacy Network Adapter, select the Virtual Switch setting as External.

Step 21
Finally, click DVD Drive and select Image File to add a Windows 2000 ISO file to the virtual machine. Specify the location of the ISO file you downloaded to your computer from this link via Browse.

Step 22
After adding the ISO file to the virtual machine, right-click on it and click Connect, and then start the Windows installation.

How to Install Windows 2000
After preparing and running the Windows 2000 virtual computer, you can now install Windows as if you were installing it on the physical computer.
Step 1
At the Windows 2000 Professional Setup screen, you can click Enter to start the installation immediately, R to repair your system, or F3 to exit setup.

Step 2
You can go to the next page by pressing PAGE DOWN to read all the content in the Windows 2000 license agreement. If you want to exit without accepting the license agreement, you can press ESC.
Press F8 to read and accept the Windows license terms and continue.

Step 3
Press the C key to create a new partition on the virtual HDD you have added to the virtual machine, or you can press Enter to automatically create a new partition and start the installation.

Step 4
If you have chosen to create a new partition on the disk, the disk space will be created automatically by the wizard. If you confirm to use all the disk space created, press Enter.

Step 5
The drive letter of the first partition created will be C. To install Windows 2000 on the C drive, press Enter on it.

Step 6
Format and prepare the virtual disk partition using the NTFS file system.

Step 7
Wait while the setup wizard formats the virtual disk.

Step 8
After the disk is formatted, the wizard will start copying the system files of Windows.

Step 9
After the wizard has copied the Windows 2000 system files, press Enter to restart the VM.

Step 10
Wait while your virtual system restarts. The installation will continue when the system boots up.

Step 11
In the Windows 2000 Setup Wizard, click Next to let the wizard gather information about the hardware.

Step 12
Wait while Setup detects and installs devices on your virtual computer.

Step 13
After collecting the necessary information for the Guest operating system, select your system display language and keyboard layout according to the country you live in the Regional Settings window.

Step 14
Type a new username for your virtual system’s user account.

Step 15
Type your 25-character Windows 2000 Professional product key and click Next.

Step 16
Type your computer name and create a new password for the admin account and continue.

Step 17
Configure the time and date settings of the guest machine according to the location you live in.

Step 18
Wait while the wizard installs the necessary network software for your virtual machine to communicate with other computers, connect it to the local network and the Internet.

Step 19
Select Typical Settings for the network settings of the virtual machine and continue.

Step 20
If you are going to use the VM in a domain environment, select the option below and type the domain name. If you are going to use the VM in a Workgroup environment, select No.

Step 21
Wait while setting up Windows 2000 components. This process may take some time depending on the performance of your host.

Step 22
Wait while the wizard configures start menu items, registry components, and deletes temporary files.

Step 23
After completing the Windows 2000 setup wizard, remove the ISO file from the VM and click Finish.

Step 24
When your virtual system restarts, click Next when the Network Identification Wizard window opens.

Step 25
Type the credentials of the user who will log on to this computer and continue.

Step 26
After completing the network identification wizard, click Finish.

Step 27
After making the necessary settings, the Microsoft Windows 2000 Professional desktop environment will open.

How to Test Internet Connection
After installing Windows 2000 with Hyper-V, you need to check that you can access the local network and the Internet in the VM.
Step 1
Open Run by pressing Windows Key + R and type CMD and click OK to open the command prompt and test your connection by pinging Google servers by executing the ping 8.8.8.8 command.

Step 2
Now that you can access the Internet, open Internet Explorer and when the Internet connection wizard opens, select the I am connecting via LAN option and click Next.

Step 3
In the window asking how you connect to the Internet, tick the option “I’m connecting via LAN again” and continue.

Step 4
Configure the proxy setting automatically and click Next.

Step 5
Check the No option to skip creating an Internet mail account.

Step 6
After completing the Internet connection wizard, click Finish.

Step 7
Check your connection by visiting the Google search engine with Internet Explorer.

Video
Related Articles
♦ How to Install Windows 10 on Hyper-V
♦ How to Install Windows 7 on Hyper-V
♦ How to Install Windows XP on Hyper-V
♦ How to Install Windows 8/8.1 on Hyper-V
♦ How to Install Windows Vista on Hyper-V
In this attempt to get NT 4.0 running on my machine, here is what I did. This holds true for 2008r2, and 2012 along with the Windows 10 preview.
old versions of Windows are not supported, but with a little bit of fun from PowerShell you can get them to work.
First make sure you run PowerShell as Administrator!
PS C:WINDOWSsystem32> get-vm
Name State CPUUsage(%) MemoryAssigned(M) Uptime Status
—- —– ———– —————– —— ——
NT40 Off 0 0 00:00:00 Operating normally
Windows 2000(wks) Off 0 0 00:00:00 Operating normally
As you can see here I have two virtual machines. Both of them are ‘off’ since there is no memory assigned, nor is there any uptime. It’s weird to me how they are “Operating normally’ since they aren’t running but I guess that’s a feature. Make sure the VMs are powered off before trying to do this.
Restricting the CPU capabilities was the checkbox to enable in the first version of Hyper-V. Now it’s hidden from the user, so you need to enable this in Power Shell.
First let’s check a VM:
PS C:WINDOWSsystem32> Get-VMProcessor NT40 | fl CompatibilityForOlderOperatingSystemsEnabled
CompatibilityForOlderOperatingSystemsEnabled : False
As you can see it’s disabled. Now to enable it with:
PS C:WINDOWSsystem32> Set-VMProcessor NT40 -CompatibilityForOlderOperatingSystemsEnabled $true
Now we can verify it’s turned on:
PS C:WINDOWSsystem32> Get-VMProcessor NT40 | fl CompatibilityForOlderOperatingSystemsEnabled
CompatibilityForOlderOperatingSystemsEnabled : True
And we are good to go.
NT 4.0 Service Pack 6 on Hyper-V / Windows 10 Technical Preview 9879
Now for the networking part, remember to remove the existing network adapter, and add the ‘legacy’ network adapter. On my PC there was an additional snag, which is that every time a VM reboots, or is powered on the legacy adapter will receive NO packets. Go into the Hyper-V console, and disconnect the legacy adapter, and reconnect it, and network traffic will flow.
And additional note on installing Windows 2000. You *MUST* change the HAL uppon instalation. By default it’ll detect an ACPI system, but the driver ACPI.SYS will bluescreen the VM. Hit F5 when it prompts about storage adapters, and select the ‘STANDARD PC’ HAL from the list.

I’m looking for a way to successfully import a Windows 2000 host (running several legacy applications that do not work on newer editions of Windows).
I normally like to use Disk2VHD for making a quick VHD of a live server.
However it doesn’t work with Windows 2000.
asked Feb 25, 2013 at 23:37
![]()
Citrix XenConvert 2.40 (and older) supports Windows 2000. One of the file type options options is to convert to VHD. This is one of the easiest ways to P2V an older server. Note that Windows 2000 support was removed in version 2.41.
answered Jan 27, 2014 at 15:31
![]()
SkyhawkSkyhawk
14.2k3 gold badges53 silver badges95 bronze badges
Windows NT 4 and Windows 2000 are no longer supported by Microsoft, and so can’t be supported on Hyper-V. Windows Server 2012 Hyper-V actually dropped integration service support for Windows 2000, which means it’s no longer possible to use synthetic devices (such as network and storage) and there are no services to integrate with Hyper-V.
The net effect is the performance would be poor compared to an OS using synthetic devices, because emulated devices would have to be used. The recommendation would be to run Windows 2000 virtual machines (VMs) on a Windows Server 2008 R2 Hyper-V server, which still has integration service support for Windows 2000.
Another (unsupported) option to try could be taking the integration services from Hyper-V 2008 R2 and installing on the Windows 2000 VM, then running on the Windows Server 2012 Hyper-V. This would give some synthetic device support and some integration with Hyper-V but would be completely unsupported by Microsoft. Longer term recommendation would be to migrate to a newer, supported OS as soon as possible.
For Windows NT 4, there really is no support. The legacy processor compatibility mode that helped NT 4 run on Hyper-V is gone in Windows Server 2012 Hyper-V, and emulated devices would definitely have to be used. However, the performance might meet what you need so this could be worth a try.
Purchase and download the full PDF and ePub versions of this Hyper-V eBook for only $8.99

In An Overview of the Hyper-V Architecture, the significance of the relationship between the Hyper-V parent partition (in which the host instance of Windows Server 2008 runs) and the child partitions containing the guest operating systems was covered in detail. Given the importance of this relationship, it is clear that anything that enhances the level of communication between parent and child partitions will serve to improve the performance and manageability of the Hyper-V environment. This is where the Hyper-V Integration Services come into play.
The goal of this chapter of Hyper-V Essentials is to provide an overview of the Hyper-V Integration Services, provide a list of guest operating systems for which the services are available and, finally, cover the steps involved in installing the services on a guest operating system.
Contents
|
||
An Overview of Hyper-V Integration Services
Hyper-V Integration Services consists of a package of services which, when installed on a Hyper-V guest operating system, improve the performance and manageability of that system running within a Hyper-V virtualization environment. In many respects, Hyper-V Integration Services are analogous to the VMware Tools package used to improve the interaction of guest operating systems within the VMware virtualization infrastructure.
The Hyper-V Integration Services provide a number of performance and usability enhancing features for Hyper-V based guest operating systems. These services are as follows:
- Virtual Machine Connection Enhancements — When the console of a guest operating system without Hyper-V Integration Services installed is accessed using the Virtual Machine Connection, clicking in the Virtual Machine Connection dialog locks the mouse pointer into that window. Focus may only be released by initiating a keyboard sequence (the default being Ctrl+Alt+Left Arrow). With Integration Services installed, however, the pointer focus is automatically assigned to and released from the Virtual Machine Connection window as the mouse pointer passes in and out of the window. This avoids the necessity to click in the window to assign focus and then press the keyboard sequence to subsequently return the focus to the local desktop.
- Virtual drivers and Hypervisor-aware Kernel — Allows the guest operating system to communicate directly with the parent partition over the VMBus when accessing devices and making I/O requests, thereby increasing performance of the guest operating system.
- Hyper-V Time Synchronization Service — The purpose of this service is to synchronize the system time between Hyper-V child and parent partitions (for a detailed description of child and parent partitions, read the chapter entitled An Overview of the Hyper-V Architecture). This synchronization is important to avoid potential time drift between the guest operating systems running in a child partitions and the Hyper-V parent partition.
- Hyper-V Heartbeat Service — The heartbeat service allows the parent partition to detect when a virtual machine has locked up, crashed or otherwise ceased to function. The parent partition sends heartbeat messages to the guest operating system at regular intervals. It is then the job of the Hyper-V Heartbeat Service installed on the guest operating system to send a response to each of these heartbeat messages. When the parent partition fails to receive responses from the child partition, it assumes that the child’s Heartbeat Service, and therefore the guest operating system on which it is running, has encountered problems. The administrative services on the parent partition will subsequently log the event accordingly such that it is brought to the attention of a system administrator for corrective action to be taken.
- Hyper-V Shutdown Service — The Hyper-V Shutdown Service allows the guest operating system to be shut down cleanly using Hyper-V management interfaces (such as the Hyper-V Manager console and the Virtual Machine Manager), thereby avoiding the necessity to log into the guest operating console and manually initiate the shutdown procedure. As a typical example, when an administrator selects the Shutdown action for a virtual machine from with Hyper-V Manager, the parent partition communicates with the Hyper-V Shutdown Service running on the selected guest operating system to notify it of the request. The Shutdown Service then initiates the guest operating system’s shut down process by making (in the case of Windows guests) standard Windows Management Instrumentation (WMI) calls.
- Hyper-V Volume Shadow-Copy Requestor — The Hyper-V Volume Shadow-Copy Service provides Volume Shadow Copy integration between Volume Shadow Copy enabled guest operating systems and the parent partition.
- Hyper-V Key/Value Pair Exchange — Provides the ability for the child and parent partitions to exchange configuration information through pre-defined registry entries in the guest operating system. In the case of the parent partition, it is able to view, set and delete registry entries in the child partition’s guest operating system. In addition, the parent partition configures a number of registry entries into the guest’s registry which serve to provide the guest with information about the parent partition and host system configuration. Additional information on the Hyper-V Key/Value Pair Exchange service is covered later in this chapter.
Understanding Hyper-V Key/Value Pair Exchange
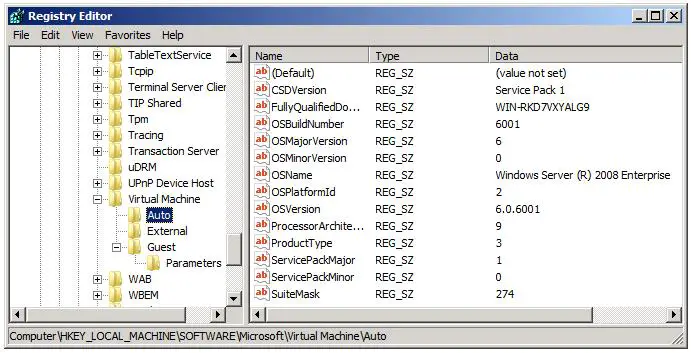
The Key/value pair exchange entries provided by the Hyper-V Key/Value Pair Exchange component of the Hyper-V Integration Services are stored on the guest operating system in the following registry locations:
* HKEY_LOCAL_MACHINESoftwareMicrosoftVirtual MachineAuto

* HKEY_LOCAL_MACHINESoftwareMicrosoftVirtual MachineExternal

* HKEY_LOCAL_MACHINESoftwareMicrosoftVirtual MachineGuestParameters
Registry entries relating to the configuration of the child partition’s guest operating system are located in HKEY_LOCAL_MACHINESoftwareMicrosoftVirtual MachineAuto and are accessible to the parent partition. The specific registry entries are as outlined in the following table:
|
Registry Key |
Description |
|---|---|
| OSMajorVersion | The guest operating system’s major version number. |
| OSMinorVersion | The guest operating system’s minor version number. |
| OSBuildNumber | The guest operating system’s build number. |
| OSVersion | The guest operating system’s version number. |
| OSPlatformId | The guest operating system’s platform ID value. |
| CSDVersion | The most recent Service Pack applied to the guest operating system (e.g. Service pack 1) |
| ServicePackMajor | The major version number of the most recent Service Pack applied to the guest operating system (e.g. 1). |
| ServicePackMinor | The minor version number of the most recent Service Pack applied to the guest operating system (e.g. 0). |
| SuiteMask | The product suites installed on the guest system. |
| ProductType | Numerical value indicating the guest operating system product type installed in the child partition. |
| OSName | The name of the guest operating system installed in the child partition (e.g. Windows Server (R) 2008 Enterprise). |
| ProcessorArchitecture | Numerical value indicating processor architecture identifier |
| FullyQualifiedDomainName | The fully qualified DNS name that uniquely identifies the guest operating system’s fully qualified domain DNS name. |
The following figure illustrates the above registry entries listed with the Registry Editor tool on a Windows Server 2008 Hyper-V guest:
In addition, the parent partition inserts the following information about itself into the HKEY_LOCAL_MACHINESoftwareMicrosoftVirtual MachineGuestParameters of the guest operating system allowing the guest to obtain basic information about the host environment on which it is running:
|
Registry Key |
Description |
|---|---|
| HostName | The domain name system (DNS) name of the operating system running in the Hyper-V parent partition. |
| PhysicalHostName | The non-fully qualified name of the operating system running in the Hyper-V parent partition. |
| PhysicalHostNameFullyQualified | The fully qualified name of the operating system running in the Hyper-V parent partition. |
| VirtualMachineName | The name of the virtual machine used by the virtualization stack. |
The following image illustrates the registry entries outlined in the above table viewed within the context of the guest operating systems registry editor:

Supported Guest Operating Systems
It is important to note that the Hyper-V Integration Services are not available for all guest operating system types. In addition, for some supported guest operating systems only a subset of the full range of integration services is actually provided.
At present the only Integration Services packages supplied by Microsoft are for members of the Windows family of operating systems. It is anticipated that Microsoft will also release Integration Services for SUSE Enterprise Linux in conjunction with Novell and also Red hat Enterprise Linux. It is also likely that other operating system vendors will eventually develop Integration Services packages for their respective offerings.
The following table lists the platforms for which Hyper-V integration Services are supported, together with details of the individual services provided in each case:
|
Platform |
Supported Services |
|---|---|
| Windows Server 2008 x64 | Time Synchronization, Heartbeat, Shutdown, Key/Value Pair Exchange, VSS |
| Windows Server 2008 x86 | Time Synchronization, Heartbeat, Shutdown, Key/Value Pair Exchange, VSS |
| Windows Server 2003 x64 (SP2) | Time Synchronization, Heartbeat, Shutdown, Key/Value Pair Exchange, VSS |
| Windows Server 2003 x86 (SP2) | Time Synchronization, Heartbeat, Shutdown, Key/Value Pair Exchange, VSS |
| Windows 2000 Server (SP4) | Time Synchronization, Heartbeat, Shutdown, Key/Value Pair Exchange |
| Windows 2000 Advanced Server (SP4) | Time Synchronization, Heartbeat, Shutdown, Key/Value Pair Exchange |
| Windows Vista x64 (SP1) | Time Synchronization, Heartbeat, Shutdown, Key/Value Pair Exchange, VSS |
| Windows Vista x86 (SP1) | Time Synchronization, Heartbeat, Shutdown, Key/Value Pair Exchange, VSS |
| Windows XP x86 (SP2/SP3) | Time Synchronization, Heartbeat, Shutdown, Key/Value Pair Exchange |
| Windows XP x64 (SP2) | Time Synchronization, Heartbeat, Shutdown, Key/Value Pair Exchange |
Installing Hyper-V Integrated Services
Before installing Hyper-V integration Services into a guest operating system it is important to understand that some Windows operating systems ship with Integration Services built in. Presently these operating systems are limited to Windows Vista and Windows Server 2008. These two operating systems are able to detect the presence of the Hyper-V hypervisor and activate the Integration Services accordingly. Obviously, any Windows release which pre-dates the release of Hyper-V will be unaware that it is running on a hypervisor.
Despite the above caveat, it is still worth re-installing the Hyper-V Integration Services even on Windows Server 2008 and Windows Vista guests. The reasons for doing so are two-fold. Firstly, integration services bundled with the guest operating system installation media may not be the latest shipping version. Secondly, the version of the Integration Services bundled with the current versions these operating systems do not include the Virtual Machine Connection enhancements outlined earlier in this chapter.
To install the Hyper-V Integration Services on a guest operating system, start the virtual machine, connect using the Virtual Machine Connection tool (for details on using the Virtual Machine Connection tool refer to the chapter entitled The Hyper-V Virtual Machine Connection Tool). Once the guest has booted, log in as a user with administrative privileges and then select the Action->Install Integration Services Setup Disk menu option from the Virtual Machine Connection tool interface. Once selected, Hyper-V will mount the ISO image of the Hyper-V Integrations Tool setup disk as a virtual CDROM on the guest’s virtual machine. Assuming Autorun is enabled on the guest the operating system will prompt to run the installation process:

Alternatively, navigate to the device containing the ISO image and double click on it to invoke the setup process. If an earlier version of Hyper-V Integration Services is detected by the setup process, the option will be provided to install the latest release in place of the old release. Once completed, the guest system will need to be rebooted before the services will be active. The following image shows the successful installation of Hyper-V Integration Services on a Windows XP Professional system:

Assuming it is convenient to do so, click Yes to initiate a reboot of the virtual machine. Once the guest operating system has restarted, the Hyper-V Integration Services should be installed and running.
Configuring Hyper-V Integrated Services
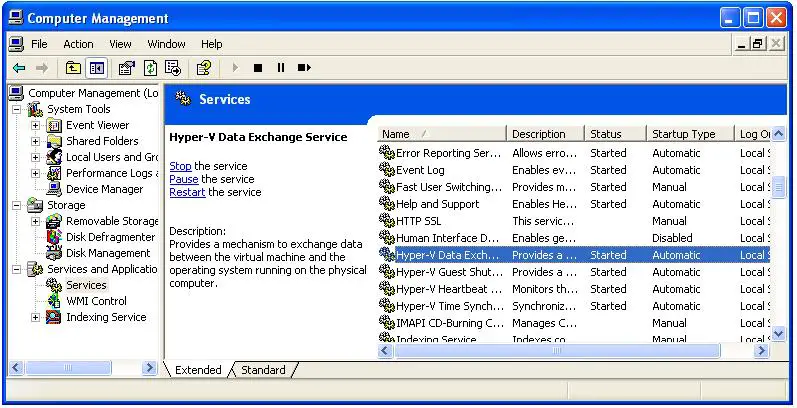
The Hyper-V Integration Services run as background services on the guest operating system and communicate with the parent partition. The method for viewing these running services differs slightly between the various guest operating system types. For example, to view the services running on a Windows XP system, click on the Start menu, right click on the My Computer entry within the menu and select Manage from the popup menu to launch the Computer Management console. Within the management console select Services and Applications->Services to display a list of configured services. Scroll down this list until the Hyper-V services are visible as illustrated in the following figure:
Similarly, the Hyper-V Integration Services running on a Windows Server 2008 guest may be viewed by launching the Server Manager console and selecting Configuration->Services.
In each of the above scenarios, the option is provided to Start, Stop or Pause the currently selected service. Whilst this provides a way to disable a particular Hyper-V integration service on a specific guest operating system, the Hyper-V Manager provides a much quicker, and more centralized method for configuring which integration services are used on a per virtual machine basis.
To configure which services are active, invoke the Hyper-V Manager, select the virtual machine for which integration services are to be configured and click on the Settings… link in the Actions panel. In the Settings dialog, select Integration Services from the Management section of the left hand panel to display the list of services provided to the selected guest as illustrated below:

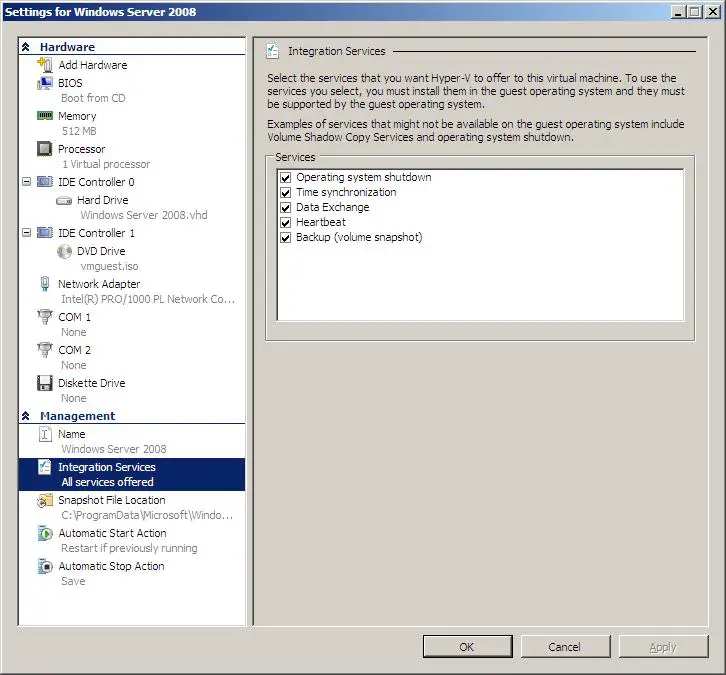
Use the check boxes to enable or disable services and click on the OK button to commit the configuration changes. When configuring these services, it is important to keep in mind that the selected service may not be supported on the guest operating system. As such, activating the service within the Hyper-V Manager may have no effect of the performance and behavior of the guest within the Hyper-V environment.
Purchase and download the full PDF and ePub versions of this Hyper-V eBook for only $8.99