На статью не тянет — тянет только на заметку, но вещь нужная.
И так, как быстро просто и легко выполнить резервное копирование и восстаановление базы данных и всех настроек DHCP сервера на ОС Windows 2008 R2 и старше:
Самый простой и быстрый способ резервного копирования DHCP (экспорта данных) на Windows Server 2008 R2 использование команды netsh.
Типовая команда для резервного копирования выглядит так:
netsh dhcp server \ServerName export PathExportdhcp.txt all
где:
\ServerName — имя сервера с которого осуществляется экспортирование БД (резервное копирование);
PathExportdhcp.txt — путь экспорта файла БД DHCP.
Восстановление базы данных DHCP происходит при помощи параметра import:
netsh dhcp server \ServerName import PathImportdhcp.txt all
где:
\ServerName — имя сервера на который осуществляется импортирование БД (восстановление ранее созданной копии БД DHCP);
PathExportdhcp.txt — путь экспорта файла БД DHCP.
Вот и все, что нужно знать для резервного копирования и восстановления DHCP-сервера на ОС Windows Server 2008 R2 и выше.
Восстановление базы данных DHCP
В Windows Server 2008 R2 процесс резервного копирования всех параметров DHCP и их восстановления на том же (или другом) сервере был упрощен. Администраторам теперь не нужно ни экспортировать записи системного реестра, ни вручную переносить базы данных с одного сервера на другой, ни применять специальные утилиты для импорта и экспорта производства Microsoft для осуществления миграции DHCP. Процесс резервного копирования и восстановления теперь может выполняться прямо из консоли ММС, а процесс миграции данных DHCP-сервера — с помощью инструментов, которые поставляются непосредственно в составе операционной системы Windows Server 2008 R2.
Служба DHCP Server (Сервер DHCP) в Windows Server 2008 R2 будет архивировать свои данные автоматически каждый час, сохраняя их в каталоге %systemroot%system32 dhcpbackup. Разумеется, в этом каталоге будут храниться только недавно сделанные резервные копии. Если требуется более длительное хранение резервных копий, администратор должен включить на диске, на котором находится корневой каталог системы, службу теневого копирования томов (Volume Shadow Сору) и периодически самостоятельно выполнять резервное копирование данных DHCP-сервера с помощью программы Windows Backup (Архивация Window) либо другого продукта, такого как Microsoft Data Protection Manager (Диспетчер защиты данных).
Резервного копирование базы данных DHCP
Перед внесением на DHCP-сервер каких-то изменений администратору должен вручную сделать резервную копию базы данных и конфигурации DHCP. Ниже перечислены необходимые шаги.
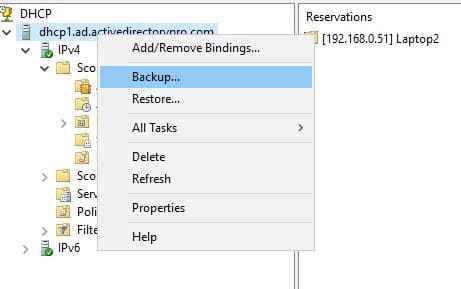
- Откройте консоль управления DHCP, выбрав в меню Start (Пуск) пункт All Programs-Administrative Tools-DHCP (Все программы — Администрирование-DНСР). Если появится окно с запросом подтвердить выполнение действия, щелкните в нем на кнопке Continue (Продолжить).
- Щелкните правой кнопкой мыши на узле, название которого совпадает с именем нужного сервера, и выберите в контекстном меню пункт Backup (Архивация)
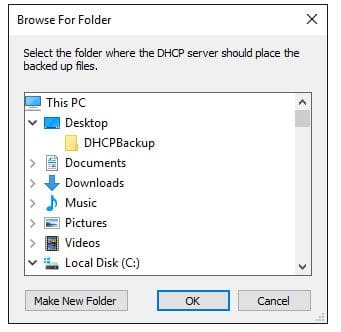
- Укажите желаемое место для размещения файла резервной копии и щелкните на кнопке ОК. После этого файлы всех резервных копий будут сохраняться в этом выбранном месте.
Восстановление базы данных DHCP
Шаги, необходимые для восстановления сохраненной в резервной копии конфигурации и базы данных DHCP-сервера как на том же самом, так и на каком-то другом сервере, выглядят следующим образом.
- Откройте консоль управления DHCP, выбрав в меню Start (Пуск) пункт All Programs-Administrative Tools-DHCP (Все программы-Администрирование-DHCP). Если появится окно с приглашением подтвердить выполнение действия, щелкните в нем на кнопке Continue (Продолжить).
- Щелкните на узле, название которого совпадает с именем нужного сервера, правой кнопкой мыши и выберите в контекстном меню пункт Restore (Восстановление). Укажите место, в котором размещаются файлы с резервными копиями, и щелкните на кнопке ОК.
- Когда появится диалоговое окно с вопросом, можно ли остановить и перезапустить службу, щелкните в нем на кнопке Yes (Да). Это приведет к перезапуску службы и восстановлению всей базы данных и системного реестра.
In this article, we’ll review the necessary information for how to backup and restore information from a Microsoft Windows DHCP server database.
Depending on how familiar you are with this procedure, you may or may not be aware that there’s more to it than just a simple “backup and restore the database”. Besides wanting a full copy of your database, sometimes you may want to only backup specific scope info, or you might want to only backup your reservations.
Whatever the need, I’ve got ya covered in this article ;). My examples will be demonstrated from a Windows Server 2008 R2 installation, but this information will basically be the same or similar in Windows 2012 and beyond.
1. DHCP Backup & Restore Introduction
It goes without saying that it’s important to keep backups of critical data, and DHCP is definitely one of those critical items. It’s important to have good backups available because you never know when unforeseen disaster is going to strike (i.e. data corruption, hardware failure, etc). While my own backup preference may seem a little overkill to some (I keep a backup, an export and occasionally a dump file), I like the peace of mind of knowing that I’ve got multiple options, just in case something ever goes wrong.
NOTE 1: It’s assumed that you have Administrative rights (and any necessary remote access to source and destination servers) to perform the steps laid out in this article. Membership in the Administrators group or the DHCP Administrators group is the minimum required permissions in order to successfully complete these procedures.
NOTE 2: It’s assumed that you already have a DHCP server configured and running.
Let’s get started with some basics first, then I’ll cover all the details of the pertinent info that you’ll want to be aware of as we continue to move forward in the article.
1.1. DHCP Backup Basics 101
To keep things simple, I’m going to present some of Microsoft’s info in my own terms and from my own perspective because I’d like to make this info as easy to understand as possible, for both experienced admins and fresh admins alike. For instance, there are basically two methods of backups that you should be aware of: automatic (“synchronous”) and manual (“asynchronous”).
Anytime you setup a Windows DHCP server, backups will automatically occur every 60 minutes by default, and they’re always saved to the following folder:
C:WindowsSystem32DHCPBackup
Keep in mind that only one backup copy is stored at any given time (the existing backup is overwritten every 60 minutes with the latest backup copy), so it’s recommended that you keep a copy of this database somewhere other than the default location (i.e. Copy the folder to a file share on your storage server).
NOTE: The DHCP database backup folder location must be a local path. You can copy the backup to a network location after it’s completed, but the backups have to be saved to a local path first.
Also, if you’d like to change the backup time interval, you can either set it with the following command (subsitute “60” with whatever time in minutes you’d like to adjust it to):
netsh dhcp server set databasebackupinterval 60
Or you can modify the following registry key:
HKLMSYSTEMCurrentControlSetServicesDHCPServerParametersBackupInterval
If you’d like to maintain extra or multiple copies of your DHCP database, you can either manually copy the folder at whatever time interval you prefer, you could create a scheduled task (covered in Step 5), or you could use something like RoboCopy (Or a combination of a scheduled task and RoboCopy! This will be covered in Step 5.6.4).
1.2. DHCP Backup Basics 201
When a DHCP backup occurs (whether it’s automatic or manual), the entire DHCP database is saved, including the following data/information:
- All scopes, including superscopes and multicast scopes
- Reservations
- Leases
- All options, including server options, scope options, reservation options, and class options
- All related registry keys and other configuration settings
NOTE: If you use DNS dynamic update credentials, this information is not saved as part of the backup; so you’ll have to manually re-enter these credentials again if you ever restore from a backup. This can be done via CLI, using the following command syntax:
netsh dhcp server set dnscredentials <username> <domain> <password>
Or via the DHCP MMC (DHCP Management Console):
Right-click “IPv4” under the server you want to add the credentials to, choose “Properties”, click the “Advanced” tab, click the “Credentials…” button, then enter the appropriate information. Refer to Figure 0 below:
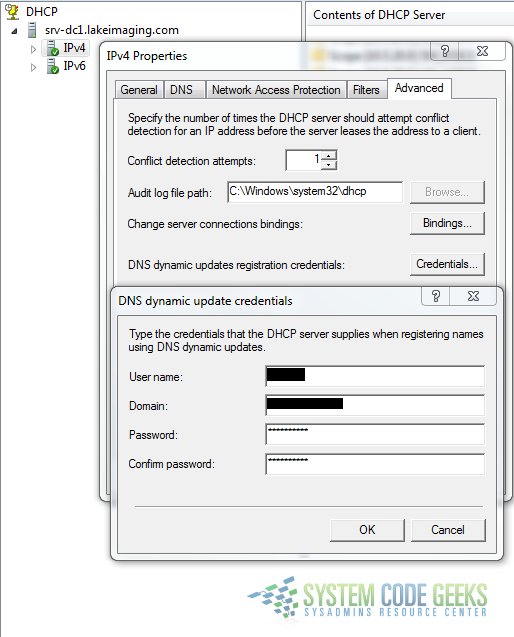
Figure 0: Setting Dynamic DNS Credentials via GUI
1.3. DHCP Backup Basics 301
There are three main groups of commands that are used when backing up DHCP server database information from CLI (all of which are associated with the “Netsh” command-line tool). I’ll list them and give a brief breakdown of each set of commands.
NOTE: There is a lot of information online pertaining to each of these commands/options! I’ve extensively researched them all and will provide my perspective on what I’ve found. For now, I’ll just list them along with a brief explanation of each, and I’ll provide more details and examples beginning with Step 2.3.
1.3.1. “Backup” & “Restore”
These are the equivalent of the GUI commands for backup and restore (the GUI commands are covered in more detail in Step 2). Command syntax is as follows:
netsh dhcp server backup <backup folder location>
netsh dhcp server restore <backup folder location>
1.3.2. “Export” & “Import”
This is the most widely used set of commands for backing up and restoring a DHCP server database, and it’s the “best practice” and commonly recommended method referenced by Microsoft. As you could likely expect, there can arise some confusion about the difference between “Backup & Restore” vs “Export & Import”. The key difference to be aware of is this: “Backup” & “Restore” can be used to backup & restore a DHCP server database from and to the same OS version, whereas “Export” & “Import” can be used for both backing up and restoring from and to the same server, as well as between different server versions.
To re-iterate and clarify this, if you want to backup a Windows Server 2008 R2 database and restore it to either the same server or to a different Windows Server 2008 R2 installation, you can use “backup & restore” or “export & import”. However, if you want to backup a Windows Server 2008 R2 database and restore it to a Windows Server 2012 R2 server installation, you’ll want to only use the “export” & “import” commands. Export/Import will be covered in more detail in Step 3. Command syntax is as follows:
netsh dhcp server export <backup folder location & filename> <scope info to export> (use "all" for ALL scope info, or specify specific scope(s))
netsh dhcp server import <backup folder location & filename> <scope info to import> (use "all" for ALL scope info, or specify specific scope(s))
1.3.3. “Dump” & “Exec”
The “dump” command is essentially used to export the configuration info of a server (not the entire database), and it’s generally only used for advanced troubleshooting and/or configuration scenarios. While you could use these commands to export/import configuration info from one server to another (with the same OS version or different OS version), I personally would only recommend using it to make changes to the same server that the information was exported from (or at least to the same OS version if your primary DHCP server dies).
Let me help clarify this some more: There are multiple scenarios where using dump and exec can be handy. One example is that you could manually create a template file (a simple .txt file with all of your DHCP configuration info) and then use exec to import that configuration info into one or more servers. This process can save some configuration and deployment time in a “multiple DHCP server deployment” scenario.
Another example of where the dump command can be handy is if you’d like to make a change to a DHCP scope. For example, if you’d like to change the subnet mask of a scope, this can’t be done without deleting the scope and recreating it. However, if there are a lot of customizations in the scope (like reservations and scope options), it’s going to be a lot of extra work to recreate all of that information. But with the dump command, you can export the configuration info for that specific scope, make modifications, then safely delete the scope from the DHCP MMC, and finally re-import all of the updated configuration info using the exec command. Dump/Exec will be covered in more detail in Step 4. Command syntax is as follows:
(Dump – two examples)
netsh dhcp server scope <scopeaddress> dump > <backup folder location & filename>
netsh dhcp server dump > <backup folder location & filename>
(Exec)
netsh exec <path location of dump file>
NOTE 1: The single “>” after “dump” acts as a redirect which outputs all of the configuration info to a file.
NOTE 2: Before using the dump command, it’s recommended that you verify and reconcile any database inconsistencies (so your dump file is “clean”). I’ll cover “reconcile” and other cool tricks in more detail in Step 5.
2. Backup & Restore (GUI & CLI)
In this first main section, I’ll detail the steps for doing a backup and restore from both the GUI and from the command line. Let’s start with the GUI steps first.
2.1. Backup via GUI
The first backup option I’ll cover is a full backup from the GUI, via the DHCP management console. Again, as stated earlier in the article, this type of backup is ideal for either restoring to the same server and OS version, or to another server running the same OS version. On the server that you want to backup DHCP from, launch the DHCP MMC by navigating to it in the Administrative Tools menu. Refer to Figure 1 below:
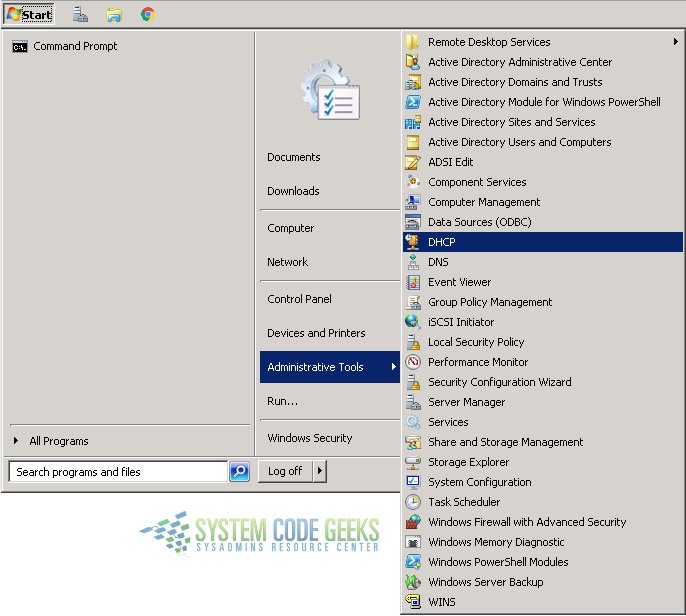
Figure 1: DHCP MMC via Admin Tools menu
After the console window opens, your server should be listed. If not, right-click on “DHCP” and choose “Add Server”. A new window opens and your server should be listed in the box under “This authorized DHCP server:”. Select it and click “OK”. Refer to Figure 2a and 2b below:
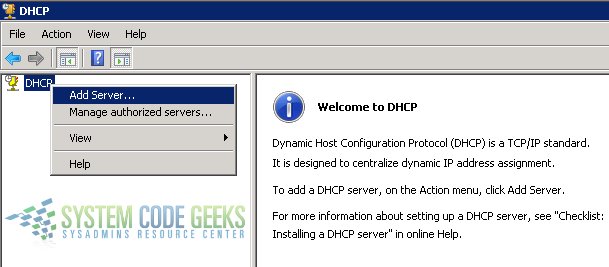
Figure 2a: Add your DHCP server
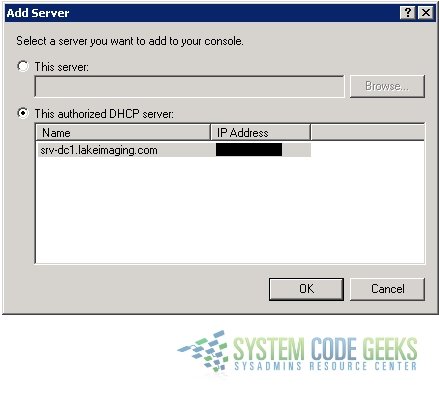
Figure 2b: Select the appropriate DHCP server
Once your server has been added to the list, right-click on it and choose “Backup”. A “Browse For Folder” window will open, and it will have the default backup folder location already selected (C:WindowsSystem32dhcpbackup); Click “OK”. Refer to Figure 3a and 3b below:

Figure 3a: Backup via the GUI
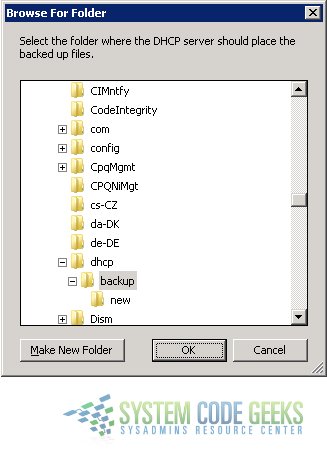
Figure 3b: Selecting the default backup folder location
Unfortunately, the Windows OS does not give you any prompt or indication that the backup “completed successfully!”. However, you can open Windows Explorer and navigate to the backup folder and verify that the files have the appropriate date and timestamp. Refer to Figure 3c below:

Figure 3c: Backup complete (verify date/timestamps)
Remember to store a copy of this backup somewhere else besides the default backup location (as previously referenced in the Note in Step 1.1).
2.2. Restore via GUI
Before doing the restore, I would recommend copying the folder from the saved backup (located on your storage server for instance; as referenced in step 1.1) to the desktop of the user profile of the admin account that you’re using to logon to the DHCP server. In my example, I’ve stored a copy of the backup in a folder named “dhcp”. Refer to Figure 4 below:
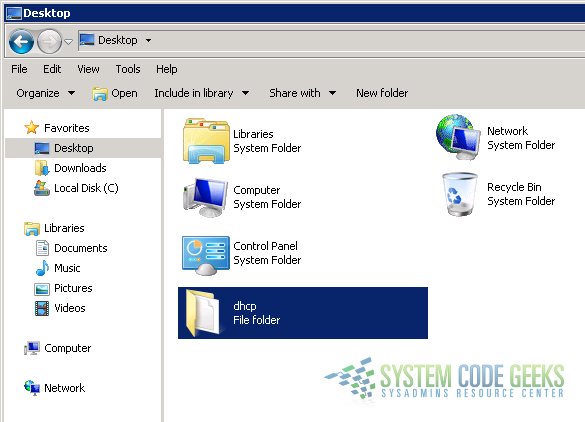
Figure 4: DHCP backup copied to desktop
NOTE: Before running the restore, if the old server will no longer be used to host DHCP services, you should either stop and disable the DHCP Server service, de-activate the scopes, or unauthorize the server (I would recommend this last option I mentioned). Refer to Figure 5a and 5b below:

Figure 5a: Unauthorize old DHPC server
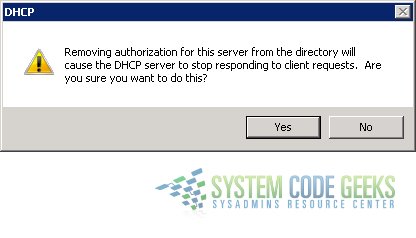
Figure 5b: Confirm unauthorize old DHPC server
NOTE: I would also recommend verifying the correct permissions on the backup folder that you copied to the desktop before beginning the restore process (Refer to Figure 6f further down).
Now it’s time to restore to the new server. To restore a backup, you would basically follow the same steps that were referenced in section 2.1, but choose “restore” instead of “backup”. As referenced in figure 2a and 2b, launch the DHCP MMC and make sure your new server is listed (if it’s not, add it).
Once your server is available in the DHPC MMC, you should see some red down arrow emblems over the icons for IPv4 and IPv6 (indicating that the server is connected but not authorized). Authorize the new server by right-clicking on it and choosing “Authorize”. Refer to Figure 5c below:

Figure 5c: Authorize the new server
It will take a few moments for the server authorization to fully take effect. You can click “Action” from the menu and choose “Refresh” to update the status. When it’s successfully updated, you should see the emblems on the icons change from red down arrows to green check marks (indicating that the server is connected and active). Refer to Figure 5d below:
Figure 5d: Server successfully authorized
If the status doesn’t successfully update, open the Services MMC (via Administrative Tools) and restart the DHCP Server service (the far right toolbar button, or right-click the service and choose “Restart”). Once the service has been successfully restarted, it should look like this (Refer to Figure 5e below):
Figure 5e: DHCP Server service successfully restarted
Be sure to check the console again and verify that the server is authorized (refer back to Figure 5d). Once the server is successfully authorized, you can perform a restore. Right-click your server and choose “Restore…”. Refer to Figure 6a below:
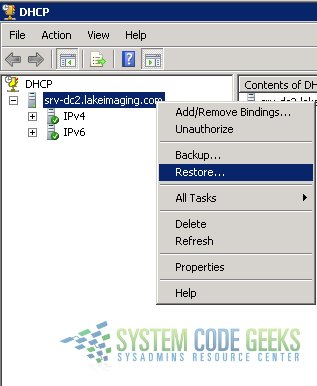
Figure 6a: Restoring the DHCP backup
You will be prompted that the service must be restarted for the changes to take effect (this is normal); choose “Yes”. Refer to Figure 6b below:
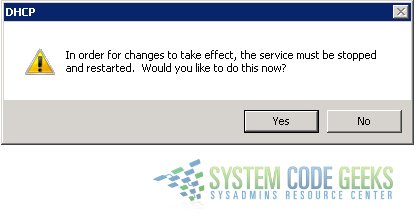
Figure 6b: Prompt for restart of services
Once the backup has been successfully restored, you’ll see a confirmation message. Refer to Figure 6c below:
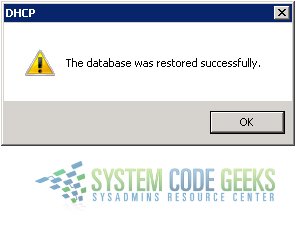
Figure 6c: Database successfully restored
NOTE: There are times when certain variables in the restore process are not quite right, which can cause various error messages. For instance, if the backup folder on the desktop does not have proper permissions configured, you could see messages like these (Refer to Figure 6d and 6e below):
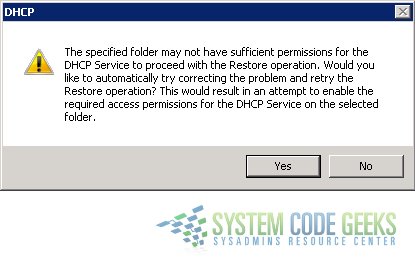
Figure 6d: Insufficient permissions on the backup folder
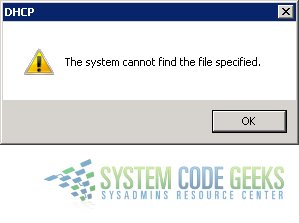
Figure 6e: Cannot find the file specified (permissions issue)
Sometimes DHCP will prompt you that it can attempt to repair the permissions. But if that fails, or you need to verify/set them manually, right-click on the backup folder on the desktop, choose “Properties”, click the “Security” tab, then click the “Edit” button. Verify that the user account you’re currently logged on with has “Allow” permissions for “Full control”. Refer to Figure 6f below:
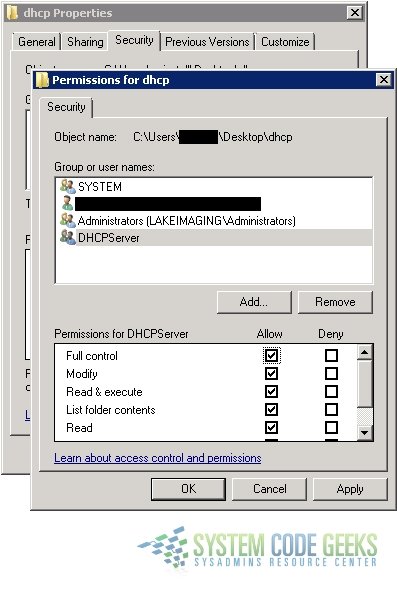
Figure 6f: Verifying proper folder permissions
Try the restore again after you’ve set the correct permissions on the folder that you’re restoring from.
If you ever get a service error message (Refer to Figure 6g below), you can wait a moment, restart the DHCP Server service, then try again:

Figure 6g: DHCP Server service error
When the restore has completed successfully, you’ll be able to verify that all of the database information exists under “IPv4” (and “IPv6” if applicable) in your DHCP MMC.
2.3. Backup via CLI
This is essentially the same procedure as in step 2.1, but done entirely from CLI using Netsh. The backup process via CLI is fast and simple compared to the GUI method (granted, neither method is difficult, but the CLI method is much shorter in terms of steps involved, and more efficient in my opinion). This process can be done by remotely connecting to the DHCP server via a command prompt, but I prefer to directly logon to the server and run the commands from the server’s CLI.
Open an admin command prompt by searching for “cmd” or “command prompt” via the Start menu, right-click on the search result, and choosing “Run as administrator”. Refer to Figure 7a below:

Figure 7a: Command Prompt via searching from Start menu
NOTE: If you’re prompted by UAC, click “Yes”. Refer to Figure 7b below:
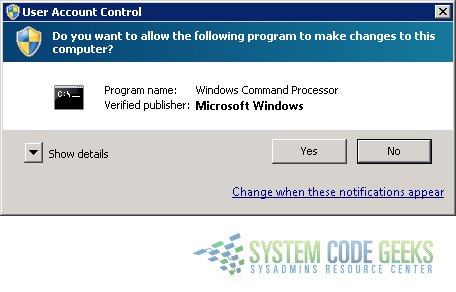
Figure 7b: UAC prompt
Once the command prompt is open, doing a backup is as simple as typing the following command syntax:
netsh dhcp server backup <backup folder location>
In the example below, I backup the database to a folder named “dhcp” under “C:UsersAdminDesktop” (Refer to Figure 8 below):
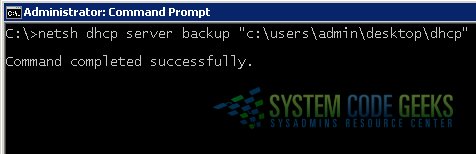
Figure 8: CLI backup
That’s it! Much faster via CLI!
Before you proceed to the next section, if you’re no longer going to use your old server to provide DHCP services, unauthorize the server by typing the following command syntax:
netsh dhcp delete server <ServerDNS> <ServerIP>
Refer to my example in Figure 9 below:
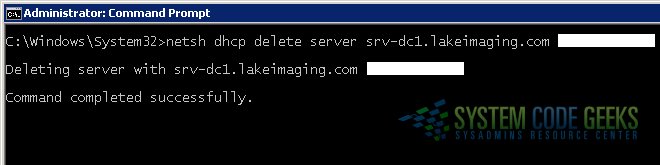
Figure 9: Unauthorize DHCP server via CLI
2.4. Restore via CLI
The restore process is also a shorter process than its GUI counterpart, but there are a couple of extra steps on this one. Remote to the new server and login, then copy the backup folder to the desktop (in my example, the folder is named “dhcp”). Be sure to verify the permissions on the backup folder (refer back to Figure 6f from Step 2.2).
Launch an admin command prompt (refer back to step 2.3) and use the following command syntax to authorize the server:
netsh dhcp add server <ServerDNS> <ServerIP>
Refer to my example in Figure 10a below:
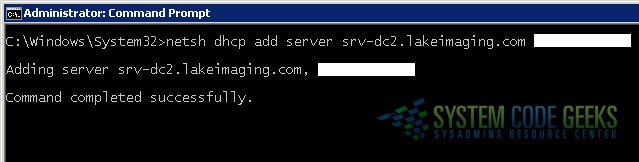
Figure 10a: Authorizing a DHCP server via CLI
You can also run a command to verify which and how many servers are authorized to provide DHCP services (If the information in the directory service is up to date) by running the following command:
netsh dhcp show server
Refer to my example in Figure 10b below:
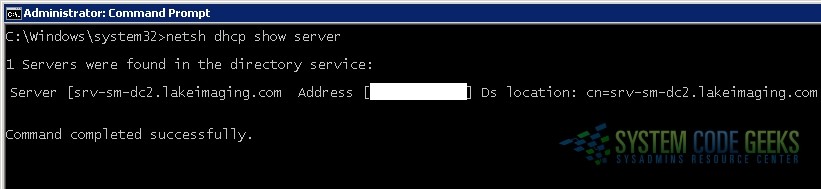
Figure 10b: Verifying authorized DHCP servers via CLI
Bonus Tip! Verify that the DHCP Server service is running. This can be done with the following command:
sc query dhcpserver
The output should look similar to my example in Figure 11 below:
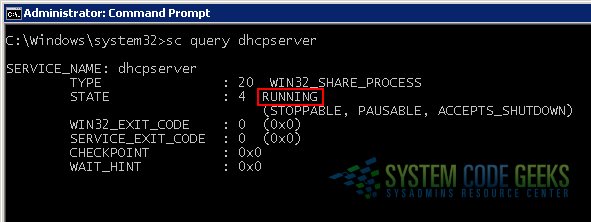
Figure 11: Verify DHCP Server service via CLI
If you ever need to start the service, you can do it like this:
sc start dhcpserver
Once everything looks good, you can perform the restore. This can be done with the following syntax:
netsh dhcp server restore <backup folder location>
Refer to my example in Figure 12 below:
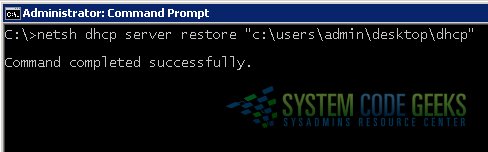
Figure 12: CLI restore
3. Export & Import (CLI Only)
The “export” command saves the database to a single file, rather than a folder (like “Backup” does). Refer back to Step 1.3.2 if you’d like to review the primer for the export/import commands. Also, in an effort to prevent this article from being too long, I won’t be covering some of the info that repeats because it would just create duplicate content (i.e. if a previous server is being unauthorized, authorizing the new server, verifying the DHCP server service, etc). Since everything beginning in Step 2.3 and beyond is all done via CLI, all of the same commands apply for the info that would count as repeat content.
3.1. Export
As with all of the commands that involve using CLI, logon to the DHCP server and launch an admin command prompt to begin. Once the command prompt is open, perform an export like this (substituting the filename and path with whatever matches your environment/preference); Refer to Figure 13 below:

Figure 13: CLI export
NOTE: The filename and extension can be named whatever you want (.log, .txt, .cfg, etc). I personally like to use “.dat” because it’s essentially a copy of the entire database stored inside a single file.
3.2. Import
To import the data from your previous export, the command is nearly identical; just change “export” to “import”. Refer to Figure 14 below:
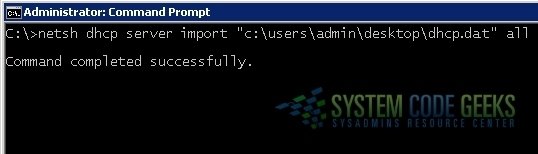
Figure 14: CLI import
As you could see in my export and import examples, I used the command “all” at the end of each full command, because my intention was to export everything from the database. I’ll give some examples in Step 5 where this command would be modified to export/import specific info instead of “all” info.
4. Dump & Exec (CLI Only)
OK, so a quick reminder about dump: You really shouldn’t ever consider using a dump file as a way to restore a DHCP server or to migrate a lot of DHCP data from one server to another. A dump file should generally only be used in situations where you’re wanting to do some fine-tuned configuring of a server.
Bonus Tip! You can dump database information directly to the command window (instead of a file), but it’s not very practical in most situations (unless you’re using the command to view some brief information). Here’s an example syntax reference (If “10.10.20.0” was one of the scopes that’s configured on the server, the following command would dump all related information related to the 10.10.20.0 scope):
netsh dhcp server scope 10.10.20.0 dump
4.1. Dump (+ Reconcile)
NOTE 1: As stated in the primer earlier (Note 2 in step 1.3.3), you should reconcile your scopes prior to dumping the configuration. There can be a lot of output when running the reconcile command, so I’m not going to provide screenshot examples; but I’ll at least provide you with the commands you need to know, as well as what to look for.
Verify the integrity of your scopes with the following command:
netsh dhcp server initiate reconcile
If everything is good, you should see a message for every scope that you have configured. The messages will each look like this:
"No database-registry inconsistencies detected for scope <Scope-IP>" (where "Scope-IP" would be an address like "10.10.20.0")
If there are any problems, you may see a message indicating that there are inconsistencies, along with specific IP addresses that were found. In those cases, you can “fix” the issue by running a command like this:
"netsh dhcp server scope <Scope-IP> intitiate reconcile fix" (where "Scope-IP" would be a specifc address like "10.10.20.129")
After running the reconcile fix command for any/all inconsistencies found, you can run the original command again to re-verify the database integrity (“netsh dhcp server initiate reconcile”). Once the database looks good, you’re ready to run the dump command.
The dump command is simple and straight-forward, and nearly as powerful as the “export” command (dump exports the same information as the “export” command, with the exception of lease info). Here’s a general example of the dump command (Refer to Figure 15 below):
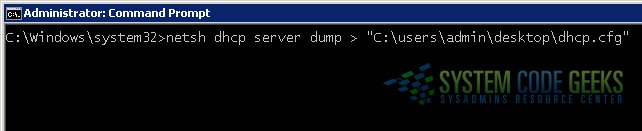
Figure 15: CLI dump
NOTE 2: Again, the filename and extension can be named whatever you want (.log, .txt, .cfg, etc). I personally like to use “.cfg” for dump files because it’s dumping configuration information to a single file.
NOTE 3: You’ll also notice that, for whatever reason, Microsoft didn’t program any kind of notification into the dump command to indicate that the command was successful; it just returns to the command prompt. The dump file is “readable” though, so you can easily open it with a text editor and view the information that was dumped.
4.2. Exec
As you may have already guessed, the “exec” command is short for “execute” (as in “execute this script or configuration file”), and in our example, it’s used to essentially import the contents of a dump file into a DHCP server.
NOTE: If you thought there was a lot of command output when running the reconcile command, it’s nothing compared to the amount of output you can see when executing a dump file! With that said, I won’t be providing any screenshots of what you would see, other than an example reference of running the command. Refer to Figure 16 below:
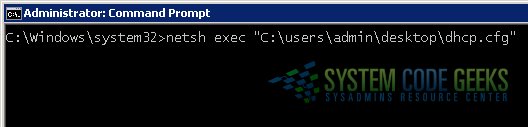
Figure 16: CLI exec
5. Bonus: Extra DHPC Management Tricks
In this section, I’m going to be covering some cool additional commands you can run which will hopefully help extend your ability to manage a Windows DHCP server.
5.1. Trick #1
Show MAC/IP reservations for a specific scope:
Example syntax:
netsh dhcp server scope <Scope-IP> show reservedip
Example command with output:
C:Windowssystem32>netsh dhcp server scope 10.10.20.0 show reservedip

Changed the current scope context to 10.10.20.0 scope.

===============================================================
  Reservation Address -    Unique ID
===============================================================

    10.10.20.56       -    00-e0-4b-39-ab-56-
    10.10.20.63       -    18-a9-05-2f-8e-15-
    10.10.20.80       -    00-20-4a-05-18-5d-
    10.10.20.92       -    00-0c-29-4c-81-25-

No of ReservedIPs : 4 in the Scope : 10.10.20.0.

Command completed successfully.
5.2. Trick #2
Dump database information to a file, then use “Find” to search the dump file and output all MAC-IP reservations to a CSV file:
Example commands:
netsh dhcp server dump > reservations.txt
find "Add reservedip" "c:usersadmindesktopreservations.txt" > "c:usersadmindesktopreservations.csv"
NOTE: I’m not exactly sure why, but the “A” in the word “Add” has to be capitalized, otherwise the command will fail.
5.3. Trick #3
Show general scope info:
Example command:
netsh dhcp server show scope
Example command (geared towards remote access):
netsh dhcp server <server_name_or_ip> show scope
Example output:
=================================================================================
 Scope Address  - Subnet Mask    - State        - Scope Name          -  Comment
=================================================================================

 10.10.10.0      - 255.255.255.0  -Active        -001_VOICE            -VLAN 10
 10.10.20.0      - 255.255.255.0  -Active        -002_VOICE            -VLAN 20
 10.10.30.0      - 255.255.255.0  -Active        -003_VOICE            -VLAN 30
 10.10.40.0      - 255.255.255.0  -Active        -004_VOICE            -VLAN 40
 10.10.50.0      - 255.255.255.0  -Active        -005_VOICE            -VLAN 50
 10.10.60.0      - 255.255.255.0  -Active        -006_VOICE            -VLAN 60
 10.10.70.0      - 255.255.255.0  -Active        -001_IT               -VLAN 70
 10.10.80.0      - 255.255.255.0  -Active        -001_STF              -VLAN 80
 10.10.90.0      - 255.255.255.0  -Active        -002_STF              -VLAN 90
 10.10.100.0     - 255.255.255.0  -Active        -003_STF              -VLAN 100
 10.10.110.0     - 255.255.255.0  -Active        -004_STF              -VLAN 110
 10.10.120.0     - 255.255.255.0  -Active        -005_STF              -VLAN 120
 10.10.130.0     - 255.255.255.0  -Active        -006_STF              -VLAN 130
 10.10.140.0     - 255.255.255.0  -Active        -007_STF              -VLAN 140
 10.10.150.0     - 255.255.255.0  -Active        -008_STF              -VLAN 150

 Total No. of Scopes = 15
Command completed successfully.
5.4. Trick #4
Show general MIB info:
Example command:
netsh dhcp server show mibinfo
Example syntax (geared towards remote access):
netsh dhcp server <server_name_or_ip> show mibinfo
Example output:
        Discovers = 63561.
        Offers = 8.
        Delayed Offers = 0.
        Requests = 626.
        Acks = 86588.
        Naks = 3.
        Declines = 0.
        Releases = 2.
        ServerStartTime = Thursday, January 19, 2017 1:03:35 PM
        Scopes = 15.
        Scopes with Delay configured= 0.
        Subnet = 10.10.10.0.
                No. of Addresses in use = 71.
                No. of free Addresses = 80.
                No. of pending offers = 0.
        Subnet = 10.10.20.0.
                No. of Addresses in use = 36.
                No. of free Addresses = 115.
                No. of pending offers = 0.
        Subnet = 10.10.30.0.
                No. of Addresses in use = 27.
                No. of free Addresses = 124.
                No. of pending offers = 0.
        Subnet = 10.10.40.0.
                No. of Addresses in use = 27.
                No. of free Addresses = 124.
                No. of pending offers = 0.
        Subnet = 10.10.50.0.
                No. of Addresses in use = 11.
                No. of free Addresses = 140.
                No. of pending offers = 0.
        Subnet = 10.10.60.0.
                No. of Addresses in use = 13.
                No. of free Addresses = 138.
                No. of pending offers = 0.
        Subnet = 10.10.70.0.
                No. of Addresses in use = 5.
                No. of free Addresses = 45.
                No. of pending offers = 0.
        Subnet = 10.10.80.0.
                No. of Addresses in use = 15.
                No. of free Addresses = 61.
                No. of pending offers = 0.
        Subnet = 10.10.90.0.
                No. of Addresses in use = 23.
                No. of free Addresses = 76.
                No. of pending offers = 0.
        Subnet = 10.10.100.0.
                No. of Addresses in use = 31.
                No. of free Addresses = 69.
                No. of pending offers = 0.
        Subnet = 10.10.110.0.
                No. of Addresses in use = 12.
                No. of free Addresses = 89.
                No. of pending offers = 0.
        Subnet = 10.10.120.0.
                No. of Addresses in use = 40.
                No. of free Addresses = 61.
                No. of pending offers = 0.
        Subnet = 10.10.130.0.
                No. of Addresses in use = 2.
                No. of free Addresses = 99.
                No. of pending offers = 0.
        Subnet = 10.10.140.0.
                No. of Addresses in use = 6.
                No. of free Addresses = 94.
                No. of pending offers = 0.
        Subnet = 10.10.150.0.
                No. of Addresses in use = 7.
                No. of free Addresses = 93.
                No. of pending offers = 0.
5.5. Trick #5
Scenario: You have two DHCP servers running in the stereotypical “80/20” rule, but you’d rather manage all of the DHCP scopes from one server instead.
Solution: Export the scopes from the server that’s managing 20% of the services, then import them into the server that’s managing the other 80% of the services (thus consolidating all of the scopes info into one server).
Example command to export the scopes from the source server:
netsh dhcp server export "c:usersadmindesktopdhcp.dat" 10.10.10.0 10.10.20.0 10.10.30.0
Example command to import the scopes into the destination server:
netsh dhcp server import "c:usersadmindesktopdhcp.dat" 10.10.10.0 10.10.20.0 10.10.30.0
5.6. Trick #6
Performing a daily backup of the DHCP server database via a scheduled task:
I’m going to explain the details of how I have mine setup, which you can then use/modify for your own environment. Here’s a brief outline of the solution I’m using:
5.6.1.
A PowerShell script that performs the daily backup:
On the local hard drive of the DHCP server, I have a folder where I store my scripts (C:Scripts). Here’s the code for the PowerShell script (stored in a file named “dhcp_daily_backup.ps1”):
$file = "C:DHCP_Backupsdhcp-$((Get-Date).tostring("yyyy-MM-dd-HH-mm-ss")).dat"
netsh dhcp server export $file all
5.6.2.
A folder on the local hard drive where the script stores the daily backup:
C:DHCP_Backups
5.6.3.
A scheduled task that runs the script each night:
- Task name = DHCP_Daily_Backup
- Description = Performs a daily backup of the DHCP server database
- Security options = Run whether user is logged on or not
- Configure for = Windows 7, Windows Server 2008 R2
- Trigger = Daily at 1am / Recur every 1 days
- Action = Start a program: C:Scriptsdhcp_daily_backup.ps1
5.6.4. (Bonus!)
A scheduled task that uses RoboCopy to archive the daily backup each night (RoboCopy is already natively included with Windows Server 2008!):
- Task name = DHCP_Daily_Backup_Archive
- Description = Archives each daily DHCP backup to our storage server
- Security options = Run whether user is logged on or not
- Configure for = Windows 7, Windows Server 2008 R2
- Trigger = Daily at 2am / Recur every 1 days
- Action = Start a program: robocopy / Add arguments = “C:DHCP_Backups” “\srv-storageIT_ShareDHCP_Backups” /copy:DAT /r:10 /w:30 /maxage:1 /log+:C:!CentralLogsdhcp-backup-archive.log
6. Summary
Managing a Windows DHCP server can be complex and a little time consuming initially (especially if you’re just diving into learning how to do it), but once you have your bearings, it’s really not difficult (and can actually be fun!). Hopefully this article has given you a lot of great info that will empower you to “level up” in your skills, understanding and experience of managing a DHCP server!
Skip to content
Прочитано:
1 420
Как известно на серверах DHCP в файлах БД хранится информацию об аренде и резервировании DHCP. Все эти файлы располагаются по пути
%systemroot%system32dhcp.

, где
dhcp.mdb — основной файл БД DHCP-сервера.
j50.log — журнал регистрации транзакций, используемый для восстановления незавершенных транзакций в случае сбоя сервера.
J50.chk — файл контрольной точки, используемый при усечении журнала регистрации транзакций DHCP-сервера.
Res1.log — зарезервированный файл журнала DHCP-сервера.
Res2.log — зарезервированный файл журнала DHCP-сервера.
Tmp.edb — Временный рабочий файл DHCP-сервера.
По умолчанию БД DHCP архивируется автоматом каждые 60 минут.
Параметры реестра, управляющие местоположением архива, расписанием архивации, хранятся в разделе:
HKLMSYSTEMCurrentControlSetServicesDHCPServerParameters

BackupDatabasePath — расположение БД DHCP.
DatabaseName — имя основной файла БД DHCP. Значение по умолчанию — DHCP.mdb
BackupInterval — интервал архивации в минутах. Значение по умолчанию — 60 мин.
DatabaseCleanupInterval — интервал очистки записей в БД. Значение по умолчанию — 60 мин.
Делаем архивации БД DHCP:

Восстанавливаем БД DHCP из архивной копии:

На время восстановления БД служба DHCP-сервер (DHCP Server) останавливается. В таком случае клиенты временно не могут устанавливать связь с dhcp-сервером и получать IP-адреса.
In this tutorial, you will learn how to backup and restore Windows DHCP server using the DHCP console and PowerShell.
Have you ever experienced a DHCP server crash or failure? All is calm until devices start rebooting.
Users will complain that they can’t access email, the internet stops working and their apps no longer work. That’s because the DHCP server is down and they are not getting connected to the network.
It’s really easy to spin up a new DHCP server but do you remember all the scopes you need to re-create? What about those reservations, did you memorize all those MAC addresses?
Let’s check out how to backup your DHCP server for a fast recovery.
DHCP Database Auto Backup Every 60 minutes
By default, Windows will backup the DHCP configuration every 60 minutes at this location %SystemRoot%System32DHCPbackup.
Important Tip: Although Windows automatically backs up the DHCP configuration it will do you no good if the server crashes and you are unable to access the file system. It is recommended to either change the location to a network share or use backup software to backup the folder. You could also schedule a task to copy the backup folder to another location.
Video Tutorial
If you don’t like video tutorials or want more details, then continue reading the instructions below.
Manual DHCP Backup Using DHCP Console
In this example, I’ll be backing up the DHCP configuration on server DHCP1. Later in this tutorial, I’ll be restoring this backup to server DHCP2.
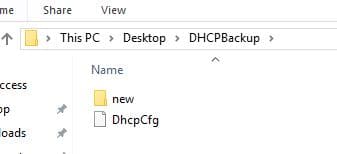
Step 1: Create a Backup Folder
I’ve created a folder on the server desktop called DHCPBackup
Step 2: Open the DHCP Administration Console
The DHCP console is located in start -> Windows Administrative Tools -> DHCP
Step 3: Right Click the Server and Select Backup
Select the folder that was created in step 1. In my case, this was the DHCPBackup folder on the desktop. Then click OK
Unfortunately, there is no confirmation that the backup was completed.
You can go open the folder and verify data was backed up.
I can see that files were written to the folder, looks like the backup was completed successfully.
That is it for manually backing up the DHCP server. Now, let’s move on to the restore process.
Restore DHCP Server Using DHCP Console
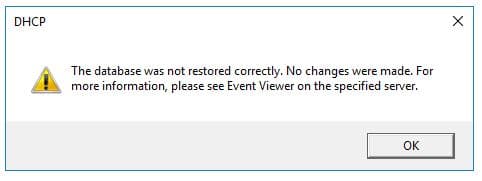
Important Tip: You must copy the backup folder from the steps above to %SystemRoot%System32DHCPbackup or you will get the following error saying the database was not restored correctly.
Step 1: Log into the server you want to restore the DHCP backup to
I’m logging into my 2nd DHCP server with the hostname of DHCP2.
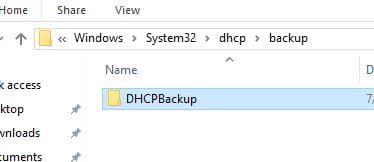
Step 2: Copy the backup to the correct location
Now I will copy the DHCPBackup folder to %SystemRoot%System32DHCPbackup
Step 3: Open The DHCP Console and Select Restore
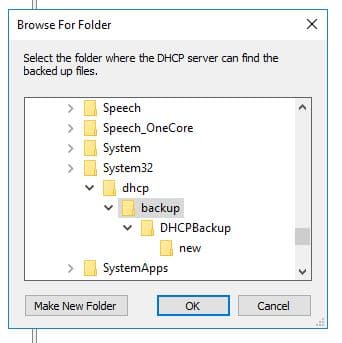
On the DHCP Console, right click the server and select Restore
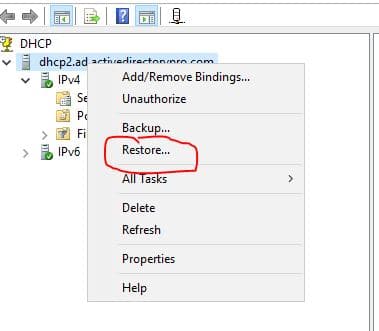
Now select the DHCPBackup folder
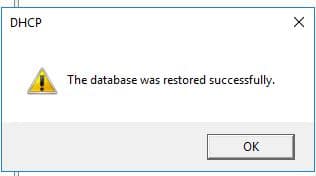
You will get a message that says the service must be stopped and restarted.
Click Yes
Restore complete
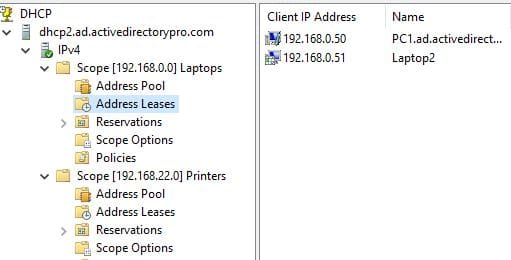
You can go browse the scopes to verify everything restored correctly.
I have a small lab but I can see the two scopes, leases, and reservations all restored.
Backup DHCP Server Using PowerShell
In this example, I’ll be logged in locally to the server.
Use the following command to backup the DHCP configuration using PowerShell.
Backup-DhcpServer -path c:DHCPBackup
If you want to backup the DHCP server from a remote computer use this command
Backup-DhcpServer -ComputerName "dhcp1" -Path "C:DHCPBackup"
Restore DHCP Server Using PowerShell
Step 1: Copy the backup folder to the correct path
Remember the backup has to be copied to “C:Windowssystem32dhcpbackup” or you will get permission errors.
Step 2: Run the following command
PS C:> Restore-DhcpServer -ComputerName "dhcp2" -Path "C:Windowssystem32dhcpbackup"
That completes the backup and restore process using PowerShell. If you need more PowerShell assistance with these commands see the Restore-DhcpServer and Backup-DHCPServer reference guides.
I hoped this article helped you learn how to backup and restore Windows DHCP servers. Let me know what you think by leaving a comment or questions below.
You Might Also Like…
- How to configure DNS aging and scavenging
- How to install and configure DHCP Server
DHCP & Print Server Backups
Scenario:
All servers are running Windows Server 2008 R2. Like most well run IT departments you have system images for servers. You probably have multiple sites, possibly with low bandwidth connections and you would like to minimize the amount of data being backed up. DHCP and print servers are important but not business critical and can stand to be down for a few hours in the event of a major failure. This procedure will allow for backup of all important information while minimizing backup size and an easy restoration task.
Method, Printers:
Server 2008R2 has advanced print management features including a tool called “Printbrm”. Printbrm.exe facilitates importing and exporting of all things print related including ports, drivers and shares. Using Printbrm we can execute a task to create a .CAB file that can be used to restore all print information to a rebuilt server. Without using this tool the only way BackupExec can backup this information is to make a system state backup. Another advantage is this Printbrm export is essentially separated from the server and can be restored to any 2008r2 machine running print services. Using BackupExec, create a Pre-Command that runs the Printbrm export to a file:
c:WindowsSystem32spooltoolsprintbrm -B -S \server -F D:printerExportsserverserver.cab Replacing “server” with your servers name.
Using conventional backup techniques backup your export directory. The printer exports can be run from your BackupExec server and saved locally if you install the Print Services roll, or you can execute the command remotely and hold the export on the individual servers. One limitation I noticed with Printbrm is that it doesn’t accommodate overwriting export files, so you will need to delete your server.cab file if you intend on making multiple backups. I used this as a Post-command:
cmd.exe /c del d:printerexportsserver*.* /q
This simply deletes the contents of the export subfolder without prompting. Another option is to create the job using backup method “Back up and delete the files” though that’s not how I have it configured.
Method, DHCP
Server 2008r2 also makes an automatic backup of the DHCP database every 60 minutes and places is in the familiar DHCP backup directory (system32dhcpbackup) . On previous versions of windows server you had to stop the services, run a backup and restart the services. It worked (most of the time) but this is system integrated and easier to deal with. Using BackupExec simply include the backup directory as a simple file backup.
Status at this point:
After implementing this you should have printer export files (server.cab) and the DHCP backups. These two items will serve as your backups assuming the target servers are dedicated to DHCP and Print services only.
The server just died:
The server just died, now you need to restore everything. Fix or replace your hardware, image the machine with Server 2008r2 and get it online. Install your DHCP and Print management rolls. You probably had to drive out there to fix the server anyway and it makes for good PR to stay until the server is back online.
DHCP:
This one is real easy.
After you have your DHCP server roll installed, open the DHCP server manager, right click on your server name and select “Restore”. Point the wizard at your DHCP backup and let it do its thing
Print:
You can either do this in the print management console or via command line. For restore tasks the GUI works just fine. Open the print management console and navigate down to your print server name. Right click on it and select “import printers from a file” and point it at your server.cab file. For good measure reboot and check your shares.
Sources
Technet DHCP Backup and Restore:
http://technet.microsoft.com/en-us/library/dd380264%28WS.10%29.aspx
Technet Print Management:
http://technet.microsoft.com/en-us/library/cc753109%28WS.10%29.aspx
I posted this question in DS forum but would like to search help from network forum too.
http://social.technet.microsoft.com/Forums/en-US/winserverDS/thread/c0cc3941-beb5-47a7-8942-c493a7ae86be
Here is my question waiting for answer. The systemstate backup includes DHCP/WINS database and log files. How can I use the restored data for systemstate backup to recover DHCP and all its settings in WIndows 2008? Can I simply copy it and overwrite
the dhcp.mdb in C:\WINDOWS\System32\dhcp? What I found was there’s an additional DhcpCfg file in the backup directory when I backed up DHCP from the DHCP managment console. It seems have the registry information and extra information. But this DhcpCfg
doesn’t exist in systemstate backup though.
[HKEY_LOCAL_MACHINESystemCurrentControlSetServicesDhcpServerParameters]
«ServiceDllUnloadOnStop»=dword:00000001
«DatabaseLoggingFlag»=dword:00000001
«RestoreFlag»=dword:00000000
«DatabaseCleanupInterval»=dword:0000003c
«ServiceMain»=»ServiceEntry»
«BackupInterval»=dword:0000003c
«APIProtocolSupport»=dword:00000005
«DebugFlag»=dword:00000000
«DhcpLogFilesMaxSize»=dword:00000046
«DatabaseName»=»dhcp.mdb»
«ServiceDll»=hex(2):25,00,53,00,79,00,73,00,74,00,65,00,6d,00,52,00,6f,00,6f,
00,74,00,25,00,5c,00,53,00,79,00,73,00,74,00,65,00,6d,00,33,00,32,00,5c,00,
64,00,68,00,63,00,70,00,73,00,73,00,76,00,63,00,2e,00,64,00,6c,00,6c,00,00,
00
«BackupDatabasePath»=hex(2):43,00,3a,00,5c,00,57,00,49,00,4e,00,44,00,4f,00,57,
00,53,00,5c,00,53,00,79,00,73,00,74,00,65,00,6d,00,33,00,32,00,5c,00,64,00,
68,00,63,00,70,00,5c,00,62,00,61,00,63,00,6b,00,75,00,70,00,00,00
«DatabasePath»=hex(2):43,00,3a,00,5c,00,57,00,49,00,4e,00,44,00,4f,00,57,00,53,
00,5c,00,53,00,79,00,73,00,74,00,65,00,6d,00,33,00,32,00,5c,00,64,00,68,00,
63,00,70,00,00,00
«DhcpLogFilePath»=»C:\WINDOWS\System32\dhcp»
«DhcpServerDUIDV6″=hex:00,01,00,00,4d,af,2e,ad,00,50,56,ac,00,02
«DhcpV6LogFilePath»=»C:\WINDOWS\System32\dhcp»
«Version»=dword:00000000
«RestoreDatabasePath»=»E:\Restore»
[HKEY_LOCAL_MACHINESystemCurrentControlSetServicesDhcpServerParametersConfiguration]
This posting is provided AS-IS with no warranties/guarantees and confers no rights.