In a previous post, we talked about Windows Server 2008 end of life upgrade strategies and considerations that need to be made when choosing an upgrade path. If an in-place upgrade is not an option, performing a migration or data migration to a different server running a supported Windows Server operating system is a great way to leave Windows Server 2008/R2 behind for a current Windows Server release.
Even if you have already migrated upwards from 2008, we take a look at Windows Server data migration tools and best practices to get a feel for the best way to easily migrate your data/roles/services to newer Windows Server platforms.
Migrate to the cloud or not?
You can easily see when reading through Microsoft’s documentation on migrating legacy Windows Servers to modern versions of Windows Server that they strongly recommend migrating to Azure. We covered some of the benefits in the Windows Server 2008 end of life upgrade strategies post, but why might Azure be a good option?
A few of the standout advantages that Azure gives your business:
- Reduced maintenance, no more hardware upgrades
- Global scale – many datacenters around the world
- Improved security – some of the best security tools and mechanisms are available to you
- Compliance tools – many Azure tools for meeting compliance objectives
What are some considerations you need to make before migrating from Windows Server 2008/R2 to VMs hosted in Azure?
- Consider which apps you can “lift and shift” directly to the cloud
- Can you make use of Azure app services for migration? Azure Active Directory, SQL Services, SharePoint, etc.
- Will some of your apps require re-architecting?
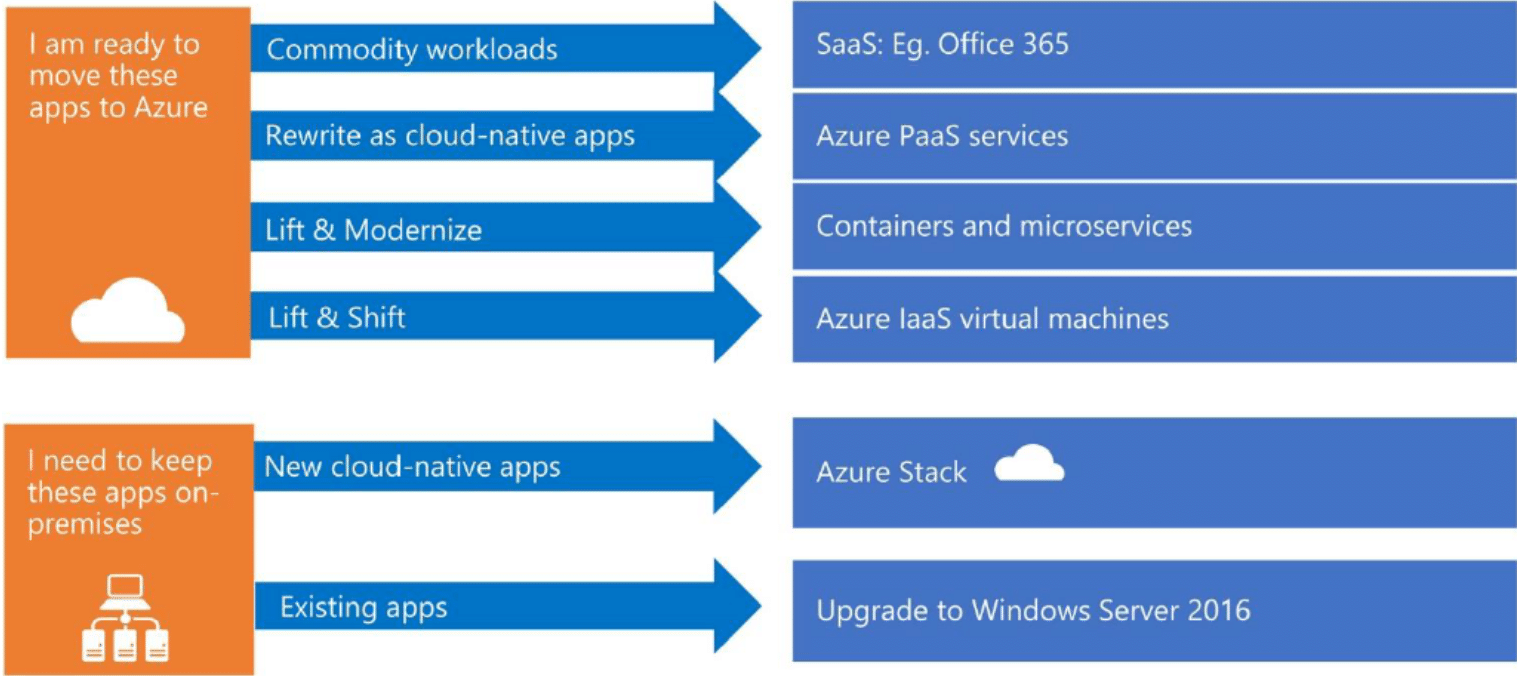
Infographic provided by Microsoft looking at migration workflows to Azure (Image courtesy of Microsoft)
Windows Server 2008/R2 migration assessment
A critical component of a successful Windows Server 2008/R2 migration is understanding the technical as well as the business requirements of the environment, architectural dependencies, roles/services, and custom applications that may be running on the existing server. Having a good picture of your Windows Server 2008/R2 environment helps to reduce the chances of adverse effects on business continuity during the migration process.
During the assessment phase of the migration process, it is good to ask questions regarding the Windows Server 2008/R2 migration.
- Will the applications, data, roles, services remain on-premises or is migration to Azure a possibility?
- Which applications might be able to migrate to Azure and which would need to stay on-premises?
- What are the dependencies of the applications on the Windows Server 2008/R2 server?
- Will there be any authentication changes after migrating?
- What are the architectural dependencies? If so, will this affect migration to Azure?
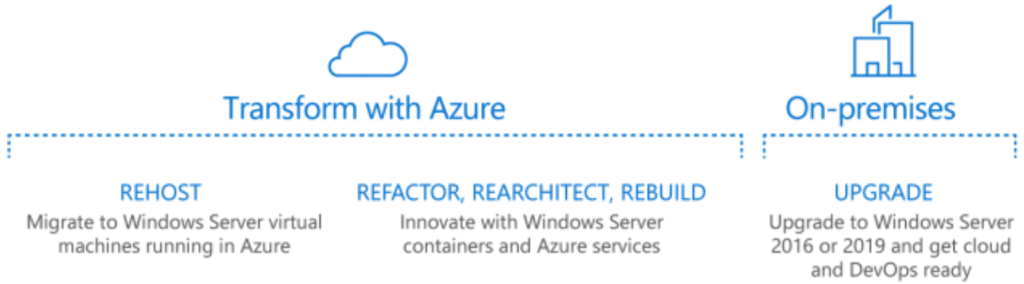
Deciding which applications can migrate to Azure or those that need to stay on-premises (Image courtesy of Microsoft)
The above are only a few of the questions you might consider when looking at migrating your Windows Server 2008/R2 servers to a newer platform. We can break out the Windows Server 2008/R2 resources into (4) components that you need to think about during migration.
- Roles and Services
- Data
- Microsoft applications
- Third-party and custom applications
Let’s look at each of these areas and talk about tools and best practices in performing the actual migration regarding these.
Windows Server 2008/R2 server roles and services migration
Microsoft’s recommended method for performing a migration from Windows Server 2008/R2 is what they call a server role migration. With server role migration, you build a new server, either physical or virtual, running a new Windows Server version (Windows Server 2016 or 2019 most likely) and then move your roles and services to the newly built physical/VM Windows Server.
What is a role/service? Typically, when thinking about a role/service, we are referring to the “in the box” roles and services included in the Windows Server operating system. Roles may include Active Directory Certificate Services, Active Directory Domain Services, DHCP Server, DNS Server, etc.
Microsoft publishes several Migration Guides that detail migration of the more common server roles/services that may be running on your Windows Server 2008/R2 servers.
Windows Server 2008/R2 data migration
One of the roles that may be served by a legacy Windows Server 2008/R2 server is a file server. You may have a large amount of data hosted by the Windows Server 2008/R2 server that needs to be migrated. Microsoft has released a new Windows Server data migration tool with Windows Server 2019 called the Storage Migration Service that will be a game-changer when migrating your Windows Server 2008/R2 servers to Windows Server 2019. What is the Storage Migration Service?
Storage Migration was developed to make it easier for IT administrators to migrate Windows Servers to newer versions. File Server migration is one of the roles that can be the most tedious to migrate. However, Storage Migration Service makes this extremely easy as it automates the entire process down to even assuming the identity of the legacy server. As noted by Microsoft, you can perform the following with the new Storage Migration Service:
- Inventory data on a single server or multiple servers
- Transfer files, file shares, and security ACLs from your source
Windows Server 2008/R2 servers to destination Windows Server 2019
- Assume the identity of the source servers so that users and apps don’t have to change anything to access existing data, mapped drives, paths, etc
- Use the Windows Admin Center interface to drive the entire Storage Migration Service process
- Use Storage Migration Service to migrate to a new server either on-premises or in the Azure cloud
The “all-encompassing” nature of the Storage Migration Service makes it extremely easy to move from legacy Windows Server versions such as Windows Server 2008/R2 in an automated way.
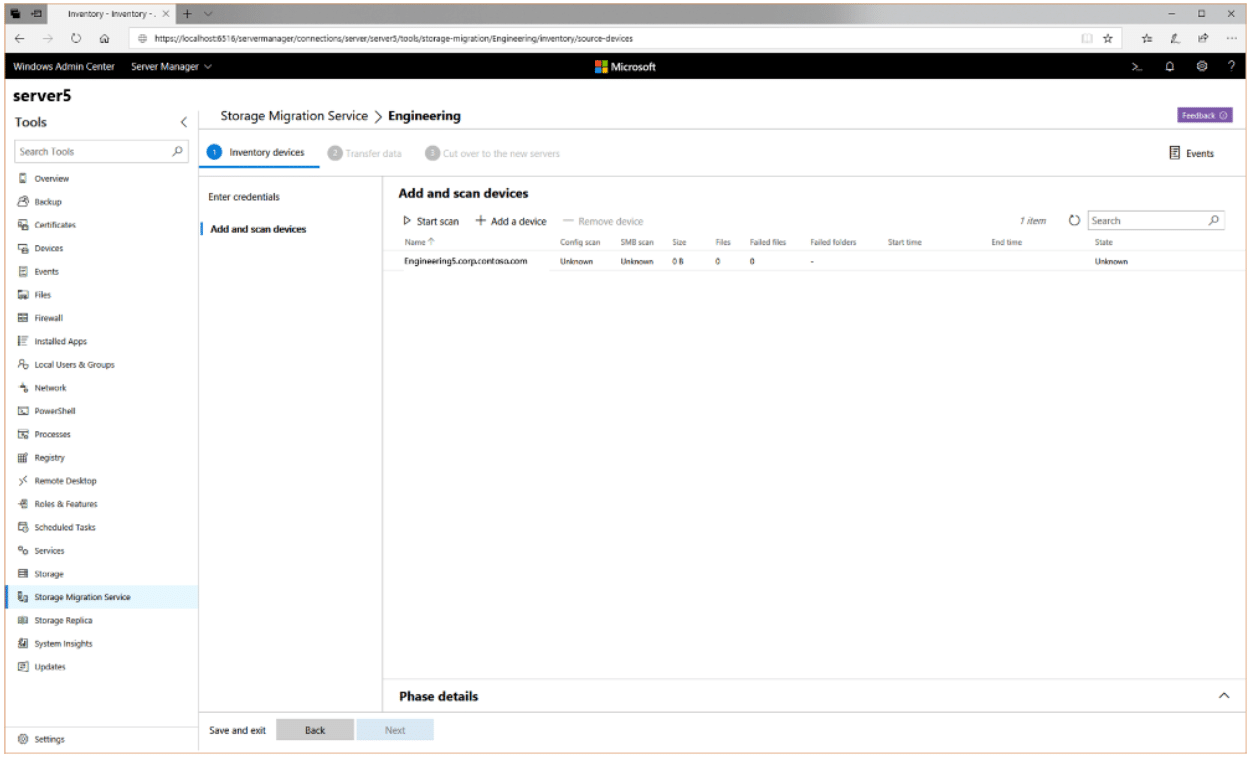
Using the Storage Migration Service to migrate to Windows Server 2019 (Image courtesy of Microsoft)
You can migrate the following source server versions to Windows Server 2019:
- Windows Server, Semi-Annual Channel
- Windows Server 2019
- Windows Server 2016
- Windows Server 2012 R2
- Windows Server 2012
- Windows Server 2008 R2
- Windows Server 2008
- Windows Server 2003 R2
- Windows Server 2003
With the Windows Server 2019 Storage Migration Service, data migrations involving files servers, large lists of ACLs, file shares, and other details are completely carried over from your legacy Windows Server 2008/R2 servers to Windows Server 2019. This is a powerful tool that you can leverage to move away from Windows Server 2008/R2.
Windows Server 2008/R2 Microsoft application migration
If you are hosting Microsoft applications on Windows Server 2008/R2, there are many attractive SaaS options available from the Microsoft Azure cloud. Applications such as SharePoint Online, Exchange Online, and Remote Desktop Services can easily be migrated and hosted in the Microsoft Azure cloud with all the benefits that come from the Azure ecosystem.
Email, SharePoint, and other communications platforms businesses run with Microsoft applications provide some of the core fundamental capabilities for the business. Moving these core applications to the Azure cloud makes sense for many businesses with the added functionality, flexibility, and security offered by Microsoft for those applications hosted in Azure.
The Office 365 Software-as-a-Service environment provides a great offering for you to migrate away from legacy on-premises servers to the Azure-backed public cloud.
Third-party and custom applications
What about third-party or custom applications that you may be running on legacy Windows platforms like Windows Server 2008/R2 in your environment? Microsoft has strong relationships with many of the major third-party, independent software vendors like SA, Adobe, and Citrix. The great news is that many of the vendors are natively moving to Azure-based solutions.
If you are thinking of rehosting in Azure, you can likely take advantage of native Azure integrations. Additionally, the Azure Marketplace often has Azure-native solutions that you can use for migrating from on-premises legacy Windows Server versions.
If you have custom applications, written in-house, you have a couple of options and tools you can use. Using Azure Site Recovery, you can replicate on-premises VMs to Azure and wait on third-party vendors to release an Azure-native solution for migration. With Azure Database Migration Service, you can move databases to Azure.
If you have custom web apps, you can also make use of Azure for containers or on-premises Windows Container services to house your web apps with little or no code changes. Containers also make a great candidate for housing custom .NET applications your business may be using.
Windows Server data migration best practices
There are certainly best practices to consider when thinking about your Windows Server data migration from Windows Server 2008/R2 to Windows Server 2019. We have already covered a few. However, you should certainly look at the following recommendations before performing your Windows Server data migration:
- Thoroughly assess your environment – including data, services, roles, applications (Microsoft and third-party)
- Do consider the Azure cloud – Azure includes many benefits and capabilities to take advantage of
- Consider the underlying architecture of your applications – Can they operate in a hybrid environment? Can they exist in Azure, what are the connectivity requirements to other server resources?
- Do use the new Storage Migration Service where possible
- Do understand the expectations from business stakeholders, before, during, and after a migration
- Consider leveraging Office 365 for core business services (Email, SharePoint, etc.)
- Use Azure Site Recovery for moving VMs to Azure
- Make use of Windows Containers for rehosting .NET and web apps either on-premises or in Azure for Containers
Wrapping up
As the end of extended support for Windows Server 2008/R2 approaches, creating a plan of action for either upgrading or migrating away from this now legacy Windows platform is no doubt a priority. There are many great migration tools and features available to make this easier than ever before.
With Microsoft Azure as well as great new tools like the Storage Migration Service, IT administrators have many options at their disposal to move away from Windows Server 2008/R2. As noted in this post and our previous post, proper planning and accurate assessment of the current Windows Server 2008/R2 environment is key to successfully migrating away from the legacy platform with the least amount of business interruption.
By utilizing the tools available as well as migrating to the cloud where feasible and possible, you can easily eliminate legacy Windows Server platforms from your environment while adding features and capabilities, agility, and flexibility.
We have two Windows Server and both are in Workgroup.
DC2003 is Windows Server 2003 x86 and WIN2KR2 is Windows Server 2008 R2.
We need migrate local users and groups from Windows Server 2003 (source server) to Windows Server 2008 R2 (destination server) and we will using Windows Server Migration Tools feature.
Here is my local users and groups on WIN2K8R2 server, before doing anything.


Here is my local users and groups on DC2003 server, before doing anything.


On Windows Server 2008 R2 (destination server), click Server Manager, right click on
Features, select Add Features, on Select Features page, select
Windows Server Migration Tools, then click Install.

After installation is finished, click Start, select Administrative Tools and you can see
Windows Server Migration Tool folder.

Now, need create deployment folders for source server by running the Smigdeploy.exe tool. Right click on
Command Promp and click Run as administrator. change to the directory in which the smigdeploy.exe tool is stored. Run following command first:
cd %Windir%System32ServerMigrationTools
Because my source server OS is Windows Server 2003 x86, command format is:
SmigDeploy.exe /package /architecture X86 /os WS03 /path <deployment folder path>
My share folder path is \DC2003Migration$, I run following command:
SmigDeploy.exe /package /architecture X86 /os WS03 /path \DC2003Migration$

Now, we need register Windows Server Migration Tools on
source server.
On Windows Server 2003 (source server), Click Start, click
Run, type cmd, and then click OK. Change to the directory to which you copied the Windows Server Migration Tools deployment folder. In my case, I run following command first:
cd MigrationSMT_ws03_x86
then run following command to register Windows Server Migration Tools cmdlets:
.Smigdeploy.exe

When registration is finished, a message is displayed that indicates that the registration finished successfully, and a Windows PowerShell session opens. You can click
Start, select Administrative Tools and you can see
Windows Server Migration Tool folder. Click Windows Server Migration Tools and run it.

We use Export-SmigServerSetting command on source server to migrate local users and groups. When we need migrate all, command format is:
Export-SmigServerSetting -User All -Group -Path <MigrationStorePath> -Verbose
My share folder path is \DC2003Migration$2003, I run following command:
Export-SmigServerSetting -User All -Group -Path \DC2003Migration$2003 -Verbose
Now, you are prompted to provide a password to encrypt the migration store. Write passwordt and press
Enter.


As you see, created file name is svrmig.mig.

On Windows Server 2008 R2 (destination server), click Start, select
Administrative Tools, select Windows Server Migration Tools folder, right click on
Windows Server Migration Tools and click Run as administrator.

We use Import-SmigServerSetting command on destination server to import local users and groups. When we need import just Enabled users, command format is:
Import-SmigServerSetting -User Enabled -Group -Path <MigrationStorePath> -Verbose
My share folder path is \DC2003Migration$2003, I run following command:
Import-SmigServerSetting -User Enabled -Group -Path \DC2003Migration$2003 -Verbose
Now, you are prompted to enter a password (that is password in export step). Write passwordt and press
Enter.


You can see, if user or group account already exists in server, the account does not migrate.

Now, we check migrated accounts.
Keep in mind, the migrated local user accounts will be disabled (Account is disabled) and have their properties set to (User must change password at next logon).


Source:
Install, Use, and Remove Windows Server Migration Tools
Please, if you find article useful, write your own article in TechNet Wiki to help TechNet Wiki community.
Introduction
I was working on a little project for a company that was running TS Gateway on 32bit Windows 2008. The reason they did not go for x64 at the time was that they used Virtual Server as their virtualization platform for some years and not Hyper-V. One of the drawbacks was that they could not use x64 guest VMs. Since then they have move to Hyper-V and now also run Window Server 2012. So after more than 5 years of service and to make sure they did not keep relying on aging technology it is time to move to Windows Server 2012 RD Gateway and reap the benefits of the latest OS.
All in all the Microsoft documentation is not too bad, all be it that the information is a bit distributed as you need to use various tools to complete the process. Basically, depending on the original setup of the source server you’ll need to use the TS/RD Gateway Export & Import functionality, Web Deploy (we’re at version 3.0 at the time of writing) and the Windows Server Migration Tools that were introduced with Windows 2008 R2 and are also available in Windows Server 2012.
In a number of posts I’ll be discussing some of the steps we took. You are reading the second post.
- x86 Windows Server 2008 TS Gateway Migration To x64 Windows Server 2012 RD Gateway
- Installing & using the Windows Server Migration Tools To Migrate Local Users & Groups
- TS/RD Gateway Export & Import (Fixing Event ID 2002 “The policy and configuration settings could not be imported to the RD Gateway server «%1″» because they are associated with local computer groups on another RD Gateway server”)
As discussed in the first part we need to migrate some local users & groups on the TS Gateway (source) server as they are also being used for some special cases of remote access, next to Active Directory users & groups for the Remote Access Policies (RAPs) & Connection Authorization Policies (CAPs). The tool the use is the Windows Server Migration Tools. These were introduced with Windows 2008 R2 and are also available in Windows Server 2012.
Some people seem to get confused a bit about the installation of the Server Migration Tools but it’s not that hard. I have used these tools several times before in the past and they work very well. You just need to read up a bit on the the deployment part and once you have it figured out they work very well.
Installing the Windows Server Migration Tools on the DESTINATION Server
First we have to install the on the DESTINATION host (W2K12 in our case, the server to which you are migrating)). For this we launch Server Manager and on the dashboard select Manage and choose Add Roles & Feature.
Navigate through the wizard until you get to Features. Find and select Windows Server Migration Tools. Click Next.![clip_image001[4]](https://blog.workinghardinit.work/wp-content/uploads/2013/05/clip_image0014_thumb.png "clip_image001[4]")
Click Install to kick of the installation.![clip_image001[9]](https://blog.workinghardinit.work/wp-content/uploads/2013/05/clip_image0019_thumb.png "clip_image001[9]")
After a while your patience will be rewarded.![clip_image001[11]](https://blog.workinghardinit.work/wp-content/uploads/2013/05/clip_image00111_thumb.png "clip_image001[11]")
Installing the Windows Server Migration Tools on the SOURCE Server
To install the Windows Server Migration Tools on the SOURCE server, you need to run the appropriate PowerShell command on the DESTINATION server. This is what trips people up a lot of the time. You deploy the correct version of the tools from the destination server to the source server, where you will than register them for use. Do this with an admin account that has admin privileges on both the DESTINATION & SOURCE Computer.
Start up the Windows Server Migration Tools from Server Manager, Tools.
This launches the Windows Server Migration Tools PowerShell window.
Our SOURCE server here is the32 bit (X86) Windows 2008 TS Gateway Server. The documentation tells us the correct values to use for the parameters /architecture and /OS to use.
SmigDeploy.exe /package /architecture X86 /os WS08 /path SourcerServerc$sysadmin
Now before you run this command be sure to go to the ServerMigrationTools folder as the UI fails to do that for you.
Also this is PowerShell so use . in front of the command otherwise you’ll get the error below.
While you want this:
Now you have also deployed the correct tools to the SOURCE server, our old legacy TS Gateway Server. Next we need to register these tools on the SOURCE Server to be able to use them. You might have gotten the message already you need PowerShell deployed on the SOURCE Server as documented.
If you have PowerShell, launch the console with elevated permissions (Runs As Administrator) and run the following command: .SmigDeploy.exe
Congratulations you are now ready to use the Windows Server Migration Tools! That wasn’t so hard was it? 
Using the Windows Server Migration Tools To Migrate Local Users & Groups
To export the local users and groups from the source TS/RD Gateway server you start up the Windows Server Migration Tools on the SOURCE server (see the documentation for all ways to achieve this) and run the following PowerShell command:
Export-SmigServerSetting -User All -Group –Path C:SysAdminExportMigUsersGroups –Verbose
As you can see I elected to migrate all user accounts not just the enabled or disabled ones. We’ll sort those out later. Also note the command will create the folder for you.
To import the local users and groups to the target RD Gateway server you start up the Windows Server Migration Tools on the Destination server (see the documentation) , i.e. our new Windows Server 2012 RD Gateway VM.
and run the following PowerShell command:
Import-SmigServerSetting -User Enabled -Group -Path C:SysAdminExportMigUsersGroups -Verbose
Do note that the migrated user accounts will be disabled and have their properties set to «Next Logon». This means you will have to deal with this accordingly depending on the scenarios and communicate new passwords & action to take to the users.

Do note that the local groups have had the local or domain groups/users added by the import command. Pretty neat.
You’re now ready for the next step. But that’s for another blog post.
![]()
About |
Rand Morimoto has more than 30 years of experience in the computer industry and has authored or contributed to dozens of books on Microsoft and tech-related topics.
Tools Included with Windows 2008 R2 “In the Box”
In the past, any time a new Windows operating system came out you had to manually migrate server configuration settings and data, or go out and buy a 3rd party tool to assist with the migration or do an inplace upgrade and bring along a lot of operating system «baggage» with your migration just to preserve your application configuration. With Windows 2008 R2, Microsoft shipped the product with a series of free migration tools PLUS they setup a Web URL where you can download new migration best practice guides and conversion tools (see http://www.microsoft.com/migration).
And these aren’t the typical Microsoft guides that are 300 pages of junk, the guides are very step by step prescriptive and where applicable, there are utilities they provide for free that is part of the migration process. So why is Microsoft providing “free tools” and “free guidance” on how to migrate to Windows 2008 R2? The big reason is that Windows 2008 R2 is a 64-bit ONLY operating system. For organizations that have been running 32-bit Windows for years and frequently just did an inplace upgrade from older to new versions of the operating system, Windows 2008 R2, being 64-bit does NOT provide an inplace migration path from 32-bit anything to Windows 2008 R2. Thus, you MUST do a server to server migration from Windows 2003 32-bit to Windows 2008 R2 64-bit. Afraid this might be a barrier to migrations, Microsoft worked really hard to come up with a series of migration tools.
In 2-years of early adopter experience working with Windows 2008 R2 and the past many months since Windows 2008 R2 RTM’d, we’ve found that Microsoft got lucky with the timing release of Windows 2008 R2. The marketplace has not only (for the most part) accepted and have adopted 64-bit as the standard server platform in datacenters, but organizations are migrating all physical servers to virtual servers as part of the process. So very few organizations are even considering taking a 5-yr old or 8-yr old 32-bit PHYSICAL Windows 2003 server and do an inplace upgrade, instead, organizations are building out new Windows servers as guest sessions of virtual servers (either Hyper-V or VMware). So the whole barrier to migration seems to be a non-issue for organizations.
Back to the migration tools… So Microsoft is providing a series of GREAT migration tools from Windows 2003 and Windows 2008 to Windows 2008 R2, and not for just Active Director migrations but for:
-
File Server Migration: including migrating Windows 2003 / 2008 files, file permissions (access control lists (ACLS)), directory structure, etc to Windows 2008 R2 fileservers
-
Physical server to Physical server migration: the migration tools can be used to migrate physical servers to new 64-bit physical servers
-
Physical server to Virtual server migration: the same migration tools can be used to migrate physical servers to new 64-bit virtual guest sessions running on Microsoft Hyper-V or VMware
-
32-bit to 64-bit and 64-bit to 64-bit migraitons: the migration tools can migrate both 32-bit and 64-bit sources to the new Windows 2008 R2 64-bit systems
-
Active Directory 2003 and Active Directory 2008 to Active Directory 2008 R2: the migration tools include migration wizards, tools, and migration procedures for migrating to the latest version of Active Directory
-
Virtual Server 2005 and Hyper-V 2008 to Hyper-V 2008 R2: guest sessions of previous Microsoft virtual sessions can be migrated directly to Windows 2008 R2 Hyper-V R2
-
DHCP and DNS Migration: migration of utility servers like DNS and DHCP can be migrated to Windows 2008 R2 with the DHCP migration tool migrating not only DHCP “scopes” but also DHCP “leases”! I’ll be covering DHCP migrations in my next post
-
Print Server Migration: tools and a step by step guide is provided to help with the migration of existing print servers running on Windows 2003 and Windows 2008 to 64-bit Windows 2008 R2 print servers, including migrating printer definition files, configuring new drivers, configuring print settings, reapplying user and administrative permissions, etc.
-
RRAS Migration: for organizations that have Routing and Remote Access Servers setup in their environment (typically for VPN access, but sometimes for Site to Site VPNs), there is a step by step guide along with a series of migration tools that help organizations migrate from RRAS on Windows 2003 and 2008 to RRAS on Windows 2008 R2.
-
Certificate of Authority Migration: this is a new one, I just reviewed it a couple weeks ago, helps you migrate your Certificate Server off a Windows 2003 or 2008 box, to a new Windows 2008 R2 box yet keep all of your certificates, policies, configurations, etc… Includes a VB script that assists with the migraiton.
These tools can be installed on a Windows Server 2008 R2 system from the Add Features Wizard in Server Manager as well as new tools as well as updated tools can be downloaded off the http://www.microsoft.com/migration link noted previously.
I will cover my favorite migration tool in my next posting titled “Migrating DHCP to Windows 2008 R2”. I really like this tool as it allows an organization to not only migrate a physical Windows 2003 (or 2008) DHCP server to a virtual (or physical) Windows 2008 R2 server, but it also migrates over all DHCP settings including scopes AND including leases! The migration of leases is a huge thing. If you have say 500 users all with DHCP addresses assigned to them, in the past when you replaced a DHCP server you had to play the game of changing the DHCP lease period so that leases expire in say 4-hours so you could slip in a new DHCP server without having DHCP address conflicts (where the new DHCP server issued leases that conflicted with the old leases issued previously by the old DHCP server). With this migration tool, it extracts DHCP leases from the old server and migrates them to the new server so that when the new Windows 2008 R2 server comes online, it knows about all previous DHCP leases and continues on doing its job as a DHCP server. What used to be a several hour / highly planned and managed process of retiring an old DHCP server is now done in minutes with the DHCP migration tool. My next post will cover this process…
Rand Morimoto is owner of the consulting firm Convergent Computing, a Microsoft MVP, and a security specialist with expertise in Office 365, Microsoft Azure, Exchange, SharePoint, SQL, Windows Server, Windows Client, and System Center.
Copyright © 2010 IDG Communications, Inc.
This article will be the second part of 4-part series articles on deployment of Windows Server 2008 R2. This
4-part series articles will talk about the options available to move to Windows Server 2008 R2, and what planning and
considerations are required for a successful migration.
With the introduction of Windows Server 2008 R2, x86 (32-bit) architecture hardware is no longer supported. Due to
this change, for the major server hardware out there, a migration process would be required. A typical migration
process involves the following steps:
- clean installation of the operating system
- installation of server role(s)
- move data and settings from source to destination (new) server
- point the clients to the new server
Migration steps are different based on the server role or the applications to be migrated. There is no single step
to migrate all types of server roles or applications, hence there are quite a lot of factors we will need to
consider, which will be covered below.
Windows Server 2008 R2 Migration Tools
Microsoft has tons of tools available to ensure a smooth migration. These tools will help speed up the deployment
of Windows Server 2008 R2 in your existing infrastructure, by ensuring that your network infrastructure and existing
hardware are supported and by providing recommendations on a successful migration.
Generally there are two stages involved for the migration: Planning and implementing.
For planning, the Microsoft Assessment and Planning (MAP) Toolkit 4.0 provides an inventory, assessment and reporting toolkit to assess IT infrastructure in an organization without the need of a software agent.
There are two tools for implementation:
The Microsoft Deployment Toolkit (MDT) 2010 allows the deployment of Windows 7 and Windows Server 2008 R2 through a common console. MDT also allows an automated process to deploy server and desktop operating systems.
The Windows Server Migration Tool is a feature in Windows Server 2008 R2 that allows the migration of some server roles, features, operating systems, shares and other data from a supported Windows Server operating system.
Performing a Migration
Here’s a basic outline of the migration process:
Step 1: Planning
MAP 4.0 is able to scan and assess the computers/servers to ensure that it is possible to migrate to Windows 7 or
Windows 2008 R2. The big advantage of MAP 4.0 is that it does not require any software agent to be present in the
computers/servers to be scanned for it to work. MAP 4.0 takes advantage of Active Directory, Windows Management
Instrumental (WMI) and Remote Registry to work.
Once MAP 4.0 has finished assessing the network environment, it will produce reports in Excel and Word. The
assessment reports will show the total servers in the environment along with their operating system version,
applications installed, IP configuration, and the next steps for a migration.
Through MAP 4.0, the server roles that need to be migrated can be identified.
Step 2: Implementation/Migration
Once the infrastructure has been assessed, it is time to deploy. Deployment can be done by using Microsoft
Deployment Toolkit (MDT) 2010, and Windows Server Migration Tool, as part of Window Server 2008 R2.
There are two general scenarios which are possible:
Scenario 1: Migration From Windows Server X86 to Windows Server 2008 R2
As an in-place upgrade is not possible for cross architecture operating system, a migration of settings and data
will need to be done. This involves using both MDT 2010 and Windows Server Migration Tool, which is a feature as part
of Windows Server 2008 R2. However for Windows Server Migration Tool to work, you’ll need to meet the following requirements:
- source server is running on x86 or x64 hardware
- migration from physical OS to virtual OS, or vice versa.
- source server is running Windows Server 2003 SP2, 2008, 2008 R2 or 2008 R2 Server Core
If the source server is not running any of the above listed operating systems, the source server will need to be
upgraded to any of the above server operating system before a migration to Windows Server 2008 R2 can be done.
To migrate server roles to Windows Server 2008 R2, here are the steps:
- Using MDT 2010, deploy Windows Server 2008 R2 on a bare machine. It is also possible to deploy by using Windows Server 2008 R2 DVD, but it would be recommended
to use MDT 2010 for flexibility. - From Windows Server 2008 R2, install the Windows Server Migration Tool feature.
- Create a shared folder, and use the tool smigdeploy.exe (under %Windir%System32ServerMigrationTools) to create the deployment files and save them in the shared folder.
- Refer to the links to the whitepaper at the bottom of the article (table 2) on migrating respective server roles.
Scenario 2: Migration From Windows Server X64 to Windows Server 2008 R2
Although an in-place upgrade can be done from Windows Server 2003 or 2008 x64 to Windows Server 2008 R2, but
depending on the network environment, this could end up very messy. It would be better to migrate to a new hardware
or a virtualized environment if the IT environment is complex.
If an in-place upgrade is preferred, the general steps are:
- Duplicate the source server onto a testing environment.
- Do an in-place upgrade on the testing server.
- Test and troubleshoot the testing server if problem arises.
- Do an in-place upgrade on the production server.
Migration Whitepapers
The migration process is different, depending on several factors, including:
- server roles
- domain controller
- custom applications
- services uptime
- complexity of the role (clustered or geographically disbursed)
The migration process is not straightforward, so it is very important to read up on the migration guide for
each and every server role, and test it out in a testing environment before migrating a production server.
Since we will not be covering on how to do a migration for all roles and applications, the following lists will point you to the right place for the migration whitepaper.
Migrating Server Roles:
- Active Directory Domain Services and DNS
Migration Guide - DHCP Migration Guide
- File Services Migration Guide
- Print Services Migration Guide
- BranchCache Migration Guide
Migrating Settings/Configurations:
- IP Configuration Migration Guide
- Local User and Group Migration
Guide
What’s Next?
Migrating to a new server is always a challenge; however Microsoft has tools ready to assist in a smooth
migration. As long as migration testing is done and migration steps are followed carefully off the whitepaper, it
should be quite a straightforward process. There are other solution accelerators
available from Microsoft, but this article only covers those needed for a successful migration to Windows Server 2008
R2.
In the next article in this series, we’ll look into application compatibility, and how do we overcome those issues.
Categories
- Transfer Programs from C Drive to D Drive
- Transfer Installed Software to New PC
- Transfer Files from Old PC to New PC
- Transfer Microsoft Office
- Find Office Product Key
- Move User Folder
- Move Google Chrome Bookmarks
| Workable Solutions | Step-by-step Troubleshooting |
|---|---|
| Part 1. Top 3 Best Windows Server Migration Tools |
1. (Recommended) EaseUS Todo PCTrans..Full steps 2. Zinstall WinServ…Full steps 3. Storage Migration Service…Full steps |
| Part 2. How to Migrate Windows Server Data and Programs | Run EaseUS Todo PCTrans > Choose «PC to PC»…Full steps |
Part 1. Why Migrating Windows Server Data and Applications By Hand is Hard
In the previous post, I talked about Windows Server 2016/2012/2008/2003 upgrade strategies and how to clone a Windows Server hard drive. Here, I am going to talk about why it is hard to move Windows Server programs and data manually. Moving applications by hand is hard because of the following reasons:
- Complex reconfiguration
- Production cutover
- Time-consuming
- …
Since manual Windows Server data migration is difficult and time-consuming, the best choice is turning to professional Windows Server migration tools. You can easily transfer programs, files, and settings to a new Windows Server PC with simple clicks.
Part 2. Top 3 Best Windows Server Migration Tools
After testing, I have listed three reliable Windows Server migration tools. You can perform Windows Server application migration and transfer data and apps from an old server to another new server with them. Find out their advantages and select the best migration tool for yourself.
- Top 1. EaseUS Todo PCTrans
- Top 2. Zinstall WinServ
- Top 3. Storage Migration Service
Top 1. EaseUS Todo PCTrans (Recommended)
Among these Windows Server migrating applications, EaseUS Todo PCTrans ranks top for its easiness and excellence. This PC transfer software can meet your exact needs with options ranging from file selection to account settings. You can move your stuff and get started with your new PC. What’s more, this tool allows you to transfer settings, applications, files, and even user profiles from an old PC to a new one. It supports the most common applications/programs, including MS Office (Word, Excel, Outlook, etc.), Photoshop, Adobe software, AutoCAD, Dropbox.
Highlights:
- It is compatible with Windows Server 2003/2008/2012/2016/2019 and Windows 7-10
- This software allows you to move programs from PC to PC
- It supports to change the installation location of programs on Windows Server local drive.
- You can create images of your files, programs & account, and automatically export them from the source PC to the target PC
EaseUS Todo PCTrans Technician
- ☆ Deploy & install Todo PCTrans on multiple PCs.
- Transfer unlimited files, programs, apps between Servers.
- Transfer account, domain account, and settings.
- Data rescue, find product key of installed programs.
- One license for multiple PCs.
Top 2. Zinstall WinServ
Zinstall WinServ migrates applications, settings, shares, profiles, data, etc. from one Windows Server to another. It is compatible with Windows Server 2019, 2016, 2012, 2008, 2003.
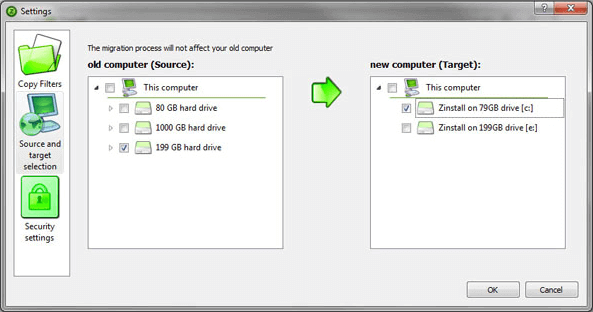
Highlights:
- You can transfer programs, settings, profiles, shares, and data from one server to another.
- WinServ can transfer from physical to virtual (P2V, V2V, V2P).
- It also works with Windows 10 (including Windows 10 to Windows 10), Windows 8/8.1, Windows 7, XP, and Vista.
Cons:
- It’s more like a disk cloning process between PCs.
- The interface looks old and hard to use.
Top 3. Storage Migration Service
Microsoft’s recommended method for performing a migration from Windows Server 2008/R2 is what they call a Storage Migration Service. This tool provides a graphical tool that inventories data on Windows and Linux servers and then transfers the data to newer servers or to Azure virtual machines. With it, you build a new server, either physical or virtual, running a new Windows Server version and then move your roles and services to the newly built physical/VM Windows Server.
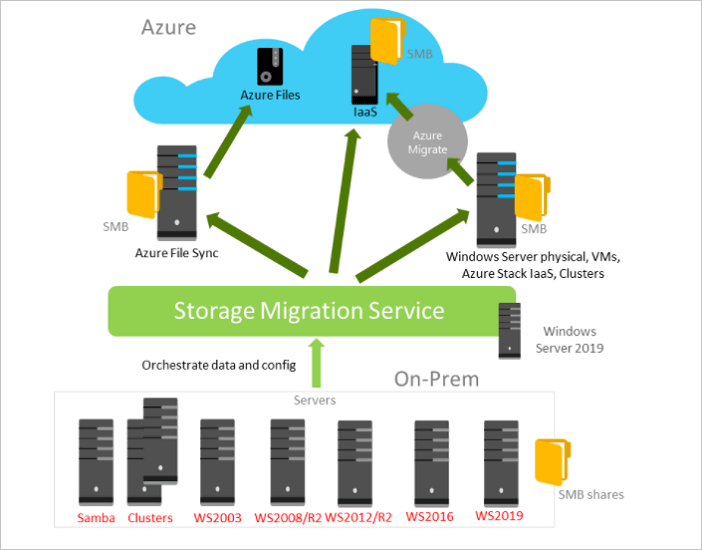
Highlights:
- It can transfer files, file shares, and security configuration from the source servers rapidly.
- It takes over the identity of the source servers optionally so that users and apps don’t have to change anything to access existing data.
- You can manage one or multiple migrations from the Windows Admin Center user interface.
Cons:
- It can only run on Windows Server operating systems.
- The operation process is difficult for beginners.
If you are looking for an easy and fast way to migrate data, applications, files, or settings from Windows Server to Server, my recommendation is using EaseUS Todo PCTrans. This easy-to-use Windows Server migration tool can move Windows Server data with simple clicks. Follow the steps below and migrate files from Windows Server to another quickly.
Step 1. Launch EaseUS Todo PCTrans on your source and target computers, connect both PCs via the internet.
1. At the «PC to PC» section, click «PC to PC» to continue.

2. Select your target computer via its device name, then enter its account password or verification code and select the transfer direction. Then click «Connect» to continue.
You can check the verification code on the right top of «PC to PC» mainscreen on the target computer.

Step 2. Select the categories Applications, Files, and Accounts to transfer via the internet.
If you want to transfer data selectively, click «Edit» under each category, and choose the specific items.

Step 3. Click «Transfer» to start transferring your apps/files/accounts from one computer to another computer via the Internet.

Conclusion
Even if you have no way to install your applications on a new server, you can still transfer them from the old one with a dedicated migration tool. So if you are looking for a way to automate a large part of your server migration project, EaseUS data migration tool is the right one for you.
Windows Server Migration Related Questions (FAQs)
It is hard to migrate installed programs to another PC or drive manually. It’s an excellent choice to try a reliable application migration tool. We have talked about the top 3 Windows Server migration tools, and how to migrate wanted files. If you still have problems, read on.
What are Windows Server Migration Tools?
Windows Server Migration Tools are utilities that work with Server 2003 and newer Server OS versions. They can migrate Server applications, personal files, settings, and other data from Windows Server to another.
What is Windows Server migration?
Windows Server migration is when you move one role or feature at a time from a source computer that is running Windows Server to another destination computer that is running Windows Server, either the same or a newer version.
How long does server migration take?
It depends on a variety of factors, including the amount of data being migrated, the stability of the original server, or other unforeseeable issues, a typical migration can take anywhere from a few minutes to a few hours.
How do I move my data from one Server to another?
To migrate Windows Server data:
Step 1. Open EaseUS Todo PCTrans on both of your computers. Choose PC to PC and go to the next step.
Step 2. Follow the interface guides to complete the connection between the two computers.
Step 3. Click Files > Transfer to copy all the files from one server to another. Or you can click Edit > Finish > Transfer to migrate specific data you have chosen.
Step 4. Wait for the process finishes. PCTrans will transfer files at a fast speed.