If you get an error code while downloading and installing Windows updates, the Update Troubleshooter can help resolve the problem.
Select Start > Settings > System > Troubleshoot > Other troubleshooters. Next, under Most frequent, select Windows Update > Run.
When the troubleshooter is finished running, it’s a good idea to restart your device.
Next, check for new updates. Select Start > Settings > Windows Update > Check for updates and then install any available updates.
If the problems aren’t all resolved, try running the troubleshooter again to check for additional errors, or see Fix Windows Update errors and follow the troubleshooting steps.
For more Windows Update troubleshooting info, see Troubleshoot problems updating Windows.
Check for Windows updates
If you get an error code while downloading and installing Windows updates, the Update Troubleshooter can help resolve the problem.
Select Start > Settings > Update & Security > Troubleshoot > Additional troubleshooters. Next, under Get up and running, select Windows Update > Run the troubleshooter.
When the troubleshooter is finished running, it’s a good idea to restart your device.
Next, check for new updates. Select Start > Settings > Update & Security > Windows Update > Check for updates and then install any available updates.
If the problems aren’t all resolved, try running the troubleshooter again to check for additional errors, or see Fix Windows Update errors and follow the troubleshooting steps.
For more Windows Update troubleshooting info, see Troubleshoot problems updating Windows.
Check for Windows updates
This tutorial contains several methods to fix Windows Update Problems in Windows 7/8/8.1 & Server 2008/2012 OS. In many cases, even in fresh Windows installations, the Windows Update is not working as expected, or it stuck when checking for updates or it displays several errors whenever you try to search for the available updates.
In such cases your system may become slow or unresponsive, because the Windows Update service (svchost.exe) causes high CPU usage. The Windows Update service is an essential feature in all Windows versions, because it is needed to provide all the available important and optional updates needed for the proper Windows operation and security.

The Windows Update problems often occur on Windows 7 or Vista based computers and in most cases, the errors are caused without any obvious reason and without a permanent solution to fix them from Microsoft. For all these reasons, I decided to write this troubleshooting guide, with the most efficient methods to resolve Windows Update problems on Windows 8.1, 8, 7 & Server 2008 or Server 2012.
Problems-Symptoms that are solved with this guide:
Windows Update is checking for updates forever.
Windows Update stuck/freezes.
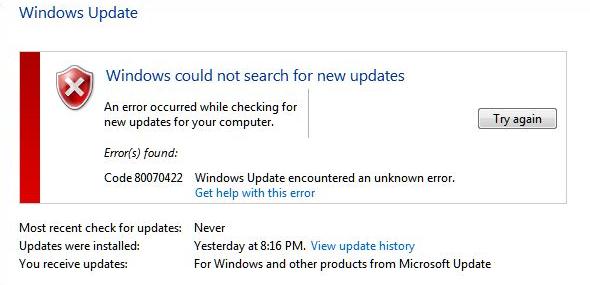
Windows Update cannot find new updates.
Windows Update cannot currently check for updates because the service is not running.
Windows Update occurred an Unknown error: Code 8007000E
How to Solve Windows Update Issues on Windows 7/8/8.1 & Server 2008/2012
Important:
1. Before proceeding to apply the methods below, in order to troubleshoot Window Update problems, make sure that the Date and Time settings are correct on your system.
2. Try the following trick: Change the Windows Update settings from «Install updates automatically» to «Never check for updates (not recommended)» & restart your system, After restart set the update settings back to «Install updates automatically« and then check for updates. If this trick fails then set the Windows Update Settings to «Check for updates but let me choose whether to download and install them» and then check for updates again.
3. If you have performed a fresh Windows 7 or Server 2008 installation, install Service Pack 1 for Windows 7 or Windows Server 2008 R2, before you continue.
4. Make sure that your computer is clean from viruses and malware. To accomplish this task you can use this Malware Scan and Removal Guide to check and remove viruses or/and malicious programs that may be running on your computer.
Method 1. Force Windows to re-create the Windows Update Store folder.
Method 2. Install the KB3102810 security Update.
Method 3. Install the latest Update Rollup.
Method 4. Run the Windows Update Troubleshooter.
Method 5. FIX Corrupted System Files and Services (SFC).
Method 6: FIX Windows corruption errors with the System Update Readiness tool (DISM).
Method 7: Update Windows by using the WSUS Offline Update tool.
Method 1. Force Windows to re-create the Windows Update Store folder
The Windows Update Store folder (commonly known as «SoftwareDistribution» folder), is the location where Windows stores the downloaded updates.
-If the SoftwareDistribution folder becomes corrupted then it causes problems with Windows Update. So, one of the most efficient solutions to resolve problems with Windows Update, is to recreate the SoftwareDistribution folder. To do that:
1. Simultaneously press the Windows ![]() + R keys to open run command box.
+ R keys to open run command box.
2. In run command box, type: services.msc and press Enter.

3. Right click on Windows Update service and select Stop.

4. Open Windows Explorer and navigate to C:Windows folder.
5. Select and Delete the “SoftwareDistribution” folder.*
(Click Continue at «Folder Access Denied» window).
* Note: The next time that the Windows Update will run, a new empty SoftwareDistribution folder will be automatically created by Windows to store updates.

6. Restart your computer and then try to check for updates.
Method 2. Install the KB3102810 (KB3102812) security Update.
I have seen many times, that Windows Update is checking for updates forever (stuck) without finding updates, even in fresh Windows 8, 7 or Vista installations. Thankfully, Microsoft has released a security update to resolve the «Installing and searching for updates is slow and CPU utilization is high» issue. To apply the fix:
Step 1. Install Internet Explorer 11. *
* Note: This step is applied only to a fresh Windows 7 or Windows 2008 installation. If Internet Explorer 11 is already installed on your system, then skip this step and continue to step 2 below.
1. Download and install Internet Explorer 11 according to your OS version.
2. Restart your computer.
Step 2. Install the KB3102810 Update.
1. Download – but do not install it yet – the following security update according to your OS version, to your computer:
- Windows 7 & Server 2008: KB3102810
- Windows 8.1 & Server 2012: KB31028102
2. After the download, restart your computer.
3. After the restart, immediately install the security update, otherwise the installation hangs.
4. After the installation, restart your computer.
Step 3. Delete the SoftwareDistribution folder.
1. Follow the steps in Method-1 and delete the «SoftwareDistribution» folder.
2. Restart your computer.
2. Navigate to Windows Update and check for updates. Then, let it run at-least half to one hour. If you ‘re lucky, Windows will find all available updates.
Method 3. Install the latest Update Rollup to fix Windows Update issues.
The Windows Update Rollups, in most cases can fix issues with Windows Update. But before installing the latest Windows update rollup, first change the way that Windows install updates to «Never check for updates (not recommended«. To do that:
1. Simultaneously press the Windows ![]() + R keys to open run command box.
+ R keys to open run command box.
2. In run command box, type: wuapp.exe and press Enter.

3. Select Change settings on the left.

4. Set Never check for updates (not recommended).

6. Proceed and download the latest Windows Update rollup for your system, but don’t install it (yet).
July 2016 update rollup for Windows 7 SP1 and Windows Server 2008 R2 SP1
July 2016 update rollup for Windows 8.1 and Windows Server 2012 R2
September 2016 update rollup for Windows 7 SP1 and Windows Server 2008 R2 SP1
September 2016 update rollup for Windows 8.1 and Windows Server 2012 R2
7. After the download, restart your computer.
8. After restart, then proceed and install the downloaded rollup.
9. Check for updates.
Method 4. Run the Windows Update Troubleshooter.
Microsoft offered the Windows Update Troubleshooter tool, in order to fix problems with Windows Update.
1. Navigate to Control Panel > All Control Panel Items > Troubleshooting > Fix Problems with Windows Update.
2. Click Next and let Windows to try to fix the update problems.
3. When the repair is completed, restart you PC and check for updates again.
Method 5. FIX Corrupted System Files and Services (SFC).
The next method to solve Windows Update problems is to run the System File Checker (SFC) tool in order to fix Windows’ corrupted files and services. To do that:
1. Open an elevated command prompt:
- Right click at Windows start button
 and select Command Prompt (Admin)
")
2. In the command window, type the following command and press Enter.
- SFC /SCANNOW

3. Wait and do not use your computer until SFC tool checks and fixes the corrupted system files or services.
4. When SFC tool finishes, reboot your computer and check for Updates.
Method 6: FIX Windows corruption errors with the System Update Readiness tool (DISM).
The System Update Readiness tool is a Microsoft tool that can fix Windows corruption errors.
Windows 7, Vista & Server 2008:
1. Download and save to your desktop the System Update Readiness tool according to your Windows version.
2. Double click to install the downloaded file (e.g. Windows6.1-KB947821-v34-x86.msu).

3. When the installation is completed, restart your computer and try to install Windows Updates.
Windows 8, 8.1 & Server 2012:
1. Right click at Windows start button ![]() and select Command Prompt (Admin).
and select Command Prompt (Admin).
2. At the command prompt window, type the following command & press Enter:
- Dism.exe /Online /Cleanup-Image /Restorehealth

3. Be patient until DISM repairs component store.

4. When the operation is completed, you should be informed that the component store corruption was repaired.

5. Close command prompt window and restart your computer.
6. Check for updates.
Method 7: Update Windows by using the WSUS Offline Update tool. (Windows 10, 8.1, 8 or 7)
1. Download the latest version of WSUS Offline Update utility.
2. After the download, extract the «wsusoffline.zip» file.
3. From the «wususoffline» folder, double click at UpdateGenerator.exe application.
4. At Windows tab, select the Windows Edition, that you are using.
5. Press the Start button.

6. Be patient until the WSUS Offline Update utility downloads all the available updates.

7. When the download is completed, open the client folder (wsusofflineclient) and double click at «UpdateInstaller.exe» application.
8. Place a check at «Automatic reboot and recall» checkbox.
9. Finally press the Start button and be patient until the WSUS Offline Update installer, installs the downloaded updates to your system.

That’s it! Which method worked for you?
Let me know if this guide has helped you by leaving your comment about your experience. Please like and share this guide to help others.
If this article was useful for you, please consider supporting us by making a donation. Even $1 can a make a huge difference for us in our effort to continue to help others while keeping this site free:

If you want to stay constantly protected from malware threats, existing and future ones, we recommend that you install Malwarebytes Anti-Malware PRO by clicking below (we
do earn a commision from sales generated from this link, but at no additional cost to you. We have experience with this software and we recommend it because it is helpful and useful):
Full household PC Protection — Protect up to 3 PCs with NEW Malwarebytes Anti-Malware Premium!

- Remove From My Forums
-
Question
-
i have server poweredge t320
and run windows server 2012 r2
when i update windows server operating system and restart the server, it dose not work and display black screen or blue screen
All replies
-
I’d try running;
sfc /scannow
dism /online /cleanup-image /restorehealth
Regards, Dave Patrick ….
Microsoft Certified Professional
Microsoft MVP [Windows Server] Datacenter ManagementDisclaimer: This posting is provided «AS IS» with no warranties or guarantees, and confers no rights.
-
Proposed as answer by
Monday, February 27, 2017 3:36 AM
-
Proposed as answer by
-
-
Proposed as answer by
Eve WangMicrosoft contingent staff
Monday, February 27, 2017 3:36 AM
-
Proposed as answer by
-
Hi,
I am checking to see how things are going there on this issue. Please let me know if you would like further assistance.
You can click “Mark as answer” if the reply is helpful. It would make this reply to the top and easier to be found for other people who has the similar problem.
Best Regards,
Eve Wang
Please remember to mark the replies as answers if they help.
If you have feedback for TechNet Subscriber Support, contact
tnmff@microsoft.com.
Если служба обновлений Windows работает не корректно, обновления не загружаются или не устанавливаются, то самый простой и эффективней способ решить проблему со службой Windows Update – восстановить ее исходные настройки. В этой статье мы покажем, как сбросить конфигурацию агента и службы обновлений Windows Update.
Содержание:
- Средство устранения неполадок Центра обновления Windows
- Сброс настроек Windows Update с помощью PowerShell
- Утилита Reset Windows Update Tool
- Восстановление исходных настроек Windows Update из командной строки
Обычно для отладки и дебага ошибок службы обновления Windows администратору необходимо проанализировать коды ошибок в файле журнала обновлений %windir%WindowsUpdate.log (в Windows 10 и 11 получить файл WindowsUpdate.log можно таким способом). Количество возможных ошибок, с которыми может столкнуться администратор при анализе журнала обновлений исчисляется десятками (список всех ошибок Windows Update) и процесс их разрешения в основном нетривиальный. В некоторых случаях вместо детального анализа ошибок Windows Update гораздо быстрее и проще сначала произвести полный сброс настроек службы Windows Update. После сброса Windows Update вы можете выполнить сканирование и поиск обновлений.
Средство устранения неполадок Центра обновления Windows
Прежде чем перейти к сбросу конфигурации центра обновления Windows, настоятельно рекомендуем сначала попробовать более встроенное средство для автоматического исправления проблем в службе обновления Windows – средство устранения неполадок Центра обновления Windows (Windows Update Troubleshooter).
В Windows 10 и 11 Windows Update Troubleshooter уже встроен в современную панель Settings. Для предыдущих версий Windows его придется скачать вручную по ссылкам ниже:
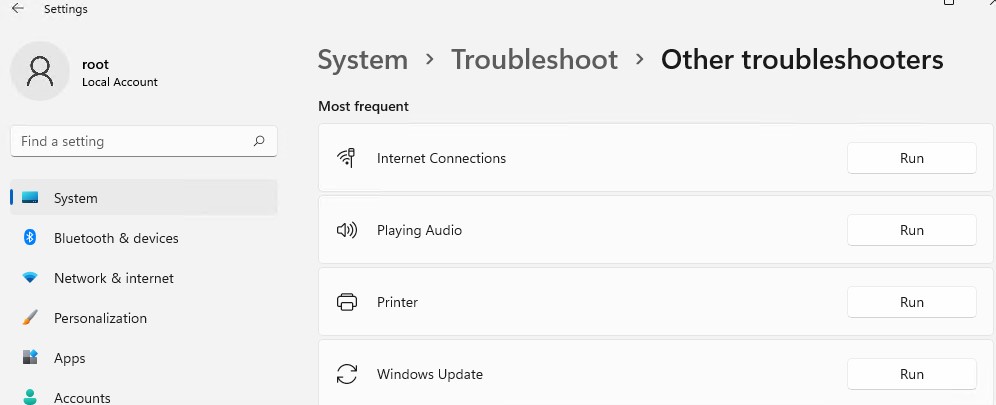
- Windows 11 — Settings -> System -> Troubleshooter -> Other Troubleshooter -> Windows Update;

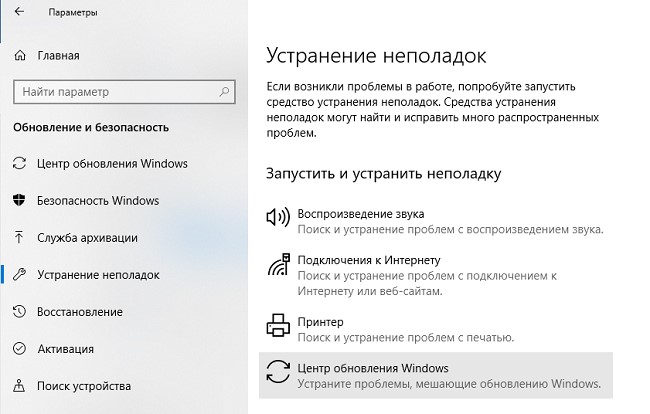
- Windows 10 – скачите wu10.diagcab по ссылке https://aka.ms/wudiag , либо запустите локальную версию инструмента: Пуск -> Параметры -> Обновления и безопасность -> Устранение неполадок -> Центр обновлений Windows (Start -> Settings -> Updates and Security -> Troubleshoot -> Additional Troubleshooters-> Windows Updates – resolve problems that prevent you from updating windows);

Для быстрого доступа к средствам исправления неполадок Windows можно использовать команду ms-settings:
ms-settings:troubleshoot - Windows 7 и Windows 8.1 — WindowsUpdate.diagcab (https://aka.ms/diag_wu).
Дождитесь пока средство устранения неполадок Центра обновления Windows просканирует систему и попытается автоматически исправить все ошибки в службе Windows Update и связанных компонентах.
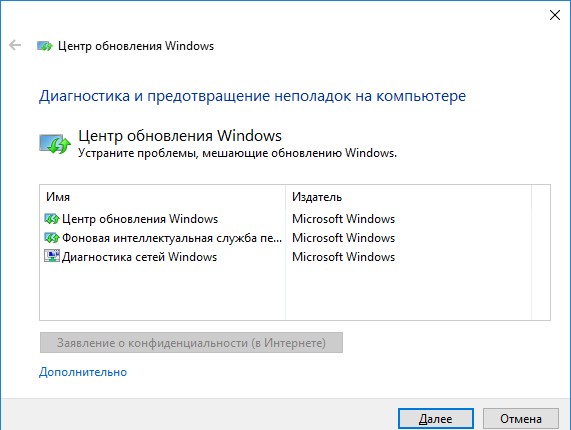
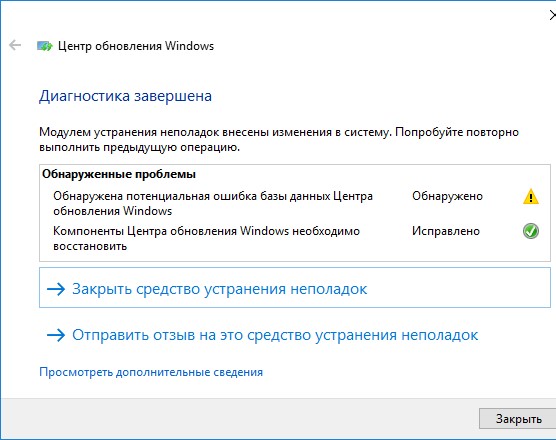
В моем случае была обнаружена и исправлена потенциальная ошибка в базе данных Центра обновления Windows. После этого перезагрузите компьютер и попробуйте выполнить поиск обновлений. Если обновления не загружаются или не устанавливаются, перейдите к следующему этапу.
Сброс настроек Windows Update с помощью PowerShell
Вы можете использовать PowerShell модуль PSWindowsUpdate для сброса настроек агента и службы Windows Update.
Установите модуль на свой компьютер из галереи скриптов PSGallery:
Install-Module -Name PSWindowsUpdate
Разрешите запуск PowerShell скриптов:
Set-ExecutionPolicy –ExecutionPolicy RemoteSigned -force
Выполните команду:
Reset-WUComponents –verbose
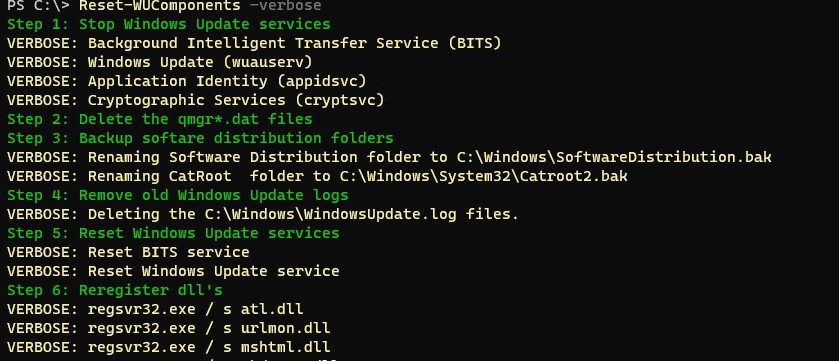
Команда Reset-WUComponents выполняет действия, по остановке служб, перерегистрации dll и очистке каталога C:WindowsSoftwareDistribution, что и описанный чуть ниже bat скрипт.
VERBOSE: Background Intelligent Transfer Service (BITS)
VERBOSE: Windows Update (wuauserv)
VERBOSE: Application Identity (appidsvc)
VERBOSE: Cryptographic Services (cryptsvc)
Step 2: Delete the qmgr*.dat files
Step 3: Backup software distribution folders
VERBOSE: Renaming Software Distribution folder to C:WindowsSoftwareDistribution.bak
VERBOSE: Renaming CatRoot  folder to C:WindowsSystem32Catroot2.bak
Step 4: Remove old Windows Update logs
VERBOSE: Deleting the C:WindowsWindowsUpdate.log files.
Step 5: Reset Windows Update services
VERBOSE: Reset BITS service
VERBOSE: Reset Windows Update service
Step 6: Reregister dll's
VERBOSE: regsvr32.exe / s atl.dll
VERBOSE: regsvr32.exe / s urlmon.dll
VERBOSE: regsvr32.exe / s mshtml.dll
VERBOSE: regsvr32.exe / s shdocvw.dll
VERBOSE: regsvr32.exe / s browseui.dll
VERBOSE: regsvr32.exe / s jscript.dll
VERBOSE: regsvr32.exe / s vbscript.dll
VERBOSE: regsvr32.exe / s scrrun.dll
VERBOSE: regsvr32.exe / s msxml.dll
VERBOSE: regsvr32.exe / s msxml3.dll
VERBOSE: regsvr32.exe / s msxml6.dll
VERBOSE: regsvr32.exe / s actxprxy.dll
VERBOSE: regsvr32.exe / s softpub.dll
VERBOSE: regsvr32.exe / s wintrust.dll
VERBOSE: regsvr32.exe / s dssenh.dll
VERBOSE: regsvr32.exe / s rsaenh.dll
 VERBOSE: regsvr32.exe / s gpkcsp.dll
VERBOSE: regsvr32.exe / s sccbase.dll
VERBOSE: regsvr32.exe / s slbcsp.dll
VERBOSE: regsvr32.exe / s cryptdlg.dll
VERBOSE: regsvr32.exe / s oleaut32.dll
VERBOSE: regsvr32.exe / s ole32.dll
VERBOSE: regsvr32.exe / s shell32.dll
VERBOSE: regsvr32.exe / s initpki.dll
VERBOSE: regsvr32.exe / s wuapi.dll
VERBOSE: regsvr32.exe / s wuaueng.dll
VERBOSE: regsvr32.exe / s wuaueng1.dll
VERBOSE: regsvr32.exe / s wucltui.dll
VERBOSE: regsvr32.exe / s wups.dll
VERBOSE: regsvr32.exe / s wups2.dll
VERBOSE: regsvr32.exe / s wuweb.dll
VERBOSE: regsvr32.exe / s qmgr.dll
VERBOSE: regsvr32.exe / s qmgrprxy.dll
VERBOSE: regsvr32.exe / s wucltux.dll
VERBOSE: regsvr32.exe / s muweb.dll
VERBOSE: regsvr32.exe / s wuwebv.dll
Step 7: Reset WinSock
VERBOSE: netsh winsock reset
Step 8: Reset Proxy
VERBOSE: netsh winhttp reset proxy
Step 9: Start Windows Update services
VERBOSE: Cryptographic Services (cryptsvc)
VERBOSE: Application Identity (appidsvc)
VERBOSE: Windows Update (wuauserv)
VERBOSE: Background Intelligent Transfer Service (BITS)
Step 10: Start Windows Update services
VERBOSE: wuauclt /resetauthorization /detectnow
Запустите поиск обновлений из панели управления или выполните поиск доступных обновлений с помощью команды PowerShell:
Get-WUList

Утилита Reset Windows Update Tool
Есть еще одни полезный и простой инструмент для сброса настроек Windows Update — Reset Windows Update Tool. Раньше это скрипт был доступен на TechNet. Сейчас автор ведет репозиторий на GitHub (м https://github.com/ManuelGil/Script-Reset-Windows-Update-Tool ).
Для загрузки предлагается скомпилированный exe файл (C++) или обычный скрипт. Я предпочитаю использовать cmd скрипт.
- Скачайте ResetWUEng.zip и распакуйте на диск;
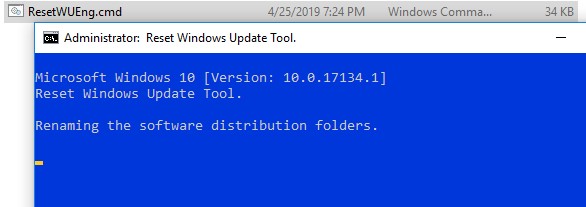
- Запустите файл ResetWUEng.cmd с правами администратора;
- Скрипт определит вашу версию ОС (в моем примере это Windows 10) и предложит 18 различных опций. Некоторые из них напрямую не относятся к сбросу настроек агента WU, но могут быть полезны для исправления различных неисправностей в Windows (проверка диска chkdsk, исправление ошибок в образе Windows с помощью DISM, сброс Winsock, очистка временных файлов и т.д.);

- Для сброса настроек Windows Update достаточно использовать опцию 2 — Resets the Windows Update Components (Сбросить компоненты службы обновления Windows). Нажмите 2 и Enter;
- Скрипт автоматически выполнит все действия, которые мы описали выше при выполнении ручного сброса агента обновлений Windows из командной строки.

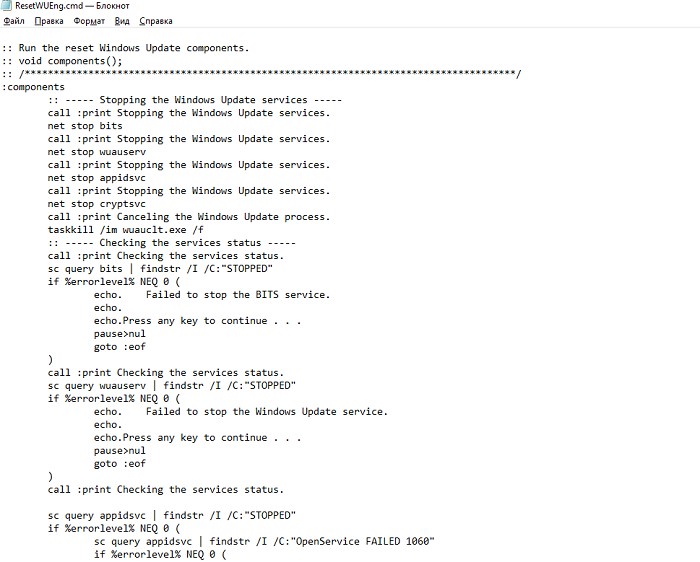
Вы можете самостоятельно посмотреть, что делает скрипт, открыв в файл ResetWUEng.cmd в любом текстовом редакторе и изучив его содержимое. Например, опция 2 отправляет на процедуру components.

- После окончания работы скрипта Reset Windows Update Agent перезагрузите компьютер и проверьте работу службы обновлений.

Скрипт ResetWUEng.cmd универсальный и подходит для всех версий Windows: начиная с Windows XP и вплоть до Windows 11.
Восстановление исходных настроек Windows Update из командной строки
Процесс сброса настроек агента и службы обновления Windows состоит из нескольких этапов. Все описанные операции выполняются в командной строке и собраны в один bat файл (готовый скрипт можно скачать по ссылке ниже).
С помощью данного скрипта можно полностью сбросить конфигурацию службы Центра обновлений Windows, и очистить локальный кэш обновлений. Скрипт является универсальный и будет работать как в Windows 11/10/8.1/7, так и в Windows Server 2022/2019/2016/2012 R2/2008 R2. Скрипт помогает устранить большинство типовых ошибок в работе службы Windows Update, когда центр обновлений перестает загружать новые обновления или пишет, что при установке обновления возникают ошибки.
Убедитесь, что настройки Windows Update на вашем компьютере на задаются с помощью доменных или локальных политик. Для вывода результирующих настроек GPO можно воспользоваться утилитой gpresult или rsop.msc. Можно сбросить настройки локальной GPO по этой инструкции.
Итак, по порядку о том, что делает скрипт:
- Остановить службы Windows Update (Центр обновлений Windows), BITS и службы криптографии:
net stop bits
net stop wuauserv
net stop appidsvc
net stop cryptsvc
taskkill /im wuauclt.exe /f - Удалить служебных файлы qmgr*.dat в каталоге %ALLUSERSPROFILE%Application DataMicrosoftNetworkDownloader:
Del "%ALLUSERSPROFILE%Application DataMicrosoftNetworkDownloaderqmgr*.dat" - Переименовать служебные каталоги, в которых хранятся конфигурационные файлы и кэш обновлений (в случае необходимости их можно будет использовать как резервные копии). После перезапуска службы обновления, эти каталоги автоматически пересоздадутся:
Ren %systemroot%SoftwareDistribution SoftwareDistribution.bak
Ren %systemroot%system32catroot2 catroot2.bak - Удаление старого журнала windowsupdate.log
del /f /s /q %windir%windowsupdate.log - Сброс разрешений на службы BITS и Windows Update (в случае, если права на службы были изменены)
sc.exe sdset bits D:(A;;CCLCSWRPWPDTLOCRRC;;;SY) (A;;CCDCLCSWRPWPDTLOCRSDRCWDWO;;;BA) (A;;CCLCSWLOCRRC;;;AU) (A;;CCLCSWRPWPDTLOCRRC;;;PU)
sc.exe sdset wuauserv D:(A;;CCLCSWRPWPDTLOCRRC;;;SY) (A;;CCDCLCSWRPWPDTLOCRSDRCWDWO;;;BA) (A;;CCLCSWLOCRRC;;;AU) (A;;CCLCSWRPWPDTLOCRRC;;;PU)
sc.exe sdset cryptsvc D:(A;;CCLCSWLOCRRC;;;AU)(A;;CCDCLCSWRPWPDTLOCRSDRCWDWO;;;BA)(A;;CCDCLCSWRPWPDTLCRSDRCWDWO;;;SO)(A;;CCLCSWRPWPDTLOCRRC;;;SY)S:(AU;FA;CCDCLCSWRPWPDTLOCRSDRCWDWO;;WD)
sc.exe sdset trustedinstaller D:(A;;CCLCSWLOCRRC;;;AU)(A;;CCDCLCSWRPWPDTLOCRSDRCWDWO;;;BA)(A;;CCDCLCSWRPWPDTLCRSDRCWDWO;;;SO)(A;;CCLCSWRPWPDTLOCRRC;;;SY)S:(AU;FA;CCDCLCSWRPWPDTLOCRSDRCWDWO;;WD) - Перерегистрация файлов системных динамических библиотек (dll), связанных со службами BITS и Windows Update:
cd /d %windir%system32
regsvr32.exe /s atl.dll
regsvr32.exe /s urlmon.dll
regsvr32.exe /s mshtml.dll
regsvr32.exe /s shdocvw.dll
regsvr32.exe /s browseui.dll
regsvr32.exe /s jscript.dll
regsvr32.exe /s vbscript.dll
regsvr32.exe /s scrrun.dll
regsvr32.exe /s msxml.dll
regsvr32.exe /s msxml3.dll
regsvr32.exe /s msxml6.dll
regsvr32.exe /s actxprxy.dll
regsvr32.exe /s softpub.dll
regsvr32.exe /s wintrust.dll
regsvr32.exe /s dssenh.dll
regsvr32.exe /s rsaenh.dll
regsvr32.exe /s gpkcsp.dll
regsvr32.exe /s sccbase.dll
regsvr32.exe /s slbcsp.dll
regsvr32.exe /s cryptdlg.dll
regsvr32.exe /s oleaut32.dll
regsvr32.exe /s ole32.dll
regsvr32.exe /s shell32.dll
regsvr32.exe /s initpki.dll
regsvr32.exe /s wuapi.dll
regsvr32.exe /s wuaueng.dll
regsvr32.exe /s wuaueng1.dll
regsvr32.exe /s wucltui.dll
regsvr32.exe /s wups.dll
regsvr32.exe /s wups2.dll
regsvr32.exe /s wuweb.dll
regsvr32.exe /s qmgr.dll
regsvr32.exe /s qmgrprxy.dll
regsvr32.exe /s wucltux.dll
regsvr32.exe /s muweb.dll
regsvr32.exe /s wuwebv.dll - Сброс параметров Winsock
netsh winsock reset - Сброс параметров системного прокси
netsh winhttp reset proxy - Опционально. При использовании локального сервера WSUS, возможно дополнительно сбросить текущую привязку клиента к серверу WSUS путем удаления следующих параметров в ветке реестра HKLMSOFTWAREMicrosoftWindowsCurrentVersionWindowsUpdate:
REG DELETE "HKLMSOFTWAREMicrosoftWindowsCurrentVersionWindowsUpdate" /v AccountDomainSid /f
REG DELETE "HKLMSOFTWAREMicrosoftWindowsCurrentVersionWindowsUpdate" /v PingID /f
REG DELETE "HKLMSOFTWAREMicrosoftWindowsCurrentVersionWindowsUpdate" /v SusClientId /f
REG DELETE "HKLMSOFTWAREPoliciesMicrosoftWindowsWindowsUpdate" /v TargetGroup /f
REG DELETE "HKLMSOFTWAREPoliciesMicrosoftWindowsWindowsUpdate" /v WUServer /f
REG DELETE "HKLMSOFTWAREPoliciesMicrosoftWindowsWindowsUpdate" /v WUStatusServer /f - Запуск остановленных служб:
sc.exe config wuauserv start= auto
sc.exe config bits start= delayed-auto
sc.exe config cryptsvc start= auto
sc.exe config TrustedInstaller start= demand
sc.exe config DcomLaunch start= auto
net start bits
net start wuauserv
net start appidsvc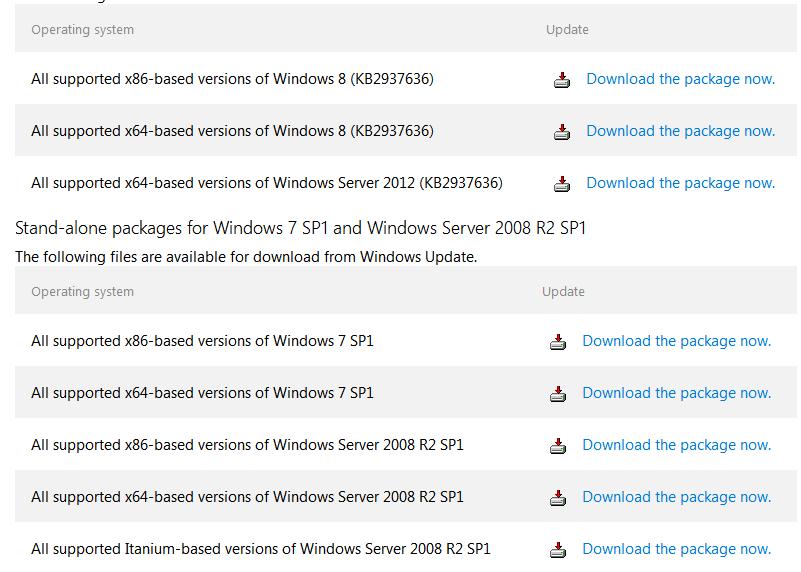
net start cryptsvc - Опционально. Для Windows 7 и 8.1 можно установить/переустановить последнюю версию агента Windows Update Agent (WUA). Скачать актуальную версию агента можно со страницы https://support.microsoft.com/en-us/kb/949104. Нужно скачать файл для вашей версии Windows
 Актуальная версия агента WUA для Windows 7 SP1 x64 — 7.6. Принудительная переустановка агента WindowsUpdate выполняется следующими командами:
- для Windows 7 x86:
WindowsUpdateAgent-7.6-x86.exe /quiet /norestart /wuforce - для Windows 7 x64:
WindowsUpdateAgent-7.6-x64.exe /quiet /norestart /wuforce
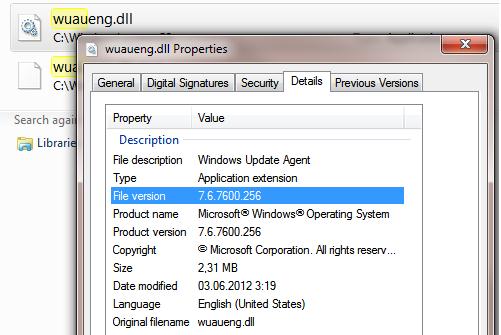
Совет. Текущую версию агента Windows Update Agent (WUA) в Windows 7 можно узнать в свойствах файла %windir%system32Wuaueng.dll. В нашем примере это 7.6.7600.256.

- для Windows 7 x86:
 Актуальная версия агента WUA для Windows 7 SP1 x64 — 7.6. Принудительная переустановка агента WindowsUpdate выполняется следующими командами:
Осталось перезагрузить компьютер и запустить синхронизацию с сервером Windows Update /WSUS.
wuauclt /resetauthorization /detectnow
Затем зайдите в Центр обновления и проверьте, пропали ли проблемы при поиске, скачивании и установке обновлений.
Сам скрипт reset_win_update.bat можно скачать по ссылке reset_win_update.zip (пункты 9 и 11 в скрипте не выполняются, т.к. являются опциональными). Скрипт нужно скачать, распаковать и запустить с правами администратора. 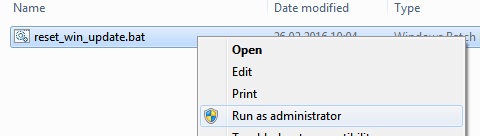
После этого перезагрузите компьютер, затем зайдите в Центр обновлений и проверьте, пропали ли проблемы при поиске, скачивании и установке обновлений.
Если обновления Windows стали скачиваться и устанавливать корректно, можно удалить папки резервные копии папок:
Ren %systemroot%SoftwareDistribution SoftwareDistribution.bak
Ren %systemroot%system32catroot2 catroot2.bak
Если ничего не помогло, попробуйте вручную скачать и установить последнее кумулятивное обновление для вашей версии Windows из каталога обновлений Microsoft Update Catalog.
Overview
We had this issue on some virtual servers migrated from a «cloud» provider back to our internal data center. The root cause was permissions to the %SystemRoot%System32catroot2 folder. There were a number of differences between the permissions on that folder on a healthy server vs those on the migrated server. I believe the key one was that TrustedInstaller didn’t have full access.
Additional Symptoms
Looking at the Application log in the event viewer, we saw a number of errors:
Source: CAPI2
EventId: 257
Text: The Cryptographic Services service failed to initialize the Catalog Database. The ESENT error was: -1032.

Source: ESENT
EventId: 490
Text: Catalog Database (416) Catalog Database: An attempt to open the file "C:Windowssystem32CatRoot2{127D0A1D-4EF2-11D1-8608-00C04FC295EE}catdb" for read / write access failed with system error 5 (0x00000005): "Access is denied. ".  The open file operation will fail with error -1032 (0xfffffbf8).
The clue is in the ESENT error’s text; i.e. permissions issue accessing a file under the catroot2 folder.
Resolution
Give the Trusted Installer account full control to the catroot2 folder and its children.
In case that’s not enough, for comparison, running icacls %systemroot%system32catroot2 on a healthy server gives this:
C:Windowssystem32catroot2 NT SERVICECryptSvc:(F)
                         NT SERVICECryptSvc:(OI)(CI)(IO)(F)
                         NT SERVICETrustedInstaller:(I)(F)
                         NT SERVICETrustedInstaller:(I)(CI)(IO)(F)
                         NT AUTHORITYSYSTEM:(I)(F)
                         NT AUTHORITYSYSTEM:(I)(OI)(CI)(IO)(F)
                         BUILTINAdministrators:(I)(F)
                         BUILTINAdministrators:(I)(OI)(CI)(IO)(F)
                         BUILTINUsers:(I)(RX)
                         BUILTINUsers:(I)(OI)(CI)(IO)(GR,GE)
                         CREATOR OWNER:(I)(OI)(CI)(IO)(F)
                         APPLICATION PACKAGE AUTHORITYALL APPLICATION PACKAGES:(I)(RX)
                         APPLICATION PACKAGE AUTHORITYALL APPLICATION PACKAGES:(I)(OI)(CI)(IO)(GR,GE)
NB: To add Trusted Installer, you’ll need to search on the local computer accounts for nt servicetrustedinstaller.
After replacing permissions on catroot2, ensure you click the replace permissions on child objects & containers checkbox to ensure that child items have their permissions resolved also.
No reboot is required for the fix itself (though obviously, once updates start working again, you’ll likely need to reboot for those).
Home users:
Please don’t try this at home! This article is intended for use by
support agents and IT professionals. If you’re looking for more
information about Windows Update or Microsoft Update errors, go to the
following Microsoft websites:
When
you try to install an update to Windows, a Windows component, or a
Microsoft or third-party software program, you experience one or more of
the following symptoms:
- You cannot view Windows roles or features.
- A service pack installation fails.
- When
you try to connect to the Windows Update or Microsoft Update website,
one of the following error codes is logged in the Windows Update log
(windowsupdate.log) or in the Component Based Servicing log (CBS.log):- 0xC80001FE
- 0x80200010
- 0x80070643
- 0x80246002
- 0x80070490
- 0x80070420
- 0x80073712
- 0x80246007
- 0x8000FFFF
- 0x80070424
- 0x80248007
- 0x8007064C
- 0x8024D00C
- 0x8007066A
- 0x80245003
- 0x8024402C
This problem may occur if one or more of the following conditions are true:
- The Windows Update database is corrupted.
- Antivirus software is configured to scan the %Windir%SoftwareDistribution folder.
- The Background Intelligent Transfer Service (BITS) service does not receive a content link header.
- A required system file is registered incorrectly.
- Windows Installer encountered an error.
- The Component Based Servicing (CBS) manifest is corrupted.
- The Windows Update service stops during the installation process.
- There’s a file version conflict with Windows Update agent files.
To
resolve this problem, try each of the following methods. After each
method, test to see whether the problem is resolved before you go on to
the next method. If the problem is resolved by any method, you don’t
have to try the remaining methods.
Method 1: Run the Windows Update troubleshooter
Method 2: Download and manually install the update
To do this, follow these steps:
- Determine
the Microsoft Knowledge Base article number of the failed update. To do
this, do one of the following: View the error code message.- View the error code message.
- View
the update history on the Windows Update website or on the Microsoft Update website. To do this, follow these steps:- Go to the following Microsoft Update website:
- Under Options, click Review your update history.
- In the Update column, determine the Microsoft Knowledge Base article number of the failed update.
- Go to the following Windows Download website:
- In the Search box on the Downloads webpage, type the article number that you located in step 1, and then click Go.
Note Do not include the letters «kb» when you type the article number. For example, type «kb123456» as 123456.
- Browse through the list of returned content to locate the Knowledge Base article that has a link to the download.
Note
You may be prompted to validate Windows. If you are prompted, follow
the instructions to validate Windows, and then continue to download the
update. - Click Download, and then click Save when you are prompted to save the download. Save the download to your desktop.
- After the download is finished, click Open to install the update.
Note The update installation may fail if the update is incorrect for your version of Windows.
Method 3: Restart your computer, and then try to install the updates again
Exit all programs that are running, restart your computer, and then try to install the updates again.
Note
Restarting the computer will make sure that all previous installations
have finished, and that no remaining processes require a system restart
before they can finish.
Method 4: Run the System Update Readiness tool (CheckSur.exe)
Download
and run the System Update Readiness tool. This tool runs a one-time
scan for inconsistencies that may prevent future servicing operations.
For more information about how to download and run the CheckSur.exe
tool, see the following article in the Microsoft Knowledge Base:
Try to install updates again.
Note After you run the tool, the CheckSur.log file is saved in the following location:
%systemroot%logscbs
Method 5: Run the System File Checker tool (SFC.exe)
To do this, follow these steps:
- Open an administrative Command Prompt window.
- At the command prompt, type sfc /scannow, and then press Enter.
- After the scan is finished, try to install updates again.
Method 6: Reset the content of the Catroot2 folder
To do this, follow these steps:
- Open an administrative Command Prompt window.
- Type the following commands, and press Enter after each command:
- net stop cryptsvc
- md %systemroot%system32catroot2.old
- xcopy %systemroot%system32catroot2 %systemroot%system32catroot2.old /s
- Delete all contents of the catroot2 folder, but do not delete the catroot2 folder.
- Type the following command, and then press Enter:
net start cryptsvc
- Exit the Command Prompt window.
Method 7: Delete any incorrect registry values
Delete any incorrect values that may exist in the registry. To do this, follow these steps:
- Click Start, and then type regedit in the Start Search box.
- In the Programs list, click regedit.exe.
- Locate and then select the following registry subkey:
HKEY_LOCAL_MACHINECOMPONENTS
- Right-click COMPONENTS.
- Click Export.
- In the File Name box, type COMPONENTS.
- In the Save in box, click Desktop, click Save, and then save the file to your desktop.
- In the details pane, right-click PendingXmlIdentifier, and then click Delete. If this value does not exist, go to the next step.
- In the details pane, right-click NextQueueEntryIndex, and then click Delete. If this value does not exist, go to the next step.
- In the details pane, right-click AdvancedInstallersNeedResolving, and then click Delete. If the value does not exist, go to the next step.
- Restart the computer.
- Try to install the updates again.
Method 8: Register the Windows Update files
To do this, follow these steps:
- Open an administrative Command Prompt window.
- At the command prompt, type the following command:
REGSVR32 WUPS2.DLL /S REGSVR32 WUPS.DLL /S REGSVR32 WUAUENG.DLL /S REGSVR32 WUAPI.DLL /S REGSVR32 WUCLTUX.DLL /S REGSVR32 WUWEBV.DLL /S REGSVR32 JSCRIPT.DLL /S REGSVR32 MSXML3.DLL /S - Try to install updates again.
Method 9: Make sure that your antivirus application does not scan certain files
Make sure that your antivirus application does not scan the files in the %windir% SoftwareDistribution directory on any computer on which Windows Update Agent is installed.
For
computers that are running Windows Server 2003, Microsoft Windows 2000,
Windows XP, Windows Vista, or Windows Server 2008, do not scan the
following files and folders.
Note
These files are not at risk of infection. If you scan these files,
serious performance problems may occur because some files may be locked.
If a specific set of files is identified by name, exclude only those
files instead of the whole folder. Sometimes, the whole folder must be
excluded. Do not exclude any of these items based on the file name
extension. For example, do not exclude all files that have a .dit
extension. Microsoft has no control over other files that may use the
same extensions as these files.
- Files that are related to Microsoft Windows Update or to Automatic Update
- The Windows Update database file or the Automatic Update database file
Note This file (Datastore.edb) is located in the following directory:
%windir%SoftwareDistributionDatastore
- The transaction log files
Note These files are located in the following folder:
%windir%SoftwareDistributionDatastoreLogs
Exclude the following files:
- Edb*.log
Note The wildcard character indicates that there may be several files.
- Res1.log
- Res2.log
- Edb.chk
- Tmp.edb
Method 10: Rename the SoftwareDistribution folder
To do this, follow these steps:
- Open an administrative Command Prompt window.
- Run the following commands, and press Enter after each command:
- Net stop wuauserv
- cd %systemroot%
- Ren SoftwareDistribution SoftwareDistribution.old
- Net start wuauserv
- Try to install updates again.
Important The following issues occur when you use this method:
- Updates
that are currently downloaded but that have not yet been installed have
to be downloaded again by using Windows Update or Microsoft Update. - When you delete the Software Distribution folder, your download history is removed.
- If
you currently receive updates from Microsoft Update and from Windows
Update, you will have to reselect this option from the Windows Update
website.
Note
If the issue is resolved and you can successfully download and install
updates, you can safely delete the SoftwareDistribution.old folder to
recover disk space.
Method 11: Clear the BITS queue of any current jobs
To do this, follow these steps:
- Open an administrative Command Prompt window.
- At the command prompt, type the following commands, and press Enter after each command:
Net stop bits
Net stop wuauserv
Ipconfig /flushdns
cd documents and settingsall usersapplication datamicrosoftnetworkdownloader
Del qmgr0.dat
Del qmgr1.dat
Net start bits
Net start wuauserv
Note
After you complete these steps, the BITS queue is cleared. - Try to install updates again.
Method 12: Rename Pending.xml
To do this, follow these steps:
- Open an administrative Command Prompt window.
- At the command prompt, type the following command:
takeown /f C:Windowswinsxspending.xml - Rename the c:windowswinsxspending.xml path by using the following command:
Ren c:windowswinsxspending.xml pending.old
Method 13: Run Chkdsk on the Windows partition
To do this, follow these steps:
- Open an administrative Command Prompt window.
- At the command prompt, type the following command:
Article ID: 2509997 — Last Review: 06/25/2015 21:29:00 — Revision: 8.0
Applies to
Windows Vista Business
Windows Vista Enterprise
Windows Vista Home Basic
Windows Vista Home Premium
Windows Vista Starter
Windows Vista Ultimate
Windows 7 Enterprise
Windows 7 Home Basic
Windows 7 Home Premium
Windows 7 Professional
Windows 7 Starter
Windows 7 Ultimate
Windows Server 2008 Datacenter
Windows Server 2008 Enterprise
Windows Server 2008 Foundation
Windows Server 2008 R2 Datacenter
Windows Server 2008 R2 Enterprise
Windows Server 2008 R2 Foundation
Windows Server 2008 R2 Standard
Windows Server 2008 Standard
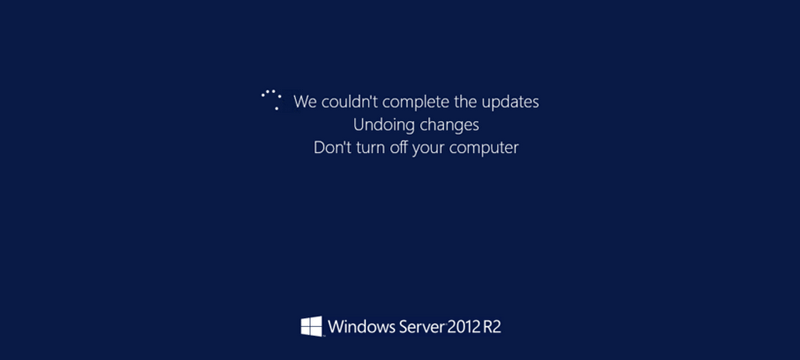
This tutorial describes an unusual problem that may occur during Windows Server 2012 R2 Updates. This issue generally occurs while performing scheduled Windows Updates. Failure of one single update may keep you stuck you at the screen that says Updating your system, but will not move a single inch, even after hours of waiting with no progress. To overcome this challenge you can follow one of the methods popular among the system administrators. Here, we will see one of them.
Troubleshooting:
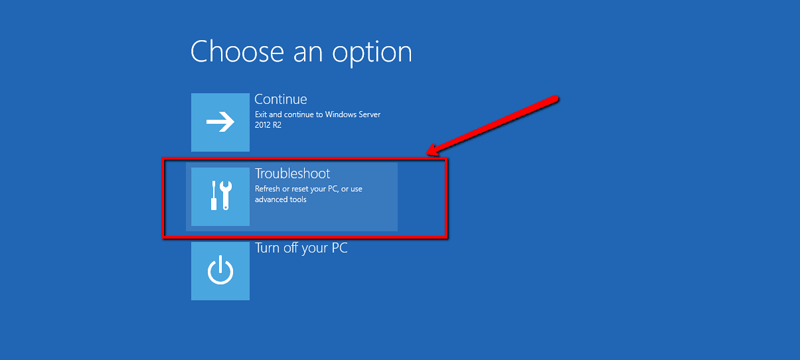
1. Boot your server from Windows Server 2012 > click on Troubleshoot to enter in recovery mode console.
2. Run the following command to get a list of available drives:
wmic logicaldisk get name

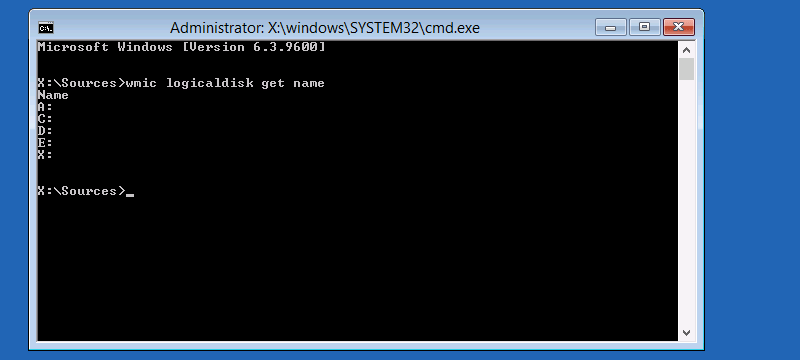
3. The next step is to locate the drive that contains the windows directory. The easiest way to confirm is to check each drive for Windows directory by using “dir” command. Generally, Windows directory exists in the “C:” drive, however, if it’s located under different drive then simply replace “C:” with respective drive.
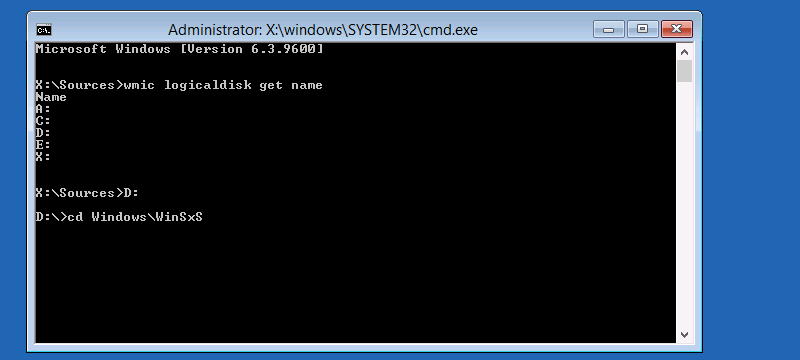
4. Navigate D:WindowsWinSxS directory by using >> “cd WindowsWinsxs”
5. Check “pending.xml” file >> run “dir pending*” command
6. Now rename the “Pending” files to “_old” at the end of the file name >> enter “ren Pending.xml Pending_old.xml” command
7. Once you rename the “pending.xml” >> the next step is to create a new blank “Pending.xml” file by using: echo > pending.xml
8. Now navigate Windows directory
9. Create a new directory within Windows >> run “mkdir directoryname” where directory name can be a random choice by you. We will name the directory as scratch.
10. Use DISM (deployment image servicing and management) command. It will remove or revert all pending actions from the damaged image >> run below command:
DISM /Image: D: / Cleanup-Image / RevertPendingActions
                          / scratchdir: D:Windows scratch
11. Now rename the “SoftwareDistribution” folder to “SoftwareDistributionOLD” >> run below command:
Ren SoftwareDistribution SoftwareDistributionOLD
12. Run a system file checker tool to repair missing or corrupt kernel files by using the following command:
sfc /SCANNOW /OFFBOOTDIR=D: /OFFWINDIR=D:Windows
13. Reboot the server
Note: If it is a virtual machine, make sure to take backup of “vhd” before making any changes on the server.
Устраняем ошибку «Обновление не применимо к этому компьютеру»

Обновление не применимо к ПК
Подобные проблемы чаще всего возникают на пиратских версиях «семерки», а также ее «кривых» сборках. «Взломщики» могут удалить нужные компоненты или повредить их при последующей упаковке. Именно поэтому в описаниях образов на торрентах мы можем встретить фразу «обновления отключены» или «не обновляйте систему».
Существуют и другие причины.
- При загрузке обновления с официального сайта была допущена ошибка в выборе разрядности или версии «винды».
- Тот пакет, который вы пытаетесь установить, уже присутствует в системе.
- Отсутствуют предыдущие обновления, без которых новые просто не могут быть инсталлированы.
- Произошел сбой в работе компонентов, отвечающих за распаковку и установку.
- Антивирус заблокировал инсталлятор, а точнее, запретил ему вносить изменения в систему.
- ОС была атакована вредоносными программами.
Разбирать причины мы будем в порядке возрастания сложности их устранения, так как иногда можно выполнить несколько простых действий, чтобы решить проблему. В первую очередь нужно исключить возможное повреждение файла при загрузке. Для этого его требуется удалить, а затем скачать заново. Если ситуация не изменилась, то переходите к рекомендациям, приведенным ниже.
Причина 1: Неподходящая версия и разрядность
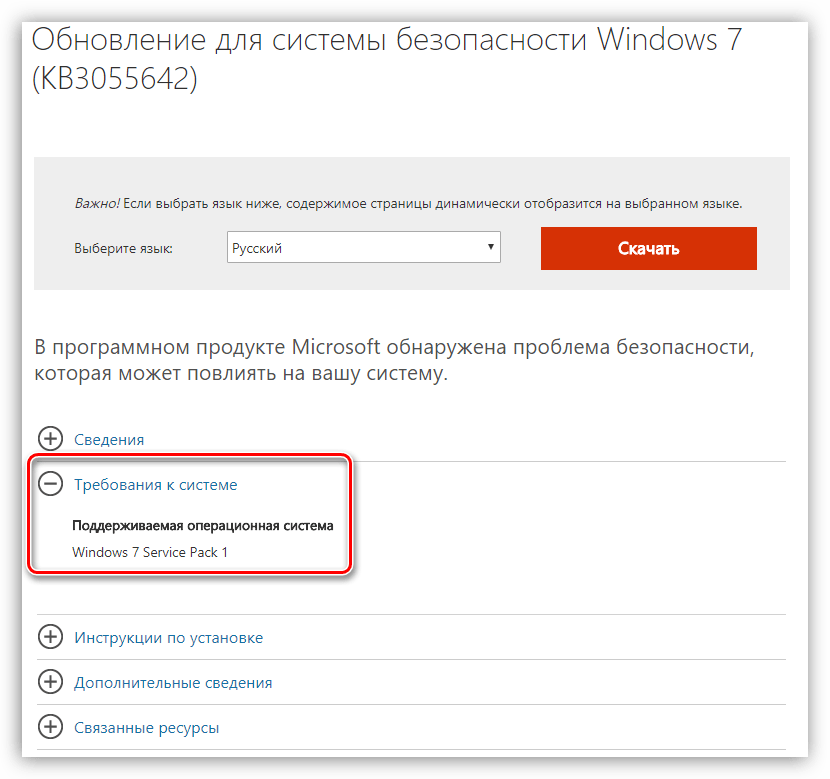
Перед тем как скачать обновление с официально сайта, удостоверьтесь, что оно подходит к вашей версии ОС и ее разрядности. Сделать это можно, раскрыв список системных требований на странице загрузки.
Причина 2: Пакет уже установлен
Это одна из самых простых и распространенных причин. Мы можем не помнить или попросту не знать, какие обновления установлены на ПК. Выполнить проверку довольно легко.
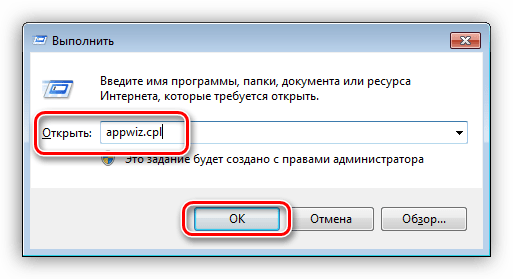
- Вызываем строку «Выполнить» клавишами Windows+R и вводим команду для перехода к апплету «Программы и компоненты».
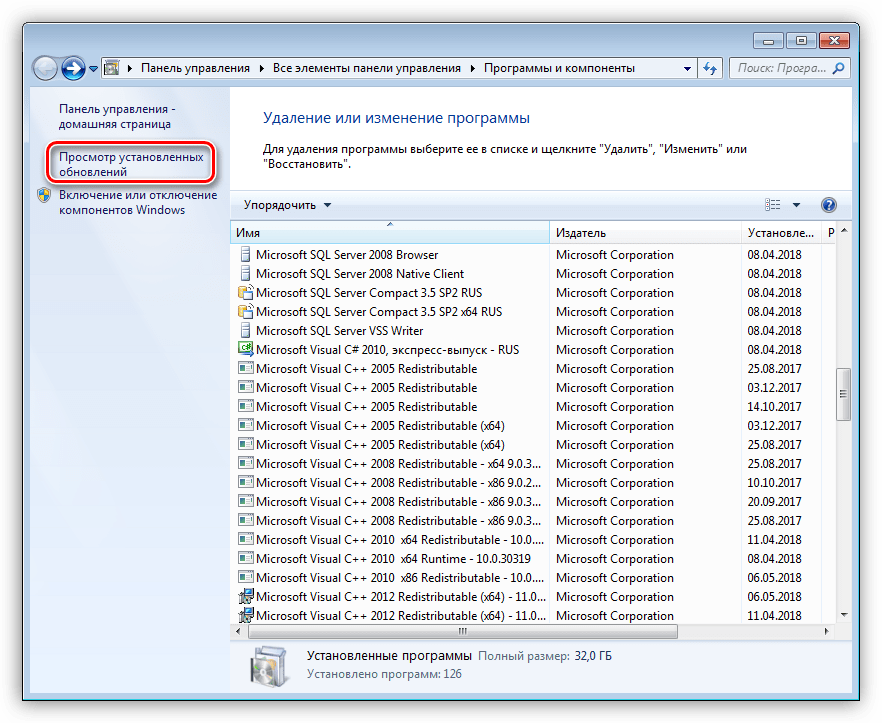
Переключаемся на раздел со списком установленных обновлений, нажав на ссылку, указанную на скриншоте.
Далее в поле поиска вводим код апдейта, например,
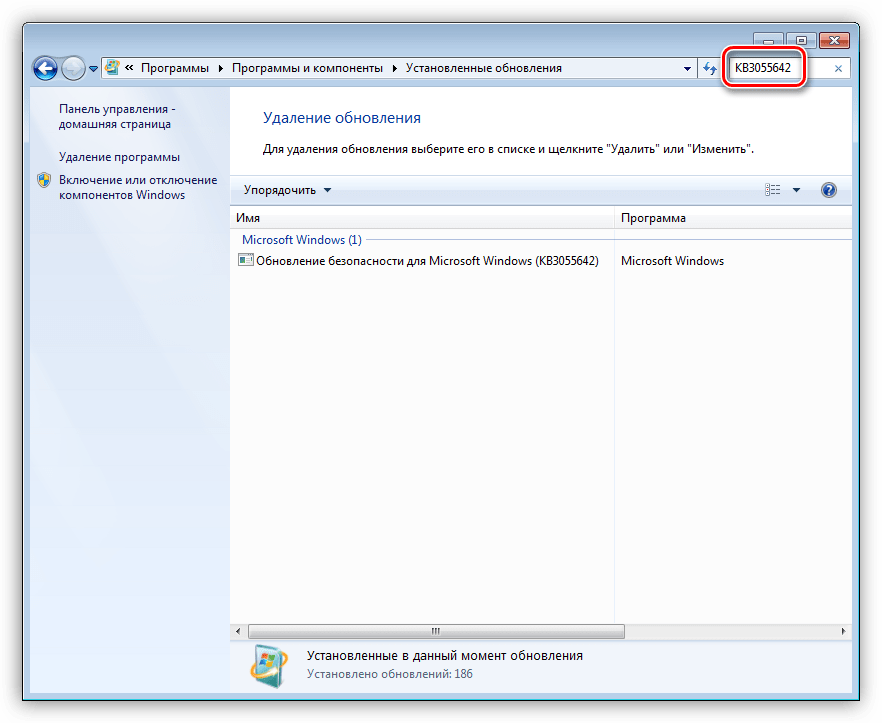
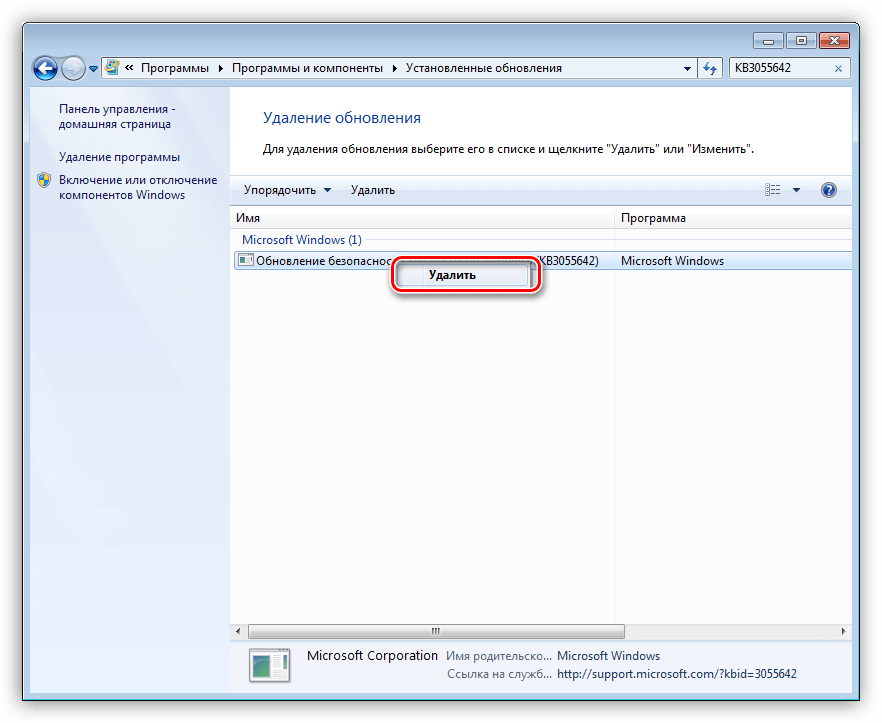
Причина 3: Отсутствуют предыдущие обновления
Здесь все просто: необходимо выполнить обновление системы в автоматическом или ручном режиме с помощью «Центра обновлений». После того как операция будет полностью завершена, можно устанавливать необходимый пакет, предварительно проверив список, как в описании причины номер 1.
Если вы являетесь «счастливым» обладателем пиратской сборки, то данные рекомендации могут не сработать.
Причина 4: Антивирус
Какими бы «умными» не называли свои продукты разработчики, антивирусные программы довольно часто поднимают ложную тревогу. Особенно пристально они следят за теми приложениями, которые работают с системными папками, расположенными в них файлами и ключами реестра, отвечающими за настройку параметров ОС. Самое очевидное решение – на время отключить антивирус.
Если отключение невозможно, или ваш антивирус не упоминается в статье (ссылка выше), то можно применить безотказный прием. Его смысл заключается в загрузке системы в «Безопасный режим», в котором все антивирусные программы не подлежат запуску.
Подробнее: Как зайти в безопасный режим на Windows 10, Windows 8, Windows 7, Windows XP
После загрузки можно попытаться установить обновление. Обратите внимание, что для этого вам понадобится полный, так называемый оффлайновый, установщик. Таким пакетам не требуется подключение к интернету, который в «Безопасном режиме» не работает. Скачать файлы можно на официальном сайте Microsoft, введя в поисковую строку Яндекса или Google запрос с кодом обновления. Если же вы предварительно скачали апдейты с помощью «Центра обновлений», то ничего больше искать не нужно: все необходимые компоненты уже загружены на жесткий диск.
Причина 5: Сбой в работе компонентов
В этом случае нам поможет ручная распаковка и установка обновления с помощью системных утилит expand.exe и dism.exe. Они являются встроенными компонентами Windows и не требуют скачивания и инсталляции.
Рассмотрим процесс на примере одного из пакетов обновлений для Windows 7. Данную процедуру нужно выполнять из учетной записи, имеющей администраторские права.
- Запускаем «Командную строку» от имени администратора. Делается это в меню «Пуск – Все программы — Стандартные».

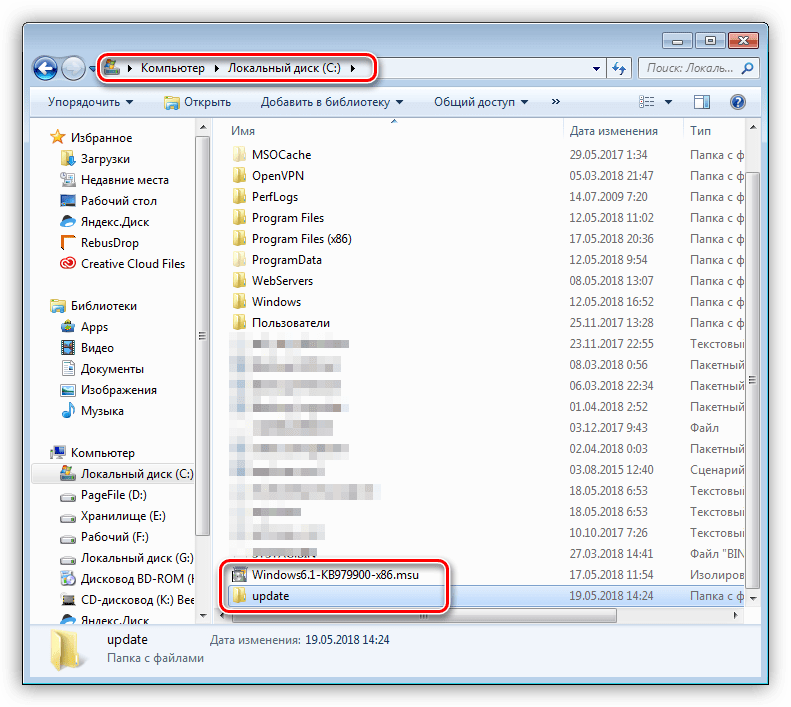
Помещаем скачанный установщик в корень диска C:. Это делается для удобства ввода последующих команд. Там же создаем новую папку для распакованных файлов и даем ей какое-нибудь простое имя, например, «update».
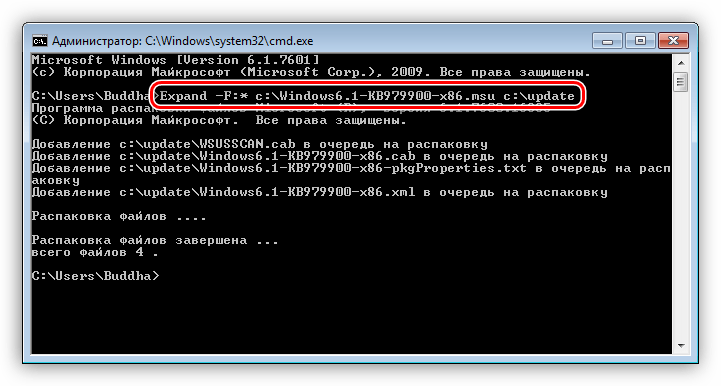
В консоли выполняем команду распаковки.
Expand -F:* c:Windows6.1-KB979900-x86.msu c:update
Windows6.1-KB979900-x86.msu — название файла с апдейтом, которое нужно заменить на свое.
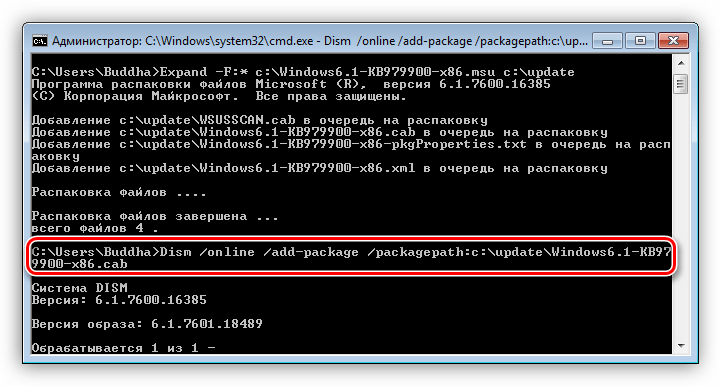
После завершения процесса вводим еще одну команду, которая установит пакет с помощью утилиты dism.exe.
Dism /online /add-package /packagepath:c:updateWindows6.1-KB979900-x86.cab
Windows6.1-KB979900-x86.cab – это архив, содержащий пакет обновления, который был извлечен из установщика и помещен в указанную нами папку «update». Здесь также нужно подставить свое значение (название скачанного файла плюс расширение .cab).
Причина 6: Поврежденные системные файлы
Начнем сразу с предупреждения. Если вы пользуетесь пиратской версией Windows или вами были внесены изменения в системные файлы, например, при установке пакета оформления, то действия, которые необходимо будет выполнить, могут привести к неработоспособности системы.
Речь идет о системной утилите sfc.exe, которая проверяет целостность системных файлов и, при необходимости (возможности), заменяет их работоспособными копиями.
В том случае, если утилита сообщает о невозможности восстановления, выполните эту же операцию в «Безопасном режиме».
Причина 7: Вирусы
Вирусы – это извечные враги пользователей Windows. Такие программы способны принести массу неприятностей – от повреждения некоторых файлов до вывода из строя системы целиком. Для того чтобы опознать и удалить вредоносные приложения, необходимо воспользоваться рекомендациями, приведенными в статье, ссылку на которую вы найдете ниже.
Заключение
Мы уже говорили в начале статьи, что обсуждаемая неполадка чаще всего наблюдается на пиратских копиях Виндовс. Если это ваш случай, и способы устранения причин не сработали, то придется отказаться от установки обновления или перейти на использование лицензионной операционной системы.
Источник
«Обновление неприменимо к вашему компьютеру»: почему выходит ошибка в Windows 10 при установке обновления
Ответ
Однозначно дать ответ почему конкретное обновление не применимо именно к вашему компьютеру я не смогу, тут нужно смот4реть сам компьютер. Но я попробую рассмотреть основные причины, из-за которых невозможно установить обновление безопасности Windows и способы решения проблемы.
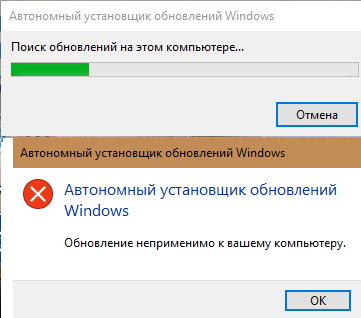
Итак, ошибка «Обновление неприменимо к этому компьютеру» (The Update is not applicable to your Computer – в английской версии Windows) появляется при попытке ручной установки MSU обновления через утилиту wusa.exe (Автономный установщик обновлений Windows). Почему Windows 10 / 8.1 / 7 может считать, что обновление неприменимо:
- Если компьютер давно не перезагружался или не перезагружался после установки последних обновлений, попробуйте принудительно перезагрузить Windows;
- Данное обновление не соответствует вашей версии ОС, редакции, билду, разрядности (архитектуре процессора) или языку. Например, вы пытаетесь установить обновление для x86 на Windows x64. Проверьте эти данные на своем компьютере и попытайтесь скачать обновление, подходящее для вашей версии Windows. Касательно языка системы: иногда используется язык установленной системы отличается от используемого языка интерфейса, здесь нужно быть внимательным;

- Данное обновление уже установлено либо установлено более обновление, заменяющее данное обновление (информацию о заменяющих обновлениях можно найти на странице KB на сайте Microsoft, обычно эта информация указан в формате Сведения о замене обновлений. Это обновление заменяет ранее выпущенное обновление….). Список установленных обновлений можно получить с помощью команды wmic qfe list или при помощи PowerShell модуля PSWindowsUpdate;
- Не выполнены требования для установки данного обновления, например большинство обновления для Windows 7 требуют наличия установленного SP1, обновлений для Windows 8.1 / Windows Server 2012 R2 требует наличие Update 1 и т.д. Вся эта информация также должна присутствовать на странице с информацией о KB. Внимательно прочтите все требования к вашему патчу, возможно перед его установкой нужно предварительно установить еще какой-то апдейт;
- Некорректно работает служба Windows Update (можно попробовать выполнить скрипт сброса настроек службы обновлений, или запустить Windows Update Troubleshooter (Параметры > Обновления и безопасность > Устранение неполадок > Центр обновления Windows и нажмите Запустить средство устранение неполадок);
- Если вы получили *.msu файл обновления из третьих источников, возможно он был поврежден. Попробуйте заново скачать файл обновления с сайта «Каталога центра обновления Windows» (https://www.catalog.update.microsoft.com);
- Проверьте целостность системных файлов Windows с помощью команды Dism.exe /Online /Cleanup-Image /Restorehealth или sfc /scannow .
В некоторых случаях можно попробовать установить MSU файл обновления не через утилиту WUSA.exe (ее использует тот самый автономный установщик обновлений Windows), а распаковав CAB файл и установив его через DISM или командлет Add-WindowsPackage напрямую в образ Windows. Для вашего обновления процедура ручной установки обновления может выглядеть так:
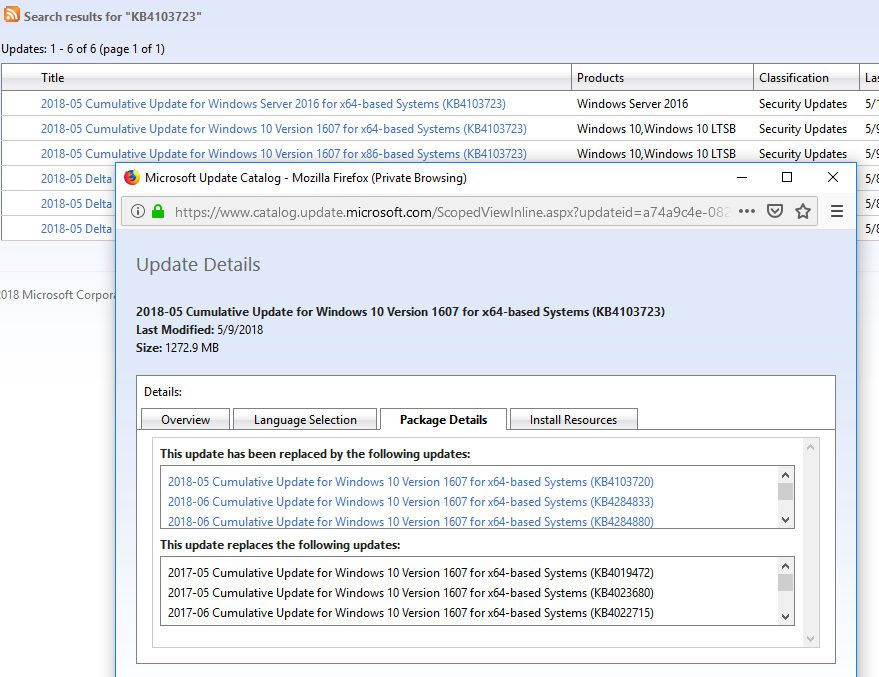
- Распакуйте MSU файл обновления: expand _f:* “C:Tempwindows10.0-KB4103723-x64.msu” C:TempKB4103723
- В каталоге C:TempKB4103723 появится CAB с именем вида Windows10.0-KB4103723-x64.cab;
- Установите данный CAB файл обновления с помощью DISM.exe ( DISM.exe /Online /Add-Package /PackagePath:c:TempWindows10.0-KB4103723-x64.cab ) или с помощью PowerShell ( Add-WindowsPackage -Online -PackagePath “c:TempWindows10.0-KB4103723-x64.cab” )
Касательно вашего случая. Не обязательно устанавливать именно обновление KB4103723. Это кумулятивное обновление для Windows 10 1607 x64 от мая 2018 года, соответственно вы можете установить любое более позднее кумулятивное обновление для вашей версии Windows, т.к. оно уже включает все предыдущие обновления. Например, вы можете установить обновление KB4467684 (ноябрь 2018) для Windows 10 1607.
Иногда полезно посмотреть конкретный код ошибки установки обновлений в консоли просмотр событий. Перейдите в раздел Установка (Event Viewer > Windows Logs > Setup) и найдите событие с источником WUSA, скорее всего там будет содержаться примерно такой текст:
Имеет смысл поискать в Google информацию по данному коду ошибки установки обновлений Windows, также вам может помочь полный список кодов ошибок Windows Update.
Источник
Windows 2012 r2 обновление не применимо к этому компьютеру
![]()
Вопрос
![]()
![]()
не устанавливается Windows8.1-KB2999226-x64
пишет обновление не применимо для вашего компьютера.
система Windows Server 2012 R2 Standard x64 обновление скачено соответсвенно с сайта майкрософт
данное обновление требуется для установки wireshark, поэтому крайне необходимо.
Ответы
![]()
![]()
Проверьте п редварительные условия д ля установки этого обновления необходимо иметь накопительный пакет обновления для Windows RT 8.1, Windows 8.1 и Windows Server 2012 R2 (2919355) от апреля 2014 г. , установленный в Windows Server 2012 R2 или Windows 8.1. Или установите Пакет обновления 1 для Windows 7 или Windows Server 2008 R2 . Или установите Пакет обновления 2 для Windows Vista и Windows Server 2008 .
Я не волшебник, я только учусь MCP CCNA. Если Вам помог чей-либо ответ, пожалуйста, не забывайте жать на кнопку «Пометить как ответ» или проголосовать «полезное сообщение». Мнения, высказанные здесь, являются отражением моих личных взглядов, а не позиции работодателя. Вся информация предоставляется как есть без каких-либо гарантий. Блог IT Инженера, Twitter, YouTube, GitHub.
![]()
![]()
Покажите пожалуйста лог сторонней антивирусной утилиты FRST , согласно следующей инструкции:
— Скачайте Farbar Recovery Scan Tool  и сохраните на Рабочем столе.
Примечание : необходимо выбрать версию, совместимую с Вашей операционной системой. Если Вы не уверены, какая версия подойдет для Вашей системы, скачайте обе и попробуйте запустить. Только одна из них запустится на Вашей системе.
[*]Запустите программу двойным щелчком. Когда программа запустится, нажмите Yes для соглашения с предупреждением.
[*]Убедитесь, что в окне Optional Scan отмечены » List BCD » и » Driver MD5 «. 
[*]Нажмите кнопку Scan .
[*]После окончания сканирования будет создан отчет ( FRST.txt ) в той же папке, откуда была запущена программа. Пожалуйста, прикрепите отчет в следующем сообщении.
[*]Если программа была запущена в первый раз, будет создан отчет ( Addition.txt ). Пожалуйста, прикрепите его в следующем сообщении.
Я не волшебник, я только учусь MCP CCNA. Если Вам помог чей-либо ответ, пожалуйста, не забывайте жать на кнопку «Пометить как ответ» или проголосовать «полезное сообщение». Мнения, высказанные здесь, являются отражением моих личных взглядов, а не позиции работодателя. Вся информация предоставляется как есть без каких-либо гарантий. Блог IT Инженера, Twitter, YouTube, GitHub.
Источник
I have 16 important updates in Windows Update waiting to be installed, but they won’t install. The general case is the following:
- To install Update X, first I need to install update Y.
- Update Y does not install with the error «This update is not applicable to your computer», even though I’ve chosen the one for Windows Server 2012 R2 64-bit from the list.
For example: to install KB2919355, first I need to install KB2919442. I go to the page for the latter (because its not on the list on WU) and click on the file for «All supported x64-based versions of Windows Server 2012 R2». When I try to install the file however, I get the above error.
I tried some proposed solutions I found on the net, but they don’t work. It was suggested I try the Troubleshooter, but in «All categories» I don’t have «Windows Update».
I tried stopping the WU and BITS services, then deleting the «SoftwareDistribution» folder, then starting the services again and trying to install it again — same error.
What do I do now?
UPDATE 1: output of command:
PS C:UsersAdministrator> get-hotfix KB3173424,KB2919355,KB2919442

Source        Description      HotFixID      InstalledBy          InstalledOn
------        -----------      --------      -----------          -----------
<edited> Update           KB2919355     <edited> 7.6.2018 г. 0:00:00
<edited> Update           KB3173424     <edited> 6.6.2018 г. 0:00:00
It shows as installed (?), when in the installed updates window it showed as «Failed» (that was before I erased the «SoftwareDistribution» folder.
I am downloading some updates manually, because they are prerequisites for the ones in thw WU list, but are not listed in it.
UPDATE 2: I tried these
sfc /scannow — returns «Windows Resource Protection did not find any integrity violations»
DISM.exe /Online /Cleanup-image /Scanhealth and
DISM.exe /Online /Cleanup-image /Restorehealth return «Error: 87 The cleanup-image option is unknown.»
UPDATE 3: This is the list of updates that won’t insatll:
2017-12 Security Monthly Quality Rollup for Windows Server 2012 R2 for x64-based Systems (KB4054519)
2018-07 Security Monthly Quality Rollup for Windows Server 2012 R2 for x64-based Systems (KB4338815)
Security Update for Windows Server 2012 R2 (KB3004365)
Security Update for Windows Server 2012 R2 (KB3045999)
Security Update for Windows Server 2012 R2 (KB3071756)
Security Update for Windows Server 2012 R2 (KB3081320)
Security Update for Windows Server 2012 R2 (KB3092601)
Security Update for Windows Server 2012 R2 (KB3126593)
Security Update for Windows Server 2012 R2 (KB3146723)
Security Update for Windows Server 2012 R2 (KB3161949)
Security Update for Windows Server 2012 R2 (KB3175024)
Update for Windows Server 2012 R2 (KB2967917)
Update for Windows Server 2012 R2 (KB3000850)
Update for Windows Server 2012 R2 (KB3008242)
Update for Windows Server 2012 R2 (KB3044374)
Update for Windows Server 2012 R2 (KB3077715)
Windows Server 2012 R2 Update (KB2919355)
I checked if some of them are superseded on catalog.update.microsoft.com. None are, except the 2017-12 Security Monthly Quality Rollup (as expected).
So the updates are not superseded.
When I type get-hotfix, from the list of available updates, only KB2919355 lists as installed, so the vast majority are not already installed.
Also, I am getting the updates via WU, so I’d think they’ll give me a list according to my architecture (64-bit). Also, when I manually go to the website and choose 64-bit, I get the same error.
So I’m left with pretty much no more options except complete reinstall, but that’s not at all guaranteed to solve the problem. Does anybody have any other ideas?
UPDATE 4:
Installed updates (sorry, PS only gives me the date and not time, so there’s no way to tell which was the last one installed):
Description      HotFixID       InstalledOn
 -----------      --------       -----------
 Security Update  KB2862152      6.6.2018 г. 0:00:00
 Security Update  KB2868626      6.6.2018 г. 0:00:00
 Security Update  KB2892074      6.6.2018 г. 0:00:00
 Security Update  KB2893294      6.6.2018 г. 0:00:00
 Security Update  KB2894856      7.12.2018 г. 0:00:00
 Security Update  KB2898871      6.6.2018 г. 0:00:00
 Security Update  KB2901128      6.6.2018 г. 0:00:00
 Security Update  KB2912390      6.6.2018 г. 0:00:00
 Update           KB2919355      7.6.2018 г. 0:00:00
 Security Update  KB2922229      6.6.2018 г. 0:00:00
 Security Update  KB2931366      6.6.2018 г. 0:00:00
 Update           KB2939087      7.5.2018 г. 0:00:00
 Security Update  KB2973201      7.12.2018 г. 0:00:00
 Update           KB2975061      7.5.2018 г. 0:00:00
 Security Update  KB2976897      7.12.2018 г. 0:00:00
 Security Update  KB2977765      7.12.2018 г. 0:00:00
 Security Update  KB2978041      7.12.2018 г. 0:00:00
 Security Update  KB2978126      7.12.2018 г. 0:00:00
 Update           KB2999226      7.6.2018 г. 0:00:00
 Security Update  KB3010788      7.12.2018 г. 0:00:00
 Security Update  KB3011780      7.12.2018 г. 0:00:00
 Security Update  KB3019978      7.12.2018 г. 0:00:00
 Security Update  KB3021674      7.12.2018 г. 0:00:00
 Security Update  KB3023222      7.12.2018 г. 0:00:00
 Security Update  KB3023266      7.12.2018 г. 0:00:00
 Security Update  KB3032663      7.12.2018 г. 0:00:00
 Update           KB3034348      7.12.2018 г. 0:00:00
 Security Update  KB3035126      7.12.2018 г. 0:00:00
 Security Update  KB3037579      7.12.2018 г. 0:00:00
 Update           KB3042085      7.12.2018 г. 0:00:00
 Security Update  KB3045685      7.12.2018 г. 0:00:00
 Security Update  KB3045755      7.12.2018 г. 0:00:00
 Security Update  KB3046017      7.12.2018 г. 0:00:00
 Security Update  KB3055642
 Security Update  KB3059317      7.12.2018 г. 0:00:00
 Security Update  KB3061512      7.12.2018 г. 0:00:00
 Security Update  KB3074228      7.12.2018 г. 0:00:00
 Security Update  KB3074548      7.12.2018 г. 0:00:00
 Security Update  KB3082089      7.12.2018 г. 0:00:00
 Security Update  KB3084135      7.12.2018 г. 0:00:00
 Security Update  KB3086255      7.12.2018 г. 0:00:00
 Security Update  KB3097997      7.12.2018 г. 0:00:00
 Security Update  KB3098779      7.12.2018 г. 0:00:00
 Security Update  KB3102939      7.12.2018 г. 0:00:00
 Security Update  KB3109103      7.12.2018 г. 0:00:00
 Security Update  KB3110329      7.12.2018 г. 0:00:00
 Security Update  KB3126041      7.12.2018 г. 0:00:00
 Security Update  KB3126434      7.12.2018 г. 0:00:00
 Security Update  KB3126587      7.12.2018 г. 0:00:00
 Security Update  KB3133043      7.12.2018 г. 0:00:00
 Security Update  KB3139398      7.12.2018 г. 0:00:00
 Security Update  KB3139914      7.12.2018 г. 0:00:00
 Security Update  KB3155784      7.12.2018 г. 0:00:00
 Security Update  KB3156059      7.12.2018 г. 0:00:00
 Security Update  KB3159398      7.12.2018 г. 0:00:00
 Security Update  KB3162343      7.12.2018 г. 0:00:00
 Security Update  KB3172729      6.6.2018 г. 0:00:00
 Update           KB3173424      6.6.2018 г. 0:00:00
 Security Update  KB3178539      7.12.2018 г. 0:00:00