-
Google Nexus 7 ADB Interface
Версия:
5.3.24758.042
(22 фев 2022)
Файл *.inf:
android_winusb.inf
Windows Vista, 7, 8, 8.1, 10
-
Google Nexus 7 ADB Interface
Версия:
1.0.0020.00000
(11 ноя 2015)
Файл *.inf:
androidusb.inf
Windows Vista, 7, 8, 8.1, 10
-
Google Nexus 7 ADB Interface
Версия:
11.0.0000.00000
(28 авг 2016)
Файл *.inf:
android_winusb.inf
Windows Vista, 7, 8, 8.1, 10
В каталоге нет драйверов для Google Nexus 7 ADB Interface под Windows.
Скачайте DriverHub для автоматического подбора драйвера.
Драйверы для Google Nexus 7 ADB Interface собраны с официальных сайтов компаний-производителей и других проверенных источников.
Официальные пакеты драйверов помогут исправить ошибки и неполадки в работе Google Nexus 7 ADB Interface (другие устройства).
Скачать последние версии драйверов на Google Nexus 7 ADB Interface для компьютеров и ноутбуков на Windows.

On this page, we have managed to share the official USB driver of the Google Nexus 7 (2012) Device. If you were already searching for the USB driver of the device, then this page will help you out.
There is 1 USB driver available for the device, i.e., ADB Driver. The ADB Driver can be useful for establishing a connection between the mobile and the computer.
Google Nexus 7 (2012) ADB Driver
You can use the ADB Driver to connect the mobile (powered by android) to the computer and transfer data between the mobile and the computer.
Driver Name: Android ADB Driver
Package Name: usb_driver_r13-windows.zip
Driver Size: 8.27 MB
How to Install: Follow Guidelines
Get Driver
How to Install any USB Driver Manually
- Download and extract the USB driver on the computer.
- Open Device Manager (devmgmt.msc) and Click on the Computer Name > Action Menu > Add Legacy Hardware.
- Click on the Next button.
- Select the Install the hardware that I manually Select from a list checkbox and Click on the Next button.
- Again, Click on the Next button.
- Click on the Have Disk > Browse > Locate the .inf file (found in the extracted driver folder) and Click on Open Button.
- Click on the Finish button to complete the installation.
Follow Complete Guidelines
Readme Once:
[*] Driver Signature Error: If you are facing Driver Signature Error while installing the USB Driver, then head over to How to Fix Driver Signature Error page.
[*] Driver Easy: We recommend you to use Driver Easy application to update all the computer drivers in a Single Click.
[*] Google Nexus 7 (2012) Stock Firmware: If you are looking for the Google Nexus 7 (2012) Stock Firmware, then head over to the Stock Firmware page.
Home » Asus » Asus Google Nexus 7 USB Driver
If you are an owner of Asus Google Nexus 7 and looking out for USB drivers to connect your device to the computer, then you have landed on the right page. Download Asus Google Nexus 7 USB driver from here, install it on your computer and connect your device with PC or Laptop successfully.
Here, we have provided two USB drivers for your Asus Google Nexus 7.

USB Driver Type: NVIDIA Driver
USB Driver Purpose: For flashing Stock firmware on your device.
File Size: 8 MB
Download Now
USB Driver Type: ADB Driver
USB Driver Purpose: For connecting your device to a computer.
File Size: 8.3 MB
Download Now
Steps To Install Asus Google Nexus 7 NVIDIA Driver In your computer
Video Tutorial:
If you don’t like this video tutorial or if you would like to get more instructions, then continue reading.
Step 1: To get started, download the driver and extract it on your desktop.

Step 2: Now, open Device Manager > Action > Add Legacy Hardware

Step 3: Click “Next” in the Add legacy hardware menu.

Step 4: Select “Install the hardware that I manually select from the list (Advanced)” and click “Next“.

Step 5: Now, select “Show all devices“, click “Next” and choose the extracted file manually from your computer.

Step 6: To start installing your new hardware, click “Next” again.

Step 7: Click “Finish” to complete installation.

That’s it. Your device driver is now successfully installed on your computer.
Steps To Install Asus Google Nexus 7 ADB Driver In your computer
Video Tutorial
If you don’t like this video tutorial or if you would like to get more instructions, then continue reading.
Step 1: To get started, download the driver and extract it on your desktop.

Step 2: Now, open Device Manager > Action > Add legacy hardware.
Step 3: Next, click “Next” in the Add legacy hardware wizard.
Step 4: Now choose “Install the hardware that I manually select from the list (Advanced)” and click “Next“.
Step 5: Once done choose “Show all devices“, click “Next” and select the extracted file manually from your computer.
Step 6: Now to start installing your new hardware, click “Next” again.
Step 7: Click “Install” in the Windows security prompt window.

Step 8: Next, click “Finish” to complete installation.
That’s it. Now you have successfully finished installed ADB driver in your Computer. If you encounter any issues while following this tutorial, do let me know via comments.
Note: If you have bricked your Asus Google Nexus 7, download Asus Google Nexus 7 stock ROM and flash it on your device using an Android flash tool.

Boopathy Sundaramoorthy is a tech and Android enthusiast working for AllUSBDrivers.com from 2018. He loves helping Android users to find the right USB drivers for their devices so that they can connect their smartphone or tablet to a computer.
Reader Interactions
ABD drivers and specially fastboot drivers are necessary to perform some technical operation on your Nexus device such as rooting, installing a custom ROM, or flashing stock Android firmware. One can simply install the drivers for Nexus 7 using Android SDK or a supported toolkit but the process is somewhat longer and there are chances that either of the drivers might not be configured properly. This guide states the easiest way to install ADB and Fastboot Drivers for Nexus 7 on Windows 7 and Windows 8.
1. Enable USB debugging on your Nexus 7. (Settings > Developer options > USB Debugging) and connect the tab to the computer.
– If Developer Options are not visible, visit here to know how to enable them.
2. Download USBDeview, extract, and open the .exe file (Run as administrator).
3. In USBDeview, carefully look for devices with Vendor IDs: ‘18d1’ or ‘04e8’. Select all such devices, right-click and select ‘Uninstall selected devices’ to remove them.

~ Ignore Steps #2 and #3 if you haven’t messed up with drivers before or are installing the drivers on a fresh installed OS.
Installing ADB drivers for Nexus 7 on Windows 7 & Windows 8 –
>> Download Nexus 7 USB Drivers for Windows 7 & Windows 8 (32-bit and 64-bit) and extract the zip file to a folder on your desktop.
1. Disconnect and reconnect your tablet to the computer and let it automatically search, download and install the drivers. (Computer should be connected to the Internet)
In Windows 7, the driver installation will appear like this:

In Windows 8, the driver installation will appear like this:

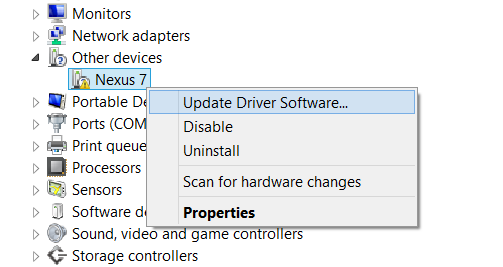
2. Open Device Manager from Control Panel. Your devices should be listed as Nexus 7 under Other devices. Right-click Nexus 7 and click ‘Update Driver Software’.

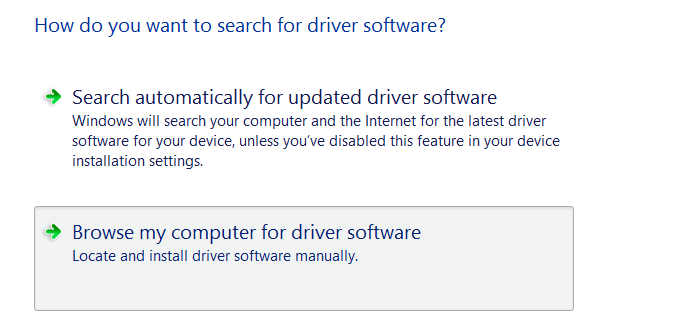
3. Select the option ‘Browse my computer for driver software’.
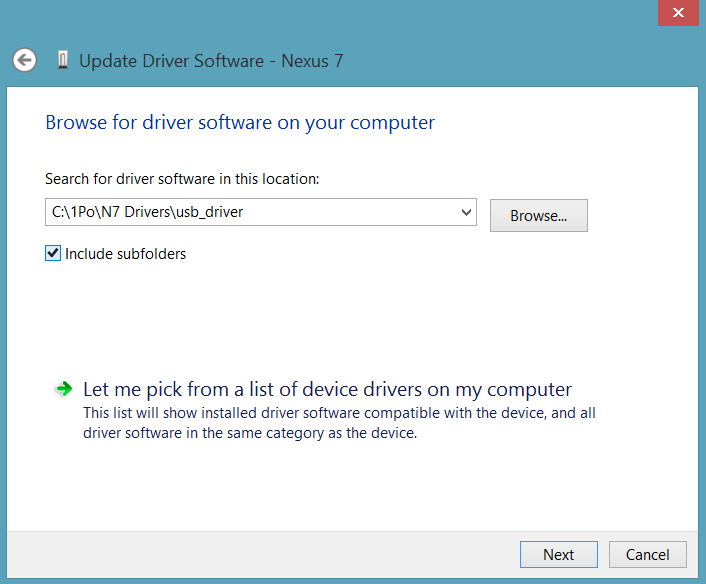
4. Browse to the ‘Google Drivers’ folder directory that you downloaded above and also tickmark ‘Include subfolders’. Click Next.

5. A dialog box will appear asking to install the device software. Select ‘Install’.

6. That’s it. Your ADB drivers are now successfully installed on Windows 7/8.

To confirm, open Device Manager and your Nexus 7 should be listed as ‘Android Composite ADB Interface’ while in USB Debugging mode on both Windows 7 & 8. That means ADB drivers for your device are working properly.

Installing Fastboot Drivers for Nexus 7 –
Boot the device into fastboot aka Bootloader mode – First power off the tab, then turn it on by ‘Holding down both volume up + volume down buttons and the power key simultaneously.’ While in Fastboot mode, connect the tab to the computer.
Both Windows 7 & Windows 8 will automatically recognize and install the right drivers for fastboot. You should see the below message.


To confirm that Fastboot drivers are installed properly, open the Device Manager and it should list your device as ‘Android Bootloader Interface’ while in Fastboot mode.

~ We’ve tried the above procedure on the 32-bit version of Windows 7 and Windows 8.

Mayur Agarwal is the founder and editor-in-chief of WebTrickz. As a Technology enthusiast and an Internet addict, he loves sharing useful How To’s and Tips & Tricks.
I have tried every suggestion on this website and many others to no avail. Is it even possible to do android development for a nexus 7 on windows?
I have tried the usb driver downloaded from the sdk manager, the one from asus. I have tried changing the usb mode to PTP and I am still getting the the same message when I try to install the driver (manually).
«Windows could not find driver software for your device»
asked Jul 31, 2013 at 13:59
![]()
ryoungryoung
8561 gold badge8 silver badges24 bronze badges
6
I know this question has been answered, but I just ran into an issue where uninstalling the Unknown Device, and then updating the driver manually was not working (by selecting the sdk/../usb_drivers folder). No matter what I did from Device Manager, I could not get the drivers to be found/installed.
Hopefully this helps someone — if you have an issue installing the device (Win7), this worked for me:
- Disconnect the USB from the device.
- On the device, go to Settings -> Developer Options, and click Revoke USB debugging authorizations.
- On the device, go to Settings -> Storage -> USB Computer Connection (available on the drop down menu at the top right of your screen). Verify that Media device (MTP) is CHECKED.
- Reconnect the device, and it should install successfully without a problem. If not, attempt to update the driver manually and point Windows to the usb_drivers folder of your SDK.
I just had this problem occur for me with two factory new Nexus devices (Nexus 7 and Nexus 4). For both devices, I had to do the steps above and everything worked fine afterward.
answered Nov 5, 2013 at 18:55
![]()
Lo-TanLo-Tan
2,7251 gold badge25 silver badges27 bronze badges
3
Ok here’s something awesome. When browsing for the driver DO NOT select the architecture (i.e. amd64 or i386). Just browse to the «usb_driver» folder. It is working now.
your_sdk_pathandroid-sdkextrasgoogleusb_driver
![]()
Pratik Butani
59.2k55 gold badges266 silver badges427 bronze badges
answered Jul 31, 2013 at 14:25
![]()
ryoungryoung
8561 gold badge8 silver badges24 bronze badges
3
I had to hook up 4 Nexus 7s (2012) on Windows 7.
After much trials, tribulations and many errors, here is what I had to do, for EACH device.
Plug in the Nexus 7 using USB. Watch it fail to install one out of 4 drivers.
Now, Computer -> Manage -> Device Manager -> Right Click on device -> Uninstall
NOTE: Check «Delete the driver software…». This buys you some time
-> OK
Unplug USB, wait 5 secs, plug it back in.
Windows tries to install a driver.
BEFORE it can complete, Right click on the device that appeared in the device list
and select «Update driver software»
Gotta be fast here. Time is of the essence. If you are slow, delete and repeat.
Browse to the Google driver ( extrasgoogleusb_driver ) -> OK
Try connecting via Eclipse..
For me, at this point, the stupid Nexus was asking whether to accept a key.
Say OK, and I was all set. Not fun…
answered Nov 2, 2013 at 1:11
![]()
SoloPilotSoloPilot
1,45820 silver badges17 bronze badges
0
I have a new nexus 7 with 4.4. Had to «enable usb debugging mode» specifically in developer options.
Haven’t seen this mentioned previously. Everything seems to work fine after that.
answered Nov 30, 2013 at 0:30
![]()
Here is a guideline how to install nexus 7 driver in windows: http://developer.android.com/tools/extras/oem-usb.html
I was also facing same type of problems and following this guideline my problem was resolved.
In a nutshell:
- open SDK manager and install Google USB Driver
- then manually update your device driver from Device Manager(control panel>>other devices)
answered Mar 6, 2014 at 5:06
![]()
Mostafiz RahmanMostafiz Rahman
7,9677 gold badges55 silver badges72 bronze badges
Install the driver manually through device manager of your PC.
answered Jul 31, 2013 at 14:09
![]()
HelmisekHelmisek
1,04910 silver badges12 bronze badges
0
Windows installs different set of drivers depending on whether you have USB Debugging enabled or disabled in Settings -> Developer Options (Of course, if your device is not rooted, you don’t have to worry about USB Debugging as you won’t see the Developer Options).
So unlike Lo-Tan suggested above, it is NOT required to disable USB Debugging.
I would rather install the drivers in 2 steps:
— First have the USB Debugging enabled and manually update the drivers.
— Second, disconnect the device, enable the USB Debugging and again manually update the drivers.
As Lo-Tan suggest, it is required to have MTP Enabled as explained in point number 2.
answered Nov 20, 2013 at 19:49
![]()
Kaushal ModiKaushal Modi
1,2502 gold badges20 silver badges42 bronze badges
I was having issues with the latest adb usb drivers on my 2012 nexus 7. I installed an older version from this link and they worked. https://app.box.com/s/2c25e8bc42ecce400afd
answered Feb 3, 2014 at 17:45
![]()
almyz125almyz125
6281 gold badge6 silver badges18 bronze badges
Nexus 7 2013:
When changing mode and looking at device manager:
-
MTP: i see only the «Nexus 7» device under «Portable Devices», not updatable
-
PTP: i see «Nexus 7» under both «Portable Devices» and «Other devices»
-
none: i see only «unknown device» under «Other devices», not updatable
So, to fully install drivers, with adb interface, i had to put it first into PTP mode (+debubbing mode).
Then update the drivers of the nexus 7 device under «other devices» manually with the google drivers.
Now put the tablet in MTP mode and update the nexus 7 driver under «portable devices». choose «let me pick…», then «composite..».
The «Android Composite ADB Interface» now appear under «Android Device».
et voila..
answered Feb 11, 2014 at 2:34
![]()
I found that when installing either the Asus or Google OEM drivers it didn’t install. But when updating the driver from device manager choosing «pick from list» and select Google as the manufacturer and select «Android ADB Interface Version 10.0.0.0» (after installing the Google USB Driver)
Notably this is on Server 2012 (albeit more similar to Win 8), but the same might apply to Win 7.
answered Aug 20, 2014 at 16:34
![]()
Alex KeySmithAlex KeySmith
16.4k10 gold badges73 silver badges150 bronze badges
Just in case you have Windows 7 edition N:
Windows 7 N edition is a release of Windows 7 distributed in Europe that lacks the Media Center/Player parafernalia, so that the users can choose their own. Windows 7 N does not include the drivers for the Nexus 7. The Nexus N drivers «suddenly appear» when you install the Media Feature Pack for Windows 7 N and Windows 7 KN. Otherwise it is difficult to make the Nexus 7 connect through USB. After the upgrade, it recognizes the Nexus 7 automatically by plug-&-play.
answered Nov 5, 2014 at 20:46
![]()
My Nexus 7 2013 worked fine connected to my laptop for months. Then yesterday I couldn’t get it to be seen by the debugger. I tried every thing on this page with no luck. I especially like the driver installation guide in the Nexus Root Toolkit (NRT) and USBDeview, but no luck. NRT’s driver installation guide has step by step instructions that are great for debugging these types of Nexus driver issues. I highly recommend it.
Today, it is working fine again.
The difference? Yesterday, I was in my office and my laptop was docked in a docking station that has built in USB hubs. Today, my laptop is undocked and there is no USB hub. Both days I was connecting my Nexus to the same USB port, and while I couldn’t get my laptop to see my Nexus, my Motorola and Samsung devices were fine.
I don’t know why this makes a difference, but if you are stuck with this problem, try removing any USB hubs and/or undocking your laptop.
answered Apr 21, 2015 at 14:57
![]()
Michael LevyMichael Levy
13k15 gold badges62 silver badges99 bronze badges
You’re probably visiting this page because you’ve run into a drivers problem on your Nexus 7 while working with either adb, fastboot or just while connecting the device to PC for transferring files. It’s annoying to know that you’ve a drivers issue on your PC, and it gets even annoying when you can’t get it installed right.
Anyway, Google has been kind in providing USB drivers for all Nexus devices. And in most cases they work just fine. But however, it’s not an .exe file that a noob user could install without any help. So follow the guide below to get the proper drivers installed for your Nexus 7.
Note: The driver below would also work perfectly for following devices:
- LG Nexus 4
- LG Nexus 5
- Asus Nexus 7
- Asus Nexus 7 2013
Download driver
Download the Google USB Driver from this → link.
Once downloaded. Extract the downloaded “.zip” file to your computer and remember the folder location of extracted contents of the zip file.
Nexus 7 Driver installation
- Connect your Nexus 7 to the PC
- Open device manager on your PC
- Windows 7 & 8 users → search for Device Manager from Start (or Start screen) and click to open.
- Windows XP users → here’s how to.
- You will see list of all devices attached to your computer in the device manager. Just find Nexus 7 (it’ll most probably be in the Other devices list with a yellow exclamation mark) and Right-click and select Update Driver Software…

- Select Browse my computer for driver software in the next window

- Now click the Browse… button and select the folder where you extracted the downloaded Google USB Driver zip file (filename: latest_usb_driver_windows.zip). Do NOT select the zip file, select the folder where the contents of the zip file are extracted. And keep the Include subfolders box checked

- During the installation (as a security check) Windows may ask your permission to install the drivers published by Google Inc. Click Install

- Once the installation is complete you’ll see a refreshed list of devices on the Device manager screen showing Nexus 7 driver installed successfully


Nexus 7 ADB and Bootloader drivers?
Well, the guide above is same for installation of Bootloader and ADB drivers as well. The Google USB Drivers file is universal. So if you’re running into Bootloader or ADB specific driver issues, just try the guide above and your computer would be fine. And make sure you connect your Nexus 7 in that particular mode to be able to install drivers for it.
For ADB driver
- First enable USB Debugging on your Nexus 7
- Now connect your Nexus 7 to your computer with a USB cable and follow then drivers installation guide above
For Bootloader/Fastboot driver
- Put your Nexus 7 in bootloader/fastboot mode:
- Switch off your Nexus 7
- Hold Volume Up Key + Volume Down Key and then press the Power button
- You’ll see a Android robot. And the first line on the bottom left corner would read FASTBOOT MODE in red
- Now connect your Nexus 7 to your computer with a USB cable and follow then drivers installation guide above
TROUBLESHOOTING TIPS!
It may happen that drivers get successfully installed on your computer, and yet you are unable to get your Nexus 5 connected to your computer. It can be easily resolved, follow the steps below:
- Connect your phone to computer with a USB cable and open Device manager on your computer
- Right click on the ‘Android Composite ADB Interface‘ entry and select uninstall
- In the uninstall pop-up that appears, tick ‘Delete the driver software for this device‘ checkbox and press the ‘Ok’ button.
- Disconnect your phone from your computer
- Disable USB debugging on your Nexus 7 from your phones Settings > Developer options > un-tick ‘USB debugging’ checkbox
- Put your phone in MTP mode
- Connect it back to your computer, and let the computer re-install drivers automatically. If it doesn’t re-installs driver, try toggling the ‘USB debugging’ option on your phone
- If it still fails to completely recognize your device in all three modes — MTP, ADB and Fastboot. Then try installing the drivers again following the guide above
Other tips:
- Connect your device to other USB ports on the computer
- Try different USB cables. The original cable that came with your device should work best, if not — try any other cable that’s new and of good quality
- Reboot computer
- Try on a different computer