- Remove From My Forums
-
Question
-
I want to give non-admin users permission to install fonts in Windows 7. Ive tried giving permission to the fonts folder and fontcache.dat file as seen in the policy below, but it is not working.
Any help is greatly appreciated.
-John
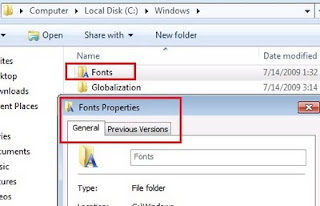
C:WINDOWSFONTS hide
Winning GPO StudentsInstallFonts Configure this file or folder then: Propagate inheritable permissions to all subfolders and files
Permissions
Type Name Permission Apply To Allow CREATOR OWNER Full Control Subfolders and files only Allow NT AUTHORITYSYSTEM Full Control This folder, subfolders and files Allow BUILTINAdministrators Full Control This folder, subfolders and files Allow EXPstudents Modify This folder, subfolders and files Allow BUILTINUsers Read and Execute This folder, subfolders and files Allow inheritable permissions from the parent to propagate to this object and all child objects Disabled Auditing
No auditing specifiedC:WINDOWSSYSTEM32FNTCACHE.DAT hide
Winning GPO StudentsInstallFonts Configure this file or folder then: Propagate inheritable permissions to all subfolders and files
Permissions
Type Name Permission Apply To Allow CREATOR OWNER Full Control Subfolders and files only Allow NT AUTHORITYSYSTEM Full Control This folder, subfolders and files Allow BUILTINAdministrators Full Control This folder, subfolders and files Allow EXPstudents Modify This folder, subfolders and files Allow BUILTINUsers Read and Execute This folder, subfolders and files Allow inheritable permissions from the parent to propagate to this object and all child objects Disabled
Answers
-
I managed to get this working in XP by giving everyone write access to the registry key HKLMSoftwareMicrosoftWindows NTCurrentVersionFonts — not sure if this works in Windows 7 though.
-
Marked as answer by
Thursday, April 22, 2010 8:54 AM
-
Marked as answer by
![]()
Загрузить PDF
![]()
Загрузить PDF
В Windows 7 можно быстро добавить новые шрифты, если у вас есть права администратора. Это позволит создавать уникальные документы, которые будут отличаться от других. Если у вас нет административных прав, существует способ добавить шрифты без необходимости менять разрешения своей учетной записи.
-

1
Войдите в систему как администратор. Сделайте это, чтобы добавить шрифты. Если у вас нет прав администратора, перейдите в следующий раздел этой статьи.[1]
- С помощью командной строки можно сбросить пароль к учетной записи администратора, если вы забыли его. Для этого вам понадобится установочный диск Windows 7. Прочитайте эту статью, чтобы получить дополнительную информацию.
-
2
Найдите нужный шрифт. Существует множество сайтов со шрифтами, которые можно скачать и использовать. Рекомендуем скачивать шрифты с надежных сайтов, например, с dafont.com, fontspace.com и fontsquirrel.com.
- Шрифты могут скачаться в виде архива (файла ZIP или RAR) или как файлы шрифтов (TTF или OTF). Если вы скачали ZIP-файл, дважды щелкните по нему, чтобы открыть и найти шрифты. Теперь перетащите файлы на рабочий стол или нажмите кнопку «Извлечь все». Если вы скачали RAR-файл, вам понадобится программа, которая может открывать RAR-файлы, например WinRAR или 7-Zip.
- Не скачивайте шрифты, которые распространяются как EXE-файлы.
-
3
Дважды щелкните по файлу, чтобы открыть окно предварительного просмотра шрифта. Так можно посмотреть, как шрифт выглядит на экране. Файл шрифта отмечен значком в виде листа бумаги с маленькой буквой «А» (и имеет расширение .ttf или .otf).
- Извлеките файл шрифта из архива (файла ZIP или RAR), чтобы открыть шрифт в окне предварительного просмотра.
-
4
Нажмите Установить, чтобы установить шрифт. Эта кнопка расположена в верхней части окна предварительного просмотра шрифта.
- Также можно щелкнуть правой кнопкой мыши по файлу шрифта или сразу по нескольким файлов шрифтов и в меню выбрать «Установить».
- Другой способ установки: откройте панель управления из меню «Пуск», откройте меню «Просмотр», выберите «Мелкие значки», нажмите «Шрифты», а затем перетащить файл шрифта в список.
-
5
Подтвердите, что хотите внести изменения и введите пароль администратора (если будет предложено). В зависимости от настроек компьютера и учетной записи Контроль учетных записей может попросить вас подтвердить, что вы хотите добавить шрифты; также может открыться предупреждение о том, что файл скачан из интернета. Возможно, вам также будет предложено ввести пароль администратора.
-
6
Используйте новые шрифты. Шрифты будут установлены, как только вы подтвердите свои действия. Теперь со шрифтом можно работать в программах, которые поддерживают изменение шрифтов, например, в Office или Photoshop.
- Старые шрифты могут установиться неправильно. Убедитесь, что выбранный вами шрифт совместим с Windows 7.
-
7
Удалите ненужные шрифты. Для этого воспользуйтесь утилитой «Шрифты» на панели управления.
- Откройте меню «Пуск» и запустите панель управления.
- Откройте меню «Просмотр» и выберите «Мелкие значки» или «Крупные значки».
- Нажмите «Шрифты».
- Найдите ненужный шрифт в списке. Также для поиска шрифта можно воспользоваться строкой поиска в верхней части окна.
- Щелкните правой кнопкой мыши по шрифту и в меню выберите «Удалить». Вам будет предложено подтвердить, что вы хотите удалить шрифт. В документах, где был использован удаленный шрифт, он будет заменен системным шрифтом.
Реклама


-
1
Скачайте программу PortableApps Platform. С ее помощью можно создать портативную программу, которая позволит установить шрифты без прав администратора. Это пригодится в школе или на работе, где у вас нет административного доступа к компьютеру.
- Программу можно скачать с сайта portableapps.com/download.
-
2
Запустите процесс установки. Как правило, устанавливать программы может только администратор, но Platform нужно установить в свою пользовательскую папку, чтобы обойти это ограничение.
-
3
Выберите «Set a custom location» (Указать пользовательскую папку), когда будет предложено выбрать папку для установки программы. Выберите «Рабочий стол», потому что для доступа к этой папке права администратора не нужны. Также можно выбрать папку «Мои документы».
-
4
Откройте папку «PortableApps», которая будет создана на рабочем столе. Откройте папку «PortableApps.com», а затем папку «Data».
-
5
Создайте папку «Fonts» в папке «Data». Возможно, в этой папке уже будет присутствовать папка «Fonts»; если нет, щелкните правой кнопкой мыши и в меню выберите «Создать» > «Папка», а затем переименуйте новую папку в «Fonts».
-
6
Скопируйте все шрифты, которые хотите установить, в новую папку «Fonts». Скопируйте и вставьте шрифты или просто перетащите их из папки «Загрузки».
- Скачивайте шрифты только с надежных сайтов. Если шрифты будут использоваться в коммерческих целях, у них должна быть свободная лицензия.
-
7
Закройте программу Platform. Для этого щелкните правой кнопкой мыши по ее значку на панели задач и в меню выберите «Exit» (Выход). Теперь заново запустите эту программу.
-
8
Используйте новые шрифты. Они появятся в любой программе, которая поддерживает изменение шрифтов. Если хотите добавить больше шрифтов, просто скопируйте их в папку «Fonts» в каталоге программы Platform.[2]
Реклама


Предупреждения
- Если новый шрифт используется в документе, который вы отправляете другим людям, они не смогут увидеть новый шрифт. Поэтому создайте PDF-файл, чтобы новый шрифт был доступен всем читателям документа. Прочитайте эту статью, чтобы узнать, как создавать PDF-файлы.
Реклама
Об этой статье
Эту страницу просматривали 6391 раз.
Была ли эта статья полезной?
Assuming your problem is not being able to install a font without admin rights, below is a solution that does not require admin or additional executables (so will work even with an extremely locked-down computer):
Load a font in Windows using PowerShell
Save the below script as a PowerShell script file somewhere on your machine, next to the TTF and OTF files you want to install:
Add-Type -Name Session -Namespace "" -Member @"
[DllImport("gdi32.dll")]
public static extern int AddFontResource(string filePath);
"@

$null = foreach($font in Get-ChildItem -Recurse -Include *.ttf, *.otf) {
    [Session]::AddFontResource($font.FullName)
}
This script will scan for .ttf and .otf font files in the directory it’s running from, and temporarily install them without needing admin access.
The main disadvantage of this is script is that it will only install the font for the duration of your current session. Once you log off or restart your system, you will need to run it again, but that could be automated (depending on how your computer is configured, such as whether it allows running .ps scripts on startup).
In Windows 7, is there a way to grant admin rights for installing fonts for non-admin users? Preferably without installing extra software.
I don’t want to grant users full admin priveliges but it seems irritating that you can’t let them run certain programs as admin.
asked Jun 7, 2012 at 13:20
![]()
In Windows 7 you can’t grant admin rights for it.
But if you aren’t admin, I can teach you how to get admin rights.
Just get a Windows LiveCD with «Password Recovery» function and change password of admin.
(You can get it free in many websites)
![]()
j0k
22.4k28 gold badges80 silver badges88 bronze badges
answered Aug 9, 2012 at 18:58
![]()
SearushSearush
6321 gold badge5 silver badges18 bronze badges
1
Allowing Non-Administrators To Install Fonts In Windows 7
 Print This Post
Window 7 is far more secure than prior Windows operating systems. The Windows directory is secured down with permissions so even an Administrator cannot circumvent security. Some security features are good other not so much, the security on fonts is a good example. I will explain how to allow normal non-privileged users access to install their own fonts without the UAC prompt.
The Fonts directory is located in the Windows directory and if a normal user wants to install Fonts; they cannot. If a normal users tries to install a font they are prompted with the UAC (User Account Control) dialog box and Administrator credentials are required. If you work for a school or a print shop and do not want to give out Administrator credentials to install fonts read on.
The following steps will loosen up security in your operating system, so that normal users can install fonts without administrative credentials and the UAC prompt. This modification has been tested on Windows 7; however it should also work on Windows Vista as well. Please be careful when making changes that could open security holes. As of the writing of this article there are no security holes, but be vigilant and read Microsoft Security Bulletins in the future.
Log on as an administrator to make the following changes!
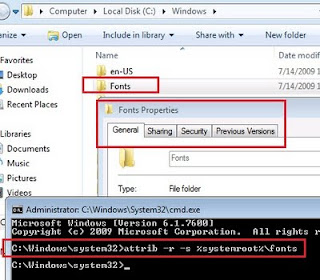
First we need to make the folder writable and make it a non-system folder.
attrib -r -s c:WindowsFonts
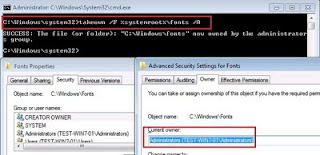
Next we need to take ownership. The /f directs it to the folder of c:WindowsFonts the /r directs it to recurse and the /d n is default answer is no or skip.
takeown /f c:WindowsFonts /r /d n
Now let’s give the users permission.
cacls c:WindowsFonts /e /t /g users:c
There is also a font cache that allows programs to display a preview of the fonts; this needs softened up as well for the user.
cacls c:WindowsSystem32FNTCACHE.DAT /e /t /g users:c

Note: you will receive an Access is denied message, this is normal; just make sure users have change security permissions.
The last thing to do is give users permissions to register fonts with Windows 7 in the registry. Use regedit and give users modify permissions to the following key in the registry.
HKLMSoftwareMicrosoftWindows NTCurrent VersionFonts
See diagram:

That’s it you done… Log out and test as a normal / non-administrator by right clicking the font and selecting “Install” from the context menu.
Tags: Security, Windows
This entry was posted
on Friday, April 29th, 2011 at 5:15 pm and is filed under Windows 7.
You can follow any responses to this entry through the RSS 2.0 feed.
Both comments and pings are currently closed.
14 Responses to “Allowing Non-Administrators To Install Fonts In Windows 7”
-
Ytsejamer1 Says:
May 6th, 2011 at 3:59 pm
Great quick article…i’m trying to get this working in a GPO. I’ve got the file/folder/registry permissions, but the tricky part is having the attrib and take ownership commands in a batch file occur before the permissions get set. I was able to get everything pushed through, but file ownership bit was set last…so permissions could not be set for my domain users on the C:WindowsFonts directory. With an additional GPUpdate /force, it went through fine and users are able to add fonts to the Fonts folder.
Any ideas? I suppose I could throw a gpupdate /force command after the take ownership is done…but seems a bit sloppy.
-
Bohack Says:
May 6th, 2011 at 4:20 pm
You may have to put a logon script in place to attrib the file. However I think the details of what is going on is in the gpupdate /force working. My suggestion is to start with a clean reboot on a clean machine (untouched by the policy). Logon and inspect if the permissions are being applied; from my understanding the OS will override the read-only attrib. The article http://support.microsoft.com/?id=298444 explains that force is nothing more than re-applying the policy. In Windows XP there was a problem with background refresh of GPO. Which means that when the machine reboots if the policy was applied already it will not try to reapply until the refresh interval of 90 minutes in the background. Since permissions are only applied on boot, it sounds like the background refresh problem. See this article for GPO processing http://technet.microsoft.com/en-us/magazine/2008.01.gpperf.aspx there is USERENV debugging that could be turned on to validate the behavior. To force Synchronous processing of GPO see this article http://support.microsoft.com/kb/305293, Vista and XP Asynchronously process GPO (background refresh); so setting it should fix your problem…. Please let me know.
-
Ytsejamer1 Says:
May 7th, 2011 at 10:37 am
Thanks for the info! Much appreciated.
Here’s what I’ve got…being the weekend, I don’t intend on setting anything up right yet. I’m having our techs work with me to test it. I haven’t yet run this complete batch file on the machine we tested yesterday. I had only the attrib and takeown commands in the batch file originally, and did run against the machine during startup. They did run successfully. Upon login with a regular user, I could see that SYSTEM was owner of the Fonts Directory. Just being able to see security on it told me it was no longer a system folder, so I know attrib ran ok.
The adding of permissions part was originally set in another area of the GPO (Computer Config>Policies>Windows Settings>Security Settings>File System/Registry), not via icacls as indicated in the batch file listed below.
#
# Makes Fonts Folder writable and make it a non-system folder
#
attrib -r -s %systemroot%Fonts
#
# Takes ownership of the %systemroot%Fonts folder. The /f directs it to the folder
# of c:WindowsFonts the /r directs it to recurse and the /d n is default answer is no or skip.
#
takeown /f “%systemroot%fonts” /r /d n
#
#
# Give user(s) modify access to %systemroot%Fonts
#
icacls “%systemroot%fonts” /grant “domain.comDomain Users”:M /t
#
#Give user(s) modify access to %systemroot%system32FNTCACHE.dat
#
icacls “%systemroot%system32FNTCACHE.dat” /grant “domain.comDomain Users”:M /t -
Ytsejamer1 Says:
May 9th, 2011 at 12:19 pm
I made a different decision…i created an MSI with the fonts and deploy that to the systems needed. Hopefully that does it a bit easier. Thanks for the feedback and the information. This was a great article that got me going! Cheers!
-
John Says:
August 3rd, 2011 at 10:12 am
I’ve tried this on Vista SP1 but non-privileged users are still caught by UAC.
Who is supposed to be taking ownership of C:WindowsFonts? It would appear to be the administrator, but why?
Can this be done by making a user a Power User?
-
Zoe Says:
November 15th, 2011 at 6:57 pm
Hello. So to start, I know next to nothing about batch files. 🙂 But a fellow student gave me a basic batch file to install my fonts on our school computers quickly.
The facts are as fallows:
– windows 7 (possibly 64 bit?)
– any changes made to the system are dumped when the computer is restarted, solutions must work without rebooting
– no administrative privileges, and yet if you manually open the font file and copy your fonts in it works fine
– my batch file works to copy the files into the font folder, but will not ‘install’ themQuestion:
– Is there another command I can add to install the fonts after they are copied to the folder?Reason:
– We have to log on to new computers everyday, installing fonts manually every day is tedious, but necessary. I really want this batch to work! -
Bohack Says:
November 15th, 2011 at 7:31 pm
So the answer is: In order to install fonts in Windows Vista thru Windows 7 you now have to register the font in the registry, which right clicking on the font and selecting install does (as well as copies the font). You could try the following batch script:
@ECHO OFF
XCOPY font.ttf %systemroot%fonts
REG ADD "HKLMSOFTWAREMicrosoftWindows NTCurrentVersionFonts" /v "Name of the font" /t REG_SZ /d "font.ttf" /f
You will probably still need to set permission on the directory and the reg key doing it this way.
-
kostix Says:
December 6th, 2011 at 11:10 am
Good!!
-
anna Says:
March 12th, 2012 at 1:57 pm
I attempted this workaround, as I have some fonts that are causing me some trouble in Photoshop (hiding won’t remove them from the list, I can’t delete them since they came with Windows 7, and they make it impossible to quickly scroll through the fonts with the arrow key, as they don’t actually seem to be functional). However, I’m getting: Access denied – C:WindowsFonts on the very first step. I am signed in as the Administrator, which is the only User on this machine. The first time I tried this I typed the command, the second time I copied / pasted just in case.
So, what could be causing this error?
-
Bohack Says:
March 12th, 2012 at 2:33 pm
I think I might have gotten that error as well, but I know that I was satisfied with the results so i didn’t pursue it. My only thought is UAC? open the CMD prompt as administrator.
-
Conan Says:
May 24th, 2012 at 11:33 am
Hi There,
I followed all the steps exactly, but when trying to install a font as a non-admin, i’m still getting the UAC pop up asking for the administrator password. Is there something i’m missing here? -
sturjl Says:
June 26th, 2012 at 4:02 am
I too am getting the UAC pop up. My batch file is the same as Ytsejamer1’s. Did anyone manage to get around this?
-
Bohack Says:
June 26th, 2012 at 5:56 am
Submit your batch file, but if you run the batch file without elevating permissions (i.e. run as administrator) then it will not work. However let take a look at the batch file.
-
Installing Fonts On Windows 7 From A VBScript | Bohack Says:
September 18th, 2012 at 12:34 pm
[…] If you decide to make this a startup script, remember that startup scripts are run under the local system security context and won’t be able to connect to remote servers. If you make this a login script the user will need rights to install the fonts. See this article if you choose the login script route: http://www.bohack.com/2011/04/allowing-non-administrators-to-install-fonts-in-windows-7/ […]
-
Donate
-
Channels
- Beer (2)
- Blog (1)
- Exchange (2)
- Ham Radio (1)
- Homebrew (3)
- Linux / Unix (4)
- Misc (1)
- Mods (4)
- Networking (1)
- Programming (4)
- Recipes (2)
- Scripts (7)
- Security (1)
- Software (2)
- Spam (1)
- Telco (7)
- Virtual PC (1)
- VMware (3)
- VOIP (3)
- Windows (16)
- Windows 2008 (4)
- Windows 7 (5)
-
Archives
- September 2012
- April 2012
- March 2012
- February 2012
- January 2012
- November 2011
- September 2011
- July 2011
- April 2011
- February 2011
- January 2011
- October 2010
- August 2010
- February 2010
- January 2010
- December 2009
- November 2009
- June 2009
- May 2009
- February 2009
- January 2009
- December 2008
- November 2008
- October 2008
-
Links
- Blogarama
Blogarama – The Blog Directory - BlogHub
Blog Directory - Blogrankings
Technology Blogs – Blog Rankings - Blogville.us
blogville.us - Buzzerhut
free directory | buzzerhut.com - Ontoplist
Online Marketing - Primechoiceautoparts
Discount Auto Parts - PTC
My Employer
- Blogarama
-
Misc
- Legal Page
I’ve run into this huge issue with a graphic designer. They want to be able to install fonts they have downloaded. This user is a non-admin user on the local machine and a non-admin user on our network. I believe that User Access Control on the local machine blocks regular users from installing fonts; this particular user has been given read and write privileges for C:WindowsFonts.
The only solution I see is disabling UAC when fontview.exe is running, which I have no idea how to accomplish. Fontview.exe isn’t an application you can simply run by itself; it is prompted by opening a font file within the Fonts folder. Therefore, you can’t use task scheduler to run the application with the highest permissions. Is there any way to have UAC disabled whenever an application is running, rather than creating a shortcut that allows a user to run the application with the highest permissions?
Keep in mind that this user cannot be promoted to an administrator, at any level, and no third party applications can be installed. Is there any way to accomplish this?
Most simple answers I’ve found apply to Windows XP or Vista. In Windows 7, installing fonts is handled by an application that needs to be run with administrative privileges, however the application cannot simply be run by itself; it only runs when a font file is opened. To reiterate, I’m looking for a Windows 7 solution, not an XP or Vista solution.
Installing Fonts for Standard Users in Windows XP was very easy. Modifying NTFS folder permissions and giving users modify permissions allow they to copy fonts into C:WindowsFonts and after that use them.
Installing Fonts in Windows 7 for standard user is different story and it could be very complicated.
Modifying NTFS Permissions on C:WindowsFonts is not possible because Fonts is a System folder and right click on Fonts folder doesn’t give possibility for direct NTFS permissions changes.
To change System folder properties attrib command can be used:
attrib -r -s %systemroot%fonts
-r — clears Read-only file attribute
-s — clears System File attribute
Next step is take ownership of Fonts Folder and all files into this folder.
Example: To give Administrators group Ownership to Fonts folder takeown command can be used:
takeown /F %systemroot%fonts /A
/F — Specifies the filename or directory name pattern. Wildcard * can be used to specify the pattern.
/A — Gives ownership to the administrators group instead of current user
Next Step is to change NTFS permissions on Fonts Folder and give Modify or Full permissions to users or groups. To do that you should use cacls command:
Example:
cacls %systemroot%fonts /E /G Users:F
/E — Edit ACL instead of replacing it.
/G — Grant specific user rights (in this example it gives Full permissions to Users group)
Note: This command changes Fonts Folder permissions and doesn’t inherit permissions to the files into the folder.

You can copy all these three lines in Notepad and save it as bat file.
attrib -r -s %systemroot%fonts
takeown /F %systemroot%fonts /A
cacls %systemroot%fonts /E /G Users:F
Next Step is to modify permissions on
HKEY_LOCAL_MACHINESOFTWAREMicrosoftWindows NTCurrentVersionFonts
and to give Full Permissions to Users. This will allow standard users to register fonts in registry.

Next step is to copy your fonts in C:WINDOWSFONTS Folder. Here is the vbs script which can copy and in same time register your fonts. Fonts are located on network share and before to execute you should modify the script with fonts names.
‘ ****************************************************************************
‘ Copy Fonts From Network Share To C:WINDOWSFONTS Folder Of Workstation
‘ ****************************************************************************
Set WshShell = CreateObject(«WScript.Shell»)
WshShell.Run «xcopy.exe «»\%SERVERNAME%%SHARE FONTS»» «»C:windowsfonts»» /C /I /S /E /H /Y /Q», 1,True
‘ ****************************************************************************
‘ Imports The Registry Information For The New Fonts — Add A New Line For Each New Font
‘ Example : WshShell. RegWrite»HKEY_LOCAL_MACHINESOFTWAREMicrosoftWindows NTCurrentVersionFonts%FONT REG KEY%», «%FONT REG KEY ENTRY%», «REG_SZ»
‘ ****************************************************************************
Set WshShell = WScript.CreateObject(«WScript.Shell»)
WshShell. RegWrite»HKEY_LOCAL_MACHINESOFTWAREMicrosoftWindows NTCurrentVersionFontsTwiggy-Bold (TrueType)», «Twiggy-Bold.ttf», «REG_SZ»
WshShell. RegWrite»HKEY_LOCAL_MACHINESOFTWAREMicrosoftWindows NTCurrentVersionFontsTwiggy-Light (TrueType)», «Twiggy-Light.ttf», «REG_SZ»
‘ ****************************************************************************