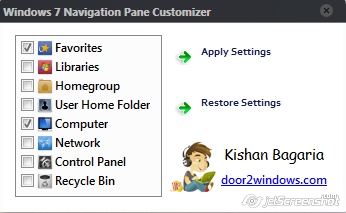
Я уже писал о Librarian — программе для управления Библиотеками в Windows 7. Библиотеки отображаются в Проводнике, Моем компьютере, и включены в навигационное дерево. Настроить это дерево папок, добавив в него новые пункты, или удалив ненужные вам, поможет небольшая, очень простая программа Windows 7 Navigation Pane Customizer.

Как и в случае с Computer Customizer, портабельная утилита Windows 7 Navigation Pane Customizer позволяет упростить навигацию по важным системным разделам. Программа позволяет добавлять в навигационное дерево все значки контрольной панели, папку текущего пользователя, Корзину, Избранное, и другие важные места, а так же удалять их, если они вам более не нужны. Изменения происходят на лету, с автоматической перезагрузкой сервиса explorer.exe, так что вам даже не нужно перезагружаться.

Если вы решили восстановить исходные значения навигационного дерева, то и такая возможность предусмотрена в Windows 7 Navigation Pane Customizer одним кликом. Чтобы программа работала стабильно, для ее запуска требуются права администратора.
Скачать Windows 7 Navigation Pane Customizer

Windows 7 Navigation Pane Customizer is a freeware from door2windows that allows you to show, hide and rename items in the Windows Explorer navigation pane.
Download Windows 7 Navigation Pane Customizer
Apps from door2windows are truly free and DON’T include any offers to install 3rd-party apps/adware/toolbars/unwanted software and never will. The apps are portable and don’t require installation.
Download door2windows App Bundle
door2windows App Bundle gives you access to all the latest apps released by door2windows in one download (along with future updates).
Download for $5
How to use:
-
Run the tool as administrator.

-
Check the items that you want to show and uncheck the items that you want to hide.
-
Click on the item that you want to rename and type the new name for it.
-
Click Apply Settings.


Now the Windows Explorer will restart and the changes will be applied. If you want to restore the default settings, click Restore Settings.

Download Windows 7 Navigation Pane Customizer
Если Вы хотите изменить не только оформление рабочего стола, меню Пуск, иконок и курсоров, но и проводника, то программа Windows 7 Navigation Buttons Customizer Вам в этом поможет. Она позволяет быстро сменить привычные стрелки навигации и строки поиска на любые другие. Если Вы не знаете с чего начать, то можете попробовать для начала готовые наборы кнопок, которые идут в комплекте с программой.
Программа полностью портативная. Её можно использовать и переносить с компьютера на компьютер без установки.
Чтобы изменить кнопки проводника нужно:
— запустить утилиту от имени администратора (клик правой кнопкой мыши на ярлыке программы)
— выбрать объект для изменения

— нажать «Change Selected Bitmap»

— выбрать внешний вид для новой кнопки

Установка завершена. Теперь у Вас новые кнопки!

Чтобы вернуть кнопкам стандартный вид нужно:
— запустить утилиту от имени администратора
— выбрать объект для изменения
— нажать «Restore Selected Bitmap»
Примечание: Обратите внимание, что иконки будут изменены, если у Вас будет полный доступ к системной библиотеке *WindowsSystem32ExplorerFrame.dll
Содержание
- Windows 7 Navigation Buttons Customizer
- Windows 7 Navigation Pane Customizer – портабельная программа для настройки панели навигации в Проводнике
- Customize the Navigation Pane
- In this article
- Before you begin
- Planning custom categories and groups
- Taking a phased approach
- Security considerations
- Create custom categories and groups
- Create a custom category
- Rename a custom category
- Create a custom group
- Rename a custom group
- Create a custom group from a database object
- Organize objects in custom groups
- Add objects to a custom group
- Hide the Unassigned Objects group
- Hide a group
- Unhide a group
- Hide an object
- Unhide an object
- Hide an object from all categories and groups
- Rename an object shortcut
- Delete an object shortcut
- Delete an object
- Advanced customization
- Hide the Navigation pane using the Options dialog box
- Disable Design view for database objects
- Use the SetDisplayedCategories Macro to show or hide a category
- Use the NavigateTo Macro to navigate to a category or group
- Use the LockNavigationPane Macro to lock the Navigation Pane
- Use the RunMenuCommand Macro to hide the Navigation Pane
Windows 7 Navigation Buttons Customizer

Если Вы хотите изменить не только оформление рабочего стола, меню Пуск, иконок и курсоров, но и проводника, то программа Windows 7 Navigation Buttons Customizer Вам в этом поможет. Она позволяет быстро сменить привычные стрелки навигации и строки поиска на любые другие. Если Вы не знаете с чего начать, то можете попробовать для начала готовые наборы кнопок, которые идут в комплекте с программой.
Программа полностью портативная. Её можно использовать и переносить с компьютера на компьютер без установки.
Чтобы изменить кнопки проводника нужно:
— запустить утилиту от имени администратора (клик правой кнопкой мыши на ярлыке программы)
— выбрать объект для изменения
— нажать «Change Selected Bitmap»
— выбрать внешний вид для новой кнопки
Установка завершена. Теперь у Вас новые кнопки!
Чтобы вернуть кнопкам стандартный вид нужно:
— запустить утилиту от имени администратора
— выбрать объект для изменения
— нажать «Restore Selected Bitmap»
Примечание: Обратите внимание, что иконки будут изменены, если у Вас будет полный доступ к системной библиотеке *WindowsSystem32ExplorerFrame.dll

- 2485 загрузок
- 7 964 просмотров
- 1 комментов
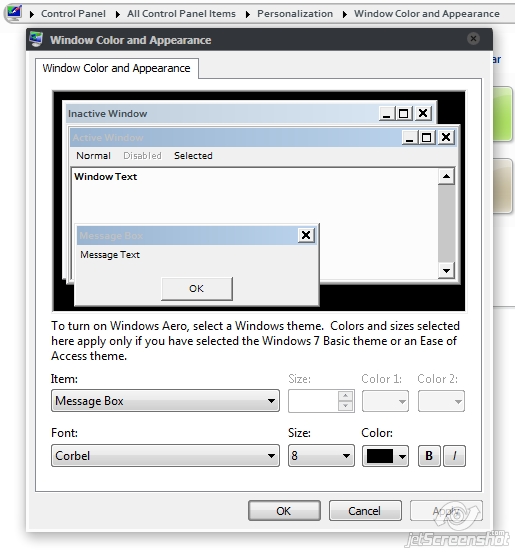
Изменение внешнего вида окон, папок и файлов windows 10/8/7/XP даст возможность настроить интерфейс в соответствии с персональными предпочтениями, сделать его более удобным и дружественным.
За безопасный Интернет
Проверить безопасность файла «Windows 7 Navigation Buttons Customizer» с помощью G o o g l e , способ который гарантирует 100% результат. Если на странице есть рекламные баннеры G o o g l e значит страница проверена, а файл «Windows 7 Navigation Buttons Customizer» является безопасным. Что бы убедиться в этом отключите на время блокировщик рекламы и обновите страницу.
Windows 7 Navigation Pane Customizer – портабельная программа для настройки панели навигации в Проводнике
Я уже писал о Librarian – программе для управления Библиотеками в Windows 7. Библиотеки отображаются в Проводнике, Моем компьютере, и включены в навигационное дерево. Настроить это дерево папок, добавив в него новые пункты, или удалив ненужные вам, поможет небольшая, очень простая программа Windows 7 Navigation Pane Customizer.
Как и в случае с Computer Customizer, портабельная утилита Windows 7 Navigation Pane Customizer позволяет упростить навигацию по важным системным разделам. Программа позволяет добавлять в навигационное дерево все значки контрольной панели, папку текущего пользователя, Корзину, Избранное, и другие важные места, а так же удалять их, если они вам более не нужны. Изменения происходят на лету, с автоматической перезагрузкой сервиса explorer.exe, так что вам даже не нужно перезагружаться.
Если вы решили восстановить исходные значения навигационного дерева, то и такая возможность предусмотрена в Windows 7 Navigation Pane Customizer одним кликом. Чтобы программа работала стабильно, для ее запуска требуются права администратора.
Customize the Navigation Pane
Want to organize database objects in a way that works best for you? Then create custom categories and groups in the Navigation Pane to reorganize, highlight, and even hide objects. You can also hide the Navigation Pane to provide your own method of navigation and use macros for more advanced control.
If you are looking for just the basics, see Use the Navigation Pane.
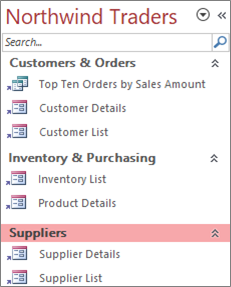
A customized Navigation Pane organized by three business functions
In this article
Before you begin
To help things go smoothly: plan your approach, proceed in phases, and understand security implications.
Planning custom categories and groups
When you plan and design the navigation system for a database, work with the people who will use it. If that’s not practical, keep their needs central to your design process. Depending on your resources, consider using focus groups for planning and conducting usability tests during your design. In short, focus on the user.
For example, suppose you have many reports in your database, and that you run the reports with varying frequencies. You might create a Reports category, and then create Daily, Weekly, Monthly, Quarterly, and Yearly groups. In each group, you could add the appropriate reports.
For many examples of Navigation Pane customization, see Featured Access Templates.
Taking a phased approach
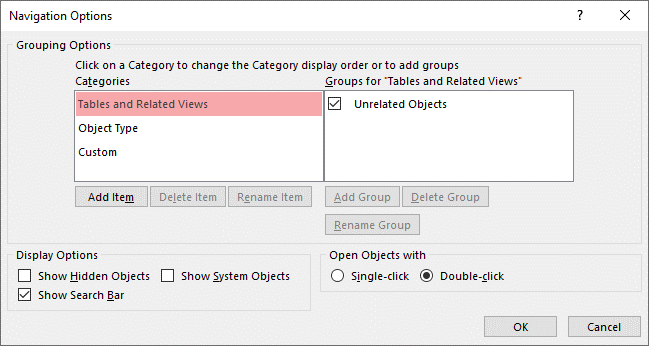
When you’re ready, create your custom categories, custom groups within those categories, and then add the database objects to each group. Use the Navigation Options dialog box to create and manage custom categories and groups. The dialog box displays a list of all the categories that have been defined in the database, and shows the groups for a selected category.
Creating custom categories and groups
Think of the creation of custom categories and groups as the scaffolding for you custom navigation.
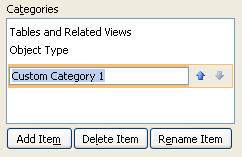
Create custom categories Access provides one pre-built custom category for you called Custom. You can rename that category and then add or remove groups to suit your needs. You can also create new custom categories.
Note When you create a custom category, it applies to the current database only. You cannot transfer custom categories and groups to other databases.
Create custom groups After you create a category, you create one or more custom groups for the new category. You can create as many groups as you need.
When you create a new custom category, groups named Unassigned Objects and Custom Group 1 are created for that category. By default, Access doesn’t put any objects in the Unassigned Objects group. Instead, all the objects in a category that aren’t in a group are displayed in the Unassigned Objects group in the Navigation Pane.
Organizing database objects in custom groups
Once you have created your categories and groups, you can add, hide, or show groups and objects to fit your needs. You can add or remove the objects in a group at any time.
Add objects to custom groups In the Navigation Pane, you can drag or copy and paste the objects from the Unassigned Objects to assign to a custom group. By doing so, you are adding a shortcut to a database object and not moving or copying the object itself. Shortcuts can be identified by a small arrow next to the lower-left corner of the object icon.
Each group should have only one shortcut to a given database object. When you open a shortcut, you open the object it points to.
Note The built-in categories and groups in the Navigation Pane do not display shortcuts, and instead display actual database objects. These groups include all groups in any built-in category and the Unassigned Objects group of any custom category.
Show or hide groups or objects After you populate your custom group or groups, you can hide the Unassigned Objects group and any other groups that you don’t want to display.
You can hide some or all of the groups in a custom category and some or all of the objects in a group. You can use right-click commands that are provided by the Navigation Pane or you can choose a property for each object and hide it from all the groups and categories in the open database.
You can make hidden objects and groups completely invisible, or you can display them in the Navigation Pane as dimmed, unavailable icons. You make that choice by selecting or clearing the Show Hidden Objects check box in the Navigation Options dialog box. You also use that check box when you need to unhide a group or an object.
Important Although you can remove objects from a custom category or group, you cannot remove objects from a predefined category or group. Although you can delete (that is, permanently remove) predefined groups, we do not recommend doing this because it can cause problems in the database. Databases are sets of components that work together, and if an object is deleted from that set of components, it can break part or all the functionality of the database.
There are several advanced ways to customize the Navigation Pane.
Hide the Navigation Pane You may prefer to provide your own method of navigation, such as a switchboard form or a navigation form.
Disable Design View You can hide database objects to help prevent design changes, but still provide shortcuts to them in custom categories and groups.
Related macros You can also use macro actions to control the Navigation Pane:
SetDisplayedCategories Use to show or hide a category regardless of the settings in the Navigation Options dialog box.
NavigateTo Use to navigate to a category or group, or automatically navigate to a category or group when the database opens.
LockNavigationPane Use to prevent users from accidentally adding, moving, or deleting items in the Navigation Pane. You can also use RunMenuCommand.
Security considerations
Usability features can be bypassed. Customizing the Navigation Pane doesn’t prevent a malicious user from making unwanted design changes to your database or prevent unauthorized access to data. Consider the following:
If you use a macro to control and lock the Navigation Pane, users can disable the macro at startup by pressing and holding the SHIFT key.
You can hide the categories and groups that contain database objects and you can hide the objects themselves, but it is possible for users to unhide them.
Locking the Navigation Pane does not prevent users from copying database objects to the clipboard.
For more information on database security, see Decide whether to trust a database and Encrypt a database by using a database password. For more information on controlling database startup, see Set user options for the current database.
Create custom categories and groups
The following procedures show how to create and rename custom categories and groups.
Important For the following procedures to work, the Navigation Pane must be visible and its right-click menu command enabled. For more information, see Advanced customization and Set user options for the current database.
Create a custom category
Right-click the top of the Navigation Pane and then select Navigation Options.
In the Navigation Options dialog box, under the Categories list, click Add Item. A new category appears in the list.
Type a name for the new category and then press ENTER.
Try to create a name that makes sense to the people who use your database. After you create the name, notice that the caption for the list on the right changes to match that name. For example, if you name the new category My Switchboard, the caption in the list on the right reads Groups for «My Switchboard».
Also, notice that the list on the right contains a group called Unassigned Objects. Access creates that group by default. This group contains all of the objects in your database, and you use those objects to populate your custom group.
Rename a custom category
Right-click the top of the Navigation Pane and then select Navigation Options.
Under Categories, click the custom category, and then click Rename Item.
Type a new name for the category, and then press ENTER.
Create a custom group
Right-click the top of the Navigation Pane and then select Navigation Options.
Select the category for which you want to add one or more groups.
For each group, under the Groups for list, click Add Group.
Type a name for the new group, and then press ENTER.
Leave the check box next to Unassigned Objects selected, and then click OK. Access closes the Navigation Options dialog box and adds your new custom group to the Navigation Pane.
Rename a custom group
Right-click the top of the Navigation Pane and then select Navigation Options.
Under Groups for , click the custom group, and then click Rename Group.
Type a new name for the group, and then press ENTER.
Create a custom group from a database object
With a custom category and group open in the Navigation Pane, right-click an object that you want to place in a new group.
Point to Add to group, and then click New Group.
A new group appears in the Navigation Pane.

Enter a name for the new group, and then press ENTER.
Organize objects in custom groups
The following procedures show how to organize database objects within custom categories and groups.
Important For the following procedures to work, the Navigation Pane must be visible and its right-click menu command enabled. For more information, see Advanced customization and Set user options for the current database.
Add objects to a custom group
You can add object shortcuts to a custom group in several different ways.
Click the menu at the top of the Navigation Pane, and in the upper section of the menu, click your new category.
The group or groups that you created for your category appear in the lower section of the menu, along with the Unassigned Objects group.
In the Unassigned Objects group, select the items that you want to use in your custom group, and then move them to that group. Access provides several ways to move the selected items. You can:
Drag the items individually.
Hold down CTRL, click multiple items, and then drag the items to your custom group.
Right-click one of the selected items, point to Add to group, and then click the name of your custom group.
In the Navigation Pane, right-click the object that you want to copy, and then click Copy.
Right-click the group in the Navigation Pane where you want to paste the object, and then click Paste. You can also paste the object into the Navigation Pane of another open Access database.
When you finish, you can leave the Unassigned Objects group visible in the Navigation Pane, or you can hide it.
Hide the Unassigned Objects group
Right-click the top of the Navigation Pane and then select Navigation Options.
In the Categories pane, select the appropriate category.
In the Groups for pane, clear the Unassigned Objects check box.
Hide a group
Right-click the top of the Navigation Pane and then select Navigation Options.
In the Groups for list, clear the check box next to the group that you want to hide.
Alternatively in the Navigation Pane, right-click the title bar of the group that you want to hide, and then click Hide.
Unhide a group
Right-click the top of the Navigation Pane and then select Navigation Options.
In the Groups for list, select the check box next to the group that you want to hide or unhide.
Hide an object
Right-click the top of the Navigation Pane and then select Navigation Options.
In the Categories list, select the appropriate category.
In the Groups for list, select the group that contains the hidden object.
Clear the check box next to the object.
Alternatively in the Navigation Pane, right-click the object and then click Hide.
Note You can’t hide objects in the Unassigned Objects group of a custom category in the Navigation Pane.
Unhide an object
Right-click the top of the Navigation Pane and then select Navigation Options.
Under Display Options, select the Show Hidden Objects check box.
In the Navigation Pane, a dimmed icon appears for all hidden objects.
Do one of the following:
If you hid a shortcut in a group, right-click the shortcut and then click Unhide in this Group.
If you hid the object only from its parent group and category, right-click the object and then click Unhide.
If you hid the object from all categories and groups by setting the Hidden property, right-click the object, click View Properties, and then clear the Hidden check box.
Hide an object from all categories and groups
Right-click the top of the Navigation Pane and then select Navigation Options.
Right-click the object that you want to hide, and then click Object Properties or (for a table) Table Properties on the shortcut menu.
Select the Hidden check box.
Rename an object shortcut
When you rename an object shortcut, Access doesn’t rename the database object that the shortcut points to.
In the Navigation Pane, right-click the object that you want to rename, and then click Rename Shortcut.
Type the new name for the shortcut and then press ENTER.
Delete an object shortcut
In the Navigation Pane, right-click the shortcut that you want to remove, and then click Remove.
When you delete an object shortcut, Access doesn’t delete the database object that the shortcut points to.
Delete an object
In the Navigation Pane, right-click the object that you want to remove, and then click Delete.
Important If you choose to delete an object from a group, be aware that this can cause problems. We do not recommend deleting an object because a database is a set of components that work together, and if an object is deleted from that set of components, it can break part or all of the functionality of the database.
Advanced customization
There are more advanced ways to customize the Navigation Pane. You can hide the Navigation Pane by using the Options dialog box and disable an object Design view by using an object property. You can also use macros to selectively show or hide categories, navigate to a category or group, hide the Navigation Pane, or lock the Navigation Pane.
To run macro actions automatically when a database opens, put the actions in a macro named autoexec. For more information, see Create a macro that runs when you open a database. For more information about creating macros to control the user interface, see Create a user interface (UI) macro.
Hide the Navigation pane using the Options dialog box
You can hide the Navigation Pane and use an alternative method of navigation, such as a switchboard form, a navigation form, or strategically located buttons and links on a startup form (See Featured Access Templates).
From the open desktop database, click the File tab, and then click Options.
Click the Current Database category, and under Navigation, clear the Display Navigation Pane check box.
For this setting to take affect, close and then re-open the database.
Note To redisplay the Navigation pane, repeat the procedure, but, select the check box.
Disable Design view for database objects
In the Navigation Pane, you can set a shortcut’s Disable Design View shortcuts property (Right-click the shortcut and click Object Properties) to control whether users can use the shortcut to open the target object in Design view or Layout view. For example, if you enable this property for a shortcut to a form, users cannot change the design or layout of the form by using the shortcut.
In the Navigation Pane, right-click the shortcut for which you want to disable Design view, and then click Object Properties or (for a table) Table Properties.
In the Properties dialog box, select the Disable Design View shortcuts check box.
Use the SetDisplayedCategories Macro to show or hide a category
Do one of the following:
To create a new macro, on the Create tab, in the Macros & Code group, click Macro.
To add the actions to an existing macro, right-click that macro in the Navigation Pane, and then click Design View.
On the Design tab, in the Show/Hide group, click Show All Actions.
In the macro designer, select SetDisplayedCategories from the drop-down list. The action appears in the macro designer.
In the Show box, choose a setting. Choose Yes if you want the category to display in the Navigation Pane. Choose No if you do not want the category to display in the Navigation Pane.
In the Category box, click the name of the category that you want to show or hide.
Repeat steps 3 through 5 for each category that you want to control by using the macro.
Use the NavigateTo Macro to navigate to a category or group
Do one of the following:
To create a new macro, on the Create tab, in the Macros & Code group, click Macro.
To add the action to an existing macro, right-click that macro in the Navigation Pane, and then click Design View.
On the Design tab, in the Show/Hide group, click Show All Actions.
In the macro designer, select NavigateTo from the drop-down list. The action appears in the macro designer.
In the Category box, click the name of the category that you want to navigate to.
If you want to navigate to a specific group in the category, click the arrow in the Group box, and then click the name of the group that you want to navigate to.
Use the LockNavigationPane Macro to lock the Navigation Pane
Do one of the following:
To create a new macro, on the Create tab, in the Macros & Code group, click Macro.
To add the actions to an existing macro, right-click that macro in the Navigation Pane, and then click Design View.
On the Design tab, in the Show/Hide group, click Show All Actions.
In the macro designer, select LockNavigationPane from the drop-down list. The action appears in the macro designer.
Specify a value for the Lock argument. Choose Yes to lock the Navigation Pane.
Use the RunMenuCommand Macro to hide the Navigation Pane
If you prefer to create your own navigation system, you can hide the Navigation Pane by using the RunMenuCommand macro action and the WindowHide argument.
Do one of the following:
To create a new macro, on the Create tab, in the Macros & Code group, click Macro.
To add the action to an existing macro, right-click that macro in the Navigation Pane, and then click Design View.
On the Design tab, in the Show/Hide group, click Show All Actions.
In the macro designer, select RunMenuCommand from the drop-down list. The action appears in the macro designer.
In the Command box, select WindowHide.
You can also turn the display of the Navigation Pane on or off by using the Display Navigation Pane check box in the Access Options dialog box. If you use the Run Menu Command macro action with the WindowHide argument, it will hide the Navigation Pane whether the Display Navigation Pane check box is selected or cleared.
Содержание
- Windows 7 Navigation Buttons Customizer
- Windows 7 Navigation Pane Customizer – портабельная программа для настройки панели навигации в Проводнике
- Customize Windows 7 with Ultimate Windows Customizer
- Ultimate Windows Customizer
- Ultimate Windows Customizer Features.
- Ultimate Windows Customizer System Requirements.
- Windows 7 Navigation Pane Customizer
- Windows 7 Navigation Buttons Customizer Driver Download
- Windows 7 Navigation Buttons Customizer Driver Details:
- Windows 7 Navigation Buttons Customizer Download Stats:
- Direct Download Success Stats:
- Installation Manager Success Stats:
- DOWNLOAD OPTIONS:
- 1. Direct Download
- 2. Driver Installation Manager
- Other drivers most commonly associated with Windows 7 Navigation Buttons Customizer problems:
- Windows 7 Navigation Buttons Customizer may sometimes be at fault for other drivers ceasing to function
- These are the driver scans of 2 of our recent wiki members*
Windows 7 Navigation Buttons Customizer
Если Вы хотите изменить не только оформление рабочего стола, меню Пуск, иконок и курсоров, но и проводника, то программа Windows 7 Navigation Buttons Customizer Вам в этом поможет. Она позволяет быстро сменить привычные стрелки навигации и строки поиска на любые другие. Если Вы не знаете с чего начать, то можете попробовать для начала готовые наборы кнопок, которые идут в комплекте с программой.
Программа полностью портативная. Её можно использовать и переносить с компьютера на компьютер без установки.
Чтобы изменить кнопки проводника нужно:
— запустить утилиту от имени администратора (клик правой кнопкой мыши на ярлыке программы)
— выбрать объект для изменения
— нажать «Change Selected Bitmap»
— выбрать внешний вид для новой кнопки
Установка завершена. Теперь у Вас новые кнопки!
Чтобы вернуть кнопкам стандартный вид нужно:
— запустить утилиту от имени администратора
— выбрать объект для изменения
— нажать «Restore Selected Bitmap»
Примечание: Обратите внимание, что иконки будут изменены, если у Вас будет полный доступ к системной библиотеке *WindowsSystem32ExplorerFrame.dll
Изменение внешнего вида окон, папок и файлов windows 10/8/7/XP даст возможность настроить интерфейс в соответствии с персональными предпочтениями, сделать его более удобным и дружественным.
Источник
Windows 7 Navigation Pane Customizer – портабельная программа для настройки панели навигации в Проводнике
Я уже писал о Librarian – программе для управления Библиотеками в Windows 7. Библиотеки отображаются в Проводнике, Моем компьютере, и включены в навигационное дерево. Настроить это дерево папок, добавив в него новые пункты, или удалив ненужные вам, поможет небольшая, очень простая программа Windows 7 Navigation Pane Customizer.
Как и в случае с Computer Customizer, портабельная утилита Windows 7 Navigation Pane Customizer позволяет упростить навигацию по важным системным разделам. Программа позволяет добавлять в навигационное дерево все значки контрольной панели, папку текущего пользователя, Корзину, Избранное, и другие важные места, а так же удалять их, если они вам более не нужны. Изменения происходят на лету, с автоматической перезагрузкой сервиса explorer.exe, так что вам даже не нужно перезагружаться.
Если вы решили восстановить исходные значения навигационного дерева, то и такая возможность предусмотрена в Windows 7 Navigation Pane Customizer одним кликом. Чтобы программа работала стабильно, для ее запуска требуются права администратора.
Источник
Customize Windows 7 with Ultimate Windows Customizer
Regular readers of The Windows Club may be familiar with our several Windows freeware releases. The one common thing among them all was that they were all small portable apps which did not require an install. But this one is different! It does a lot, is a 10 MB download, and requires to be installed.
We present to you our new release: Ultimate Windows Customizer! While our Ultimate Windows Tweaker allows you to tweak various settings in Windows 7 and Windows Vista, this freeware will let you easily customize and change your Windows 7 (Windows 8 support to be added later) look – like changing the Start Button, Logon Screen, Thumbnails, Taskbar, Explorer look, Windows Media Player, etc.
Ultimate Windows Customizer
There are tons of applications available to customize your Windows installation, but the problem is that most are tweak specific. Hardly any offering multiple customization options. Ultimate Windows Customizer (UWC) is the first integrated freeware that offers you almost everything that can be customized in a Windows installation – well everything that matters, at least!
Once you have downloaded Ultimate Windows Customizer, unzip the contents, open the folder and click on UWC Setup file to start the installation. The installation is simple and there are no boxes to check/uncheck. It is completely clean, and like all our other Windows freeware does not include any of the hated toolbars or accompaniments. You can see the UWC Installation Screenshots here.
It is important to note that before running Ultimate Windows Customizer if you have tweaked your operating system either manually or by using any other software, we recommend that you reverse the changes first. This is due to the fact that upon First Run, UWC will generate backups of the Current Files and Registry Settings, to allow the user to revert back to Default. Due to the wide nature of Customizations, this is the only option to revert back to Default.
Once you are sure about this, create a System Restore Point first. Then you can go ahead and start customizing to your heart’s content!
Each section offers several customization tweaks relating to the function. It is really difficult to list the near-endless options being offered, but you can see all the UWC UI screenshots here. This will give you an idea.
Once you have customized your Windows, you may click on the Close button to exit UWC. You will be asked to log off or restart your computer or Explorer as the case may be.
Click on the appropriate button to allow the action to complete and the effects to take place.
If you face any errors, they will be recorded in the Error Log for easy troubleshooting. You can view the error log by clicking on the View Error Log in the Extras tab.
Ultimate Windows Customizer Features.
UWC will automatically check for updates and download them automatically. But you can also Check For updates from the Settings & Extras tab.
If you use the Update Feature from the application itself. The new file will be download and automatically extracted to your desktop. Just open the folder and run UWC Setup.exe.
Ultimate Windows Customizer System Requirements.
Before you use Ultimate Windows Customizer, remember to create a system restore point first.
Ultimate Windows Customizer v1.0.1.0 has been developed by TWC Team member Lee Whittington, for The Windows Club. UWC was updated to v 1.0.1.0 on 26.11.11 to fix some bugs.
Some software may block the download, but rest assured that its a false positive.
Want to move the Start Orb and Start Menu? Check out our Start Orb Mover!
If you would like to check out our several Freeware, E-Books, Wallpapers, Themes, etc, releases you may visit this page.
Date: November 23, 2014 Tags: Customize, TWC App
Источник
Windows 7 Navigation Pane Customizer
The default file browser Windows Explorer under Windows 7 displays several sidebar items by default which link to libraries, user favorites, the Homegroup and connected hard drives and optical drives.
While those guarantee quick access to files and folders, they often display at least some folders and links that users do not need because they never access them.
Even worse, they sometimes may cause users to miss-click on items.
A Windows 7 user who is not using the Homegroup feature for example does not necessarily need the Homegroup link displayed in the sidebar.
The free software program Windows 7 Navigation Pane Customizer gives you better control over the items that are displayed in the sidebar in Windows Explorer.
The application displays a list of system folders that can be added or removed from the navigation pane in Windows Explorer. Checkboxes are used to enable or disable items in the sidebar.

Available are the following items:
All items can be enabled or disabled individually. It is theoretically possible to remove all items, enable all or make a custom selection.
A click on the Apply Settings button applies the settings to Windows Explorer and restarts the process so that the changes are visible during the same session. A restart of the PC, logging out and on again, or killing the process manually is not required.
The restore settings button offers to restore the changes made and display the default selection of links in the navigation pane of Windows Explorer again.
The program appears to work only under 32-bit editions of Windows 7. 64-bit users receive an error message (file not found) after they click on the Apply Settings button.
Update : You need to run the program with elevated privileges. If you do, it will also work on 64-bit versions of Windows 7. To do so, right-click the executable file and select run as administrator from the context menu.
Источник
Windows 7 Navigation Buttons Customizer Driver Download
Windows 7 Navigation Buttons Customizer Driver Details:
Windows 7 Navigation Buttons Customizer File Name: windows_7_navigation_buttons_customizer.zip
Windows 7 Navigation Buttons Customizer Driver Version: 641rW
Windows 7 Navigation Buttons Customizer ZIP Size: 126.kb
Windows 7 Navigation Buttons Customizer now has a special edition for these Windows versions: Windows 7, Windows 7 64 bit, Windows 7 32 bit, Windows 10, Windows 10 64 bit,, Windows 10 32 bit, Windows 8, Windows RT 64bit, Windows Vista Enterprise (Microsoft Windows NT 6.0.6000.0) 32bit, Windows Vista Home Premium 64bit, Windows 7 Ultimate 64bit, Windows 7 Service Pack 1 (Microsoft Windows NT) 64bit, Windows Vista Starter 32bit, Windows Vista Home Basic 32bit, Windows 7 Starter 64bit, Windows 10 Pro 32bit, Windows XP Starter Edition 64bit, Windows 8 Pro 64bit,
Windows 7 Navigation Buttons Customizer Download Stats:
Direct Download Success Stats:
Reports Issued By 379/583 Users
Success Reported By 342/379 Users
Driver Download Score88/100
Driver Installation Score85/100
Overall preformance Score91/100
Installation Manager Success Stats:
Reports Issued By 171/222 Users
Success Reported By 157/171 Users
Driver Download Score88/100
Driver Installation Score93/100
Overall preformance Score98/100
DOWNLOAD OPTIONS:
1. Direct Download
This option requires basic OS understanding.
Select Your Operating System, download zipped files, and then proceed to
manually install them.
Recommended if Windows 7 Navigation Buttons Customizer is the only driver on your PC you wish to update.
2. Driver Installation Manager
This option requires no OS understanding.
Automatically scans your PC for the specific required version of Windows 7 Navigation Buttons Customizer + all other outdated drivers, and installs them all at once.
Other drivers most commonly associated with Windows 7 Navigation Buttons Customizer problems:
Windows 7 Navigation Buttons Customizer may sometimes be at fault for other drivers ceasing to function
These are the driver scans of 2 of our recent wiki members*
Outdated or Corrupted drivers:7/21
Outdated or Corrupted drivers:9/24
If you encounter problems with the direct download for these operating systems, please consult the driver download manager for the specific Windows 7 Navigation Buttons Customizer model.
Источник
Как изменить кнопки навигации в Проводнике
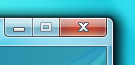
В своей статье «Как изменить стандартный вид Windows 7» я уже рассказал как поменять тему оформления, вид кнопки Пуск, иконки. Однако некоторые элементы оформления остались не охвачены нашим вниманием и портят своим первозданным видом все усилия по приданию системе нового и стильного макияжа. Сегодня мы поговорим о том, как изменить кнопки навигации в Проводнике.
Windows 7 Navigation Buttons Customizer — это бесплатная утилита для изменения оформления кнопок навигации, адресной строки и поля поиска в Проводнике. Утилита работает в Windows 7 и представляет собой один исполнимый файл.
После того как вы скачали и распаковали архив необходимо запустить утилиту от имени администратора. Мы видим в появившемся окне изображения элементов интерфейса, которые можно изменить. Выделяем нужный элемент, затем щелкаем кнопку Change Selected Bitmap и выбираем рисунок в формате BMP. Скачать наборы элементов оформления для программы можно на форуме разработчика (требуется регистрация).
После этого Проводник автоматически перезапустится и вы увидите изменения в интерфейсе. Для того, чтобы восстановить исходный вид, выделяем нужный элемент и жмем Restore Selected Bitmap.
Скачать утилиту Windows 7 Navigation Buttons Customizer можно на сайте разработчика. А вот здесь можно скачать эту же утилиту, но с подробными инструкциями на русском языке и наборами различных кнопок.
В результате моя система наконец-то приобрела симпатичные кнопочки, наиболее подходящие под используемую тему. 
Нравится? А как вы относитесь к подобным украшательствам?
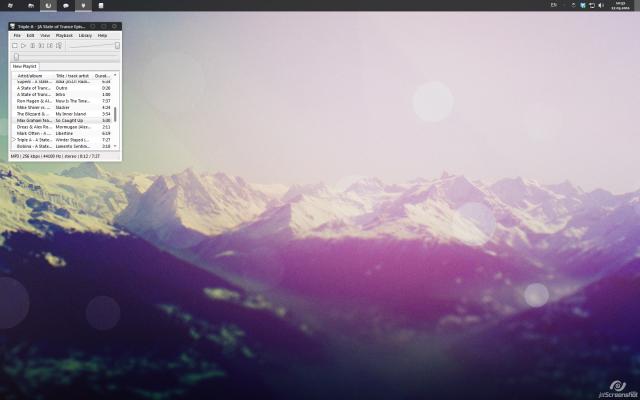
 В последнее время я стал замечать, что большая часть пользователей «семерки» используют стандартную тему оформления, которую разработчики ласково назвали Aero.
На мой взгляд, она излишне ориентирована на планшеты. Об этом нам говорят огромные кнопки управления окном и излишне широкие заголовки и рамки окон — все это придает интерфейсу некоторую громоздкость. Кроме того, разработчики перемудрили с разнообразием цветовой гаммы: все эти прозрачности, переливания, градиенты и прочие изыски создают своеобразный эффект грязи.
Возможно, кому-то так нравится, кому-то безразлично, кто-то привык, а кто-то попросту не знает, что все это можно изменить.
Visual Styles
 Визуальные стили включают в себя всю графику оформления окон, контролов, фонов и настройки шрифтов. В этот список не входят, пожалуй, только кнопка «Пуск», кнопки навигации «Вперед» и «Назад», а также иконки.
Themes
Кучу тем можно найти на DeviantArt’e.
 Темы представляют собой просто некий файл описания того, что должно использоваться. Сюда входит непосредственно сам визуальный стиль, некоторые иконки, скринсейверы, обои, курсоры и некоторые другие элементы.
 Стоит упомянуть, что иногда темы могут быть ориентированы на разные настройки Панели Задач. Так, например, для большой панели задач справа и для маленькой сверху могут быть предназначены разные темы. Обычно разработчики добавляют к ним соответствующий префикс, типа «Top» или «Left».
Установка тем
Все темы складируются по пути %SystemRoot%ResourcesThemes. После чего их можно будет выбрать в окне «Персонализация».
Но не все так просто. Изначально запрещено устанавливать не подписанные самой Microsoft темы. Чтобы обойти это ограничение, необходимо пропатчить три dll’ки. Для этого существует простенькая open-source программа, называемая Universal Theme Patcher for Windows (Оф. сайт, скачать, зеркало).
Отключаем UAC, запускаем с правами администратора и нажимаем на три кнопки Patch. Данная операция абсолютно безопасна, кроме того, программа автоматически делает бэкап, чтоб вы могли в случае чего могли восстановить исходные файлы. Для 64bit рекомендуется патчить обоими версиями, т.к. в системе содержатся одновременно и 32, и 64 битные dll’ки.
После этого перезагружаем компьютер.
Теперь осталось переместить нужные темы в %SystemRoot%ResourcesThemes и выбрать их в «Персонализации». Сделав это, вы увидите, что оформление окон поменялось, а вот «Пуск» и кнопки навигации остались. Все дело в том, что они намертво «зашиты» в системные файлы. Поэтому большинство тем сейчас поставляются вместе с уже измененными файлами, которые необходимо будет просто заменить.
Замены системных файлов
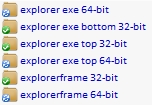
Здесь нам тоже зарыли собаку. Чтобы заменить системные файлы своими измененными версиями, нам нужно получить статус владельца этих файлов. Для этого будем использовать утилиту TakeControl (скачать, зеркало). Запускаем от администратора и добавляем в список следующие файлы:
- C:Windowsexlporer.exe
- C:WindowsSystem32ExplorerFrame.dll
- C:WindowsSystem32shell32.dll
- C:WindowsSystem32timedate.cpl
Ленивые же могут просто импортировать list.fls, лежащий рядом с программой
После чего жмем на «Take control» и дожидаемся окончания процесса. Перезагружаться не обязательно.
Теперь нам осталось только заменить оригинальные файлы на имеющиеся в теме. Для этого добавьте к исходным файлам префикс _old, после чего переместите патченый файл на место старого. Можно поступить проще, и использовать Theme Manager, ссылка на который есть чуть ниже. Он сам все сделает.
ВНИМАНИЕ:
- Разработчики тем обычно делают две версии системных файлов: для x86 и для 64 отдельно.
- Не поленитесь сверить версии файлов! Если они не сходятся, то скорее всего придется делать восстановление через live-cd или «Восстановление системы»
- После замены shell32.dll у вас может отвалиться многоканальный звук.
Перезагружаемся и видим обновленный внешний вид.
Дополнительная настройка
Порой бывает, что авторы пихают в тему какие-то не кириллические шрифты, делают их жирно-курсивными, или просто размер мелковат. Тут на помощь приходят Настройки Цвета и Вида. В них можно поменять используемые цвета, шрифты и размеры для каждого отдельного типа элементов. Кстати, сюда входят так же рамки и заголовки, то есть можно изменить их размер, правда на стандартной теме в некоторых местах от этого появляются артефакты.
Иконки
Вы, наверное, заметили не совсем стандартные иконки в моей панели задач. Это можно сделать двумя способами: вручную создавать кучу ярлыков, менять в них иконки и пихать на панельку, либо же воспользоваться утилитой 7conifier (скачать, зеркало).
Она автоматически подменяет иконки нужных приложений исходя из правил, описанных в package.xml. Тут все довольно просто, так что объяснять на пальцах смысла нет.
А ещё на том же девиарте существуют готовые паки, практически полностью заменяющие системные иконки. Одним из самых популярных является Faenza IconPack
, который так бурно ненавидят на ЛОРе.
Упрощаем себе жизнь
Ниже приведу краткий обзор некоторых полезных программ, которые могут вам помочь в настройке.
Theme Manager (Оф. сайт, скачать, зеркало)
Позволяет устанавливать темы буквально одним кликом. Вам остается лишь указать необходимые файлы и установить тему, указать название и применить. Особенностью программы является то, что можно сохранять темы со всеми ресурсами в zip-контейнеры. Причем эта особенность как бы скрыта от глаз — её можно вызвать только с помощь горячих клавиш Ctrl + E и Ctrl + I.
Logon Screen Changer (скачать, зеркало)

А с помощью этой софтинки можно поменять бэкграунд экрана приветствия, а так же изменить некоторые другие параметры.
Navigation Panel Customizer (Оф. сайт, скачать, зеркало)
Это простой способ убрать ненужные пункты из левого меню Проводника.
Taskbar Item Pinner (Оф. сайт, скачать, зеркало)
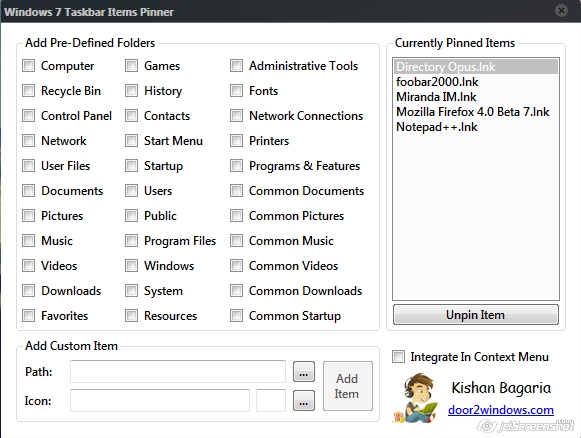
А с этой штукой можно прицепить к Панели Задач абсолютно любой элемент, будь то папка, файл, или даже разделитель.
AltTabTuner (скачать, зеркало)
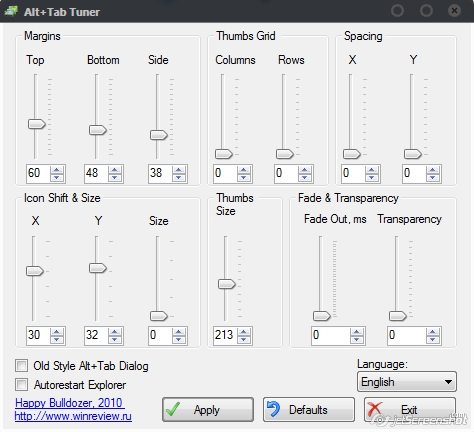
Позволяет тонко настроить меню по Alt+Tab — отступы, размеры, прозрачность. Можно даже вернуть олдскульный XP’шный стиль.
Taskbar Thumbmail Customizer (Оф. сайт, скачать, зеркало)

Кастомизатор всплывающих превью окон.
StartNavi Buttons Changer (Оф. сайт, скачать, зеркало)
Позволяет изменять вид кнопки «Пуск» и кнопок навигации. Применяет изменения к уже существующим системным файлам. Готовые кнопки можно найти на том же девианте.
Примечания
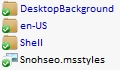
Тема на скринах — Snoheso с измененными настройками шрифтов.
От себя порекомендую попробовать APPOWS и Gaia09.
Wallpaper (скачать, зеркало).
Сервера JetScreenshot были повержены, что и предполагалось.
Ну и как обычно, тут должно быть что-то про фломастеры, их вкус и цвет
|
Представляем вам русификатор для программы Windows 7 Navigation Buttons Customizer! Русификатор позволит вам перевести программу. Достуен русификатор от KaSS, в ближайшее время мы постараемся добавить больше файлов для этой программы! Русификатор текста для программы Windows 7 Navigation Buttons Customizer (полный перевод программы) Количество скачиваний:
Установка русификатора для программы Windows 7 Navigation Buttons Customizer: 1. Скачать файл Русификатор(RUS) Windows 7 Navigation Buttons Customizer. 2. Закинуть файлы в папку с программой Windows 7 Navigation Buttons Customizer. 3. Установить русификатор Windows 7 Navigation Buttons Customizer. 4. Запускаем программу. Полноценный русификатор для программы Windows 7 Navigation Buttons Customizer.
Похожее материалы:
|

Информация
Посетители, находящиеся в группе Гости, не могут оставлять комментарии к данной публикации.