The «Automatic Repair couldn’t repair your PC … Log file: C:Windowssystem32LogfilesSrtSrtTrail.txt» error message, can be faced on a Windows 10 based computer, after installing a Windows Update or after closing you computer without performing a normal shutdown (e.g. after a power outage).

If you are experiencing the blue screen problem «Automatic Repair couldn’t repair your PC (SrtTrail.txt)», then follow the steps below to resolve it…
How to FIX: Automatic Repair couldn’t repair your PC (Log file: SrtTrail.txt).
Method-1. Disable Driver Signature Enforcement.
This first method to fix the «Automatic Repair couldn’t repair your PC – Log file: D:Windowssystem32LogfilesSrtSrtTrail.txt» error in Windows 10, is to disable the «Secure boot» option in Bios and the «Driver signature enforcement». To do that, follow the steps below:
Step 1. Disable Secure Boot in BIOS
1. Power On your system and press the corresponding key* to enter into BIOS SETUP
* Usually is the DEL or F1 or F2 or F10 key. (depends on manufacturer)
2. Look at Security or at Boot Options settings,* to find the Secure Boot option and Disable it.
* Note: The location of the Secure Boot setting in BIOS depends on device’s manufacturer.
3. Save settings and EXIT BIOS Setup.
4. Let Windows to boot normally. If Windows cannot start then continue to step-2.
Step 2. Disable Driver Signature Enforcement.
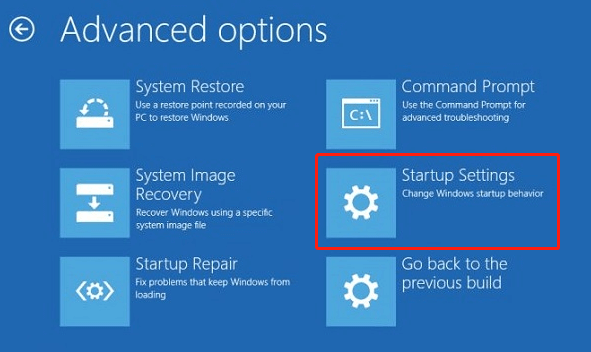
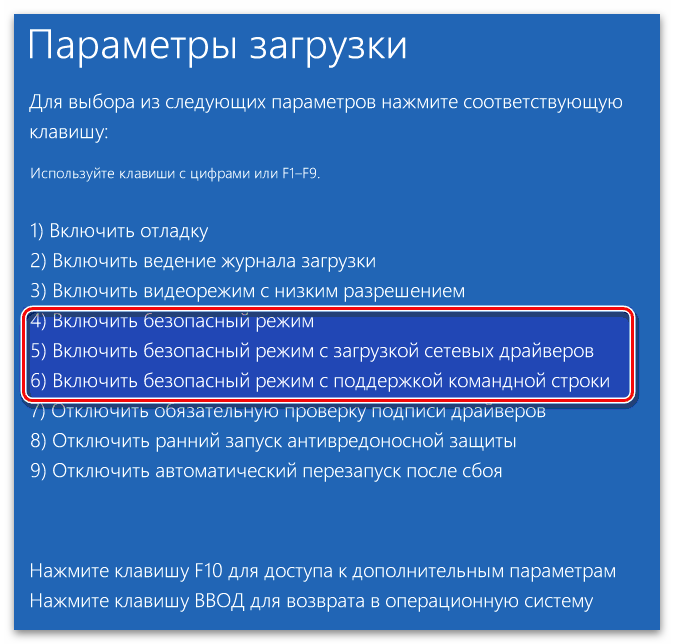
1. If you PC doesn’t start normally, then at the «Automatic Repair couldn’t repair your PC» error screen, click Advanced Options and then Startup Settings.
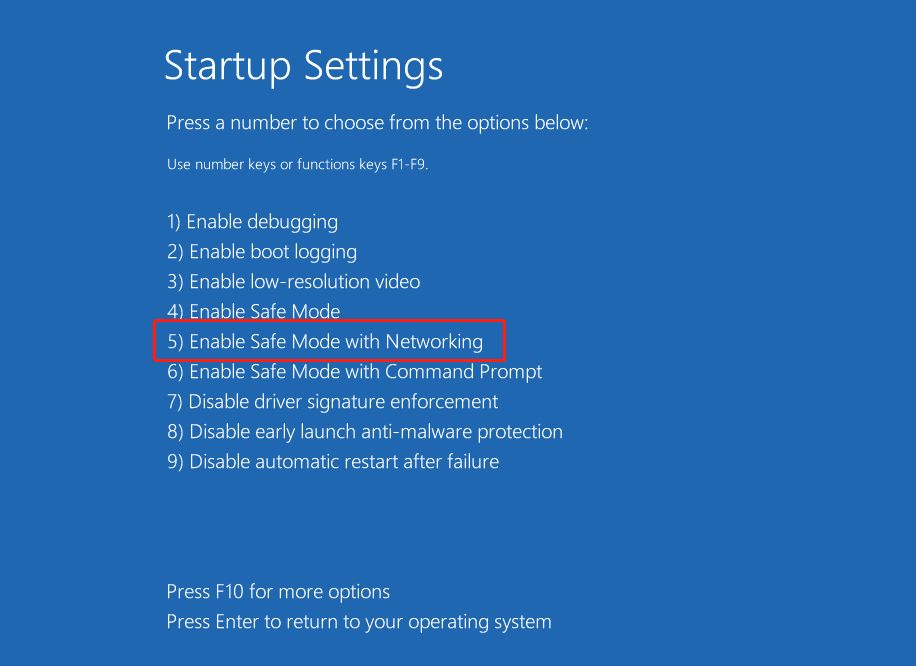
2. At Startup Settings, press the F7 (or «7«) key to Disable driver signature enforcement.

3. If Windows starts normally,* then continue to Step-3 and permanently disable the driver signature checking.
* Note: If Windows cannot start, enable the Secure Boot in BIOS Settings and continue to Method-2.
Step 3. Disable Driver Signature Enforcement permanently,
1. Open an elevated command prompt.
2. At command prompt windows, type the following commands in order.
- bcdedit -set loadoptions DISABLE_INTEGRITY_CHECKS
- bcdedit -set TESTSIGNING ON

3. Reboot your computer.
– If you want to enable signature enforcement in the future, then open Command Prompt (with administrative rights) and type these commands in order:
- bcdedit -set loadoptions ENABLE_INTEGRITY_CHECKS
- bcdedit /set testsigning off
Method-2. Run Check Disk to Find and Fix Hard Disk Errors.
Requirements: A Windows Installation Media on a USB disk.
In order to perform the below steps, you will need to boot you computer from a Windows USB installation media. If you don’t own a Windows 10/11 USB Media, you can create one using these instructions:
- How to Create a Windows 10 USB Installation Media.
- How to Create a Windows 11 USB Installation Media.
1. Boot your computer from the USB Windows Installation media.
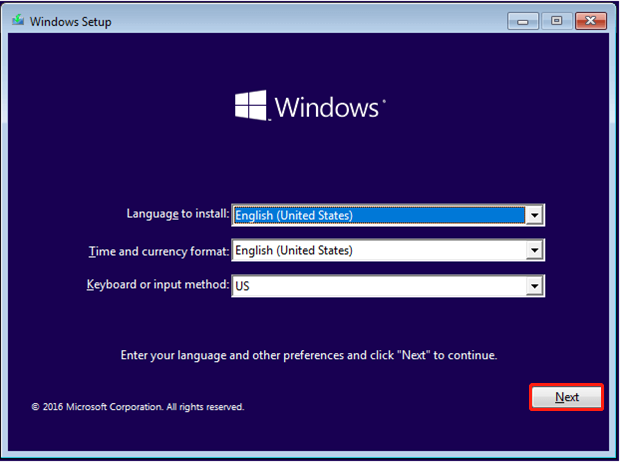
2. Press Next at Language options screen.
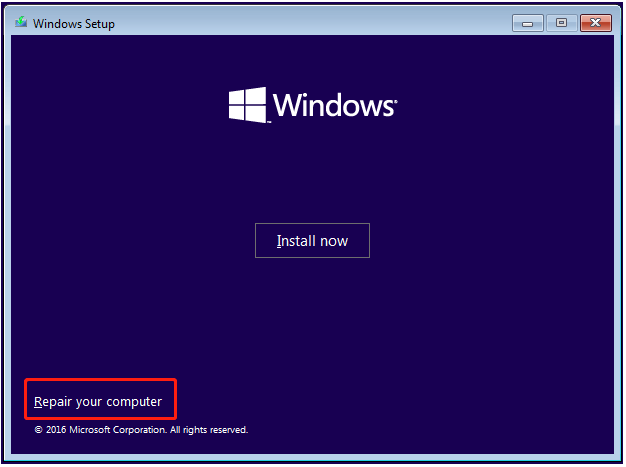
3. Choose Repair your computer.
4. Then choose Troubleshoot -> Advanced Options –> Command Prompt.

5. In command prompt type: diskpart & press Enter.
6. In “DISKPART” prompt, type: list volume & press Enter.
7. Now find out the Drive letter of the Operating System (OS) volume.
* Note: The OS Volume is usually the biggest volume in size (GB) and contains the Windows Operating System.
e.g. At the example screenshot below, the OS volume is located at drive «D«.

8. Type exit to close the DISKPART tool.
9. Then give the following command to repair the OS drive and press Enter. *
- chkdsk X: /R
* Note: Replace the letter «D», according your case. (e.g. In this example the command is: «chkdsk D: /R».
10. Now wait for the disk check process to finish. (it will take several hours).
11. When the check disk process is completed, close all open windows and restart your computer. If Windows fails to boot again, then continue to the next method.
Method 3. Repair System Files and Windows with the SFC & DISM Tools.
1. Boot your computer from the Windows Installation media.
2. Press Next at Language options screen.
3. Choose Repair your computer.
4. Then choose Troubleshoot -> Advanced Options –> Command Prompt.
5. Give this command to repair the offline Windows image: *
- dism.exe /Image:D: /Cleanup-Image /Restorehealth
* Notes:
1. Where «D« = the Windows OS drive. (See method 2 above to find the OS drive letter, and change it according your situation).
2. Don’t forget the space between & /
3. If the above DISM command cannot run with «error 5: The scratch directory size might be insufficient to perform this operation», then give the following commands:
- mkdir D:Scratch
- dism.exe /Image:D: /ScratchDir:D:Scratch /Cleanup-Image /Restorehealth

6. When the DISM operation is completed, give the following SFC command to complete the repairs. *
- SFC /SCANNOW /OFFBOOTDIR=D: /OFFWINDIR=D:Windows
* Notes:
1. Where «D« = the Windows OS drive. (Change it according your situation)
2. Don’t forget the space between & /

7. When the operation is completed, reboot your computer. If your system fails to boot again, proceed to next method.
Method-4. Repair the Boot Configuration Data (BCD).
The third method to fix the «Automatic Repair couldn’t repair your PC – SrtTrail.txt», is to repair the BCD. To do that:
1. Boot your computer from the Windows recovery media.
2. Press Next at Language options screen.
3. Choose Repair your computer.
4. Then choose Troubleshoot -> Advanced Options –> Command Prompt.
5. In command prompt type: diskpart & press Enter.
6. In “DISKPART” prompt, type: list volume & press Enter.
7. Now, according your case…
a. If you see a FAT32 (FS) partition, then you own a UEFI based system.
At this case, follow the instructions at Case A. Repair BCD on UEFI Based Systems.b. If you don’t see a FAT32 (FS) partition, and all partitions are NTFS, then you own a BIOS/MBR/Legacy based system.
At this case, follow the instructions at Case B. Repair BCD on LEGACY Based Systems.
e.g. At the example screenshot below, the system is UEFI based.

Case A. How to Repair BCD on a UEFI Based System.
1. If your system is UEFI, then notice the Volume number of the FAT32 * partition and the drive letter of the Operating System (OS) volume.
e.g. At the example screenshot below, the FAT32 partition is located at “Volume 1” and the OS volume has the drive letter «D«.

2. Now select the FAT32 volume, with the following command and press Enter. *
- select volume 1
* Note: Replace the number «1», with whatever volume number is your System drive.
3. Then assign the drive letter “Z” at the selected volume with this command:
- assign letter=Z
4. Type exit & press Enter, to close DISKPART utility.

5. Finally give the following command to fix the boot configuration data and press Enter. *
- bcdboot D:windows /s Z: /f ALL
* Note: Replace the letter «D» with whatever drive letter it is for your OS Volume.

6. Type exit & press Enter to close command prompt.
7. Remove the recovery media and Restart your PC.
8. Test if your system can boot to Windows normally. If your system still does not start, then continue to next method.
Case B. How to Repair BCD on a LEGACY Based Systems.
1. Type exit to close the DISKPART utility.
2. Then give the following commands in order:
- bootrec /fixmbr
- bootrec /fixboot
- bootrec /rebuildbcd
3. If after executing the last command, you receive that “Total Windows installations: 0”, then continue to the next step (4), otherwise skip to step 5.

4. If you receive that”Total Windows Installations=0” then give the following commands in order:
- bcdedit /export C:bcdbackup
- C:
- cd boot
- attrib bcd -s -h –r
- ren C:bootbcd bcd.old
- bootrec /rebuildbcd
5. Press “A” to add the installation to boot list and press Enter. Then restart your system.

6. Close command prompt window.
7. Restart your computer and if the boot problem persists, then continue to next Method.
Method-5. Diagnose Hard Disk’s Health.
If none of the above methods work for you, then your hard disk probably is damaged and you should replace it. To diagnose your hard drive’s health, connect your hard disk to another working computer and use the diagnostic utilities mentioned on this article: Best Hard Drive Test & Diagnostic Tools to Check Hard Disk’s Health. *
* Note: If your hard drive is healthy, then backup your files and perform a clean installation of Windows 10.
That’s all folks! Did it work for you?
Please leave a comment in the comment section below or even better: like and share this blog post in the social networks to help spread the word about this solution.
If this article was useful for you, please consider supporting us by making a donation. Even $1 can a make a huge difference for us.

7 способов исправить — застрял в цикле автоматического восстановления Windows!
- Нажмите «Восстановить компьютер» внизу.
- Выберите Устранение неполадок> Дополнительные параметры> Командная строка.
- Введите chkdsk / f / r C: и нажмите Enter.
- Введите exit и нажмите Enter.
- Перезагрузите компьютер, чтобы увидеть, решена ли проблема.
Как я могу восстановить свою Windows 8?
Для этого выполните следующие действия:
- Вставьте исходный установочный DVD-диск или USB-накопитель. …
- Перезагрузите компьютер.
- Загрузиться с диска / USB.
- На экране установки щелкните Восстановить компьютер или нажмите R.
- Нажмите Устранение неполадок.
- Нажмите «Командная строка».
- Введите следующие команды: bootrec / FixMbr bootrec / FixBoot bootrec / ScanOs bootrec / RebuildBcd.
Как исправить подготовку автоматического ремонтного цикла?
Официальное решение Windows для подготовки к автоматическому восстановлению — это обновление или перезагрузка ПК напрямую. Вот как работает ремонт: в окне «Подготовка к автоматическому ремонту» выберите трижды нажмите кнопку питания, чтобы компьютер выключился. После перезапуска система потребует ремонта.
Что вызывает цикл автоматического восстановления Windows?
Есть несколько причин возникновения ужасного автоматического цикла ремонта: неправильное обновление Windows для отсутствующих или поврежденных системных файлов, включая проблемы с реестром Windows, повреждение файлов диспетчера загрузки Windows и несовместимые жесткие диски.
Как исправить проблему с запуском Windows?
Метод 1: средство восстановления при загрузке
- Запустите систему с установочного носителя для установленной версии Windows. …
- На экране «Установить Windows» выберите «Далее»> «Восстановить компьютер».
- На экране «Выберите параметр» выберите «Устранение неполадок».
- На экране «Дополнительные параметры» выберите «Восстановление при загрузке».
Как исправить поврежденные драйверы Windows 8?
Вот несколько решений, которые помогут вам исправить ошибку DRIVER CORRUPTED EXPOOL.
- Восстановление системы. Воспользуйтесь функцией восстановления системы на своем ПК, чтобы вернуться к ранее установленному стабильному состоянию.
- Запустите средство устранения неполадок синего экрана. …
- Удалите неисправные драйверы. …
- Сбросить Windows. …
- Как проверить, не поврежден ли Bios, обновите Bios. …
- Обновите драйверы устройств.
Как восстановить Windows 8.1 без диска?
Метод #1
- Загрузитесь в систему и выберите Компьютер> C:, где C: — это диск, на котором установлена ваша Windows.
- Создать новую папку. …
- Вставьте установочный носитель Windows 8 / 8.1 и перейдите в папку Source. …
- Скопируйте файл install.wim.
- Вставьте файл install.wim в папку Win8.
- Откройте командную строку от имени администратора.
Как вывести компьютер из режима автоматического ремонта?
Чтобы изменить это, введите bcdedit / set {default} recoveryenabled no для отключения автоматического восстановления загрузки. Если вы запускаете эту команду из командной строки или окна PowerShell в безопасном режиме, вам может потребоваться заменить значение идентификатора на {current} (например, bcdedit / set {current} recoveryenabled no).
Что это значит, когда на вашем ноутбуке написано «Подготовка к автоматическому ремонту»?
Автоматический ремонт есть встроенная функция Windows, предназначенная для устранения проблем, связанных с загрузкой, когда проблема запуска возникает автоматически. Иногда, когда он не работает, появляется ошибка «Автоматический цикл восстановления», заставляющая ваш компьютер перезагружаться снова и снова.
Сколько времени занимает автоматическое восстановление Windows 10?
Затем вам нужно будет нажать Дополнительные параметры. 2. Щелкните Восстановление при загрузке. Windows унесет куда угодно от нескольких секунд до нескольких минут чтобы попытаться решить проблему.
Как исправить бесконечный цикл перезагрузки в Windows 10?
Посмотрите на график WinX В меню Windows 10 откройте Система. Затем щелкните Дополнительные параметры системы> вкладка Дополнительно> Запуск и восстановление> Параметры. Снимите флажок «Автоматический перезапуск». Нажмите Применить / ОК и Выйти.
Ответ: Да, Windows 10 имеет встроенный инструмент восстановления, который помогает устранять типичные проблемы с ПК.
Have your Windows Automatic Repair ever stopped working? How to fix it and recover the lost data when Windows cannot load correctly? In this post, I will show several ways to fix the “Windows Automatic Repair not working” issue, as well as how to recover lost data via MiniTool data recovery software quickly and easily.
Windows Automatic Repair Not Working
Windows systems like Windows 8 and Windows 10 include a recovery feature called Automatic Repair. When the operating system fails to boot, Windows Automatic Repair will try to repair Windows. However, it has some limitations and it doesn’t always work.
There are two most common causes for the Windows Automatic Repair not working issue based on user feedback:
- Windows couldn’t load correctly.
- Automatic Repair couldn’t repair your PC.
Now, this article walks you through the two errors one by one.
Part 1. Fix: Automatic Repair Windows Couldn’t Load Correctly in Windows 10/8
Have you ever encountered the Windows Automatic Repair fails to work issue? If you google «Windows couldn’t load correctly» or visit some professional forums like Windows forum and Windows seven forum, you can find many users are talking about this error.
Many reasons can cause this error. For instance:
- File system integrity may become corrupted or damaged (That happens even more often if one turns off a PC while it is in the middle of writing crucial data to the boot sector).
- Boot Configuration Data (BCD) is missing or corrupt (This could happen because of disk write errors, power outages, boot sector viruses, or errors made while configuring the BCD manually).
How to fix this issue? If your Windows Automatic Repair fails to work because the Windows couldn’t load correctly, you can try the following solutions.
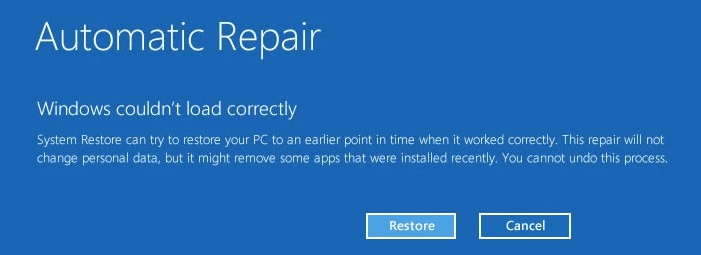
Way 1. Restore the PC to a Normal System State Using System Restore Function
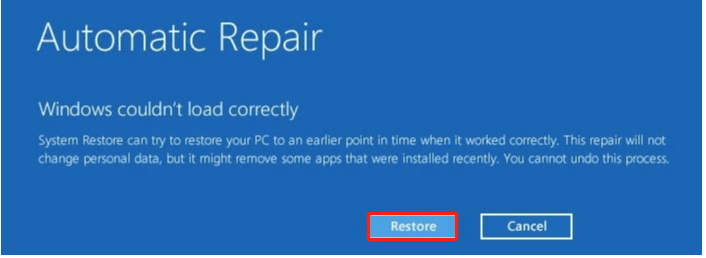
Generally speaking, the easiest and most effective way to fix the “Windows Automatic Repair not working” issue is to click the Restore button when you see the Windows couldn’t load correctly error.
Here is how to do a system restore: Make the Most of System Restore in Windows 10: Ultimate Guide
After restoring, Windows starts to revert to a previous system state and reboots. Finally, you have just one more thing to do: recover the removed files after the system restore!
Now, you might be wondering:
«How to recover moved files after system restore?»
Here you are suggested to try MiniTool Power Data Recovery to check whether it can find your lost data. You can download it on your computer by pressing the following button.
Free Download
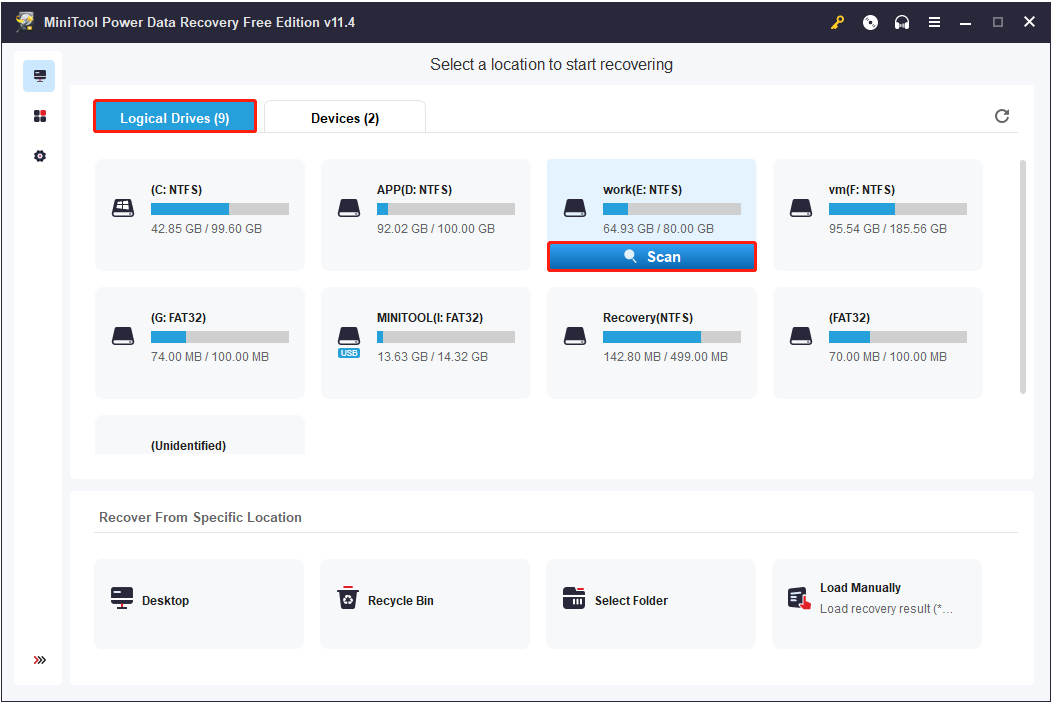
First, you need to launch this software and enter its main interface.
Second, you can click the Scan Settings button in the left panel to specify needed file systems as well as file types before scanning.
Third, under the Logical Drives section, select the target drive which contains the files you want to recover and then click the Scan button, or you can click the Devices tab and select the whole disk to scan.
Tip: While scanning, you can click the Stop button to stop the scan process once you have found all files to be recovered. However, to get the best recovery result, you had better wait patiently until the scan is completed. The scanning time is determined by data volume, disk capacity, and disk status.
Finally, preview and check the needed files, and then click the Save button to store them in a different path from the original files.
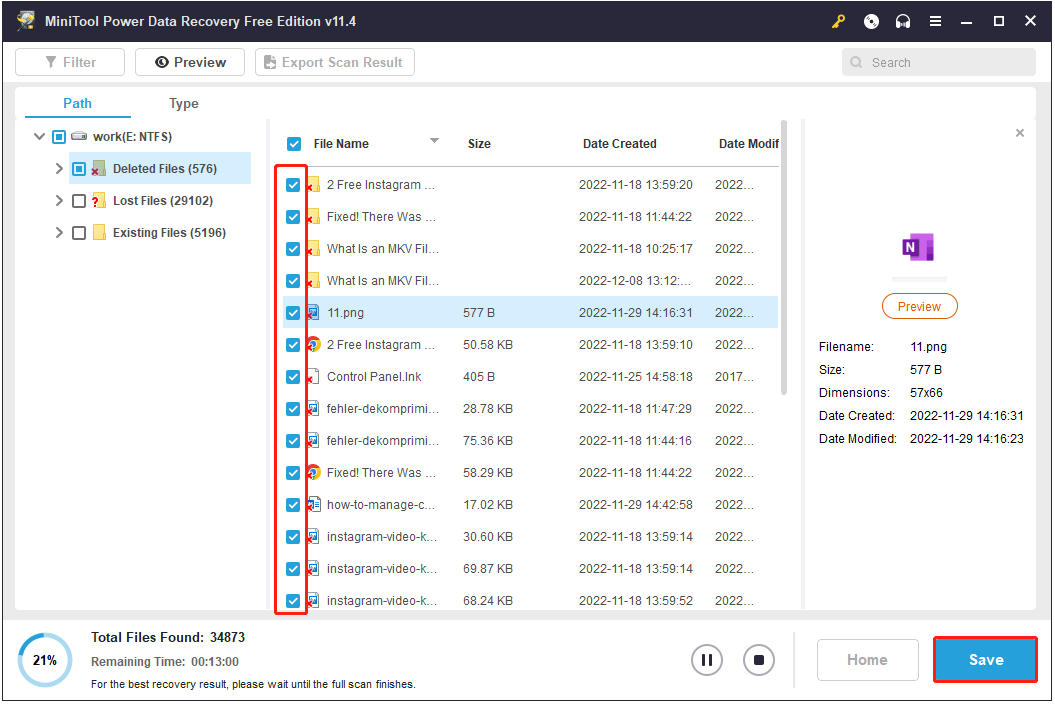
Tip: While saving data, you might receive a warning: You have reached the file saving limit for the selected files.
With the free edition of this software, you can only recover files no more than 1 GB. To break this limitation, you need to upgrade your edition of MiniTool Power Data Recovery. You can refer to the “license comparison” to know which license type is the best for you.
Way 2. Run CHKDSK Command to Fix Hard Disk & File System Issues
Sometimes, you may still get stuck in the startup repair infinite loop after using the System Restore function. In that case, you can try running CHKDSK to troubleshoot the “Windows couldn’t load correctly” error, as shown in the following steps.
Step 1: Download Window Media Creation Tool on a working computer to create a bootable media.
Step 2: Insert the bootable media into your computer which suffers the startup repair loop and boot from it.
Step 3: Select your language preferences, and click Next.
Step 4: Click Repair your computer.
Step 5: Choose Troubleshoot.

Step 6: Click Command Prompt.
Step 7: Type chkdsk /r and press Enter.

Step 8: Wait for the system to finish the operation. Then type exit and press Enter.
Step 9: Restart your computer and see if the Windows couldn’t load correctly error disappeared.
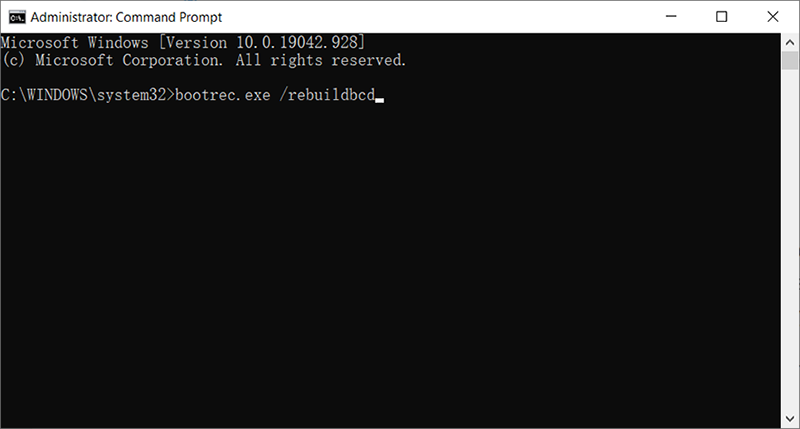
Way 3. Run Bootrec Command to Rebuild Windows BCD
If you are still stuck in Automatic Repair with Windows couldn’t load correctly error after trying the above 2 solutions, you can try rebuilding Windows’ BCD.
Step 1: Insert the Windows bootable disk and boot from it.
Step 2: Click Repair your computer > Troubleshoot > Advanced Options > Command Prompt.
Step 3: Type Bootrec /fixmbr and press Enter.
Step 4: Type bootrec /fixboot and press Enter.
Step 5: Type bootrec /rebuildbcd and press Enter.

Step 5: Restart your computer and see if the Windows automatic repair not working issue persists.
Part 2. Fix: Windows 10/8 Automatic Repair Couldn’t Repair Your PC
Let’s start with a true example from answers.microsoft.com:
I’ve tried every option in the boot options menu and cannot get Windows 8 to boot. I just get ‘Automatic Repair couldn’t repair your PC.» And later: «Log file: D:WindowsSystem32LogfilesSrtSrtTrail.txt» with the Shutdown and Advanced options button, which just takes me to the boot options screen.
I have no installed media as this is originally a Win7 machine for which I downloaded Windows 8.
https://answers.microsoft.com/
Generally speaking, if your Windows Automatic Repair fails to work because of the Automatic Repair couldn’t repair your PC error, you can try the following solutions to solve the problem.
Way 1. Repair MBR and Rebuild the BCD
As we know, once the mbr or Boot Configuration Data (BCD) is missing, corrupted, or not properly configured, Windows won’t be able to start. Therefore, you can try repairing MBR and rebuilding BCD to fix the Windows Automatic Repair not working issue.
1) Insert the Windows bootable drive and boot from it.
2) Select your language preferences, and click Next.
3) After selecting language, press Shift + F10 to open Command Prompt.
4) Type the following commands and press Enter after each of them:
- exe /rebuildbcd
- exe /fixmbr
- exe /fixboot
5) Type exit and press Enter after completing each command successfully.
6) Restart your PC to see if the Windows Automatic Repair couldn’t repair your PC error disappeared.
Way 2. Boot to Safe Mode and Run Command Prompt
Some users reported that the reason why Windows 10 Automatic Repair couldn’t repair your PC could be a bad driver. In this situation, you can try the following solution to solve the Windows Automatic Repair not working issue.
1. Choose Troubleshoot > Advanced options > Startup Settings.
2. Click the Restart button, and your computer should now restart and give you a list of options.
3. Choose Enable Safe Mode with Networking.
4. Download the updated version of the driver that’s giving you trouble when Safe Mode starts.
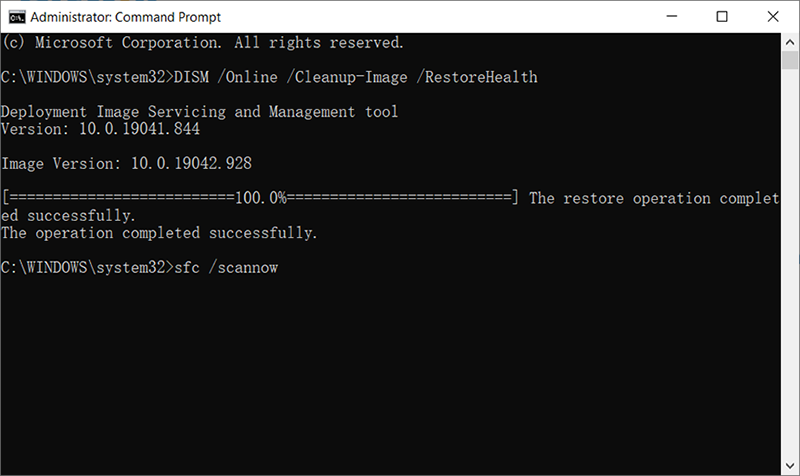
5. Press Windows + X key combinations and choose Command Prompt (Admin) from the list.
6. Type DISM /Online /Cleanup-Image /RestoreHealth and press Enter.

7. Restart your computer.
8. Install the driver that you’ve downloaded and the Windows Automatic Repair fails to work issue should be resolved.
Way 3. Disable Early Launch Anti-Malware Protection
Some users recommend disabling early launch anti-malware protection to fix the Windows 10 Automatic Repair couldn’t repair your PC loop.
Choose to Troubleshoot > Advanced Options > Startup Settings. After that, the computer should restart, and then you can see a list of options. Next, choose Disable early launch anti-malware protection. After that, restart your PC and check if the Windows Automatic Repair not working issue has been resolved.
Way 4. Delete the Problematic File
Sometimes, certain files like VMW can cause the Windows 10/8 Automatic Repair couldn’t repair your PC issue. Now, do the following to check the log files.
1. Boot your computer and select your language preferences. Then press Shift + F10 to open Command Prompt (The steps are the same as Way 1. Repair MBR and Rebuild the BCD).
2. Type these commands in order (Press Enter every time you enter a command):
- C:
- cd WindowsSystem32LogFilesSrt
- txt.
3. When the file opens, you will see «Boot critical file c:windowssystem32driverstmel.sys is corrupt».
4. Now, type the following commands in Command Prompt to delete the problematic file.
- cd c:windowssystem32drivers
- del vsock.sys

Note: You might need to navigate to a different folder and delete a different file in your case because the file can vary in different situations. Make sure the file you want to delete isn’t a core Windows 10 file before deleting it. Or, you can cause damage to your operating system.
5. Restart to see if the issue is fixed. If not, continue to the next method.
Way 5. Disable Automatic Startup Repair
Sometimes, you just need to disable Automatic Startup Repair when you are stuck in the loop of Windows 10 Automatic Repair couldn’t repair your PC.
1. Open Command Prompt and type the following command and press Enter to run it:
bcdedit /set {default} recoveryenabled No

2. Type exit and press Enter.
3. Restart your PC and Automatic Startup Repair should be disabled.
4. Type the following command in Command Prompt if you need to re-enable it.
bcdedit /set {default} recoveryenabled Yes
5. Restart your computer to apply changes.
Way 6. Perform Refresh or Reset
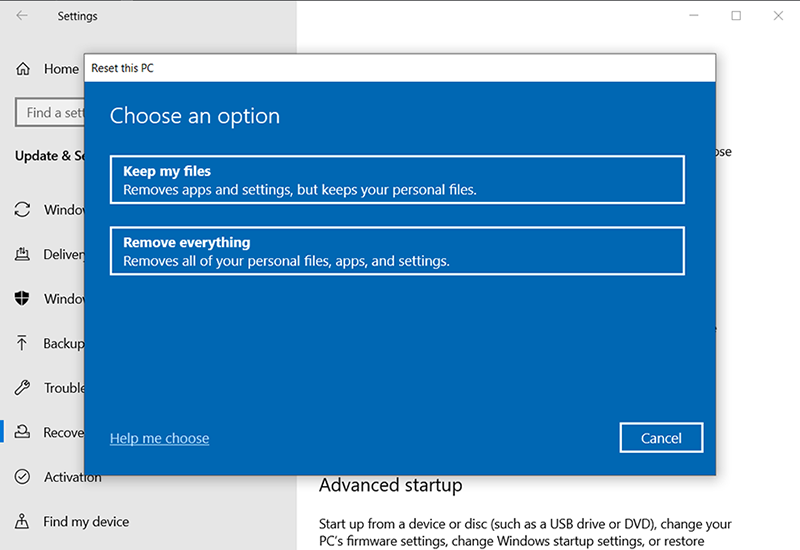
If the Windows Automatic Repair loop issue still exists, you might have to try to perform a Reset or Refresh to troubleshoot the Automatic Repair couldn’t repair your PC issue.
To perform a Refresh or Reset, you need to do the following:
In the Windows Boot Options menu, choose Troubleshoot. Choose Reset your PC or Refresh your PC as shown in this picture.
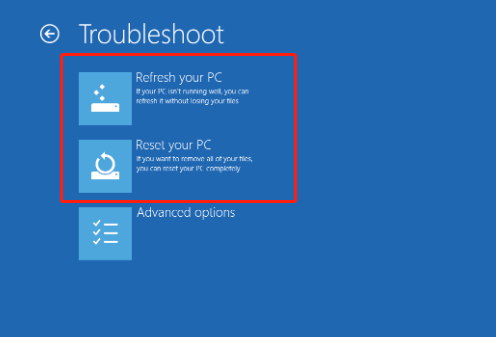
If you choose the Refresh option, your installed applications will be removed but your installed universal apps and settings will be saved. If you choose the Reset option, your data, files, and apps will be deleted.
It is recommended to recover all your important files before taking this step. Because writing new data may cause the original data to be overwritten, which cannot be recovered.
MiniTool Power Data Recovery is recommended here. This professional data recovery software can help you effectively recover lost data. Besides, even if all solutions cannot help you, you also can try using this tool to get lost data back because it offers a feature called Bootable Media Builder which can help you recover data when your PC won’t boot.
Tip: Free edition doesn’t offer MiniTool Bootable Media Builder. It is recommended to choose the Personal or above editions to get it.
Now, let’s see the detailed steps to use it.
Free Download
1. Download and launch MiniTool Power Data Recovery on a working computer, and then click the Bootable Media button at the top toolbar to create a bootable CD, DVD, or USB flash drive.

2. Connect the burned bootable media to your unbootable PC and boot from the burned MiniTool bootable CD/DVD/USB Flash Drive.
3. Click MiniTool Power Data Recovery in the main interface of the MiniTool PE Loader interface.
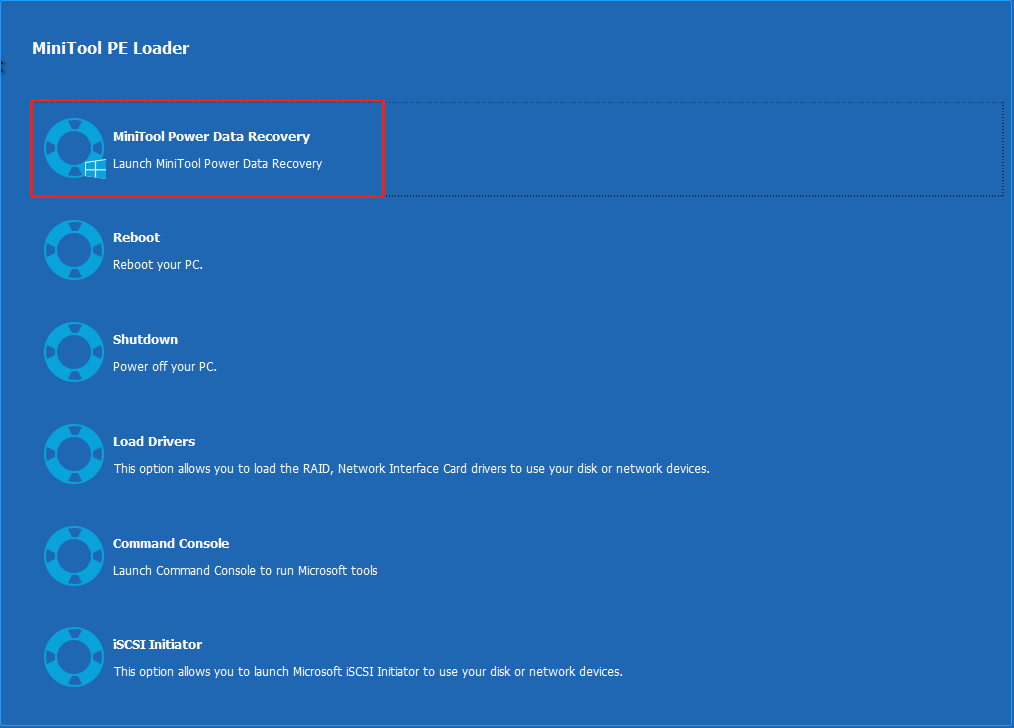
4. Now, you will see the main interface of this professional data recovery software, and then double-click the target drive to scan.

5. After scanning, check all needed files and click Save to save them in a safe place different from the original path.

Thus, all work has been done.
Bottom Line
Now you have probably learned everything about how to fix Windows Automatic Repair when it is not working.
If you still have any questions regarding this Windows Automatic Repair loop, please feel free to write them in the comment section or send your email to [email protected].
Windows 10 Startup Repair Not Working FAQ
How do you fix Windows 10 when it fails to boot?
- Repair MBR and Rebuild the BCD.
- Boot into Safe Mode and Run Command Prompt.
- Disable Early Launch Anti-Malware Protection.
- Delete the Problematic File.
- Disable Automatic Startup Repair.
- Perform Refresh or Reset.
How do I fix the windows automatic repair loop?
- Restart the PC.
- Restore Windows Registry.
- Delete the Problematic File.
- Disable Automatic Startup Repair.
- Run Bootrec Command to Rebuild Windows BCD.
- Restore the system and data recovery.
Why does my computer keep saying preparing automatic repair?
Automatic Repair can fix some PC issues when the computer cannot boot properly. However, sometimes it fails to work, and you will get stuck on a black screen with the «Preparing Automatic Repair» or «Diagnosing your PC» error message. HP, Lenovo, Asus, Dell, and Acer users are the most common victims of this issue — Laptop Stuck on Preparing Automatic Repair during Startup.
How do I get out of the automatic repair loop?
- Perform a hard reboot.
- Boot into safe mode.
- Extend system reserved partition.
- Rebuild BCD.
- Disable Automatic Repair at Windows 10 boot.
- Reinstall Windows and recover lost data.
Summary: Computer systems are vulnerable to many lurking errors. Even Windows 10, one of the most popular operating systems, isn’t safe from encountering several vexing issues. From BSOD (Blue Screen of Death) to booting problems, there are several technical issues a Windows PC can run into on any given day. Luckily, Microsoft has offered a dedicated Automatic Startup Repair feature to combat these types of technical errors to repair your system immediately. However, there are several scenarios when Automatic Startup Repair falls foul drastically of some errors and displays the message: Automatic Repair Couldn’t Repair Your PC. Hence, in this article, we will explain to you several solutions to this issue, as well as how to recover data via Bitwar Data Recovery quickly and easily.
WIN VERSION MAC VERSION
What Are the Possible Causes of This Issue?
First of all, let’s learn the causes that make the automatic startup repair tool fail and display the message on your screen. Here are a few reasons that might lead to the error:
- If the primary boot partition is corrupted due to some malware, the automatic startup repair tool may fail in fixing the error.
- In many cases, a BSOD error may need to be fixed manually by the user. These types of errors are so head-scratching that the computer is simply incapable of fixing them on its own.
It’s worth noting that, despite being an advanced OS, Windows is not capable of fixing all the issues. It means you might need to rely on some third-party tool, instead of the built-in Automatic Repair, to fix the error.
So, here’s a list of several effective solutions that’ll help you fix the automatic repair that couldn’t repair your PC issue.
How To Solve the Automatic Repair Cannot Repair Issue?
Solution 1: Use Command Prompt
Since Automatic Repair is a tool that usually deals with startup issues, it might be used to deal with your boot in order to fix this particular issue. There are several quite useful commands which might help you get rid of this error message and possibly even eliminate the option of fixing your PC at all.
Step 1: Navigate to the Windows login screen and click the Power button. Hold the shift key while clicking Restart in order to enter Boot Options.
Step 2: Navigate to Troubleshoot > Advanced options and click on Command Prompt.
Step 3: After the Command Prompt has opened, type in the following command lines and press Enter after each line.
bootrec.exe /rebuildbcd
bootrec.exe /fixmbr
bootrec.exe /fixboo
Step 4: Plenty of users reported that the aforementioned commands were able to fix the boot of their system and they successfully got rid of the Automatic Repair couldn’t repair your PC error once and for all. And since you are still in the Command Prompt, run the commands below to check your drives for errors.
Step 5: Note that the letters c and d, represent your hard drive partitions and the two letters are the usual ones for each computer. If you are not sure what your PC’s drive letters are, you can check them via Command Prompt by typing in the commands below and then pressing Enter after each one:
diskpart
DISKPART> list volume
Step 6: The commands above should display a list of all hard drive partitions available on your computer. Replace the letters corresponding to them with the ones in the example.
Solution 2: Troubleshoot in Safe Mode
There are other commands you can use in Command Prompt. You can try using these commands. But it would be better if you used them in Safe Mode because the error message you are dealing with is sometimes triggered by a faulty driver or a system file that might not show up if we did the scanning in normal boot.
Step 1: Restart your computer and wait for the boot window to appear. It’s usually the screen with your computer’s manufacturer with an option such as Press () to Run Setup.
Step 2: Right after the screen appears, press the F8 key. If the key doesn’t work, restart your computer again and then press the F5 key.
Step 3: The Windows Advanced Options Menu should appear and several options are presented for booting your computer.
Step 4: Click on Boot into Safe Mode with Command Prompt.
Step 5: As soon as Command Prompt appears, try typing in the following commands below to check your Windows image for errors and your system for any missing or broken files.
DISM /Online /Cleanup-Image /RestoreHealth
sfc /scannow
Step 6: Please allow these commands enough time to run and don’t interfere with them before they finish.
Solution 3: Disable Early Launch of Anti-Malware Protection
This solution is a fairly easy one. Please use the instructions below:
Step 1: Navigate to your Windows login screen and click the Power button. Press the shift key while clicking Restart to enter Boot Options.
Step 2: After the Boot Menu has opened, navigate to Troubleshoot > Advanced Options > Startup Settings.
Step 3: Your PC should restart and present a list of options for you to choose from.
Step 4: Select the number next to the Disable early launch anti-malware protection option and then reboot your computer.
Solution 4: Delete the File Causing These Issues
It’s quite possible that one of the files on your computer simply malfunctioned and now it’s causing problems with your PC which the Automatic Repair can’t deal with. If the file at hand is not a system file, you can locate it and delete it easily.
Step 1: Navigate to your Windows login screen and click on the Power button. Hold the shift key while clicking on Restart in order to enter Boot Options.
Step 2: When the Boot Menu opens, navigate to Troubleshoot > Advanced Options > Command Prompt.
Step 3: Type in the following commands into the Command Prompt window and then press Enter at the end of each line:
C:
cd WindowsSystem32LogFiles
Srt SrtTrail.tx
Step 4: Look for a message like the following one:
Boot critical file () is corrupt.
Step 5: Any file can be displayed in the message and you will have to delete those files that cause the issue if it’s not a system file. You could google the file name to learn whether it’s a system file.
Step 6: To delete the file, you need to navigate to its location via Command Prompt. For example, if the file stays in a folder called drivers in System32, you can locate it by typing in the following command:
cd c:windowssystem32drivers
Step 7: Delete the file by using the following command and then press Enter:
del errorfile.sys
Step 8: Reboot your computer, uninstall the program to which the corrupted file belonged to and check to check whether the issue is solved.
Solution 5: Disable Automatic Startup Repair
The Automatic Repair feature might have been enabled for no reason and it’s preventing you from using your computer properly. It might have something to do with a malfunctioning Automatic Startup Repair tool. Hence you could try to disable it:
Step 1: Navigate to your Windows login screen and click the Power button. Press the shift key while clicking Restart to enter Boot Options.
Step 2: After the Boot Menu has opened, navigate to Troubleshoot > Advanced Options > Command Prompt.
Step 3: When Command Prompt starts, type in the following command and then press Enter:
bcdedit /set {default} recovery enabled No
Step 4: Reboot your PC and check to see whether there are any changes.
Solution 6: Fix Your Registry Issues
Registry issues are always hard to handle, especially when they are triggering error messages like the one discussed in this article. Windows Registry is a vulnerable place and changing anything without supervision can result in irreversible changes to your computer. Fortunately, you can restore your registry to a previous state by importing a copy of the registry you have backed up before.
Step 1: Navigate to your Windows login screen and click the Power button. Press the shift key while clicking Restart to enter Boot Options.
Step 2: After the Boot Menu has opened, navigate to Troubleshoot > Advanced Options > Command Prompt.
Step 3: Type in the following command and then press Enter:
copy c:windowssystem32configRegBack* c:windowssystem32config
Step 4: If a message pops up asking whether you want to overwrite existing files, choose to overwrite all and then press Enter.
Step 5: Reboot your computer and check to see whether your issue has been solved.
Solution 7: Fix Your Automatic Repair Tool (Windows 10 Only)
If there is indeed some problem with your Automatic Repair Tool, you might be able to fix this issue by booting into Recovery mode with the help of a Windows 10 ISO file and launching Automatic Repair from there.
Step 1: Download the Windows 10 ISO and create a Media Creation Tool to launch Automatic Repair. Download and burn Windows ISO by using the instructions on Microsoft’s page.
Step 2: Connect the bootable media to your computer (DVD or USB drive) and reboot your PC.
Step 3: If a message pops up saying Press any key to boot from DVD/USB, please do so.
Step 4: After the Install Windows page has opened, click the Repair your computer option, which should open the Windows Recovery Environment.
Step 5: When the Windows Recovery Environment is ready, click the Troubleshoot option.
Step 6: Navigate to Advanced Options and then click Automatic Repair.
Step 7: Doing the aforementioned steps should allow you to open Automatic Repair from the bootable drive and fix the issue.
Solution 8: Hardware Issues
If you recently added any new hardware to your PC, it may have caused system instability and error messages such as the one discussed in this article. On the other hand, even your old devices such as hard drives may be causing this particular issue. In this case, let’ start diagnosing just what might be the culprits.
Step 1: Start off by disconnecting all external devices from your PC except your mouse and keyboard. If doing this solves your problem, reconnect the devices one by one to your PC and check which one may be the culprit.
Step 2: If your computer has more than one RAM stick, try removing one of them and rebooting your computer. If this fixes the issue, consider replacing the malfunctioning memory stick.
Step 3: Remove your external storage drives such as your Solid State Drive or your external HDD and check whether the issue is fixed.
Step 4: Replace or repair any of the devices that were faulty because booting your computer with this kind of faulty device connected only exacerbates the problem.
Solution 9: System Refresh or Reset
Unfortunately, if all of the methods mentioned above failed to fix the issue you were running into, your last resort may be to refresh your Windows installation or to carry out a complete reset of your system. Windows 10 has made things simpler for you since you can perform a refresh of your system without losing important files.
Step 1: Right-click on the Start menu and then select Settings.
Step 2: Click on the Update & security section and navigate to Recovery.
Step 3: Under the Reset, this PC title, click the Get started button.
Step 4: Click on the Keep my files option.
Step 5: Bear in mind that your apps and programs are going to be uninstalled so make sure that you back up important data.
Step 6: You can also use bootable Windows 10 ISO media to start with a clean version of Windows 10 but in this way, all your personal files and programs will be removed.
How To Recover Lost Data Using Bitwar Data Recovery?
As we mentioned earlier, there are several scenarios when even the automatic repair tool will fail to fix the specific issue. In this case, how can we recover your lost data? Bitwar Data Recovery is one such tool that can help you do so. Refer to the following steps to learn how it works.
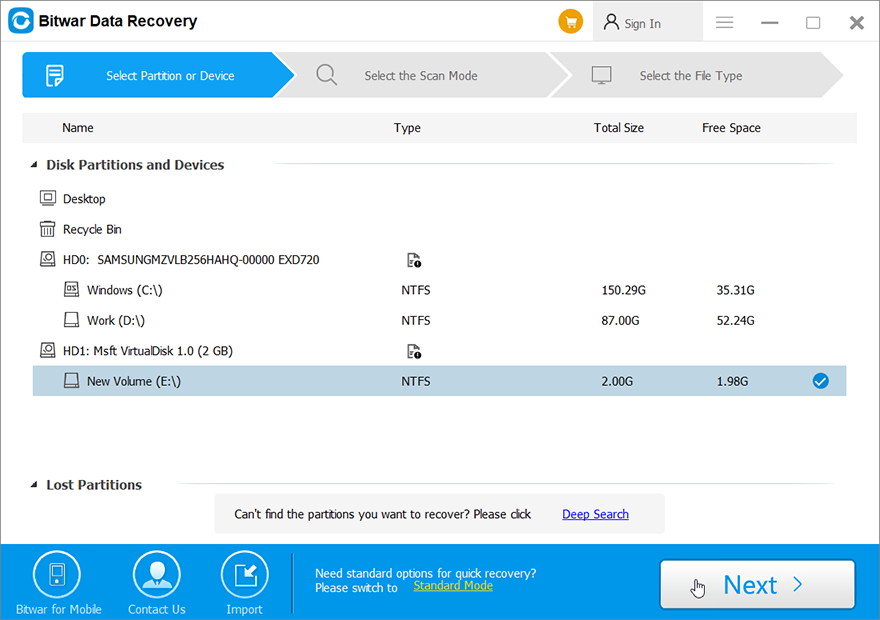
Step 1: Download Bitwar Data Recovery from our official website.
Step 2: After installing the software, open it, choose the drive where the lost files were stored, followed by clicking the Next button.
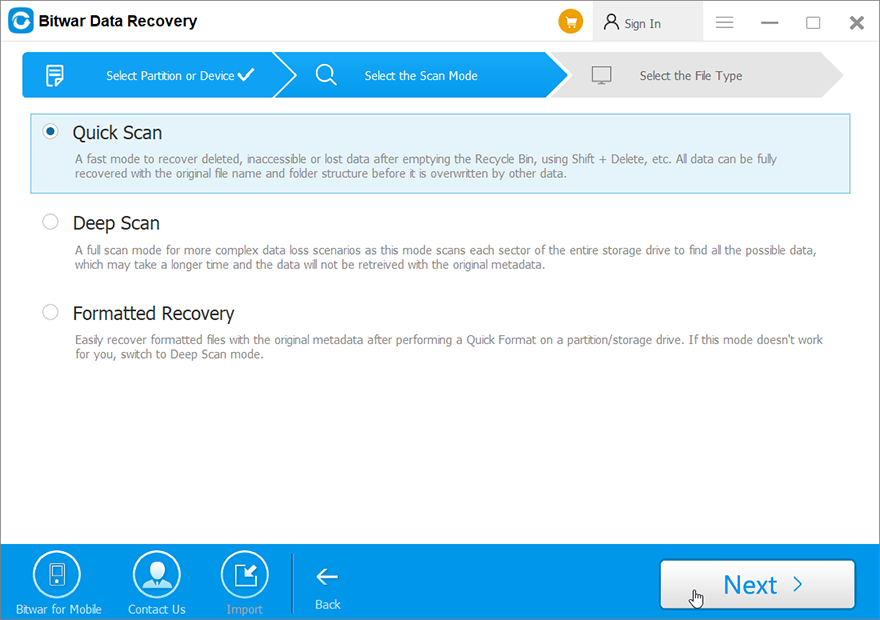
Step 3: Now, you can select a scan mode in this stage. We would like to recommend Quick Scan, which is capable of retrieving most of the lost files. If it fails to work, you could come back to this stage and then select Deep Scan.
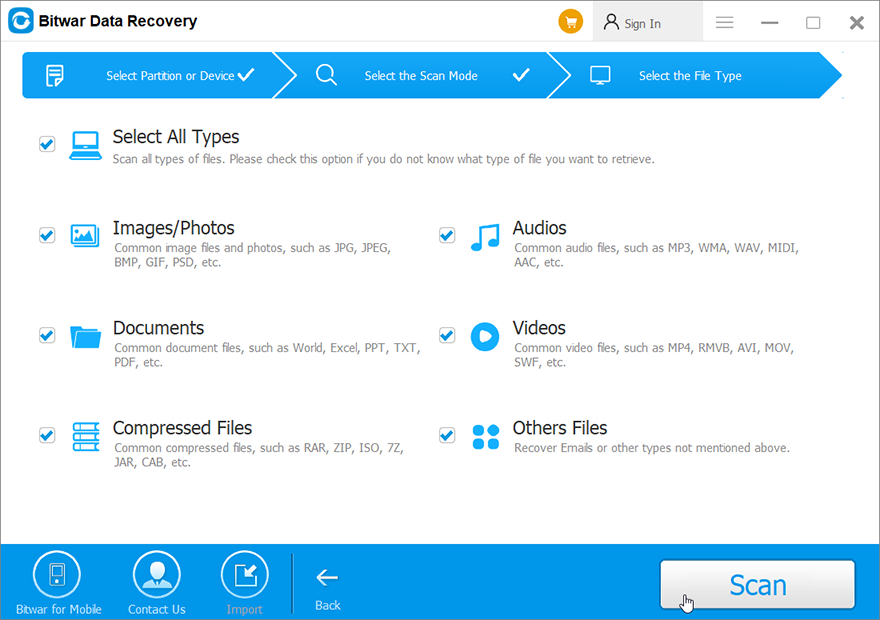
Step 4: Select the file types you want to recover and then press the Next button.
Step 5: At the end, preview the files you want and then press the Recover.
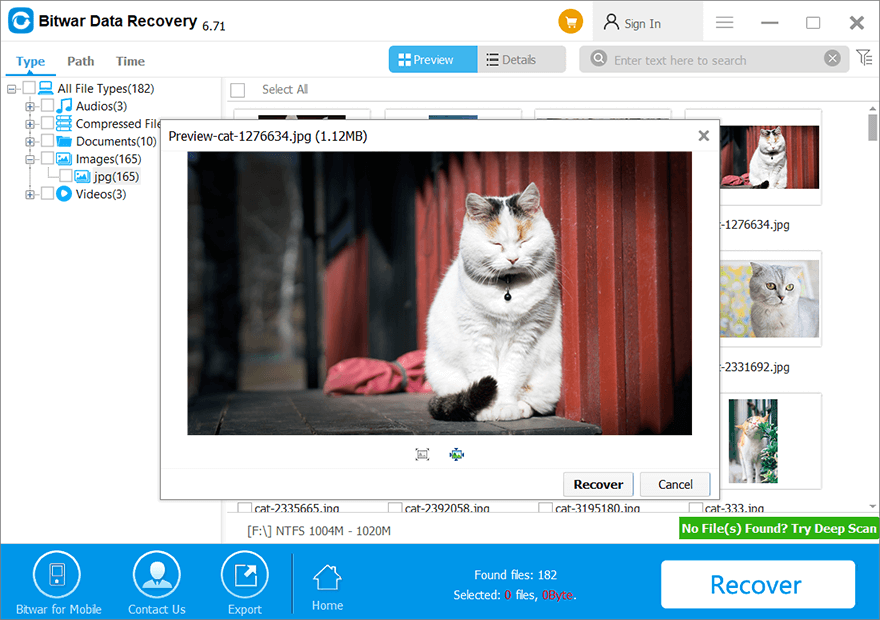
Note: Keep in mind that you shouldn’t put files to be recovered back to the origin drive.
Conclusion
To fix the automatic repair that couldn’t repair your PC error, you can use the solutions mentioned above. If you run into any data loss problems triggered by this issue, you must restore your valuable data with a professional data recovery software like Bitwar Data Recovery. This way, your data will be restored intact. Data recovery software is an indispensable tool as it safeguards your valuable data from virus attacks, system errors, hardware crashes, etc.
Read more:
- 4 Effective Solutions To Fix Bad System Config Info Error
- Effective Solutions to the kernel_security_check_failure Error
Содержание
- Способ 1: Сброс оперативной памяти и BIOS
- Способ 2: Восстановление запуска
- Способ 3: Отключение автоматического запуска восстановления Windows
- Способ 4: Обновление драйверов
- Способ 5: Восстановление системных компонентов
- Вопросы и ответы
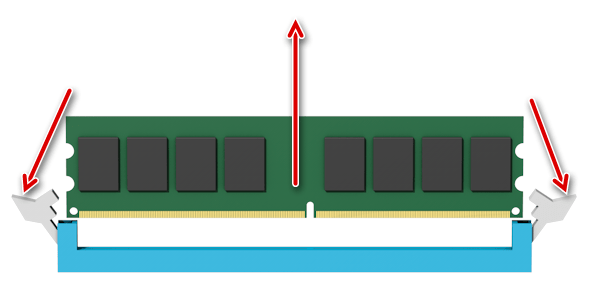
Способ 1: Сброс оперативной памяти и BIOS
Иногда проблемы с автоматическим восстановлением системы связаны со сбоями, появляющимися из-за настроек BIOS или заполненности кеша оперативной памяти. Это не самая распространенная причина, однако ее решение самое простое, поэтому и поговорим о нем в первую очередь. Сначала разберите компьютер и поменяйте планки оперативной памяти местами. Если к материнской плате подключена только одна, установите ее в другой свободный разъем. Детальные инструкции по этой теме вы найдете в другой статье на нашем сайте, перейдя по следующей ссылке.
Подробнее: Устанавливаем модули оперативной памяти
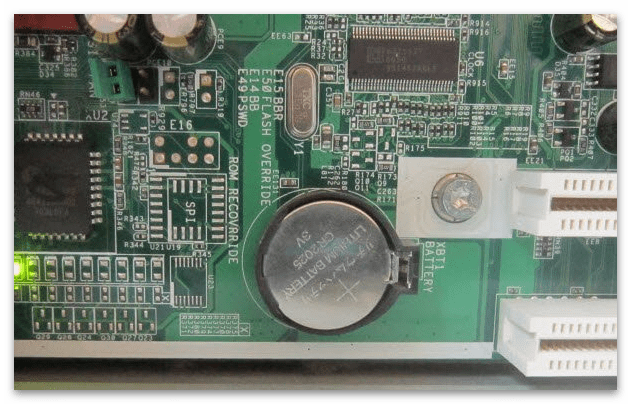
Попробуйте сразу запустить компьютер или параллельно со сбросом кеша ОЗУ вытащить и батарейку на материнской плате и через несколько секунд вставить ее обратно. Такое действие сбросит настройки BIOS и позволит загрузиться компьютеру в «чистом» виде. Не забудьте только отключить питание от системного блока перед тем, как разбирать компьютер и взаимодействовать с комплектующими.
Подробнее: Замена батарейки на материнской плате
Способ 2: Восстановление запуска
Одна из самых частых проблем, из-за которой появляется ошибка «Не удалось восстановить компьютер» — неполадки при загрузке операционной системы. Они могут быть связаны как с загрузчиком, так и с другими компонентами, поэтому каждое решение придется перебирать вручную. Если у вас под рукой уже есть загрузочная флешка или диск с ОС, пропустите первую часть инструкции, в противном случае воспользуйтесь другим рабочим ПК, где выполните такие действия:
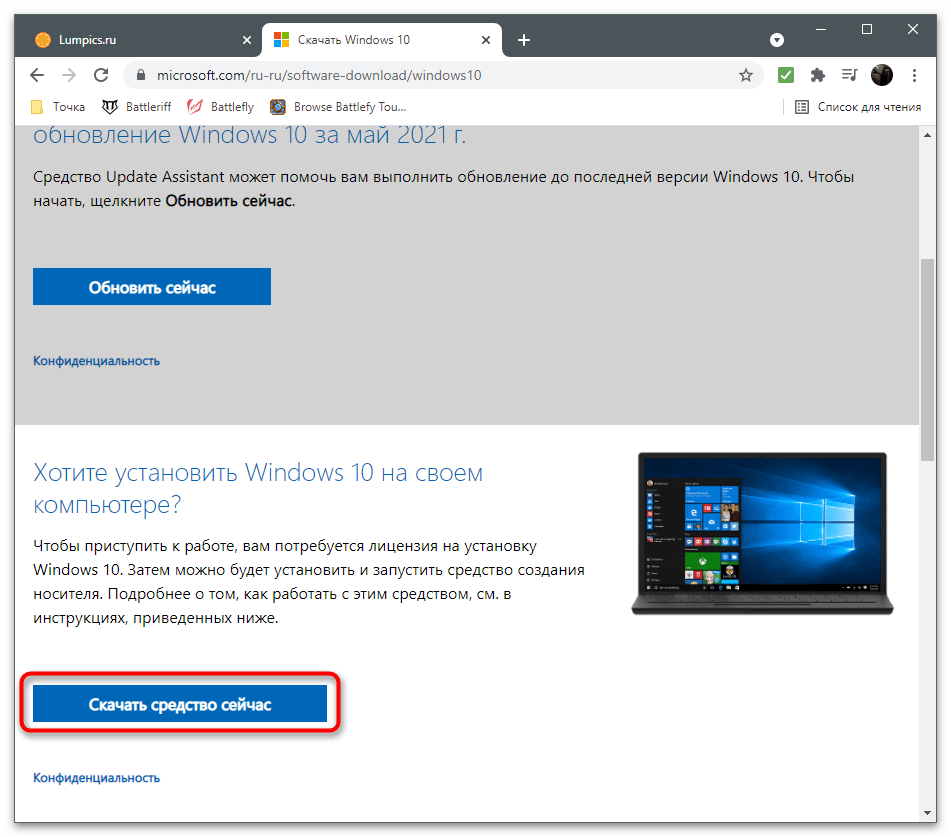
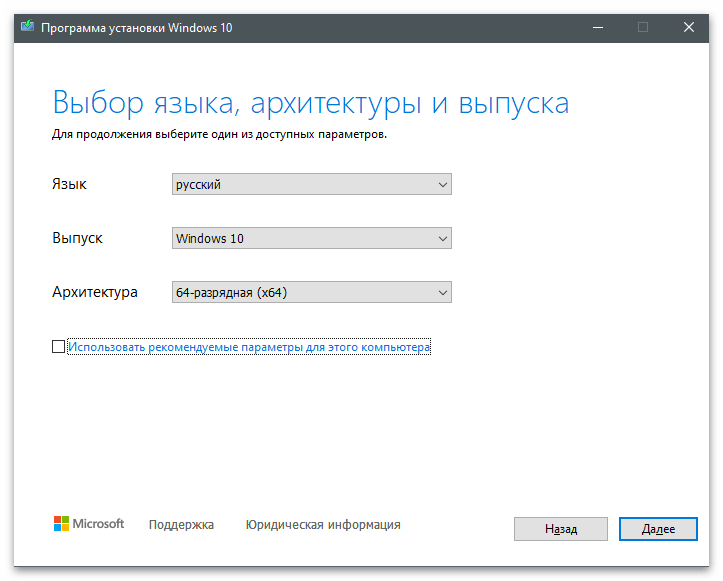
- Сейчас больше всего актуальна Windows 10, поэтому разберем руководство на примере этой версии операционной системы. Перейдите по следующей ссылке и скачайте средство создания носителя, нажав по соответствующей кнопке на сайте.
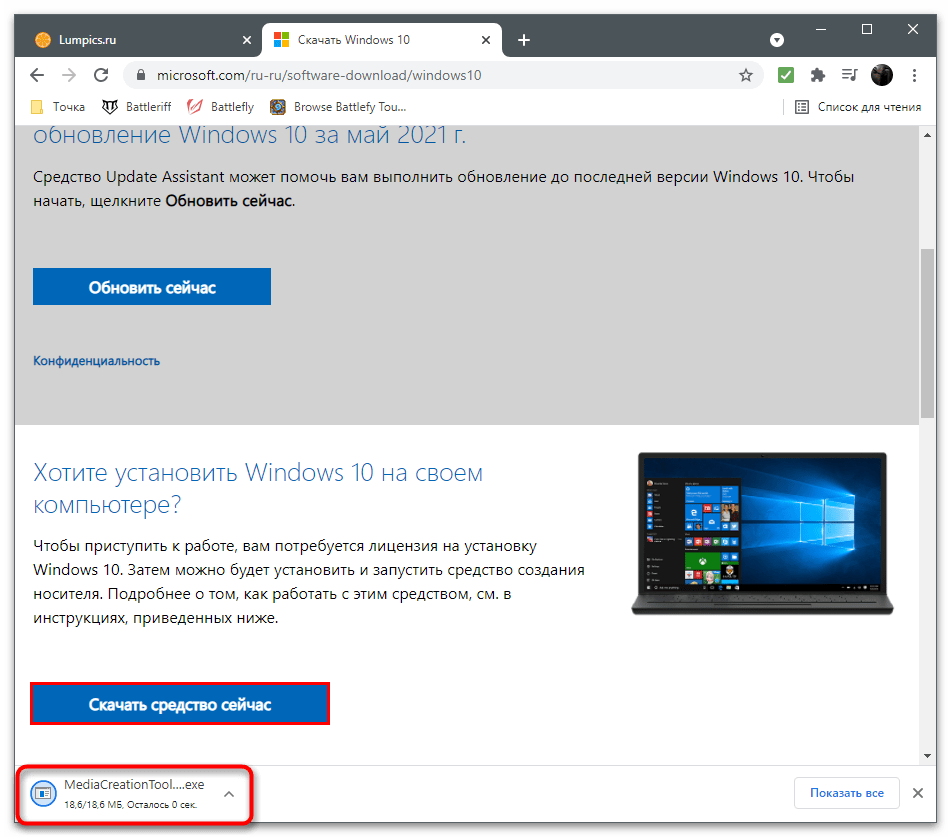
Скачать средство создания носителя Windows 10 с официального сайта
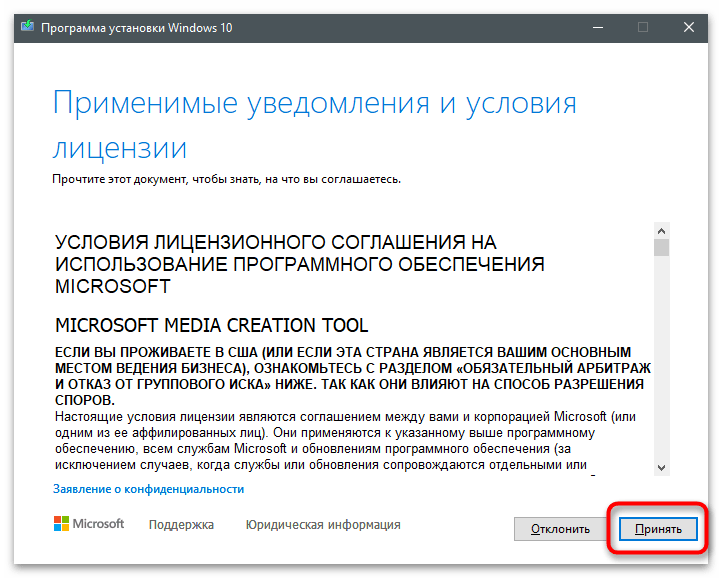
- Запустите полученный исполняемый файл.
- Примите условия лицензионного соглашения и переходите к следующему шагу.
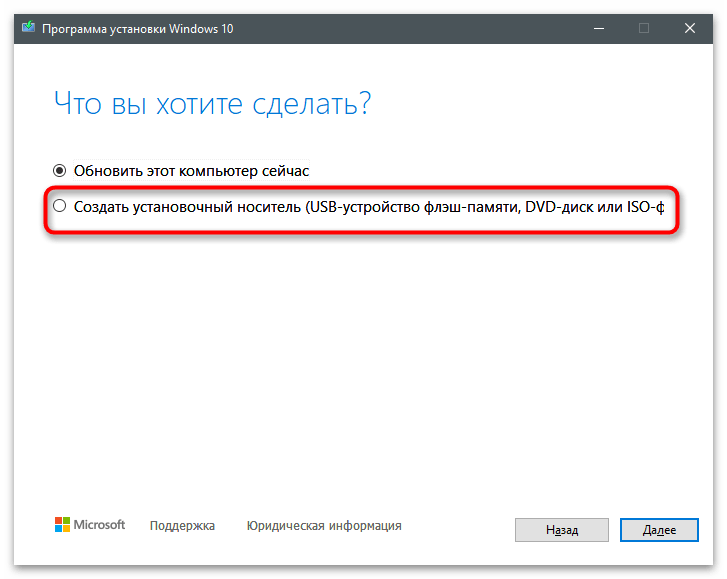
- Отметьте маркером пункт «Создать установочный носитель (USB-устройство флеш-памяти, DVD-диск или ISO-файл)».
- В следующем шаге используйте рекомендуемые параметры, поскольку в этом случае они ни на что не повлияют.
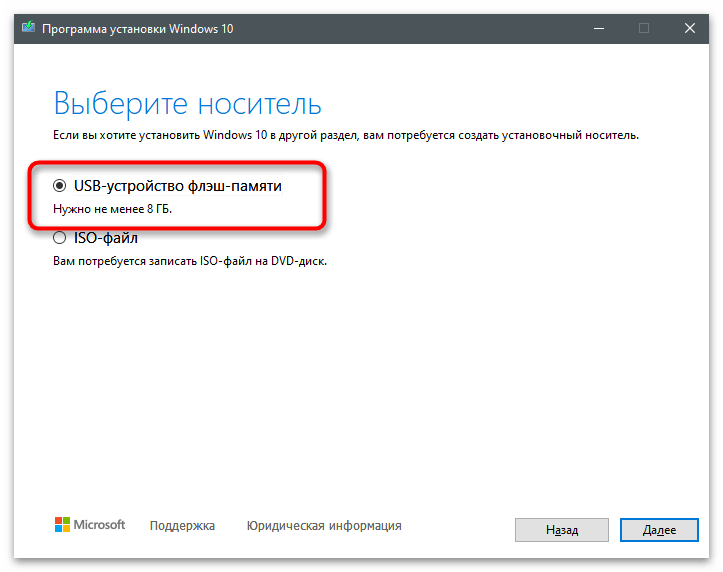
- Выберите тип записи «USB-устройство флеш-памяти».
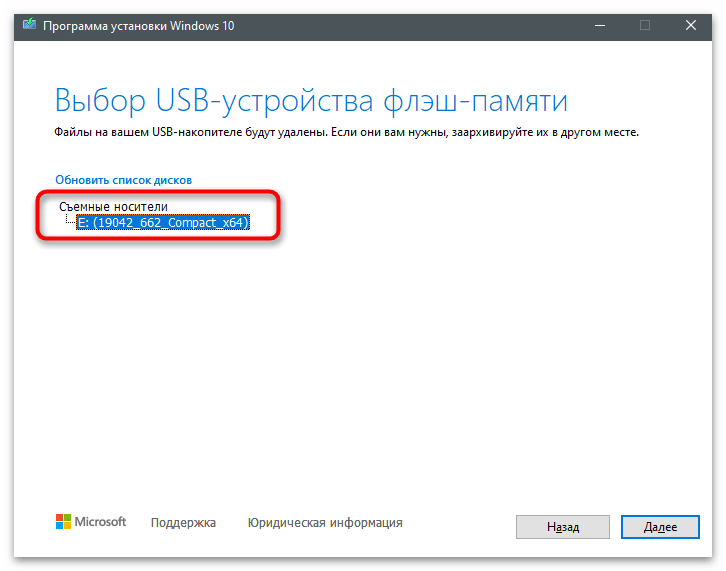
- Подключите к компьютеру любую флешку с объемом не менее 8 ГБ. Убедитесь в том, что на ней отсутствуют важные файлы, поскольку носитель будет форматирован. Выберите его из списка дисков в окне создания носителя, после чего запустите процесс записи и дождитесь его окончания.

Обладателям других версий Windows или тем, кому не подходит описанное выше средство, придется создавать загрузочную флешку при помощи других программ, предварительно получив на свой компьютер ISO-образ с операционной системой, скачав его с официального сайта или других источников. Вспомогательные инструкции по данной теме вы найдете в материале от другого нашего автора.
Подробнее: Инструкция по созданию загрузочной флешки на Windows
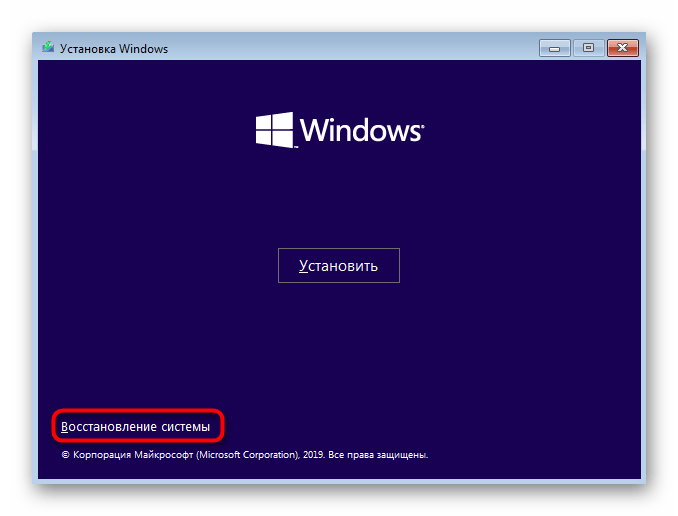
Теперь, когда носитель с операционной системой готов, можно приступать к восстановлению важных для загрузки компонентов. Выключите компьютер, оставьте флешку подсоединенной, после чего повторно включите устройство и выполните следующие шаги:
- Выберите вариант загрузки с флешки, если этого не произошло автоматически. В случае возникновения проблем с запуском установщика (когда не появляется экран выбора и стартует установленная Виндовс) прочитайте статью о том, как осуществляется запуск с подобных носителей.
Подробнее: Настраиваем BIOS для загрузки с флешки
- После загрузки установщика кликните по ссылке «Восстановление системы».
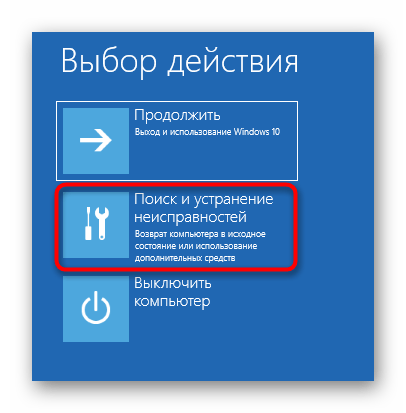
- Перейдите в раздел «Поиск и устранение неисправностей».
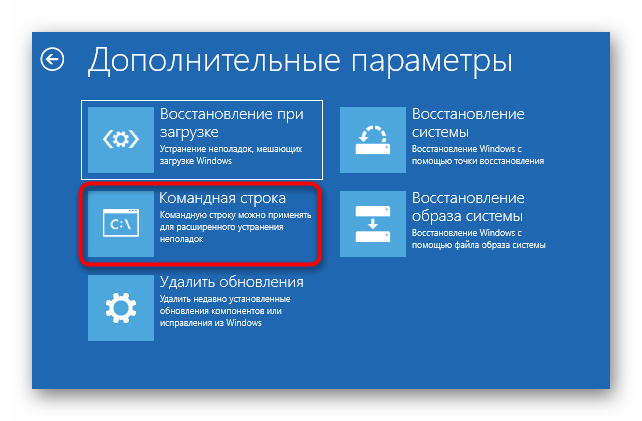
- Запустите «Командную строку», нажав по плитке с соответствующим названием.
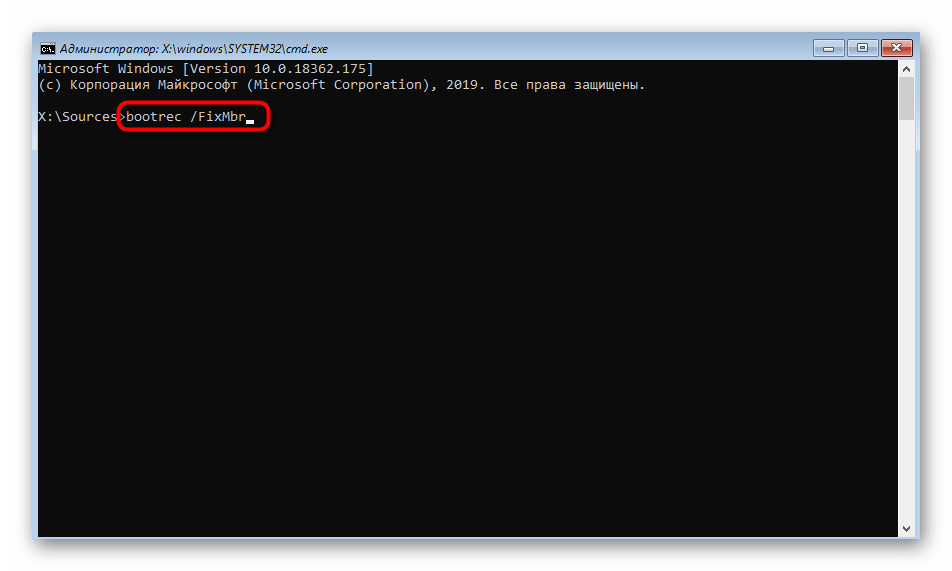
- В консоли поочередно введите команды ниже, нажимая Enter после каждой для активации:
bootrec /rebuildbcd

bootrec /fixmbr

bootrec /fixboot

bootsect /nt60 SYS

bootsect /nt60 ALL

По завершении перезагрузите компьютер в штатном режиме, предварительно вынув загрузочную флешку. Если процесс восстановления все еще не удался, переходите к следующему способу данной статьи.
Способ 3: Отключение автоматического запуска восстановления Windows
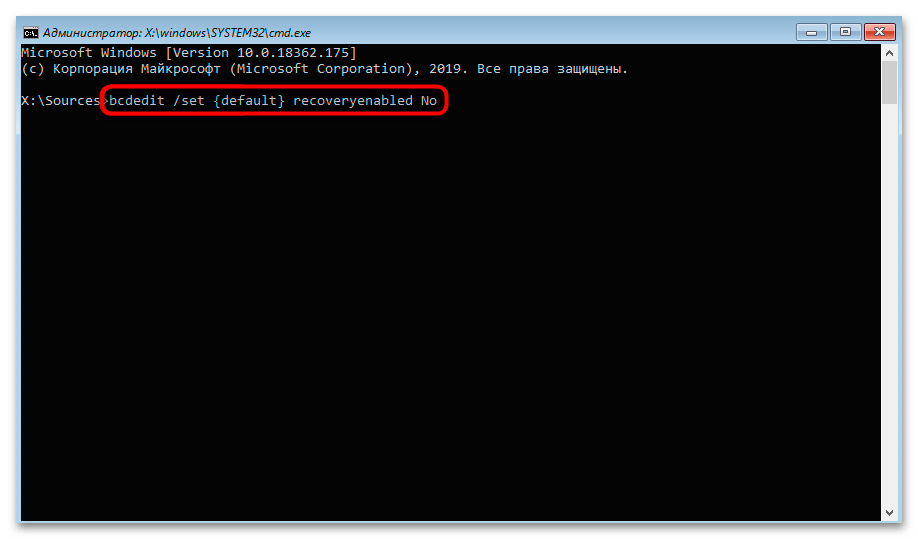
Иногда сама операционная система может работать нормально, а проблемы наблюдаются непосредственно со средством восстановления, что чаще всего происходит после установки обновлений или новых версий драйверов. В данном случае помогает отключение данного средства собственными силами. Для этого вам придется обратиться к предыдущим инструкциям, чтобы зайти в «Командную строку» в окне восстановления системы. В ней остается ввести bcdedit /set {default} recoveryenabled No и нажать Enter для применения команды.
Способ 4: Обновление драйверов
Как уже было сказано ранее, проблема с восстановлением системы может появиться сразу после обновления некоторых драйверов, что часто происходит в автоматическом режиме. Иногда апдейт прерывается или завершается только для некоторых устройств, оставляя остальные драйверы необновленными. Исправляется эта ситуация самостоятельным обновлением драйверов для каждого комплектующего и периферийного оборудования (да, даже из-за драйвера клавиатуры или мышки уже может возникнуть рассматриваемая неприятность).
- Поскольку сейчас ОС не запускается в штатном режиме, придется переключиться на безопасный, о чем более детально написано в материале по ссылке ниже. При этом важно выбрать вариант с загрузкой сетевых драйверов, поскольку понадобится подключение к сети для выполнения дальнейших действий.
Подробнее: Безопасный режим в Windows 10
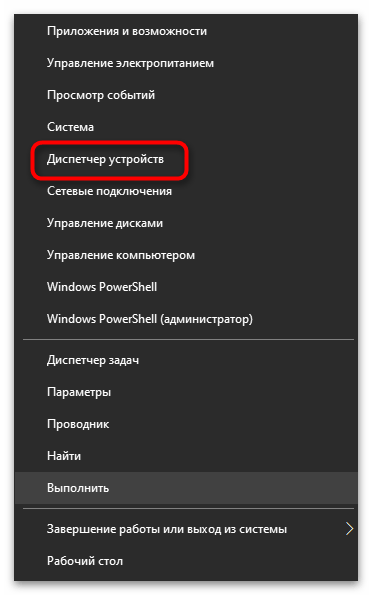
- После запуска Виндовс кликните по кнопке «Пуск» правой кнопкой мыши и из появившегося меню выберите вариант «Диспетчер устройств».
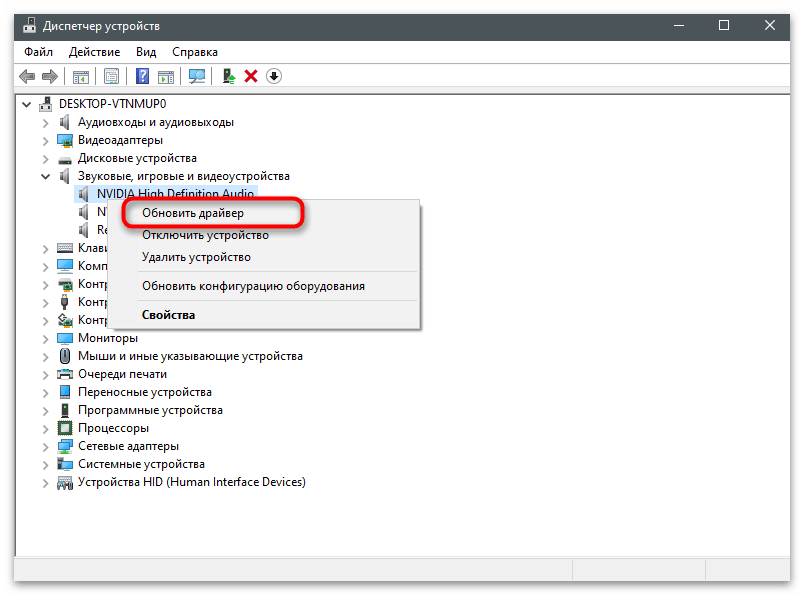
- Ознакомьтесь со списком оборудования и начните открывать разделы с каждым используемым.
- Нажмите по строке правой кнопкой мыши и выберите пункт «Обновить драйвер», запустив после этого автоматический поиск обновлений.


Вы можете использовать и другие средства для обновления драйверов: фирменные программы от разработчиков, официальные сайты или сторонние программы.
Подробнее: Как обновить драйверы на компьютере
Способ 5: Восстановление системных компонентов
В завершение разберем метод, подразумевающий восстановление основных системных компонентов, если вдруг ошибки с восстановлением как раз и связаны с нарушением целостности файлов операционной системы. Для выполнения следующих рекомендаций нужно загрузиться в безопасном режиме, о чем написано в предыдущем методе.
- После этого запустите «Командную строку» через «Пуск» или любым удобным для вас образом.
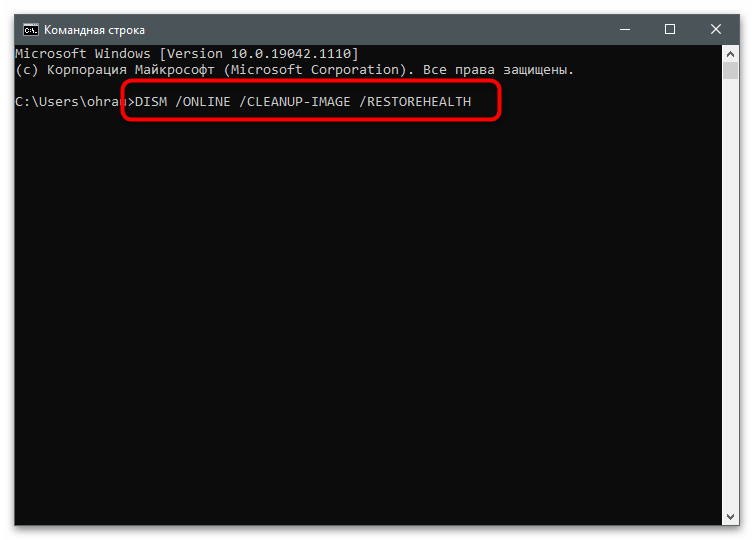
- Введите команду
dism /Online /Cleanup-Image /CheckHealth, которая проверит целостность системных файлов и восстановит их, если проблемы будут найдены. Более развернуто о данной консольной утилите читайте в другом материале далее.Подробнее: Использование и восстановление проверки целостности системных файлов в Windows 10
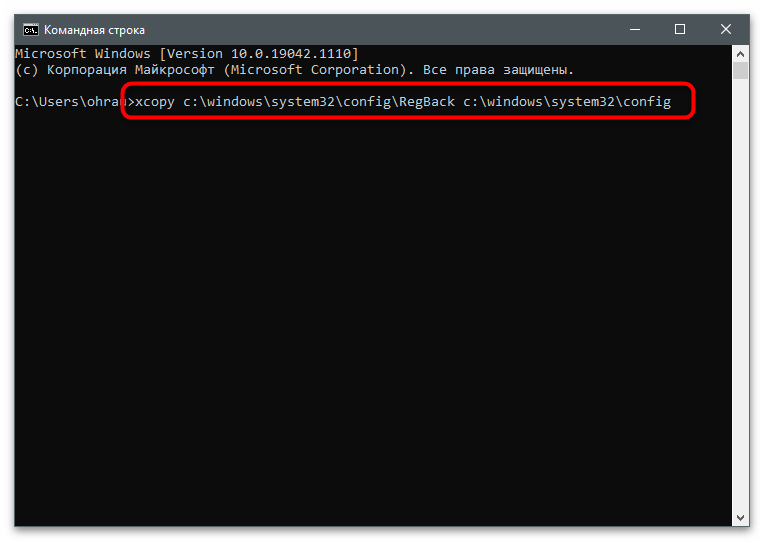
- После завершения сканирования вы можете сразу перезагрузить компьютер, проверяя результаты действий, либо использовать другую команду:
xcopy c:windowssystem32configRegBack c:windowssystem32config, чтобы вернуть базовые параметры реестра, исправив тем самым возможные ошибки.


Если вы столкнулись с проблемами на своем компьютере под управлением Windows 10, и вы или ОС решили запустить «Восстановление при запуске» — и если «Запуск ремонта» не удается, вы можете получить экран со следующим сообщением — Автоматический запуск не смог восстановить ваш компьютер, Полное сообщение об ошибке читается следующим образом:
Automatic/Startup Repair couldn’t repair your PC . Press “Advanced options” to try other options to repair your PC or “Shut Down” to turn off your PC. Log file: C:WindowsSystem32LogfilesSrtSrtTrail.txt

Автоматический ремонт не смог восстановить ваш компьютер
Если вы попадете в эту ситуацию, вот несколько вещей, которые вы могли бы попробовать. Сначала просмотрите весь список, а затем решите, какие предложения могут применяться в вашем случае, и какие из них вы хотели бы попробовать.
Прежде чем приступить к проверке, этот файл журнала может дать вам представление об ошибке:
C:WindowsSystem32LogfilesSrtSrtTrail.txt
1] Восстановить BCD и ремонт MBR
Вам необходимо перестроить файл данных конфигурации загрузки и восстановить файл главной загрузочной записи. Для этого нажмите Расширенные настройки и затем выберите Командная строка, После этого ваша система запросит пароль. После ввода команды вы найдете подсказку прямо на экране. Введите один из следующих команд:
bootrec.exe /rebuildbcd bootrec.exe /fixmbr bootrec.exe /fixboot
Эти команды исправят проблемы Boot Sector. После запуска этих команд проверьте, можете ли вы начать нормально или нет.
2] Выполнить chkdsk
Проверка диска на наличие ошибок может быть хорошей идеей. Поэтому снова откройте окна командной строки, как описано выше, и запустите следующую команду и посмотрите, помогает ли это:
chkdsk /r c:
Для вашей информации команда будет проверять и исправлять проблемы только вашего привода C.
3] Используйте инструмент DISM в безопасном режиме
Загрузите Windows 10 в безопасном режиме, откройте командную строку с правами администратора и запустите DISM, чтобы восстановить системный образ:
DISM /Online /Cleanup-Image /RestoreHealth
Эта команда будет использовать Управление развертыванием и обслуживанием развертывания инструмент для сканирования возможного повреждения. Для вашей информации для выполнения этой команды требуется некоторое время, поэтому не закрывайте окно.
4] Отключить защиту от вредоносного ПО раннего запуска
Если вы столкнулись с этими проблемами после установки антивирусной программы, это решение исправит ее. После нажатия «Дополнительные параметры» нажмите «Устранение неполадок»> «Дополнительные параметры»> «Параметры запуска».
На Настройки запуска страницы, нажмите Запустить снова кнопка.
Вы будете перезапущены на этом экране. Вам нужно нажать клавишу «8» на клавиатуре, чтобы выбрать Отключить настройку защиты от раннего запуска антивирусной защиты.

Ваша система начнет это через несколько минут.
5] Отключить автоматическое восстановление при запуске
При возникновении проблемы, связанной с системным диском, автоматически открывается окно автоматического восстановления при загрузке. Если вы считаете, что находитесь в такой ситуации, вы можете отключить автоматическое восстановление при запуске. Вам нужно нажать «Устранение неполадок»> «Дополнительные параметры»> «Командная строка» и выполнить следующую команду:
bcdedit /set recoveryenabled NO
Перезагрузите компьютер и посмотрите.
6] Восстановить реестр из каталога RegBack
Иногда неправильное значение реестра может создать эту проблему. Посмотрите, поможет ли вам восстановление реестра. Для этого откройте командную строку из Расширенные настройки, и выполните следующие команды:
copy c:windowssystem32configRegBack* c:windowssystem32config
Вас спросят, хотите ли вы перезаписать все файлы или частично. Вы должны ввести Все и нажмите кнопку «Ввод». После этого вам необходимо перезагрузить компьютер и проверить, остается ли проблема или нет.
7] Сброс этого ПК
Этот параметр в Windows 10 помогает пользователям получить заводские настройки без удаления личных файлов. Используйте опцию «Сброс этого ПК» в меню «Устранение неполадок» в качестве последнего параметра.
Есть еще несколько вещей, которые вы могли бы попробовать, и это на самом деле связано с вашим оборудованием.
- Отключите и снова подключите жесткий диск
- Повторно подключить ОЗУ
- Отключите все внешние устройства.
Всего наилучшего!
Связанное чтение: Не удалось выполнить автоматический автоматический запуск Windows 10.
Tweet
Share
Link
Plus
Send
Send
Pin

How to Fix Automatic Repair couldn’t repair your PC: Windows 10 is the latest operating system offered by Microsoft and with each Windows upgrade Microsoft is trying their best to overcome the limitation and shortcomings of various issues found in earlier versions of Windows. But there are some errors that are common to all versions of Windows including boot failure being the major one. Boot failure can happen with any version of Windows including Windows 10.
Automatic repair is generally able to fix the boot failure error, this is a built-in option that comes along with Windows itself. When Windows 10 running system fails to boot, the Automatic Repair option tries to repair Windows automatically. In most cases, automatic repair fixes various issues related to boot failures but like any other program, it also has its limitations, and sometimes Automatic Repair fails to work.
Automatic Repair fails because there are some errors or corrupted or missing files in your operating system installation that prevent Windows from starting correctly and if Automatic Repair fails then you won’t be able to get into Safe Mode. Often a failed automatic repair option will show you some kind of error message like this one:
Automatic Repair couldn't repair your PC.
Press "Advanced options" to try other options to repair your PC or "Shut down" to turn off your PC.
Log file: C:WINDOWSSystem32LogfilesSrtSrtTrail.txt
In a situation when Automatic Repair couldn’t repair your PC, Bootable installation media or Recovery Drive/System Repair Disc are helpful in such cases. Let’s get started and see step by step how you can fix Automatic Repair couldn’t repair your PC error.
Note: For each and every step below you need to have Bootable installation media or Recovery Drive/System Repair Disc and if you don’t have one then create one. If you don’t want to download the entire OS from the website then you use your friend’s PC to create the disc using this link or you need to download official Windows 10 ISO but for that, you need to have a working internet connection and PC.
IMPORTANT: Never convert a Basic disk that contains your operating system to a Dynamic disk, as it could make your system unbootable.
Contents
- How to open Command Prompt at Boot in Windows 10
- Fix Automatic Repair couldn’t repair your PC
- Method 1: Fix boot and rebuild BCD
- Method 2: Use Diskpart to fix corrupted file system
- Method 3: Use Check Disk Utility
- Method 4: Recover Windows registry
- Method 5: Repair Windows Image
- Method 6: Delete the problematic file
- Method 7: Disable Automatic Startup Repair Loop
- Method 8: Set correct values of device partition and osdevice partition
- Method 9: Disable driver signature enforcement
- Method 10: Last option is to perform Refresh or Reset
How to open Command Prompt at Boot in Windows 10
NOTE: You need to open Command Prompt at Boot a lot in order to fix various issues.
a) Put in the Windows installation media or Recovery Drive/System Repair Disc and select your language preferences, and click Next.

b) Click Repair your computer at the bottom.

c) Now choose Troubleshoot and then Advanced Options.

d) Select Command Prompt (With networking) from the list of options.

Important Disclaimer:
These are very advanced tutorial, if you don’t know what you’re doing then you may accidentally harm your PC or perform some steps incorrectly that will ultimately make your PC unable to boot to Windows. So if you don’t know what you’re doing, please take help from any technician or expert supervision is recommended.
Method 1: Fix boot and rebuild BCD
1. Open the Command prompt and type the following commands one by one & hit enter:
bootrec.exe /rebuildbcd
bootrec.exe /fixmbr
bootrec.exe /fixboot

2. After completing each command successfully type exit.
3. Restart your PC to see if you boot to windows.
4. If you get an error in the above method then try this:
bootsect /ntfs60 C: (replace the drive letter with your boot drive letter)

5. And again try the above commands which failed earlier.
Method 2: Use Diskpart to fix corrupted file system
1. Again go to Command Prompt and type: diskpart
2. Now type these commands in Diskpart: (don’t type DISKPART)
DISKPART> select disk 1
DISKPART> select partition 1
DISKPART> active
DISKPART> extend filesystem
DISKPART> exit

3. Now type the following command:
 bootrec.exe /rebuildbcd
 bootrec.exe /fixmbr
 bootrec.exe /fixboot
4. Restart to apply changes and see if you’re able to fix Automatic Repair couldn’t repair your PC error.
Method 3: Use Check Disk Utility
1. Go to command prompt and type the following: chkdsk /f /r C:

2. Now restart your PC to see if the problem is fixed or not.
Method 4: Recover Windows registry
1. Enter the installation or recovery media and boot from it.
2. Select your language preferences and click next.
3. After selecting language press Shift + F10 to command prompt.
4. Type the following command in the Command Prompt:
cd C:windowssystem32logfilessrt (change your drive letter accordingly)

5. Now type this to open the file in notepad: SrtTrail.txt
6. Press CTRL + O then from file type select “All files” and navigate to C:windowssystem32 then right-click CMD and select Run as administrator.

7. Type the following command in cmd: cd C:windowssystem32config
8. Rename Default, Software, SAM, System, and Security files to .bak to back up those files.
9. To do so type the following command:
rename DEFAULT DEFAULT.bak
rename SAM SAM.bak
rename SECURITY SECURITY.bak
rename SOFTWARE SOFTWARE.bak
rename SYSTEM SYSTEM.bak

10. Now type the following command in cmd:
copy c:windowssystem32configRegBack c:windowssystem32config
11. Restart your PC to see if you can boot to Windows.
Method 5: Repair Windows Image
1. Open Command Prompt and enter the following command:
DISM /Online /Cleanup-Image /RestoreHealth

2. Press enter to run the above command and wait for the process to complete, usually, it takes 15-20 minutes.
NOTE: If the above command doesn’t work then try this: Dism /Image:C:offline /Cleanup-Image /RestoreHealth /Source:c:testmountwindows or Dism /Online /Cleanup-Image /RestoreHealth /Source:c:testmountwindows /LimitAccess
3. After the process is completed restart your PC.
4. Reinstall all the windows drivers and fix Automatic Repair couldn’t repair your PC error.
Method 6: Delete the problematic file
1. Access Command Prompt again and enter the following command:
cd C:WindowsSystem32LogFilesSrt
SrtTrail.txt

2. When the file opens you should see something like this:
Boot critical file c:windowssystem32driverstmel.sys is corrupt.

3. Delete the problematic file by entering the following command in cmd:
cd c:windowssystem32drivers
del tmel.sys

NOTE: Don’t delete drivers which are essential for windows to load the operating system
4. Restart to see if the issue is fixed if not continue to the next method.
Method 7: Disable Automatic Startup Repair Loop
1. Open Command Prompt and enter the following command:
NOTE: Only disable if you are in Automatic Startup Repair Loop
bcdedit /set {default} recoveryenabled No

2. Restart and Automatic Startup Repair should be disabled.
3. If you need to again enable it, enter the following command in cmd:
bcdedit /set {default} recoveryenabled Yes
4. Reboot to apply changes.
Method 8: Set correct values of device partition and osdevice partition
1. In Command Prompt type the following and press enter: bcdedit

2. Now find the values of device partition and osdevice partition and make sure their values are correct or set to correct partition.
3. By default value is C: because Windows comes pre-installed on this partition only.
4. If by any reason it is changed to any other drive then enter the following commands and press Enter after each one:
bcdedit /set {default} device partition=c:
bcdedit /set {default} osdevice partition=c:

Note: If you have installed your windows on any other drive make sure you use that one instead of C:
5. Reboot your PC to save changes and fix Automatic Repair couldn’t repair your PC error.
Method 9: Disable driver signature enforcement
1. Put in the Windows installation media or Recovery Drive/System Repair Disc and select your language preferences, and click Next.
2. Click Repair your computer at the bottom.
3. Now choose Troubleshoot and then Advanced Options.
4. Choose Startup Settings.

5. Restart your PC and press the number 7 (If 7 isn’t working then relaunch the process and try different numbers).

Method 10: Last option is to perform Refresh or Reset
Again insert Windows 10 ISO then select your language preferences and click Repair your computer at the bottom.
1. Choose Troubleshooting when the Boot menu appears.

2. Now choose between the option Refresh or Reset.

3. Follow the on-screen instructions to complete the Reset or Refresh.
4. Make sure you have the latest OS disc (preferably Windows 10) in order to complete this process.
Recommended for you:
- How to fix Server’s certificate has been revoked in chrome
- Fix ERR_TUNNEL_CONNECTION_FAILED error in Google Chrome
- Fix Error Code 0x80070002 The system cannot find the file specified
- How to fix Audio services not responding in Windows 10
By now you must have successfully fix Automatic Repair couldn’t repair your PC but if you still have any questions regarding this guide please feel free to ask them in the comment section.