I originally wrote this blog post when System Center 2012 R2 Configuration Manager’s (SCCM) Role-Based Administration (RBA) feature was relatively new. Since then, RBA is now widely used, so I thought that the time was right to re-visit this post. Here I’ll demonstrate how to add a SQL Server Reporting Services (SSRS) execution or computer account to the Windows Authorization Access Group. Doing this will allow SCCM’s RBA feature to work correctly with MEMCM / SCCM security users and roles.
In order for MEMCM / SCCM to use the RBA feature within SSRS, the SSRS execution or computer account needs to determine who is running the report. Then it determines what SCCM rights the user has before displaying the report results.
In some cases, however, after upgrading to SCCM Current Branch, when you run a SSRS report you may receive the following error message:
The DefaultValue expression for the report parameter ‘UserTokenSIDs’ contains an error: The specified directory service attribute or value does not exist.
The solution to this problem is to add the execution or computer account to the Windows Authorization Access Group (Active Directory (AD) security group). The online documentation for Windows Authorization Access Group says:
Members of this group have access to the computed token GroupsGlobalAndUniversal attribute on User objects. Some applications have features that read the token-groups-global-and-universal (TGGAU) attribute on user account objects or on computer account objects in Active Directory Domain Services. Some Win32 functions make it easier to read the TGGAU attribute. Applications that read this attribute or that call an API (referred to as a function) that reads this attribute do not succeed if the calling security context does not have access to the attribute. This group appears as a SID until the domain controller is made the primary domain controller and it holds the operations master role (also known as flexible single master operations or FSMO).
In MEMCM / SCCM terms this means that the SSRS execution account will be allowed to query for the, “…token GroupsGlobalAndUniversal attribute, this token is used to determine who is running the reports and therefore using RBA it can check to see what SCCM objects (Collections, Software Update groups, etc.) the user executing the SSRS is allowed to access.”
Below are the steps and my screenshots from the original blog post. Even though I was using SCCM 2012 R2 at the time, the steps are still the same with Current Branch.

Open Active Directory Users and Computers (ADUC), and browse to the Builtin container. Double-click on the Windows Authorization Access Group.

Click on the Members tab.

Click Add…

Add the execution or computer account and click OK twice to return back to the ADUC.
From this point forward the MEMCM / SCCM SSRS account will be able to read the access token from AD and the reports will work correctly.
If you have any questions, please feel free to contact me @GarthMJ.
Do you have an idea for a blog post about a System Center Configuration Manager (SCCM / MEMCM) query or reporting topic? Let me know. Your idea might become the focus of my next blog post!
Additional Resources
Learn more about how to successfully use MEMCM / SCCM through our many posts dedicated to Systems Management:
MEMCM / SCCM Overview
- MEMCM / SCCM Overview
External Integration
- How to Integrate SCCM Data with ServiceNow
Inventory
- How to Collect Free Disk Space Data in SCCM
- Setup, Configure, and Use SCCM’s Asset Intelligence
- Creating a Subselect Query for WQL
Reporting
- How to Install a SCCM Reporting Services Point
- Dynamic Images to SSRS Report for SCCM
- Editing SCCM Reports with Report Builder
Scripting
- Best Feature of SCCM: Run Scripts
Security/Permissions
- Grant Permission to One SCCM SSRS Report
Software
- Download Software Outside the SCCM Console
- The Facts on SCCM Software Inventory
Troubleshooting
- Fixing the SCCM Reporting Services Point

See how Right Click Tools are changing the way systems are managed.
Immediately boost productivity with our limited, free to use, Community Edition.
Get started with Right Click Tools today:
Related Resources
Когда реализованные в Active Directory (AD) средства для работы с протоколом Kerberos дают сбой, выяснить причину неполадки бывает чрезвычайно трудно. 99% времени все работает нормально, так что наши возможности попрактиковаться в диагностике ограничены. Но когда все-таки необходимо решить какую-либо проблему, важно иметь четкое представление о технических особенностях протокола. Одним из самых сложных настраиваемых компонентов технологии Kerberos является концепция делегирования
.
Вкратце делегирование сводится к следующему. Пользователь обращается к тому или иному приложению, а затем это приложение обращается к другой службе от имени (в контексте) данного пользователя. Характерный пример — это веб-сайт, обращающийся к базе данных SQL Server. Можно представить себе ситуацию, когда любое обращение к базе данных выполняется всякий раз в контексте учетной записи той или иной службы. На самом же деле все происходит иначе: каждый запрос к базе данных осуществляется в контексте пользователя, обратившегося к веб-узлу. Дополнительную информацию о работе с протоколом Kerberos в каталоге AD можно найти в статье «Kerberos в Active Directory», опубликованной в Windows IT Pro/RE № 11 за 2010 год. В рамках данной статьи мы будем исходить из того, что, если не указано иное, наш лес AD функционирует под управлением системы Windows Server 2003 или более поздней, а серверы приложений — под управлением системы Server 2003 или более новых версий. В системе Server 2003 в средства Kerberos, реализованные в AD, внесено множество усовершенствований.
Делегирование аутентификации по протоколу Kerberos
Недавно на одной из конференций я выступал с докладом по проблемам делегирования аутентификации по протоколу Kerberos. Я попросил поднять руки тех слушателей, которым хотя бы раз доводилось настраивать процесс делегирования Kerberos. Таких оказалось довольно много. Тогда я попросил опустить руки тех, кому не удалось правильно выполнить настройку с первой же попытки. Поднятыми остались всего две-три руки. К сожалению, документации по вопросам делегирования и ограниченного делегирования существует немного. Между тем настройка делегирования — это жизненно важный компонент многих корпоративных приложений.
Как уже отмечалось, самый типичный пример делегирования сводится к следующему. Пользователь обращается к приложению (обычно речь идет о веб-приложении), которое затем обращается к некоему ресурсу, например к базе данных SQL Server. Чтобы получить соединение с базой данных, приложение должно представить учетные данные. Часто соединение устанавливается с использованием выделенной учетной записи службы с правом чтения и записи всех необходимых данных внутри базы данных, как показано на рисунке 1. После этого приложение становится ответственным за контроль над элементами управления доступом непосредственно к данным, поскольку учетная запись службы имеет доступ ко всем объектам.
 |
| Рисунок 1. Обращение к данным с использованием учетной записи службы |
Еще одна возможность заключается в том, чтобы управлять данными с помощью реализованных в SQL Server собственных средств управления доступом на уровне пользователя или группы. Элементы управления будут работать эффективно лишь в том случае, если приложение установит соединение в контексте пользователя, обращающегося к приложению, как показано на рисунке 2. Процесс, в ходе которого устанавливается такое соединение, именуется делегированием Kerberos или, чаще, ограниченным делегированием Kerberos.
Чтобы обратиться к системе SQL Server на рисунке 2, веб-сервер должен получить билет службы для службы SQL Server. Этот билет службы должен быть сгенерирован для пользователя, обращающегося к веб-приложению (скажем, для User 1), но не для учетной записи службы веб-сервера. Таким образом, веб-сервер представляет билет службы пользователя User 1, который использовался для доступа к сайту (скажем, www.contoso.com), центру распространения ключей Key Distribution Center (KDC) и запрашивает билет службы системы SQL Server. KDC оценивает настройки делегирования в AD для данного веб-сервера; если имеется разрешение на делегирование полномочий системе SQL Server, KDC принимает представленный билет службы в качестве доказательства того, что полномочия данного пользователя проверены, и возвращает новый билет службы для обращения данного пользователя к системе SQL Server. Этот обмен информацией представлен на рисунке 3.
|
|
| Рисунок 2. Обращение к данным с использованием делегирования Kerberos |
|
|
| Рисунок 3. Обмен сообщениями при делегировании Kerberos |
Пока мы исходили из следующей посылки: делегирование может осуществляться, как показано на рисунке 3, без предварительной настройки в AD, но эта посылка неверна, и вот почему. Если бы любая служба могла просто делегировать проверку подлинности любой другой службе, тогда злоумышленники получили бы возможность обманом заставить какого-либо пользователя пройти проверку подлинности в их службе и имели бы доступ ко всем службам сети, доступным для незадачливого пользователя.
В соответствии с принимаемой по умолчанию настройкой вкладки Delegation, которая доступна в оснастке Active Directory Users and Computers консоли Microsoft Management Console (MMC), система не доверяет пользователю в вопросах, касающихся делегирования. Это означает, что службы, выполняемые в контексте соответствующей учетной записи, не могут делегировать проверку подлинности. В системе Windows 2000 Server имеется настройка Trust this user for delegation to any service (Kerberos only), которую можно увидеть на экране 1. Если эта функция включена, служба может от имени пользователя запросить билет службы для доступа к любой службе сети. Пользоваться рассматриваемой функцией небезопасно, поэтому старайтесь по возможности не применять ее.
|
|
| Экран 1. Активизация функции ограниченного делегирования |
Предпочтительная настройка, представленная на экране 1, предусматривает использование ограниченного делегирования с помощью настройки Trust this user for delegation to specific services only. Эта настройка предписывает учетной записи службы (или компьютера) запрашивать делегирование проверки подлинности только службами, указанными в списке. В рассматриваемом нами случае билеты службы могут запрашиваться только от имени других пользователей для службы SQL Server на Web-сайте sql.contoso.com. Нажав кнопку Add, вы должны отыскать пользователя (то есть учетную запись службы) или компьютер, являющийся хостом службы, для доступа к которой хотите санкционировать делегирование. В данном случае я выбрал учетную запись службы SQL Server. Как показано на экране 2, вы увидите список имен участников служб Service Principal Name (SPN), определенный выделенному пользователю или компьютеру, где вы можете выбрать службы, для доступа к которым будет выполняться аутентификация.
|
|
| Экран 2. Выбор служб для осуществления делегирования |
Смена протокола
Смена протокола — добавленная функция системы AD Kerberos, которую корпорация Microsoft реализовала в версии Windows Server 2003. Пока что при рассмотрении нашего примера в ситуациях, когда возникала необходимость обращения приложения c www.contoso.com к SQL Server в контексте текущего пользователя, веб-сервер предъявлял веб-приложению билет службы для данного пользователя, обеспечивающий получение билета службы системы SQL Server, как показано на рисунке 3. Такой сценарий возможен лишь в том случае, если пользователь удостоверяет свою подлинность сайту по протоколу Kerberos. Если же пользователь выполняет процедуру аутентификации в ходе регистрации на основе форм с применением другого протокола, скажем NTLM, или, может быть, иного механизма, такого как маркер RSA SecurID, веб-приложение не может получить билет службы от имени пользователя, ибо протокол Kerberos в подобной ситуации не используется.
Чтобы задействовать этот сценарий, пользователь может изменить настройки учетной записи службы или учетной записи компьютера для выполнения смены протокола; при этом учетная запись службы или компьютера сможет запросить билет службы для той или иной службы, не получая билет службы от пользователя. Вместо того чтобы представить веб-сайту билет службы для данного пользователя, учетная запись службы представляет собственный билет на получение билета Ticket-Granting Ticket (TGT) и запрашивает билет службы для себя от имени пользователя. На рисунке 4 показан последовательный ряд запросов и ответов Kerberos в момент выполнения смены протокола.
|
|
| Рисунок 4. Обмен сообщениями при смене протокола |
Важно отметить, что вследствие уязвимости смены протокола данная служба доступна лишь в сочетании с ограниченным делегированием Kerberos. Чтобы настроить смену протокола, необходимо в процессе включения функции ограниченного делегирования вместо настройки Use Kerberos only выбрать настройку Use any authentication protocol. Уязвимость данной конфигурации связана с тем, что пользователь предоставляет приложению возможность отрапортовать центру распространения ключей об успешной проверке полномочий пользователя вне зависимости от того, была ли такая проверка выполнена на самом деле. Для ограничения связанного с этим риска необходимо настроить службы, которым приложение может сообщить об успешной проверке подлинности, в виде билета службы.
Чтобы гарантировать успешное выполнение обмена, представленного на рисунке 4, необходимо наряду с указанием настроек учетной записи службы выполнить ряд дополнительных предварительных условий. Во первых, учетная запись службы должна иметь возможность получать данные о членстве в группах пользователя, для которого она пытается получить билет службы. Эта возможность предоставляется через членство в группе AD Windows Authorization Access. Данной группе делегируется доступ с правом чтения к атрибуту AD tokenGroupsGlobalAndUniversal.
Далее для фактического выполнения процедуры делегированной аутентификации учетной записи службы требуются привилегии безопасности Act as Part of the Operating System (SeTcbPrivilege) и Impersonate a Client After Authentication (SeImpersonatePrivilege). Особой уязвимостью отличается привилегия Act as Part of the Operating System; по умолчанию она предоставляется только учетной записи SYSTEM. Если это право будет предоставлено учетной записи службы, выполняющей веб-приложение, и если это приложение будет скомпрометировано, злоумышленник получит полный доступ к серверу. Обычно в приложениях, которые активно используют смену протокола, например в средствах обеспечения процедуры однократной регистрации (SSO), предусмотрена специальная служба, которая выполняется с использованием учетной записи SYSTEM и осуществляет необходимые вызовы по протоколу Kerberos от имени веб-приложения.
Диагностика Kerberos
Делегирование — один из наиболее сложных компонентов Kerberos, подлежащих настройке, причем ошибки в настройках ведут к сбою приложений. При работе с протоколом Kerberos возникает большое число дополнительных, не столь существенных проблем; тем не менее важно уметь распознавать такие проблемы и устранять их.
Для мониторинга функционирования Kerberos, а также для диагностики часто используются две утилиты — Klist и Kerbtray. Klist — утилита командной строки, встроенная в Windows. Этот инструмент позволяет видеть все билеты, кэшированные в данный момент для сеанса, а также просматривать билет на получение билета TGT. Чтобы просмотреть кэшированные билеты, достаточно запустить программу klist; для просмотра TGT нужно запустить klist tgt. При необходимости очистки кэшированных билетов (а также TGT) выполните команду klist purge. Очистка билетов дает возможность, не выходя из системы, получить новый TGT с обновленными данными по членству в группах.
Утилита Kerbtray входит в набор ресурсов Microsoft Windows Server 2003 Resource Kit, а также в набор Microsoft Windows 2000 Server Resource Kit. Kerbtray представляет те же данные, что и Klist; однако Kerbtray выполняется в системной панели задач и отображает данные в графическом, а не в текстовом представлении.
При работе с протоколом Kerberos администраторам AD чаще всего приходится сталкиваться с такой проблемой, как дубликаты имен участников служб SPN. Эти имена используются для идентификации служб, которые выполняются в сети. Когда пользователь запрашивает билет службы для доступа к той или иной службе, этот пользователь указывает в запросе SPN службы, к которой хочет обратиться. Далее центр распространения ключей осуществляет поиск учетной записи, которая содержит указанное имя SPN и зашифровывает билет с помощью секрета данной учетной записи. Если же одно и то же имя SPN содержит не одна, а большее число учетных записей, центр распространения ключей не может надлежащим образом зашифровать билет, поскольку имеется более одного секрета, которые могут быть использованы для шифрования билета.
Дубликаты имен SPN часто появляются в ситуациях, когда системы объединяются в одном домене, а затем присоединяются к другому домену леса, оставляя в старом домене «висячую» учетную запись компьютера. Дубликаты могут появляться и в том случае, когда имя SPN вручную вводится в несколько учетных записей пользователей или компьютеров. Когда центр распространения ключей получает запрос на билет службы и находит несколько объектов, содержащих заданное имя SPN, в системный журнал контроллера домена записывается событие, подобное тому, которое представлено на экране 3.
|
|
| Экран 3. Событие Duplicate SPN |
Существует целый ряд различных способов поиска и удаления повторяющихся в лесу имен SPN. В статье Microsoft «Event ID 11 in the System log of domain controllers» (support.microsoft.com/kb/321044) рассматривается несколько методов обработки события, показанного на экране 3.
Огромное значение для обеспечения надлежащего функционирования механизма Kerberos имеет процедура синхронизации времени. Если часы клиента, сервера или центра распространения ключей не синхронизированы, Kerberos не будет функционировать корректно. В соответствии со спецификацией Kerberos для защиты различных сообщений, от которых зависит работа протокола, используются отметки времени; когда часы в сети показывают разное время, билеты ошибочно аннулируются. По умолчанию AD позволяет часам уходить вперед или назад не более чем на пять минут.
Kerberos в значительной степени полагается на службу имен доменов. Имена участников службы задаются в контексте имени службы DNS (например, http/www.contoso.com). Если вы зайдете на сайт www.contoso.com через URL, отличный от www.contoso.com, протокол Kerberos не будет функционировать корректно. В случаях когда требуется обеспечить возможность просмотра приложений с использованием имени их хоста, часто прибегают к такому решению: для имени хоста (скажем, http/www) определяют также имя участника службы (SPN), с тем чтобы пользователям не приходилось вводить полное доменное имя Fully Qualified Domain Name (FQDN) соответствующей службы. Надо отметить, что метод Kerberos неприменим, если доступ к службе осуществляется по IP-адресу. В таких случаях аутентификация обычно проводится по протоколу NTLM.
Когда осуществляется возврат к средствам аутентификации на базе NTLM, приложения, реализующие делегирование Kerberos, но не поддерживающие смену протокола, дают сбой. Иногда NTLM используется не потому, что возникла проблема с использованием протокола Kerberos, а вследствие ошибки в настройке либо сервера, либо браузера. Для диагностики подобных сбоев можно применять, например, бесплатно распространяемую утилиту Fiddler. Ее можно загрузить с сайта www.fiddler2.com.
Немало хлопот доставляет и чрезмерное разрастание маркеров (token bloat). Спецификация Kerberos предусматривает хранение данных о членстве пользователя в группах (наряду с прочими сведениями) в разделе PAC (Privilege Attribute Certificate) предоставленного данному пользователю билета на получение билета, а значит, и в билетах служб. В статье Microsoft «New resolution for problems with Kerberos authentication when users belong to many groups» (support.microsoft.com/kb/327825) рассказывается о том, как осуществляется корректировка параметра реестра Max-TokenSize и как выполняется расчет вклада каждой группы в общий размер маркера. Но надо сказать, что, хотя с помощью корректировки можно на время снять данную проблему, лучше пойти по другому пути — пересмотреть стратегию членства в группах, принятую в вашей организации.
Простые решения
В большинстве случаев средства аутентификации на базе протокола Kerberos функционируют без сбоев. Но если у вас возникнет необходимость развернуть приложение, предусматривающее ограниченное делегирование Kerberos, вы сможете решить эту задачу лишь при условии четкого представления о том, как функционирует делегированная аутентификация. А если средства Kerberos все-таки дадут сбой, помните, что существует множество инструментов, которые помогут определить причину неполадок, а также найти простые и быстрые решения.
Брайан Десмонд (brian@briandesmond.com) — старший консультант компании Moran Technology Consulting (Чикаго). Имеет сертификат Directory Services MVP. Автор книги «Active Directory», ведет блог www.briandesmond.com
Ловушка для хакеров: ложная учетная запись администратора домена
Впроцессе создания домена Active Directory (AD) автоматически формируется учетная запись администратора для этого домена. Эта учетная запись, на которую возлагаются обязанности по управлению всеми объектами в домене — очевидная мишень для злоумышленников. Безопасность домена можно повысить, изменив имя учетной записи администратора и заменив подлинную учетную запись ложной. Сделать это просто.
- Смените имя учетной записи Administrator домена на какое-нибудь другое, например DOM-ADMIN. Изменение имени не повлияет на разрешения и права, которыми учетная запись наделяется по умолчанию.
- Создайте неадминистративную учетную запись, назовите ее Administrator и отключите эту ложную учетную запись.
- Назначьте аудит неудачных событий безопасности для созданной ложной учетной записи.
- Периодически проверяйте журналы событий в поисках событий, связанных с попытками нарушения защиты. Наиболее вероятные причины этих событий:
- попытки злоумышленников проникнуть в домен (не зная нового имени, они будут использовать стандартное имя Administrator);
- неправильно настроенные приложения; если приложение (например, программа резервного копирования) настроено на использование учетной записи Administrator, то после смены имени в его работе начнутся сбои и будут формироваться события безопасности.
И неудачные события безопасности, и ошибки в настройке приложений свидетельствуют о наличии проблем в домене.
Обратите внимание, что каждый член домена, сервер и клиент имеет административную учетную запись, поэтому формирование ложной учетной записи Administrator в домене не защитит серверы и клиентские компьютеры. Этот недостаток можно преодолеть, создав ложные локальные административные учетные записи.
Пол Лемонидис (paul_lemonidis@hotmail.com) — специалист по системам сообщений с 20 летним опытом работы из Tower Hamlets Council в Лондоне. Поддерживает почтовую организацию Exchange Server с 7000 почтовых ящиков

- Remove From My Forums
-
Вопрос
-
What is the Windows Authorization Access Group? How would you see it functioning in a multi-tree/domain enterprise? Why would a user account be the Owner of this Security Group? Could this group cause a failed Event 4776 with Failure Code 0xC0000199?
-
Изменено
Kiowa
19 февраля 2020 г. 0:09
-
Изменено
Все ответы
-
Hello,
Thank you for posting in our forum.
According to the article:Active Directory Security Groups mentioned
«Members of this group have access to the computed token GroupsGlobalAndUniversal attribute on User objects. Some applications have features that read the token-groups-global-and-universal (TGGAU) attribute on user account objects or on computer account
objects in Active Directory Domain Services. Some Win32 functions make it easier to read the TGGAU attribute. Applications that read this attribute or that call an API (referred to as a function) that reads this attribute do not succeed if the calling security
context does not have access to the attribute. This group appears as a SID until the domain controller is made the primary domain controller and it holds the operations master role (also known as flexible single master operations or FSMO).»In addition, can you share the screenshot of the error to me?
Hope the information can be helpful and if there is anything else we can do for you, please feel free to post in the forum.
Best regards,
Cynthia
Please remember to mark the replies as answers if they help.
If you have feedback for TechNet Subscriber Support, contact
tnmff@microsoft.com. -
Hi,
Just checking in to see if the information provided was helpful. Please let us know if you would like further assistance.
Best Regards,
Cynthia
Please remember to mark the replies as answers if they help.
If you have feedback for TechNet Subscriber Support, contact
tnmff@microsoft.com. -
There’s some information Windows Security Monitoring by Wiley. It’s just a paragraph but gives some more insight. [para] «Members of this group have Read access to the token-groups-global-and-universal (TGGAU) attribute for users & computers. Its
generated dynamically. The group has no logon rights or user privileges by default. Its a low priority but its good to monitor for changes.»For my question, this group wouldn’t apply to 4776 because they have no logon rights. However, I still wonder what is the effect if the Owner has an expired account. Could it affect computers they imaged and deployed?
При обслуживании больших сетей системные администраторы часто сталкиваются с проблемами аутентификации на сетевом оборудовании. В частности, довольно сложно организовать нормальную работу нескольких сетевых администраторов под индивидуальными учетными записями на большом количестве оборудования (приходится вести и поддерживать в актуальном состоянии базу локальных учетных записей на каждом устройстве). Логичным решение было бы использовать для авторизации уже существующей базы учетных записей — Active Directory. В этой статье мы разберемся, как настроить доменную (Active Directory) аутентификацию на активном сетевом оборудовании (коммутаторы, маршрутизаторы).
Не все сетевое оборудование популярных вендоров (CISCO, HP, Huawei) поддерживает функционал для непосредственного обращения к каталогу LDAP, и такое решение не будет универсальным. Для решения нашей задачи подойдет протокол AAA (Authentication Authorization and Accounting), фактически ставший стандартом де-факто для сетевого оборудования. Клиент AAA (сетевое устройство) отправляет данные авторизующегося пользователя на сервер RADIUS и на основе его ответа принимает решение о предоставлении / отказе доступа.
Протокол Remote Authentication Dial In User Service (RADIUS) в Windows Server 2012 R2 включен в роль NPS (Network Policy Server). В первой части статьи мы установим и настроим роль Network Policy Server, а во второй покажем типовые конфигурации сетевого устройств с поддержкой RADUIS на примере коммутаторов HP Procurve и оборудования Cisco.
Содержание:
- Установка и настройка сервера с ролью Network Policy Server
- Настройка сетевого оборудования для работы с сервером RADUIS
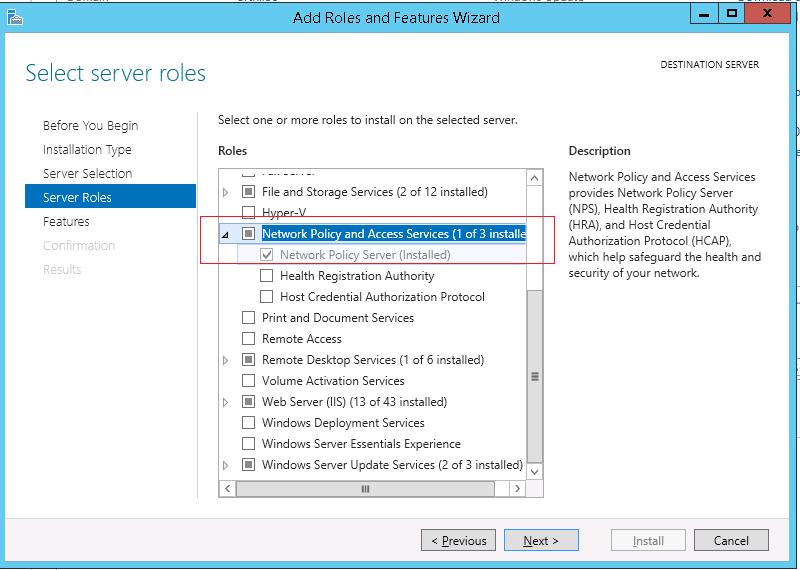
Установка и настройка сервера с ролью Network Policy Server
Как правило, сервер с ролью NPS рекомендуется устанавливать на выделенном сервере (не рекомендуется размещать эту роль на контроллере домена). В данном примере роль NPS мы будем устанавливать на сервере с Windows Server 2012 R2.
Откройте консоль Server Manager и установите роль Network Policy Server (находится в разделе Network Policy and Access Services).
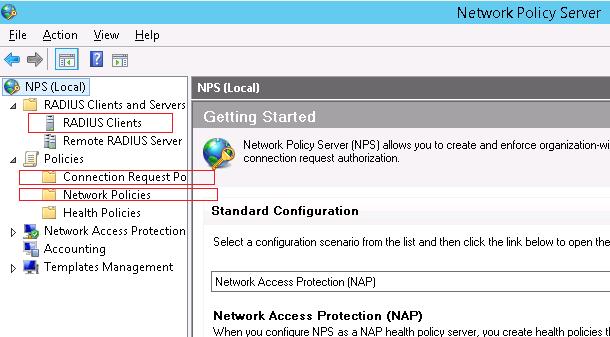
 После окончания установки запустите mmc-консоль управления Network Policy Server. Нас интересуют три следующих раздела консоли:
- RADIUS Clients — содержит список устройств, которые могут аутентифицироваться на сервере
- Connection Request Policies – определяет типы устройств, которые могут аутентифицироваться
- Network Polices – правила аутентификации
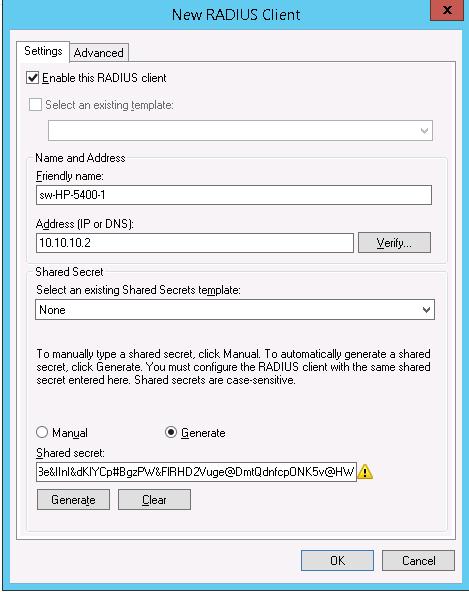
 Добавим нового клиента RADIUS (это будет коммутатор HP ProCurve Switch 5400zl), щелкнув ПКМ по разделу RADIUS Clients и выбрав New. Укажем:
- Friendly Name:sw-HP-5400-1
- Address (IP or DNS): 10.10.10.2
- Shared secret (пароль/секретный ключ): пароль можно указать вручную (он должен быть достаточно сложным), либо сгенерировать с помощью специальной кнопки (сгенерированный пароль необходимо скопировать, т.к. в дальнейшем его придется указать на сетевом устройстве).
 Отключим стандартную политику (Use Windows authentication for all users) в разделе Connection Request Policies, щелкнув по ней ПКМ и выбрав Disable.
Создадим новую политику с именем Network-Switches-AAA и нажимаем далее. В разделе Сondition создадим новое условие. Ищем раздел RADIUS Client Properites и выбираем Client Friendly Name.
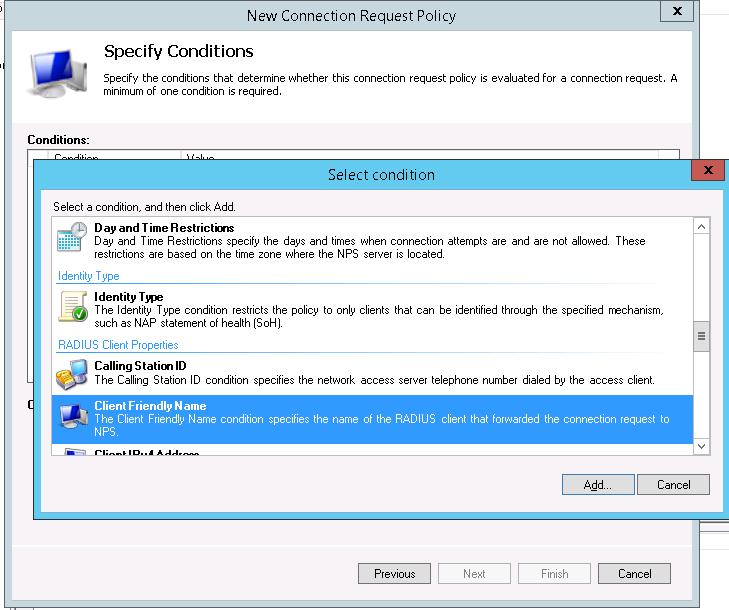 В качестве значения укажем sw-?. Т.е. условие будет применяться для всех клиентов RADIUS, начинающийся с символов :”sw-“. Жмем Next->Next-> Next, соглашаясь со всеми стандартными настройками.
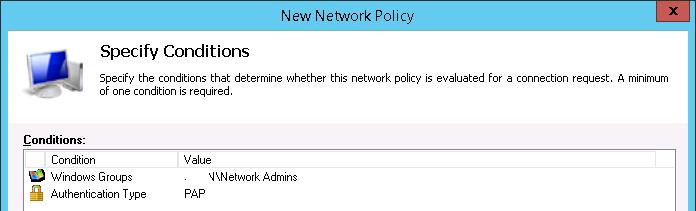
Далее в разделе Network Policies создадим новую политику аутентификации. Укажите ее имя, например Network Switch Auth Policy for Network Admins. Создадим два условия: в первом условии Windows Groups, укажем доменную группу, члены которой могут аутентифицироваться (учетные записи сетевых администраторов в нашем примере включены в группу AD Network Admins) Второе условие Authentication Type, выбрав в качестве протокола аутентификации PAP.
 Далее в окне Configure Authentication Methods снимаем галки со всех типов аутентификации, кроме Unencrypted authentication (PAP. SPAP).
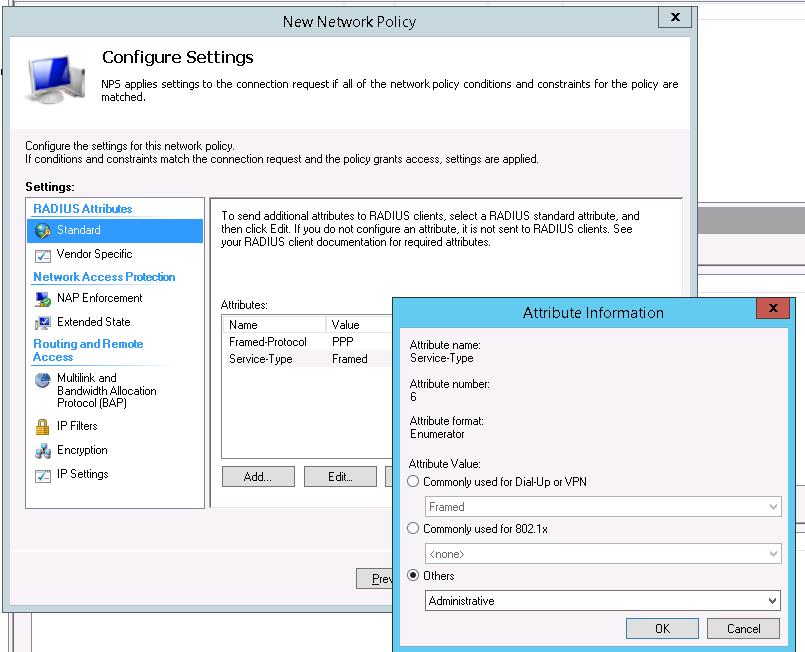
В окне Configure Settings изменим значение атрибута Service-Type на Administrative.
 В остальных случаях соглашаемся со стандартными настройками и завершаем работу с мастером.
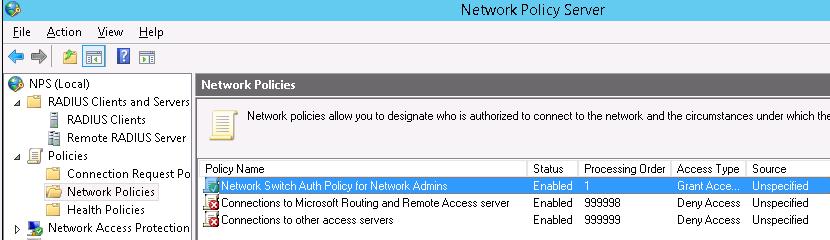
И, напоследок, переместим новую политику на первое место в списке политик.
Настройка сетевого оборудования для работы с сервером RADUIS
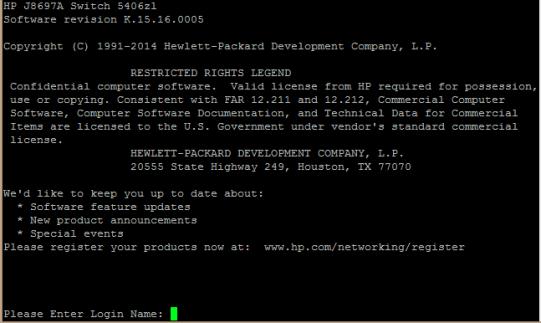
Осталось настроить наше сетевое оборудование для работы с сервером Radius. Подключимся к нашему коммутатору HP ProCurve Switch 5400 и внесем следующе изменение в его конфигурацию (измените ip адрес сервера Raduis и пароль на свои).
aaa authentication console enable radius local

aaa authentication telnet login radius local

aaa authentication telnet enable radius local

aaa authentication ssh login radius local

aaa authentication ssh enable radius local

aaa authentication login privilege-mode

radius-server key YOUR-SECRET-KEY

radius-server host 10.10.10.44 YOUR-SECRET-KEY auth-port 1645 acct-port 1646

radius-server host 10.10.10.44 auth-port 1645

radius-server host 10.10.10.44 acct-port 1646
Совет. Если в целях безопасности вы запретили подключаться к сетевому оборудованию через telnet, эти строки нужно удалить из конфига:
aaa authentication telnet login radius local

aaa authentication telnet enable radius local
Не закрывая консольное окно коммутатора (это важно!, иначе, если что-то пойдет не так, вы более не сможете подключиться к своему коммутатору), откройте вторую telnet-сессию. Должно появиться новое окно авторизации, в котором будет предложено указать имя и пароль учетной записи. Попробуйте указать данные своей учетной записи в AD (она должна входить в группу Network Admins ). Если подключение установлено – вы все сделали правильно!
 Для коммутатора Cisco конфигурация, предполагающая использование доменных учетных записей для аутентификации и авторизации, может выглядеть так:
Примечание. В зависимости от модели сетевого оборудования Cisco и версии IOS конфигурация может несколько отличаться.
aaa new-model
radius-server host 10.10.10.44 auth-port 1645 acct-port 1646 key YOUR-SECRET-KEY
aaa authentication login default group radius local
aaa authorization exec default group radius local
ip radius source-interface Vlan421
line con 0
line vty 0 4
line vty 5 15
Примечание. В такой конфигурации для аутентификации сначала используется сервер RADIUS, а если он не доступен – локальная учетная запись.
Для Cisco ASA конфигурация будет выглядеть так:
aaa-server RADIUS protocol radius
aaa-server RADIUS host 10.10.10.44 key YOUR-SECRET-KEY
radius-common-pw YOUR-SECRET-KEY
aaa authentication telnet console RADIUS LOCAL
aaa authentication ssh console RADIUS LOCAL
aaa authentication http console RADIUS LOCAL
aaa authentication http console RADIUS LOCAL
Совет. Если что то-не работает, проверьте:
- Совпадают ли секретные ключи на сервере NPS и коммутаторе (для теста можно использоваться простой пароль).
- Указан ли правильный адрес NPS сервера в конфигурации. Пингуется ли он?
- Не блокируют ли межсетевые экраны порты 1645 и 1646 между коммутатором и сервером?
- Внимательно изучите логи NPS сервера
Обновлено 10.07.2020

Добрый день! Уважаемые читатели и гости одного из крупнейших IT порталов по системному администрированию Pyatilistnik.org. В прошлый раз мы с вами распространяли на доменные компьютеры компании библиотеку vcruntime140.dll, средствами групповой политики. Сегодня я хочу рассмотреть еще одну проблему с которой вы можете столкнуться в ходе своей работы, это проблема подключения к RDS ферме. На данном сервере появилась ошибка «The Remote Desktop Connection Broker server could not enumerate the targets for the provider named NULL from the database».
Описание ситуации
Начали поступать жалобы на подключение к удаленному рабочему столу на базе Windows Server 2016. Пользователи были разные, у кого-то компьютеры на базе Windows 10, кто-то использовал MacOS. Ошибки были такого плана:
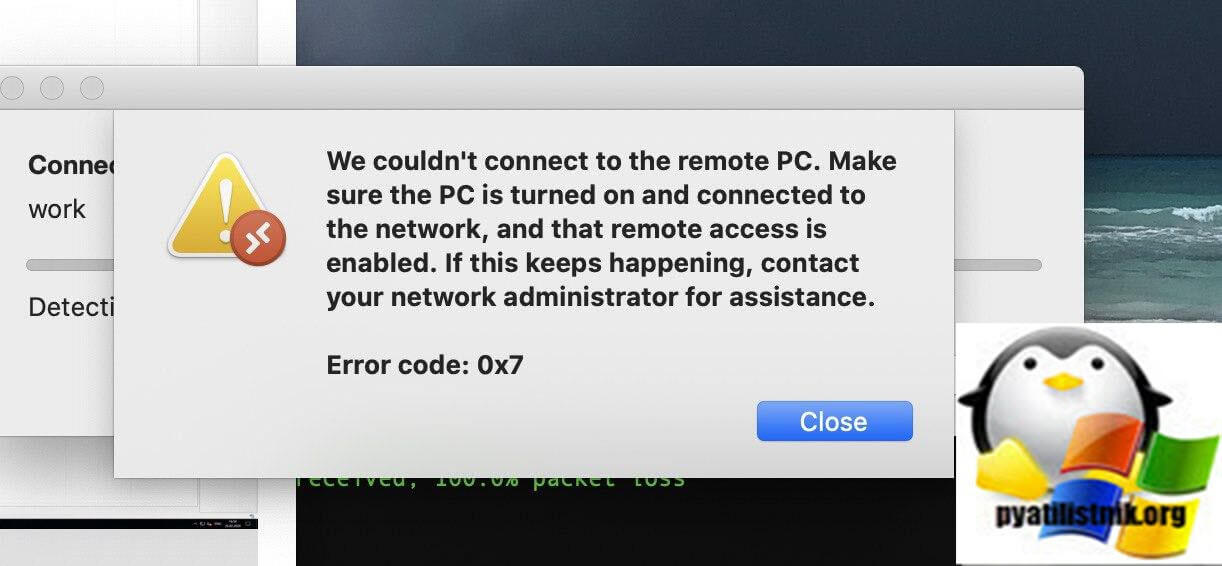
We couldn’t connect to the remote PC. Make sure the PC is turned on and connected to the network, and that remote access is enabled. If this keeps happening, contact your network administrator for assistance. Error code: 0X7
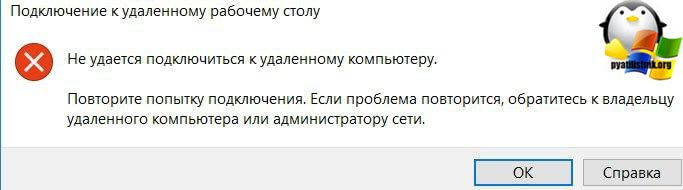
Или до более знакомую ошибку в Windows, которую я уже решал в двух статьях:
-
Не удается подключиться к удаленному компьютеру с Windows Server 2008 R2
- Не удается подключиться к удаленному компьютеру с Windows Server 2012 R2
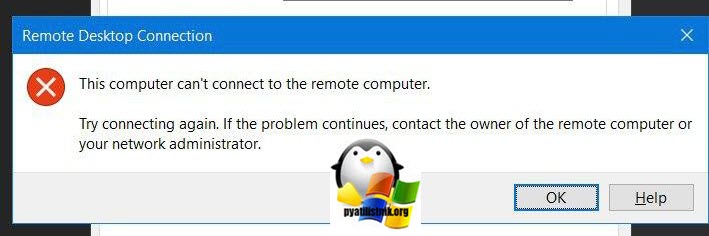
This computer can’t connect to the remote computer. Try connecting again. If the promlem continues, contact the owner of the remote computer or your network administrator.
Как устранять данную проблему
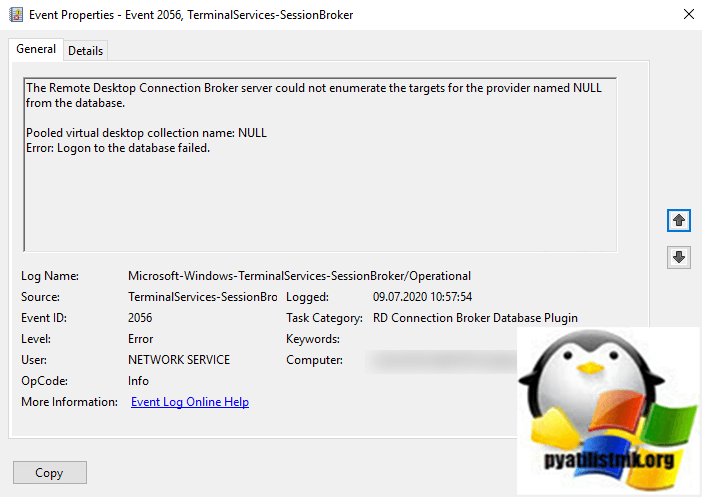
Как я и писал выше, методы описанные с статьях про ошибку с подключением мне не помогли, поэтому я как и любой системный администратор стал искать ошибки в журналах. Хочу еще немного описать свой виртуальный сервер, на нем установлена Windows Server 2016 и локально поднята стандартная установка Remote Desktop Services, все роли несет на себе данный хост. Напоминаю, что логи Windows можно смотреть через «Просмотр событий» или же использовать для этого веб-инструмент Windows Admin Center. Где смотреть логи RDS сервера я рассказывал, меня заинтересовал журнал «Microsoft-Windows-TerminalServices-SessionBroker/Operational«. В нем я обнаружил два интересных события:
Ошибка с кодом ID 2056: The Remote Desktop Connection Broker server could not enumerate the targets for the provider named NULL from the database. Pooled virtual desktop collection name: NULL. Error: Logon to the database failed.
Так же вы можете еще обнаружить событие ID 770:
Ошибка ID 770: RD Connection Broker failed while adding Target server name.
Farm Name = CRM.
Error: Invalid pointer
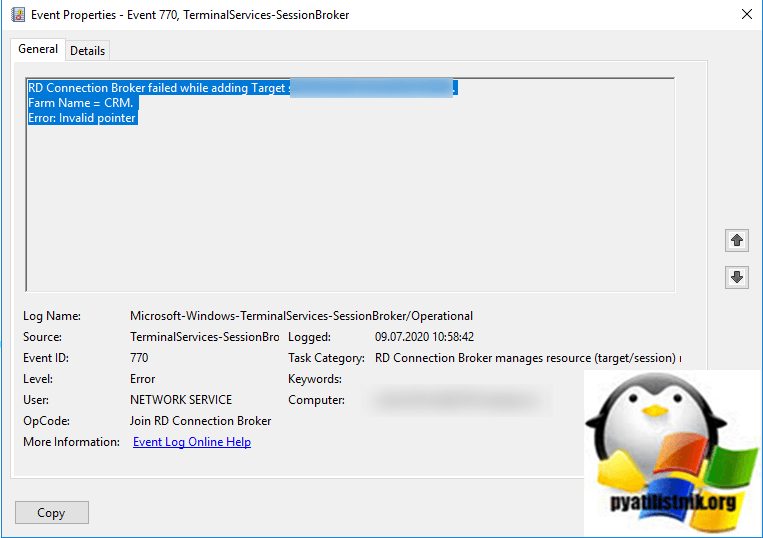
Явно видно, что с нашим брокером, что-то не так и он не может воспользоваться своей локальной базой подключений. Изучив данный вопрос с ошибками ID 770 и ID 2056, есть несколько вариантов решения.
- Первое, что я вам советую, это перезагрузить сервер, как ни странно это может помочь в большинстве случаев и будет гораздо быстрее, нежели вы будите заниматься траблшутингом. Если у вас есть активные сеансы на данном RDS сервере, то переведите его в режим стока и оповестите пользователей, о предстоящих работах, чтобы они смогли сохранить все свои данные.
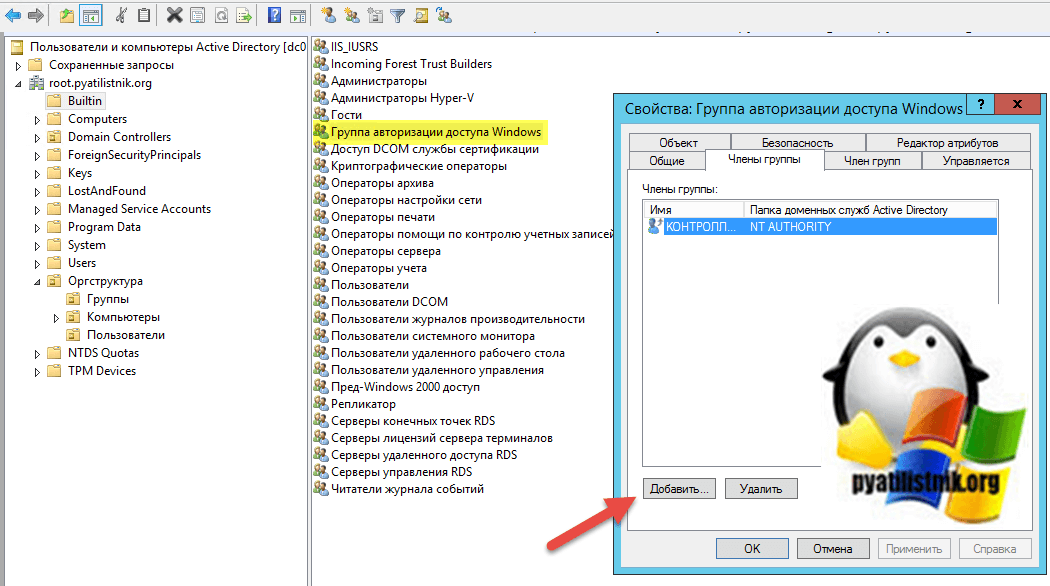
- Если перезагрузка не помогла, то как советуют на одном обсуждении Microsoft, вам необходимо добавить ваш сервер в определенную группу Active Directory.
Ветка обсуждения — https://social.technet.microsoft.com/Forums/Azure/en-US/aef50c99-0f0e-4da2-bc4c-d5435692cb8b/server-2012-rds-remote-desktop-connection-broker-client-failed-to-redirect-the-user?forum=winserver8gen или https://support.microsoft.com/en-us/help/331951/some-applications-and-apis-require-access-to-authorization-information
Откройте оснастку «Active Directory — Пользователи и компьютеры» и перейдите в раздел Bultin и найдите группу «Группа авторизации доступа Windows (Windows Authorization Access Group)». Откройте ее свойства и в членах группы, добавьте ваш сервер.
- Если это не помогло, то с большой вероятностью у вас повредилась локальная база подключений RDCB. Открыть ее можно с помощью инструмента Server Management Studio. В качестве адреса подключения нужно использовать.
\.pipeMICROSOFT##WIDtsqlquery
Удостоверьтесь, что у локальной учетной записи nt authoritynetwork service есть права на базу (sysadmin). На этом у меня все, мы успешно восстановили работу RDS сервера, решили ошибку «The Remote Desktop Connection Broker server could not enumerate the targets for the provider named NULL from the database», короче мир спасен. С вами был Иван Семин, автор и создатель IT портала Pyatilistnik.org.
What is this? «Windows Authentication Access Group»
It just saved my life a week ago, and I’m not sure why because apparently I fail at googeling seeing as how I can’t seem to find any documentation describing this built in Windows feature.
-yes I know the name is really descriptive, but I would like to know how it worked So I can better utilize this in the future.
-back story
Last Monday I came in and I had about 3 tickets saying people logged onto the remote desktop «terminal server» and received a temporary profile. Which was weird as no changes had been made over the weekend or week prior to the server. So i went through found an article on how to rename the reg file for their profile blow out their old profile folder and then they were able to log back in. by the end of the day I was doing that at least once if not multiple times an hour. I couldn’t understand why it was happening, just I knew how to temporarily fix it. come the 2nd or 3rd day some of the peoples profiles that I had fixed it was happening again to them where they would log in and be forced to get a temp profile. Come Friday after trying a lot of random solutions, I came a cross a gem saying add the terminal servers (rdp servers windows 2008r2) into this innocuous group called «Windows Authentication Access Group with these instructions —
1) Log on to the server as a Domain Admin
2) Add my regular user account to the local admin group
3) add the session host server to the Windows Authorization Access Group
4) Reboot
5) Log on to the session host server as my regular user account and delete my Domain Admin Profile
6) Log off my regular user account and log on as my Domain Admin account (No temporary profile now)
7) Delete the regular user account from the Local Administrator group.
Lee Alderman (Thu 2015-03-19 14:02:51):
https://social.technet.microsoft.com/Forums/itmanagement/en-US/68bc8da5-c7bc-403e-97e0-ba48a9cb17a2/… Opens a new window
It seemingly has worked and just for kicks I went ahead and added my second terminal server (rdp server) in the group as well. I tested it out last Friday a lot, and as of this Monday no one is receiving temporary profiles (when the week before I had gone through blowing out at least 30-40 profiles total.
I would just like to know why the rdp servers needed to be in that group.
Contents:
- Basic Access Check
- The Security Descriptor, DACL & SACL
- Integrity Level Check / Mandatory Integrity Control (MIC)
- Privileges
- UAC
- UAC for the RID-500er local Admin
- Disabling UAC For Non-RID-500er Admins
- UAC and Remote Access
- UAC And Pass-the-Hash
- Access Tokens
- Impersonation
- Privilege Escalation With Identification Tokens
- Privilege Escalation By Leaky Tokens
Compared to Linux, the Window’s authorization process is quite complex and quite a few actors and objects are involved in this process. As a result, there a lot of terms and acronyms that must be known in order to understand and follow up on the topic. To get an idea of what is covered in this guide take a look on this overview of terms and acronyms:
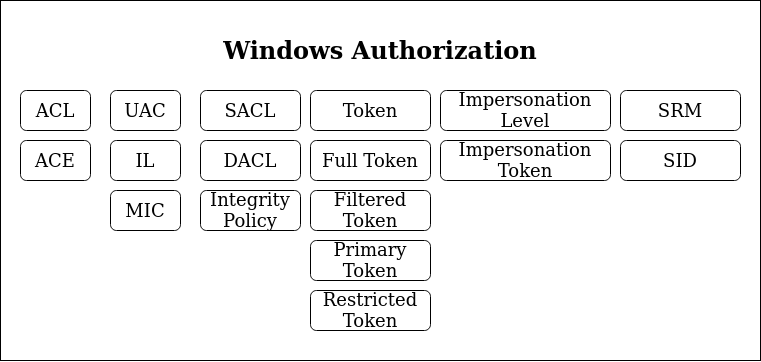
Facing this wall of acronyms, i’d say the best to get into this complex environment is to dive right in and cross reference all new terms.
For all of the following (and in general) be aware that there is a Windows Security Glossary that you could use to look up any acronym or term used in the following.
Basic Access Check
Starting with the simplest scenario: You log onto your Windows system and want to open a file. Who decides if you get access and how is this decision made?
As a reference recap how this decision is made on Unix systems. On Unix systems your user has a user- & group-ID and the access target (the file in this scenario) has an associated list of access permissions that could look like this:
-rwxr-xr-- 1 root root 2048 Jun 13 10:00 file.txt
The Unix OS checks these file permissions, figures that everyone got read access rights and grants the logged in Unix user read access. Most of the Unix authorisation decisions can be broken down to this very simple access check.
Now let’s dive into the Windows World:
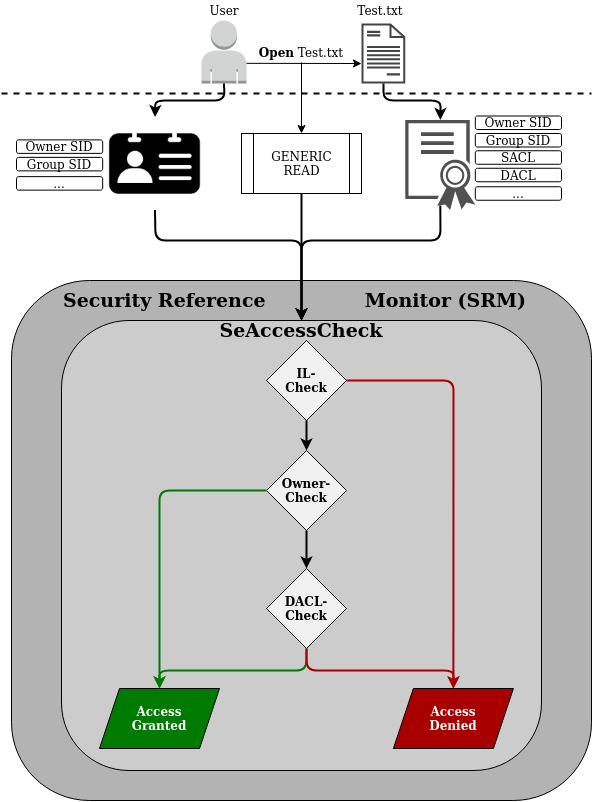
Let’s start simple: When a user logs into his Windows machine (regardless if that is a local or a domain joined user), an Access Token is created for that user. Precisely that means this access token is created for that user’s logon thread.
When that logged on user tries to open a file, an access request is generated that specifies what the user wants to do with that file (access right). In our case the user simply wants to read a file, which maps to the GENERIC_READ access right. There are a set of different access rights, which at the end of the day are all just bitmasks representing numbers that serve as a global reference to have a clear definition of what the user requests to do. The most important access rights are the Generic Access Rights and the so called Standard Access Rights.
The user’s access request is taken on by a Windows component called the Security Reference Monitor (SRM), which takes on the requested access right along with the user’s Access Token and compares these bits of information against the defined access permissions for the requested file, which are composed in a structure called Security Descriptor.
Important to note here: Each Securable Object, which include files, directories, registry keys and many other things, has a Security Descriptor.
Okay let’s break that down in key »Take aways«::
- Each user logon thread has an access token
(Read this as: Each user got assigned an access token) - A required action, e.g. to open a file, is expressed in an Access Right, e.g. GENERIC_READ
- Each Securable Object has a Security Descriptor, which defines who can do what with that object.
- The Security Reference Monitor (SRM) is the software component in charge to evaluate if a certain process should be granted access to the requested object for the requested access right.
The key function for granting or denying access within the SRM is called SEAcessCheck.
And since I really like visual representation of things, take the following picture to get an overview of what has just been introduced:
(I based that representation on a figure James Forshaw used in his 2015 BlackHat Talk)
Now that the basic concept of access checks in the Windows world has been introduced, let’s dig deeper into the individual components.
The Security Descriptor, DACL & SACL
This section will bring light on the Owner- and the DACL-Check shown in the figure above.
As mentioned previously each Securable Object has a Security Descriptor.
The Security Descriptor defines an object structure to keep record of to whom the referenced object belongs (Owner and Group) and to whom access is granted (or denied) for which actions.
To get an idea of what this looks like the following screenshot shows the Security Descriptor (as kernel object) of the running explorer.exe process:
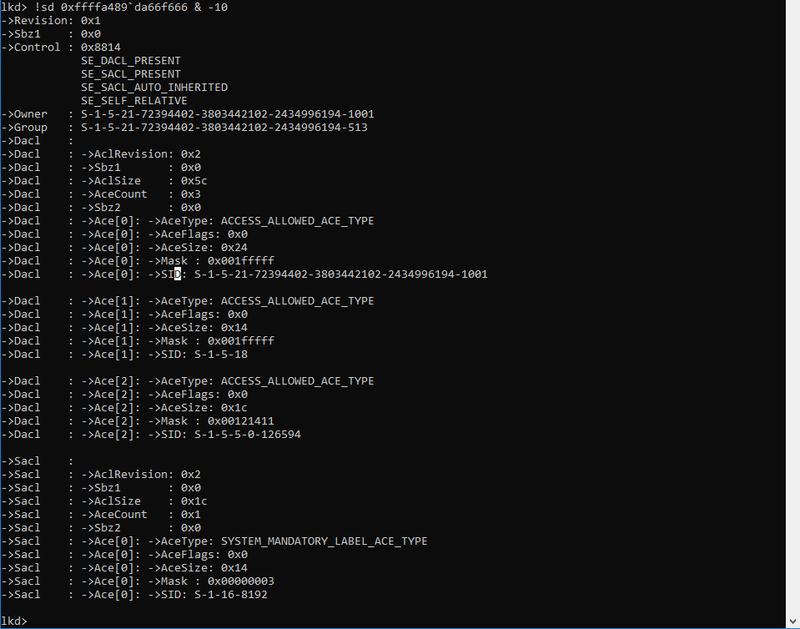
The most basic part here is the Owner and Group field, which are expressed by a Secure Identifier (SID). In the Windows world a SID is just a unique string to identify a security principal, e.g. a user, a group, etc. The SID consists of three blocks:
- The first part — always beginning with an ‘S’ — describes the group, e.g. Domain Everyone (S-1-1-0), Anonymous (S-1-5-7), Authenticated Users (S-1-5-11), which can be looked up in the register for Well-known SIDs.
- The second part is a unique domain ID (also present in each default WORKGROUP) (S-1-5-21), e.g. S-1-5-21-2884053423-3431565070-78458365-….
- The last part is called the relative ID (RID), which describes a user group inside a security group, e.g. the group of builtin Administrator group (S-1-5-32—544) or the builtin Guests group (S-1-5-32—546) or the famous default Admin account — by me often referred to as RID-500 Admin — (S-1-5-21-2884053423-3431565070-78458365—500). Note how the first two groups are in the same security group (S-1-5-32-…), while the RID-500 admin is in the domain security group.
Okay now back to our example from above: The Owner is set to the SID of S-1-5-21-…..-1001, which is the unique value for my current user and the group is set to the SID of S-1-5-21-…-513, which is the domain users group.
You can look up these SIDs in the register for Well-known SIDs
Apart from the owner and group of the explorer.exe process, the above shown Security Descriptor also contains two lists, the Discretionary Access Control List (DACL) and the System Access Control List (SACL):
The DACL is a list controlled by the owner of the Security Descriptor, that specifies the access particular users or groups can have on the object.
The SACL is a list controlled by system administrators, which holds two types of control entries:
- The SACL holds the MANDATORY_INTEGRITY_LABEL (more on this later); and
- The SACL holds control entries used for the generation of audit messages (which we ignore for now)
For the SACL just keep in mind that the MANDATORY_INTEGRITY_LABEL is stored in here (we ignore the rest for now…).
The DACL is the important control list used for the authorization process. Review the screenshot above and see that the presented DACL actually contains three Access Control Entries (ACEs). For each of the three ACEs the following important fields are set:
- SID: The SID defines the Security Principal (a user or group) to which the ACE applies.
S-1-5-21-…..-1001 references to one specific domain user.
S-1-5-18 references the local System account. - Mask: The access mask is a numeric value, which resembles a combination (addition) of multiple Access Rights, e.g. GENERIC_READ. The access mask is a data structure described in the Microsoft Docs here.
- AceType: The AceType defines whether access should be allowed or denied for the given security principal (SID) and based on the given access mask.
In the example above three ACEs with AceType ACCESS_ALLOWED_ACE_TYPE are given, which means that if the Security Reference Monitor (SCM) finds a matching access mask for the requesting user in any of these ACEs access will be granted.
For this part the important »Take away«: is:
The SCM will review the Security Descriptor of the requested object and iterate over each ACE in the Security Descriptor’s DACL and check whether the requesting user — identified by it’s SID and requested access right (e.g. GENERIC_READ) match with an Access Mask inside of an ACE. If a match is found the AceType of that ACE will determine if access is granted or denied.
A side note on empty DACLs:
If a DACL of a Security Descriptor is set to NULL, aka the Security Descriptor has no DACL, than full access is granted to everyone.
If the DACL of a Security Descriptor is empty, aka a DACL exists, but does not contain any ACEs than no access is granted to that object.
The last bit of information that is missing is the identity of the requesting user. The SRM gets the identity of the requesting user from the given user access token. Insights of how this token looks like will be given later, for now it’s just important to know that this token contains the SID of the requesting user, as well as the SID of the user’s groups.
Okay and now let’s put in the full picture for the SeAccessCheck:
After the Integrity Level-Check (IL-Check), which will be described in the following section, the Security Reference Monitor (SRM) queries the Security Descriptor of the requested object for the following information:
- Who is the owner of the requested object?
→ If the requesting user is the owner of the requested object: Grant Access - If the requesting user is not the owner, iterate over all ACEs in the DACL of the Security Descriptor and determine:
– Does the ACE apply for the requesting user by comparing the ACE SID to the user SID and his/her group SIDs ?
– Does the access mask contain the requested access right, e.g. does the access mask contain the GENERIC_READ access right ?
– Does the access type is set to allow access or is it set to deny access? - If any ACCESS_DENIED_ACE_TYPE matches the user and requested access right: Deny Access
- If no ACCESS_DENIED_ACE_TYPE but a ACCESS_ALLOWED_ACE_TYPE matches the user and requested access right: Grant Access
Next to the Owner and DACL checks there is only one element missing to understand the SeAccessCheck, which is the Integrity Level Check (IL-Check). So let’s dive into that.
Integrity Level Check / Mandatory Integrity Control (MIC)
This section will bring light on the Integrity Level Check shown in the figure above.
The Integrity Level check is meant to enforce another Windows control layer, called Mandatory Integrity Control (MIC).
Mandatory Integrity Control (MIC) provides a mechanism for controlling access to securable objects. This mechanism is in addition to discretionary access control and evaluates access before access checks against an object’s discretionary access control list (DACL) are evaluated.
Source: Mandatory Integrity Control
The first question that should arise in your head now is:
Why the f** do we need MIC? We got DACL checks, which are basically the same checks that are done in Unix systems – shouldn’t that be enough?*
The answer to this question is: Yes the DACL checks are the core of the authorization checks and the vast majority of all access request will be granted or denied based on the DACL checks. MIC is just another layer added by Microsoft in Windows Vista alongside with User Access Control (UAC) to get more fine grained control and to prevent compromised processes from accessing sensitive resources.
This is a very abstract answer to a simple question, but the following introduction to MIC and UAC will hopefully shed some more light on this.
Each Securable Object got a MANDATORY_INTEGRITY_LABEL set in it’s SACL. This label assigns one of four possible Integrity Levels (IL) to the object (as defined in Windows Integrity Mechanism Design):
- Low (SECURITY_MANDATORY_LOW_RID 0x00001000)
- Medium (SECURITY_MANDATORY_MEDIUM_RID 0x00002000)
- High (SECURITY_MANDATORY_HIGH_RID 0X00003000)
- System (SECURITY_MANDATORY_SYSTEM_RID 0x00004000)
These Integrity Levels label the degree of ‘security protection’ that has been assigned to a Securable Object.
»By default all objects are assigned with a Medium Integrity Label.
As an example refer back to the previous screenshot of the Security Descriptor, notice that the Security Descriptor of this object (the explorer.exe process) got the following MANDATORY_INTEGRITY_LABEL: SID: S-1-16-8192
A quick look up to the Well-known SIDs Register reveals that this SID describes the ‘Medium Mandatory Level’ (default for all objects).
»Take away«:
The whole story of integrity labels is to prevent lower level integrity processes from accessing higher level integrity objects.
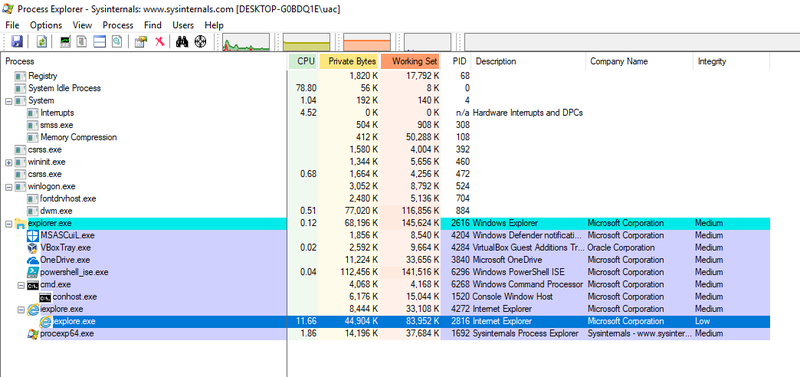
Another example: When starting the Internet Explorer, a low Integrity Level IE process will be spawned (see screenshot below). This low level IE process is the process that is used by the user for surfing the internet.
If this process is compromised, e.g. by exploiting an IE/Flash/etc. vulnerability, the process would not be able to access a user’s documents, because these were created with the default medium Integrity Level label (and the IE process is running with low integrity).
This is the point where the Integrity Levels checks should begin to make sense. Imagine the compromised IE scenario without MIC. The IE process has been launched by the logged in user and therefore is owned by the logged in user. The DACL-check would therefore grant the compromised IE process access to the user’s resources.
By enforcing an IL-Check, access to user resources is denied to the compromised IE process.
So am I saying that access is generally denied when a process with a lower Integrity Level tries to access a resource with a higher Integrity Level? Of course not – why should it be that simple…
During the Integrity Level check, the SRM compares the Integrity Level of the requesting process with the Integrity Level of the requested object and decides to go to the DACL check or denies access based on the Integrity Level Policy defined for that object.
The Integrity Level Policy of an object is based on the following three defined states (as defined in the SYSTEM_MANDATORY_LABEL_ACE Structure):
- SYSTEM_MANDATORY_LABEL_NO_WRITE_UP ( 0x1 )
- SYSTEM_MANDATORY_LABEL_NO_READ_UP ( 0x2 )
- SYSTEM_MANDATORY_LABEL_NO_EXECUTE_UP ( 0x4 )
Once again refer back to the Security Descriptor of the running explorer.exe given in the previous section. Notice that the Access Mask of the SACL ACE SYSTEM_MANDATORY_LABEL_ACE_TYPE is set to 0x00000003, meaning that this integrity policy denies READ and WRITE access attempts from processes with a lower Integrity Level than Medium, which is the integrity level of that object.
That’s the story of integrity level checks.
Refer back to the initial figure and double check that all makes sense now.
Privileges
The best way to introduce Privileges is with the official MSDN explanation:
A privilege is the right of an account, such as a user or group account, to perform various system-related operations on the local computer, such as shutting down the system, loading device drivers, or changing the system time. Privileges differ from access rights in two ways:
- Privileges control access to system resources and system-related tasks, whereas access rights control access to securable objects.
- A system administrator assigns privileges to user and group accounts, whereas the system grants or denies access to a securable object based on the access rights granted in the ACEs in the object’s DACL.
Each system has an account database that stores the privileges held by user and group accounts. When a user logs on, the system produces an access token that contains a list of the user’s privileges, including those granted to the user or to groups to which the user belongs. Note that the privileges apply only to the local computer; A domain account can have different privileges on different computers.
Source: https://msdn.microsoft.com/en-us/library/windows/desktop/aa379306(v=vs.85).aspx
To enumerate what privileges your user has, simply run the following command and find the list of privileges at the end of the outputted result
C:> whoami /all
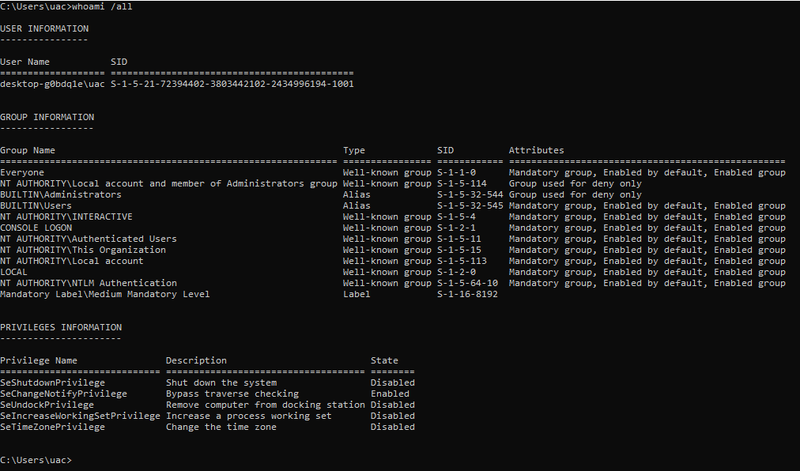
Notice how the privileges expand once you run that command in a cmd started with “Run as administrator”:

To cross check or look up the privileges you got you can use the following MSDN resource:
https://msdn.microsoft.com/en-us/library/windows/desktop/bb530716(v=vs.85).aspx
UAC
The sole purpose of User Access Control (UAC) is to have more fine-grained control over administrative execution and to prevent administrative users to use their admin execution rights when it’s not needed.
Recall from the introduction that by logging into your Windows computer your logon thread is assigned a user access token and all child processes launched by that user will inherit this token. For non-admin users this is a Medium Integrity token with your default privileges.
Prior to Windows Vista admin users got a high integrity token with all administrative privileges and each child processes launched would inherit this token. This meant that all processes spawned by an admin user would run with high privileges even if the process would not need those high privileges (e.g. the explorer.exe started by an admin would run with a high integrity token and full admin privileges without needing those privileges). UAC was introduced to fix this.
»Note: All of the following explanations assume that UAC is enabled and the administrative user we’re talking about is not the local RID-500er administrator (we get to that special case afterwards)
Since UAC was introduced in Windows Vista, when an admin logs in two access tokens are created:
- A Full Admin Token, also often referred to as ‘Non-filtered Token’ or ‘Full Token’, with high Integrity Level (IL) and all administrative privileges
- A filtered admin token, also often referred to as ‘Standard Token’ or ‘Restriced Token’, with medium integrity level (IL) and reduced privileges
These two tokens are linked together in the kernel, so that an executing thread could access both tokens if needed.
Now if an admin user logs into his account and launches cmd.exe this process will be spawned using the filtered, medium integrity token (remember: UAC is enabled and the user is not the RID-500 administrator). Thereby high access privileges are not given to processes that do not need those.
But in case the administrator user needs to run a process with full admin privileges he can ask the operating system to elevate this processes privileges with his full admin token, this is the ‘Run as administrator’-button. This will cause the prominent ‘consent’ prompt to pop up (C:WindowsSystem32consent.exe) as shown in the screenshot below:
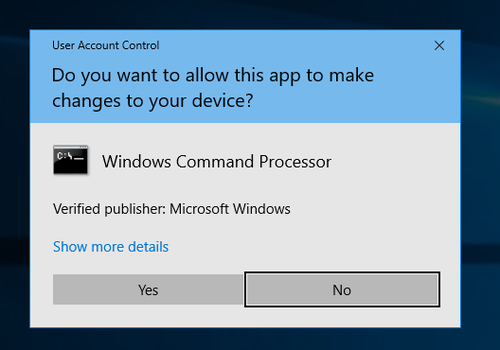
By accepting this consent prompt, the system will create the elevated process (in this case cmd.exe) with full admin privileges, as it can be seen in the screenshot below:
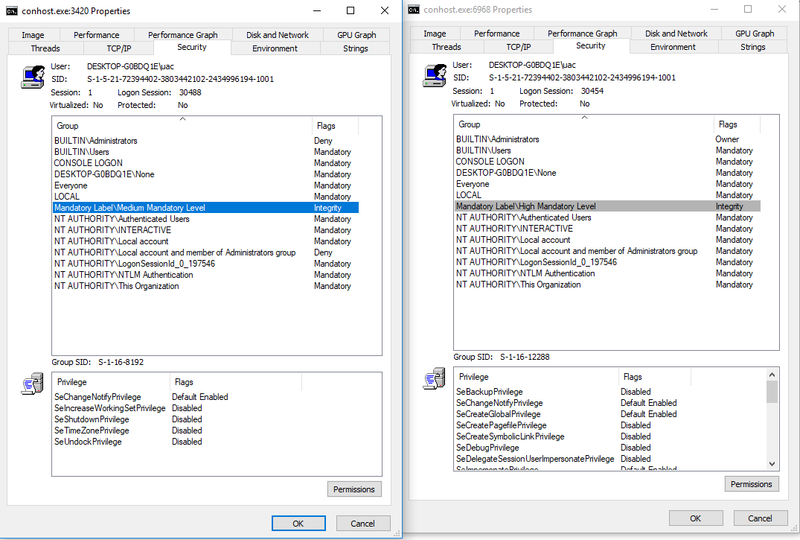
The cmd.exe process (note that conhost.exe is the child processes created by cmd.exe) launched by the administrator without elevating is shown on the left and the elevated cmd.exe by hitting ‘Run as administrator’ is shown on the right.
Also compare the Integrity Levels and Privileges of these processes to determine which is which.
UAC for the RID-500er local Admin
All of the explanations above are only true for local or domain administrators that are not the RID-500er local admin. Each installation of Windows comes with a local Administrator account (which is disabled by default), that can be identified by the Relative Identifier (RID) of 500 (SID: S-1-5-21-DomainID—500).
The Story for the RID-500 local admin is that this account is not enrolled in UAC by default.
That means that if you log in to your Windows computer with the RID-500er local admin account you will be assigned a high privileged full access token right away (and don’t get a ‘filtered’ medium integrity token). If you run cmd.exe (or anything else) with the RID-500 local admin, even without specifying ‘Run as administrator’, then the cmd.exe will spawn with full administrative privileges and a high Integrity Level (because your only got a full token that the cmd.exe process can inherit). If you hit ‘Run as administrator’ with your RID-500er local admin there will be no consent prompt.
The RID-500er admin is by default not enrolled in UAC, but can be enrolled by setting the following registry key to ‘1’:
HKLMSOFTWAREMicrosoftWindowsCurrentVersionPoliciesSystemFilterAdministratorToken
As shown in the following screenshot the FilterAdminstratorToken has been set to ‘1’ in this instance, which enrolls the RID-500er Admin in UAC (and thereby all of the rules mentioned previously would also apply for this user).

Disabling UAC For Non-RID-500er Admins
So by default the RID-500er Admin is not enrolled in UAC, but all other admins (meaning local or domain users that are in the administrative group) are enrolled in UAC.
Now as the RID-500er admin user can be enrolled in UAC, also the Non-RID-500er admins can be dis-enrolled from UAC, by setting the LocalAccountTokenFilterPolicy to ‘1’.
HKLMSOFTWAREMicrosoftWindowsCurrentVersionPoliciesSystemLocalAccountTokenFilterPolicy
This registry key is not set by default, so if this key is missing all non RID-500er accounts are enrolled in UAC:

UAC and Remote Access
All of the above is true for local access, meaning your user locally logs into the computer and executes processes. Now for remote access there is another addition to the story.
The short version: For remote access (e.g. via wmic) domain administrators are given a full high integrity access token, but local Non-RID-500er admins will only be given a medium integrity restricted token.
Terming it the Microsoft way:
1) Remote Access for Local Admins (Non-RID-500er):
Source: https://support.microsoft.com/en-us/help/951016/description-of-user-account-control-and-remote-restrictions-in-windows
When a user who is a member of the local administrators group on the target remote computer establishes a remote administrative connection … they will not connect as a full administrator. The user has no elevation potential on the remote computer, and the user cannot perform administrative tasks. If the user wants to administer the workstation with a Security Account Manager (SAM) account, the user must interactively log on to the computer that is to be administered with Remote Assistance or Remote Desktop.
2) Remote Access for Domain Admins:
Source: https://support.microsoft.com/en-us/help/951016/description-of-user-account-control-and-remote-restrictions-in-windows
When a user with a domain user account logs on to a Windows Vista computer remotely, and the user is a member of the Administrators group, the domain user will run with a full administrator access token on the remote computer and UAC is disabled for the user on the remote computer for that session.
» This addition to UAC applies for remote administrative access, this does not affect Remote Desktop connections (which are considered as local logon).
UAC And Pass-the-Hash
Now comes the kicker.. Let’s face the following question:
Q: The following accounts try to establish a remote connection to a computer with default settings via a pth-attack (pass-the-hash) (using psexec or wmic).
Who will be able to establish a successful remote connection and why?
- a) The Local ‘Administrator’ — SID: S-1-5-21DomainID-500
- b) The Local user ‘LocalAdm’ who is member of the local Administrators Group (SID: S-1-5-32-544)
- c) The domain user ‘LabFrank’ who is a standard domain user without administrative privileges
- d) The domain user ‘LabBob’ who is a member of the domain Administrators group
Be aware that remote access requires to launch high privileges processes and consider that there is no way to remotely elevate privileges.
——– SPOILER / ANSWER ——–
Answer: a) & d) are correct
And here’s why:
a) –> The local 500er Admin is not enrolled in UAC per default. The 500er admin receives a full access token per default and can establish a remote connection.
b) –> The non-500er local Admin is enrolled in UAC, but does not receive a full access token.
The full story here is: The non-500er admins tries to log in and gets a standard/medium access token. The remote connection access requires to start full token administrative access processes, which the user does not have (he/she got the medium token). Thereby his connection is refused.
c) –> Same story as for the non-500er local Admin. He/she gets a standard (medium) token and is rejected.
d) –> The domain admin is enrolled in UAC but gets automatically elevated. This is the exception that applies to remote access compared to local access.
The full story is: The domain admin, tries to log in, automatically receives a full/admin access token (instead of a standard/medium access token) and is able to get a remote shell.
If you’re still interested i also recommend a read over harmj0y’s blog post on Pass-the-Hash Is Dead: Long Live LocalAccountTokenFilterPolicy https://www.harmj0y.net/blog/redteaming/pass-the-hash-is-dead-long-live-localaccounttokenfilterpolicy/
Bonus Kicker: As mentioned before, the UAC remote rules do not apply for remote desktop connections. Therefore, if your user is part of the remote desktop user group you could also go for pass-the-hash via remote desktop, as described here: https://www.kali.org/penetration-testing/passing-hash-remote-desktop/
Access Tokens
So far when talking about basic access checks or UAC, user ‘access tokens’ were introduced. This access tokens hold information about the current user and the user’s groups and are for example used by the Security Reference Monitor (SRM) to determine who is requesting access.
These tokens are of major relevance for the access check and also play a role for certain privilege escalation attacks. Therefore it’s worth getting a closer look at access tokens.
So to start with there are only two kinds of token:
- Primary Tokens, which are assigned to processes; and
- Impersonation Tokens that are assigned to threads
Two kinds of tokens, that’s it. ‘Filtered tokens’, ‘Restricted Tokens’, ‘Full Tokens’, ‘Admin Tokens’, or in general ‘Access Tokens’, are just names given to describe the token, but all of these are Impersonation Tokens.
Both, primary and impersonation tokens, consist of the following major fields:
- User SID: the SID of the user (impersonation token) or the SID of the user that created the process (Primary token)
- Group SIDs: Group SIDs of the corresponding user (User SID)
- Logon SID: Identifies the current logon session
- Privileges: List of Privileges the User (impersonation token or process has)
- Primary Group SID: identifies the primary group of the impersonated user (impersonation token), e.g. ‘Domain Users’
- Default DACL: The default DACL that the system uses when a user creates a securable object without specifying a security descriptor (comparable to Linux umask)
- Type: Information if token is primary or impersonation
- Impersonation Level: The degree (level) of allowed impersonation.
- Integrity Level: SID of integrity level
- …
It is the token that is passed to the SRM to determine if a process has access to an object, therefore if you are able to obtain a high privileged token, you can escalate your privileges.
To get a hands on experience with tokens, James Forshaw develop the great tool Token Viewer (contained in the Sandbox-AttackSurface-Analysis-Tools), which is shown below:
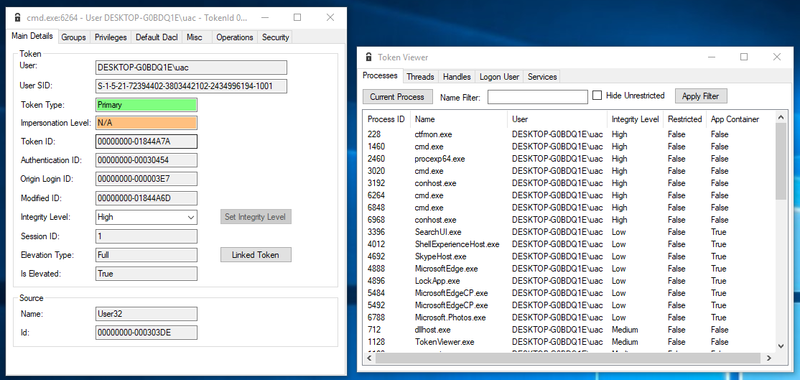
In the right window a list of processes is shown. The token of one of the high integrity cmd.exe processes was opened and is shown in the left window. Notice that the token type is primary (because it’s a process) and the Integrity Level (IL) is set to High (because the cmd.exe process was started as elevated process by an admin).
Keep in mind that each process has a token assigned to it and this token is always a primary token.
Now let’s move to threads. Remember from the introduction that a user is assigned with a token once the user logs in and more precisely that means that the user’s logon thread is assigned with an impersonation token. A process can only have a primary token, but a thread can have an impersonation token as well as a primary token, in which case the impersonation token will always take primary over the primary token.
(… yep I know. Microsoft just sucks when it comes to naming things)
An example of an impersonation token is given below:
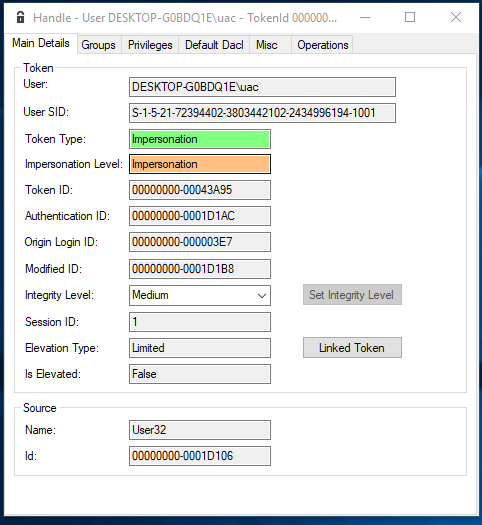
Notice that the token type now says ‘Impersonation’ and that now also the field ‘Impersonation Level’ is set to ‘Impersonation’. The impersonation level is an important field that influences if a token can be impersonated (more on this in the next section).
So far so good. The key take away here is that there are only two types of tokens for processes and threads.
Impersonation
The process of impersonation is quite important and frequently used in the Windows authorization process. To understand why impersonation is used we first must take a step back:
Imagine a user wants to delete a file on a remote file share. Now the server hosting the file needs to determine if the user is allowed to do that. The server can’t access the user’s access token because that token is not accessible in the remote server’s memory (the token is stored on the computer of the user requesting to delete the file). What the server could do is query the user’s account and group information from the Active Directory (AD) and check manually if the user is allowed to delete files, but this task is tedious and prone to errors. Therefore another approach was implemented and termed ‘Impersonation’.
The basic idea is that the server simply pretends to be the requesting user and carries out the requested action as if the server was the user. So what the server does is it duplicates the user’s Impersonation token and requests the action (e.g. delete a file) with that duplicated token (as if the server was the user).
Impersonation is a powerful feature, it enables a process to pretend to be someone else.
OK Million dollar idea: I just impersonate the token of a high privileged user and gain instant privilege escalation! … Nice thought, but obviously it cannot be that easy. There are two obstacles in the way:
- a) Not every impersonation token can be used to carry out actions
- b) You need special privileges to be able to ‘impersonate’ a token (which technically means duplicate a token)
The first obstacle is that not every token is actually ‘valuable’. What that means is that each impersonation token got an attribute called Impersonation Level, that can have one of the following values:
- Anonymous Level — the server can impersonate the client, but the token does not contain any information about the client. Anonymous level is only supported for inter process communication (e.g. for named pipes). All other transports silently promote this to ‘Identification Level’
- Identification Level — This is the default. The server can obtain the identity of the client in order to do ACL checks. You can use that token to read information about the impersonated user or check the resources ACL, but you can’t actually access that resource (read/write/execute)
- Impersonate Level — The server can impersonate the security context of the client in order to access local resources. If the server is local, it can access local and network resources. If the server is remote it can only access resources on the same machine as the server.
- Delegate Level — The most powerful impersonation level. The server can impersonate the security context of the client to access local or remote resources.
So what you want is an Impersonation or Delegation Level impersonation token to be able to actually do anything (a little more on this in the next section).
The second obstacle in your way is that you need special privileges in order to be able to duplicate (impersonate) another token. That special privilege is TOKEN_DUPLICATE (as specified in Access Rights for Access-Token Objects).
The plot twist here is that if you do not hold this privilege, your request to duplicate a token is not denied, you still get a duplicated token, but one with a lower Impersonation Level.
The flow of duplicating/impersonating another token is shown below:
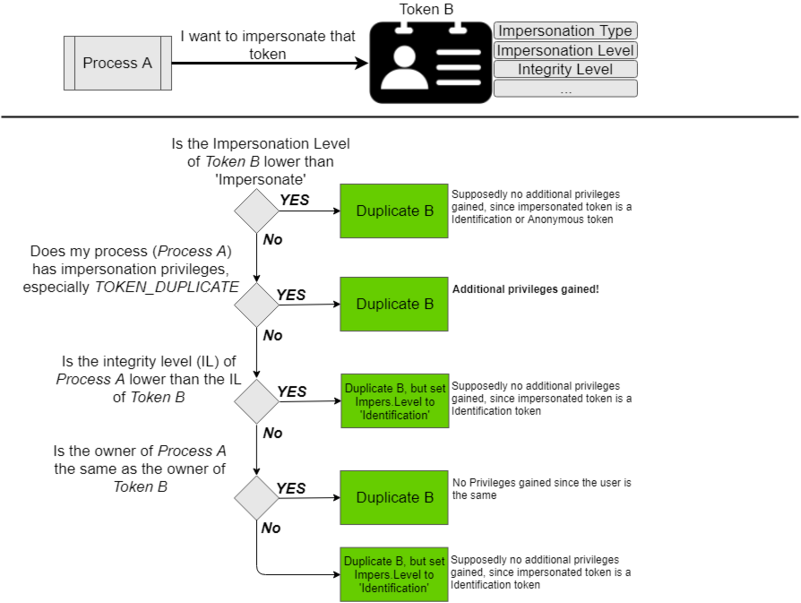
So at the end of the day you either hold the TOKEN_DUPLICATE privilege (or compromised a process that holds this) or you end up with an Identification Level token, which is supposedly of no use to an attacker because you can’t carry out any action with that.
At this point we’re almost done with tokens. The following sections are meant to get you into the mind-set of privilege escalation attacks based on tokens…
Privilege Escalation With Identification Tokens
The previous section describes that it is pretty easy to obtain an identification token.
To once more underline the fact that this is true, I activated the local administrator account on my windows machine and used Forshaw’s Token Viewer tool, to impersonate the Administrators Impersonation token (for more details check out His 2015 BlackHat Talk):

I ran this tool with a standard non admin user, and still got access to the Administrators token. It feels odd, but based on the access check for duplicate tokens that was presented in the previous section, this is all as it should be.
Notice that I only gained an Identification Impersonation Token.
There should be not much that I can do with that token, especially not carry out administrative tasks or access protected resources…
… unless of course some programmers forget to check the Impersonation Level of the token that is presented for authorization checks. James Forshaw found that this happened for some windows components, which resulted in CVE-2015-0002 as shown for example in this PoC.
I highly recommend to review James 2015 BlackHat Talk to understand the full impact and application of this vulnerability, but the basic story for this was that a certain Windows component made an access check to verify if the presented impersonation token belongs to an Administrator, but the component only checked the Impersonation type and the associated groups and totally ignored the impersonation level, which resulted in access for any user that could present a high integrity identification token with administrative groups… Amazing finding!
Privilege Escalation By Leaky Tokens
Another privilege escalation vulnerability that Forshaw found is what he termed ‘Leaky Tokens’. The basic idea of this kind of vulnerability is as follows:
Kernel code can access any kind of token to read and manipulate it. So what if you found a Windows kernel component that just gives out tokens, that it had accessed, back to the user ?!
It sounds a bit too obvious that this is flawed, but Forshaw found that an undocumented win32k system call existed that passed a previously used token right back to the user.
This flaw exited in the kernel code for the Windows clipboard (used for copy+paste). So once an administrator copied something (e.g. say text from an editor), any user could call the undocumented function NtUserGetClipboardToken and get back the previously used admin access token.
This was raised by Forshaw in CVE-2015-0087.