В этой статье мы рассмотрим, как установить PowerShell модуль для подключения к Azure AD, подключится к своему тенанту и получить различную информацию из Azure. Сейчас Microsoft разрешает использовать два PowerShell модуля для подключения к Azure:
- MS Online (MSOnline) – старый модуль для работы с Azure/Office 365 из PowerShell, который появился около 6 лет назад и сейчас не развивается Microsoft;
- Azure Active Directory PowerShell for Graph (AzureAD) – современный PowerShell модуль для работы с инфраструктурой Azure. Модуль активно развивается, в него добавляется новый функционал (в нем доступны почти все аналоги командлетов MSOnline за небольшим исключением)
Теперь можно установить модуль Azure PowerShell из PowerShell Gallery. Запустите консоль PowerShell с правами администратора и выполните команду:
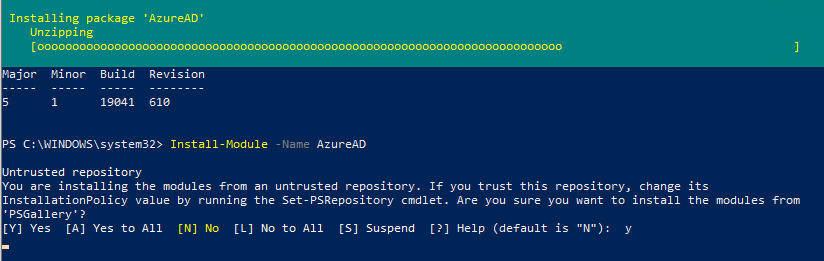
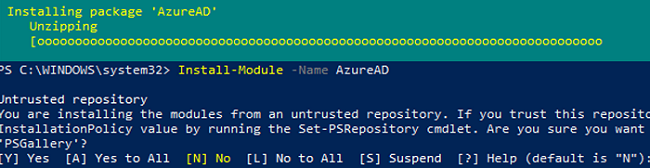
Install-Module -Name AzureAD
Появится сообщение:
Untrusted repository. You are installing the modules from an untrusted repository. If you trust this repository, change its InstallationPolicy value by running the Set-PSRepository cmdlet.
Нажмите Y -> Enter
Вы можете добавить галерею PowerShell в доверенные хосты с помощью команды:
Set-PSRepository -Name PSGallery -InstallationPolicy Trusted
После окончания установки, можно проверить версию модуля AzureAD:
Get-Module AzureAD –ListAvailable
В нашем случае это 2.0.2.130

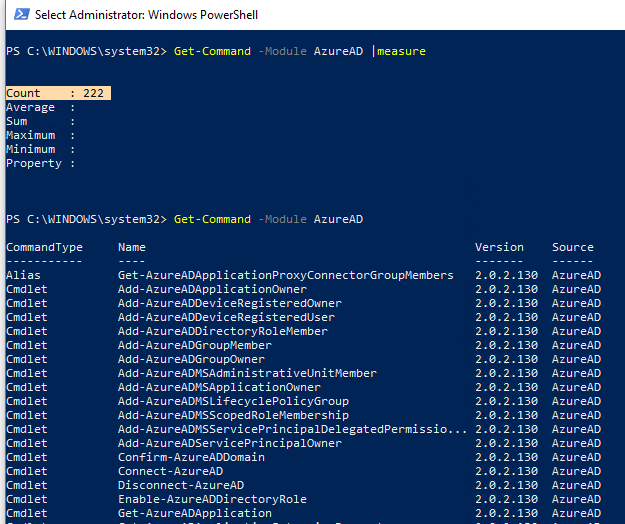
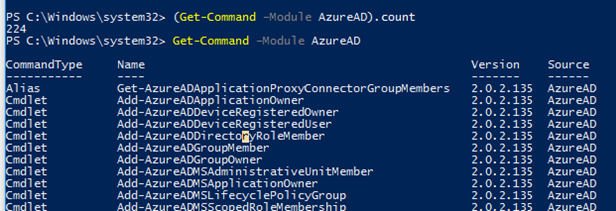
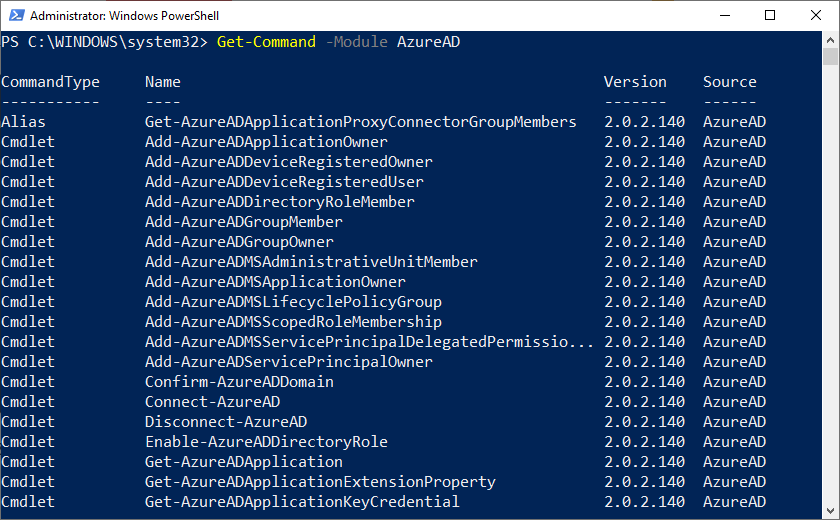
В этой версии модуля AzureAD доступно 222 командлета, которые содержат в названии *-AzureAD*. Список доступных команды можно вывести так:
Get-Command –Module AzureAD
Если у вас установлена более старая версия модуля AzureAD, ее можно обновить:
Update-Module -Name AzureAD
Если нужно установить определенную версию модуля, выполните:
Update-Module -Name AzureAD -RequiredVersion 2.0.2.120
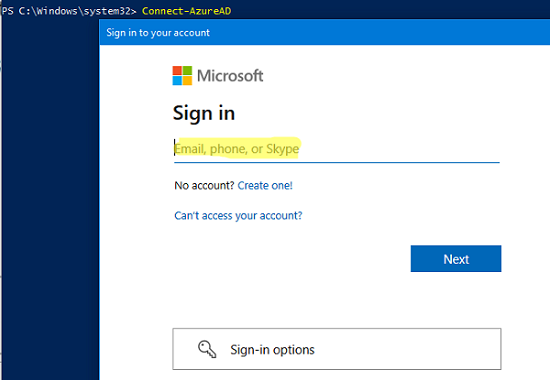
Теперь можно подключиться в Azure с помощью вашего аккаунта:
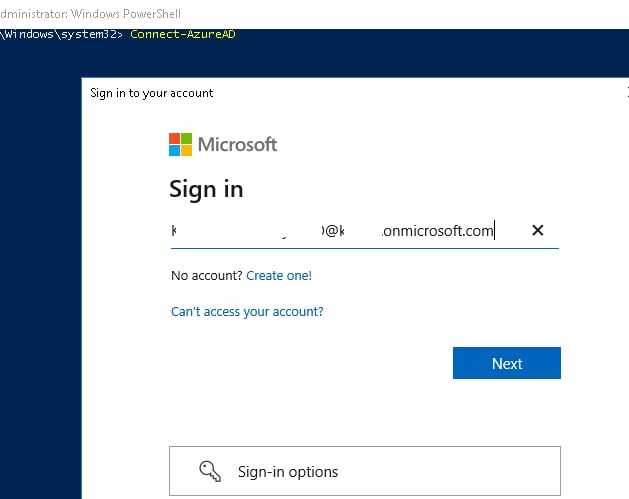
Connect-AzureAD
Командлет запросит ввести учетные данные, которые вы хотите использовать для доступа к каталогу AzureAD. В этом примере для доступа к моему тенанту я использую учетную запись [email protected]
Если у вас включен Azure MFA, подтвердите в вход в аккаунт на устройстве.
Также можно запросить имя и пароль для подключения и сохранить их в переменную:
$AzureADcreds = Get-Credential
И затем использовать их для подключения:
Connect-AzureAD -Credential $AzureADcreds
Вы можете использовать сохраненный пароль во внешнем хранилище с помощью PowerShell модуля SecretManagement (поддерживаются почти все популярные vault провайдеры: Bitwarden, Azure Key Vault, KeePass, LastPass, HashiCorp Vault, Windows Credential Manager и т.д). Для подключения к Azure AD с паролем из хранилища используется такая команда PowerShell:
Connect-AzureAD -Credential (Get-Secret -Vault MyPersonalVault -Name azadm_kbuldogov)
Командлет возвращает подтверждение, показывающее, что сеанс был успешно подключен к каталогу. В строке будет указано окружение AzureCloud, TenantID и TenantDomain.

Для подключения к некоторым специализированным облакам AzureOffice 365 нужно указывать параметр -AzureEnvironmentName.
Connect-AzureAD -AzureEnvironmentName AzureChinaCloud
Connect-AzureAD -AzureEnvironmentName AzureGermanyCloud
Connect-AzureAD -AzureEnvironmentName AzureUSGovernment
По умолчанию модуль подключается к облаку Worldwide.
Информацию о текущем тенанте Azure можно вывести так:
Get-AzureADTenantDetail

Теперь вы можете использовать командлеты модуля AzureAD для получения различной информации из домена. Найдем пользователей, чьи имена начинаются с Dmit:
get-azureaduser -SearchString Dmit

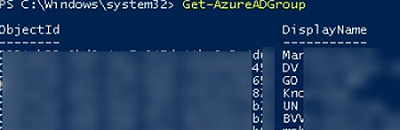
Или список облачных групп в AzureAD:
Get-AzureADGroup

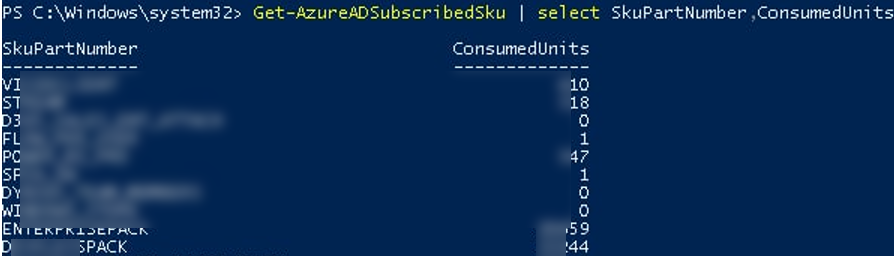
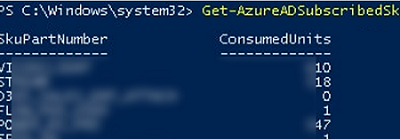
Чтобы получить список доступных лицензий, которые доступны в вашей подписке Office 365 используется командлет:
Get-AzureADSubscribedSku | select SkuPartNumber, ConsumedUnits
Можно определить, какая лицензия назначена определенному аккаунту:
Get-AzureADUser -SearchString [email protected] | Select -ExpandProperty AssignedLicenses
Затем по полученному SkuID можно узнать имя лицензии:
Get-AzureADSubscribedSku | Where {$_.SkuId -eq "6123434-b223-4332-babcd-1e9231231235"}
Подрообнее про управление лицензиями в Azure AD через PowerShell рассказано в статье.

Чтобы в сессии PowerShell отключится от Azure, выполните:
Disconnect-AzureAD

In this Azure tutorial, we will discuss the Azure Active Directory Module for Windows Powershell. Along with this, we will also discuss the below topics.
- Why do you need the Azure Active Directory PowerShell Module?
- Microsoft Azure Active Directory Module for Windows
- Update Azure AD PowerShell Module
- Azure Active Directory PowerShell for Graph
- Installation of the Azure AD Module and AzureADPreview module
- How to update the Azure AD module?
- Connect to Azure AD PowerShell
- What is msonline module?
- What is the difference between Azure AD Module and MS Online module?
Table of Contents
- Why do you need the Azure Active Directory PowerShell Module?
- Azure Active Directory Module for Windows Powershell
- Microsoft Azure Active Directory Module for Windows
- Update Azure AD PowerShell Module
- Azure Active Directory PowerShell for Graph
- Installation of the Azure AD Module and AzureADPreview module
- How to update the Azure AD module?
- Connect to Azure AD PowerShell
- What is msonline module
- What is the difference between Azure AD Module and MS Online module?
Why do you need the Azure Active Directory PowerShell Module?
Before installing the Azure Active Directory PowerShell module for windows, we should know why do you need the Azure Active Directory PowerShell module? then we will discuss the Azure Active Directory Module for Windows Powershell.
- Vault Cannot Be Deleted As There Are Existing Resources Within The Vault
Once you installed the Azure Active Directory PowerShell module, you can able to manage many administrative tasks related to the Office 365 user and your Organisation using PowerShell. Also, it helps you to provide you the capability to reset the passwords, policies related to the Password, and the license management.
Now, we came to know why do you need the Azure Active Directory PowerShell module? So let’s discuss how to install the Azure Active Directory Module for Windows Powershell. Follow the below steps to install the Azure Active Directory Module.
Step-1: Open the Windows PowerShell or PowerShell ISE as an Administrator mode.

Step-2: Now you can run the below PowerShell cmdlet to install the MSOnline module.
Install-Module -Name MSOnline
Step-3: Click on the Yes button from the above Pop up. Once you click on the Yes button, it will install the module successfully.

You can see above, the PowerShell module has been installed successfully with out any issue.
Step- 4: Now use the below PowerShell cmdlet to connect to the Active Directory.
PS C:WINDOWSsystem32> Connect-MsolServiceStep-5: Once you will enter the above PowerShell cmdlet, It will prompt you to enter your credentials. Enter your Office or school account details.

Here we have discussed windows azure active directory module for windows powershell download option.
Microsoft Azure Active Directory Module for Windows
Azure AD Connect is one of the Microsoft tools that helps with multiple features for example Password hash synchronization – This is a sign-in method that synchronizes a hash of the on-premises Active Directory password of the user with Azure AD.
It also allows you to quickly onboard to Azure AD and Office 365.
For more information on the Azure AD Connect like download, installation, Azure ad connect requirements details you can check my article Azure AD connect download.
Update Azure AD PowerShell Module
In Common, if you want to update a PowerShell module, you can do the same way how you are installing the module. The only thing is for installing, you are using Install–Module command. Same way if you want to update the module you can use the Update–Module command.
For Example, if you want to update all of your installed module, then you can use the below cmdlets
PS C:WINDOWSsystem32> Update-ModuleIf you want to update a specific module, then you can mention the name of your module with the below cmdlet
PS C:WINDOWSsystem32> Update-Module -Name ModuleNameFor example, if we want to update the Azure Active Directory module that we installed by following the above steps, then you can use the below cmdlet
PS C:WINDOWSsystem32> Update-Module -Name MSOnline
You can also update a module to a specified version using the below cmdlet
PS C:WINDOWSsystem32> Update-Module -Name MSOnline -RequiredVersion version numberFinally, if you want to update the module without the confirmation, you can use the below PowerShell cmdlet
Update-Module -Name MSOnline -ForceThis is how we can update Azure AD PowerShell Module.
Azure Active Directory PowerShell for Graph
Azure Active Directory PowerShell for Graph (AzureAD) is a module that is used to manage the Azure Active Directory.
you can perform many operations like retrieve data from the Azure Active Directory, create and update the objects in Azure Active Directory. With the help of AzureAD cmdlet, you can also configure the ActiveDirectory and all its features.
The AzureAD module is also used to do all the user management task, to configure the single sign-on option in Azure Active Directory.
There are two versions of Azure AD PowerShell for Graph module i.e a Public preview version (AzureADPreview) and a General Availability version (AzureAD).
Installation of the Azure AD Module and AzureADPreview module
There are some operating systems that are supported for the installation of AzureAD module. These are as below
- Windows 8
- Windows 7
- Windows Server 2012 R2
- Windows Server 2012
- Windows Server 2008 R2
You can use the below PowerShell cmdlet to install the AzureAD module
PS C:WINDOWSsystem32> Install-Module AzureAD
Once you will execute the above PowerShell cmdlet, you will see it will start the installation and will complete the installation successfully.

To install the AzureADPreview module, use the below PowerShell cmdlet
PS C:WINDOWSsystem32> Install-module AzureADPreview
Once you will run the above PowerShell cmdlet, Click on the Yes button from the below pop up.

Once you will click on the Yes button, it will start installing the AzureADPreview module. It will take few seconds to install the AzureADPreview module.

The Azure AD module is available in the PowerShell gallery. You can check the updated version using the PowerShell Get module.
How to update the Azure AD module?
You can check the latest version of the Azure AD module available in the PowerShell Gallery using the below PowerShell cmdlet.
PS C:WINDOWSsystem32> Get-Module AzureADPreviewNow you can see the latest version available in the PowerShell Gallery.
Now, if you want to update the Azure AD module to the latest version then you need to run the below PowerShell cmdlet again.
PS C:WINDOWSsystem32> Install-Module AzureADPreview
This will check if the latest version is available in the PowerShell Gallery, it will install the latest version of the Azure AD module on your computer. If already the latest version is available in your system then it will not do anything.
Connect to Azure AD PowerShell
Before running any of the PowerShell cmdlets related to Azure AD as discussed above, you should connect to your online service using Connect-AzureAD cmdlet.
Once you will execute the below cmdlet, it will prompt you to enter your credentials to connect to your Azure AD module.
PS C:WINDOWSsystem32> Connect-AzureAD
Now we have discussed about Azure AD. Now let’s see what is msonline module?
What is msonline module
Let’s discuss what is msonline exactly?. This is the older version of Azure Active Directory PowerShell module. This is the version one of the Azure Active Directory module.
There are some features that are available in the MSOnline module, that are not present still in version 2.0 i.e AzureAD module.
Msonline provides some of the functionality that is not yet available in the latest version AzureAD module.
We have already discussed above how to install the Msonline module.
Below are few PowerShell cmdlets of Azure Active Directory MSOnline module that helps us to perform multiple tasks
| Add-MsolAdministrativeUnitMember | This helps us to add a member to an administrative unit. |
| Add-MsolGroupMember | This helps to add a member to an existing security group. |
| Connect-MsolService | This command helps to initiate a connection to Azure Active Directory. |
| Disable-MsolDevice | This helps us to disable a device object in Azure Active Directory. |
| Enable-MsolDevice | This command helps to Enable a device object in Azure Active Directory |
| Get-MsolSubscription | This command helps to get subscriptions |
| Get-MsolUser | This command helps to gets users from Azure Active Directory |
| Get-MsolContact | This command gets you the contacts from Azure Active Directory. |
| Get-MsolDevice | This cmdlet helps to gets an individual device or a list of devices. |
| Get-MsolGroup | This cmdlet helps to retrieve a group from Microsoft Azure Active Directory. |
| Get-MsolGroupMember | This cmdlet helps to retrieve all members of the specified group. |
| New-MsolGroup | This cmdlet helps to add a new group to the Azure Active Directory |
| New-MsolUser | This cmdlet creates a user in Azure Active Directory |
| Remove-MsolContact | It helps to remove a contact from Azure Active Directory. |
| Remove-MsolDevice | It helps to remove a device object from Azure Active Directory. |
| Set-MsolDomain | It helps to Modify settings of a domain. |
| Set-MsolGroup | It helps to update a security group. |
| Set-MsolUser | It helps to Modify a user in Azure Active Directory. |
For more information on more PowerShell cmdlet on Msonline , you can visit to Microsoft Official site.
What is the difference between Azure AD Module and MS Online module?
| AzureAD | MSOnline |
| Azure AD module is the new module for Azure Active Directory. It is Azure Active Directory PowerShell for Graph | MS Online is the old module for Azure Active Directory. |
| This module is known as the Azure Active Directory module version 1.0. | This module is known as the Azure Active Directory module version 2.0. |
| Microsoft recommends to use the newer AzureAD module. | There are some features that are available in MSOnline that are not present still in the AzureAD module. |
| To install the AzureAD module, you can use the below PowerShell cmdlet
PS C:WINDOWSsystem32> Install-Module AzureAD |
To install the MSOnline module, you can use the below PowerShell cmdlet
PS C:WINDOWSsystem32> Install-Module -Name MSOnline |
These are the difference between Azure AD Module and MS Online module.
You may like to follow the below articles
- The following commands are already available on this system
Conclusion
Well, in this tutorial, we discussed Azure Active Directory Module for Windows Powershell, Why do you need the Azure Active Directory PowerShell Module?, Microsoft Azure Active Directory Module for Windows, Update Azure AD PowerShell Module and also we discussed Azure Active Directory PowerShell for Graph, Installation of the Azure AD Module and AzureADPreview module, How to update the Azure AD module?, Connect to Azure AD PowerShell and finally we discussed What is ms online module? and What is the difference between Azure AD Module and MS Online module?.
How to install the Azure Active Directory PowerShell Module
In order to connect to manage users and organisation settings in Office 365 via Powershell, you need to install the Azure Active Directory PowerShell Module. This can be simply installed via PowerShell itself.
Why do you need the Azure Active Directory PowerShell Module?
This module allows you to perform a lot of the Office 365 user and organisation administration tasks via PowerShell. It’s great for bulk tasks like password resets, password policies, license management/reporting etc.
If you’re a Microsoft Partner, and are managing your customers Office 365 tenants via delegated administration, this module gives you a secure way to perform admin tasks using your own credentials. See our guide here for more info.
Importantly, this module doesn’t give you the ability to manage the features of Exchange Online, Skype for Business, SharePoint/OneDrive etc. These require a separate PowerShell connection method or PowerShell module.
How to Install the Azure Active Directory PowerShell Module via PowerShell
- Open the Start menu on your computer and search for ‘Powershell’
- Right-click on Windows PowerShell and choose ‘Run as administrator’

- Type the following command and press enter.
Install-Module -Name MSOnline
- Type “Y” to install and import the NuGet provider

- Type “Y” again to trust the provider

- Wait for the package to install, then type the following to enter your Office 365 admin credentials and connect to Azure Active Directory via PowerShell:
Connect-MsolService

- Once the Azure Active Directory PowerShell module has been installed, you only need to run the Connect-MsolService command to connect to the Azure AD service on this PC.


To perform Exchange Online Administration tasks, you’ll need to set up a separate connection to Exchange Online via PowerShell. Follow our quick guide here for more info.

Elliot Munro
Need additional help? Want to be across Microsoft 365 updates and GCITS articles when they’re released? Connect with Elliot Munro on LinkedIn here. If you have an Office 365 or Azure issue that you’d like us to take a look at (or have a request for a useful script) send Elliot an email at [email protected]
 Tip
Tip
The Windows Azure Active Directory team regularly updates the Azure Active Directory PowerShell Module with new features and functionality. Not all additions are applicable to all audiences.
This article is designed to help you keep track of the versions that have been released since calendar year 2014, and to understand whether you need to update to the newest version or not, while also providing you access to all previously released versions.
Table of Contents
- Related FAQ
- How can I determine what version of AAD PowerShell I have?
- Where can I find the latest version of AAD PowerShell?
- Installing PowerShell V2 from the PowerShell Gallery
- What can I do if AAD PowerShell doesn’t work as expected after upgrading to the latest version?
- Release overview
- Version 2.0.0.17 (PowerShell V2 Public Preview)
- Version 2.0.0.7 (PowerShell V2 Public Preview)
- Version 1.1.166.0 (PowerShell V1 General Availability)
- Version 1.1.143.0 (PowerShell V2 Public Preview)
- Some changes
- New functionality in AzureAD PowerShell
- Download link
- Version 9031.1
- Version 8362.1
- Version 8262.2
- Version 8073.4
- Version 8000.119
- Preview Versions of MSOL PowerShell
- Version 8808.1 (Public Preview v2)
- Version 8806.11 (Public Preview v1)
↑ Back to top
Related FAQ
How can I determine what version of AAD PowerShell I have?
You can run the get-item cmdlet to check the version of the DLL files of the module that you have currently installed:
(get-item C:WindowsSystem32WindowsPowerShellv1.0ModulesMSOnlineMicrosoft.Online.Administration.Automation.PSModule.dll).VersionInfo.FileVersion
Where can I find the latest version of AAD PowerShell?
- The following fwlinks should always point to the most current version of AAD PowerShell
- Azure Active Directory Module for Windows PowerShell V2 (64-bit version)
- Azure Active Directory Module for Windows PowerShell V1 (64-bit version)
Installing PowerShell V2 from the PowerShell Gallery
The AzureAD PowerShell V2 module can be downloaded and installed from the PowerShell Gallery,
www.powershellgallery.com. The gallery uses the PowerShellGet module.
The PowerShellGet module requires PowerShell 3.0 or newer.
Therefore, PowerShellGet requires one of the following operating systems:
- Windows 10
- Windows 8.1 Pro
- Windows 8.1 Enterprise
- Windows 7 SP1
- Windows Server 2016 TP5
- Windows Server 2012 R2
- Windows Server 2008 R2 SP1
PowerShellGet also requires .NET Framework 4.5 or above. You can install .NET Framework 4.5 or above from
here.
For more information, please refer to
https://msdn.microsoft.com/powershell/gallery/readme
What can I do if AAD PowerShell doesn’t work as expected after upgrading to the latest version?
Please use the download links below to reinstall a previous version of the AAD PowerShell Module to unblock any issues you may be facing, and then make a post to the
Azure Active Directory Forum, describing your issue, and how to reproduce the problems.
↑ Back to top
Release overview
Version 2.0.0.17 (PowerShell V2 Public Preview)
This is a public preview release of the new AzureAD PowerShell V2 cmdlets. The following changes are included in this release:
- New cmdlets New-AzureADMSGroup, Set-AzureADMSGroup and Remove-AzureADMSGroup added. These cmdlets can be used to manage Office 365 groups and dynamic groups in your directory
- New cmdlets to revoke a user’s Refresh Tokens added: Revoke-AzureADSignedInUserAllRefreshTokens and Revoke-AzureADUserAllRefreshTokens
- Connect-AzureAD no longer requires -Force
- Naming convention change for cmdlets that call Microsoft Graph
- Going forward, all cmdlets that call Microsoft Graph will have “MS” in their cmdlet names, as in “Get-AzureADMSGroup”. The cmdlets that call Azure AD Graph will not change, so there is also a “Get-AzureADGroup” cmdlet.
Download link
Version 2.0.0.7 (PowerShell V2 Public Preview)
This is a public preview release of the new AzureAD PowerShell V2 cmdlets. The following changes are included in this release:
- New cmdlets to manage Policy objects have been added
- New cmdlets to manage Device owner and user have been added
- More inline help is a added
- Domain cmdlet parameter is changed
- Connect cmdlet parameter is changed
- A Native app creation bug is fixed
- A User creation/update bug fixed
- There is improved reliability on link related cmdlets.
Download link
Version 1.1.166.0 (PowerShell V1 General Availability)
This is the general availability release of the V1 version («MSOnline») of Azure Active Directory PowerShell cmdlets. The following cmdlets have been added:
- Get-MsolCompanyAllowedDataLocation
- Set-MsolCompanyMultiNationalEnabled
- Set-MsolCompanyAllowedDataLocation
The following cmdlets are not available in this release.
- Get-MSOLAllSettings, Get-MSOLSetting, New-MSOLSetting, Remove-MSOLSetting, Set-MSOLSetting
- Get-AllSettingTemplate, Get-SettingTemplate
Please note that the Settings cmdlets that were published in the preview release of the MSOL module are no longer available in this module. This functionality can now be found in the newer
Azure AD PowerShell V2 Preview module, which can be installed from here: https://www.powershellgallery.com/packages/AzureADPreview
More information about how to use the new cmdlets for Settings can be found here: https://docs.microsoft.com/en-us/azure/active-directory/active-directory-accessmanagement-groups-settings-cmdlets
More information about the Azure AD PowerShell V2 module can be found here: https://docs.microsoft.com/en-us/powershell/azuread/
Download link
64-bit
Version 1.1.143.0 (PowerShell V2 Public Preview)
This the public preview of the new V2 version of Azure Active Directory PowerShell cmdlets. This preview release marks a first step on a journey to renew the existing MSOL PowerShell cmdlets which you are so familiar with. One of the key features of this
release is a close alignment of the PowerShell functionality with the Graph API capabilities. We are also moving towards a faster and more agile release process for new or updated functionality of these cmdlets.
The new PowerShell cmdlets provide more functionality in several areas, most notably for Modern Authentication and MFA, and includes management of Applications and Certificate Authority through PowerShell.
Over time, we will fully replace the existing MSOL cmdlets. You will see regular new functionality updates to this preview release until the complete replacement is available.
Some changes
As you will notice, some things have changed when compared to the existing MSOL library. First of all – we have updated the names of all cmdlets to conform with the Azure PowerShell naming conventions. Since we’re publishing a new module for these cmdlets,
the name of the module has changed as well: the existing module’s name was “MSOL”, the new module is call “AzureAD”. So where e.g. an existing cmdlet was named “New-MSOLUser”, which adds a new user to the directory, the new cmdlet’s name is “New-AzureADUser.
Secondly – the parameters for the new cmdlets sometimes changed as well. As we are developing cmdlets in close alignment with the Graph API functionality, we’re also keeping the names of objects and parameters as close as possible to what is used in Graph
API.
New functionality in AzureAD PowerShell
Managing Certificate Authority using Powershell for Azure AD
These are the new cmdlets that are used to manage Certificate Authority:
- New-AzureADTrustedCertificateAuthority — Adds a new certificate authority for the tenant
- Get-AzureADTrustedCertificateAuthorities — Retrieves the list of certificate authority for the tenant
- Remove-AzureADTrustedCertificateAuthority — Removes a certificate authority for the tenant
- Set-AzureADTrustedCertificateAuthority — Modifying a certificate authority for the tenant
Managing Applications in Azure AD using PowerShell
Several new cmdlets have been added to enable management of Applications in Azure AD using PowerShell. There is a set of cmdlets to create, modify and remove Applications:
- New-AzureADApplication
- Remove-AzureADApplication
- Set-AzureADApplication
- We also offer capabilities to manage Directory Extensions in PowerShell:
- Get-AzureADApplicationExtensionProperty
- New-AzureADApplicationExtensionProperty
- Remove-AzureADApplicationExtensionProperty
There are new cmdlets to manage Owners for an Application:
- Add-AzureADApplicationOwner
- Get-AzureADApplicationOwner
- Remove-AzureADApplicationOwner
And finally, we’re offering new capabilities to manage credentials for Applications in PowerShell:
- Get-AzureADApplicationKeyCredential
- New-AzureADApplicationKeyCredential
- Remove-AzureADApplicationKeyCredential
- Get-AzureADApplicationPasswordCredential
- New-AzureADApplicationPasswordCredential
- Remove-AzureADApplicationPasswordCredential
Download link
PowerShell Gallery
↑ Back to top
Version 9031.1
| Released | 3/10/2016 | |
|---|---|---|
| New Features |
|
|
|
Download Link (EN) |
32-Bit |
64-Bit |
↑ Back to top
Version 8362.1
| Released | 1/19/2015 | |
|---|---|---|
| New Features |
|
|
| Download Link (EN) |
32-Bit |
64-Bit |
↑ Back to top
Version 8262.2
| Released | 12/15/2014 | |
|---|---|---|
| New Features |
|
|
| Download Link (EN) |
32-Bit |
64-Bit |
↑ Back to top
Version 8073.4
| Released | 11/5/2014 | |
|---|---|---|
| New Features |
|
|
| Download Link (EN) |
32-Bit |
64-Bit |
↑ Back to top
Version 8000.119
| Released | 09/10/2014 | |
|---|---|---|
| New Features |
|
|
| Download Link (EN) |
32-Bit |
64-Bit |
↑ Back to top
Preview Versions of MSOL PowerShell
Version 8808.1 (Public Preview v2)
| Released | 10/30/2015 | |
|---|---|---|
| New Features |
|
|
| Download Link (EN) |
32-Bit |
64-Bit |
↑ Back to top
Version 8806.11 (Public Preview v1)
| Released | 9/25/2015 | |
|---|---|---|
| New Features |
See blogpost |
|
| Download Link (EN) |
32-Bit |
64-Bit |
↑ Back to top
When you want to use PowerShell to interact with your Azure AD environment you will need to install the Azure AD Module. This module allows you to manage your whole Azure Active Directory with PowerShell.
Good to know up front is that the Azure AD Module isn’t supported in PowerShell 7. Also, Microsoft is planning to deprecate Azure AD Graph (the endpoint that the Azure AD Module uses) after June 30, 2022.
In this article, I will explain how you can install and update the Azure AD Module in PowerShell.
To install the Azure Module we will be using PowerShell. For production environments, is recommended to use the General Availability (GA) version. If you want to test out new features, then you could also install the Public Preview version of the module.
Time needed: 5 minutes.
- Open PowerShell with Elevated permissions
– Right-click on your Start menu (or press Windows key + X)
– Choose Windows PowerShell (admin) or Windows Terminal (admin) on Windows 11 - Install Azure AD Module
Type the following command in PowerShell:
Install-Module AzureADType Y to install the NuGet provider when requested
- Access Untrusted Repository
After NuGet is installed you will get the question if you want to install from an Untrusted Repository. Press Y to install the Azure AD Module
- Connect to AzureAD
The AzureAD module is now installed in PowerShell. You can test the module by connecting to Azure AD using the following command
Connect-AzureAD
Install the AzureADPreview Module
To install the preview version of the module you can follow the same steps. Only replace the module name with AzureADPreview:
Install-Module AzureADPreview
Update the Azure AD Module
Updating the Azure AD Module is basically a re-install of the module in PowerShell. We can first check the version that you have currently installed with the Get-Module cmdlet
Get-Module -Name AzureADPreview
And then check the available version in the repository of PSGallery:
Find-module -Name AzureADPreview -Repository psgallery
If you have an older version installed then it’s a good idea to update the module. This way you will have access to the latest cmdlets of the module.
We are going to use the Update-Module cmdlet to update the module:
Update-Module -Name AzureADPreview
Again press Y to install the module from an untrusted source
Wrapping Up
For now, is the Azure AD module still the easiest way to go to manage our Azure Active Directory users with PowerShell. But keep in mind that the module may stop working after June 2022.
Read more about the new module, Microsoft Graph SDK, in this article.
If you have any questions, just drop a comment below.
Related Posts
In this article, we’ll look at how to install the AzureAD PowerShell module, connect to your Azure Active Directory tenant and get some information from Azure. Microsoft currently allows you to use two PowerShell modules to connect to Azure AD:
- MS Online is an old module to manage the Azure/Office 365 from PowerShell.
MSOnlinemodule appeared about 6 years ago and is not developed by Microsoft now. - Azure Active Directory PowerShell for Graph (
AzureAD) is a modern PowerShell module for interacting with Azure infrastructure. The module is being actively developed, new features are being added (analogs of almost all MSOnline cmdlets are available).
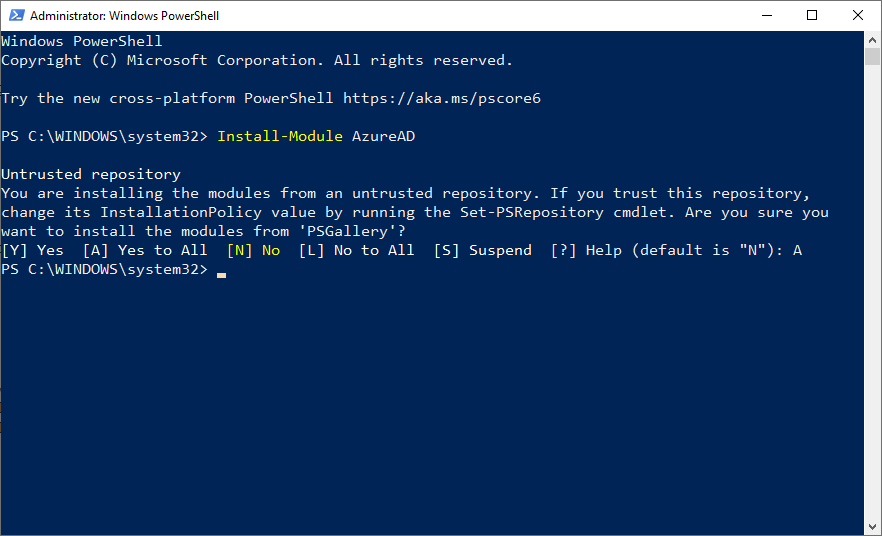
Now you can install the Azure PowerShell module from the PowerShell Gallery. Open the PowerShell console as an administrator and run the command below:
Install-Module -Name AzureAD
The following message appears:
Untrusted repository. You are installing the modules from an untrusted repository. If you trust this repository, change its InstallationPolicy value by running the Set-PSRepository cmdlet.
Press Y -> Enter.
You can add the PowerShell Gallery to the list of trusted repositories using this command:
Set-PSRepository -Name PSGallery -InstallationPolicy Trusted
After the installation is over, you can check the version of the AzureAD module:
Get-Module AzureAD –ListAvailable
In our case, it is 2.0.2.135.

In this AzureAD module version, there are 224 cmdlets containing *-AzureAD* in their names. You can display a list of available cmdlets in the module as follows:
Get-Command –Module AzureAD
If you have an older version of the Azure AD installed, you can update it:
Update-Module -Name AzureAD
If you want to install the specific module version, run this command:
Update-Module -Name AzureAD -RequiredVersion 2.0.2.120
You can connect to the Azure tenant:
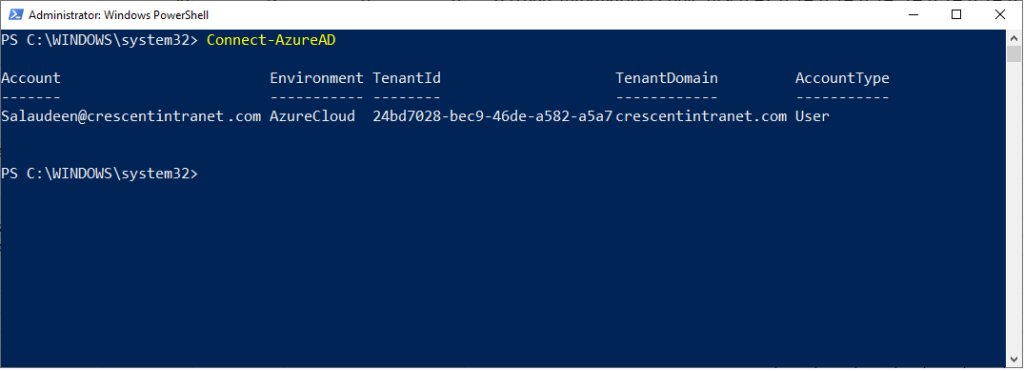
Connect-AzureAD
The cmdlet will prompt you to enter the credentials you want to use to access the AzureAD directory. In this example, I am using admin account username@woshub.onmicrosoft.com to access my tenant.
If you have Azure MFA enabled, confirm sign-in on your device.
You can also get connection credentials in PowerShell and save them into a variable:
$AzureADcreds = Get-Credential
Then you can use it for connection:
Connect-AzureAD -Credential $AzureADcreds
You can use the saved credential from the external Secret Vault using the SecretManagement PowerShell module. It supports almost all popular vault providers: Bitwarden, Azure Key Vault, KeePass, LastPass, HashiCorp Vault, Windows Credential Manager, etc. To connect to Azure AD with your saved credentials from the secret vault, use the following PowerShell command:
Connect-AzureAD -Credential (Get-Secret -Vault MyVaultName -Name azadm_maxbak)
The cmdlet returns a confirmation showing that the session with the Azure Active Directory has been successfully established. The command should display the AzureCloud environment, TenantID, and TenantDomain.

You can get information about the current Azure tenant as follows:
Get-AzureADTenantDetail

To connect to the special national Azure (Microsoft 365) clouds, use the –AzureEnvironmentName option.
Connect-AzureAD -AzureEnvironmentName AzureChinaCloud

Connect-AzureAD -AzureEnvironmentName AzureGermanyCloud

Connect-AzureAD -AzureEnvironmentName AzureUSGovernment
By default, the module connects to the Worldwide cloud.
Then you can use AzureAD module cmdlets to get different information from your domain. Let’s find users whose contains Max:
Get-AzureADUser -SearchString Max

Or get a list of cloud groups in AzureAD:
Get-AzureADGroup
To get a list of available licenses in your Office 365 (Microsoft 365) subscription, the following cmdlet is used:
Get-AzureADSubscribedSku | select SkuPartNumber, ConsumedUnits
You can check which Azure license is assigned to the specific user account:
Get-AzureADUser -SearchString maxbak@woshub.onmicrosoft.com | Select -ExpandProperty AssignedLicenses
Then you can get the license name by the SkuID you got:
Get-AzureADSubscribedSku | Where {$_.SkuId -eq "7654321-babb-1234-ababa-2d2345678905"}

To disconnect from Azure in your PowerShell session, run the command below:
Disconnect-AzureAD
В ходе данной статьи я расскажу о развертывании нового сервиса Windows Azure Active Directory и присоединении новых виртуальных машин. Перед тем, как приступить к развертыванию Active Directory необходимо:
• Настроить Virtual Networking, включая Affinity Group.
• Создать учетную запись хранения (Storage Account).
• Установить Windows PowerShell.
Создание первой Virtual Machines.
1. Запустите Windows Azure PowerShell, и выполните следующую команду:
Set-ExecutionPolicy RemoteSigned 2. Далее, подключите соответствующие модули:
Import-Module 'C:Program Files (x86)Microsoft SDKsWindows AzurePowerShellAzureAzure.psd1'3. Необходимо загрузить .publishsettings file вашей подписки Windows Azure, для того чтобы при последующих запусках избавить себя от первоначальных настроек:
Get-AzurePublishSettingsFile4. Далее, запустите Windows Azure PowerShell ISE:
powershell ise5. Вставьте следующий скрипт, в Windows Azure PowerShell ISE, и отредактируйте скрипт под свою подписку: путь к PublishSettingsFile, SubscriptionName, StorageAccount и т.д.
Import-Module "C:Program Files (x86)Microsoft SDKsWindows AzurePowerShellAzureAzure.psd1"
Import-AzurePublishSettingsFile 'E:PowerShell MyAccount.publishsettings'
Set-AzureSubscription -SubscriptionName MSDN -CurrentStorageAccount Test
Select-AzureSubscription -SubscriptionName MSDN

$myDNS = New-AzureDNS -Name 'myDNS' -IPAddress '127.0.0.1'
$vmname = 'Test'
$image = 'MSFT__Win2K8R2SP1-Datacenter-201207.01-en.us-30GB.vhd'
$service = 'YourHabrahabr'
$AG = 'Habrahabr'
$vnet = 'HabrahabrVM'


#Конфигурирование VM's
$MyDC = New-AzureVMConfig -name $vmname -InstanceSize 'Small' -ImageName $image |
    Add-AzureProvisioningConfig -Windows -Password 'Pa$w0rd!' |
        Set-AzureSubnet -SubnetNames 'BackEnd'
New-AzureVM -ServiceName $service -AffinityGroup $AG -VMs $MyDC -DnsSettings $myDNS -VNetName $vnet
6. Убедится в том, что скрипт работает правильно, можно, — просмотрев ход работы на портале Windows Azure:
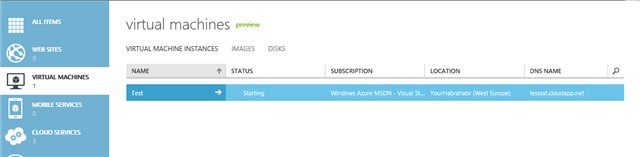
Портал управления Windows Azure
7. Далее, к ранее созданной виртуальной машине необходимо присоединить Empty Disk:
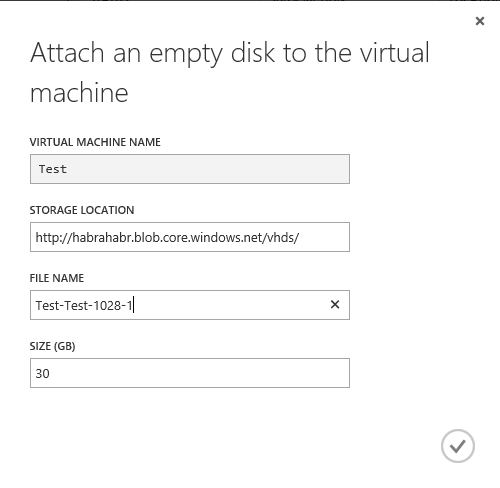
Присоединение пустого диска
8. Для подключения к виртуальной машине нажмите Connect и загрузите .rdp профиль для осуществления удаленного соединения.
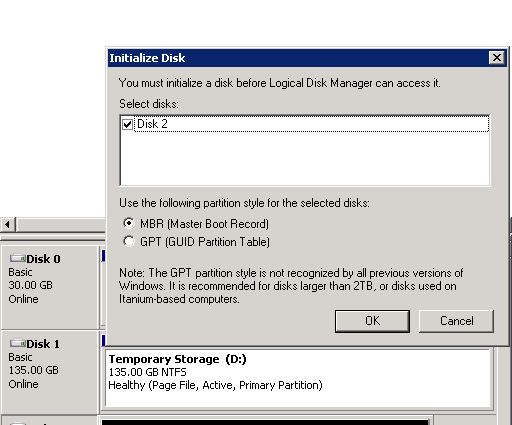
Инициализация диска
Развертывание контроллера домена.
1. Подключитесь к виртуальной машине с помощью ранее скаченного профиля удаленного подключения .rdp.
2. После подключения, выполните команду IPConfig, для получения IP-адреса.
3. Откройте Computer Management, для инициализации присоединенного раннее диска.
4. Запустите Active Directory Domain Services Installation Wizard, командой DCPromo.
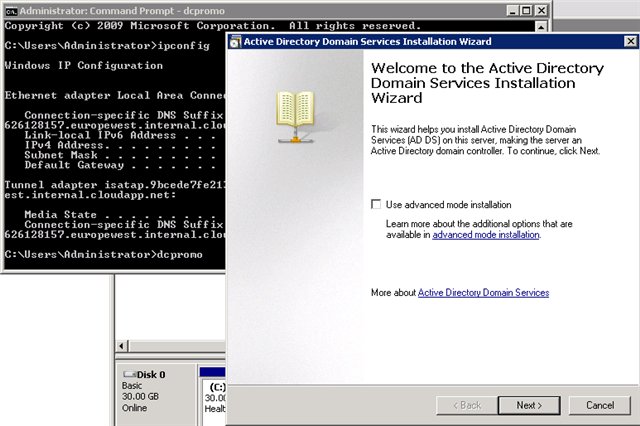
Добавление роли AD DS
5. Выберите Create a domain in a new forest.

Создание AD DS
6. Назовите Forest Root Domain и укажите функциональный уровень, как Windows Server 2008 R2. Для создания DNS-server’a оставьте стандартный выбор.
7. Поскольку при использовании виртуальных машин Windows Azure, IP-адрес присваивается только на то время пока запущена эта виртуальная машина, нажмите Yes, the computer will use an IP address automatically assigned by a DCHP server (not recommended).
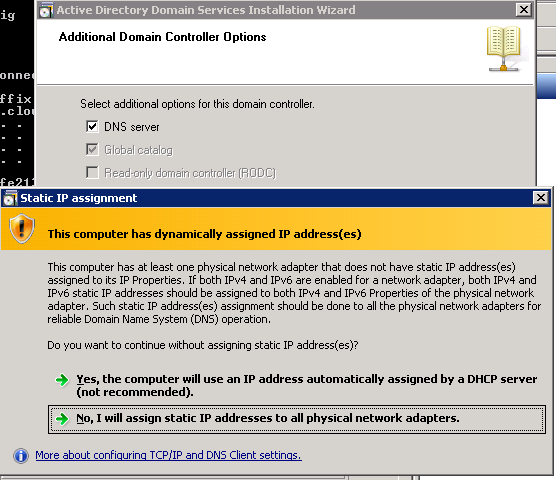
Использование автоматически назначаемого IP-адреса
8. В завершении, остается определить расположение папок Databases, Log files и SYSVOL на ранее созданном диске.
Развертывание новых виртуальных машин и присоединение к домену из PowerShell
Данный раздел демонстрирует пример того, как можно автоматически развернуть новые виртуальные машины к созданному домену.
1. Откройте в режиме администратора Windows Azure PowerShell.
2. Настройте DNS для новой виртуальной машины. Для этого понадобится виртуальная машина, созданная ранее и настроенная для Active Directory.
$advmIP = '[IP-ADDRESS]'
$advmName = '[AD-NAME]'
# IP-адрес контроллера домена
$dns1 = New-AzureDns -Name $advmName -IPAddress $advmIP
3. Далее, необходимо настроить виртуальную машину так, чтобы она автоматически входила в домен AD на стадии развертывания.
$vmName = 'adtest'
$adminPassword = '[PASSWORD]'
$domainPassword = '[PASSWORD]'
$domainUser = 'administrator'
$FQDomainName = 'testHabrAD.com'
$subNet = 'AppSubnet'
# Настройка VM для автоматического входа в домен
$advm1 = New-AzureVMConfig -Name $vmName -InstanceSize Small -ImageName $imgName |
            Add-AzureProvisioningConfig -WindowsDomain -Password $adminPassword `
            -Domain ' testHabrAD' -DomainPassword $domainPassword `
            -DomainUserName $domainUser -JoinDomain $FQDomainName |
     Set-AzureSubnet -SubnetNames $subNet
Заключение
В этом посте я рассмотрел процесс создания нового Active Directory домена в Windows Azure IaaS, частично используя Windows Azure PowerShell.
Requirement: Connect to Azure AD with PowerShell.
How to Connect to Azure Active Directory using PowerShell?
Azure Active Directory (Azure AD) is Microsoft’s cloud-based identity and access management service. Azure AD allows you to manage user identities and access rights to your applications, whether on-premises or in the cloud. With the Power of PowerShell, we can automate tasks, access settings that are not available in the web user interface, Filter and query data, generate reports, make configuration changes to the objects, etc. This blog post will show you how to connect to Azure AD using PowerShell and demonstrate some of the basics of working with Azure AD for Office 365 using PowerShell!
Step 1: Install the Azure AD PowerShell Module
To start with Azure AD PowerShell, You have to install the Microsoft Azure Active Directory module on your local computer. To check if you have the Azure AD PowerShell module already installed, use:
Get-Module AzureAD -ListAvailable
You can also use the “Get-InstalledModule” cmdlet to get a list of installed modules on your local computer.
Assuming you have an x64 bit operating system at least Windows 7 Sp1/Windows Server 2008 R2 SP1 or later, And have at least a PowerShell version 5.1 installed (Check your current PowerShell version with the command: $PSVersionTable.PSVersion) on your computer, here are the steps to install the AzureAD PowerShell module:
- Type “PowerShell” from the start menu >> Right-click on Windows PowerShell and choose “Run as administrator”
- Type “Install-Module AzureAD” and hit Enter.
- You’ll be asked to confirm the installation from the PSGallery. Type “A” to select “Yes to All” and hit the Enter key.

Install-Module -Name AzureAD
This will download and install the PowerShell module for Azure Active Directory to your local computer. (AKA: Azure Active Directory PowerShell for Graph)
Want to suppress the confirmation prompt: You are installing the modules from an untrusted repository. If you trust this repository, change its InstallationPolicy value by running the Set-PSRepository cmdlet. Are you sure you want to install the modules from ‘PSGallery’? It’s a good idea to trust PowerShell Gallery so that you won’t get this confirmation prompt! Use:
Set-PSRepository -Name PSGallery -InstallationPolicy Trusted
To update the existing Azure AD module to the latest version, run the following command as admin:
Update-Module -Name AzureAD
Step 2: Connect to Azure AD using Connect-AzureAD cmdlet
The next step is to connect to Azure AD from PowerShell. Type Connect-AzureAD cmdlet and hit the enter key. You’ll be prompted to login to Azure AD, which is Multi-factor authentication (MFA) aware. Ensure you have administrator access to Azure Active Directory before executing these cmdlets.
You can also get the credentials prompt to enter the username and password of an admin account and connect to Azure AD:
Connect-AzureAD -Credential (Get-Credential)
There are more parameters you can pass to the above cmdlet, such as TenantID, AccountID (UserPrincipleName), etc. How about connecting with a saved user name and password?
#Parameter
$AdminUserName = "[email protected]"
$AdminPassword = "Password goes here"

#Variable for Pscredential object
$SecurePassword = ConvertTo-SecureString $AdminPassword -AsPlainText -Force
$Credential = New-Object System.Management.Automation.PSCredential -argumentlist $AdminUserName, $SecurePassword

#Connect to Azure Active Directory
Connect-AzureAD –Credential $Credential
But the above two methods don’t support two-factor authentication!
Step 3: Start using cmdlets from Azure AD PowerShell Module.
Once connected, you can start using PowerShell cmdlets available for Azure AD to interact with your tenant. To get all cmdlets from the AzureAD module, use:
Get-Command -Module AzureAD
This will list all PowerShell cmdlets for Azure AD
The Azure AD PowerShell Module allows us to manage users and groups, applications, and domains on Office 365 and Azure with activities such as automating tasks, generate reports, export data, Performing bulk operations, etc. The Azure AD PowerShell module can be installed in client operating systems such as Windows 10 or Server operating systems like Windows 2016.
Once connected, You can start using the cmdlets in your PowerShell script, such as: To list all users in your tenant, use:
To disconnect from Azure in your PowerShell session, run the below command:
How to Install the AzureADPreview module?
The azureADPreview module is where new updates are shipped first. E.g., the cmdlet Get-AzureADAuditSignInLogs is available only in the Azure AD Preview module as of today. To install the preview version of the module, you can replace the module name with AzureADPreview in the Install-Module cmdlet.
Install-Module -Name AzureADPreview
Install Azure AD PowerShell Module V1
For some backward compatibility, If you need the V1 of the Azure AD PowerShell module (AKA: MSOnline), here is how to install and connect to Microsoft Azure Active Directory with Connect-MSOLService cmdlet:
#Install the MSOnline Module
Install-Module -Name MSOnline

#Connect to Azure Active Directory
Connect-MsolService

#Start executing cmdlets
Get-MsolUser
How do I Connect to Exchange Online with PowerShell?
To connect to Exchange Online with PowerShell, you need to first install the PowerShell Module for Exchange Online Management using “Install-Module ExchangeOnlineManagement”. And then, you can connect to Exchange Online using the Connect-ExchangeOnline cmdlet.
More info: Connect to Exchange Online PowerShell
How do I connect to SharePoint Online from PowerShell?
You must first download and install the SharePoint Online Management Shell or SharePoint Online PowerShell Module. Then you can connect to SharePoint Online through PowerShell using the Connect-SPOService cmdlet.
More info: Connect to SharePoint Online PowerShell
How do I connect to a Microsoft team using PowerShell?
Connecting to teams from PowerShell is a two-step process: First, Install Microsoft Teams PowerShell Module using “Install-Module MicrosoftTeams”. Next, Connect to Microsoft Teams using the PowerShell cmdlet “Connect-MicrosoftTeams”
More info: Connect to Teams PowerShell