On Windows 10, a batch file typically has a «.bat» extension, and it is a special text file that contains one or multiple commands that run in sequence to perform various actions with Command Prompt.
Although you can type commands manually to execute a particular task or change system settings on Windows 10, a batch file simplifies the work of having to re-type the commands, saving you time and avoiding mistakes.
You can also use other tools like PowerShell to write even more advanced scripts. However, running batch files in Command Prompt is still relevant for executing commands to change settings, automate routines, and launch apps or web pages on your computer.
This guide will walk you through the steps to create and run a batch file on Windows 10. Also, we will outline the steps to create advanced scripts and rum them automatically on schedule using the Task Scheduler.
How to create a batch file on Windows 10
The process of writing a batch file is not complicated. You only need Notepad or another text editor and some basic knowledge of typing commands in Command Prompt. These instructions will help you create a basic and advanced batch file to query system settings.
Create basic Windows 10 batch file
To create a basic batch file on Windows 10, use these steps:
- Open Start.
- Search for Notepad and click the top result to open the text editor.
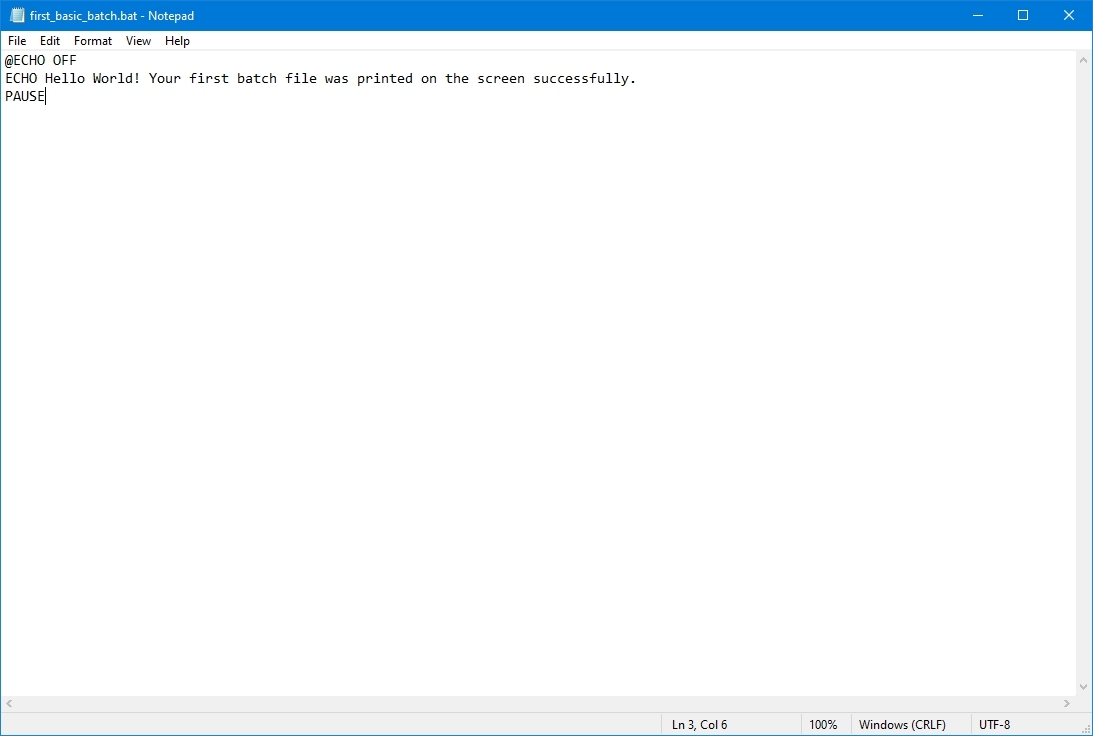
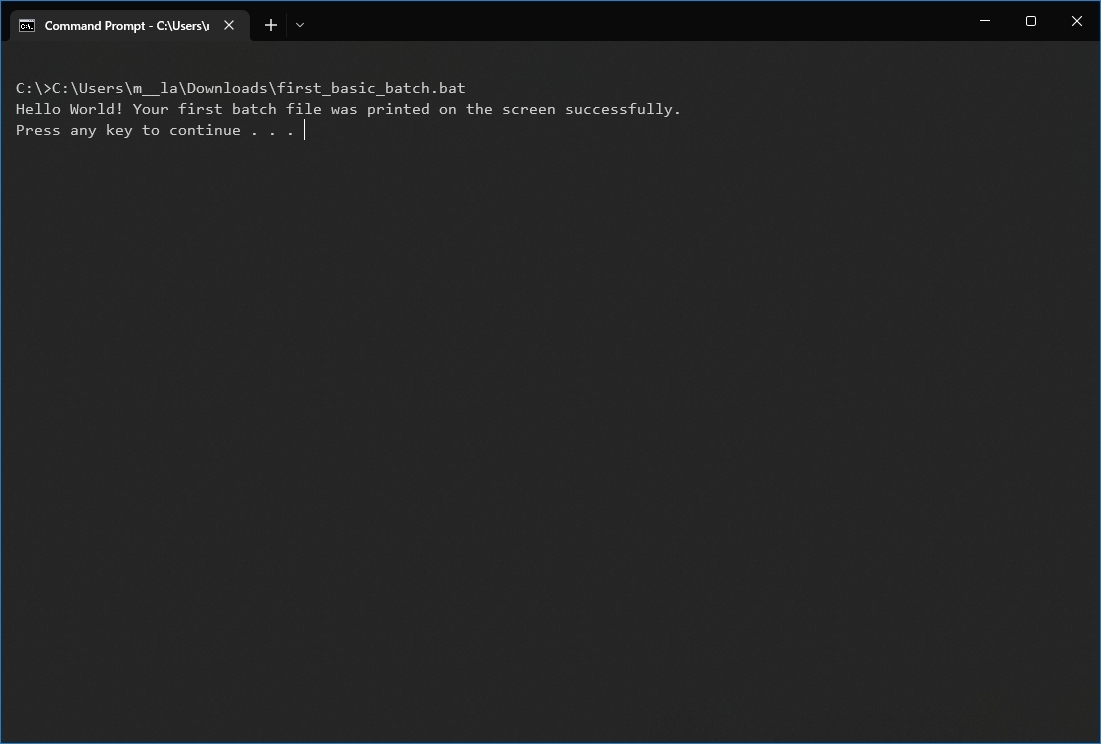
- Type the following lines in the text file to create a batch file:
@ECHO OFF
ECHO Hello World! Your first batch file was printed on the screen successfully.
PAUSE
The above script outputs the phrase, «Hello World! Your first batch file was printed on the screen successfully,» on the screen.
- @ECHO OFF — Shows the message on a clean line disabling the display prompt. Usually, this line goes at the beginning of the file. (You can use the command without the «@» symbol, but it’s recommended to include it to show a cleaner return.)
- ECHO — The command prints the text after the space on the screen.
- PAUSE — Allows the window to stay open after the command has been executed. Otherwise, the window will close automatically as soon as the script finishes executing. You can use this command at the end of the script or after a specific command when running multiple tasks and wanting to pause between each line.
- Click the File menu.
- Select the Save as option.
- Confirm a name for the script — for example, first_basic_batch.bat.
- Quick note: While batch files typically use the .bat file extensions, you can also find them using the .cmd or .btm file extensions.
Once you complete the steps, double-click the file to run it. Alternatively, you can use the steps below to learn how to run a batch file with Command Prompt, File Explorer, or Task Scheduler.
Create advanced Windows 10 batch file
To create an advanced Windows batch file with multiple commands, use these steps:
- Open Start.
- Search for Notepad and click the top result to open the text editor.
- Type the following lines in the text file to create a more advanced Windows 10 batch file:
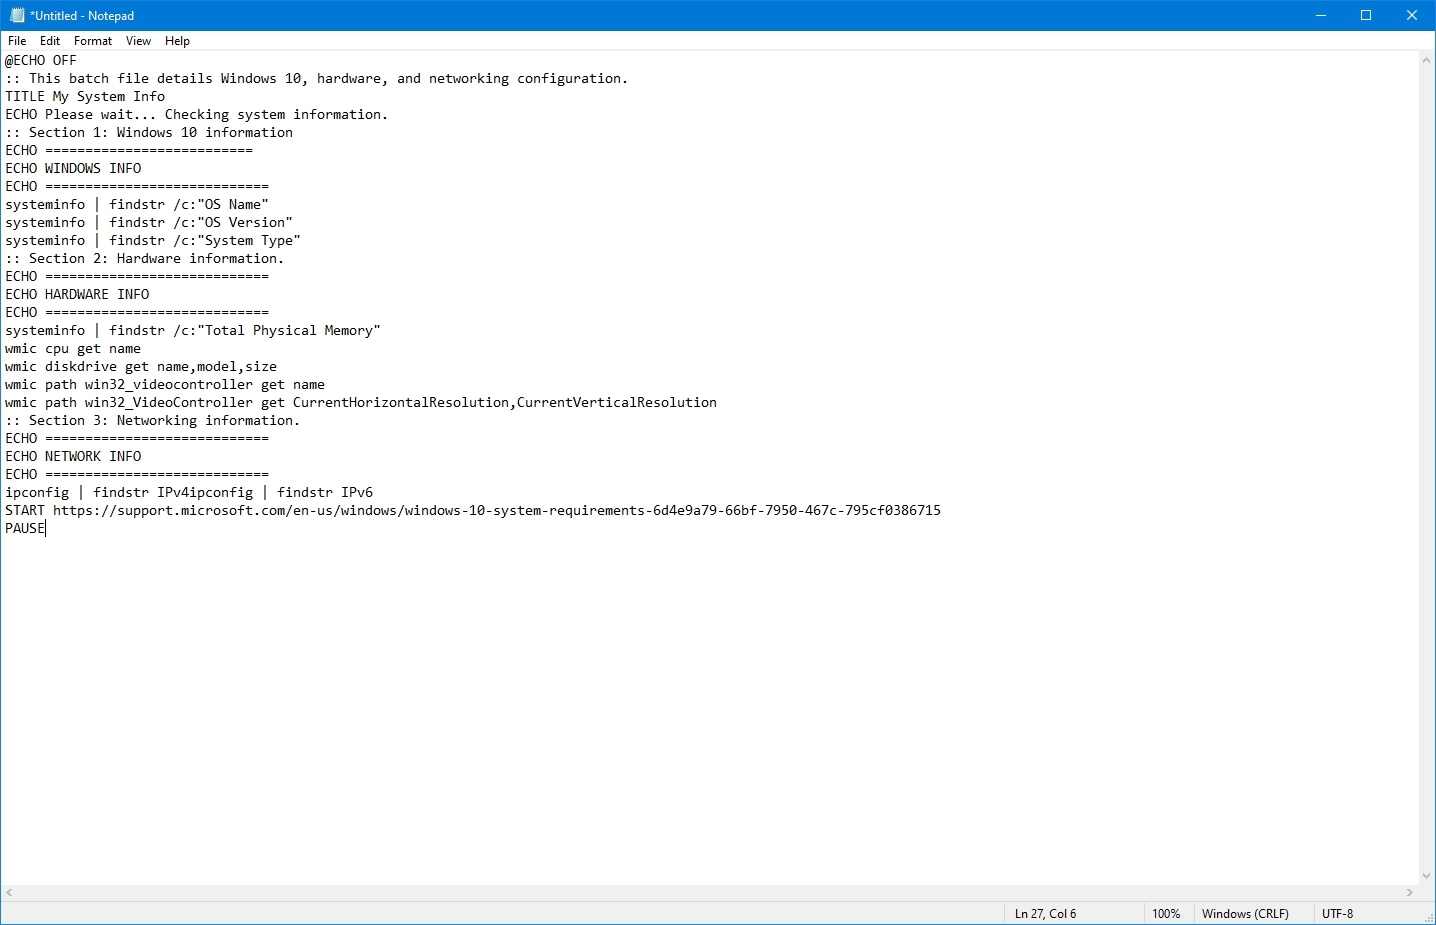
@ECHO OFF
:: This batch file details Windows 10, hardware, and networking configuration.
TITLE My System Info
ECHO Please wait… Checking system information.
:: Section 1: Windows 10 information
ECHO ==========================
ECHO WINDOWS INFO
ECHO ============================
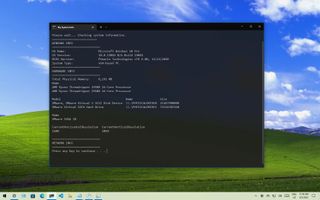
systeminfo | findstr /c:»OS Name»
systeminfo | findstr /c:»OS Version»
systeminfo | findstr /c:»System Type»
:: Section 2: Hardware information.
ECHO ============================
ECHO HARDWARE INFO
ECHO ============================
systeminfo | findstr /c:»Total Physical Memory»
wmic cpu get name
wmic diskdrive get name,model,size
wmic path win32_videocontroller get name
wmic path win32_VideoController get CurrentHorizontalResolution,CurrentVerticalResolution
:: Section 3: Networking information.
ECHO ============================
ECHO NETWORK INFO
ECHO ============================
ipconfig | findstr IPv4ipconfig | findstr IPv6
START https://support.microsoft.com/en-us/windows/windows-10-system-requirements-6d4e9a79-66bf-7950-467c-795cf0386715
PAUSE
The above script runs each line to query a series of system details, and the result will be divided into three categories, including «WINDOWS INFO,» «HARDWARE INFO,» and «NETWORK INFO.» Also, the «START» command will open the web browser in the official support page outlining the Windows 10 system requirements, which you can check against your information.
- @ECHO OFF — Shows the message on a clean line disabling the display prompt. Usually, this line goes at the beginning of the file.
- TITLE — Prints a custom name in the title bar of the console window.
- :: — Allows writing comments and documentation information. These details are ignored when the system runs the batch file.
- ECHO — Prints the text after the space on the screen.
- START — Opens an app or website with the default web browser.
- PAUSE — Tells the console window to stay open after running the command. If you do not use this option, the window will close automatically as soon as the script finishes executing.
- Click the File menu.
- Select the Save as option.
- Type a name for the script — for example, first_advanced_batch.bat.
After you complete the steps, double-click the .bat file to run it or use the steps below to execute the script with Command Prompt, File Explorer, or Task Scheduler.
Create actionable Windows 10 batch file
You can also write batch scripts for any task that does not require user interaction. For instance, to map a network drive, install an application, change system settings, and more.
To create a non-interactive batch file on Windows 10, use these steps:
- Open Start.
- Search for Notepad and click the top result to open the text editor.
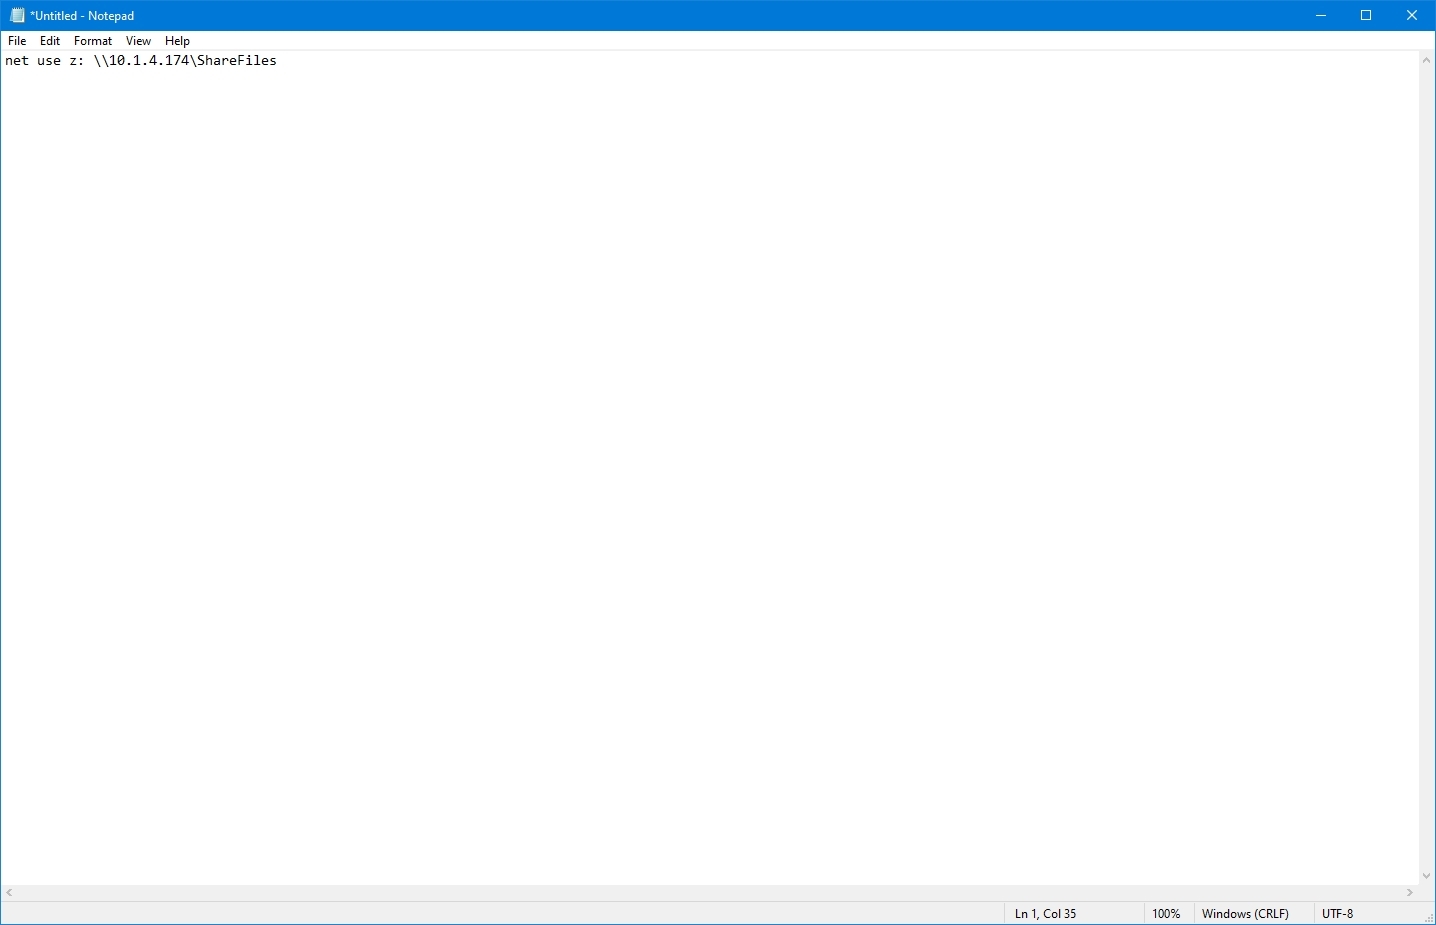
- Type the following command to map a network drive in the text file: net use z: \PATH-NETWORK-SHAREFOLDER-NAME /user:YOUR-USERNAME YOUR-PASSWORD
In the command, replace the «\PATH-NETWORK-SHAREFOLDER-NAME» for the folder network path to mount on the device and «YOUR-USERNAME YOUR-PASSWORD» with the username and password that authenticates access to the network share.
This example maps a network folder as a drive inside File Explorer using the «Z» drive letter: net use z: \10.1.4.174ShareFiles
- Quick note: If you are accessing the files from another computer that uses a specific username and password, do not forget to use the /user: option with the correct credentials.
- Click the File menu.
- Select the Save as option.
- Confirm a name for the script — for example, mount-z-network-drive.bat.
Once you complete the steps, the batch file will map the network folder without opening a Command Prompt window.
We only demonstrate a script with a single command, but you can include as many as you like, as long as you write them one per line.
How to run a batch file on Windows 10
Windows 10 has at least three ways to write batch files. You can run them on-demand using Command Prompt or File Explorer. You can configure the script using the Task Scheduler app to run it on schedule. Or you can save the batch files in the «Startup» folder to let the system run them as soon as you sign into the account.
Run batch file on-demand
If you want to run a script on-demand, you can use File Explorer or Command Prompt.
Command Prompt
To run a script file with Command Prompt on Windows 10, use these steps:
- Open Start.
- Search for Command Prompt, right-click the top result, and select the Run as administrator option.
- Type the following command to run a Windows 10 batch file and press Enter: C:PATHTOFOLDERBATCH-NAME.bat
In the command, make sure to specify the path and name of the script.
This example runs the batch file located in the «scripts» folder inside the «Downloads» folder: C:UsersUserAccountDownloadsfirst_basic_batch.bat
After you complete the steps, the console will return the results, and the window won’t close even if the script does not include the «PAUSE» command since you are invoking the script from within a console session that was already open.
File Explorer
To run a batch file with File Explorer, use these steps:
- Open File Explorer.
- Browse to the folder with the batch file.
- Double-click the script file to run it.
- (Optional) If a command in the batch file requires administrator privileges, you will have to run the script as an admin by right-clicking the file and selecting the Run as administrator option.
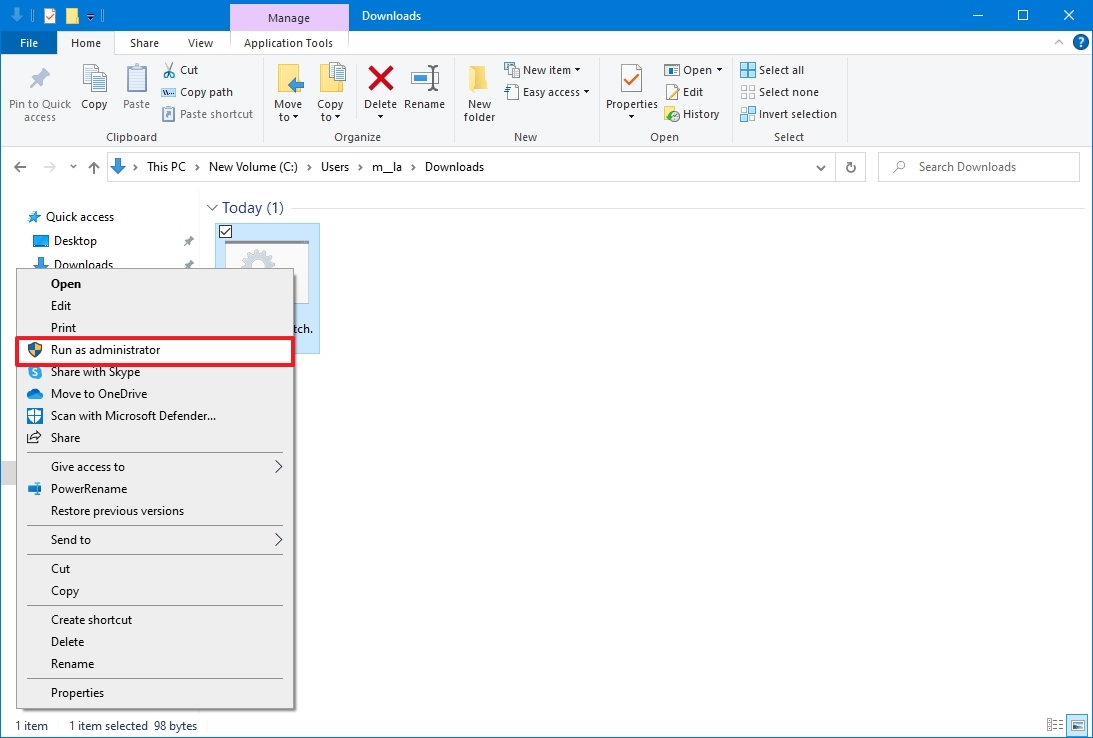
- Click the Yes button
Once you complete the steps, the script will run each command in sequence, displaying the results in the console window.
Run batch files on startup
Windows 10 also features a known folder called «Startup,» which the system checks every time it starts to run applications, shortcuts, and scripts automatically without the need for extra configuration.
To run a script on the Windows 10 startup, use these steps:
- Open File Explorer.
- Open the folder containing the batch file.
- Right-click the batch file and select the Copy option.
- Use the Windows key + R keyboard shortcut to open the Run command.
- Type the following command: shell:startup
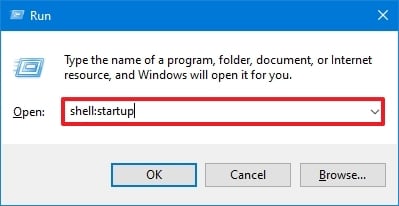
- Click the OK button.
- Click the Paste option from the «Home» tab in the Startup folder. (Or click the Paste shortcut button to create a shortcut to the batch file.)
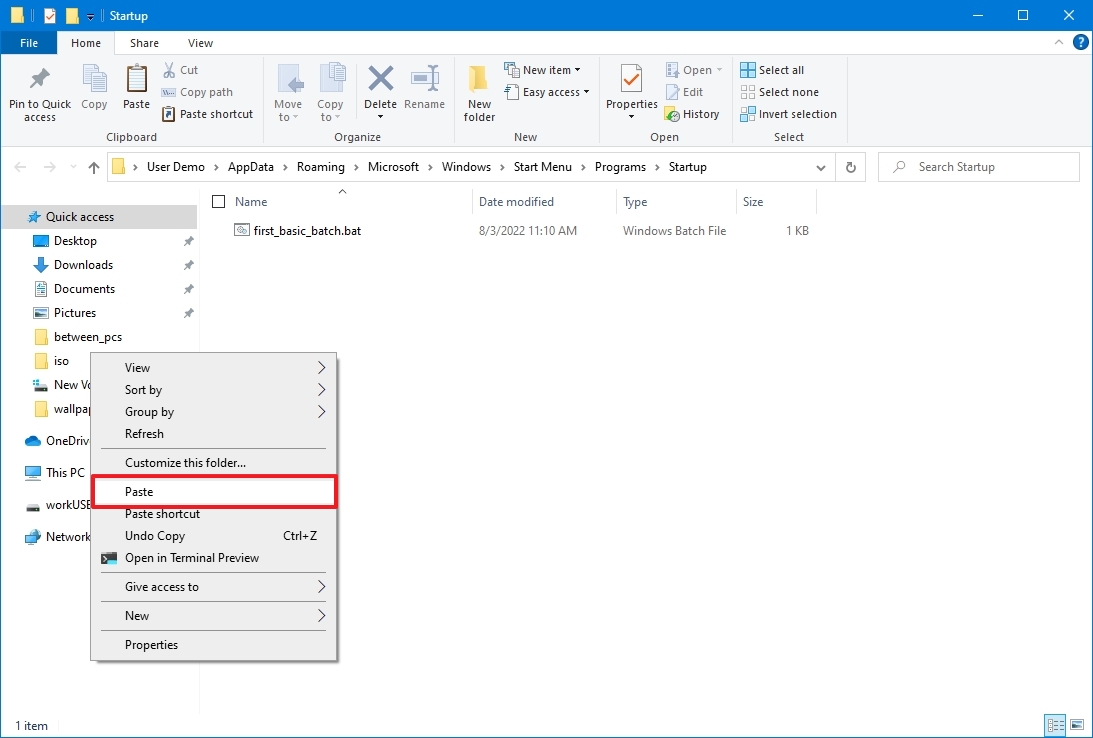
After you complete the steps, the batch file will execute automatically every time you log into your account.
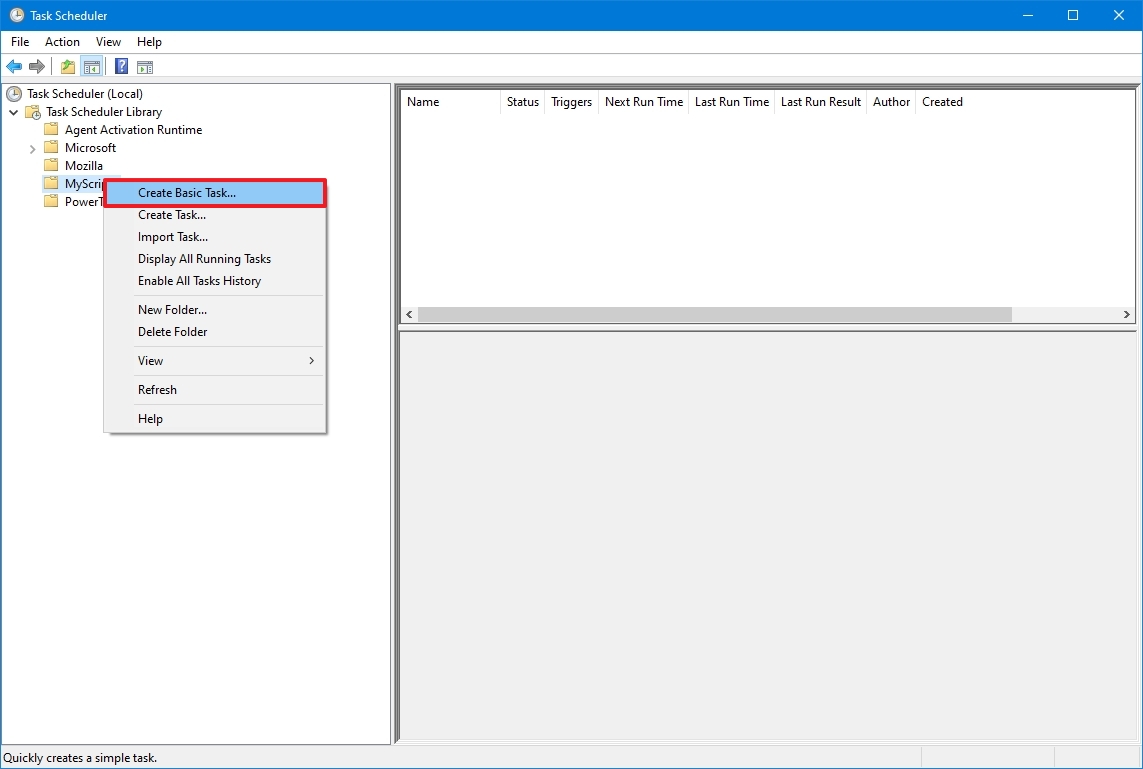
Run batch file with Task Scheduler
To use Task Scheduler to run the batch file automatically at a specific time, use these steps:
- Open Start.
- Search for Task Scheduler and click the top result to open the app.
- Right-click the «Task Scheduler Library» branch and select the New Folder option.
- Confirm a name for the folder — for example, MyScripts.
- Quick note: You don’t need to create a folder, but keeping the system and your tasks separate is recommended.
- Click the OK button.
- Expand the «Task Scheduler Library» branch.
- Right-click the MyScripts folder.
- Select the Create Basic Task option.
- In the «Name» field, confirm a name for the task — for example, SystemInfoBatch.
- (Optional) In the «Description» field, write a description for the task.
- Click the Next button.
- Select the Monthly option.
- Quick note: Task Scheduler lets you choose from different triggers, including a specific date, during startup, or when a user logs in to the computer. In this example, we will select the option to run a task every month, but you may need to configure additional parameters depending on your selection.
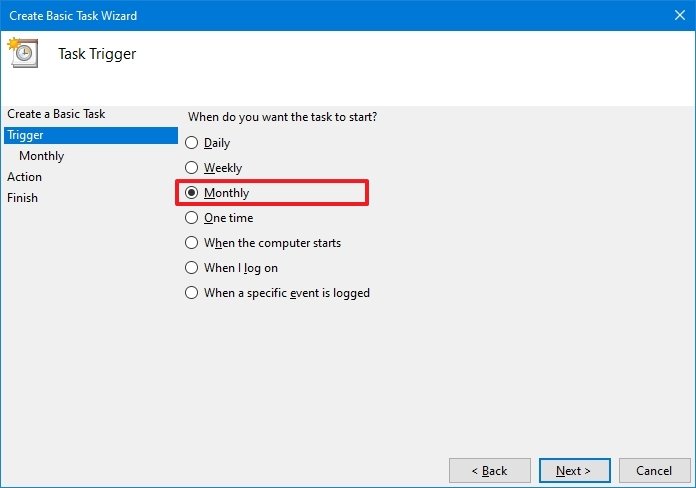
- Click the Next button.
- Use the «Start» settings to confirm the day and time to run the task.
- Use the «Monthly» drop-down menu to pick the months of the year to run the task.
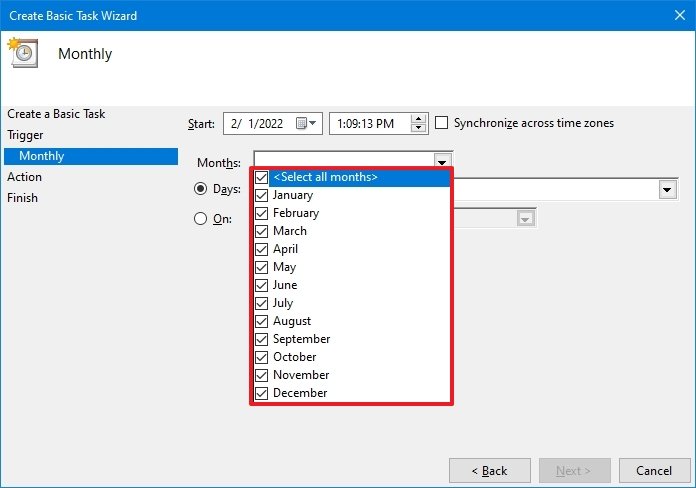
- Use the «Days» or «On» drop-down menu to confirm the days to run the task.
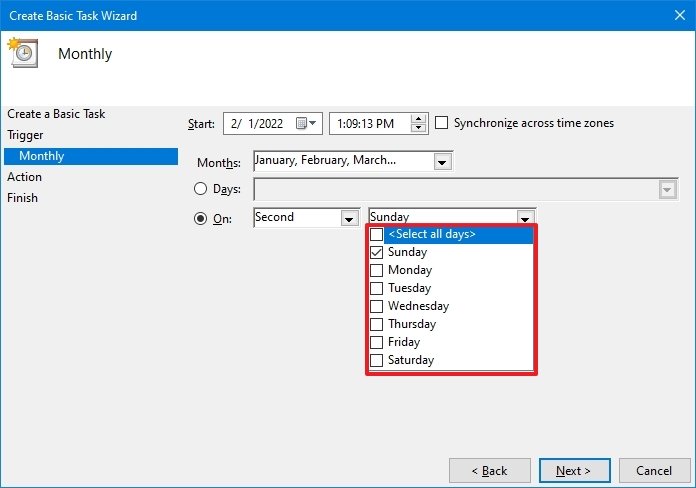
- Click the Next button.
- Select the Start a program option to run the batch file.
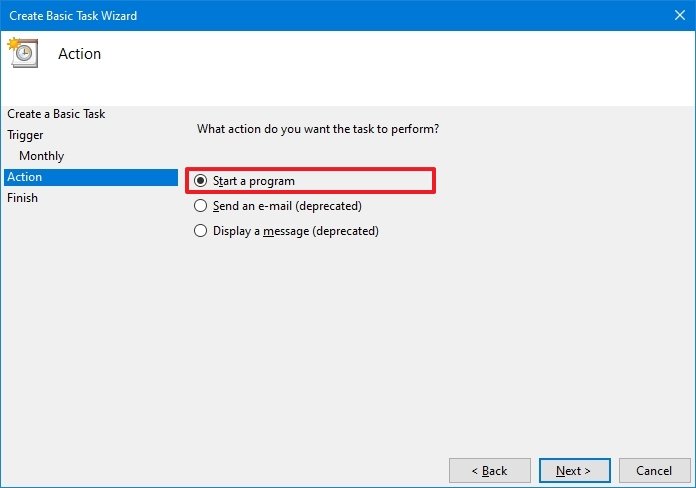
- In the «Program/script» field, click the Browse button.
- Select the batch file you want to execute.
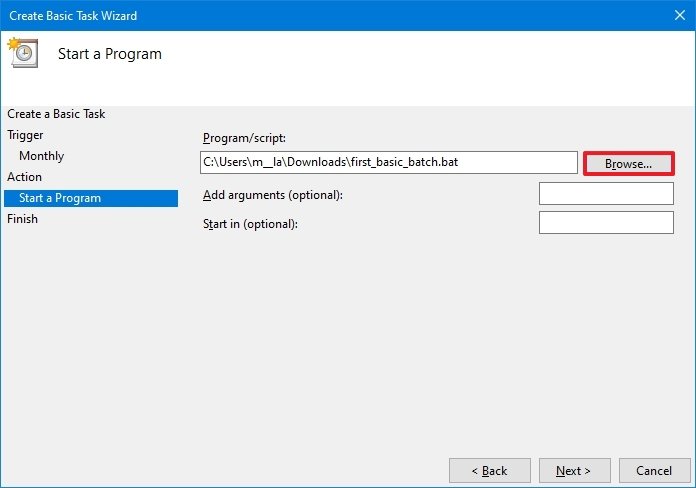
- Click the Finish button.
Once you complete the steps, the task will run the script during the configured time and date or action.
The above instructions are meant to schedule only a basic task. You can use these instructions to create a more customizable task with the Task Scheduler.
This guide focuses on Windows 10, but the same steps will also work for older versions, including Windows 8.1 and 7. Also, you can refer to these instructions if you have Windows 11 installed on your computer.
More Windows resources
For more helpful articles, coverage, and answers to common questions about Windows 10 and Windows 11, visit the following resources:
- Windows 11 on Windows Central — All you need to know
- Windows 10 on Windows Central — All you need to know
Get the best of Windows Central in in your inbox, every day!
Mauro Huculak is technical writer for WindowsCentral.com. His primary focus is to write comprehensive how-tos to help users get the most out of Windows 10 and its many related technologies. He has an IT background with professional certifications from Microsoft, Cisco, and CompTIA, and he’s a recognized member of the Microsoft MVP community.
![]()
Download Article
![]()
Download Article
This wikiHow teaches you how to run a batch file (.BAT) from the Windows command line. You can run the program from the “Run” dialog or by typing commands into a terminal window.
-

1
Press ⊞ Win+R. This opens the Run dialog.
- If you need to run the batch file as an administrator, see this method instead.
-
2
Click Browse….
Advertisement
-
3
Navigate to the folder that contains the batch file.
-
4
Click the batch file once to select it. The file is now highlighted.
-
5
Click Open. This pastes the full path to the batch file into the Run box.
-
6
Click OK. The batch file will open in a terminal window and run. When it’s finished running, you’ll see a line at the bottom of the window that says “Press any key to continue.”
-
7
Press any key. This closes the terminal window after the command runs.


Advertisement
-
1
Click the
menu. It’s usually at the bottom-left corner of the screen.
-
2
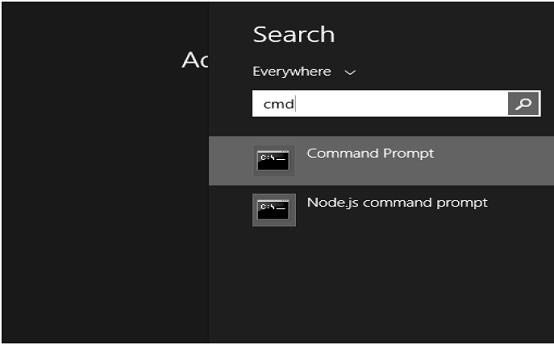
Type cmd into the search bar. A list of matching results will appear.
-
3
Right-click Command Prompt. A menu will expand.
-
4
Click Run as Administrator. A confirmation message will appear.
-
5
Click Yes. This opens the command line at an elevated (administrator) level.
-
6
Type cd followed by full path to the folder with the .BAT file. Here’s an example:
- If the batch file is on your desktop, type cd UsersYourLoginNameDesktop.
- If it’s in your downloads folder, type cd UsersYourLoginNameDownloads.
- If you don’t know what your login name is, type cd Users and press ↵ Enter to go to the Users folder, and then type dir and press ↵ Enter to see a list of logins.
-
7
Press ↵ Enter. This will move you into the directory.
-
8
Type the name of the batch file. For example, if it’s called “program.bat,” type program.bat.
- If you don’t know the name, type dir and press ↵ Enter to view the files in the folder. You’ll find it there.
-
9
Press ↵ Enter. This runs the batch file.


Advertisement
Add New Question
-
Question
It gives an error saying «The input line is too long. The syntax of the command is incorrect.»

Double-check the code, as there’s a command that was not correctly written. Ensure all spaces and special characters are in the proper places.
Ask a Question
200 characters left
Include your email address to get a message when this question is answered.
Submit
Advertisement
Thanks for submitting a tip for review!
About This Article
Article SummaryX
1. Press the Windows + R keys.
2. Click Browse.
3. Select the .bat file.
4. Click Open.
5. Click OK.
Did this summary help you?
Thanks to all authors for creating a page that has been read 268,057 times.
Is this article up to date?
Batch Script — Overview
Batch Script is incorporated to automate command sequences which are repetitive in nature. Scripting is a way by which one can alleviate this necessity by automating these command sequences in order to make one’s life at the shell easier and more productive. In most organizations, Batch Script is incorporated in some way or the other to automate stuff.
Some of the features of Batch Script are −
-
Can read inputs from users so that it can be processed further.
-
Has control structures such as for, if, while, switch for better automating and scripting.
-
Supports advanced features such as Functions and Arrays.
-
Supports regular expressions.
-
Can include other programming codes such as Perl.
Some of the common uses of Batch Script are −
-
Setting up servers for different purposes.
-
Automating housekeeping activities such as deleting unwanted files or log files.
-
Automating the deployment of applications from one environment to another.
-
Installing programs on various machines at once.
Batch scripts are stored in simple text files containing lines with commands that get executed in sequence, one after the other. These files have the special extension BAT or CMD. Files of this type are recognized and executed through an interface (sometimes called a shell) provided by a system file called the command interpreter. On Windows systems, this interpreter is known as cmd.exe.
Running a batch file is a simple matter of just clicking on it. Batch files can also be run in a command prompt or the Start-Run line. In such case, the full path name must be used unless the file’s path is in the path environment. Following is a simple example of a Batch Script. This Batch Script when run deletes all files in the current directory.
:: Deletes All files in the Current Directory With Prompts and Warnings
::(Hidden, System, and Read-Only Files are Not Affected)
:: @ECHO OFF
DEL . DR
Batch Script — Environment
This chapter explains the environment related to Batch Script.
Writing and Executing
Typically, to create a batch file, notepad is used. This is the simplest tool for creation of batch files. Next is the execution environment for the batch scripts. On Windows systems, this is done via the command prompt or cmd.exe. All batch files are run in this environment.
Following are the different ways to launch cmd.exe −
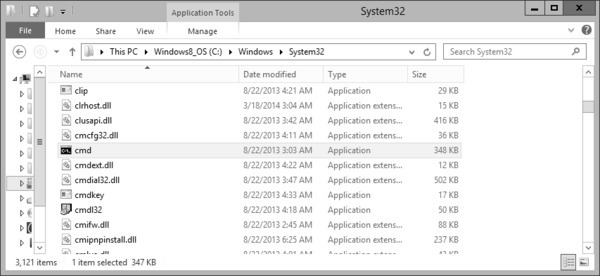
Method 1 − Go to C:WindowsSystem32 and double click on the cmd file.
Method 2 − Via the run command – The following snapshot shows to find the command prompt(cmd.exe) on Windows server 2012.
Once the cmd.exe is launched, you will be presented with the following screen. This will be your environment for executing your batch scripts.
Environment Variables
In order to run batch files from the command prompt, you either need to go to the location to where the batch file is stored or alternatively you can enter the file location in the path environment variable. Thus assuming that the batch file is stored in the location C:Applicationbin, you would need to follow these instructions for the PATH variable inclusion.
| OS | Output |
|---|---|
| Windows | Append the String; C:Applicationbin to the end of the system variable PATH. |
Batch Script — Commands
In this chapter, we will look at some of the frequently used batch commands.
| S.No | Commands & Description |
|---|---|
| 1 | VER
This batch command shows the version of MS-DOS you are using. |
| 2 | ASSOC
This is a batch command that associates an extension with a file type (FTYPE), displays existing associations, or deletes an association. |
| 3 | CD
This batch command helps in making changes to a different directory, or displays the current directory. |
| 4 | CLS
This batch command clears the screen. |
| 5 | COPY
This batch command is used for copying files from one location to the other. |
| 6 | DEL
This batch command deletes files and not directories. |
| 7 | DIR
This batch command lists the contents of a directory. |
| 8 | DATE
This batch command help to find the system date. |
| 9 | ECHO
This batch command displays messages, or turns command echoing on or off. |
| 10 | EXIT
This batch command exits the DOS console. |
| 11 | MD
This batch command creates a new directory in the current location. |
| 12 | MOVE
This batch command moves files or directories between directories. |
| 13 | PATH
This batch command displays or sets the path variable. |
| 14 | PAUSE
This batch command prompts the user and waits for a line of input to be entered. |
| 15 | PROMPT
This batch command can be used to change or reset the cmd.exe prompt. |
| 16 | RD
This batch command removes directories, but the directories need to be empty before they can be removed. |
| 17 | REN
Renames files and directories |
| 18 | REM
This batch command is used for remarks in batch files, preventing the content of the remark from being executed. |
| 19 | START
This batch command starts a program in new window, or opens a document. |
| 20 | TIME
This batch command sets or displays the time. |
| 21 | TYPE
This batch command prints the content of a file or files to the output. |
| 22 | VOL
This batch command displays the volume labels. |
| 23 | ATTRIB
Displays or sets the attributes of the files in the curret directory |
| 24 | CHKDSK
This batch command checks the disk for any problems. |
| 25 | CHOICE
This batch command provides a list of options to the user. |
| 26 | CMD
This batch command invokes another instance of command prompt. |
| 27 | COMP
This batch command compares 2 files based on the file size. |
| 28 | CONVERT
This batch command converts a volume from FAT16 or FAT32 file system to NTFS file system. |
| 29 | DRIVERQUERY
This batch command shows all installed device drivers and their properties. |
| 30 | EXPAND
This batch command extracts files from compressed .cab cabinet files. |
| 31 | FIND
This batch command searches for a string in files or input, outputting matching lines. |
| 32 | FORMAT
This batch command formats a disk to use Windows-supported file system such as FAT, FAT32 or NTFS, thereby overwriting the previous content of the disk. |
| 33 | HELP
This batch command shows the list of Windows-supplied commands. |
| 34 | IPCONFIG
This batch command displays Windows IP Configuration. Shows configuration by connection and the name of that connection. |
| 35 | LABEL
This batch command adds, sets or removes a disk label. |
| 36 | MORE
This batch command displays the contents of a file or files, one screen at a time. |
| 37 | NET
Provides various network services, depending on the command used. |
| 38 | PING
This batch command sends ICMP/IP «echo» packets over the network to the designated address. |
| 39 | SHUTDOWN
This batch command shuts down a computer, or logs off the current user. |
| 40 | SORT
This batch command takes the input from a source file and sorts its contents alphabetically, from A to Z or Z to A. It prints the output on the console. |
| 41 | SUBST
This batch command assigns a drive letter to a local folder, displays current assignments, or removes an assignment. |
| 42 | SYSTEMINFO
This batch command shows configuration of a computer and its operating system. |
| 43 | TASKKILL
This batch command ends one or more tasks. |
| 44 | TASKLIST
This batch command lists tasks, including task name and process id (PID). |
| 45 | XCOPY
This batch command copies files and directories in a more advanced way. |
| 46 | TREE
This batch command displays a tree of all subdirectories of the current directory to any level of recursion or depth. |
| 47 | FC
This batch command lists the actual differences between two files. |
| 48 | DISKPART
This batch command shows and configures the properties of disk partitions. |
| 49 | TITLE
This batch command sets the title displayed in the console window. |
| 50 | SET
Displays the list of environment variables on the current system. |
Batch Script — Files
In this chapter, we will learn how to create, save, execute, and modify batch files.
Creating Batch Files
Batch files are normally created in notepad. Hence the simplest way is to open notepad and enter the commands required for the script. For this exercise, open notepad and enter the following statements.
:: Deletes All files in the Current Directory With Prompts and Warnings
::(Hidden, System, and Read-Only Files are Not Affected)
::
@ECHO OFF
DEL .
DR
Saving Batch Files
After your batch file is created, the next step is to save your batch file. Batch files have the extension of either .bat or .cmd. Some general rules to keep in mind when naming batch files −
-
Try to avoid spaces when naming batch files, it sometime creates issues when they are called from other scripts.
-
Don’t name them after common batch files which are available in the system such as ping.cmd.
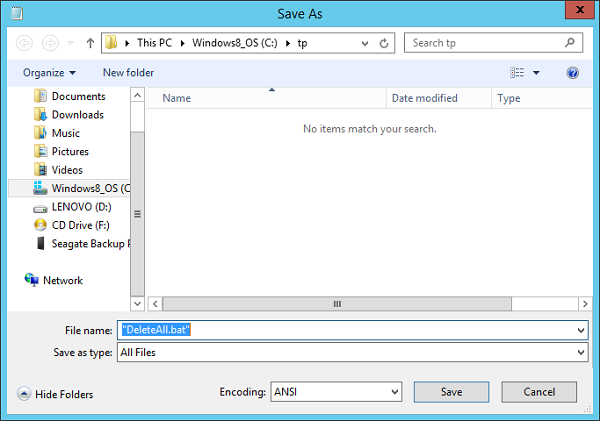
The above screenshot shows how to save the batch file. When saving your batch file a few points to keep in mind.
- Remember to put the .bat or .cmd at the end of the file name.
- Choose the “Save as type” option as “All Files”.
- Put the entire file name in quotes “”.
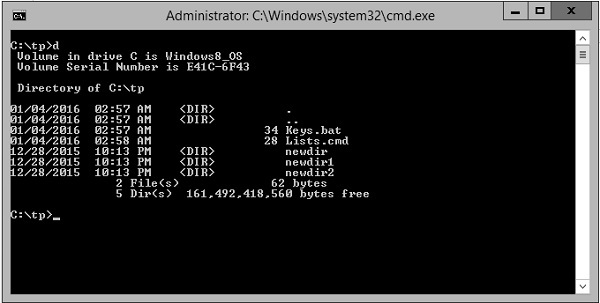
Executing Batch Files
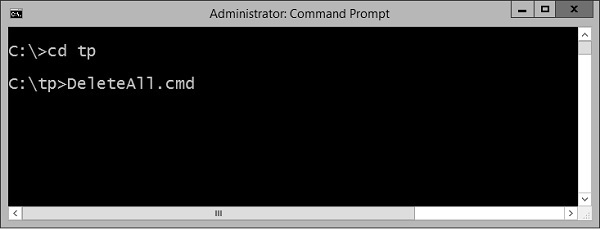
Following are the steps to execute a batch file −
-
Step 1 − Open the command prompt (cmd.exe).
-
Step 2 − Go to the location where the .bat or .cmd file is stored.
-
Step 3 − Write the name of the file as shown in the following image and press the Enter button to execute the batch file.
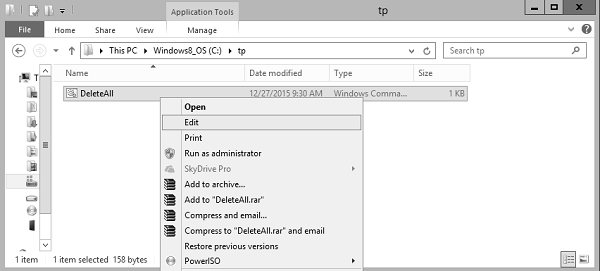
Modifying Batch Files
Following are the steps for modifying an existing batch file.
-
Step 1 − Open windows explorer.
-
Step 2 − Go to the location where the .bat or .cmd file is stored.
-
Step 3 − Right-click the file and choose the “Edit” option from the context menu. The file will open in Notepad for further editing.
Batch Script — Syntax
Normally, the first line in a batch file often consists of the following command.
ECHO Command
@echo off
By default, a batch file will display its command as it runs. The purpose of this first command is to turn off this display. The command «echo off» turns off the display for the whole script, except for the «echo off» command itself. The «at» sign «@» in front makes the command apply to itself as well.
Documentation
Very often batch files also contains lines that start with the «Rem» command. This is a way to enter comments and documentation. The computer ignores anything on a line following Rem. For batch files with increasing amount of complexity, this is often a good idea to have comments.
First Batch Script Program
Let’s construct our simple first batch script program. Open notepad and enter the following lines of code. Save the file as “List.cmd”.
The code does the following −
-
Uses the echo off command to ensure that the commands are not shown when the code is executed.
-
The Rem command is used to add a comment to say what exactly this batch file does.
-
The dir command is used to take the contents of the location C:Program Files.
-
The ‘>’ command is used to redirect the output to the file C:lists.txt.
-
Finally, the echo command is used to tell the user that the operation is completed.
@echo off
Rem This is for listing down all the files in the directory Program files
dir "C:Program Files" > C:lists.txt
echo "The program has completed"
When the above command is executed, the names of the files in C:Program Files will be sent to the file C:Lists.txt and in the command prompt the message “The program has completed” will be displayed.
Batch Script — Variables
There are two types of variables in batch files. One is for parameters which can be passed when the batch file is called and the other is done via the set command.
Command Line Arguments
Batch scripts support the concept of command line arguments wherein arguments can be passed to the batch file when invoked. The arguments can be called from the batch files through the variables %1, %2, %3, and so on.
The following example shows a batch file which accepts 3 command line arguments and echo’s them to the command line screen.
@echo off
echo %1
echo %2
echo %3
If the above batch script is stored in a file called test.bat and we were to run the batch as
Test.bat 1 2 3
Following is a screenshot of how this would look in the command prompt when the batch file is executed.
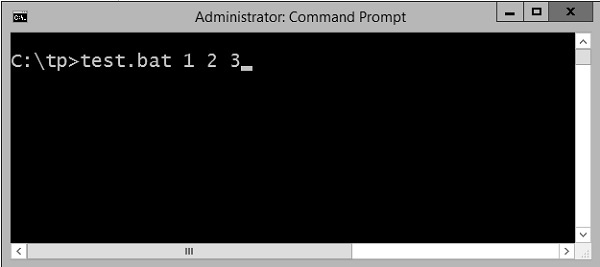
The above command produces the following output.
1
2
3
If we were to run the batch as
Example 1 2 3 4
The output would still remain the same as above. However, the fourth parameter would be ignored.
Set Command
The other way in which variables can be initialized is via the ‘set’ command. Following is the syntax of the set command.
Syntax
set /A variable-name=value
where,
-
variable-name is the name of the variable you want to set.
-
value is the value which needs to be set against the variable.
-
/A – This switch is used if the value needs to be numeric in nature.
The following example shows a simple way the set command can be used.
Example
@echo off
set message=Hello World
echo %message%
-
In the above code snippet, a variable called message is defined and set with the value of «Hello World».
-
To display the value of the variable, note that the variable needs to be enclosed in the % sign.
Output
The above command produces the following output.
Hello World
Working with Numeric Values
In batch script, it is also possible to define a variable to hold a numeric value. This can be done by using the /A switch.
The following code shows a simple way in which numeric values can be set with the /A switch.
@echo off
SET /A a = 5
SET /A b = 10
SET /A c = %a% + %b%
echo %c%
-
We are first setting the value of 2 variables, a and b to 5 and 10 respectively.
-
We are adding those values and storing in the variable c.
-
Finally, we are displaying the value of the variable c.
The output of the above program would be 15.
All of the arithmetic operators work in batch files. The following example shows arithmetic operators can be used in batch files.
@echo off
SET /A a = 5
SET /A b = 10
SET /A c = %a% + %b%
echo %c%
SET /A c = %a% - %b%
echo %c%
SET /A c = %b% / %a%
echo %c%
SET /A c = %b% * %a%
echo %c%
The above command produces the following output.
15
-5
2
50
Local vs Global Variables
In any programming language, there is an option to mark variables as having some sort of scope, i.e. the section of code on which they can be accessed. Normally, variable having a global scope can be accessed anywhere from a program whereas local scoped variables have a defined boundary in which they can be accessed.
DOS scripting also has a definition for locally and globally scoped variables. By default, variables are global to your entire command prompt session. Call the SETLOCAL command to make variables local to the scope of your script. After calling SETLOCAL, any variable assignments revert upon calling ENDLOCAL, calling EXIT, or when execution reaches the end of file (EOF) in your script. The following example shows the difference when local and global variables are set in the script.
Example
@echo off
set globalvar = 5
SETLOCAL
set var = 13145
set /A var = %var% + 5
echo %var%
echo %globalvar%
ENDLOCAL
Few key things to note about the above program.
-
The ‘globalvar’ is defined with a global scope and is available throughout the entire script.
-
The ‘var‘ variable is defined in a local scope because it is enclosed between a ‘SETLOCAL’ and ‘ENDLOCAL’ block. Hence, this variable will be destroyed as soon the ‘ENDLOCAL’ statement is executed.
Output
The above command produces the following output.
13150
5
You will notice that the command echo %var% will not yield anything because after the ENDLOCAL statement, the ‘var’ variable will no longer exist.
Working with Environment Variables
If you have variables that would be used across batch files, then it is always preferable to use environment variables. Once the environment variable is defined, it can be accessed via the % sign. The following example shows how to see the JAVA_HOME defined on a system. The JAVA_HOME variable is a key component that is normally used by a wide variety of applications.
@echo off
echo %JAVA_HOME%
The output would show the JAVA_HOME directory which would depend from system to system. Following is an example of an output.
C:AtlassianBitbucket4.0.1jre
Batch Script — Comments
It’s always a good practice to add comments or documentation for the scripts which are created. This is required for maintenance of the scripts to understand what the script actually does.
For example, consider the following piece of code which has no form of comments. If any average person who has not developed the following script tries to understand the script, it would take a lot of time for that person to understand what the script actually does.
ECHO OFF
IF NOT "%OS%"=="Windows_NT" GOTO Syntax
ECHO.%* | FIND "?" >NUL
IF NOT ERRORLEVEL 1 GOTO Syntax
IF NOT [%2]==[] GOTO Syntax
SETLOCAL
SET WSS=
IF NOT [%1]==[] FOR /F "tokens = 1 delims =  " %%A IN ('ECHO.%~1') DO SET WSS = %%A
FOR /F "tokens = 1 delims =  " %%a IN ('NET VIEW ^| FIND /I "\%WSS%"') DO FOR /F
"tokens = 1 delims = " %%A IN ('NBTSTAT -a %%a ^| FIND /I /V "%%a" ^| FIND "<03>"')
DO ECHO.%%a %%A
ENDLOCAL
GOTO:EOF
ECHO Display logged on users and their workstations.
ECHO Usage: ACTUSR [ filter ]
IF "%OS%"=="Windows_NT" ECHO Where: filter is the first part
of the computer name^(s^) to be displayed
Comments Using the Rem Statement
There are two ways to create comments in Batch Script; one is via the Rem command. Any text which follows the Rem statement will be treated as comments and will not be executed. Following is the general syntax of this statement.
Syntax
Rem Remarks
where ‘Remarks’ is the comments which needs to be added.
The following example shows a simple way the Rem command can be used.
Example
@echo off
Rem This program just displays Hello World
set message=Hello World
echo %message%
Output
The above command produces the following output. You will notice that the line with the Rem statement will not be executed.
Hello World
Comments Using the :: Statement
The other way to create comments in Batch Script is via the :: command. Any text which follows the :: statement will be treated as comments and will not be executed. Following is the general syntax of this statement.
Syntax
:: Remarks
where ‘Remarks’ is the comment which needs to be added.
The following example shows a simple way the Rem command can be used.
Example
@echo off
:: This program just displays Hello World
set message = Hello World
echo %message%
Output
The above command produces the following output. You will notice that the line with the :: statement will not be executed.
Hello World
Note − If you have too many lines of Rem, it could slow down the code, because in the end each line of code in the batch file still needs to be executed.
Let’s look at the example of the large script we saw at the beginning of this topic and see how it looks when documentation is added to it.
::===============================================================
:: The below example is used to find computer and logged on users
::
::===============================================================
ECHO OFF
:: Windows version check
IF NOT "%OS%"=="Windows_NT" GOTO Syntax
ECHO.%* | FIND "?" >NUL
:: Command line parameter check
IF NOT ERRORLEVEL 1 GOTO Syntax
IF NOT [%2]==[] GOTO Syntax
:: Keep variable local
SETLOCAL
:: Initialize variable
SET WSS=
:: Parse command line parameter
IF NOT [%1]==[] FOR /F "tokens = 1 delims =  " %%A IN ('ECHO.%~1') DO SET WSS = %%A
:: Use NET VIEW and NBTSTAT to find computers and logged on users
FOR /F "tokens = 1 delims =  " %%a IN ('NET VIEW ^| FIND /I "\%WSS%"') DO FOR /F
"tokens = 1 delims = " %%A IN ('NBTSTAT -a %%a ^| FIND /I /V "%%a" ^| FIND
"<03>"') DO ECHO.%%a %%A
:: Done
ENDLOCAL
GOTO:EOF
:Syntax
ECHO Display logged on users and their workstations.
ECHO Usage: ACTUSR [ filter ]
IF "%OS%"=="Windows_NT" ECHO Where: filter is the first part of the
computer name^(s^) to be displayed
You can now see that the code has become more understandable to users who have not developed the code and hence is more maintainable.
Batch Script — Strings
In DOS, a string is an ordered collection of characters, such as «Hello, World!».
| S.No | Strings & Description |
|---|---|
| 1 | Create String
A string can be created in DOS in the following way. |
| 2 | Empty String
Empty String |
| 3 | String Interpolation
String interpolation is a way to construct a new String value from a mix of constants, variables, literals, and expressions by including their values inside a string literal. |
| 4 | String Concatenation
You can use the set operator to concatenate two strings or a string and a character, or two characters. Following is a simple example which shows how to use string concatenation. |
| 5 | String length
In DOS scripting, there is no length function defined for finding the length of a string. There are custom-defined functions which can be used for the same. Following is an example of a custom-defined function for seeing the length of a string. |
| 6 | toInt
A variable which has been set as string using the set variable can be converted to an integer using the /A switch which is using the set variable. The following example shows how this can be accomplished. |
| 7 | Align Right
This used to align text to the right, which is normally used to improve readability of number columns. |
| 8 | Left String
This is used to extract characters from the beginning of a string. |
| 9 | Mid String
This is used to extract a substring via the position of the characters in the string. |
| 10 | Remove
The string substitution feature can also be used to remove a substring from another string. |
| 11 | Remove Both Ends
This is used to remove the first and the last character of a string. |
| 12 | Remove All Spaces
This is used to remove all spaces in a string via substitution. |
| 13 | Replace a String
To replace a substring with another string use the string substitution feature. |
| 14 | Right String
This is used to extract characters from the end of a string. |
Batch Script — Arrays
Arrays are not specifically defined as a type in Batch Script but can be implemented. The following things need to be noted when arrays are implemented in Batch Script.
- Each element of the array needs to be defined with the set command.
- The ‘for’ loop would be required to iterate through the values of the array.
Creating an Array
An array is created by using the following set command.
set a[0]=1
Where 0 is the index of the array and 1 is the value assigned to the first element of the array.
Another way to implement arrays is to define a list of values and iterate through the list of values. The following example show how this can be implemented.
Example
@echo off
set list = 1 2 3 4
(for %%a in (%list%) do (
   echo %%a
))
Output
The above command produces the following output.
1
2
3
4
Accessing Arrays
You can retrieve a value from the array by using subscript syntax, passing the index of the value you want to retrieve within square brackets immediately after the name of the array.
Example
@echo off
set a[0]=1
echo %a[0]%
In this example, the index starts from 0 which means the first element can be accessed using index as 0, the second element can be accessed using index as 1 and so on. Let’s check the following example to create, initialize and access arrays −
@echo off
set a[0] = 1
set a[1] = 2
set a[2] = 3
echo The first element of the array is %a[0]%
echo The second element of the array is %a[1]%
echo The third element of the array is %a[2]%
The above command produces the following output.
The first element of the array is 1
The second element of the array is 2
The third element of the array is 3
Modifying an Array
To add an element to the end of the array, you can use the set element along with the last index of the array element.
Example
@echo off
set a[0] = 1
set a[1] = 2
set a[2] = 3
Rem Adding an element at the end of an array
Set a[3] = 4
echo The last element of the array is %a[3]%
The above command produces the following output.
The last element of the array is 4
You can modify an existing element of an Array by assigning a new value at a given index as shown in the following example −
@echo off
set a[0] = 1
set a[1] = 2
set a[2] = 3
Rem Setting the new value for the second element of the array
Set a[1] = 5
echo The new value of the second element of the array is %a[1]%
The above command produces the following output.
The new value of the second element of the array is 5
Iterating Over an Array
Iterating over an array is achieved by using the ‘for’ loop and going through each element of the array. The following example shows a simple way that an array can be implemented.
@echo off
setlocal enabledelayedexpansion
set topic[0] = comments
set topic[1] = variables
set topic[2] = Arrays
set topic[3] = Decision making
set topic[4] = Time and date
set topic[5] = Operators

for /l %%n in (0,1,5) do (
   echo !topic[%%n]!
)
Following things need to be noted about the above program −
-
Each element of the array needs to be specifically defined using the set command.
-
The ‘for’ loop with the /L parameter for moving through ranges is used to iterate through the array.
Output
The above command produces the following output.
Comments
variables
Arrays
Decision making
Time and date
Operators
Length of an Array
The length of an array is done by iterating over the list of values in the array since there is no direct function to determine the number of elements in an array.
@echo off
set Arr[0] = 1
set Arr[1] = 2
set Arr[2] = 3
set Arr[3] = 4
set "x = 0"
:SymLoop

if defined Arr[%x%] (
   call echo %%Arr[%x%]%%
   set /a "x+=1"
   GOTO :SymLoop
)
echo "The length of the array is" %x%
Output
Output The above command produces the following output.
The length of the array is 4
Creating Structures in Arrays
Structures can also be implemented in batch files using a little bit of an extra coding for implementation. The following example shows how this can be achieved.
Example
@echo off
set len = 3
set obj[0].Name = Joe
set obj[0].ID = 1
set obj[1].Name = Mark
set obj[1].ID = 2
set obj[2].Name = Mohan
set obj[2].ID = 3
set i = 0
:loop

if %i% equ %len% goto :eof
set cur.Name=
set cur.ID=

for /f "usebackq delims==.tokens=1-3" %%j in (`set obj[%i%]`) do (
   set cur.%%k=%%l
)
echo Name = %cur.Name%
echo Value = %cur.ID%
set /a i = %i%+1
goto loop
The following key things need to be noted about the above code.
-
Each variable defined using the set command has 2 values associated with each index of the array.
-
The variable i is set to 0 so that we can loop through the structure will the length of the array which is 3.
-
We always check for the condition on whether the value of i is equal to the value of len and if not, we loop through the code.
-
We are able to access each element of the structure using the obj[%i%] notation.
Output
The above command produces the following output.
Name = Joe
Value = 1
Name = Mark
Value = 2
Name = Mohan
Value = 3
Batch Script — Decision Making
Decision-making structures require that the programmer specify one or more conditions to be evaluated or tested by the program, along with a statement or statements to be executed if the condition is determined to be true, and optionally, other statements to be executed if the condition is determined to be false.
| S.No | Strings & Description |
|---|---|
| 1 | If Statement
The first decision-making statement is the ‘if’ statement. |
| 2 | If/else Statement
The next decision making statement is the If/else statement. Following is the general form of this statement. |
| 3 | Nested If Statements
Sometimes, there is a requirement to have multiple ‘if’ statement embedded inside each other. Following is the general form of this statement. |
Batch Script — Operators
An operator is a symbol that tells the compiler to perform specific mathematical or logical manipulations.
In batch script, the following types of operators are possible.
- Arithmetic operators
- Relational operators
- Logical operators
- Assignment operators
- Bitwise operators
Arithmetic Operators
Batch script language supports the normal Arithmetic operators as any language. Following are the Arithmetic operators available.
Show Example
| Operator | Description | Example |
|---|---|---|
| + | Addition of two operands | 1 + 2 will give 3 |
| − | Subtracts second operand from the first | 2 − 1 will give 1 |
| * | Multiplication of both operands | 2 * 2 will give 4 |
| / | Division of the numerator by the denominator | 3 / 2 will give 1.5 |
| % | Modulus operator and remainder of after an integer/float division | 3 % 2 will give 1 |
Relational Operators
Relational operators allow of the comparison of objects. Below are the relational operators available.
Show Example
| Operator | Description | Example |
|---|---|---|
| EQU | Tests the equality between two objects | 2 EQU 2 will give true |
| NEQ | Tests the difference between two objects | 3 NEQ 2 will give true |
| LSS | Checks to see if the left object is less than the right operand | 2 LSS 3 will give true |
| LEQ | Checks to see if the left object is less than or equal to the right operand | 2 LEQ 3 will give true |
| GTR | Checks to see if the left object is greater than the right operand | 3 GTR 2 will give true |
| GEQ | Checks to see if the left object is greater than or equal to the right operand | 3 GEQ 2 will give true |
Logical Operators
Logical operators are used to evaluate Boolean expressions. Following are the logical operators available.
The batch language is equipped with a full set of Boolean logic operators like AND, OR, XOR, but only for binary numbers. Neither are there any values for TRUE or FALSE. The only logical operator available for conditions is the NOT operator.
Show Example
| Operator | Description |
|---|---|
| AND | This is the logical “and” operator |
| OR | This is the logical “or” operator |
| NOT | This is the logical “not” operator |
Assignment Operators
Batch Script language also provides assignment operators. Following are the assignment operators available.
Show Example
| Operator | Description | Example |
|---|---|---|
| += | This adds right operand to the left operand and assigns the result to left operand |
Set /A a = 5 a += 3 Output will be 8 |
| -= | This subtracts the right operand from the left operand and assigns the result to the left operand |
Set /A a = 5 a -= 3 Output will be 2 |
| *= | This multiplies the right operand with the left operand and assigns the result to the left operand |
Set /A a = 5 a *= 3 Output will be 15 |
| /= | This divides the left operand with the right operand and assigns the result to the left operand |
Set /A a = 6 a/ = 3 Output will be 2 |
| %= | This takes modulus using two operands and assigns the result to the left operand |
Set /A a = 5 a% = 3 Output will be 2 |
Bitwise Operators
Bitwise operators are also possible in batch script. Following are the operators available.
Show Example
| Operator | Description |
|---|---|
| & | This is the bitwise “and” operator |
| | | This is the bitwise “or” operator |
| ^ | This is the bitwise “xor” or Exclusive or operator |
Following is the truth table showcasing these operators.
| p | q | p & q | p | q | p ^ q |
|---|---|---|---|---|
| 0 | 0 | 0 | 0 | 0 |
| 0 | 1 | 0 | 1 | 1 |
| 1 | 1 | 1 | 1 | 0 |
| 1 | 0 | 0 | 1 | 1 |
Batch Script — DATE and TIME
The date and time in DOS Scripting have the following two basic commands for retrieving the date and time of the system.
DATE
This command gets the system date.
Syntax
DATE
Example
@echo off
echo %DATE%
Output
The current date will be displayed in the command prompt. For example,
Mon 12/28/2015
TIME
This command sets or displays the time.
Syntax
TIME
Example
@echo off
echo %TIME%
Output
The current system time will be displayed. For example,
22:06:52.87
Following are some implementations which can be used to get the date and time in different formats.
Date in Format Year-Month-Day
Example
@echo off
echo/Today is: %year%-%month%-%day%
goto :EOF
setlocal ENABLEEXTENSIONS
set t = 2&if "%date%z" LSS "A" set t = 1

for /f "skip=1 tokens = 2-4 delims = (-)" %%a in ('echo/^|date') do (
   for /f "tokens = %t%-4 delims=.-/ " %%d in ('date/t') do (
      set %%a=%%d&set %%b=%%e&set %%c=%%f))
endlocal&set %1=%yy%&set %2=%mm%&set %3=%dd%&goto :EOF
Output
The above command produces the following output.
Today is: 2015-12-30
Batch Script — Input / Output
There are three universal “files” for keyboard input, printing text on the screen and printing errors on the screen. The “Standard In” file, known as stdin, contains the input to the program/script. The “Standard Out” file, known as stdout, is used to write output for display on the screen. Finally, the “Standard Err” file, known as stderr, contains any error messages for display on the screen.
Each of these three standard files, otherwise known as the standard streams, are referenced using the numbers 0, 1, and 2. Stdin is file 0, stdout is file 1, and stderr is file 2.
Redirecting Output (Stdout and Stderr)
One common practice in batch files is sending the output of a program to a log file. The > operator sends, or redirects, stdout or stderr to another file. The following example shows how this can be done.
Dir C: > list.txt
In the above example, the stdout of the command Dir C: is redirected to the file list.txt.
If you append the number 2 to the redirection filter, then it would redirect the stderr to the file lists.txt.
Dir C: 2> list.txt
One can even combine the stdout and stderr streams using the file number and the ‘&’ prefix. Following is an example.
DIR C: > lists.txt 2>&1
Suppressing Program Output
The pseudo file NUL is used to discard any output from a program. The following example shows that the output of the command DIR is discarded by sending the output to NUL.
Dir C: > NUL
Stdin
To work with the Stdin, you have to use a workaround to achieve this. This can be done by redirecting the command prompt’s own stdin, called CON.
The following example shows how you can redirect the output to a file called lists.txt. After you execute the below command, the command prompt will take all the input entered by user till it gets an EOF character. Later, it sends all the input to the file lists.txt.
TYPE CON > lists.txt
Batch Script — Return Code
By default when a command line execution is completed it should either return zero when execution succeeds or non-zero when execution fails. When a batch script returns a non-zero value after the execution fails, the non-zero value will indicate what is the error number. We will then use the error number to determine what the error is about and resolve it accordingly.
Following are the common exit code and their description.
| Error Code | Description |
|---|---|
| 0 | Program successfully completed. |
| 1 | Incorrect function. Indicates that Action has attempted to execute non-recognized command in Windows command prompt cmd.exe. |
| 2 | The system cannot find the file specified. Indicates that the file cannot be found in specified location. |
| 3 | The system cannot find the path specified. Indicates that the specified path cannot be found. |
| 5 | Access is denied. Indicates that user has no access right to specified resource. |
|
9009 0x2331 |
Program is not recognized as an internal or external command, operable program or batch file. Indicates that command, application name or path has been misspelled when configuring the Action. |
|
221225495 0xC0000017 -1073741801 |
Not enough virtual memory is available. It indicates that Windows has run out of memory. |
|
3221225786 0xC000013A -1073741510 |
The application terminated as a result of a CTRL+C. Indicates that the application has been terminated either by the user’s keyboard input CTRL+C or CTRL+Break or closing command prompt window. |
|
3221225794 0xC0000142 -1073741502 |
The application failed to initialize properly. Indicates that the application has been launched on a Desktop to which the current user has no access rights. Another possible cause is that either gdi32.dll or user32.dll has failed to initialize. |
Error Level
The environmental variable %ERRORLEVEL% contains the return code of the last executed program or script.
By default, the way to check for the ERRORLEVEL is via the following code.
Syntax
IF %ERRORLEVEL% NEQ 0 (
   DO_Something
)
It is common to use the command EXIT /B %ERRORLEVEL% at the end of the batch file to return the error codes from the batch file.
EXIT /B at the end of the batch file will stop execution of a batch file.
Use EXIT /B < exitcodes > at the end of the batch file to return custom return codes.
Environment variable %ERRORLEVEL% contains the latest errorlevel in the batch file, which is the latest error codes from the last command executed. In the batch file, it is always a good practice to use environment variables instead of constant values, since the same variable get expanded to different values on different computers.
Let’s look at a quick example on how to check for error codes from a batch file.
Example
Let’s assume we have a batch file called Find.cmd which has the following code. In the code, we have clearly mentioned that we if don’t find the file called lists.txt then we should set the errorlevel to 7. Similarly, if we see that the variable userprofile is not defined then we should set the errorlevel code to 9.
if not exist c:lists.txt exit 7
if not defined userprofile exit 9
exit 0
Let’s assume we have another file called App.cmd that calls Find.cmd first. Now, if the Find.cmd returns an error wherein it sets the errorlevel to greater than 0 then it would exit the program. In the following batch file, after calling the Find.cnd find, it actually checks to see if the errorlevel is greater than 0.
Call Find.cmd

if errorlevel gtr 0 exit
echo “Successful completion”
Output
In the above program, we can have the following scenarios as the output −
-
If the file c:lists.txt does not exist, then nothing will be displayed in the console output.
-
If the variable userprofile does not exist, then nothing will be displayed in the console output.
-
If both of the above condition passes then the string “Successful completion” will be displayed in the command prompt.
Loops
In the decision making chapter, we have seen statements which have been executed one after the other in a sequential manner. Additionally, implementations can also be done in Batch Script to alter the flow of control in a program’s logic. They are then classified into flow of control statements.
| S.No | Loops & Description |
|---|---|
| 1 | While Statement Implementation
There is no direct while statement available in Batch Script but we can do an implementation of this loop very easily by using the if statement and labels. |
| 2 | For Statement — List Implementations
The «FOR» construct offers looping capabilities for batch files. Following is the common construct of the ‘for’ statement for working with a list of values. |
| 3 | Looping through Ranges
The ‘for’ statement also has the ability to move through a range of values. Following is the general form of the statement. |
| 4 | Classic for Loop Implementation
Following is the classic ‘for’ statement which is available in most programming languages. |
Looping through Command Line Arguments
The ‘for’ statement can also be used for checking command line arguments. The following example shows how the ‘for’ statement can be used to loop through the command line arguments.
Example
@ECHO OFF
:Loop

IF "%1"=="" GOTO completed
FOR %%F IN (%1) DO echo %%F
SHIFT
GOTO Loop
:completed
Output
Let’s assume that our above code is stored in a file called Test.bat. The above command will produce the following output if the batch file passes the command line arguments of 1,2 and 3 as Test.bat 1 2 3.
1
2
3
| S.No | Loops & Description |
|---|---|
| 1 | Break Statement Implementation
The break statement is used to alter the flow of control inside loops within any programming language. The break statement is normally used in looping constructs and is used to cause immediate termination of the innermost enclosing loop. |
Batch Script — Functions
A function is a set of statements organized together to perform a specific task. In batch scripts, a similar approach is adopted to group logical statements together to form a function.
As like any other languages, functions in Batch Script follows the same procedure −
-
Function Declaration − It tells the compiler about a function’s name, return type, and parameters.
-
Function Definition − It provides the actual body of the function.
Function Definition
In Batch Script, a function is defined by using the label statement. When a function is newly defined, it may take one or several values as input ‘parameters’ to the function, process the functions in the main body, and pass back the values to the functions as output ‘return types’.
Every function has a function name, which describes the task that the function performs. To use a function, you «call» that function with its name and pass its input values (known as arguments) that matches the types of the function’s parameters.
Following is the syntax of a simple function.
:function_name
Do_something
EXIT /B 0
-
The function_name is the name given to the function which should have some meaning to match what the function actually does.
-
The EXIT statement is used to ensure that the function exits properly.
Following is an example of a simple function.
Example
:Display
SET /A index=2
echo The value of index is %index%
EXIT /B 0
| S.No | Functions & Description |
|---|---|
| 1 | Calling a Function
A function is called in Batch Script by using the call command. |
| 2 | Functions with Parameters
Functions can work with parameters by simply passing them when a call is made to the function. |
| 3 | Functions with Return Values
Functions can work with return values by simply passing variables names |
| 4 | Local Variables in Functions
Local variables in functions can be used to avoid name conflicts and keep variable changes local to the function. |
| 5 | Recursive Functions
The ability to completely encapsulate the body of a function by keeping variable changes local to the function and invisible to the caller. |
| 6 | File I/O
In Batch Script, it is possible to perform the normal file I/O operations that would be expected in any programming language. |
| 7 | Creating Files
The creation of a new file is done with the help of the redirection filter >. This filter can be used to redirect any output to a file. |
| 8 | Writing to Files
Content writing to files is also done with the help of the redirection filter >. This filter can be used to redirect any output to a file. |
| 9 | Appending to Files
Content writing to files is also done with the help of the double redirection filter >>. This filter can be used to append any output to a file. |
| 10 | Reading from Files
Reading of files in a batch script is done via using the FOR loop command to go through each line which is defined in the file that needs to be read. |
| 11 | Deleting Files
For deleting files, Batch Script provides the DEL command. |
| 12 | Renaming Files
For renaming files, Batch Script provides the REN or RENAME command. |
| 13 | Moving Files
For moving files, Batch Script provides the MOVE command. |
| 14 | Batch Files – Pipes
The pipe operator (|) takes the output (by default, STDOUT) of one command and directs it into the input (by default, STDIN) of another command. |
| 15 | Batch Files – Inputs
When a batch file is run, it gives you the option to pass in command line parameters which can then be read within the program for further processing. |
| 16 | Using the SHIFT Operator
One of the limitations of command line arguments is that it can accept only arguments till %9. Let’s take an example of this limitation. |
| 17 | Folders
In Batch Script, it is possible to perform the normal folder based operations that would be expected in any programming language. |
| 18 | Creating Folders
The creation of a folder is done with the assistance of the MD (Make directory) command. |
| 19 | Listing Folder Contents
The listing of folder contents can be done with the dir command. This command allows you to see the available files and directories in the current directory. |
| 20 | Deleting Folders
For deleting folders, Batch Scripting provides the DEL command. |
| 21 | Renaming Folders
For renaming folders, Batch Script provides the REN or RENAME command. |
| 22 | Moving Folders
For moving folders, Batch Script provides the MOVE command. |
Batch Script — Process
In this chapter, we will discuss the various processes involved in Batch Script.
Viewing the List of Running Processes
In Batch Script, the TASKLIST command can be used to get the list of currently running processes within a system.
Syntax
TASKLIST [/S system [/U username [/P [password]]]] [/M [module] | /SVC | /V] [/FI filter]
[/FO format] [/NH]
| S.No. | Options & Description |
|---|---|
| 1. |
/S system Specifies the remote system to connect to |
| 2. |
/U [domain]user Specifies the user context under which the command should execute. |
| 3. |
/P [password] Specifies the password for the given user context. Prompts for input if omitted. |
| 4. |
/M [module] Lists all tasks currently using the given exe/dll name. If the module name is not specified all loaded modules are displayed. |
| 5. |
/SVC Displays services hosted in each process. |
| 6. |
/V Displays verbose task information. |
| 7. |
/FI filter Displays a set of tasks that match a given criteria specified by the filter. |
| 8. |
/FO format Specifies the output format. Valid values: «TABLE», «LIST», «CSV». |
| 9. |
/NH Specifies that the «Column Header» should not show in the output. Valid only for «TABLE» and «CSV» formats. |
Examples
TASKLIST
The above command will get the list of all the processes running on your local system. Following is a snapshot of the output which is rendered when the above command is run as it is. As you can see from the following output, not only do you get the various processes running on your system, you also get the memory usage of each process.
Image Name                    PID       Session Name       Session#     Mem Usage
========================= ========    ================ =========== ============
System Idle Process             0        Services            0              4 K
System                          4        Services            0            272 K
smss.exe                      344        Services            0          1,040 K
csrss.exe                     528        Services            0          3,892 K
csrss.exe                     612        Console             1         41,788 K
wininit.exe                   620        Services            0          3,528 K
winlogon.exe                  648        Console             1          5,884 K
services.exe                  712        Services            0          6,224 K
lsass.exe                     720        Services            0          9,712 K
svchost.exe                   788        Services            0         10,048 K
svchost.exe                   832        Services            0          7,696 K
dwm.exe                       916        Console             1        117,440 K
nvvsvc.exe                    932        Services            0          6,692 K
nvxdsync.exe                  968        Console             1         16,328 K
nvvsvc.exe                    976        Console             1         12,756 K
svchost.exe                  1012        Services            0         21,648 K
svchost.exe                   236        Services            0         33,864 K
svchost.exe                   480        Services            0         11,152 K
svchost.exe                  1028        Services            0         11,104 K
svchost.exe                  1048        Services            0         16,108 K
wlanext.exe                  1220        Services            0         12,560 K
conhost.exe                  1228        Services            0          2,588 K
svchost.exe                  1276        Services            0         13,888 K
svchost.exe                  1420        Services            0         13,488 K
spoolsv.exe                  1556        Services            0          9,340 K
tasklist > process.txt
The above command takes the output displayed by tasklist and saves it to the process.txt file.
tasklist /fi "memusage gt 40000"
The above command will only fetch those processes whose memory is greater than 40MB. Following is a sample output that can be rendered.
Image Name                    PID      Session Name     Session#     Mem Usage
=========================   ======== ================ =========== ============
dwm.exe                        916     Console             1        127,912 K
explorer.exe                  2904     Console             1        125,868 K
ServerManager.exe             1836     Console             1         59,796 K
WINWORD.EXE                   2456     Console             1        144,504 K
chrome.exe                    4892     Console             1        123,232 K
chrome.exe                    4976     Console             1         69,412 K
chrome.exe                    1724     Console             1         76,416 K
chrome.exe                    3992     Console             1         56,156 K
chrome.exe                    1168     Console             1        233,628 K
chrome.exe                     816     Console             1         66,808 K
Killing a Particular Process
Allows a user running Microsoft Windows XP professional, Windows 2003, or later to kill a task from a Windows command line by process id (PID) or image name. The command used for this purpose is the TASKILL command.
Syntax
TASKKILL [/S system [/U username [/P [password]]]] { [/FI filter]
[/PID processid | /IM imagename] } [/T] [/F]
| S.No. | Options & Description |
|---|---|
| 1. |
/S system Specifies the remote system to connect to |
| 2. |
/U [domain]user Specifies the user context under which the command should execute. |
| 3. |
/P [password] Specifies the password for the given user context. Prompts for input if omitted. |
| 4. |
/FI FilterName Applies a filter to select a set of tasks. Allows «*» to be used. ex. imagename eq acme* See below filters for additional information and examples. |
| 5. |
/PID processID Specifies the PID of the process to be terminated. Use TaskList to get the PID. |
| 6. |
/IM ImageName Specifies the image name of the process to be terminated. Wildcard ‘*’ can be used to specify all tasks or image names. |
| 7. |
/T Terminates the specified process and any child processes which were started by it. |
| 8. |
/F Specifies to forcefully terminate the process(es). |
Examples
taskkill /f /im notepad.exe
The above command kills the open notepad task, if open.
taskill /pid 9214
The above command kills a process which has a process of 9214.
Starting a New Process
DOS scripting also has the availability to start a new process altogether. This is achieved by using the START command.
Syntax
START "title" [/D path] [options] "command" [parameters]
Wherein
-
title − Text for the CMD window title bar (required.)
-
path − Starting directory.
-
command − The command, batch file or executable program to run.
-
parameters − The parameters passed to the command.
| S.No. | Options & Description |
|---|---|
| 1. |
/MIN Start window Minimized |
| 2. |
/MAX Start window maximized. |
| 3. |
/LOW Use IDLE priority class. |
| 4. |
/NORMAL Use NORMAL priority class. |
| 5. |
/ABOVENORMAL Use ABOVENORMAL priority class. |
| 6. |
/BELOWNORMAL Use BELOWNORMAL priority class. |
| 7. |
/HIGH Use HIGH priority class. |
| 8. |
/REALTIME Use REALTIME priority class. |
Examples
START "Test Batch Script" /Min test.bat
The above command will run the batch script test.bat in a new window. The windows will start in the minimized mode and also have the title of “Test Batch Script”.
START "" "C:Program FilesMicrosoft OfficeWinword.exe" "D:testTESTA.txt"
The above command will actually run Microsoft word in another process and then open the file TESTA.txt in MS Word.
Batch Script — Aliases
Aliases means creating shortcuts or keywords for existing commands. Suppose if we wanted to execute the below command which is nothing but the directory listing command with the /w option to not show all of the necessary details in a directory listing.
Dir /w
Suppose if we were to create a shortcut to this command as follows.
dw = dir /w
When we want to execute the dir /w command, we can simply type in the word dw. The word ‘dw’ has now become an alias to the command Dir /w.
Creating an Alias
Alias are managed by using the doskey command.
Syntax
DOSKEY [options] [macroname=[text]]
Wherein
-
macroname − A short name for the macro.
-
text − The commands you want to recall.
Following are the description of the options which can be presented to the DOSKEY command.
| S.No. | Options & Description |
|---|---|
| 1. |
/REINSTALL Installs a new copy of Doskey |
| 2. |
/LISTSIZE = size Sets size of command history buffer. |
| 3. |
/MACROS Displays all Doskey macros. |
| 4. |
/MACROS:ALL Displays all Doskey macros for all executables which have Doskey macros. |
| 5. |
/MACROS:exename Displays all Doskey macros for the given executable. |
| 6. |
/HISTORY Displays all commands stored in memory. |
| 7. |
/INSERT Specifies that new text you type is inserted in old text. |
| 8. |
/OVERSTRIKE Specifies that new text overwrites old text. |
| 9. |
/EXENAME = exename Specifies the executable. |
| 10. |
/MACROFILE = filename Specifies a file of macros to install. |
| 11. |
macroname Specifies a name for a macro you create. |
| 12. |
text Specifies commands you want to record. |
Example
Create a new file called keys.bat and enter the following commands in the file. The below commands creates two aliases, one if for the cd command, which automatically goes to the directory called test. And the other is for the dir command.
@echo off
doskey cd = cd/test
doskey d = dir
Once you execute the command, you will able to run these aliases in the command prompt.
Output
The following screenshot shows that after the above created batch file is executed, you can freely enter the ‘d’ command and it will give you the directory listing which means that your alias has been created.
Deleting an Alias
An alias or macro can be deleted by setting the value of the macro to NULL.
Example
@echo off
doskey cd = cd/test
doskey d = dir
d=
In the above example, we are first setting the macro d to d = dir. After which we are setting it to NULL. Because we have set the value of d to NULL, the macro d will deleted.
Replacing an Alias
An alias or macro can be replaced by setting the value of the macro to the new desired value.
Example
@echo off
doskey cd = cd/test
doskey d = dir

d = dir /w
In the above example, we are first setting the macro d to d = dir. After which we are setting it to dir /w. Since we have set the value of d to a new value, the alias ‘d’ will now take on the new value.
Batch Script — Devices
Windows now has an improved library which can be used in Batch Script for working with devices attached to the system. This is known as the device console – DevCon.exe.
Windows driver developers and testers can use DevCon to verify that a driver is installed and configured correctly, including the proper INF files, driver stack, driver files, and driver package. You can also use the DevCon commands (enable, disable, install, start, stop, and continue) in scripts to test the driver. DevCon is a command-line tool that performs device management functions on local computers and remote computers.
Display driver and device info DevCon can display the following properties of drivers and devices on local computers, and remote computers (running Windows XP and earlier) −
-
Hardware IDs, compatible IDs, and device instance IDs. These identifiers are described in detail in device identification strings.
-
Device setup classes.
-
The devices in a device setup class.
-
INF files and device driver files.
-
Details of driver packages.
-
Hardware resources.
-
Device status.
-
Expected driver stack.
-
Third-party driver packages in the driver store.
-
Search for devices DevCon can search for installed and uninstalled devices on a local or remote computer by hardware ID, device instance ID, or device setup class.
-
Change device settings DevCon can change the status or configuration of Plug and Play (PnP) devices on the local computer in the following ways −
-
Enable a device.
-
Disable a device.
-
Update drivers (interactive and non-interactive).
-
Install a device (create a devnode and install software).
-
Remove a device from the device tree and delete its device stack.
-
Rescan for Plug and Play devices.
-
Add, delete, and reorder the hardware IDs of root-enumerated devices.
-
Change the upper and lower filter drivers for a device setup class.
-
Add and delete third-party driver packages from the driver store.
-
DevCon (DevCon.exe) is included when you install the WDK, Visual Studio, and the Windows SDK for desktop apps. DevCon.exe kit is available in the following locations when installed.
%WindowsSdkDir%toolsx64devcon.exe
%WindowsSdkDir%toolsx86devcon.exe
%WindowsSdkDir%toolsarmdevcon.exe
Syntax
devcon [/m:\computer] [/r] command [arguments]
wherein
-
/m:\computer − Runs the command on the specified remote computer. The backslashes are required.
-
/r − Conditional reboot. Reboots the system after completing an operation only if a reboot is required to make a change effective.
-
command − Specifies a DevCon command.
-
To list and display information about devices on the computer, use the following commands −
-
DevCon HwIDs
-
DevCon Classes
-
DevCon ListClass
-
DevCon DriverFiles
-
DevCon DriverNodes
-
DevCon Resources
-
DevCon Stack
-
DevCon Status
-
DevCon Dp_enum
-
-
To search for information about devices on the computer, use the following commands −
-
DevCon Find
-
DevCon FindAll
-
-
To manipulate the device or change its configuration, use the following commands −
-
DevCon Enable
-
DevCon Disable
-
DevCon Update
-
DevCon UpdateNI
-
DevCon Install
-
DevCon Remove
-
DevCon Rescan
-
DevCon Restart
-
DevCon Reboot
-
DevCon SetHwID
-
DevCon ClassFilter
-
DevCon Dp_add
-
DevCon Dp_delete
-
Examples
Following are some examples on how the DevCon command is used.
List all driver files
The following command uses the DevCon DriverFiles operation to list the file names of drivers that devices on the system use. The command uses the wildcard character (*) to indicate all devices on the system. Because the output is extensive, the command uses the redirection character (>) to redirect the output to a reference file, driverfiles.txt.
devcon driverfiles * > driverfiles.txt
The following command uses the DevCon status operation to find the status of all devices on the local computer. It then saves the status in the status.txt file for logging or later review. The command uses the wildcard character (*) to represent all devices and the redirection character (>) to redirect the output to the status.txt file.
devcon status * > status.txt
The following command enables all printer devices on the computer by specifying the Printer setup class in a DevCon Enable command. The command includes the /r parameter, which reboots the system if it is necessary to make the enabling effective.
devcon /r enable = Printer
The following command uses the DevCon Install operation to install a keyboard device on the local computer. The command includes the full path to the INF file for the device (keyboard.inf) and a hardware ID (*PNP030b).
devcon /r install c:windowsinfkeyboard.inf *PNP030b
The following command will scan the computer for new devices.
devcon scan
The following command will rescan the computer for new devices.
devcon rescan
Batch Script — Registry
The Registry is one of the key elements on a windows system. It contains a lot of information on various aspects of the operating system. Almost all applications installed on a windows system interact with the registry in some form or the other.
The Registry contains two basic elements: keys and values. Registry keys are container objects similar to folders. Registry values are non-container objects similar to files. Keys may contain values or further keys. Keys are referenced with a syntax similar to Windows’ path names, using backslashes to indicate levels of hierarchy.
This chapter looks at various functions such as querying values, adding, deleting and editing values from the registry.
| S.No | Types of Registry & Description |
|---|---|
| 1 | Reading from the Registry
Reading from the registry is done via the REG QUERY command. |
| 2 | Adding to the Registry
Adding to the registry is done via the REG ADD command. |
| 3 | Deleting from the Registry
Deleting from the registry is done via the REG DEL command. |
| 4 | Copying Registry Keys
Copying from the registry is done via the REG COPY command. |
| 5 | Comparing Registry Keys
Comparing registry keys is done via the REG COMPARE command. |
Batch Script — Network
Batch script has the facility to work with network settings. The NET command is used to update, fix, or view the network or network settings. This chapter looks at the different options available for the net command.
| S.No | NET Commands & Description |
|---|---|
| 1 | NET ACCOUNTS
View the current password & logon restrictions for the computer. |
| 2 | NET CONFIG
Displays your current server or workgroup settings. |
| 3 | NET COMPUTER
Adds or removes a computer attached to the windows domain controller. |
| 4 | NET USER
This command can be used for the following View the details of a particular user account. |
| 5 | NET STOP/START
This command is used to stop and start a particular service. |
| 6 | NET STATISTICS
Display network statistics of the workstation or server. |
| 7 | NET USE
Connects or disconnects your computer from a shared resource or displays information about your connections. |
Batch Script — Printing
Printing can also be controlled from within Batch Script via the NET PRINT command.
Syntax
PRINT [/D:device] [[drive:][path]filename[...]]
Where /D:device — Specifies a print device.
Example
print c:example.txt /c /d:lpt1
The above command will print the example.txt file to the parallel port lpt1.
Command Line Printer Control
As of Windows 2000, many, but not all, printer settings can be configured from Windows’s command line using PRINTUI.DLL and RUNDLL32.EXE
Syntax
RUNDLL32.EXE PRINTUI.DLL,PrintUIEntry [ options ] [ @commandfile ]
Where some of the options available are the following −
-
/dl − Delete local printer.
-
/dn − Delete network printer connection.
-
/dd − Delete printer driver.
-
/e − Display printing preferences.
-
/f[file] − Either inf file or output file.
-
/F[file] − Location of an INF file that the INF file specified with /f may depend on.
-
/ia − Install printer driver using inf file.
-
/id − Install printer driver using add printer driver wizard.
-
/if − Install printer using inf file.
-
/ii − Install printer using add printer wizard with an inf file.
-
/il − Install printer using add printer wizard.
-
/in − Add network printer connection.
-
/ip − Install printer using network printer installation wizard.
-
/k − Print test page to specified printer, cannot be combined with command when installing a printer.
-
/l[path] − Printer driver source path.
-
/m[model] − Printer driver model name.
-
/n[name] − Printer name.
-
/o − Display printer queue view.
-
/p − Display printer properties.
-
/Ss − Store printer settings into a file.
-
/Sr − Restore printer settings from a file.
-
/y − Set printer as the default.
-
/Xg − Get printer settings.
-
/Xs − Set printer settings.
Testing if a Printer Exists
There can be cases wherein you might be connected to a network printer instead of a local printer. In such cases, it is always beneficial to check if a printer exists in the first place before printing.
The existence of a printer can be evaluated with the help of the RUNDLL32.EXE PRINTUI.DLL which is used to control most of the printer settings.
Example
SET PrinterName = Test Printer
SET file=%TEMP%Prt.txt
RUNDLL32.EXE PRINTUI.DLL,PrintUIEntry /Xg /n "%PrinterName%" /f "%file%" /q

IF EXIST "%file%" (
   ECHO %PrinterName% printer exists
) ELSE (
   ECHO %PrinterName% printer does NOT exists
)
The above command will do the following −
-
It will first set the printer name and set a file name which will hold the settings of the printer.
-
The RUNDLL32.EXE PRINTUI.DLL commands will be used to check if the printer actually exists by sending the configuration settings of the file to the file Prt.txt
Batch Script — Debugging
Debugging a batch script becomes important when you are working on a big complex batch script.
Following are the ways in which you can debug the batch file.
Using echo command
A very simple debug option is to make use of echo command in your batch script wherever possible. It will display the message in the command prompt and help you debug where things have gone wrong.
Here is a simple example that displays even numbers based on the input given. The echo command is used to display the result and also if the input is not given. Similarly, the echo command can be used in place when you think that the error can happen. For example, if the input given is a negative number, less than 2, etc.
Example
@echo off
if [%1] == [] (
   echo input value not provided
   goto stop
)
rem Display numbers
for /l %%n in (2,2,%1) do (
   echo %%n
)
:stop
pause
Output
C:>test.bat
10
2
4
6
8
10
22
Press any key to continue ...
Using pause command
Another way is to pause the batch execution when there is an error. When the script is paused, the developer can fix the issue and restart the processing.
In the example below, the batch script is paused as the input value is mandatory and not provided.
Example
@echo off
if [%1] == [] (
   echo input value not provided
   goto stop
) else (
   echo "Valid value"
)
:stop
pause
Output
C:>test.bat
 input value not provided
Press any key to continue..
Logging the error messages to another file
It might get hard to debug the error just looking at a bunch of echo displayed on the command prompt. Another easy way out is to log those messages in another file and view it step by step to understand what went wrong.
Here is an example, consider the following test.bat file:
net statistics /Server
The command given in the .bat file is wrong. Let us log the message and see what we get.
Execute the following command in your command line:
C:>test.bat > testlog.txt 2> testerrors.txt
The file testerrors.txt will display the error messages as shown below:
The option /SERVER is unknown.
The syntax of this command is:
NET STATISTICS
[WORKSTATION | SERVER]
More help is available by typing NET HELPMSG 3506.
Looking at the above file the developer can fix the program and execute again.
Using ErrorLevel to detect errors and log them
Errorlevel returns 0 if the command executes successfully and 1 if it fails.
Consider the following example:
@echo off
PING google.com
if errorlevel 1 GOTO stop
:stop
   echo Unable to connect to google.com
pause
During execution, you can see errors as well as logs:
C:>test.bat > testlog.txt
testlog.txt
Pinging google.com [172.217.26.238] with 32 bytes of data:
Reply from 172.217.26.238: bytes=32 time=160ms TTL=111
Reply from 172.217.26.238: bytes=32 time=82ms TTL=111
Reply from 172.217.26.238: bytes=32 time=121ms TTL=111
Reply from 172.217.26.238: bytes=32 time=108ms TTL=111
Ping statistics for 172.217.26.238:
   Packets: Sent = 4, Received = 4, Lost = 0 (0% loss),
Approximate round trip times in milli-seconds:
   Minimum = 82ms, Maximum = 160ms, Average = 117ms
   Connected successfully
Press any key to continue . . .
In case of failure, you will see the following logs inside testlog.txt.
Ping request could not find host google.com. Please check the name and try again.
Unable to connect to google.com
Press any key to continue . . .
Batch Script — Logging
Logging in is possible in Batch Script by using the redirection command.
Syntax
test.bat > testlog.txt 2> testerrors.txt
Example
Create a file called test.bat and enter the following command in the file.
net statistics /Server
The above command has an error because the option to the net statistics command is given in the wrong way.
Output
If the command with the above test.bat file is run as
test.bat > testlog.txt 2> testerrors.txt
And you open the file testerrors.txt, you will see the following error.
The option /SERVER is unknown.
The syntax of this command is −
NET STATISTICS
[WORKSTATION | SERVER]
More help is available by typing NET HELPMSG 3506.
If you open the file called testlog.txt, it will show you a log of what commands were executed.
C:tp>net statistics /Server
Рассмотрим мощный инструмент автоматизации рутинных задач в семействе операционных систем Windows.
BAT-файл — это последовательность команд для интерпретатора командной строки в виде текстового файла с расширением .bat или .cmd. Основное предназначение пакетных файлов — автоматизация рутинных действий пользователя компьютера.
Название BAT появилось от английского batch — пакетная обработка. В истории продуктов Microsoft пакетные файлы существовали с первой версии MS-DOS в 80-х годах и позже успешно интегрировались в Microsoft Windows. В MS-DOS командным интерпретатором выступает COMMAND.COM, а начиная с Windows NT и до сих пор используется CMD.EXE.
Интерпретатор COMMAND.COM принимает файлы с расширением .BAT. Расширение .CMD создано для интерпретатора CMD.EXE с целью различать файлы для «старого» и «нового» интерпретаторов. CMD.EXE корректно обрабатывает оба расширения.
Интерпретатор CMD.EXE является частью современных операционных систем семейства Microsoft Windows, несмотря на отсутствие развития с начала 2000-х.
Основы взаимодействия с bat-файлами
Пакетный файл bat — это текстовый документ со специальным расширением. Для создания своего первого bat-файла достаточно «Блокнота», который доступен в операционной системе. Для повышения удобства написания и поддержки bat-файлов рекомендуем использовать Notepad++ или любой другой текстовый редактор с подсветкой синтаксиса.
Создание bat-файлов

Для создания пакетных файлов необходимо открыть текстовый редактор и в меню Файл выбрать Сохранить как….

В появившемся окне выбрать Тип файла → Все файлы и задать имя с расширением .bat, как продемонстрировано на изображении выше. По умолчанию Windows скрывает расширения файлов, и пакетный файл можно отличить от текстового по пиктограмме окна с шестеренками.

Если вы ошиблись при сохранении и пакетный файл сохранился с расширением txt, то не обязательно совершать повторное сохранение. Можно включить отображение расширения имен файлов и переименовать файл.
Запуск bat-файлов

Запуск пакетных файлов производится двойным кликом по иконке. Дополнительно можно использовать команду Открыть из контекстного меню, которое доступно при нажатии правой клавиши мыши (ПКМ) по файлу. Если для выполнения команд требуются права администратора, то в том же контекстном меню есть пункт Запуск от имени администратора.
Исполняемые bat-файлы не могут запрашивать права администратора, если командам нужны расширенные права.
Запуск через контекстное меню откроет командный интерпретатор, в котором выполнятся команды bat-файла. По завершении команд окно закроется. Такое поведение неприемлемо, если от пакетного файла требуется какая-то обратная связь — например, сообщение об ошибке или результат вычислений. В таком случае интерпретатор следует запустить вручную и передать ему пакетный файл.

Для запуска интерпретатора командной строки необходимо открыть меню Выполнить сочетанием клавиш Win + R, вписать cmd и нажать ОК.

Для запуска пакетного файла его необходимо перенести мышкой в открывшееся окно и нажать Enter. Команды bat-файла будут выполнены, а его вывод вы увидите на экране.
Вне зависимости от способа запуска откроется окно, которое может привлекать внимание и раздражать. Для запуска в «скрытом» режиме необходимо использовать другой скриптовой язык Microsoft Windows — VBScript.
По аналогии создаем файл с расширением .vbs и заполняем его следующими командами:
Set WshShell = CreateObject("WScript.Shell")
WshShell.Run chr(34) & "С:путьдовашегоскрипта.bat" & Chr(34), 0
Set WshShell = Nothing
Для скрытого запуска следует запускать созданный файл, а не bat-файл. Скрытый запуск bat-файла актуален для автоматизации действий по расписанию, например, создание резервной копии.
Запуск по расписанию
За выполнение действий по расписанию отвечает Планировщик заданий. Открываем меню Выполнить и запускаем программу taskschd.msc.

Выбираем пункт Создать простую задач и заполняем параметры задания:
- имя для простой идентификации,
- периодичность и время запуска,
- действие — Запустить программу,
- программа или сценарий — путь до вашего .bat-файла или .vbs-файла, который запускает .bat-файл скрытно.
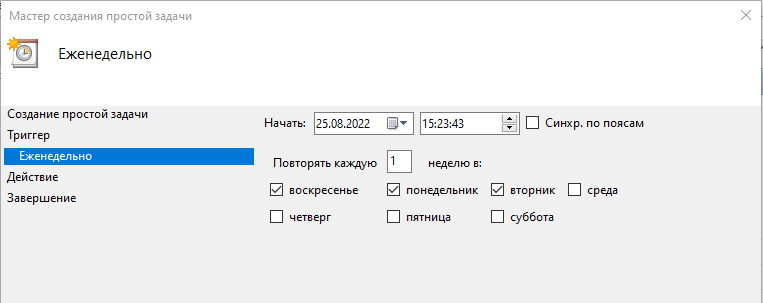
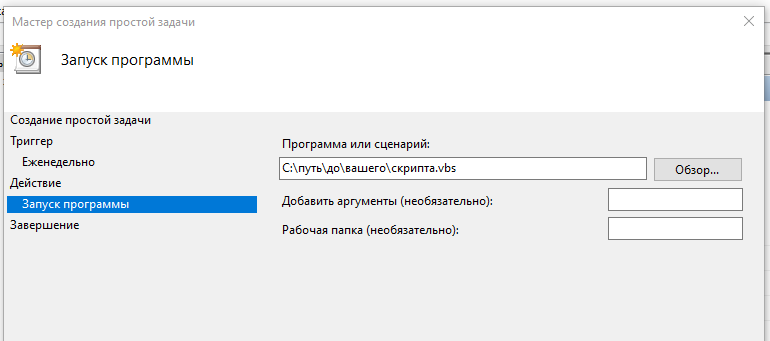
Обратите внимание, что планировщик позволяет не только выполнять действие по времени, но и при наступлении события — например, при загрузке компьютера. Такой подход является альтернативой автозагрузке.
В случае разработки собственного bat-файла следует ознакомиться с основами командного интерпретатора.
Команды и синтаксис пакетных файлов
Командный интерпретатор выполняет команды из файла последовательно — строка за строкой. Исключение составляет только оператор GOTO, который «отправляет» к указанной строке. Командный интерпретатор выполняет два вида команд: встроенные команды и внешние исполняемые файлы.
Внешние исполняемые файлы — это любой исполняемый файл, то есть с расширением EXE, CMD или BAT, который доступен в операционной системе. Например, «Блокнот» — это исполняемый файл notepad.exe. Следующая команда приведет к запуску этого приложения с открытым файлом C:1.txt:
notepad.exe C:1.txtАргументом может быть не только путь, но и ключ — специальный аргумент, который начинается с символа слэш (/). У каждой программы свой «реестр» ключей и их значений.
Обратите внимание, что не все внешние команды «понимают» аргументы, переданные из интерпретатора командной строки. Например, исполняемый файл приложения калькулятор, calc.exe, игнорирует все аргументы командной строки. Внешним исполняемым файлом может быть в том числе другой bat-файл.

Встроенные команды — это команды, которые являются частью интерпретатора командной строки. Полный список команд доступен по команде HELP. Данные команды не имеют отдельного исполняемого файла.
Иногда в имени файла или каталога встречаются пробелы. Наиболее очевидный пример — каталог Program Files на диске C. В этом случае помогают кавычки. Их можно расставить различными способами. Например:
cd "C:Program Files123"
cd C:”Program Files”123
Операционная система Windows запрещает использование множества специальных символов в именах файлов, в том числе кавычки, поэтому проблем с указанием файлов не возникнет.
Оставлять комментарии при разработке — хороший тон. Так можно объяснить выполняемые действия и потенциальные ошибки. В пакетных файлах можно оставлять комментарии несколькими способами.
Официальный способ — команда rem или два двоеточия.
rem Это первый комментарий
:: Это тоже комментарий
Перечисленные команды позволяют оставлять однострочные комментарии. Если хочется оставить развернутый многострочный комментарий, то прибегают к хитрости с командной GOTO.
goto start
===
Здесь можно оставить большой комментарий,
лицензию или даже ASCII-арт
===
:start
В конце комментария задаем имя метки, а в начале комментария выполняем команду GOTO c именем метки. Этот способ требует внимания, так как для каждого комментария должна быть своя метка, иначе выполнение bat-файла может отличаться от ожидания разработчика.
Совместимость с MS-DOS
В старых ОС, таких как MS-DOS, было ограничение на отображение имени файлов. На экран выводилось восемь символов имени, точка и три символа расширения. Если имя файла превышало по длине восемь символов, то имя файла отображалось по следующей схеме:
<первые шесть символов имени>~<порядковый номер>Например, каталог Program Files выглядит следующим образом:
Progra~1В современных операционных системах такое отображение не применяется, но CMD.EXE до сих пор поддерживает такие запросы к файлам и каталогам.
Используйте bat-файлы в работе с выделенным сервером
Выберите подходящий из более 100 готовых конфигураций.
Подобрать сервер
Примеры bat-файлов
Рассмотрим несколько примеров bat-файлов. Начнем с базовых команд.
Обновление IP-адреса
Представим простой пример: необходимо обновить аренду IP-адресов на всех сетевых интерфейсах. В командной строке это делается одной командой:
ipconfig /renewДанная команда генерирует много текстового вывода, который может испугать неподготовленного пользователя. Сама команда также может быть непривлекательной. Поэтому отключим отображение команды и перенаправим вывод выполнения в «никуда». Вместо слова NUL может быть любое имя или путь. Тогда вывод будет перенаправлен в указанный файл.
rem Отключаем отображение команд. Символ @ отключает отображение текущей команды
@echo off

rem Переводим вывод выполнения в устройство NUL, вывод исчезнет
ipconfig /renew > NUL
При запуске такого скрипта появляется черное окно, которое быстро исчезает. Можно оставить простые и понятные пользователю сообщения и не дать окну закрыться.
@echo off
echo Выполняется настройка, пожалуйста, подождите...
ipconfig /renew > NUL
echo Все хорошо.

rem Эта команда остановит выполнение до тех пор, пока пользователь не нажмет любую клавишу
pause
Скорее всего данный скрипт выведет набор непонятных символов вместо сообщения. Дело в том, что в русскоязычных ОС Windows по умолчанию в CMD.EXE используется кодировка CP866. Блокнот сохраняет в CP1251 (Windows-1251), а Notepad++ — в UTF-8. Для решения проблемы необходимо сменить кодировку интерпретатора командой chcp или сохранить bat-файл в кодировке интерпретатора.
rem Смена кодировки на Windows-1251
chcp 1251 > NUL
rem Смена кодировки на UTF-8
chcp 65001 > NUL
Я сохранил файл в кодировке UTF-8 и итоговый скрипт получился таким:
@echo off
chcp 65001 > NUL
echo Выполняется настройка, пожалуйста, подождите...
ipconfig /renew > NUL
echo Все хорошо.
pause
Создание резервной копии каталога
Перейдем к более жизненной ситуации — создание резервной копии (backup) каталога. Предположим, что каждый архив должен иметь в названии дату создания копии. Создадим каталог, имя которого — текущая дата. Текущая дата хранится в переменной DATE. Для обращения к переменным название переменной помещается между знаками процента.
mkdir %DATE%
cd %DATE%
Копирование файлов в текущий каталог производится командой COPY.
rem файлы 1.txt и 2.txt будут скопированы в текущую папку
COPY C:1.txt C:2.txt .

rem файл 3.txt будет сохранен в текущую папку как example.txt
COPY C:1.txt .example.txt
Возможно, в резервную копию необходимо дополнить служебную информацию — например, список файлов в корне копии и имя компьютера.
rem Имя компьютера записывается в файл computer.txt
hostname > computer.txt

rem Список файлов в текущем каталоге записывается в files.txt
dir . > files.txt
Обычно резервные копии хранят в zip- или rar-архивах. Из командной строки отлично управляется архиватор 7z.
cd ..
7z -tzip a backup.zip %DATE%
Переименование файлов
Переименование файлов в Windows производится командой RENAME. Однако эта команда имеет свои особенности.
Во-первых, переименование возможно только в рамках одного диска и одного каталога. Между каталогами одного диска допустимо перемещение, а между разными дисками — только копирование.
rename abc.txt cba.txtВо-вторых, возможно переименование по маске. Допустим, есть список фотографий photo000.jpeg, photo001.jpeg и так далее. Нужно сменить префикс с photo на mobile.
rename photo* mobile*Если в текущем каталоге есть другие файлы с префиксом photo, а переименовать надо только изображения с расширением jpeg, то команда модифицируется:
rename photo*.jpeg mobile*.jpegУдаление файлов
Программы и пользователи оставляют следы работы в виде файлов, которые не удаляются автоматически. К счастью, процесс очистки поддается автоматизации.
Предположим, что в процессе работы пользователя генерируется большое количество файлов с расширением jpeg, которые нужно удалять. На помощь приходит оператор цикла FOR.
rem Ищем все файлы с расширением jpeg в каталоге work
rem Ключ /r включает в поиск все подкаталоги в каталоге work
for /r work %%file in (*.jpeg) do (
   rem Выводим имя файла
   echo %%file

   delete %%i
)
Заключение
Командный интерпретатор CMD.EXE существует долгое время, но, даже несмотря на отсутствия развития, остается востребованным инструментом для автоматизации рутинных действий в операционной системе Microsoft Windows.
using «&«
As you have noticed executing the bat directly without CALL,START, CMD /C causes to enter and execute the first file and then the process to stop as the first file is finished. Though you still can use & which will be the same as using command1 & command2 directly in the console:
(
    first.bat
)&(
    second.bat
)& (
    third.bat
)&(
    echo other commands
)
In a term of machine resources this will be the most efficient way though in the last block you won’t be able to use command line GOTO,SHIFT,SETLOCAL.. and its capabilities will almost the same as in executing commands in the command prompt. And you won’t be able to execute other command after the last closing bracket
Using CALL
call first.bat
call second.bat
call third.bat
In most of the cases it will be best approach — it does not create a separate process but has almost identical behaviour as calling a :label as subroutine. In MS terminology it creates a new «batch file context and pass control to the statement after the specified label. The first time the end of the batch file is encountered (that is, after jumping to the label), control returns to the statement after the call statement.»
You can use variables set in the called files (if they are not set in a SETLOCAL block), you can access directly labels in the called file.
CMD /C, Pipes ,FOR /F
Other native option is to use CMD /C (the /C switch will force the called console to exit and return the control)
Something that cmd.exe is doing in non transparent way with using FOR /F against bat file or when pipes are used.
This will spawn a child process that will have all the environment ot the calling bat.
Less efficient in terms of resources but as the process is separate ,parsing crashes or calling an EXIT command will not stop the calling .bat
@echo off
CMD /c first.bat
CMD /C second.bat

::not so different than the above lines.
:: MORE,FINDSTR,FIND command will be able to read the piped data
:: passed from the left side

break|third.bat
START
Allows you more flexibility as the capability to start the scripts in separate window , to not wait them to finish, setting a title and so on. By default it starts the .bat and .cmd scripts with CMD /K which means that the spawned scripts will not close automatically.Again passes all the environment to the started scripts and consumes more resources than cmd /c:
:: will be executed in the same console window and will wait to finish
start "" /b /w cmd /c first.bat

::will start in a separate console window and WONT wait to be finished
:: the second console window wont close automatically so second.bat might need explicit exit command
start "" second.bat

::Will start it in a separate window ,but will wait to finish
:: closing the second window will cause Y/N prompt
:: in the original window
start "" /w third.cmd


::will start it in the same console window
:: but wont wait to finish. May lead to a little bit confusing output
start "" /b cmd /c fourth.bat
WMIC
Unlike the other methods from now on the examples will use external of the CMD.exe utilities (still available on Windows by default).
WMIC utility will create completely separate process so you wont be able directly to wait to finish. Though the best feature of WMIC is that it returns the id of the spawned process:
:: will create a separate process with cmd.exe /c
WMIC process call create "%cd%first.bat","%cd%"

::you can get the PID and monitoring it with other tools
for /f "tokens=2 delims=;= " %%# in ('WMIC process call create "%cd%second.bat"^,"%cd%" ^|find "ProcessId"') do (
    set "PID=%%#"
)
echo %PID%
You can also use it to start a process on a remote machine , with different user and so on.
SCHTASKS
Using SCHTASKS provides some features as (obvious) scheduling , running as another user (even the system user) , remote machine start and so on. Again starts it in completely separate environment (i.e. its own variables) and even a hidden process, xml file with command parameters and so on :
SCHTASKS /create /tn BatRunner /tr "%cd%first.bat" /sc ONCE /sd 01/01/1910 /st 00:00
SCHTASKS /Run /TN BatRunner
SCHTASKS /Delete /TN BatRunner /F
Here the PID also can acquired from the event log.
ScriptRunner
Offers some timeout between started scripts. Basic transaction capabilities (i.e. rollback on error) and the parameters can be put in a separate XML file.
::if the script is not finished after 15 seconds (i.e. ends with pause) it will be killed
ScriptRunner.exe -appvscript %cd%first.bat -appvscriptrunnerparameters -wait -timeout=15


::will wait or the first called script before to start the second
:: if any of the scripts exit with errorcode different than 0 will try
:: try to restore the system in the original state
ScriptRunner.exe -appvscript second.cmd arg1 arg2 -appvscriptrunnerparameters -wait -rollbackonerror -appvscript third.bat -appvscriptrunnerparameters -wait -timeout=30 -rollbackonerror
This book describes and shows how to use the Microsoft-supplied command interpreter cmd.exe and the associated commands, and how to write Windows batch scripts for the interpreter. cmd.exe is the default interpreter on all Windows NT-based operating systems, including Windows XP, Windows 7 and Windows 10.
Introduction[edit | edit source]
This book addresses 32-bit Windows commands applicable to modern versions of Windows based on the Windows NT environment. It does not address commands that are specific to DOS environments and to DOS-based operating systems, such as Windows 95, Windows 98, and Windows Me, whose Microsoft-supplied command interpreters are in fact DOS programs, not Win32 programs.
You can find out which version of Windows you are running using the VER command.
This book first describes using the Windows NT command interpreter, how it receives, parses, and processes commands from users. Then it describes various commands available.
To obtain an extensive list of Windows commands and their short summaries, open the command prompt on any Windows computer, and type help. To find out about a particular command, type the name of the command followed by «/?».
The subject of this book is also known as «batch programming», even though «batch» refers not only to batch files for MS DOS and Windows command interpreter. Other subject terms include «batch file programming», «batch file scripting», «Windows batch command», «Windows batch file», «Windows command line», «Windows command prompt», and «Windows shell scripting».
For Windows scripting, cmd.exe is a legacy technology; a modern equivalent is PowerShell, which is based on .NET and whose streams for pipelines are objects, not character (byte) streams. PowerShell capabilities vastly outstrip those of cmd.exe; PowerShell has the capabilities of a full programming language, including typed content of variables, floating-point arithmetic, big integers, GUI programming via .NET classes, etc. Nonetheless, cmd.exe is still useful for simple scripting and command-line interaction tasks, often offering shorter syntax and quicker startup time, and working with the character stream pipelining familiar from other operating systems. cmd.exe can be enhanced by commands known from other operating systems; see #Unix commands. Another alternative for scripting Windows is the popular Python with its pywin32 and wmi libraries; however, that requires installation.
Using the Windows command interpreter[edit | edit source]
How a command line is interpreted[edit | edit source]
The parsing of a command line into a sequence of commands is complex. There are four main components:
- Variable substitution: A command line is scanned for variable specifications, and any found are replaced with the contents of those variables.
- Quoting: Special characters can be quoted, to remove their special meanings.
- Syntax: Command lines are developed into a sequence of commands according to a syntax.
- Redirection: Redirection specifications are applied, and removed from the command line, before an individual command in a sequence is executed.
Variable substitution[edit | edit source]
Command lines can contain variable specifications. These comprise a % character followed by a name, followed by a second % character unless the name is a digit in 0 … 9 or an asterisk *.
Variable specifications are replaced with values as follows:
- %varname%, such as %PATH% or %USERNAME%, is replaced with the value of the named environment variable. For example, %PATH% is replaced by the value of the PATH environment variable. The variable name match is case insensitive: %PATH% and %path% have the same effect.
- %n for 0 <= n <= 9, such as %0 or %9, is replaced with the value of the n-th parameter passed to the batch file when it was invoked, subject to any subsequent modifications by the SHIFT command. For example: %2 is replaced by the value of the second batch file parameter. In interactive use (outside of a batch), no substitution takes place for this case.
- %* is replaced with the values of all the command-line parameters except for %0, even those beyond index 9. SHIFT command has no impact on the result of %*. See also Command-line arguments. In interactive use (outside of a batch), no substitution takes place for this case.
Special variable names[edit | edit source]
Some variable names are not visible using SET command. Rather, they are made available for reading using the % notation. To find out about them, type «help set».
Special variable names and what they expand to:
| Name | Replacement Value Used |
|---|---|
| %CD% | The current directory, not ending in a slash character if it is not the root directory of the current drive. See also #CD. |
| %TIME% | The system time in HH:MM:SS.mm format unless regional settings dictate otherwise. See also #TIME. |
| %DATE% | The system date in a format specific to localization. See also #DATE. |
| %RANDOM% | A generated pseudorandom number between 0 and 32767. See also #Calculation. |
| %ERRORLEVEL% | The error level returned by the last executed command, or by the last called batch script. See also #Error level. |
| %CMDEXTVERSION% | The version number of the Command Processor Extensions currently used by cmd.exe. |
| %CMDCMDLINE% | The content of the command line used when the current cmd.exe was started. |
Links:
- Windows Environment Variables at ss64.com
- Command shell overview at TechNet / Microsoft Docs
Quoting and escaping[edit | edit source]
You can prevent the special characters that control command syntax from having their special meanings as follows, except for the percent sign (%):
- You can surround a string containing a special character by quotation marks.
- You can place caret (^), an escape character, immediately before the special characters. In a command located after a pipe (|), you need to use three carets (^^^) for this to work.
The special characters that need quoting or escaping are usually <, >, |, &, and ^. In some circumstances, ! and may need to be escaped. A newline can be escaped using caret as well.
When you surround the string using quotation marks, they become part of the argument passed to the command invoked. By contrast, when you use caret as an escape character, the caret does not become part of the argument passed.
The percent sign (%) is a special case. On the command line, it does not need quoting or escaping unless two of them are used to indicate a variable, such as %OS%. But in a batch file, you have to use a double percent sign (%%) to yield a single percent sign (%). Enclosing the percent sign in quotation marks or preceding it with caret does not work.
Examples
- echo «Johnson & son»
- Echoes the complete string rather than splitting the command line at the & character. Quotes are echoed as well
- echo Johnson ^& son
- As above, but using caret before the special character ampersand. No quotes are echoed.
- echo Johnson & son
- Does not use an escape character and therefore, «son» is interpreted as a separate command, usually leading to an error message that command son is not found.
- echo A ^^ B
- Echoes A ^ B. Caret needs escaping as well or else it is interpreted as escaping a space.
- echo > NUL | echo A ^^^^ B
- Echoes A ^ B. When after a pipe, a caret used for escaping needs to be tripled to work; the fourth caret is the one being escaped.
- if 1 equ 1 ^
echo Equal &^
echo Indeed, equal- Echoes the two strings. The caret at the end of the line escapes the newlines, leading to the three lines being treated as if they were a single line. The space before the first caret is necessary or else 1 gets joined with the following echo to yield 1echo.
- attrib File^ 1.txt
- Does not show attributes of file named «File 1.txt» since escaping of space does not work. Using quotes, as in attrib «File 1.txt», works.
- echo The ratio was 47%.
- If run from a batch, the percent sign is ignored.
- echo The ratio was 47%%.
- If run from a batch, the percent sign is output once.
- set /a modulo=14%%3
- If run from a batch, sets modulo variable to 2, the remainder of dividing 14 by 3. Does not work with single %.
- for %%i in (1,2,3) do echo %%i
- If run from a batch, outputs 1, 2 and 3.
- echo %temp%
- Outputs the content of temp variable even if run from a batch file. Use of the percent sign in a batch to access environment variables and passed arguments needs no escaping.
- echo ^%temp^%
- Outputs literally %temp% when run from the command line.
- echo %%temp%%
- Outputs literally %temp% when run from a batch.
- echo //comment line | findstr //
- Command FINDSTR uses backslash () for escaping. Unlike caret, this is internal to the command and unknown to the command shell.
Links:
- Syntax : Escape Characters, Delimiters and Quotes at ss64
- Command shell overview at Microsoft
- set at Microsoft
Syntax[edit | edit source]
Command lines are developed into a sequence of commands according to a syntax. In that syntax, simple commands may be combined to form pipelines, which may in turn be combined to form compound commands, which finally may be turned into parenthesized commands.
A simple command is just a command name, a command tail, and some redirection specifications. An example of a simple command is dir *.txt > somefile.
A pipeline is several simple commands joined together with the «pipe» metacharacter—»|», also known as the «vertical bar». The standard output of the simple command preceding each vertical bar is connected to the standard input of the simple command following it, via a pipe. The command interpreter runs all of the simple commands in the pipeline in parallel. An example of a pipeline (comprising two simple commands) is dir *.txt | more.
A compound command is a set of pipelines separated by conjunctions. The pipelines are executed sequentially, one after the other, and the conjunction controls whether the command interpreter executes the next pipeline or not. An example of a compound command (comprising two pipelines, which themselves are just simple commands) is move file.txt file.bak && dir > file.txt.
The conjunctions:
- & — An unconditional conjunction. The next pipeline is always executed after the current one has completed executing.
- && — A positive conditional conjunction. The next pipeline is executed if the current one completes executing with a zero exit status.
- || — A negative conditional conjunction. The next pipeline is executed if the current one completes executing with a non-zero exit status.
A parenthesized command is a compound command enclosed in parentheses (i.e. ( and )). From the point of view of syntax, this turns a compound command into a simple command, whose overall output can be redirected.
For example: The command line ( pushd temp & dir & popd ) > somefile causes the standard output of the entire compound command ( pushd temp & dir & popd ) to be redirected to somefile.
Links:
- Conditional Execution at ss64.com
- Using parenthesis/brackets to group expressions at ss64.com
- Command shell overview at TechNet / Microsoft Docs
Redirection[edit | edit source]
Redirection specifications are applied, and removed from the command line, before an individual command in a sequence is executed. Redirection specifications control where the standard input, standard output, and standard error file handles for a simple command point. They override any effects to those file handles that may have resulted from pipelining. (See the preceding section on command syntax.) Redirection signs > and >> can be prefixed with 1 for the standard output (same as no prefix) or 2 for the standard error.
The redirection specifications are:
- < filename
- Redirect standard input to read from the named file.
- > filename
- Redirect standard output to write to the named file, overwriting its previous contents.
- >> filename
- Redirect standard output to write to the named file, appending to the end of its previous contents.
- >&h
- Redirect to handle h, where handle is any of 0—standard input, 1—standard output, 2—standard error, and more.
- <&h
- Redirect from handle h.
Examples:
- dir *.txt >listing.log
- Redirects the output of the dir command to listing.log file.
- dir *.txt > listing.log
- As above; the space before the file name makes no difference. However, if you type this into the command window, auto-completion with tab after typing «> l» actually works, while it does not work with «>listing.log».
- dir *.txt 2>NUL
- Redirects errors of the dir command to nowhere.
- dir *.txt >>listing.log
- Redirects the output of the dir command to listing.log file, appending to the file. Thereby, the content of the file before the redirected command was executed does not get lost.
- dir *.txt >listing.log 2>&1
- Redirects the output of the dir command to listing.log file, along with the error messages.
- dir *.txt >listing.log 2>listing-errors.log
- Redirects the output of the dir command to listing.log file, and the error messages to listing-errors.log file.
- >myfile.txt echo Hello
- The redirection can precede the command.
- echo Hello & echo World >myfile.txt
- Only the 2nd echo gets redirected.
- (echo Hello & echo World) >myfile.txt
- Output of both echos gets redirected.
- type con >myfile.txt
- Redirects console input (con) to the file. Thus, allows multi-line user input terminated by user pressing Control + Z. See also #User input.
- (for %i in (1,2,3) do @echo %i) > myfile.txt
- Redirects the entire output of the loop to the file.
- for %i in (1,2,3) do @echo %i > myfile.txt
- Starts redirection anew each time the body of the loop is entered, losing the output of all but the latest loop iteration.
Links:
- Redirection at ss64.com
- Using command redirection operators at Microsoft
How a command is executed[edit | edit source]
(…)
Batch reloading[edit | edit source]
The command interpreter reloads the content of a batch after each execution of a line or a bracketed group.
If you start the following batch and change «echo A» to «echo B» in the batch shortly after starting it, the output will be B.
@echo off
ping -n 6 127.0.0.1 >nul & REM wait
echo A
What is on a single line does matter; changing «echo A» in the following batch after running it has no impact:
@echo off
ping -n 6 127.0.0.1 >nul & echo A
Nor have after-start changes have any impact on commands bracketed with ( and ). Thus, changing «echo A» after starting the following batch has no impact:
@echo off
for /L %%i in (1,1,10) do (
  ping -n 2 127.0.0.1 >nul & REM wait
  echo A
)
Ditto for any other enclosing, including this one:
@echo off
(
ping -n 6 127.0.0.1 >nul & REM wait
echo A
)
Environment variables[edit | edit source]
The environment variables of the command interpreter process are inherited by the processes of any (external) commands that it executes. A few environment variables are used by the command interpreter itself. Changing them changes its operation.
Environment variables are affected by the SET, PATH, and PROMPT commands.
To unset a variable, set it to empty string, such as «set myvar=».
The command interpreter inherits its initial set of environment variables from the process that created it. In the case of command interpreters invoked from desktop shortcuts this will be Windows Explorer, for example.
Command interpreters generally have textual user interfaces, not graphical ones, and so do not recognize the Windows message that informs applications that the environment variable template in the Registry has been changed. Changing the environment variables in Control Panel will cause Windows Explorer to update its own environment variables from the template in the Registry, and thus change the environment variables that any subsequently invoked command interpreters will inherit. However, it will not cause command interpreters that are already running to update their environment variables from the template in the Registry.
See also #Variable substitution.
Links:
- Windows Environment Variables at ss64.com
- Command shell overview at TechNet / Microsoft Docs
COMSPEC[edit | edit source]
The COMSPEC environment variable contains the full pathname of the command interpreter program file. This is just inherited from the parent process, and is thus indirectly derived from the setting of COMSPEC in the environment variable template in the Registry.
PATH[edit | edit source]
The value of the PATH environment variable comprises a list of directory names, separated by semi-colon characters. This is the list of directories that are searched, in order, when locating the program file of an external command to execute.
PATHEXT[edit | edit source]
The value of the PATHEXT environment variable comprises a list of filename extensions, separated by semi-colon characters. This is the list of filename extensions that are applied, in order, when locating the program file of an external command to execute.
An example content of PATHEXT printed by «echo %PATHEXT%»:
- .COM;.EXE;.BAT;.CMD;.VBS;.VBE;.JS;.JSE;.WSF;.WSH;.MSC
By adding «.PL» to the variable, you can ensure Perl programs get run from the command line even when typed without the «.pl» extension. Thus, instead of typing «mydiff.pl a.txt b.txt», you can type «mydiff a.txt b.txt».
Adding «.PL» to the variable in Windows Vista and later:
- setx PATHEXT %PATHEXT%;.PL
- If you use «set» available in Windows XP, the effect will be temporary and impacting only the current console or process.
Links:
- Windows Environment Variables at ss64
- Making Python scripts run on Windows without specifying “.py” extension at stackoverflow
PROMPT[edit | edit source]
The PROMPT environment variable controls the text emitted when the command interpreter displays the prompt. The command interpreter displays the prompt when prompting for a new command line in interactive mode, or when echoing a batch file line in batch file mode.
Various special character sequences in the value of the PROMPT environment variable cause various special effects when the prompt is displayed, as in the following table:
| Characters | Expansion Result |
|---|---|
| $$ | $ character itself |
| $A | & symbol AKA ampersand. A convenience, since it is difficult to place a literal & in the value of the PROMPT environment variable using the SET command. |
| $B | Vertical bar ‘|’ (pipe symbol) |
| $C | Left parenthesis ‘(‘ |
| $D | Current date |
| $E | ESC (ASCII code 27) |
| $F | Right parenthesis ‘)’ |
| $G | Greater-than symbol ‘>’ |
| $H | Backspace (deletes previous character) |
| $L | Less-than symbol ‘<‘ |
| $M | Remote name linked to the current drive if it is a network drive; empty string otherwise. |
| $N | Current drive letter |
| $P | Current drive letter and full path |
| $Q | ‘=’ (equals sign) |
| $S | ‘ ‘ (space character) |
| $T | Current system time |
| $V | Windows version number |
| $_ | <CR> (carriage return character, aka «enter») |
| $+ | As many plus signs (+) as there are items on the pushd directory stack |
Links:
- prompt at ss64
- prompt at Microsoft
Switches[edit | edit source]
Most Windows commands provide switches AKA options to direct their behavior.
Observations:
- Switches most often consist of a single-letter; some switches consist of a sequence of multiple letters.
- Switches are preceded with a slash (/) rather than, as in some other operating systems, with a minus sign (-).
- Switches are case-insensitive rather than, as in some other operating systems, case-sensitive.
- If a command from another operating system is ported to Windows (such as grep), it usually retains the option conventions from the original operating system, including the use of minus sign and case-sensitivity.
Examples:
- dir /?
- Outputs the help. This option is provided by many commands.
- dir /b /s
- Lists all files and folders in the current folder recursively. Two switches are used: b and s.
- dir /bs
- Does not work; switches cannot be accumulated behind a single slash.
- findstr /ric:»id: *[0-9]*» File.txt
- Unlike many other commands, findstr allows the accumulation of switches behind a single slash. Indeed, r, i and c are single-letter switches.
- dir/b/s
- Works. In dir, removing whitespace between the command and the first switch or between the switches does not make a difference; thus, does the same as dir /b /s.
- tree/f/a
- Does not work, unlike tree /f /a. In tree, separation by whitespace is mandatory. Nor does find/i/v work.
- dir /od
- The switch letter o is further modified by a single letter specifying that ordering should be by date. The letter d is not a switch by itself. Similar cases include dir /ad and more /t4.
- dir /B /S
- The switches are case-insensitive, unlike in some other operating systems.
- sort /r file.txt
- Sorts the file in a reverse order.
- sort /reverse file.txt
- Sort allows the switch string to be longer than a single-letter.
- sort /reve file.txt
- Sort allows the specified switch string to be a substring of the complete long name of the switch. Thus, does the same as the above.
- sort /reva file.txt
- Does not work, since «reva» is not a substring of «reverse».
- taskkill /im AcroRd32.exe
- Taskkill requires a multiletter switch name for /im; shortening to /i does not work.
- java -version
- Java, which originated in the environment of another operating system family, uses the minus convention for its switches AKA options.
- grep —help
- If GNU grep is installed, it requires multi-letter switches to be preceded by two dashes.
Error level[edit | edit source]
Commands usually set error level at the end of their execution. In Windows NT and later, it is a 32-bit signed integer; in MS DOS, it used to be an integer from 0 to 255. Keywords: return code, exit code, exit status.
The conventional meaning of the error level:
- 0 — success
- not 0 — failure
- The error levels being set are usually positive.
- If the command does not distinguish various kinds of failure, the error level on failure is usually 1.
Uses of the error level:
- It can be tested using && and ||; see also #Syntax.
- It can be tested using IF.
- The value can be accessed from ERRORLEVEL variable.
Examples:
- dir >NUL && echo Success
- The part after && is executed only if the error level is zero.
- color 00 || echo Failure
- The part after || is executed only if the error level is non-zero, whether positive or negative.
- color 00 || (
echo Failure
)- Multiline bracketing works as well.
- echo %ERRORLEVEL%
- Outputs the error level without changing it.
- if %errorlevel% equ 0 echo The error level is zero, meaning success.
- if %errorlevel% neq 0 echo The error level is non-zero, meaning failure.
- if errorlevel 1 echo The error level is >= 1, meaning failure via positive error level.
- Does not cover failure via negative error level. Note the «>=» part: this is not the same as if %errorlevel% equ 1.
- exit /b 1
- Returns a batch file, setting the error level to 1.
- cmd /c «exit /b 10»
- In the middle of a batch file or on the command line, sets the error level to 10.
- (cmd /c «exit /b 0» && Echo Success) & (cmd /c «exit /b -1» || Echo Failure)
- As above, showing the error level is indeed affected.
- (cmd /c «exit /b 0» & cmd /c «exit /b 1») || Echo Failure
- The error level of a chain created by & is the error level of the last command of the chain.
- cmd /c «exit /b -1» & if not errorlevel 1 echo Would-be success
- The «if not errorlevel 1» test, which might appear to test for success, passes on negative numbers: it tests on «not error level >= 1», which is «error level <= 0».
- set myerrorlevel=%errorlevel%
- Remembers the error level for later.
- set errorlevel=0
- To be avoided: overshadows the built-in errorlevel variable. Ensures that subsequent accesses via %ERRORLEVEL% return 0 rather than the actual error level.
- cmd /c «exit /b 0»
if 1 equ 1 ( cmd /c «exit /b 1» & echo %errorlevel% )- Outputs 0, since %errorlevel% gets expanded before cmd /c «exit /b 1» gets executed.
Links:
- Error level at ss64
String processing[edit | edit source]
Getting a substring of a non-empty variable:
set a=abcdefgh
echo %a:~0,1%   & rem from index 0, length 1; result: a
echo %a:~1,1%   & rem from index 1, length 1; result: b
echo %a:~0,2%   & rem from index 0, length 2; result: ab
echo %a:~1,2%   & rem from index 1, length 2; result: bc
echo %a:~1%     & rem from index 1 to the end; result: bcdefgh
echo %a:~-1%    & rem from index -1 (last char) to the end; result: h
echo %a:~-2%    & rem from index -2 (next-to-last) to the end; result: gh
echo %a:~0,-2%  & rem from index 0 to index -2, excl.; result: abcdef
echo %a:~0,-1%  & rem from index 0 to index -1, excl.; result: abcdefg
echo %a:~1,-1%  & rem from index 1 to index -1, excl.; result: bcdefg
Testing substring containment:
- if not «%a:bc=%»==»%a%» echo yes
- If variable a contains «bc» as a substring, echo «yes».
- This test is a trick that uses string replacement, discussed below.
- This test does not work if the variable contains a quotation mark.
Testing for «starts with»:
if %a:~0,1%==a echo yes   & rem If variable a starts with "a", echo "yes".
if %a:~0,2%==ab echo yes  & rem If variable a starts with "ab", echo "yes".
String replacement:
set a=abcd & echo %a:c=%   & rem replace c with nothing; result: abd
set a=abcd & echo %a:c=e%  & rem replace c with e; result: abed;
set a=abcd & echo %a:*c=%  & rem replace all up to c with nothing; result: d
rem Above, the asterisk (*) only works at the beginning of the sought pattern.
See also the help for SET command: set /?.
Splitting a string by any of » «, «,» and «;»: [«space», «comma» and «semicolon»:]
set myvar=a b,c;d
for %%a in (%myvar%) do echo %%a
Splitting a string by semicolon, assuming the string contains no quotation marks:
@echo off
set myvar=a b;c;d
set strippedvar=%myvar%
:repeat
for /f "delims=;" %%a in ("%strippedvar%") do echo %%a
set prestrippedvar=%strippedvar%
set strippedvar=%strippedvar:*;=%
if not "%prestrippedvar:;=%"=="%prestrippedvar%" goto :repeat
Limitations:
- The above string processing does not work with parameter variables (%1, %2, …).
Links:
- Variables: extract part of a variable (substring) at ss64
- Variable Edit/Replace at ss64
Command-line arguments[edit | edit source]
The command-line arguments AKA command-line parameters passed to a batch script are accessible as %1, %2, …, %9. There can be more than nine arguments; to access them, see how to loop over all of them below.
The syntax %0 does not refer to a command-line argument but rather to the name of the batch file.
Testing for whether the first command-line argument has been provided:
if not -%1-==-- echo Argument one provided
if -%1-==-- echo Argument one not provided & exit /b
A robust looping over all command-line arguments using SHIFT (for each command-line argument, …):
:argactionstart
if -%1-==-- goto argactionend
echo %1 & REM Or do any other thing with the argument
shift
goto argactionstart
:argactionend
A robust looping over all command-line arguments using SHIFT without modifying %1, %2, etc.:
call :argactionstart %*
echo Arg one: %1 & REM %1, %2, etc. are unmodified in this location
exit /b

:argactionstart
if -%1-==-- goto argactionend
echo %1 & REM Or do any other thing with the argument
shift
goto argactionstart
:argactionend
exit /b
Transferring command-line arguments to environment variables:
setlocal EnableDelayedExpansion
REM Prevent affecting possible callers of the batch
REM Without delayed expansion, !arg%argno%! used below won't work.
set argcount=0
:argactionstart
if -%1-==-- goto argactionend
set /a argcount+=1
set arg%argcount%=%1
shift
goto argactionstart
:argactionend

set argno=0
:loopstart
set /a argno+=1
if %argno% gtr %argcount% goto loopend
echo !arg%argno%! & REM Or do any other thing with the argument
goto loopstart
:loopend
Looping over all command-line arguments, albeit not a robust one:
for %%i in (%*) do (
  echo %%i
)
This looks elegant but is non-robust, maltreating arguments containing wildcards (*, ?). In particular, the above for command replaces arguments that contain wildcards (*, ?) with file names that match them, or drops them if no files match. Nonetheless, the above loop works as expected as long as the passed arguments do not contain wildcards.
Finding the number of command-line arguments, in a non-robust way:
set argcount=0
for %%i in (%*) do set /a argcount+=1
Again, this does not work with arguments containing wildcards.
The maximum possible number of arguments is greater than 4000, as empirically determined on a Windows Vista machine. The number can differ on Windows XP and Windows 7.
In passing arguments to a batch script, characters used for argument separation are the following ones:
- space
- comma
- semicolon
- equal sign
- tab character
Thus, the following lines pass the same four arguments:
- test.bat a b c d
- test.bat a,b,c,d
- test.bat a, b, c, d
- test.bat a;b;c;d
- test.bat a=b=c=d
- test.bat a b,c;,;=d
Yes, even the line with «a b,c;,;=d» passes four arguments, since a sequence of separating characters is considered a single separator.
To have a space, comma or semicolon in the argument value, you can pass the value enclosed in quotation marks. However, the quotation marks become part of the argument value. To get rid of the enclosing quotation marks when referring to the argument in the script, you can use %~<number> described in #Percent tilde.
When passing arguments to an invoked command rather than a batch script, you usually need to separate the command from the first argument using a space. However, for internal commands, that separation is not necessary if the first character after the command name is one of a couple of symbols, including ./, and more:
- echo.
- Outputs a newline.
- tree.
- Fails: «tree.» not found. tree is an external command.
- dir..
- Lists the content of the parent directory.
- cd..
- Changes the current directory to the parent one.
- cd
- Changes the current directory to the root one.
- start.
- Opens Windows Explorer from the current directory.
- dir/b/s
- Lists directory content recursively, showing full paths.
Links:
- Parameters / Arguments at ss64
- Escape Characters, Delimiters and Quotes at ss64
- Using batch parameters at Microsoft
Wildcards[edit | edit source]
Many commands accept file name wildcards—characters that do not stand for themselves and enable matching of a group of filenames.
Wildcards:
- * (asterisk): any sequence of characters
- ? (question mark): a single character other than a period («.») or, if part of a sequence of question marks at the end of a maximum period-free part of a file name, possibly zero number of characters; see examples for clarification
Examples:
- dir *.txt
- Matches Myfile.txt, Plan.txt and any other file with the .txt extension.
- dir *txt
- The period does not need to be included. However, this will also match files named without the period convention, such as myfiletxt.
- ren *.cxx *.cpp
- Renames all files with .cxx extension to have .cpp extension.
- dir a?b.txt
- Matches files aab.txt, abb.txt, a0b.txt, etc.
- Does not match ab.txt, since a question mark followed by a character other than a question mark or period cannot match zero characters.
- Does not match a.b.txt, since a question mark cannot match a period.
- dir ???.txt
- Matches .txt, a.txt, aa.txt, and aaa.txt, among others, since each question mark in the sequence followed by a period can match zero number of characters.
- dir a???.b???.txt???
- Matches a.b.txt, among others. While the last question mark sequence is not followed by a period, it is still a sequence at the end of a maximum period-free part of a file name.
- dir ????????.txt & @REM eight question marks
- Matches the same files as *.txt, since each file also has a short file name that has no more than 8 characters before .txt.
Quirk with short file names: the wildcard matching is performed both on long file names and the usually hidden short 8 chars + period + 3 chars file names. This can lead to bad surprises.
Unlike shells of some other operating systems, the cmd.exe shell does not perform wildcard expansion (replacement of the pattern containing wildcards with the list of file names matching the pattern) on its own. It is the responsibility of each program to treat wildcards as such. This enables such things as «ren *.txt *.bat», since the ren command actually sees the * wildcard rather than a list of files matching the wildcard. Thus, «echo *.txt» does not display files in the current folder matching the pattern but rather literally outputs «*.txt». Another consequence is that you can write «findstr a.*txt» without fearing that the «a.*txt» part gets replaced with the names of some files in the current folder. Furthermore, recursive «findstr /s pattern *.txt» is possible, while in some other operating systems, the «*.txt» part would get replaced with the file names found in the current folder, disregarding nested folders.
Commands accepting wildcards include ATTRIB, COPY, DIR, FINDSTR, FOR, REN, etc.
Links:
- Wildcards at ss64
- Using wildcard characters at Microsoft
User input[edit | edit source]
You can get input from the user using the following methods:
- SET /P command
- CHOICE command
- Using «type con >myfile.txt», for which the multi-line user input is terminated by user pressing Control + Z.
Percent tilde[edit | edit source]
When a command-line argument contains a file name, special syntax can be used to get various information about the file.
The following syntaxes expand to various information about the file passed as %1:
| Syntax | Expansion Result | Example |
|---|---|---|
| %~1 | %1 with no enclosing quotation marks | Not provided |
| %~f1 | Full path with a drive letter | C:WindowsSystem32notepad.exe |
| %~d1 | Drive letter | C: |
| %~p1 | Drive-less path with the trailing backslash | WindowsSystem32 |
| %~n1 | For a file, the file name without path and extension
For a folder, the folder name |
notepad |
| %~x1 | File name extension including the period | .exe |
| %~s1 | Modify of f, n and x to use short name | C:PROGRA~2WINDOW~3ACCESS~1wordpad.exe |
| %~a1 | File attributes | —a—— |
| %~t1 | Date and time of last modification of the file (format depends on Windows «Regional format» setting) | 02.11.2006 11:45 (example format as «English (United States)») |
| %~z1 | File size | 151040 |
| %~pn1 | A combination of p and n | WindowsSystem32notepad |
| %~dpnx1 | A combination of several letters | C:WindowsSystem32notepad.exe |
| %~$PATH:1 | The full path of the first match found in the folders present in the PATH variable, or an empty string in no match. | |
| %~n0 | %~n applied to %0:
The extensionless name of the batch |
tildetest |
| %~nx0 | %~nx applied to %0:
The name of the batch |
tildetest.bat |
| %~d0 | %~d applied to %0:
The drive letter of the batch |
C: |
| %~dp0 | %~dp applied to %0:
The folder of the batch with trailing backslash |
C:UsersJoe Hoe |
The same syntax applies to single-letter variables created by FOR command, such as «%%i».
To learn about this subject from the command line, type «call /?» or «for /?».
Links:
- Parameters / Arguments at ss64
- Using batch parameters at Microsoft
- for at Microsoft
Functions[edit | edit source]
Functions AKA subprograms can be emulated using CALL, labels, SETLOCAL and ENDLOCAL.
An example of a function that determines arithmetic power:
@echo off
call :power 2 4
echo %result%
rem Prints 16, determined as 2 * 2 * 2 * 2
goto :eof

rem __Function power______________________
rem Arguments: %1 and %2
:power
setlocal
set counter=%2
set interim_product=%1
:power_loop
if %counter% gtr 1 (
  set /a interim_product=interim_product * %1
  set /a counter=counter - 1
  goto :power_loop
)
endlocal & set result=%interim_product%
goto :eof
While the goto :eof at the end of the function is not really needed, it has to be there in the general case in which there is more than one function.
The variable into which the result should be stored can be specified on the calling line as follows:
@echo off
call :sayhello result=world
echo %result%
exit /b

:sayhello
set %1=Hello %2
REM Set %1 to set the returning value
exit /b
In the example above, exit /b is used instead of goto :eof to the same effect.
Also, remember that the equal sign is a way to separate parameters. Thus, the following items achieve the same:
- call :sayhello result=world
- call :sayhello result world
- call :sayhello result,world
- call :sayhello result;world
(See Command-line arguments as a reminder)
Links:
- Functions at ss64
Calculation[edit | edit source]
Batch scripts can do simple 32-bit signed integer arithmetic and bitwise manipulation using SET /a command. The largest supported integer is 2147483647 = 2 ^ 31 — 1. The smallest supported integer is -2147483648 = — (2 ^ 31), assignable with the trick of set /a num=-2147483647-1. The syntax is reminiscent of the C language.
Arithmetic operators include *, /, % (modulo), +, -. In a batch, modulo has to be entered as «%%». There is no exponentiation operator.
Bitwise operators interpret the number as a sequence of 32 binary digits. These are ~ (complement), & (and), | (or), ^ (xor), << (left shift), >> (arithmetic AKA sign-preserving right shift). There is no logical AKA sign-erasing right shift and no bit rotation operators.
A logical operator of negation is !: it turns zero into one and non-zero into zero.
A combination operator is ,: it allows more calculations in one set command.
Combined assignment operators are modeled on «+=», which, in «a+=b», means «a=a+b». Thus, «a-=b» means «a=a-b». Similarly for *=, /=, %=, &=, ^=, |=, <<=, and >>=.
The precedence order of supported operators, is as follows:
- ( )
- * / % + —
- << >>
- &
- ^
- |
- = *= /= %= += -= &= ^= |= <<= >>=
- ,
Literals can be entered as decimal (1234), hexadecimal (0xffff, leading 0x), and octal (0777, leading 0).
The internal bit representation of negative integers is two’s complement. This provides for bit operations on negative integers, assignment and arithmetic results for hexadecimal literals larger than 0x7FFFFFFF and smaller or equal to 0xFFFFFFFF, and overflow and underflow behavior for arithmetic operations. For instance, -2147483648 is represented as 0x80000000, and therefore the binary complement operation «set /a num=~(-2147483647-1)» yields 2147483647, which equals 0x7FFFFFFF (type set /a num=0x7FFFFFFF to check). For another instance, «-2 & 0xF» yields 14 since -2 is 0xFFFFFFFE, which ANDed with 0xF yields 0xE, which is 14. While maximum decimal literal is 2147483647, maximum hexadecimal literal is 0xFFFFFFFF, which gets assigned as decadic -1. Similarly, 0xFFFFFFFE gets assigned as decadic -2, etc., and therefore, e.g. 0xFFFFFFFE — 2 yields -4. A hexadecimal literal larger than 0xFFFFFFFF is converted to -1, e.g. 0xFFFFFFFFFFFFFFFF, while a decimal literal larger than 2147483647 yields an error. The smallest representable 32-bit signed integer is -2147483648; «-2147483648» cannot be assigned directly since this is interpreted as -1 * 2147483648, and 2147483648 is larger than the maximum decimal literal 2147483647; however, -2147483647-1 does the trick, as does 0x80000000. «-2147483647-2» underflows to the largest positive integer, 2147483647; similary, «-2147483647-3» underflows to 2147483646. In the other direction, «2147483647+1» overflows to -2147483648, which corresponds to the addition being performed on the internal bit representation as if unsigned; «2147483647+2» overflows to -2147483647, etc.
As some of the operators have special meaning for the command interpreter, an expression using them needs to be enclosed in quotation marks, such as this:
- set /a num=»255^127″
- set /a «num=255^127»
- Alternative placement of quotation marks.
- set /a num=255^^127
- Escape ^ using ^ instead of quotation marks.
Examples:
- set /a n=(2+3)*5
- Performs a simple calculation and stores the result in environment variable n. When called interactively (outside of a batch), outputs the result of calculation, otherwise outputs nothing.
- set /a (2+3)*5
- When called interactively (outside of a batch), outputs the result of calculation, otherwise outputs nothing. Changes no variable, being useful only for interactive use.
- set n1=40 & set n2=25
set /a n3=%n1%+%n2%
- Uses the standard percent notation for variable expansion.
- set n1=40 & set n2=25
set /a n3=n1+n2
- Avoids the percent notation around variable names as unneeded for /a.
- set /a num=»255^127″
- Encloses «^» in quotation marks to prevent its special meaning for the command interpreter.
- set /a n1 = (10 + 5)/5
- The spaces around = do not matter with /a. However, getting used to it lends itself to writing «set var = value» without /a, which sets the value of «var » rather than «var».
- if 1==1 (set /a n1=(2+4)*5)
- Does not work: the arithmetic brackets within grouping brackets cause trouble.
- if 1==1 (set /a n1=^(2+4^)*5)
- Escaping the arithmetic brackets with caret (^) works, as does enclosing «n1=2+(4*5)» in quotation marks.
- set /a n1=2+3,n2=4*7
- Performs two calculations.
- set /a n1=n2=2
- Has the same effect as n1=2,n2=2.
- set n1=40 & set n2=25 & set /a n3=n1+n2
- Works as expected.
- set /a n1=2,n2=3,n3=n1+n2
- Works as expected.
- set n1=40 & set n2=25 & set /a n3=%n1%+%n2%
- Does not work unless n1 and n2 were set previously. The variable specifications «%n1%» and «%n2″% get expanded before the first set command is executed. Dropping percent notation makes it work.
- set /a n1=2,n2=3,n3=%n1%+%n2%
- Does not work unless n1 and n2 were set previously, for the reason stated in the previous example.
- set /a n1=0xffff
- Sets n1 using hexadecimal notation, to «65535».
- set /a n1=0777
- Sets n1 using octal notation, to «511».
- set /a n1=0xffffffff
- Sets n1 to -1.
- set /a n1=»~0″
- Sets n1 to -1, in keeping with the underlying two’s complement representation of negative integers. Thus, bitwise complements (~) of non-negative integers yield negative integers.
- set /a «n1=-1>>1»
- Outputs -1 as a result of the «>>» operator being an arithmetic right shift, preserving the highest bit of the underlying bitwise representation of the signed 32-bit integer. Note that -1 is internally 0xFFFFFFFF. Logical right shift (highest-bit-dropping one) would result in 0x7FFFFFFF, the maximum positive 32-bit integer.
- set /a «n1=(-1>>1) & 0x7FFFFFFF»
- Emulates logical right shift (highest-bit-dropping one) by 1 by clearing the highest bit of the underlying bitwise representation of the 32-bit signed integer.
- set /a «n=-1, shiftcount=4, n1=(n>>shiftcount) & (0x7FFFFFFF >> (shiftcount-1))»
- Emulates logical right shift for shiftcount > 0, which when by more than 1 bit requires clearing multiple highest bits.
- set /a «n1=1<<32»
- Yields 0 for the right operand being 32 or higher, or when negative. This is unlike the behavior of the left shift instruction on modern x86 processors, which for 32-bit registers masks the right operand to constrain it to 5 bits. Thus, using the x86 instruction, the result would be 1 since 32 & 0x1F is 0. In the C language, the result is undefined and the actual result is platform dependent.
- set /a n1=%random%
- A pseudo-random number from 0 to 32767 = 2^15-1.
- set /a n1=»%random%>>10″
- A pseudo-random number from 0 to 31 = 2^5-1. The shift right operator drops 10 out of 15 bits, keeping 5 bits.
- set /a n1=%random%%50
- A pseudo-random number from 0 to 49. Uses the % modulo operator. In a batch, %% is needed for modulo: set /a n1=%random%%%50. Because of this particular use of the modulo, the result is not perfectly uniform; it is uniform if the 2nd modulo operand—above 50—equals to a power of 2, e.g. 256 = 2^8.
- set /a n1=»(%random%<<15)+%random%»
- A pseudo-random number from 0 to 1073741823 = 2^30 — 1. Combines the two 15-bit random numbers produced by %random% alone to produce a single 30-bit random number..
- set /a n1=»((%random%<<15)+%random%)%1000000″
- As above, but again using modulo, this time to achieve the range 0 to 999999.
An example calculation that prints prime numbers:
@echo off
setlocal
set n=1
:print_primes_loop
set /a n=n+1
set cand_divisor=1
:print_primes_loop2
set /a cand_divisor=cand_divisor+1
set /a cand_divisor_squared=cand_divisor*cand_divisor
if %cand_divisor_squared% gtr %n% echo Prime %n% & goto :print_primes_loop
set /a modulo=n%%cand_divisor
if %modulo% equ 0 goto :print_primes_loop & REM Not a prime
goto :print_primes_loop2
Links:
- set at ss64.com
- set at Microsoft
- Random Numbers at ss64.com
- Rules for how CMD.EXE parses numbers by dbenham, dostips.com
- Bitwise operations # Batch File, rosettacode.org
Finding files[edit | edit source]
Files can be found using #DIR, #FOR, #FINDSTR, #FORFILES, and #WHERE.
Examples:
- dir /b /s *base*.doc*
- Outputs all files in the current folder and its subfolders such that the file name before the extension contains the word «base» and whose extension starts with «doc», which includes «doc» and «docx». The files are output with full paths, one file per line.
- dir /b /s *.txt | findstr /i pers.*doc
- Combines the result of outputting files including their complete paths with the findstr filtering command supporting limited regular expressions, yielding a versatile and powerful combination for finding files by names and the names of their directories.
- for /r %i in (*) do @if %~zi geq 1000000 echo %~zi %i
- For each file in the current folder and its subfolders that has the size greater than or equal to 1,000,000 bytes, outputs the file size in bytes and the full path of the file. For the syntax in %~zi, see #Percent tilde.
- forfiles /s /d 06/10/2015 /c «cmd /c echo @fdate @path»
- For each file in the current folder and its subfolders modified on 10 June 2015 or later, outputs the file modification date and full file path. The date format after /d is locale specific. Thus, allows to find most recently modified files.
- (for /r %i in (*) do @echo %~ti :: %i) | findstr 2015.*::
- Searching the current folder recursively, outputs files whose last modification date is in year 2015. Places the modification date and time, followed by a double colon, before the file name. Works as long as the used version of Windows and locale displays dates in a format that contains four-digit years. The double colon is used to make sure the findstr command is matching the date and not the file name.
- for /r %i in (*) do @echo %~ti | findstr 2015 >NUL && echo %i
- As above, outputs files changed in 2015. Unlike the above, only outputs the files, not the modification dates.
- findstr /i /s /m cat.*mat *.txt
- Finds files by their content. Performs a full text search for regular expression cat.*mat in files with names ending in .txt, and outputs the files names. The /m switch ensures only the file names are output.
- where *.bat
- Outputs all .bat files in the current directory and in the directories that are in PATH.
Keyboard shortcuts[edit | edit source]
When using Windows command line from the standard console that appears after typing cmd.exe after pressing Windows + R, you can use multiple keyboard shortcuts, including function keys:
- Tab: Completes the relevant part of the typed string from file names or folder names in the current folder. The relevant part is usually the last space-free part, but use of quotation marks changes that. Generally considers both files and folders for completion, but cd command only considers folders.
- Up and down arrow keys: Enters commands from the command history, one at a time.
- Escape: Erases the current command line being typed.
- F1: Types the characters from the single previously entered command from the command history, one character at a time. Each subsequent press of F1 enters one more character.
- F2: Asks you to type a character, and enters the shortest prefix of the previous command from the command history that does not include the typed character. Thus, if the previous command was echo Hello world and you typed o, enters ech.
- F3: Enters the single previous command from the command history. Repeated pressing has no further effect.
- F4: Asks you to type a character, and erases the part of the currently typed string that starts at the current cursor location, continues to the right, and ends with the character you entered excluding that character. Thus, if you type echo Hello world, place the cursor at H using left arrow key, press F4 and then w, you get echo world. If you press F4 and then Enter, erases the text from the cursor to the end of the line.
- F5: Enters previous commands from the command history, one at a time.
- F6: Enters Control+Z character.
- F7: Opens a character-based popup window with the command history, and lets you use arrow key and enter to select a command. After you press enter in the popup, the command is immediately executed.
- F8: Given an already typed string, shows items from the command history that have that string as a prefix, one at a time.
- F9: Lets you enter the number of the command from the command history, and then executes the command.
- Alt + F7: Erases the command history.
The above are also known as command prompt keyboard shortcuts.
The availability of the above shortcuts does not seem to depend on running DOSKEY.
Links:
- Windows Keyboard shortcuts at ss64.com
- doskey at Microsoft
Paths[edit | edit source]
File and directory paths follow certain conventions. These include the possible use of a drive letter followed by a colon (:), the use of backslash () as the path separator, and the distinction between relative and absolute paths.
Forward slash (/) often works when used instead of () but not always; it is normally used to mark switches (options). Using forward slash can lead to various obscure behaviors, and is best avoided.
Special device names include NUL, CON, PRN, AUX, COM1, …, COM9, LPT1, …, LPT9; these can be redirected to.
Examples:
- attrib C:WindowsSystem32notepad.exe
- Succeeds if the file exists, as it should. This is an absolute path with a drive letter. It is also known as a fully qualified path.
- attrib WindowsSystem32notepad.exe
- Succeeds if the current drive is C:, and if the file exists, as it should. This is an absolute path without a drive letter.
- cd /d C:Windows & attrib System32notepad.exe
- Succeeds if the file exists. The path given to attrib is a relative path.
- cd /d C:WindowsSystem32 & attrib C:notepad.exe
- Succeeds if the file exists. The path given to attrib is a relative one despite containing a drive letter: there would have to be C:notepad.exe with a backslash for that to be an absolute path.
- cd /d C:Windows & attrib .System32notepad.exe
- Succeeds if the file exists. A single period denotes the current folder.
- attrib .
- A single period denotes the current folder.
- cd /d C:Windows & attrib .System32\notepad.exe
- Succeeds if the file exists. Piling of backslashes has no impact beyond the first backslash.
- cd /d C:Windows & attrib .System32
- Succeeds if the folder exists.
- cd /d C:Windows & attrib .System32
- Fails. Folders are usually denoted without the final backslash.
- cd C:WindowsSystem32
- Succeeds, whyever.
- cd ..
- A double period denotes the parent folder.
- attrib C:WindowsSystem32….WindowsSystem32
- A double period can be used in the middle of the path to navigate to the parent folder, even multiple times.
- attrib \myservermyvolume
- A network UNC path starts with double backslash and no drive letter.
- cd \myservermyvolume
- Does not work; changing to a server folder in this direct manner does not work.
- pushd \myserverfolder
- Automatically creates a drive for the folder and changes to it. After you use #POPD, the drive gets unassigned again.
- attrib C:/Windows/System32/notepad.exe
- Succeeds on multiple versions of cmd.exe. Uses forward slashes.
Links:
- Long filenames, NTFS and legal filename characters at ss64.com
- Naming Files, Paths, and Namespaces at Microsoft
- W:Path (computing)#MS-DOS/Microsoft Windows style, wikipedia.org
- Why does the cmd.exe shell on Windows fail with paths using a forward-slash (‘/) path separator?, stackoverflow.com
Arrays[edit | edit source]
Arrays can be emulated in the delayed expansion mode using the combination of % and ! to indicate variables. There, %i% is the value of variable i with the immediate expansion while !i! is the value of variable i in the delayed expansion.
@echo off
setlocal EnableDelayedExpansion
for /l %%i in (1, 1, 10) do (
  set array_%%i=!random!
)

for /l %%i in (1, 1, 10) do (
  echo !array_%%i!
)

:: For each item in the array, not knowing the length
set i=1
:startloop
if not defined array_%i% goto endloop
set array_%i%=!array_%i%!_dummy_suffix
echo A%i%: !array_%i%!
set /a i+=1
goto startloop
:endloop
Links:
- Arrays, linked lists and other data structures in cmd.exe (batch) script, stackoverflow.com
Perl one-liners[edit | edit source]
Some tasks can be conveniently achieved with Perl one-liners. Perl is a scripting language originating in the environment of another operating system. Since many Windows computing environments have Perl installed, Perl one-liners are a natural and compact extension of Windows batch scripting.
Examples:
- echo «abcbbc»| perl -pe «s/a.*?c/ac/»
- Lets Perl act as sed, the utility that supports textual replacements specified using regular expressions.
- echo a b| perl -lane «print $F[1]»
- Lets Perl act as cut command, displaying the 2nd field or column of the line, in this case b. Use $F[2] to display 3rd field; indexing starts at zero. Native solution: FOR /f.
- perl -ne «print if /x22hellox22/» file.txt
- Acts as grep or FINDSTR, outputting the lines in file.txt that match the regular expression after if. Uses the powerful Perl regular expressions, more powerful than those of FINDSTR.
- perl -ne «$. <= 10 and print» MyFile.txt
- Lets Perl act as head -10 command, outputting the first 10 lines of the file.
- perl -e «sleep 5»
- Waits for 5 seconds.
- for /f %i in (‘perl -MPOSIX -le «print strftime ‘%Y-%m-%d’, localtime»‘) do @set isodate=%i
- Gets current date in the ISO format into isodate variable.
- perl -MWin32::Clipboard -e «print Win32::Clipboard->Get()»
- Outputs the text content of the clipboard. When stored to getclip.bat, yields a handy getclip command to complement CLIP command.
- perl -MText::Diff -e «print diff ‘File1.txt’, ‘File2.txt'»
- Outputs differences between two files in a format similar to diff command known from other operating systems, including context lines, lines starting with + and lines starting with -.
- perl -MWin32::Sound -e «Win32::Sound::Play(‘C:WINDOWSMedianotify.wav’);»
- Plays notification sound in notify.wav without showing any window.
On the web, Perl one-liners are often posted in the command-line conventions of another operating system, including the use of apostrophe (‘) to surround the arguments instead of Windows quotation marks. These need to be tweaked for Windows.
Links:
- Perl One Liners at novosial.org
- Why doesn’t my Perl one-liner work on Windows? at stackoverflow.com
- W:One-liner program#Perl
Unix commands[edit | edit source]
Windows cmd.exe command interpreter can use commands from Unix-like operating systems, provided they are installed. Example commands include grep, sed, awk, wc, head and tail. The commands are available from GNU project, and their Windows ports exist. You can learn more about the commands in Guide to Unix Wikibook. Beware that batch programs that come to depend on these commands are not guaranteed to work on other Windows machines.
Freely licensed Windows versions of GNU commands can be obtained from the following projects:
- GnuWin32, sourceforge.net
- ezwinports, sourceforge.net: has some fresher ports than GnuWin32
An alternative way of running GNU commands for Windows 10 is Windows Subsystem for Linux.
Changing file timestamp[edit | edit source]
There is no touch command familiar from other operating systems. The touch command would modify the last-modification timestamp of a file without changing its content.
One workaround, with unclear reliability and applicability across various Windows versions, is this:
- copy /b file.txt+,,
Links:
- Windows recursive touch command at superuser.com
- Windows version of the Unix touch command at stackoverflow.com
Getting last lines[edit | edit source]
There is no built-in command to get last lines of a file; no equivalent of tail command. However, a batch can be written to do the job and is available from the link below. Alternatively, one can install tail command for Windows, or run a PowerShell equivalent with no installation required.
Links:
- CMD.EXE batch script to display last 10 lines from a txt file, stackoverflow.com
Hex dump[edit | edit source]
There is no preinstalled hex dump tool to view file content in hexadecimal. Nonetheless, there are the following options:
1) Use fsutil file createnew to create a file of all zero bytes and use fc to view the bytes via comparison:
- fsutil file createnew allzeros.bin 1000
fc /b C:Windowsnotepad.exe allzeros.bin- The notepad.exe bytes that are zero are not shown in the comparison, but other bytes are shown with their offset, one byte per line. You can determine how many initial bytes you want to see by choosing the length of the all-zero-byte file by changing the final 1000 above. To view complete file, create the all-zero-byte file of the length of the inspected file. Far from perfect, but can be used as a quick hack to view e.g. BOM marks or the kind of newlines used.
2) Use certutil -encodeHex, where the encodeHex feature is not officially documented:
- certutil -encodeHex file.txt filehex.txt
- Writes the file content of file.txt in hexadecimal to filehex.txt. Refuses to overwrite filehex.txt if it exists. You cannot limit the number of bytes to be converted.
3) Use PowerShell 5.0 Format-Hex:
- powershell Format-Hex C:Windowsnotepad.exe
- Option -Count is supported in latest PowerShell.
4) Install a command such as the feature-rich od or hexdump; see Unix commands. od can do octal dump as well.
5) If you are on old 32-bit version of Windows (not very likely), use debug; see DEBUG.
Links:
- fc, docs.microsoft.com
- certutil, ss64.com
- certutil, docs.microsoft.com
- Format-Hex, docs.microsoft.com
- HEXDUMP.BAT version 2.1 using CERTUTIL by Dave Benham, dostips.com
- New function — :hexDump by Dave Benham, dostips.com — pure batch; heavy batch magic and also slow
Limitations[edit | edit source]
Limitations include the following:
- No while loop; can be emulated via labels and goto. There is a for loop and an if statement.
- No break and continue statements for loop control known from the C language.
- No proper custom functions; a custom function can be created using labels, call and %n parameter expansion.
- Fragile processing of strings with special characters such as quotation marks («) or ampersands (&).
- No arrays; can be emulated in a limited manner.
- No associative arrays AKA dictionaries.
- No floating-point arithmetic.
- No ternary conditional operator from the C language.
- No function to convert a character to its ascii value or to convert an ascii value to a character. No sane workarounds.
- No arbitrarily large integer arithmetic.
- No touch command to change file timestamp from other operating systems; no head and tail commands.
- No GUI programming.
- And more.
Built-in commands[edit | edit source]
These commands are all built in to the command interpreter itself, and cannot be changed. Sometimes this is because they require access to internal command interpreter data structures, or modify properties of the command interpreter process itself.
Overview[edit | edit source]
| Command | Description |
|---|---|
| ASSOC | Associates an extension with a file type (FTYPE). |
| BREAK | Sets or clears extended CTRL+C checking. |
| CALL | Calls one batch program from another. |
| CD, CHDIR | Outputs or sets the current directory. |
| CHCP | Outputs or sets the active code page number. |
| CLS | Clears the screen. |
| COLOR | Sets the console foreground and background colors. |
| COPY | Copies files. |
| DATE | Outputs and sets the system date. |
| DEL, ERASE | Deletes one or more files. |
| DIR | Outputs a list of files and subdirectories in a directory. |
| ECHO | Outputs messages, or turns command echoing on or off. |
| ELSE | Performs conditional processing in batch programs when «IF» is not true. |
| ENDLOCAL | Ends localization of environment changes in a batch file. |
| EXIT | Quits the CMD.EXE program (command interpreter). |
| FOR | Runs a specified command for each file in a set of files. |
| FTYPE | Sets the file type command. |
| GOTO | Goes to a label. |
| IF | Performs conditional processing in batch programs. |
| MD, MKDIR | Creates a directory. |
| MOVE | Moves a file to a new location |
| PATH | Sets or modifies the PATH environment |
| PAUSE | Causes the command session to pause for user input. |
| POPD | Changes to the drive and directory popped from the directory stack |
| PROMPT | Sets or modifies the string displayed when waiting for input. |
| PUSHD | Pushes the current directory onto the stack, and changes to the new directory. |
| RD / RMDIR | Removes the directory. |
| REM | A comment command. Unlike double-colon (::), the command can be executed. |
| REN / RENAME | Renames a file or directory. |
| SET | Sets or outputs shell environment variables. |
| SETLOCAL | Creates a child-environment for the batch file. |
| SHIFT | Moves the batch parameters forward. |
| START | Starts a program with various options. |
| TIME | Outputs or sets the system clock. |
| TITLE | Changes the window title |
| TYPE | Prints the content of a file to the console. |
| VER | Shows the command processor, operating system versions. |
| VERIFY | Verifies that file copy has been done correctly. |
| VOL | Shows the label of the current volume. |
ASSOC[edit | edit source]
Associates an extension with a file type (FTYPE), outputs existing associations, or deletes an association. See also FTYPE.
Examples:
- assoc
- Lists all associations, in the format «<file extension>=<file type>», as, for example, «.pl=Perl» or «.xls=Excel.Sheet.8».
- assoc | find «.doc»
- Lists all associations containing «.doc» substring.
Links:
- assoc at ss64.com
- assoc at Microsoft
- Making Python scripts run on Windows without specifying “.py” extension at stackoverflow
BREAK[edit | edit source]
In Windows versions based on Windows NT, does nothing; kept for compatibility with MS DOS.
Examples:
- break > empty.txt
- Creates an empty file or to clears the content of an existing file, taking advantage of the fact that break does nothing and has no output. Shorter to type than «type nul > empty.txt».
Links:
- break at Microsoft
CALL[edit | edit source]
Calls one batch program from another, calls a subprogram within a single batch program, or, as an undocumented behavior, starts a program. In particular, suspends the execution of the caller, starts executing the callee, and resumes the execution of the caller if and when the callee finishes execution.
For calling a subprogram, see Functions section.
Beware that calling a batch program from a batch without using the call keyword results in the execution never returning to the caller once the callee finishes.
The callee inherits environment variables of the caller, and unless the callee prevents that via SETLOCAL, changes made by the callee to environment variables become visible to the caller once it resumes execution.
Examples:
- mybatch.bat
- If used in a batch, transfers control to mybatch.bat and never resumes the execution of the caller.
- call mybatch.bat
- call mybatch
- call mybatch.bat arg1 «arg 2»
- call :mylabel
- call :mylabel arg1 «arg 2»
- cmd /c mybatch.bat
- Similar to call, but resumes execution even when there are errors. Furthermore, any changes the callee makes to environment variables are not propagated to the caller.
- call notepad.exe
- Launches Notepad, or in general, any other executable. This is apparently not the intended usage of call, and is not officially documented.
See also Functions, CMD amd START.
Links:
- call at ss64.com
- call at Microsoft
- CALL command vs. START with /WAIT option, stackoverflow.com
CD[edit | edit source]
Changes to a different directory, or outputs the current directory. However, if a different drive letter is used, it does not switch to that different drive or volume.
Examples:
- cd
- Outputs the current directory, e.g. C:WindowsSystem32.
- cd C:Program Files
- No surrounding quotes are needed around paths with spaces.
- cd Program Files
- cd Documents
- cd %USERPROFILE%
- cd /d C:Program Files
- Changes to the directory of the C: drive even if C: is not the current drive.
- C: & cd C:Program Files.
- Changes to the directory of the C: drive even if C: is not the current drive.
- cd ..
- Changes to the parent directory. Does nothing if already in the root directory.
- cd ….
- Changes to the parent directory two levels up.
- C: & cd C:WindowsSystem32 & cd ….Program Files
- Uses «..» to navigate through the directory tree up and down
- cd \myserverfolder
- Does not work. Changing the directory directly to a network Universal Naming Convention (UNC) folder does not work. Keywords: UNC path.
- subst A: \myserverfolder && cd /d A:
- Changes the directory to a server folder with the use of #SUBST command, assuming drive letter A: is free.
- pushd \myserverfolder
- Automatically creates a drive for the folder and changes to it. After you use #POPD, the drive gets unassigned again.
- cd C:W*
- Changes to C:Windows, in a typical Windows setup. Thus, wildcards work. Useful for manual typing from the command line.
- cd C:W**32
- Changes to C:WindowsSystem32, in a typical Windows setup.
Links:
- cd at ss64.com
- cd at Microsoft
CHDIR[edit | edit source]
A synonym of CD.
CLS[edit | edit source]
Clears the screen.
COLOR[edit | edit source]
Sets the console foreground and background colors.
Examples:
- color f9
- Use white background and blue foreground.
- color
- Restore the original color setting.
Links:
- color at ss64.com
- color at Microsoft
COPY[edit | edit source]
Copies files. See also MOVE, XCOPY and ROBOCOPY.
Examples:
- copy F:File.txt
- Copies the file into the current directory, assuming the current directory is not F:.
- copy «F:My File.txt»
- As above; quotation marks are needed to surround a file with spaces.
- copy F:*.txt
- Copies the files located at F: and ending in dot txt into the current directory, assuming the current directory is not F:.
- copy F:*.txt .
- Does the same as the above command.
- copy File.txt
- Issues an error message, as File.txt cannot be copied over itself.
- copy File1.txt File2.txt
- Copies File1.txt to File2.txt, overwriting File2.txt if confirmed by the user or if run from a batch script.
- copy File.txt «My Directory»
- Copies File.txt into «My Directory» directory, assuming «My Directory» exists.
- copy Dir1 Dir2
- Copies all files directly located in directory Dir1 into Dir2, assuming Dir1 and Dir2 are directories. Does not copy files located in nested directories of Dir1.
- copy *.txt *.bak
- For each *.txt file in the current folder, makes a copy ending with «bak» rather than «txt».
Links:
- copy at ss64.com
- copy at Microsoft
DEL[edit | edit source]
Deletes files. Use with caution, especially in combination with wildcards. Only deletes files, not directories, for which see RD. For more, type «del /?».
Examples:
- del File.txt
- del /s *.txt
- Deletes the files recursively including nested directories, but keeps the directories; mercilessly deletes all matching files without asking for confirmation.
- del /p /s *.txt
- As above, but asks for confirmation before every single file.
- del /q *.txt
- Deletes without asking for confirmation.
Links:
- del at ss64.com
- del at Microsoft
DIR[edit | edit source]
Lists the contents of a directory. Offers a range of options. Type «dir /?» for more help.
Examples:
- dir
- Lists the files and folders in the current folder, excluding hidden files and system files; uses a different manner of listing if DIRCMD variable is non-empty and contains switches for dir.
- dir D:
- dir /b C:Users
- dir /s
- Lists the contents of the directory and all subdirectories recursively.
- dir /s /b
- Lists the contents of the directory and all subdirectories recursively, one file per line, displaying complete path for each listed file or directory.
- dir *.txt
- Lists all files with .txt extension.
- dir /a
- Includes hidden files and system files in the listing.
- dir /ah
- Lists hidden files only.
- dir /ad
- Lists directories only. Other letters after /A include S, I, R, A and L.
- dir /ahd
- Lists hidden directories only.
- dir /a-d
- Lists files only, omitting directories.
- dir /a-d-h
- Lists non-hidden files only, omitting directories.
- dir /od
- Orders the files and folders by the date of last modification. Other letters after /O include N (by name), E (by extension), S (by size), and G (folders first)
- dir /o-s
- Orders the files by the size descending; the impact on folder order is unclear.
- dir /-c /o-s /a-d
- Lists files ordered by size descending, omitting the thousands separator via /-C, excluding folders.
- dir /s /b /od
- Lists the contents of the directory and all subdirectories recursively, ordering the files in each directory by the date of last modification. The ordering only happens per directory; the complete set of files so found is not ordered as a whole.
- dir /a /s
- Lists files recursively including hidden files and system files. Can be used to find out the disk usage (directory size), by considering the final lines of the output.
Links:
- dir at ss64.com
- dir at Microsoft
DATE[edit | edit source]
Outputs or sets the date. The way the date is output depends on country settings. Date can also be output using «echo %DATE%».
Getting date in the iso format, like «2000-01-28»: That is nowhere easy, as the date format depends on country settings.
- If you can assume the format of «Mon 01/28/2000», the following will do:
- set isodate=%date:~10,4%-%date:~4,2%-%date:~7,2%
- If you have WMIC, the following is locale independent:
- for /f %i in (‘wmic os get LocalDateTime’) do @if %i lss a if %i gtr 0 set localdt=%i
set isodate=%localdt:~0,4%-%localdt:~4,2%-%localdt:~6,2% - To use the above in a batch, turn %i into %%i and remove @ from before if.
- for /f %i in (‘wmic os get LocalDateTime’) do @if %i lss a if %i gtr 0 set localdt=%i
- If you have Perl installed:
- for /f %i in (‘perl -MPOSIX -le «print strftime ‘%Y-%m-%d’, localtime»‘) do @set isodate=%i
Links:
- date at ss64.com
- date at Microsoft
- How to get current datetime on Windows command line, in a suitable format for using in a filename? at stackoverflow
ECHO[edit | edit source]
Outputs messages, or turns command echoing on or off.
Examples:
- echo on
- @echo off
- echo Hello
- echo «hello»
- Outputs the quotes too.
- echo %PATH%
- Outputs the contents of PATH variable.
- echo Owner ^& son
- Uses caret (^) to escape ampersand (&), thereby enabling echoing ampersands.
- echo 1&echo 2&echo 3
- Outputs three strings, each followed by a newline.
- echo.
- Outputs a newline while the period is not being output. Without the period, outputs «echo off» or «echo on». Adding a space before the period leads to the period being output. Other characters having the same effect as period include :;,/(=+[].
- echo %random%>>MyRandomNumbers.txt
- While it seems to output random numbers to MyRandomNumbers.txt, it actually does not do so for numbers 0-9, since these, when placed before >>, indicate which channel is to be redirected. See also #Redirection.
- echo 2>>MyRandomNumbers.txt
- Instead of echoing 2, redirects standard error to the file.
- (echo 2)>>MyRandomNumbers.txt
- Echoes even a small number (in this case 2) and redirects the result.
- >>MyRandomNumbers.txt echo 2
- Another way to echo even a small number and redirect the result.
Displaying a string without a newline requires a trick:
- set <NUL /p=Output of a command:
- Outputs «Output of a command:». The output of the next command will be displayed immediately after «:».
- set <NUL /p=Current time: & time /t
- Outputs «Current time: » followed by the output of «time /t».
- (set <NUL /p=Current time: & time /t) >tmp.txt
- Like before, with redirecting the output of both commands to a file.
Links:
- echo at ss64.com
- echo at Microsoft
ELSE[edit | edit source]
An example:
if exist file.txt (
  echo The file exists.
) else (
  echo The file does not exist.
)
See also IF.
ENDLOCAL[edit | edit source]
Ends local set of environment variables started using SETLOCAL. Can be used to create subprograms: see Functions.
Links:
- endlocal at ss64.com
- endlocal at Microsoft
ERASE[edit | edit source]
A synonym of DEL.
EXIT[edit | edit source]
Exits the DOS console or, with /b, only the currently running batch or the currently executed subroutine. If used without /b in a batch file, causes the DOS console calling the batch to close.
Examples:
- exit
- exit /b
Links:
- exit at ss64.com
- exit at Microsoft
FOR[edit | edit source]
Iterates over a series of values, executing a command. Keywords: loop.
In the following examples, %i is to be used from the command line while %%i is to be used from a batch.
The index (e.g., %i) must be a single character variable name.
Examples without switches and with /r and /d switches:
- for %%i in (1,2,3) do echo %%i
- In a batch, echoes 1, 2, and 3. In a batch, the command must use a double percent sign.
- The remaining examples are intended to be directly pasted into a command line, so they use a single percent sign and include «@» to prevent repetitive display.
- for %i in (1,2,3) do @echo %i
- From a command line, echoes 1, 2, and 3.
- The for command tries to interpret the items as file names and as patterns of file names containing wildcards.
- It does not complain if the items do not match existing file names, though.
- for %i in (1,2,a*d*c*e*t) do @echo %i
- Unless you happen to have a file matching the third pattern, echoes 1 and 2, discarding the third item.
- for %i in (1 2,3;4) do @echo %i
- Echoes 1, 2, 3, and 4. Yes, a mixture of item separators is used.
- for %i in (*.txt) do @echo %i
- Echoes file names of files located in the current folder and having the .txt extension.
- for %i in («C:Windowssystem32*.exe») do @echo %i
- Echoes file names matching the pattern.
- for /r %i in (*.txt) do @echo %i
- Echoes file names with full paths, of files having the extension .txt located anywhere in the current folder including nested folders.
- for /d %i in (*) do @echo %i
- Echoes the names of all folders in the current folder.
- for /r /d %i in (*) do @echo %i
- Echoes the names including full paths of all folders in the current folder, including nested folders.
- for /r %i in (*) do @if %~zi geq 1000000 echo %~zi %i
- For each file in the current folder and its subfolders that has the size greater than or equal to 1,000,000 bytes, outputs the file size in bytes and the full path of the file. For the syntax in %~zi, see #Percent tilde.
Examples of /l switch:
- for /l %i in (1,2,11) do @echo %i
- Echoes the numbers from 1 to 11 with step 2. Thus, the format is (start, step, end). 32-bit signed integers are supported.
- for /l %i in (10,-1,1) do @echo %i
- Echoes the numbers from 10 to 1 descending.
- for /l %i in (1,0,1) do @echo %i
- Keeps echoing 1; an infinite loop.
- for /l %i in (0) do @echo %i
- Keeps echoing 0; an infinite loop.
- for /l %i in () do @echo %i
- Keeps echoing 0; an infinite loop.
- for /l %i in (-10,1) do @echo %i
- Echoes the numbers from -10 to 0; the unstated end limit integer is taken to be zero.
- for /l %i in (0xF, 1, 020) do @echo %i
- Echoes the numbers from 15 to 16; thus, hexadecimal and octal literals are supported.
- for /l %i in (2147483646,1,2147483647) do @echo %i
- Echoes 2147483646, then 2147483647, then -2147483648, then -2147483647, and so on. This is probably caused by an increment of 2147483647 overflowing to -2147483648.
- for /l %i in (-2147483648,1,-2147483647) do @echo %i
- Echoes -2147483648 and then -2147483647. Thus, directly supports -2147483648 literal, unlike set /a.
Examples with /f switch:
- for /f «tokens=*» %i in (list.txt) do @echo %i
- For each line in a file, echoes the line.
- for /f «tokens=*» %i in (list1.txt list2.txt) do @echo %i
- For each line in the files, echoes the line.
- for /f «tokens=*» %i in (*.txt) do @echo %i
- Does nothing. Does not accept wildcards to match file names.
- for /f «tokens=1-3 delims=:» %a in («First:Second::Third») do @echo %c-%b-%a
- Parses a string into tokens delimited by «:».
- The quotation marks indicate the string is not a file name.
- The second and third tokens are stored in %b and %c even though %b and %c are not expressly mentioned in the part of the command before «do».
- The two consecutive colons are treated as one separator; %c is not «» but rather «Third».
- Does some of the job of the cut command from other operating systems.
- for /f «tokens=1-3* delims=:» %a in («First:Second::Third:Fourth:Fifth») do @echo %c-%b-%a: %d
- As above, just that the 4th and 5th items get captured in %d as «Fourth:Fifth», including the separator.
- for /f «tokens=1-3* delims=:,» %a in («First,Second,:Third:Fourth:Fifth») do @echo %c-%b-%a: %d
- Multiple delimiters are possible.
- for /f «tokens=1-3» %a in («First Second Third,item») do @echo %c-%b-%a
- The default delimiters are space and tab. Thus, they differ from the separators used to separate arguments passed to a batch.
- for /f «tokens=*» %i in (‘cd’) do @echo %i
- For each line of the result of a command, echoes the line.
- for /f «tokens=*» %i in (‘dir /b /a-d-h’) do @echo %~nxai
- For each non-hidden file in the current folder, outputs the file attributes followed by the file name. In the string «%~nxai», uses the syntax described at #Percent tilde.
- for /f «usebackq tokens=*» %i in (`dir /b /a-d-h`) do @echo %~nxai
- As above, but using the backquote character (`) around the command to be executed.
- for /f «tokens=*» %i in (‘tasklist ^| sort ^& echo End’) do @echo %i
- Pipes and ampersands in the command to be executed must be escaped using caret (^).
Examples of redirection:
- (for %i in (1,2,3) do @echo %i) > anyoldtemp.txt
- To redirect the entire result of a for loop, place the entire loop inside brackets before redirecting. Otherwise, the redirection will tie to the body of the loop, so each new iteration of the body of the loop will override the results of the previous iterations.
- for %i in (1,2,3) do @echo %i > anyoldtemp.txt
- An example related to the one above. It shows the consequence of failing to put the loop inside brackets.
Continue: To jump to the next iteration of the loop and thus emulate the continue statement known from many languages, you can use goto provided you put the loop body in a subroutine, as shown in the following:
for %%i in (a b c) do call :for_body %%i
exit /b

:for_body
    echo 1 %1
    goto :cont
    echo 2 %1
  :cont
exit /b
If you use goto directly inside the for loop, the use of goto breaks the loop bookkeeping. The following fails:
for %%i in (a b c) do (
    echo 1 %%i
    goto :cont
    echo 2 %%i
  :cont
    echo 3 %%i
)
Links:
- for at ss64.com
- for at Microsoft
- Rules for how CMD.EXE parses numbers by dbenham, dostips.com
FTYPE[edit | edit source]
Outputs or sets the command to be executed for a file type. See also ASSOC.
Examples:
- ftype
- Lists all associations of commands to be executed with file types, as, for example, ‘Perl=»C:Perlbinperl.exe» «%1» %*’
- ftype | find «Excel.Sheet»
- Lists only associations whose display line contains «Excel.Sheet»
Links:
- ftype at ss64.com
- ftype at Microsoft
- Making Python scripts run on Windows without specifying “.py” extension at stackoverflow
GOTO[edit | edit source]
Goes to a label.
An example:
goto :mylabel
echo Hello 1
REM Hello 1 never gets printed.

:mylabel
echo Hello 2
goto :eof

echo Hello 3
REM Hello 3 never gets printed. Eof is a virtual label standing for the end of file.
Goto within the body of a for loop makes cmd forget about the loop, even if the label is within the same loop body.
Links:
- goto at ss64.com
- goto at Microsoft
IF[edit | edit source]
Conditionally executes a command. Documentation is available by entering IF /? to CMD prompt.
Available elementary tests:
- exist <filename>
- <string>==<string>
- <expression1> equ <expression2> — equals
- <expression1> neq <expression2> — not equal
- <expression1> lss <expression2> — less than
- <expression1> leq <expression2> — less than or equal
- <expression1> gtr <expression2> — greater than
- <expression1> geq <expression2> — greater than or equal
- defined <variable>
- errorlevel <number>
- cmdextversion <number>
To each elementary test, «not» can be applied. Apparently there are no operators like AND, OR, etc. to combine elementary tests.
The /I switch makes the == and equ comparisons ignore case.
An example:
if not exist %targetpath% (
  echo Target path not found.
  exit /b
)
Examples:
- if not 1 equ 0 echo Not equal
- if 1 equ 0 echo A & echo B
- Does nothing; both echo commands are subject to the condition.
- if not 1 equ 0 goto :mylabel
- if not a geq b echo Not greater
- if b geq a echo Greater
- if b geq A echo Greater in a case-insensitive comparison
- if B geq a echo Greater in a case-insensitive comparison
- if 0 equ 00 echo Numerical equality
- if not 0==00 echo String inequality
- if 01 geq 1 echo Numerical comparison
- if not «01» geq «1» echo String comparison
- if 1 equ 0 (echo Equal) else echo Unequal
- Notice the brackets around the positive then-part to make it work.
- if not a==A echo Case-sensitive inequality
- if /i a==A echo Case-insensitive equality
- if /i==/i echo This does not work
- if «/i»==»/i» echo Equal, using quotation marks to prevent the literal meaning of /i
Links:
- if at ss64.com
- if at Microsoft
MD[edit | edit source]
Creates a new directory or directories. Has a synonym MKDIR; see also its antonym RD.
Examples:
- md Dir
- Creates one directory in the current directory.
- md Dir1 Dir2
- Creates two directories in the current directory.
- md «My Dir With Spaces»
- Creates a directory with a name containing spaces in the current directory.
Links:
- md at ss64.com
- md at Microsoft
MKDIR[edit | edit source]
A synonym for MD.
MKLINK[edit | edit source]
Makes a symbolic link or other type of link. Available since Windows Vista.
Links:
- mklink at ss64.com
- mklink at Microsoft
MOVE[edit | edit source]
Moves files or directories between directories, or renames them. See also REN.
Examples:
- move File1.txt File2.txt
- Renames File1.txt to File2.txt, overwriting File2.txt if confirmed by the user or if run from a batch script.
- move File.txt Dir
- Moves File.txt file into Dir directory, assuming File.txt is a file and Dir is a directory; overwrites target file Dira.txt if conditions for overwriting are met.
- move Dir1 Dir2
- Renames directory Dir1 to Dir2, assuming Dir1 is a directory and Dir2 does not exist.
- move Dir1 Dir2
- Moves directory Dir1 into Dir2, resulting in existence of Dir2Dir1, assuming both Dir1 and Dir2 are existing directories.
- move F:File.txt
- Moves the file to the current directory.
- move F:*.txt
- Moves the files located at F: and ending in dot txt into the current directory, assuming the current directory is not F:.
Links:
- move at ss64.com
- move at Microsoft
PATH[edit | edit source]
Outputs or sets the value of the PATH environment variable. When outputting, includes «PATH=» at the beginning of the output.
Examples:
- path
- Outputs the PATH. An example output:
- PATH=C:Windowssystem32;C:Windows;C:Program FilesPython27
- Outputs the PATH. An example output:
- path C:UsersJoe HoeScripts;%path%
- Extends the path with C:UsersJoe HoeScripts, applying only to the process of the cmd.exe.
- path ;
- Empties the path.
- echo %path% | perl -pe «s/;/n/g» | sort
- Shows the folders in the path sorted if you have perl installed.
Links:
- path at ss64.com
- path at Microsoft
PAUSE[edit | edit source]
Prompts the user and waits for a line of input to be entered.
Links:
- pause at SS64.com
- pause at Microsoft
POPD[edit | edit source]
Changes to the drive and directory popped from the directory stack. The directory stack is filled using the PUSHD command.
Links:
- popd at ss64.com
- popd at Microsoft
PROMPT[edit | edit source]
Can be used to change or reset the cmd.exe prompt. It sets the value of the PROMPT environment variable.
C:>PROMPT MyPrompt$G

MyPrompt>CD
C:

MyPrompt>PROMPT

C:>
The PROMPT command is used to set the prompt to «MyPrompt>». The CD shows that the current directory path is «C:». Using PROMPT without any parameters sets the prompt back to the directory path.
Links:
- prompt at ss64.com
- prompt at Microsoft
PUSHD[edit | edit source]
Pushes the current directory onto the directory stack, making it available for the POPD command to retrieve, and, if executed with an argument, changes to the directory stated as the argument.
Links:
- pushd at ss64.com
- pushd at Microsoft
RD[edit | edit source]
Removes directories. See also its synonym RMDIR and antonym MD. Per default, only empty directories can be removed. Also type «rd /?».
Examples:
- rd Dir1
- rd Dir1 Dir2
- rd «My Dir With Spaces»
- rd /s Dir1
- Removes the directory Dir1 including all the files and subdirectories in it, asking for confirmation once before proceeding with the removal. To delete files recursively in nested directories with a confirmation per file, use DEL with /s switch.
- rd /q /s Dir1
- Like above, but without asking for confirmation.
Links:
- rd at ss64.com
- rd at Microsoft
REN[edit | edit source]
Renames files and directories.
Examples:
- ren filewithtpyo.txt filewithtypo.txt
- ren *.cxx *.cpp
Links:
- ren at ss64.com
- ren at Microsoft
- How does the Windows RENAME command interpret wildcards?, superuser.com
RENAME[edit | edit source]
This is a synonym of REN command.
REM[edit | edit source]
Used for remarks in batch files, preventing the content of the remark from being executed.
An example:
REM A remark that does not get executed
echo Hello REM This remark gets displayed by echo
echo Hello & REM This remark gets ignored as wished
:: This sentence has been marked as a remark using double colon.
REM is typically placed at the beginning of a line. If placed behind a command, it does not work, unless preceded by an ampersand, as shown in the example above.
Double colon is an alternative to REM. It can cause trouble when used in the middle of sequences in parentheses, like those used in FOR loops. The double colon seems to be just a trick, a label that starts with a colon.
Links:
- rem at ss64.com
- rem at Microsoft
- Which comment style should I use in batch files?, stackoverflow.com
RMDIR[edit | edit source]
This is a synonym of RD.
SET[edit | edit source]
Outputs or sets environment variables. With /P switch, it asks the user for input, storing the result in the variable. With /A switch, it performs simple arithmetic calculations, storing the result in the variable. With string assignments, spaces before and after the equality sign are usually avoided since they lead to usually unintended consequences: «set name = Peter» assigns to variable «name «, while «set name=Peter» assigns to variable «name». See also #Environment variables and #Calculation.
Examples:
- set
- Outputs a list of environment variables with their values, in the format of VAR=VALUE, a variable per line.
- set home
- Outputs a list of environment variables with their values for the variables whose names start with «home», case-insensitive, in the format of VAR=VALUE, a variable per line.
- set HOME
- As above; the match between the variable name prefix and the variable name is case insensitive.
- set myname=Joe Hoe
- Sets the variable to a new value.
- set mynumber=56
- Sets the variable to the string value of «56».
- set mynumber=
- Unsets the variable, removing it from variables. The equal sign (=) must be the final character; with any spaces after the equal sign, they become the new value of the variable.
- set home=%home%;C:Program FilesMy Bin Folder
- set /P user_input=Enter an integer:
- set /P firstline=< File.txt
- Sets the variable to the first line of the file. An equivalent of head -1 command from other operating systems.
- set /A result = 4 * ( 6 / 3 )
- Sets the result variable with the result of a calculation. See also #Calculation.
- set name = Peter
echo *%name %*- Sets the value of variable «name «, with ending space, to the value of » Peter», with leading space. The intent was probably to use «set name=Peter», with no separating spaces.
Links:
- set at ss64.com
- set at Microsoft
SETLOCAL[edit | edit source]
When used in a batch file, makes all further changes to environment variables local to the current batch file. When used outside of a batch file, does nothing. Can be ended using ENDLOCAL. Exiting a batch file automatically calls «end local». Can be used to create subprograms: see Functions.
Furthermore, can be used to enable delayed expansion like this: «setlocal EnableDelayedExpansion». Delayed expansion consists in the names of variables enclosed in exclamation marks being replaced with their values only after the execution reaches the location of their use rather than at an earlier point.
The following is an example of using delayed expansion in a script that prints the specified number of first lines of a file, providing some of the function of the command «head» known from other operating systems:
@echo off

call :myhead 2 File.txt
exit /b

:: Function myhead
:: ===============
:: %1 - lines count, %2 - file name
:myhead
setlocal EnableDelayedExpansion
set counter=1
for /f "tokens=*" %%i in (%2) do (
  echo %%i
  set /a counter=!counter!+1
  if !counter! gtr %1 exit /b
)
exit /b
Links:
- setlocal at ss64.com
- EnableDelayedExpansion at ss64.com
- setlocal at Microsoft
SHIFT[edit | edit source]
Shifts the batch file arguments along, but does not affect %*. Thus, if %1=Hello 1, %2=Hello 2, and %3=Hello 3, then, after SHIFT, %1=Hello 2, and %2=Hello 3, but %* is «Hello 1» «Hello 2» «Hello 3».
Links:
- shift at ss64.com
- shift at Microsoft
START[edit | edit source]
Starts a program in new window, or opens a document. Uses an unclear algorithm to determine whether the first passed argument is a window title or a program to be executed; hypothesis: it uses the presence of quotes around the first argument as a hint that it is a window title.
Examples:
- start notepad.exe & echo «Done.»
- Starts notepad.exe, proceeding to the next command without waiting for finishing the started one. Keywords: asynchronous.
- start «notepad.exe»
- Launches a new console window with notepad.exe being its title, apparently an undesired outcome.
- start «» «C:Program FilesInternet Exploreriexplore.exe»
- Starts Internet Explorer. The empty «» passed as the first argument is the window title of a console that actually does not get opened, or at least not visibly so.
- start «C:Program FilesInternet Exploreriexplore.exe»
- Launches a new console window with «C:Program FilesInternet Exploreriexplore.exe» being its title, apparently an undesired outcome.
- start /wait notepad.exe & echo «Done.»
- Starts notepad.exe, waiting for it to end before proceeding.
- start /low notepad.exe & echo «Done.»
- As above, but starting the program with a low priority.
- start «» MyFile.xls
- Opens the document in the program assigned to open it.
- start
- Starts a new console (command-line window) in the same current folder.
- start .
- Opens the current folder in Windows Explorer.
- start ..
- Opens the parent folder in Windows Explorer.
- start «» «mailto:»
- Starts the application for writing a new email.
- start «» «mailto:joe.hoe@hoemail.com?subject=Notification&body=Hello Joe, I’d like to…»
- Starts the application for writing a new email, specifying the to, subject and body of the new email.
- start «» «mailto:joe.hoe@hoemail.com?subject=Notification&body=Hello Joe,%0a%0aI’d like to…»
- As above, with newlines entered as %0a.
- start /b TODO:example-application-where-this-is-useful
- Starts the application without opening a new console window, redirecting the output to the console from which the start command was called.
Links:
- start at ss64.com
- start at Microsoft
- How to use command line switches to create a pre-addressed e-mail message in Outlook, support.microsoft.com
TIME[edit | edit source]
Ouputs or sets the system time. See also #DATE and TIME variable in #Special variable names.
Examples
- time /t
- Outputs the system time in HH:MM format, with no seconds and milliseconds. An example output: 09:19.
- time
- Outputs the system time in a locale-specific format possibly featuring seconds and hundredths of seconds and asks for a new time to set; the time is preceded by a locale-specific message, usually a translation of «Current time:». Thus, the output format differs from the one of «time /t».
- echo %time%
- Outputs the current time using the special variable TIME, in a locale-dependent format featuring hours, minutes, seconds and possibly hundredths of seconds. An example output for one locale: 9:19:31.55.
- echo %time% & timeout 1 >nul & echo,|time
- Outputs time before and after the command in the middle, here timeout 1. Can be used to measure execution time of the sequence in the middle; keywords: how long does it take.
Links:
- time at ss64.com
- time at Microsoft
TITLE[edit | edit source]
Sets the title displayed in the console window.
Links:
- title at ss64.com
- title at Microsoft
TYPE[edit | edit source]
Prints the content of a file or files to the output.
Examples:
- type filename.txt
- type a.txt b.txt
- type *.txt
- type NUL > tmp.txt
- Create an empty file (blank file).
Links:
- type at ss64.com
- type at Microsoft
VER[edit | edit source]
Shows the command processor or operating system version.
C:>VER

Microsoft Windows XP [Version 5.1.2600]

C:>
Some version strings:
- Microsoft Windows [Version 5.1.2600]
- For Windows XP
- Microsoft Windows [Version 6.0.6000]
- For Windows Vista
- …
The word «version» appears localized.
Links:
- ver at ss64.com
- ver at Microsoft
- Operating System Version at Microsoft
- List of Microsoft Windows versions, wikipedia.org
- Windows Build Numbers, eddiejackson.net
- mxpv/windows_build_numbers.txt, gist.github.com
VERIFY[edit | edit source]
Sets or clears the setting to verify whether COPY files etc. are written correctly.
Links:
- verify at ss64.com
- verify at Microsoft
VOL[edit | edit source]
Outputs volume labels.
Links:
- vol at ss64.com
- vol at Microsoft
External commands[edit | edit source]
External commands available to Windows command interpreter are separate executable program files, supplied with the operating system by Microsoft, or bundled as standard with the third-party command interpreters. By replacing the program files, the meanings and functions of these commands can be changed.
Many, but not all, external commands support the «/?» convention, causing them to write on-line usage information to their standard output and then to exit with a status code of 0.
ARP[edit | edit source]
Outputs or changes items in the address resolution protocol cache, which maps IP addresses to physical addresses.
Links:
- arp at ss64.com
- at arp Microsoft
AT[edit | edit source]
Schedules a program to be run at a certain time. See also SCHTASKS.
Links:
- at at ss64.com
- at at Microsoft
ATTRIB[edit | edit source]
Outputs or sets file attributes. With no arguments, it outputs the attributes of all files in the current directory. With no attribute modification instructions, it outputs the attributes of the files and directories that match the given search wildcard specifications. Similar to chmod of other operating systems.
Modification instructions:
- To add an attribute, attach a ‘+’ in front of its letter.
- To remove an attribute, attach a ‘-‘ in front of its letter
- Attributes:
- A — Archived
- H — Hidden
- S — System
- R — Read-only
- …and possibly others.
Examples:
- attrib
- Outputs the attributes of all files in the current directory.
- attrib File.txt
- Outputs the attributes of the file.
- attrib +r File.txt
- Adds the «Read-only» attribute to the file.
- attrib -a File.txt
- Removes the «Archived» attribute from the file.
- attrib -a +r File.txt
- Removes the «Archived» attribute and adds the «Read-only» attribute to the file.
- attrib +r *.txt
- Acts on a set of files.
- attrib /S +r *.txt
- Acts recursively in subdirectories.
For more, type «attrib /?».
Links:
- attrib at ss64.com
- attrib at Microsoft
BCDEDIT[edit | edit source]
(Not in XP). Edits Boot Configuration Data (BCD) files. For more, type «bcdedit /?».
Links:
- bcdedit at ss64.com
- at Microsoft
CACLS[edit | edit source]
Outputs or changes discretionary access control lists (DACLs). See also ICACLS. For more, type «cacls /?».
Links:
- cacls at ss64.com
- cacls at Microsoft
CHCP[edit | edit source]
Outputs or sets the active code page number. For more, type «chcp /?».
Links:
- chcp at ss64.com
- chcp at Microsoft
CHKDSK[edit | edit source]
Checks disks for disk problems, listing them and repairing them if wished. For more, type «chkdsk /?».
Links:
- chkdsk at ss64.com
- chkdsk at Microsoft
CHKNTFS[edit | edit source]
Shows or sets whether system checking should be run when the computer is started. The system checking is done using Autochk.exe. The «NTFS» part of the command name is misleading, since the command works not only with NTFS file system but also with FAT and FAT32 file systems. For more, type «chkntfs /?».
Links:
- chkntfs at ss64.com
- chkntfs at Microsoft
CHOICE[edit | edit source]
Lets the user choose one of multiple options by pressing a single key, and sets the error level as per the chosen option. Absent in Windows 2000 and Windows XP, it was reintroduced in Windows Vista, and has remained in Windows 7 and 8.
Examples:
- choice /m «Do you agree»
- Presents the user with a yes/no question, setting the error level to 1 for yes and to 2 for no. If the user presses Control + C, the error level is 0.
- choice /c rgb /m «Which color do you prefer»
- Presents the user with a question, and indicates the letters for the user. Responds to user pressing r, g or b, setting the error level to 1, 2 or 3.
An alternative is «set /p»; see SET.
Links:
- choice at ss64.com
- choice at Microsoft
CIPHER[edit | edit source]
Shows the encryption state, encrypts or decrypts folders on a NTFS volume.
Links:
- cipher at ss64.com
- cipher at Microsoft
CLIP[edit | edit source]
(Not in XP, or make a copy from Server 2003) Places the piped input to the clipboard.
Examples:
- set | clip
- Places the listing of environment variables to the clipboard.
- clip < File1.txt
- Places the content of File1.txt to the clipboard.
Links:
- clip at ss64.com
- clip at Microsoft
CMD[edit | edit source]
Invokes another instance of Microsoft’s CMD.
Links:
- cmd at ss64.com
- cmd at Microsoft
COMP[edit | edit source]
Compares files. See also FC.
Links:
- comp at ss64.com
- comp at Microsoft
COMPACT[edit | edit source]
Shows or changes the compression of files or folders on NTFS partitions.
Links:
- compact at Microsoft
CONVERT[edit | edit source]
Converts a volume from FAT16 or FAT32 file system to NTFS file system.
Links:
- convert at ss64.com
- convert at Microsoft
DEBUG[edit | edit source]
Allows to interactively examine file and memory contents in assembly language, hexadecimal or ASCII. Available in 32-bit Windows including Windows 7; the availability in 64-bit Windows is unclear. In modern Windows, useful as a quick hack to view hex content of a file. Keywords: hex dump, hexdump, hexadecimal dump, view hex, view hexadecimal, disassembler.
Debug offers its own command line. Once on its command like, type «?» to find about debug commands.
To view hex of a file, invoke debug.exe with the file name as a parameter, and then repeatedly type «d» followed by enter on the debug command line.
Limitations:
- Being a DOS program, debug chokes on long file names. Use dir /x to find the 8.3 file name, and apply debug on that one.
- Debug cannot view larger files.
Links:
- Debug for Windows XP at TechNet / Microsoft Docs
- Debug for MS-DOS at TechNet / Microsoft Docs
- W:Debug (command)
DISKCOMP[edit | edit source]
Compares the content of two floppies.
Links:
- diskcomp at ss64.com
- diskcomp at Microsoft
DISKCOPY[edit | edit source]
Copies the content of one floppy to another.
Links:
- diskcopy at ss64.com
- diskcopy at Microsoft
DISKPART[edit | edit source]
Shows and configures the properties of disk partitions.
Links:
- diskpart at ss64.com
- diskpart at Microsoft, for XP
- diskpart at Microsoft
DOSKEY[edit | edit source]
Above all, creates macros known from other operating systems as aliases. Moreover, provides functions related to command history, and enhanced command-line editing. Macros are an alternative to very short batch scripts.
Macro-related examples:
- doskey da=dir /s /b
- Creates a single macro called «da»
- doskey np=notepad $1
- Creates a single macro that passes its first argument to notepad.
- doskey /macrofile=doskeymacros.txt
- Loads macro definitions from a file.
- doskey /macros
- Lists all defined macros with their definitions.
- doskey /macros | find «da»
- Lists all macro definitions that contain «da» as a substring; see also FIND.
Command history-related examples:
- doskey /history
- Lists the complete command history.
- doskey /history | find «dir»
- Lists each line of command history that contains «dir» as a substring
- doskey /listsize=100
- Sets the size of command history to 100.
To get help on doskey from command line, type «doskey /?».
Links:
- doskey at ss64.com
- doskey at Microsoft
DRIVERQUERY[edit | edit source]
Shows all installed device drivers and their properties.
Links:
- driverquery at ss64.com
- driverquery at Microsoft
EXPAND[edit | edit source]
Extracts files from compressed .cab cabinet files. See also #MAKECAB.
Links:
- expand at ss64.com
- expand at Microsoft
FC[edit | edit source]
Compares files, displaying the differences in their content in a peculiar way.
Examples:
- fc File1.txt File2.txt >NUL && Echo Same || echo Different or error
- Detects difference using the error level of fc. The error level of zero means the files are the same; non-zero can mean the files differ but also that one of the files does not exist.
Links:
- fc at ss64.com
- fc at Microsoft
FIND[edit | edit source]
Searches for a string in files or input, outputting matching lines. Unlike FINDSTR, it cannot search folders recursively, cannot search for a regular expression, requires quotation marks around the sought string, and treats space literally rather than as a logical or.
Examples:
- find «(object» *.txt
- dir /S /B | find «receipt»
- dir /S /B | find /I /V «receipt»
- Prints all non-matching lines in the output of the dir command, ignoring letter case.
- find /C «inlined» *.h
- Instead of outputting the matching lines, outputs their count. If more than one file is searched, outputs one count number per file preceded with a series of dashes followed by the file name; does not output the total number of matching lines in all files.
- find /C /V «» < file.txt
- Outputs the number of lines AKA line count in «file.txt». Does the job of «wc -l» of other operating systems. Works by treating «» as a string not found on the lines. The use of redirection prevents the file name from being output before the number of lines.
- type file.txt | find /C /V «»
- Like the above, with a different syntax.
- type *.txt 2>NUL | find /C /V «»
- Outputs the sum of line counts of the files ending in «.txt» in the current folder. The «2>NUL» is a redirection of standard error that removes the names of files followed by empty lines from the output.
- find «Schönheit» *.txt
- If run from a batch file saved in unicode UTF-8 encoding, searches for the search term «Schönheit» in UTF-8 encoded *.txt files. For this to work, the batch file must not contain the byte order mark written by Notepad when saving in UTF-8. Notepad++ is an example of a program that lets you write UTF-8 encoded plain text files without byte order mark. While this works with find command, it does not work with #FINDSTR.
- find «Copyright» C:Windowssystem32a*.exe
- Works with binary files no less than text files.
Links:
- find at ss64.com
- find at Microsoft
FINDSTR[edit | edit source]
Searches for regular expressions or text strings in files. Does some of the job of «grep» command known from other operating systems, but is much more limited in the regular expressions it supports.
Treats space in a regular expression as a disjunction AKA logical or unless prevented with /c option.
Examples:
- findstr /s «[0-9][0-9].*[0-9][0-9]» *.h *.cpp
- Searches recursively all files whose name ends with dot h or dot cpp, printing only lines that contain two consecutive decimal digits followed by anything followed by two consecutive decimal digits.
- findstr «a.*b a.*c» File.txt
- Outputs all lines in File.txt that match any of the two regular expressions separated by the space. Thus, the effect is one of logical or on regular expressions.
- echo world | findstr «hello wo.ld»
- Does not match. Since the 1st item before the space does not look like a regex, findstr treats the whole search term as a plain search term.
- echo world | findstr /r «hello wo.ld»
- Matches. The use of /r forces regex treatment.
- findstr /r /c:»ID: *[0-9]*» File.txt
- Outputs all lines in File.txt that match the single regular expression containing a space. The use of /c prevents the space from being treated as a logical or. The use of /r switches the regular expression treatment on, which was disabled by default by the use of /c. To test this, try the following:
- echo ID: 12|findstr /r /c:»ID: *[0-9]*$»
- Matches.
- echo ID: 12|findstr /c:»ID: *[0-9]*$»
- Does not match, as the search string is not interpreted as a regular expression.
- echo ID: abc|findstr «ID: *[0-9]*$»
- Matches despite the output of echo failing to match the complete regular expression: the search is interpreted as one for lines matching «ID:» or «*[0-9]*$».
- echo ID: 12|findstr /r /c:»ID: *[0-9]*$»
- Outputs all lines in File.txt that match the single regular expression containing a space. The use of /c prevents the space from being treated as a logical or. The use of /r switches the regular expression treatment on, which was disabled by default by the use of /c. To test this, try the following:
- findstr /ric:»id: *[0-9]*» File.txt
- Does the same as the previous example, but in a case-insensitive manner.
- While findstr enables this sort of accumulation of switches behind a single «/», this is not possible with any command. For instance, «dir /bs» does not work, while «dir /b /s» does.
- To test this, try the following:
- echo ID: 12|findstr /ric:»id: *[0-9]*$»
- echo ID: ab|findstr /ric:»id: *[0-9]*$»
- findstr /msric:»id: *[0-9]*» *.txt
- Like above, but recursively for all files per /s, displaying only matching files rather than matching lines per /m.
- echo hel lo | findstr /c:»hel lo» /c:world
- /c switch can be used multiple times to create logical or.
- echo hello | findstr «hello»
- Does not match. Backslash before quotation marks and multiple other characters acts as an escape; thus, » matches «.
- echo hello | findstr «\hello\»
- Matches. Double backslash passed to findstr stands for a single backslash.
- echo hello | findstr hello
- Matches. None of the single backslashes passed to findstr is followed by a character on which the backslash acts as an escape.
- echo ^»hey | findstr ^»hey | more
- To search for a quote (quotation mark), you need to escape it two times: once for the shell using caret (^), and once for findstr using backslash ().
- echo ^»hey | findstr ^»^»hey there^» | more
- To search for a quote and have the search term enclosed in quotes as well, the enclosing quotes need to be escaped for the shell using caret (^).
- echo //comment line | findstr //
- If forward slash (/) is the 1st character in the search term, it needs to be escaped with a backslash (). The escaping is needed even if the search term is enclosed in quotes.
- findstr /f:FileList.txt def.*():
- Search in the files stated in FileList.txt, one file per line. File names in FileList.txt can contain spaces and do not need to be surrounded with quotation marks for this to work.
- findstr /g:SearchTermsFile.txt *.txt
- Search for the search terms found in SearchTermsFile.txt, one search term per line. A space does not serve to separate two search terms; rather, each line is a complete search term. A line is matched if at least one of the search terms matches. If the first search term looks like a regex, the search will be a regex one, but if it looks like a plain search term, the whole search will be a plain one even if 2nd or later search terms look like regex.
- findstr /xlg:File1.txt File2.txt
- Outputs set intersection: lines present in both files.
- findstr /xlvg:File2.txt File1.txt
- Outputs set difference: File1.txt — File2.txt.
- findstr /m Microsoft C:Windowssystem32*.com
- Works with binary files no less than text files.
Limitations of the regular expressions of «findstr», as compared to «grep»:
- No support of groups — «(«, «)».
- No support of greedy iterators — «*?».
- No support of «zero or one of the previous» — «?».
- And more.
Other limitations: There is a variety of limitations and strange behaviors as documented at
What are the undocumented features and limitations of the Windows FINDSTR command?.
Bugs:
- echo bb|findstr «bb baaaa»
- Does not find anything in multiple Windows versions, but it should.
Also consider typing «findstr /?».
Links:
- findstr at ss64.com
- findstr at Microsoft
- What are the undocumented features and limitations of the Windows FINDSTR command? at StackOverflow
FORFILES[edit | edit source]
Finds files by their modification date and file name pattern, and executes a command for each found file. Is very limited, especially compared to the find command of other operating systems. Available since Windows Vista. For more, type «forfiles /?».
Examples:
- forfiles /s /d 06/10/2015 /c «cmd /c echo @fdate @path»
- For each file in the current folder and its subfolders modified on 10 June 2015 or later, outputs the file modification date and full file path. The date format after /d is locale specific. Thus, allows to find most recently modified files. Keywords: most recently changed files.
- forfiles /m *.txt /s /d 06/10/2015 /c «cmd /c echo @fdate @path»
- As above, but only for files ending in .txt.
Links:
- forfiles at ss64.com
- forfiles at Microsoft
forfiles /?
FORMAT[edit | edit source]
Formats a disk to use Windows-supported file system such as FAT, FAT32 or NTFS, thereby overwriting the previous content of the disk. To be used with great caution.
Links:
- format at ss64.com
- format at Microsoft
FSUTIL[edit | edit source]
A powerful tool performing actions related to FAT and NTFS file systems, to be ideally only used by powerusers with an extensive knowledge of the operating systems.
Links:
- fsutil at ss64.com
- fsutil at Microsoft
- Fsutil: behavior
- Fsutil: dirty
- Fsutil: file
- Fsutil: fsinfo
- Fsutil: hardlink
- Fsutil: objectid
- Fsutil: quota
- Fsutil: reparsepoint
- Fsutil: sparse
- Fsutil: usn
- Fsutil: volume
GPRESULT[edit | edit source]
Outputs group policy settings and more for a user or a computer.
Links:
- gpresult at ss64.com
- gpresult at Microsoft
- Wikipedia:Group Policy
GRAFTABL[edit | edit source]
Enables the display of an extended character set in graphics mode. For more, type «graftabl /?».
Links:
- graftabl at Microsoft
HELP[edit | edit source]
Shows command help.
Examples:
- help
- Shows the list of Windows-supplied commands.
- help copy
- Shows the help for COPY command, also available by typing «copy /?».
Links:
- help at ss64.com
- help at Microsoft
ICACLS[edit | edit source]
(Not in XP) Shows or changes discretionary access control lists (DACLs) of files or folders. See also CACLS. Fore more, type «icacls /?».
Links:
- icacls at ss64.com
- icacls at Microsoft
IPCONFIG[edit | edit source]
Outputs Windows IP Configuration. Shows configuration by connection and the name of that connection (i.e. Ethernet adapter Local Area Connection)
Below that the specific info pertaining to that connection is displayed such as DNS suffix and ip address and subnet mask.
Links:
- ipconfig at ss64.com
- ipconfig at Microsoft
LABEL[edit | edit source]
Adds, sets or removes a disk label.
Links:
- label at ss64.com
- label at Microsoft
MAKECAB[edit | edit source]
Places files into compressed .cab cabinet file. See also #EXPAND.
Links:
- makecab at ss64.com
- makecab at Microsoft
MODE[edit | edit source]
A multi-purpose command to display device status, configure ports and devices, and more.
Examples:
- mode
- Outputs status and configuration of all devices, such as com3 and con.
- mode con
- Outputs status and configuration of con device, the console in which the command interpreter is running.
- mode con cols=120 lines=20
- Sets the number of columns and lines for the current console, resulting in window resizing, and clears the screen. The setting does not affect new console instances. Keywords: wide screen, wide window, screen size, window size, resize screen, resize window.
- mode 120, 20
- As above: Sets the number of columns (120) and lines (20), resulting in window resizing, and clears the screen.
- mode con cols=120
- Sets the number of columns for the current console, resulting in window resizing, and clears the screen. It seems to change the number of visible lines as well, but the total lines count of the console buffer seems unchanged.
- mode 120
- As above: Sets the number of columns.
- mode con cp
- Outputs the current code page of the console.
- mode con cp select=850
- Sets the current code page of the console. For a list of code pages, see the linked Microsoft documentation below.
- mode con rate=31 delay=1
- Sets the rate and delay for repeated entry of a character while a key is held pressed, of the console. The lower the rate, the fewer repetitions per second.
Links:
- mode at ss64.com
- mode at Microsoft
MORE[edit | edit source]
Outputs the contents of a file or files, one screen at a time. When redirected to a file, performs some conversions, also depending on the used switches.
Examples:
- more Test.txt
- more *.txt
- grep -i sought.*string Source.txt | more /p >Out.txt
- Taking the output of a non-Windows grep command that produces line breaks consisting solely of LF character without CR character, converts LF line breaks to CR-LF line breaks. CR-LF newlines are also known as DOS line breaks, Windows line breaks, DOS newlines, Windows newlines, and CR/LF line endings,as opposed to LF line breaks used by some other operating systems.
- In some setups, seems to output gibberish if the input contains LF line breaks and tab characters at the same time.
- In some setups, for the conversion, /p may be unneeded. Thus, «more» would convert the line breaks even without /p.
- more /t4 Source.txt >Target.txt
- Converts tab characters to 4 spaces.
- In some setups, tab conversion takes place automatically, even without the /t switch. If so, it is per default to 8 spaces.
Switch /e:
- The online documentation for «more» in Windows XP and Windows Vista does not mention the switch.
- The switch /e is mentioned in «more /?» at least in Windows XP and Windows Vista.
- Per «more /?», the switch is supposed to enable extended features listed at the end of «more /?» help such as showing the current row on pressing «=». However, in Windows XP and Windows Vista, that seems to be enabled by default even without /e.
- Hypothesis: In Windows XP and Windows Vista, /e does not do anything; it is present for compatibility reasons.
Links:
- more at ss64.com
- more at Microsoft, Windows XP
- more at Microsoft, Windows Server 2008, Windows Vista
NET[edit | edit source]
Provides various network services, depending on the command used. Available variants per command:
- net accounts
- net computer
- net config
- net continue
- net file
- net group
- net help
- net helpmsg
- net localgroup
- net name
- net pause
- net print
- net send
- net session
- net share
- net start
- net statistics
- net stop
- net time
- net use
- net user
- net view
Links:
- net at ss64.com
- net services overview at Microsoft, Windows XP
- net computer at Microsoft
- net group at Microsoft
- net localgroup at Microsoft
- net print at Microsoft
- net session at Microsoft
- net share at Microsoft
- net use at Microsoft
- net user at Microsoft
- net view at Microsoft
OPENFILES[edit | edit source]
Performs actions pertaining to open files, especially those opened by other users over the network. The actions involve querying, displaying, and disconnecting. For more, type «openfiles /?».
Links:
- openfiles at ss64.com
- openfiles at Microsoft
PING[edit | edit source]
Syntax:
- PING /?
- PING address
- PING hostname
Send ICMP/IP «echo» packets over the network to the designated address (or the first IP address that the designated hostname maps to via name lookup) and print all responses received.
Examples:
- ping en.wikibooks.org
- ping 91.198.174.192
- ping http://en.wikibooks.org/
- Does not work.
Links:
- ping at ss64.com
- ping at Microsoft
RECOVER[edit | edit source]
Recovers as much information as it can from damaged files on a defective disk.
Links:
- recover at ss64.com
- recover at Microsoft
REG[edit | edit source]
Queries or modifies Windows registry.
The first argument is one of the following commands: query, add, delete, copy, save, load, unload, restore, compare, export, import, and flags. To learn more about a command, follow it by /?, like reg query /?.
Links:
- reg at ss64.com
- reg at Microsoft
REPLACE[edit | edit source]
Replaces files in the destination folder with same-named files in the source folder.
Links:
- replace at ss64.com
- replace at Microsoft
ROBOCOPY[edit | edit source]
(Not in XP) Copies files and folders. See also XCOPY and COPY.
Examples:
- robocopy /s C:Windowssystem C:Windows-2system *.dll
- Copies all files ending in .dll from one directory to another, replicating the nested directory structure.
Links:
- robocopy at ss64.com
- robocopy at Microsoft
RUNDLL32[edit | edit source]
Runs a function available from a DLL. The available DLLs and their functions differ among Windows versions.
Examples:
- rundll32 sysdm.cpl,EditEnvironmentVariables
- In some Windows versions, opens the dialog for editing environment variables.
Links:
- rundll32 at ss64.com
- at Microsoft
- rundll at robvanderwoude.com
- dx21.com — lists rundll32 examples
SC[edit | edit source]
Controls Windows services, supporting starting, stopping, querying and more. Windows services are process-like things. A Windows service is either hosted in its own process or it is hosted in an instance of svchost.exe process, often with multiple services in the same instance. Processor time use of a particular service can be found using freely downloadable Process Explorer from Sysinternals, by going to properties of a service and then Threads tab. Another command capable of controlling services is NET. TASKLIST can list hosted services using /svc switch.
Examples:
- sc start wuauserv
- Starts wuauserv service.
- sc stop wuauserv
- sc query wuauserv
- sc query
- Outputs information about all services.
- sc config SysMain start= disabled
- Make sure SysMain service is disabled after start. SysMain is the SuperFetch service, causing repeated harddrive activity by trying to guess which programs to load into RAM in case they will be used, and loading them. Notice the mandatory lack of space before = and the mandatory space after =.
Links:
- sc at ss64.com
- Windows 7 Services at ss64.com
- sc at Microsoft
SCHTASKS[edit | edit source]
Schedules a program to be run at a certain time, more powerful than AT.
Links:
- schtasks at ss64.com
- schtasks at Microsoft
SETX[edit | edit source]
Like SET, but affecting the whole machine rather than the current console or process. Not available in Windows XP; available in Windows Vista and later.
Links:
- setx at ss64.com
- setx at Microsoft, Windows Server 2008, Windows Vista
SHUTDOWN[edit | edit source]
Shuts down a computer, or logs off the current user.
Examples:
- shutdown /s
- Shuts down the computer.
- shutdown /s /t 0
- Shuts down the computer with zero delay.
- shutdown /l
- Logs off the current user.
Links:
- shutdown at ss64.com
- shutdown at Microsoft
SORT[edit | edit source]
Sorts alphabetically, from A to Z or Z to A, case insensitive. Cannot sort numerically: if the input contains one integer per line, «12» comes before «9».
Examples:
- sort File.txt
- Outputs the sorted content of File.txt.
- sort /r File.txt
- Sorts in reverse order, Z to A.
- dir /b | sort
Links:
- sort at ss64.com
- sort at Microsoft
SUBST[edit | edit source]
Assigns a drive letter to a local folder, outputs current assignments, or removes an assignment.
Examples:
- subst p: .
- Assigns p: to the current folder.
- subst
- Outputs all assignments previously made using subst.
- subst /d p:
- Removes p: assignment.
Links:
- subst at ss64.com
- subst at Microsoft
SYSTEMINFO[edit | edit source]
Shows configuration of a computer and its operating system.
Links:
- systeminfo at ss64.com
- systeminfo at Microsoft
TASKKILL[edit | edit source]
Ends one or more tasks.
Examples:
- taskkill /im AcroRd32.exe
- Ends all process with the name «AcroRd32.exe»; thus, ends all open instances of Acrobat Reader. The name can be found using tasklist.
- taskkill /f /im AcroRd32.exe
- As above, but forced. Succeeds in ending some processes that do not get ended without /f.
- tasklist | find «notepad»
taskkill /PID 5792
- Ends the process AKA task with process ID (PID) of 5792; the assumption is you have found the PID using tasklist.
Links:
- taskkill at ss64.com
- taskkill at Microsoft
TASKLIST[edit | edit source]
Lists tasks, including task name and process id (PID).
Examples:
- tasklist | sort
- tasklist | find «AcroRd»
- tasklist | find /C «chrome.exe»
- Outputs the number of tasks named «chrome.exe», belonging to Google Chrome browser.
- tasklist /svc | findstr svchost
- Outputs Windows services hosted in svchost.exe processes alongside the usual information abot the process.
Links:
- tasklist at ss64.com
- tasklist at Microsoft
TIMEOUT[edit | edit source]
Waits a specified number of seconds, displaying the number of remaining seconds as time passes, allowing the user to interrupt the waiting by pressing a key. Also known as delay or sleep. Available in Windows Vista and later.
Examples:
- timeout /t 5
- Waits for five seconds, allowing the user to cancel the waiting by pressing a key.
- timeout /t 5 /nobreak
- Waits for five seconds, ignoring user input other than Control + C.
- timeout /t 5 /nobreak >nul
- As above, but with no output.
Workaround in Windows XP:
- ping -n 6 127.0.0.1 >nul
- Waits for five seconds; the number after -n is the number of seconds to wait plus 1.
Perl-based workaround in Windows XP, requiring Perl installed:
- perl -e «sleep 5»
- Waits for 5 seconds.
Links:
- timeout at ss64.com
- timeout at Microsoft
- How to wait in a batch script? at stackoverflow.com
- Sleeping in a batch file at stackoverflow.com
TREE[edit | edit source]
Outputs a tree of all subdirectories of the current directory to any level of recursion or depth. If used with /F switch, outputs not only subdirectories but also files.
Examples:
- tree
- tree /f
- Includes files in the listing, in addition to directories.
- tree /f /a
- As above, but uses 7-bit ASCII characters including «+», «-» and » to draw the tree.
A snippet of a tree using 8-bit ASCII characters:
├───winevt
│   ├───Logs
│   └───TraceFormat
├───winrm
A snippet of a tree using 7-bit ASCII characters:
+---winevt
|   +---Logs
|   ---TraceFormat
+---winrm
Links:
- tree at Microsoft
WHERE[edit | edit source]
Outputs one or more locations of a file or a file name pattern, where the file or pattern does not need to state the extension if it listed in PATHEXT, such as .exe. Searches in the current directory and in the PATH by default. Does some of the job of «which» command of some other operating systems, but is more flexible.
Available on Windows 2003, Windows Vista, Windows 7, and later; not available on Windows XP. An alternative to be used with Windows XP is in the examples below.
Does not find internal commands, as there are no dot exe files for them to match.
Examples:
- where find
- Outputs the location of the find command, possibly «C:WindowsSystem32find.exe». The .exe extension does not need to be specified as long as it is listed in PATHEXT, which it is by default.
- If there are more find commands in the path, outputs paths to both. In some situations, it can output the following:
C:WindowsSystem32find.exe
C:Program FilesGnuWin32binfind.exe
- for %i in (find.exe) do @echo %~$PATH:i
- Outputs the location of «find.exe» on Windows XP. The name has to include «.exe», unlike with the where command.
- where /r . Tasks*
- Searches for files whose name matches «Task*» recursively from the current folder. Similar to «dir /b /s Tasks*». The /r switch disables search in the folders in PATH.
- where *.bat
- Outputs all .bat files in the current directory and in the directories that are in PATH. Thus, outputs all .bat files that you can run without entering their full path.
- where ls*.bat
- As above, constraining also the beginning of the name of the .bat files.
- where ls*
- As above, but with no constraint on the extension. Finds lsdisks.bat, lsmice.pl, and lsmnts.py if in the current directory or in the path.
- where *.exe *.com | more
- Outputs countless .exe and .com files in the path and in the current folder, including those in C:WindowsSystem32.
- where $path:*.bat
- Outputs .bat files in the path but not those in the current folder unless the current folder is in PATH. Instead of path, another environment variable containing a list of directories can be used.
- where $windir:*.exe
- Outputs .exe files found in the folder stated in WINDIR environment variable.
- where $path:*.bat $windir:*.exe
- A combination is possible. Outputs all files matching either of the two queries.
- where /q *.bat && echo Found
- Suppresses both standard and error output, but sets the error level, enabling testing on it. The error level is set either way, with or without /q.
Links:
- where at ss64.com
- where at Microsoft
- Is there an equivalent of ‘which’ on windows?
WMIC[edit | edit source]
Starts Windows Management Instrumentation Command-line (WMIC), or with arguments given, passes the arguments as commands to WMIC. Not in Windows XP Home. For more, type «wmic /?».
Examples:
- wmic logicaldisk get caption,description
- Lists drives (disks) accessible under a drive letter, whether local hard drives, CD-ROM drives, removable flash drives, network drives or drives created using #SUBST.
- wmic logicaldisk get /format:list
- wmic logicaldisk get /format:csv
- wmic
Control + C- Enters wmic and then interrupts it. A side effect is that the console buffer becomes very wide, and the screen becomes horizontally resizable with the mouse as a consequence. This is the result of wmic setting a high number of columns of the console, which you can verify using mode con. You can achieve a similar result by typing mode 1500. See also #MODE.
- wmic datafile where name=»C:\Windows\System32\cmd.exe» get Version /value
- Outputs the version of the cmd.exe, which should be close to the Windows version.
Links:
- wmic at ss64.com
- wmic at Microsoft
XCOPY[edit | edit source]
Copies files and directories in a more advanced way than COPY, deprecated in Windows Vista and later in favor of ROBOCOPY. Type xcopy /? to learn more, including countless options.
Examples:
- xcopy C:Windowssystem
- Copies all files, but not files in nested folders, from the source folder («C:Windowssystem») to the current folder.
- xcopy /s /i C:Windowssystem C:Windows-2system
- Copies all files and folders to any nesting depth (via «/s») from the source folder («C:Windowssystem») to «C:Windows-2system», creating «Windows-2system» if it does not exist (via «/i»).
- xcopy /s /i /d:09-01-2014 C:Windowssystem C:Windows-2system
- As above, but copies only files changed on 1 September 2014 or later. Notice the use of the month-first convention even if you are on a non-US locale of Windows.
- xcopy /L /s /i /d:09-01-2014 C:Windowssystem C:Windows-2system
- As above, but in a test mode via /L (list-only, output-only, display-only). Thus, does not do any actual copying, merely lists what would be copied.
- xcopy /s /i C:Windowssystem*.dll C:Windows-2system
- As one of the examples above, but copies only files ending in .dll, including those in nested folders.
Links:
- xcopy at ss64.com
- xcopy at Microsoft
[edit | edit source]
- PowerShell — a modern technology for scripting Windows operating systems
- VBScript Programming — a legacy Windows scripting technology whose syntax resembles Visual Basic
External links[edit | edit source]
- Windows CMD Commands at ss64.com — licensed under Creative Commons Attribution-Non-Commercial-Share Alike 2.0 UK: England & Wales[1], and thus incompatible with CC-BY-SA used by Wikibooks
- Windows XP — Command-line reference A-Z at microsoft.com
- Windows Server 2008R2 — Command-Line Reference at microsoft.com
- Windows Server 2012R2 — Command-Line Reference at microsoft.com
- Windows Server 2016 — Windows Commands at microsoft.com
- The FreeDOS HTML Help at fdos.org — a hypertext help system for FreeDOS commands, written in 2003/2004, available under the GNU Free Documentation License
- Category:Batch File, rosettacode.org
- Cmd.exe, wikipedia.org
- Batch file, wikipedia.org
cmd.exe, also known as a Command Prompt, is one of oldest software components in Windows. For decades, this command-line processor has been used to make direct changes to Microsoft operating systems. Batch files (also known as .bat files) are closely associated with Command Prompt. These files contain native commands that cmd.exe uses to process a sequence of commands. We’ll explain the unique features of these useful scripts and show you how to create, save, and run batch files yourself.
Contents
- What is a batch or .bat file?
- Creating a batch file: Step-by-step tutorial
- Step 1: Select and open your editor
- Step 2: Familiarize yourself with batch commands
- Step 3: Create and save a batch file
- Step 4: Run the new batch script
- Step 5: Editing batch files retrospectively
- Examples of more frequently used and complex batch scripts
- Batch script with simple backup mechanism
- Batch file with complex backup function
$1 Domain Names
Register great TLDs for less than $1 for the first year.
Why wait? Grab your favorite domain name today!
![]() Matching email
Matching email
![]() SSL certificate
SSL certificate
![]() 24/7/365 support
24/7/365 support
What is a batch or .bat file?
A batch file (also known as a .bat file or batch script) is a text file that the Windows cmd.exe command line processor executes as a batch job. Command Prompt assumes both the role of interpreter and runtime environment. Put simply, a batch file is a computer program or script containing data or tasks that are processed sequentially by Command Prompt.
Note
The term “batch processing” comes from the early days of data processing, when interactive processing was not yet possible. Back then, data sets were usually stored on punched cards that were processed one card at a time in batches. In modern computer operating systems, the term came into widespread use with MS-DOS (1981) and refers to the batch files we’re discussing in this tutorial.
Batch files allow you to use and run ordinary CMD commands with cmd.exe as the interpreter and runtime environment. You can also use comments, labels, variables, conditions, and queries when writing a batch file. To convert text files to batch files, you have to use the .bat extension in newer Microsoft systems. The .cmd extension was common in Windows NT and OS/2.
Fact
In 2006, Microsoft released PowerShell, another framework that allows you to program and execute batch files. It was made open-source and cross-platform in 2016 and uses the MIT license. PowerShell provides an alternative command line interpreter and its own scripting language called PowerShell Scripting Language.
Creating a batch file: Step-by-step tutorial
Creating your own batch files is useful for automating the execution of recurring command sequences. These sequences might include login processes or what is known as TSR programs (Terminate and Stay Resident) that you want to run continuously as background processes. In the following sections, we’ll explain the tools you need to create batch files and show you how to create, save, and run your own batch files.
Step 1: Select and open your editor
As mentioned earlier, text documents are a good starting point for batch scripts. To write your own batch file, all you need is an ordinary text editor. You don’t really need features like syntax highlighting, so the Notepad application included with Windows is perfect. To open it, simply type “Notepad” in the Windows search bar and click on the Notepad icon in the search results:
Step 2: Familiarize yourself with batch commands
You don’t have to learn complicated programming language to create batch files. But you doneed to know common system commands and understand how they work in batch files. That’s why you should familiarize yourself with some commands before writing your first script. Here are the most important commands to learn:
- ECHO: Turns on the on-screen text display for executed commands
- @ECHO OFF: Turns off the on-screen text display for executed commands
- START: Runs a file with its default associated application
- REM: Indicates a comment line
- MKDIR/RMDIR: Creates or deletes a directory
- DEL: Deletes selected file(s)
- COPY: Copies selected file(s)
- TITLE: Sets the title of the CMD window
Step 3: Create and save a batch file
An easy introduction to the art of creating batch files is to write a simple script that creates multiple directories on a selected disk on your computer. For example, if you create and run a batch file with the following input, it will create two directories named “Example1” and “Example2” on drive C:
MKDIR C:Example1
MKDIR C:Example2
Simply copy the two lines into an empty Notepad document, as shown in the following screenshot:
To save these batch instructions or the script, click File and choose Save As… Specify the save location and enter a name for the script with the extension .bat in the File Name field:
Step 4: Run the new batch script
After you create and save the batch file, you have two options to run it: Either run the script in the familiar Windows Explorer environment or open Command Prompt and run it using a command-line command.
The first option is simpler and easier for beginners because all you have to do is go to the directory where the batch file is located and double-click to run it.
Note
If a batch script contains commands that require administrator privileges to execute, you have to run the script as an administrator. In this case, right-click to select the batch file and then choose “Run as administrator.”
If you want to open the batch file from the command line instead, do the following:
- Go to the Windows search bar and type cmd.
- Click Command Prompt to open the command line in the standard way. If you need administrator privileges to run it, right-click Command Prompt and then choose Run as Administrator.
- Use the “Change directory” command (cd) to go to the directory where the batch file is located.
- Type the name of the batch script (including the file extension) and press Enter.
Step 5: Editing batch files retrospectively
You can customize a batch script at any time, for example if you want to add or remove commands or modify directories. To do this, simply go to the folder containing the command line script and right-click it. Then choose Edit:
Professional Email Address & Personal Domain Name
Get an email address as professional and unique as you are including a free matching domain!
![]() Address book
Address book
![]() Calendar
Calendar
![]() Virus protection
Virus protection
Examples of more frequently used and complex batch scripts
With the above step-by-step guide, you can create a wide variety of batch files with an unlimited number of different commands. However, scripts that you can use more frequently are definitely more useful in the long run. We’ll conclude with two examples of batch files with long-term value to illustrate the possibilities of batch processing with Windows Command Prompt.
Batch script with simple backup mechanism
The following example shows how useful batch files can be for creating regular back-ups of any directory:
XCOPY C:Outgoing directory C:Back-up-directory /m /e /yWhen you create and run a batch file containing the line shown above, use the “xCOPY” command to copy the contents from the “source folder” to the “back-up folder.” You’ll need to adjust the directories containing these two folders accordingly. The three parameters at the end have the following effect:
- /m: Ensures that only updated files are copied so that files that have already been backed up don’t have to be copied again during further back-up operations.
- /e: Indicates that the back-up includes all subdirectories in the specified directory.
- /y: Suppresses prompting to confirm that you want to overwrite an existing destination file that was changed since the last backup.
Batch file with complex backup function
The above backup program allows you to copy the source files from the source folder to the destination folder. You can also create a batch file that distributes source data to multiple destination folders, in which case you can use the file type as a selection criterion. To do this, you need a for loop, which allows a command to run repeatedly with a variable argument:
cd C:Outgoing directory
FOR %%f IN (*.doc *.txt) DO XCOPY C:Outgoing directory"%%f" C:Back-up-directoryTexte /m /y
FOR %%f IN (*.jpg *.png *.bmp) DO XCOPY C:Outgoing directory "%%f" C:Back-up-directoryimages /m /y
The batch code shown above ensures that:
- all files in the source directory with the .doc and .txt extensions are moved to the “Text” back-up folder.
- all files in the source directory with the .jpg, .png and .bmp extensions are moved to the “Images” backup folder.
- only updated files are copied.
- the confirmation prompt is always suppressed.
Note
This script only works if file names have declared extensions, otherwise matching documents won’t be found during batch processing, even if they actually have the right format.

PostgreSQL: a closer look at the object-relational database management system
The PostgreSQL database management system, also known to many as Postgres, has many decades of development behind it. It originally started as a project at Berkeley University in California. Today, the open source database continues to defy solutions from commercial competitors, since the development team is constantly working on its functionality and performance. But what exactly is PostgreSQL?…
PostgreSQL: a closer look at the object-relational database management system

How to format USB drives on Mac
For USB sticks to work as storage media, they need to have their own file system. Without this, it can be added manually by formatting the flash drive. Mac users have a tool available for this with the “Disk Utility” program. Read this tutorial article to find out what the individual steps are and which file systems are available to use.
How to format USB drives on Mac

Understanding and managing Docker container volumes
Software for managing containers makes working with Linux containers significantly easier. You can not only transfer files between containers but also save files from containers. This article shows you how you can effectively manage containers using Docker container volumes, including extensive Docker volumes examples.
Understanding and managing Docker container volumes

How to open an ISO file
Want to open an ISO file or mount a guest operating system into your system via an ISO installation medium? Thanks to added functionalities as part of popular operating systems such as Windows, macOS, and Ubuntu that’s easy enough to do. Out of the box or through external apps – it’s easy to unpack an ISO file. If you tend to work with ISO files regularly, you can also use specialist software to…
How to open an ISO file
A batch file is a file that contains MS-DOS commands and when the batch files are clicked or called these commands are executed. Batch files are also called BAT files. Most operating systems like windows provide the ability to create and run batch files. In this tutorial, we will learn how to create a batch file for MS-DOS and PowerShell, How To Run, or Execute a Batch File?
Batch files are supported by all modern Windows operating system versions like Windows XP, Windows 7, Windows 8, Windows 10, and Windows Server versions. But the batch file contents like commands, binaries, and features should be compatible with the current operating system in order to execute in a reliable way. If specific command, binary, or feature is not supported it will be skipped and not executed but other lines of batch file will be executed.
What Is a Batch File?
Before starting to create and run batch files we should learn what is a batch file. A batch file is a simple text file that has the *.bat file extension and contains MS-DOS commands or binary files. Batch files are also balled as BAT files because of their extension. Batch files are popular among system administrators and technical people in order to complete repetitive or non-interactive jobs easily and reliably. Even interactive jobs can be completed with batch files with little or no effort or action.
Advantages of Batch/BAT Files
Batch or BAT files are a lot of advantages for Windows users. Below we will list some of them.
- Offload repetitive tasks and automate them.
- Reliable command execution
- Noninteractive command execution.
- Advanced reporting and performance tracking
- Scheduled tasks can be executed on different dates and times.
Batch files are a simple text file that contains MS-DOS and related commands and binaries. First, open Notepad and create a file and save the file whatever name you want but set the file extension as *.bat .In this example we will create the batch file named runwise.bat . Batch files may also use extensions like .cmd and .btm.

mkdir Test
@ECHO OFF
Welcome a folder named Test has been created
PAUSE
The saved batch file will look like the below. As you can see the batch files or files with *.bat extension has the following file icon which is simply used for system-related files. By default, the .bat extension is not displayed.

Run Batch File
In order to run batch files content and commands batch files should be executed properly. Batch files can be executed in the following ways.
- Clicking on Batch File
- Using Scheduled Jobs
- Calling From MS-DOS or PowerShell Command Lines
- Calling Another Batch File
Run Batch File By Clicking
The simplest and most popular method to run a batch file is just clicking on the batch file. This is a GUI method to run a batch file where it can be used from desktop or file explorer. Double-clicking on a batch file will run the batch file in an MS-DOS command prompt.

Run Batch File Using Scheduled Jobs
Scheduled Tasks is a tool used to schedule different jobs or tasks to run the future at the specified date or time or repetitively etc. It is recently called as Task Scheduler and can be opened by typing schedule in the start menu like below.

In the following screen, you can create a new task for the batch file. We will click to the Create Basic Task in order to create a new task.

In the following screen, we will set the name of the task which is not the batch file name. Then we will click to the Next . Below we can set the name of the task and also add some description about the task.

In the following screen, the date or time of the execution will be specified. The batch file will be executed at the specified date, time, or interval. We can see that Daily, Weekly, Monthly, One time, When the computer starts, When I log on, or When a specific event is logged time values are provided to trigger a task.

As we have selected daily the start date with the time and recur count will be provided in the following screen.

This step is important where we will select the Start a program in order to specify our batch file to execute.

This step is the most important to schedule our batch file. In the program script part, we will specify the script file location. Also, the Browser button can be used to select and specify a batch file location. Also, we can specify arguments to be passed into the batch script from the Add arguments textbox.

The following screen is the last screen where all information about the scheduled batch job will be displayed.

Run Batch File From MS-DOS or PowerShell Command Lines
Batch files can be run from MS-DOS or PowerShell command lines. MS-DOS command line can only run MS-DOS-based batch files and con not run PowerShell batch files. But PowerShell command line can run both MS-DOS and PowerShell batch files. In order to run a batch file from the MS-DOS command line just specify the batch file name with the full path. Alternatively, if the batch file is located in the current working directory only the name of the batch file can be called.
C:UsersismailDesktop>runwise.bat
Or alternatively, the complete path of the batch file runwise.bat can be provided from any directory like below.
C:> C:UsersismailDesktoprunwise.bat
Run Batch File From Another Batch File
Batch files can call another batch file like a regular MS-DOS command. The most important thing about running a batch file in a batch file is to provide the complete path of the batch file. Even just the name or relative path can be used to run a batch file in a batch file the most reliable way is using the absolute or complete path of the batch file.
mkdir Test
@ECHO ON
Welcome a folder named Test has been created

C:UsersismailDesktoprunwise.bat
Run Batch File As Administrator
If the batch file has commands that need to be executed as Administrator or with Administrative privileges you should open the MS-DOS or PowerShell as Administrator. Please follow the following tutorial in order to open MS-DOS, Command Prompt, or PowerShell as administrator and then use previously described steps like “Run Batch File From MS-DOS or PowerShell command line“.
- Overview
- Part 1 – Getting Started
- Part 2 – Variables
- Part 3 – Return Codes
- Part 4 – stdin, stdout, stderr
- Part 5 – If/Then Conditionals
- Part 6 – Loops
- Part 7 – Functions
- Part 8 – Parsing Input
- Part 9 – Logging
- Part 10 – Advanced Tricks
Getting Started with Windows Batch Scripting
Windows batch scripting is incredibly accessible – it works on just about any modern Windows machine. You can create and modify batch scripts on just about any modern Windows machine. The tools come out of the box: the Windows command prompt and a text editor like Notepad.exe. It’s definitely far from
the best shell scripting langauge, but, it gets the job done. It’s my “duct tape” for Windows.
Launching the Command Prompt
Windows gurus launch the command prompt using the keyboard shortcut Windows Logo Key+R (i.e., “Run”) > Type cmd.exe then Enter. This is way faster than navigating the Windows Start Menu to find the Command Prompt.
Editing Batch Files
The universal text editor for batch files is Notepad (Windows Logo Key + R > Type notepad then Enter). Since batch files are just ASCII text, you can probably use just about any text editor or word processor. Very few editors do anything special for Batch files like syntax highlighting or keyword support, so notepad is good enough fine and will likely be installed on just about every Windows system you encounter.
Viewing Batch Files
I would stick with Notepad for viewing the contents of a batch file. In Windows Explorer (aka, “My Computer”), you should be able to view a batch file in Notepad by right clicking the file and seleting Edit from the context menu. If you need to view the contents within a command prompt window itself, you can use a DOS command like TYPE myscript.cmd or MORE myscript.cmd or EDIT myscript.cmd
Batch File Names and File Extensions
Assuming you are using Windows XP or newer, I recommend saving your batch files with the file extension .cmd. Some seriously outdated Windows versions used .bat, though I recommend sticking with the more modern .cmd to avoid some rare side effects with .bat files.
With the .cmd file extension, you can use just about filename you like. I recommend avoiding spaces in filenames, as spaces only create headaches in shell scripting. Pascal casing your filenames is an easy way to avoid spaces (e.g., HelloWorld.cmd instead of Hello World.cmd). You can also use punctuation characters like . or - or _ (e.g. Hello.World.cmd, Hello-World.cmd, Hello_World.cmd).
Another thing with names to consider is avoiding names that use the same name of any built-in commands, system binaries, or popular programs. For example, I would avoid naming a script ping.cmd since there is a widely used system binary named ping.exe. Things might get very confusing if you try to run ping and inadvertently call ping.cmd when you really wanted ping.cmd. (Stay tuned for how this could happen.) I might called the script RemoteHeartbeat.cmd or something similar to add some context to the script’s name and also avoid any naming collisions with any other executable files. Of course, there could be a very unique circumstance in which you want to modify the default behavior of ping in which this naming suggestion would not apply.
Saving Batch Files in Windows
Notepad by default tries to save all files as plain jane text files. To get Notepad to save a file with a .cmd extension, you will need to change the “Save as type” to “All Files (.)”. See the screenshot below for an example of saving a script named “HelloWorld.cmd” in Notepad.
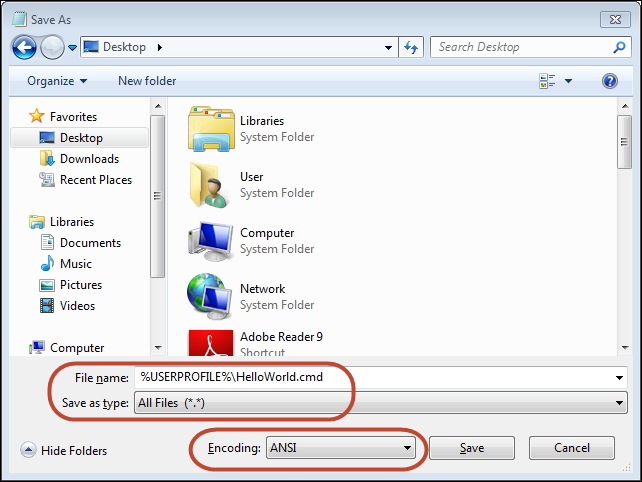
SIDEBAR: I’ve used a shortcut in this screenshot that you will learn more about later. I’ve saved the file to my “user profile folder” by naming
the file%USERPROFILE%HelloWorld.cmd. The%USERPROFILE%keyword is the Windows environmental variable for the full path
to your user profile folder. On newer Windows systems, your user profile folder will typically beC:Users<your username>. This shortcut
saves a little bit of time because a new command prompt will generally default the “working directory” to your user profile folder. This lets you run
HelloWorld.cmdin a new command prompt without changing directories beforehand or needing to specify the path to the script.
Running your Batch File
The easy way to run your batch file in Windows is to just double click the batch file in Windows Explorer (aka “My Computer”). Unfortunately, the command prompt will not give you much of a chance to see the output and any errors. The command prompt window for the script will disappear as soon as the script exits. (We will learn how to handle this problem in Part 10 – Advanced Tricks ).
When editing a new script, you will likely need to run the batch file in an existing command window. For newbies, I think the easiest foolproof way to
run your script is to drag and drop the script into a command prompt window. The command prompt will enter the full path to your script on the
command line, and will quote any paths containing spaces.
Some other tips to running batch files:
- You can recall previous commands using the up arrow and down arrow keys to navigate the command line history.
- I usually run the script as
%COMPSPEC% /C /D "C:UsersUserSomeScriptPath.cmd" Arg1 Arg2 Arg3
This runs your script in a new command prompt child process. The/Coption instructs the child process to quit when your script quits.
The/Ddisables any auto-run scripts (this is optional, but, I use auto-run scripts). The reason I do this is to keep the command prompt
window from automatically closing should my script, or a called script, call theEXITcommand. TheEXITcommand automatically closes
the command prompt window unless theEXITis called from a child command prompt process. This is annoying because you lose any messages
printed by your script.
Comments
The official way to add a comment to a batch file is with the REM (Remark) keyword:
REM This is a comment!
The power user method is to use ::, which is a hack to uses the the label operator : twice, which is almost always ignored.
Most power authors find the :: to be less distracting than REM. Be warned though there are a few places where :: will cause errors.
:: This is a comment too!! (usually!)
For example, a FOR loop will error out with :: style comments. Simply fall back to using REM if you think you have a situation like this.
Silencing Display of Commands in Batch Files
The first non-comment line of a batch file is usually a command to turn off printing (ECHO’ing) of each batch file line.
@ECHO OFF
The @ is a special operator to suppress printing of the command line. Once we set ECHO’ing to off, we won’t need the @ operator again
in our script commands.
You restore printing of commands in your script with:
ECHO ON
Upon exit of your script, the command prompt will automatically restore ECHO to it’s previous state.
Debugging Your Scripts
Batch files invole a lot of trial and error coding. Sadly, I don’t know of any true debugger for Windows batch scripts. Worse yet, I don’t
know of a way to put the command processor into a verbose state to help troubleshoot the script (this is the common technique for Unix/Linux
scripts.) Printing custom ad-hoc debugging messages is about your only option using the ECHO command. Advanced script writers can do
some trickery to selectively print debugging messages, though, I prefer to remove the debugging/instrumentation code once my script is
functioning as desired.
<< Overview
Part 2 – Variables >>