We’ll look at some things that can cause a black or blank screen:
-
Connection problems with your monitor or screen
-
Display adapter driver update issues
-
Issues with recent system updates or installations
Let’s go through some troubleshooting steps and check your hardware and software. The steps on this page might look complicated at first, but follow them in order, step by step, and we’ll try to get you back on track. You’ll use safe mode for many of the steps because that will start Windows with a limited set of files and drivers to help you narrow down the problems. You can learn more about safe mode, or keep reading and we’ll provide details when you need them.
Need more help?
Booting in safe mode may be an option
by Madalina Dinita
Madalina has been a Windows fan ever since she got her hands on her first Windows XP computer. She is interested in all things technology, especially emerging technologies… read more
Published on September 8, 2022
Reviewed by
Vlad Turiceanu

Passionate about technology, Windows, and everything that has a power button, he spent most of his time developing new skills and learning more about the tech world. Coming… read more
- The Windows 10 black screen after login usually occurs after upgrading your OS.
- The solutions for fixing the black screen after login starts with installing dedicated repair software.
- If the computer screen goes black after login, you can also try to log in without seeing what you type.
- Another solution is to tweak some start-up options in Windows 10.
XINSTALL BY CLICKING THE DOWNLOAD FILE
This software will repair common computer errors, protect you from file loss, malware, hardware failure and optimize your PC for maximum performance. Fix PC issues and remove viruses now in 3 easy steps:
- Download Restoro PC Repair Tool that comes with Patented Technologies (patent available here).
- Click Start Scan to find Windows issues that could be causing PC problems.
- Click Repair All to fix issues affecting your computer’s security and performance
- Restoro has been downloaded by 0 readers this month.
You have found this guide because you are experiencing the Windows 10 or 11 black screen after login in. We will show you how to fix it.
A free upgrade for your Windows is quite possibly the best thing that Microsoft could give you – and that is exactly what they did with Windows 10 and 11.
However, the free upgrade did not go smoothly for every. As you would expect, Microsoft software does not always work as intended for all the thousands of different hardware combinations.
Today we attempt to fix one such problem, which might have been caused by the massive diversity of hardware components Windows operates.
Why is my screen black after I log in?
You upgraded your Windows 10, and it worked brilliantly – until you restarted and hit the login screen.
All you can see is a black screen with your cursor, there are multiple causes for this problem, but the most common reason involves you having an Intel on-chip GPU and a standalone AMD/Nvidia GPU combination. Such combinations are usually found in laptops due to their battery-saving advantages.
In other cases, it is a problem with your Windows OS preventing your desktop and icons from loading if you get a black screen after logging in. Typically, it’s a program that starts up automatically.
Additionally, it’s possible that the crucial procedures required to load the computer’s display are not loaded properly at startup.
Furthermore, it may occur if your computer is short on storage space or malware has compromised the firmware.
Here are a few variations to this error:
- Windows 10 black screen after login no desktop show up – In this case, you will not be able to view your desktop after logging in. you should drain the battery and restart the computer.
- Computer screen goes black but computer still running – If it does not come up after a few minutes, press the power key for about 10 seconds, then restart the computer.
- Windows 10 black screen for 5 minutes after login – You may wait it out in this case. Then try and update all your drivers as soon as the screen turns on.
- Windows 10 black screen with cursor after login – In case of this issue, try restarting the computer after disconnecting all non-critical peripherals and try disabling the startup apps.
- Windows 10 black screen before login – When getting a black screen before login, booting into Safe Mode will allow you to fix things.
Let us now show you some of the best resolutions.
How do I fix a black screen on Windows 10 after login?
1. Use a third-party repair solution
Black screen errors are less common and dangerous than blue screen errors but have similar behavior and manifestation.
You can treat and troubleshoot them with the same tools and procedures. That is why you can use the following solution, even though it’s meant for fixing Blue screen issues.
Restoro is powered by an online database that features the latest functional system files for Windows 10 PCs, allowing you to easily replace any elements that can cause a BSoD error.
This software can also help you by creating a restore point before starting the repairs, enabling you to easily restore the previous version of your system if something goes wrong.
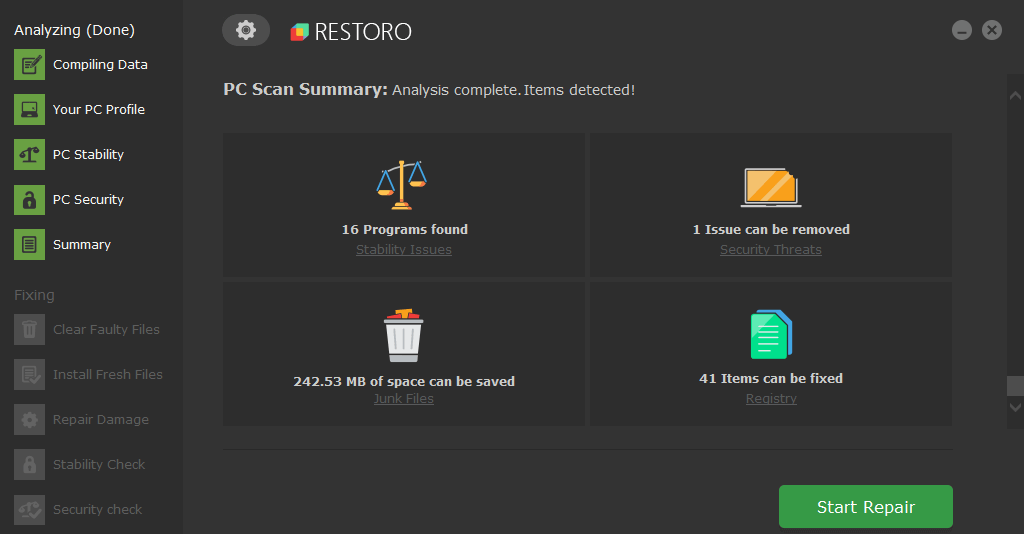
This is how you can fix registry errors using Restoro:
- Download and install Restoro.
- Launch the application.
- Wait for the software to identify stability issues and possible corrupted files.
- Press Start Repair.
- Restart your PC for all the changes to take effect.
As soon as the fixing process is completed, your PC should work without problems, and you will not have to worry about BSoD errors or slow response times ever again.
⇒ Get Restoro
Disclaimer: This program needs to be upgraded from the free version in order to perform some specific actions.
2. Try to log in blindly
- When you are on the black screen, wait for your mouse cursor to appear.
- Once you have the cursor, press Control on your keyboard – this will put the focus on the login password field.
- Now type your password. You can’t see it, but you must do it anyway.
- Once typed, hit Enter, and voila, you are logged into Windows.
- If your desktop does not appear after 30 seconds, try pressing Windows Key + P, press the Down Arrow key twice, and hit Enter.
After that, you should be logged in to Windows, and your screen should appear.
3. Disable Fast Boot on your PC
3.1 Enter Safe Mode
- Restart your PC several times during the boot sequence.
- Now choose Troubleshoot.

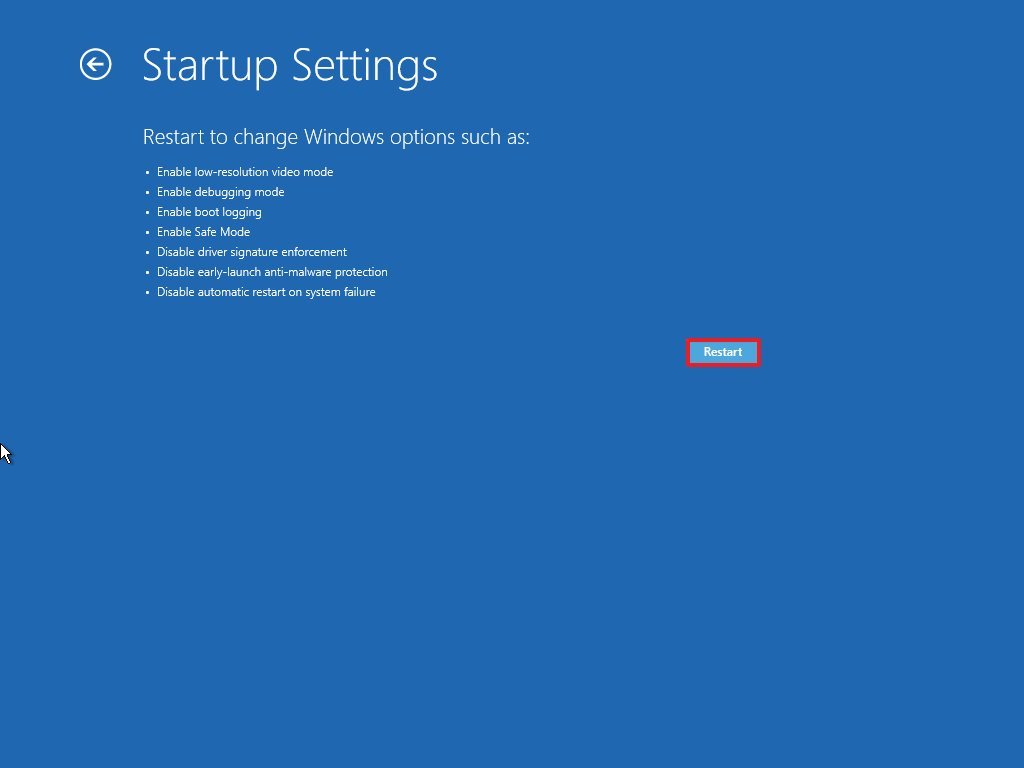
- Select Advanced options, click on Startup Settings, and click Restart.
- Once your PC restarts, you’ll be presented with options. Select any version of Safe Mode by pressing the appropriate key.

3.2 Disable Fast Boot
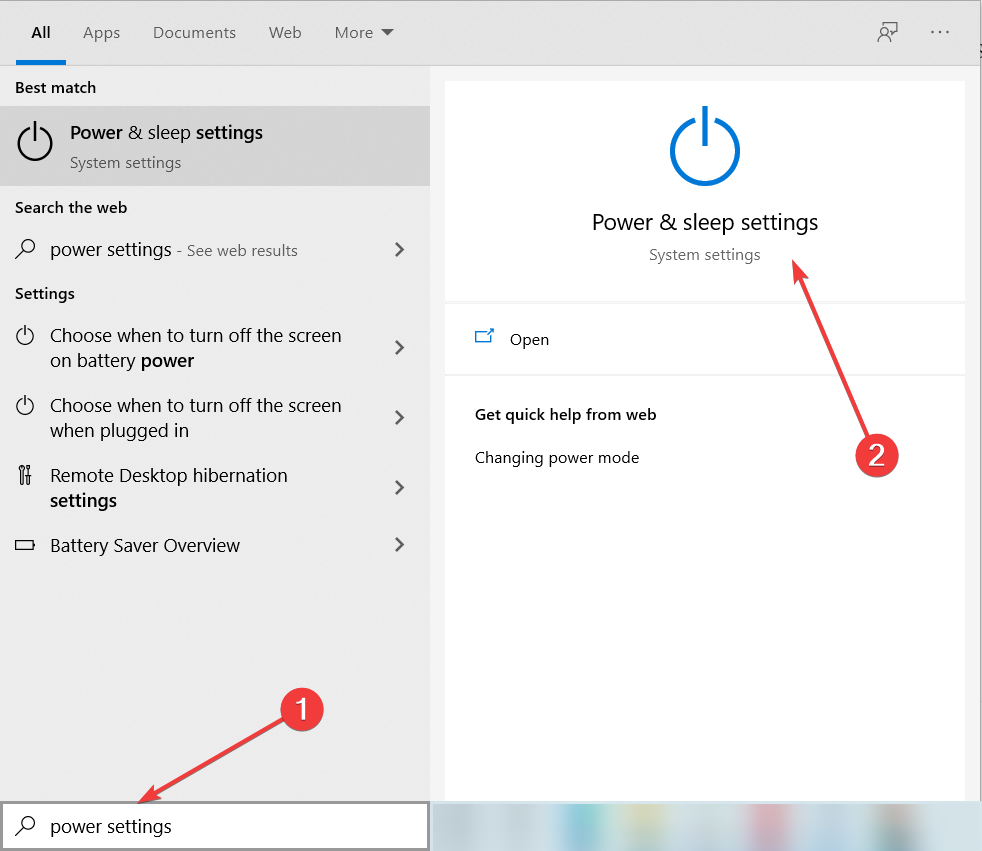
- Press Windows Key + S and type power settings.
- Now select Power & sleep settings from the list.

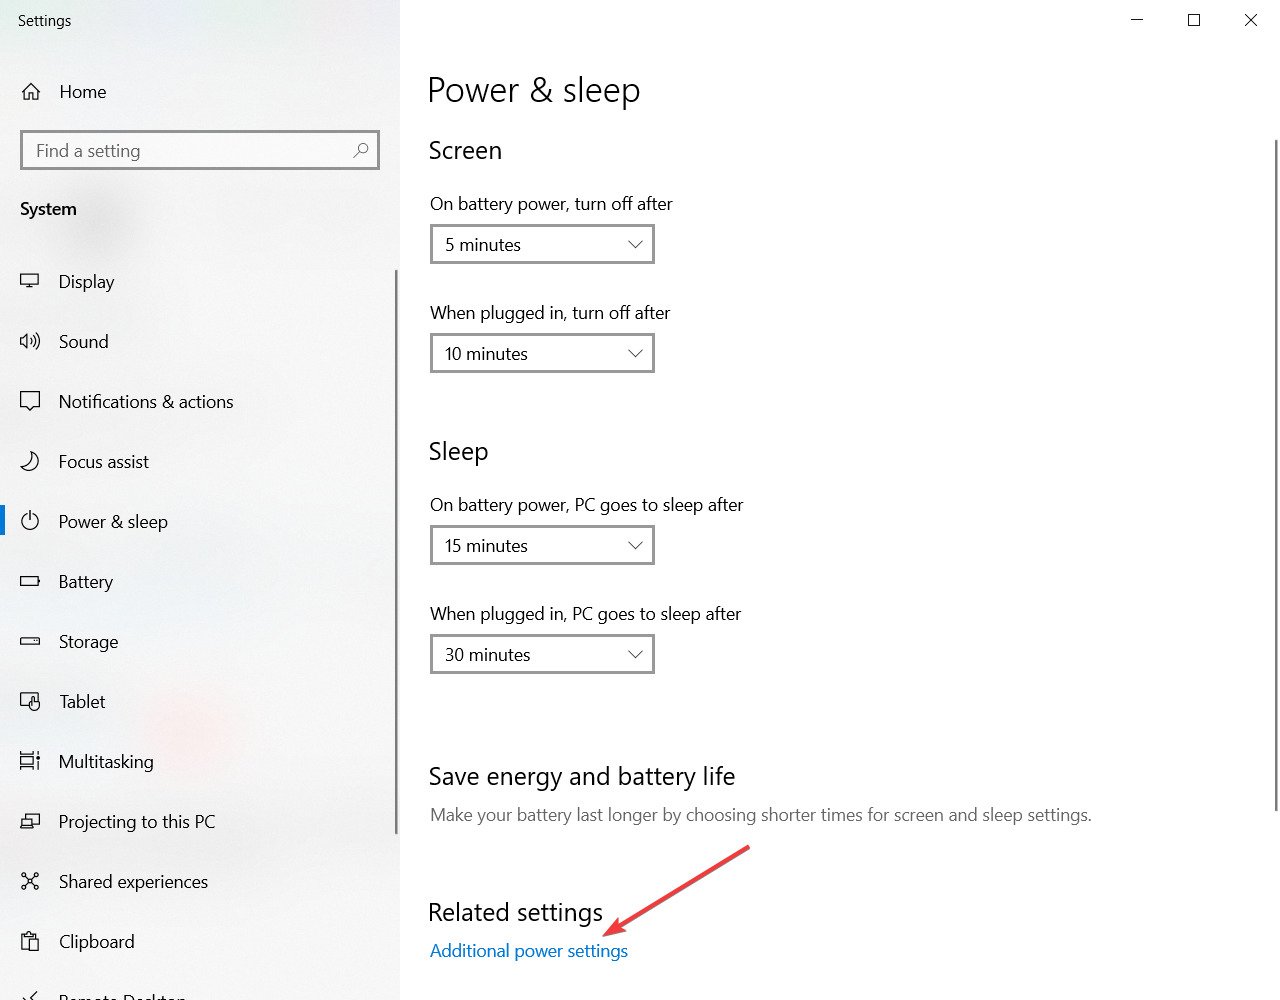
- Scroll down to the Related settings section and click Additional power settings.

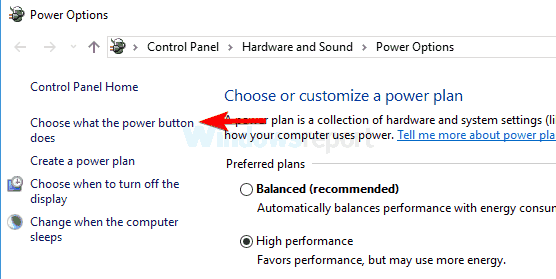
- When the Power Options window appears, click Choose what the power button does option from the left pane.

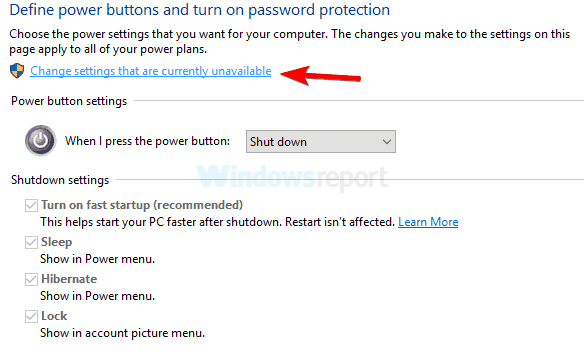
- Now click Change settings that are currently unavailable.

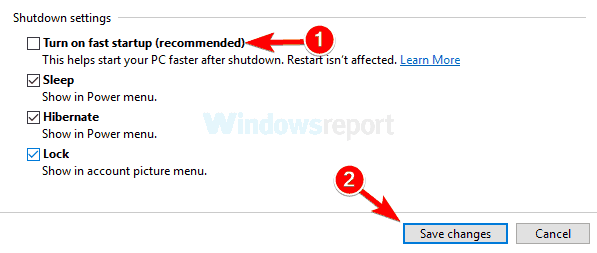
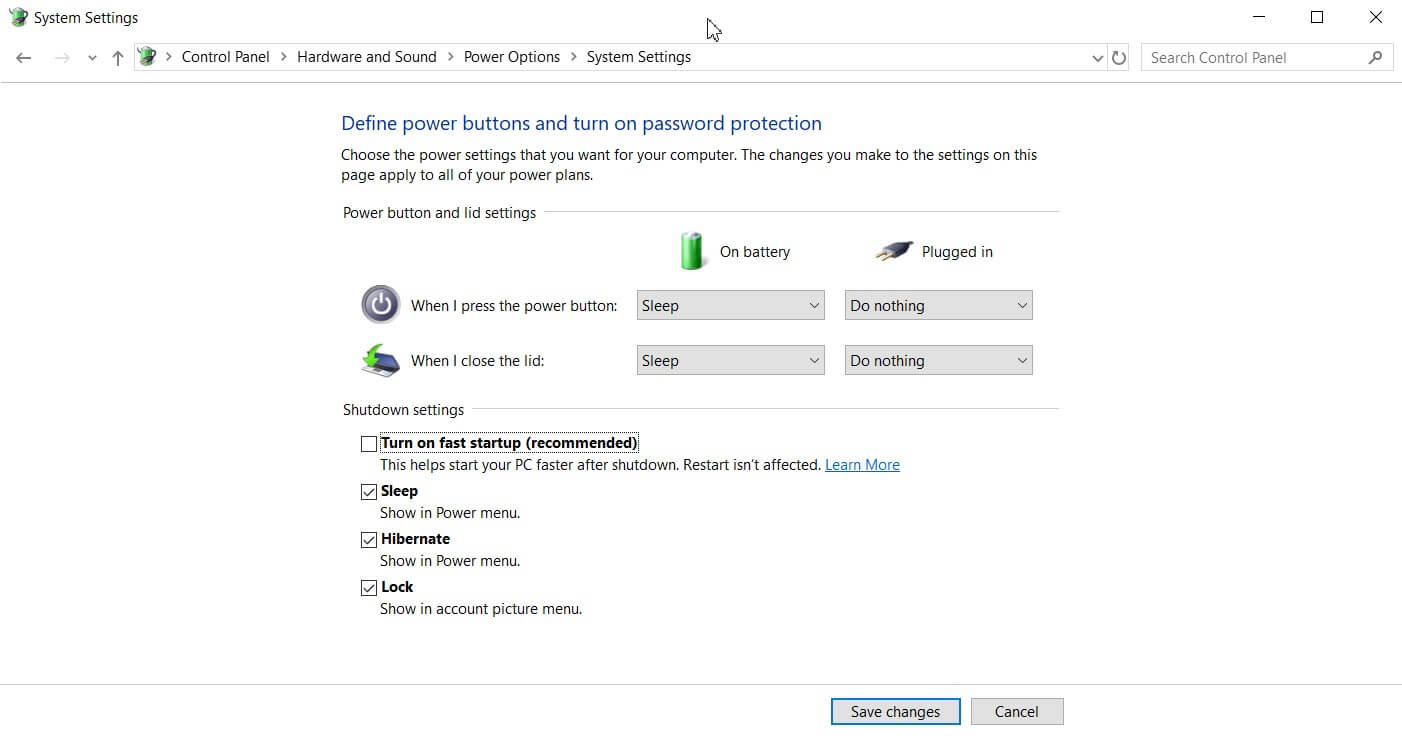
- Uncheck Turn on fast startup (recommended) option and click Save changes.

After disabling this feature, restart your PC and check if the problem is still there. Remember that disabling Fast Startup might cause your PC to boot slightly slower, but at least the issue should be resolved.
The issue might be the Fast Boot feature if you get a black screen after sign-in on Windows 10. This is a valuable feature since it will allow you to start your PC faster, but sometimes this feature can cause problems.
To fix the issue, you need to disable Fast Startup. However, since you can’t access Windows, you’ll have to do that from Safe Mode.
4. Try your hand at Startup Repair
- Restart your PC a couple of times during the boot sequence.
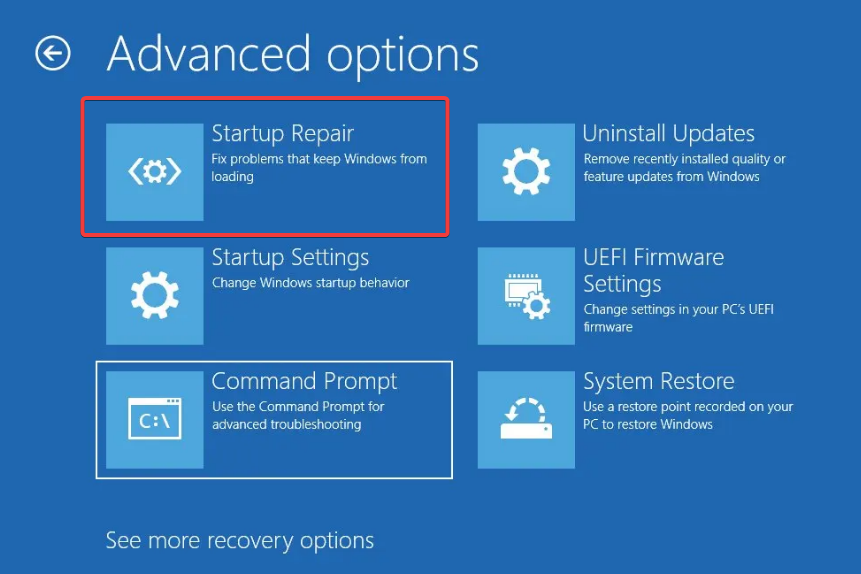
- Go to Troubleshoot, select Advanced options and click on Startup Repair.

- Follow the instructions on the screen to complete the process.
Once the process is finished, the problem should be resolved.
Some PC issues are hard to tackle, especially when it comes to corrupted repositories or missing Windows files. If you are having troubles fixing an error, your system may be partially broken.
We recommend installing Restoro, a tool that will scan your machine and identify what the fault is.
Click here to download and start repairing.
If you’re stuck on a black screen after sign-in in, you might be able to solve the problem simply by performing a Startup Repair, so follow the steps above.
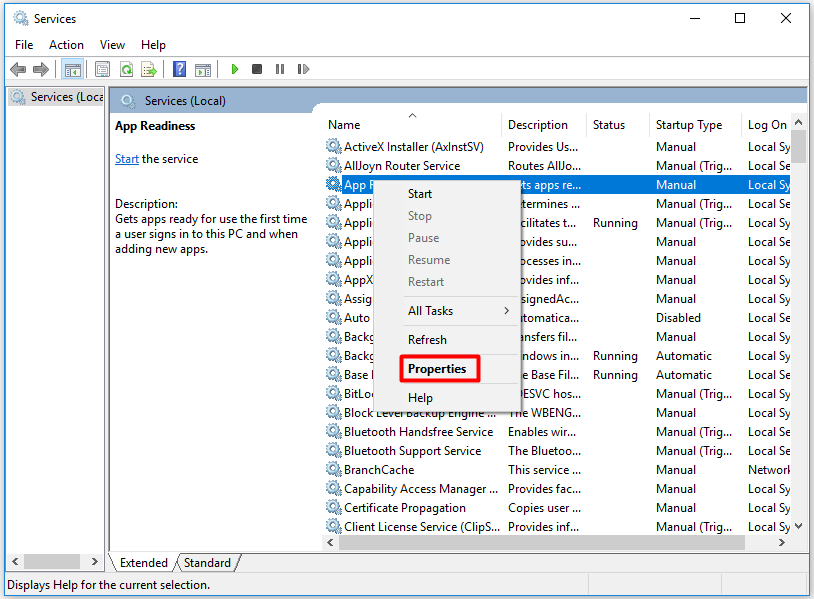
5. Disable App Readiness service
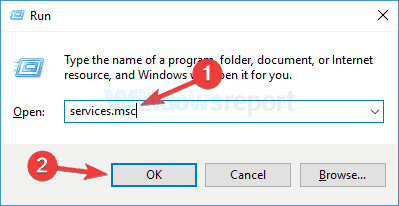
- Press Windows Key + R, and enter services.msc, then press Enter, or click OK.

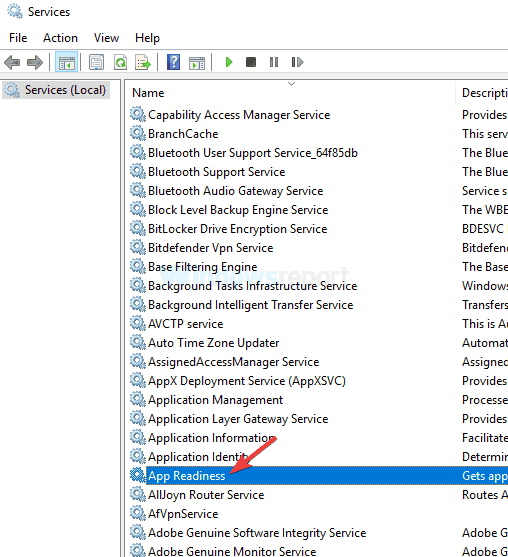
- Locate the App Readiness service on the list and double-click it to open its properties.

- Set Startup type to Disabled and click Apply and OK to save the changes.

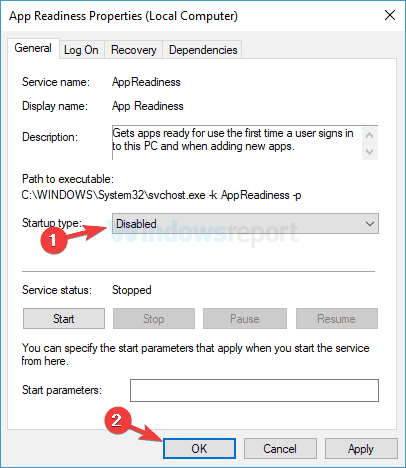
After disabling this service, restart your PC and check if the problem is still there. Remember that this is just a workaround, so you’ll probably have to enable this service someday.
As you know, Windows uses various services to work correctly, but sometimes certain services can cause a black screen after sign-in.
Usually, the App Readiness service is the culprit, and to fix the problem, you need to disable it.
6. Remove your laptop battery (if possible)
- Disconnect your laptop from the adapter and remove the battery. Check the laptop manual if you don’t know how to remove the battery.
- Once the battery is removed, hold down the power button for 30-60 seconds, or even more.
- Now put the battery back in your laptop and start it again.
Several users reported a black screen after signing in on their laptops, but you can quickly fix this annoying issue. According to users, you must remove your laptop battery and drain the remaining power.
This is a relatively simple procedure, and several users claim it works, so try it out. But, of course, this is only if your laptop has a removable battery.
7. Remove the problematic update
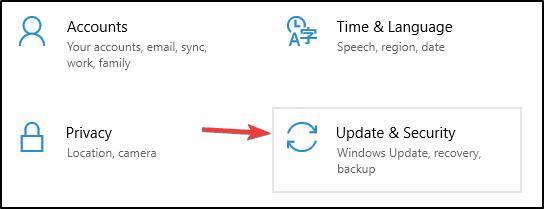
- Use Windows Key + I shortcut to open the Settings app.
- Go to the Update & Security section.

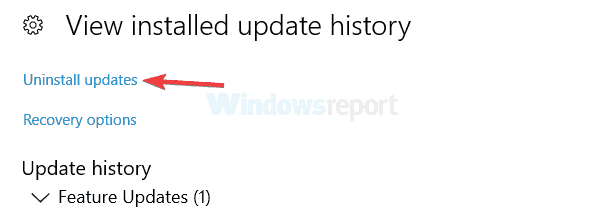
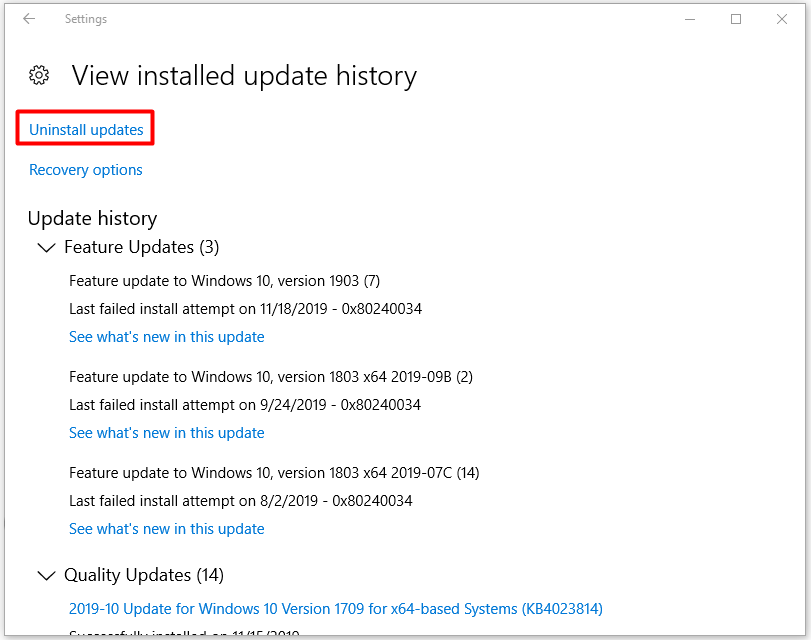
- Now select View update history.
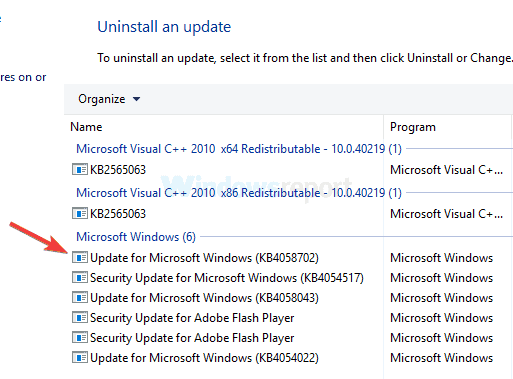
- A list of recent updates will appear. Memorize a couple of recent updates and click Uninstall updates.

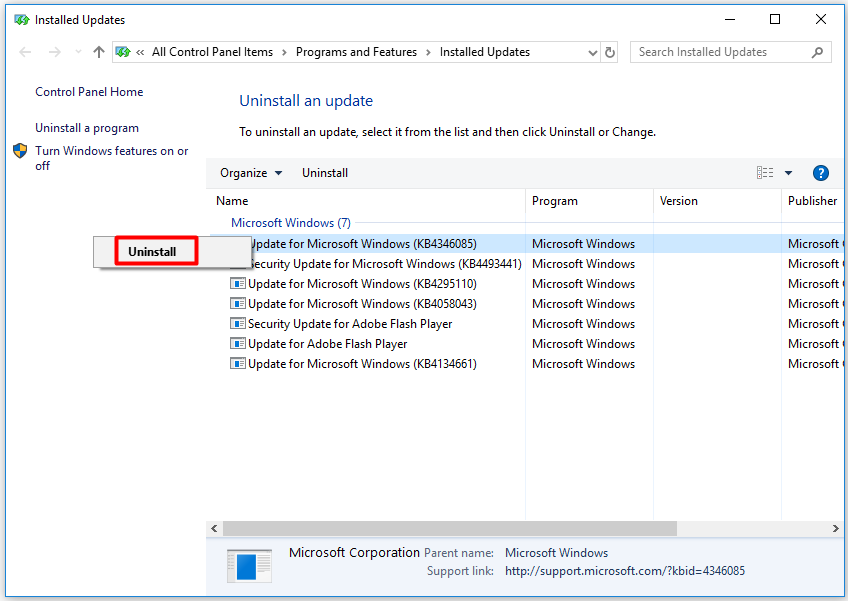
- Double-click the update you want to uninstall and follow the instructions on the screen to complete the process.

After you remove the problematic update, check if the problem is still there.
If this issue started after a Windows Update, the update is likely causing a black screen after sign-in.
To fix this issue, you must go to Safe Mode and remove the problematic update.
Keep in mind that Windows tends to install the missing updates automatically, so if the update was the problem, be sure to block Windows from installing the automatic updates.
- WHEA Internal Error: Fix it Using These 9 Quick Methods
- Windows Update Error 80200053: 4 Quick Fixes
- Your Computer Could Not Connect to Another Console Session [Fixed]
- Video Dxgkrnl Fatal Error: What Is It & How to Fix It [9 Tips]
How can I fix Windows 11 black screen after login?
We recommend starting in safe mode and trying a Startup repair. However, most of the solutions that work in Windows 10 will fix a Windows 11 black screen after the login issue.
The UI may differ slightly in a few cases, but generally, it should be about the same process. So pick what solution you prefer from those mentioned above and try on Windows 11.
How do I fix a black screen on startup?
Remove your laptop battery following the steps in solution six above.
Alternatively, you should shut down your computer and unplug any external devices. This applies to your mouse, keyboard, external hard drive, and other devices. Check if you still receive the black screen after restarting your computer. If not, try plugging every device individually until you identify the issue.
Also, note that before exploring anything complicated, you should verify that the monitor is responsive since you may not have powered it on in the first place.
Finally, if you have a PC, ensure the monitor cables are connected since this could easily be overlooked while powering up your computer.
Sometimes, your monitor may be damaged, and you will need a new monitor.
The black screen can be a big problem on your PC since it will prevent you from accessing Windows. However, we hope that you managed to solve this issue by using one of our solutions.
In the comments section below, let us know what worked for you (not necessarily from our list).
![]()
Newsletter

4 January 2021 Senior Program Developer
Summary
Generally, black screen in Windows 10 results from computer hardware or system. Most commonly, Windows 10 black screen happens, with a cursor left after the Windows 10 login. Several solutions will be provided and help you to fix Windows 10 black screen after login.
How Does Black Screen Happen in Windows 10?
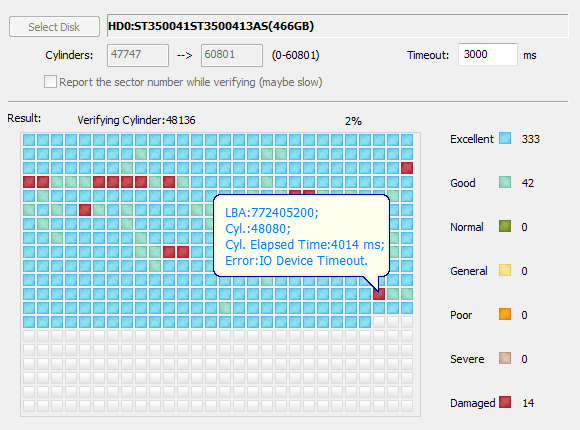
Black screen in Windows 10 results from computer hardware or system. If there is something wrong with Windows, black screen is usually caused by the incompatible of graphic card driver, virus, system settings and so on. Besides, hardware problems like hard disk bad track or memory corruption could also lead to black screen.
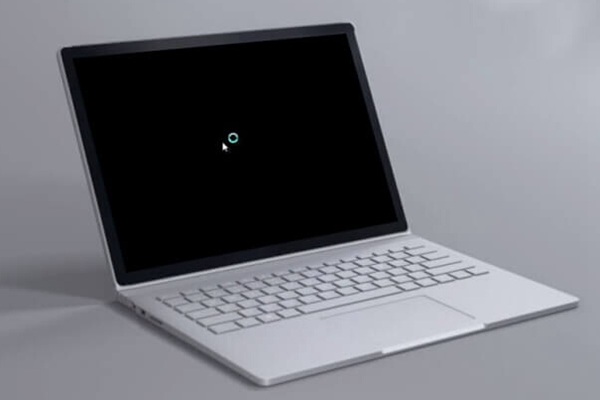
However, it is very common that a black screen happens with only a cursor left after the loggin in Windows 10. It can be fixed by signing in safe mode. Next, you can try to fix the black screen with the following methods and tips.
After the login of Windows 10, you encounter black screen only with cursor on the screen, we can try to restart the PC at first. Firstly, please hold the power button for a few seconds to reboot your computer and disconnect all uncessary external devices. If it still doesn’t work, please try to boot the comptuer to safe mode.
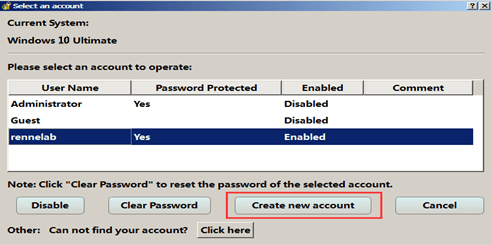
Administrator account will be required to access safe mode. If administrator privilege is not available, it’s suggested to use Renee PassNow to create an administrator account and then sign in safe mode with it. The created administrator account named “Reneelab” with administrator rights, and its default password is “123456789”. You are able to change the password of target account with this new created administrator. If you want to know how to create the administrator account, please click here to get detailed information.
Please follow steps below to access the safe mode when you have an administrator account.
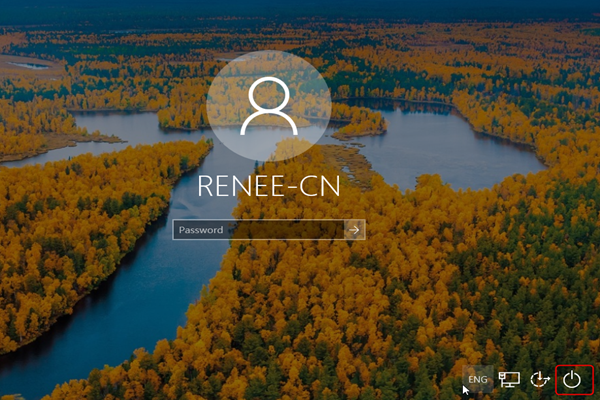
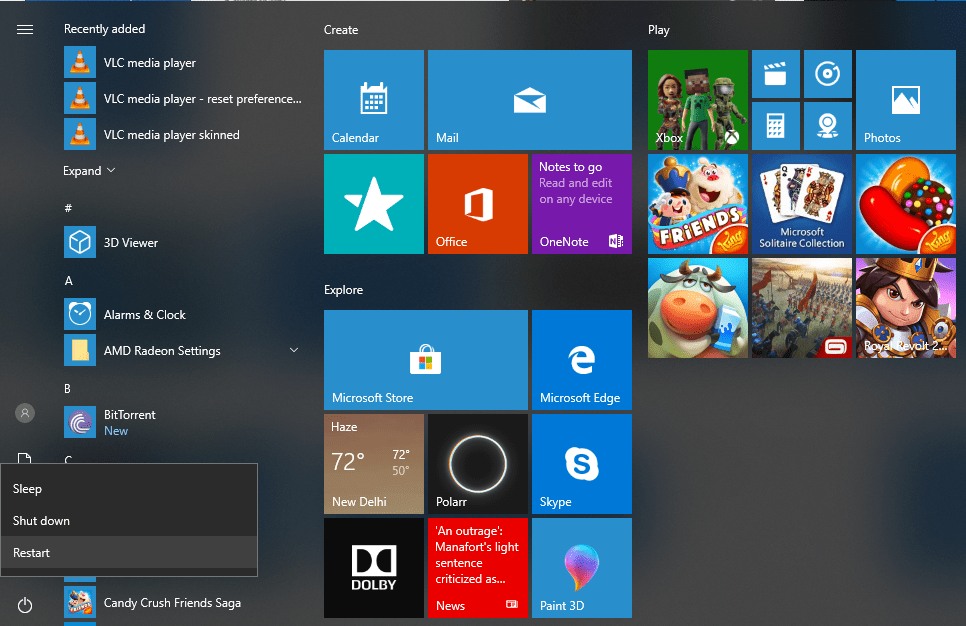
Step 1: Hold down “shift” key, click the “Power” on the lower right corner of the login screen and then click “Restart” at the same time to enter “Choose an option”.
If nothing shows on the screen, please press and hold the power button for a few seconds when computer is booted and Windows icon shows on the screen. Please repeat this step three times until Windows 10 automatic repair is triggered. And then follow the instructions on the screen and go to “Advanced options”.
Step 2: Select these options in order “Troubleshoot” — “Advanced options” — “Startup Settings”. Finally, click on “Restart” on the screen of Startup setting.
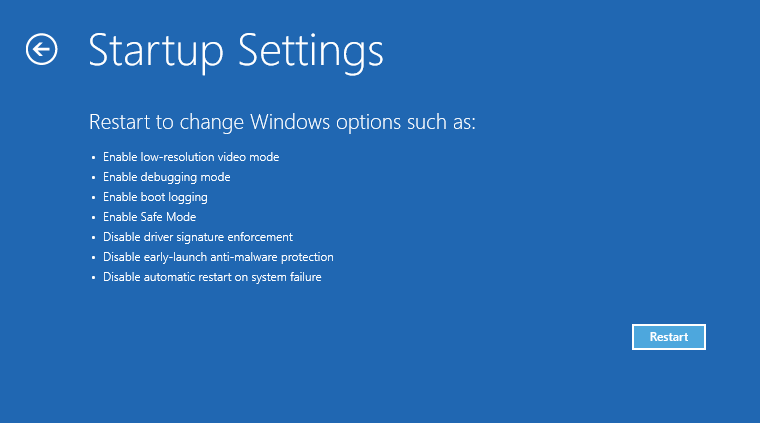
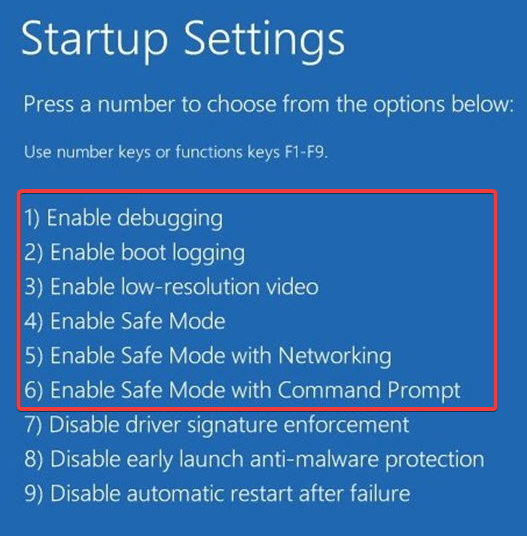
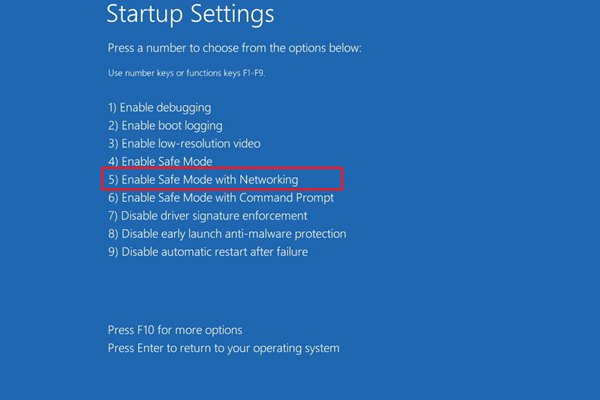
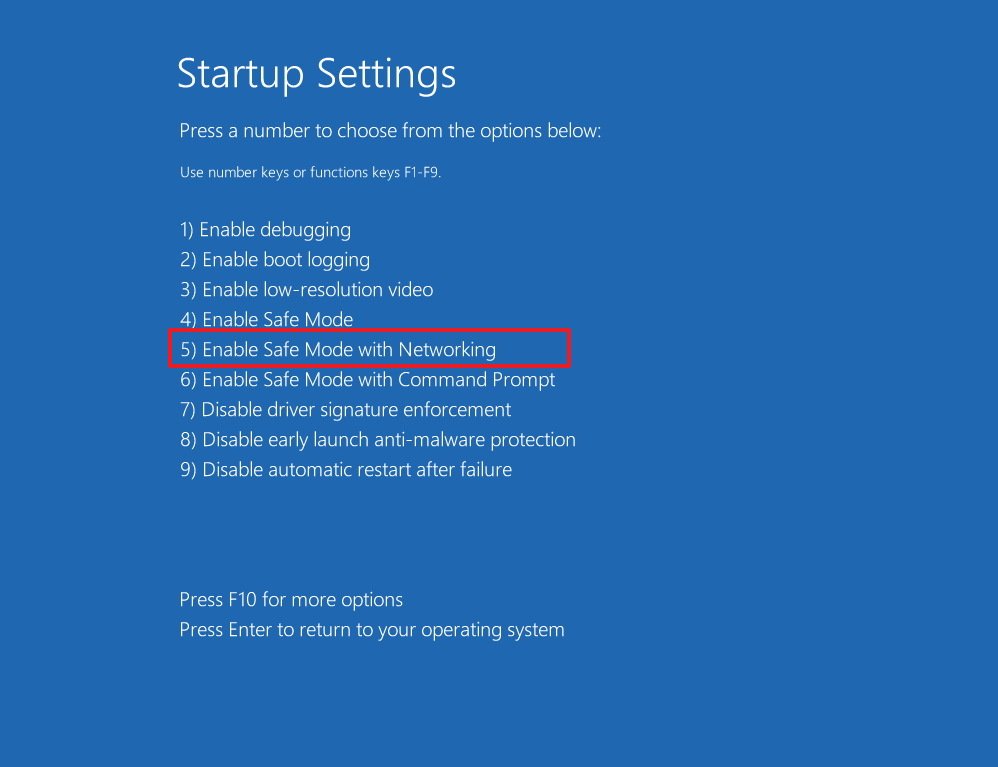
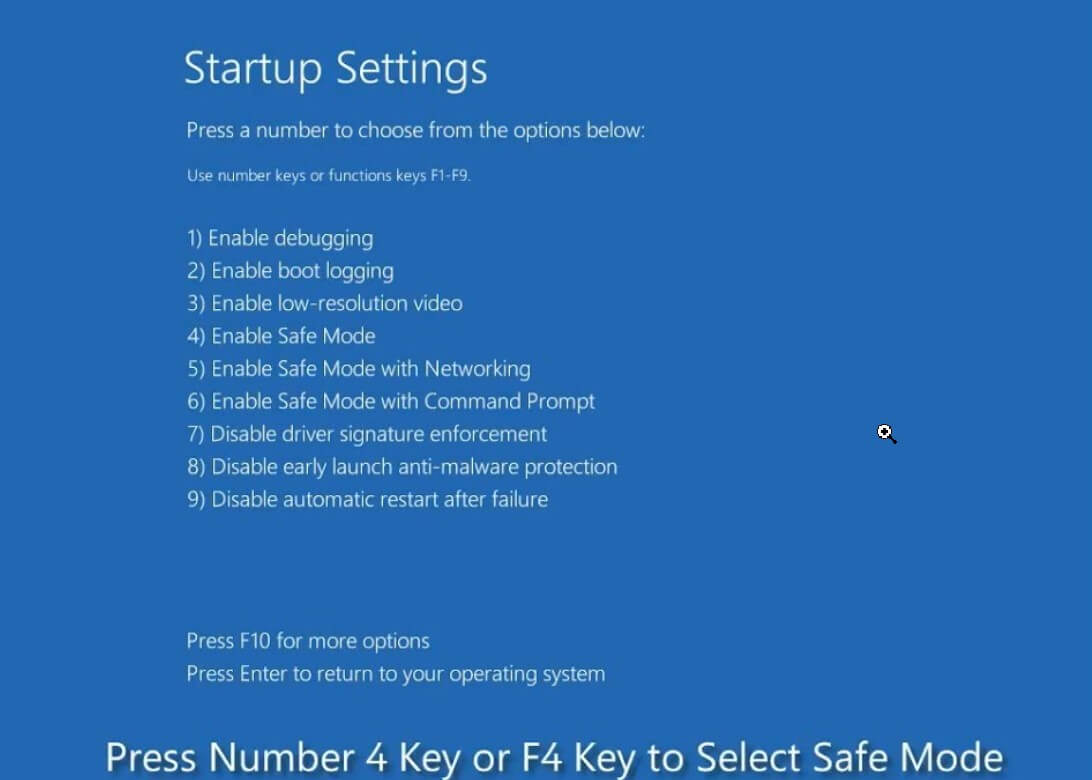
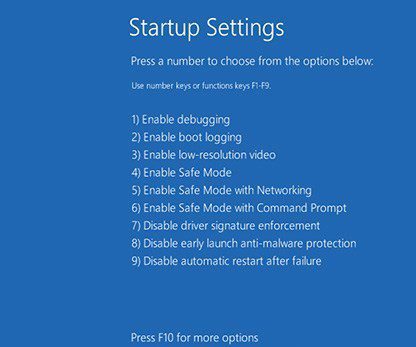
Step 3: After restarting the computer, you will get access to the “Startup Settings” page. Press “F5” or “5” to enable “Safe Mode with Networking”.
After successfully entering safe mode, you can start to check and fix Windows 10 black screen after login
- Option One: Use antivirus software to scan the system
- Option Two: Uninstall graphic card driver
- Option Three: Check the Registry Editor
- Option Four: Disable high contrast
- Tips: Transfer Important files from PC before reinstalling system with Renee Passnow
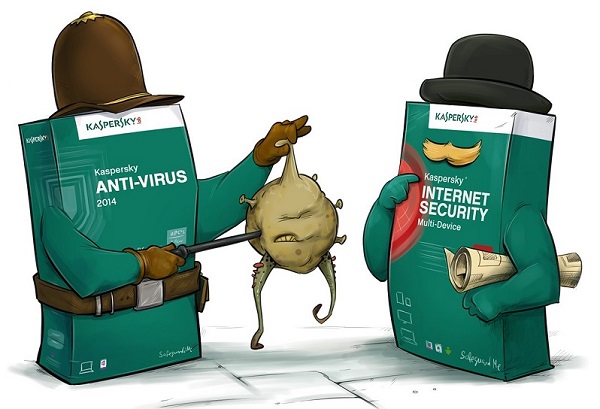
Option One: Use Antivirus Software to Scan the System
Virus infection could also lead to computer black screen. In safe mode, we can use the antivirus software, such as Kaspersky, to scan system and remove the virus.
Option Two: Uninstalled Graphic Card Driver
Video card driver can also result in black screen problem. You can try to solve it by uninstalling the video card driver.
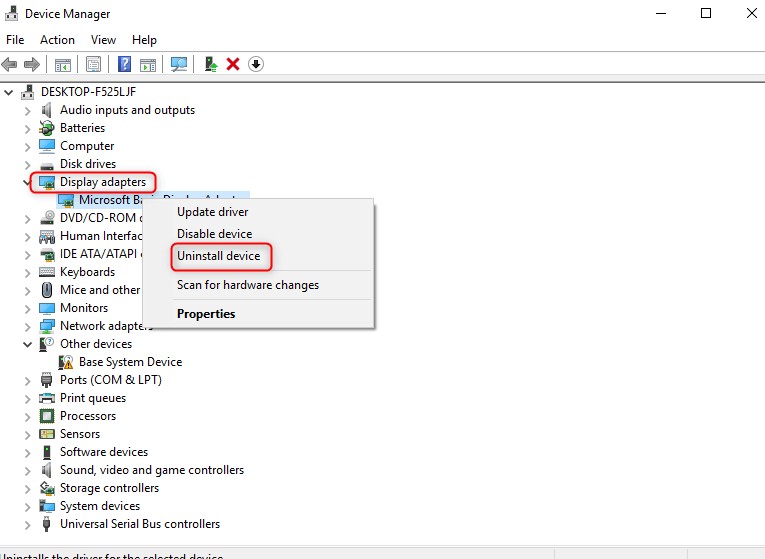
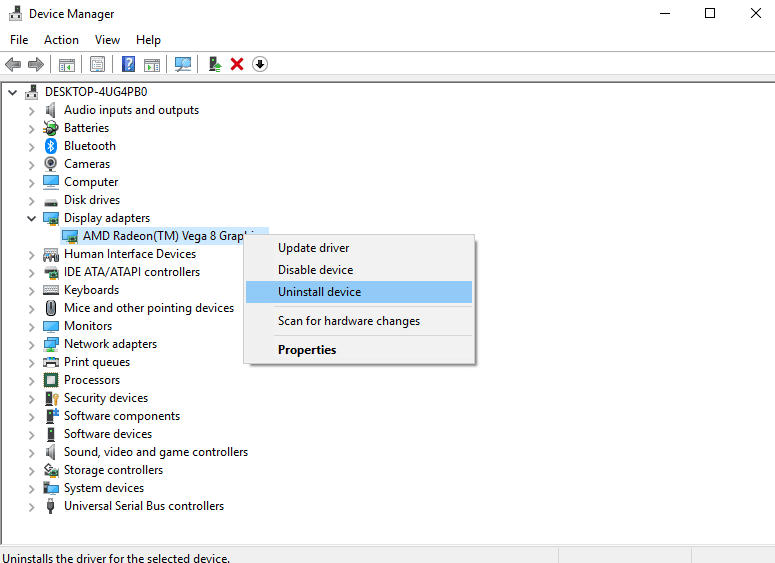
Step 1: In safe mode, right click the Windows icon and select “Device Manager”.
Step 2: Click “Display adapters”, right click on the adapter and select “Uninstall device”. Finally, please restart your computer.
Tips: Windows will install the default graphic card driver after restart.
Option Three: Check the Registry Editor
When there’s something wrong with the Registry Editor, the black screen problem will probably happen. Checking and correcting it is helpful to fix the black screen problem.
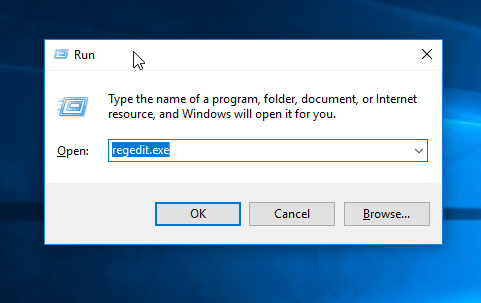
Step1: In safe mode, press “Win” + “R” to open “Run”, type in “regedit” and click “OK”.
Step 2: Navigate to: HKEY_LOCAL_MACHINE SOFTWARE Microsoft Windows NT CurrentVersion Winlogon
Step 3: Click on “Winlogon”. Please find and check the value of the “Shell” on the right side. If its value data is not “explorer.exe”, please change it to be “explorer.exe” in the Value data.
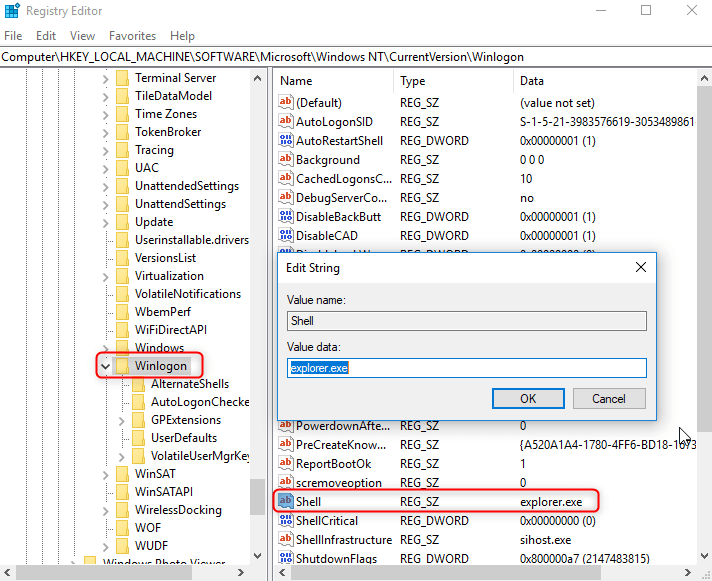
Step 4: Restart your computer.
Option Four: Disable High Contrast
High contrast in Windows could also lead to black screen. We can disable it in safe mode.
Step 1: Press “Win” + “I” to open “Settings” and click “Ease of Access”.
Step 2: Click “High contrast”. On the right side, select “None” from the menu.
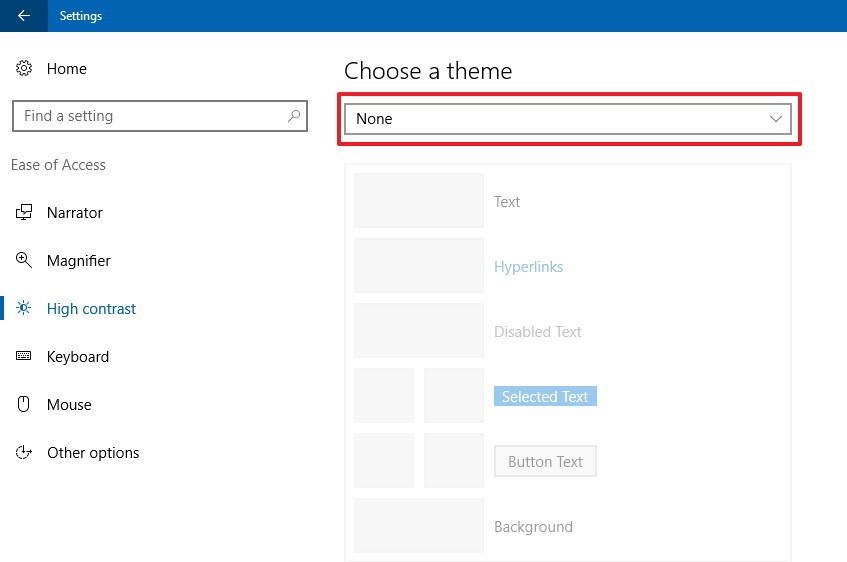
Step 3: Finally, restart your computer.
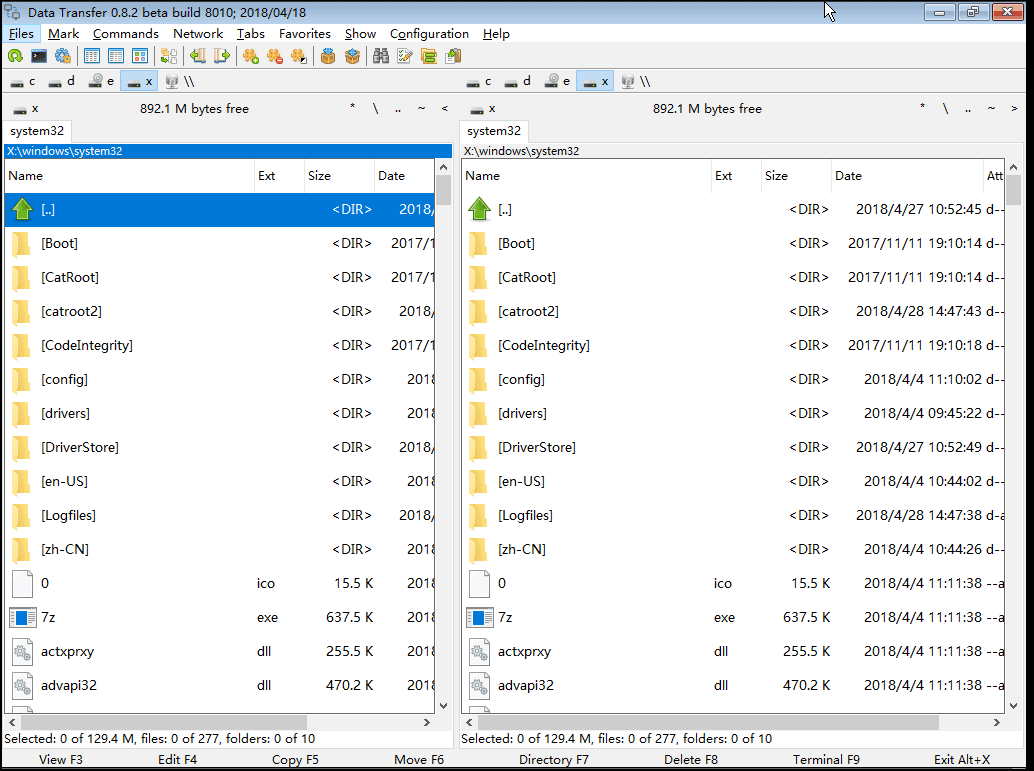
If the methods above still cannot fix the black screen problem in Windows 10, it’s necessary to reinstall the system. In order to prevent the file or data loss, it’s suggested to transfer the important files or documents before reinstalling system. Data Transfer function in Renee Passnow can help you out!
Transfer Important Files from PC before System Reinstall with Renee Passnow
Step 1: Download and install Renee Passnow on any other workable computer.
The Windows computer you installed Renee Passnow need to be able to login and work normally (The Windows version of the computer you are using to create the new password reset disk does not matter.).

Step 2: Launch Renee Passnow. Create bootable media with USB/CD/DVD.
Select one option from [Crate a Live USB] and [Create a Live CD]. Then, select [x64] or [x86] according to your computer. Next, click on [Download Now] to download the licensed ISO. Remember to activate the software beforehand. After that, click on [Create USB] to create the boot media.

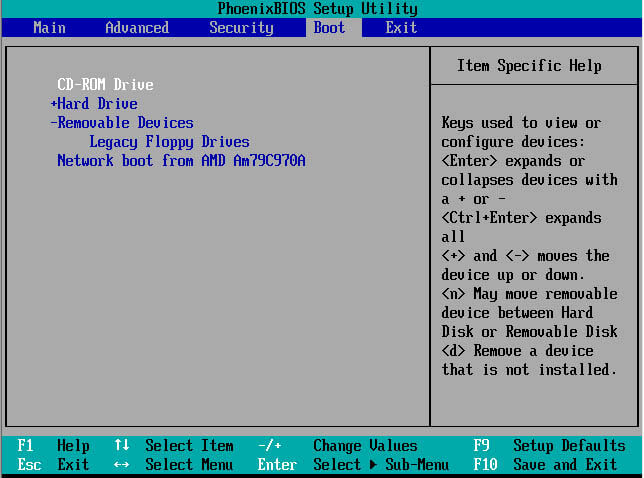
Step 3: Boot the target computer with the created bootable media.
Please hold a Hot key to enter the BIOS menu.Please click here to find how to change the boot order of your computer brand. Please make the create bootable media to be the first in the boot order. (Can not find your brand? Please refer to your PC manual to find out the method.)
Step 4: After loading into the main interface of Renee Passnow, please select “Data Transfer” function.

Step 5: Select the original disk and target disk. And drag the target files to the target disk directly.
Did Windows 10 Desktop/Laptop Stuck At Black Screen After installing Recent windows updates or upgrade to windows 10? The main cause of this problem ( windows 10 black screen with cursor after login ) seems to be Display drivers ( incompatible with the current windows version, Corrupted, outdated ). Still, it’s not limited to that only. As corrupted Windows system files or battery residue sometimes also causes this issue.
Users Report when they login to windows but don’t get any display Screen Stuck on Black Screen. Or some other users Report can’t even sign into the computer and see a black screen at startup. Here 5 best solutions applicable to both causes ( Black screen After login or At startup )
Fix Windows 10 Black Screen with cursor problem
A black screen issue on Windows 10 usually occurs after an upgrade or when an automated Windows Update installs updates on your system. Since this black screen is most likely a hardware (GPU) problem, we will need to assess and troubleshoot various settings to diagnose and fix it.
Start with Basic Troubleshooting
— Advertisement —
Restart Windows Explorer: If you are getting windows 10 black screen with a cursor after login. Then try to press Ctrl + Alt + Del, which open Task manager. Then click on File -> Run new task -> Type Explorer.exe Checkmark on Create this task with Administrative privileges And click OK. This Starts the Stuck Windows Explorer, and you get back to the normal screen.
Also, on Task manager, look for the process ( RunOnce32.exe or RunOnce.exe ). Right-click on it and select end task. Restart your computer and check Windows started normally.
Remove All External Devices, like Printer, Scanner, and External HDD etc. Expect the keyboard & mouse. And Also, Try To remove the External Graphic Card ( If installed ) and Start windows with the normal display driver.
— Advertisement —
Power Reset Laptop/ Desktop: If you have Black Screen Issue on your Laptop, Press The power button to shutdown Completely. Now Remove The Battery ( Also remove If any external Device Keyboard, Mouse, USB Drive etc attached ) Now Press and hold the power button for 30 sec. Attach the Battery again And Try to start the windows again.
Also, For Desktop users, same remove all external devices include Power code and VGA cable. Press and hold the Power button for 30 sec, Then only attach the power cable, VGA cable, Keyboard & mouse and start windows normally.
— Advertisement —
Perform Startup Repair: Boot windows from an installation media To Access Advanced Boot options. Where you will get the Startup repair option, which helps to scan and fix startup problems that cause, Prevent windows to Start normally.
Applying these solutions didn’t fix the problem and still windows 10 PC stuck on a black screen with a cursor after login. Boot into Safe mode ( Which start windows with minimum system requirements )To perform Some Advanced troubleshooting steps.
Registry Tweak to fix the Black Screen problem
When you boot into safe mode, perform the registry tweak by following the steps below to permanently fix the black screen issue. To do this, open the Windows registry, Press Win + R, type Regedit and hit the enter key. From the left pane, navigate to the following key.
HKEY_Local_MACHINESoftwareMicrosoftWindows NTCurrentVersionWinlogon.
Here highlight Winlogon and Double-click the value Shell showing on the right side to make sure the Value data is explorer.exe. If not, change it to explorer.exe, click ok, close the Windows registry and Restart windows. Check problem solved windows normally start without any black screen stuck.
Create a New User Account
Also, Problems with user account / User account profile can also cause black screen issues ( profile does not load properly ) etc. You Can create a new user account, check the account load properly without any black screen stuck etc. To create a new user account, open Command prompt as administrator type net user username password/add Remember To change name and password in the command for the name of the account and password you want.
Now Logoff from safe mode, Restart windows and try to login with a new user account. Check user profile loaded completely without any black screen stuck.
Disable Fast Startup Feature
First, try to disable the Fast startup Feature by following the steps below. Open Control panel, View by “Small icons” and click Power Options. Next, click on Choose what the power button does, then click on Change settings that are currently unavailable. Here Under “Shutdown settings,” uncheck Turn on fast startup (recommended), then click Save changes. Now Restart windows to check Windows start normally or Stuck again on Black Screen. If you still having the same issue, then follow the next solution.
Disable integrated graphics card / Display Driver
If you have a separate graphics card, the computer sometimes believes it has a dual monitor. In this case, the error would occur. So disabling the integrated graphics card may fix the problem.
Press Windows key + X, navigate to Device Manager and find Display adapters, right-click the display driver and click Disable. Afterward, restart your computer to see if the setup is working.
Uninstall Recently Installed Programs or Updates
Also, you can try uninstalling the programs or Windows Updates you’ve installed recently. Maybe the new programs/updates are not compatible with Windows 10 2020 Update, and as a result, you get stuck on the black screen with a cursor frequently.
To uninstall recently installed applications, Again start windows into safe mode, Open Control panel -> small icon view click on programs and features, select the application and click uninstall. To remove recent updates, click on view installed updates, Right-click and uninstall recent updates.
Run SFC / DISM command
Sometimes, Corrupted windows system files cause the issue on Startup, Which results in windows 10 black screen with a cursor after login. Run The SFC utility to make sure corrupted system files are not causing the issue.
To run System file checker Utility, open command prompt as administrator. Then Type SFC /scannow and hit the enter key. This will start the scanning process for corrupted, missing system files. If found, any SFC utility will restore them from a compressed folder located on %WinDir%System32dllcache.
Wait until 100% complete the process after that Restart windows and check the system started normally. If SFC scan results, Windows Resource Protection found corrupt files but was unable to fix them Run the DISM command which repairs the System image and allows SFC to complete its job.
Recommended :
- Fix windows store won’t open error code 0x80070422 in Windows 10
- Things to do when Windows 10 failed to start 0xc000000f
- Fix: Windows 10 Runtime Broker High CPU usage, 100% Disk usage
These are some best applicable solutions to fix windows 10 black screen with cursor after login or black screen windows 10 before login, windows 10 stuck at black screen with loading circle etc. Have any query, suggestion about this post feel free to discuss on comments below. Also, Read Windows 10 Running slow? Here how to make windows 10 run faster.
Your computer sometimes may run into black screen without any sign. It is terrible, but it is not hard to be fixed. You will obtain some methods to fix the Windows 10 black screen after login error in this post of MiniTool.
Black screen may often happen to you. In fact, black screen can be divided into four circumstances.
- Windows 10 black screen with cursor after update.
- Windows 10 black screen before login.
- Windows 10 black screen after login.
- Black screen after restart.
This post mainly discusses the Windows 10 black screen after login error. Now, let’s move on.
You may be also interested in this: Here Are Ways to Fix Black Screen Error When Booting Windows
Solution 1: Unplug All External Devices
When black screen occurs, you should try press Ctrl + Alt + Del keys to check if the Task Manager is enabled. If so, click File > Run new task. Type explorer.exe and press the Enter key. However, it sometimes doesn’t work. In this circumstance, you should unplug all external devices to fix the error.
If your computer can display normally after unplugging all external devices, you can find what device causes the error by plugging these devices one by one until the display disappears. reboot your computer.
On the contrary, if the error still exists after removing all external devices, you can try the next one.
Solution 2: Delete Problematic Updates
The Windows 10 black screen after login error may also happens to you due to problematic Windows updates. In this case, you need to delete the update to solve the black screen error.
Step 1: Open Windows Settings, and then navigate to Update & Security section.
Step 2: Click on Windows Update in the left side of the page, and then click on View installed update history.
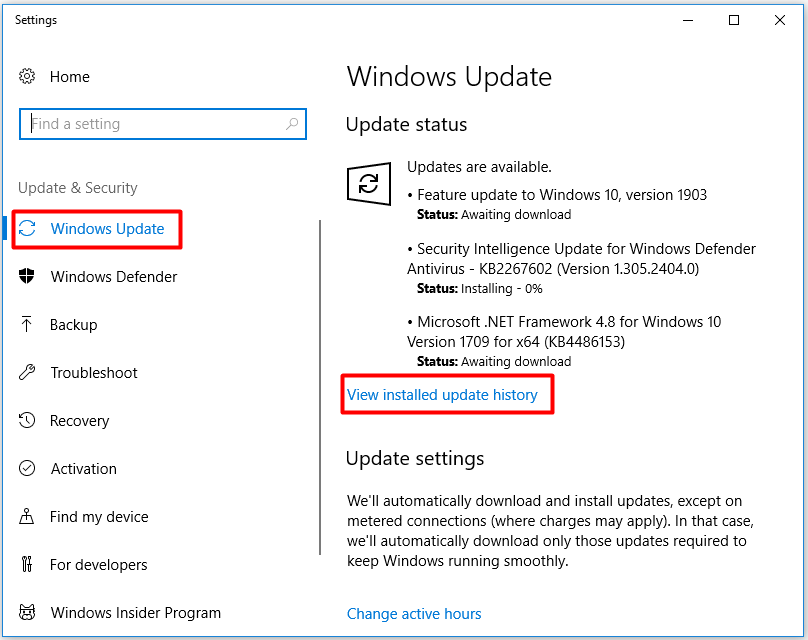
Step 3: Then you will see the latest several updates. Remember them, and click Uninstall updates.
Step 4: In the pop-up window, right click the update that you would like to uninstall and click on Uninstall.
When the whole process ends, check if the error still persists.
Solution 3: Try to Log in Blindly
You may encounter a black screen before you login to Windows. If so, you are unable to see the login window and type your password. In this case, you can try typing password blindly to fix the error.
Step 1: If you are struck in a black screen, you need to wait patiently for the display of your mouse.
Step 2: When the mouse cursor appears, press the Ctrl key, which will put the focus on the login password field.
Step 3: Type your password. Even though you can’t see it, you have to do it anyway.
Step 4: Press the Enter key to login your Windows. If your desktop does not appear in 30 seconds for certain reason, try pressing Win and P keys, and then press the down arrow key twice and press Enter.
After that, you can login Windows and the black screen will disappear.
Solution 4: Remove Laptop Battery
It has been proved that removing laptop battery is effective to fix the Windows 10 black screen after login. It is very easy to operate.
Step 1: Disconnect your laptop from the adapter and take out the battery. If you are not sure how to take out the battery, you should check the laptop manually.
Step 2: When the battery is removed, hold down the power button for 30 to 60 seconds.
Step 3: Wait for a while. Then lay back the battery and reboot the laptop.
Solution 5: Disable App Readiness Service
As it known to all, Windows utilizes various services to enable itself to run normally. However, some services can cause black screen after login. In general, app readiness service is the top one to blame. To fix the Windows 10 black screen after login error, you should disable it.
Step 1: Press Win plus R keys to open the Run window. Type services.msc in the box and hit Enter.

Step 2: Find the App Readiness service in the Services page, and then right click it and choose Properties.
Step 3: Set the Startup type as Disabled and click on OK to save the changes.

Step 4: After that, reboot your computer to check if the black screen error still persists. If so, you should ty other solutions instead and enable app readiness service back by following the above steps.
(Image credit: Future)
On Windows 10, a black screen is one of the most challenging problems because it won’t give an error code or message you can use to determine the root of the cause to fix it quickly.
Although a black screen could appear due to many problems, it’s usually related to a graphics driver or compatibility issues with a new feature update. It could also happen when the computer installs a buggy update. Or it could end up being a hardware-related problem with the video adapter, display, or physical connection.
Whatever the reason, Windows 10 provides several ways to check and solve this problem, whether you have access to the desktop or the system doesn’t start correctly.
This guide will walk you through the instructions to troubleshoot and fix black screen problems on Windows 10.
Checking connection problems
When a black screen appears, there are many things to consider, including issues with hardware or software. These instructions outline the steps to troubleshoot and resolve the most common problems on Windows 10.
Check connection issues
If the problem occurs before signing into Windows 10, it’s likely a problem with the connection between the computer and the display.
You can resolve this issue by double-checking the physical connection, ensuring that both ends of the video signal cable are correctly connected in the correct in and out ports. Disconnecting and reconnecting the video cable and shaking the mouse can also help wake up the display.
While it might be evident for many people, recheck the monitor to ensure it’s receiving power. (You may need to check your manufacturer support website for more specific details.)
If the video card has multiple outputs, try to use a different port, shake the mouse, or press any key on the keyboard to wake up the monitor. Although this rarely happens, a driver update could sometimes change the video signal to a different port (DisplayPort, HDMI, DVI, Thunderbolt, VGA) in the adapter.
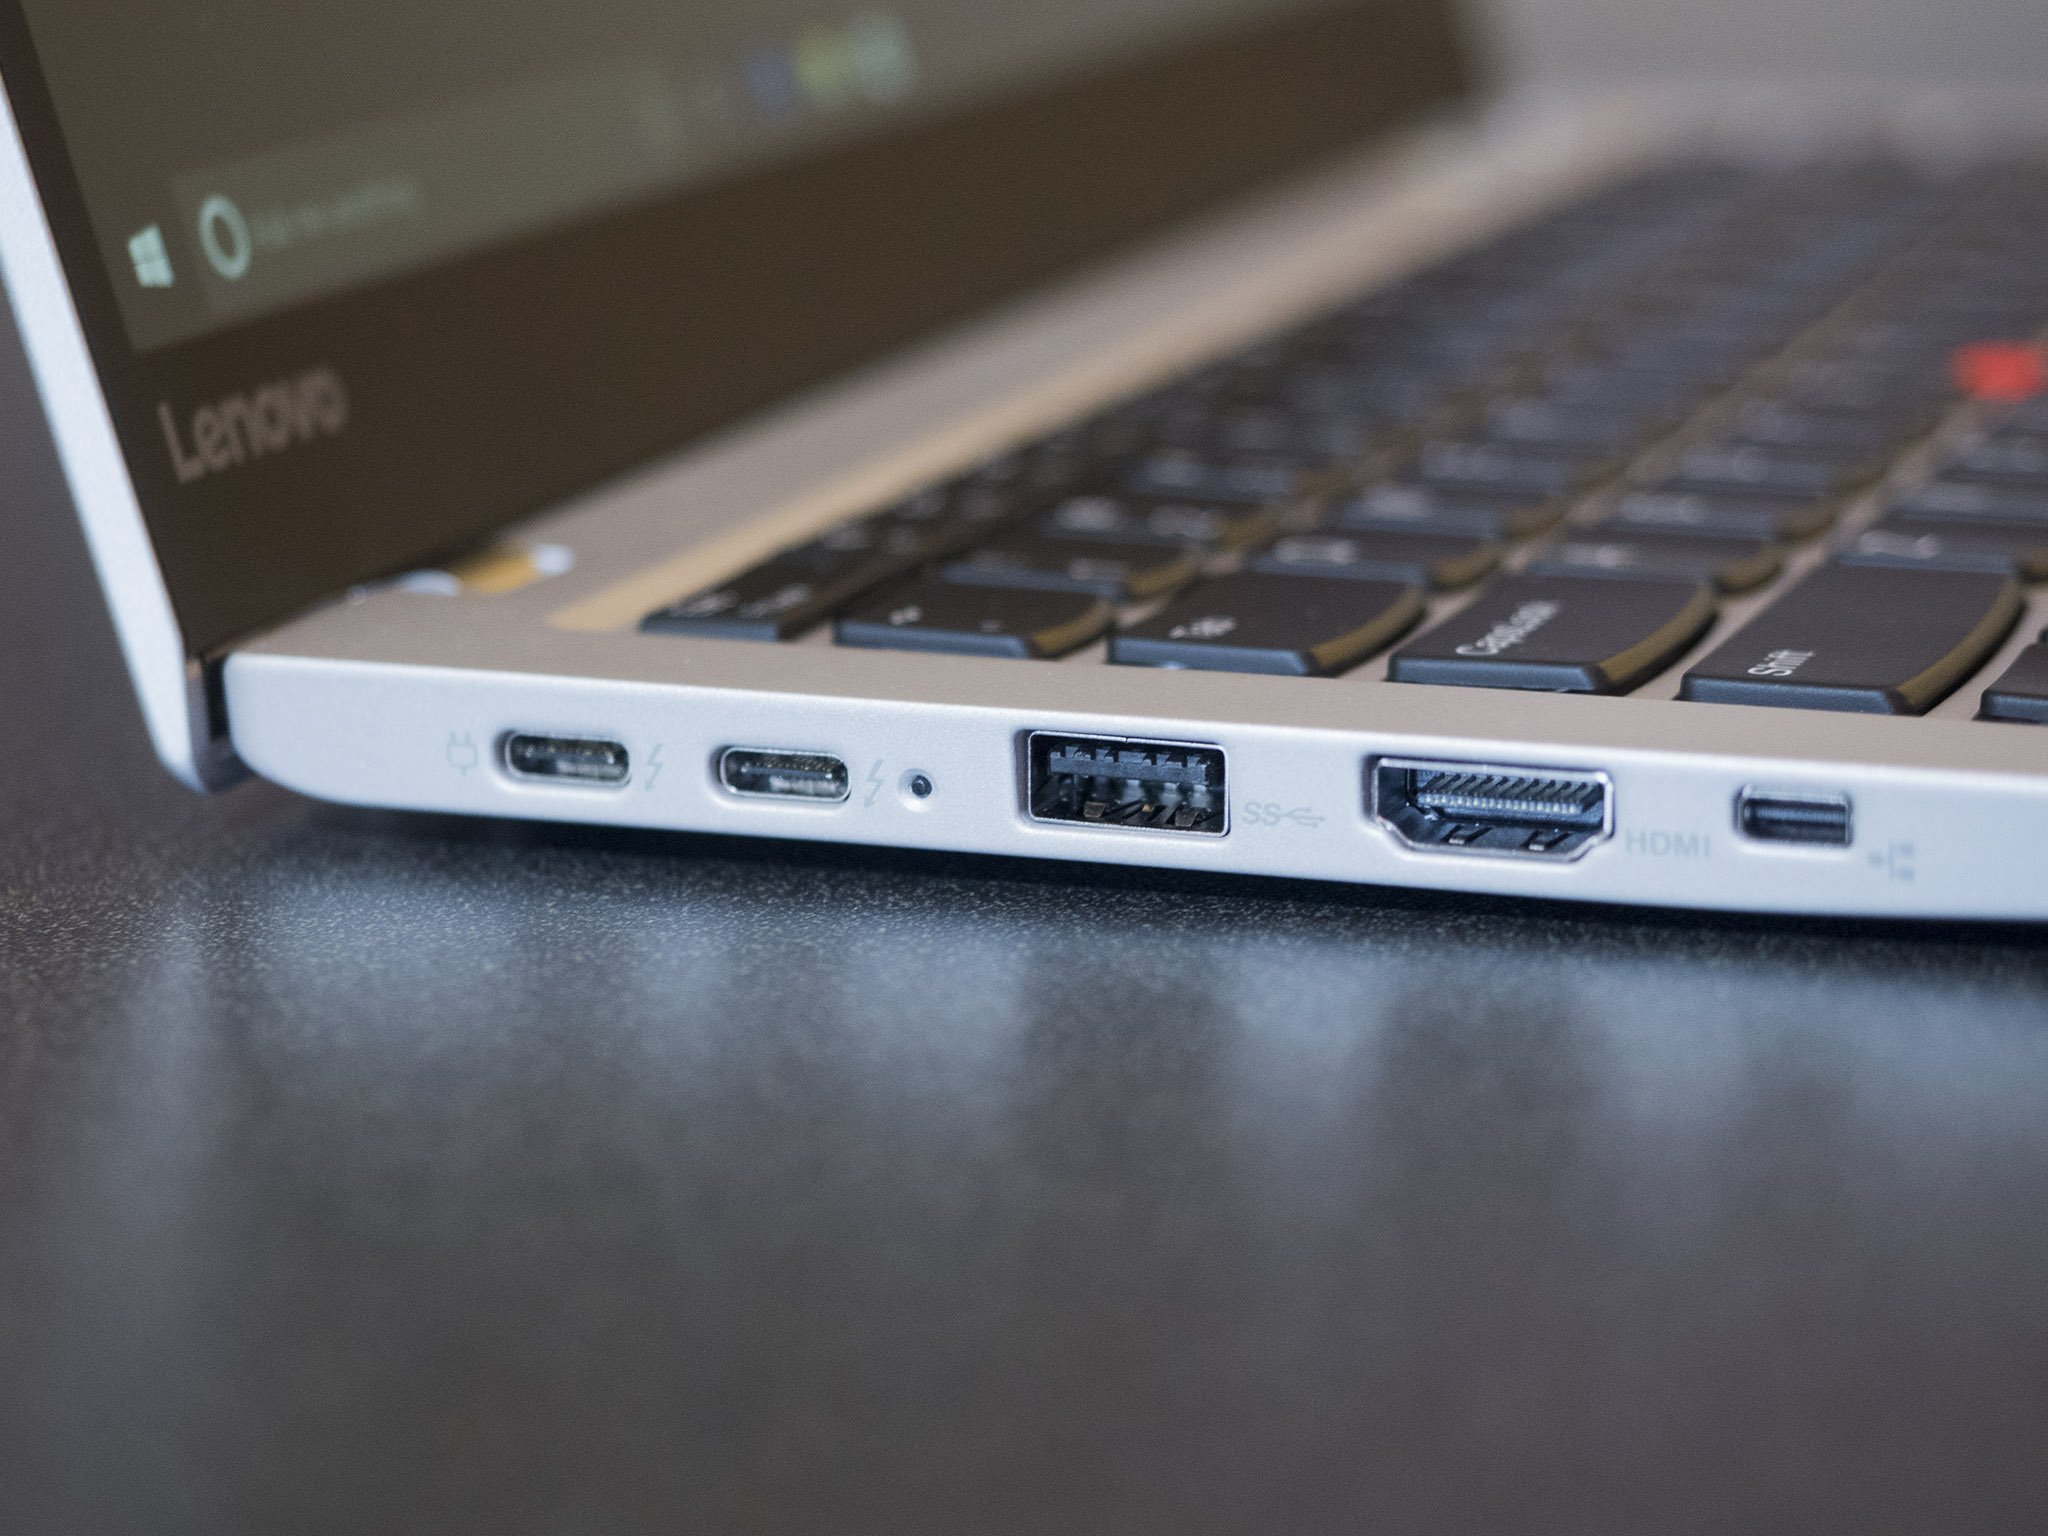
If the device has both a discrete and integrated graphics card, you can try switching to the integrated video card to determine whether the discrete card is the problem. In the case that you recently updated the UEFI (Unified Extensible Firmware Interface) or BIOS (Basic Input/Output System), this can sometimes disable the discrete graphics card, which you can only enable again from the motherboard firmware.
When you connect to an external monitor, open the control panel on the display to increase the brightness to resolve the black screen problem. It’s also a good idea to check the monitor is using the correct input. (You may need to check the manufacturer support website for specific details.)
If the problem occurs on a laptop, use the function key on the keyboard to increase the display brightness. Typically, you will need to press the Function (Fn) key and one of the functions keys like F8 or F10.
You can also try connecting the monitor to a different computer or using a different video cable to determine whether you are dealing with a broken display, graphics card, or damaged cable.
Detect display
A black screen could also happen because Windows 10 will lose its connection with the display. The «Windows key + Ctrl + Shift + B» keyboard shortcut can restart the video driver and refresh the connection with the monitor.
On specific devices, you can wake up the screen by pressing the volume up and volume down buttons at the same time three times (quickly).
When you perform the wake action, you will hear a beep and activity on the screen indicating that Windows 10 can respond to the command and is trying to establish a new connection.
Alternatively, you can use the «Windows key + P» keyboard shortcut to open the «Project» flyout menu. Then hit the P key again and the Enter key to cycle through the different display modes to see whether the black screen disappears. (You will need to repeat the steps four times to allow passing through all the possible modes.)
If the black screen still appears, press and hold the power button for about 10 seconds to shut down the device. Then press the power button again to restart. (If documents are open, you might lose unsaved content using this action.)
Disconnect non-essential devices
Connected peripherals may be why the black screen or black screen with the spinning dots during startup. Typically, spinning dots during startup indicates that an update is in the installation process, and you must wait a few moments. However, if it takes a long time, it could be a compatibility problem with the hardware.
You can fix this problem by disconnecting all peripherals, including printers, cameras, removable drives, Bluetooth, the docking station, and other USB devices from the computer.
Once you disconnect the peripherals, restart the computer, and if it returns to normal, the problem will likely be one of the devices. You can determine which component is causing the issue by reconnecting them one at a time until you find the conflict.
After finding the problematic peripheral, disconnect it, restart the computer, search online to find a solution, or contact the manufacturer for additional assistance.
Fix black screen with desktop access
If you see a black screen after signing into Windows 10 and can still use the mouse, the problem could be something with the Windows Explorer process.
To resolve Windows Explorer process issues, use these steps:
- Use the «Ctrl + Shift + Esc» keyboard shortcut to open Task Manager.
- Quick tip: You can also use the «Ctrl + Alt + Del» keyboard shortcut and click the Task Manager button. We are using these methods since we assume the Taskbar is also missing when experiencing a black screen.
- Click the More details button (if in compact mode).
- Click the Processes tab.
- Select the Windows Explorer service.
- Click the Restart button from the bottom-right corner.
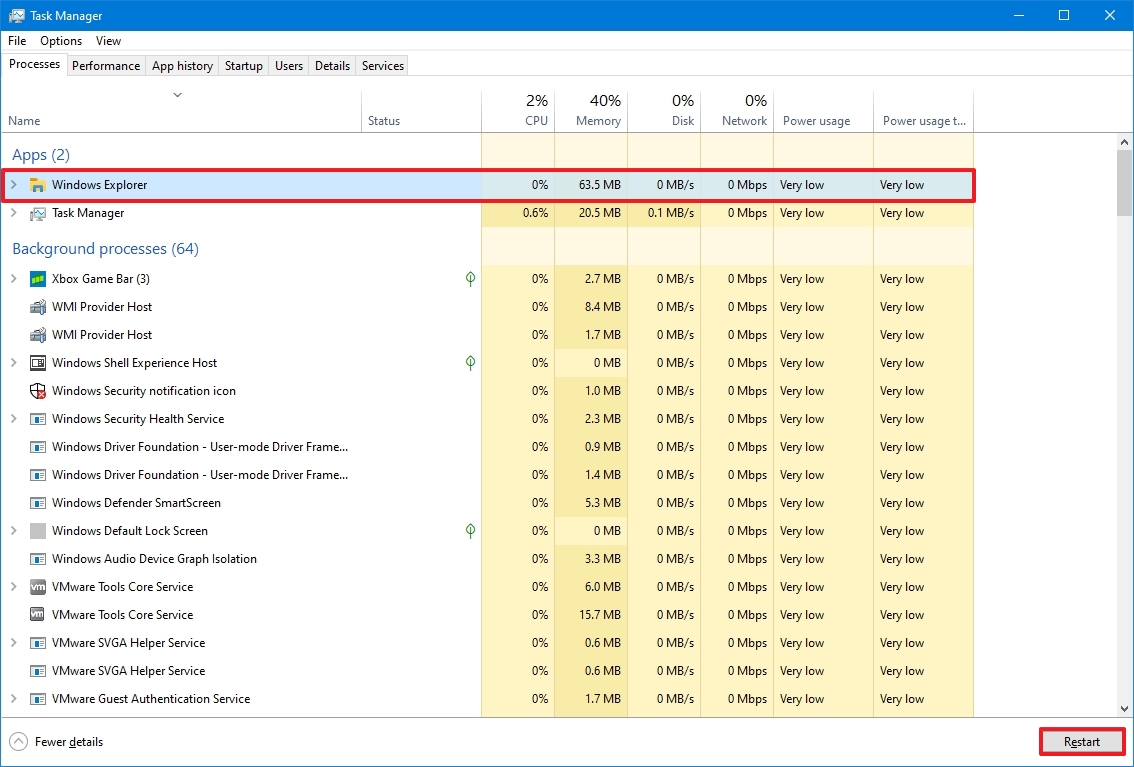
After you complete the steps, the desktop should appear, fixing the black screen problem.
Restart explorer.exe process
If the above instructions do not work, you can restart the process with these steps:
- Use the «Ctrl + Alt + Delete» keyboard shortcut to open Task Manager.
- Click the More details button (if in compact mode).
- Right-click the Windows Explorer service and select the End task option (if available).
- Click the File menu.
- Select the Run new task option.
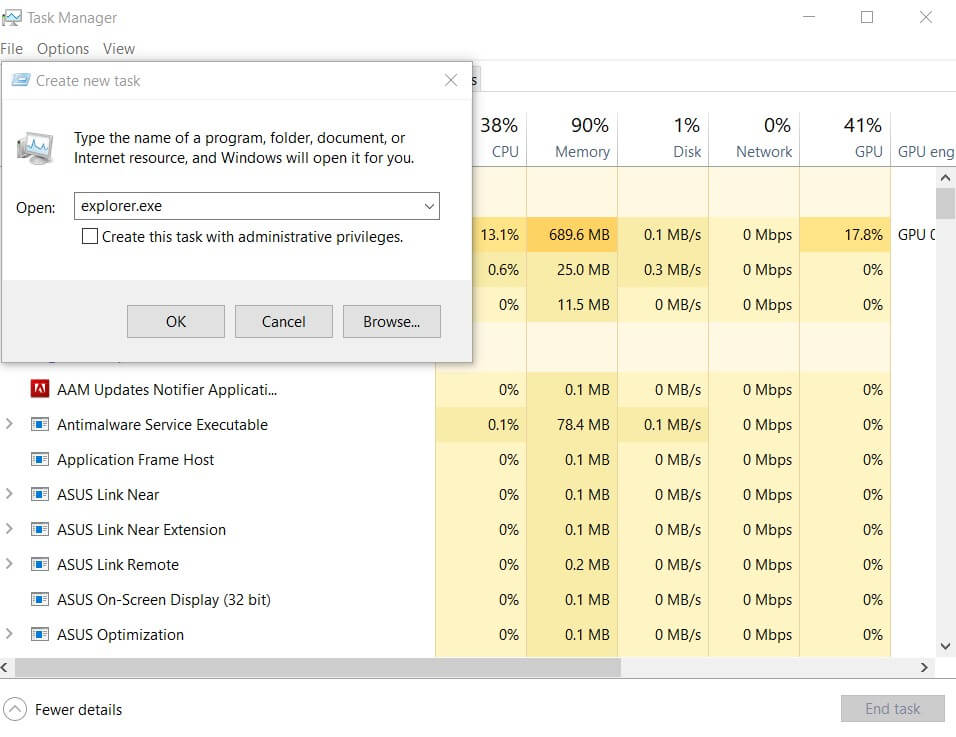
- Type the following command and click the OK button: explorer.exe
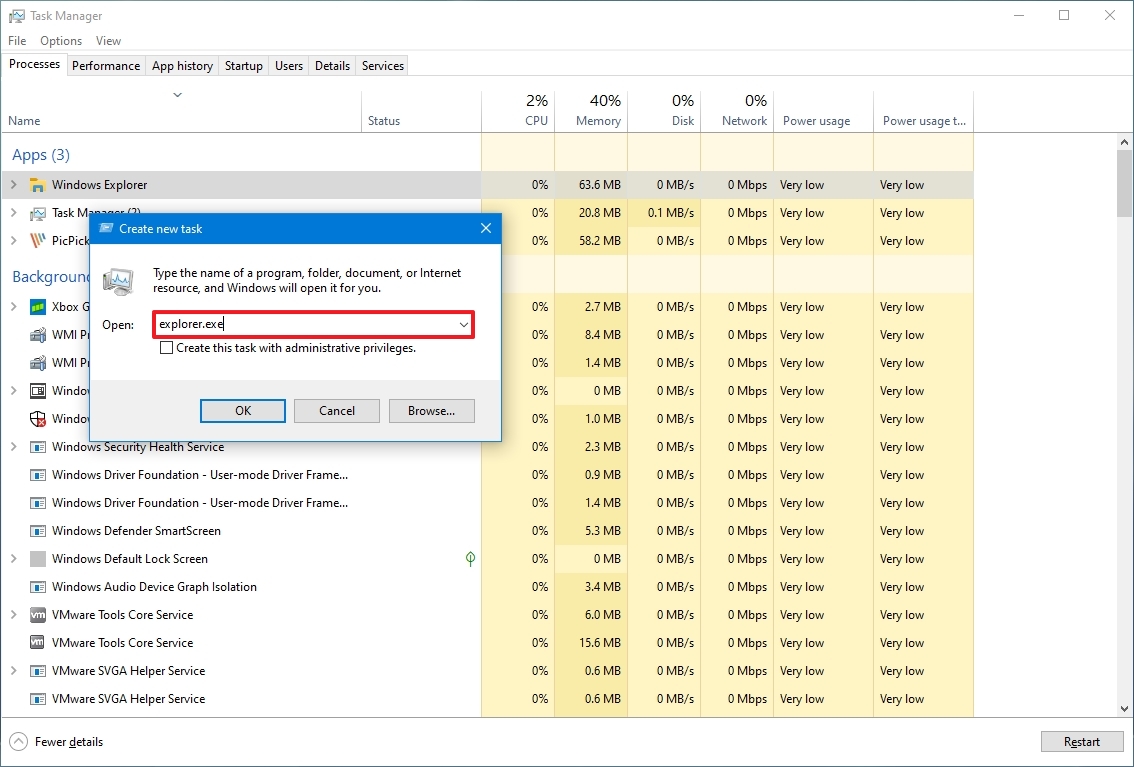
Once you complete the steps, the black screen should go away, and the desktop alongside the Taskbar and icons should appear.
Fix black screen with safe mode
If you do not have access to the desktop, you can use the «Advanced startup» settings boot in safe mode to troubleshoot and fix the black screen issue.
Open Advanced startup using the three-fail boot method
To access the Windows 10 advanced options, use these steps:
- Start the computer.
- As soon as the Windows logo appears on the screen, press the power button to interrupt the boot sequence.
- Repeat steps 1 and 2 two more times.
After the second interruption, Windows 10 will start the Automatic Repair environment, where you will find the option to access Advanced startup, and then you can continue with the steps to boot in safe mode.
Open Advanced startup using bootable media method
Alternatively, you can use a Windows 10 bootable USB flash drive to access the advanced settings using these steps:
- Start computer using a USB flash drive.
- Quick tip: If the device is not starting from USB, you will have to change the motherboard’s BIOS settings to ensure it can boot from USB. You can usually access the BIOS by powering up the device and pressing one of the functions, the Delete or Esc keys. However, you may need to check your manufacturer’s support website for more specific details.
- Click the Next button.
- Click the «Repair your computer» option in the bottom-left corner.
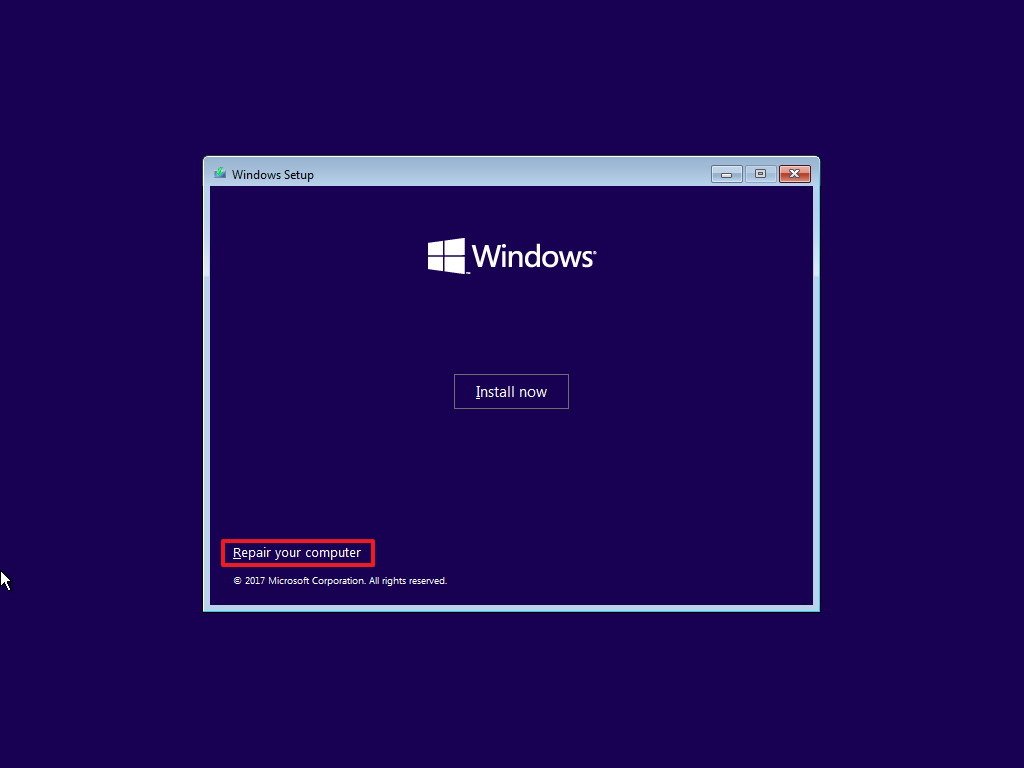
Once you complete the steps, continue with the instructions to access safe mode on Windows 10.
Boot Windows 10 in safe mode
To start in safe mode through Advanced startup, use these steps:
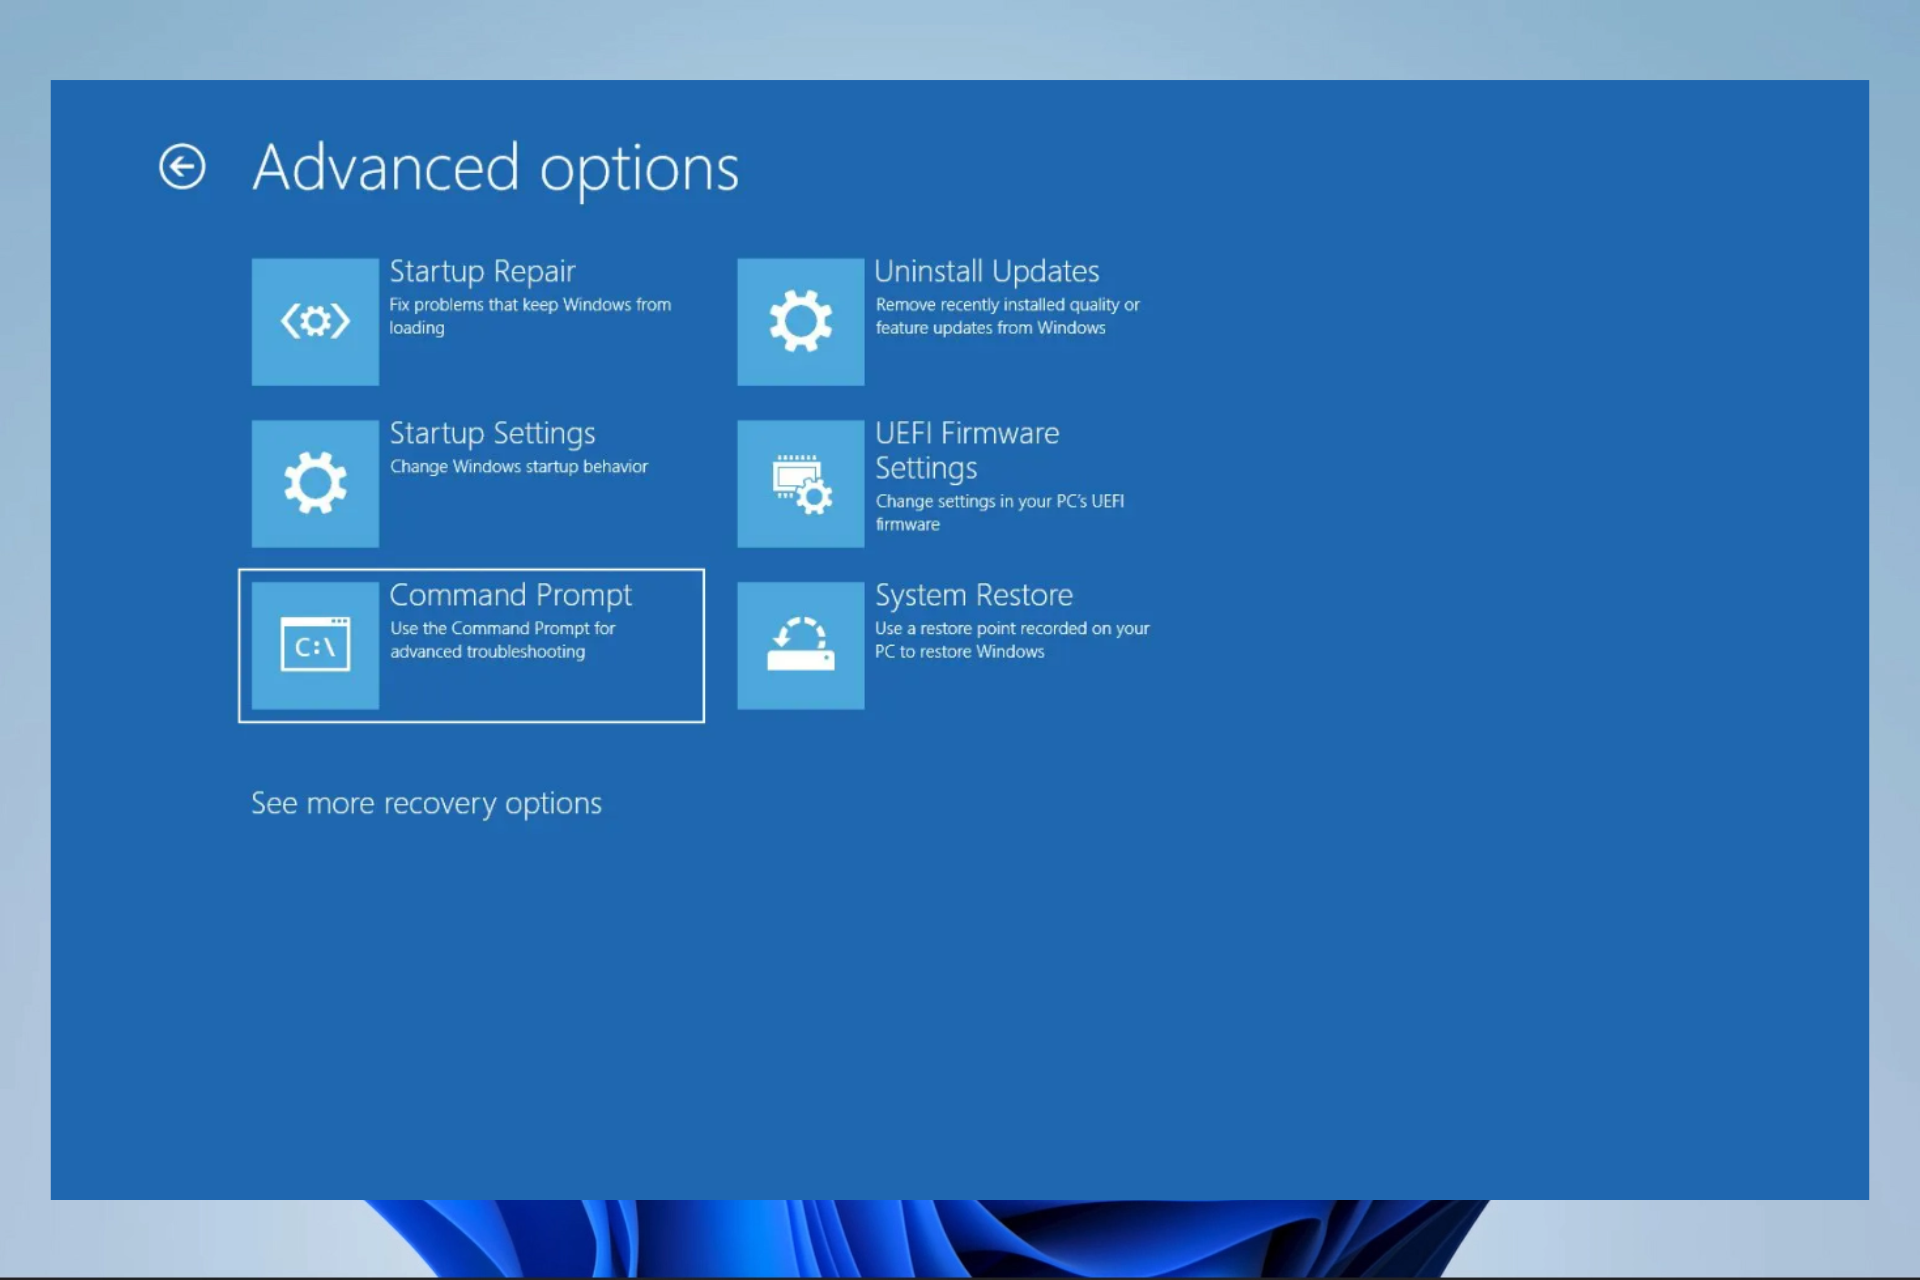
- Click the Troubleshoot option.
- Click the Advanced options button.
- Click the Startup Settings option.
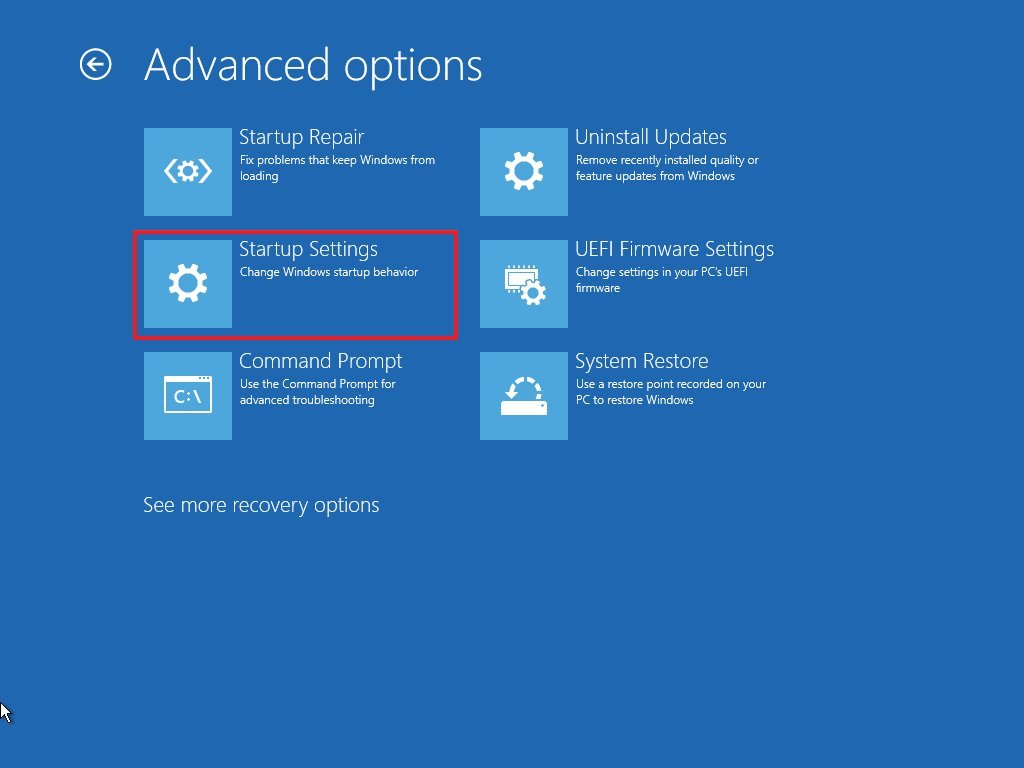
- Click the Restart button.
- On the «Startup Settings» page, press the 5 or F5 key to select the «Enable Safe Mode with Networking» option.
After the computer boots in safe mode, you can use many troubleshooting steps to fix the black screen problem. For instance, you can reinstall the graphics driver, remove buggy updates, change system settings, and more (see instructions below).
Perform Windows 10 clean boot
Typically, Windows 10 loads services, drivers, and apps during startup, which will remain running in the background. If one or more components are not working correctly, you will see a black screen.
A clean boot allows you to start the system with a minimal set of services, drivers, and apps, which can help you figure out if something running in the background is causing the screen to turn dark.
On Windows 10, a clean boot is similar to safe mode but allows you to re-enable services individually to determine the component causing the issue.
To perform a clean boot of Windows 10, use these steps:
- Open Start.
- Search for msconfig and click the top result to open the System Configuration app.
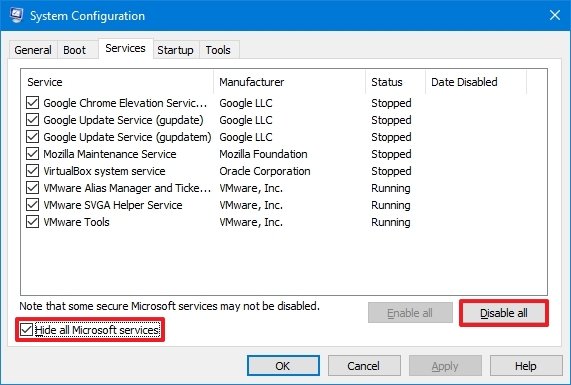
- Click the Services tab.
- Check the «Hide all Microsoft services» option.
- Click the Disable all button.
- Click the Apply button.
- Click the Startup tab.
- Click the Open Task Manager option.
- Click the Startup tab.
- Select each application, and click the Disable button in the bottom-right corner.
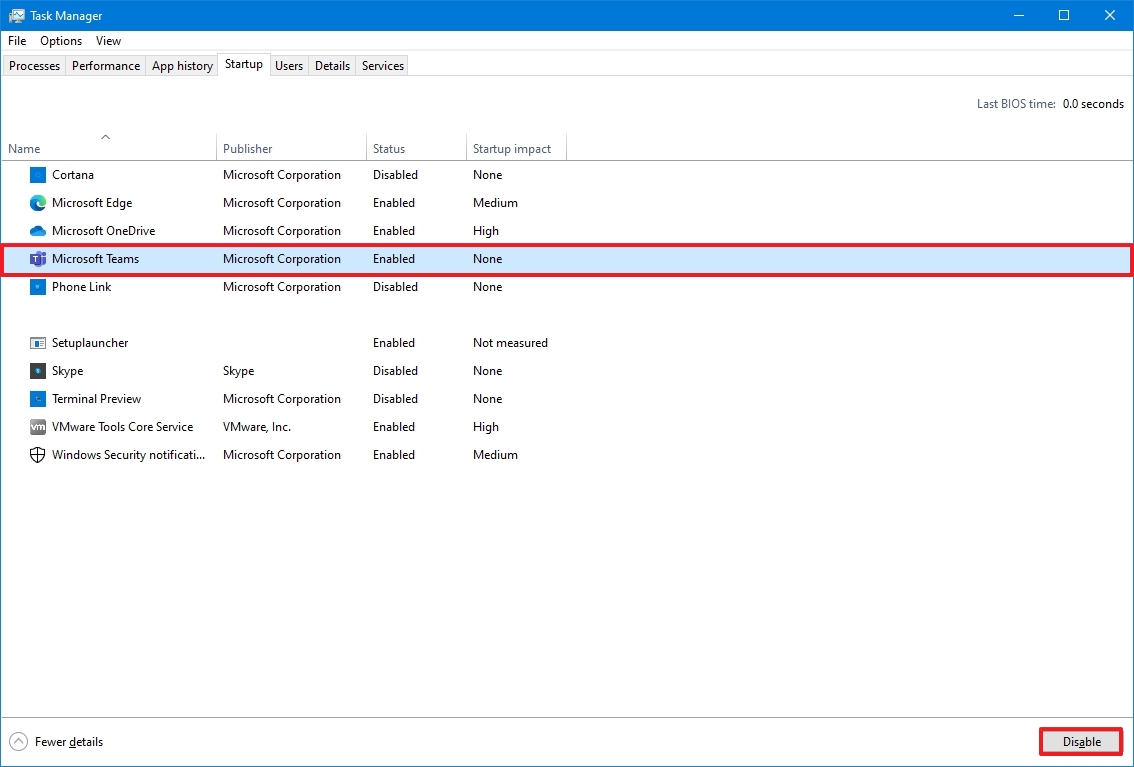
- Close Task Manager.
- Click the OK button.
- Restart the computer.
These steps won’t fix the problem, but they will give you an idea of where to start looking to resolve the black screen problem on Windows 10.
Troubleshoot black screen using clean boot
If, after restarting the computer, the black screen disappears, then you will know the problem is one of the processes.
To fix the issue, re-enable the items one at a time and restart the computer to see which one is causing the black screen with these steps:
- Open Start.
- Search for msconfig and click the top result to open the System Configuration app.
- Click the Services tab.
- Check the «Hide all Microsoft services» option.
- Check one of the services.
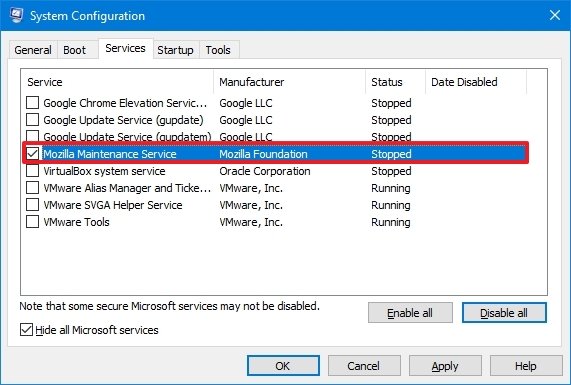
- Click the Apply button.
- Click the OK button.
- Restart the computer.
Once you complete the steps, repeat the steps for every item until you find causing the problem.
Re-enable startup items
If none of the services seem to be the issue, use these steps to re-enable the startup items:
- Open Start.
- Search for Task Manager.
- Click the Startup tab.
- Select an app and click the Enable button in the bottom-right corner.
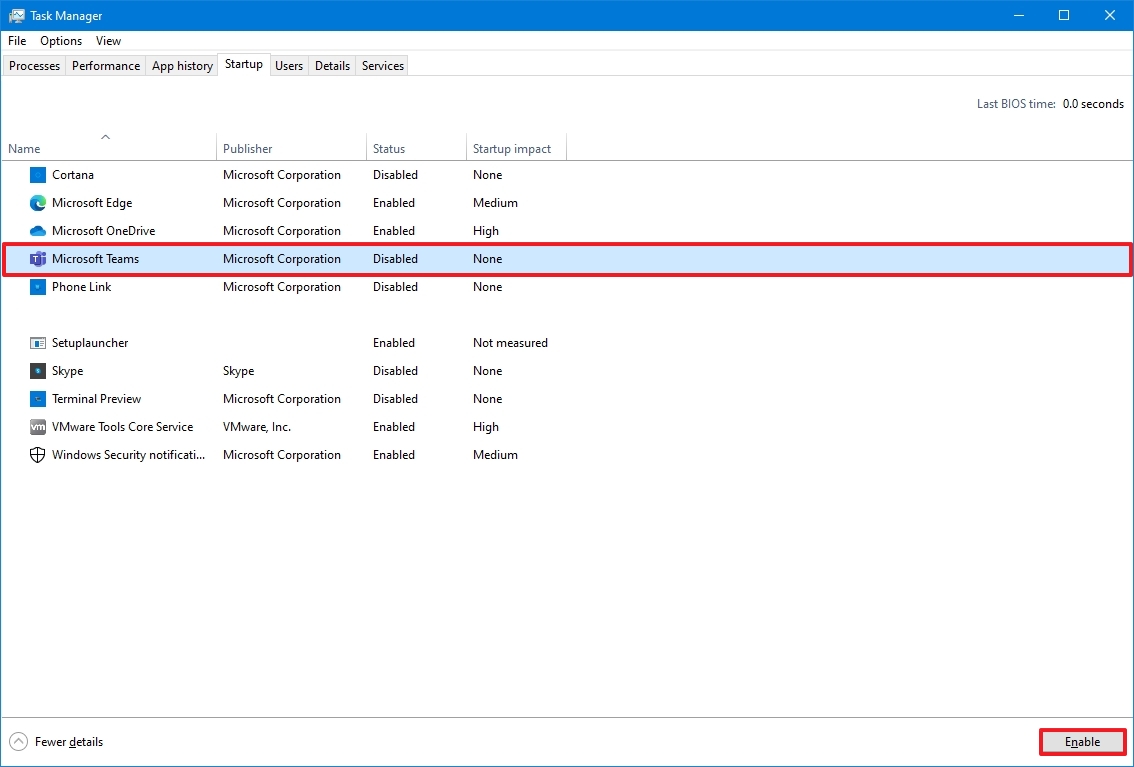
- Close Task Manager.
- Restart the computer.
After you complete the steps, repeat the instructions for every item until figuring out which app is causing the black screen.
If you need to revert the changes, use the same instructions outlined above, but on step 5, click the Enable all button, and on step 10, click the Enable button for each previously enabled application.
Reinstall or rollback graphics driver
Typically, a black screen could result from a compatibility issue with a graphics driver update installed through Windows Update or manually. Other times, it could be the case that the driver got corrupted for unknown reasons.
Reinstall graphics driver
To reinstall the graphics driver while in safe mode, use these steps:
- Open Start.
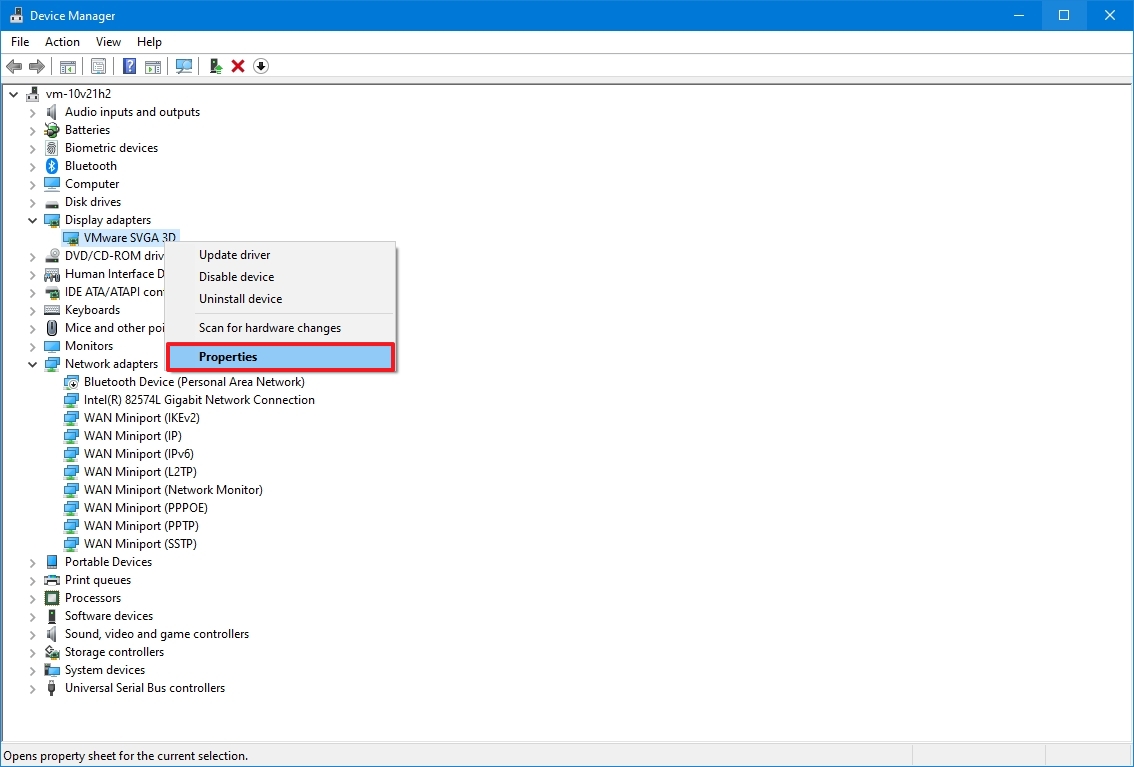
- Search for Device Manager and click the top result to open the app.
- Expand the Display Adapters branch.
- Right-click the video adapter and select the Uninstall device option.
- Quick tip: Alternatively, you can also select the Delete the driver software for this device option to remove the driver from the computer. Sometimes, this is recommended, but if Windows 10 can’t find the driver online, you will need to download it from your manufacturer’s support website.
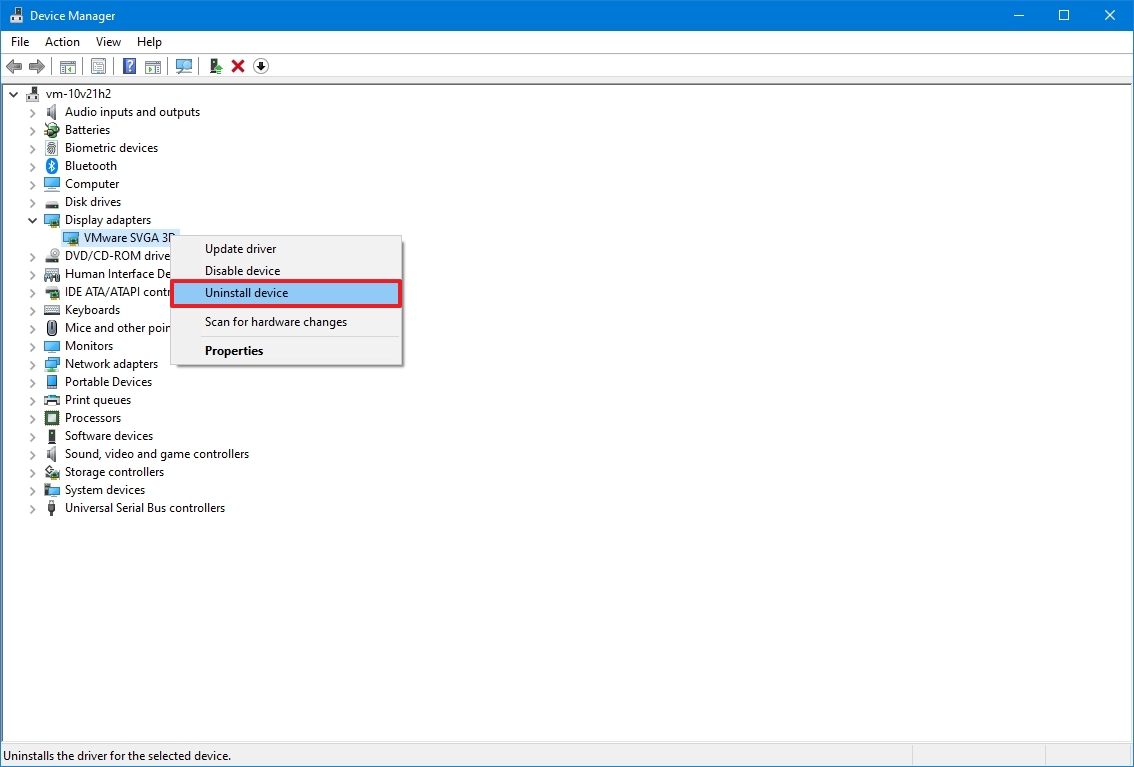
- Click the OK button.
- Restart the computer.
Once the device restarts, Windows 10 will automatically try to reinstall the graphics driver, resolving the black screen problem.
Alternatively, you can uninstall the video drivers from the «Apps & features» settings page by selecting the device driver package and clicking the Uninstall button.
If the problem occurs immediately after upgrading to a new version of Windows 10, then it is likely that the device is experiencing a compatibility problem. In this case, you may need to download and install a newer version of the driver from the computer or graphics card manufacturer’s support website to resolve the issue.
Rollback graphics driver
When the black screen shows up after applying an update, rolling back to the previous version of the driver may fix the problem on Windows 10.
To roll back a previous version of a driver on Windows 10, use these steps:
- Open Start.
- Search for Device Manager and click the top result to open the app.
- Expand the Display Adapters branch.
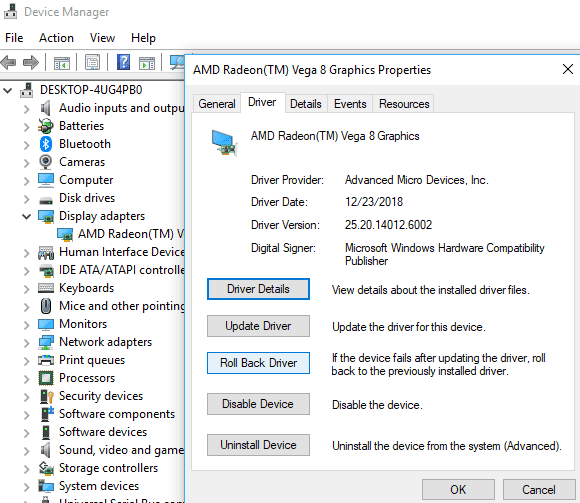
- Right-click the video card and select the Properties option.
- Click the Driver tab.
- Click the «Roll Back Driver» button.
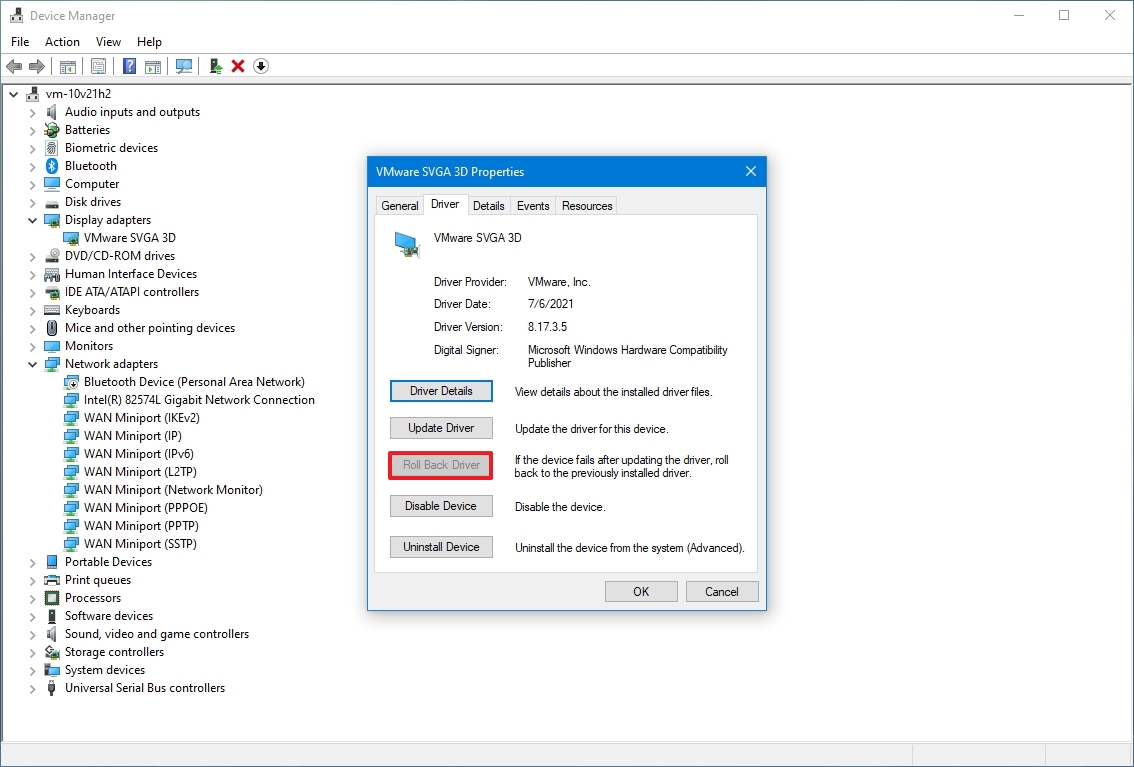
- Select a reason to enable the option to roll back.
- Click the Yes button.
- Restart the computer.
After you complete the steps, Windows 10 will uninstall the driver, and the previous version will be restored, fixing the black screen problem.
The system does not have a previous driver version if the Roll Back Driver option is unavailable. If an earlier version of the driver was working correctly, you might be able to download it from your manufacturer’s support website.
Disable Fast Startup
Sometimes, the fast startup feature may be why the device ends up with a black screen. On Windows 10, fast startup is a feature available in specific hardware configurations to speed up the boot process. If it’s causing a black screen, you can disable it to mitigate the issue.
To disable fast startup on Windows 10, use these steps:
- Open Settings.
- Click on System.
- Click on Power & sleep.
- Under the «Related settings» section, click the «Additional power settings» option.
- Select the «Choose what the power button does» option on the left pane.
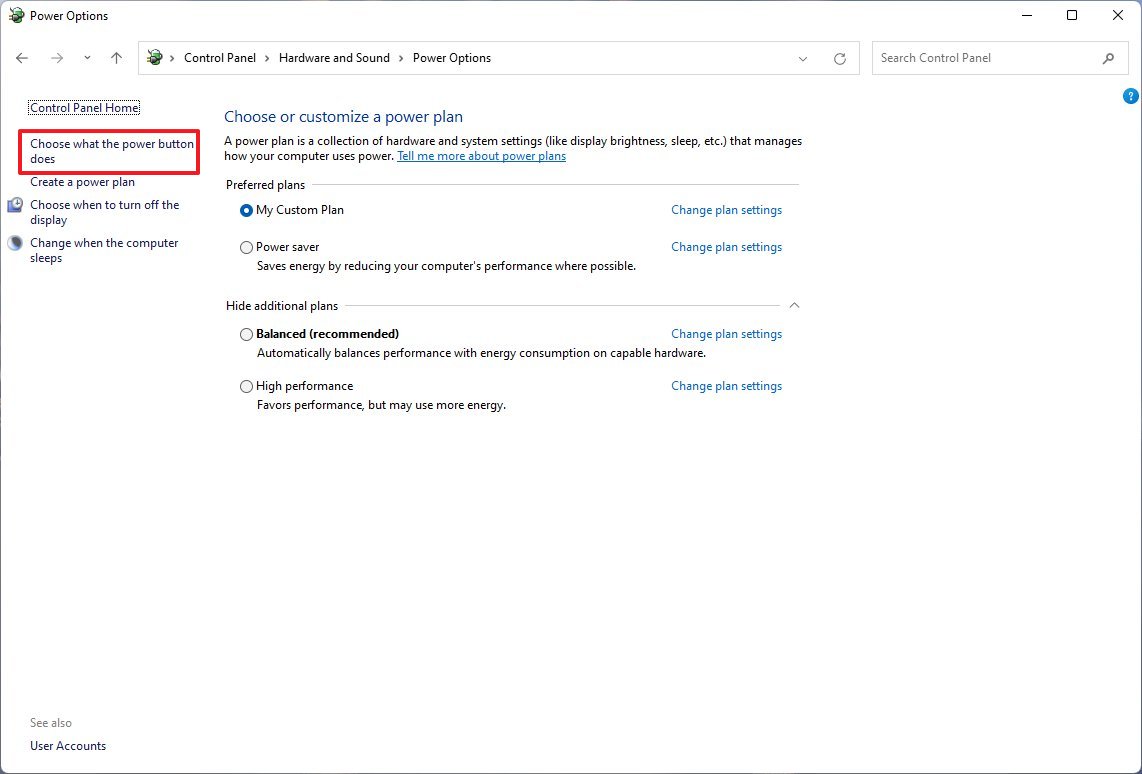
- Click the «Change settings that are currently unavailable» option.
- Clear the «Turn on fast startup (recommended)» option.
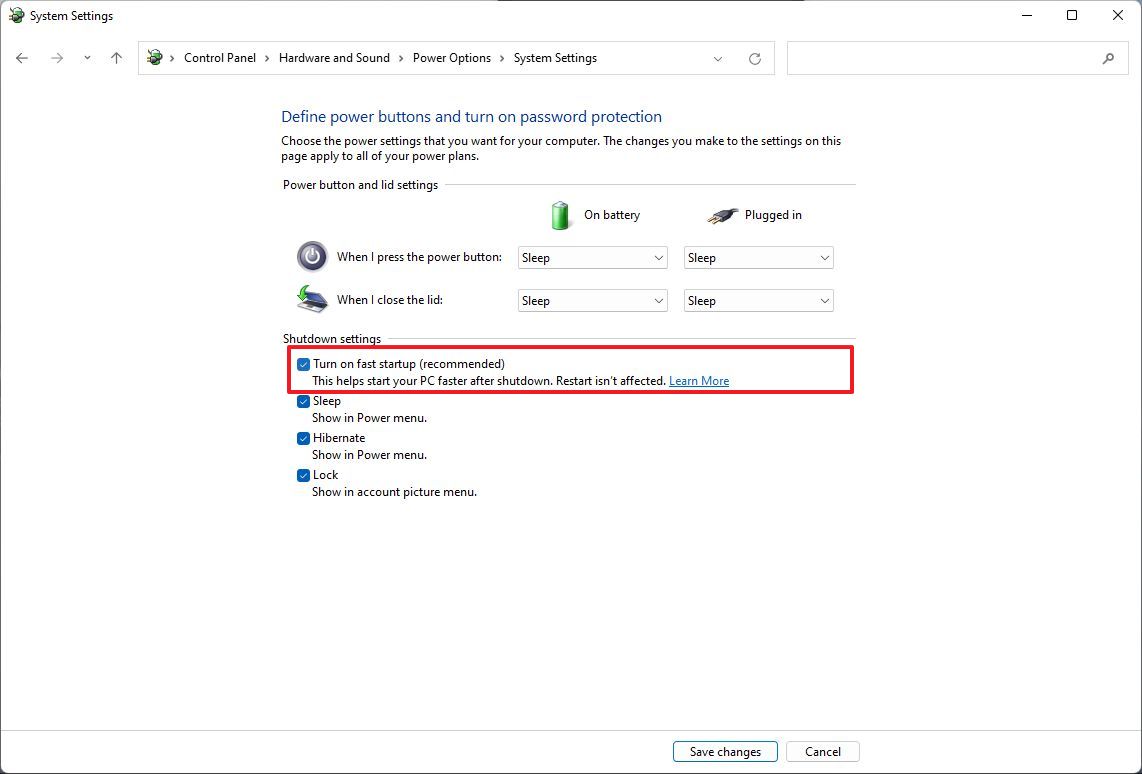
- Click the Save changes button.
- Restart the computer.
After restarting the computer, you should no longer experience the black screen problem.
Disable high contrast
On Windows 10, the high contrast feature can also cause a black screen.
To disable high contrast on Windows 10 while in safe mode, use these steps:
- Open Settings.
- Click on Ease of Access.
- Click on High contrast.
- Turn off the «Use high contrast» toggle switch.
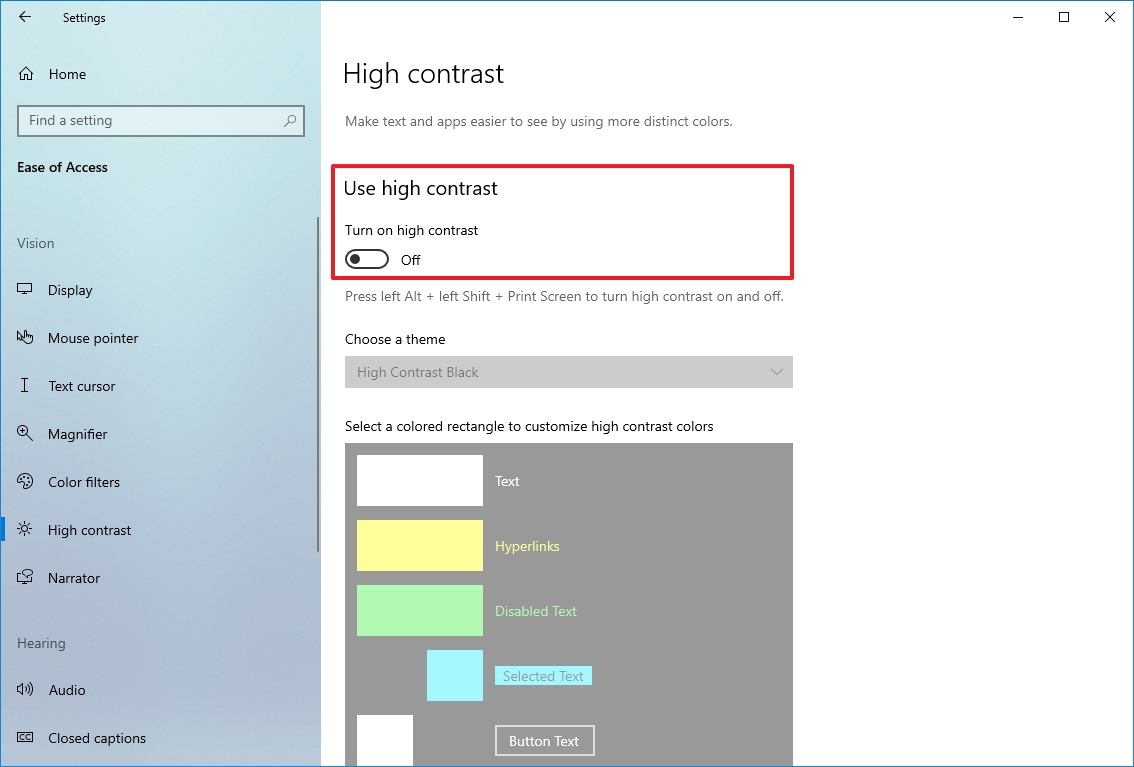
Once you complete the steps, restart the device to confirm the black screen problem has been fixed.
Stop RunOnce process
Windows 10 also includes the «RunOnce» feature to specify a series of commands that should run once during the next reboot, but it can sometimes cause the screen to go black on a computer.
To stop the RunOnce process on Windows 10, use these steps:
- Open Start.
- Search for Task Manager and click the top result to open the app.
- Click the Processes tab.
- Select the RunOnce process and click the End task button.
- (Optional) Click the Services tab (if the process was not in the «Processes» tab).
- Right-click the RunOnce item and select the Stop button.
- Restart the computer.
If the RunOnce process was causing the problem, you should be able to start using the computer normally again.
Uninstall quality updates
It’s not uncommon for updates with bugs and compatibility issues. If your computer recently received an update and you see a black screen, uninstalling the patch may resolve the problem.
You won’t be able to access the «Update & Security» settings to remove a quality update while in Safe mode, but you can still use Control Panel.
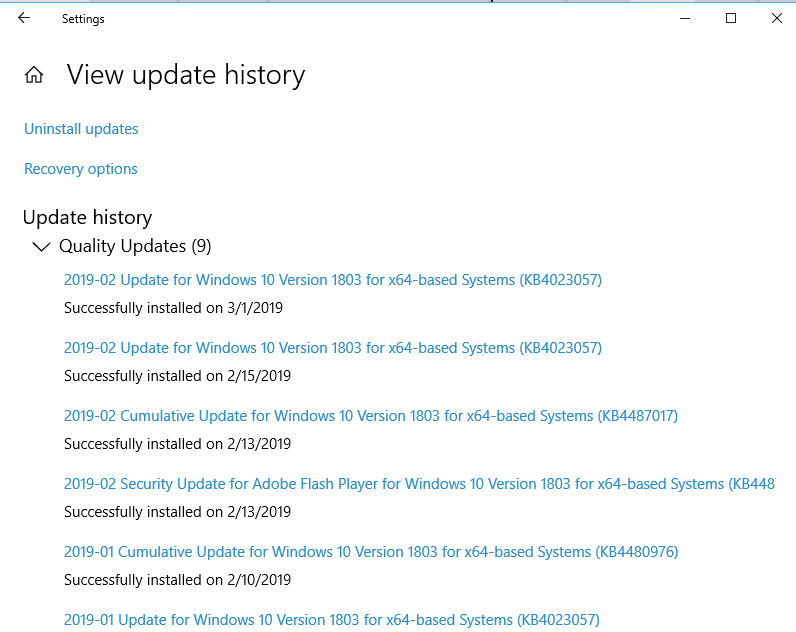
To uninstall Windows 10 updates in Safe mode, use these steps:
- Open Start.
- Search for Control Panel and click the top result to open the app.
- Click on Programs.
- Click the «Programs and Features» option.
- Click the «View installed updates» option from the left pane.
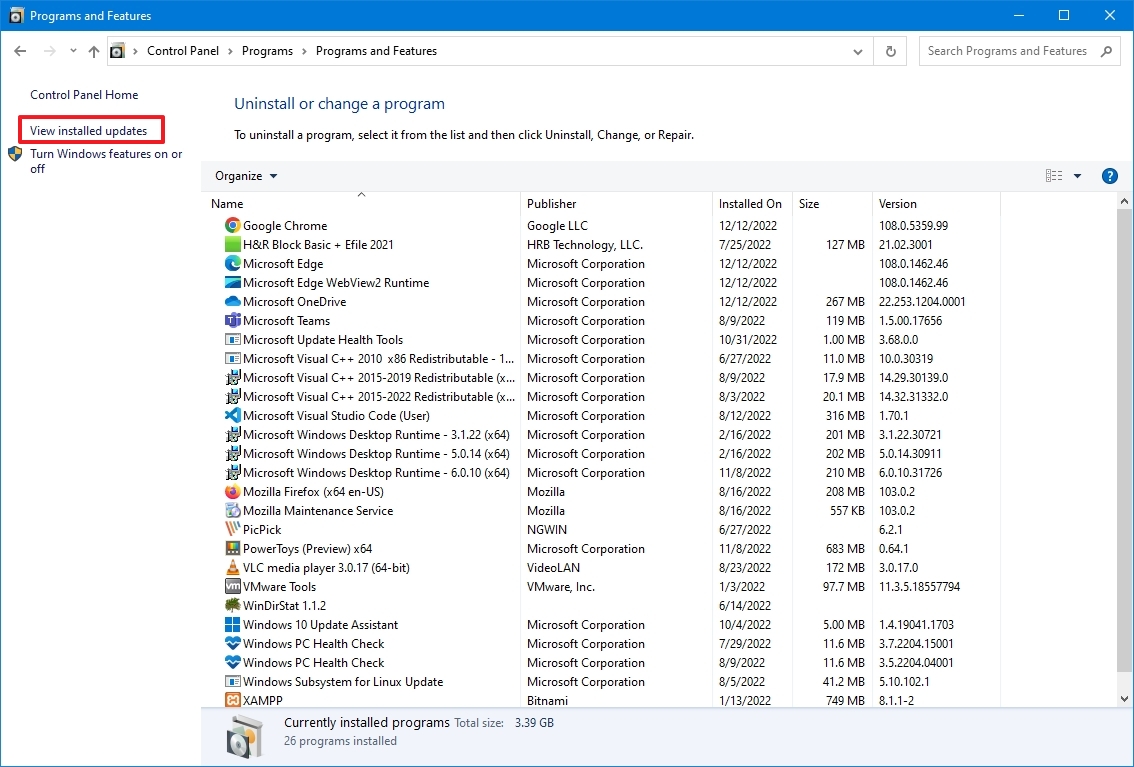
- Select the most recent update.
- Click the Uninstall button.
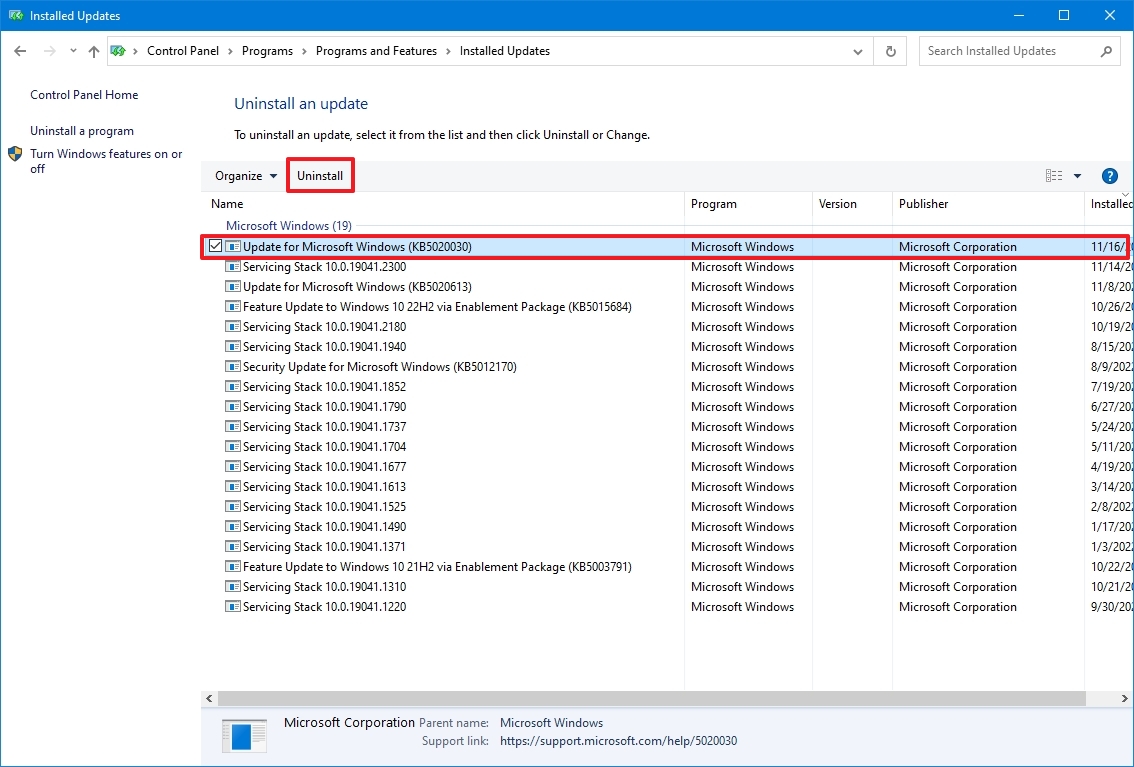
- Restart the computer.
Once you complete the steps, the update will uninstall from the computer, and the system won’t try to install it again until a subsequent update becomes available.
Uninstall security software
Security solutions like third-party antivirus and security software can sometimes cause black screens on Windows 10.
If the computer has a security program, you can temporarily remove it to determine whether the app is causing the problem.
To uninstall a security app while in safe mode on Windows 10, use these steps:
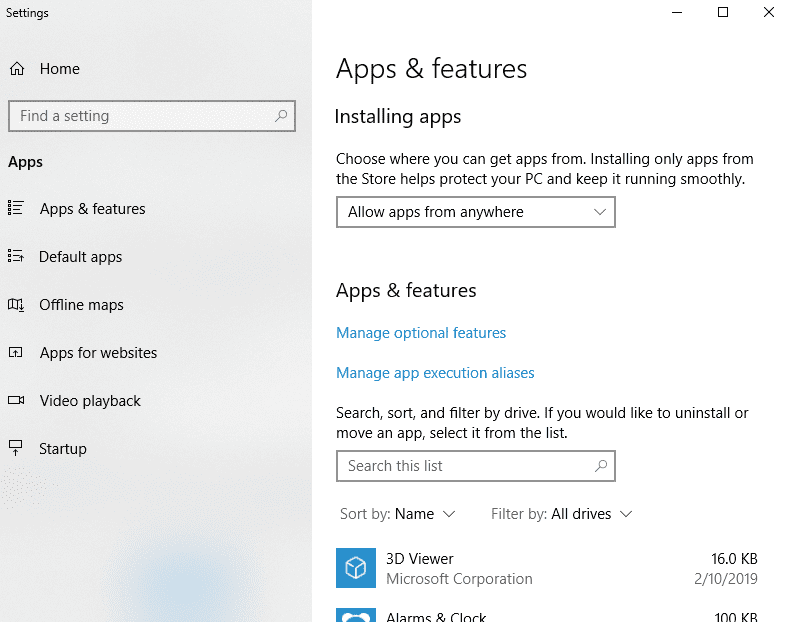
- Open Settings.
- Click on Apps.
- Click on Apps & features.
- Under the «Apps & features» section, select the security app.
- Click the Uninstall button.
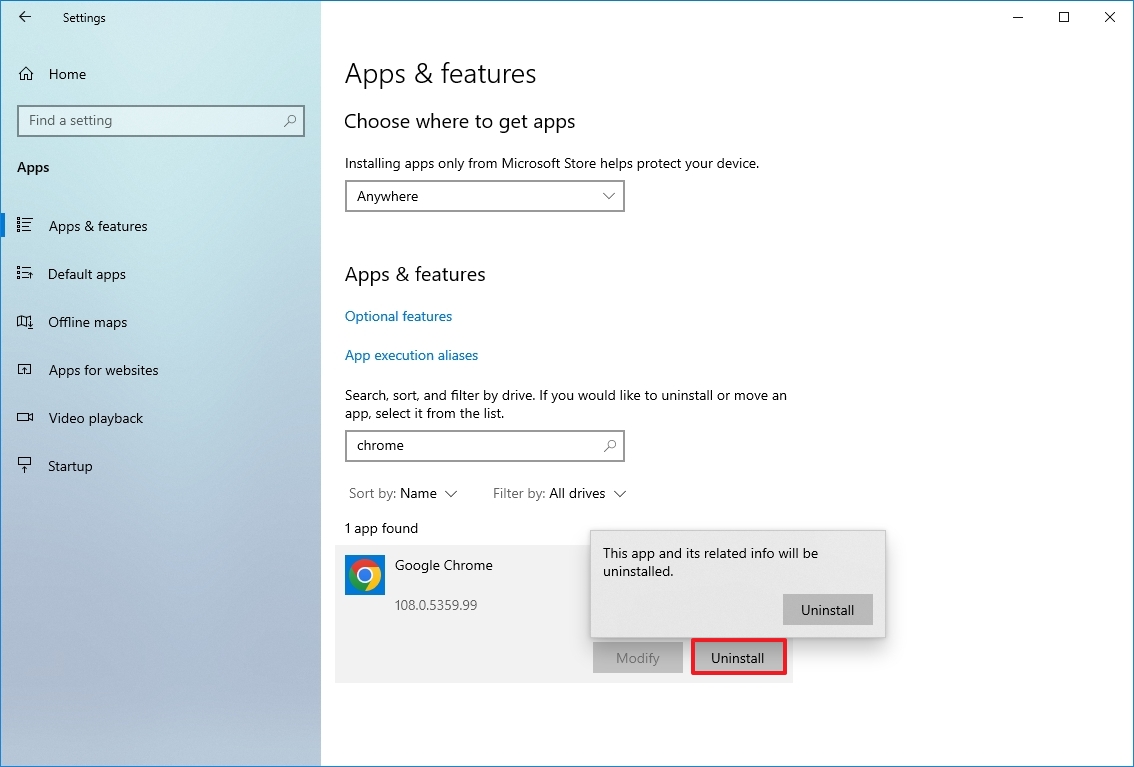
- Continue with the on-screen directions (if applicable).
- Restart the computer.
After you complete the steps, the problem will resolve, and you should be able to install the program again. If the black screen returns, you may need to remove it completely to mitigate the issue.
You may want to check the software support website to download an updated version or contact support for guidance if the program conflicts.
Create new Windows 10 account
A damaged Windows 10 account can also cause a black screen. While in safe mode, you can create a new account to test and see if this is causing the problem. If you can use the device without a black screen, you should consider transferring your files and settings to the new account.
To create a new account in safe mode on Windows 10, use these steps:
- Open Start.
- Search for Command Prompt, right-click the top result, and select the Run as administrator option.
- Type the following command to create a new account and press Enter: net user ACCOUNT-NAME /add
In the command, change «ACCOUNT-NAME» to the name of the account you want to create. For example, this command creates an account named tempuser: net user tempuser /add
- Type the following command to change the account type to «Administrator» and press Enter: net localgroup administrators tempuser /add
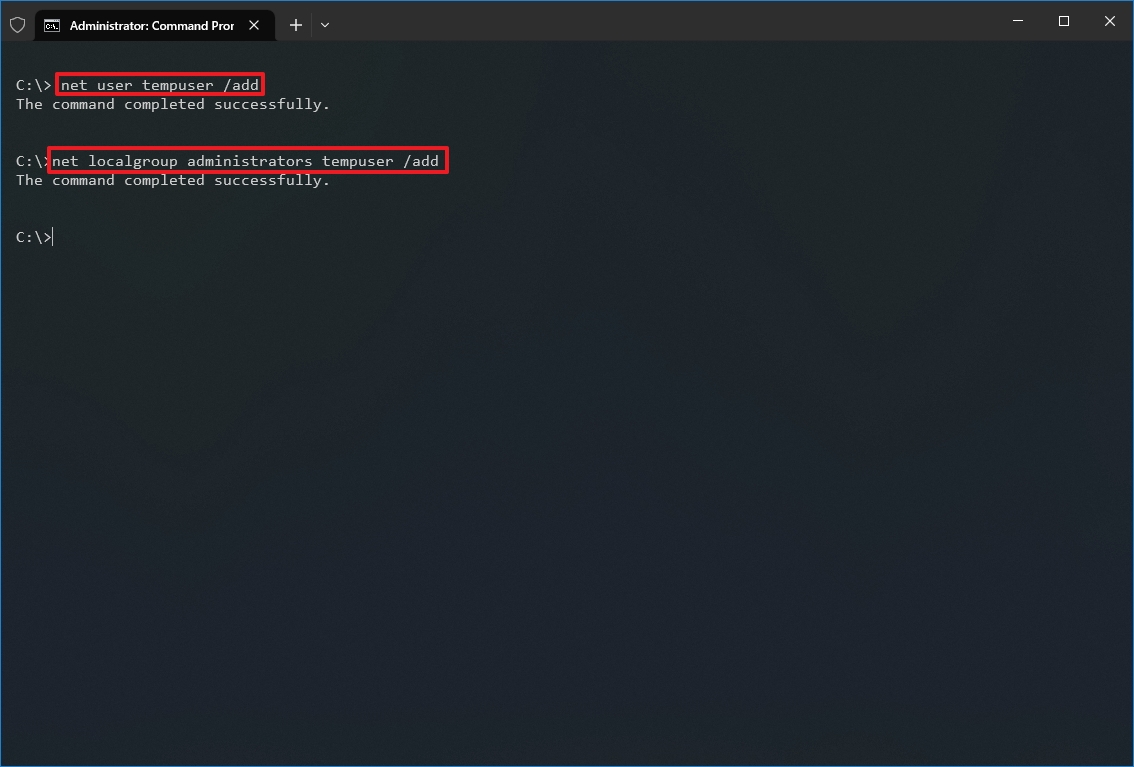
- Restart the computer.
- Sign in with the new user account.
The problem could be related to your old user account if the computer no longer shows a black screen. Instead of troubleshooting the problem, which could take a lot of time, you should refer to this guide to transfer your files, link your user profile with a Microsoft account, and delete the old account.
Fix black screen with System Restore
System Restore is a feature that can help to undo system changes that could be causing the black screen. Using this feature, you won’t lose your files, but you may lose some settings, apps, and updates depending on the current configuration. (System Restore will only work if you have previously enabled and configured the feature.)
Open Advanced startup using the three-fail boot method
Since you won’t be able to access the System Restore feature when dealing with a black screen, you will need to trigger the recovery environment manually. Here’s how:
- Start the computer.
- As soon as the Windows logo appears on the screen, press the power button to interrupt the boot sequence.
- Repeat steps No. 1 and 2 two more times.
After the second interruption, Windows 10 will open into the recovery environment, and then you can continue with the steps to use System Restore.
Open Advanced startup using bootable media method
Alternatively, you can use a USB flash drive to access the recovery environment settings with these steps:
- Start computer using a USB flash drive.
- Quick tip: If the computer is not starting from the USB media, you have to adjust the motherboard’s BIOS settings to ensure it can boot from the USB. Type, you can access the BIOS by powering up the device and pressing one of the functions, Delete or Esc keys. However, you may need to check your manufacturer’s support website for more specific details.
- Click the Next button.
- Click the «Repair your computer» option in the bottom-left corner.
Once you complete the steps, continue with the System Restore instructions. (See steps below.)
Use restore point to undo system changes
To restore a device to an earlier point in time, use these steps:
- Click the Advanced Startup option.
- Click the Troubleshoot option.
- Click the Advanced options button.
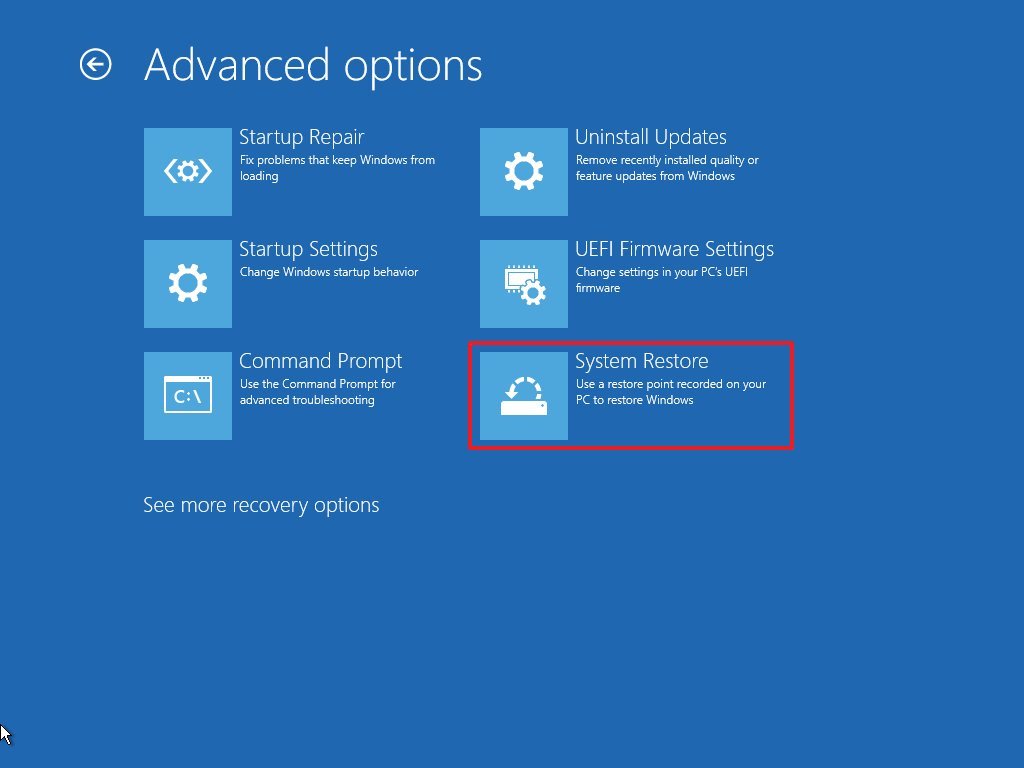
- Click the System Restore option.
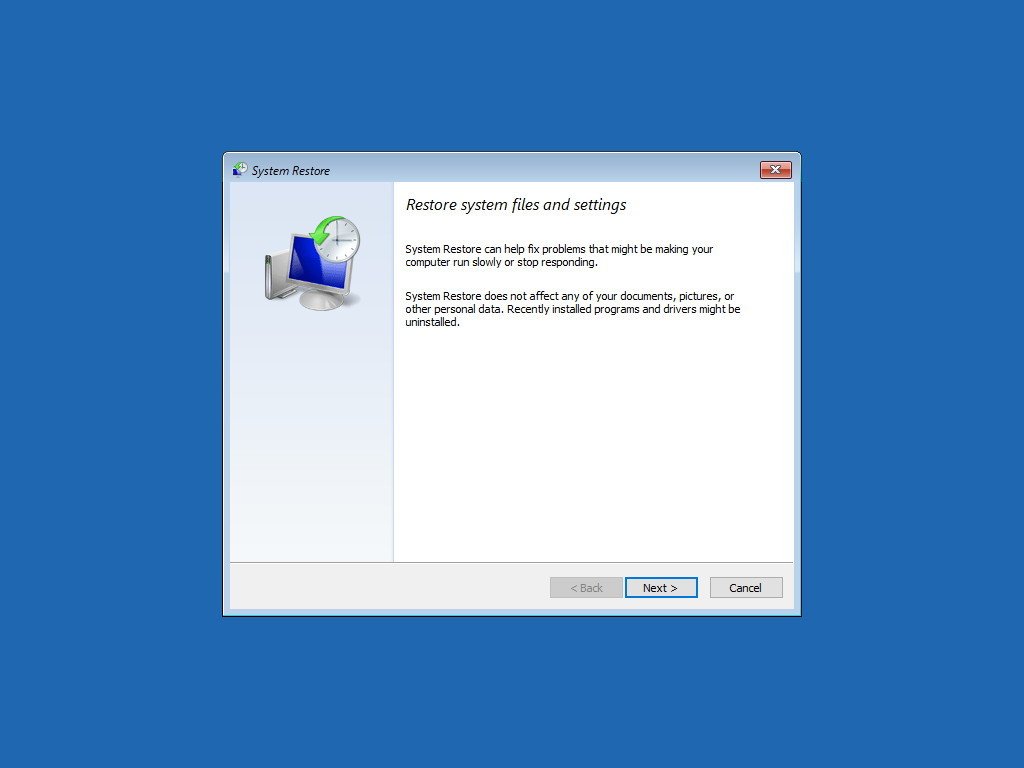
- Click the Next button.
- Select the most recent restore point likely to resolve the issue.
- Click the «Scan for affected programs» button to determine the apps that will be affected after the restore point is created.
- Click the Close button.
- Click the Next button.
- Click the Finish button.
After you complete the steps, the feature will restore the device to an earlier time when everything was working correctly without a black screen.
Reverting to a previous version of Windows 10
If the problem appeared after an upgrade, rolling back to the previous version may mitigate the issue until a system or driver update becomes available to permanently resolve the black screen problem.
Open Advanced startup using the three-fail boot method
Whenever you see a black screen, you won’t be able to use the recovery options through the Settings app or access safe mode from the desktop experience. This means that you will have to trigger the recovery environment manually.
To access the Windows recovery environment, use these steps:
- Start the computer.
- As soon as the Windows logo appears on the screen, press the power button to interrupt the boot sequence.
- Repeat steps 1 and 2 two more times.
After the second interruption, Windows 10 will open into the recovery environment and continue with the steps below to roll back to a previous version.
Open Advanced startup using bootable media method
You can also use a bootable USB flash drive to access the Advanced startup settings on Windows 10 using these steps:
- Start computer using a USB bootable media.
- Quick tip: If the computer is not starting from the USB drive, you must change the motherboard’s BIOS settings to ensure it can boot from the USB. Typically, you can access the BIOS by powering up the device and pressing one of the functions, Delete or Esc keys. However, you may need to check your manufacturer’s support website for more specific details.
- Click the Next button.
- Click the «Repair your computer» option in the bottom-left corner.
Once you complete the steps, continue with the instructions to revert to an earlier version of Windows 10.
Uninstall latest version of Windows 10
To roll back to the previous version of Windows 10, use these steps:
- Click the Troubleshoot option.
- Click the Advanced options button.
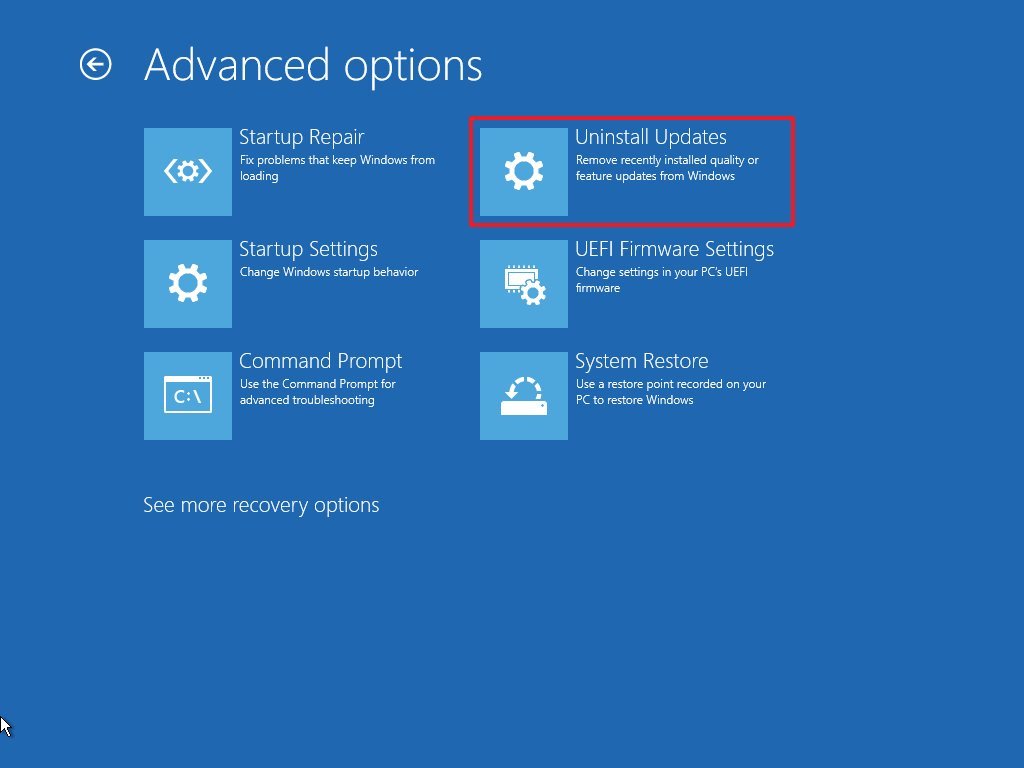
- Click the Uninstall Update option.
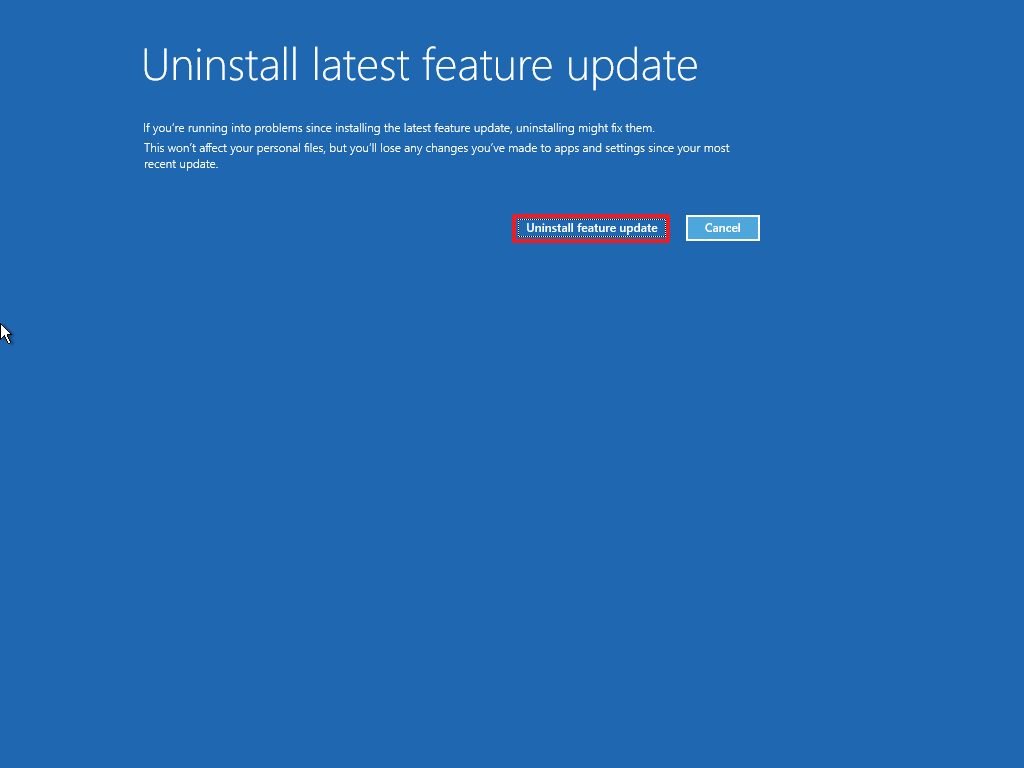
- Select the «Uninstall latest feature update» option.
- Sign in with your account credentials.
- Click the «Uninstall feature update» button.
If rolling back to a previous version resolves the problem, you should avoid updating again until Microsoft makes an update available that permanently fixes the problem.
Fix black screen during installation of Windows 10
If the black screen happens when installing a new version of Windows 10, the setup may still be working in the background. If this is the case, it can take several hours for the installation to complete, but it will eventually finish successfully.
However, if the installation seems stuck after a long time (after six hours), you should try powering off the computer manually. You can force a device to shut down by pressing and holding the power button for five to 10 seconds or until it shuts down completely. Then unplug the power cable. On a laptop, you should also remove the battery (if possible).
After the computer is powered down, disconnect all non-essential peripherals, including removable storage, printer, network cable, docking station, and secondary displays. Only leave the essentials, such as the mouse, keyboard, and primary monitor.
Wait at least one full minute, and reconnect the battery and power cable, but do not reconnect any peripherals and power on the computer.
If this was not a critical error, the installation should resume and complete successfully. Once on the desktop, remember to reconnect the remaining peripherals.
If this was a critical error, and the system rolls back to the previous setup, then do not reconnect the peripherals and try to install the update manually one more time. If this was a Windows 10 upgrade, you could try the installation one more time, but use a bootable USB flash drive to install Windows 10.
More Windows 10 resources
For more helpful articles, coverage, and answers to common questions about Windows 10, visit the following resources:
- Windows 11 on Windows Central — All you need to know
- Windows 10 on Windows Central — All you need to know

(opens in new tab)
Cutting-edge operating system
A refreshed design in Windows 11 enables you to do what you want effortlessly and safely, with biometric logins for encrypted authentication and advanced antivirus defenses.
Get the best of Windows Central in in your inbox, every day!
Mauro Huculak is technical writer for WindowsCentral.com. His primary focus is to write comprehensive how-tos to help users get the most out of Windows 10 and its many related technologies. He has an IT background with professional certifications from Microsoft, Cisco, and CompTIA, and he’s a recognized member of the Microsoft MVP community.
One of the most common problems among users who have upgraded to Windows 10 or otherwise decided to install the latest Microsoft operating system is the inexplicable appearance of a black screen on startup or after login.
To fix the black screen appearing in Windows 10, you can apply some simple steps, which vary depending on when the black screen appears.
If Windows 10 shows the login screen and the screen goes black only after choosing the desired user account and entering the corresponding password, we recommend carrying out – one after the other – a series of checks:
1) If you see the mouse pointer regularly move on the black screen
You can press the key combination CTRL + SHIFT + ESC to bring up the Windows 10 Task Manager.
Selecting the File menu, Run new task; you will have to type explorer. exe in the Open box, and finally click OK.
Let Windows 10 optimize the operating system startup, then reboot the system. To check when Windows 10 has optimized startup, just select the Processes tab, click on the Disk header and wait for the Service Host: Startup Optimization process to disappear completely (make sure that the entries in the Disk column are displayed in descending order. starting with the software elements that stress the disk or SSD most importantly).
After restarting your PC, the black screen problem on startup should be resolved.
2) Disconnect all external hardware devices, one after the other.
If following the disconnection of a specific device, the black screen disappears, the cause of the problem has been identified.
To resolve the black screen’s appearance in Windows 10, usually, just visit the website of the hardware manufacturer then download and install the updated driver. If disconnecting the various external devices does not solve the problem, the advice is to restart Windows 10 in safe mode.
As already seen in the case of Windows 8.1 ( Reboot in safe mode Windows 8.1, Windows 8 and Windows 7 ), even Windows 10 no longer takes into account pressing the F8 key when booting the system.
To quickly restart in safe mode from within Windows 10, just click on the new Start button, select the Shutdown item from the menu and then hold down the SHIFT key while clicking on Restart.
The next time the machine is restarted, the emergency menu will automatically appear with the three options Continue, Troubleshoot, and Turn off the PC.
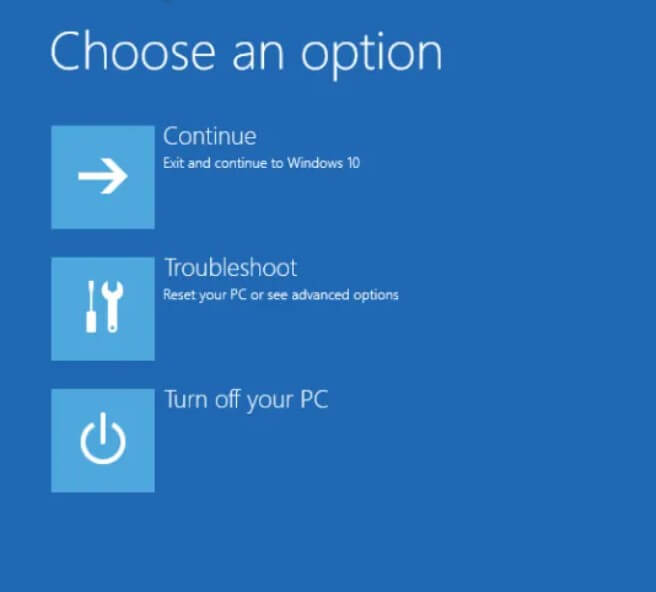
After clicking on Troubleshoot, then on Advanced Options, you will need to select Startup Settings and finally click on Restart.
After reboot, pressing the F5 key will activate the Windows 10 Safe Mode access.
Once in Windows 10 Safe Mode, you will have to go to the Control Panel of the operating system ( Windows + X, Control Panel ) then choose Display.
From here, by clicking on Change display settings, you will need to verify that Windows 10 is using the correct screen.
3) Uninstall video card drivers from Windows 10 Safe Mode.
If the intervention described in the previous point does not prove to be decisive or if you are using a single screen, you can try to uninstall the video card drivers.
To proceed, simply use – again – the Windows + X key combination from Windows 10 Safe Mode, then choose Device Manager from the menu.
Once in the Device Manager window, you will have to double-click on Display adapters, right-click on the graphics card’s name, and then select the Uninstall command.
Restarting the system normally, Windows 10 should reinstall the correct video card driver, and the problem related to the appearance of the black screen should be resolved.
4) Disable Windows 10 Fast Startup.
Activating quick start, especially on PCs not equipped with the latest drivers, can result in the black screen appearing when the operating system starts.
It is suggested that you start in safe mode, press Windows + R, type powercfg.cpl, click the entry “Specification power button behaviour”, and click Edit Settings that are currently unavailable. As the last step, you will have to remove the checkmark from the Enable quick start box, click on the Save changes button and restart the machine.
5) On systems with multiple video cards, Windows 10 may fail – at startup – to select the correct one use 1.
To solve the black screen problem when Windows 10 starts, you can try to access the operating system in safe mode – as seen in the previous steps -, press the Windows + R key combination and type Regedit.
Press the key combination CTRL + F and type EnableULPS to search for all instances in the registry.
As soon as you will find a DWORD value called EnableULPS that is displayed in the right pane of the Registry Editor, you will need to double-click it and set it.
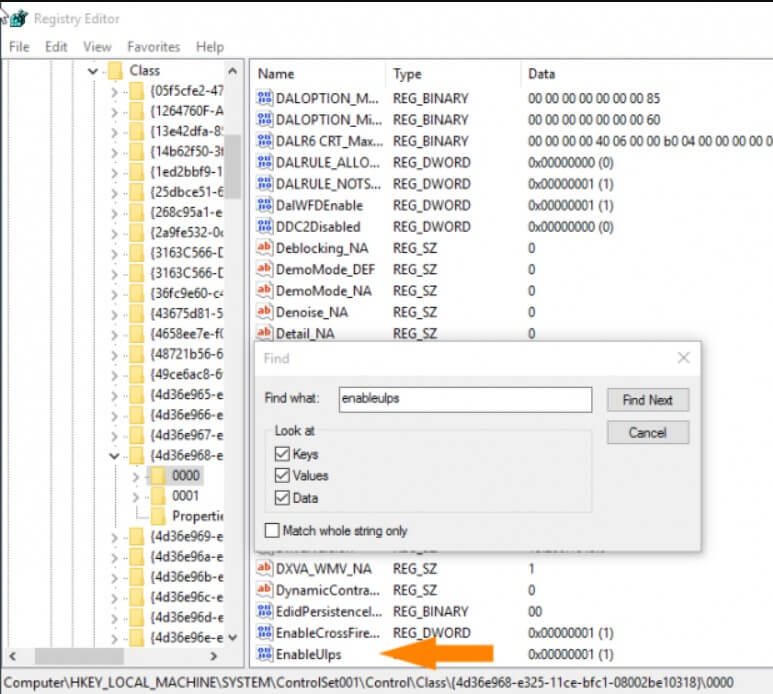
Continue with the Search for any further instances of EnableULPS in the system registry (press the F3 key ) and change them to 0, as seen previously.
Important: do not change the setting of the EnableUlps_NA value, which must remain the default one.
6) Try a clean boot of Windows 10.
Like any other Windows version, multiple third-party drivers, services, and programs can be loaded when Windows 10 starts.
We suggest you press the Windows + R key combination from safe mode, then type msconfig and disable all third-party programs automatically loaded every time Windows 10 starts.
By deactivating the applications and drivers loaded when Windows 10 starts and then reactivating them one at a time, you can trace the problem’s root.
7) Some software that changes the appearance of the Windows 10 GUI and, in particular, the shell ( File Explorer ) may be the cause of the black window appearing after login.
Applications like UXStyle and StartIsBack can cause the black screen in Windows 10 – completely uninstalling these programs usually solves the problem.
Finally, some outdated antimalware solutions may be responsible for the black screen appearing in Windows 10: it may be advisable to uninstall them and restart the machine.
Black screen before the Windows 10 logon window appears.
If the black screen in Windows 10 appears before the log in window appears, you will need to restart the safe mode system.
Since Windows 10, by default, does not support pressing the F8 button at startup, the advice is to restart the machine a couple of times when the operating system logo appears during boot.
After a couple of forced reboots, performed manually, the message “Preparing for automatic recovery” should appear under the Windows 10 logo.
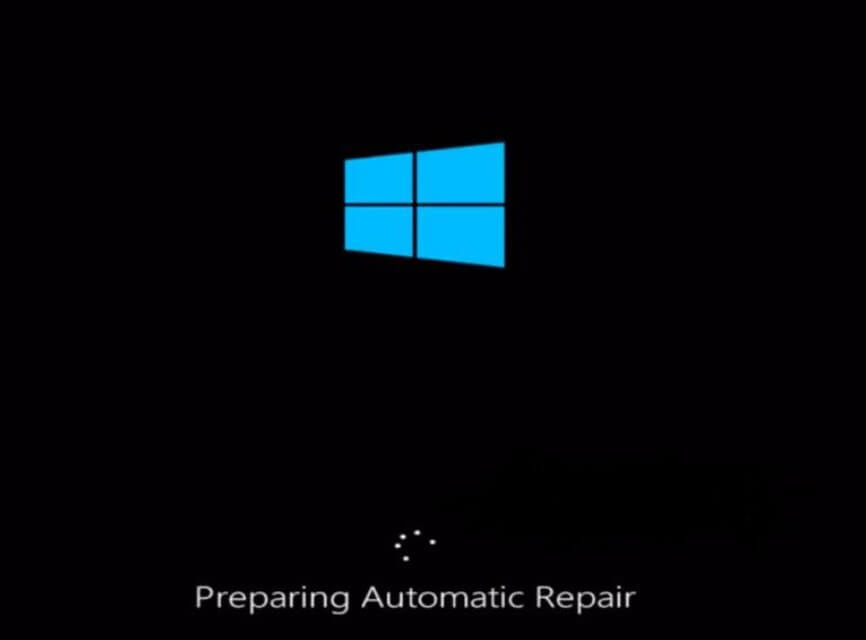
Just wait for the appearance of the Windows boot menu 10.
Now, click the Advanced Options and then click Troubleshooting and follow the directions in the previous paragraph ( Black Screen in Windows 10 after login ) to open safe mode.

We suggest trying the following interventions one after the other by attempting to restart Windows 10 after each step and re-entering Safe Mode in case of failure:
1) Press the Windows + R key combination, then type powercfg.cpl.
Then click Specify power buttons behaviour and choose Change settings that are currently unavailable.
Under Shutdown settings, remove the checkmark from the Enable quick start box.
2) If you are using a dedicated video card, but the motherboard has an integrated graphics card, press the Windows + R key combination, then type devmgmt.msc.
Following this, you need to click on Display adapters, then with the right mouse button, select the integrated graphics card and choose the item Disable device.
If the problem disappears the next time Windows is restarted, the cause has been identified. Otherwise, the other video drivers can be disabled, one by one, thus by exclusion.
3) After checking the screen set as default ( Windows + P key combination ), you can try to update the video card driver (make sure you have started Windows 10 in safe mode with network support so you can download the updated driver from the manufacturer’s website).
From the Device Manager screen ( Windows + R,devmgmt.msc ), just right-click on the video card, choose Update driver, click Search for driver software on your computer indicating the updated driver previously taken from the manufacturer’s site.
4) If necessary, try to create a new user account in Windows 10 following the instructions that are given in point  in the article Black screen when Windows starts: how to solve.
5) If this still does not resolve, you can try to reset your PC by typing Reset your PC in the Windows 10 search box and clicking on the Get started button.
Alternatively, you can request a complete reinstall of Windows 10 without losing your data: How to restore Windows 10 without losing data.
What to do if the recovery menu did not contain boot options?
It may happen that in the recovery menu that appears automatically ( Preparing for automatic recovery ) after two successive failed attempts to start Windows 10, the features for entering safe mode are not made available.
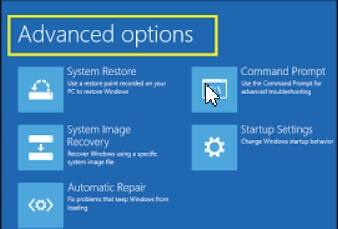
In these cases, it is possible to solve the black screen problem by clicking on Advanced Options, Troubleshooting, Advanced Options, Command Prompt, and typing the following:
bcdedit / set {bootmgr} displaybootmenu yes
At the command prompt typing mode, use the curly brackets by holding down the ALT key, and then by typing 123 and 125 on the numeric keypad, you can help resolve the problem.
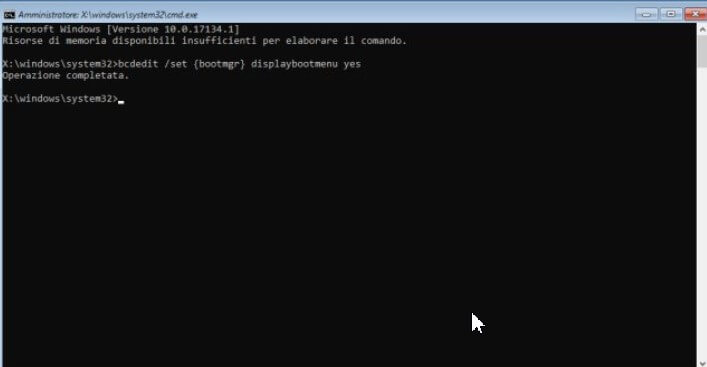
Doing so will reactivate the old Windows start menu, which can be called up by the F8 key, as was done with Windows 7. Typing exit, turning off the PC, and turning it on again, the Windows Boot Manager screen will appear.
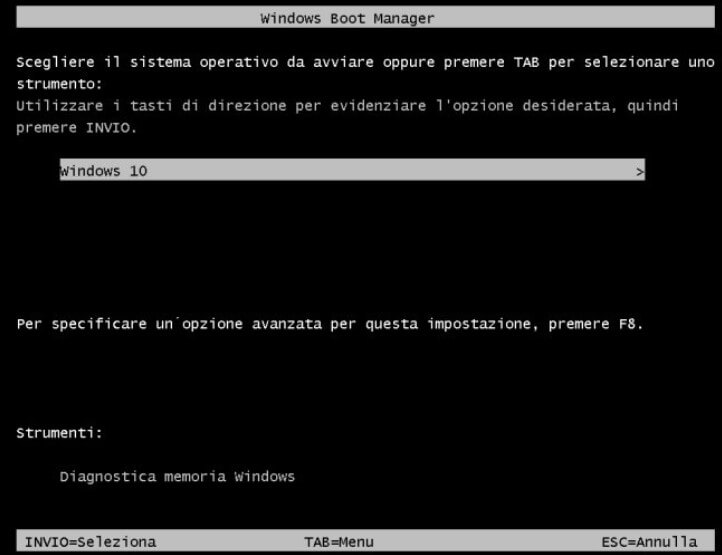
Instead of pressing Enter at the Windows 10 entry, you will have to press the F8 key to access the boot menu by opting to boot in safe mode with networking (item number 5).
Once in safe mode, you can try to solve the problem, following the instructions described above (for example, disable or uninstall the video card driver, create a new user account, delete some program that causes problems, etc. loaded at the Windows startup …).
After correcting the problem that prevented Windows 10 from loading and caused the appearance of the black screen, if you later wanted to delete the Windows Boot Manager, just open the command prompt with administrator rights (type cmd in the Windows search box then press the key combination CTRL + SHIFT + ENTER ) and issue the following command 2 :
bcdedit / set {bootmgr} displaybootmenu no

A tech-savvy writer with a knack for finding the latest technology in the market, this is what describes John Carter. With more than 8 years of experience as a journalist, John graduated as an engineer and ventured soon into the world of online journalism. His interest includes gadget reviews, decoding OS errors, hunting information on the latest technology, and so on.
Windows 10 Black Screen after Login is among the most common issues faced by Windows 10 users on their system. There are lots of ways by which you can fix this black screen after login windows 10 issue and different forums/websites out there recommend different methods in order to get the problem resolved.

If you too are facing the Windows 10 black screen after login issue and want a quick resolution, then in this black screen after login windows 10 article we have compiled a list of the easiest and 100% working solutions for the issue.
So here we are showing you all the methods and solutions for fixing and solving this type of Windows 10 Black Screen after Login Error Issue from your Devices permanently. So just check it out,
1. Check if your Windows 10 Device is Still Active

The most probable reason as for why you are suddenly seeing a Windows 10 black screen after login might be due to your display suddenly becoming unresponsive.
To check whether your Windows 10 system is still active and responsive, press the Windows key + Shift key + Ctrl key + “B” key. Once you press all the keys at once, you will be able to hear a “BEEP” sound and your display with either dim or quickly blink in order to refresh the display.
In case you are using a tablet powered by Windows 10, then instead of the key sequence mentioned above, you can also press the Volume Down + Volume Up buttons at once in order to initiate the “BEEP” sound and display refresh.
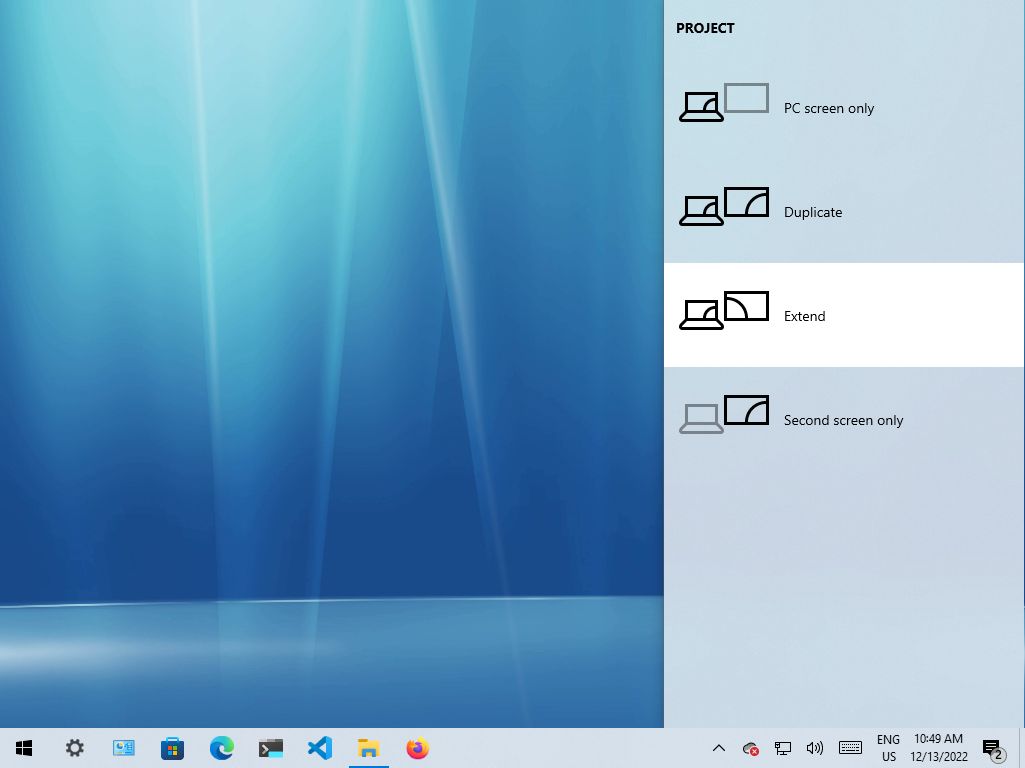
2. Check if your Windows 10 Device is Projecting to a Different Screen
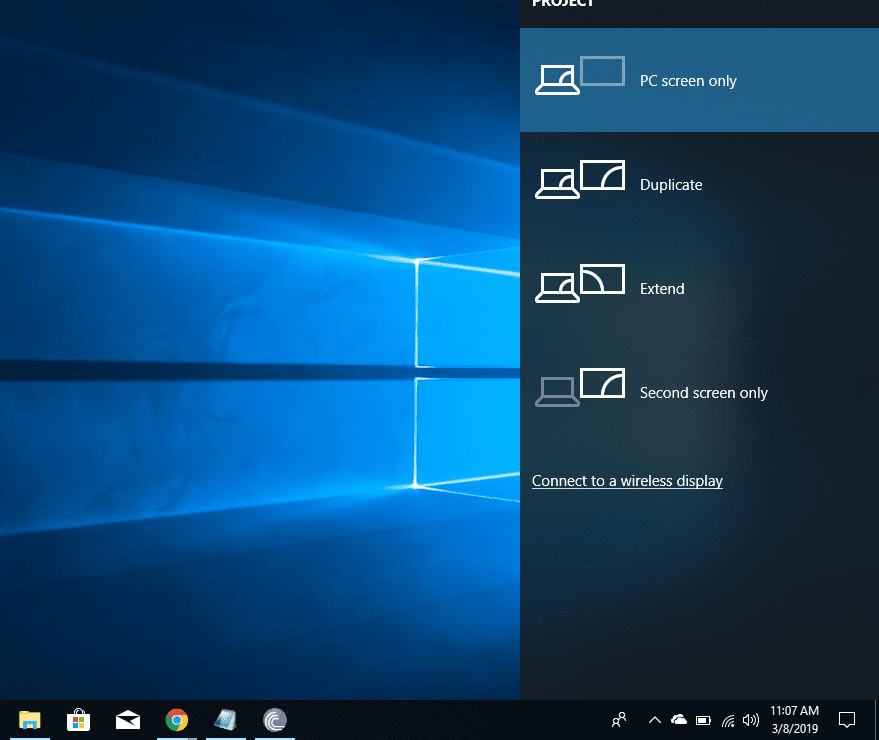
If you earlier projected to a secondary display or projector from your Windows 10 system and then forgot to switch back to your system’s main display to view content, then that might be the reason why you are experiencing the Windows 10 Black Screen after Login issue.
In this case, you need to change the setting so as to project content to your main display only.
To do the same, press the Windows key + “P” key on your keyboard and from the menu that appears, select the option that says “PC Screen Only”. This should resolve the error you are facing.
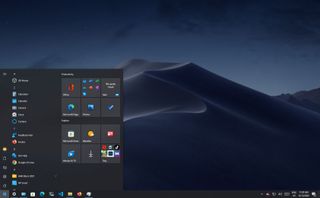
3. Restart Windows Explorer on your System
Another method to fix the Windows 10 Black Screen after Login issue is to restart the Windows Explorer task on your Windows 10 system. Please keep in mind that you can only follow this method if you are facing with the cursor displayed on the screen along with parts of the display itself.
Below are the steps you need to follow in order to restart Windows Explorer:
- Press the Delete key + Alt key + Ctrl key on your keyboard.
- From the menu that appears, click on “Task Manager”.
- A new task manager window will now open.
- Switch to the “Process” tab.
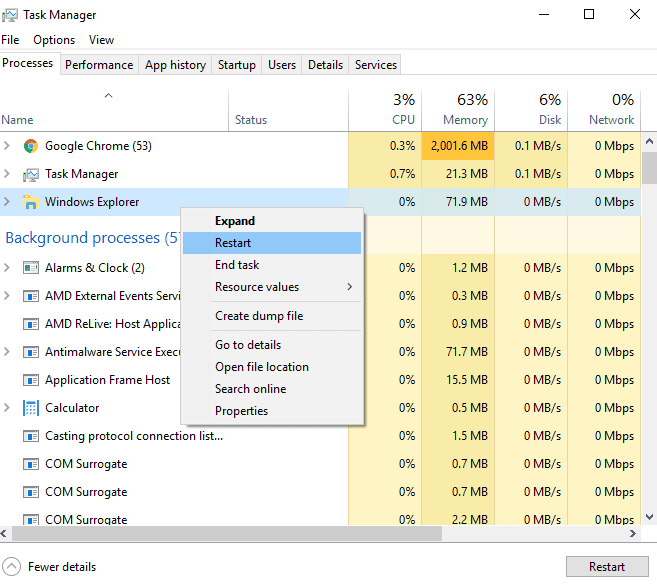
- Within this tab, find the “Windows Explorer” process. Using your mouse, right-click on this option.
- A drop-down menu will now appear and from this menu, click on “Restart”.
The Windows Explorer task will restart on your system, and this should resolve the Windows 10 Black Screen after Login issue.
4. Restart Your System
Another easy way to fix the Windows 10 black screen after login error is by simply restarting your system.
Restarting your system will restart any faulty processes, services, or programs that may have caused the error in the first place.
Before you restart your system, make sure to save any work that you were currently doing so that you do not lose the progress after the system restarts.
5. Boot into Safe Mode
If none of the above methods works, then you can try rebooting your Windows 10 system in safe mode.
If you are wondering what is Safe Mode in Windows, it is a boot mode incorporated within the Windows operating system. When a computer boots in Safe Mode, only the essential programs and services required to run Windows are loaded. This makes it easy to troubleshoot and resolve most of the issues related to the Windows operating system.
If you wish to boot your Windows 10 system into safe mode, all you have to do is follow these steps:
- First of all, power OFF your device.
- Now, press the power button to turn your device ON.
- As soon as you see the Windows logo or manufacturer logo (whichever comes first), press the power button again and turn OFF your device.
- Repeat step 2 and step 3 two more times.
- The last time your system boots up, do not press any key.
- You will now enter the winRE (Windows Recovery Environment) mode.
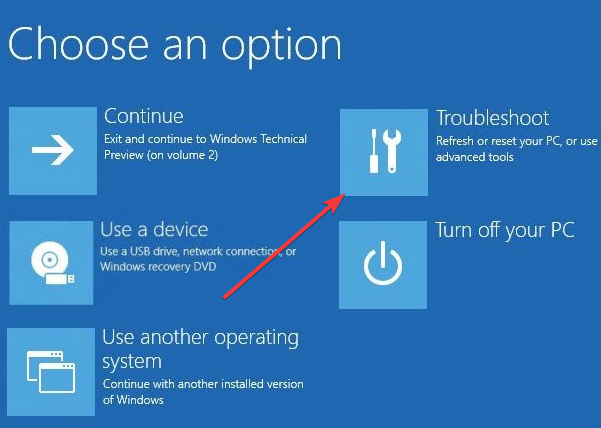
- Within the winRE menu, click on “Troubleshoot”.
- Then click on “Advanced Options”.
- Now, click on “Startup Settings”.
- And in the new window that appears, click on the “Restart” button located in the bottom right side of the display.
- After the restart, you will see a list of options — Press F5 to select the “Safe Mode with Networking” option.
And that is it. Your system has now successfully booted into Safe Mode.
6. Rollback Display Drivers to the Previous Version
Maybe the latest update of the display drivers installed on your system might be causing the error that you are facing.
Therefore, in order to resolve the error, you can try reverting the display drivers installed on your system to an older version. Below is how you can easily rollback display drivers in Windows 10.
- Press the Windows key + “R” key on your keyboard to launch the Run window.
- When the Run window opens up, type in “devmgmt — Msc” and press Enter.
- The Device Manager window will now open.
- Within the devices listed in the left side of the window, look for “Display Adapters” and expand this option.
- Right-click using your mouse on each driver that appears inside Display Adapters section.
- From the drop-down menu that now appears, click on “Properties”.
- When the Properties window launches, switch to the “Driver” tab from the top.
- Click on the option that says “Roll Back Driver”.
- Click on “OK”.
And you have now reinstalled an older version of the display driver on your system. Restart your PC and the Windows 10 Black Screen after Login issue should get resolved.
7. Reinstall the Display Drivers
If rolling back display drivers did not resolve the Windows 10 Black Screen after Login issue, then maybe reinstalling the display drivers on your system must help and below is how you can do the same.
- Press the Windows key + “R” key on your keyboard.
- Type in “devmgmt.msc” (without quotes) and press Enter.
- Within the Device Manager window that opens up, find “Display Adapters” and expand the option.
- Find the display driver installed on your device within the expanded Display Adapters option and using your mouse, right-click on the same.
- Click on the option that says “Uninstall Device”.
- In the pop-up box that appears, tick the “Delete the driver software for this device” option and then click on the “Uninstall” button.
- Restart your device.
After uninstalling the display drivers and rebooting your machine, the latest version of the display drivers should be installed on your device which should resolve the issue.
8. Uninstall any Third-Party Antivirus Software
In some cases, even third-party antivirus software that is installed on your Windows 10 system can also cause the Windows 10 Black Screen after Login issue.
To determine whether the antivirus software installed on your system is causing the issue, temporarily uninstall the antivirus software from your system and if the Windows 10 Black Screen after Login issue gets resolved, try installing some other third-party antivirus software.
Apart from antivirus software, if you had recently installed some other third-party software just before the Windows 10 Black Screen after Login issue started appearing, then try uninstalling that software as well.
9. Uninstall any Recent Windows Update
If you had installed any Windows update recently, then you can try uninstalling the same to check whether the Windows 10 Black Screen after Login issue gets resolved.
In order to uninstall the recent Windows update, first, you need to boot your system into Safe Mode by following the steps mentioned in section 5 above.
After booting into Safe Mode, follow the steps below to uninstall any recent Windows updates that were installed on your system.
- Click on the search bar present in the bottom left side of the taskbar, and search for “Settings”.
- From within the search results, click on the Settings app.
- When the Settings window launches, click on “Update & Security”.
- Now, click on “Windows Update”, and then on “View Your Update History”.
- You then have to click on “Uninstall Updates” and then select the recent update you wish to uninstall from your system.
- Finally, click on the “Uninstall” button.
And now the update(s) you selected will be uninstalled from your Windows 10 device.
You can also check:
| Error 0x000006ba | Runtime Error 217 at 00580d29 |
| Error 113 | Your Windows License will Expire Soon |
| Err_Invalid_Chunked_Encoding | Error 413 Google |
| Err_Connection_Failed | Steam Error Code 105 |
| How to Fix Error 3194 Successfully | Error 1722 Getting Session Names |
| Accountsd Wants to Use the Login Keychain | Err_Access_Denied |
| Gamestop Error Code 16 | 0xc000009a |
| Err_Timed_Out | Steam Error Code 107 |
Conclusion:
We hope that one of the 9 different ways described above to fix the Windows 10 Black Screen after Login problem was effective to you.
In case your Windows 10 Black Screen after Login issue is still not resolved, do mention details about the problem you are currently facing and the steps you took to resolve the issue as a comment below. We will surely look into it and help you out to fix the error you are facing.