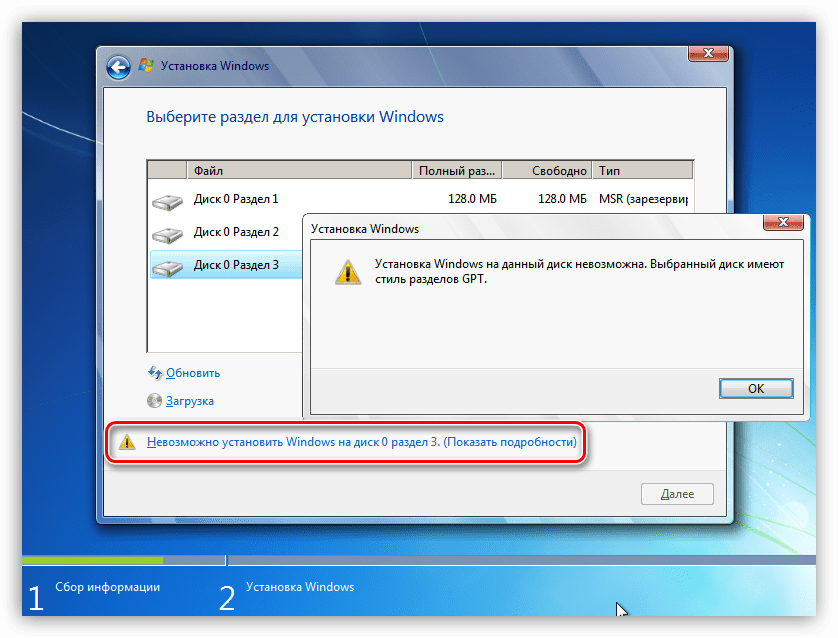
 В этой инструкции подробно о том, что делать, если при установке Windows вам сообщают, что невозможно установить Windows в раздел диска, а в подробностях — «Установка Windows на данный диск невозможна. Возможно, оборудование компьютера не поддерживает загрузку с данного диска. Убедитесь, что контроллер данного диска включен в меню BIOS компьютера». Похожие ошибки и способы их исправить: Установка на диск невозможна, выбранный диск имеет стиль разделов GPT, Установка на данный диск невозможна, на выбранном диске находится таблица MBR-разделов, Нам не удалось создать новый или найти существующий раздел при установке Windows 10.
Если же все-таки выбрать этот раздел и нажать «Далее» в программе установки, вы увидите ошибку сообщающую, что нам не удалось создать новый или найти существующий раздел с предложением просмотреть дополнительные сведения в файлах журнала программы установки. Ниже будут описаны способы исправить такую ошибку (которая может возникать в программах установки Windows 10 — Windows 7).
По мере того, как все чаще на компьютерах и ноутбуках пользователей встречается разнообразие в таблицах разделов на дисках (GPT и MBR), режимов работы HDD (AHCI и IDE) и типов загрузки (EFI и Legacy), учащаются и ошибки при установке Windows 10, 8 или Windows 7, вызванные этими параметрами. Описываемый случай — как раз одна из таких ошибок.
Примечание: если сообщение о том, что установка на диск невозможна сопровождается информацией об ошибке 0x80300002 или текстом «Возможно, этот диск скоро выйдет из строя» — это может быть вызвано плохим подключением диска или кабелей SATA, а также повреждениями самого накопителя или кабелей. Данный случай не рассматривается в текущем материале.
Исправление ошибки «Установка на данный диск невозможна» с помощью настроек БИОС (UEFI)
Чаще всего указанная ошибка происходит при установке Windows 7 на старых компьютерах с БИОС и Legacy загрузкой, в тех случаях, когда в БИОС в параметрах работы SATA устройств (т.е. жесткого диска) включен режим AHCI (или какие-либо режимы RAID, SCSI).

Решение в данном конкретном случае — зайти в параметры БИОС и изменить режим работы жесткого диска на IDE. Как правило, это делается где-то в разделе Integrated Peripherals — SATA Mode настроек БИОС (несколько примеров на скриншоте).

Но даже если у вас не «старый» компьютер или ноутбук, этот вариант также может сработать. Если же вы устанавливаете Windows 10 или 8, то вместо включения IDE режима, рекомендую:
- Включить EFI-загрузку в UEFI (если она поддерживается).
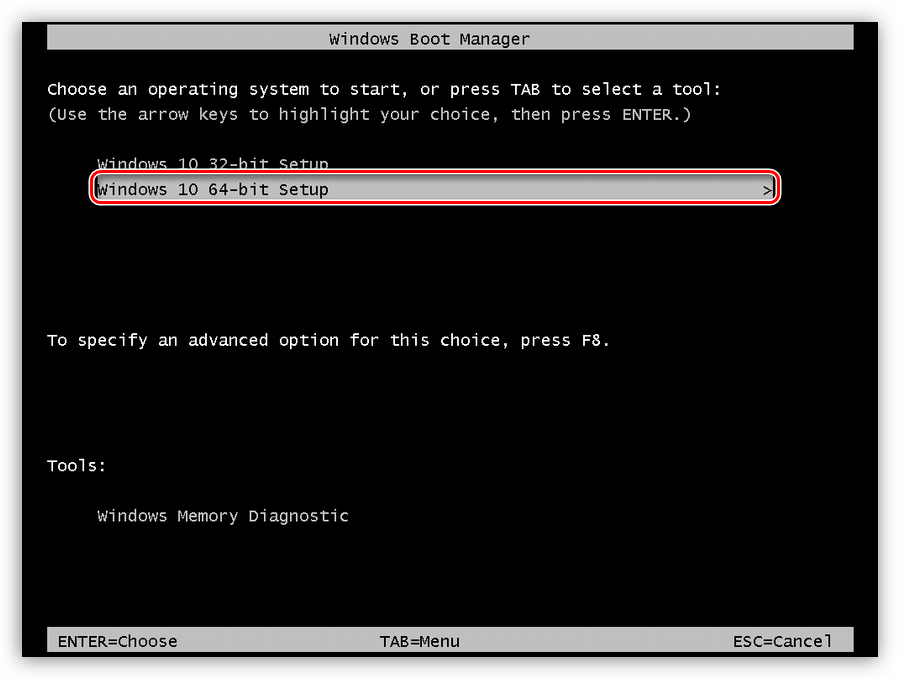
- Загрузиться с установочного накопителя (флешки) и попробовать установку.
Правда в этом варианте вам может встретиться другой тип ошибки, в тексте которой будет сообщаться, что на выбранном диске находится таблица MBR-разделов (инструкция по исправлению упомянута в начале этой статьи).
Почему такое происходит я и сам не до конца понял (ведь драйвера AHCI включены в образы Windows 7 и выше). Более того, воспроизвести ошибку я смог и для установки Windows 10 (скриншоты как раз оттуда) — просто изменив контроллер диска с IDE на SCSI для виртуальной машины Hyper-V «первого поколения» (т.е. с БИОС).

Будет ли появляться указанная ошибка при EFI-загрузке и установке на диск, работающий в IDE-режиме, проверить не смог, но допускаю подобное (в этом случае пробуем включить AHCI для SATA дисков в UEFI).
Также в контексте описываемой ситуации может оказаться полезным материал: Как включить режим AHCI после установки Windows 10 (для предыдущих ОС все аналогично).
Сторонние драйвера контроллера дисков AHCI, SCSI, RAID
В некоторых случаях проблема вызвана специфичностью оборудования пользователя. Наиболее распространенный вариант — наличие кэширующих SSD на ноутбуке, многодисковые конфигурации, RAID-массивы и SCSI карты.
Эта тема затронута у меня в статье Windows не видит жесткий диск при установке, а суть сводится к тому, что, если у вас есть основания предполагать, что особенности оборудования являются причиной ошибки «Установка Windows не данный диск невозможна», первым делом следует зайти на официальный сайт производителя ноутбука или материнской платы, и посмотреть, а есть ли там какие-то драйвера (как правило, представленные в виде архива, а не установщика) для SATA-устройств.
Если есть — загружаем, распаковываем файлы на флешку (там обычно присутствуют inf и sys файлы драйвера), а в окне выбора раздела для установки Windows нажимаем «Загрузить драйвер» и указываем путь к файлу драйвера. А уже после его установки, становится возможной и установка системы на выбранный жесткий диск. 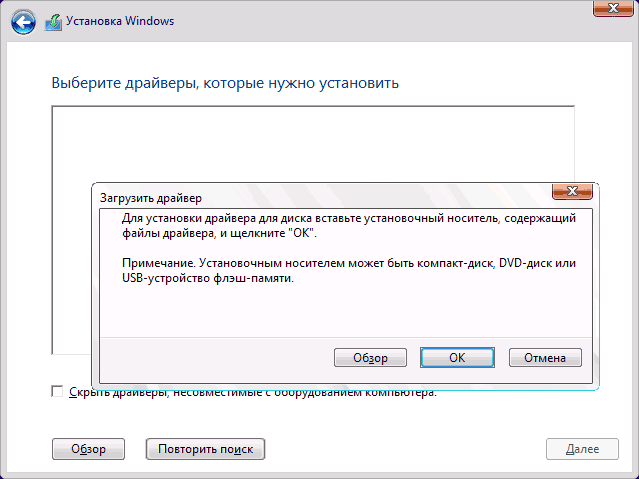
Если предложенные решения не помогают, пишите комментарии, будем пробовать разобраться (только упоминайте модель ноутбука или материнской платы, а также какую ОС и с какого накопителя устанавливаете).
Содержание
- Решаем проблему дисков GPT
- Способ 1: Настройка параметров BIOS
- Способ 2: Флешка UEFI
- Способ 3: Конвертирование GPT в MBR
- Способ 4: Удаление разделов
- Заключение
- Вопросы и ответы
В настоящее время, когда в сети доступна практически любая информация, каждый пользователь способен установить на свой компьютер операционную систему. Вместе с тем даже такая простая, на первый взгляд, процедура может вызвать затруднения, выражающиеся в виде различных ошибок программы установки. Сегодня поговорим о том, как решить проблему с невозможностью инсталлировать Windows на диск формата GPT.
На сегодняшний день в природе существует два типа форматов дисков — MBR и GPT. Первым пользуется BIOS для определения и запуска активного раздела. Второй применяется с более современными версиями микропрограммного обеспечения – UEFI, которые имеют графический интерфейс для управления параметрами.
Ошибка, о которой мы сегодня говорим, возникает из-за несовместимости BIOS и GPT. Чаще всего это происходит из-за неправильных настроек. Также ее можно получить при попытке установки Windows х86 или несоответствии загрузочного носителя (флешки) требованиям системы.
Проблему с разрядностью решить довольно просто: перед началом установки убедитесь, что на носитель записан образ х64 операционной системы. Если образ универсальный, то на первом этапе нужно выбрать соответствующий вариант.
Далее разберем способы решения остальных проблем.
Способ 1: Настройка параметров BIOS
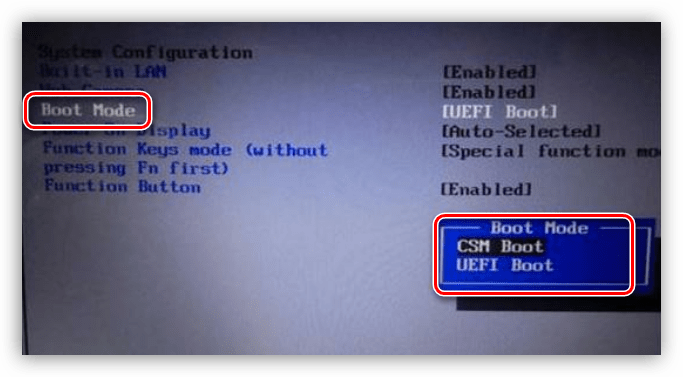
К возникновению данной ошибки могут привести измененные настройки БИОС, в котором отключена функция загрузки UEFI, а также включен режим «Secure Boot». Последний препятствует нормальному определению загрузочных носителей. Также стоит обратить внимание на режим работы SATA – он должен быть переключен в режим AHCI.
- UEFI включается в разделе «Features» либо «Setup». Обычно параметром по умолчанию является «CSM», его необходимо переключить на нужное значение.

- Режим защищенной загрузки можно отключить, выполнив в обратном порядке действия, описанные в статье ниже.
Подробнее: Отключаем UEFI в BIOS
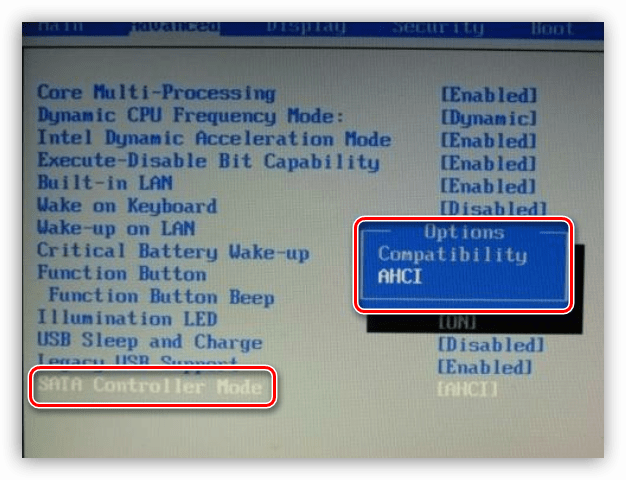
- Режим AHCI можно включить в разделах «Main», «Advanced» или «Peripherals».
Подробнее: Включаем AHCI режим в BIOS

Если в вашем БИОС отсутствуют все или некоторые параметры, то придется поработать непосредственно с самим диском. Об этом поговорим ниже.
Способ 2: Флешка UEFI
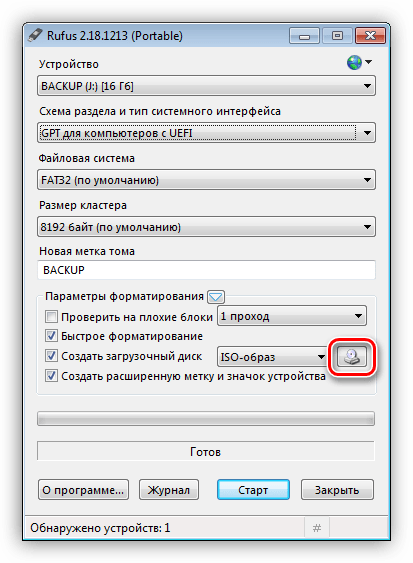
Такая флешка представляет собой носитель с записанным на него образом ОС, поддерживающий загрузку в UEFI. Если планируется установка Windows на GPT-диск, то желательно озаботиться ее созданием заранее. Делается это с помощью программы Rufus.
- В окне софта выбираем носитель, на который необходимо записать образ. Затем в списке выбора схемы раздела выставляем значение «GPT для компьютеров с UEFI».

- Нажимаем кнопку поиска образа.
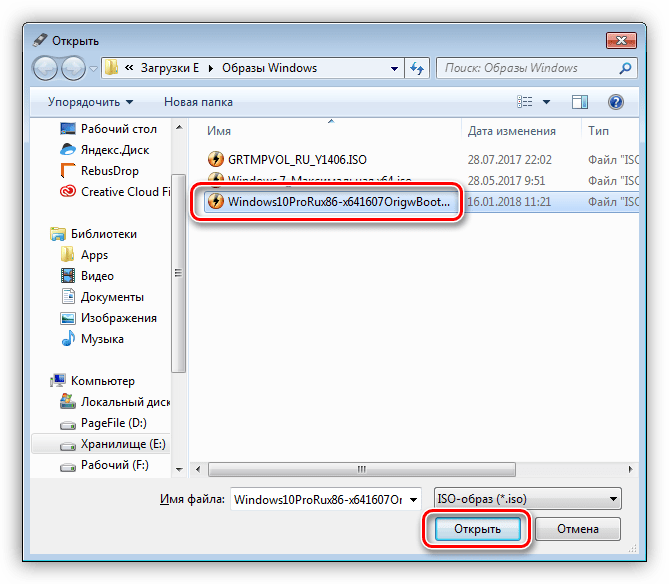
- Находим соответствующий файл на диске и нажимаем «Открыть».

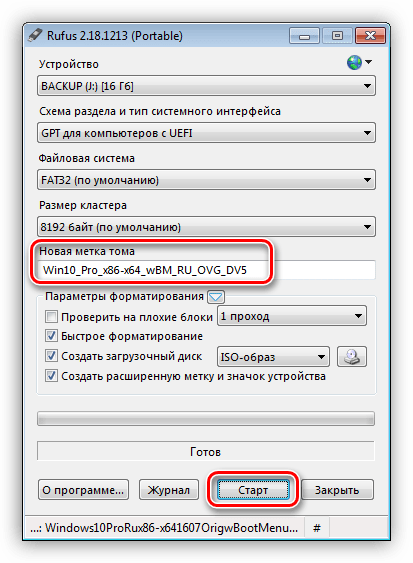
- Метка тома должна поменяться на название образа, после чего жмем «Старт» и ждем окончания процесса записи.

Если возможности создать UEFI-флешку нет, переходим к следующим вариантам решения.
Способ 3: Конвертирование GPT в MBR
Данный вариант подразумевает преобразование одного формата в другой. Сделать это можно как из загруженной операционной системы, так и непосредственно при установке Windows. Обратите внимание, что все данные на диске будут безвозвратно утрачены.
Вариант 1: Системные средства и программы

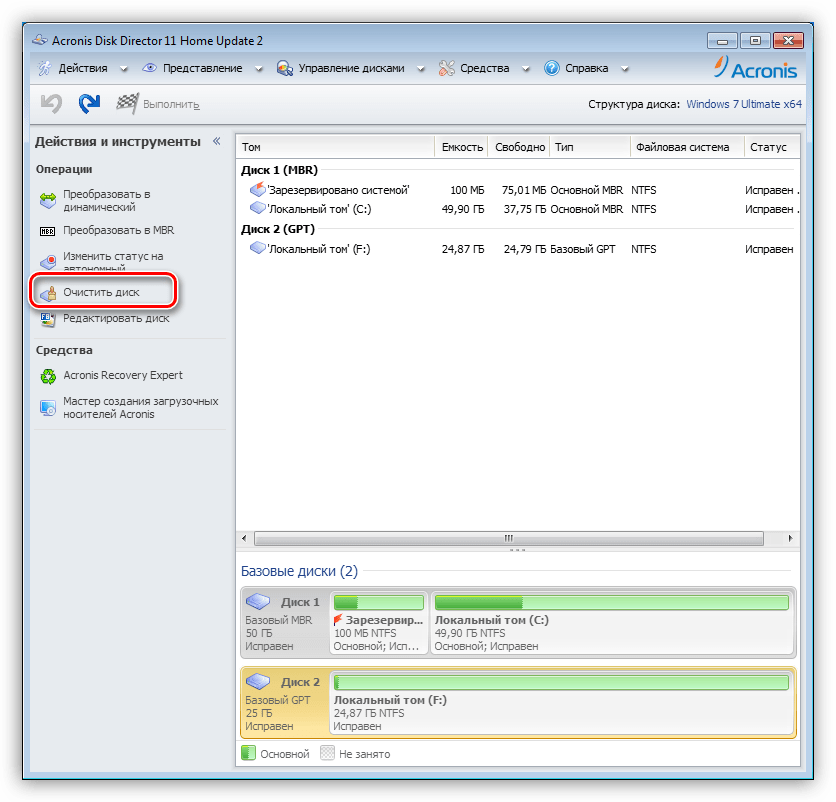
Для конвертирования форматов можно воспользоваться такими программами для обслуживания дисков, как Acronis Disk Director или MiniTool Partition Wizard. Рассмотрим метод с применением Акрониса.
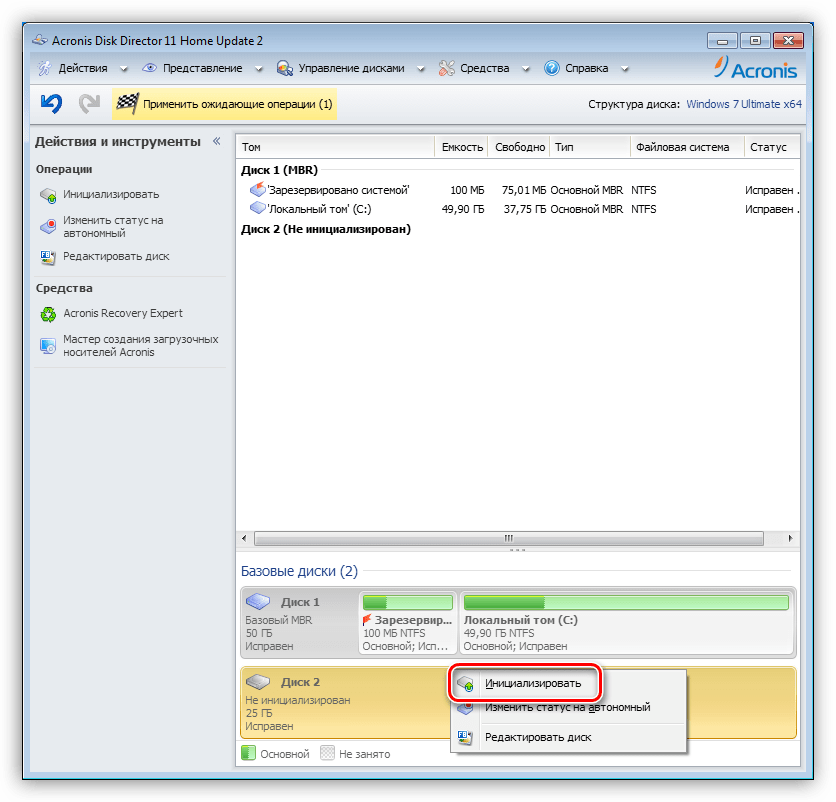
- Запускаем программу и выбираем наш диск GPT. Внимание: не раздел на нем, а именно весь диск (см. скриншот).

- Далее находим в списке настроек слева «Очистить диск».
- Кликаем по диску ПКМ и выбираем пункт «Инициализировать».
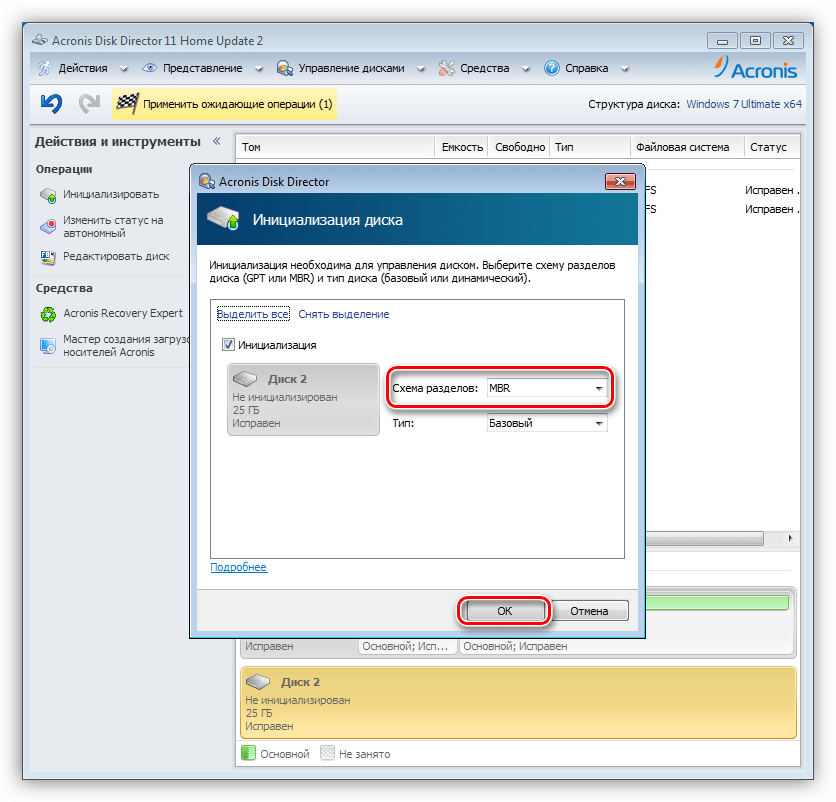
- В открывшемся окне настроек выбираем схему разделов MBR и жмем ОК.
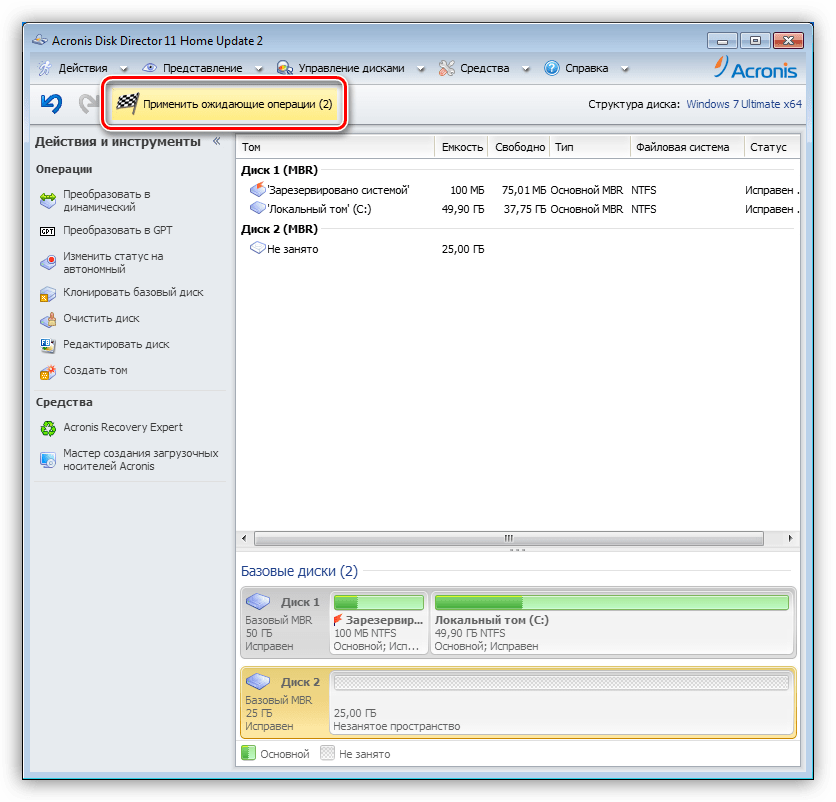
- Применяем ожидающие операции.

Средствами Windows это делается так:
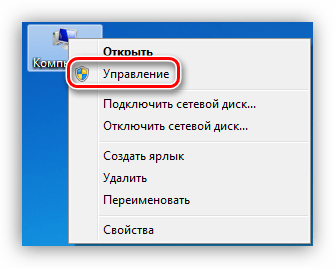
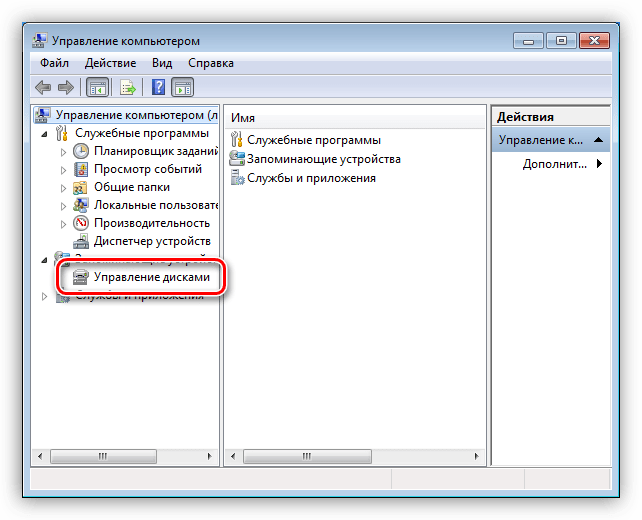
- Нажимаем ПКМ по значку компьютера на рабочем столе и переходим к пункту «Управление».

- Затем идем в раздел «Управление дисками».

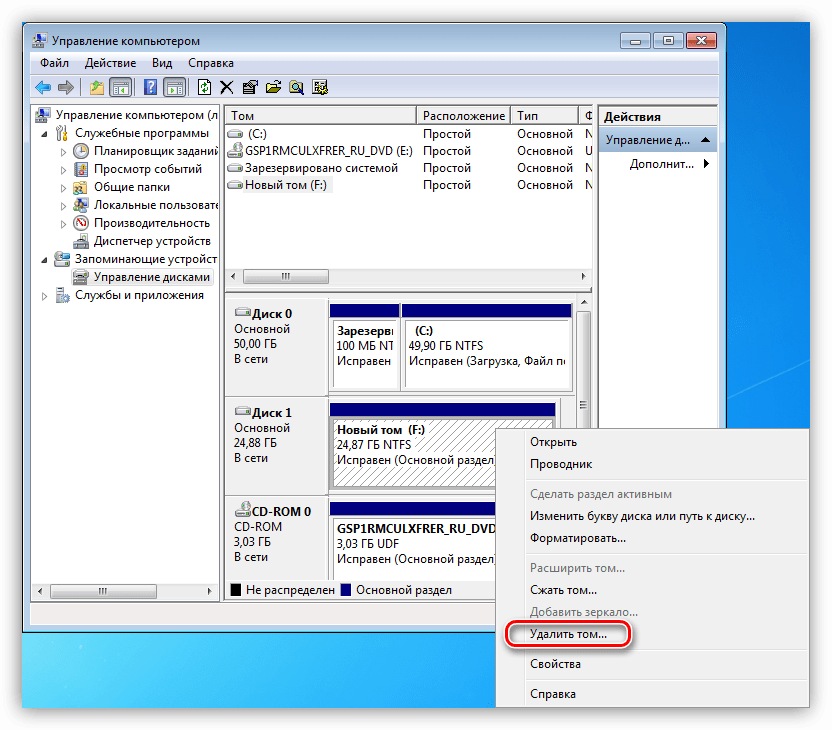
- Выбираем в списке наш диск, жмем ПКМ на этот раз по разделу и выбираем пункт «Удалить том».

- Далее кликаем правой кнопкой по основанию диска (квадрату слева) и находим функцию «Преобразовать в MBR-диск».


В таком режиме можно работать только с теми дисками, которые не являются системными (загрузочными). Если требуется подготовить к установке рабочий носитель, то это можно сделать следующим способом.
Вариант 2: Конвертирование при загрузке
Данный вариант хорош тем, что работает независимо от того, доступны ли в данный момент системные средства и софт или нет.
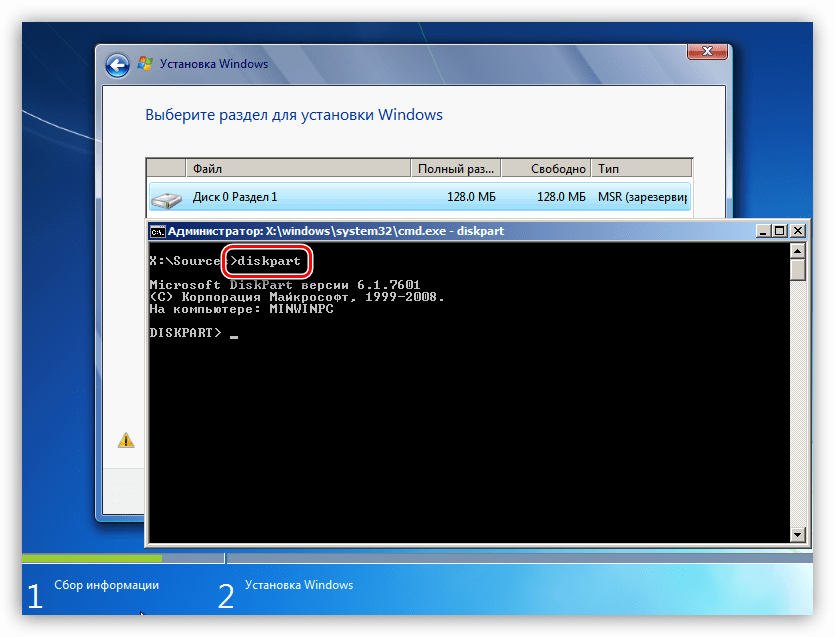
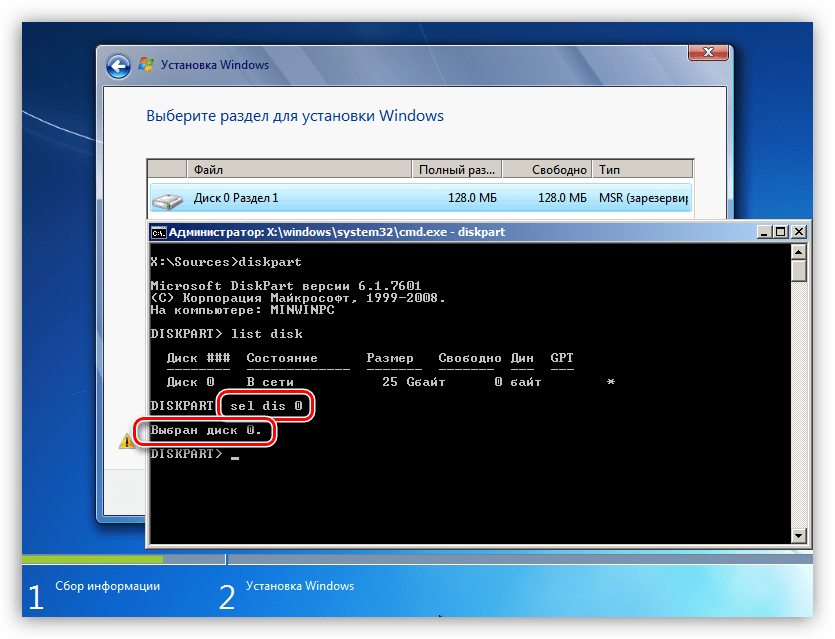
- На этапе выбора диска запускаем «Командную строку» с помощью комбинации клавиш SHIFT+F10. Далее активируем утилиту управления дисками командой
diskpart
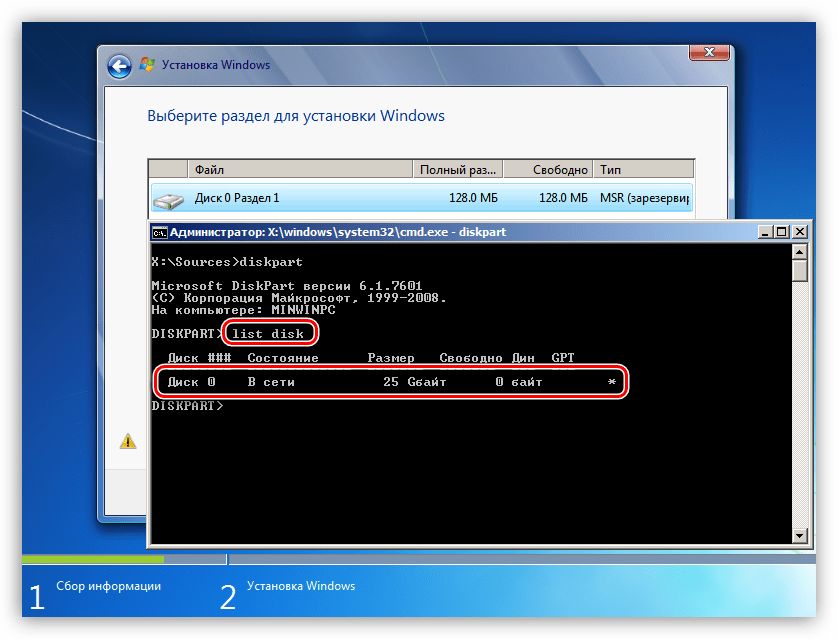
- Выводим на экран список всех установленных в систему жестких дисков. Делается это путем ввода следующей команды:
list disk

- Если дисков несколько, то необходимо выбрать тот, на который мы собираемся установить систему. Отличить его можно по размеру и структуре GPT. Пишем команду
sel dis 0

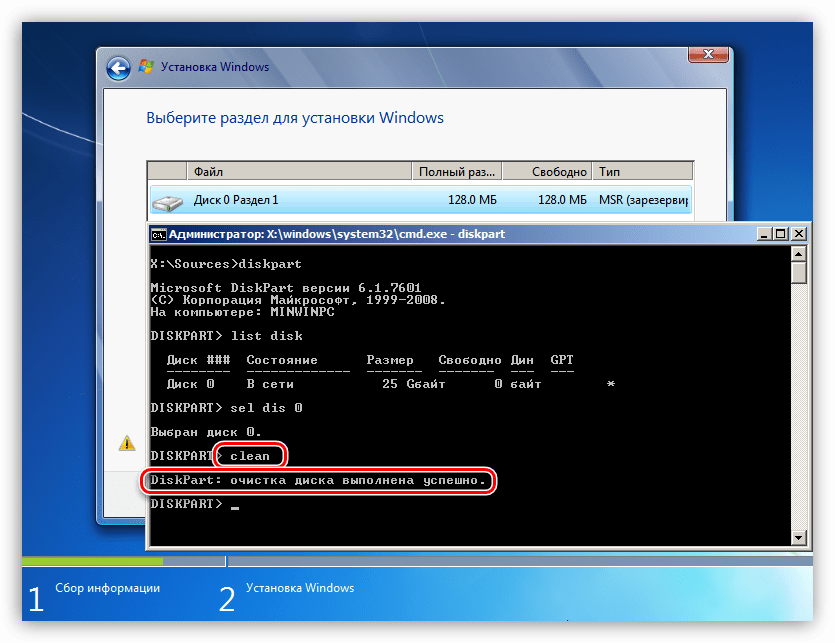
- Следующий шаг – очистка носителя от разделов.
clean

- Заключительный этап – конвертирование. В этом нам поможет команда
convert mbr

- Осталось только завершить работу утилиты и закрыть «Командную строку». Для этого дважды вводим
exitс последующим нажатием ENTER.

- После закрытия консоли жмем «Обновить».

- Готово, можно продолжать установку.


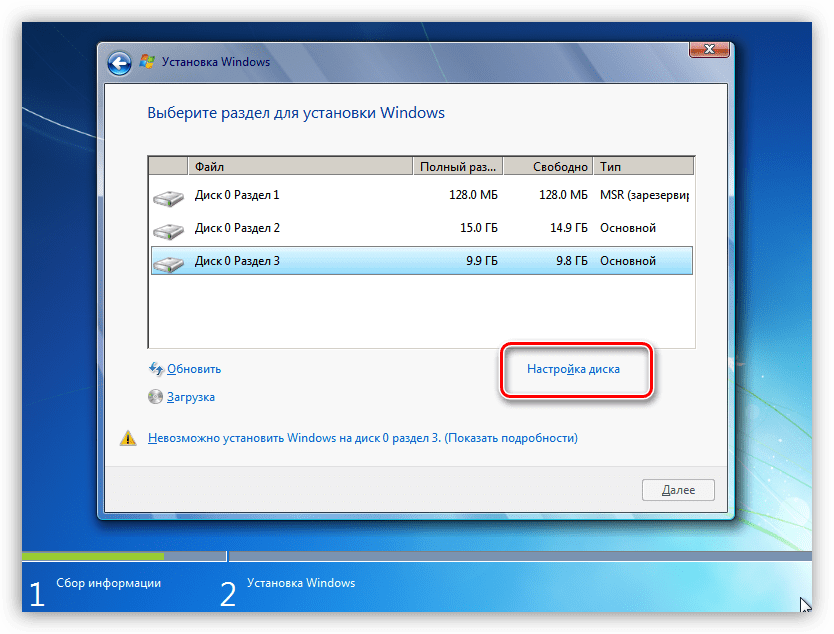
Способ 4: Удаление разделов
Этот способ поможет в тех случаях, когда по какой-то причине невозможно воспользоваться другими инструментами. Мы просто вручную удалим все разделы на целевом жестком диске.
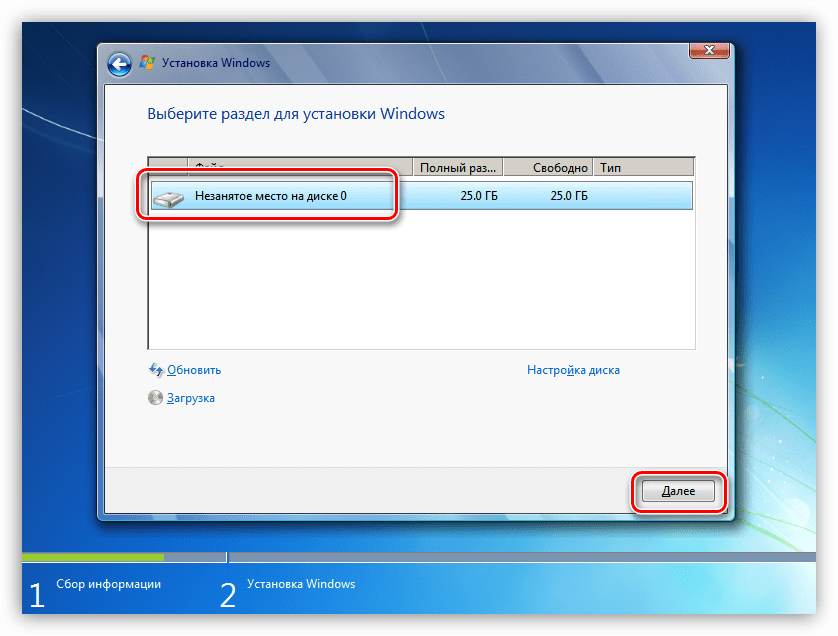
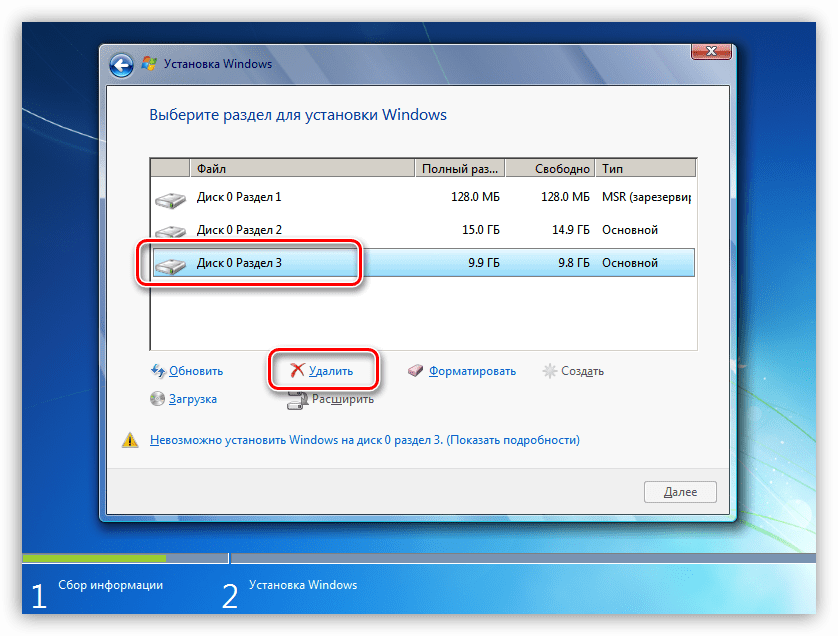
- Нажимаем «Настройка диска».

- Выбираем каждый раздел по очереди, если их несколько, и жмем «Удалить».
- Теперь на носителе осталось только чистое пространство, на которое можно без проблем инсталлировать систему.


Заключение
Как становится ясно из всего написанного выше, проблема с невозможностью установки Windows на диски со структурой GPT решается довольно просто. Все приведенные способы могут выручить вас в разных ситуациях – от устаревшего БИОС до отсутствия под рукой необходимых программ для создания загрузочных флешек или работы с жесткими дисками.
Еще статьи по данной теме:
Помогла ли Вам статья?
Поскольку ПК приобретается раз в несколько лет, а его комплектующие периодически заменяются, программные и аппаратные компоненты порой плохо соответствуют друг другу. Сам ПК может быть достаточно старым, но вы укомплектовали его современным SSD. Уже не первый год доступна Windows 10, а вы до сих пор отдаете предпочтение привычной «семерке».
Помимо таких заметных каждому вещей, как производительность процессора и интерфейс ПО, есть значимые характеристики, которые начинают представлять интерес только в тех случаях, когда становятся причиной сбоев.
К ним относится и формат таблиц разделов HDD или SSD. Вы могли и не слышать о существовании характеристики накопителя, которая неожиданно огорчила, препятствуя установке Windows 7, 10 или 8.
ПК «говорит», что установка Windows невозможна. Причина: таблица разделов диска — GPT или MBR. Увы, технологии прошлого не всегда «дружат» с современными. К счастью, это легко исправимо.

Не получается поставить ОС на GPT-диск. Решения, которые помогут
Содержание
- Не получается поставить ОС на GPT-диск. Решения, которые помогут
- Настоящее (UEFI и GPT) и прошлое (BIOS и MBR)
- Выбор метода
- Помните:
- BIOS или UEFI
- Чаще всего не получается установить Windows 7
- Преобразование GPT в MBR
- Невозможно поставить ОС на диск с MBR-разделами
- Преобразование MBR в GPT. Вся информация будет удалена
- Как не потерять данные при преобразовании
- Как обойтись без преобразования
Существуют две возможности:
- Установка ОС на диск GPT.
- Преобразование в MBR.
Настоящее (UEFI и GPT) и прошлое (BIOS и MBR)
Раньше материнская плата ПК оснащалась ПО BIOS. Оно осуществляло диагностику и анализ железа, а затем загружало ОС, опираясь на загрузочную запись раздела MBR.

В более современных моделях роль BIOS выполняет UEFI. Загружается быстрее и поддерживает:
- Безопасную загрузку.
- HDD, зашифрованные на аппаратном уровне.
- Драйвера UEFI.
- GPT-диски.

GPT превосходит MBR по важным параметрам:
- Работает с HDD большего объема.
- Большее число разделов на HDD.
Выбор метода
Пытаться все же установить систему на «несовместимый HDD» или преобразовать его в MBR и тем самым сделать так, что ошибка больше появляться не будет. В каждом случае решение зависит от ряда факторов:
- Для старого ПК со старомодным BIOS и 32-битным процессором оптимальным решением будет преобразование GPT в MBR.
- Обладателям ПК с 64-битным процессором и UEFI предпочтительно установить систему на GPT-диск.
Помните:
- Предельный объем MBR-диска — 2 терабайта.
- Возможность создания на MBR-диске более четырех разделов затруднено.
BIOS или UEFI
Когда вы заходите в BIOS и видите старомодный синий экран — перед вами традиционный BIOS. Если интерфейс с современной графикой и поддержкой мыши — это UEFI.
Чаще всего не получается установить Windows 7
Сложности с установкой системы на GPT-диск с большей вероятностью возникают у пользователей, которые предпочитают Windows 7.
Для установки Windows на диск со стилем разделов GPT необходимо соблюсти два условия:
- 64-битная ОС.
- Загрузка в режиме EFI.
Исхожу из того, что вы устанавливаете 64-битную версию Windows. Это означает, что сообщение об ошибке появляется по причине несоответствия второму требованию.
Не исключено, что будет достаточно поменять настройки BIOS. Зайдите в него, нажав предусмотренную для этого клавишу. Вы увидите, какую клавишу нажимать в процессе загрузки компьютера. В ноутбуках чаще всего применяется F2, в настольных моделях — Delete.
Поменяйте загрузку CSM (Compatibility Support Mode) на UEFI.
Ищите в разделах «BIOS Setup», «BIOS Features» или подобных по смыслу. В SATA определите режим AHCI, а не IDE.

Для седьмой (и еще более древних) версий Windows нужно также выключить Secure Boot.

BIOS вашей модели компьютера может выглядеть иначе. Названия пунктов меню также могут быть другими. Но смысл всегда сохраняется.
После изменения и сохранения вами новых параметров BIOS у вас появится возможность установки системы на GPT-диск. Если вы устанавливаете ОС с DVD, то сообщение об ошибке при повторной попытке установки, скорее всего, не появится.
В случае установки с USB-накопителя сообщение может отобразиться опять. В этой ситуации необходимо пересоздать установочную флешку таким образом, чтобы она поддерживала загрузку UEFI.
Не забудьте подписаться на наш Дзен
Если накопителем поддерживаются два метода загрузки, удалите файл «bootmgr» в корневой директории флешки. Тем самым вы предотвратите возможность загрузки в режиме BIOS. Если нужна загрузка в режиме BIOS, удалите каталог «efi». Не делайте этого в тех случаях, когда есть хоть малейшие сомнения. Можно повредить дистрибутив.
Преобразование GPT в MBR
Если вы располагаете ПК с классическим BIOS и собираетесь поставить Windows 7, этот вариант будет лучшим (и, возможно, единственным). В процессе преобразования вся информация с накопителя будет удалена.
Во время работы мастера установки ОС нажмите F10 и Shift. В некоторых моделях ноутбуков — F10, Fn и Shift. В открывшейся командной строке последовательно введите такие команды:
— diskpart
— list disk (запишите номер подлежащего преобразованию диска)
— select disk N (вместо N — записанный номер)
— clean (команда очистит диск)
— convert mbr
— create partition primary
— active
— format fs=ntfs quick (быстрое форматирование в файловой системе NTFS)
— assign
— exit

Невозможно поставить ОС на диск с MBR-разделами
Вероятна обратная ситуация. Появляется ошибка:
«Установка Windows на данный диск невозможна. На выбранном диске находится таблица MBR-разделов. В системах EFI Windows можно установить только на GPT-диск»
Она означает, что вы пытаетесь установить систему с DVD или USB-накопителя в режиме EFI. Таблица разделов HDD или SSD старая — MBR. В этом случае вы можете:
- Преобразовать SSD или HDD в GPT.
- В UEFI или BIOS поменять установленный способ загрузки с Legacy на EFI.
Первый вариант предпочтительнее, поскольку проще и быстрее. Помните, что информация со всех разделов накопителя будет полностью потеряна.
Преобразование MBR в GPT. Вся информация будет удалена
В установщике системы запустите командную строку:
- F10 и Shift (на настольных ПК).
- F10, Fn и Shift (на некоторых ноутбуках).
В открывшемся окне:
- Последовательно вводите показанные команды.
- Нажимайте Enter после ввода каждой из них.
Последовательность команд:
— diskpart
— list disk (запишите номер подлежащего преобразованию диска)
— select disk N (вместо N — записанный номер)
— clean (команда очистит диск)
— convert gpt
— exit

Когда команды применены:
- Закройте окно командной строки.
- Нажмите «Обновить» в окне выбора разделов.
- Нажмите «Создать» для формирования нескольких разделов на HDD или SSD.
- Выберите свободное пространство и запустите установку ОС.

Более простой способ преобразования с потерей информации на накопителе:
- Удалите все разделы на HDD или SSD.
- Выберите свободное пространство.
- Нажмите «Далее».
Результатом ваших действий станет автоматическое преобразование в GPT. Следующим шагом стартует установка ОС.
Как не потерять данные при преобразовании
Используйте стороннюю утилиту Minitool Partition Wizard Bootable. Скачайте ISO-образ и запишите его на флешку, отформатированную в FAT32. Необходимые условия:
- Используется загрузка EFI.
- В BIOS выключена функция «Secure Boot».
Загрузите ПК с созданного вами накопителя. В окне программного инструмента:
- Выберите HDD или SSD таблицу разделов которого нужно преобразовать.
- В левой части окна программы выберите пункт «Convert MBR Disk to GPT Disk».
- Примените изменения нажатием кнопки «Apply».
- Дайте положительный ответ на предупреждение утилиты.
- Ждите завершения преобразования. Время, которое потребуется, зависит от объема накопителя и занятого пространства на нем.

Если диск системный, может появиться сообщение о том, что его преобразование невозможно. Чтобы все же преобразовать его:
- Выберите раздел загрузчика ОС, который располагается в самом начале.
- Удалите его, нажав «Delete» и подтвердив действие кнопкой «Apply». Вместо него вы можете тут же создать новый раздел загрузчика, но уже в файловой системе FAT32.
- Повторите действия для преобразования таблицы разделов.
Как обойтись без преобразования
Зайдите в BIOS и установите режим загрузки CSM (Compatibility Support Mode) или Legacy, отключив EFI. Отключите «Secure Boot».
Ранее я подробно рассмотрел процессы чистой установки Windows 10 и Windows 7.
Какие другие затруднения возникали у вас при установке Windows?
Are you having problems installing Windows on your target GPT or MBR drive? On this page, we’ll thoroughly discuss this issue in two parts and you can follow to find respective solutions toward different errors.
| Workable Solutions | Step-by-step Troubleshooting |
|---|---|
| Fix Can’t Install Windows on GPT Disk | Fix 1. Convert GPT Disk to MBR Disk using EaseUS Partition Master…Full steps Fix 2. Enable UEFI Boot Option in BIOS…Full steps Fix 3. Convert MBR to GPT via EaseUS Partition Master…Full steps Fix 4. Convert MBR to GPT using DiskPart…Full steps |
| Fix Windows Cannot Be Installed the This Disk | Fix 1. Convert Dynamic Disk to Basic Disk…Full steps Fix 2. Remove HDD Protection and Change SATA Controller Mode…Full steps Fix 3. Repair Your HDD…Full steps Fix 4. Format the Partition to NTFS…Full steps |
Check out and find the easiest solution to resolve your problem, installing Windows on your PC without any issue now.
Note that if you have saved important data on the target disk, back up your data first as some of the following fixes may remove data on your target drive.
Applies to: Fix «Windows Cannot Be Installed on GPT Partition Drive’ or «Can’t Install Windows on GPT» error.
Problem: Can’t Install Windows on GPT Disk
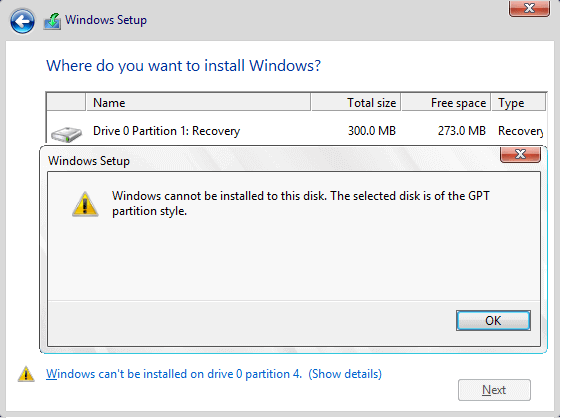
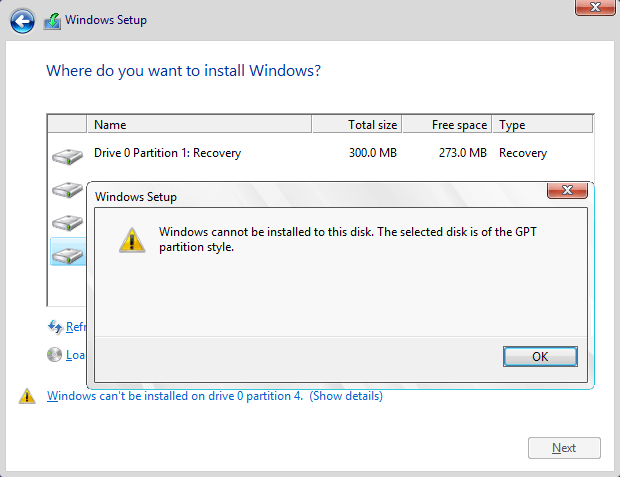
«I’m trying to install Windows 10 on a new SSD, but the computer keeps giving me this message ‘Windows cannot be installed on this disk. The selected disk is of the GPT partition style.’ What does this mean? Do I have to convert the GPT disk to MBR? Or to enable UEFI boot mode in BIOS?«
You won’t be able to install Windows on GPT disk if you are receiving this notice from your PC as listed below:
Error 1. «Windows cannot be installed to this disk. The selected disk is of the GPT partition style.»
Error 2. «Windows cannot be installed on this disk. The selected disk has an MBR partition table. On EFI systems, Windows can only installed on GPT disks».

Those two errors mean that the Windows cannot be installed on GPT drive. Don’t be panic. In the following, we’ll explain why you cannot install Windows to the selected disk and list practical solutions to help you out.
Why You Fail to Install Windows on GPT Drive
1. You forget to enable UEFI boot option. Or the motherboard supports Legacy BIOS only. (Error 1)
2. If you receive Error 2, you must learn something about UEFI and BIOS. Know the differences and relations between them.
Usually, when you install Windows on UEFI-based PC using Windows Setup, the target disk must be set up to UIEFI mode or BIOS compatibility mode. If your computer is booted in UEFI mode,while your target disk is not configured UEFI mode, you’ll met Error 2.
4 Fixes to Resolve «Cannot Install Windows on GPT Disk» Error
Here, we’ll provide you with 4 effective methods to fix this error issue and relative errors. Note that the former method is presented, the higher success rate it will be.
Fix 1. Convert GPT Disk to MBR Disk using EaseUS Partition Master [Error 1]
When the computer doesn’t support UEFI, you cannot install the Windows on GPT drive unless you convert the disk from GPT to MBR.
Professional partition manager software — EaseUS Partition Master can organize your hard drive and change the partition style easily. You can easily convert GPT to MBR with the help of this software, making disk available to install Windows again:
Step 1. Install and launch EaseUS Partition Master on your computer, go to the Disk Converter section.
Step 2. Select «Convert GPT to MBR» and click «Next» to continue.
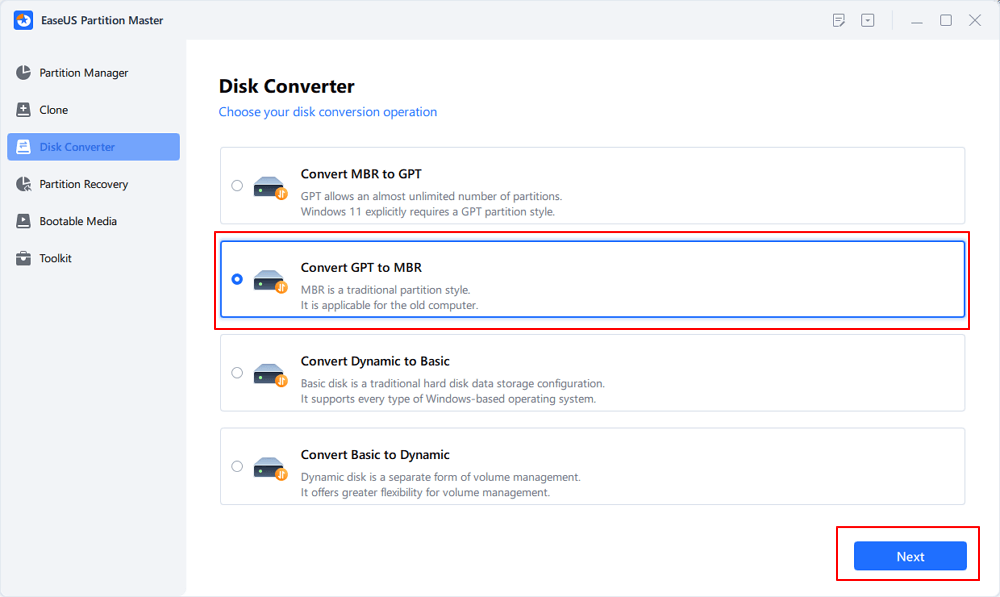
Step 3. Select the target GPT disk that you want to convert to MBR, and click «Convert» to start the conversion.

Fix 2. Enable UEFI Boot Option in BIOS to Fix Windows Cannot Install on GPT Drive Error
If you are faced with Error 1 — «Windows cannot be installed to this disk. The selected disk is of the GPT partition style.», you can boot to UEFI mode if your motherboard supports UEFI.
Step 1. Reboot the PC and press the key that opens the boot device menu. You can press the Esc, F2, F9, F12, or another key to enter the boot menus.
Step 2. Boot into UEFI mode and locate the boot options menu.
Step 3. Confirm in the Boot Priority List that the USB UEFI OS Boot option is at the top of the list. Save your changes and continue to install Windows.
Fix 3. Convert MBR to GPT to using EaseUS Partition Master
If you encounter Error 2, you can fix the «The Selected Disk Has an MBR Partition Table» error by converting MBR disk to GPT disk.
On the UEFI system, Windows can only be installed to GPT disks or something similar. That’s because MBR is compatible with BIOS while GPT is compatible with UEFI.
The steps are similar to those of converting GPT to MBR. The difference is that you need to convert to GPT with the help of EaseUS Partition Master:
Step 1. Download and launch EaseUS Partition Master on your computer.
Step 2. Go to Disk Converter, select «Convert MBR to GPT» and click «Next» to continue.

Step 3. Select the target MBR disk that you tend to convert to GPT, and click «Convert» to start the conversion.

Fix 4. Convert MBR to GPT using DiskPart
Aims to resolve Error 2.
Step 1. Turn off the PC and put in the Windows installation DVD or USB.
Step 2. Boot the PC from the DVD or USB.
Step 3. In Windows Setup, press «Shift + F10» to start Command Prompt.
Step 4. Enter the following command in order:
- diskpart
- list disk
- select disk
- clean
- convert gpt
- exit
Step 5. Close Command Prompt.
After removing «Can’t install Windows on GPT disk» error, you can now continue installing Windows on your PC. You can refer to Install Windows 10 on GPT disk for a detailed tutorial guide.
Part 2. Fix «Windows Cannot Be Installed the This Disk» Error
Applies to: Fix «Windows Cannot Be Installed to This Disk» Error.
Error: Windows Cannot Be Installed to This Disk
When you are going to install Windows 10/8/7, you might receive different kinds of errors saying Windows cannot be installed to this disk. Here are some common errors that you might receive:
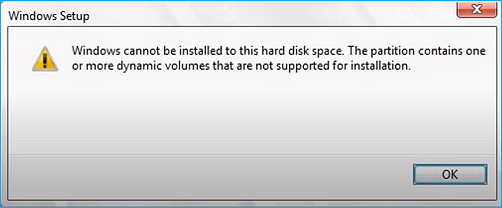
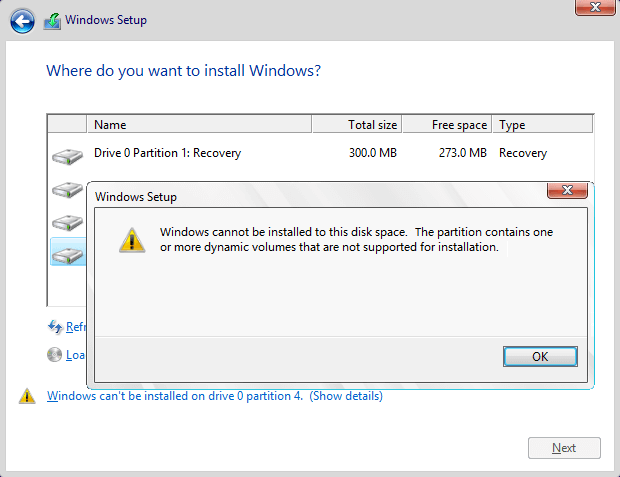
Error 1. «Windows cannot be installed to this hard disk space. The partition contains one or more dynamic volumes that are not supported for installation».
Error 2. «Windows cannot be installed to this disk. This computer’s hardware may not support booting to this disk. Ensure the disk’s controller is enabled in the computer’s BIOS menu.»

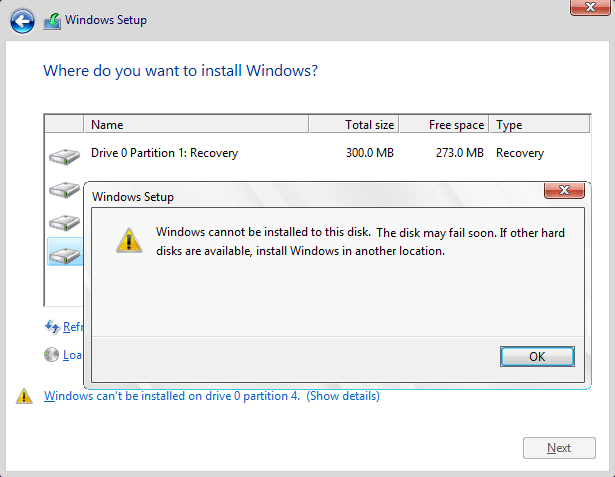
Error 3. «Windows cannot be installed to this disk. The disk may fail soon. If other hard disks are available, install Windows to another location.»
Error 4. «Windows cannot be installed to the hard disk space. Windows must be installed to a partition formatted in NTFS.»
Why Windows Cannot Be Installed to The Selected Disk
Why you could receive these errors? What are the main reasons? According to the error messages, the main reasons are as follows:
1. Users can only make a fresh install on a dynamic volume only when the volume was converted from a basic disk and was a boot partition or system partition. (Error 1)
2. Hardware protection and SATA Controller mode could bring up Error 2.
3. If you get Error 3, you can take your hard disk failure into account.
4. An incompatible file system of the partition to be installed with Windows. Microsoft rules that Windows must be installed to a partition formatted in NTFS since Windows Vista. (Error 4)
Fixes to Remove «Windows Cannot Be Installed to This Disk» Error
You can now selectively choose one of the solutions to fix Windows cannot be installed to the disk issue on your own PC.
Fix 1. Convert Dynamic Disk to Basic Disk
If you receive Error 1 — «Windows cannot be installed to this hard disk space. The partition contains one or more dynamic volumes that are not supported for installation», convert dynamic to basic disk.
EaseUS Partition Master also helps you convert dynamic disk to basic disk easily and quickly.
Here are the detailed steps:
Step 1. Install and open EaseUS Partition Master and go to Disk Converter.
Step 2. Select the disk disk conversion mode that suits your need:
- Convert Basic to Dynamic: change a Basic disk to Dynamic.
- Convert Dynamic to Basic: change a Dynamic disk to Basic.
Step 3. Select the target disk — Basic or Dynamic, confirm you’ve select the correct disk and click «Convert» to start.
0:00 — 0:18 Convert Basic to Dynamic Disk; 0:19- 0:36 Convert Dynamic to Basic Disk.
Fix 2. Remove HDD Protection and Change SATA Controller Mode (for Error 2)
If you receive this message «Windows cannot be installed to this disk. This computer’s hardware may not support booting to this disk. Ensure the disk’s controller is enabled in the computer’s BIOS menu.» — Error 2, you should do two things:
Phrase 1. Remove Hard Disk Protection
Check if your hard disk protection is enabled. If it is, contact the salesperson and remove the protection according to his instructions.
Here is a quick guide that you can follow to remove write protection from hard drive using DiskPart:
Step 1. Start > Run -> type CMD and press enter.
Step 2. Type diskpart and press enter.
Step 3. Type the following command lines and hit enter each time:
- list volume
- select volume # (# is the number of your HDD.)
- attributes disk clear read-only
- clean
Step 4. Type exit and hit Enter. Close DiskPart to finish the process.
After this, you’ve successfully removed write protection from your hard drive. If you need more practical solutions, refer to How to Remove Write Protection on SSD for help.
Phrase 2. Change SATA Controller Mode
This error may indicate that BIOS settings of your computer are not properly configured. Make sure you have changed the SATA Controller mode in BIOS. Then, you can try setting BIOS to the factory and go back to the default setting.
Fix 3. Repair Your HDD to Fix «Windows Cannot Be Installed to the Hard Disk Space»
Error 3 — «Windows cannot be installed to this disk. The disk may fail soon.» occurs when there’s something wrong with your HDD. What to do with a dying HDD? How to repair it? You should stop Windows installation, and then clone or back up important data immediately. Then, you can start repairing your HDD.
Also read: How to Repair HDD Without Losing Data
Fix 4. Format the Partition to NTFS
This method aims to solve Error 4. When partitions on the target disk are not with the NTFS file system, Windows cannot be installed to the disk.
Changing a volume’s file system is not an easy task for those who are not familiar with computer management and command line. Thus, an easy and safe solution is needed.
Comprehensive partition manager software — EaseUS Partition Master can fully meet this requirement. It enables you to format HDD to NTFS easily.
For this case, you need to create a bootable drive and then format hard drive from USB.
After fixing Windows cannot be installed to this disk or GPT/MBR drive error, you can then continue installing Windows on your target disk in your PC.
Conclusion
This page covers 4 fixes to get rid of «Can’t install Windows on GPT disk» error and 4 practical methods to remove «Windows cannot be installed to the drive» error for all levels of Windows users.
If you are faced with any one of the errors, you can find answers here. If your target disk has unsupported partition styles disallow you installing Windows on it, EaseUS Partition Master helps convert GPT to MBR, Convert MBR to GPT, and even change Dynamic to Basic disk.
This software plays an important role during the fixing process. Why not get it now.
Extended Reading: Cannot Install Windows FAQs
Besides the above issues, if you have further concerns about installing Windows on GPTor MBR disk, check the questions and answer below.
You may get a clue:
1. How do I fix Windows cannot be installed to this disk MBR?
How do you fix ‘Windows cannot be installed to this disk’? The solution is easy to conclude: change MBR to GPT.
Here are two methods that you can try:
- Method 1. Change MBR to GPT using EaseUS Partition Master (as presented on this page in Fix 3 Part 1)
- Method 2. Run DiskPart to change MBR disk to GPT (as presented on this page in Fix 4 Part 1)
2. Can GPT boot into Windows?
Yes. GPT can be used to boot Windows OS as long as you have a Windows system installed on the disk or you have migrated your computer operating system on the disk.
If you need a guide to migrate OS to GPT, follow this link for help: Transfer Windows 10 to New Hard Drive (HDD/SSD).
3. How do I change GPT partition to BIOS?
Mostly, GPT partition supports UEFI boot mode and BIOS compatibility mode. In order to change GPT partition to Legacy BIOS mode, you need to follow the following tips:
- #1. Check if your computer motherboard supports BIOS boot mode. (Check BIOS)
- #2. If the motherboard supports BIOS boot, then you need to check if your disk is with the MBR partition style.
- If not, convert GPT to MBR disk using provided method on this page in Part 1.
- #3. Install Windows that support BIOS boot on the disk.
- #4. Finish Windows installation, enter BIOS and set the computer to boot on the MBR disk which was with GPT partition.
- #5. Save the changes, and restart PC.
Table of Contents:
Fix 1: Windows cannot be installed to this disk. The selected disk is of the GPT partition style.
You may receive the error message «The selected disk is of the GPT partition style» when installing Windows OS to a GPT-style disk, see picture below. You will ask why Windows cannot be installed to this GPT disk. Generally, the main cause is motherboard. There are two types of boot modes: BIOS Boot Mode and UEFI Boot Mode. Most Windows versions have UEFI (Unified Extensible Firmware Interface) boot mode, while some versions since older days of Window XP have BIOS (Basic Input Output System) boot mode. Due to different boot modes, there are two types of partitioning schemes: MBR (Master Boot Record) and GPT (GUID Partition Table). If you want to boot system from GPT disk, the motherboard should support UEFI; while on BIOS you should use MBR partition table. Thus, if you install Windows on BIOS system and GPT partition table comes in your way. The installation will be blocked by the error.
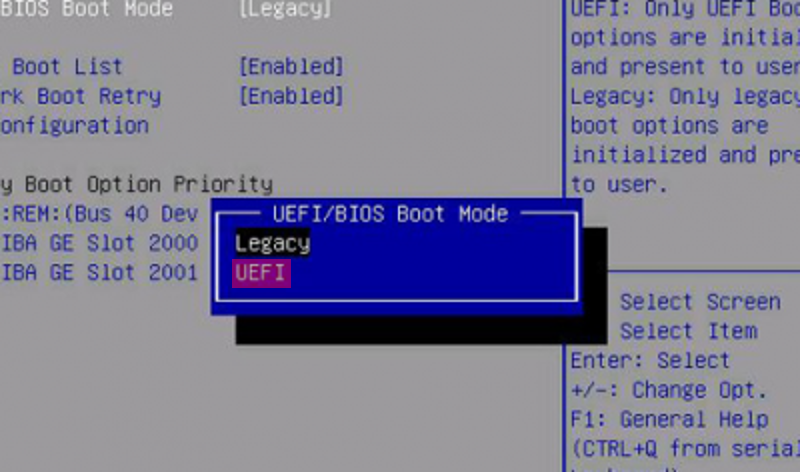
Solution #1: Configure BIOS settings (boot mode)
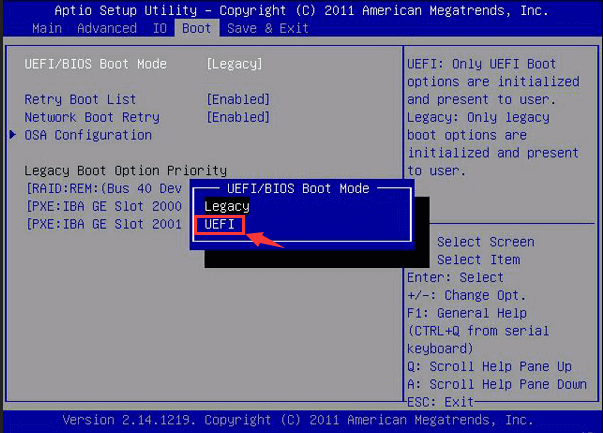
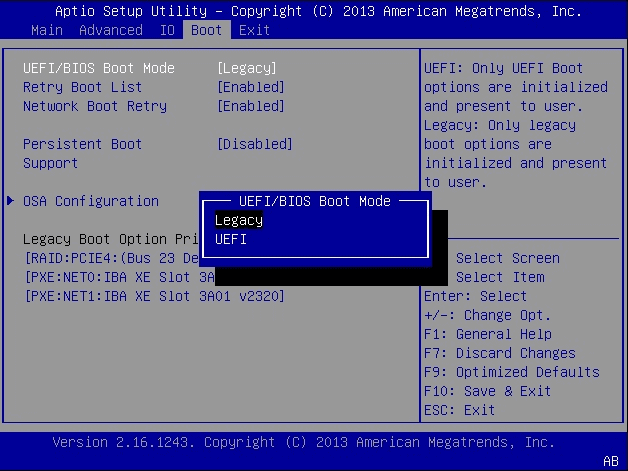
First of all, you should ensure the Boot Mode in your BIOS is set to Legacy BIOS instead of UEFI. At present, most motherboards support both legacy BIOS boot and UEFI boot. Thus, you need to make sure the proper boot mode is selected in BIOS setting. The picture shows the boot mode is modified to Legacy. Please note that the BIOS menu may look different on your computer, as it varies based on the models of the PC you have.
Solution #2: Clean up the disk and convert to MBR using Command Prompt
Step 1. Backup all of your data on the GPT disk you want to convert, as the process will erase all data.
If you can’t afford to clean the disk or do not want to take efforts to back up data, you can convert GPT to MBR following steps in Solution 3 which does not disturb existing data.
Step 2. Run Command Prompt. Boot computer from the Windows installation disk and go to System Recovery Options where you can choose Command Prompt.
Step 3. Type diskpart in the command prompt and press Enter.
Step 4. Type in list disk and hit Enter key to view which one is of GPT style. The GPT disk is marked with asterisk in the GPT column. Remember the disk number you need to clean and convert.
Step 5. Type select disk # (# is the disk number and you should replace it with the actual number in your computer) to select disk.
Step 6. Type clean and press Enter
Notice: this step will completely clean up selected disk and all partitions and data will be deleted. Please make sure you have a backup before performing this command.
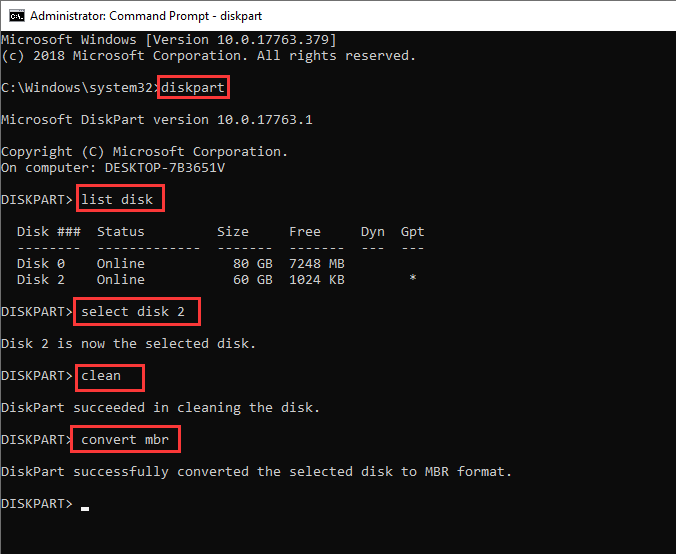
Step 7. Type convert mbr and press Enter, and the disk will be converted to MBR. Then you can execute exit command to exit or continue creating partition on this MBR disk.
Solution #3: Convert GPT to MBR with free partition manager
DiskGenius is free partition manager for all Windows users and it is able to convert GPT disk to MBR without data loss. If you are not comfortable with using Command Prompt, DiskGenius Free can be a good alternative, as it is easier and safer to use. Also, this partition tool can create WinPE bootable USB disk so that you can manage disk or partition when system fails to boot. Besides, it can help you back up data, image system, recover lost data or partition, backup partition table, etc.
Step 1. Download, install and launch DiskGenius from your computer. If your computer cannot boot to system, you can create a bootable disk to boot computer, and then carry out rest task.
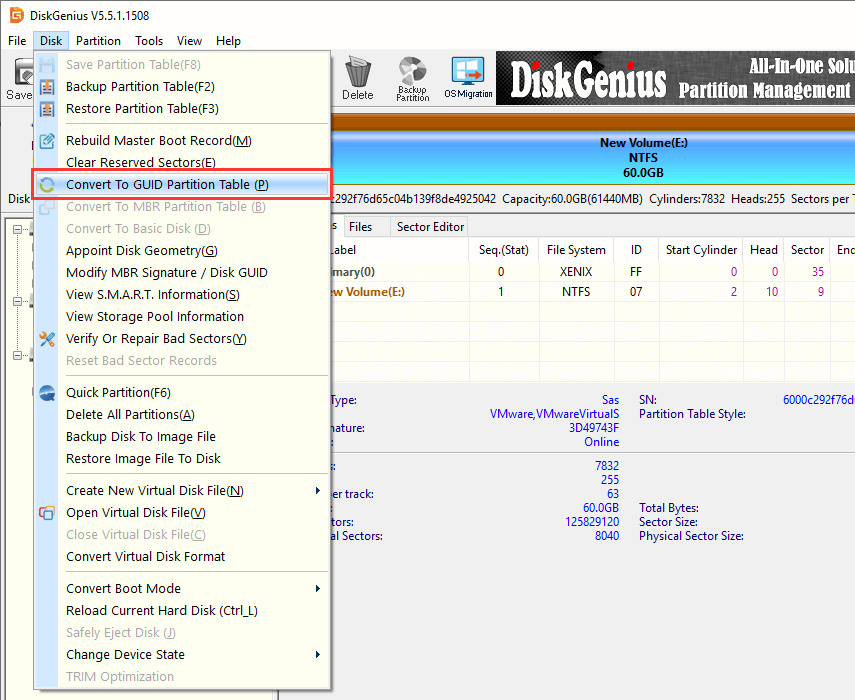
Step 2. Select the GPT disk to be converted and click Disk menu to choose «Convert to MBR Partition Table«, as below:
Step 3. Click OK button from the message box which asks confirmation for the conversion.
Tips: If capacity of the GPT disk is larger than 2TB, system can only make use of 2TB after it is converted to MBR.
Step 4. Click Save All button from toolbar and click Yes from pop-up message box to save changes on partition table.
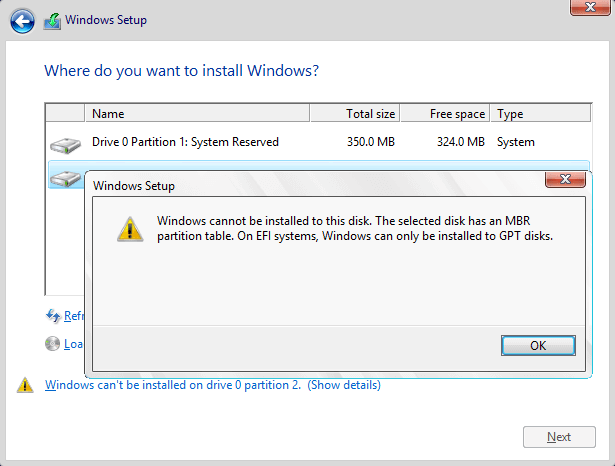
Fix 2: Windows cannot be installed to this disk. The selected disk has an MBR partition table. On EFI systems, Windows can only be installed to GPT disks.
When you attempt to install Windows in UEFI mode on your computer, you cannot select the disk you want. You may click Show details to view the reason which says «The selected disk has an MBR partition table». That means you cannot install UEFI mode on a disk using MBR partition table and it can only install to GPT disks, as image below:
GPT (GUID Partition Table) was introduced as part of UEFI which is the acronym for Unified Extensible Firmware Interface. GPT offers more flexible approach for disk partitioning than MBR partitioning scheme. A partition or volume is a contiguous area on a physical or logical disk and it is visible to system firmware as well as installed Windows system. System firmware controls the access to a partition before operating system boots and then partitions are controlled by OS.
Currently many computers are capable of using the UEFI version of BIOS in order to speed up boot and shutdown time as well as provide security features. If you want to boot computer in UEFI mode, the disk installs operating system should be of GPT style. Many computers are able to use UEFI and they also provide CSM (compatibility support module) so that legacy version of BIOS can be used in necessary. The GPT drive format allows users to set up drivers larger than 4TB and does not limit partition number.
Solution #1: Change BIOS Boot Setting
The first try to solve the problem should be going through BIOS and changing UEFI boot settings. You can manually switch boot mode to legacy BIOS compatibility instead of UEFI mode.
Step 1. Restart computer and enter BIOS by pressing specified key prompted by your motherboard manufacturer. The prompt appears on screen before system boots.
Step 2. Go to Boot tab and locate boot order option. Then disable EFI Boot Source and change boot mode to Legacy.
Step 3. Save changes and exit.
Solution 2: Convert MBR disk to GPT using DiskGenius
DiskGenius Free Edition is able to convert MBR disk to GPT without losing data and the process is quite easy to follow:
Step 1. Install and launch DiskGenius Free. You can download this free partition manger free of charge from download center.
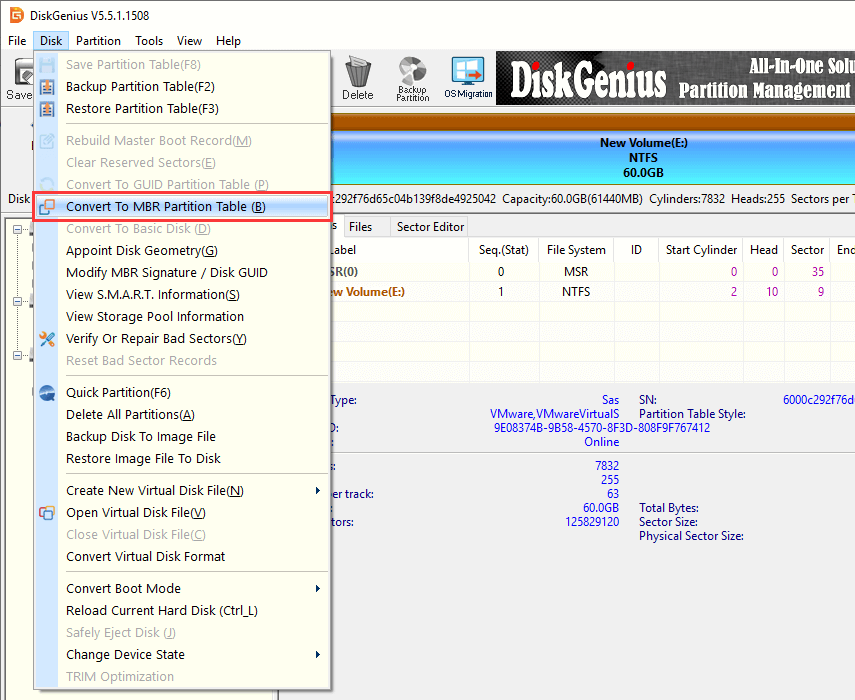
Step 2. Locate and select the MBR disk to be converted to GPT in DiskGenius and click Disk menu to choose «Convert To GUID Partition Table«.
Step 3. Click OK button on the message box. Then click Save All button to make the converting work
When the disk is converted to GPT, you can retry installing Windows again and check if the error is fixed.
Fix 3: Windows cannot be installed to this hard disk space. The partition contains one or more dynamic volumes that are not supported for installation.
The «The partition contains one or more dynamic volumes that are not supported for installation» error is likely to appear when you attempt to install Windows on a dynamic disk. Users are allowed to make a fresh Windows installation on a dynamic volume only when the volume was converted from a basic disk and retained an entry in partition table. However, simple volumes (except system or boot volumes before conversion) that have been converted from basic disks do not have an entry in partition table, thus the installation will end up with following error.
What is basic disk and dynamic disk?
Basic disk is a storage type mostly used with Windows, providing a solution to accommodate an array which changes storage requirement scenarios. This term refers to a disk containing partitions for example primary partition and logical partition which can be formatted with a file system to storage data. Generally, basic disks use MBR partition style since the disk is used by Microsoft MS-DOS operating system and all versions of Windows. Also, it supports GPT partitions on systems that support it. With basic disks you can create and delete primary, extended and logical partitions as well as format a partition or mark is as active.
Dynamic disk provides features that basic disk does not, for example, it is able to create volumes crossing multiple disks as well as create fault-tolerant volumes. Both MBR and GPT partition styles can be used by dynamic disks as well. Dynamic disk provides greater flexibility for volume management, as it makes use of database to track information for volumes and other dynamic disks. Besides, dynamic disk volumes can be created on noncontiguous scope or physical disks, while volumes on basic disk should locate on contiguous extents on one disk.
Solution #1: Convert dynamic disk to basic disk in Disk Management
Step 1. Back up all volumes and data on the dynamic disk to be converted to basic, as this converting method removes all partitions and data on the disk.
Step 2. Open Disk Management. Click Start and right click Computer to select Manage. Click Disk Management in the Computer Management window.
Step 3. Delete all volumes on the disk. Right-click each volume on the disk you want to change to basic disk and select Delete Volume.
Step 4. Right-click the disk and select Convert to Basic Disk. Once the disk is converted to basic disk, you can create partitions on the disk.
Solution #2: Change a dynamic disk back to basic disk using command line
Warning: If you want to keep your files on the disk, back up files or copy data to another disk before starting following steps.
Step 1. Open Command Prompt. If there in not operating system on your computer, you can use Windows installation CD or bootable disk to boot computer and open CMD. Choose Repair your computer and then Troubleshoot to locate Command Prompt.
Step 2. Delete all volumes on the dynamic disk by typing following commands with pressing Enter after each command.
diskpart
list disk
select disk # (# is the number of the dynamic disk)
detail disk
select volume=0
To delete other volumes, you can continue typing select volume=1 -> delete volume one more time.

Step 3. After all volumes are deleted, type convert basic and the empty will be converted into a basic disk.
Solution #3: Convert dynamic disk to basic disk without data loss
Both methods above require you delete all volumes and data before converting, thus you should make sure there are not important data or create a copy beforehand. Here is an alternative solution which is able to complete the conversion without losing data. DiskGenius is a professional dynamic disk converter, it is able to convert dynamic disk to basic without deleting volumes within several seconds. Let’s see the entire converting process.
Step 1. Run DiskGenius and you can see the dynamic disk on the main interface.
Step 2. Locate and right-click on the dynamic disk and select Convert to Basic Disk option, as below:
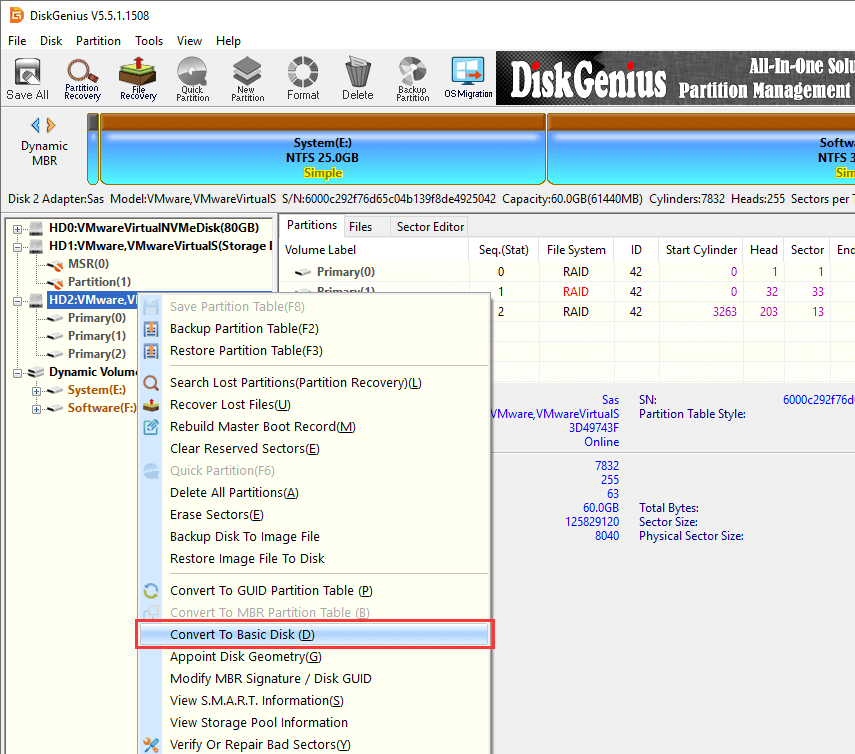
Step 3. Click OK button from the pop-up message box to make the changing work.
Fix 4: Windows cannot be installed to this disk. Windows must be installed to a partition formatted as NTFS
Due to compatibility problem on file system, most versions of Windows operating system can be installed to partitions formatted to NTFS only and few versions can be installed to FAT partition. If the volume is formatted to an improper file system, you’ll receive error «Windows must be installed to a partition formatted as NTFS». Since target partition has a file system issue, we can fix this error easily by changing its files system to NTFS.
Solution #1: Convert FAT file system to NTFS using Convert.exe
Step 1. Click Start button and enter cmd in searching box and press Enter.
Step 2. Type convert G:/fs:ntfs in command prompt and press Enter.
G is the drive letter of the partition that you want to change file system. You can open Windows Explorer to view the drive letter. Make sure the drive letter is correctly entered here. If it asks to enter the volume name, type in the name and press Enter.
Step 3. Convert.exe attempts to convert file system into NTFS and the process won’t take too long.
Solution #2: Format partition into NTFS
Step 1. Copy the folder where DiskGenius installs to your bootable disk and then use the disk to boot computer.
Besides, you can create a bootable disk with DiskGenius: Click «Tools» menu and choose «Create WinPE Bootable USB Drive of DiskGenius» option.
Step 2. Launch DiskGenius and right-click the system partition you want to format to select Format Current Partition.
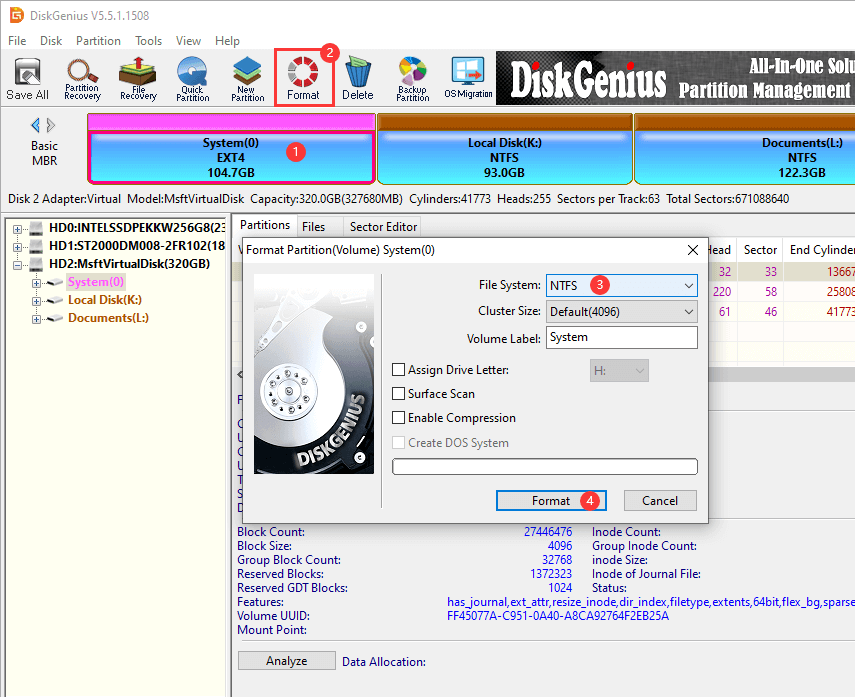
Step 3. Set the file system as NTFS and click Format button. As to options like Cluster Size, Volume Label, Surface Scan, etc. you can follow the default value set by partition manager.
Step 4. Click Yes from the message box which prompts all files on this partition will be lost after formatting.
Fix 5: Windows cannot be installed to this disk. This computer’s hardware may not support booting to this disk. Ensure the disk’s controller is enabled in the computer’s BIOS menu
You may receive the warning message «Windows is unable to install to the selected location. Error: 0x80300001…This computer’s hardware may not support booting to his disk. Ensure the disk’s controller is enabled in the computer’s BIOS menu» when you try to install Windows. If you click Next to continue and you will receive another error «Windows cannot find a system volume that meets requirements for installation».
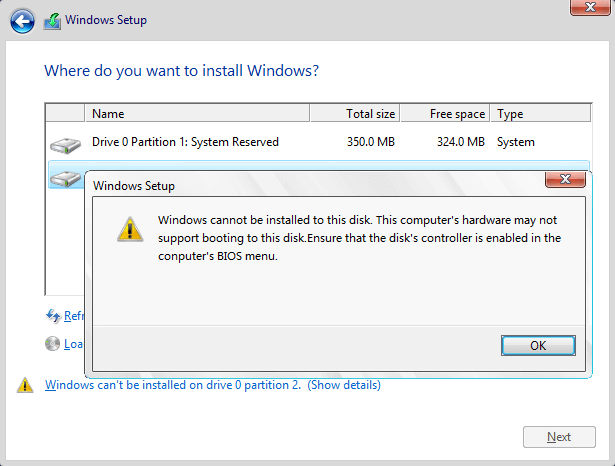
This error may indicate that BIOS settings of your computer are not properly configured, thus you can try setting BIOS to factory and go back to default setting. Also, this issue is caused by hard disk mode; in that case, you need to change AHCI to Compatibility in BIOS. If there is not Compatibility option, you can select IDE.
Fix 6: Windows cannot be installed to this disk. The disk may fail soon. If other hard disks are available, install Windows in another location
There might be something wrong with the hard drive if you get the error «Windows cannot be installed to this disk. The disk may fail soon. If other hard disks are available, install Windows in another location.» You should be cautious if hard drive is damaged, as data on that disk may get lost. Similar to system warning Windows detected a hard disk problem, you should have a check for hard drive’s health condition.
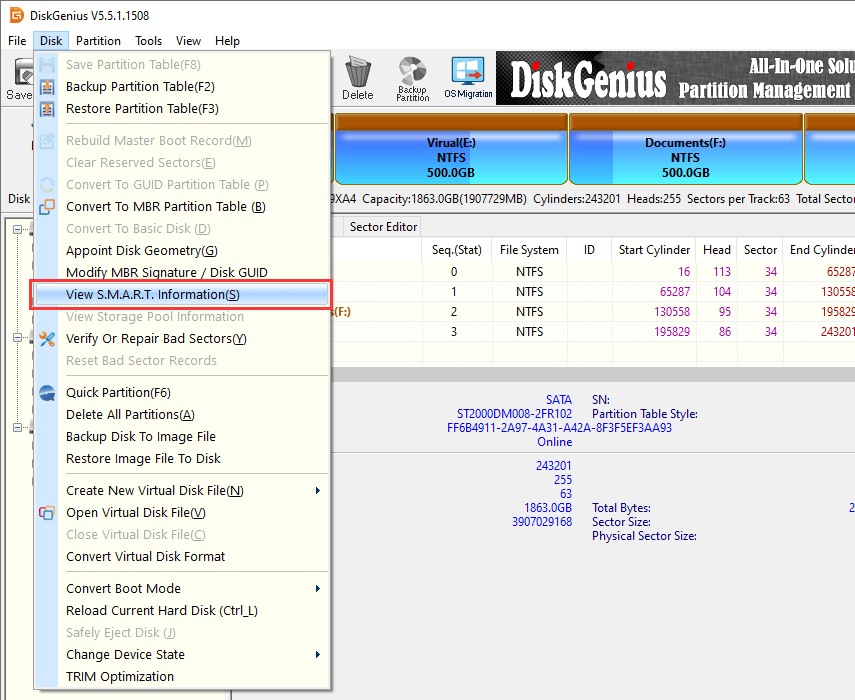
Step 1. View hard drive S.M.A.R.T. information. Select the hard disk that may fail soon and click Disk menu to choose View S.M.A.R.T. Information. If the health status is NOT Good, then backup data and verify bad sectors following Step 2.
Step 2. Verify bad sectors for hard drive in questions. Still in DiskGenius, select the disk you want to check and click Disk to choose «Verify Or Repair Bad Sectors«. Then click Start Verify button to start scanning sectors for selected area.
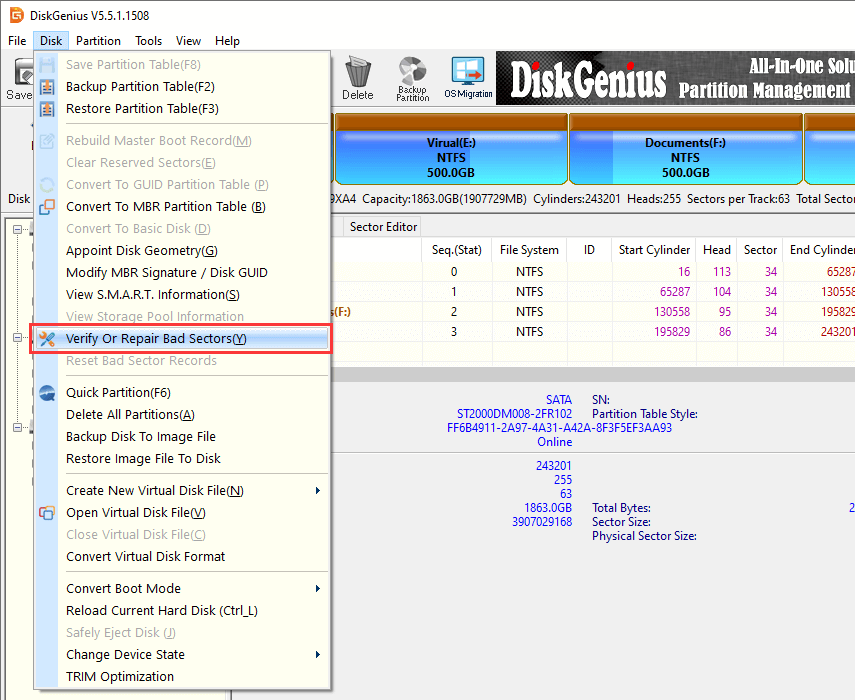
If hard disk contains bad sectors, you can try repairing it with the program. Ensure that all files are backed up first, because bad sector repairing destroys. It’s normal some bad sectors caused by physical damage cannot be repair. In that situation, you can manually create a hidden partition on that area to isolate bad sectors. Moreover, operating system shouldn’t be installed to a hard drive that contains bad sectors.
Fix 7: Windows is unable to install to the selected location. Error: 0x80300001
While install Windows 7 you might run into an error saying «Windows is unable to install to the selected location. Error: 0x80300001». This error typically occurs when you are asked to exchange hard drives in order to install required drivers on the system and the system disk hasn’t been put back. It can also be caused by other reasons, so you may have to try more than one solution to solve it.
Solution #1: Reconnect Windows installation disk
Step 1. Boot computer using Windows install CD or USB disk to the setup wizard. Go to the step which requires selecting a partition and click Load Driver. When you see the error message, ignore it.
Step 2. Reinsert the install disk and click Refresh link and then Advanced Drive Options to create a new partition with any size. If Windows prompts it has to carry out some operations, click OK. Then you can see a new system partition and a new primary partition.
Step 3. Select the new primary partition and click Next button and the setup will continue without any errors.
Solution #2: Change boot order
It’s possible that this error occurs when the disk is not set as boot disk provided that you are not using RAID. In that circumstance, you can get rid of the problem by changing boot order in BIOS.
Step 1. Enter BIOS Setup Utility. Turn on or restart computer and watch message appearing on screen, and a particular key such as Del or F2 will be displayed to enter BIOS. Press that key.
Step 2. Select the Boot tab. All BIOS utilities look different, but boot option is definitely included. Locate and select it.
Step 3. Set the hard drive where you want to install system as the boot disk. Any attached storage devices like hard drive, USB flash drive, floppy drive, etc. are listed here and you can change their order manually. Save changes and exit.
Fix 8: Windows cannot be installed to Disk 0 Partition 1
People who try to install Windows using internal SAS controller for hard drive will encounter the message «Windows cannot be installed to disk # partition #». Usually this issue occurs due to SAS driver issue or corrupted MFT. The Microsoft Windows partition manager is out of touch with driver after changes were made on partition. Here is an approach to troubleshoot the problem.
Step 1. When the Windows installation process asks where you want to install Windows, load the SAS driver from USB key. If the disk is larger than 2TB and needs to be converted to GPT, you can follow steps in previous solutions to do the conversion.
Step 2. View and check all possible partitions available for system installing. If the disk does not show up, have a check whether the driver is correctly installed.
Step 3. Delete partitions until there is only Unallocated Space on the disk. Click New and you can see recommended partition size. Continue OK and you can see 3 partitions: system partition, MSR partition and large partition. For this step, you can use DiskGenius to repartition the disk and choose GUID partition table, which is easier and intuitive.
Step 4. Select the big partition and click Refresh. Then click Next to start installation.
Conclusion
This guide includes 8 cases that «Windows cannot be installed to this disk» error appears during Windows se tup process. If selected disk is of improper partition table style corresponding to BIOS settings, Windows installation will be blocked by errors. This article provides step by step solutions to each situation. If you have better solutions, please feel free to contact us or share with other readers; many approaches in this article such as formatting disk and delete partitions lead to data loss, please make sure files and partitions are backed up beforehand; the free partition manager DiskGenius provides proper and effective functions to help fix this error occurring in different cases, and it is a qualified partition and disk management as well as data recovery program for both average and professional users.
Содержание:
- 1 Настройка UEFI и установка Windows на GPT-диск
- 2 Конвертирование разметки GPT в MBR
- 3 Использование сторонних программ
- 4 Установка системы в нераспределенное пространство
Развитие компьютерных технологий подразумевает не только рост вычислительных мощностей, наряду с повышением производительности имеют место усовершенствования, касающиеся стабильности, безопасности и удобства современных компьютеров. Одним из наиболее значимых изменений, произошедших за последние годы, стала замена старого BIOS более совершенным UEFI, а также переход со стиля разметки дисков MBR на GPT.
Преимущества последнего стиля очевидны. В отличие от MBR, разметка GPT позволяет создавать практически неограниченное количество разделов, присваивать им уникальные идентификаторы, имена и атрибуты. Также GPT поддерживает дублирование загрузочного кода и таблицы разделов, работу без каких-либо ограничений с носителями объёмом более 2,2 Тб. Впрочем, есть у стиля разделов GPT и свои недостатки, среди которых самым значительным является отсутствие поддержки этой технологии на компьютерах со старым BIOS.
Кроме того, у начинающих пользователей могут возникнуть трудности с установкой Windows на GPT-диск. Так, вследствие несовместимости программного обеспечения BIOS или отдельных его настроек с современными накопителями, при попытке установить систему на диск с новым стилем разметки на начальном этапе может возникнуть ошибка «Установка Windows на данный диск невозможна. Выбранный диск имеет стиль GPT».

Неискушённым в компьютерных тонкостях пользователям ошибка может показаться серьёзной, в действительности здесь нет ничего такого, что могло бы воспрепятствовать установке системы.
Появление сообщения «Установка Виндовс невозможна, выбранный диск имеет стиль разделов GPT» обычно имеет место на новых моделях компьютеров с объёмными дисками или, напротив, на старых ПК после замены дисков более новыми моделями накопителей. При этом версия операционной системы не играет особой роли, ошибка может возникнуть при установке и Windows 7, и Windows 10, хотя, по многочисленным свидетельствам, с ошибкой чаще приходится сталкиваться при установке «семёрки». В настоящее время существует два основных решения этой проблемы – изменение соответствующих настроек в BIOS UEFI и преобразование стиля GPT в MBR.
Настройка UEFI и установка Windows на GPT-диск
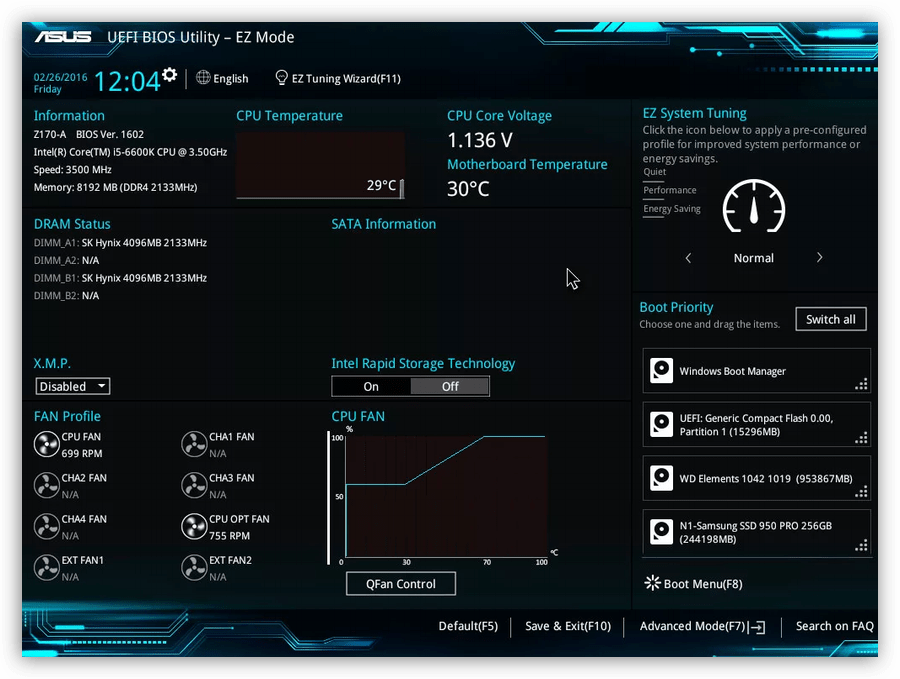
Этот способ применим только для компьютеров с прошивкой UEFI, поэтому первым делом необходимо удостовериться, что таковая действительно присутствует. Если при входе в BIOS вы видите графический интерфейс с поддержкой мыши, с большей долей вероятности на вашем ПК используется прошивка UEFI, следовательно, вы можете установить систему на диск GPT. Попасть в новый BIOS можно так же, как и в старый – достаточно зажать кнопку F2 или Del при загрузке.

Далее в разделе BIOS Features или BIOS Setup вам нужно найти и включить загрузку UEFI вместо CSM, а в разделе Peripherals режим работы SATA вместо IDE выбрать AHCI. Если вы устанавливаете Windows 7 или более раннюю версию системы, необходимо также отключить функцию Secure Boot (обычно располагается в разделе Boot).

После проделанных манипуляций сообщение «Невозможно установить Windows. Стиль разделов GPT» больше не должно появляться.
Важно: устанавливаемая на GPT-диск система должна быть 64-битной, таковы условия политики Microsoft. Если вы хотите установить 32-разрядную версию Windows, разметку придётся сконвертировать в MBR. Если установка системы производится с флешки, рекомендуется пересоздать загрузочный USB-носитель с тем, чтобы он поддерживал UEFI. Для этого можно воспользоваться командной строкой, а ещё лучше – специальной утилитой Rufus.
Конвертирование разметки GPT в MBR
Если на ПК используется обычный BIOS, установка Windows на диск GPT будет невозможна. В этом случае наиболее правильным решением будет преобразование стиля GPT в MBR непосредственно перед установкой системы. Получив уведомление о невозможности установки Windows, закройте окно мастера и нажмите Shift + F10. В открывшейся командной строке последовательно выполните такие команды:
diskpart
list disk
sеlеct disk 0
clean
convert mbr
Первая команда запускает утилиту Diskpart, вторая выводит список всех подключённых к ПК физических дисков, третьей командой производится выбор нужного диска (в данном примере это диск 0), четвёртой выполняется его полная очистка (удаляются все созданные разделы), пятая команда преобразует стиль разметки GPT в MBR. При выполнении команды list disk обратите внимание на звездочку в колонке GPT, она как раз указывает на то, что диск имеет стиль GPT.

Дабы убедиться, что конвертация выполнена успешно, можете ещё раз вывести список дисков (list disk) – звёздочка в колонке GPT должна исчезнуть. Это всё, командой exit завершите работу утилиты Diskpart, закройте командную строку и продолжите установку Windows, предварительно перезагрузив компьютер. Разделы после очистки придётся создавать заново, но на этот раз никаких уведомлений о невозможности установки в выбранный раздел возникнуть не должно, так как диск уже будет иметь разметку MBR.
Использование сторонних программ
Маловероятно, но может статься, что преобразовать стиль разметки GPT в MBR нужно будет на диске с уже имеющимися на нём данными. Описанный выше способ с использованием Diskpart в данном случае не подходит, так как команда clean удаляет все разделы с диска, а вместе с ними и содержащиеся в них данные. В такой ситуации можно воспользоваться сторонними приложениями, например, загрузочным диском Minitool Partition Wizard Bootable, Paragon Hard Disk Manager или AOMEI PE Builder.

Все эти программы позволяют конвертировать базовый диск GPT в MBR и наоборот, при этом процедура конвертации в них отличается простотой и доступна пользователям с любым уровнем подготовки.
Установка системы в нераспределенное пространство
В некоторых случаях можно обойтись и без использования командной строки или дополнительных приложений. Если при установке Виндовс 7/10 мастер пишет «установка на данный диск невозможна», а объём диска не превышает 2,2 Гб, стоит испытать такой способ. Удалите с помощью мастера установки все созданные разделы и попробуйте установить Windows в единое нераспределённое пространство.

Если ошибка не возникнет, система сама выбрала стиль MBR и в него же преобразовала диск. Правда, в этом случае пользовательский раздел D после установки вам придётся создавать отдельно. Также на диске у вас не будет скрытого раздела «Зарезервировано системой», что несколько снизит отказоустойчивость Windows.
When installing Windows on your PC or Laptop, you can get two very common errors :
- Windows cannot be installed on this disk. The selected disk is of the GPT partition style.
- Windows cannot be installed on this disk. The selected disk has an MBR partition table. On EFI systems, Windows can only be installed on GPT disks
Let’s look at both of these problems in detail.
Contents
- Windows cannot be installed on this disk. The selected disk is of the GPT partition style
- Windows cannot be installed on this disk. The selected disk has an MBR partition table. On EFI systems, Windows can only be installed on GPT disks
Windows cannot be installed on this disk. The selected disk is of the GPT partition style
The reason for this error is that the motherboard only supports Legacy BIOS, not both Legacy and UEFI or CSM boot. Since conventional BIOS cannot accept GPT partitions, you can only mount Windows to an MBR disc in legacy BIOS mode, but data read/write on GPT discs is possible as long as Windows supports it.
You can solve this problem by opening cmd during the installation process and cleaning the disk you are trying to install your windows on and convert it to MBR. Here are detailed steps :
- On the main installation wizard, where you have the option to INSTALL NOW, press “SHIFT + F10 ” to open up Command Prompt(cmd). If you are using a laptop, you may need to press the “Fn” key as well to use your function keys on the keyboard, ie “Shift + Fn + F10”.

Enter Command Prompt – Windows 10 - Once the cmd is opened, execute the following commands one by one. It will show available disks on your system, their status, size, and other different attributes.
diskpart
and
list disk

Execute “diskpart” and “list disk” - Select the disk you want to install your Windows on by the following command:
select disk n
Here n could be any available disk. In our case, we selected Disk 1 so our command the following:
select disk 1
- Now write the following command to clean this disk:
clean
- Finally, execute the following command to convert the selected disk (disk 1 in our case) to the MBR partition.
convert mbr
- Once you get the message “Diskpart successfully converted the selected disk to MBR format”, write the exit command to exit the cmd.

Run these commands - Now you are ready to install your windows on the selected disk and there should be no errors.


Note: Make sure you backup your data because cleaning the disk will remove the data in it.
Windows cannot be installed on this disk. The selected disk has an MBR partition table. On EFI systems, Windows can only be installed on GPT disks
The second common error during installing Windows is that the selected disk is of MBR format. You’ll need some knowledge of UEFI + GPT boot to understand this issue. While both an MBR and a GPT disc can potentially be used to boot operating systems on EFI systems, Microsoft requires that Windows be built on a GPT disc.
The easiest way to correct this mistake is to transform the MBR disc into a GPT disc. The solution Process is similar for this problem too; cmd during installation is used to convert MBR disk to GPT format.
- Navigate to the command prompt as we did in the previous solution.
- Search for disks and select the one you want to install as we did in steps 2 – 3.
- Execute these commands in order to select and delete all the volumes of the selected disk:
detail disk

select volume=0

delete volume

select volume=1

delete volume
- Once all volumes on the dynamic disk are deleted, write the following command to convert our MBR format disk to GPT format.
convert basic

, write the convert basic command to convert our MBR format disk to GPT format - Once Diskpart shows it has successfully converted the selected dynamic disk to basic format, you can type ‘exit’ to quit from Diskpart.
- Now you are ready to install your windows on the selected disk and there should be no errors.

Note: Make sure you backup your data because cleaning the disk will remove the data in it.

Shaheer is the lead troubleshooter at Computer Verge. He has over 7 years of IT experience. He has a Bachelor’s degree in Computer Science and has completed various IT programming and support certifications.
Back to top button