Содержание
- Невозможна установка Windows на диск
- Вариант 1: Не хватает места на диске
- Вариант 2: Таблица разделов
- Заключение
- Вопросы и ответы
При установке Windows довольно редко, но все же возникают различные ошибки. В большинстве случаев они приводят к тому, что продолжение инсталляции становится невозможным. Причин таких сбоев множество – от некорректно созданного установочного носителя до несовместимости различных компонентов. В этой статье мы поговорим об устранении ошибок на этапе выбора диска или раздела.
Рассмотрим подробнее саму ошибку. При ее возникновении в нижней части окна выбора диска появляется ссылка, нажатие на которую открывает подсказку с указанием причины.
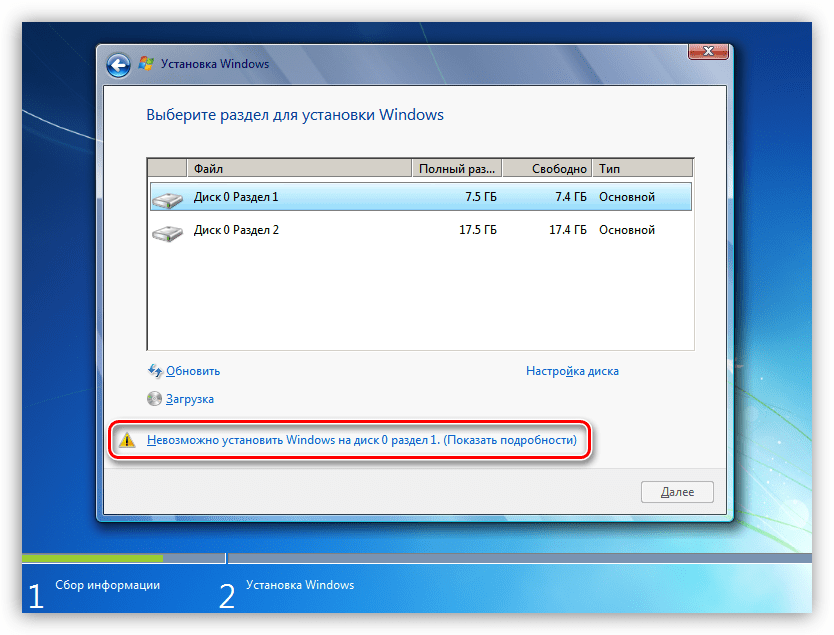
Причин, вызывающих данную ошибку, всего две. Первая – недостаток свободного места на целевом диске или разделе, а вторая связана с несовместимостью стилей разделов и микропрограммного обеспечения – BIOS или UEFI. Далее мы разберемся, как решить обе этих проблемы.
Читайте также: Нет жесткого диска при установке Windows
Вариант 1: Не хватает места на диске
В такую ситуацию можно попасть при попытке установки ОС на диск, который до этого был разбит на разделы. Доступа к софту или системным утилитам мы не имеем, но нам на выручку придет инструмент, «вшитый» в установочный дистрибутив.
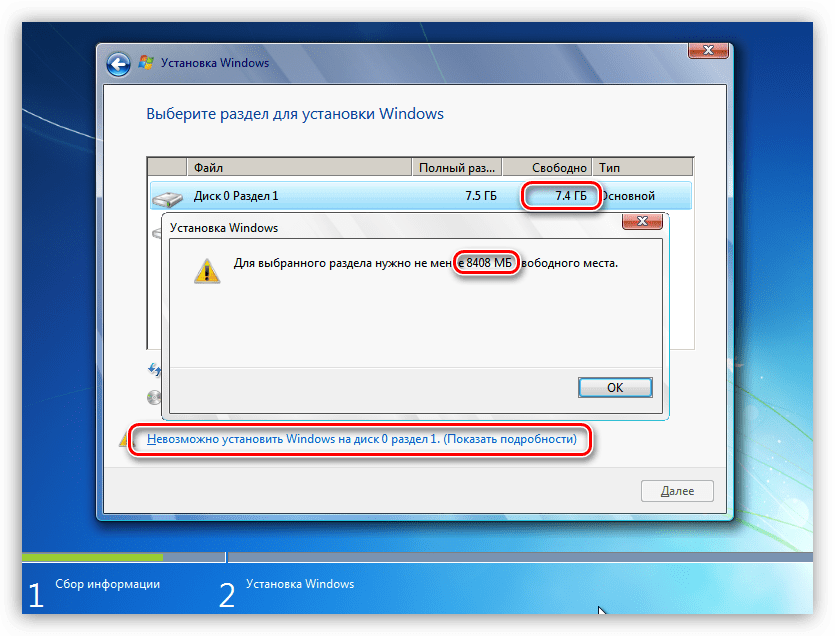
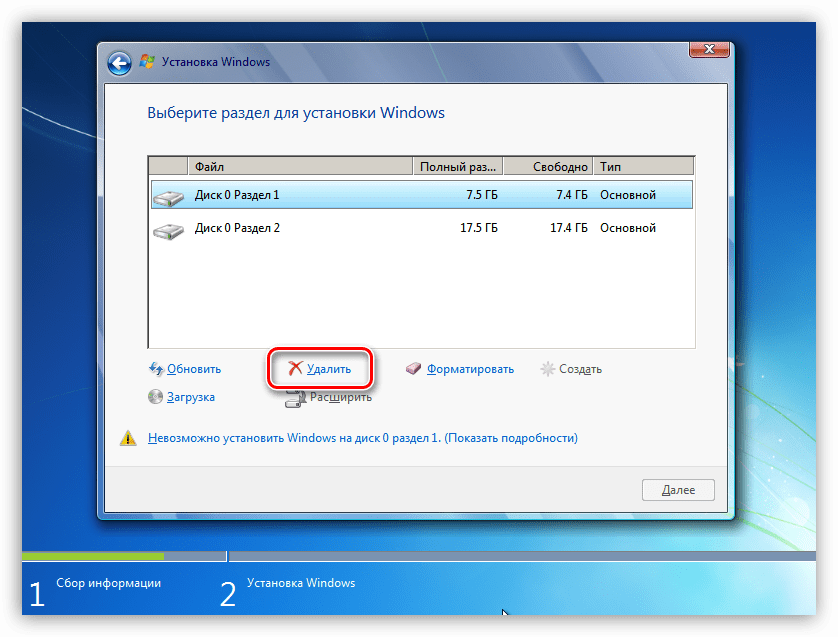
Нажимаем на ссылку и видим, что рекомендуемый объем немного больше имеющегося в разделе 1.
Можно, конечно, установить «винду» и в другой подходящий раздел, но в таком случае в начале диска останется пустое место. Мы пойдем другим путем – удалим все разделы, объединив пространство, а затем создадим свои тома. Имейте в виду, что все данные при этом будут удалены.
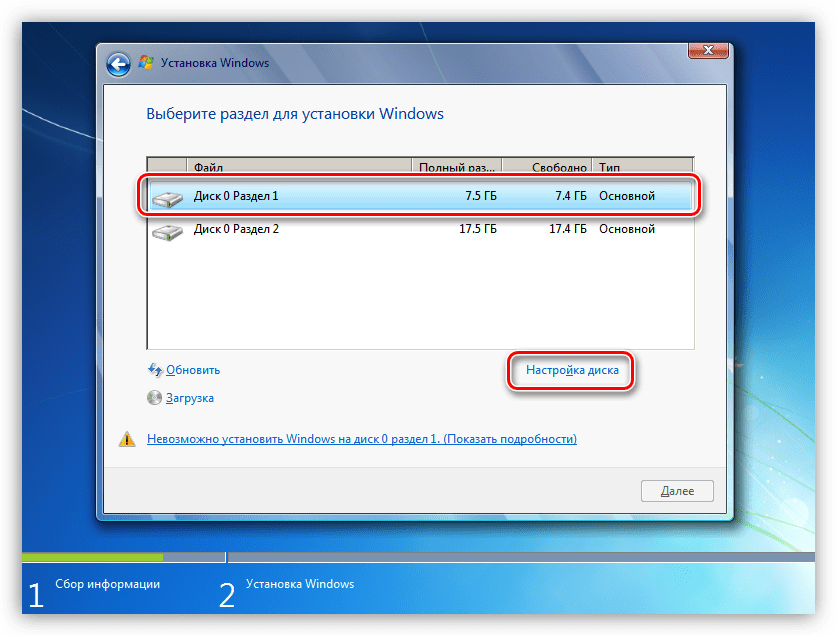
- Выбираем первый том в списке и открываем настройки диска.

- Нажимаем «Удалить».

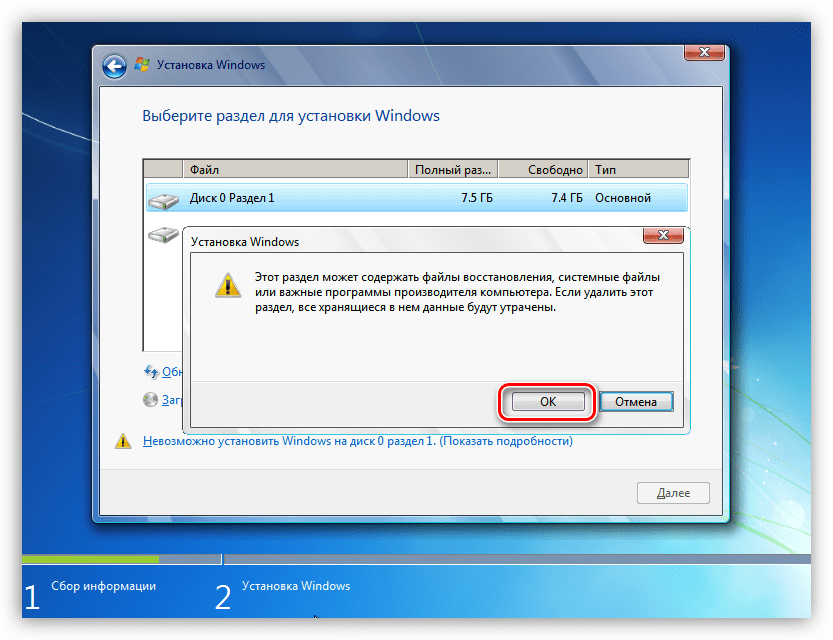
В диалоговом окне с предупреждением жмем ОК.

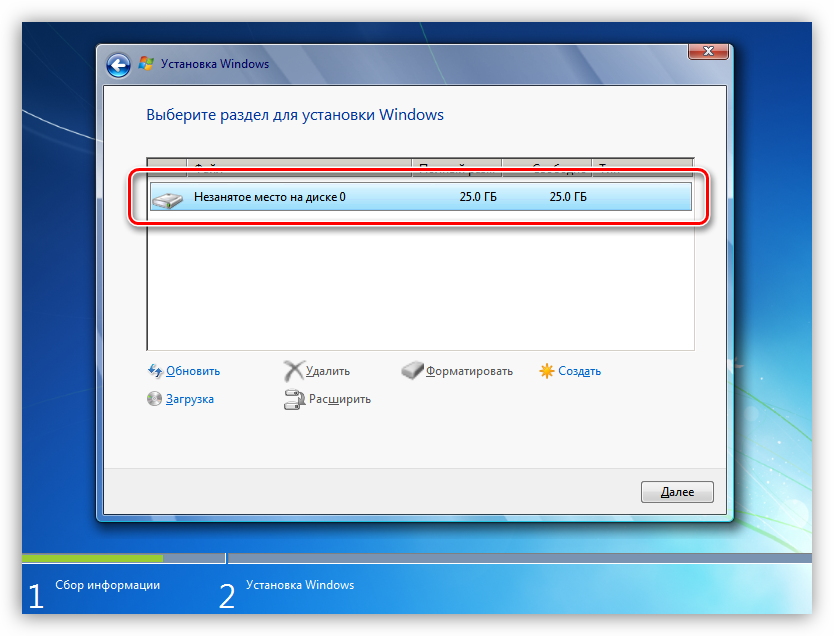
- Повторяем действия с остальными разделами, после чего получим одно большое пространство.

- Теперь переходим к созданию разделов.
Если диск разбивать не требуется, то этот шаг можно пропустить и перейти непосредственно к установке «винды».
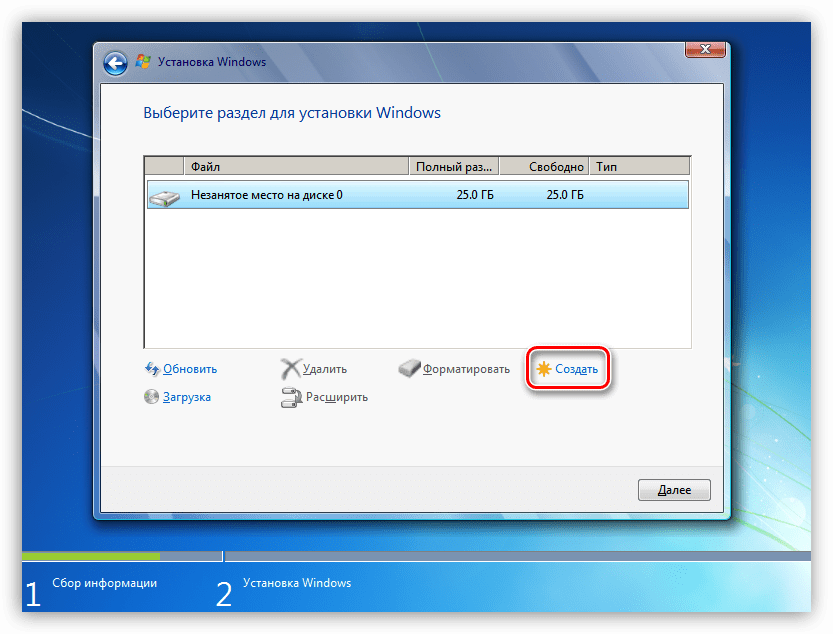
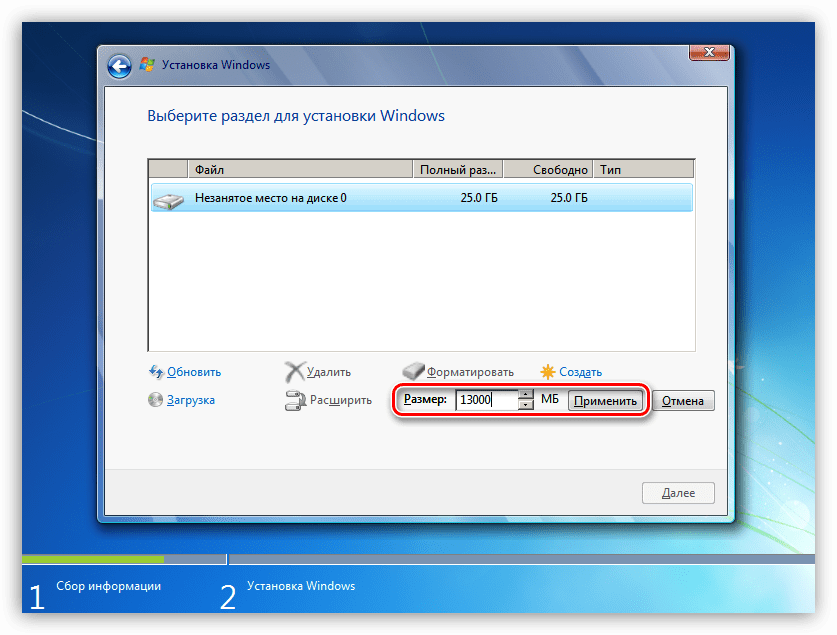
Нажимаем «Создать».

- Настраиваем необходимый объем тома и нажимаем «Применить».

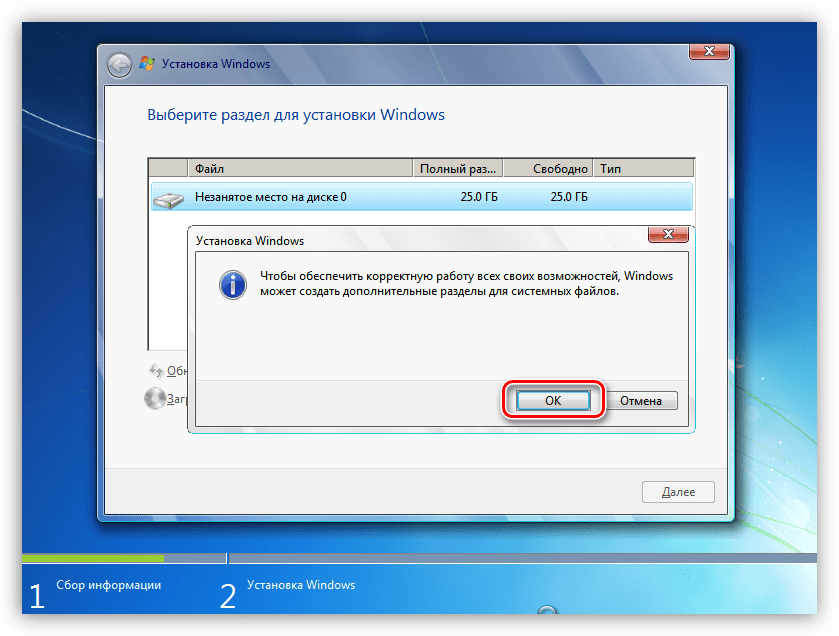
Установщик сообщит нам, что может быть создан дополнительный системный раздел. Соглашаемся, нажав ОК.


- Теперь можно создать еще один или несколько разделов, а может, заняться этим позже, прибегнув к помощи специальных программ.
Подробнее: Программы для работы с разделами жесткого диска
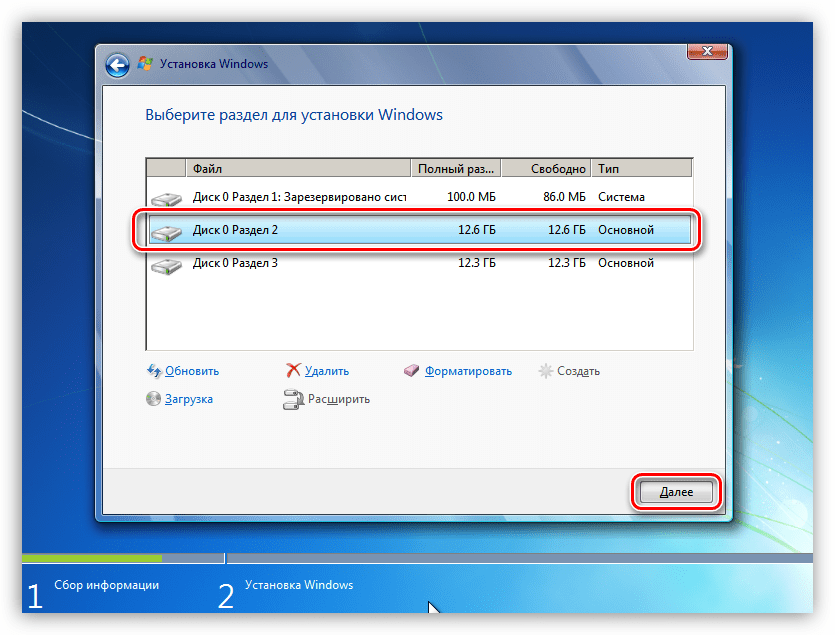
- Готово, в списке появился том нужного нам размера, можно устанавливать Windows.


Вариант 2: Таблица разделов
На сегодняшний день существует два вида таблиц – MBR и GPT. Одно из главных их отличий – наличие поддержки типа загрузки UEFI. В GPT такая возможность имеется, а в MBR нет. Есть несколько вариантов действий пользователя, при которых возникают ошибки установщика.
- Попытка установки 32-разрядной системы на GPT-диск.
- Инсталляция с флешки, содержащей дистрибутив с UEFI, на диск MBR.
- Установка из дистрибутива без поддержки UEFI на носитель GPT.
Что касается разрядности, то здесь все ясно: нужно найти диск с 64-битной версией Windows. Проблемы же с несовместимостью решаются либо конвертированием форматов, либо путем создания носителя с поддержкой того или иного типа загрузки.
Подробнее: Решение проблемы с GPT-дисками при установке Windows
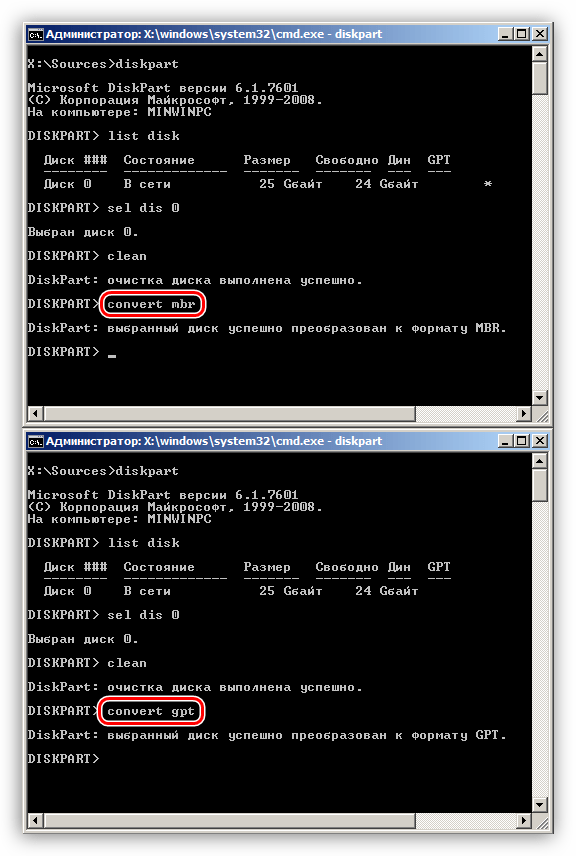
В статье, доступной по ссылке выше, описан только вариант с установкой системы без UEFI на диск GPT. При обратной ситуации, когда у нас установщик UEFI, а диск содержит таблицу MBR, все действия будут аналогичными, кроме одной консольной команды.
convert mbr
ее нужно заменить на
convert gpt
C настройками BIOS также все наоборот: для дисков с MBR нужно отключить UEFI и режим AHCI.

Заключение
Таким образом, мы разобрались в причинах проблем с дисками при установке Виндовс и нашли их решение. Для того чтобы избежать возникновения ошибок в дальнейшем, необходимо запомнить, что на диски GPT можно установить только 64-разрядную систему с поддержкой UEFI или создать такую же флешку. На MBR, в свою очередь, устанавливается все остальное, но только с носителя без UEFI.
Еще статьи по данной теме:
Помогла ли Вам статья?
 В этой инструкции подробно о том, что делать, если при установке Windows вам сообщают, что невозможно установить Windows в раздел диска, а в подробностях — «Установка Windows на данный диск невозможна. Возможно, оборудование компьютера не поддерживает загрузку с данного диска. Убедитесь, что контроллер данного диска включен в меню BIOS компьютера». Похожие ошибки и способы их исправить: Установка на диск невозможна, выбранный диск имеет стиль разделов GPT, Установка на данный диск невозможна, на выбранном диске находится таблица MBR-разделов, Нам не удалось создать новый или найти существующий раздел при установке Windows 10.
Если же все-таки выбрать этот раздел и нажать «Далее» в программе установки, вы увидите ошибку сообщающую, что нам не удалось создать новый или найти существующий раздел с предложением просмотреть дополнительные сведения в файлах журнала программы установки. Ниже будут описаны способы исправить такую ошибку (которая может возникать в программах установки Windows 10 — Windows 7).
По мере того, как все чаще на компьютерах и ноутбуках пользователей встречается разнообразие в таблицах разделов на дисках (GPT и MBR), режимов работы HDD (AHCI и IDE) и типов загрузки (EFI и Legacy), учащаются и ошибки при установке Windows 10, 8 или Windows 7, вызванные этими параметрами. Описываемый случай — как раз одна из таких ошибок.
Примечание: если сообщение о том, что установка на диск невозможна сопровождается информацией об ошибке 0x80300002 или текстом «Возможно, этот диск скоро выйдет из строя» — это может быть вызвано плохим подключением диска или кабелей SATA, а также повреждениями самого накопителя или кабелей. Данный случай не рассматривается в текущем материале.
Исправление ошибки «Установка на данный диск невозможна» с помощью настроек БИОС (UEFI)
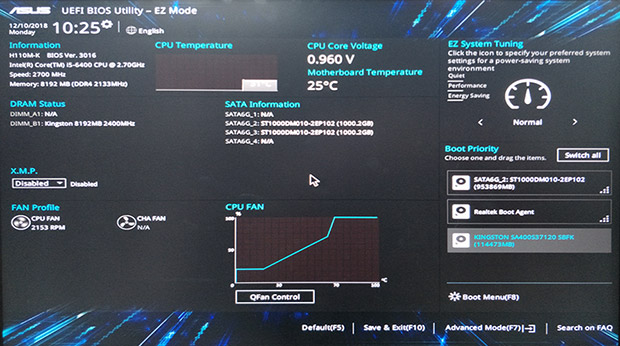
Чаще всего указанная ошибка происходит при установке Windows 7 на старых компьютерах с БИОС и Legacy загрузкой, в тех случаях, когда в БИОС в параметрах работы SATA устройств (т.е. жесткого диска) включен режим AHCI (или какие-либо режимы RAID, SCSI).

Решение в данном конкретном случае — зайти в параметры БИОС и изменить режим работы жесткого диска на IDE. Как правило, это делается где-то в разделе Integrated Peripherals — SATA Mode настроек БИОС (несколько примеров на скриншоте).

Но даже если у вас не «старый» компьютер или ноутбук, этот вариант также может сработать. Если же вы устанавливаете Windows 10 или 8, то вместо включения IDE режима, рекомендую:
- Включить EFI-загрузку в UEFI (если она поддерживается).
- Загрузиться с установочного накопителя (флешки) и попробовать установку.
Правда в этом варианте вам может встретиться другой тип ошибки, в тексте которой будет сообщаться, что на выбранном диске находится таблица MBR-разделов (инструкция по исправлению упомянута в начале этой статьи).
Почему такое происходит я и сам не до конца понял (ведь драйвера AHCI включены в образы Windows 7 и выше). Более того, воспроизвести ошибку я смог и для установки Windows 10 (скриншоты как раз оттуда) — просто изменив контроллер диска с IDE на SCSI для виртуальной машины Hyper-V «первого поколения» (т.е. с БИОС).

Будет ли появляться указанная ошибка при EFI-загрузке и установке на диск, работающий в IDE-режиме, проверить не смог, но допускаю подобное (в этом случае пробуем включить AHCI для SATA дисков в UEFI).
Также в контексте описываемой ситуации может оказаться полезным материал: Как включить режим AHCI после установки Windows 10 (для предыдущих ОС все аналогично).
Сторонние драйвера контроллера дисков AHCI, SCSI, RAID
В некоторых случаях проблема вызвана специфичностью оборудования пользователя. Наиболее распространенный вариант — наличие кэширующих SSD на ноутбуке, многодисковые конфигурации, RAID-массивы и SCSI карты.
Эта тема затронута у меня в статье Windows не видит жесткий диск при установке, а суть сводится к тому, что, если у вас есть основания предполагать, что особенности оборудования являются причиной ошибки «Установка Windows не данный диск невозможна», первым делом следует зайти на официальный сайт производителя ноутбука или материнской платы, и посмотреть, а есть ли там какие-то драйвера (как правило, представленные в виде архива, а не установщика) для SATA-устройств.
Если есть — загружаем, распаковываем файлы на флешку (там обычно присутствуют inf и sys файлы драйвера), а в окне выбора раздела для установки Windows нажимаем «Загрузить драйвер» и указываем путь к файлу драйвера. А уже после его установки, становится возможной и установка системы на выбранный жесткий диск. 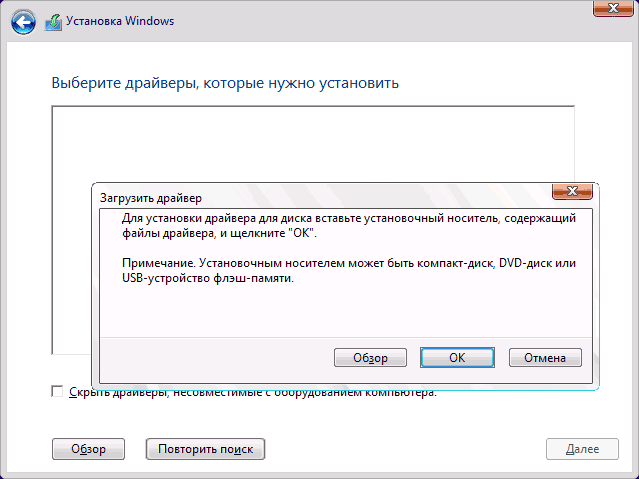
Если предложенные решения не помогают, пишите комментарии, будем пробовать разобраться (только упоминайте модель ноутбука или материнской платы, а также какую ОС и с какого накопителя устанавливаете).
When you encounter this error — «Windows cannot be installed to disk 0 partition 1» on your computer, here are two ways to help you out:
①. Convert disk 0 to MBR or GPT; ②. Clean the target disk.
Follow the detailed tutorial steps to get Windows installed on your disk 0 partition 1 with ease:
| Workable Solutions | Step-by-step Troubleshooting |
|---|---|
| Fix 1. Convert Disk 0 to MBR/GPT | Try to convert MBR disk to GPT disk with…Full steps |
| Fix 2. Clean Target Disk via DiskPart | Type diskpart > list disk > sel disk 0…Full steps |
The provided solutions are viable to fix «Windows cannot be installed on this drive» error on Windows 10/8/7 and Windows XP/Vista, etc.
Warm Note: As Windows installation will cause partial data loss, make sure that you have backed-up all valuable data on the target disk to another secure storage device in advance. For example, backup computer to USB flash drive.
Causes for Windows Can’t Be Installed to Disk Error
When you come across with «Windows cannot be installed to Disk 0 Partition 1» or «Windows is unable to install to the selected location» error while installing Windows, don’t worry.

Here are two possible causes that prevent you from installing Windows on the target disk:
1. The Target Disk Doesn’t Support BIOS or UEFI Boot Mode
«Windows cannot be installed to this disk 0 partition 1» error usually happens when the Boot Mode or Boot List Option in the Bios settings is set to UEFI (Unified Extensible Firmware Interface), and the hard drive is over 2 TB (terabytes) in size.
When it appears, you will not be able to install windows on your computer successfully. To get rid of this error and continue with Windows installation, you will need to convert the target disk 0 to MBR to GPT first.
2. SAS Driver Issue or Corrupted MFT on the Target Disk
When the target hard drive contains SAS driver issue or corrupted Master File Table (MFT), Windows Partition Manager (partmgr.sys) will lose communication when changes are made on the partition.
If you attempt to install Windows Windows 10/8/7 using the internal SAS controller for the hard drives, you might get a «Windows cannot be installed to disk 0 partition 1» error message.
So how to remove this error, and install Windows computer on your selected disk 0 partitions 1 effectively? Try the following fixes in both Part 1 and Part 2.
Part 1. Fix «Windows Cannot Be Installed on Drive 0 Partition 1» Error
When the «Windows cannot be installed to disk 0 partition 1» error occurs, you can fix it using DiskPart or EaseUS partition software. And you can follow either fix with the tutorial steps listed below to get rid of this error from your disk. Both two solutions are simple and easy.
However, as the DiskPart CMD command will result in data loss on the disk, so we recommend you to try EaseUS partition software, a safer way as your first choice.
EaseUS Partition Master allows you to fix the «Windows cannot be installed to disk 0 partition 1» error without losing data.
Method 1. Fix by Converting Disk to MBR or GPT using EaseUS Partition Master
Applies to: Get rid of «Windows cannot be installed to disk 0 partition 1» error by converting target disk to MBR or GPT on Windows 10/8.1/7/Vista/XP. No data loss.
#1. Converting Disk 0 (Target Disk) to GPT
Don’t worry if you received the error message as shown below:
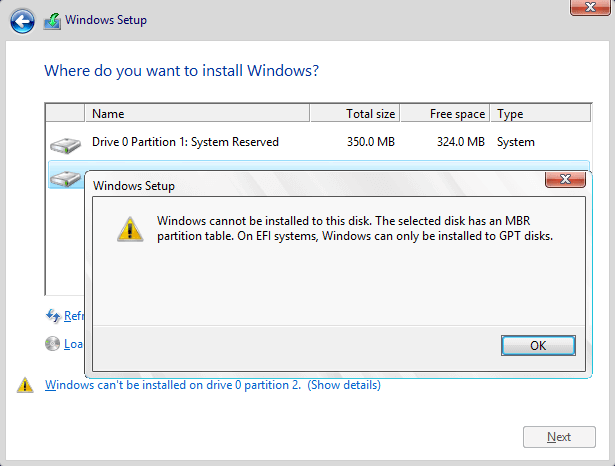
«Windows cannot be installed to this disk. The selected disk has an MBR partition table. On EFI systems, Windows can only be installed to GPT disks.»
When your target disk 0 has more than 2TB capacity, you will also need to convert the target disk to GPT so to gain a smooth Windows installation process.
First, you need to discontinue the Windows installation process and reboot computer from your old OS disk.
Then, you can install EaseUS partition software and apply it to convert MBR disk to GPT disk so to fix «Windows cannot be installed to disk 0 partition 1» issue easily.
Tutorial: Steps to Convert Target Disk (0) to GPT:
Step 1. Download and launch EaseUS Partition Master on your computer.
Step 2. Go to Disk Converter, select «Convert MBR to GPT» and click «Next» to continue.

Step 3. Select the target MBR disk that you tend to convert to GPT, and click «Convert» to start the conversion.

#2. Convert the Target Disk (0) to MBR
Relax when you receive the following error message while installing Windows on your selected disk:
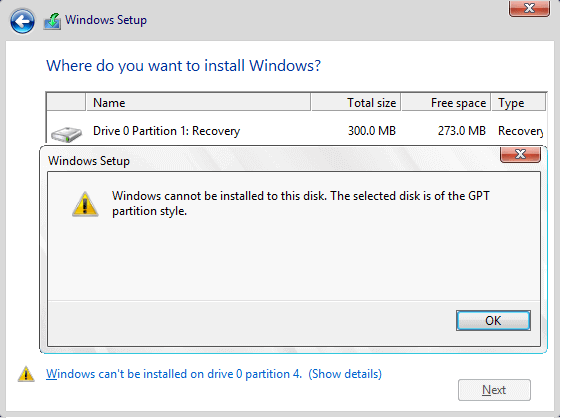
«Windows cannot be installed to this disk. The selected disk is of the GPT partition style. Windows cannot be installed to this hard disk space. The partition is an EFI system partition (ESP).»
First, escape or discontinue the Windows installation process.
Next, you can easily fix «Windows cannot be installed to disk 0 partition 1» issue by using EaseUS Partition Master to convert GPT disk to MBR disk on your own.
Tutorial: Guide Steps to Convert Target Disk to MBR:
Step 1. Install and launch EaseUS Partition Master on your computer, go to the Disk Converter section.
Step 2. Select «Convert GPT to MBR» and click «Next» to continue.
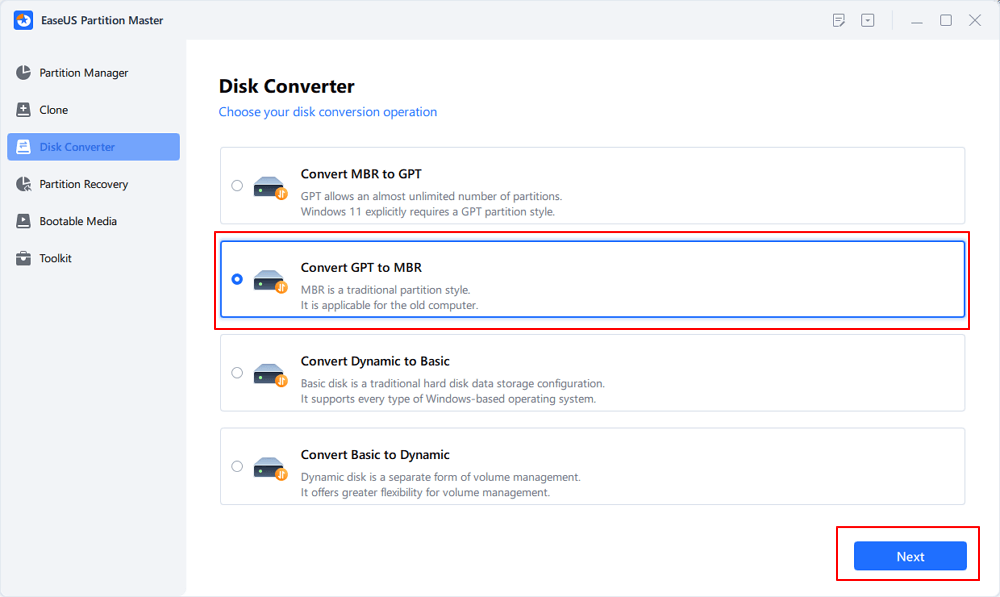
Step 3. Select the target GPT disk that you want to convert to MBR, and click «Convert» to start the conversion.

When the process completes, restart your computer if necessary. And you may jumpy to Part 2 to finish installing Windows to Disk 0 Partition 1.
Method 2. Fix by Cleaning Target Disk Partitions via DiskPart Clean Command
Applies to: Get rid of SAS driver issue or fix corrupted MFT issue on target disk, empty disk partition to install Windows on the disk. This is a data destroy procedure.
When you receive «Windows can’t be installed on drive 0 partition 1» error on your computer, you can close the Windows set up windows. And follow the steps here to clean all existing partitions on the target disk using DiskPart clean command:
Step 1. Close the Windows Setup window.
Step 2. Press «Shift+F10» to bring up Command Prompt windows.
Step 3. Type the following command and hit Enter each time:
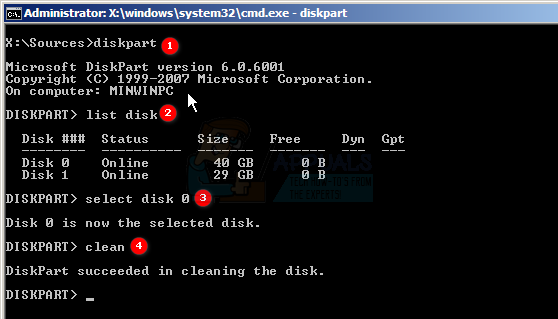
- diskpart
- list disk
- select disk 0 (0 represents the disk number of your target disk.)
- clean
Step 4. Type exit to close the DiskPart window.
When you finish the above steps, you may now continue with steps in Part 2, finishing the Windows installation process on your target disk.
Part 2. Install Windows after Fixing «Windows Cannot Be Installed to Disk» Error
Applies to: Complete Windows installation process after fixing or removing «Windows cannot be installed to disk 0 partition 1» error on Windows 10/8/7.
You can directly turn to Microsoft to start fresh with a clean installation of Windows. Here, we will take Windows 10 as an example to show you the complete process of Windows 10 installation with Windows Installation Media.
Step 1. Create a Windows Installation Media to an Empty USB flash drive, connect it to your PC.
Step 2. Reboot PC and enter BIOS, setting PC to boot from the USB installation media.
Step 3. Once PC boot from the installation media, click «Install Now» to set up preferences settings, such as languages, time, etc.
Step 4. Follow on-screen guidelines to install Windows, activate it if you have a key.
Step 5. Set up PC to boot from new disk (disk 0) after installing Windows in BIOS.
Save the changes and restart your PC. When your computer restarts, log in and activate your Windows with an activation key if you didn’t activate it during the installation.
Now, you can restore your backups back to your computer and enjoy life with a new Windows OS.
Conclusion
On this page, we covered the reasons why you cannot install Windows to a selected disk partition and offered two practical solutions to help you fix the «Windows cannot be installed to disk 0 partition 1» error.
If your target disk is not disk 0 partition but you are having a similar issue, you can also apply EaseUS Partition Master or DiskPart command to effectively resolve this issue.
For a no-data risk process while installing Windows, back up everything in advance.
Содержание
- Если установка Windows на данный диск невозможна
- Проблема с режимом AHCI
- Проблема в GPT формате
- Инсталляция ОС Windows 7, 8 и 10 на GPT
- Конвертация GPT тома в MBR
- Конвертация в MBR при инсталляции Windows через командную строку
- Изменение стиля раздела с GPT на MBR с помощью управления дисками Windows
- Утилиты для изменения стиля раздела
- Видео по теме
- Fixes for Windows Cannot Be Installed to Disk 0 Partition 1 Error
- Causes for Windows Can’t Be Installed to Disk Error
- Part 1. Fix «Windows Cannot Be Installed on Drive 0 Partition 1» Error
- Method 1. Fix by Converting Disk to MBR or GPT using EaseUS Partition Master
- Method 2. Fix by Cleaning Target Disk Partitions via DiskPart Clean Command
- Part 2. Install Windows after Fixing «Windows Cannot Be Installed to Disk» Error
- Conclusion
- Не получается установить Windows на диск GPT или MBR. Исправляем
- Не получается поставить ОС на GPT-диск. Решения, которые помогут
- Настоящее (UEFI и GPT) и прошлое (BIOS и MBR)
- Выбор метода
- Помните:
- BIOS или UEFI
- Чаще всего не получается установить Windows 7
- Преобразование GPT в MBR
- Невозможно поставить ОС на диск с MBR-разделами
- Преобразование MBR в GPT. Вся информация будет удалена
- Как не потерять данные при преобразовании
- Как обойтись без преобразования
- Установка Windows на данный диск невозможна. Выбранный диск имеют стиль разделов GPT
- Комментарии (52)
- Рекламный блок
- Подпишитесь на рассылку
- Навигация
- Облако тегов
- Архив статей
- Сейчас обсуждаем
- Андрей С.
- Екатерина
- Александр
- Дмитрий
- Фёдор
- О проекте RemontCompa.ru
Если установка Windows на данный диск невозможна
Иногда при инсталляции Windows, в том числе 10-й версии, на экране отображается сообщение об ошибке. Текст сообщения таков: «установка Windows на данный диск невозможна». При этом жесткий диск в BIOS отображается. Также он виден и на этапе инсталляции операционной системы, где его можно было разбить на разделы.
Такая проблема возникает по двум причинам:
Проблема с режимом AHCI
Кроме сообщения об ошибке, информирующей о том, что невозможно установить Windows 7 или 10 на данный диск, при сложностях с режимом AHCI компьютер не может загрузиться с выбранного диска. Причина состоит в том, что контролер, возможно, выключен в BIOS.
Проблема решается следующим образом:
Проблема в GPT формате
Другой причиной невозможности инсталляции Windows 7-ой или 10-ой версий c отображением подобного сообщения может быть GPT – формат раздела жесткого диска.
Еще совсем недавно все винчестеры были однотипными. Единственным стилем разделов был MBR. Последние несколько лет производители постепенно переходят на выпуск винчестеров с GPT-форматом. А вот загрузочные файлы с ОС не модифицированы под новые форматы, и как следствие при инсталляции появляется вышеописанная ошибка.
MBR (главная загрузочная запись) — это программный код и данные, требуемые для предварительного старта компьютера. Они находятся в начальном размеченном секторе винчестера. Старт MBR начинается после первичного анализа BIOS работоспособности всех устройств. Основная его функция — это определение местонахождения файлов, которые нужны для загрузки ОС.
GPT – новый стандарт формата размещения таблицы томов. Также был разработан стандартный интерфейс встроенного программного обеспечения для компьютеров, заменяющий BIOS. Он получил название UEFI (Unified Extensible Firmware Interface).
Проблема возникает вследствие того, что установщик ОС не может проинсталлировать Windows в указанный раздел, в связи с тем, что ему не подходит таблица разделов.
Имеется 2 метода устранения проблемы:
Выбор способа должен быть обусловлен следующими правилами:
Использование MBR ограничивает некоторые возможности, такие как:
Инсталляция ОС Windows 7, 8 и 10 на GPT

Проблемы при инсталляции ОС на GPT-том обычно возникают у желающих, установить Windows 7, 8 и 10.
Для установки ОС на том GPT необходимо выполнить 2 условия:
Если не выполняется первое условие, что надлежит подготовить загрузочный UEFI накопитель.
Но в большинстве случаев не выполняется лишь второе условие. Поэтому целесообразней сразу зайти в BIOS и проверить настройки.
В BIOS следует установить два параметра:

После сохранения параметров на компьютер можно устанавливать ОС. Ошибка больше не повторится.
Конвертация GPT тома в MBR
Вариантов преобразования стиля томов несколько. Рассмотрим их более детально.
Конвертация в MBR при инсталляции Windows через командную строку
Этот метод оптимален для применения в ситуации, когда установка ОС, таких как Windows 7, 8, 10, неосуществима из-за типа томов GPT. Также он может быть полезен не только при установке ОС, но и при штатном функционировании ОС для конвертации не системных разделов.
Следует не забывать, что при преобразовании разделов вся информация с них будет утеряна. Поэтому все важное рекомендуется заранее сохранить на внешнем носителе информации.
Для изменения стиля томов с GPT в MBR через командную строку необходимо:
Создать тома на HDD можно выбрав в окошке выбора тома для установки пункт «Настроить диск».

Изменение стиля томов завершено.
Изменение стиля раздела с GPT на MBR с помощью управления дисками Windows
Альтернативный метод конвертации томов требует нормально функционирующей ОС Windows 7, 8 или 10 на персональном компьютере. Конвертировать можно только том диска, который не является системным.
Последовательность действий по конвертации тома HDD следующая:
Утилиты для изменения стиля раздела
Кроме стандартных методов преобразования томов HDD, предусмотренных разработчиками Microsoft, можно применять сторонние утилиты управления томами жестких дисков, такие как
Видео по теме
Источник
Fixes for Windows Cannot Be Installed to Disk 0 Partition 1 Error
Follow the detailed tutorial steps to get Windows installed on your disk 0 partition 1 with ease:
| Workable Solutions | Step-by-step Troubleshooting |
|---|---|
| Fix 1. Convert Disk 0 to MBR/GPT | Try to convert MBR disk to GPT disk with. Full steps |
| Fix 2. Clean Target Disk via DiskPartВ | Type diskpart > list disk > sel disk 0. Full steps |
The provided solutions are viable to fix «Windows cannot be installed on this drive» error on Windows 10/8/7 andВ Windows XP/Vista, etc.
Warm Note: As Windows installation will cause partial data loss, make sure that you have backed-up all valuable data on the target disk to another secure storage device in advance. For example, backup computer to USB flash drive.
Causes for Windows Can’t Be Installed to Disk Error
When you come across with «Windows cannot be installed to Disk 0 Partition 1» or «Windows is unable to install to the selected location» error while installing Windows, don’t worry.В
Here are two possible causes that prevent you from installing Windows on the target disk:
1. The Target Disk Doesn’t Support BIOS or UEFI Boot Mode
«Windows cannot be installed to this disk 0 partition 1» error usually happens when the Boot Mode or Boot List Option in the Bios settings is set to UEFI (Unified Extensible Firmware Interface), and the hard drive is over 2 TB (terabytes) in size.В
When it appears, you will not be able to install windows on your computer successfully. To get rid of this error and continue with Windows installation, you will need to convert the target disk 0 to MBR to GPT first.В
2. SAS Driver Issue or Corrupted MFT on the Target Disk
When the target hard drive contains SAS driver issue or corrupted Master File Table (MFT), Windows Partition Manager (partmgr.sys) will lose communication when changes are made on the partition.
If you attempt to install Windows Windows 10/8/7 using the internal SAS controller for the hard drives,В you might get a «Windows cannot be installed to disk 0 partition 1» error message.В
So how to remove this error, and install Windows computer on your selected disk 0 partitions 1 effectively? Try the following fixes in both Part 1 and Part 2.
Part 1. Fix «Windows Cannot Be Installed on Drive 0 Partition 1» Error
When the «Windows cannot be installed to disk 0 partition 1» error occurs, you can fix it using DiskPart or EaseUS partition software. And you can follow either fix with the tutorial steps listed below to get rid of this error from your disk. Both two solutions are simpleВ and easy.В
However, as the DiskPart CMD command will result in data loss on the disk, so we recommend you to try EaseUS partition software, a safer way as your first choice.В
EaseUS Partition Master allows you to fix the «Windows cannot be installed to disk 0 partition 1» error without losing data.В
оћѓ Happy autumn sale once for all
Method 1. Fix by Converting Disk to MBR or GPT using EaseUS Partition Master
Applies to: Get rid of «Windows cannot be installed to disk 0 partition 1» error by converting target disk to MBR or GPT on Windows 10/8.1/7/Vista/XP. No data loss.
#1. Converting Disk 0 (Target Disk) to GPT
Don’t worry if you received the error message as shown below:
«Windows cannot be installed to this disk. The selected disk has an MBR partition table. On EFI systems, Windows can only be installed to GPT disks.»
When your target disk 0 has more than 2TB capacity, you will also need to convert the target disk to GPT so to gain a smooth Windows installation process.
First, you need to discontinue the Windows installation process and reboot computer from your old OS disk.
Then, you can installВ EaseUSВ partition software and apply it toВ convert MBR disk to GPT diskВ so to fix «Windows cannot be installed to disk 0 partition 1» issue easily.
Tutorial: Steps to Convert Target Disk (0) to GPT:
Step 1. Download and launch EaseUS Partition Master on your Windows computer.
Step 2. Right-click the MBR disk that you want to convert and choose «Convert to GPT».
Step 3. After that, find and click the «Execute 1 Operation» button on the toolbar and choose «Apply» to start the conversion.
#2. Convert the Target Disk (0) to MBR
Relax when you receive the following error message while installing Windows on your selected disk:
«Windows cannot be installed to this disk. The selected disk is of the GPT partition style. Windows cannot be installed to this hard disk space. The partition is an EFI system partition (ESP).»
First, escape or discontinue the Windows installation process.
Next, you can easilyВ fix «Windows cannot be installed to disk 0 partition 1» issue by using EaseUS Partition MasterВ toВ convert GPT disk to MBR diskВ on your own.
Tutorial: Guide Steps to Convert Target Disk to MBR:
Step 1.В InstallВ and openВ EaseUS Partition Master on your Windows computer.
Step 2.В Right-click the GPT diskВ that you want to convertВ and select «Convert to MBR». Then, you will add a pending operation.
Step 3.В Click the «Execute Operation»В button at the top-left corner. Next, click «Apply» and begin to convert GPT disk to MBR. All data is safe with EaseUS partition manager software.
When the process completes, restart your computer if necessary. And you may jumpy to Part 2 to finish installing Windows to Disk 0 Partition 1.В
Method 2. Fix by Cleaning Target Disk Partitions via DiskPart Clean Command
Applies to: Get rid of SAS driver issue or fix corrupted MFT issue on target disk, empty disk partition to install Windows on the disk. This is a data destroy procedure.
When you receive «Windows can’t be installed on drive 0 partition 1» error on your computer, you can close the Windows set up windows. And follow the steps here to clean all existing partitions on the target disk using DiskPart clean command:
Step 1. Close the Windows Setup window.
Step 2. Press «Shift+F10» to bring up Command Prompt windows.
Step 3. Type the following command and hit Enter each time:
Step 4. TypeВ exitВ to close the DiskPart window.
When you finish the above steps, you may now continue with steps in Part 2, finishing the Windows installation process on your target disk.
Part 2. Install Windows after Fixing «Windows Cannot Be Installed to Disk» Error
Applies to: Complete Windows installation process after fixing or removing «Windows cannot be installed to disk 0 partition 1» error on Windows 10/8/7.
You can directly turn to Microsoft to start fresh with a clean installation of Windows.В Here, we will take Windows 10 as an example to show you the complete process of Windows 10 installation with Windows Installation Media.В
Step 1. Create a Windows Installation Media to an Empty USB flash drive, connect it to your PC.В
Step 2. Reboot PC and enter BIOS, setting PC to boot from the USB installation media.
Step 3. Once PC boot from the installation media, click «Install Now» to set up preferences settings, such as languages, time, etc.
Step 4. Follow on-screen guidelines to install Windows, activate it if you have a key.
Step 5. Set up PC to boot from new disk (disk 0) after installing Windows in BIOS.В
Save the changes and restart your PC. When your computer restarts, log in and activate your Windows with an activation key if you didn’t activate it during the installation.
Now, you can restore your backups back to your computer and enjoy life with a new Windows OS.В
Conclusion
On this page, we covered the reasons why you cannot install Windows to a selected disk partition and offered two practical solutions to help you fix the «Windows cannot be installed to disk 0 partition 1» error.
If your target disk is not disk 0 partition but you are having a similar issue, you can also apply EaseUS Partition Master or DiskPart command to effectively resolve this issue.
For a no-data risk process while installing Windows, back up everything in advance.
Источник
Не получается установить Windows на диск GPT или MBR. Исправляем
Поскольку ПК приобретается раз в несколько лет, а его комплектующие периодически заменяются, программные и аппаратные компоненты порой плохо соответствуют друг другу. Сам ПК может быть достаточно старым, но вы укомплектовали его современным SSD. Уже не первый год доступна Windows 10, а вы до сих пор отдаете предпочтение привычной «семерке».
Помимо таких заметных каждому вещей, как производительность процессора и интерфейс ПО, есть значимые характеристики, которые начинают представлять интерес только в тех случаях, когда становятся причиной сбоев.
К ним относится и формат таблиц разделов HDD или SSD. Вы могли и не слышать о существовании характеристики накопителя, которая неожиданно огорчила, препятствуя установке Windows 7, 10 или 8.
ПК «говорит», что установка Windows невозможна. Причина: таблица разделов диска — GPT или MBR. Увы, технологии прошлого не всегда «дружат» с современными. К счастью, это легко исправимо.

Не получается поставить ОС на GPT-диск. Решения, которые помогут
Существуют две возможности:
Настоящее (UEFI и GPT) и прошлое (BIOS и MBR)
Раньше материнская плата ПК оснащалась ПО BIOS. Оно осуществляло диагностику и анализ железа, а затем загружало ОС, опираясь на загрузочную запись раздела MBR.

В более современных моделях роль BIOS выполняет UEFI. Загружается быстрее и поддерживает:

GPT превосходит MBR по важным параметрам:
Выбор метода
Пытаться все же установить систему на «несовместимый HDD» или преобразовать его в MBR и тем самым сделать так, что ошибка больше появляться не будет. В каждом случае решение зависит от ряда факторов:
Помните:
BIOS или UEFI
Когда вы заходите в BIOS и видите старомодный синий экран — перед вами традиционный BIOS. Если интерфейс с современной графикой и поддержкой мыши — это UEFI.
Чаще всего не получается установить Windows 7
Сложности с установкой системы на GPT-диск с большей вероятностью возникают у пользователей, которые предпочитают Windows 7.
Для установки Windows на диск со стилем разделов GPT необходимо соблюсти два условия:
Исхожу из того, что вы устанавливаете 64-битную версию Windows. Это означает, что сообщение об ошибке появляется по причине несоответствия второму требованию.
Не исключено, что будет достаточно поменять настройки BIOS. Зайдите в него, нажав предусмотренную для этого клавишу. Вы увидите, какую клавишу нажимать в процессе загрузки компьютера. В ноутбуках чаще всего применяется F2, в настольных моделях — Delete.
Поменяйте загрузку CSM (Compatibility Support Mode) на UEFI.

Ищите в разделах «BIOS Setup», «BIOS Features» или подобных по смыслу. В SATA определите режим AHCI, а не IDE.

Для седьмой (и еще более древних) версий Windows нужно также выключить Secure Boot.

BIOS вашей модели компьютера может выглядеть иначе. Названия пунктов меню также могут быть другими. Но смысл всегда сохраняется.
После изменения и сохранения вами новых параметров BIOS у вас появится возможность установки системы на GPT-диск. Если вы устанавливаете ОС с DVD, то сообщение об ошибке при повторной попытке установки, скорее всего, не появится.
В случае установки с USB-накопителя сообщение может отобразиться опять. В этой ситуации необходимо пересоздать установочную флешку таким образом, чтобы она поддерживала загрузку UEFI.
Если накопителем поддерживаются два метода загрузки, удалите файл «bootmgr» в корневой директории флешки. Тем самым вы предотвратите возможность загрузки в режиме BIOS. Если нужна загрузка в режиме BIOS, удалите каталог «efi». Не делайте этого в тех случаях, когда есть хоть малейшие сомнения. Можно повредить дистрибутив.
Преобразование GPT в MBR
Если вы располагаете ПК с классическим BIOS и собираетесь поставить Windows 7, этот вариант будет лучшим (и, возможно, единственным). В процессе преобразования вся информация с накопителя будет удалена.
Во время работы мастера установки ОС нажмите F10 и Shift. В некоторых моделях ноутбуков — F10, Fn и Shift. В открывшейся командной строке последовательно введите такие команды:
— diskpart
— list disk (запишите номер подлежащего преобразованию диска)
— select disk N (вместо N — записанный номер)
— clean (команда очистит диск)
— convert mbr
— create partition primary
— active
— format fs=ntfs quick (быстрое форматирование в файловой системе NTFS)
— assign
— exit

Невозможно поставить ОС на диск с MBR-разделами
Вероятна обратная ситуация. Появляется ошибка:
«Установка Windows на данный диск невозможна. На выбранном диске находится таблица MBR-разделов. В системах EFI Windows можно установить только на GPT-диск»
Она означает, что вы пытаетесь установить систему с DVD или USB-накопителя в режиме EFI. Таблица разделов HDD или SSD старая — MBR. В этом случае вы можете:
Первый вариант предпочтительнее, поскольку проще и быстрее. Помните, что информация со всех разделов накопителя будет полностью потеряна.
Преобразование MBR в GPT. Вся информация будет удалена
В установщике системы запустите командную строку:
В открывшемся окне:
— diskpart
— list disk (запишите номер подлежащего преобразованию диска)
— select disk N (вместо N — записанный номер)
— clean (команда очистит диск)
— convert gpt
— exit

Когда команды применены:

Более простой способ преобразования с потерей информации на накопителе:
Результатом ваших действий станет автоматическое преобразование в GPT. Следующим шагом стартует установка ОС.
Как не потерять данные при преобразовании
Используйте стороннюю утилиту Minitool Partition Wizard Bootable. Скачайте ISO-образ и запишите его на флешку, отформатированную в FAT32. Необходимые условия:
Загрузите ПК с созданного вами накопителя. В окне программного инструмента:

Если диск системный, может появиться сообщение о том, что его преобразование невозможно. Чтобы все же преобразовать его:
Как обойтись без преобразования
Зайдите в BIOS и установите режим загрузки CSM (Compatibility Support Mode) или Legacy, отключив EFI. Отключите «Secure Boot».
Ранее я подробно рассмотрел процессы чистой установки Windows 10 и Windows 7.
Какие другие затруднения возникали у вас при установке Windows?
Если вы нашли ошибку, пожалуйста, выделите фрагмент текста и нажмите Ctrl+Enter.
Источник

Если нажать на предупреждение, то и выходит ошибка.

Установка Windows на данный диск невозможна. Выбранный диск имеют стиль разделов GPT


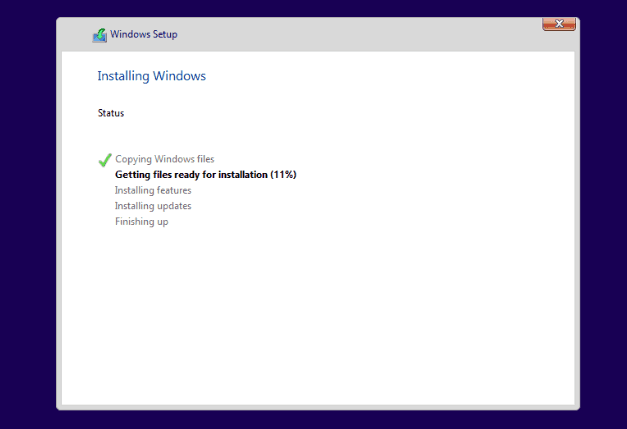
Когда все разделы на жёстком диске будут удалены и он будет представлять из себя одно нераспределённое пространство, то выделите это пространство левой кнопкой мыши и нажмите на кнопку «Далее»

Начнётся обычный процесс инсталляции Windows 10 на ваш компьютер или ноутбук.

Второй способ посложнее.

В открывшейся командной строке вводим команды:
lis dis (выводим в список все подключенные к компьютеру диски)
sel dis 0 (выбираем единственный Диск 0)
clean (производим удаление всех разделов с диска)

Закрываем командную строку и жмём «Обновить».

Выделяем нераспределённое пространство левой кнопкой мыши и жмём на кнопку «Далее». Начинается процесс установки OS.
Статьи, которые вам пригодятся:
Комментарии (52)
Рекламный блок
Подпишитесь на рассылку
Навигация
Облако тегов
Архив статей
Сейчас обсуждаем
![]()
Андрей С.
александр, У меня тоже Linux mint. Очень нравится эта операционка, гибкая в настройках, более
![]()
Екатерина
admin, Спасибо, загрузила в безопасном просто режиме и нашла все фото
![]()
Александр
![]()
Дмитрий
Дмитрий, Добрый день! Чистая 11 официальная без твиков и каких либо изменений, кроме доступных
![]()
Фёдор
код ошибки 0х8007007b
О проекте RemontCompa.ru
RemontCompa — сайт с огромнейшей базой материалов по работе с компьютером и операционной системой Windows. Наш проект создан в 2010 году, мы стояли у истоков современной истории Windows. У нас на сайте вы найдёте материалы по работе с Windows начиная с XP. Мы держим руку на пульсе событий в эволюции Windows, рассказываем о всех важных моментах в жизни операционной системы. Мы стабильно выпускаем мануалы по работе с Windows, делимся советами и секретами. Также у нас содержится множество материалов по аппаратной части работы с компьютером. И мы регулярно публикуем материалы о комплектации ПК, чтобы каждый смог сам собрать свой идеальный компьютер.
Наш сайт – прекрасная находкой для тех, кто хочет основательно разобраться в компьютере и Windows, повысить свой уровень пользователя до опытного или профи.
Источник
Installing Windows is not always easy, and sometimes certain problems can occur. One of the most problematic problems is the “Windows cannot be installed to this disk” error, so let’s see how to fix it.
This is not the only installation error, and many have reported installation failure during the safe_os step, so the problem can occur at any stage of the installation.
In most cases, the error is caused by hardware incompatibility. After that check your SATA device or use the diskpart tool.
What if Windows 10/11 cannot be installed to this drive?
- Windows 10 cannot be installed to this drive
- Can’t install on GPT partitions Windows 10
- Windows 10 cannot be installed on MBR partitions
- Your computer hardware may not be able to boot
- Windows cannot be installed to this SSD drive
- Partition contains one or more dynamic volumes
Windows 10 cannot be installed to this drive
1. Make sure the additional hard drives are not connected
Sometimes additional hard drives or storage devices can cause this error to appear, so you need to disable all hard drives other than the one you intend to use to install Windows 10.
Users have also reported that sometimes USB drives or SD cards can interfere with Windows 10 installation, so be sure to remove them all. If necessary, try installing Windows 10 from DVD.
2. Check your SATA device
According to users, this error can appear if your primary hard drive is plugged into an eSATA port, so be sure to plug it into a different port. Also, make sure your SATA controller is set to AHCI or RAID mode.
If you have a CD, DVD, or Blu-ray drive connected to an eSATA or SATA 3 port, be sure to unplug it and plug it into a SATA 2 controller.
Also, do not use the chassis cover with a SATA 3 hard drive connected to a SATA 3 controller.
Keep in mind that a failed drive will result in Windows not being able to be installed on that drive, the drive may fail soon, so be prepared to replace the drive.
Windows 10 cannot be installed on GPT partitions
1. Use the diskpart tool
- While installing Windows 10, press the keyboard shortcut Shift+F10, to open command line.
- Optional: use the command convert gtp or convert mbrto convert your drive to the correct type.
- Close Command Prompt and try installing Windows 10 again.
Once again, we must mention that the cleanup command will remove all files and partitions from the selected hard drive.
So be sure to back up your important files, or use this solution if you have a new PC that doesn’t have important files.
2. Use Legacy BIOS Mode
- While the computer is booting, press the appropriate key to open the boot menu. Usually this key matters Esc, or F2, F9, F12 but it may differ depending on your motherboard.
- When the boot menu opens, select the option BIOS USB flash drive and press Enter, and you will boot from that flash drive using Legacy BIOS mode.

- Proceed with the installation and install Windows 10.
3. Use Rufus to create a bootable flash drive
- Take an 8 GB or 16 GB flash drive and plug it into your computer.
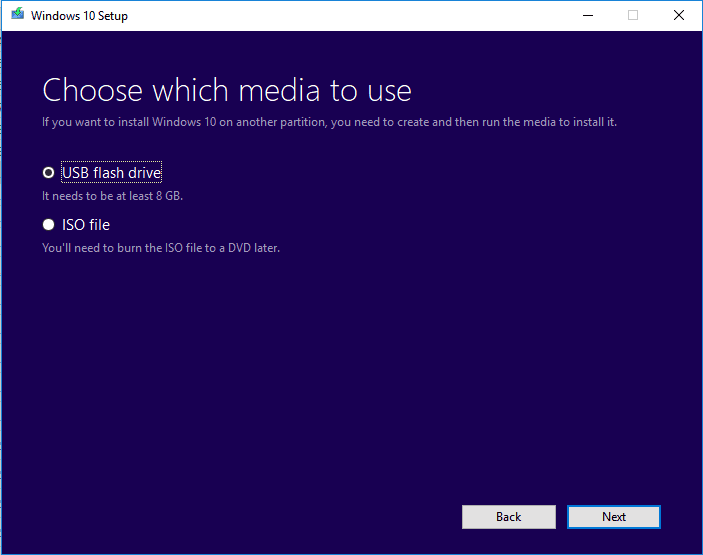
- Download Windows Media Creator.

- Launch the software and select «Create Installation Media» (USB stick, DVD or ISO file) for another PC and click «Next».

- Check your PC settings. If they are incorrect, uncheck Use the recommended settings for this PC and change the settings accordingly.

- Select USB drive and click «Further».

- Wait for the process to complete. This may take some time depending on the download speed, so please be patient.
Once the download is complete, you need to use Rufus to create bootable media. You can do this by doing the following:
- Visit Rufus page and download it.

- Once the software is downloaded, launch it.
- Select your flash drive from the list of devices.

- Set the boot selection to «Disk» or «ISO Image». Click the button «Select” and select the Windows ISO file.

- Click «Start»to start the process.

- You will be prompted to format the drive, so click «OK«, to continue.

- Wait for the process to complete.
Windows 10 cannot be installed on MBR partitions
1. Disable EFI boot sources
- While the computer is booting, press the appropriate key to enter the BIOS. Usually this Fwd or F2, but on your computer they may be different.
- After entering the BIOS, you need to find the partition «Load order» and disable EFI boot sources.

- Save changes and restart.
After disabling EFI boot sources, you should be able to install Windows without problems. If the installation was successful, you need to go back to BIOS and enable EFI boot sources.
2. Delete the partition and re-format it
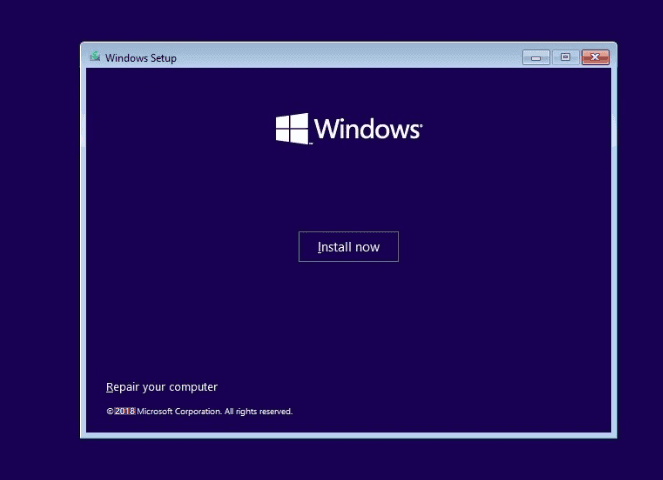
- Boot the device from the installation USB.
- Press «Install Now».

- Выберите Custom: install only Windows (Advanced).

- Select the drive you want to install Windows on and click «Remove».
- Now click «Create‘ to create a new drive.
- Select a new drive and follow the on-screen instructions.
If you’re getting Windows 10 that can’t be installed on that disk’s MBR partition table on an EFI system, formatting your disk might be your only option.
3. Use a DVD drive
If you are having this issue, you should be able to work around it by using a DVD drive to install Windows 10. When installing an operating system from a DVD, users are suggesting using the ODD option instead of EFI.
Alternatively, you can also try using an external DVD drive to fix this issue.
4. Disable UEFI boot
Newer motherboards support the UEFI boot option, but sometimes UEFI boot can cause Windows installation to this drive to fail. To fix this, you need to enter the BIOS and enable the Legacy Boot option.

For more information on how to enter the BIOS and how to use Legacy Boot, we highly recommend that you check your motherboard manual.
Some motherboards support both UEFI and Legacy booting, so you can use both modes without having to disable anything. In some situations, you can even fix this problem by disabling Legacy Boot and using UEFI instead.
5. Use diskpart to remove the problematic partition
- Open command line. If you are trying to install Windows 10 you can use the shortcut Shift+ F10 to run the command line.
- Enter the diskpart.

- Now enter list disk.

- Select the drive you want to use. Enter select disk. Replace # with the appropriate number for the specific drive. We used disk 0, but it may be different on your PC.

- Enter the list partition.

- Find the section you want to delete and type select partition#. Replace # with the appropriate number representing the section.

- Finally enter delete patition.

- After that, try to install Windows 10 again.
If this process seems complicated to you, you can always use third-party GUI tools like AOMEI Partition Assistant.
With the help of such tools, you can easily delete partitions, format them, or perform any other disk management actions easily and in seconds.
6. Wait until the message appears again Press any key to boot from disk.
Many motherboards support both UEFI boot and legacy boot, and some motherboards run UEFI boot first. If you see the message Press any key to boot from disk, do not press anything.

If your motherboard has UEFI and Legacy boot enabled, the same message will appear again. When the message «Press any key to boot from disk» appears for the second time, press any key to boot from the specified device.
7. Use a USB 2.0 flash drive
Users have reported that USB 3.0 flash drives don’t give them the option to choose MBR or Legacy boot when choosing a boot device, but you can fix this issue by using a USB 2.0 flash drive instead.
Alternatively, you can use the USB 2.0 port on your PC if you have one.
Your computer hardware may not be able to boot
1. Delete all partitions and convert your hard drive to GPT.
In order to fix Windows 10 can’t install to this GPT disk without data loss error, you may have to delete all partitions. This procedure will delete all your files, so we strongly recommend that you create a backup before starting.
If your hard drive is larger than 2TB, you must convert it to GPT. To do this, use the diskpart tool to clean up your hard drive and then convert it to GPT.
For more instructions on how to do this, be sure to check out our guide on how to convert an MBR disk to GPT.
2. Format your hard drive under Linux
If you don’t want to use the command line to solve this problem, you can start your computer from the Live Linux CD. After starting Linux, find the appropriate disk management tool and format it to a FAT32 drive.

Be sure to use the slow method to completely clean up your hard drive. This procedure will delete all files from your hard drive, so be sure to back them up.
After formatting your hard drive, try installing Windows 10 again.
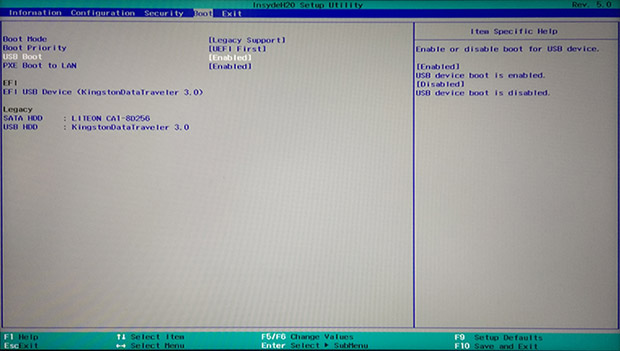
3. Disable unnecessary boot devices in BIOS
- While the system is booting, press F2 or Fwd to enter the BIOS.
- Now go to section Boat.

- Disable any unnecessary boot devices.
For more information on how to disable boot devices, be sure to check your motherboard manual.
4. Connect the hard drive to the Intel SATA 3 port instead of the Marvell port.
- Restart the computer.
- While downloading, press F2 or Fwd. This should take you to the BIOS.
- Now find the settings for the Intel SATA 3 controller and set it to work in AHCI mode.

- Enable the SMART option for Intel SATA 3.
These types of problems can sometimes appear if your hard drive is not connected to an Intel SATA 3 port, so be sure to connect it to an Intel SATA 3 port on your PC.
5. Connect your hard drive and optical drive to the correct SATA ports.
Some motherboards require you to connect a hard drive and an optical drive to the appropriate ports. Users reported that after connecting a hard drive and an optical drive to the SATA 5 and SATA 6 ports on their motherboard, the issue was resolved.
For more information on which SATA ports to use, we highly recommend checking your motherboard manual.
6. Remove the USB installation media after the first reboot.
Few users reported that this problem can be avoided simply by removing the USB installation media. According to users, you need to remove the installation media before your PC restarts during the installation process.

After removing the USB stick, the installation should continue without any problems. Also, make sure that no additional USB drives or devices are connected to your PC.
We don’t know if this solution works, but several users have reported that it fixed the issue for them, so feel free to give it a try.
7. Check if your hard drive is on the list of bootable devices
- Restart your computer and keep clicking F2or Fwd to enter the BIOS.
- Go to section downloads.
- Make sure your hardware is added as a boot device.

Few users reported that there was an exclamation mark in front of their hard drive in the boot options menu, which means that the hard drive is disabled.
According to them, you can turn your hard drive back on just by using the shortcut Ctrl+ 1. Keep in mind that different BIOS versions may use different labels, so check your motherboard manual for a detailed explanation.
8. Disable boot from external device
- Open BIOS settings. You should be able to do this by clicking Assist button on your laptop.

- Go to settings download from an external device and disconnect this option.
- Save changes and try installing Windows 10 again.
Few users reported that you can fix this problem on Sony Vaio devices by disabling external boot. According to them, the device finds more than one boot option in the BIOS, but this can be fixed by doing the following:
9. Disable Intel Boot Security
- While the computer is booting, press F2 to access the BIOS. Please note that your computer may use a different key.
- Go to the section «Secure Boot».

- Now turn off Intel Boot Security.
If your device supports the Intel Boot Security feature, you must disable it in the BIOS. Users have reported that the Intel Boot Security feature can interfere with Windows 10 installation, so be sure to disable this option in BIOS.
After disabling Boot Security, Windows 10 should install without problems.
10. Disable AHCI Mode
- Restart your computer and enter BIOS. You can do this by clicking F2 at boot time.
- Now find storage settings.
- Find a mode AHCI for your drive and disable it.

After using this solution, Windows cannot be installed to this drive, make sure the disk controller is enabled in the BIOS. The message will disappear.
11. Disconnect the Ethernet cable
Many users reported that they fixed this problem simply by unplugging the Ethernet cable.
We don’t know why the ethernet cable caused this issue, but if you’re getting Computer hardware may not support boot error, be sure to try this solution.
12. Set the boot order correctly
- Restart the computer.
- While the PC is booting, keep pressing F2or Fwdto access the BIOS.
- Go to section downloads.

- Now make sure your flash drive is set as the first boot device.
Few users have reported this error when selecting a USB drive as a boot device. According to them, the only way to solve this problem is to enter the BIOS and set the flash drive as the first boot device.
For some strange reason, the fastboot menu option didn’t work for them, but after changing the boot order in the BIOS, the issue was resolved.
13. Make the section active
- Run command line. If you are trying to install Windows 10, you can start the command prompt by clicking Shift+ F10.
- If you have two or more hard drives, enter the command list disk. Find the hard drive you want to use to install Windows 10.

- Enter the select disk. Replace # with the appropriate number. If you only have one hard drive use disk 0.

- Now enter list partition.

- Find the desired section and enter select partition#. Replace # with the appropriate number.

- Close Command Prompt and try installing Windows 10 again.
Sometimes you may encounter that Windows 10 cannot be installed to this drive, the selected drive has a GPT partition style error, but this can be fixed using diskpart.
Windows cannot be installed to this SSD drive
1. Make sure your SSD is clean
According to users, Windows 10 installation problems can occur if your SSD drive is not cleaned. To fix this issue, be sure to delete all partitions and files from your SSD and try installing Windows 10 again.
Also, make sure AHCI is enabled.
2. Try to boot without UEFI
- Restart the computer.
- While the PC is booting, press F2 or Fwd.
- Now go to boot section and disable UEFI boot.

Few users reported that you can fix this issue simply by using non-UEFI boot, so you might want to give it a try.
3. Unplug another SSD
If you have two or more SSDs installed on your computer, you may encounter this error. One of the easiest solutions is to disable all other SSD drives and see if that fixes the problem.
Also, be sure to unplug all storage devices from your PC.
4. Use SATA port 2
Users have reported that this problem can occur if the SATA 3 expansion card is faulty, so you might want to try using the SATA 2 port instead.
According to users, they were able to install Windows 10 after plugging their SSD into a SATA 2 port, so be sure to try that.
5. Connect the DVD drive to the motherboard.
This problem seems to occur when you plug the SSD and DVD into the controller.
One of the easiest solutions is to unplug the DVD drive and plug it into the motherboard, leaving the SSD connected to the controller.
After that, Windows cannot be installed to this drive. The installation does not support USB communication.
6. Remove RAID configuration
- Restart the computer.
- While downloading, keep pressing F2to access the BIOS.
- Go to settings storage.
- Set the SATA mode to anything other than RAID.

Users have reported this issue when using RAID, and according to them, removing the RAID configuration from the BIOS fixed the issue.
Once the RAID is removed, create it again, make it bootable, and you should be able to install Windows 10.
7. Make sure your flash drive and SSD don’t match
This is a very unlikely issue, but users have reported that Windows 10 installation may fail if you try to install it from a USB drive.
Users have reported that they had problems with Corsair’s USB flash drive and SSD, but after replacing the Corsair flash drive with a different brand, the problem was fixed.
Partition contains one or more dynamic volumes
Convert your dynamic disk to basic disk
- During Windows Setup, click Shift+, F10 to open a command prompt.
- Now enter diskpart.

- Enter the list disk. Find the drive you want to convert.

- Enter the select disk. Replace # with the appropriate number.

- Close Command Prompt and try installing Windows 10 again.
After converting your drive to basic, try installing Windows 10 again.
What if Windows 11 won’t install to this drive?
This issue affects all versions of Windows and in most cases is caused by your configuration, so changing your BIOS settings will fix the issue.
Since this is a very common problem caused by the BIOS, fixing it in Windows 11 is exactly the same as in older versions.
Windows cannot be installed to this drive. The error can be a big problem and prevent you from installing Windows 10, but you should be able to fix this problem with one of our solutions.
If you have found another way to solve this error, or have other questions, feel free to share them in the comments section below.
To install your operating system you need a drive or partition available to copy all of the files. This drive or partition needs to have partitioning system, this system can be saved in two different ways; MBR which stands for Master Boot Record, or GPT for GUID Partitioning Table.
Your partitioning system gets installed depending on your booting options and your operating system, if your computer is booting in Legacy BIOS then the MBR system will get installed, however if you boot in UEFI mode, the GPT system will be installed. There’s a way to differentiate both at the moment of installing, the first one will create a 100MB partition for this table, and the latter (UEFI) will create a 500MB partition, this partition will be automatically hidden by the system.
Unfortunately both partitioning system are not compatibles, and at the moment of installing, if not set up properly you can get an error saying that Windows cannot be installed to your Disk. Please see how to resolve this issue.
Method 1: Erase your drive to avoid compatibility with previous partitioning systems
- Boot your computer with the Operating System installer.
- Start the installation process until you get to the system partitioning part.
- Select the primary partition on which you want to install Windows and click on Drive Options then click on Delete.
- Once your Disk has only one entry for unallocated space, click on New.
- Windows will alarm you about a new partition being created, select yes to confirm. Windows will create a partition for the specified size, and will take 100MB or 500MB depending on the partitioning system applied.
- Select the partition where you want to install the system and press next.
Method 2: Select the correct option for booting, Legacy BIOS or UEFI
- Turn on your computer and immediately press F2, F12, DEL or F10 to access your BIOS Setup (They key to access your BIOS might change depending on your PC manufacturer).
- Once in the BIOS/UEFI search for Booting Options (refer to your PC manual for exact location).
- Look for an option called UEFI/BIOS Boot Mode and select either Legacy or UEFI. If your hard drive had a GPT before, and you are booting in Legacy BIOS, you will have compatibility issue, or vice versa. If you see
- Once you changed the Boot mode, restart your computer, and boot from your installation media.
Method 3: Change the partitioning table from GPT to MBR (Please backup your data if any)
- Boot from installation media.
- Click install but don’t continue with the process, instead, press Shift + F10 to open the command prompt.
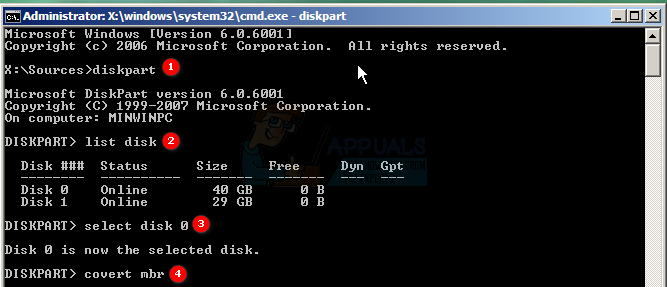
- Type diskpart and then type list disk.
- Search for the disk you wish to convert and type select disk 0 (Change 0 by the number of the disk you want to convert).
- Type down convert mbr and then type in quit.
- Continue with the installation process.
Method 4: Erase partitioning system through command prompt
- Boot from your installation media.
- Click install but don’t continue with the process, instead, press Shift + F10 to open the command prompt.
- Type diskpart and then type list disk.
- Search for the disk you wish to convert and type select disk 0 (Change 0 by the number of the disk you want to convert).
- Type down clean and wait until it’s done, then type exit.
- Continue with the installation process.

Kevin Arrows
Kevin is a dynamic and self-motivated information technology professional, with a Thorough knowledge of all facets pertaining to network infrastructure design, implementation and administration. Superior record of delivering simultaneous large-scale mission critical projects on time and under budget.
Back to top button