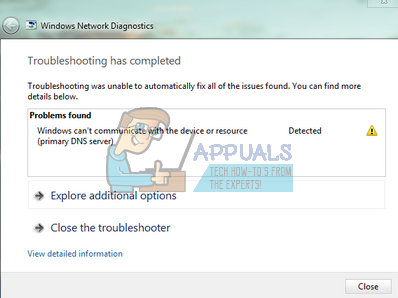
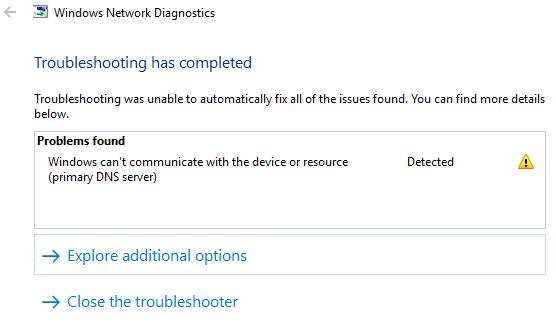
The error “Windows Can’t Communicate with the Device or Resource (Primary DNS Server)” occurs when your computer is unable to connect to the primary DNS server set by your internet service provider. This error message pops up in the Network Diagnostics which is run when you are unable to connect to the internet.
This error message can be caused by a number of reasons such as your IPv4 or IPv6 settings not configured properly, you running a proxy server, a conflict with the network settings, or when the DNS server you are trying to access is temporarily unavailable. We will go through all the workarounds present by starting with the simplest one and working our way to more complex solutions.
Note: Try disabling proxy servers before you start with the solutions listed here. Also if you are using restricted internet in any institution (college, university etc.), it is best to follow the guidelines given by them as they have their own internet settings as compared to unrestricted internet we use in our homes.
Solution 1: Changing IPv4 and IPv6 Settings
The Internet Protocol version 4 (IPv4) is a protocol for use on packet-switched Link Layer networks (e.g. Ethernet). IPv4 provides an addressing capability of approximately 4.3 billion addresses. The Internet Protocol version 6 (IPv6) is more advanced and has better features compared to IPv4. It has the capability to provide an infinite number of addresses.
We will try changing both the settings on your computer and see if this solves the problem. This is the most common workaround for solving this problem and mostly solves the error message instantly.
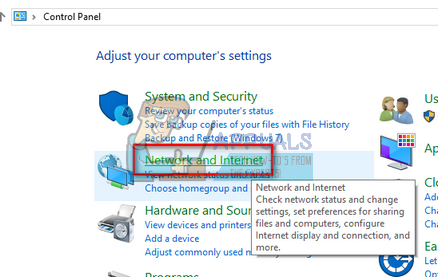
- Press Windows + R, type “control panel” in the dialogue box and press Enter.
- Once in the control panel, click on the sub-heading “Network and Internet”.
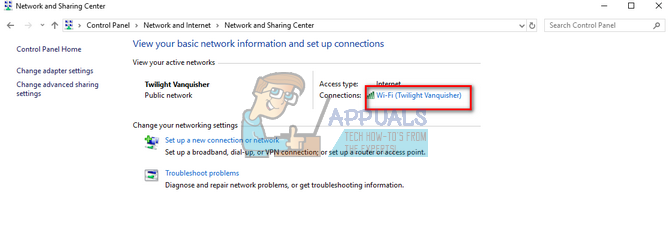
- Select “Network and Sharing Center” from the next window you are navigated to.

- Here you will find the network to which you are connected to. Click on the network present in front of “Connections” as shown in the screenshot below.
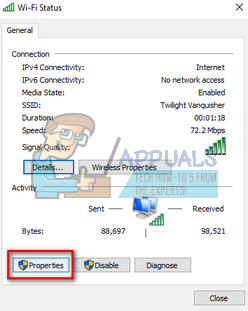
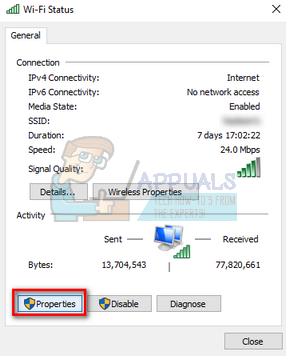
- Now click on “Properties” present at the near bottom of the small window which pops up.
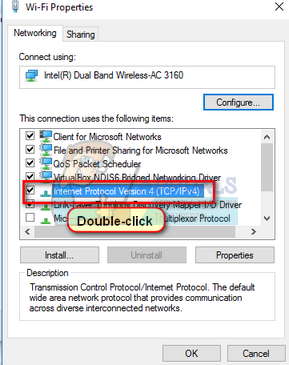
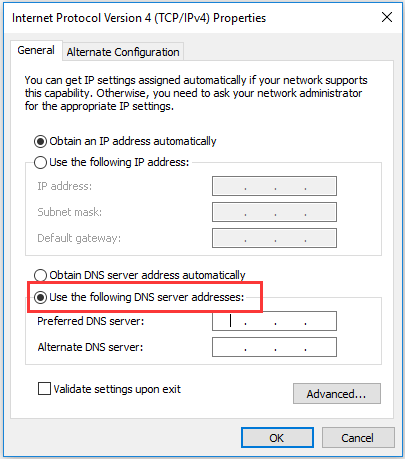
- Double-click on “Internet Protocol Version 4 (TCP/IPv4)”. Set both the options to “Obtain an IP address automatically” and “Obtain DNS server address automatically”.
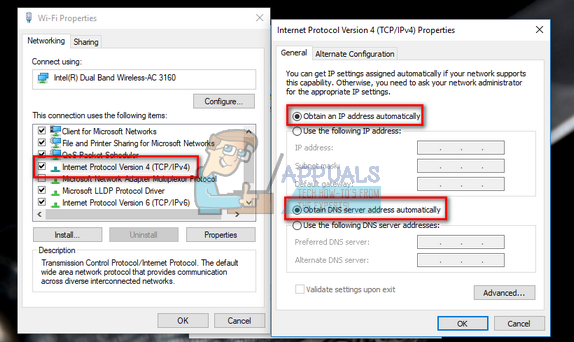
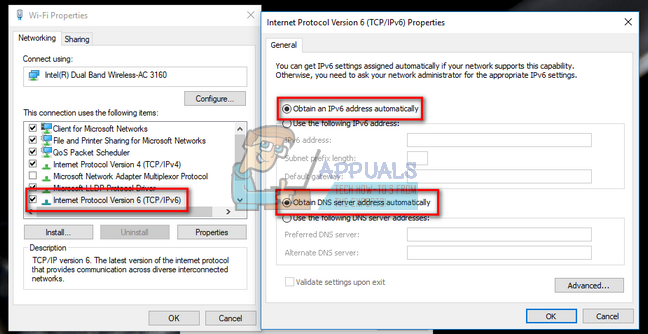
- Press OK to save changes. Now click on “Internet Protocol Version 6 (TCP/IPv6)” perform the same steps as mentioned in the earlier step.
- Press OK to save changes and exit. Now check if you can connect to the internet successfully.
Solution 2: Using Command Prompt to Reset Connection Settings
We can try another workaround which will force your computer to flush the IP and DNS configurations. It is possible that these settings are either corrupt or not configured as expected. We can try resetting them and see if this solved the problem. Do note that you administrator access to follow this solution.
- Press Windows + R, type “command prompt” in the dialogue box, right-click on the application and click “Run as administrator”.
- Once in elevated command prompt, execute the following commands one by one.
ipconfig /flushdns
ipconfig /registerdns
ipconfig /release
ipconfig /renew
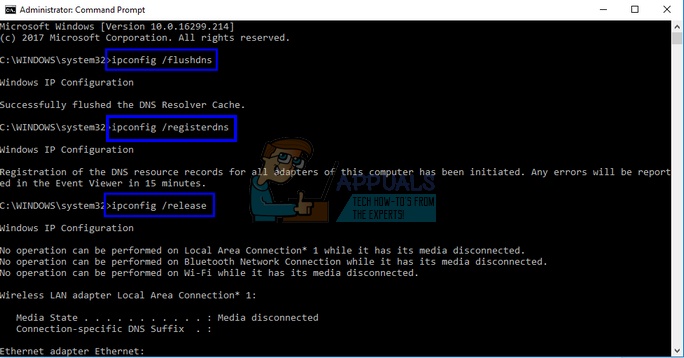
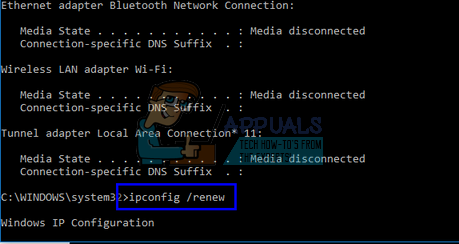
- Close the command prompt after executing the workarounds and restart your computer. Now check if the problem at hand got solved.
Solution 3: Resetting TCP/IP
If you are receiving this error message, your Internet Protocol or TCP/IP may have been corrupted. TCP/IP is one of the main components required by the Windows operating system to connect successfully to the internet. In this situation, even if you are physically connected to the internet or the link is up and running, you will not be able to send the packets. We will try resetting the TCP/IP of your computer and see if this does the trick.
We can achieve our goal by downloading a tool from Microsoft and running it on the computer affected. Do note that you will require another device with an active internet connection.
- Head over to Microsoft’s official website and download the utility.
- Double-click the file downloaded, click on “Next” and follow the on-screen instructions.
Alternatively, you can perform the same function by opening an elevated command prompt, and executing the command “netsh int ip reset”. You can also define any specific path for the log file to be created by executing “netsh int ip reset c:resetlog.txt”. Remember to restart your computer after performing this operation and check if the problem at hand got solved.
Solution 4: Resetting Drivers of your Network Device
The possibility that you have incorrect drivers installed are almost ignored when this error occurs. Windows automatically updates all the driver updates using Windows Update. It is possible that the current driver installed on your computer isn’t compatible or fit for your computer. It can also be the case that it is corrupted. We can try rolling back drivers and check if this solves the problem.
- Press Windows + R, type “devmgmt.msc” and press Enter.
- Once in the device manager, expand network adapters and locate your hardware. Right-click on it and select “Uninstall”.
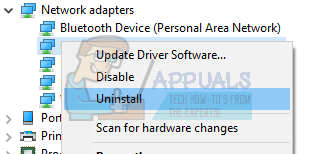
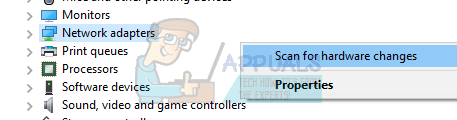
- Windows might pop up a UAC confirming your actions. Press Yes and proceed. After uninstalling the driver, right-click on any empty space and select “Scan for hardware changes”. Windows will now automatically detect your hardware and install the default drivers. Reboot your computer and check if the problem got solved.
If rolling back drivers doesn’t do the trick, we can try installing latest drivers. You should head over to your manufacturer’s website and download the latest drivers to an accessible location. Make sure you download the drivers according to your system specifications.
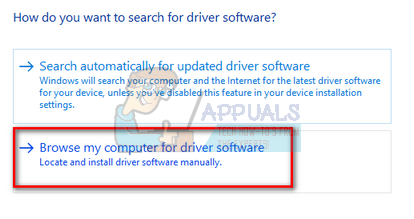
- Open device manager, right-click on your Ethernet hardware and select “Update driver software”.
- Select the second options “Browse my computer for driver software”. Browse to the driver you downloaded and install it accordingly. Reboot your computer and check if the adapters works as expected.
Solution 5: Restarting the Modem and Router
It can be possible that your internet router may be saved in the wrong configuration. Or any recent settings may have caused it not to work properly. Of course, you should try to restart the router first and check, but, if that doesn’t work, we can try resetting the router (hard-reset) manually and see if it improves our situation.
- Pick up your router and turn it back so all the ports are in front of you.
- Look for any button named “reset” on its back. Most routers don’t have these buttons so you don’t accidentally reset it to factory defaults, instead, you have to use something thin like a pin to press inwards towards the hole which says “reset”.
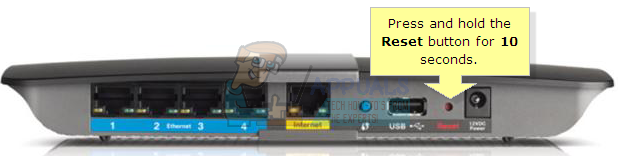
- Reset your router and connect your computer again to the Wi-Fi network. Launch Steam again and check if the problem gets fixed.
Note: It is worth noting that after you manually reset your router, your router won’t have any SSID (password) and the name of your Wi-Fi will be set to default (something like TPlink121). Furthermore, any internet settings that your internet provider have set on it will be removed. Do not perform this method unless you know those settings or your router works as a plug and play. It can be a real pain to call up the provider and ask them to guide how to make the internet working again so always keep this factor in mind. All the connected devices will be disconnected and you will have to re-connect all the devices one by one again.
Solution 6: Setting Google’s DNS
If all the above methods don’t work, we can try changing your DNS manually. We will use Google’s DNS and check if the connection problem goes away. If it doesn’t, feel free to revert the changes using the same method we implemented them.
- Navigate to the Properties of your internet hardware using the same guidelines given in solution 1.
- Double-click on “Internet Protocol Version 4 (TCP/IPv4)” so we can change the DNS server.
- Click on “Use the following DNS server addresses:” so the dialogue boxes below become editable. Now set the values as following:
Preferred DNS server: 8.8.8.8
Alternate DNS server: 8.8.4.4
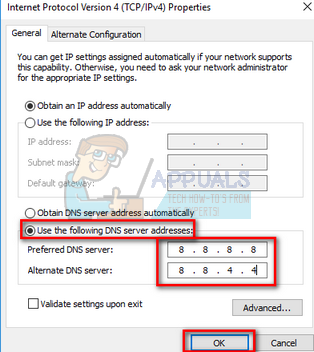
- Press OK to save changes and exit. Now restart your computer and see if this solved your problem.
Note: You can also use this method to set other DNS servers as provided by your Internet Service Provider (ISP). Ask them to give you a list of DNS servers which implemented on the network try inputting them accordingly. Furthermore, if none of the solutions work, it is possible that there is problem with the network you are using. Contact your Network Administrator or ISP. If you are facing this issue periodically, it’s highly possible that something is wrong with your router. You can try to replace it or let your ISP know about the whole situation.

Kevin Arrows
Kevin is a dynamic and self-motivated information technology professional, with a Thorough knowledge of all facets pertaining to network infrastructure design, implementation and administration. Superior record of delivering simultaneous large-scale mission critical projects on time and under budget.
DNS issues are not new, and they could be one of the major causes of the internet not working. When using the built-in Internet Connections Troubleshooter in Windows 11/10, if you receive an error saying that Windows can’t communicate with the device or resource (Primary DNS Server), this post will look at ways to resolve this.
")
What is a Primary DNS Server?
When configuring DNS Server in Windows or the Router, two entries are taken. First is the primary, and then the secondary. This is a failsafe where a website can still be opened if the first DNS server fails to respond.
Your ISP configures a DNS server, or you can manually set it on your router or PC if you are using the public DNS such as Cloudflare, Google, and others. Since the error message clearly says it cannot communicate, we need to resolve the connection issue.
- Restart Router or PC
- Add a Secondary DNS
- Check on DNS and DHCP Client
- Change DNS
Follow these methods to fix the Windows problem that can’t communicate with the device or resource (Primary DNS server).
1] Restart Router or PC
Sometimes the hardware gets stuck and needs a restart. I would recommend restarting both the router and the PC as the first step to troubleshooting. It will reset whatever it’s holding temporarily, and reload the configured settings, and start fresh.
2] Add a Secondary DNS
")
Are you missing a secondary DNS? While it’s rare, if you have manually configured the DNS and did not enter the secondary DNS, and the primary DNS is failing, then this can be the root cause of the problem. It is also called an Alternate DNS in some of the settings.
3] Change DNS
It is always preferable to use Public DNS. The list includes Google DNS, Cloudflare, Quad9, OpenDNS, Comodo Secure DNS, and more. Some of these DNS are paid, while others are free. Unless you need a paid service, free services should be good enough to get you started.
4] Ensure Your DNS Client and DHCP Client Are Running

These two services need to be running to ensure there is no DNS-related error because of it.
- DHCP Client Service registers and updates IP addresses and DNS records for the PC. If this service is stopped, this computer will not receive dynamic IP addresses and DNS updates.
- DNS Client Service or dnscache names and registers the full computer name for this computer. If the service is stopped, there will be no caching.
Type services.msc in the Run Prompt and press the Enter key. It will open the Services window. Locate DNS Client and DHCP Client, and ensure they are running.
Related: Your computer appears to be correctly configured, but the device or resource (DNS server) is not responding.
How Do I Resolve DNS Issues?
If restart the PC and router don’t help, and you have already cleared the cache, then it would be best to use a VPN or another DNS resolver. It will help you figure out if the ISP is the problem that happens many a time.
How Do I Check My DNS Settings?

On the router, you need to check on the configuration where the ISPs IP settings are configured. If everything is configured on your PC, then go to Settings > Network & Internet. Click on Properties, and then click on the Edit button next to the DNS server assignment. Here you can view the settings.
What Is a Good DNS To Use?
There is no particular definition of Good DNS, but using Cloudflare, Google DNS, and others on similar lines can deliver better performance than the ISP.
What Is a Secondary DNS?
If the primary server that resolves website name to IP address aka DNS fails, the PC sends the same query to secondary DNS. It ensures if the query is taking too long or is not available, the user can still access the website. Once resolved, the computer stores it locally and doesn’t query the DNS again until the cache expires.
How to Clear Your DNS Cache?
Once a website IP address is resolved, it is kept in the cache. The next time the browser requests it again, the local cache is used to resolve it quickly instead of querying it with the DNS. If the website is not using that IP address anymore, then the website may fail to resolve. Check our detailed guide on how you can clear the DNS cache.
Does DNS change your IP address?
No, it cannot. An IP address is allocated either manually or using DHCP. It’s a different function that is not part of the DNS Server. The function of DNS is to resolve website to IP address and fast.
This error is external, and there is little you can do. While you can restart the services on the client PC, checking using an alternate external DNS server is important to ensure it’s not a PC problem. When changing the DNS server, make sure to note down the old.
I hope the post resolved your error, and you can browse as usual.
We use the internet for so many different things that it has become a part of our day-to-day lives. Having issues with your internet connection can be one of the most frustrating things to deal with.
You can diagnose the error by using the Windows Network Diagnostics tool. Once the tool finishes scanning for issues, it will return the “Windows can’t communicate with the device or resource primary DNS server)” error.
Are you not sure what the next step should be to fix this issue in Windows 10? Don’t worry, we compiled multiple useful methods for you. Even if you’ve never performed any troubleshooting in the past, you can easily follow along and get back online from your computer.
What Causes Windows can’t communicate with the device or resource error
There are three common causes for this error to happen. You either have outdated network drivers, badly configured settings, or connection issues to the DNS server you’re using. Something many users report is proxy servers causing trouble that can lead to this error message appearing as well. Before you attempt any of our methods, try simply disabling your proxy server to see if you can gain your internet back.
If you have a restricted internet connection (college, work, public wifi, etc.) it’s best not to mess with the settings, as it can cause the error as well. These connections use different settings and guidelines than home connections. This can cause conflict in settings, making you unable to go online.
Fix: Windows can’t communicate with the device or resource (Primarily DNS Server)
There are several quick and easy ways of fixing this Windows 10 issue. Although these methods are all safe, we recommend setting up a System Restore point, just in case something goes wrong.
Note: If you’re unsure of how to set up and use System Restore points, you can watch this video by MDTechVideos. They offer an in-depth tutorial on the entire process, allowing you to follow along and keep your computer safe.
Method 1. Update your drivers
Keeping your drivers up-to-date is extremely important. An outdated driver can cause more issues than you’d imagine. There are multiple ways in which you can update your drivers. Follow one of the guides which suit your approach.
Update your driver from Windows itself
In this method, we will be using the Device Manager to find a new, updated driver.
- Press and hold the Windows key, then press R. This will launch the Run application.
- Type in devmgmt.msc and hit OK to bring up the Device Manager.

- Expand the Network adapters section by clicking on the arrow icon.
- Right-click on your audio driver and select Update Driver.
- Click on Search automatically for updated driver software.

- If Windows can find an updated driver, it will automatically download and install the update to your computer.
- Restart your PC and test if you can connect to the internet.


Update your drivers with a third-party app
You can also find and download third-party updater tools such as Driver Booster, DriverHub or DriverPack Solution. These three tools are all free and easy to use, but you can always look around the web for more advanced apps.
Note: Always make sure that the app you’re using is trustworthy. Many applications that promise to fix or update your drivers contain malware, adware or spyware. We recommend searching the name of the product and reading reviews made by real people.
Method 2. Clear the DNS Cache
Caching data is often useful and can speed up the performance of many applications and services. However, it can also backstab you by storing outdated information, for example.
We recommend trying to clear the DNS cache before any other methods, as it’s a simple and easy task to perform. If it works, you’re saving a lot of precious time. For this method, you will be required to have a local user with administrator permissions.
- Type in Command Prompt to the search bar within your taskbar. Right-click on it from the results, then select Run as administrator.

- Type in the ipconfig /flushdns command then hit the enter key on your keyboard.

- When you see the “Successfully flushed the DNS Resolver Cache.” message, you can close the Command Prompt. Try and see if you can connect to the internet now.


Method 3. Reset Connection Settings
There is a second method that allows you to flush the IP and DNS settings on your computer. This is a little bit more advanced, which means it might work even if the previous solution failed.
Once again, you will be required to have a local user with administrator permissions. Follow these steps to reset your connection settings:
- Type in Command Prompt to the search bar within your taskbar. Right-click on it from the results, then select Run as administrator.
- Input the following four commands. After each one, press the enter key to execute the command:
- ipconfig /flushdns
- ipconfig /registerdns
- ipconfig /release
- ipconfig /renew

- Close the Command Prompt and restart your computer. When you’re done, try to connect to the internet to test your connection.

Method 4. Change your IPV4 and IPV6 Settings
Messing around with the settings of your wifi can often lead to unpredictable issues with your connection. For example, you might have a static IPv4 or IPv6 address that’s preventing you from establishing a connection.
Note: A static IP address means that the address your computer is using was entered and configured manually. This can cause a number of issues on your network.
We will attempt to have an IP address automatically assigned to your device by your router. To do this, you need to change both your IPv4 and IPv6 settings, as they are separate protocols.
- Press and hold the Windows key on your keyboard, then press R. This will bring up the Run utility.
- Type in ncpa.cpl and click on the OK button. Doing this will open up the Network Connections window.
- Right-click on the network you’re using, then select the Properties option.
- Double click on Internet Protocol Version 4 (TCP/IPv4).
- From the General tab, select both Obtain an IP address automatically and Obtain DNS server address automatically. Click the OK button when you’re done.
- Double click on Internet Protocol Version 6 (TCP/IPv6).
- From the General tab, select both Obtain an IP address automatically and Obtain DNS server address automatically. Click the OK button when you’re done.
- Click the OK button on both windows and restart your computer. Once your computer is booted up again, try and connect to the internet.
Method 5. Reset TCP/IP with the NetShell Utility
Corrupted TCP/IP files can also be the culprit behind the “Windows can’t communicate with the device or resource” error. Luckily, Microsoft has addressed this issue and provided an accessible fix for anyone to download.
Note: If you can’t access the internet from your own device at all, download the tool on a PC or laptop with a working internet connection. After you’re done, simply transfer the file to your device.
Follow our steps to download and run the NetShell utility distributed by Microsoft. This tool is completely free and safe of any malware, as it comes from the official website of Microsoft.
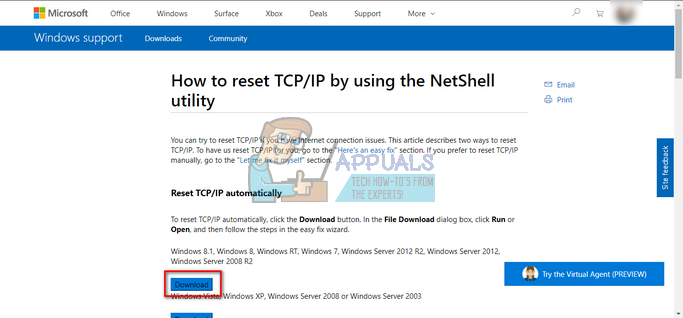
- Click here to open the official Microsoft download page of the utility.
- Click on the Download button. Even though it doesn’t list Windows 10 as a compatible operating system, you can still run the tool.
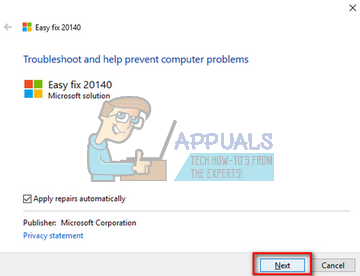
- Double click on the .diagcab file you just downloaded to launch the NetShell utility. Simply click the Next button and follow the instructions on the screen to have your TCP/IP reset.
Final Words
We hope that our article was able to provide you with a way of fixing the “Windows can’t communicate with the device or resource” error. Enjoy your connection to the internet!
If you’re looking for a software company you can trust for its integrity and honest business practices, look no further than SoftwareKeep. We are a Microsoft Certified Partner and a BBB Accredited Business that cares about bringing our customers a reliable, satisfying experience on the software products they need. We will be with you before, during, and after all the sales.
Experiencing No Internet access, Unable to Reach Web pages, And running network Troubleshooter results “Windows can’t communicate with the device or resource (Primary DNS Server)”. That means your computer is unable to connect to the primary DNS server set by your internet service provider. Which caused due to various reasons such as your IPv4 or IPv6 settings not configured properly, you running a proxy server, a conflict with the network settings, or when the DNS server you are trying to access is temporarily unavailable and more. Whatever the reason, here we collected the best working solutions to fix can’t connect to DNS server windows 10.
Windows can’t communicate with the device or resource
Note: solutions below apply for computers, laptops, desktops, and tablets running the Windows 10, Windows 8/8.1, Windows 7 operating systems. Works for all major computer manufacturers (Dell, HP, Acer, Asus, Toshiba, Lenovo, Samsung).
- Whenever you face any network and Internet, related problems, the first thing we recommend to restart your PC including the network devices (Router, Switch, and modem if connected) that fix if any temporary gitch causing the issue.
- Temporarily Disable security software (Antivirus) VPN if installed and configured.
- Perform clean boot to check and make sure any third-party conflict not causing the issue.
- Run free System optimizer like Ccleaner to clear junk, temp files, browser cache, cookies and fix broken registry entries.
- Also open command prompt as administrator, type ipconfig /flushdns and enter key. Restart Windows and check now Internet connection started working.
Change your adapter settings
If Still the issue persists, let’s try changing the network/WiFi adapter settings:
- Press Windows + R, type ncpa.cpl and ok
- The Network connections screen will open.
- Locate your current network and right-click on it.
- Select Properties from the drop-down menu.
- Go to Internet Protocol Version 4 (TCP/IPv4). Click on the Properties button.
- Once in the General tab, select Obtain an IP address automatically as well as Obtain DNS server address automatically.
- Click OK for the changes to take effect.
— Advertisement —
After changing the settings, restart your PC and check if the issue has been resolved.
Switch to Google Public DNS
If the above option didn’t resolve the issue, try to use google public DNS in place of DNS server address that most probably fixes the problem. To do this
- Again open the Network connections window using ncpa.cpl command.
- Right-click on the Active network, Select Properties.
- Double click on Internet Protocol Version 4 (TCP/IPv4).
- Select Use the following DNS server addresses Radio button.
- Set Preferred DNS server to 8.8.8.8.
- And Alternet DNS server to 8.8.4.4
- Click OK to save your changes.
— Advertisement —
Now restart your PC and check your Internet connection.
Reset Winsock and TCP/IP Configuration
If none the previous methods have helped you, try resetting Winsock and TCP/IP configuration:
- Open the elevated version of your command prompt.
- Type the commands below and make sure you press Enter after each:
Type netsh winsock reset and press Enter.
Type netsh int ip reset and press Enter.
Type ipconfig /release and press Enter.
Type ipconfig /renew and press Enter.
Type ipconfig /flushdns and press Enter. - After the type exit to close the command prompt, and restart Windows.
- Open a Web browser and check Internet connection started working.
Reinstall Network adapter
— Advertisement —
Again outdated, incompatible network adapter drivers also cause the problem fails to communicate with the device or resource We recommend update or Reinstall the network driver with the latest version to do this. Since your PC doesn’t have an active internet connection to the online download and update network adapter driver Lets perform the Reinstall option.
- Press Windows + R, type devmgmt.msc and ok
- Expand Network adapter,
- Right-click on installed driver select Uninstall Device.
- Click yes if ask for confirmation
- Restart Windows to completely uninstall the driver
- Most of the time on next restart Windows automatically install the build in Network driver
- If Windows fails to install, then open Device Manager, Action and select Scan for hardware changes.
Or on a different computer, Download the latest Network Adapter driver for your PC. Copy the same and run the setup.exe to manually install the driver. Restart PC and check Internet connection started working.
Did these solutions help to fix “Windows cannot communicate with the device or resource” ?let us know on the comments below, also Read The application was unable to start correctly (0xc000007b) windows 10
The problem that Windows can’t communicate with the device or resource may occur when your computer can’t connect the DNS Server. This post shows how to solve the problem. Apart from that, you can visit MiniTool to find more Windows tips and solutions.
When your computer cannot connect to the primary DNS Server, you may encounter the problem that Windows can’t communicate with the device or resource showing on the Windows Network Diagnostic tool.
The error where Windows 10 can’t communicate with the device or resource may be caused by a lot of reasons, such as the IPv4 or IPv6 address settings not configured properly, the conflict of the network settings, and so on.
Therefore, you may wonder how to fix the problem that Windows can’t communicate with the device or resource.
How to Fix Windows Can’t Communicate with the Device or Resource?
In this section, we will show you the Windows can’t communicate with device or resource fix Windows 10. If you have the same trouble, try these solutions.
Solution 1. Change IPv4 or IPv6 Settings
The first solution to fix the problem that Windows can’t communicate with the device or resource is to change IPv4 or IPv6 address.
Now, we will show you the detailed steps to do so.
Step 1: Type Control Panel in the search box of Windows 10 and choose the best-matched one. Then enter its main interface.
Step 2: In the pop-up window, choose Network and Internet to continue.
Step 3: Choose Network and Sharing Center to continue.

Step 4: Then you will see the network which you are connected to. Click it under the Connections to continue.
Step 5: In the pop-up window, click Properties to continue.

Step 6: Double-click on the Internet Protocol Version 4 (TCP/IPv4). Check the options Obtain an IP address automatically and Obtain DNS server address automatically.

Step 7: Click OK to confirm the changes. Then double-click Internet Protocol Version 6 (TCP/IPv6) and perform the same operation as the same steps.
When all steps are finished, reboot your computer and check whether the problem that Windows can’t communicate with the device or resource is solved.
Solution 2. Reset Network Connection Using Commands
The second solution to solve the problem that Windows can’t communicate with device or resource (primary DNS Server) is to reset Network connection. By resetting Network connection, you can do that in the command line window.
Now, here is the tutorial.
Step 1: Type Command Prompt in the search box of Windows 10 and choose the best-matched one. Then right-click to choose the Run as administrator.
Step 2: In the pop-up window, input the following commands and hit Enter after each command.
ipconfig /flushdns
ipconfig /registerdns
ipconfig /release
ipconfig /renew
Solution 3. Update Drivers
The third way to fix the problem that Windows can’t communicate with the device or resource is to update drivers.
Now, here is the tutorial.
Step 1: Press Windows key and R key together to open Run dialog, then type devmgmt.msc in the box and click OK to continue.
Step 2: In the pop-up window, expand Network adapters and locate your hardware. Right-click it to choose Update driver to continue and then you can follow the wizard to continue.

When all steps are finished, reboot your computer to check whether the issue that Windows 10 can’t communicate with the device or resource is solved.
Solution 4. Reset TCP/IP
Here is another Windows 10 can’t communicate with the device or resource fix. In this way, you can choose to reset TCP/IP.
Now, here is the tutorial.
Step 1: Type Command Prompt in the search box of Windows 10 and choose the best-matched one. Then choose Run as administrator to continue.
Step 2: In the pop-up window, type the following commands one by one and hit Enter after each command.
ipconfig /flushdns
nbtstat –r
netsh int ip reset
netsh winsock reset
After that, reboot your computer and check whether the problem that Windows cannot communicate with the device or resource Windows 10 is solved.
Solution 5. Use Google DNS
If none of the above methods works, you can try changing your DNS manually. Thus, you can choose to use Google’s DNS to check whether the issue that Windows can’t communicate with the device or resource can be solved.
Now, here is the tutorial.
Step 1: Repeat the first five steps of solution 1 and then choose Properties to continue.
Step 2: In the pop-up window, double-click the Internet Protocol Version (TCP/IPv4).
Step 3: In the pop-up window, check the option Use the following DNS server addresses.
Step 5: Set the value as the following.
Preferred DNS Server: 8.8.8.8
Alternate DNS Server: 8.8.4.4
At last, click OK to confirm the changes. Then reboot your computer and check whether the problem that Windows can’t communicate with the device or resource is solved.
Final Words
To sum up, this post has introduced 5 ways to solve the problem that Windows can’t communicate with the device or resource. If you have the same issue, try these ways.