Windows Cannot Connect to the Printer Access is Denied Windows PC Error issue is that none of our Windows 7 PC’s can access the one that is attached to the server. This is the error problem with your hardware connections. You may get this error if you can’t upgrade your printer & need to print something. This error occurs when you are trying to connect to a shared network printer. This error means that access is denied. There are also many different reasons for getting this type of error code problem. This Windows Cannot Connect to the Printer access is denied error is caused when a new driver is created on the print server or when the print driver is updated. You may also get this type Windows Cannot Connect to the Printer access is denied error issue when you are trying to install an HP printer to your Windows PC.
Windows Cannot Connect to the Printer Access is Denied Windows PC
This Windows Cannot Connect to the Printer access is denied to check the printer name, and try error again means that an initial attempt to install the driver will fail. This is the most common error problem mostly facing on your Windows PC while adding your printer or adding your new printer. This Windows Cannot Connect to the Printer access is denied error means that either your printer name was mistyped or your specified printer has lost the connection. This error also means that your registry is missing some entries. From this error, the Windows Cannot Connect to the Printer access is denied, and it says like that check the printer name and tries again. This Windows Cannot Connect to the Printer access is denied error occurs when your printer is set to offline mode. When you get this type of error problem, then sometimes doing a simple thing such as adding a network shared printer can also become a frustrating task. When you are trying to add any printer on your Windows PC, then you may get this type of Windows Cannot Connect to the Printer access is denied error issue.
Causes of Windows Cannot Connect to the Printer Access is Denied Windows Error Issue:
- Windows PC error problem
- No Printers were found
- Check the printer name and try again
- Printer error issue
So, here are some quick tips and tricks for efficiently fixing and solving this Windows Cannot Connect to the Printer Access is Denied Windows PC Error Code problem from you permanently.
How to Fix & Solve Windows Cannot Connect to the Printer Access is Denied Windows Error Issue
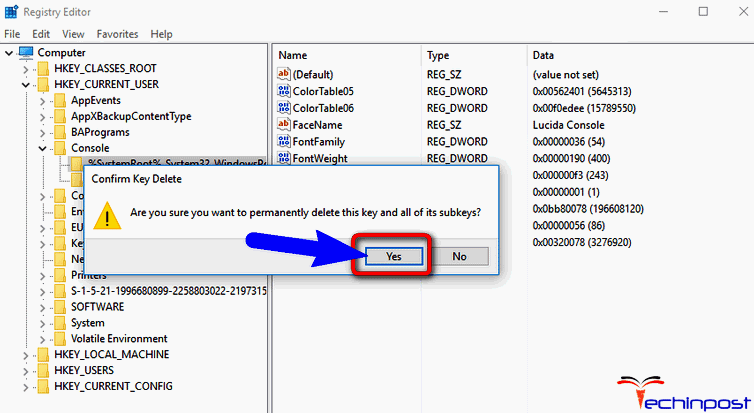
1. Delete the BIDI Branch in CopyFiles Section –
- Open the registry editor
- Go to this below following
HKEY_LOCAL_MACHINESOFTWAREMicrosoftWindows NTCurrentVersionPrintPrinters - Expand the branch with the printer name
- Apparently of printer that has faced the error,
- Delete the BIDI branch in CopyFiles section
- Restart the Spooler on client
- Try to connect an HP printer on the client
- That’s it, done
- After completing, close all the tabs there
By deleting the BIDI branch through the CopyFiles section can help you to get rid out of this type of error, Windows Cannot Connect to the Printer access is denied the issue.
2. Add the Printer Manually –

- Go to the Control Panel
- Go to & Click on the Printer section
- Select Add Printers
- Add a new local printer (By using a local port, not TCP/IP)
- For the name, but the whole path
\YourPrintServerThePrintersName - Now, it will ask you about Drivers
(So, for that Make sure you have already downloaded the 64-Bit drivers for your printer) - Choose Hard Disk
- Browse to where you have saved it
- It will ask you for what you want to call your printer on your PC
- That’s it, done
- After completing, close all the tabs
By adding the printer manually can fix and solve this type of error, Windows Cannot Connect to the Printer Access Is Denied Windows 10 code problem.
” OR “
3. Create a New Local Port on your Windows PC –
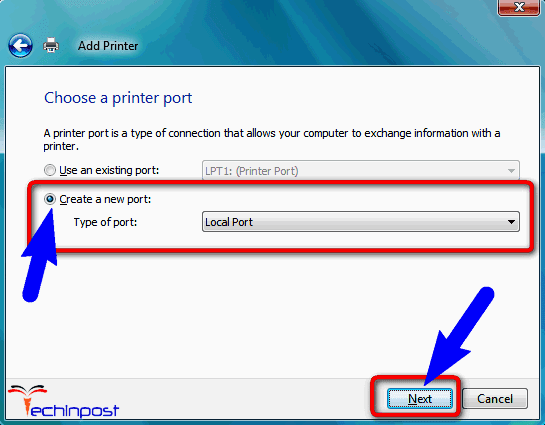
- Go to the start menu
- Search for Devices and Printers
- Open the Devices & Printers there
- Click on the Add a Printer section
- Select ‘Add a local Printer,’
- Select “Create a new Port” there
(Make sure there is a local port, selected for Type of Port) - You will ask for a Port name
- Type the printer’s address in the below following format
\IP address or the PC namePrinter’s name - Now click OK, then Next option
- Select your Printer model from the directory to install its drivers
- Click on the Next option
If you have a disk, then insert the disk there - Click on the Have Disk &
- Browse to driver’s location in the disk
- Click on the OK option
- Type in the name of your new printer
- Click on Next option again
- That’s it, done
- After completing, close all the tabs
By creating a new local port can help you to get back from this type of error, Windows Cannot Connect to the Printer access is denied 0x00000002 code issue.
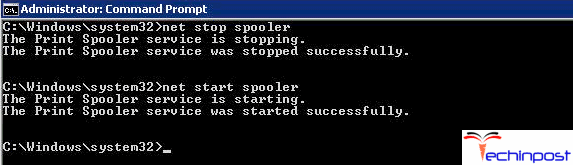
4. Resetting by the Service.MSC Properties on your Windows PC –
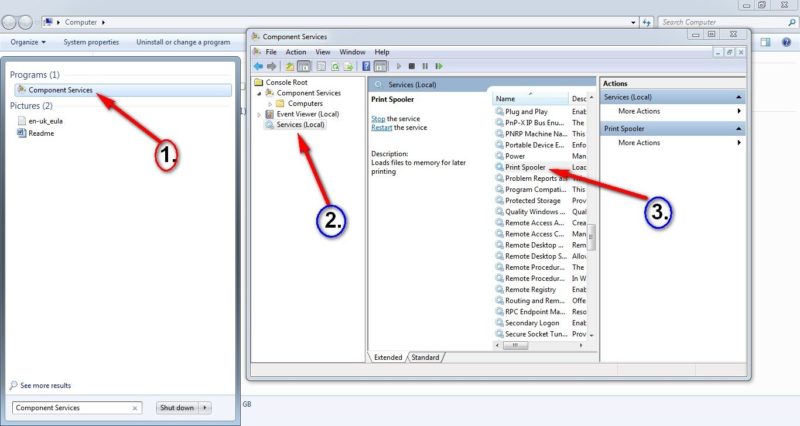
- Go to the Start Menu
- Search for ‘Component Services their & Open it
- In the Component Services, Go to Services (Local)
- Search for Print Spooler there & Right clicks on it
- Press ‘Stop‘ or ‘Restart‘ there
(If you press ‘Stop,’ then Click on Start to again start it)
That’s it; It will fix this error Windows Cannot Connect to the Printer Access is Denied code problem.
5. Run the Microsoft Automated Printer Troubleshooter –
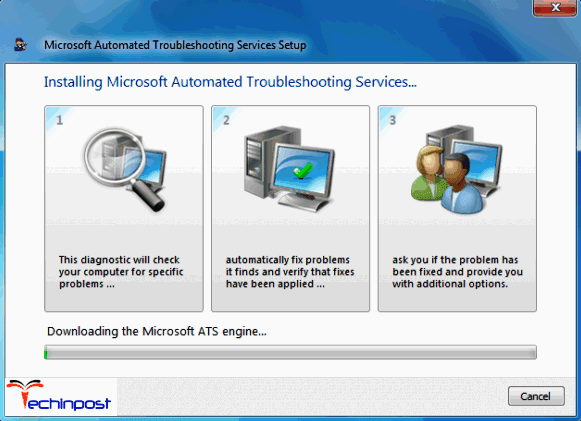
- Download a file from here: Download Now
- Download it and install it
- Open the file & install it
- Troubleshoot it from the wizard
- Test it by clicking on Add new printer option
- After troubleshooting has completed
- Try to re-add the printer frequently
- After finishing, close the tab
- That’s it, done
By downloading and running Microsoft‘s automated printer troubleshooter can help you to fix and solving this type of error, Windows Cannot Connect to the Printer access is denied the local print spooler service is not running issue.
6. Delete the Pre-Existing Driver Files from the Registry Editor –
- Press the Windows Key + R
- Type regedit there
- Press Enter to open it
- Go to the following location
HKEY_LOCAL_MACHINESYSTEMControlSet001ControlPrintPrintersYourPrinter’sNameCopYFiles - Delete the ICM folder
(It’s under the CopyFiles folder) - That’s it, done
- After completing, close all the tabs
By deleting the pre-existing driver files from the registry can get rid out of this error, Windows Cannot Connect to the Printer access is denied 7E code problem permanently.
7. Remove Unnecessary Printer Drivers from your PC –
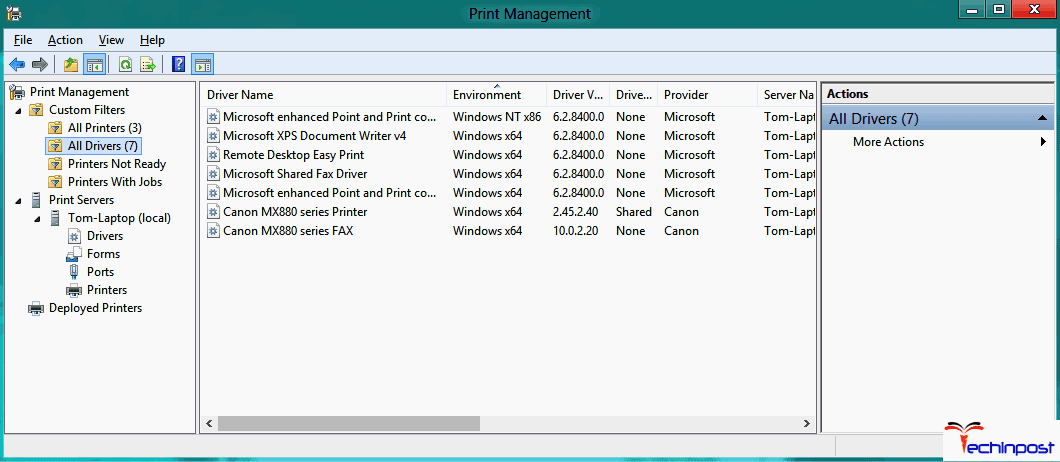
- Press Windows Key + R
- Type ‘Printmanagement.msc’ there
- Press Enter to open it
- Double click on ‘All Printers‘
- Delete any Printer’s Driver
For deleting any printer,
Right-click on the driver
Click on Delete option there to delete it - Now, re-add it again
- That’s it, done
- After completing, close the tabs
By removing unnecessary printer drivers can get rid of you of this error, Windows Cannot Connect to the Printer access is denied 0x2 code issue.
8. By Copying mscms.dll Files Manually on your PC –
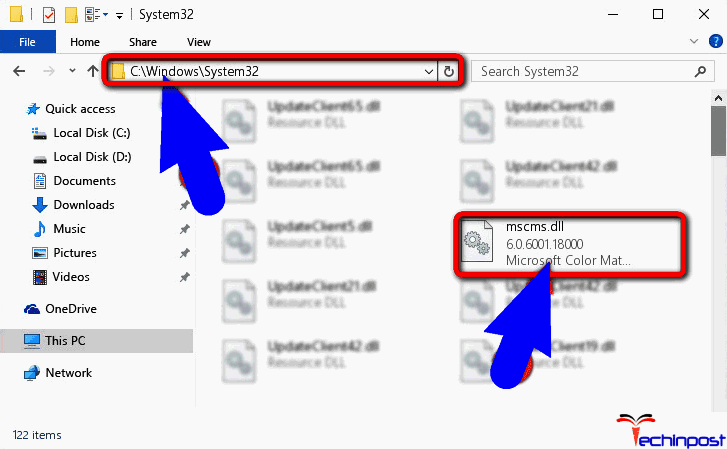
- Go to the start menu or,
- Directly press Windows Key + R button
- Type ‘system32‘ there
- Press Enter to open System32 folder
- Type mscms.dll in the search bar
- Copy the file with the name mscms.dll
Shortcut: (CTRL+C) to Copy & (CTRL+V) to paste - For 32-Bit Windows, go to
C:Windowssystem32spooldriversw32x863 - For 64-Bit Windows, go to
C:Windowssystem32spooldriversx643 - Now, try again to connect to the printer
- That’s it, done
- After completing, close all the tabs
By copying the mscms.dll files manually on your Windows PC can get back from this error Windows Cannot Connect to the Printer Access is denied code problem completely.
9. Share the Permissions to Printers on your Windows PC –

- Go to the start menu
- Go to this below the following path
C:Windowssystem32spoolPrinters - Right-click on the Properties
- Go to the Sharing tab there
- Click on Advanced Sharing option
- Tick the ‘Share this Folder‘ option
- Click OK & then,
- Click on Apply to save this configuration
- After completing, close all the tabs
- That’s it, done
By sharing the permissions to printers on your PC can get back you from this error, Windows Cannot Connect to the Printer Access Is Denied Windows 10 issue.
These are the quick and the best ways methods to get quickly rid out of this Windows Cannot Connect to the Printer Access is Denied Windows PC Error Code problem from you entirely. I hope these solutions will surely help you to get back from this error Windows Cannot Connect to the Printer access is denied the problem.
If you are facing or falling in this Windows Cannot Connect to the Printer Access is Denied Windows PC Error Code problem or any error problem, then comment down the error problem below so that we can fix and solve it too by our top best quick methods guides.
‘Windows cannot connect to the printer. Access is denied’ is a common printer error that Windows 10 users mostly face after installing the security update KB5005565 in Windows 10 or in some cases, out of the blue as well.
This error message occurs while adding a printer because of some issue with the ‘Print Spooler’ service. The ‘Print Spooler’ service is necessary for carrying out all the printing tasks successfully.

Contents
- Variations of the ‘Windows Cannot Connect to the Printer’ Issue
- Reasons for the Occurrence
- Prerequisites
- How to Fix the Issue?
- 1. Editing ‘Providers’ in Windows Registry
- 2. Removing the ‘Deny’ Permission from /spool/drivers
- 3. Enabling the Guest Account
- 4. Creating a New Port While Connecting to the Shared Printer
- 5. Disabling the Mitigation for CVE-2021-1678
- 6. Disabling the ‘Point and Print Restrictions’
- 7. Uninstalling the Security Update KB5005565
Variations of the ‘Windows Cannot Connect to the Printer’ Issue
Apart from Windows 10 users, Windows 7 and Windows XP users also face this error. This error message has several variations with almost all of them rooting to the same problem.
- Operation could not be completed (error 0x0000007e).
- Printer error access denied unable to connect.
- Access is denied 0x0000011b.
- Operation Failed with Error 0x00000002.
- Operation Failed with Error 0x0000007e.
- Access is denied server 2012 r2.
- No printers were found.
Following are the error codes that are displayed separately:
- 0x00000bcb
- 0x00003e3
- 0x11b
If your error message is one of those, then you will find the solution to your issue here.
Reasons for the Occurrence
After researching this error message for several days and troubleshooting it, we have found the following reasons for its occurrence.
- Print Spooler service is not running or is stuck in an error state.
- Pending documents might be locked in the printing documents queue.
- Permissions might not be granted to the computer. Typically, this happens in a network when multiple computers are sharing a single printer. In some cases, the administrator blocks the printing access.
- A corrupted or improper installation of the printer drivers might also cause this error message.
Prerequisites
Reinstalling the Printer
The most basic remedy to this error message is reinstalling the printer by checking whether all the wires are plugged right or not.
If reinstalling the wires of the printer didn’t resolve this error message, then move to the next tip.
Running the Basic Troubleshooter and Resetting the Printer
The next tip is to use the default troubleshooter of Windows to detect the problem. Mostly this doesn’t work but trying it won’t cost anything.
- So, go to the ‘Control Panel’ and choose the ‘View devices and printers’ option under the ‘Hardware and Sound’ section.

Opening ‘Control Panel’ via ‘Start menu’ 
Choosing the ‘View devices and printers’ option under the ‘Hardware and Sound’ section - Now, right-click on your printer under the ‘Printers’ section and choose the ‘Set as default printer’ and ‘Troubleshoot’ options.

Setting the current printer as default and choosing the ‘Troubleshoot’ option - When you select the ‘Troubleshoot’ option, Windows will run a troubleshooter to find the problem you are facing with this device and try to fix it.

Windows is detecting the problems in the printer via default troubleshooter - Once Windows has finished the troubleshooting procedure, then right-click on the printer again and choose the ‘Printer preferences’ option.

Clicking the ‘Printing preferences’ option by right-clicking the printer - A new window will open. So, click on the ‘Reset’ button and save the changes by clicking on the ‘OK’ button.

Clicking on the ‘Reset’ button and then, choosing the ‘OK’ button


Checking the Drivers of the Printer
The next tip is to reinstall the printer drivers because sometimes faulty or corrupted drivers’ updates can also cause this issue.
- So, go to the ‘Device Manager’ window and find your printer.
- Then, right-click on it and choose the ‘Uninstall device’ option.
- Now, reconnect the printer again and Windows will automatically install the best possible drivers. However, if you are using an older version of Windows, like Windows-XP/Vista/7, then you may have to install the drivers manually.
- So, go to the official website of your printer’s manufacturer and download and install the drivers.
If reinstalling the printer’s drivers didn’t resolve this error message, then move to the main solution.
How to Fix the Issue?
Before trying any solution, read the description of the solution because the solutions to this error message vary from use case to use case. So, it’s better to read the description first because it will save you from trying anything stupid and wasting your time.
1. Editing ‘Providers’ in Windows Registry
If none of the methods work, we are going to delete a registry key in the ‘Providers’ section in the Windows registry. We recommend backing up your registry before proceeding as you can always revert the changes back if this doesn’t work.
- Press Windows + R, type ‘regedit‘ in the dialogue box, and press Enter.
- Once in the registry editor, navigate to the following path:
HKLMSOFTWAREMicrosoftWindows NTCurrentVersionPrintProviders
- Now, delete the following key from this registry:
Client Side Rendering Print Providers
- The last step is to restart the Print Spooler service. Press Windows + R, type “services.msc” in the dialogue box, and press Enter.
- Search through the services until you find the service. Open its properties and Stop the service. After waiting a few seconds, Start it again.
- Now try connecting to the printer and see if this solves the problem.
2. Removing the ‘Deny’ Permission from /spool/drivers
Another workaround as reported by numerous Redditors was to remove the ‘Deny’ permission from the following file path:
C:WindowsSystem32spooldrivers
This seems to do a quick fix if the issue is originating from not having enough permissions available. This was particularly the case after updating Windows to the latest build available.
Here is a batch file you can use to instantly perform the action instead of manually changing the permissions
@echo off
net  stop  spooler
takeown  /F  C:WindowsSystem32SpoolPrinters  /R
icacls  C:WindowsSystem32SpoolPrinters  /T  /Grant Everyone:F
del  /Q  C:WindowsSystem32SpoolPrinters*.*
net  start  spooler
You can learn more about how to create Batch files from an article on Windows Central.
3. Enabling the Guest Account
If you are using a printer in a computer network, the administrator might have disabled your guest account. Here, enabling the guest account will resolve this issue for you.
- First, right-click on ‘This PC’ (for Windows-10 and Windows-8/8.1 users) on the computer with which you have (physically) attached the printer. But if you are using Windows-7 or Windows-XP, then the required option would be ‘Computer’ or ‘My Computer.’
- Then, choose the ‘Manage’ option to open the ‘Computer Management’ window.

RIght-clicking on ‘This PC’ and choosing the ‘Manage’ option - After that, go to the ‘Local Users and Groups’ and inside that, go to the ‘Users’ folder.

Going to the ‘Local Users and Groups’ and inside that, opening the ‘Users’ folder - Now, you will find a ‘Guest’ account inside the ‘Users’ folder and the administrator of your network may have disabled this account, which is why you are facing this issue.
- So, right-click on the ‘Guest’ account and choose the ‘Properties’ option.

Going to the ‘Properties’ of ‘Guest’ account - Then, uncheck the box that says ‘Account is disabled’ inside the ‘General’ tab.
- After that, click on the ‘Apply’ and then the ‘OK’ button.

Unchecking the ‘Account is disabled’ option and clicking on the ‘Apply,’ then the ‘OK’ button - Now, restart the system.

Restarting the system by going to the ‘Start’ < ‘Power’ < ‘Restart’ options


After restart, check whether this solution has fixed the error message.
4. Creating a New Port While Connecting to the Shared Printer
Suitable for Shared Printers
If you have faced the error message while attempting to add the network printer, then try this solution. Even if you have already applied the basic troubleshooting, such as checking the security settings of the shared printer, check the sharing settings to make sure that the file and printer sharing is enabled.
Sharing the Printer from the Host Computer/Laptop
- First of all, share the printer as usual from the computer on which you have physically attached the printer. So, ‘follow Step 1 of Tip # 2’ to reach the ‘Devices and Printers’ window.
- Now, right-click on your printer under the ‘Printers’ section and choose the ‘Printer properties’ option.
Choosing the ‘Printer properties’ option of the connected printer - Then, go to the ‘Sharing’ tab and type an easy-to-remember name of the printer. In our case, we have used ‘EpsonR200.’

Typing a custom printer name while sharing and clicking on the ‘Apply,’ then the ‘OK’ button


Connecting to the Shared Printer from the Other Computer/Laptop
- Now, on the other computer (from which you want to connect to this printer), we will run the printer wizard as usual. So, go to the ‘Control Panel’ again and choose the ‘View devices and printers’ option under the ‘Hardware and Sound’ section according to ‘Step 1 of Tip # 2.’
- Now, click on the ‘Add a printer’ option in the new window.

Clicking on the ‘Add a printer’ option inside the ‘Devices and Printers’ window - Then, windows will run a scan to find the attached printer. So, click on the ‘The printer that I want isn’t listed’ option.

Choosing the ‘The printer that I want isn’t listed’ option - A new window will open. So, choose the ‘Add a local printer or network printer with manual settings’ option and click on the ‘Next’ button.

Choosing the ‘Add a local printer or network printer with manual settings’ option and clicking on the ‘Next’ button - After that, choose the ‘Create a new port’ option and keep the ‘Type of port:’ as ‘Local Port.’ Then, click on the ‘Next’ button.

Choosing the ‘Create a new port’ option and keeping the ‘Type of port’ as ‘Local Port.’ then, clicking on the ‘Next’ button - Now, type the port name in this format ‘//computername/printername.’ So, in our case, the ‘computername’ is ‘Talha’ and ‘printername’ is ‘EpsonR200.’


Note: If you don’t know your computer name, then right-click on ‘This PC’ (or ‘Computer’) and choose the ‘Properties’ option. Then, choose the ‘Rename this PC (advanced)’ option and click on the ‘Change…’ button to view your ‘Computer name:’

Note: Make sure that you are using the name of that computer, on which you have (physically) attached the printer
- Then, click on the ‘OK’ button.

Entering the port name and clicking on the ‘OK’ button - Next, Windows will ask you to select the make and model of the printer, install its drivers, etc. So, keep following the wizard and provide the information it requires to connect to the printer successfully.

After following all the steps, this solution will definitely solve the ‘shared printer access denied unable to connect windows 10’ error message for you because it worked for others in the past. But if this solution didn’t prove useful, then try the next solution.
5. Disabling the Mitigation for CVE-2021-1678
If you are receiving the error message after installing the Windows security update (KB5005565), then this might be an issue with the ‘Print Spooler’ service. Here, uninstalling the faulty security update will fix this issue. But if you don’t want to uninstall the update, then disable the mitigation for CVE-2021-1678 with the help of the following guide.
- Press the ‘Windows + R‘ keys to open the ‘Run’ dialog box and type ‘Regedit’ in the text box. Then, click the ‘OK’ button.

Opening the ‘Run’ dialog box and typing ‘Regedit’ - In the next window, click on the ‘Yes’ button to allow the windows ‘Registry Editor’ to make changes to your device. This will open the Registry Editor.

Clicking on ‘Yes’ to open the ‘Registry Editor’ - Now, paste the following address after ‘Computer’ in the address bar of ‘Registry Editor’ and hit the ‘Enter’ key to reach the required folder.


HKEY_LOCAL_MACHINESYSTEMCurrentControlSetControlPrint

- Now, right-click on the space inside the ‘Print’ folder and choose the ‘New’ < ‘DWORD (32-bit) Value’ options.

Right-clicking on the empty space inside the ‘Print’ folder and choose the ‘New’ ‘DWORD (32-bit) Value’ option - Then, rename the newly created value as ‘RpcAuthnLevelPrivacyEnabled.’
- Right-click on the newly created value and click on the ‘Modify…’ option.

Right-clicking on the ‘RpcAuthnLevelPrivacyEnabled’ and choosing the ‘Modify…’ option - Then, change the ‘Value data:’ to ‘0’ to disable it and click on the ‘OK’ button.

Changing ‘Value data’ to ‘0’ and clicking on the ‘OK’ button


This solution will let you use the printer again. However, if this solution didn’t prove useful, then you can undo the changes and try the next method.
6. Disabling the ‘Point and Print Restrictions’
If the above solutions didn’t work for you, then try disabling the ‘Point and Print Restrictions’ by going to the ‘Edit group policy’ application.
- First, go to the ‘Edit group policy’ application.

Opening the ‘Edit group policy’ from the ‘Start menu’ - Then, go to ‘Administrative Templates’ under ‘Computer Configuration’ and double click on the ‘Printers’ folder to open it.

Going to ‘Administrative Templates’ under the ‘Computer Configuration’ section and double-clicking on the ‘Printers’ folder - Now, double-click on the ‘Point and Print Restrictions’ option.

Opening the ‘Point and Print Restrictions’ option by double-clicking on It - Then, choose the ‘Disabled’ option and click on the ‘Apply’ and ‘OK’ buttons to save the changes.

Checking the ‘Disabled’ option and applying the Settings by clicking on the ‘Apply’ and ‘OK’ buttons - Now, restart the system.
Restarting the system by going to the ‘Start’ < ‘Power’ < ‘Restart’ options


After restarting, check if this solution has fixed the error message for you. If yes, then good for you. Otherwise, try the next solution.
7. Uninstalling the Security Update KB5005565
If none of the discussed methods have worked for you, then we recommend uninstalling the security update. Uninstalling the security update will definitely fix this issue because this issue mostly originates after installing the security update (KB5005565).RpcAuthnLevelPrivacyEnabled
- First, go to the ‘Control Panel.’
Opening ‘Control Panel’ via ‘Start menu’ - Then, choose the ‘Uninstall a program’ option under the ‘Programs’ section.

Clicking on the ‘Uninstall a program’ option under the ‘Programs’ section in the ‘Control Panel’ window - Now, click on the ‘View installed updates’ option.

Clicking on the ‘View installed updates’ option - Then, select the ‘Security Update for Microsoft Windows (KB5005565)’ update and click on the ‘Uninstall’ option.

Uninstalling the ‘KB5005565’ security update - Click on the ‘Yes’ button in the next window to confirm the uninstallation procedure.

Confirming the uninstallation procedure of uninstalling the updates by clicking on the ‘Yes’ button


I am a BSCS graduate and a technology nerd who now loves working and writing about computers and other tech-related stuff. In my free time, I like watching Netflix and playing Cricket 22 and The Witcher 3 (Wild Hunt).
Printer stop printing job after the windows 10 update? Or while connecting to a network-shared printer display the error message “Windows Cannot Connect to the Printer, Access is denied”. The most common reason for this error “windows cannot connect to the printer” is the print spooler service is stuck, has a document pending in the queue locked, and Your user account doesn’t have the right to connect to the printer. Or corruption and improper installation of the print-driver result
- Windows Cannot Connect to the Printer – Operation Failed With Error 0x0000007e
- Windows Cannot Connect to the Printer – Operation Failed with Error 0x00000002
- The operation could not be completed (error 0x0000007e)
- Windows cannot connect to the printer 0x00000bcb
- Windows cannot connect to the printer 0x00003e3
- Windows cannot connect to the printer no printers were found
If you are struggling with this problem, unable to connect to the printer, here is how to get rid of this error and install the printer without any problem.
Windows Cannot Connect to the Printer
First of all, Connect your Printer to the computer and switch it ON.
— Advertisement —
In the case of a Wireless printer, Switch it ON and connect it to the Wifi network.
Sometimes power cycling your printer can resolve the issue. Turn off your printer and unplug it, wait 30 seconds, plug your printer back in, and then turn the printer back on.
Also, it’s suggested to check if the user account has permission to print and manage the printer. To do this move to the PC where the local printer is installed and
- Open the Control panel.
- Under Hardware and Sound, click on Devices and Printers.
- Locate your printer and right-click.
- Click on the Printer properties from the menu and select the Security tab.
- Select your user account name from the list of user accounts.
Make sure that all the checkboxes against the permissions are marked as “Allow”.
If the permission is already set as “allow”, then this could be a network setting issue. Check if your account is configured correctly to the network and check the network options.
Run Printer Troubleshooter
— Advertisement —
If the issue persists, run the Printer troubleshooter and check if it helps.
- Type troubleshoot settings on the start menu search and press enter.
- Click on Printer and select run the troubleshooter
- this will check and fix the problems and prevent complete printing job.
Restart Print Spooler Service
- Press Windows Key + R then type services.msc and hit Enter.
- Find the Print Spooler service in the list and double-click on it.
- Make sure the Startup type is set to Automatic and the service is running, then click on Stop and then again click on start in order to restart the service.
- Now move to the dependencies tab and check the listed dependencies services running.
- Click Apply followed by OK.
- After that, again try to add the printer and see if you’re able to Fix Windows Cannot Connect to the Printer issue.
— Advertisement —
Copy the mscms.dll
- Navigate to the following folder: C:Windowssystem32
- Find the mscms.dll in the above directory and right-click then select copy.
- Now paste the above file in the following location according to your PC architecture:
C:windowssystem32spooldriversx643 (For 64-bit)
C:windowssystem32spooldriversw32x863 (For 32-bit)
- Reboot your PC to save changes and again try to connect to the remote printer again.
- This should help you Fix Windows Cannot Connect to the Printer issue, if not then continue.
Delete Incompatible Printer Drivers
Sometimes The problem can be caused due to incompatible printer drivers. Also, An installation of the previous printer can prevent the printer spooler from adding new printers. So you can try to remove these outdated drivers and re-install them again.
- Press Win + R then type printmanagement.msc and hit Enter
- This will open print management.
- From the left pane, click All Drivers
- Now in the right window pane, right-click on the printer driver and click Delete.
- If you see more than one printer driver’s name, repeat the above steps.
- Restart windows and Again try to add the printer and install its drivers.
Create a New Local Port
- Open Control Panel.
- View by Large icons, click Devices and Printers.
- Click Add a printer at the top of the window.
- Select Add a network, wireless or Bluetooth printer
- Select Create a new port, change the “Type of port” to Local Port then click the Next button.
- Enter a port name in the box. The port name is the printer’s address.
The address format is the \IP address or the Computer NamePrinter’s Name (refer to the following screen). Then click the OK button.
- Select the printer model from the directory and click the Next button.
- Follow the rest on-screen instructions to finish adding the printer.
Tweak Windows Registry
- Press Win + R then type regedit and hit the enter key,
- This will open the Windows Registry Editor.
- Backup Windows registry then In the left pane, navigate to the following key
HKEY_LOCAL_MACHINESOFTWAREMicrosoftWindows NTCurrentVersionPrintProvidersClient Side Rendering Print Provider
- Right-click on Client Side Rendering Print Provider and select Delete.
- Restart both PC and printer and check this time for no more errors while connecting to the local shared printer.
Did these solutions help to fix “Windows Cannot Connect to the Printer“? Let us know in the comments below, Also read:
- Printer in Error State? Here is how to fix printer problems on windows 10.
- iTunes Not Working on Windows 10? Here 5 Different iTunes problems and solutions.
- Fix iPhone Not Showing Up in iTunes For Windows 10, 8.1 and 7
- Solved: Windows 10 Settings not Opening Working
- 7 solutions to fix Windows 10 Can’t Connect to This Network (WiFi).
- Remove From My Forums
-
Question
-
I’m running vista home premium and have it connected to a home network (the host computer is running xp home edition). I can connect to the internet and share files and do everything else over the network except print. Whenever I run the add a printer wizard the printer I am trying to connect to appears as an option (its an hp 5550 networked through the host computer) and when I try to connect I get the error message «Windows cannot connect to the printer. Access is denied». I’m using an administer account and printer sharing is turned on on both my and the host computer. Any suggestions would be greatly appreciated. Thanks.
Answers
-
I had the same problem. I found a solution. Logically it makes no sense to me, but it worked so…
Go to Control Panel. Choose printer. Then choose Add Printer.
ChooseAdd a local printer. Click on Create a new port. The default in the drop down box is Local Port. Do not change that. Click Next.
A dialogue box will appear asking for you to enter a port name. Type in the \computer nameprinter name ie. My computer’s name is basement and the printer name is EpsonSty so I typed in \basementepsonsty
Yahoo! It worked. Go figure! I guess Microsoft thinks printers on a intranet are local.
Hope this helps someone else so they don’t spend the hours I did on it!
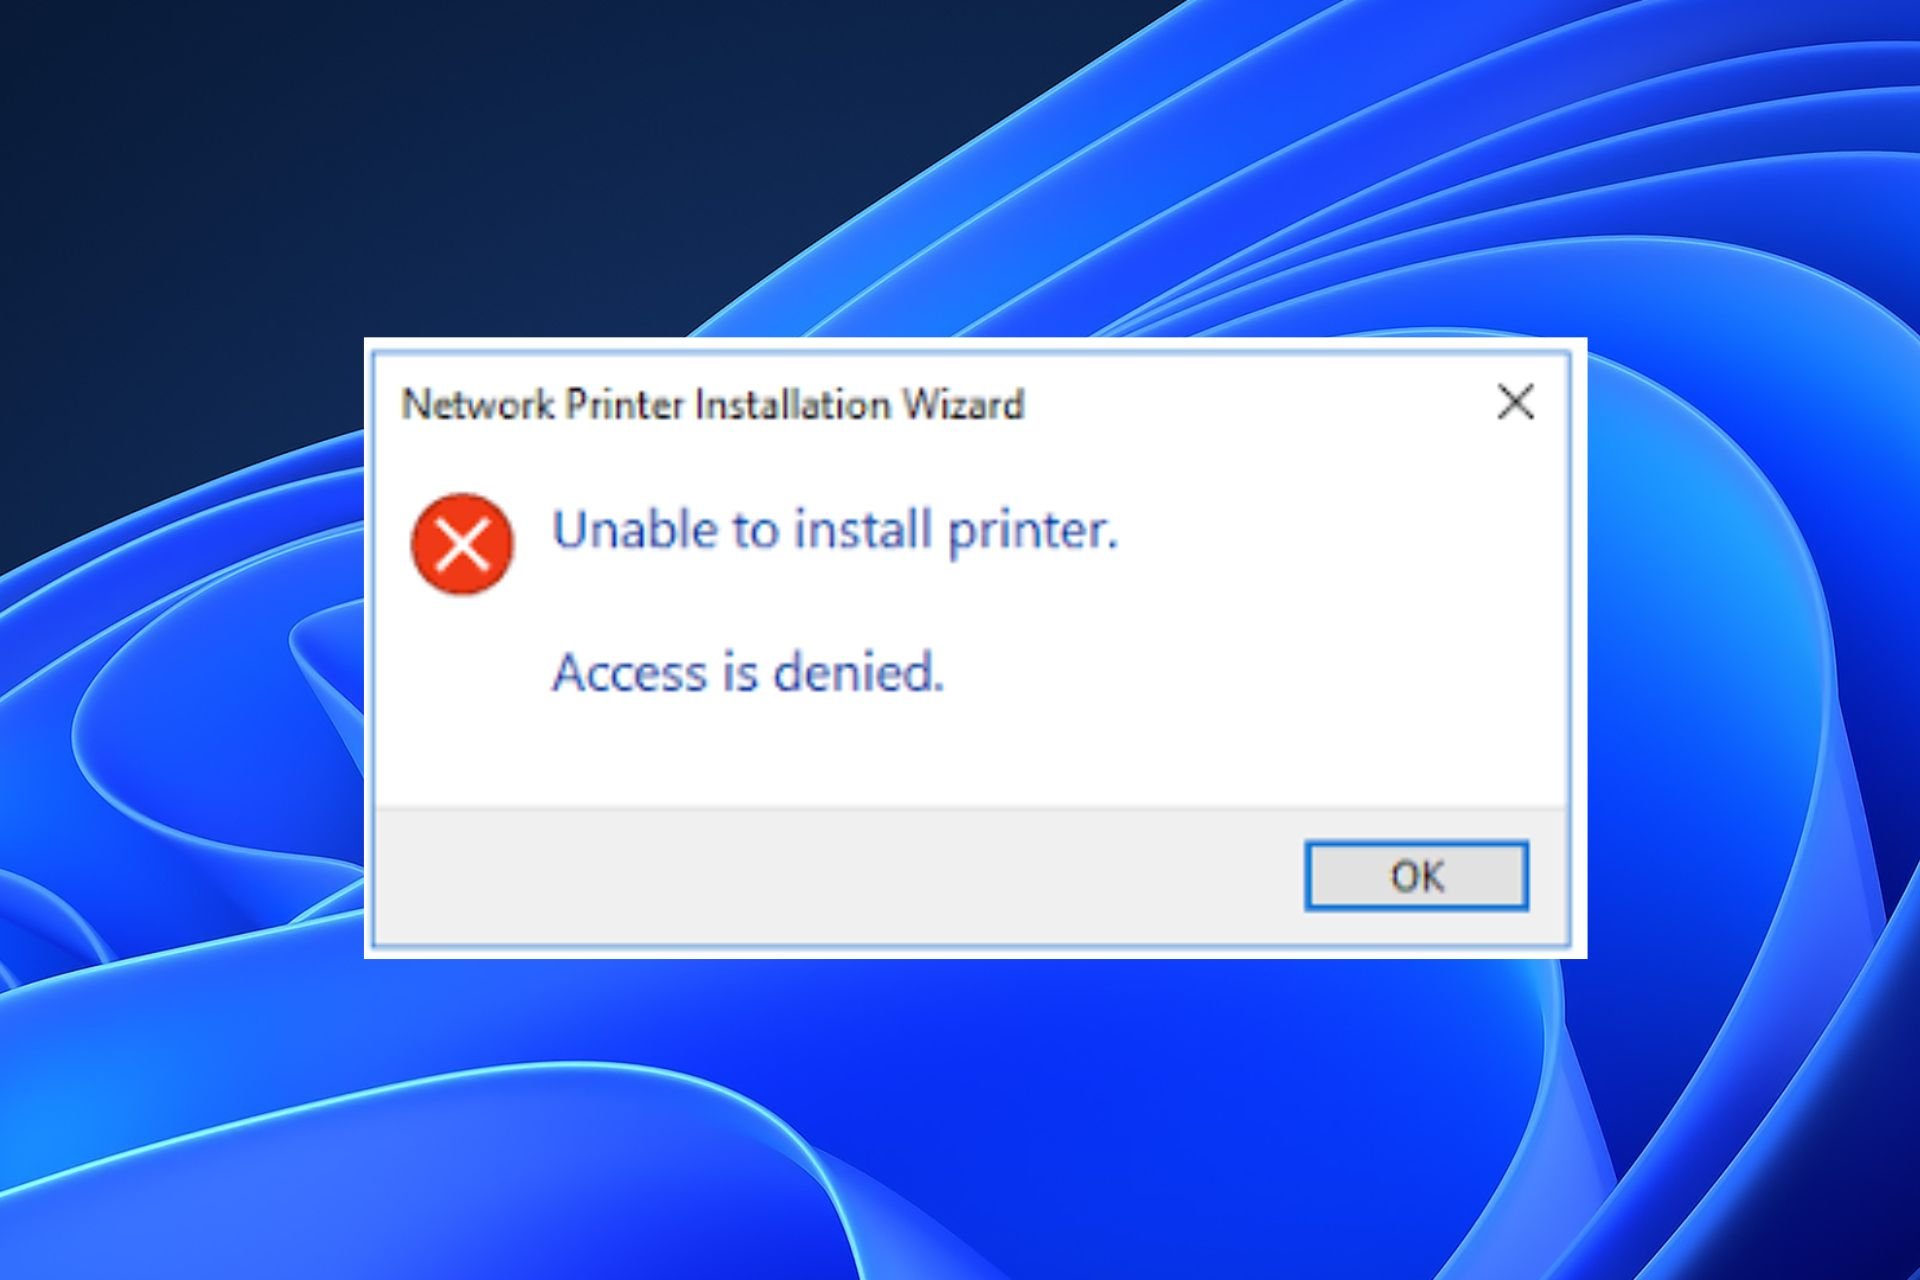
Windows 11 printer access denied prevents the printer from working
by Henderson Jayden Harper
Passionate about technology, Crypto, software, Windows, and everything computer-related, he spends most of his time developing new skills and learning more about the tech world. He also enjoys… read more
Published on September 1, 2022
Reviewed by
Vlad Turiceanu

Passionate about technology, Windows, and everything that has a power button, he spent most of his time developing new skills and learning more about the tech world. Coming… read more
- Outdated printer drivers can cause many printer errors on your computer.
- Removing the print spooler can fix the access denied printer error in Windows 11.
- Updating Windows can fix the various errors you may encounter on your computer.
XINSTALL BY CLICKING THE DOWNLOAD FILE
This software will keep your drivers up and running, thus keeping you safe from common computer errors and hardware failure. Check all your drivers now in 3 easy steps:
- Download DriverFix (verified download file).
- Click Start Scan to find all problematic drivers.
- Click Update Drivers to get new versions and avoid system malfunctionings.
- DriverFix has been downloaded by 0 readers this month.
Connecting Windows computers to external devices like the printer allow you to do things more conveniently. However, there are several issues you can encounter while trying to collect your computer from external devices like printers. Users complain about the Windows 11 printer access denied error.
Many conditions may be responsible for this issue ranging from hardware issues, driver issues, and lots more. Hence, This article will discuss the causes of the problem and how to fix it.
The Windows 11 printer access denied error prevents you from using the printer for any action on the computer. It indicates that there isn’t a good connection between the computer and the printer.
Likewise, printer errors can result in the Windows cannot connect to the printer access is denied error 0x0000011b. However, it can be due to driver issues, permission not granted errors, and others.
Moreover, this error is prominent in Windows 11 but can be encountered in other devices regardless of the version.
Fortunately, there are some fixes you can use to fix the ‘Windows can’t connect to printer access is denied. So, we’ll guide you through how to fix the error and what to look out for whenever you encounter it.
Why does my printer Say Access Denied?
- Faulty connection between the computer and the printer: There are several errors users can encounter with printers, like the access denied when adding a printer from the print server and Windows 11 shared printer access denied. However, these errors can occur due to connection issues while connecting the printer to the computer. However, Windows 11 printer access denied error occurs when there isn’t a smooth connection between the printer and the computer. Hence, preventing it from performing as expected.
- Interference from other connected printer devices: Whenever you have many concurrent printers connected to your computer, the Windows 11 printer access denied error could be prompted. This is because one of the connected printers you are not using may impede the connection and access of your printer with the computer. Likewise, these printers install printer drivers on your computer, which is unnecessary. Hence, these drivers may become faulty or corrupt.
- Corrupt or faulty printer drivers: Users can encounter many difficulties if the printer drivers are corrupt or old. It impedes the smooth connection between the printer and the computer. Hence, it can prompt the Windows 11 printer access denied error. Also, outdated or faulty printer drivers can cause errors because the computer won’t have the necessary updates and patches to fix bugs on the printer.
- Outdated Windows issue: Generally, an outdated Windows is dangerous and can result in countless errors. However, it can be responsible for denying access when adding a printer from a print server error. Furthermore, outdated Windows lacks the essential patches to help fix printer connection issues.
Nonetheless, many other causes of the Windows 11 printer access denied issue exist, but we’ve highlighted the prominent ones above.
How do I fix my printer if it says access denied in Windows 11?
1. Update the printer drivers
- Click on the Start button and select Device Manager.
- Click on the Print queues drop-down button.
- Select your printer and right-click on it.

- Select Update driver and Search automatically for drivers.

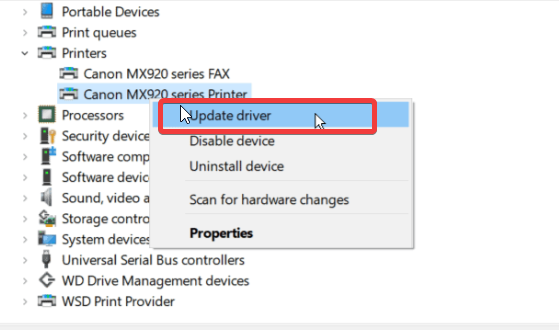
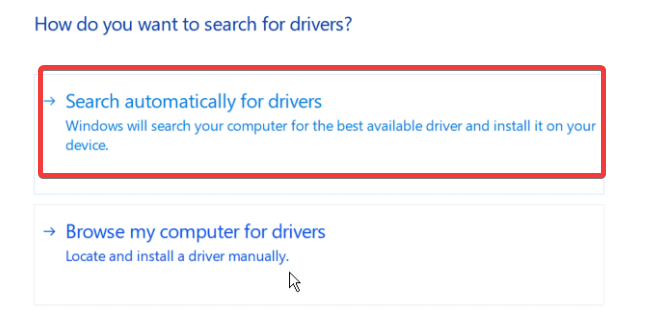
Wait while Windows installs the update, then restart your computer.
2. Update Windows
- Click on Start.
- Select Settings from the options.
- Click on Windows Update, then select Check for updates.


Some PC issues are hard to tackle, especially when it comes to corrupted repositories or missing Windows files. If you are having troubles fixing an error, your system may be partially broken.
We recommend installing Restoro, a tool that will scan your machine and identify what the fault is.
Click here to download and start repairing.
Windows will automatically search and download updates if there are any available.
3. Restart your computer
- Click on Start.
- Select Power and click on Restart.
- Click OK.

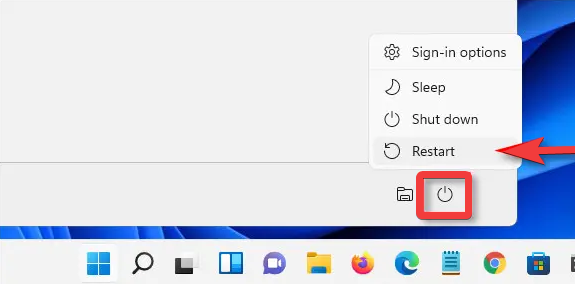
Restarting your computer will help it fix issues that may prompt printer errors.
4. Delete unnecessary printer drivers
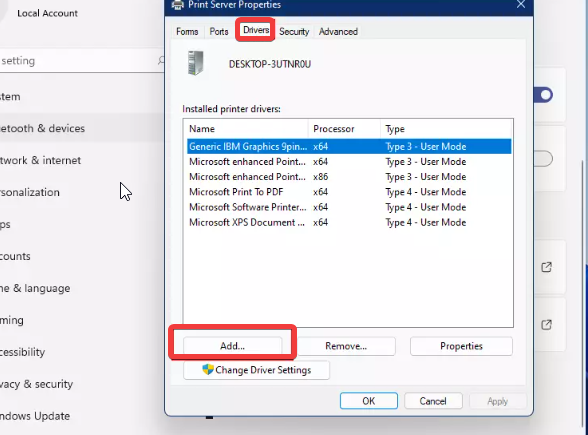
- Press Win + R to prompt Run, then type printmanagement.msc and press Enter.
- In Print Management, click on All drivers.
- Right-click on the printer driver you aren’t using and click Delete.

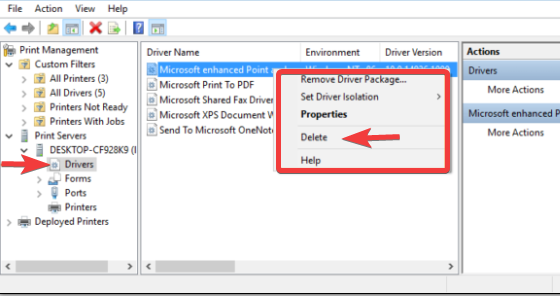
Repeat step 3 for other printer drivers you want to delete. Then, restart your computer and see if the error persists.
- How to Remove Windows 11 File Explorer Please Sign In
- How to Change Real Time Update Speed in Task Manager
- How to Check Your Windows Experience Index on Windows 11
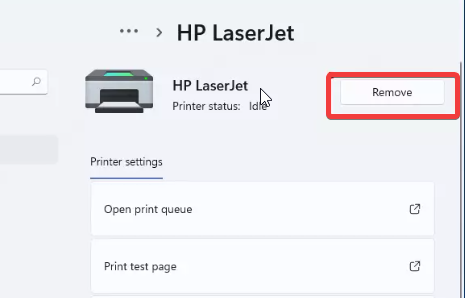
5. Remove and add the printer
- Click on Start and select Settings.
- Click on Devices and select Printers & scanners.

- Select the printer you want to remove and click Remove device.
- Click Yes to proceed with the action.

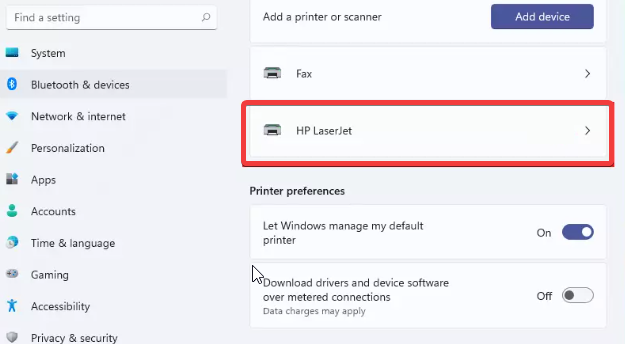
- Click on Start and select Settings.
- Select Bluetooth & devices and turn it on.
- Select Printers & scanners.
- Go to Add a printer or scanner and select Add device. (Your computer will scan for nearby printers, select your printer and click on Add device)


6. Tweak Windows Registry
- Press Win + R to prompt Run, type Regedit, and press Enter.
- In Windows Registry Editor, backup the Windows registry and follow this path:
HKEY_LOCAL_MACHINESOFTWAREWicrosoftWindowsNTCurrentVersionPrintProvidersClient Side Rendering Print Provider
- Right-click on the Client Side Rendering Print Provider and click on Delete.

Restart your computer and see if the windows 11 printer access denied issue still persists.
7. Remove Print Spooler
- Press Windows key + R to prompt Run.
- Type control printers and press Enter.
- On the Devices and Printers tab, right-click on the printer you’re using and click on Properties.
- Allow not to use the spooler, then click OK.

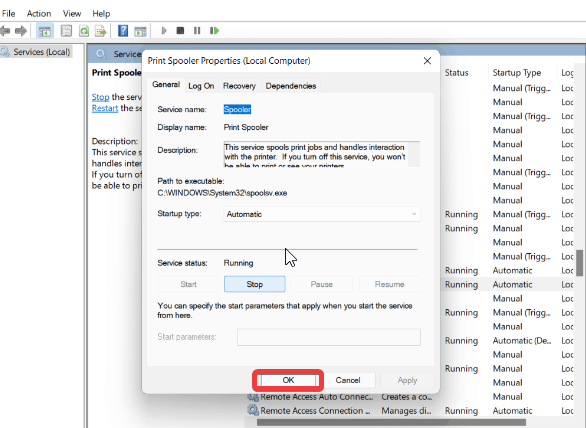
Restart your computer and see if the Windows 11 printer access denied error persist.
How do I enable Printers in Windows 11?
- Click on Start and select Settings.
- Select Bluetooth & devices, and toggle it On.
- Select Printers & scanners.
- Go to Add a printer or scanner and select Add device. (Your computer will scan for nearby printers)
- Select your printer and click on Add device. (Adding the printer enables it in Windows 11)

However, it may be beneficial for users to read through our article about what to do if you can’t remove the printer in Windows 10/11.
Likewise, we recommend you check out our article on how to fix the printer busy error with ease.
If this guide has been helpful, kindly leave your comments and suggestions below. We’d love to hear from you.
Still having issues? Fix them with this tool:
SPONSORED
If the advices above haven’t solved your issue, your PC may experience deeper Windows problems. We recommend downloading this PC Repair tool (rated Great on TrustPilot.com) to easily address them. After installation, simply click the Start Scan button and then press on Repair All.
![]()
Newsletter
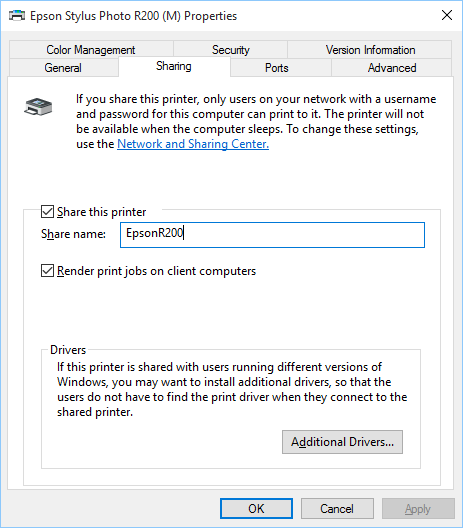
Recently we wanted to print something from an old computer running Windows 2000 (yes, we have all kinds of dinosaurs in our office zoo) to a printer connected to a laptop that was recently upgraded to Windows 10. In the past, all we needed to do was to share the printer on the laptop, and then add it as a network printer on the Windows 2000 computer, and it would work beautifully.
This time, however, when attempting to add the network printer to the Windows 2000 computer, we received the following message: «Windows cannot connect to the printer. Access is denied.» We tried to do the usual troubleshooting: checked the security settings of the shared printer, checked the sharing settings, made sure that the file and printer sharing was enabled on the Windows 10 laptop, all was in order, yet the Windows 2000 computer was still denied access to the shared printer.
After restarting both computers a few times and repeating the sharing/connecting steps, but the same error message appeared every time. So we tried something different, and it worked. We decided to share our solution here, hoping it could be of help to someone else:
- On the computer to which the printer is connected (in our case it was the Windows 10 laptop), share the printer as usual, and when sharing it, set up the share name that is easy to type in. For example, in our case the long name of the printer was «Epson Stylus Photo R200», but we shared it with the name EpsonR200: (using a simple name like that should make it easier to enter it later on)
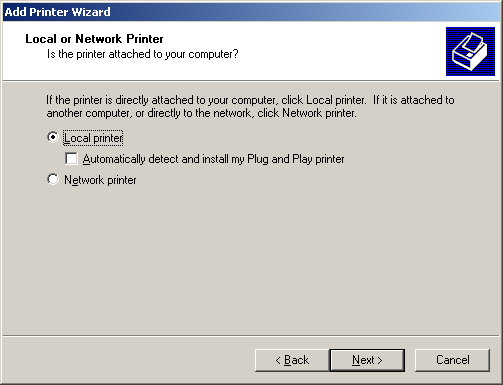
- On the computer from which you want to connect to this printer (in our case it was the Windows 2000 computer) use the built-in Add Printer wizard and choose the ‘Add Local Printer’ option. (If your computer runs Windows 10, you can find this wizard on the Devices — Printers and Scanners page of the Windows Settings window)
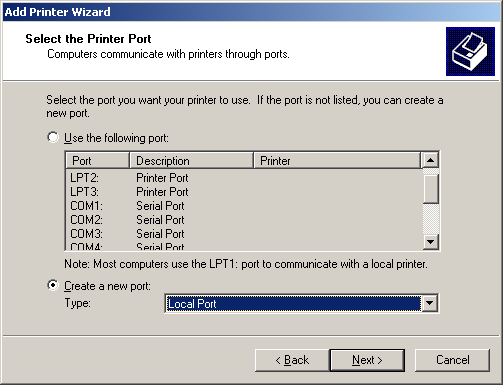
- Press Next, and on the next page choose the ‘Create a new port’ option and make sure the ‘Local port’ option is selected:
- When you press Next, Windows will prompt you to enter the port name. Enter the UNC name of the shared printer, in the format: //computername/sharedname . In our case, the computer name of the Windows 10 laptop was laptop, and we had previously set up the shared name of the printer as EpsonR200 (see Step 1 above), so we entered the port name as:
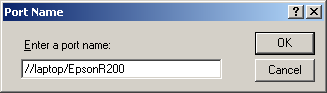
If you don’t know the network name of your computer, you can find it out as follows: right-click on the This PC folder (or Computer) in Explorer or some other file manager, and choose Properties from the shortcut menu. On that page, look for the ‘computer name’ text. That’s the name you need to enter instead of ‘laptop’ in our example. Be sure to use the name of the computer that has the printer attached to it, not the one from which you are trying to connect to the printer through the network!
Next, Windows will probably ask you to select the printer make and model, install its drivers, etc. Keep providing the information that the wizard requires, according to your specific printer. When done, Windows should add the new printer to the computer, and you should be able to use it to print files. The procedure described above worked for us, hopefully it will work for you, too.
Happy printing!
If you want to link to this article, you can use this HTML code: <a href=»https://www.winability.com/windows-cannot-connect-to-the-printer-access-is-denied/»>Solved: Windows cannot connect to the printer. Access is denied.</a>
Read more
Fix Windows Cannot Connect to the Printer Access is Denied:
Are you encountering the «Windows cannot connect to the printer. access denied» error. If yes, then this is a common printer error, that Windows 10 users face post installing the security update KB5005565 in Windows 10.
This error message appears at the time of adding a printer because of a problem with the print spooler service. This service is required to carry out all the printing tasks properly.
Why Does This Error Occur?
Below are some of the reasons why you may face the «Windows cannot connect to the printer. Access is denied».
Step 1: Print spooler service is stuck in an error state.
Step 2: Pending documents are locked in the queue.
Step 3: Permissions are not given to the computer. This particularly happens when your network has multiple computers and they are sharing a single printer. Sometimes, the administrator blocks the printing access.
Step 4: Improper or corrupt installation of your printer drivers can also lead to this error message.
How to Fix This Problem?
Before you try any solution, you are required to read the description of the solution as the solutions to fix this problem may vary from case to case. Therefore, it is recommended to read the description first as it will save you from doing something stupid and wasting time.
1) Edit Providers in the Windows Registry
If any method does not work, then you need to delete the registry key in the section of providers in the Windows registry.
Step 1: Press the Windows key and R key simultaneously and then enter Regedit in the dialogue box. After that, press the Enter key.
Step 2: Once you reach the Registry editor navigate to the path
- HKLMSOFTWAREMicrosoftWindows NTCurrentVersionPrintProviders
Step 3: After that, delete the below key from the registry.
- HKLMSOFTWAREMicrosoftWindows NTCurrentVersionPrintProviders
Step 4: In the end, you are required to restart the Print Spooler service. Press the Windows key and R key simultaneously and then type «Services.msc» in the dialog box and then press the enter key.
Step 5: Search through your devices until you find the service. Launch the properties and then Stop the service. After a while, start it once again.
Step 6: After that, try to connect to your printer and check if this resolves your issue.
2) Remove the Deny Permission from the Drivers
Another thing that you can try to fix this problem is to remove the Deny permission from the file path mentioned below.
- C:WindowsSystem32spooldrivers
This is a simple solution if the problem is arising from not having enough permissions. This is especially the case after updating Windows to the latest build.
Below is the batch file that you can use to perform the action rather than changing the permissions manually.
- @echo off
- net stop spooler
- takeown /F C:WindowsSystem32SpoolPrinters /R
- icacls C:WindowsSystem32SpoolPrinters /T /Grant Everyone:F
- del /Q C:WindowsSystem32SpoolPrinters*.*
- net start spooler
3) Enable the Guest Account
If you are using your printer in the computer network, then there is a chance that the administrator has disabled your guest account. Just by enabling the guest account, you will be able to resolve your problem.
Step 1: First of all, right-click on This PC on your computer to which you have attached your printer.
Step 2: After that, select the Manage option on your Computer Management» window.
Step 3: Then, go to the «Local Users and Groups» and then go to the Users folder.
Step 4: After that, you are going to see a Guest account. From there, you need to select the Properties option.
Step 5: Then, restart your system.
Once you are done with the restart, check whether your system has fixed the error message or not.
4) Create a New Port While Connecting to a Shared Printer
If you are still encountering the «Windows cannot connect to the printer. Access is denied» while trying to add the network printer. In case you have already tried basic troubleshooting like checking the security settings of your shared printer. Check the sharing settings to ensure that the file and printer sharing is enabled.
Share your printer from the host laptop
Step 1: Firstly, you are required to share your printer from the laptop to which your computer is attached. After that, go to the Devices and Printers window.
Step 2: After that, right-click on your printer below the ‘Printers’ section and select the option of «Printer Properties».
Step 3: Then, go to the Sharing tab and enter an easy-to-remember name of your printer. In our case, we have used the name ‘EpsonR200’.
Step 4: Now, go to your other computer and then we will run the printer wizard. After that, go to the Control Panel again and select the «View devices and printers» option given below the «Hardware and Sound» section.
Step 5: Then, select the «Add a printer» option in the new window.
Step 6: After that, windows is going to run a scan to find the printer attached to your device. Then, select «The printer I want is not listed» option.
Step 7: Now, another window will open up. Therefore, choose the option of «Add a local printer or network printer with manual settings» and then select the Next button.
Step 8: Then, choose the «Create a new port» option. After that, keep the «Type of port» as a «Local Port». After that, select the Next button.
Step 9: In the port name format, enter ‘//computername/printername’.
Step 10: Click on the OK button.
One problem I’ve run across a lot with clients is not being able to print to a networked printer. The most popular error message I see is
Windows Cannot Connect to the Printer or
Windows Cannot Connect to the Printer. Access is Denied.
There are several reasons why this error can come up and a lot depends on your setup. Firstly, I ask users whether the printer is actually a networked printer with a LAN port or if it is simply connected to another computer and is being shared on the network.
Depending on that, you have to troubleshoot the problem differently. I’ll try to go through all the possible solutions I’ve come across for fixing this printing error.
Shared Networked Printer
If your printer is attached to a computer and you have shared the printer on that PC and are now trying to add that printer to another PC on your network, you can try a few things. Firstly, go to the Add Printer wizard and choose A network printer, or a printer attached to another computer.

Click Next and choose Connect to this printer. Then type in the path to the shared printer by entering “\” followed by the computer name on which the printer is shared followed by the printer name.

You should be able to connect to the printer. If you’re getting the cannot connect error message, then you can try to add the printer as a local printer. You can do this by choosing Local printer attached to this computer and unchecking Automatically detect and install my Plug and Play printer.
On the next screen, choose Create a new port and choose Local Port from the list.

Click Next and you’ll be asked to enter a Port Name. Here you will type in the path to the printer we mentioned above.

That should work! Remember only do these steps if your printer is attached to a another computer and it is being shared on the network.
Networked Printer
If you have a printer that is attached directly to your LAN network or wireless network, you should also choose Local printer attached to this computer, and then choose Create a new port like mentioned above.
However, instead of choosing Local Port, choose Standard TCP/IP Port.

Type in the IP address of the printer and you should be good to go. If you don’t know the IP address, you can print the configuration sheet off the printer.
Windows Firewall
Another reason why your might not be able to connect to the printer is if your firewall is preventing the connection. Make sure File and Printer Sharing is allowed through the firewall on your computer and the computer to which the printer is attached.
You can enable File and Printer Sharing by going to Control Panel, Windows Firewall and then clicking on Exceptions.

Make sure the File and Printer Sharing check box is checked. That will ensure your connection is not being blocked by the firewall.
Drivers
You’ll also see this Cannot Connect to Printer error is you are trying to add a printer to a Windows 7 machine and the computer that is hosting the printer is running Windows XP or Windows Vista.
In this case, you have to download and install the Windows 7 drivers from the manufacture’s website on the host machine. When you try to connect to the printer again from Windows 7, the driver for the Windows 7 OS should be available from the host machine for installation.
Note that you can run into this problem with 32-bit and 64-bit operating systems. If the computer hosting the printer is a 32-bit machine and the computer trying to connect is a 64-bit machine, you will not be able to connect.
You need to install the 64-bit version of the printer driver on the 64-bit machine and try to connect again. You can also try to install the 64-bit driver onto the host machine, but it’s a bit more difficult. Either way, you will need to make sure you have all versions of the drivers and that the 64-bit and 32-bit printer drivers have the same name.
Anti-Virus Software
A little bit less common is when anti-virus software blocks connections. Try disabling your anti-virus software and then connect to a shared printer. This is especially true if you are using Norton Anti-Virus or their full suite of apps.
If you’re still having problems connecting to a printer, post a comment here and I will try to help!
Getting Windows Cannot Connect to the Printer, Access is denied or the Error would be different Windows cannot connect to the printer. Operation failed with error 0x0000007e While Add a Shared printer on a local Network using Add printer feature? This issue occurs because, after the printer is installed, Windows 10 or Windows 7 incorrectly looks for the Mscms.dll file in a subfolder different than the windowssystem32 subfolder. If you Are also Suffer with Windows Cannot Connect to the Printer Error here apply bellow solutions to fix the issue.
Also Some times This Error occur if the Print spooler service is stucked, has a document pending in the que locked, And the most common one corrupted or outdated and improper printer Driver installation. specifically the incorrect installation pushes the printer and the system to look for files in a subfolder different then windowssystem32 subfolder.
Post Contents :-
- 1 Fix Windows Cannot Connect to the Printer
- 1.1 Copy mscms.dll manually
- 1.2 Restart Print Spooler Service
- 1.3 Create a New Local Port
- 1.4 Delete Incompatible Printer Drivers
- 1.4.1 Tweak Windows Registry
- 1.4.2 Registry Tweak
Fix Windows Cannot Connect to the Printer
After understand What is this Windows Cannot Connect to the Printer Error and the reason behind this Error, let’s apply Bellow solutions to get rid of this Windows Cannot Connect to the Printer Error And install shared printer without any error.
Copy mscms.dll manually
Manually copy the mscms.dll file to driver installation folder is the best working solution to fix this issue. As we discussed the main Reason For this Windows Cannot Connect to the Printer Error Mscms.dll file. This mscms.dll is a color module which maybe failing to reach its destination folder. You Can copy this mscms.dll file manually to fix this issue.
To copy it manually, Open C:Windowssystem32 and find the file “mscms.dll“. Right click on it and select copy.
copy the mscms.dll file
Now, if you have a 32 bit Windows installed, navigate to the following folder and paste the previously copied mscms.dll file in it:
C:windowssystem32spooldriversw32x863
And, If you have a 64 bit Windows installed, navigate to the following folder and paste the previously copied file in it:
C:windowssystem32spooldriversx643
Reboot your windows computer to save changes and again try to connect to the remote printer again. If it doesn’t connect, re-add the printer and test. This should help you Fix Windows Cannot Connect to the Printer issue, if not then fallow next solution.
Restart Print Spooler Service
Also Some times stucked print spooler service cause Different issues, and may this Windows Cannot Connect to the Printer error is one of them. Restart The Print spooler service is the good solution to fix this issue.
To Restart the print spooler Service first press Win + R then Type Services.msc and hit enter key. This will open Windows services here scroll down then look for print spooler service and double-click on it. Here make sure the startup type is set to Automatic if not change it to Automatic as shown bellow image.
Then look for Service status, if its running then click Stop button, To stop the service, And Start the service again using Start button. That’s all click apply and ok to make save changes. After that, add the printer again and see if the problem persists.
Create a New Local Port
Also Create a new local port for the shared printer will help to fix printer installation Error, windows cannot connect to the printer.
To Create a New Local Port first open Control panel -> Hardware and Sound then click on Devices and Printers. Here Click Add a printer from the top menu.
Windows will scan for available shared printers on local network, If you don’t see you printer listed click the link which says “The printer that I want isn’t listed.“ Here From the next screen select “Add a local printer or network printer with manual settings” and click Next.

Select Create a new port and then from type of port drop-down select Standrd TCP / IP Port and then click Next. Here Type the printer’s address in Printers port name field in the following format:
\IP address or the Computer NamePrinters Name
For example \192.168.1.50HP LaserJet Pro M1136
Note : Type the IP address or computer name where the shared printer physically installed. For network printer type the IP address of the printer.
If you don’t know the IP Address of the computer where the printer is physically connected to and shared from, Hold Windows Key and Press R. Now type cmd in the run dialog and press enter. Type ipconfig in the black window and press enter. Look for IPv4 Address for the computer’s IP in the black window.

Now click OK and then click Next. Select your printer model from the directory to install its drivers, Click Next. If you have a disk, insert the disk, click “Have Disk” and browse to the driver’s location in the disk. Click OK. Type in a name for your new printer. Click Next. Print a test page to check its connection. And click Finish.
Delete Incompatible Printer Drivers
Some Times The problem can be caused due to incompatible printer drivers. Also An installation of previous printer can prevent the printer spooler from adding new printers. So you can try to remove these outdated drivers and re-install them again.
You can do the by Press Win + R then type printmanagement.msc and hit Enter. This will open print management, here From the left pane, click All Drivers.

Now in the right window pane, right-click on the printer driver and click Delete. If you see more than one printer driver names, repeat the above steps.
Then Restart windows and Again try to add the printer and install its drivers. Hope This time you install printer without Windows Cannot Connect to the Printer error.
Tweak Windows Registry
Registry are essential part of your computer. Modifying registry keys incorrectly may cause serious system problems. So before you get started, it is recommended To Create a system restore point so you can restore it in case any problems occurs.
First press Win + R then type regedit and hit enter key, This will open Windows registry Editor. Now In the left pane, navigate to the following key
HKEY_LOCAL_MACHINESYSTEMControlSet001ControlPrintPrinters*YOUR PRINTER’S NAME*CopyFiles
Delete the “ICM” folder which is under the “CopyFiles” folder. Then close registry editor and restart windows to take effect the changes you have made. Now again try connecting to the printer see problem fixed this time.
Registry Tweak
If first option failed to fix then here another registry Tweak, First open windows services and stop the print spooler service. Then navigate to the following key.
HKEY_LOCAL_MACHINESOFTWAREMicrosoftWindows NTCurrentVersionPrintProvidersClient Side Rendering Print Provider

Here right-click on Client Side Rendering Print Provider and select Delete. again start Printer Spooler service and reboot your PC to save changes.
These are some best working solutions to Fix Windows cannot connect to the printer 0x00000057, windows cannot connect to the printer, Access is denied Error on Windows 10 Computer. I hope After apply these solutions your problem windows cannot connect to the printer will get solved. Still have any query suggestion About this windows cannot connect to the printer Error feel free to discuss on comments below.
- How to fix DHCP is not enabled for WiFi windows 10
- Fix MACHINE_CHECK_EXCEPTION BSOD error On Windows 10
- Fix The print spooler service is not running Error In Windows 10
- Solved: Keyboard Input not Working on Windows 10
- Fix Microsoft Edge can’t be opened using Built-in Admin windows 10