Download PC Repair Tool to quickly find & fix Windows errors automatically
While formatting a partition, if you see a message Windows cannot format the system partition on this disk then this post will help you. Although it is a rare error that appears if you choose to format the system disk on Windows 10 and some other older versions, you can troubleshoot the issue.

Many people use a dual boot facility to install a secondary operating system alongside Windows 10/8/7. Let’s say you have done that earlier, but now you are not using one of the operating systems.
To free up some storage, you want to delete the partition containing the secondary OS files. The easiest method people use is the Disk Management panel. However, it might show you the error message as mentioned above. If it is happening with you, you have two options –
- You have to use the Diskpart utility via Command Prompt to remove the volume or partition.
- You can use PowerShell to do the same.
We have shown both methods in this article.
To fix this disk issue, follow these steps-
- Use Diskpart to delete the partition
- Use PowerShell to delete the partition
To learn more about these steps, keep reading.
1] Use Diskpart to delete the partition
Diskpart is a command-line utility, allows users to manage hard drives attached to their computer. To use this tool to delete the partition, follow these steps-
Search for cmd in the Taskbar search box, find the result, and select the Run as administrator option. Click the Yes button in the UAC prompt to open the elevated Command Prompt window. After opening it, enter the following commands one after one-
diskpart

list volume
Now you can find a list containing all the volumes.
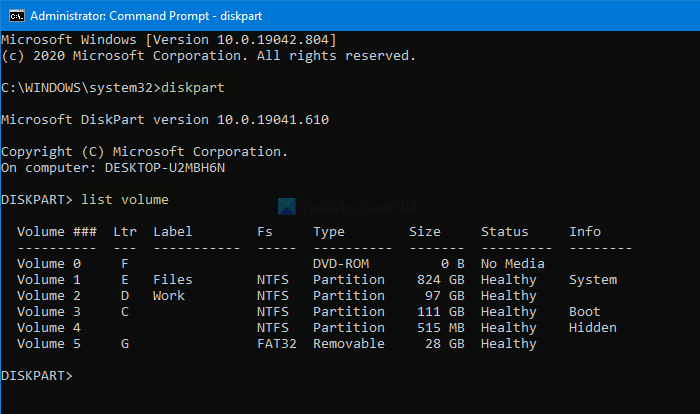
The best thing is that it shows all types of volumes, including the one, which Windows creates while installing the OS. From the list, you have to find out the number of the desired volume and enter this command-
select volume [number]
Don’t forget to replace the [number] with the original volume number. Next, enter this command-
delete volume
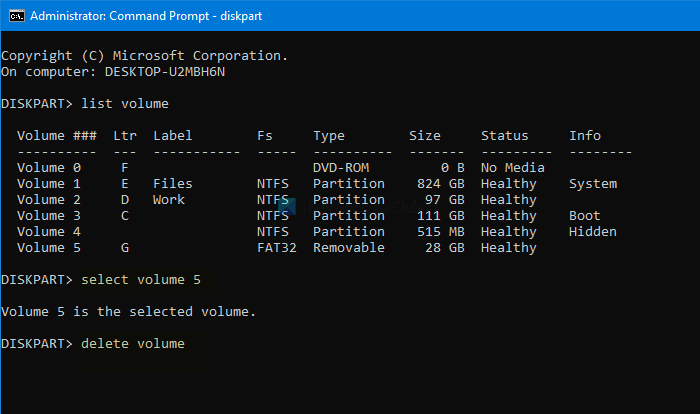
After pressing the Enter button, it will take some time to delete the volume.
Read: Windows cannot format this drive. Quit any disk utilities or other programs that are using this drive.
2] Use PowerShell to delete the partition
Using the PowerShell to delete a partition is comparatively less time-consuming, but it may not all the time. However, you can still try if you do not want to run the diskpart, which takes a reasonable time.
First, press Win+X and select the Windows PowerShell (Admin) option from the menu. It opens an elevated Windows PowerShell window. Following that, enter this command-
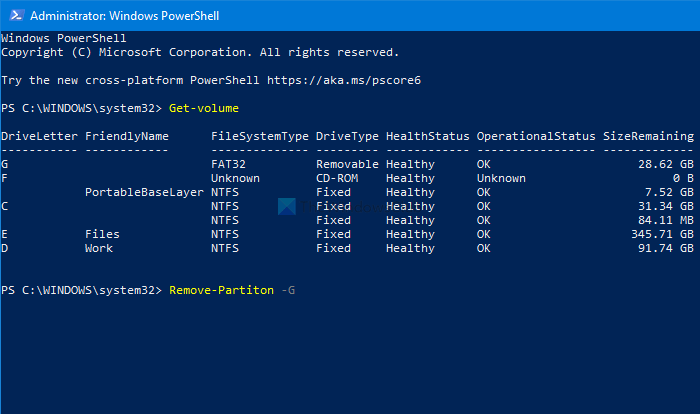
Get-Volume
Now you can see all the partitions on your screen with a drive letter. Note down the respective DriveLetter, and enter this command-
Remove-Partition –[DriveLetter]
Don’t forget to replace [DriveLetter] with the original drive letter.
Following that, it asks for confirmation, where you have to enter Y.
That’s all! Now you have an allocated space.
Now read: Windows was unable to complete the format – SD card, USB drive, External disk.

Sudip loves to engage with the latest technology & gadgets. Apart from writing about all things technology, he is a Photoshop junkie and a football enthusiast.
Overview of System Partition
The system partition contains boot files such as BCD, bootmgr, and boot.ini, as well as the area where the Windows operating system is installed. Formatting can delete all of the files on a partition and establish a new file system. However, your machine will not boot if the system partition is formatted. As a result, while Windows is running, users are unable to format or harm the system drive. Therefore, a user’s screen can sometimes prompt, «system partition is not allowed to be formatted.»
You might wonder if there is a way to format the system partition? Yes, you can format system partitions while Windows is not working, for example, in WinPE or on other PCs. After attaching the system disc to another computer as a secondary drive, you’ll be able to format it effortlessly. If unplugging and plugging hard discs is inconvenient for you, try the ways below to finish the formatting operation.
Method 1. Format System Partition With EaseUS Partition Master
The efficient format tool – EaseUS Partition Master Professional – makes formatting a hard drive partition simple. It is a partition manager designed for users to better manage their hard drives and partitions. It can not only format partitions according to your needs, but can also let you create, resize, transfer, combine, and clone partitions.
To format the system partition, you need to first create a bootable disk, boot your computer from the created disk, then format the system partition. The following process may help you format the system partition. Read further to know more.
1. Create a Windows Bootable Media with EaseUS Partition Master
Step 1. To create a bootable disk of EaseUS Partition Master, you should prepare a storage media, like a USB drive, flash drive or a CD/DVD disc. Then, correctly connect the drive to your computer.
Step 2. Launch EaseUS Partition Master, and find the «Bootable Media» feature on the left. Click on it.
Step 3. You can choose the USB or CD/DVD when the drive is available. However, if you do not have a storage device at hand, you can also save the ISO file to a local drive, and later burn it to a storage media. Once made the option, click the «Create» button to begin.
- Check the Warning message and click «Yes».
When the process finishes, you have successfully created an EaseUS Partition Master WinPE bootable disk. Now, you can manage your hard disks and partitions through the bootable drive whenever the computer fails to boot normally.
If you have RAID drives, load the RAID driver first by clicking Add Driver from the menu bar, which can help you add the driver of your device under WinPE environment, as some specific device cannot be recognized under WinPE environment without drivers installed, such as RAID or some specific hard disk.
2. Boot the Computer from the Bootable Media
Step 1. Restart your computer and long-press the F2 (depending on the computer you use, it could be F2, F8, or Delete …) to enter BIOS.
Step 2. In BIOS, set to boot the computer from the bootable USB/CD/DVD.
3. Format System C Drive Using EaseUS Partition Master
After the startup, your computer will boot into a system with EaseUS Partition Master installed. Now your computer is using another operating system with formatting abilities. You can format the system partition now.
Step 1. Right-click the hard drive partition and choose the «Format» option.
Step 2. In the new window, set the Partition label, File system, and Cluster size for the partition, then click «OK».
Step 3. You can see a warning window, click «Yes» to continue.
Step 4. Click the «Execute 1 Task(s)» button, then click «Apply» to start formatting the hard drive partition.
Method 2. Format System Partition Using Windows Installation Disc
This approach is a convenient way to format the C drive. You can format C drive using the installation disc for Windows 10, Windows 8, Windows 7, or Windows Vista. The steps to format the C drive are as follows:
Step 1. Insert the Windows Installation Disc and start the computer. Follow the instructions after inserting the CD into the optical hard drive.
Step 2. Click «Next» after selecting the language you want to use.
Step 3. Select «Install Now» and wait for it to complete. It isn’t the same as installing the Windows operating system.
Step 4. Select «Next» after accepting the terms and conditions.
Step 5. Select Custom (advanced) from the drop-down menu. You’ll get a list of all the drives that are currently installed. Next, select «Drive settings (advanced)» from the drop-down menu and click on «Next.»
Step 6. Select «Format» from the drop-down menu. Windows will now begin the formatting operation on your hard drive.

![]()
Conclusion
With these methods above, you can format the system partition without hassle. But we still hope you can think twice before making the decision. If your purpose of erasing the operating system is to leave room for the new OS installation, then it is unnecessary for you to do that. Because when you install Windows on the disk that has an OS, the format will occur during the operating system installation.
For an easier system partition formatting solution, you can turn to EaseUS Partition Master for help. It’s easier, efficient, and more user-friendly for Windows beginnrs.
FAQs About System Partition Is Not Allowed fo Be Formatted
As we know that the system partition is not allowed to be formatted directly due to Windows protection mechanism, and if you have more questions about this issue, relax. Follow and find answers below:
1. How do I fix Windows cannot format the system partition on this disk?
To do so, first, make sure that you are ready to accept the result of formatting the system partition — Windows unbootable, data loss, software unbootable, etc.
If yes, you can turn to EaseUS Partition Master to create a bootble USB drive. Then, reboot PC from the bootable USB to enter EaseUS Partition Master, and again, right-click on the system parition to format it.
2. How do I force a partition to format?
- Right-click on Windows icon, select and open Disk Management.
- Right-click on the target partition you want to force formatting it, and select «Format…».
- Select a new file system — NTFS or exFAT, etc., tick «Perform a quick format».
- Click «OK».
3. Is it OK to format a system partition?
Well, it’s not really OK to format a system partition on a Running Windows computer. When you format a Windows system partition, you’ll have to face the following issues:
- Data loss
- Software unbootable
- Operating system crush or failure, etc.
To take care of your Operating System running healthy on computer, Microsoft doesn’t allow you to directly format the system drive. If you really need to reformat the system partition for OS reinstallation, you can turn to EaseUS Partition Master with its Create bootable media feature for help.
Windows cannot format the system partition on this disk
-
Thread starterRapson_27
-
Start dateJul 9, 2017
-
#1

-
- Mar 25, 2010
-
- 60,403
-
- 1,077
-
- 152,940
- 16,853
-
#2
- Advertising
- Cookies Policies
- Privacy
- Term & Conditions
- Topics
- Remove From My Forums
-
Question
-
Hi,
Using Windows 2008 R2:
I have a SATA disk attached to my computer and I would like to quick format it in Disk Management MMC. The disk is not my boor partition and it is just empty.
When I attempt to format or delete the partition I receive the following errors:
—————————
Disk Management
Windows cannot delete the system volume on this disk.
—————————
—————————
Disk Management
Windows cannot format the system volume on this disk.
—————————
Not sure if this relates to policy. How can I delete/zap/format this hard disk?
Thank you…Max
Answers
-
Hello Max,
Thank you for sending the screenshot.
From your screenshots, the disk shows as a Dynamic System volume. I agree with Dave that this disk contains some system partition that result in the OS cannot remove it. If a dynamic disk set that contained a «system» partition was imported into the current system, the dynamic disk set imported still has the system partition flagged in the LDM private region database. It will be marked as «System» partition which is protected from deleting.
Cannot Remove False System Partition Using Disk Management
http://support.microsoft.com/kb/245799How To Use Disk Management to Configure Dynamic Disks in Windows XP
http://support.microsoft.com/kb/308424In this case, please try to use diskpart in Windows Recovery Console to repartition the disk and convert this disk back to Basic disk. If the disk is important, I’d like suggest that contact Microsoft Customer Service and Support (CSS) for this. You can speak directly with a Microsoft Support Professional.
For a complete list of Microsoft Product Support Services phone numbers, please go to the following address on the World Wide Web, to find the local number:
How and when to contact Microsoft Customer Service and Support
http://support.microsoft.com/kb/295539
Hope the issue will be resolved soon.
This posting is provided «AS IS» with no warranties, and confers no rights.
-
Marked as answer by
Wednesday, December 30, 2009 7:45 AM
-
Marked as answer by
Выполняя чистую установку Windows, форматируя жёсткий диск или объединяя разделы, пользователи на разных этапах процедуры могут сталкиваться с ошибками разного характера. Один из таких сбоев сопровождается сообщением «Не удалось отформатировать выбранный раздел» с кодом 0x8004242d. Ошибка не позволяет выполнить действие, препятствуя дальнейшей инсталляции системы. Рассмотрим, как можно устранить проблему, в зависимости от источника возникновения неполадки.

Возможные причины
Обычно ошибка 0x8004242d с текстом «Не удалось отформатировать выбранный раздел» предстаёт перед пользователем в условиях установки систем на HDD с форматом MBR (Mater Boot Record – главная загрузочная запись), уже устаревшим. Задачу искать логические разделы при таком сценарии выполняет BIOS, после чего управление перейдёт к загрузчику.
В современных ПК и ноутбуках применяется формат разделов диска с табличной структурой GPT (GUID Partition Table), созданный на замену MBR и являющийся частью системы UEFI. Чтобы установить 64-разрядную версию ОС, необходимо использовать новый стандарт, 32-битная Windows 8 также может работать с данной структурой, тогда как для более ранних версий нужен MBR.

В результате несоответствия с загрузочной записью и возникает ошибка. Это может происходить в следующих случаях:
- выполняется инсталляция на диск формата MBR операционной системы, не поддерживающей данный стандарт;
- требуется выполнить установку на диск более 2 ТБ – такие объёмные разделы подразумевают использование GPT таблицы;
- материнкой поддерживается UEFI. Причём, когда UEFI отсутствует, следует применять MBR.
Реже неисправность может быть спровоцирована конфликтом настроек BIOS и UEFI. В таком случае исправление заключается деактивацией поддержки загрузки посредством USB в процессе установки.
Как исправить ошибку 0x8004242d в Windows 10
Сбой возникает при инсталляции ОС Windows 7 или более свежих версий на шаге форматирования, при этом независимо от причины его появления вместо того, чтобы пробовать форматировать диск, можно устранить проблему путём удаления разделов. Если удалить разделы не получается, с задачей поможет справиться утилита DiskPart.
Иногда проблему усугубляет отсутствие доступа к графическому интерфейсу системы. Если при установке Windows 10 или 11 вы получили сбой с кодом 0x8004242d, сопровождающийся сообщением «Нам не удалось отформатировать выбранный раздел» (или подобным), пробуйте поочерёдно задействовать варианты исправления.
Очистка диска перед форматированием
В первую очередь рассмотрим устранение ошибки с учётом сценария, когда получить доступ к рабочему столу не удаётся. Способ подходит при возникновении сбоя вследствие несовместимости или повреждения контроллера накопителя либо драйвера устройства. Действия выполняются при условии наличия совместимого установочного накопителя. Необходимо проделать следующие шаги:
- компьютер загружаем с совместимого установочного накопителя – диска или USB-флешки (вставляем в разъём носитель и перезагружаем устройство);
- подтверждаем действие, соглашаясь на загрузку с установочного накопителя;
- переходим к восстановлению системы и идём на вкладку «Поиск и устранение неисправностей»;

- в разделе дополнительных параметров выбираем пункт «Командная строка»;

- в запустившемся терминале вводим запрос diskpart и жмём клавишу ввода на клавиатуре, чтобы воспользоваться инструментом;

- задаём команду list disk (жмём Enter после ввода команд), позволяющую просмотреть список доступных разделов и жёстких дисков. Утилита также отображается размер каждого из них, эту информацию можно использовать для определения проблемного накопителя;

- определив нужный диск, используем команду select disk 0, где 0 – это номер раздела (вносим числовое значение, соответствующее проблемному диску);

- вводим команду det disk, подтверждая действие;
- убедившись, что выбор номера раздела выполнен правильно, начинаем очистку выбранного диска командой clean, в результате чего с накопителя будут удалены все данные без возможности восстановления;

- по завершении процедуры заканчиваем работу с инструментом, применив запрос exit, закрываем терминал и перезагружаем компьютер.


После вышеприведённых манипуляций снова пробуем выполнить задачу чистой установки или объединения разделов. Если способ не помог, переходим к следующему варианту исправления ошибки.
Сканирование жёсткого диска на ошибки и битые сектора
Поскольку сбой при форматировании жёсткого диска может быть вызван некоторыми неисправностями накопителя, стоит выполнить проверку HDD. Для этой цели используем встроенный системный инструмент, позволяющий выявить ошибки и битые сектора диска. Запускаем сканирование следующим образом:
Удаление всех разделов жёсткого диска
Нередко проблема может быть вызвана повреждением загрузочной записи, поэтому оптимальным решением по устранению ошибки с кодом 0x8004242d будет удаление всех разделов HDD. В процессе инсталляции Windows их можно снова создать, но при наличии нужной информации на накопителе лучше предварительно создать резервную копию, что позволит предотвратить потерю данных.
Удалить разделы можно, используя командную строку:
СОВЕТ. В случае чистой установки Windows можно выполнить процедуру удаления разделов на начальном этапе установки системы. После загрузки с установочного носителя и выбора инсталляции ОС вы перейдёте к окну, где можно удалить все разделы, оставив только один диск нераспределённого пространства (0). После этого можно создать новые разделы и продолжить процедуру установки системы.

Выключение поддержки UEFI
В некоторых случаях проблема может быть вызвана конфликтом настроек в БИОС, и при таком развитии событий решается она путём отключения UEFI в меню настроек конфигурации. В зависимости от версии, названия разделов и пунктов могут немного отличаться, но принцип действий остаётся тем же, а задача заключается в деактивации нужной опции. Выключаем поддержку UEFI:
- идём в BIOS (жмём соответствующую кнопку при загрузке компьютера, на начальном экране можно увидеть подсказку – это может быть Del, F2, Fn+F2 или прочие клавиши, в том числе их сочетания);
- переходим на вкладку Boot (в зависимости от интерфейса, может называться по-разному, например, Boot Menu, Boot Option, возможен также вариант расположения в одном из основных разделов меню, таких как System Configuration);
- находим опцию Secure Boot и деактивируем, выбрав значение Disabled. Сохраняем настройки и выходим (жмём F10).


ВНИМАНИЕ. На разных ноутбуках и материнских платах способы отключения UEFI отличаются. Например, для некоторых вариаций оборудования Asus в разделе Boot на вкладке Secure Boot нужно изменить тип операционной системы (пункт OS Type), установив «Other OS», а для отключения опции на некоторых материнках Gigabit осуществляется на вкладке BIOS Features.
Обычно один из рассмотренных выше способов срабатывает, устраняя ошибку 0x8004242d вне зависимости от причины и момента её возникновения.
Formatting a drive is not new thing for any of us and everyone here knows how to format a drive in Windows. But the matter of interest is – what if Windows refuses to format a drive and you can do nothing about it? Well, this is case we recently came around and we thought it should be shared with all of you because this issue can happen with anyone.
While formatting a hard-drive which was being utilized for System Image backup in Windows 10, we got following warning:
Windows cannot format this drive. Quit any disk utilities or other programs that are using this drive, and make sure that no window is displaying the contents of the drive. Then try formatting again.
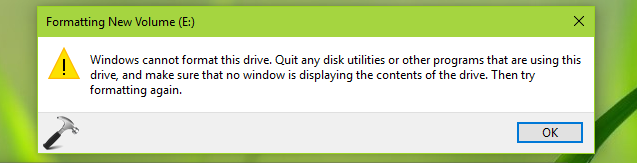
As per the suggestions, we quit all the windows displaying contents of this drive and also tried to change location of System Image Backup to different drive, but still there were no changes in situation and we can’t format the drive.
You may instead receive following message, if the disk you’re formatting is being used in other third-party program:
Windows was unable to complete the format.
For both type of problems, we have found the fixes mentioned below. Try the fix matches your case and get rid of this hiccup.
FIX : ‘Windows Cannot Format This Drive’ In Windows 10
CASE 1 : If Drive Is Utilized In Some Program
The drive Windows is unable to format may be utilized in some third-party software you might be using on your machine. If it is possible for you to uninstall that software for a while, you can do so and format the drive. But if it is not possible for you to remove the software (due to interruption from background services etc.), however you still want to format the drive, you can try formatting via Command Prompt at boot recovery options. Here’s how:
1. Boot into Advanced System Recovery Options and select Command Prompt.
2. In Command Prompt window, type following commands (mentioned in bold) one-by-one and press Enter key after each.
diskpart Starts Disk Management Utility
list disk Lists your system hard-drive
list volume Lists all hard-drive partitions including USB, DVD
select volume # Replace # with drive number you're unable to format
format fs=ntfs quick Performs quick NTFS format on selected drive
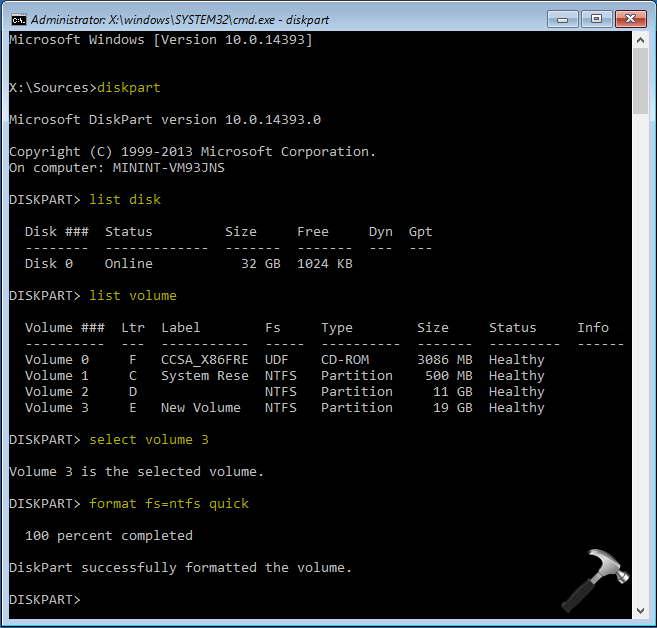
You can now close the Command Prompt window and Continue to your operating system. The formatted drive can now be used for your desired purpose.
CASE 2 : If Drive Is Utilized In Windows Operating System
When you’re unable to format the drive you’re using for System Image Backup, the reason is that its paging file is system managed. This system managed paging file doesn’t allows Disk Management to manipulate the drive. These steps should help you in this case:
1. Press  + R and type sysdm.cpl in Run. Click OK or press Enter key.
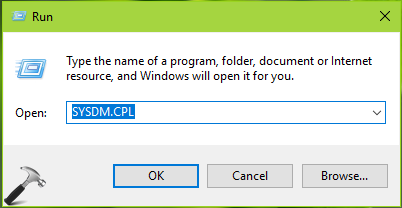
2. In System Properties window, switch to Advanced tab. Click Settings under Performance.
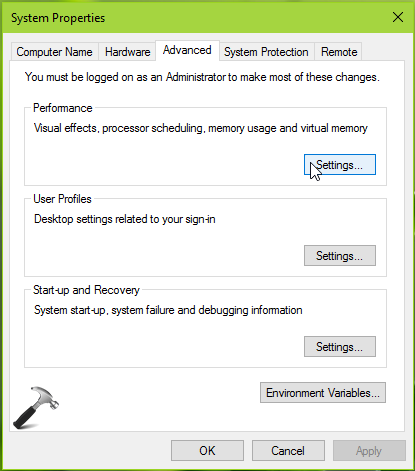
3. Then in Performance Options window, switch to Advanced tab. Under Virtual memory section, hit Change.
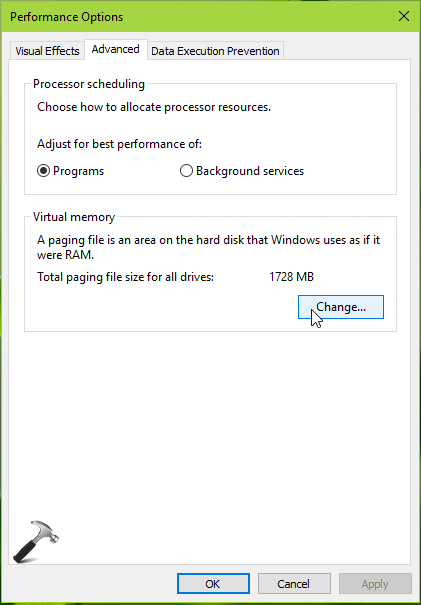
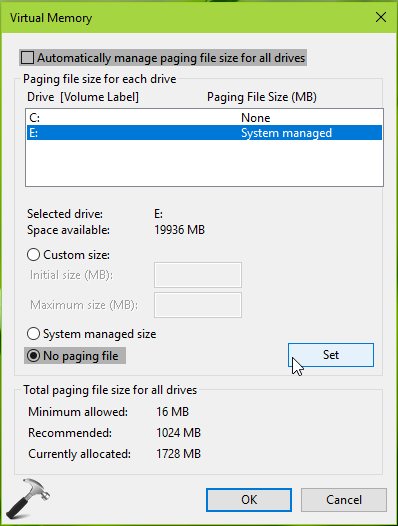
4. Next in Virtual Memory window, uncheck Automatically manage paging file size for all drives. Then select the drive which you’re were unable to format, it must be having its Paging File Size set to System Managed. Select the No paging file option and hit Set which should change Paging File Size to None from System Managed. Click OK, Apply and close System Properties.
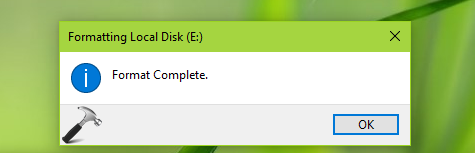
Finally, re-try to format the same drive and this time it should work without any warnings.
That’s it!
READ THESE ARTICLES NEXT
- Fix: SSD Not Showing Up in Windows 11/10
- Fix: 100% Disk Usage in Windows 11
- Fix: Windows cannot run disk checking on this volume because it is write protected
- Fix: The disk check could not be performed because Windows can’t access the disk
- Recover permanently deleted files with Windows File Recovery
- How to remove drive letter in Windows 10
- How to change drive letter in Windows 10
- How To Format A Drive In Windows
- FIX: Multiple Recovery Partitions In Windows 10
- Remove Previous Windows Installation Files In Windows 10