On this page, we collected 6 fixes for you to get rid of «Startup repair cannot repair this computer automatically» error on Windows 10/8/7 with step-by-step tutorial guides.
| Workable Solutions | Step-by-step Troubleshooting |
|---|---|
| Fix 1. Remove Peripheral Devices | If you have recently attached a device to your computer, remove the device…Full steps |
| Fix 2. Run Bootrec.exe | Restart your computer and press «F8», then choose «Repair Your Computer»…Full steps |
| Fix 3. Run CHKDSK | Restart your computer, choose «Repair Your Computer» > «Command Prompt»…Full steps |
| More Fixes | Restart your computer. Once it starts, press «F8», choose «Safe Mode with Command Prompt»…Full steps |
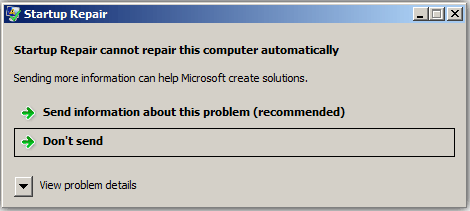
Startup Repair is a Windows built-in tool that can check and replace the missing or damaged system files on your computer. Generally, this tool is applied when your computer cannot boot properly. However, many users have encountered an issue while using this utility, which is «Startup Repair cannot repair this computer automatically». This is the error message in Windows 7 or Windows Vista. In Windows 10, it’s equivalent is «Automatic Repair couldn’t repair your PC».
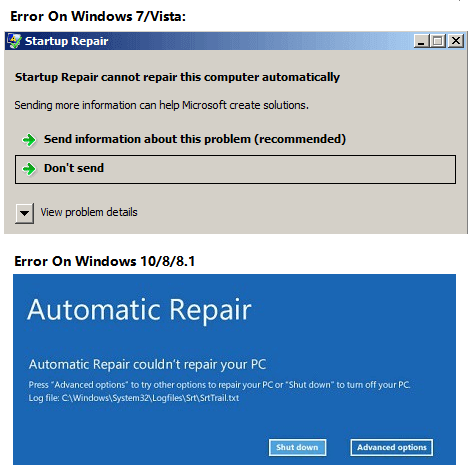
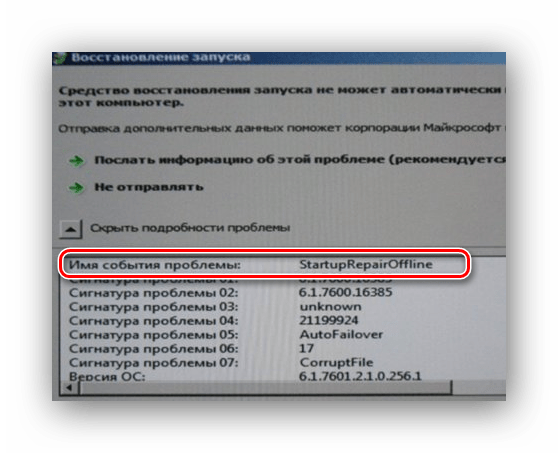
If you click «View problem details» in Windows 7/Vista, you will the information below. (The problem signature might be shown different variables from the ones above on different OS.)
Problem Event Name: StartupRepairOffline
Problem Signature 01: 6.1.7600.16385
Problem Signature 02: 6.1.7600.16385
Problem Signature 03: unknown
Problem Signature 04: 21200442
Problem Signature 05: AutoFailover
Problem Signature 06: 65
Problem Signature 07: CorruptFile
OS Version: 6.1.7600.2.0.0.256.1
Locale ID: 1033
Then why did Startup Repair fail to work? Generally, when you receive the error message, it may indicate:
- There is a problematic device attached to your computer
- The file system of your system disk is damaged
- The MBR (Master Boot Record) of the hard drive is corrupted
- There may be virus attacks, disk write errors or power outages on your disk
6 Fixes for «Startup Repair cannot repair this computer automatically» in Windows 10/8/7
If you cannot specify the cause of why Windows Startup Repair failed, never mind trying the simple fixes first.
Method 1. Remove Peripheral Devices
Based on the information given by Microsoft, if you have recently attached a device to your computers like a camera or portable music player, you can remove the device and restart your computer. Sometimes, Windows cannot repair the computer automatically due to the device connected.
If this tip doesn’t work, don’t get upset. There are many other ways for you to try.
Method 2. Run Bootrec.exe
Bootrec, also called bootrec.exe utility, is a tool provided by Microsoft in the Windows Recovery Environment. Bootrec.exe can be used to fix the Master Boot Record (MBR), Boot Sector, Boot Configuration (BCD), and boot.ini. If it’s the corrupt MBR or BCD that caused the problem, the solution is to correct the MBR or BCD record with the help of bootrec. By the way, this method requires a Windows recovery disk. Since you are using it when you perform a startup repair, you can run bootrec.exe following the steps below.
In Windows 7:
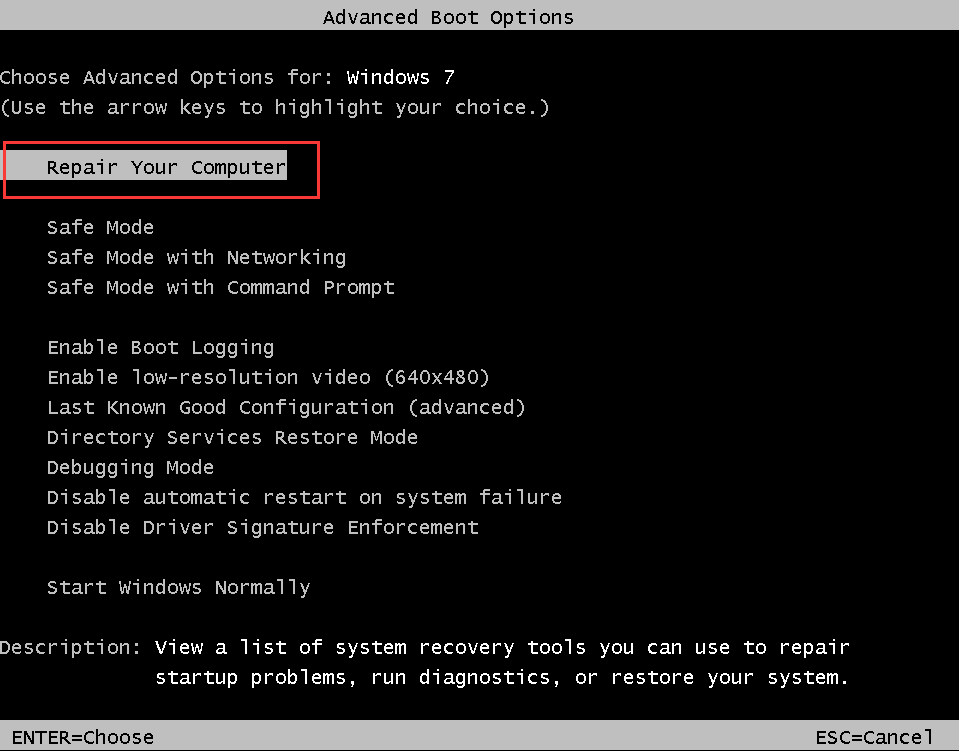
Step 1. Restart your computer and press «F8» once you see the Windows logo.
Step 2. Among the advanced boot options, choose «Repair Your Computer».
Step 3. In the system recovery options, choose «Command Prompt».
Step 4. Enter the commands below in order:
bootrec /fixmbr
bootrec /fixboot
Method 3. Run CHKDSK
As mentioned, bad sectors and file system errors on your hard drive may be the reason why you receive the error message «Startup Repair cannot repair the computer automatically». Running CHKDSK is able to check and repair your disk errors including bad sectors and file system errors.
Step 1. Restart your computer and press «F8» once you see the Windows logo.
Step 2. Among the advanced boot options, choose «Repair Your Computer».
Step 3. In the system recovery options, choose «Command Prompt».
Step 4. Enter the command below: chkdsk C: /f /r
«C» is the drive letter of your Windows installation drive.
Method 4. Run Windows System File Checker Tool
Windows System File Checker Tool can check and repair missing or corrupted Windows system files on your computer. Besides, using this tool doesn’t need the Windows installation CD. All you need is to boot into the Safe Mode with Command Prompt.
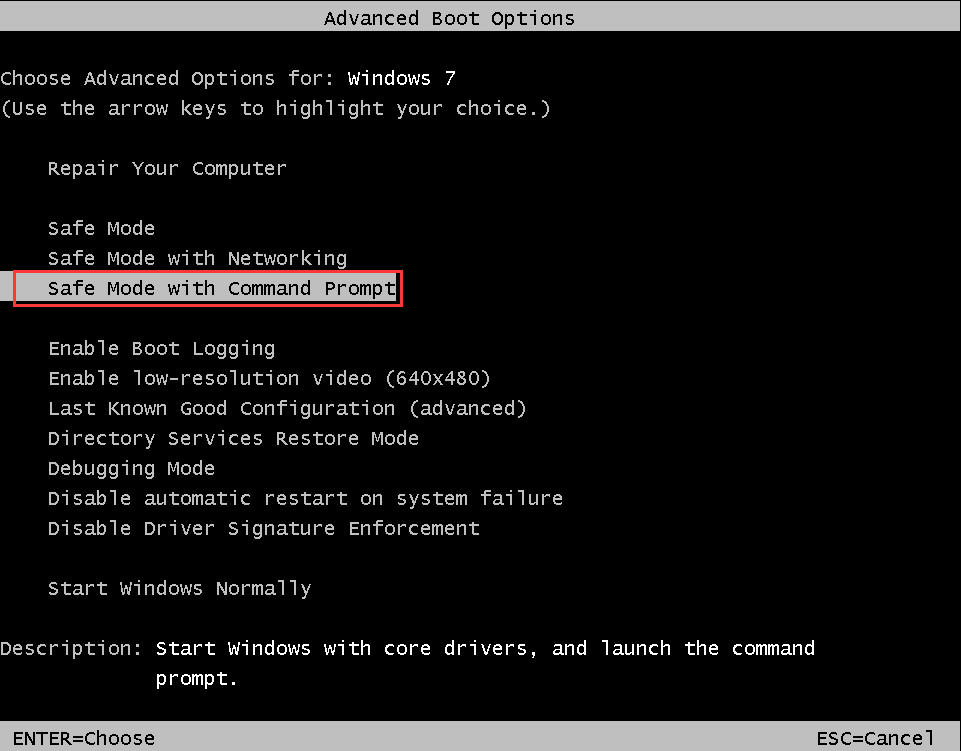
Step 1. Restart your computer. Once it starts, press «F8» in 1-second intervals until you see the Windows logo.
Step 2. Then you will see the menu of «Advanced Boot Options». Under it, choose «Safe Mode with Command Prompt».
Step 3. In Command Prompt, enter the following command: sfc /scannow /offbootdir=d: /offwindir=d:windows
Step 4. Restart your computer.
Method 5. Perform System Restore
If you’ve created a Windows system restore point as a system backup on your Windows 10/8/7 PC, you have the chance to fully restore your PC to its original state, at least to the previous state. System Restore is a feature in Microsoft Windows that allows users to revert their computer’s state (including system files, installed applications, Windows Registry, and system settings) to a previous point in time. Thus, it can be used to recover from system malfunctions or other problems.
Procedure 1. Restore Important Data from the Dead PC
When you are stuck with «Startup Repair cannot repair this computer automatically» or ‘»Automatic Repair couldn’t repair your PC» error message on Windows PC, don’t rush to perform System Restore. Performing a system restore will take your PC back to an earlier point in time, called a system restore point. Restore points are generated when you install a new app, driver, or Windows update, and when you create a restore point manually. Restoring won’t affect your personal files, but it will remove apps, drivers, and updates installed after the restore point was made. Therefore, we highly recommend you to try powerful data recovery software — EaseUS Data Recovery Wizard with Bootable Media to get your data out of the current ‘dead’ PC:
Notice: This will require a second healthy computer for help.
Note: To guarantee a high data recovery chance, install EaseUS data recovery software on another disk instead of the original disk where you lost files.
Step 1. Launch EaseUS Data Recovery Wizard on your Windows 11, Windows 10, Windows 8, or Windows 7 computer. Select the disk partition or storage location where you lost data and click «Scan».

Step 2. This recovery software will start scanning the disk to find all lost and deleted files. When the scan process completes, click «Filter» > «Type» to specify lost file types.

Step 3. Preview and restore lost Windows files. You can double-click to preview the scanned files. Then, select the target data and click the «Recover» button to save them to another safe spot in the PC or an external storage device.

Procedure 2. Perform a System Restore
If you have enabled the System Restore on your computer and created a system restore point, you can fix «Startup repair cannot repair this computer automatically» in Windows 10/8/7/Vista be performing a system restore:
For Windows 10/8/8.1 users:
Step 1. Reboot your Windows 10/8 PC into Advanced Startup, and click «Troubleshoot».

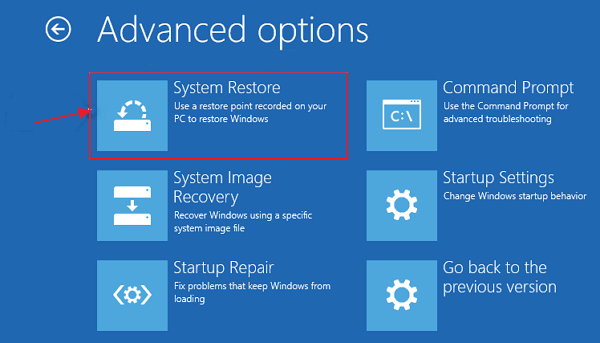
Step 2. Select «Advanced options», choose «System Restore».
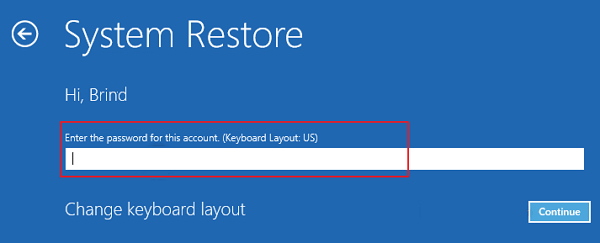
Step 3. Click on the Administrator Account and enter your password, click «Continue» to move on.
Step 4. Choose your system restore point created previous and follow the on-screen guidelines to complete the whole process.
For Windows 7/Vista Users:
Step 1. Insert your Windows installation CD or disc.
Step 2. Press any key when «Press any key to boot from CD or DVD» message appears.
Step 3. Select a language, a time and currency, and a keyboard or input method, and then click «Next».
Step 4. Click «Repair your computer».
Step 5. Select your Windows installation drive, which is usually C: and click «Next».
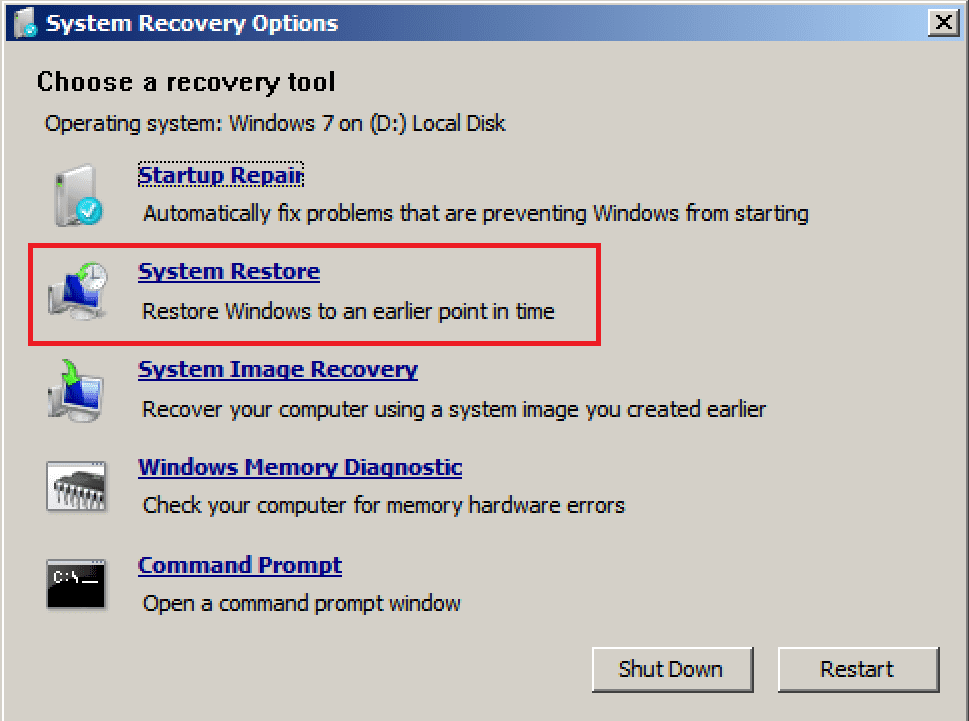
Step 6. In the System Recovery Options Dialog Box, click on «System Restore».
Step 7. Follow the System Restore Wizard instruction and choose the appropriate restore point.
Step 8. Click «Finish» to restore the system.
Finally, restart your computer and copy your restore data back to your PC. You should be able to use your computer and data again.
Method 6. Repair Startup Error Without System Backup
If you don’t have a system backup, fixing «Startup Repair couldn’t repair your PC» error will be more complex. You can:
Procedure 1. Restore from the Problem PC
You can directly follow the detail guidelines above to rescue your data with the help of EaseUS Data Recovery Wizard with Bootable Media. It fully allows you to recover data when PC won’t boot or start in Windows 10/8/7/Vista.
Procedure 2. Clean Install/Reinstall Windows OS
When you don’t have a system restore point on your PC, the best way to remove ‘Startup Repair’ error on Windows 10/8/7, etc. is to perform a clean install of Windows OS. You can directly turn to Microsoft for online assistance (and Windows 7/Vista users are recommended to try this way). Or you can refer to the article about how to clean install Windows 10.
How to Prevent «Startup Repair cannot repair this computer automatically» Error
After restoring your PC back to life and rescuing all precious data, it doesn’t mean that your PC and data are safe now. Virus attack, system failure, system crash, data loss, and other unknown issues may occur anytime. How to prevent these issues from happening? That’s quite difficult! Is it possible to protect your System and data securely from these disasters? Sure!
Powerful Windows system backup software — EaseUS Todo Backup can help. It provides System Backup, File Backup, Disk/Partition Backup, System Clone, and other more advanced features to help you fully protect your PC from these issues. It will help you prevent and protect your computer from ‘Startup Repair failure’ error or similar issues. Making a backup is always the best way to prevent complete data loss.
The Bottom Line
«Startup Repair cannot repair this computer automatically» is a relatively complex issue related to Windows. Although there are solutions to the problem, it may be difficult for you to apply since these operations are seldom taken during your daily use. If you don’t want to try it yourself, you can send your computer to professionals for manual repair.
On this page, we collected 6 fixes for you to get rid of «Startup repair cannot repair this computer automatically» error on Windows 10/8/7 with step-by-step tutorial guides.
| Workable Solutions | Step-by-step Troubleshooting |
|---|---|
| Fix 1. Remove Peripheral Devices | If you have recently attached a device to your computer, remove the device…Full steps |
| Fix 2. Run Bootrec.exe | Restart your computer and press «F8», then choose «Repair Your Computer»…Full steps |
| Fix 3. Run CHKDSK | Restart your computer, choose «Repair Your Computer» > «Command Prompt»…Full steps |
| More Fixes | Restart your computer. Once it starts, press «F8», choose «Safe Mode with Command Prompt»…Full steps |
Startup Repair is a Windows built-in tool that can check and replace the missing or damaged system files on your computer. Generally, this tool is applied when your computer cannot boot properly. However, many users have encountered an issue while using this utility, which is «Startup Repair cannot repair this computer automatically». This is the error message in Windows 7 or Windows Vista. In Windows 10, it’s equivalent is «Automatic Repair couldn’t repair your PC».
If you click «View problem details» in Windows 7/Vista, you will the information below. (The problem signature might be shown different variables from the ones above on different OS.)
Problem Event Name: StartupRepairOffline
Problem Signature 01: 6.1.7600.16385
Problem Signature 02: 6.1.7600.16385
Problem Signature 03: unknown
Problem Signature 04: 21200442
Problem Signature 05: AutoFailover
Problem Signature 06: 65
Problem Signature 07: CorruptFile
OS Version: 6.1.7600.2.0.0.256.1
Locale ID: 1033
Then why did Startup Repair fail to work? Generally, when you receive the error message, it may indicate:
- There is a problematic device attached to your computer
- The file system of your system disk is damaged
- The MBR (Master Boot Record) of the hard drive is corrupted
- There may be virus attacks, disk write errors or power outages on your disk
6 Fixes for «Startup Repair cannot repair this computer automatically» in Windows 10/8/7
If you cannot specify the cause of why Windows Startup Repair failed, never mind trying the simple fixes first.
Method 1. Remove Peripheral Devices
Based on the information given by Microsoft, if you have recently attached a device to your computers like a camera or portable music player, you can remove the device and restart your computer. Sometimes, Windows cannot repair the computer automatically due to the device connected.
If this tip doesn’t work, don’t get upset. There are many other ways for you to try.
Method 2. Run Bootrec.exe
Bootrec, also called bootrec.exe utility, is a tool provided by Microsoft in the Windows Recovery Environment. Bootrec.exe can be used to fix the Master Boot Record (MBR), Boot Sector, Boot Configuration (BCD), and boot.ini. If it’s the corrupt MBR or BCD that caused the problem, the solution is to correct the MBR or BCD record with the help of bootrec. By the way, this method requires a Windows recovery disk. Since you are using it when you perform a startup repair, you can run bootrec.exe following the steps below.
In Windows 7:
Step 1. Restart your computer and press «F8» once you see the Windows logo.
Step 2. Among the advanced boot options, choose «Repair Your Computer».
Step 3. In the system recovery options, choose «Command Prompt».
Step 4. Enter the commands below in order:
bootrec /fixmbr
bootrec /fixboot
Method 3. Run CHKDSK
As mentioned, bad sectors and file system errors on your hard drive may be the reason why you receive the error message «Startup Repair cannot repair the computer automatically». Running CHKDSK is able to check and repair your disk errors including bad sectors and file system errors.
Step 1. Restart your computer and press «F8» once you see the Windows logo.
Step 2. Among the advanced boot options, choose «Repair Your Computer».
Step 3. In the system recovery options, choose «Command Prompt».
Step 4. Enter the command below: chkdsk C: /f /r
«C» is the drive letter of your Windows installation drive.
Method 4. Run Windows System File Checker Tool
Windows System File Checker Tool can check and repair missing or corrupted Windows system files on your computer. Besides, using this tool doesn’t need the Windows installation CD. All you need is to boot into the Safe Mode with Command Prompt.
Step 1. Restart your computer. Once it starts, press «F8» in 1-second intervals until you see the Windows logo.
Step 2. Then you will see the menu of «Advanced Boot Options». Under it, choose «Safe Mode with Command Prompt».
Step 3. In Command Prompt, enter the following command: sfc /scannow /offbootdir=d: /offwindir=d:windows
Step 4. Restart your computer.
Method 5. Perform System Restore
If you’ve created a Windows system restore point as a system backup on your Windows 10/8/7 PC, you have the chance to fully restore your PC to its original state, at least to the previous state. System Restore is a feature in Microsoft Windows that allows users to revert their computer’s state (including system files, installed applications, Windows Registry, and system settings) to a previous point in time. Thus, it can be used to recover from system malfunctions or other problems.
Procedure 1. Restore Important Data from the Dead PC
When you are stuck with «Startup Repair cannot repair this computer automatically» or ‘»Automatic Repair couldn’t repair your PC» error message on Windows PC, don’t rush to perform System Restore. Performing a system restore will take your PC back to an earlier point in time, called a system restore point. Restore points are generated when you install a new app, driver, or Windows update, and when you create a restore point manually. Restoring won’t affect your personal files, but it will remove apps, drivers, and updates installed after the restore point was made. Therefore, we highly recommend you to try powerful data recovery software — EaseUS Data Recovery Wizard with Bootable Media to get your data out of the current ‘dead’ PC:
Notice: This will require a second healthy computer for help.
Note: To guarantee a high data recovery chance, install EaseUS data recovery software on another disk instead of the original disk where you lost files.
Step 1. Launch EaseUS Data Recovery Wizard on your Windows 11, Windows 10, Windows 8, or Windows 7 computer. Select the disk partition or storage location where you lost data and click «Scan».
Step 2. This recovery software will start scanning the disk to find all lost and deleted files. When the scan process completes, click «Filter» > «Type» to specify lost file types.
Step 3. Preview and restore lost Windows files. You can double-click to preview the scanned files. Then, select the target data and click the «Recover» button to save them to another safe spot in the PC or an external storage device.
Procedure 2. Perform a System Restore
If you have enabled the System Restore on your computer and created a system restore point, you can fix «Startup repair cannot repair this computer automatically» in Windows 10/8/7/Vista be performing a system restore:
For Windows 10/8/8.1 users:
Step 1. Reboot your Windows 10/8 PC into Advanced Startup, and click «Troubleshoot».
Step 2. Select «Advanced options», choose «System Restore».
Step 3. Click on the Administrator Account and enter your password, click «Continue» to move on.
Step 4. Choose your system restore point created previous and follow the on-screen guidelines to complete the whole process.
For Windows 7/Vista Users:
Step 1. Insert your Windows installation CD or disc.
Step 2. Press any key when «Press any key to boot from CD or DVD» message appears.
Step 3. Select a language, a time and currency, and a keyboard or input method, and then click «Next».
Step 4. Click «Repair your computer».
Step 5. Select your Windows installation drive, which is usually C: and click «Next».
Step 6. In the System Recovery Options Dialog Box, click on «System Restore».
Step 7. Follow the System Restore Wizard instruction and choose the appropriate restore point.
Step 8. Click «Finish» to restore the system.
Finally, restart your computer and copy your restore data back to your PC. You should be able to use your computer and data again.
Method 6. Repair Startup Error Without System Backup
If you don’t have a system backup, fixing «Startup Repair couldn’t repair your PC» error will be more complex. You can:
Procedure 1. Restore from the Problem PC
You can directly follow the detail guidelines above to rescue your data with the help of EaseUS Data Recovery Wizard with Bootable Media. It fully allows you to recover data when PC won’t boot or start in Windows 10/8/7/Vista.
Procedure 2. Clean Install/Reinstall Windows OS
When you don’t have a system restore point on your PC, the best way to remove ‘Startup Repair’ error on Windows 10/8/7, etc. is to perform a clean install of Windows OS. You can directly turn to Microsoft for online assistance (and Windows 7/Vista users are recommended to try this way). Or you can refer to the article about how to clean install Windows 10.
How to Prevent «Startup Repair cannot repair this computer automatically» Error
After restoring your PC back to life and rescuing all precious data, it doesn’t mean that your PC and data are safe now. Virus attack, system failure, system crash, data loss, and other unknown issues may occur anytime. How to prevent these issues from happening? That’s quite difficult! Is it possible to protect your System and data securely from these disasters? Sure!
Powerful Windows system backup software — EaseUS Todo Backup can help. It provides System Backup, File Backup, Disk/Partition Backup, System Clone, and other more advanced features to help you fully protect your PC from these issues. It will help you prevent and protect your computer from ‘Startup Repair failure’ error or similar issues. Making a backup is always the best way to prevent complete data loss.
The Bottom Line
«Startup Repair cannot repair this computer automatically» is a relatively complex issue related to Windows. Although there are solutions to the problem, it may be difficult for you to apply since these operations are seldom taken during your daily use. If you don’t want to try it yourself, you can send your computer to professionals for manual repair.
Содержание
- Исправляем ошибку «Startup Repair Offline»
- Способ 1: Сброс настроек BIOS
- Способ 2: Подключение шлейфов
- Способ 3: Восстановление запуска
- Способ 4: «Командная строка»
- Заключение
- Вопросы и ответы
Запуская свой компьютер, юзер может наблюдать ошибки, связанные с загрузкой операционной системы. Виндовс 7 предпримет попытку по восстановлению работы, но она может оказаться безуспешной, и Вы увидите сообщение о том, что невозможно выполнить решение этой проблемы, а также есть необходимость отправить информацию о неисправности в Microsoft. Нажав на вкладку «Показать подробности» отобразится имя данной ошибки – «Startup Repair Offline». В этой статье мы рассмотрим, как нейтрализовать эту ошибку.
Исправляем ошибку «Startup Repair Offline»
Буквально данная неисправность означает – «восстановление запуска не в сети». После перезапуска компьютера, система предприняла попытку по восстановлению работы (не подключаясь к сети), но попытка оказалась неудачной.
Неисправность «Startup Repair Offline» зачастую появляется из-за проблем с жестким диском, а именно из-за повреждения сектора, на котором находятся системные данные, отвечающие за правильный запуск Windows 7. Также возможны проблемы с поврежденными разделами реестра системы. Перейдем к способам исправления этой неполадки.
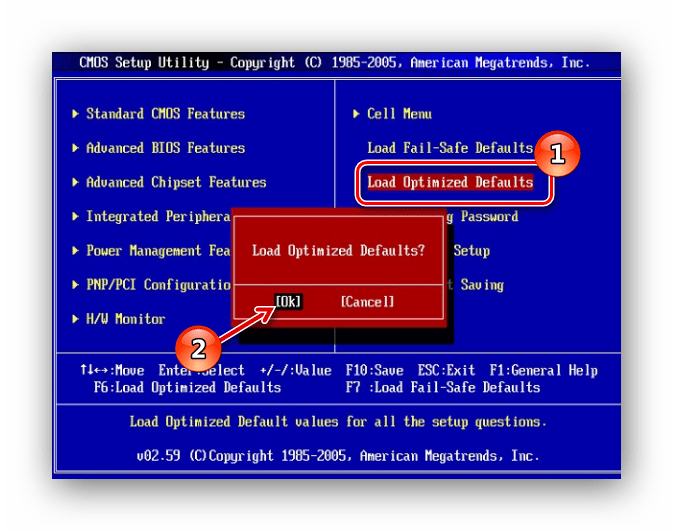
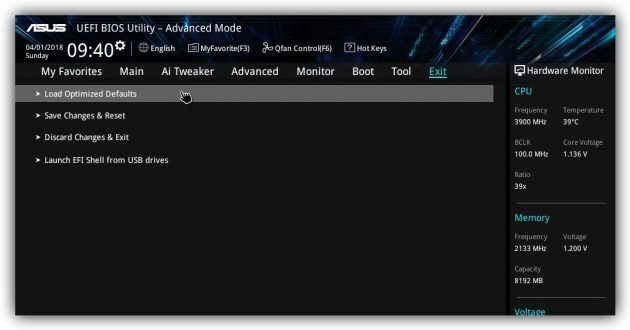
Способ 1: Сброс настроек BIOS
Переходим в БИОС (при помощи клавиш F2 или Del при загрузке компьютера). Производим загрузку настроек по умолчанию (пункт «Load optimized defaults»). Сохраняем сделанные изменения (нажав клавишу F10) и перезапускаем Виндовс.
Подробнее: Сбрасываем настройки BIOS
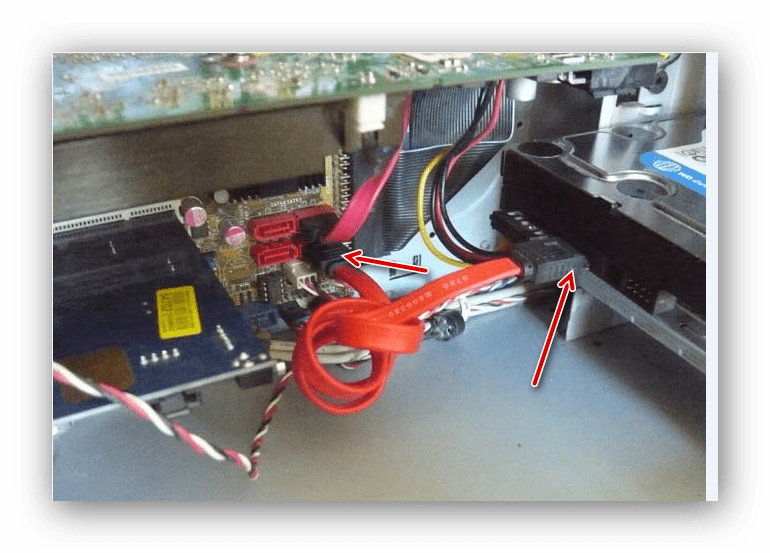
Способ 2: Подключение шлейфов
Необходимо произвести проверку целостности разъемов и плотность подключения шлейфов жесткого диска и материнской платы. Убедитесь, что все контакты подключены качественно и плотно. После проверки перезапускаем систему и проверяем на наличие неисправности.
Способ 3: Восстановление запуска
Так как обычный запуск операционной системы невозможен, рекомендуем воспользоваться загрузочным диском или флешкой с системой, которая является идентичной установленной.
Урок: Инструкция по созданию загрузочной флешки на Windows
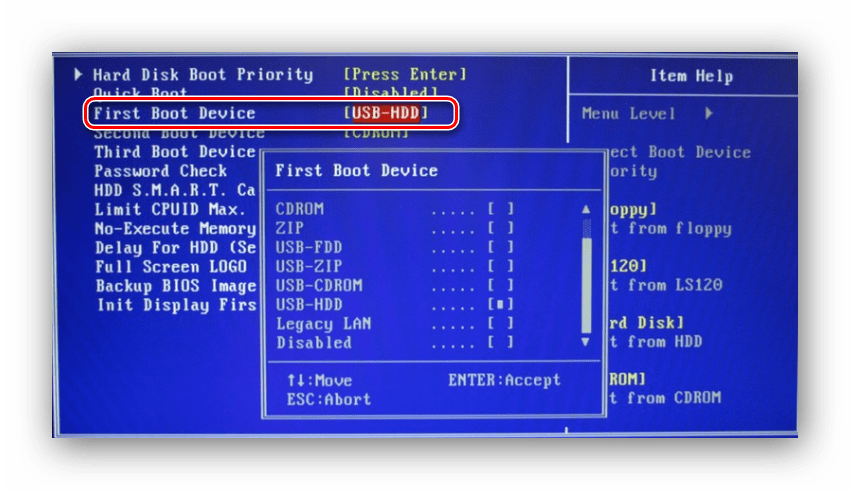
- Выполняем запуск с загрузочной флешки или диска. В БИОСе устанавливаем опцию запуска с диска или флеш-накопителя (устанавливаем в пункте «First Boot Device USB-HDD» параметр «USB-HDD«). Как это сделать на различных версиях BIOS, подробно описано в уроке, который представлен ниже.
Урок: Настраиваем BIOS для загрузки с флешки
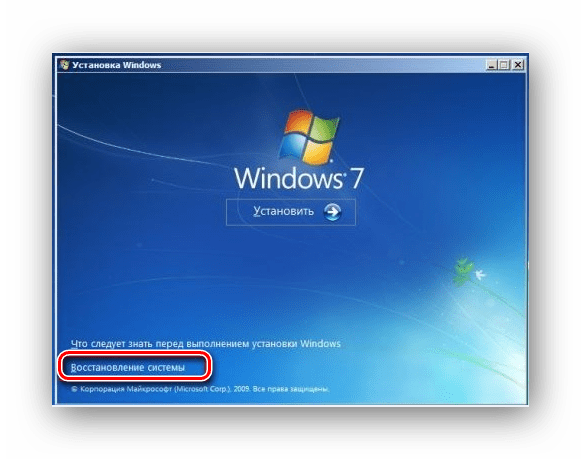
- В установочном интерфейсе выбираем язык, клавиатуру и время. Жмём «Далее» и на появившемся экране кликаем на надпись «Восстановление системы» (в англ. версии Windows 7 «Repair your computer»).
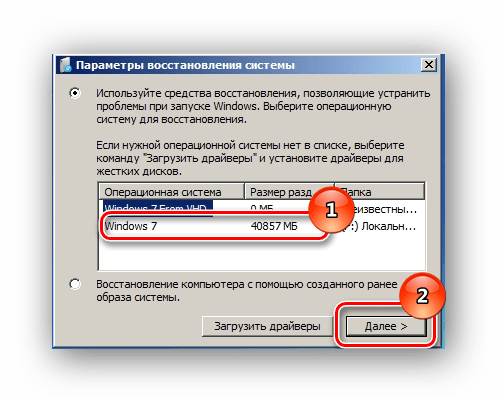
- Системой будет произведён поиск неполадок в автоматическом режиме. Жмём на кнопочку «Далее» в открывшемся окне, выбрав необходимую ОС.

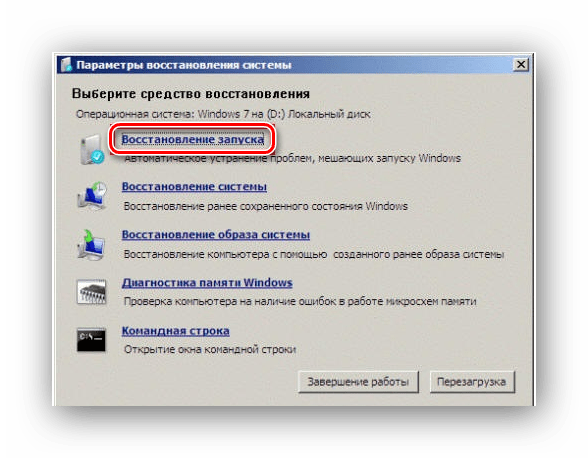
В окошке «Параметры восстановления системы» щелкаем по пункту «Восстановление запуска» и дожидаемся завершения проверочных действий и корректного запуска компьютера. После окончания проверки перезагружаем ПК.
Способ 4: «Командная строка»
Если приведенные выше способы не помогли устранить неполадку, тогда вновь запускаем систему с флешки или установочного диска.

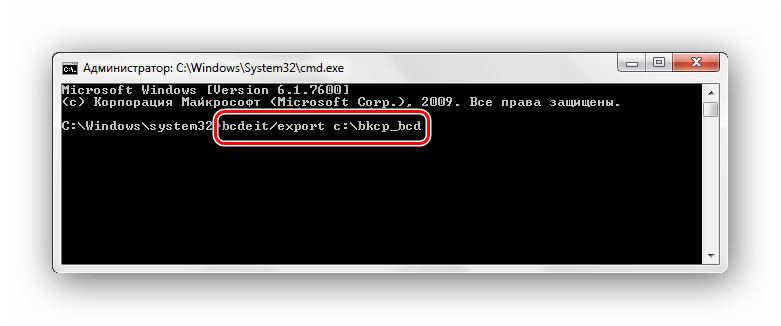
Нажимаем клавиши Shift+F10 в самом начале установочного процесса. Попадаем в меню «Командной строки», где необходимо набрать поочередно определенные команды (после ввода каждой из них нажимаем Enter).
bcdedit /export c:bckp_bcd
attrib c:bootbcd -h -r –s

ren c:bootbcd bcd.old

bootrec /FixMbr
bootrec /FixBoot

bootrec.exe /RebuildBcd
После того, как ввели все команды, перезапускаем ПК. Если Виндовс 7 не запустилась в работоспособном режиме, тогда в данных о неисправности может быть имя проблемного файла (например, библиотеки расширения .dll). Если было указано название файла, то необходимо попробовать совершить поиска данного файла в интернете и поместить его на ваш винчестер в необходимую директорию (в большинстве случаев, это папка windowdssystem 32).
Подробнее: Как установить библиотеку DLL в систему Windows
Заключение
Итак, что же делать с неполадкой «Startup Repair Offline»? Самый простой и эффективный способ – это использование восстановления запуска ОС, применяя загрузочный диск или флеш-накопитель. Если способ с восстановлением системы не исправил проблему, то воспользуйтесь командной строкой. Также проверьте целостность всех соединений компьютера и настройки BIOS. Применение этих методов позволит устранить ошибку запуска Windows 7.
Еще статьи по данной теме:
Помогла ли Вам статья?

Просмотров 16.4к. Опубликовано 14 февраля, 2019 Обновлено 24 июня, 2019
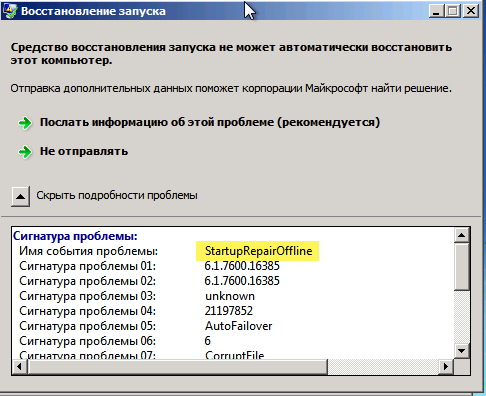
Инструкция по решению проблемы StartupRepairOffline, которая возникает при восстановление системы, после неудачного запуска компьютера. Пользователь видит сообщение «Средство восстановления запуска не может автоматически восстановить этот компьютер». При нажатии на «Показать подробности» пользователь сможет прочесть имя имеющегося события — «Startup Repair Offline».
Код ошибки:
Problem Signature:
Problem Event Name: StartupRepairOffline
Problem Signature 01: 6.1.7600.16385
Problem Signature 02: 6.1.7600.16385
Problem Signature 03: unknown
Problem Signature 04: 21199208
Problem Signature 05: AutoFailover
Problem Signature 06: 7
Problem Signature 07: BadDriver
OS Version: 6.1.7601.2.1.0.256.1
Locale ID: 1033
Способ 1 — сброс настрок BIOS по умолчанию
Сбросьте настройки вашего БИОСа. Перейдите в ваш БИОС (обычно с помощью нажатия на F2 или Del при запуске системы), и загрузите настройки по умолчанию (обычно это опция «Load optimized defaults»). Затем сохраните данные изменения (обычно нажатием на F10), и перезагрузите ваш ПК;
Способ 2 — через командную строку
- Загружаемся в режим восстановления ОС.
- Выбираем режим командной строки в меню восстановления (Если в системе была учетная запись Администратора с паролем, то необходимо будет ввести пароль и выбрать соответствующую учетную запись).
- Вводим в командную строку следующие команды:
bcdedit /export c:bckp_bcd

attrib c:bootbcd -h -r -s

ren c:bootbcd bcd.old

bootrec.exe /RebuildBcd
- Затем перегружаем систему и смотрим на экран. На этот раз он стал более информативен и показывает четко какого файла нам не хватает чтобы система загрузилась (в моем случае это был файл ci.dll).
Теперь достаточно просто найти и скопировать (для копирования можно использовать любой удобный LiveCD/DVD/Live Flash диск) этот файл с любой «эталонной» машины в каталог c:windowssystem32 и система успешно загрузится.
Способ 3 — через точку восстановления
Вы также можете выполнить восстановление системы. Используйте среду восстановления Windows (WinRE) для запуска восстановления системы (если на вашем компьютере включено восстановление системы)
1. Вставьте установочный диск Windows 7 в дисковод и запустите компьютер.
2. Нажмите клавишу, когда появится сообщение «Нажмите любую клавишу для загрузки с CD или DVD…».появляется.
3. Выберите язык, время и валюту, а также клавиатуру или метод ввода и нажмите кнопку Далее.
4. Нажмите Восстановить ваш компьютер.
5. В диалоговом окне «Параметры восстановления системы» выберите диск установки Windows и нажмите «Далее».
6. В диалоговом окне «Параметры восстановления системы» нажмите «Восстановление системы».
7. Следуйте инструкциям мастера восстановления системы и выберите подходящую точку восстановления.
8. Нажмите Готово, чтобы восстановить систему.
Способ 4 — через безопасный режим
- Вы можете загрузить компьютер в безопасном режиме и проверить, можете ли вы получить доступ к рабочему столу.
- Вы можете выполнить чистую загрузку и проверить.
Что мне делать, если программа восстановления при загрузке не смогла восстановить мой компьютер?
Автоматическое восстановление при загрузке не может восстановить ваш компьютер
- Восстановить BCD и восстановить MBR.
- Выполнить chkdsk.
- Запустите SFC и используйте DISM Tool в безопасном режиме.
- Отключите ранний запуск защиты от вредоносных программ.
- Отключите автоматическое восстановление при запуске.
- Восстановите реестр из каталога RegBack.
- Перезагрузите этот компьютер.
1 ян. 2019 г.
Почему мой компьютер завис при восстановлении при запуске?
Вирусы загрузочного сектора и другие вредоносные программы, нацеленные на загрузчик или загрузочную цепочку, могут вызывать ошибки в настройках загрузчика и состояния, которые приводят к бесконечному циклу восстановления при загрузке. Затем вирус может блокировать запуск программы Startup Repair или ее успешное восстановление.
Сначала полностью выключите компьютер. Затем включите его и продолжайте нажимать клавишу F8 во время загрузки. Вы увидите экран Advanced Boot Options, откуда вы должны запустить безопасный режим. Выберите «Восстановить компьютер» и запустите восстановление при запуске.
Как вызвать автоматическое восстановление Windows?
Метод 1: используйте восстановление при загрузке Windows
- Перейдите в меню дополнительных параметров запуска Windows 10. …
- Нажмите «Восстановление при запуске».
- Выполните шаг 1 из предыдущего метода, чтобы перейти в меню дополнительных параметров запуска Windows 10.
- Нажмите Восстановление системы.
- Выберите ваше имя пользователя.
- Выберите точку восстановления в меню и следуйте инструкциям.
19 сред. 2019 г.
Как вывести компьютер из режима автоматического ремонта?
7 способов исправить — застрял в цикле автоматического восстановления Windows!
- Нажмите «Восстановить компьютер» внизу.
- Выберите Устранение неполадок> Дополнительные параметры> Командная строка.
- Введите chkdsk / f / r C: и нажмите Enter.
- Введите exit и нажмите Enter.
- Перезагрузите компьютер, чтобы увидеть, решена ли проблема.
14 ночей. 2017 г.
Не можете даже загрузиться в безопасном режиме?
Вот некоторые вещи, которые мы можем попробовать, когда вы не можете загрузиться в безопасном режиме:
- Удалите все недавно добавленное оборудование.
- Перезагрузите устройство и нажмите и удерживайте кнопку питания, чтобы принудительно выключить устройство, когда появится логотип, после чего вы можете войти в среду восстановления.
28 колода 2017 г.
Как мне исправить мой компьютер, который не загружается?
Что делать, если компьютер не запускается
- Дайте ей больше силы. …
- Проверьте свой монитор. …
- Слушайте сообщение в звуковом сигнале. …
- Отключите ненужные USB-устройства. …
- Переустановите оборудование внутри. …
- Изучите BIOS. …
- Сканирование на вирусы с помощью Live CD. …
- Загрузитесь в безопасном режиме.
Как исправить бесконечный цикл перезагрузки в Windows 10?
Использование безопасного режима для исправления зависания Windows 10 в цикле перезапуска
- Удерживая нажатой клавишу Shift, выберите «Пуск»> «Перезагрузить», чтобы загрузиться с дополнительными параметрами запуска. …
- Нажмите Win + I, чтобы открыть Настройки, а затем выберите Обновление и безопасность> Восстановление> Расширенный запуск> Перезагрузить сейчас.
12 февраля. 2021 г.
Как исправить Windows Error Recovery?
Исправление №4: запустить chkdsk
- Вставьте свой компакт-диск; перезагрузите компьютер.
- Загрузитесь с компакт-диска, нажав любую клавишу, когда на вашем компьютере появится сообщение «Нажмите любую клавишу для загрузки с компакт-диска».
- Нажмите R, чтобы открыть консоль восстановления в меню параметров.
- Введите свой пароль администратора.
- Нажмите Enter.
Ответ: Да, в Windows 10 есть встроенный инструмент восстановления, который помогает устранять типичные проблемы с ПК.
Как удалить Windows Error Recovery из автозагрузки?
Чтобы предотвратить появление экрана восстановления после ошибки Windows, выполните следующие действия.
- Загрузите компьютер с Windows.
- Нажмите «Пуск» и введите CMD.
- Щелкните правой кнопкой мыши CMD и выберите «Запуск от имени администратора».
- Введите «bcdedit / set bootstatuspolicy ignoreallfailures».
28 сред. 2018 г.
Как принудительно выполнить восстановление в Windows 10?
Чтобы активировать Windows 10 «режим восстановления Windows», вы должны прервать последовательность запуска Windows с помощью кнопки питания компьютера. Вы делаете это, нажимая и удерживая кнопку питания компьютера, когда впервые видите логотип Windows. Подождите, пока компьютер выключится, а затем отпустите кнопку.
Как мне загрузиться в безопасном режиме?
Запуск вашего телефона в безопасном режиме
Во-первых, полностью выключите телефон. Затем включите телефон и, когда появится логотип Samsung, нажмите и удерживайте клавишу уменьшения громкости. Если все сделано правильно, в нижнем левом углу экрана отобразится «Безопасный режим».
Сброс Windows 10, когда компьютер HP не загружается | Компьютеры HP | HP
- Перезагрузите компьютер и сразу несколько раз нажмите клавишу F11. Откроется экран «Выберите вариант».
- Щелкните «Пуск». Удерживая нажатой клавишу Shift, нажмите «Питание», а затем выберите «Перезагрузить».
Startup Repair is used to fix the issue when your computer won’t boot properly. However, you may encounter the error «Startup Repair cannot repair this computer automatically» while using it. Given that situation, you can refer to this post offered by MiniTool Solution. It will show you multiple methods to fix this error. Hope this post can be helpful.
“Startup Repair Cannot Repair This Computer Automatically”
If Windows can’t help you fix a misconfigured computer and it cannot start the computer in the normal state, an error “Startup Repair cannot repair this computer automatically” will occur. Windows 7 Startup Repair cannot repair this computer automatically is the same as the error — Automatic Repair couldn’t repair your PC in Windows 10/8/8.1.
If you click View problem details, it will show more details but there is no solution suggested. Only computer specific variables will be displayed:
Problem Event Name: StartupRepairOffline
Problem Signature 01: 6.1.7600.16385
Problem Signature 02: 6.1.7600.16385
Problem Signature 03: unknown
Problem Signature 04: 21200442
Problem Signature 05: AutoFailover
Problem Signature 06: 65
Problem Signature 07: CorruptFile
OS Version: 6.1.7600.2.0.0.256.1
Locale ID: 1033
On different operating systems, the problem signature may display variables that are different from the variables above.
Then why does Startup Repair fail to work? You need to know that there are some reasons for this error: there might be a problematic device attached to your computer, you have the damaged file system of your system disk, the MBR of the hard drive is corrupted, etc.
Luckily, you can fix it.
Fixes for “Startup Repair Cannot Repair This Computer Automatically”
The following part will show you how to fix “Startup Repair Cannot Repair This Computer Automatically” in detail. If you are interested in this topic, please read on.
Method 1: Remove Peripheral Devices
Sometimes, Startup Repair fails because of the connected device. According to Microsoft, you can try to remove the device and restart the computer to fix this issue, if you recently attached a device to your computer, such as a camera or portable music player.
If this method doesn’t work, there are many other ways given below for you to try.
Method 2: Run Bootrec.exe
Bootrec is also known as the bootrec.exe utility. It is a tool offered by Microsoft in the Windows Recovery Environment. Bootrec.exe can help you to repair errors of MBR, BCD, Boot Sector, and boot.ini.
If a corrupted MBR or BCD is causing the problem, you can try correcting the MBR or BCD record with the help of bootrec to fix the problem. Here, you can follow the instructions given below to run bootrec.exe.
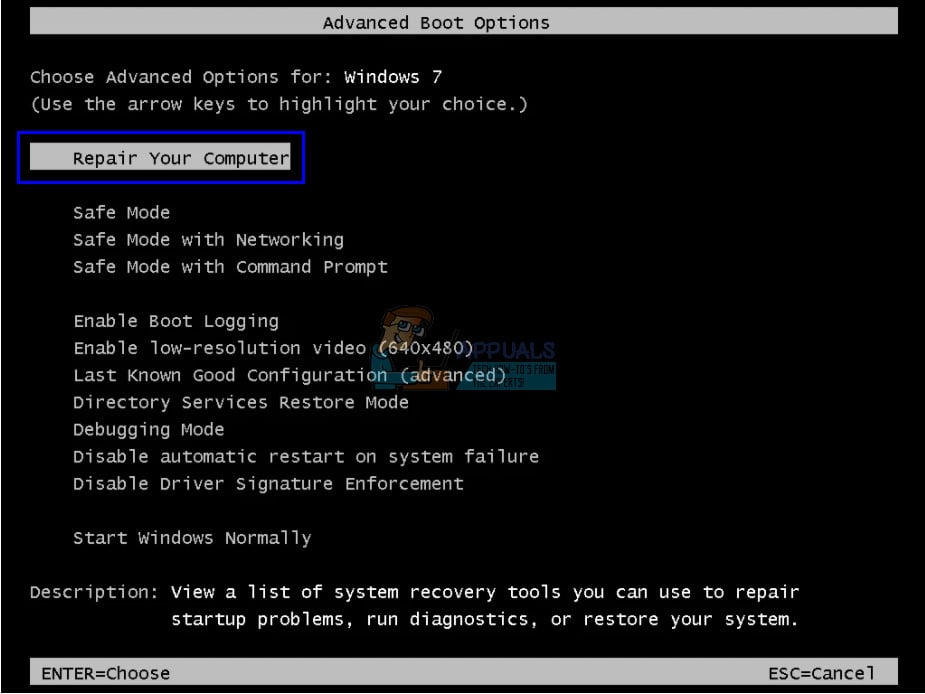
Step 1: Restart your computer and hold F8 until the Advanced Boot Options window appears.
Step 2: Select Repair Your Computer among the available boot options.
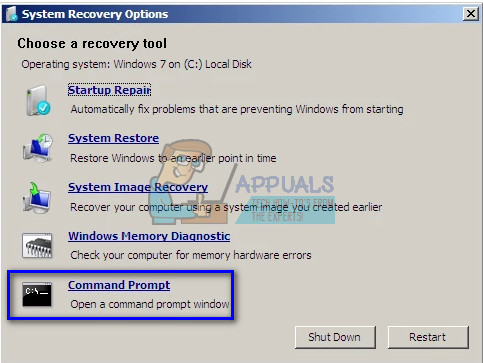
Step 3: A new small window will pop up. Now, select Command Prompt to continue.
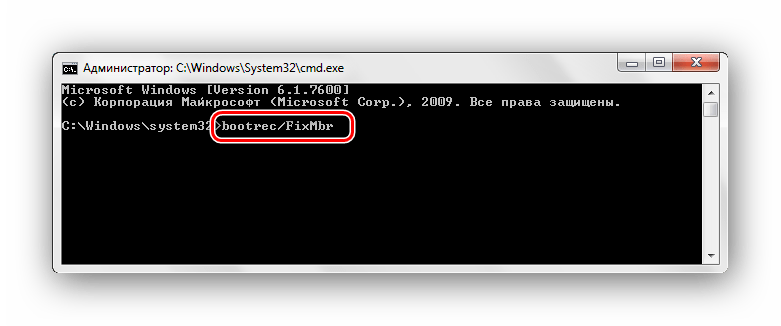
Step 4: Enter the following commands in order and press Enter after each to run these commands:
bootrec /fixmbr
bootrec /fixboot
Step 5: After the operation is completed successfully, reboot your system.
Right now, you can check if “Startup Repair cannot repair this computer automatically” is solved at the startup.
Method 3: Run CHKDSK
Bad sectors and file system errors can also be reasons why Startup Repair cannot repair. Thus, you can try to run CHKDSK to fix this error.
CHKDSK is a system tool in Windows that can verify the integrity of a volume and fix logical system errors. It can also identify bad sectors that exist on the hard disk and mark them so that the computer uses the drive without the errors.
How to run CHKDSK in Windows? Here are the steps on how to do that.
Step 1: Open Command Prompt following the instructions mentioned above.
Step 2: Type this command: chkdsk C: /f /r in the command prompt window and press Enter to run it.
Tip: «C» stands for the drive letter of your Windows installation drive.
Step 3: Restart your system. CHKDSK will scan your hard drive for any issues and fix them accordingly.
After that, “Startup Repair cannot repair this computer automatically” should be solved.
Method 4: Run Windows SFC Tool in Safe Mode
SFC (System File Checker) is a built-in tool provided by Windows. It can help check and repair the corrupted or missing system files. In addition, you don’t need the Windows installation CD while using this tool. What you need to do is to boot your computer into the Safe Mode with Command Prompt. Here is how to do that.
Step 1: Restart your computer and hold F8 until the Advanced Boot Options window appears.
Step 2: Choose Safe Mode with Command Prompt among the available advanced boot options.
Step 3: In the Command Prompt window, type this command: sfc /scannow and press Enter to execute it.
Step 4: After successfully running the command, restart your computer.
After that, “Startup Repair cannot repair this computer automatically” should be solved.
Method 5: Clean Boot Your Computer
If the solutions mentioned above don’t work out, you can load your computer in Safe Mode and try to clean boot your computer. In this way, you can open your PC with a minimal set of drivers and programs, enabling only essential services and disabling all others.
Here are the steps on how to clean boot your computer.
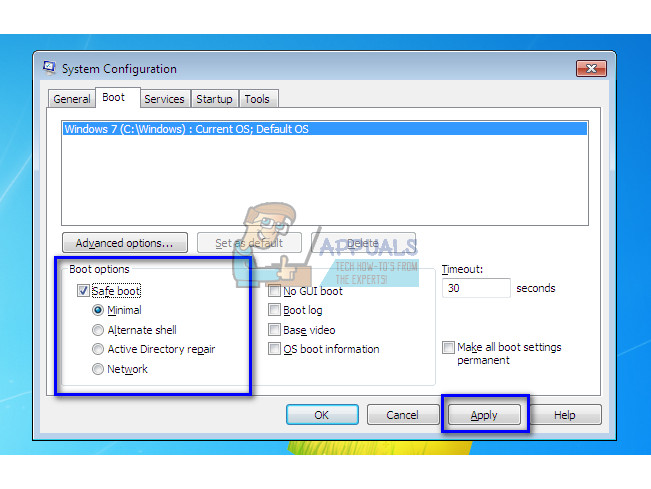
Step 1: Press the Win key + R key at the same time to open the Run dialog box. Then, type msconfig in the dialogue box and press Enter to open System Configuration.
Step 2: When the new window pops up, switch to the Boot tab. Navigate to Boot options, check the Safe boot option and set the option as Minimal. After that, click Apply to save changes.

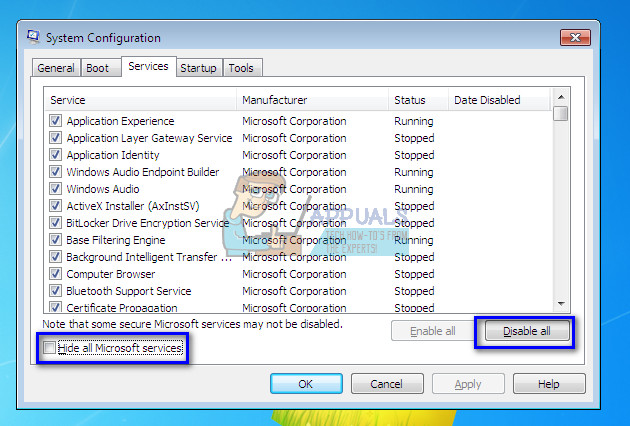
Step 3: Then, switch to the Services tab. To hide all Microsoft related services leaving behind all the third-party services, check Hide all Microsoft services in the lowerleft corner. To disable all the third-party services, click the Disable all button. Click Apply to save changes.

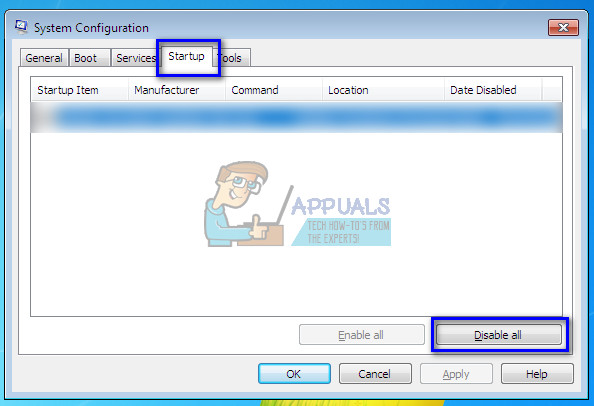
Step 4: Now, switch to the Startup tab. Select all of the present services and click the Disable all button present in the lower right corner of the window. Click Apply to save changes.

Step 5: After saving all changes, try booting the computer in the normal mode.
After that, “Startup Repair cannot repair this computer automatically” should be solved.
Tip: If you want to clean boot Windows 10, you can refer to this related article: How to Clean Boot Windows 10 and Why You Need to Do So?
Method 6: Perform a System Restore
If you’ve created a Windows System Restore point before this problem happens on your computer, you have the chance to revert your PC to its original normal state by performing a system restore. Here is how to do that.
Step 1: Click here to download and create Windows 7 installation disc.
Step 2: Connect it to your computer and boot from it.
Step 3: Select the proper language, time and keyboard input.
Step 4: Choose Repair your computer.
Step 5: Now, all of the available system recovery options in Windows 7 will be listed. Choose System Restore, follow the System Restore Wizard instructions shown on the screen and choose an appropriate restore point.
Step 6: Click Finish to restore the system.
After the operation is complete, you should be able to use your computer normally and “Startup Repair cannot repair this computer automatically” should not appear again.
I recently received an error message saying “Startup Repair cannot repair this computer automatically”. After reading this post, I have successfully fixed this error.Click to Tweet
Top Recommendation: Create the System Image to Safeguard Your PC
After trying the methods mentioned above, you should manage to fix the “Startup Repair cannot repair this computer automatically” issue on your computer.
However, some system issues will still occur on your computer in the future, which could make you frustrated. System image recovery could be a great solution provided that a system image was created ahead of time.
With the system image, you can restore your PC to the previous normal state after the problem happens on your computer. Therefore, how do you create a system image? A piece of the professional backup software — MiniTool ShadowMaker is your best assistant.
It is compatible with Windows 7/8/10. With its various powerful features, you are allowed to back up the operating system, files and folders, disks, partitions and so on.
To create a system image, just get MiniTool ShadowMaker Trial by clicking on the following button to have a try or purchase its Pro Edition to use it permanently.
Free Download
Follow the instructions below to learn how to back up your system with MiniTool ShadowMaker.
Step 1: Select the Backup Mode
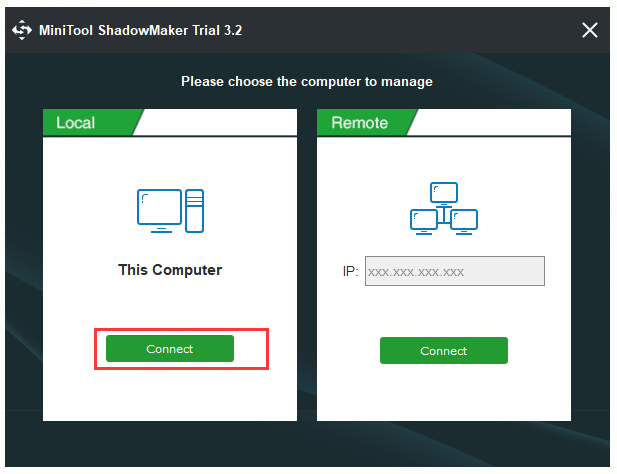
1.Install MiniTool ShadowMaker and launch it.
2.Then, click Keep Trial to keep using the Trial Edition.
3.To manage your local computer, click the Connect button in This Computer.
Step 2: Choose Your Backup Source
MiniTool ShadowMaker is designed to back up the operating system by default. The system reserved partition and C drive are already selected, so just move to choose a destination path to save your system image.
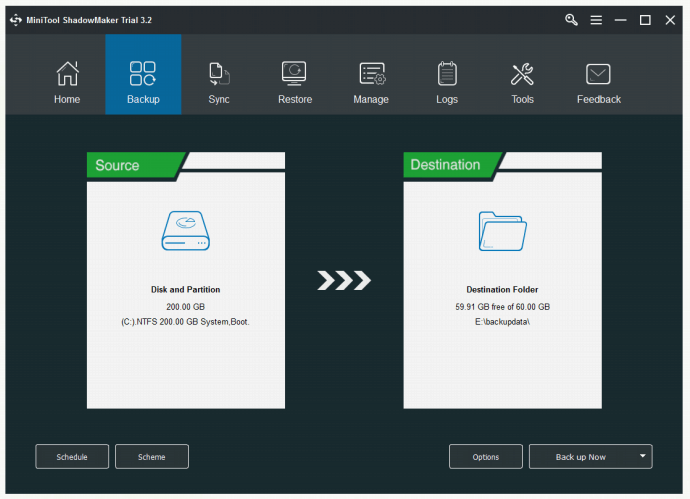
Step 3: Choose a Destination Path
1.Click the Destination tab in the Backup page.
2.Choose a suitable destination path and then click OK to continue.

Step 4: Start to Perform the Backup Operation
1.Right now, you can choose to click Back up Now to create a backup image right now or click Back up Later to delay this process.
2.Just click Yes to confirm your operation when a confirmation window pops up.
After you finish all the steps given above, you should have created your system image successfully now.
In addition to the fact that some system issues can appear on your computer, there is also the possibility that you will lose data when you perform some troubleshooting fixes or because of other errors. To protect your data, you can also use MiniTool ShadowMaker to back up your data in advance.
Free Download
This post introduces how to make a backup of the system with MiniTool ShadowMaker. I successfully create a system image with it. It is a really powerful backup program.Click to Tweet
Conclusion
“Startup Repair cannot repair this computer automatically” is a relatively complex issue related to Windows. After reading this post, you should have solved this error and now you can use your computer normally. In addition, this post also shows you a great backup program — MiniTool ShadowMaker. To safeguard your computer and data, you will need it to create a backup.
If you encounter any problems when you are using MiniTool ShadowMaker, feel free to contact us by sending an email to [email protected].
Startup Repair Cannot Repair This Computer Automatically FAQ
What is Startup Repair on my computer?
Startup Repair is a recovery tool in the System Recovery Options menu. You can use it to fix certain system problems that might prevent a successful Windows 7 boot. It is designed to fix only certain problems such as missing or damaged system files that are used to load the operating system.
What causes a computer not to boot up?
- Bad electrical connection.
- Power supply failure.
- Operating system failure.
- Hardware failure.
How do you troubleshoot a computer?
- Run a thorough virus scan.
- Update your software.
- Cut down on the bloat.
- Test your Wi-Fi connection.
- Reinstall the operating system.
What is error recovery?
- Error recovery is a process of taking action on an error in order to reduce its negative impact.
- This phase conducts the system to an error-free state. An incorrect state can cause a new system failure unless the error is removed.
- The ability to salvage the remaining data after a read error in the decoding process.
The error ‘Startup repair cannot repair this computer automatically’ occurs when Windows is unable to fix the computer for misconfigurations present and fails to boot it in a normal state. There are several reasons this error might pop up; your hard drive might be damaged, there may be some bad sectors, you may have two hard drives with an operating system present in both of them etc.
There are several solutions to address this problem. Sometimes they work and sometimes they don’t. In the worst case scenario, you have to reset your Windows to factory settings which ‘may’ cause loss of your files and folders. We have listed the solutions in the order of increasing technicality. Start with the first one and work your way down accordingly.
Note: Before you move on to carrying out all the solutions listed below, make sure that you have not attached two hard drives onto the same computer where both contain their version of operating systems. If you have, try prioritizing the boot to the correct drive. If this doesn’t work, remove on the drive physically from the computer and try booting from the other one.
Solution 1: Using Bootrec (bootrec.exe)
Bootrec is tool provided by Microsoft in Windows recovery environment (also called Windows RE). When your computer fails to boot successfully, Windows automatically starts in RE. This environment has several tools that can potentially fix your computer such as Command Prompt, Startup Repair etc. There is also a utility ‘bootrec.exe’ which is used in connection with:
- Boot Sector
- Boot Configuration Data (BCD)
- Master Boot Record (MBR)
You are already using the RE when you try to repair your startup. We will try using Bootrec using the command prompt and see if this fixes the problem for us.
- Restart your computer. When your computer loads up (when Windows 7 logo appears), press F8.
- Now select ‘Repair your computer’ from the list of options available.
- A new small window will pop up. Select ‘command prompt’ from the list of options available.
- Now execute the following commands in the window and wait for each one to complete:
bootrec /fixmbr
bootrec /fixboot
Each command should give you a confirmation that the operation completed successfully. Now reboot your system and hopefully, the problem will be solved.
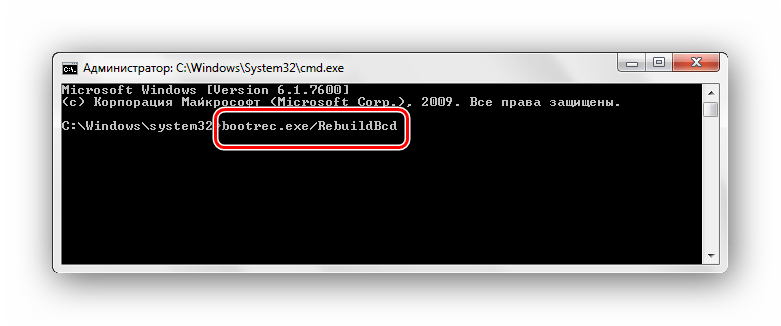
Note: You can also use the command ‘bootrec /RebuildBcd’.
Solution 2: Using CHKDSK
As explained earlier, this error usually occurs when your hard drive is not working properly or has bad sectors present. We can use the CHKDSK utility using the command prompt and see if there are any present. CHKDSK is a system tool present in Windows which verifies the integrity of a volume and tries to fix logical system errors. It also identifies bad sectors present on the hard drive and marks them so there will be no error when the computer uses the drive.
- Restart your computer. When your computer loads up (when Windows 7 logo appears), press F8.
- Now select ‘Repair your computer’ from the list of options available.
- A new small window will pop up. Select ‘command prompt’ from the list of options available.
- Now execute the following command in the command prompt window:
chkdsk /r
- Restart your system. Upon the restart, the check disk utility will scan your hard drive for any discrepancies and fix them accordingly.
If you are having a problem when running CHKDSK, you can execute the following commands at the command prompt prior to running the CHKDSK command:
diskpart
select disk X (X=0,1,2)
attrib disk
attrib disk clear
readonly
diskpart
list vol
sel vol X (X=0,1,2)
attrib vol
attrib vol clear readonly
After executing these commands, run CHKDSK and see if this solves the problem at hand.
navigate your way down accordingly.
Solution 3: Clean Booting your Computer
If both the above solutions don’t work out, you can load your computer in Safe Mode and try clean booting.
This boot allows your PC to turn on with a minimal set of drivers and programs. Only the essential ones are enabled while all the other services are disabled. If your computer starts in this mode, you should backup all your important data immediately. After backing up your important data, you can either install a new version of Windows or try turning the processes back on and see what the problem was.
- Press Windows + R to launch the Run application. Type “msconfig” in the dialogue box and press Enter.
- Select the tab ‘Boot’, check the option ‘Safe boot’, and set the option as ‘Minimal’. Press Apply to save changes.
- Navigate to the Services tab present at the top of the screen. Check the line which says “Hide all Microsoft services”. Once you click this, all Microsoft related services will be disabled leaving behind all the third-party services (you can also disable all Microsoft related processes too and check more extensively if there are no third-party services causing the problem).
- Now click the “Disable all” button present at the near bottom at the left side of the window. All the third-party services will now be disabled.
- Click Apply to save changes. Now select the ‘Startup’ tab. Select each service one by one and click “Disable” at the bottom right side of the window.
- After saving all changes, try booting the computer in normal mode and see if this does the trick. You can easily select ‘Start Windows Normally’ using the boot options preset when the operating system boots up.
Solution 4: Changing SATA Mode
SATA modes determine how your hard drive communicates with your computer. You can set your SATA hard drive to function in one of the three modes (AHCI, IDE, and RAID). The IDE mode is the simplest mode available and in it, the hard drive is set to run as an IDE or Parallel ATA. Advanced Host Controller Interface (AHCI) mode enables the use of advanced features on SATA drives such as Native Command Queuing (NCQ), or hot swapping.
We can try changing the SATA mode of your hard drive and see if this makes any difference.
- Enter the BIOS of your computer by restarting it and immediately pressing DEL or F2. Once in BIOS, search for the option of ‘Storage Configuration’. It will most probably on the Main
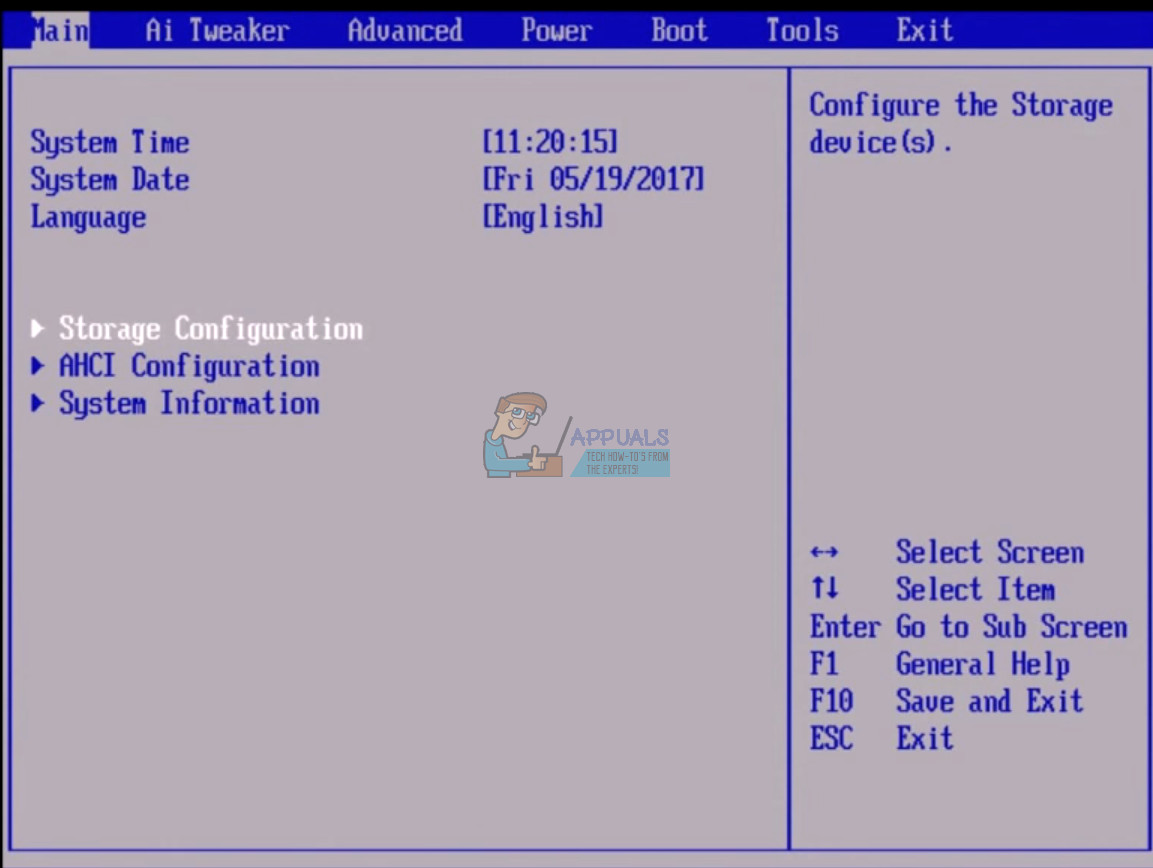
- If the mode is set to AHCI, then change it to IDE. If it is set to IDE, then change it to AHCI.
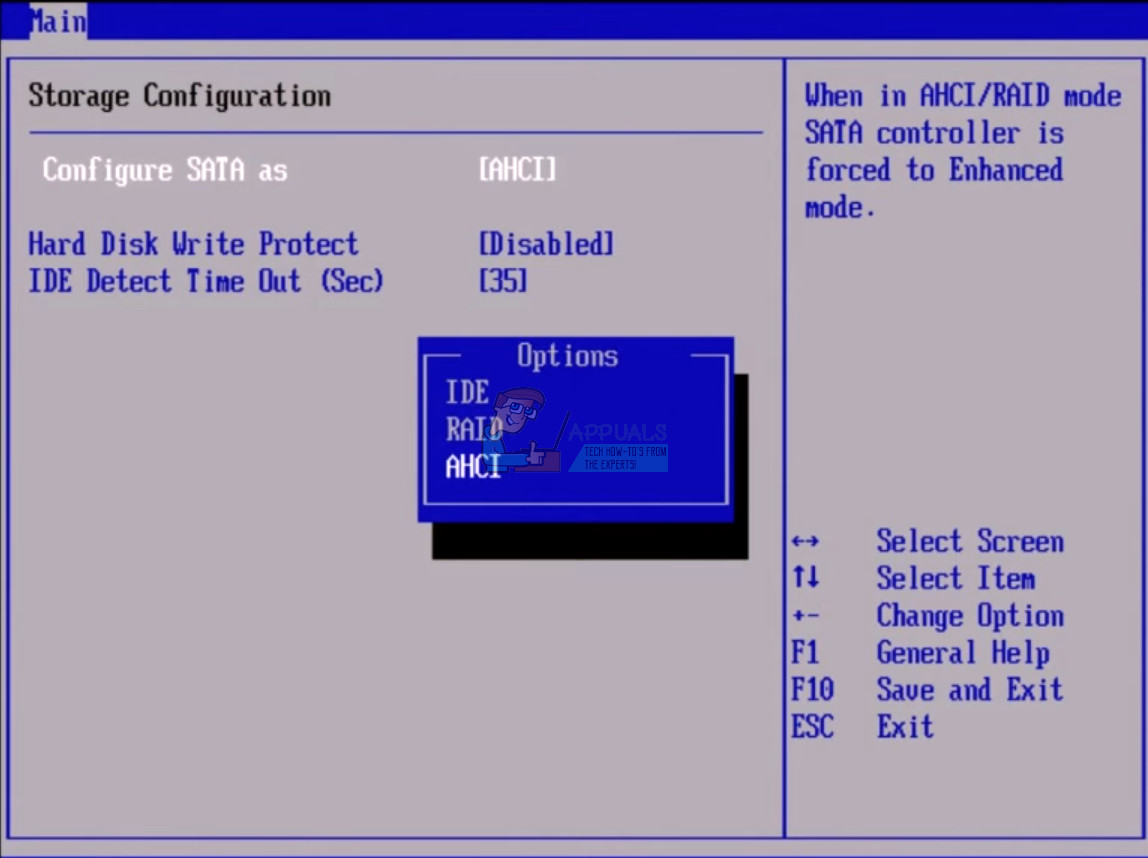
- You can also change the setting of the controller by navigating to ‘Advanced’ and then ‘Onboard Devices Configuration’.
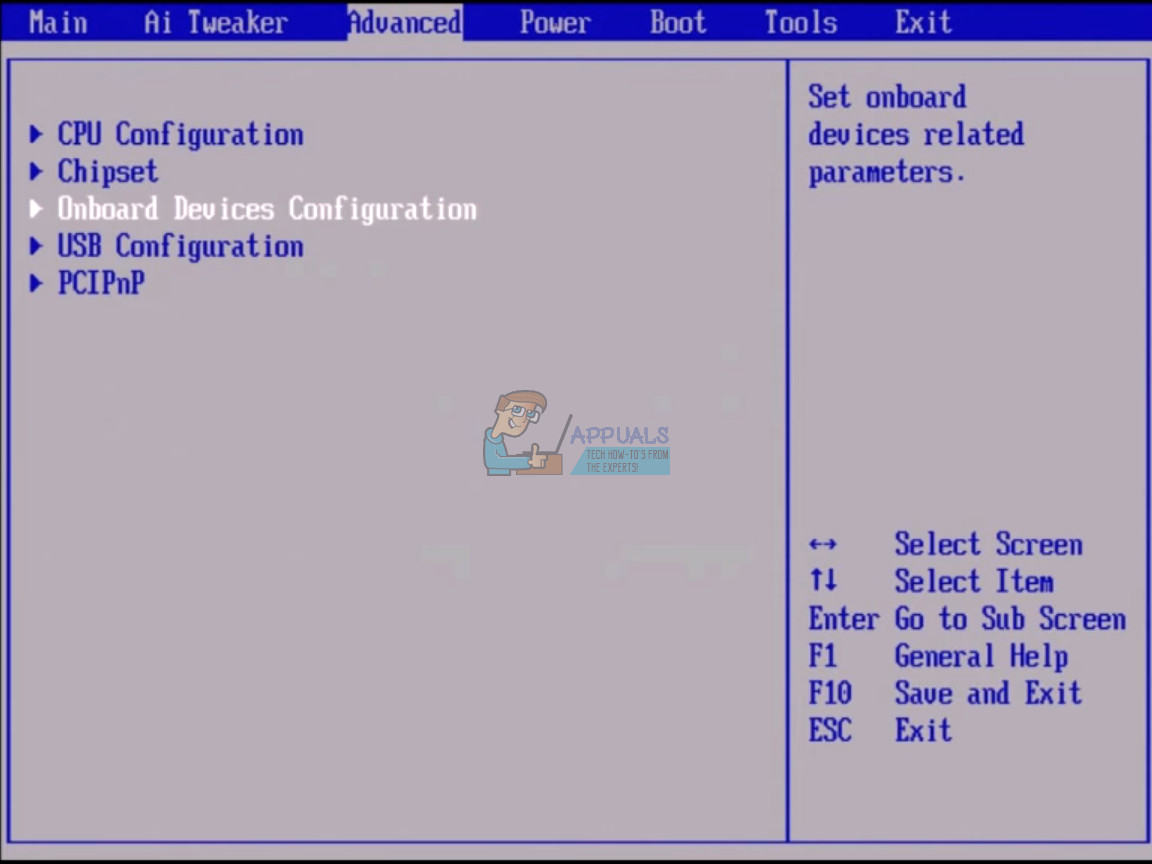
- Now look for the mode under your controller. If the mode is set to AHCI, then change it to IDE. If it is set to IDE, then change it to AHCI.

If Windows still doesn’t boot as required, you can perform solution 1 and 2 again. Make sure that you perform the CHKDSK operation either on all the drives or on the drive where your boot files are stored.
Solution 5: Backing up your Data
Before we go on to test the hard drive, you should retrieve and backup your data by following the steps mentioned below. For this, you might need a working USB port and a USB or an External Storage device. We will use the command prompt which we opened earlier on in the RE.
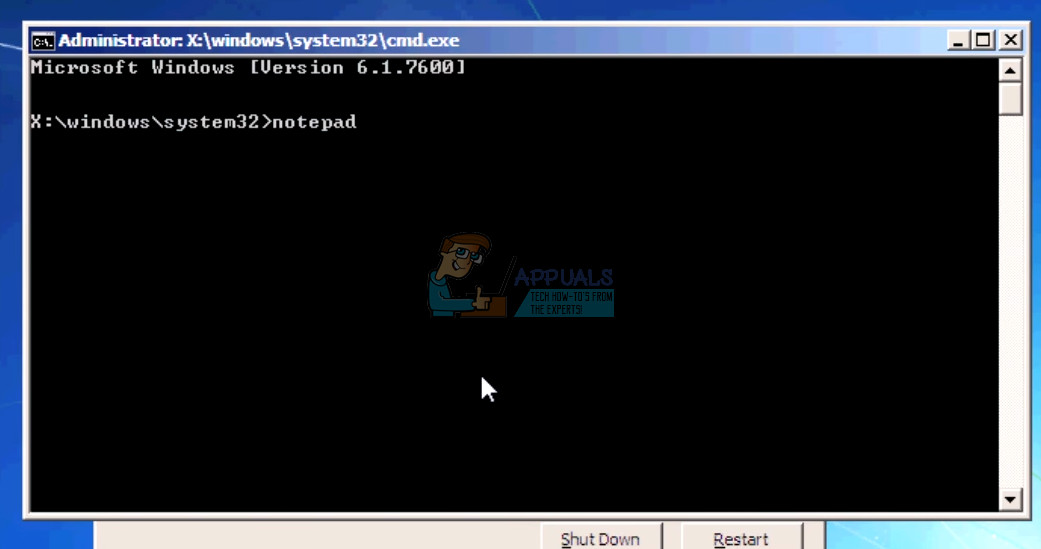
- Open the command prompt in RE as mentioned in the article earlier. Once at the command prompt, execute the instruction ‘notepad’. This will launch the normal notepad application on your computer in RE environment.
- Press File > Open in the notepad. Now select ‘All Files’ from the option “Files of type”. You will now be able to see all the files on your computer using this explorer.
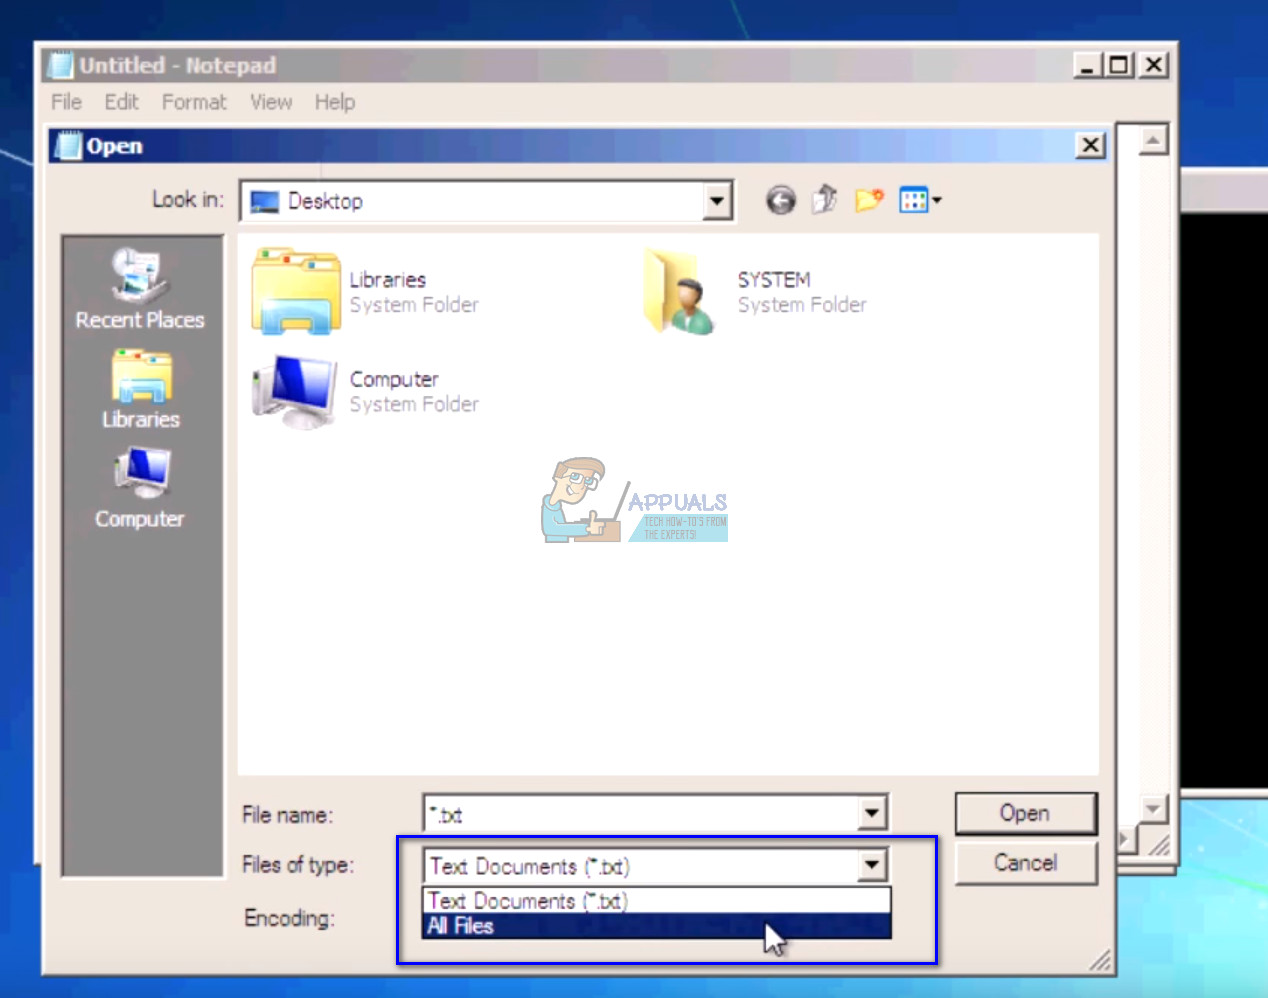
- Navigate to the data you want to back up. Right-click on it and select ‘Copy’.
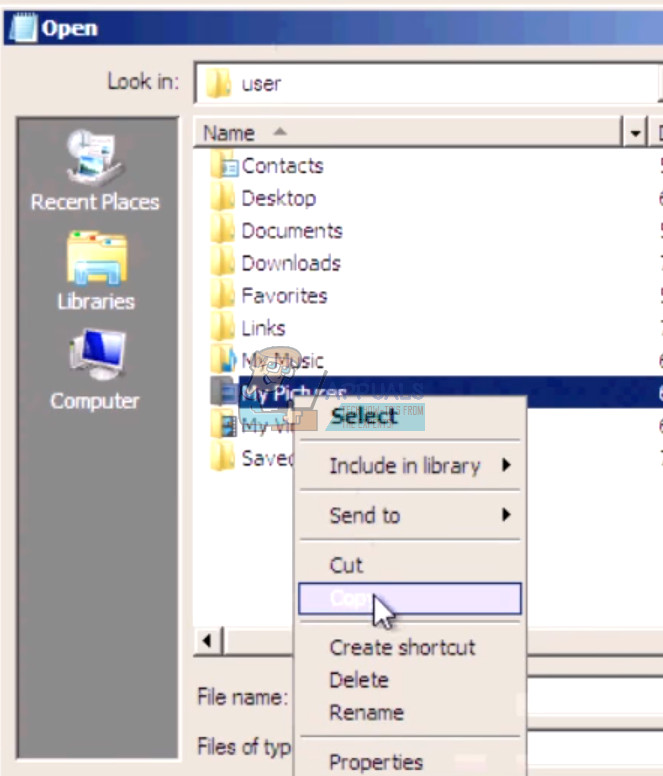
- Now navigate to My Computer again, locate the removable hard drive and paste all the contents in it. Repeat the steps until you have successfully backed up all your important data in the external hard drive.
Solution 6: Checking your Hard Drive Physically
If all the above methods fail, you should check your hard drive for any physical errors by plugging it into another computer. Carefully remove the hard drive, plug it into another computer and try running CHKDSK in it. You can also back up your data using this method.
Note: When you plug the hard drive in the new computer, make sure that the boot priority is set to that computer’s hard drive. Otherwise, you will be experiencing the same problem on that computer too.
If after following all the solutions, the computer still doesn’t fix the hard drive, there is no choice but to plug it back to your computer and install a new version of Windows from scratch. Make sure that you back up your data before proceeding.

Kevin Arrows
Kevin is a dynamic and self-motivated information technology professional, with a Thorough knowledge of all facets pertaining to network infrastructure design, implementation and administration. Superior record of delivering simultaneous large-scale mission critical projects on time and under budget.

What Can We Still Try After “Startup Repair Cannot Repair This Computer Automatically” Error?
Sometimes the startup repair won’t able to repair your computer’s windows and showing you the “Startup Repair Cannot Repair This Computer Automatically” error with the description like this:
Problem Event Name: StartupRepairOffline
Problem Signature 01: 6.1.7600.16385
Problem Signature 02: 6.1.7600.16385
Problem Signature 03: unknown
Problem Signature 04: 21200400
Problem Signature 05: AutoFailover
Problem Signature 06: 13
Problem Signature 07: CorruptFile
OS Version: 6.1.7600.2.0.0.256.1
Locale ID: 1033
 That’s not compulsory the startup repair will definitely fix your problem because most of the time your windows got corrupted in really bad condition and that’s why it forgot its own boot volume.
The second reason which also could be possible is, your startup repair can’t able to repair those files which need to be replaced because of some minor fault in your previously installed windows.
So, both reasons can be possible and the bad part about this error is we can’t able to identify why this problem is occurring in your PC by which one of these reasons.
That’s why you‘ll need to troubleshoot it step by step to find and fix the real problem and I’m gonna help you out to fix this problem by your own.
Solution 1# – Fixing Inactive HDD Partition
An active partition is a partition in your computer’s hard disk which known as bootable partition who contain your PC’s operating system. Normally only one partition can be active at the time like c: drive where mainly our windows is installed.
Sometimes that partition got inactive due to some reasons and we’ll need to reactive it in order to show it on recovery options.
First open cmd on your computer’s screen by pressing the Shift + F10 Key and then type the command what I’m listed below:
Command #1 – diskpart
This command will start disk part utility in your command prompt. When diskpart will start you’ll able to see “DISKPART>” on the left side.
Command #2 – list disk
This will list all of your connected drives in your computer.
Command #3 – select disk 0
In this step, we’re selecting our main hard drive where your window is installed. In my case, I’m selecting disk 0 because that’s the only drive shown in my cmd and that’s the also one where my OS is installed.
Command #4 – list partition
This command will show you all the partitions created in that disk what you’ve selected.
Command #5 – select partition 1
Normally we are selecting partition 1 because that’s our Windows Boot Partition, but that also doesn’t prove that we will always need to select the 1st one because sometimes partition 2 can be our Boot Partition too. So, make sure you select the partition where your Boot files are located and not the windows.
Note: Only select those drives whose capacity is same as these “100 MB”, “350MB” And “500MB”.
Command #6 – active
That will make your partition active.
Command #7 – exit
Now restart your computer and open the system recovery options again to see the changes in it.
Solution 2# – Fixing Windows Master Boot Recode
The MBR or I say master boot recode is the most important data structure on the disk which is mainly created when we make a partition in our hard disk to install windows.
It’s possible your boot volume got corrupted by some recently installed Software, Viruses or Windows/Software updates and it’s better to get it repair as soon as possible So, now we are using cmd command to repair our hard disk boot volume and now you’ll just need a cmd to type the command into the command prompt.
Command 1# – Diskpart
Command 2# – List volume
Command 3# – Exit

You’ll need to find your windows drive letter in that list, like mine is 29 GB D: drive.
Now you know what is your drive letter is, so just enter your drive letter in the command prompt and repeat the following command given below.
Command 4# – D: (Your Windows Drive Letter)
Command 5# – Bootrec /fixmbr
Command 6# – Bootrec /fixboot
Command 7# – Bootrec /rebuildbcd {Skip this command only for the first time and use it if skipping this won’t works after testing but definitely use the chkdsk command written below in every try.}
Command 8# – Chkdsk /f (Try chkdsk /f /r If “Chkdsk /f” command Won’t Works)
Command 9# – Y
After “chkdsk” command completes, just restart your computer and I hope your problem is solved.

Solution 3# – Fixing Windows Files Manually
First open cmd on your computer’s screen by pressing the Shift + F10 Key and then type the command what I’m listed below and follow the other instructions too:
When you opened your command prompt it will show you the path “X:windowssystem32>” by default because of your setup using an internal ram disk to open itself.
But now we’ll need to change the cmd path because we do want to edit our previously installed windows to fixing it and that’s why the next thing what we’re doing is trying to find our previous installed windows drive.
Command 1# – c:
This command will change’s your cmd path to the C: Drive and then you can easily check that’s my windows driver or not by using the second command which is:
Command 2# – dir
After dir command if your cmd shows you some directory listed in it, which showing you Program Files, Users, and Windows folders, if you’ve did found your system drive perfectly and “C:/ Drive” is your windows drive and you can skip the next couple paragraphs where are written about changing drives path to the second partition.
If your cmd shows you “volume in drive c is system reserved” just like the picture given below then it’s not your windows driver and now you’ll need to use the “d:” in your next command to open the D Driver in the command prompt and just like the above one use the “dir” command again to confirm that does “D: Driver” is the one who’s having my windows installed in it or not.
Mine one is d: and If you still won’t getting the directory in your D Drive also, then now change your drive letter to E, F or some other letter until you’ve found where the system drive is located.

Now type your windows config folders path into the cmd to open it and after that use the dir command again to find which files and folders are stored in it.
Command 3# – cdwindowssystem32config
Command 4# – dir
After using the dir command if your command prompt shows you some files and folder who’s having these names exist in that config folder, then everything is great just move to the next command.
- RegBack (which is a folder)
- DEFAULT
- SAM
- SECURITY
- SOFTWARE
- SYSTEM

Now you’ll have to make a backup of all some files and restore it into the another folder to fix your windows important boot files which help your window to start properly
So, use these command
Command 5# – MD mybackup
Command 6# – copy *.* mybackup
If it asks you to overwrite existing files, just type A and press enter to allow all backups to be overwritten.

Now let’s check if we can use the automatic Windows backups to restore your corrupted registry:
Command 7# – CD RegBack
Command 8# – DIR
After the above one commands now you’ll need to check does that directory what you’ve opened is having these files stored in it with the file name.
I want you to check the file or folder size also.
- The DEFAULT, SAM and SECURITY files must be about 262,000 bytes in their size.
- The SOFTWARE file should be about 26,000,000 bytes.
- The SYSTEM file should be about 9,900,000 bytes.
The file sizes what I existing here are estimated, and its possible it may differ by the condition of your system. If anyone of them shows you 0 bytes, then you have to stop what you’re doing and try to use some other alternative method to fixing your windows, because an operating system cannot work with 0-byte size registry hive.
If everything looks good then use the remaining commands mentioned below.

Command 9# – copy *.* ..
If it asks you to overwrite existing files, just type A and press enter to allow all backups to be overwritten.
Command 10# – exit

Now restart your computer and test it, if the problem still stays then try to use the startup repair thing one more time.
REINSTALL YOUR WINDOWS IF NOTHING WORKS!!!
Click Here To See >> How To Install Windows?