-
MiniTool
-
MiniTool News Center
- How to Change Drive Letter with CMD Windows 10
By Alisa | Follow |
Last Updated June 29, 2020
![]()
Diskpart is a command-line tool in Windows system that allows you to manage your disks and partitions. This post introduces how to change drive letter with CMD in Windows 10, namely, by using Diskpart CMD tool. MiniTool software provides users a free disk partition manager, data recovery software, system backup and restore software, etc.
If you want, you can change drive letter for a drive with CMD (Command Prompt) in Windows 10. This post includes detailed guides for how to use Diskpart command-line tool to change driver letter in CMD.
How to Change Drive Letter with CMD in Windows 10
Diskpart is a Windows built-in CMD tool that lets you easily manage hard drive and change drive letter. To change or assign drive letter in CMD, you can firstly open Diskpart utility in Command Prompt. Check the steps below.
Step 1. Open CMD in Windows 10
You can press Windows + R, type cmd, and press Ctrl + Shift + Enter to open elevated Command Prompt.
Step 2. Open Diskpart tool
In Command Prompt window, you can type diskpart command, and press Enter. This will open the Diskpart command-line utility.
Step 3. Change drive letter CMD
Next you can type the command line below to change drive letter in Command Prompt in Windows 10. Remember to press Enter after typing each command line.
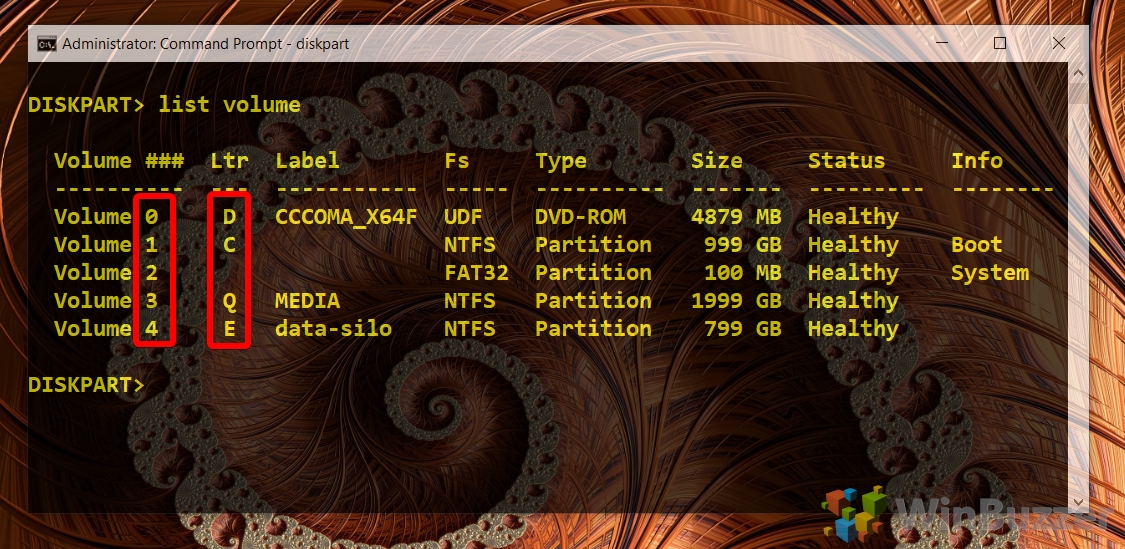
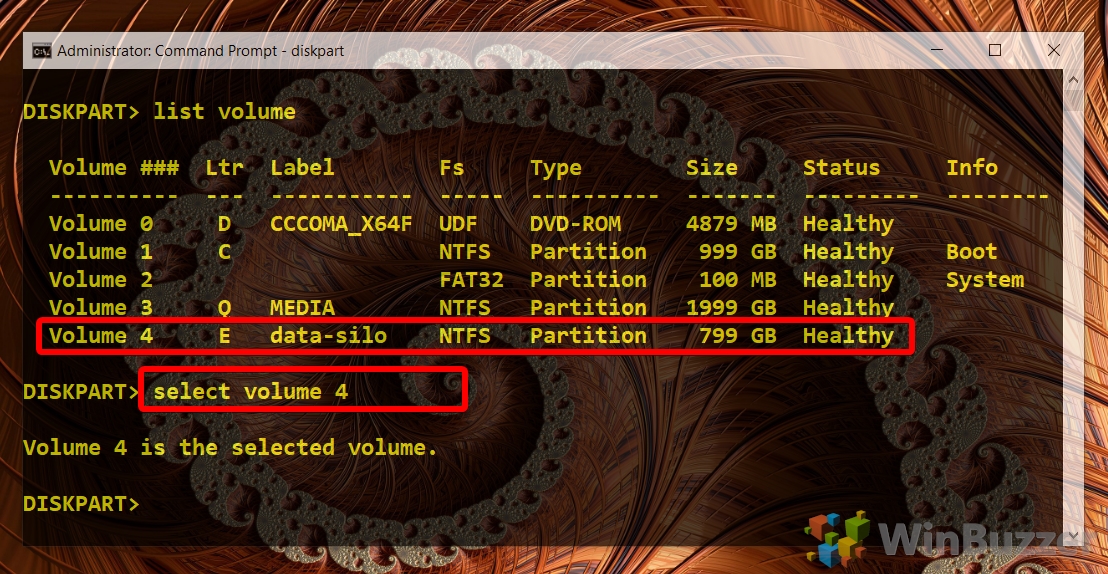
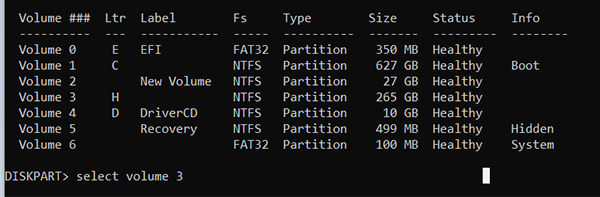
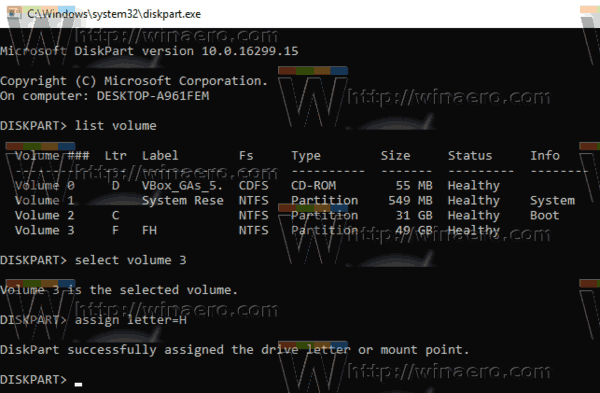
- list volume (this command will list all available volumes detected by your computer)
- select volume * (replace “*” with the exact volume number of the target partition)
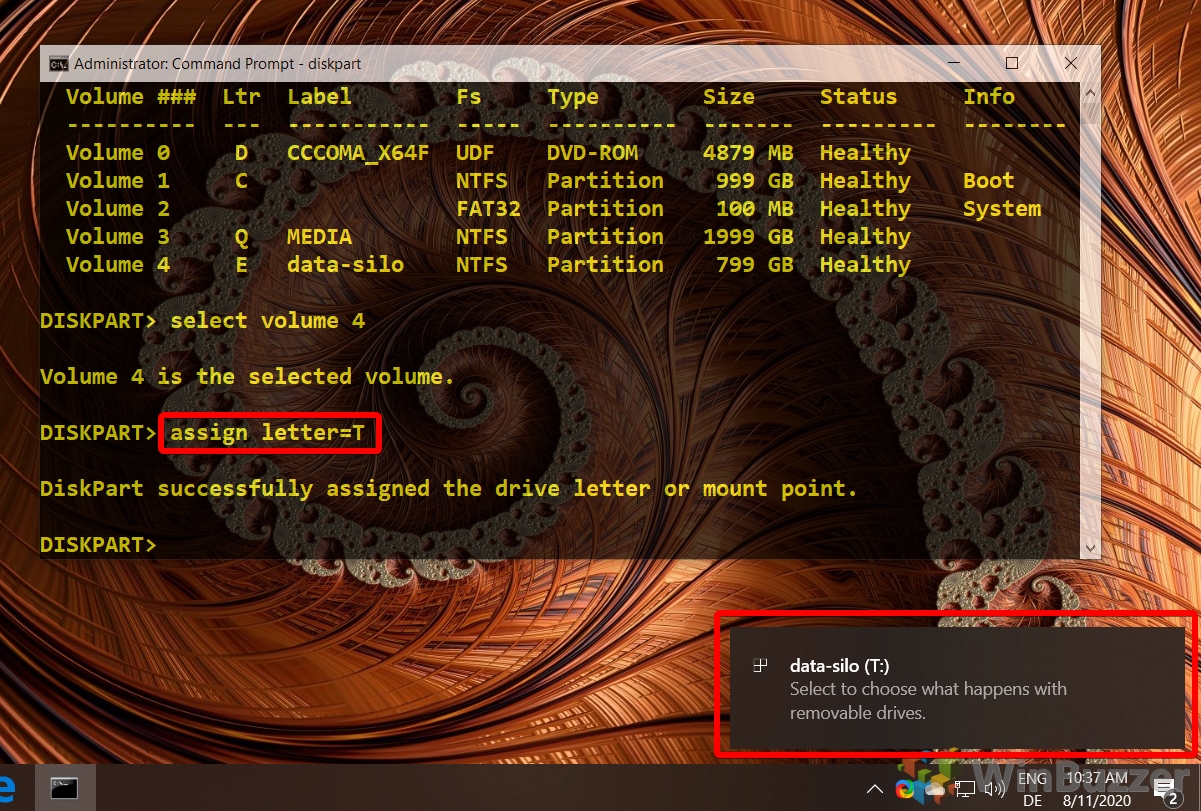
- assign letter=* (replace “*” with the preferred drive letter like “F”)

After you change or assign a drive letter for a drive or device, Windows will display the same letter automatically next time you reconnect the device to your computer.
If you want to remove the drive letter of a specific drive, you can type remove letter=* command and press Enter. Still, replace “*” with the exact drive letter of the target drive.
How to Change Drive Letter Using PowerShell
Some Windows 10 users might find that Command Prompt is missing from Win + X menu, and instead, it shows Windows PowerShell. Windows PowerShell can do most things that Command Prompt does. Alternatively, you can also use Windows PowerShell to change drive letter in Windows 10.
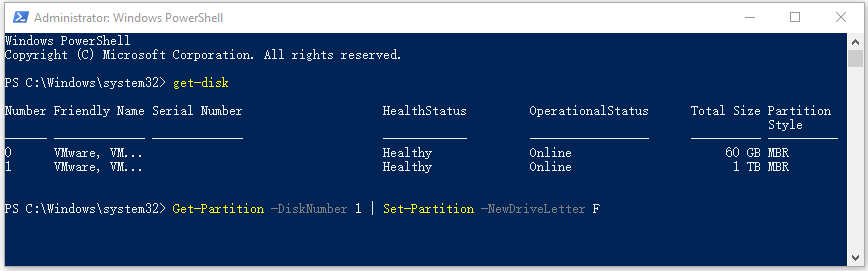
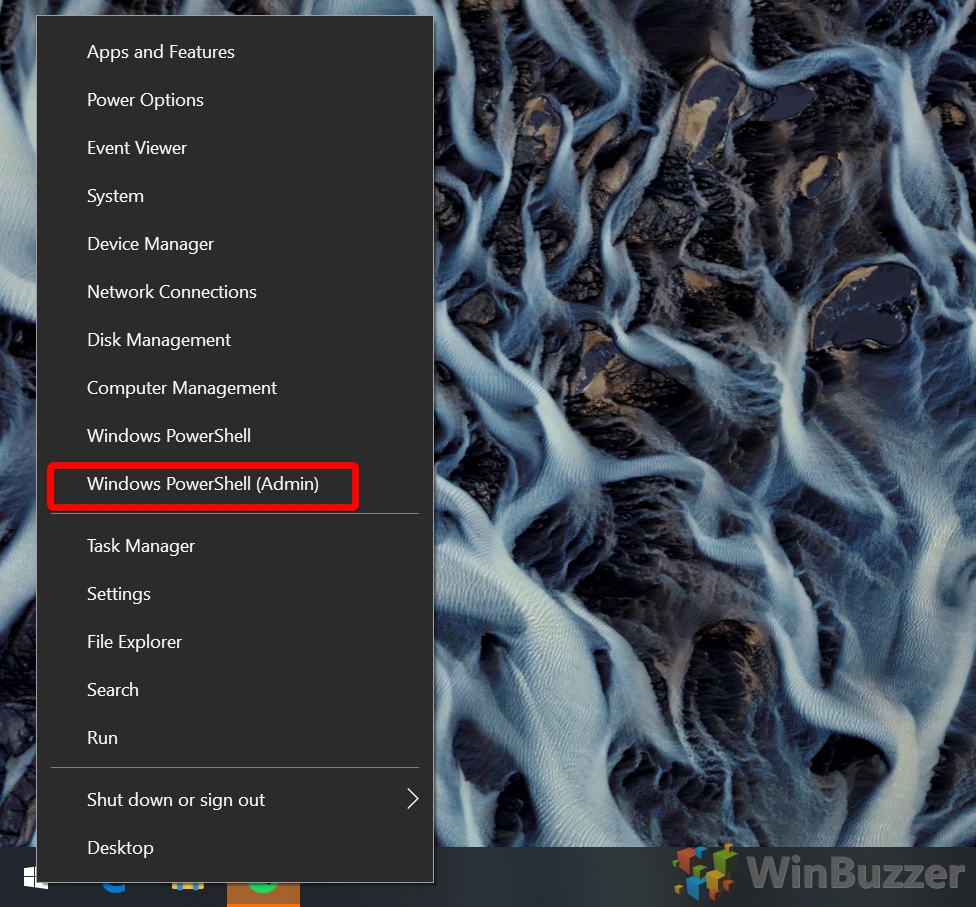
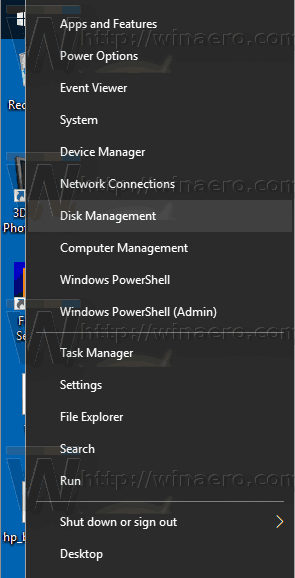
Step 1. Press Windows + X, and choose Windows PowerShell (Admin) to run Windows PowerShell utility as administrator.
Step 2. Next type get-disk command and press Enter to list all available drives the computer detected.
Step 3. Then you can type the command: Get-Partition -DiskNumber 1 | Set-Partition -NewDriveLetter F, and press Enter to assign a new drive letter. You should change “*” with the actual disk number of target drive, and replace “F” with the new drive letter you’d like to assign to the drive.
Instead of using CMD or PowerShell to change drive letter for a drive in Windows 10, you can also utilize third-party free disk partition manager like MiniTool Partition Wizard to easily change drive letter and manage disk partitions on Windows 10.
MiniTool Partition Wizard let you easily create/delete/extend/resize/format/wipe partitions, convert partitions formats, migrate OS, clone disk, test hard drive speed, analyze hard drive space usage, check and fix disk errors, and more.

Conclusion
By following the detailed guides above, you can easily change drive letter with CMD (Command Prompt), PowerShell or MiniTool Partitioon Wizard on Windows 10.
About The Author

Position: Columnist
Alisa is a professional English editor with 4-year experience. She loves writing and focuses on sharing detailed solutions and thoughts for computer problems, data recovery & backup, digital gadgets, tech news, etc. Through her articles, users can always easily get related problems solved and find what they want. In spare time, she likes basketball, badminton, tennis, cycling, running, and singing. She is very funny and energetic in life, and always brings friends lots of laughs.

Contents
- 1 How to Change Drive Letter in Windows 10 via Disk Management
- 2 How to Change Drive Letter in CMD using a DISKPART Disk Management Command
- 3 How to Change Drive Letter in Windows 10 with a PowerShell Disk Management Command
- 4 How to Change / Assign a Drive Letter via the Registry Editor
Windows 10 helpfully assigns drive letters to disks as they’re added, but they aren’t always the most logical choices. While we all know that C: is the system drive, it doesn’t make quite as much sense to have D: as your games drive or E: as your media drive. Luckily it’s quite easy to change a drive letter in Windows 10, and we’re going to walk you through the process today.
How does Windows 10 drive letter assignment work?
For the most part, Windows 10 automatically assigns letters to drives as they’re connected, in alphabetical order. However, there are a few exceptions to this rule that may leave some users confused.
As mentioned earlier, C: is always reserved for the system drive, but A: and B: are reserved too, for rarely used floppy drives. Because of Windows automatic assignment, you may have also noticed that Windows changes the drive letter of your USB stick if you’ve connected another before it.
If you want letters that are easier to identify in bios or don’t want your USB letters jumping around, it’s quite easy to permanently change a drive letter in Windows 10 to something of your choosing. We’re going to cover a few different ways today, including how to change the drive letter in CMD.
How to Change Drive Letter in Windows 10 via Disk Management
The most user-friendly way to assign drive letters in Windows is through the Disk Management interface, which is relatively easy to use.
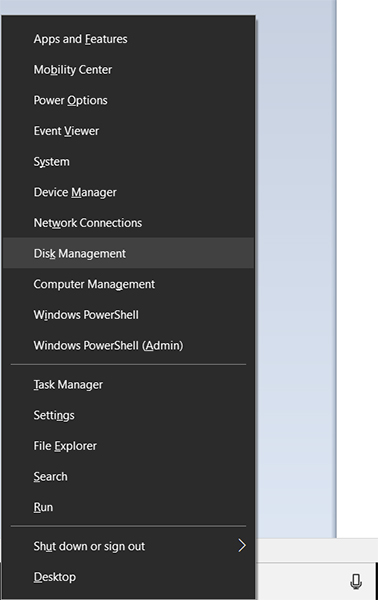
- Open Disk Management
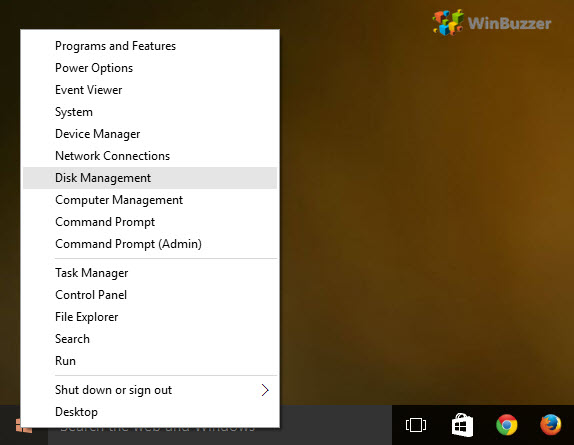
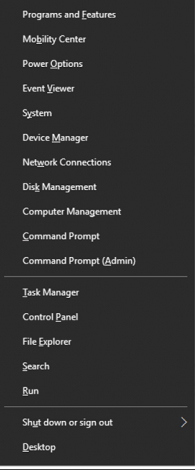
Press “Ctrl+ X”, and click “Disk Management”.

- Open the Windows 10 Change Drive Letter interface
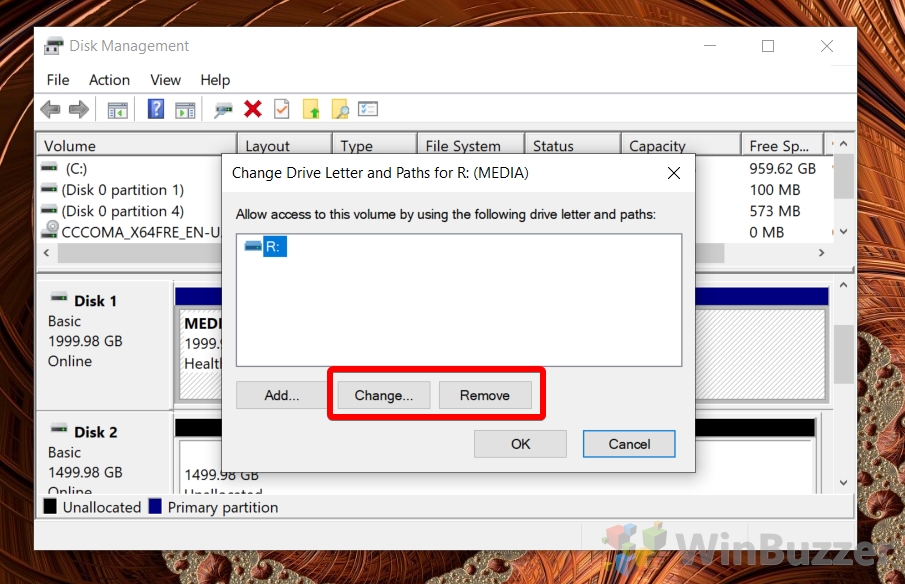
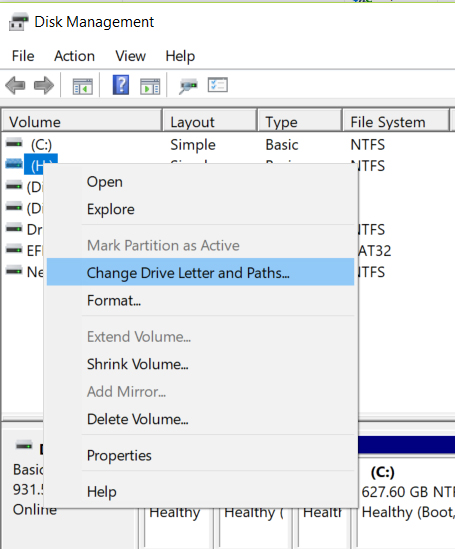
Right-click the drive that you want to change or free the letter from and click “Change Drive Letter and Paths…”

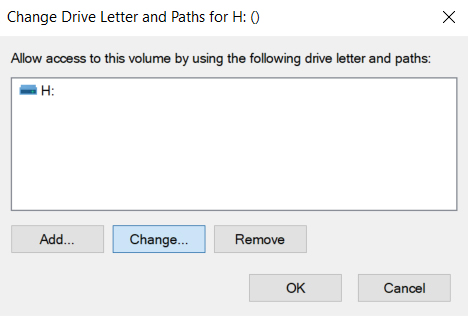
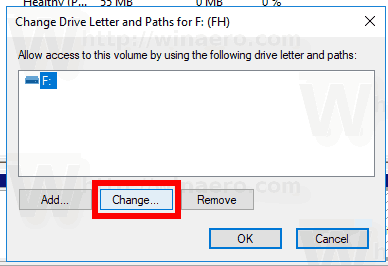
- Click the “Change…” button
If you want to free up the letter you can instead click “Remove”, or “Add” if it doesn’t have a letter.

- Select “Assign the following drive letter”
In the dropdown next to it, use disk management to change the drive letter in Windows. Click “OK”.


How to Change Drive Letter in CMD using a DISKPART Disk Management Command
Though it’s not quite as user-friendly, it can be much faster to change a drive letter with Command Prompt.
- Open Command Prompt as admin

- Run the diskpart command
In your cmd window, run Disk Management command
diskpartby typing it and pressing “Enter”
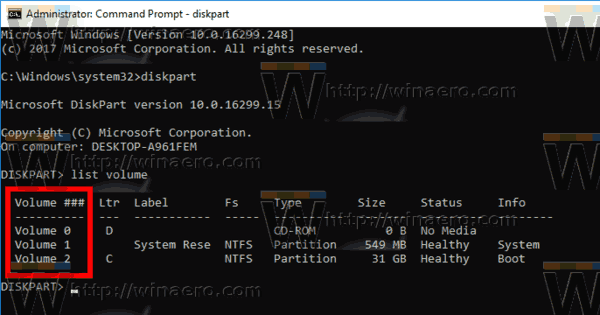
- Run “list volume”
Now that the Disk Management Command is running, type
list volumeand press “Enter” to get a list of all your drives and their letters. Note the number next to the one you want to change.
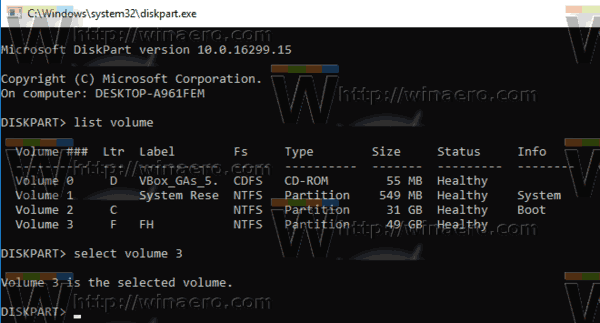
- Select the volume
Type
select volume x, replacingxwith the number you noted down in the previous step.
- How to change the drive letter in CMD
Now that the disk is selected, you can assign a drive letter with the following command:
assign letter=xUnless you want the drive to assigned to X:, change the above letter to one that makes sense to you.
If you get an error indicating that it’s not available, repeat the command with a different letter.


How to Change Drive Letter in Windows 10 with a PowerShell Disk Management Command
Those more familiar with PowerShell can use this method instead to achieve the same result.
- Open PowerShell
Press “Windows + X”, then click “Windows PowerShell (Administrator)” to open it.

- List your drives
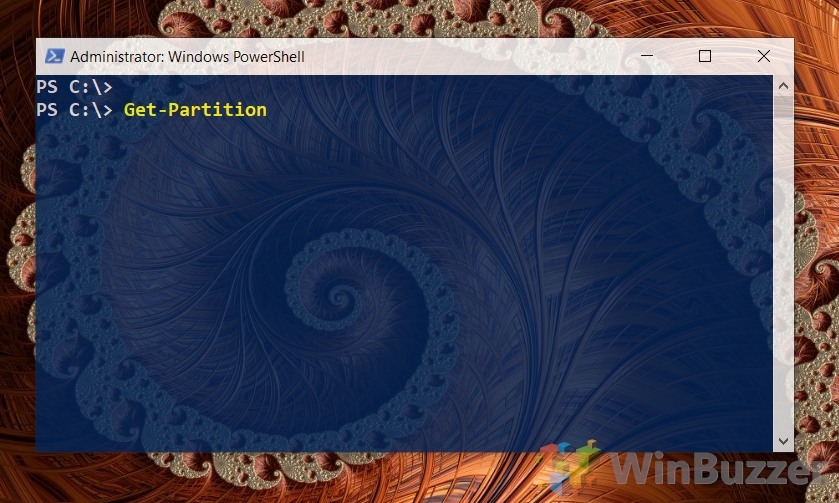
In PowerShell, type
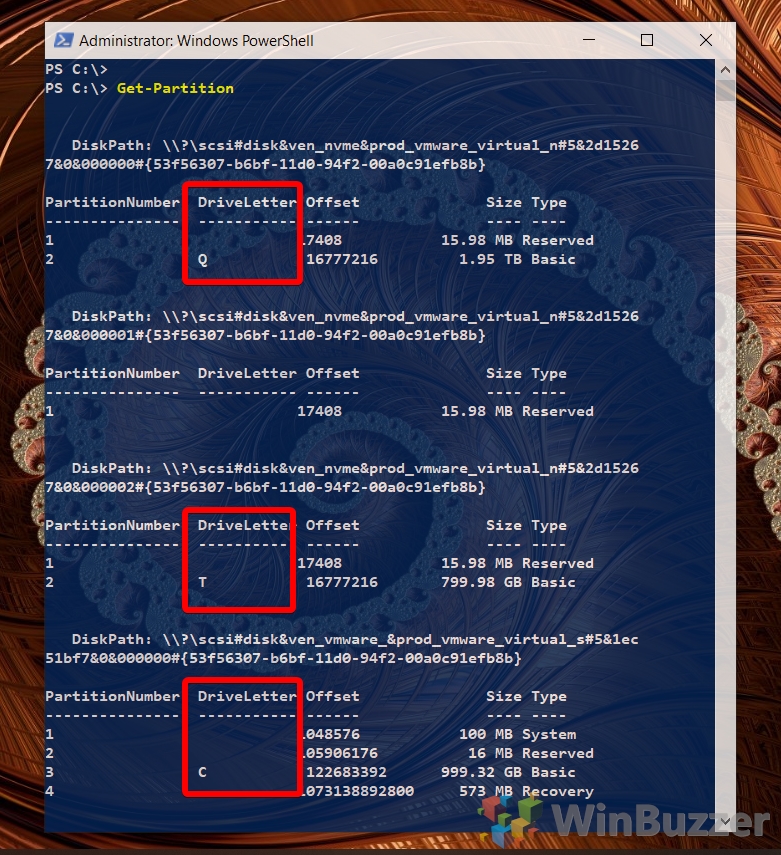
Get-Partitionand press “Enter”.
- Note down the drive letter you want to change

- Assign a drive letter via PowerShell command
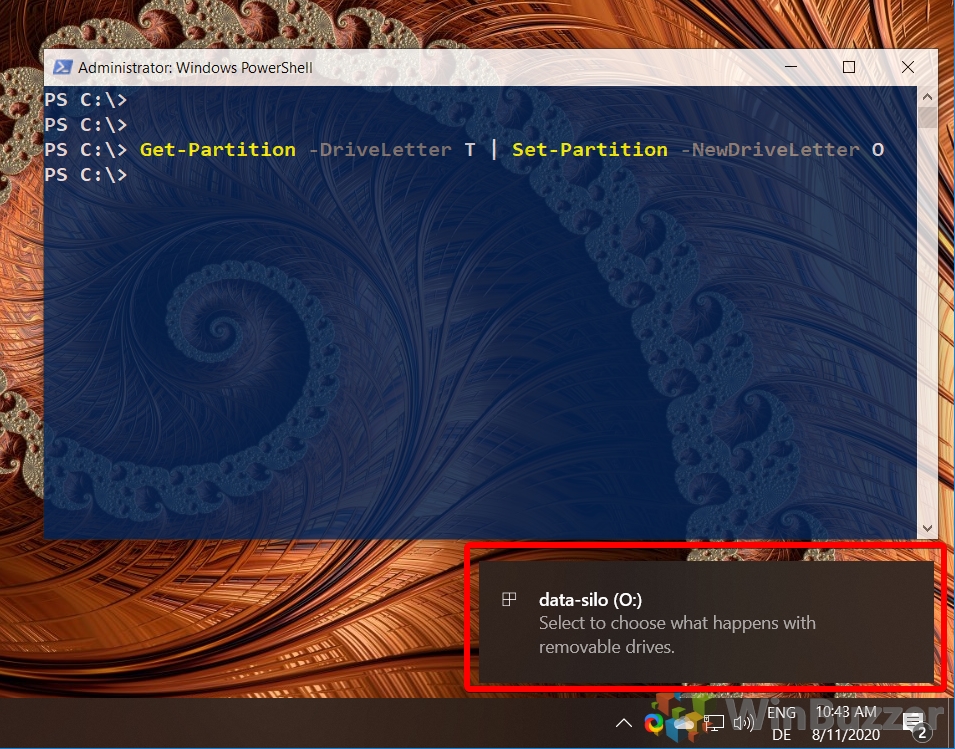
Remembering the letter you noted down earlier, type:
Get-Partition -DriveLetter x | Set-Partition -NewDriveLetter yReplace
xwith the drive letter you want to change, andywith what you want it changed to.
How to Change / Assign a Drive Letter via the Registry Editor
Alternatively, if none of the above methods worked or you’re just feeling brave, you can modify the drive letter via the registry. Just be sure to read our safe registry editing guide first.
- Open the registry editor
Press the “Windows” key, type “Registry editor” and click on the top result.

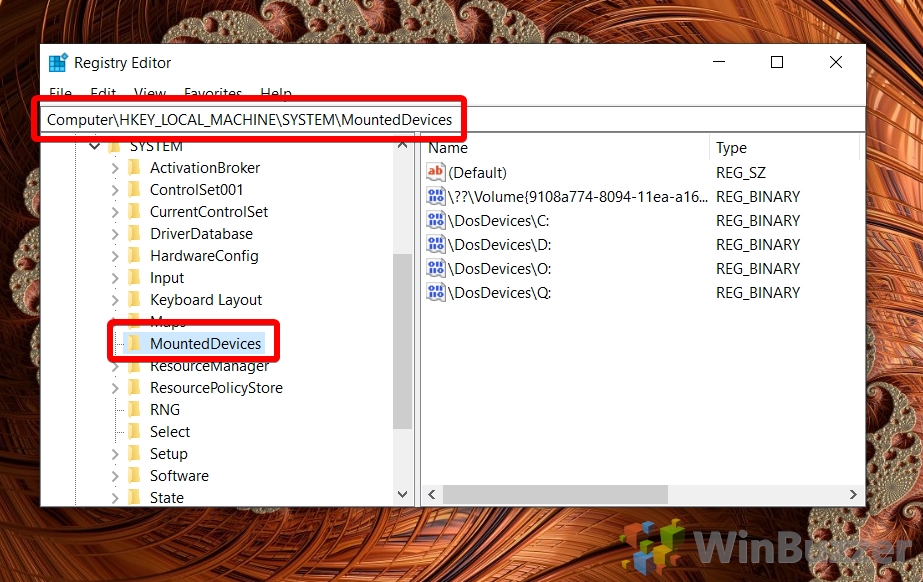
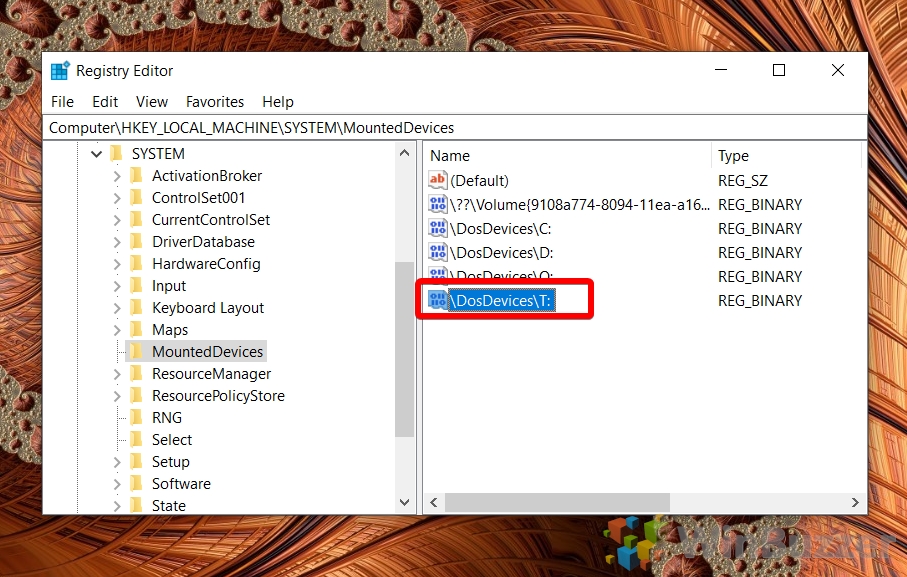
- Navigate to the “MountedDevices” key
In the left-sidebar, navigate to “SYSTEM > MountedDevices” or paste the following in your address bar:
ComputerHKEY_LOCAL_MACHINESYSTEMMountedDevices
- Note the drive you want to change
The MountedDevices key will contain entries for all of your drives, with the format
DosDevicesX:. Find the one you want to change.
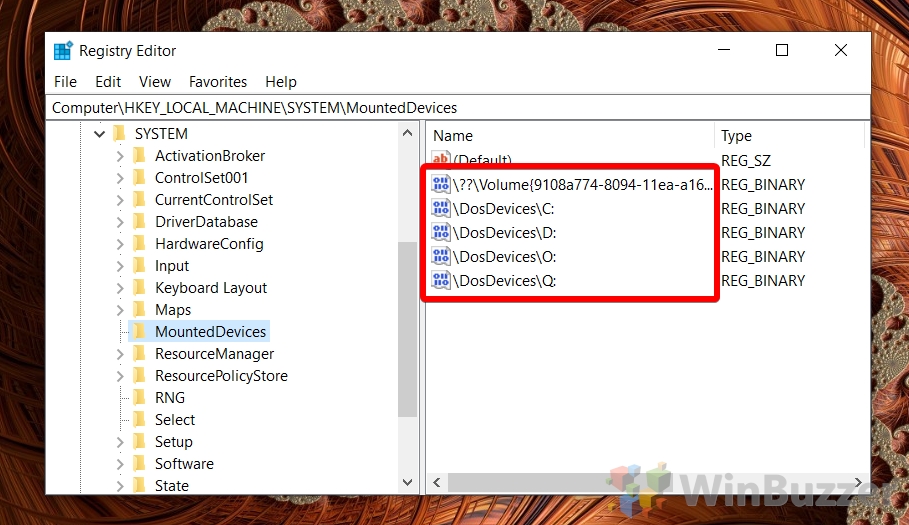
- Rename the registry entry
Right-click the drive you want to change and choose “Rename”.

- Change the drive letter in Windows 10 to one of your choosing
Edit the final part of the name, after the
to a letter of your choosing, followed by:. Do not delete DosDevices or you may cause issues. Sign in and out of the PC to apply the changes.


If you enjoyed this guide, you may want to consider enabling or disabling disk caching or turning on BitLocker for your newly customized drives.
How to Add, Remove, or Change a Drive Letter in Windows 10 Using Two Methods
By default, your Windows 10 operating system automatically assigns a unique letter to each drive on your computer. The first two letters of the alphabet are reserved for floppy drives and the letter C is for your Windows installation disk. Apart from these, if you would like to perform the Windows 10 change drive letter function to add a letter, or remove a letter, here’s how you do it.
The following guide teaches two ways to change drive letter Windows 10. It also shows how you can add and remove a drive letter on your PC. Let’s check it out.
- Part 1. Add, Remove or Change a Windows 10 Drive Letter in Disk Management
- Part 2. Add, Remove or Change a Windows 10 Drive Letter Using Command Line
- Extra Tip: How to Hide Drive Letter in Windows 10?
Part 1. Add, Remove or Change a Windows 10 Drive Letter in Disk Management
Disk Management is a utility found on Windows computers that allows users to manage various tasks related to disks on your computers. The utility lets you view your disks, format them, shrink them, and even delete them from your PC.
The utility can add, remove and change a drive letter and the following is how you can use it for this purpose on your PC.
1. Add or Change a Windows 10 Drive Letter in Disk Management
In this section, you will learn how you can add or change the letter of a drive located on your PC. This allows you to use any of the unused letters for your drive but make sure to only use the unreserved ones so as not to get any errors.
Here’s how to assign a drive letter Windows 10:
Step 1: Press the Windows + X keys on your keyboard and a menu will appear. Click on Disk Management in the menu and the utility will launch.
Step 2: When the utility launches, find and right-click on the disk whose letter you want to change. Select Change Drive Letter and Paths from the context menu.
Step 3: On the screen that follows, click on the button that says Change to change the drive letter.
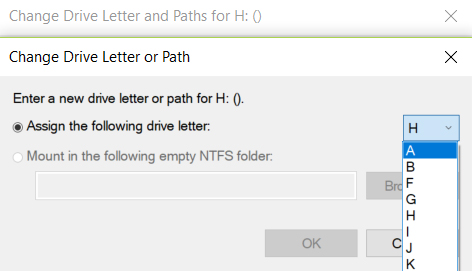
Step 4: On the following screen, next to where it says Assign the following drive letter you will find a dropdown menu. Choose the new letter from the menu and click on OK to save the changes.
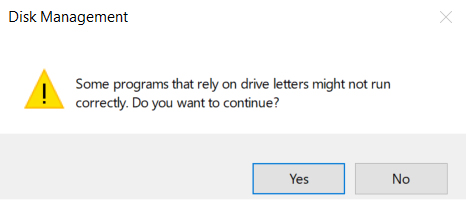
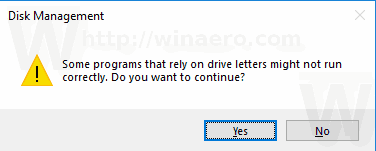
Step 5: A prompt will appear on your screen where you need to click on Yes to allow the procedure to happen.
Your selected drive will now have a new letter chosen by you in the Disk Management utility. So that’s how to change drive letter Windows 10 using a built-in utility on your computer.
2. Remove a Windows 10 Drive Letter in Disk Management
When you remove the letter of a disk drive from your computer, you are hiding the drive from appearing in This PC on your computer. The drive will not show up anywhere nor will it be used by any apps on your computer.
With that in mind, let’s see how to remove the letter of a drive in Disk Management on a Windows 10 PC:
Step 1: Press the Windows + X key and choose Disk Management from the menu that appears on your screen.
Step 2: When Disk Management opens, right-click on the drive you want to remove the letter for and select Change Drive Letter and Paths option.
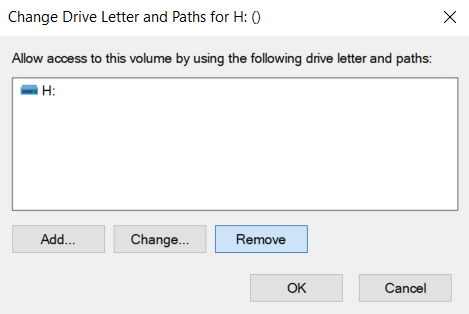
Step 3: On the next screen, click on the button that says Remove to remove the drive letter.
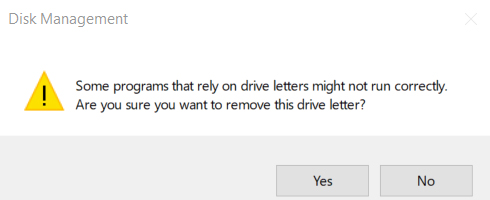
Step 4: A prompt will appear telling you that some of the apps won’t work if you remove the drive letter. Click on Yes and it will let you move forward.
There you go. The drive letter has been successfully removed and your drive will not show up in your file explorer.
Part 2. Add, Remove or Change a Windows 10 Drive Letter Using Command Line
Are you not a huge fan of using GUI to accomplish tasks? No worries, the above task can be done using a command prompt window as well and the following shows how to do the change drive letter CMD operation on your PC.
There’s a command that you can use in a command prompt session to assign and change drive letters for your PC. The following shows how you do it on your computer.
Step 1: Press the Windows + X key and choose Command Prompt (Admin) to open a command prompt window on your PC.
Step 2: In the command prompt window, type in list volume to see all of your drives. Make a note of the volume number you want to change the letter for.

Step 3: Type in the following command replacing vol_num with your volume number.
select volume vol_num
Step 4: Now that your volume has been selected, execute the following command changing M with your chosen drive letter to change your current drive letter.
assign letter=M

If the chosen drive letter is available, it should instantly be assigned to your selected volume. So that was how to change drive letter in Windows 10 using command line.
Extra Tip: How to Hide Drive Letter in Windows 10?
One more thing you can do with the drives on your PC is that you can hide their letters from appearing on your computer. This doesn’t remove or assign a letter but just hides the letter on your PC. The following is how you do it.
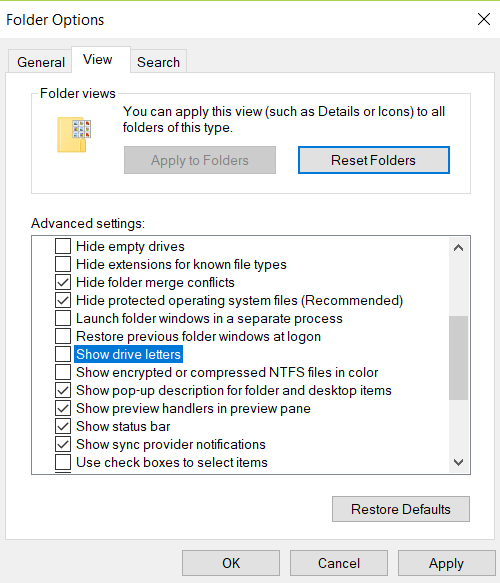
Open File Explorer and press the Alt + V keyboard shortcut. Then, press Y followed by O and Folder Options dialog box will appear. Head to the View tab and uncheck the option that says Show drive letters. Click on OK to save changes. The drive letter should now be hidden on your PC.
Another useful tip you might want to learn is how you can get access to your Windows account when you have forgotten the password. There’s a software called Windows Password Keythat allows users to recover lost passwords on your computer. You can use it to recover the password for your account and then log-in to your account.
We hope you find the above solutions on how to change drive letter Windows 10 to be easy and efficient to follow on your Windows 10 PCs. Also, we hope you like the 4WinKey tool that lets users recover passwords for your accounts.
Recommended Product
![]()
- Reset/Remove Windows admin and other user password for local/domain account.
- Create a new local/domain admin account to unlock your computer.
- Change your Microsoft account password offline.
- Fully support Windows 10/8.1/8/7/Vista/XP, Windows Server 2012 (R2)/2008 (R2)/2003 (R2).
Free Download
- Related Articles
- How to Disable Windows 10 Fast Startup
- Windows 10 Keeps Asking for Login User Password, How to Fix It
- Windows 10 Password is Incorrect, How to Fix it
comments powered by
By default, Windows 10 automatically assigns drive letters to connected drives, including internal and external drives. You might want to change these letters. Here is how it can be done.
Windows 10 assigns an available drive letter to a new drive connected to the computer. The operating system goes through the alphabet from A to Z to find the first available letter to assign it to various drives. Historically, it reserves the drive letters A and B for floppy drives.
Modern Windows versions assign the C letter to the system partition which Windows is installed on. Even in a dual-boot configuration, Windows 10 displays its own system partition as C:.
![]()
Changing drive letters will allow re-arranging drives in the This PC folder. This can be useful after you add an extra drive or create a new partition. For example, you might want to change its drive letter to display it before the DVD drive. Also, when you change the drive letter of a USB drive, it will be assigned permanently. Often Windows 10 randomly changes the drive letter for external drives when you connect them, so this way you can make this process more predictable.
Tip: Show drive letters before drive names in This PC / Computer folder.
There are a number of methods you can use to change the drive letter of a drive in Windows 10. Let’s review them.
To change the drive letter in Windows 10, do the following.
- Press the Win + X keys together.
- In the menu, select Disk Management.

- In Disk Management, right-click on the partition whose drive letter you would like to change. Select Change Drive Letter and Paths in the context menu.

- In the next dialog, click on the Change… button.

- Select Assign the following drive letter and choose the desired letter in the drop down list.
 Confirm the change.

 Confirm the change.
You are done. The drive will appear in File Explorer under the letter you’ve chosen.
Change the drive letter in the command prompt
- Open an elevated command prompt.
- Type
diskpart. - Type
list volumeto see all drives and their partitions.
- Look at the ### column in the output. You need to use its value with the command
select volume NUMBER. Substitute the NUMBER portion with the actual partition number for which you want to change the drive letter.
- Type the command
assign letter=Xto change the drive letter. Substitute the X portion with a desired letter. Note: If the new drive letter you are trying to use is not available, you will get an appropriate error message.
You are done.
Change the drive letter in PowerShell
- Open an elevated PowerShell instance.
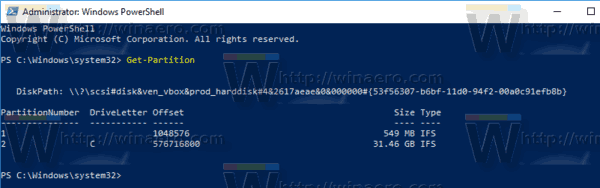
- Type
Get-Partitionto see the list of your partitions.
- Note the drive letter and type the next command:
Get-Partition -DriveLetter <your_current_drive_letter> | Set-Partition -NewDriveLetter <a_new_drive_letter>
For example, the command can look as follows:
Get-Partition -DriveLetter H | Set-Partition -NewDriveLetter F

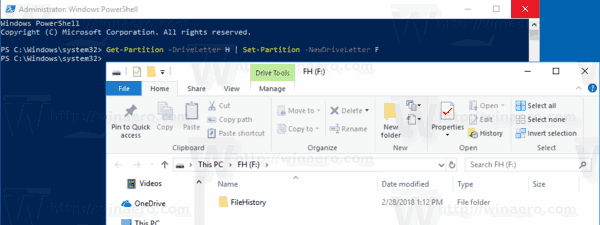
That’s it!
Support us
Winaero greatly relies on your support. You can help the site keep bringing you interesting and useful content and software by using these options:
If you like this article, please share it using the buttons below. It won’t take a lot from you, but it will help us grow. Thanks for your support!
Download PC Repair Tool to quickly find & fix Windows errors automatically
This post will show you how to change the Drive letter in Windows 11/10. For each hard drive partition, a letter like C, D, E, etc., is assigned automatically. If you want to change or rename some drive letter, then you can try any of the simple options covered in this post.
There are 5 different ways covered in this post to change or rename a drive letter in Windows 11/10. These are:
- Using Command Prompt
- Disk Management
- PowerShell
- Registry Editor
- Drive Letter Changer software.
1] Using Command Prompt

Follow these steps to change a drive letter using CMD or Command Prompt window:
- Run Command Prompt as an administrator
- Type
diskpartcommand and hit the enter key - Execute
list volumecommand to see the list of all hard drives including their volume numbers and letters - Run
select volume 5command. Replace 5 with any other volume number for which you want to change the drive letter - Execute
assign letter=Lcommand. Here again, replace L with any other alphabet.
This will change the drive letter immediately.
If the Drive letter is missing or hidden, then you can try some easy options to fix such an issue and then see the newly assigned letter.
2] Using Disk Management

Type diskmgmt in the Search box and use the Enter key.
In the Disk Management window, the list of all volumes or drives, volume type, capacity, free space, etc., are visible. Right-click on a volume and use Change Drive Letters and Paths option.
A small box appears. Here, use the Change button, and another box will open. Now you can select the new letter using the drop-down menu and press the OK button.
Finally, confirm the change using the Yes button.
Read: How to Show Drive Letters first before Drive Names.
3] Using PowerShell

This option is also useful to change drive letters, but it doesn’t show volume numbers and letters. So, you first need to check which drive letter you want to change. After that, use these steps:
- Run elevated PowerShell window
- Now execute this command:
Get-partition -driveletter F | set-partition -newdriveletter L
Make sure to replace F and L with your actual drive letter and new drive letter.
4] Using Registry Editor

This method requires a PC reboot after applying the changes. The steps are:
Launch Registry Editor by typing regedit in the Search box.
Go to MountedDevices Registry key. Its path is:
HKEY_LOCAL_MACHINESYSTEMMountedDevices
On the right section, you will see DWORD values like DosDevicesD: for all the hard drives along with drive letters. Right-click on a value and use the Rename option.
You need to only rename the drive letter with a new letter and leave everything as it is. For example, change DosDevicesD: with DosDevicesL: and save it.
5] Using Drive Letter Changer software

Drive Letter Changer is a free and portable tool. If you want to try some freeware to change drive letters in Windows 10, then this tool is nice. This tool also shows which letters are already assigned to other hard drives and which letters are available or free.
Grab this tool and execute its EXE file to launch its interface. It will show the list of all the drives. Select a drive and it will show the Change drive letter menu. Access that menu and the list of assigned and free drive letters will be visible to you. Select a letter and confirm your action using the Yes button to change the drive letter.
You can also use this tool to directly open the Disk Management window, Restart File Explorer, etc.
Hope these ways will help you easily change drive letters in Windows 11/10.
Related read: How to change Drive Icons in Windows 11/10.

Anand Khanse is the Admin of TheWindowsClub.com, a 10-year Microsoft MVP (2006-16) & a Windows Insider MVP (2016-2022). Please read the entire post & the comments first, create a System Restore Point before making any changes to your system & be careful about any 3rd-party offers while installing freeware.
Whenever you connect any drive to Windows 10, either internal or external, the operating system automatically assigns a letter. The same goes when you map a drive and create a new partition. By default, when assigning a letter for a disk or partition, Windows goes from the top of the alphabet to the bottom, omitting letters A and B — those are for floppy drives (yes, still a thing.) C is always a system drive – you cannot change it, and you should not even try. The next drive you connect to your computer gets the letter D, E, F, and so on.
If you want to change a drive letter in Windows 10, you have a few options to choose from. There is no need to download third-party apps just to change a drive letter in Windows 10. Built-in tools are more than enough for any users.
Changing a Drive Letter in Windows 10 Using Disk Management
Keep in mind that you need Administrator privileges to change a drive letter in Windows 10. Also, our manual applies to any type of disks, including USB thumb drives, external SSD, network drives, etc.
- Press Win + X and select Disk Management. Alternatively, press Win + R and enter the diskmgmt.msc command.
- Find the drive or partition for which you want to change the letter.
- Select Change drive letter and paths.

- In the next window, click Change.

- Select a letter from the Assign the following drive letter drop-down list.
- Click Ok to save changes.


How to Change the Drive Letter for Disk C: in Windows 10?
You cannot change the drive letter for disk C in Windows 10. Deal with that. The system drive in Windows always has the C letter. You can rename it, for example, from “Local drive” to “Windows” or whatever comes to your mind, but you cannot change the letter.
How to Change a Drive Letter in Windows 10 with Command Prompt?
Again, you need Administrator privileges or an Administrator password to change a drive letter using Command Prompt. Unlike changing a drive letter, renaming a disk or partition in Windows 10 does not require Administrator privileges unless you want to rename drive C:.
- Open the Start menu and type in cmd. Click Run as Administrator.
- Enter the following command:
diskpart
- Enter the list volume command. That command will show you the list of all available volumes, not only physical drives.

- Find the letter you want to change and note its number.
- Enter the select volume X. Replace the X with the number.
- Enter the assign=X. Replace the X with the letter you want to assign.
- Close Command Prompt.


That is how you change a drive letter in Windows 10 using Command Prompt or Disk Management.
- About
- Latest Posts

I enjoy technology and developing websites. Since 2012 I’m running a few of my own websites, and share useful content on gadgets, PC administration and website promotion.