When you first connect to a Wi-Fi network in Windows 11, it’s set as public by default. This is the recommended setting. However, you can set it as public or private depending on the network and what you want to do:
-
Public network (Recommended). Use this for networks you connect to at home, work, or in a public place. You should use this in most cases. Your PC will be hidden from other devices on the network. Therefore, you can’t use your PC for file and printer sharing.
-
Private network. Your PC is discoverable to other devices on the network, and you can use your PC for file and printer sharing. You should know and trust the people and devices on the network.
-
Select the Start button, then type settings. Select Settings > Network & internet > Wi-Fi.
-
On the Wi-Fi settings screen, select Manage known networks, and then select the Wi-Fi network you want to change.
-
On the Wi-Fi network screen, under Network profile type, select Public (Recommended) or Private.
When you first connect to a Wi-Fi network, you can set it as public or private—depending on the network and what you want to do:
-
Private network. Use this for networks you trust, such as a network at home or work. When a network is set to private, your PC is discoverable to other devices on the network, and you can use your PC for file and printer sharing.
-
Public network. Use this for networks you connect to when you’re out and about, such as a Wi-Fi network at a coffee shop. Your PC will be hidden from other devices on the network, and you can’t use your PC for file and printer sharing.
After you connect to a network the first time, you can change it to public or private at any time.
-
On the right side of the taskbar, select the Wi-Fi network icon.
-
Select the Wi-Fi network you want to connect to, then select Connect.
-
Type the network password, and then select Next.
-
When asked if you want your PC to be discoverable to other devices on the network, do one of the following:
-
To set it as a private network where your PC will be discoverable to other devices on the network, choose Yes.
-
To set it as a public network where your PC won’t be discoverable to other devices on the network, choose No.
-
-
On the right side of the taskbar, select the Wi-Fi network icon.
-
Under the name of the Wi-Fi network that you’re connected to, select Properties.
-
Under Network profile, select Public or Private.
Note: To use these steps to set a network to public or private, your PC must be running Windows 10 Version 1709 or later. To see which version of Windows 10 your device is currently running, select Start , then select Settings > System > About .
Need more help?
Windows 10 makes it easy for users to configure Windows Firewall using pre-defined configurations of Windows Firewall. By default, there are three network types on which Windows Firewall configurations are used: Public, Private, and Domain.
Windows gives users the option to select a network type when a new network is connected to the computer. Windows will set Windows Firewall rules according to the network type selected. Let’s first learn more about each network type.
Quick Fix
In Windows, you can change the Network Type by navigating to Settings > Network & Internet and clicking on the Properties button for your active network. You can set the network type from Public, Private, or Domain under the Network Profile section of the next screen.
Table of contents
- Network Types
- Public Network
- Private Network
- Domain Network
- What is the Current Network Type of Your Computer?
- Check your current network type using Settings App
- Check your current network type from the Control Panel
- Change network types in Windows 10
- 1- How to set Network Type Using Settings App
- 2- How to set Network Type Using Windows Registry
- 3- How to change Network Type using Local Security Policy
- 4- How to set Network Type Using PowerShell
- What Network Type Should I Set?
Network Types
Public Network
A public network is the default network type. If no network type is selected, Windows will configure Windows Firewall using the public network type rules. In a public network, Windows Firewall rules will be the most restrictive. The firewall will block most apps from connecting from the Internet and disable some features like file and printer sharing, network discovery, automatic setup of network devices, etc.
You should use this type of network when you have only one computer and do not want to communicate with any other network device.
Private Network
A private network can be a home network or a work network. This type of network will enable most networking features of Windows 10 like file sharing, network device setup, network discovery, etc.
Use this network type if you trust the network you are connecting to.
Domain Network
The domain network is automatically detected when your computer is a member of an Active Directory (AD) domain network. Windows should automatically detect this type of network and configure Windows Firewall accordingly. This type of network gives more control to the network administrator and the admin can apply different network security configurations using Active Directory group policies.
In this article, we will be more interested in changing the network type from public to private and vice versa as the domain network is automatically detected by Windows 10 and we don’t need to change anything.
What is the Current Network Type of Your Computer?
Before going through ways to change the network type in Windows 10, we need to see what is the current network type of the connected network. To check the current network type settings, follow the methods given below.
Check your current network type using Settings App
Perform the following steps to determine your current network type in Windows 10 from the Settings app:
- Navigate to
Settings app >> Network & Internet. - Click Properties below the currently connected network.
 14")
 14")
On the Properties page, you will see the current network profile that has been selected. You can also change your network profile from this location.
 15")
Check your current network type from the Control Panel
Perform the given steps below to determine your current network type in Windows 10 from the Control Panel:
- Navigate to
Control Panel >> Network and Internet >> Network and Sharing Center. - You will see the network type under the connected network.
 16")
Please note that although we have tested these methods to change network types in Windows 10 and Windows 11, they should work fine for Windows 8, Windows 7 and Windows Vista.
1- How to set Network Type Using Settings App
Perform the following steps to change your network profile using the Settings app:
- Navigate to
Settings app >> Network & Internet. - Click Properties below the currently connected network.
- Now select the respective radio button to which you want to change your network type to.
 18")
2- How to set Network Type Using Windows Registry
If you are an advanced user and are comfortable with editing Windows Registry, this method will be easier for you to change the network type especially when you want it to be done on multiple PCs using just a single registry file.
Misconfiguration of critical values in the system’s registry could be fatal for your operating system. Therefore, we insist that you create a system restore point before proceeding forward with the process.
- Open the Registry Editor by typing in regedit in Run.
 19")
- Now paste the following into the address bar at the top of the Editor for quick navigation:
ComputerHKEY_LOCAL_MACHINESOFTWAREMicrosoftWindows NTCurrentVersionNetworkListProfiles - Under the Profiles key, you will find some sub-keys with different GUIDs. This corresponds to the number of network cards you’re using with your computer. Click on each sub-key under Profiles and look for the “ProfileName” value in the right-hand pane. This will give you the name of the network, so that you can easily recognize which network you want to change.
- After identifying the correct sub-key, you can change the “Category” DWORD value in the right-hand pane to change the network type of that particular network. Double-click it and change its Value Data to any one of the following choices. When entered, click OK.
- For public Networks: 0
- For private networks: 1
- For domain networks: 2
- Now restart your computer for the changes to take effect.
 19")
 20")
 21")
3- How to change Network Type using Local Security Policy
Perform the following steps to change your network type using the Local Security Policy Management Console:
- Open the Local Security Policy console by typing in secpol.msc in Run.
 22")
- Click Network List Manager Policies from the left pane. This will list all known networks in the right-hand pane.
- Double-click the network you want to change the type of.
- Switch to the Network Location tab and change the Location Type to either Not configured, Private or Public.
- Now click Apply and Ok to save the changes.
 22")
 23")
 24")
If you want to do this for all the connected networks, you can double-click “All Networks” instead of your desired network (in step 3 above) and then perform the remaining steps.
4- How to set Network Type Using PowerShell
You can easily set the network type for Windows using the command line. Perform the following steps in Windows PowerShell to change your network’s type:
- Open PowerShell with administrative privileges.
- Run the following command to get your network name:
Get-NetConnectionProfile 25")
- Use the following command while replacing NetworkName to correspond from your network’s name to change its type. Also, replace Type with “Public,” “Private,” or “Domain” to configure the new type:
Set-NetConnectionProfile -Name "<em>NetworkName</em>" -NetworkCategory <em>Type</em> 26")
 25")
 26")
This will change the network type immediately.
What Network Type Should I Set?
You are already aware of the different network types/profiles and which profile is suitable for different situations. If your PC is connected to an Active Directory, we suggest you configure it to Domain type.
However, if you are on a public network that is free to use for everyone, we strongly recommend that you configure the network type to Public, as then the Firewall restricts unwanted traffic, making your system more secure.
If you feel that you are secure on your home or work network, then it may be okay to set the type as Private. However, some users would prefer configuring them as Public too, just to be on the safe side.
Also see:
Usman Khurshid is a seasoned IT Pro with over 15 years of experience in the IT industry. He has experience in everything from IT support, helpdesk, sysadmin, network admin, and cloud computing. He is also certified in Microsoft Technologies (MCTS and MCSA) and also Cisco Certified Professional in Routing and Switching.
Windows OS Hub / Windows 10 / How to Change the Network Profile (Location) to Public or Private on Windows?
When connecting to a new network, Windows prompts you to select its network profile type (network location): Public or Private. Windows network profiles are part of Windows Defender Firewall with Advanced Security and allow you to apply different firewall rules depending on the type of network your computer is connected to. Depending on the profile used for your network connection, other computers may or may not see your computer on the network, use shared network folders and printers (network discovery settings).
In this article, we will look at how to change the Network profile type from “Public” to “Private” and vice versa in Windows (and Windows Server) using Windows Settings, PowerShell, Registry, and Security Policies.
Contents:
- What is Network Location (Profile) in Windows?
- How to Change the Network Profile (Location) from Public to Private on Windows?
- Change Network Location to Public or Private with PowerShell
- How to Set Network Location via Windows Registry?
- Change Network Type Using Local Security Policy
- Private Network Instead of Domain on Windows Server
What is Network Location (Profile) in Windows?
A network connection in Windows (whether Ethernet or Wi-Fi) can be assigned one of three network profiles.
- Private or Home network – a profile for a trusted network (home or office network). In such a network, the computer will be available for discovery by other devices and you can share your files and printers;
- Public network (Guest/Open) – a profile for untrusted networks (public Wi-Fi network in the subway, cafe, or airport). You don’t trust other devices on such a network, your computer will be hidden from other network devices, and no one will be able to access shared folders and printers on your computer;
- Domain network – a profile for computers joined to an Active Directory domain. Applies automatically after joining the Windows device to the AD domain. You can apply domain firewall policies for this profile.
The Network Location Awareness (NLA) service is used in Windows to determine whether a network connection is on a Public, Private, or Domain network.
Depending on the type of network, different Windows Firewall rules apply to the network interface.
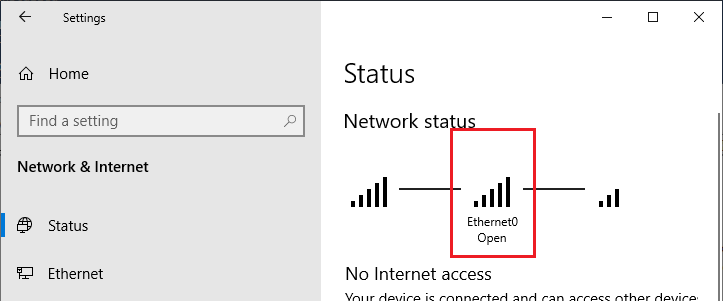
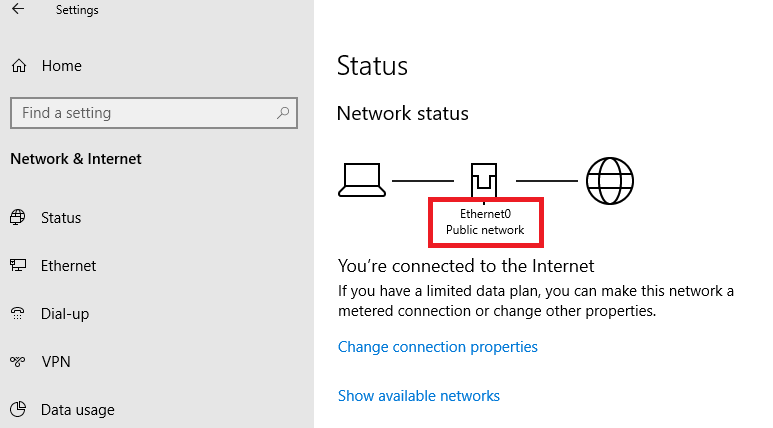
On Windows 10 and 11, you can see the current profile (location) assigned to the network connection in Settings -> Network and Internet -> Status (quick access command ms-settings:network ). The Ethernet0 network interface in my example is assigned the Public (Open) profile.
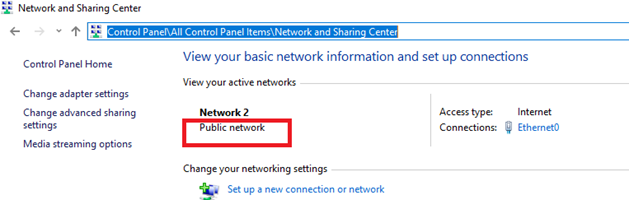
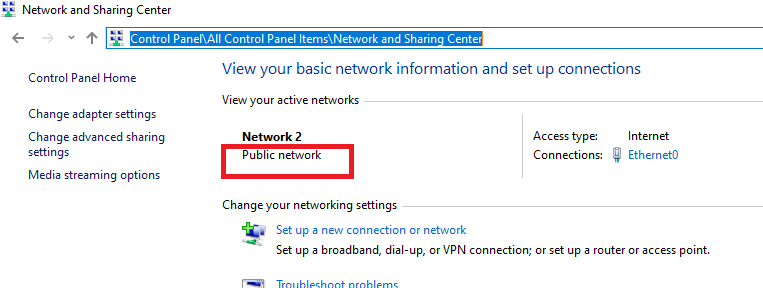
You can check the network type for active network connections in Windows 10 using the classic Control Panel (All Control Panel ItemsNetwork and Sharing Center).
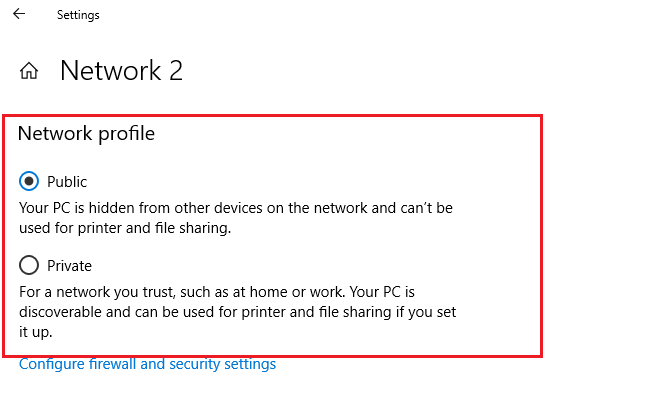
The network profile in Windows 10 is selected by the user when the device is connected to the new network for the first time. A prompt appears:
Network 2
Do you want to allow your PC to be discoverable by other PCs and devices on this network?
We recommend allowing this on your home and work networks, but not public ones.
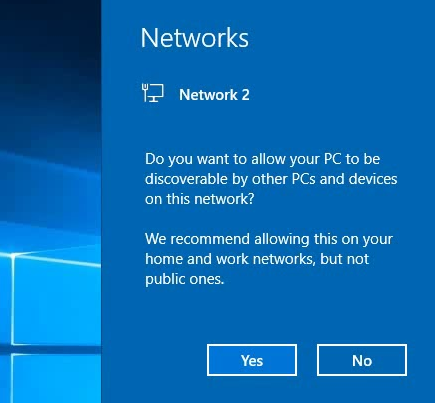
If you select “Yes”, the Private profile will be assigned to the network, or the Public profile if you select “No”. The next time you connect to the same LAN or WiFi network, the previously selected profile is automatically assigned.
You can hide the “Network Location Wizard” in Windows. Open the Registry Editor and create an empty registry key HKEY_LOCAL_MACHINESystemCurrentControlSetControlNetworkNewNetworkWindowOff. After that, all new networks will be defined as public networks when connected.
reg add "HKLMSYSTEMCurrentControlSetControlNetworkNewNetworkWindowOff" /f
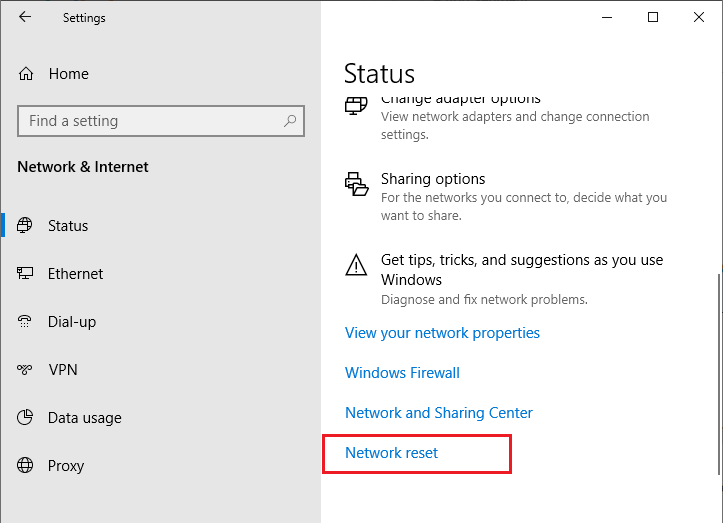
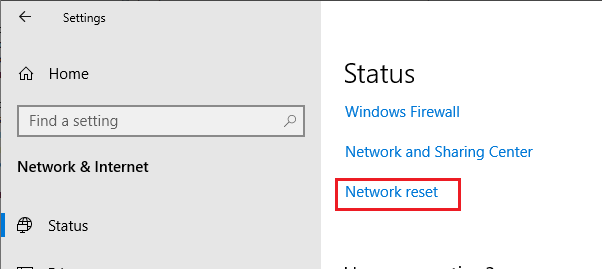
You can reset all settings and profiles for all saved network connections in Windows by selecting Settings -> Network & Internet -> Status -> Network Reset. Then reboot the computer.
Now when you connected to the network, a network discovery request appears again.
How to Change the Network Profile (Location) from Public to Private on Windows?
You can change the network profile type on Windows 10/11 using the modern Settings app. Go to “Network & Internet” -> “Status” and open your network connection settings.
Here you can switch the network location profile from Public to Private and vice versa.

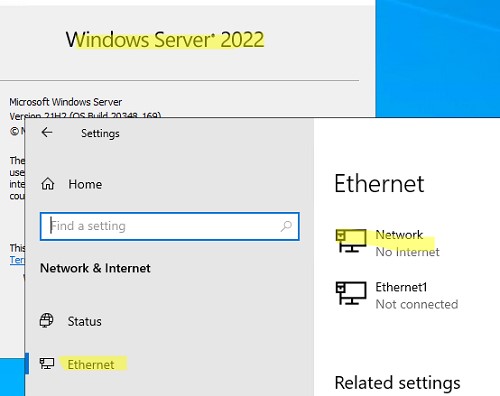
In Windows Server 2022/2019, the Properties option is missing from the Status tab. Therefore, select the Ethernet section in the Network and Internet section (or the Wi-Fi section if wireless networking is enabled in Windows Server). Select your network connection.
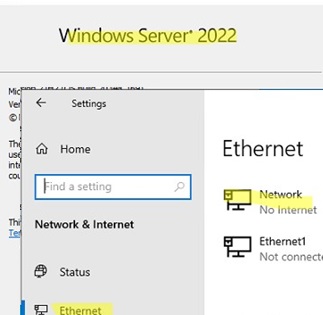
You cannot change the network connection profile type through the classical Control Panel in Windows.
If a server or a computer is joined to the AD domain, you cannot change the network type for a domain network connection. After the reboot, it will automatically change back to the Domain Network profile.
Change Network Location to Public or Private with PowerShell
On Windows 10/11 and Windows Server 2022/2019/2016, you can manage network connection locations from PowerShell. Open the elevated PowerShell console. List Windows network interfaces and the network profiles applied to them:
Get-NetConnectionProfile
In my example, there is only one physical network adapter (Ethernet0) on a computer with a Public network location (in the NetworkCategory value, you can see the following types of network profiles: Public, Private or DomainAuthenticated).
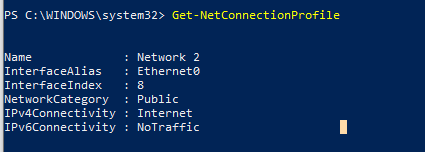
Let’s try to change the assigned network profile for the NIC. You need to get the index assigned to this network adapter. In this example, InterfaceIndex = 8.
Name : Network 2
InterfaceAlias : Ethernet0
InterfaceIndex : 8
NetworkCategory : Public
IPv4Connectivity : Internet
IPv6Connectivity : NoTraffic
To change the network for the network adapter with index 8 to Private, run the command:
Set-NetConnectionProfile -InterfaceIndex 8 -NetworkCategory Private
Check that the network profile has changed:
Get-NetConnectionProfile -InterfaceIndex 8

Windows Defender Firewall will automatically apply firewall rules to the network connection according to the assigned network profile without rebooting.
Similarly, you can change the location of the network to Public:
Set-NetConnectionProfile -InterfaceIndex 8 -NetworkCategory Public
Or domain:
Set-NetConnectionProfile -InterfaceIndex 8 -NetworkCategory DomainAuthenticated
You can also change the network profile for all network adapters of the computer at once:
Get-NetConnectionProfile | Set-NetConnectionProfile -NetworkCategory Private
You won’t be able to change the network connection profile from domain to private or public on a domain-joined computer. Make sure your computer is joined to an AD domain:
Get-CimInstance -ClassName Win32_ComputerSystem).PartOfDomain
Try changing the network location:
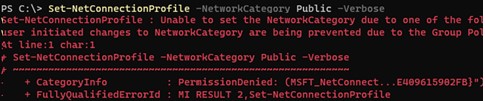
Set-NetConnectionProfile -InterfaceIndex 8 -NetworkCategory Public –Verbose
An error will appear:
Set-NetConnectionProfile : Unable to set the NetworkCategory due to one of the following possible reasons: not running PowerShell elevated; the NetworkCategory cannot be changed from 'DomainAuthenticated'; user initiated changes to NetworkCategory are being prevented due to the Group Policy setting 'Network List Manager Policies'.

How to Set Network Location via Windows Registry?
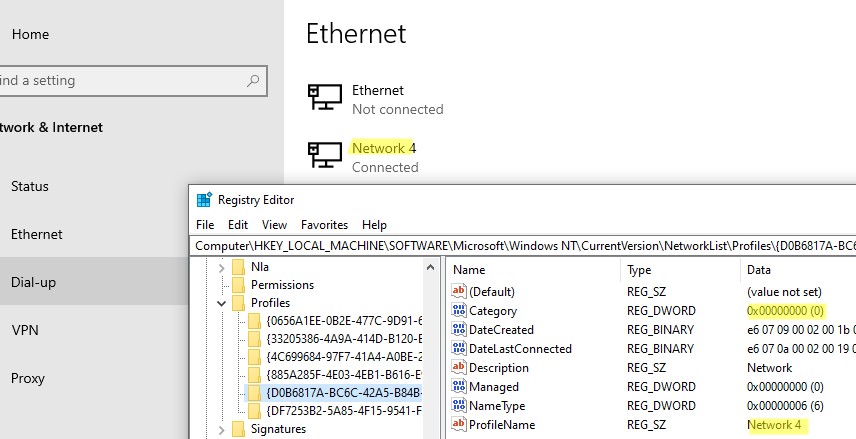
You can change the network location using the Registry Editor. Open the regedit.exe and go to the HKEY_LOCAL_MACHINESOFTWAREMicrosoftWindows NTCurrentVersionNetworkListProfiles. This registry section contains a list of all network connections on your computer. There is a separate registry key for each network connection with a name in GUID format ({xxxxxx-xxxxx-……..}).
In order to find the network you need, look through all the registry keys and find the key that contains the parameter ProfileName with the network you need from the Network and Sharing Center (or the Name value from the Get-NetConnectionProfile command). In our case, the computer is connected to Network 4.
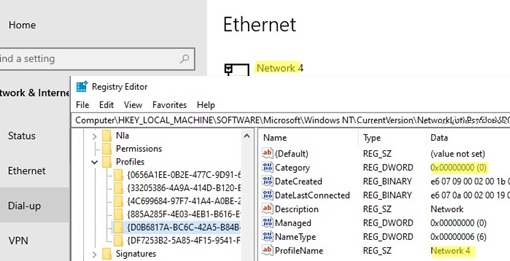
Check your network name in the ProfileName registry string value. The network type is specified in the Category parameter. The following values are available:
- 0 — Public Network
- 1 — Private Network
- 2 — Domain Network
In order to change the network type, set the parameter value to the one you need and restart your computer.
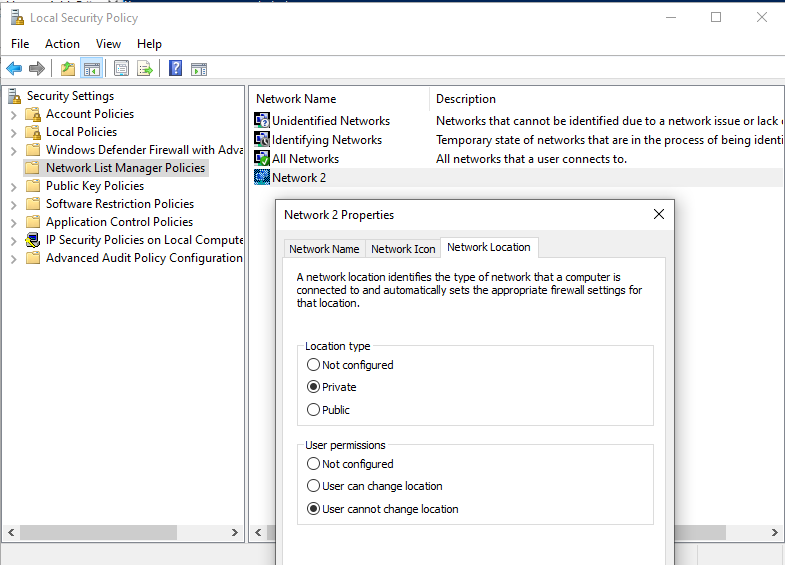
Change Network Type Using Local Security Policy
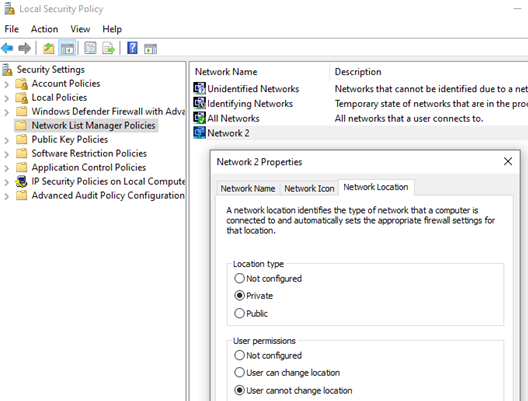
Another way to change the network connection type is to use the Local Security Policy Editor.
Run the secpol.msc snap-in and go to the section Network List Manager Policies. On the right, find your network by its name as it is displayed in the Network and Sharing Center. Open the network properties and go to the Network Location tab, then change the network type from Not configured to Private and save the changes. To prevent users from changing the network location profile, check the option “User cannot change location”.
Private Network Instead of Domain on Windows Server
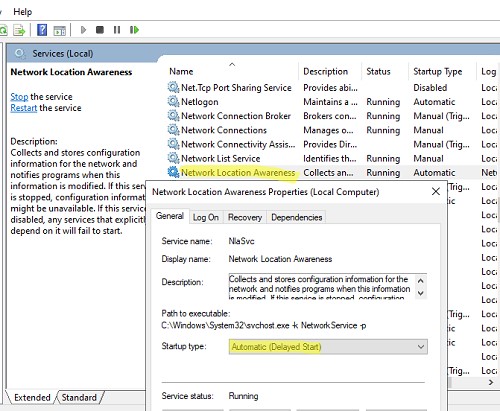
In the new versions of Windows Server 2022/2019, I have seen several times a bug where the domain server (or even a domain controller or RODC) itself changes the network type from domain to private.
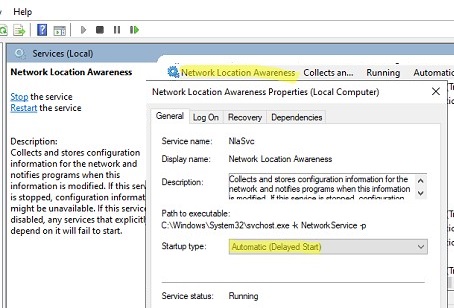
To solve the problem, just restart the Network Location Awareness service (from the services.msc console) or with the PowerShell command:
Get-Service NlaSvc| Restart-Service -Force (run as SYSTEM account)
To fix this problem on Windows Server, you need to configure the delayed start type for the Network Location Awareness service. To do this, select the Automatic (Delayed Start) option in the service properties and save the changes.
Make sure that after a reboot, the network type in Windows Server is now always defined as domain (not private).
If the problem occurs on an Active Directory domain controller, you need to change the dependencies of the NlaSvc service so that it starts after the DNS Server service:
sc config nlasvc depend=DNS
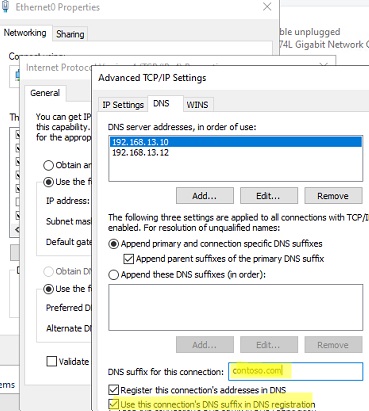
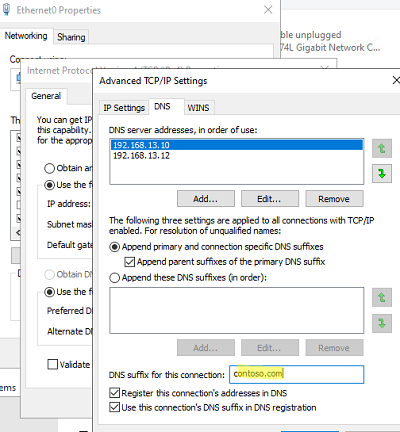
Also, in some cases, it can help to force set the DNS suffix of your domain in the network adapter settings (network adapter -> TCP / IPv4 -> Advanced -> DNS, specify your domain name in the “DNS suffix for this connection”, and check the option “Use the suffix of this connection in the DNS registration”.
При подключении к новой сети Windows предлагает вам выбрать ее тип (профиль или сетевое расположение): Public network (общедоступная) или Private (частная). Сетевые профили Windows являются частью Microsoft Defender Firewall и позволяют применять различные правила брандмауэра в зависимости от типа сети, к которой подключен компьютер. В зависимости от примененного профиля для вашего сетевого подключения, другие компьютеры могут видеть или не видеть ваш компьютер в сети (настройки сетевого обнаружения), использовать общие папки и сетевые принтеры.
В этой статье мы рассмотрим, как в Windows (и Windows Server) изменить назначенный профиль сети с “общедоступной” на “частную” и наоборот.
Содержание:
- Типы (профили) сети в Windows
- Как изменить профиль для сетевого подключения в Windows?
- Изменить тип сети с Public на Private с помощью PowerShell
- Изменить тип сети в реестре Windows
- Сменить профиль сети через политику безопасности
- Слетает доменный профиль сети на частную в Windows Server
Типы (профили) сети в Windows
Сетевому подключению в Windows (будь то Ethernet или Wi-Fi) можно назначить один из трех сетевых профилей.
- Частная или домашняя сеть (Private) – профиль для доверенной сети (домашняя или рабочая сеть в офисе). В такой сети компьютер будет доступен для обнаружения другими устройствами, на нем можно использовать службы общего доступа к сетевым файлам и принтерам;
- Общедоступная (общественная) сеть (Public / Guest) – профиль для недоверенной сети (кафе, публичная Wi-Fi сеть в метро, аэропорту). Вы не доверяете другим устройствам в такой сети, ваш компьютер будет скрыт для других устройств, нельзя получить удаленный доступ к опубликованным у вас сетевым папкам и принтерам;
- Доменная сеть (Domain) – сетевой профиль для компьютеров, которые присоединены в домен Active Directory. Применяется автоматически после добавления Windows в домен. Для этого профиля вы можете применять доменные политики брандмауэра.
В зависимости от типа сети, к сетевому интерфейсу применяются разные правила брандмауэра Windows.
В Windows 10 и 11 вы можете увидеть текущий профиль, который назначен сетевому подключению, в меню Settings -> Network and Internet (команда быстрого доступа
ms-settings:network
). Сетевому интерфейсу Ethernet0 в моем примере назначен профиль Public.
В классической панели управления Windows тип сети для активных сетевых подключений отображается здесь: Control PanelAll Control Panel ItemsNetwork and Sharing Center.
Профиль сети в Windows 10 выбирается пользователем при первом подключении к новой сети. Появляется запрос:
Network_name
Вы хотите разрешить другим компьютерам и устройствам в этой сети обнаруживать ваш ПК.
Рекомендуется делать это в домашней или рабочей сети, а не в общедоступных.

Если выбрать “Да”, сети присваивается профиль Private (домашняя), если “Нет” – public (общедоступная). При следующем подключении к этой же самой LAN или WiFi сети автоматически назначается выбранный ранее профиль.
Вы можете скрыть мастер подключения к новым сетям (Network Location wizard) в Windows. Для этого откройте редактор реестра и создайте раздел HKEY_LOCAL_MACHINESystemCurrentControlSetControlNetworkNewNetworkWindowOff. После этого все новые сети при подключении будут определяться как общедоступные (Public).
reg add "HKLMSYSTEMCurrentControlSetControlNetworkNewNetworkWindowOff" /f
В Windows вы можете сбросить все настройки и профили для всех сохраненных сетей, выбрав Параметры -> Сеть и Интернет -> Состояние -> Сброс сети. Перезагрузите компьютер.
Теперь при подключении к сети опять появится запрос о включении сетевого обнаружения.
Как изменить профиль для сетевого подключения в Windows?
Вы можете изменить тип сети в Windows из современной панели управления Параметры: перейдите в раздел «Сеть и Интернет» -> «Состояние» -> Откройте свойства вашего сетевого подключения.
Здесь можно переключить сетевой профиль с Public на Private и наоборот.
В Windows Server 2022/2019 опция Properties отсутствует на вкладке Status. Поэтому нужно в секции Network and Internet выбрать раздел Ethernet (или раздел Wi-Fi если в Windows Server включена поддержка беспроводных сетей). Выберите ваше подключение к сети.
В классической панели управления Windows отсутствуют настройки для смены типа профиля сетевого подключения.
Также вы не можете сменить профиль на компьютере в домене AD. Для сетевого подключения к домену всегда будет использоваться профиль Domain.
Изменить тип сети с Public на Private с помощью PowerShell
В Windows 10/11 и Windows Server 2022/2019/2016 вы можете управлять профилями сетевых подключений из PowerShell. Запустите консоль PowerShell с правами администратора.
Выведите список сетевых интерфейсов Windows и применённые к ним сетевых профилей:
Get-NetConnectionProfile
В моем примере на компьютере имеется 4 сетевых подключения, с разными типами сетей (NetworkCategory: Public, Private и DomainAuthenticated).

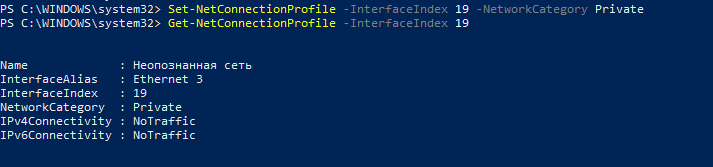
Чтобы изменить профиль сети, нужно указать номер сетевого интерфейса, назначанный сетевому адаптеру (InterfaceIndex). В этом примере InterfaceIndex = 19.
Name : Неопознанная сеть
InterfaceAlias : Ethernet 3
InterfaceIndex : 19
NetworkCategory : Public
IPv4Connectivity : NoTraffic
IPv6Connectivity : NoTraffic
Чтобы изменить тип сети для сетевого интерфейса с индексом 19 на Private, выполните команду:
Set-NetConnectionProfile -InterfaceIndex 19 -NetworkCategory Private
Проверим, что профиль сети изменился:
Get-NetConnectionProfile -InterfaceIndex 19
Windows Defender Firewall автоматически применит к сетевому подключению правила в соответствии с назначенным профилем без перезагрузки.
По аналогии вы можете изменить местоположение сети на Public:
Set-NetConnectionProfile -InterfaceIndex 19 -NetworkCategory Public
Или доменный:
Set-NetConnectionProfile -InterfaceIndex 19 -NetworkCategory DomainAuthenticated
Также вы можете изменить профиль сети сразу для всех сетевых адаптеров компьютера:
Get-NetConnectionProfile | Set-NetConnectionProfile -NetworkCategory Private
На компьютерах в домене вы не сможете изменить профиль сетевого подключения с доменного на частный или публичный. Проверьте, что ваш компьютер добавлен в домен AD:
Get-CimInstance -ClassName Win32_ComputerSystem).PartOfDomain
Попробуйте изменить сетевой профиль:
Set-NetConnectionProfile -InterfaceIndex 19 -NetworkCategory Public –Verbose
Появится ошибка:
Set-NetConnectionProfile : Unable to set the NetworkCategory due to one of the following possible reasons: not running PowerShell elevated; the NetworkCategory cannot be changed from 'DomainAuthenticated'; user initiated changes to NetworkCategory are being prevented due to the Group Policy setting 'Network List Manager Policies'.
Изменить тип сети в реестре Windows
Вы можете изменить тип сети через редактора реестра. Для этого нужно запустить regedit.exe и перейти в раздел HKEY_LOCAL_MACHINESOFTWAREMicrosoftWindows NTCurrentVersionNetworkListProfiles, в котором хранятся профили всех сетевых подключений. Для каждого сетевого подключения здесь присутствует отдельная ветка реестра с именем в формате GUID {xxxxxxxx-xxxx-……..}).
Чтобы найти нужную вам сеть, нужно просмотреть все ветки реестра и найти раздел, в котором указано имя нужной вам сети из панели управления (или значение Name из команды Get-NetConnectionProfile). В нашем случае компьютер подключен к сети Network 4.
Имя сети указано в строковом параметре реестра ProfileName. Тип сети задается в параметре Category. Доступны следующие значения этого ключа:
- 0 — Общественная сеть (Public Network)
- 1 — Частная сеть (Private Network)
- 2 — Доменная сеть (Domain Network)
Чтобы изменить тип сети, просто вручную изменить значение параметра Category. Перезагрузить компьютер чтобы применить изменения.
Сменить профиль сети через политику безопасности
Еще один способ смены типа сети — редактор локальной политики безопасности (Local Security Policy).
Запустите оснастку secpol.msc и перейдите в раздел Network List Manager Policies (Политики диспетчера списка сетей). В списке сетей справа найдите сеть по ее имени в Центре управления сетями. Откройте свойства сети и перейдите на вкладку Network Location, измените тип сети на Private и сохраните изменения. Чтобы пользователи не могли сменить профиль сети, выберите дополнительно опцию “User cannot change location” (Пользователь не может изменить расположение).
Примечание. Если сервер или компьютер включены в домен, изменить тип сети на другой нельзя, при перезагрузке тип все равно сменится на Domain Network.
Слетает доменный профиль сети на частную в Windows Server
В новых версиях Windows Server 2022/2019 периодически встречается глюк, когда на доменном сервере (или даже контроллере домена) тип сети сам меняется с доменной на частную после перезагрузки.
Для решения проблемы достаточно перезапустить службу Network Location Awareness (из консоли
services.msc
) или командой:
Get-Service NlaSvc| Restart-Service -Force
(запускать от имени SYSTEM)
Чтобы служба Network Location Awareness при загрузке компьютера загружалась немного позже, можно задать для нее отложенный тип запуска. Для этого в свойствах службы нужно выбрать опцию Automatic (Delayed Start).
Проверьте, что после перезагрузки тип сети в Windows Server всегда определяется как доменный (вместо private).
Если проблема возникает на контроллере домена Active Directory, нужно изменить зависимости службу NlaSvc, чтобы она запускалась после службы DNS Server:
sc config nlasvc depend=DNS
Также в некоторых случаях вам может помочь принудительное указание DNS суффикса вашего домена в настройках сетевого адаптера (сетевой адаптера -> TCP/IPv4 -> Advanced -> DNS, укажите имя вашего домена в поле DNS suffix for this connection и проверьте, что включена опция «Use this connection’s suffix in DNS registration».
-
MiniTool
-
MiniTool News Center
- How to Change Network from Public to Private Windows 10/8/7
By Alisa | Follow |
Last Updated October 21, 2022
![]()
When you first connect your computer to a new wireless network, it gives choices to set it as a Public or Private network. You can later easily change network from Public to Private or vice versa on Windows 10/8/7 at any time by following the steps below.
For Windows wireless network connection, it has two types of network profiles Private and Public for choice. When you try to connect to a new network or a wired network, it will ask you to choose a Public or Private network type for the connection.
Tip: MiniTool offers professional tools for data recovery, hard drive partition management, system backup and restore, data backup and sync.
Public vs Private Network Type
Obviously, Public network refers to networks you connect when you are out in public areas like airport, coffer shop, etc. Your computer will not be visible to other devices on the same network, and you can’t use your computer for file and printer sharing. You can use this network type when you don’t want to communicate with other devices on the same network.
On the contrary, you can use Private network profile type if you trust the network. It is often used at home or work place. If you set a network as Private, then your computer can be discovered by other devices on the same network. Still, you can use the file and printer sharing feature.

Hola VPN Free Download for Chrome, PC, Mac, Android, iOS, etc.
Learn how to download free Hola VPN for Chrome, Edge, PC, Mac, Android, iOS, etc. to use it to unblock and access worldwide content online with no limit.
Read More
How to Check Your Current Network Type on Windows 10/8/7
You can follow the instructions below to check your current network type.
- Open Control Panel Windows 10. You can click Start, type control panel and click Control Panel to open it.
- Next click Network and Internet -> Network and Sharing Center.
- In Network and Sharing Center, you can view your active networks and check the network type under each connected network.

How to Change Network from Public to Private or Vice Versa in Windows 10/8/7
1. How to Change Network from Public to Private Windows 10
Step 1. Click the Network icon at the toolbar and select Open Network & Internet settings.
Step 2. Click Ethernet or WiFi from the left pane, and click your connected Wi-Fi or Ethernet network. Then you can change the network type from Public or Private or vice version under Network Profile.

Step 3. If you are using a VPN, you can click VPN in the left pane in Network & Internet settings window. Then click one of your connected VPN networks in the right pane, and change the network profile to Public or Private based on your need.
For some Windows 10 computers, you can also click the Network icon in the Notification area, select your connected network and click Properties, and choose Public or Private under Network profile to change network type Windows 10.

Download VeePN for PC, Mac, Mobile, and Browser
This post gives a VeePN review and offers guides on how to download VeePN for Chrome, Edge, Firefox, PC, Mac, Android, iOS, etc. to use this VPN service.
Read More
2. How to Change Network from Public to Private Windows 7
Step 1. Click the Network icon and click Open Network & Sharing Center link.
Step 2. Under View your active networks, you can see the name of the WiFi or Ethernet network. And you should also see a link under the name of the network: Home network, Work network or Public network. You can click this link and change the network type among the three network types.
3. How to Change Network from Public to Private Windows 8
Step 1. Right-click the Network icon and choose Open Network and Sharing Center.
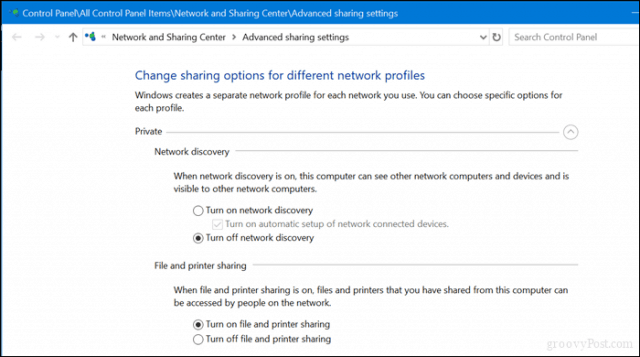
Step 2. If your network is set as Public network, you can click Change advanced sharing settings in the left pane, and click Private. And make sure these three options are enabled: Turn on network discovery, Turn on file and printer sharing, Allow Windows to manage homegroup connections.
Step 3. Then you can expand Guest or Public and tick Turn off network discovery, Turn off file and printer sharing.
Step 4. At last, you can go to computer Settings and click Network icon to connect it. Right-click the network and click Turn sharing on or off. Click Yes to set it as a Private, and click No if you want to set it as Public.
Bottom Line
You can now change network from public to private on Windows 10/8/7 based on your own need.
About The Author

Position: Columnist
Alisa is a professional English editor with 4-year experience. She loves writing and focuses on sharing detailed solutions and thoughts for computer problems, data recovery & backup, digital gadgets, tech news, etc. Through her articles, users can always easily get related problems solved and find what they want. In spare time, she likes basketball, badminton, tennis, cycling, running, and singing. She is very funny and energetic in life, and always brings friends lots of laughs.

In this article, I will explain how to switch a network profile from public to private on Windows 10 and Windows Server 2019. First, here’s a quick primer on the different types of network profiles on Windows computers (clients and servers). If you are not familiar with these profiles, I encourage you to read this section so you have a better understanding of the purpose of these profiles before learning how to switch between them.
What are Network Profiles?
Windows computers have three types of network profiles: Private, Domain, and Guest or Public.
- Private
A private profile is meant for a computer at home or work connected to a private, internal network. This computer is part of a Workgroup and is not connected to the Active Directory domain. For private networks you can turn on Network Discovery as well as File & Print Sharing so that other computers can easily find your computer and access network shares and other resources that you have shared on your private network, such as network shares, printers, and scanners. If your computer is part of a business network, but is running in a Workgroup, rather than a domain, then your settings would depend on the security requirements. - Domain
A domain profile is designed for computers in a business network that have “joined” the Active Directory domain. This offers a much higher level of security and authentication for users and devices. For domain networks the Network Discovery and File & Print Sharing may or may not be turned on. These settings are determined by the network administrators and depend on how your network is configured. The domain profile is only applicable when a computer has joined a Windows domain, which is usually the case in a business environment. Did you notice that I used the word applicable, rather than visible? That’s because users can’t switch their profile on a domain-joined computer so the option to switch to another profile doesn’t apply and therefore it isn’t visible. However, you can go to the Control Panel and configure a couple of options under Change advanced sharing options for your domain profile. - Guest or Public
A guest or public profile is designed for public networks that are not secure. This profile is used on mobile devices for wireless networks at a coffee shop or an Internet cafe. For security reasons, you want to turn off Network Discovery and File & Print Sharing on this profile because you don’t want hackers to easily access resources on your laptop or other mobile device.
The network profiles can be accessed by going to Settings -> Network and Internet -> Ethernet -> Change advanced sharing options.
As mentioned earlier, for Guest or Public networks you should turn off network discovery as well as file and print sharing, as follows.

The screen shots in this article are from Windows 10 Enterprise and Windows Server 2019 member servers. Your screen may look slightly different depending on the version and build of your operating system.
TIP: For security reasons, you can leave the network discovery off on all networks, public, private, and domain. Turn on file and printer sharing for your domain or private profile, but create all the shares as hidden shares by adding a dollar sign ($) at the end of share name. You won’t be able to browse them in your File Explorer, which uses the browser service, but because you know their names you will be able to connect to them easily or map a drive permanently. Using the browser service is very slow anyway, using universal naming convention (UNC) to map drives (e.g. \servernamesharename) is much faster.
How to Switch Between Profiles
To switch between the profiles you need to click on the network icon, as shown below.

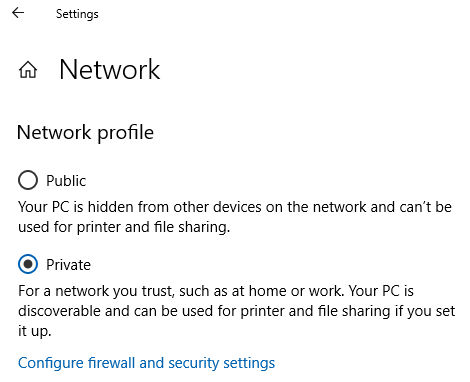
If you want to switch your profile from public to private, simply select the Private radio button.
NOTE: You can only switch between Private and Public profiles on computers in a Workgroup. Domain-joined computers are controlled by the domain administrator and for security reasons don’t allow users to change the network profile on a workstation.
What if You Don’t See the Option to Switch Profiles?
Sometimes, when you click on the network icon, instead of the option to switch between network profiles (above screenshot) you may just see the Metered connection screen.
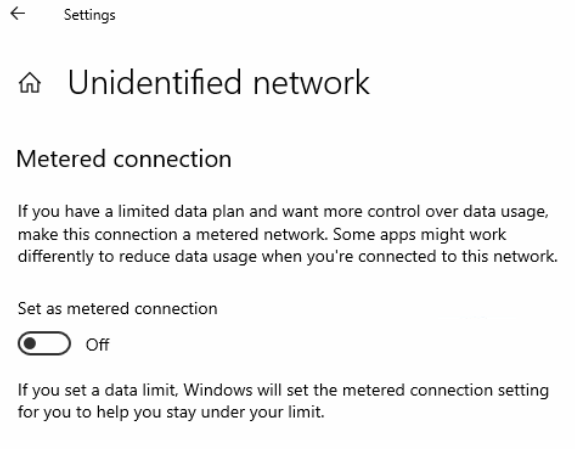
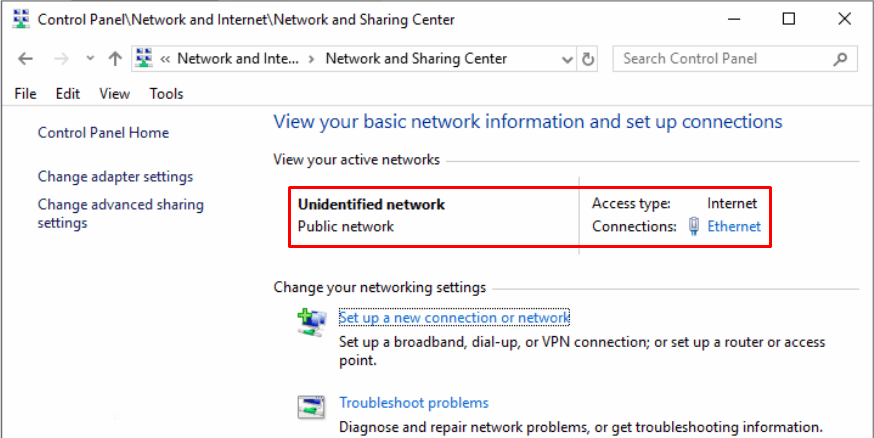
The Control Panel will display the unidentified network profile as public.
SOLUTION #1
One solution that worked for me and may be helpful to you is this. Temporary enable the Metered connection, close the Settings window and go back into the network icon. You will see the option to switch between profiles. Change the profile from public to private and go back and turn off the Metered connection. Your profile should stay as private. This solution worked for me on Windows 10.
SOLUTION #2
If the first solution doesn’t work then try this second solution. I have tested this solution several times on Windows 10 workstations and Windows Server 2019 member servers. The Windows Server 2019 Domain Controllers always have the Domain profile as their current (i.e. active) profile, so the issue doesn’t apply to them.
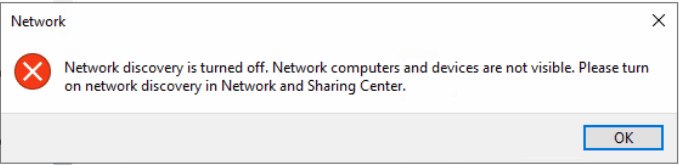
- Make sure you only have the Ethernet interface enabled for the public network that you are trying to switch. Disable all other interfaces temporarily.
- Go to File Explorer and click the blue Network icon in the navigation pane.
- You should see the following error message. Click OK.

- You will see the following message in the top bar. Click anywhere in the bar.

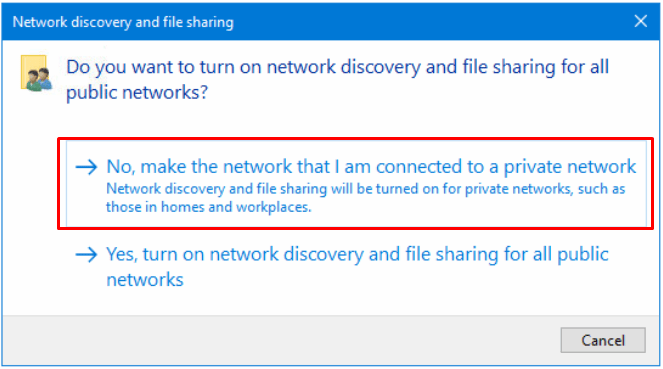
NOTE: If you don’t see the above message in the File Explorer, go to the Control Panel -> Network and Internet -> Network and Sharing Center -> Advanced sharing settings and make sure that network discovery and file and printer sharing are both turned off. - From the drop-down message select Turn on network discovery and file sharing.

- When prompted to turn on network discovery and file sharing for all public networks, select No, make the network that I am connected to a private network.

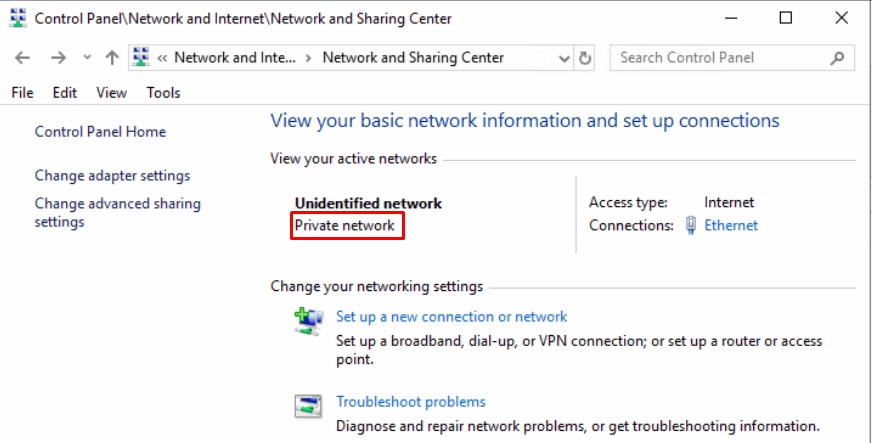
- Now if you go to the Network and Sharing Center in the Control Panel you can verify that the profile has been switched to private.

- To change the name of the network use the following PowerShell commands. The first command can be used to get the information about the connection profile and the second to change the name of the profile.
Get-NetConnectionProfile
Set-NetConnectionProfile -Name “NETWORK” -NetworkCategory Private - You may also want to run the Get-NetConnectionProfile again to verify that the name has been updated.


Please let me and the readers know if either one of these solutions worked for you by posting a comment.
Update: September 21, 2020
I forgot to mention that you can turn off network discovery once your profile has been switched to private. Thanks to the reader Peter for pointing this out. You can turn off network discovery in Control Panel -> Network and Internet -> Network and Sharing Center -> Change advanced sharing settings. I prefer to leave network discovery off for both security and performance reasons for all three profiles (Private, Public, and Domain) because I have seen the profiles switched to public on Windows 10 workstations and Windows Server 2019 member servers. Domain Controllers will always have the Domain profile so you don’t have to worry about their profile switching to public.
Thanks for reading my article. If you are interested in IT training & consulting services, please reach out to me. Visit ZubairAlexander.com for information on my professional background.
Copyright © 2018 SeattlePro Enterprises, LLC. All rights reserved.
This div height required for enabling the sticky sidebar
We use cookies on our website to give you the most relevant experience by remembering your preferences and repeat visits. By clicking “Accept”, you consent to the use of ALL the cookies.
Need help to change a Network Location from Public to Private on Windows? We can help you.
As part of our Server Management Services, we assist our customers with several Windows-related queries.
Today, let us focus on the various aspects of network profiles in Windows.
What is a Network Location (Profile) in Windows
Windows network profiles are a part of the Windows Defender Firewall with Advanced Security. It allows to apply different firewall rules depending on the type of network the computer is connected to.
Network profiles first appeared in Vista/Windows Server 2008. In Windows 10, we can assign one of the following network security profiles for NIC (network interface card), whether Ethernet or Wi-Fi:
- Private or Home network – a profile for a trusted network (home or office networks).
In such a network, the computer will be available for discovery by other devices; we can share your files and printers.
- Public network – a profile for an untrusted network (public Wi-Fi network in the subway, cafe, airport).
We do not trust other devices on such a network, the computer will be hidden to other network devices, no one will be able to access shared network folders and printers on the computer.
- Domain network – a profile for computers that are members of an Active Directory domain.
This applies automatically after joining Windows to the AD domain. We can apply domain firewall policies for this profile.
Windows use the Network Location Awareness (NLA) service to determine if a network connection is on a Public, Private, or Domain network.
Different Windows Firewall rules apply to network connection based on the network profile of NIC.
In Windows 10, we can check the current network profile (location) assigned to the network connection in the Settings -> Network & Internet.

In the classic Control Panel, the network type for active network connections is displayed here: Control Panel -> All Control Panel Items -> Network and Sharing Center. But, we cannot change the assigned network location from there.
For instance, in Windows Server 2012 R2/Windows 8.1, we can only change the network profile through the PowerShell, registry, or local security policy.
How to Set a Network Profile in Windows 10
We select a network profile in Windows 10 when the device connects to the new network for the first time. Generally, a prompt appears:

If we select “Yes”, the Private profile will assign to the network, and if we select “No“, the Public profile. The next time we connect to the same LAN or WiFi network, it will automatically assign the previous profile.
We can hide the “Network Location Wizard” when connecting to a new network through the registry. We just need to create an empty registry key: HKEY_LOCAL_MACHINESystemCurrentControlSetControlNetworkNewNetworkWindowOff.
Once done, all networks will be Public.
We can reset all settings and profiles for saved networks in Windows 10 from Settings -> Network & Internet -> Status -> Network. Then, reset and reboot the computer.
Now as we connect to the network, a network discovery request will appear again.
[Need assistance to Set a Network Profile in Windows? We are available 24*7]
Change a Network Location from Public to Private on Windows
We can change the network profile from the Windows 10 GUI. If we are using the new Settings panel, go to Network & Internet -> Status -> Change connection properties.
Here we can switch the network location profile from Public to Private and vice versa.

We cannot change the network profile from the classic Control Panel in Windows 10.
Also, we cannot change the network profile on the domain-joined computer. The Domain profile will always be for a domain network connection.
[Hard to change location? We’d be happy to help.]
Change Network Types Using PowerShell in Windows
On Windows 10/Windows Server 2016/2019, we can manage network connection location from the PowerShell. To do this, we run the PowerShell console.
We use the Get-NetConnectionProfile cmdlet to get a list of network adapters on the computer and their associated network profiles.
For instance, there is only one physical network adapter on a computer with a Public network location type.
Now, let us try to change the assigned network profile for the NIC. We need to get the index assigned to this network card.
For example, here the InterfaceIndex is 8.
Name : Network 2
InterfaceAlias : Ethernet0
InterfaceIndex : 8
NetworkCategory : Public
IPv4Connectivity : Internet
IPv6Connectivity : NoTraffic
After we get the network adapter index, we can change the network type to Private:
Set-NetConnectionProfile -InterfaceIndex 8 -NetworkCategory PrivateCheck that the network profile has changed:
Get-NetConnectionProfile -InterfaceIndex 19The new firewall rules will be applied to the interface according to the assigned network profile without rebooting.
We can also change the network profile for all network adapters of the computer at once:
Get-NetConnectionProfile | Set-NetConnectionProfile -NetworkCategory PrivateSetting Network Type Using Windows Registry
The network type can also be changed from the Registry Editor. To do this, we run regedit.exe and go to the following key:
HKEY_LOCAL_MACHINESOFTWAREMicrosoftWindows NTCurrentVersionNetworkListProfiles.This registry key contains profiles of all network connections.
We can find the necessary network profile by its name listed in the ProfileName registry parameter.
The network type is specified in the Category parameter. The following values are available:
- 0 — Public Network
- 1 — Private Network
- 2 — Domain Network

Change the key value to the one we need and restart the computer.
[Stuck with the procedures? We are here for you]
Change Network Location Type Using Security Policy
Another way to change the network location type is to use the Local Security Policy Editor.
We run the secpol.msc snap-in and go to the section Network List Manager Policies. On the right, find the network by its name in the Network and Sharing Center.
Then, open the network properties, and go to the Network Location tab, change the network type from Not configured to Private, and save the changes.
To prevent users from changing the network profile, select the option “User cannot change location”.
If a server or a computer is joined to the AD domain, we cannot change the network type. After the reboot, it will automatically change back to the Domain Network.
[Confused with Network Profiles? We’d be happy to assist.]
Conclusion
To conclude, we saw the concept, types, and the use of network profiles in Windows. We saw some effective ways our Support Engineers employ to change a Network Location from Public to Private on Windows.
PREVENT YOUR SERVER FROM CRASHING!
Never again lose customers to poor server speed! Let us help you.
Our server experts will monitor & maintain your server 24/7 so that it remains lightning fast and secure.
GET STARTED
var google_conversion_label = «owonCMyG5nEQ0aD71QM»;

Windows 10 makes it easy to set your network profiles for wired or wireless devices to public or private. Find out how you can do it with your network.
In Windows 10, there are two sets of default security and sharing settings when you connect to a wired or wireless network: public and private. The names of these two settings are fairly straightforward. Private networks are in your home or office, while public networks are everywhere—coffee shops, airports, libraries, etc.
That much is obvious. But how does Windows 10 treat public networks and private networks differently? And how do you switch from one to the other? That’s precisely what we’ll be covering in this article.
When you first connect to a network, Windows will ask you what kind of network and what settings you want to use. If you don’t remember doing this or change your mind about creating a network, you can switch it.
Public vs. Private Networks in Windows 10
Generally speaking, when you set a network profile to “public,” the settings are more restrictive. Your PC won’t be visible to other devices on the same network. Other devices won’t be able to access your files or printers on the network.
On a “private” network, Windows 10 assumes that you are on a trusted network that only you and your family members have access to. Your device will be discoverable on the network (others can see it). If you are using Homegroups, you’ll be able to share printers and files with other computers on the network.
Public and private networks also have different firewall settings. By default, both public and private networks have pretty restrictive firewall settings. But you can customize your firewall settings to be different depending on what type of connection you’re on.
How to Change a Wireless Network to Private or Public
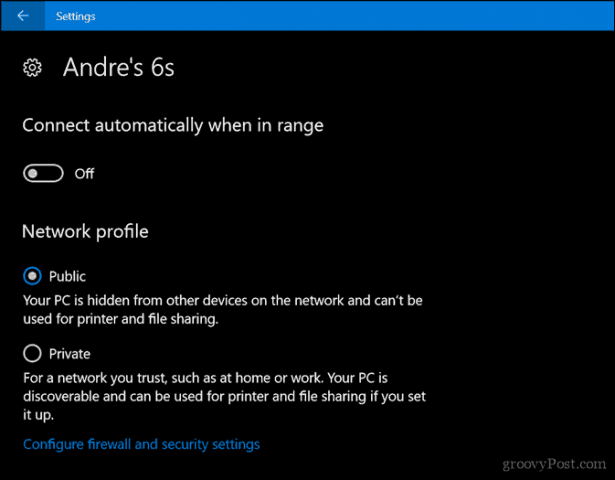
To change from a public network to a private network for vice versa, start by connecting to your network. You can do this by opening the available Network icon in the Notification area. Select the network, then connect to it. After connecting, select it, then click Properties.
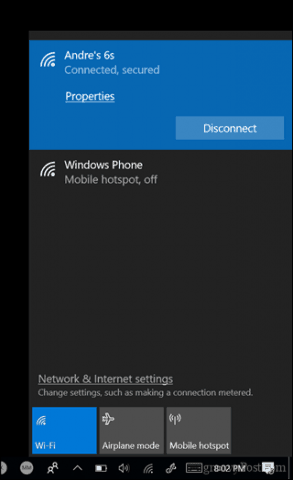
Here you can change your Network profile to Public or Private. Choose the one that best suits your environment.
How to Change a Wired Network to Public or Private
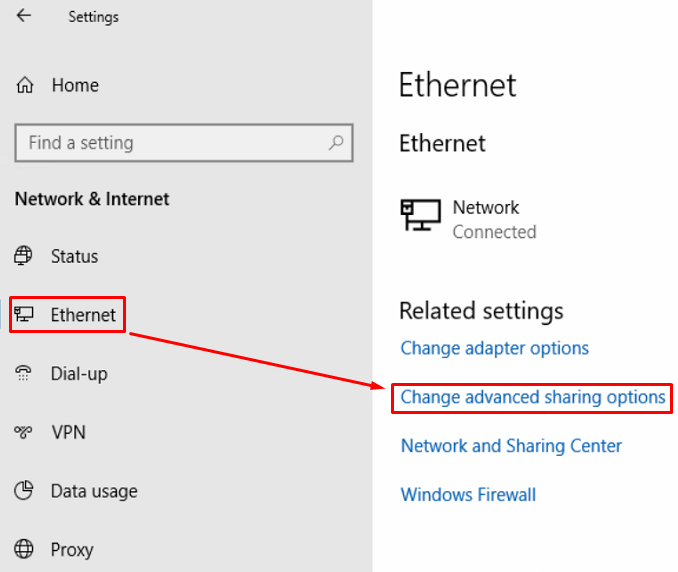
If you want to change the network profile for a wired network, open Start > Settings > Network & Internet > Ethernet, then click your network adapter.

Then choose the profile you want.

Customize Public and Private Network Settings
You can change the settings for your public or private networks. For example, if you wanted to make your computer discoverable on public networks (not recommended) or disable file or printer sharing on a private network, you could.
Open Start > Settings > Network & Internet, under Change your network settings, click Sharing options.

Expand Private or public, then choose the radio box for the desired options such as turning off network discovery, file and printer sharing, or accessing homegroup connections.
There you have it, easy ways to protect or give access to your networks. If you want to learn more about managing networks in Windows 10, check out our other articles, How to Create and Join a HomeGroup in Windows 10 and Connect Windows 10 to Wired, Wireless, and P2P Networks. Users working with a mix of Macs and Windows can find help in our guide How to Network Windows 10 and OS X and Share Files.
![]()