What is a simple way in Windows to test if traffic gets through to a specific port on a remote machine?
![]()
asked Jul 2, 2009 at 18:01
![]()
1
I found a hiddem gem the other day from Microsoft that is designed for testing ports:
Portqry.exe
«Portqry.exe is a command-line utility that you can use to help troubleshoot TCP/IP connectivity issues. Portqry.exe runs on Windows 2000-based computers, on Windows XP-based computers, and on Windows Server 2003-based computers. The utility reports the port status of TCP and UDP ports on a computer that you select. «
![]()
answered Jul 2, 2009 at 18:30
![]()
Peter MPeter M
9968 silver badges20 bronze badges
3
Which version of Windows? For Windows 8/Server 2012 and later, the following works in PowerShell:
Test-NetConnection 128.159.1.1 -Port 80
Some Googling will also turn up alternatives which use the .NET Framework directly (since PowerShell lets you do that) for systems running lower versions of Windows that won’t have Test-NetConnection available.
If you’re not averse to using third-party utilities, Nmap is also a very good friend to have and it works from the command line.
answered Oct 16, 2014 at 6:18
![]()
IsziIszi
2,2668 gold badges25 silver badges33 bronze badges
6
Use the telnet command to connect to the server on the specified port, and see if a connection can be established.
Success:
$ telnet my_server 25
220 my_server ESMTP Postfix
Fail:
$ telnet my_server 23632
Connecting To my_server...Could not open connection to the host, on port 23632:
Connect failed
answered Jul 2, 2009 at 18:05
![]()
Jørn Schou-RodeJørn Schou-Rode
7101 gold badge6 silver badges12 bronze badges
4
Telnet will work for TCP.
Netcat is a better tool for these sorts of things, including UDP, watch out though, some AV softwares consider it an ‘evil hacker tool’
answered Jul 2, 2009 at 18:07
![]()
whatsisnamewhatsisname
2911 gold badge3 silver badges8 bronze badges
Use netcat Windows port:
>nc -zvv www.google.com 80
www.google.com [108.177.96.103] 80 (http) open
sent 0, rcvd 0
>

>nc -zvv www.google.com 888
www.google.com [108.177.96.147] 888 (?): TIMEDOUT
sent 0, rcvd 0: NOTSOCK
>
answered Oct 25, 2016 at 12:48
![]()
rustyxrustyx
1,5963 gold badges19 silver badges30 bronze badges
the following command will list all ports in use on the machine…
netstat -a
The output contains the protocol, local address, foreign address and current state
Netstat documentation on microsoft.com
answered Jul 11, 2012 at 13:05
![]()
BaldyBaldy
1952 silver badges11 bronze badges
1
As @iszi’s answer suggested, using the free nmap utility downloadable from nmap.org is a viable option. It could scan for UDP or TCP ports. Example:
nmap -n -P0 -p "80,443" microsoft.com duolingo.com
where
-n           never do DNS resolution
-P0          do not ping to test 'up' state
-p           this is the list of desired ports
"22,80,443"  check in SSH, HTTP and HTTPS in TCP
The port list should be inside quotes in Windows because the comma is interpreted as space in the shell.
Result:
Nmap scan report for microsoft.com (20.53.203.50)
Host is up (0.21s latency).
Other addresses for microsoft.com (not scanned): 20.81.111.85 20.103.85.33 20.84.181.62 20.112.52.29

PORT    STATE SERVICE
80/tcp  open  http
443/tcp open  https

Nmap scan report for duolingo.com (184.72.124.184)
Host is up (0.068s latency).

PORT    STATE SERVICE
80/tcp  open  http
443/tcp open  https

Nmap done: 2 IP addresses (2 hosts up) scanned in 0.62 seconds
Port 22 is not open on the tested hosts.
Reference: https://nmap.org/book/man.html
answered Oct 27, 2022 at 23:16
![]()
FjorFjor
1864 bronze badges
‘netstat’ is you friend.
answered Jul 2, 2009 at 18:03
![]()
2
There were times when we used to test network connectivity of a specific port of the router using telnet command. Telnet used to come pre-installed in Windows but not in Windows 10. We explore different possibilities to check if a remote network port is open using command line options in Windows 10.
Windows 10 does not come with Telnet pre-installed. Even DOS Command Prompt has also become secondary with PowerShell taking the center stage.
Portqry used to be the command of choice for checking remote ports being alive and listening but it was only available up till Windows XP and Windows Server 2003.
Install Telnet in Windows 10
If you are going strictly with a DOS based command then you are left with no option but to install telnet in Windows 10. To install Telnet, follow the instructions below:
- Open Command Prompt Run –> cmd
- Run the following command:
pkgmgr /iu:”TelnetClient” - Go to Run –> telnet
Check whether the port is open or not using Command Prompt
To check the network port, follow the instructions below:
Open Telnet using the three steps described above and issue the following command:
open google.com 80
Where google.com is the host you want to test. You can also put an IP address instead of the name. 80 is the port number which you want to probe. You should replace 80 with you desired port number.
If you receive “Press any key to continue” prompt, this means that the port is open and responding to telnet. If you receive “Could not open connection” or a blank screen with blinking cursor, this means the port is closed.
If you receive “Connection to host lost“, this means that the port is open but the host is not accepting new connections.
Check open port using PowerShell
Since Microsoft is pushing PowerShell and CMD has become a legacy system, we should be using PowerShell for most of our working. Let’s check whether a remote network port is open and listening or not.
- Open PowerShell by going to Run –> powershell
- Run the following command
tnc google.com -port 80

tns is short for Test-NetworkConnection command. google.com is the host name. You can also put an IP address instead of the host name. You can specify the port number using the -port switch at the end of tnc command.
The TNC command will give you basic information about the network connection like computer name, IP address, Interface through which you are connecting, source IP, whether the ping is successful or not, Ping reply time and finally TcpTestSucceeded. TcpTestSucceeded will give you True if the port is open and false if the port is closed.
These commands and techniques are very useful when you are troubleshooting a network. Please let us know if this has been useful for you in the comments below and we will add more troubleshooting techniques in future.
Also see:
Usman Khurshid is a seasoned IT Pro with over 15 years of experience in the IT industry. He has experience in everything from IT support, helpdesk, sysadmin, network admin, and cloud computing. He is also certified in Microsoft Technologies (MCTS and MCSA) and also Cisco Certified Professional in Routing and Switching.
![]()
Download Article
![]()
Download Article
Are you looking for a quick way to check if a port on your router or firewall is open? It’s actually pretty simple. The right way to do it just depends on whether you’re using a Mac or PC and what kind of port you’re checking. We’ll walk you through how to do it step-by-step on Windows and macOS.
-

1
Enable Telnet for Windows. You can use Telnet to check if a certain port is open on your local router or access point. Here’s how to enable it:
- Type windows features in to the search bar. If you don’t see the search bar, click the circle or magnifying glass to the right of the Start menu.
- Click Turn Windows features on or off.
- Check the box next to Telnet Client and click OK.
- Click Close when the app is finished installing.
-
2
Open a command prompt. Here’s how to open the command prompt:
- Type cmd into the Windows search bar.
- Click Command prompt in the search results.
Advertisement
-
3
Type ipconfig at the prompt and press ↵ Enter. This displays a bunch of network information.
-
4
Write down the router’s IP address. The address that appears next to «Default Gateway» in the ipconfig results is the local address of your router.
-
5
Type telnet at the prompt and press ↵ Enter. This opens the Microsoft Telnet prompt.
-
6
Type open (router's IP address) (port number). For example, if you wanted to see if port 25 is open on your router, and your router’s IP address is 10.0.0.1, you would type open 10.0.0.1 25.
-
7
Press ↵ Enter. Telnet will try to connect to the port.
- If you see a message that says «Please press Enter» or «Press any key to continue,» the port is open.
- If you see a message that says «Could not open connection,» the port is not open.


Advertisement
-
1
Open a Terminal window. To open a Terminal window, open Spotlight by clicking the magnifying glass at the top-right corner of the screen, type terminal, and then click Terminal in the search results.
- Use this method to see if a port is open on your local router or access point.
-
2
Type netstat -nr | grep default at the prompt and press ⏎ Return. The router’s IP address appears next to «default» at the top of the results.
-
3
Type nc -vz (your router's IP address) (port). For example, if you wanted to see if port 25 is open on your router, and your router’s IP address is 10.0.0.1, you would type nc -vz 10.0.0.1 25.[1]
-
4
Press ⏎ Return. Here’s how to interpret the results:[2]
- If the port is open, you’ll see a message that says the connection succeeded.
- If the port is closed, you’ll see a message that says the connection was refused or timed out.


Advertisement
-
1
Open Windows search and type firewall. If the search bar is not already open, click the circle or magnifying glass to the right of the Start menu to open it.
- Use this method if you want to see if Windows is set up to allow an app you’ve installed to communicate through your firewall.
- The Windows firewall is enabled by default. If you’ve installed your own firewall software, use that software to check if an app is allowed through.
-
2
Click Windows Defender Firewall. This opens your Firewall and Network Protection settings.
-
3
Click Allow an app through firewall. It’s one of the text links near the bottom of the window. A list of apps allowed through the firewall will appear.
- If the app is allowed through the firewall only when you’re connected to a network you’ve marked as «private» (such as when you’re on your home network), a check will appear in the «Private» column next to the app.
- If the app is allowed through the firewall when you’re connected to a public network, a check will appear in the «Public» column.
-
4
Allow an unlisted app or port through the firewall. If you don’t see the app on the «Allowed apps and features» list, click the Change Settings button at the top-right corner, and then follow these steps:
- Click Allow another app near the bottom.
- Click Browse, select the app, and then click Open.
- Click Network Types near the bottom-left corner, select a privacy preference, and then click OK.
- Click Add to add the app, and then click OK.


Advertisement
-
1
Go to http://www.canyouseeme.org in a web browser. You can use it to see if a port on your computer or network is accessible on the internet. The website will automatically detect your IP address and display it in the «Your IP» box.[3]
- There are many different sites you can use to check for an open port. Search for «open port check tool» in your favorite search engine to find an alternative, if desired.
-
2
Enter the port. Type the port you want to check (e.g., 22 for SSH) into the «Port to Check» box.[4]
-
3
Click Check Port. If the port is open and available, you’ll see a confirmation message. If not, you’ll see a message that says «Error: I could not see your service on (your IP address) on port (the port number).»[5]

Advertisement
-
1
Click the
menu and select System Preferences. The Mac firewall is not enabled by default.[6]
-
2
Click Security & Privacy. It’s the house icon on the top row.
-
3
Click the Firewall tab. It’s near the top-center part of the window.
- If you see the message «Firewall:On» near the top of the tab, this means your firewall is active.
- If the firewall is not active but you want it to be, click the padlock icon at the bottom-left part of the window, enter your administrator password, and then click Turn On Firewall.
-
4
Click Firewall Options. This opens your settings, including a list of apps and services set to either allow or disallow incoming connections.
- If an app or service has a green dot and the text «Allow incoming connections,» that means its port is open.
- If you see a red dot that says «Block incoming connections,» the port is closed.
- You can toggle whether a port is allowed or not allowed by clicking the double-arrow icon next to the app’s current status, and choosing an option.


Advertisement
Add New Question
-
Question
How do I check if a port is open Windows 10?

Luigi Oppido is the Owner and Operator of Pleasure Point Computers in Santa Cruz, California. Luigi has over 25 years of experience in general computer repair, data recovery, virus removal, and upgrades. He is also the host of the Computer Man Show! broadcasted on KSQD covering central California for over two years.
Computer & Tech Specialist
Expert Answer
An easy way to do this is to go to canyouseeme.org and type in the port number into the webpage. It’ll be able to tell you whether or not the port is open.

Ask a Question
200 characters left
Include your email address to get a message when this question is answered.
Submit
Advertisement
About This Article
Thanks to all authors for creating a page that has been read 499,755 times.
Is this article up to date?
In Windows 10, there is an ability to check the connection to a certain port on a remote machine. This is possible thanks to PowerShell. So, no third party tools are required and you can do it natively.
PowerShell is an advanced form of command prompt. It is extended with a huge set of ready-to-use cmdlets and comes with the ability to use .NET framework/C# in various scenarios. If you have the skill to write scripts, you can create some very powerful ones to automate Windows.
One of its cmdlets, Test-NetConnection, can be used to check the connection to a remote address and to a custom port specified by the user.
It has the following syntax:
Test-NetConnection -ComputerName COMPUTER_NAME -Port PORT_NUMBER
Use it as follows.
Test remote network port connection in Windows 10
- Open PowerShell
- Type the following command:
Test-NetConnection -ComputerName COMPUTER_NAME -Port PORT_NUMBER
Replace the COMPUTER_NAME portion with the actual remote PC name or IP address. Specify the port you need to connect to instead of the PORT_NUMBER portion.
For example, let’s test the connection to the DNS port (53) of the public Google DNS server (8.8.8.8). The command will look as follows:
Test-NetConnection -ComputerName 8.8.8.8 -Port 53
The output: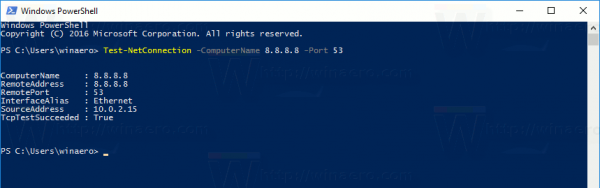 The line TcpTestSucceeded: True indicates that the connection was successful and the port 53 is open.
If you try to connect to some random port, which is closed for incoming connections, the Test-NetConnection cmdlet will respond with the following information:
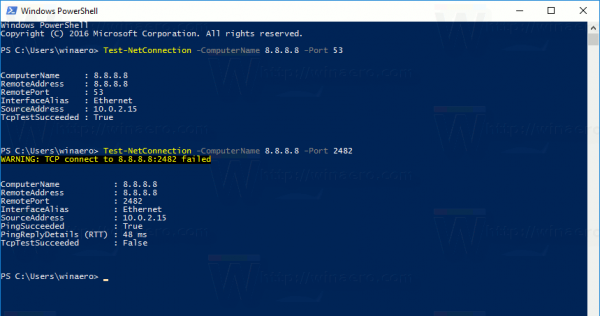 The output indicates that the connection has failed. The line TcpTestSucceeded has the value «False», but the cmdlet shows additional information that the target server is alive. It pinged the destination address and includes the results in the output. See the lines:
PingSucceeded          : True
PingReplyDetails (RTT) : 48 ms
For some servers, you may face the situation where PingSucceeded is False but TcpTestSucceeded is True. It just means that ICMP Ping is disabled on the target server but the destination port is open for incoming connections.
The cmdlet Test-NetConnection is one of the most useful PowerShell cmdlets. It saves your time and extends the built-in network diagnostics functionality in Windows 10.
The Test-NetConnection cmdlet is available in Windows 8.1 too.
That’s it.
Support us
Winaero greatly relies on your support. You can help the site keep bringing you interesting and useful content and software by using these options:
If you like this article, please share it using the buttons below. It won’t take a lot from you, but it will help us grow. Thanks for your support!
Introduction
The ping command is a network tool for checking whether a remote system is up and running. In other words, the command determines if a certain IP address or a host are accessible. Ping uses a network layer protocol called Internet Control Message Protocol (ICMP) and is available on all operating systems.
On the other hand, port numbers belong to transport layer protocols, such as TCP and UDP. Port numbers help identify where an Internet or other network message is forwarded when it arrives.
In this tutorial, you will learn how to ping a port in Windows and Linux using different tools.

Prerequisites
- A Linux or Windows system
- Access to the command line
- An account with sudo/admin privileges
Can You Ping a Specific Port?
Network devices use ICMP to send error messages and information on whether communication with an IP address is successful or not. ICMP differs from transport protocols as ICMP is not used to exchange data between systems.
Ping uses ICMP packets, and ICMP does not use port numbers which means a port can’t be pinged. However, we can use ping with a similar intention – to check if a port is open or not.
Some network tools and utilities can simulate an attempt to establish a connection to a specific port and wait to see if the target host responds. If there is a response, the target port is open. If not, the target port is closed, or the host is unable to accept a connection because there is no service configured to listen for connections on that port.
You can use three tools to ping a port in Linux:
- Telnet
- Netcat (nc)
- Network Mapper (nmap)
See our tutorial on how to use the ping command in Linux to learn about additional ping options and variations in Linux.
Ping a Specific Port Using Telnet
Telnet is a protocol used for interactive communication with the target host via a virtual terminal connection.
1. To check whether telnet is already installed, open a terminal window and enter telnet.
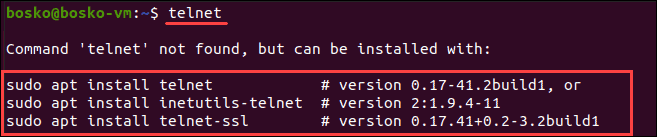
2. If telnet is not installed, install it using the following command
- For CentOS/Fedora:
yum -y install telnet - For Ubuntu:
sudo apt install telnet
3. To ping a port using telnet, enter the following command in the terminal:
telnet <address> <port_number>The <address> syntax is the domain or the IP address of the host, while <port_number> is the port you want to ping.
telnet google.com 443
If the port is open, telnet establishes a connection. Otherwise, it states a failure.
4. To quit telnet, press Ctrl + ] and run the q command.
Ping a Specific Port Using Netcat
Netcat (nc) reads and writes from connections using TCP and UDP protocols. This command-line tool can perform many network operations.
1. To check if netcat is installed:
- For Debian, Ubuntu, and Mint: enter
netcat -h - For Fedora, Red Hat Enterprise Linux, and CentOS:
ncat -h
2. If netcat is not installed, run the following command in the terminal:
sudo apt install netcat3. To ping a port using netcat enter the following:
nc -vz <address> <port_number>The output informs the user if the connection to the specified port is successful or not. If it is successful, the port is open.
Ping a Specific Port Using Nmap
Nmap is a network tool used for vulnerability scanning and network discovery. The utility is also useful for finding open ports and detecting security risks.
Important: Be aware of legal ramifications regarding improper Nmap use, for example, flooding a network or crashing a system.
1. Check if you have Nmap installed by entering nmap -version in the terminal.

If Nmap is installed, the output informs the user about the app version and platform it runs on.
2. If there is no Nmap on your system, enter the following command:
- For CentOS or RHEL Linux:
sudo yum install nmap - For Ubuntu or Debian Linux:
sudo apt install nmap
3. Once Nmap is installed on the system, use the following command to ping a specific port:
nmap -p <port_number> <address>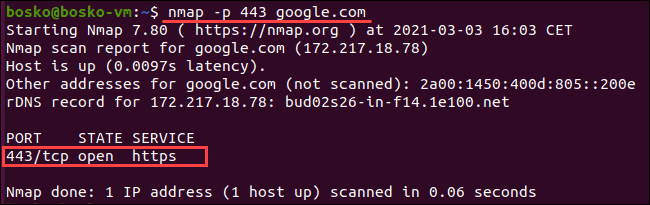
The output informs the user about the port’s state and service type, latency, and the time elapsed until the completion of the task.
4. To ping more than one port, enter nmap -p <number-range> <address>.
The <number-range> syntax is the range of port numbers you want to ping, separated by a hyphen.
For example:
nmap -p 88-93 google.com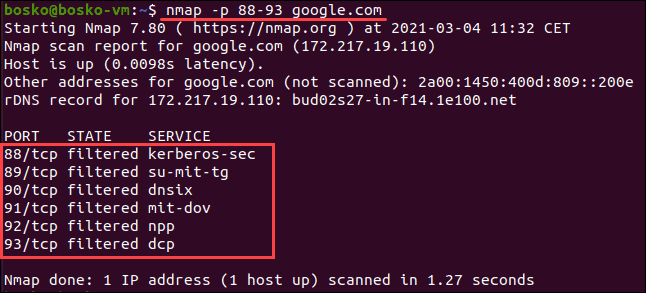
Learn in-depth how to use nmap to scan ports with our guide How To Scan & Find All Open Ports With Nmap.
How to Ping a Specific Port in Windows?
There are two ways to ping a port in Windows:
- Telnet
- PowerShell
Ping a Port Using Telnet
Before using telnet, make sure it is activated:
1. Open the Control Panel.
2. Click Programs, and then Programs and Features.
3. Select Turn Windows features on or off.
4. Find Telnet Client and check the box. Click OK.
You activated the Telnet Client on the system.
After completing the activation, you are ready to ping a port using telnet.
Follow these steps:
1. Search for “cmd” in the start menu. Click the Command Prompt.
2. In the command prompt window, enter
telnet <address> <port_number>The <address> syntax is the domain or the IP address of the host, while <port_number> is the port number you want to ping.

The output lets you know if the port is open and reachable. Alternatively, a connection failure message is shown.
Ping a Port Using PowerShell
PowerShell is a text-based shell that comes with Windows by default.
To ping a port using PowerShell, follow these steps:
1. Search for “PowerShell” in the start menu. Click the Windows PowerShell app.
2. In the PowerShell prompt window enter
Test-NetConnection <address> -p <port_number>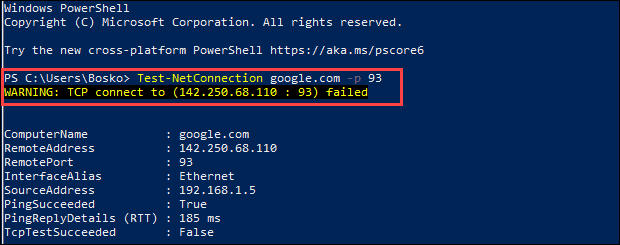
If the port is open and the connection passes, the TCP test is successful. Otherwise, a warning message appears saying the TCP connection failed.
Conclusion
Now you know how to ping and check if a port is open by using several network tools and utilities on Linux and Windows.
Bear in mind that you should not do TCP probing or scan a system unless you have the owner’s permission. Otherwise your actions may be interpreted as an attempt to compromise security.
In this how to check if port is open article, we will try to answer all the how-to questions we receive on our website.
We will add a new question from time to time base on new how to questions that users will ask.
For general question, we will try to answer it for the Windows operation system, assuming it can be asking for Windows, Linux, MAC or Mobile device.
Here is a common question regarding how to check a port is open:
- how to check 443 port open or not?
- how to check if port 443 is open?
- how to check if port 9675 is open?
- how to check port 443 is open?
- how to test port 443 is open?
- how to check if port 25 is open?
- how to check if the port 47827 open?
To check if a port is open or not on your local computer you will have to use a tool.
Using our own Open Port Viewer tool:
You can download our Open Port Viewer tool and run it (right click and run as administrator).
Open Port Viewer is an easy to use GUI tool to get the current list of used ports on your system.

In the list of ports that you will see, please check if you can see the port you are searching.
Using netstat command line tool:
Another option is to use the netstat command line tool.
To do so, please open cmd as administrator:
- Press the Windows button
- Type cmd
- Right click on Command Prompt.
- Select Run as administrator.

In the command prompt type the following:
netstat -an | find “PORT NUMBER TO FIND”
example to check for 443 with netstat:
netstat -an | find “443”
If you see the port number on the left side (red location on the blow image) the port is open.

Read more information about netstat on our netstat command article.
Using telnet command line tool:
Telnet is also a command line tool, to use it you may have to enable it first, on Windows 10.
This is how you enable telnet on windows 10:
- Open Turn Windows Feature on or off
- Press the Windows Button + R
- On the Run dialog type: OptionalFeatures
- Press enter or Click OK.
- Fin Telnet client in the list.
- Mark V near it.
- Press Ok

Open the command prompt as administrator (look above how to open cmd as administrator).
Type the following:
telnet localhost <PORT NUMBER>
example to check for 443 with telnet:
telnet localhost 443
If you get the following error, the port is close:
Connecting To localhost…Could not open a connection to the host, on port 443: Connect failed
Using putty tool:
To check if the port is open using putty tool, you need to download putty from the internet first.
Putty can open a terminal, like telnet or SSH to connect to a remote host, like the telnet command.
We will use it to connect a local port.
Downloading putty from putty website – Putty
When the site is open scroll down to the Alternative binary files section.
Select the 32-bit or 64-bit version of the tool, and download it to your computer.
Once it finishes downloading open it.
- Set hostname – localhost
- Set Port – The port number
- Select telnet
- Press open
Example of using putty to check port 443:

If you see the following message the port is close:

In this article, we show you 4 tools that you can use to check if port is open or not.
The above tools are designed to run on Windows operation system and you might need to be an administrator to use them.
Hope it helps.
Certain apps and processes in Windows 10 can cause problems if you’re not properly connected to the internet. Firewalls can cause these connection issues when they cannot determine whether incoming and outgoing connections pose a threat. Work around this issue and open ports for incoming and outgoing connections. We will know to check whether a TCP port is open or closed on the Windows operating system.
Basically, many times we need to check the port status when any of the below issues results in closing the port.
- They may not be properly working.
- External IP addresses that are in use may be set to private IPs.
- Firewall rules may block the network.
There are several ways to check open TCP/IP ports in Windows. Here are a few options:
Using Telnet Client:
Step 1: Check whether the telnet client feature is ON or not. In order to check, open the Turn Windows feature on or off settings from the search bar. OR press the ‘window’ key and type ‘windows’ features. Then press on “Turn Windows features on or off”.
-660.png)
Windows Features Option
A new prompt will be opened. Search for “Telnet Client” and check the box in front of ‘telnet Client’.

Windows Features
Step 2: Open the command prompt. Press the ‘windows’ key and type ‘cmd’. Press “Command Prompt”.
-660.png)
Command Prompt Option
Step 3: On the command prompt, type the command “telnet + IP address or hostname + port number” and check the status of the provided TCP port.
-660.png)
Telnet Command
Step 4: If only the blinking cursor is visible, then the port is open.
-660.png)
Port is Open
Step 5: If you get the message “connection failed” then the port is closed.
-660.png)
Port is close
Using built-in netstat command-line utility:
Step 1: Open the command prompt.
Step 2: Run the following command:
netstat -an

Using TcpView
Another option is to use the TcpView utility from Microsoft’s Sysinternals suite of tools. This utility provides a more user-friendly interface for viewing active TCP/IP connections, along with additional information such as the process ID and process name for each connection. Steps to be followed:
Step 1: Download the TcpView utility from the Microsoft Sysinternals website. You can find the download link on the TcpView page of the Sysinternals website.
-660.png)
Download Page
Step 2: Extract the downloaded file and run the TcpView.exe file to launch the TcpView utility. This will open the TcpView window, which shows a list of all active TCP/IP connections on your machine.

Extracted FIles
Step 3: Open the tcpview.exe (application).
By default, TcpView will display the following columns in the list of connections:
Protocol: Shows the protocol being used for the connection (TCP or UDP)
Local Address: Shows the local address and port being used for the connection
Remote Address: Shows the remote address and port being connected to
State: Shows the current state of the connection (e.g. Established, Listen, etc.)
You can use the “Local Address” and “Remote Address” columns to see which ports are being used by which applications. For example, if you see a connection with a local address of “127.0.0.1:80”, this means that the local application is using port 80 for outgoing connections.
Windows PowerShell
You can also use Windows PowerShell to check open TCP/IP ports. To do this, use the Get-NetTCPConnection cmdlet, which allows you to view a list of active TCP/IP connections and the local and remote addresses and ports being used. For example, you can run the following command to view a list of all active TCP/IP connections:
Get-NetTCPConnection |
Select-Object LocalAddress,
LocalPort, RemoteAddress, RemotePort

Get-NetTCPConnection cmdlet
Nmap
To install Nmap in the Windows command line, follow these steps:
Step 1: Download the latest version of Nmap from the Nmap website. You can find the download link on the Nmap download page:
https://nmap.org/download.html
Step 2: Extract the downloaded file to a location on your computer. This will create a new folder containing the Nmap files.
Step 3: Open a command prompt and navigate to the directory where you extracted the Nmap files. For example, if you extracted the files to the C:nmap directory, you would run the following command:
cd C:nmap
Step 4: Once you are in the Nmap directory, you can install Nmap by running the nmap.exe file. To do this, run the following command:
nmap.exe -V
This will display the version number of Nmap, indicating that it has been installed successfully.
Step 5: To use nmap to scan for open TCP/IP ports, run the “nmap -sT” command, followed by the IP address or hostname of the machine you want to scan.
nmap -sT localhost

This will scan the specified host or IP address and display the results. You can also use the -h option to view a list of available options and arguments for the nmap command. Overall, installing Nmap in the Windows command line is a straightforward process. You can download the latest version of Nmap from the Nmap website, extract the files, and then run the nmap.exe file to install it. Once it is installed, you can use the nmap command to scan hosts and IP addresses and view the results.