![]()
Download Article
![]()
Download Article
- Installation
- Use
- Q&A
|
|
Telnet is a command line tool that is designed for administering remote servers through the Command Prompt. Unlike Windows XP and Vista, Windows 7 does not come with the Telnet client installed automatically. You will need to enable it before you can start using it. See Step 1 below to learn how to do both.
-

1
Open the Control Panel. By default, Telnet is not installed with Windows 7. It will need to be manually activated in order for you to use it. You can do so through the Control Panel, which can be accessed from the Start menu.
-
2
Open «Programs and Features» or «Programs». The option available to you will depend on whether your Control Panel is in Icon or Category view, but they both take you to the same place.
Advertisement
-
3
Click the «Turn Windows features on or off» link. You may be asked for the Administrator password.
-
4
Find the «Telnet Client» entry. In the list of available features, you will see an entry labeled Telnet Client. You may have to scroll down to find it. Check the box next to Telnet Client, and click OK.
- You may have to wait a minute or two for the client to be installed after selecting it.
-
5
Install Telnet through the command prompt. If you’d rather do everything through the Command Prompt, you can install Telnet with a quick command. First, open the Command Prompt by typing cmd into the Run box. At the command line, type pkgmgr /iu:"TelnetClient" and press ↵ Enter. After a moment, you will be returned to the command prompt.[1]
- Restart the command prompt to begin using Telnet.


Advertisement
-
1
Open the Command Prompt. Telnet runs through the Command Prompt. You can access the command prompt by pressing Win and typing cmd into the Run field.
-
2
Start the Telnet client. Type telnet and press ↵ Enter to start Microsoft Telnet. The Command Prompt will disappear, and you will be taken to the Telnet command line, displayed as Microsoft Telnet>.
-
3
Connect to a Telnet server. At the Telnet command line, type open serveraddress [port]. You have successfully connected to the server when you receive either a welcome message or are prompted for your username and password.
- For example, to watch ASCII Star Wars, type open towel.blinkenlights.nl and press ↵ Enter.
- You can also start a connection directly from the Command Prompt by typing telnet serveraddress [port].
-
4
Close your Telnet session.Once you are finished administering your Telnet server, you should close your connection before closing the window. To do so, open the Telnet command line by pressing Ctrl+]. Type quit and press ↵ Enter to close the connection.[2]


Advertisement
Add New Question
-
Question
What if I cannot find the telnet server on my Windows 10 computer?

You can find it in control panel by clicking on Programs and Features then Turn windows features on/off. You will find telnet client there.
Ask a Question
200 characters left
Include your email address to get a message when this question is answered.
Submit
Advertisement
Thanks for submitting a tip for review!
About This Article
Article SummaryX
1. Open Control Panel.
2. Click Programs or Programs and features.
3. Click Turn Windows features on or off.
4. Check the box next to «Telnet client.»
5. Click OK.
Did this summary help you?
Thanks to all authors for creating a page that has been read 847,878 times.
Is this article up to date?
Немногие пользователи компьютера сегодня знают о существовании различных специальных протоколов на компьютере, позволяющих без использования графического интерфейса и сторонних программ выполнять различные действия. Поэтому сразу возникает желание узнать, как пользоваться службой TELNET, когда узнают о соответствующем протоколе.
Далее будут изложено немного теории о том, что такое TELNET, то, ради чего многие и стремятся ей овладеть: возможности службы, а также список основных команд, позволяющий эти возможности осуществить на Windows.

TELNET
Сетевой протокол и текстовый интерфейс
TELNET — это средство связи, которое устанавливает транспортное соединение между терминальными устройствами, клиентами, то есть вашим компьютером и чьей-то ещё машиной, сервером, поддерживающей этот стандарт соединения. Это не специальная программа, а всего лишь сетевой протокол, но также словом TELNET (terminalnetwork) называют различные утилиты, которые также используют этот протокол. Сегодня Телнет присутствует практически везде, все ОС, так или иначе, его используют, в том числе и Windows.
TELNET реализует текстовый интерфейс, который отличается от привычного рядовому пользователю графического тем, что все команды необходимо вбивать вручную.
Что нам всё это даёт?
Ранее эта служба была одним из немногих способов подключения к сети, но с течением времени утратила свою актуальность. Сегодня есть гораздо более удобные программы, которые делают за пользователя всю работу, и не заставляют его заучивать наизусть различные команды для того, чтобы выполнить простейшие действия. Однако кое-что при помощи Телнет можно сделать и сейчас.

Подключения к сети
При помощи Телнет вы можете:
- подключаться к удалённым компьютерам;
- проверить порт на наличие доступа;
- использовать приложения, которые доступны только на удалённых машинах;
- использовать различные каталоги, к которым получить доступ можно только таким образом;
- отправлять электронные письма без использования специальных программ (клиентов);
- понимать суть работы многих протоколов, использующихся сегодня, и извлекать из этого для себя определённую выгоду;
- обеспечивать другим юзерам доступ к данным, размещённым на своём компьютере.
Начинаем пользоваться
Запуск
Запустить TELNET на Windows 7 и на любой другой Винде достаточно просто. Для этого необходимо сначала клиент, если он ещё не установлен:
- Зайти в Панель управления.

- Выбрать пункт «Программы».
- Выбрать вкладку «Включение или отключение компонентов Windows».

- Найти Telnet-клиент и поставить напротив него маркер, если он ещё не установлен.
После нажимаем «ОК» и ждём минуту, пока клиент устанавливается.
Запуск терминала осуществляется в Windows через командную строку, если у вас не установлено каких-либо специальных утилит для работы с Телнет. Но раз вы читаете эту статью, значит, только начинаете знакомство с этой темой, и для начала неплохо бы было освоить основы управления при помощи командной строки.
- Запускаем командную строку от имени администратора.
- Вводим «telnet».
Командная строка перезагружается, и теперь откроется командная линия TELNET, в которой мы и будем работать.
Проверяем порт
Одно из простейших действий, выполняемых в TELNET — проверка порта. Вы можете проверить порт на наличие доступа к нему с вашего компьютера. Для этого нужно сделать следующее:
В командной строке, открытой по методу выше вводим: telnetip-адрес номер порта

К примеру, если ваш IP-адрес 192.168.0.1, а номер порта 21 (порт FTP), то вводим:
telnet 192.168.0.1 21
Если команда выдаёт сообщение об ошибке, значит, порт недоступен. Если появляется пустое окно или просьба ввести дополнительные данные, значит, порт открыт. Для Windows такой способ проверить порт может быть достаточно удобным.
Команды
Команды TELNET составляют основу использования терминала. С их помощью можно управлять компьютером, который использует этот протокол, если для вас разрешён доступ, а также совершать другие различные действия. Как уже сказано выше, на Windowsони вводятся в командной строке приложения Телнет.
Для того чтобы увидеть основной список команд, введите в строке helpи нажмите «Enter». Базовые команды:
- Open — подключение к удалённому серверу. Необходимо ввести эту команду вместе с именем управляемого сервера и номером порта, например: openredmond 44. Если параметры не указаны, то используются локальный сервер и порт по умолчанию.
- Close — отключение от удалённого сервера. Используются аналогичные параметры.
- Set — настройка удалённого сервера, используется с именем управляемого сервера. Вместе с Set используются следующие команды:
- [Term {терминал}] — используется, чтобы задавать терминал указанного типа.
- [Escapeсимвол] — задаёт управляющий символ.
- [Mode {console или stream}] — задаёт режим работы.
- Unset [параметр] — отключает заданный ранее параметр.
- Start — запускает сервер Телнет.
- Pause — ставит работу сервера на паузу.
- Continue — возобновляет работу.
- Stop — останавливает сервер.
TELNET — один из старейших протоколов, но при этом он до сих пор применяется. Это означает, что и вы можете начать использовать его в своих целях. Для этого нужно лишь изучить синтаксис и список команд и начать практиковаться. Вы можете почерпнуть много нового, а заодно совсем по-другому начать смотреть на интернет и на привычные ранее действия в сети.
Introduction
Telnet (teletype network) is a network protocol for two-way text-based communication through a CLI, allowing remote access. Telnet is vulnerable to cybersecurity attacks because it lacks encryption methods compared to the more modern SSH. However, it is still helpful for tasks that do not involve transmitting sensitive information.
This article teaches you what Telnet is as well as how to use Telnet on Windows to test for open ports.
Prerequisites
- Windows OS with administrator privileges
- Access to the command prompt
- An address and port to test
What is Telnet?
Telnet is a client-server protocol predating the TCP protocol. The network protocol allows a user to log into another computer within the same network through a TCP/IP connection.
A client machine running the Telnet client connects to a CLI on a remote device, most commonly a dedicated platform. Telnet is lightweight and fast, making it the preferred option in some use cases:
- Initial network hardware configuration.
- Remote access to trusted internal networks.
- Testing for open or used ports.
- Troubleshooting mail and web servers.
- Checking port forwarding.
How Does Telnet Work?
The Telnet protocol creates a communication path through a virtual terminal connection. The data distributes in-band with Telnet control information over the transmission control protocol (TCP).
Unlike other TCP/IP protocols, Telnet provides a log-in screen and allows logging in as the remote device’s actual user when establishing a connection on port 23. This type of access grants direct control with all the same privileges as the owner of the credentials.
Telnet comes with a command accessible from the command line in Windows. The telnet command also exists for macOS and Linux operating systems.
How to Enable Telnet on Windows 10?
In Windows systems, Telnet is disabled by default. To check if Telnet is already activated, open your command line, and run telnet:

If the command prompt does not recognize the command, there are two possible ways to enable the Telnet client in Windows.
Option 1: Enable Telnet using GUI
To activate the Telnet command using the GUI:
1. Open the Programs and Features options in Control Panel:

2. Click the Turn Windows features on or off setting:
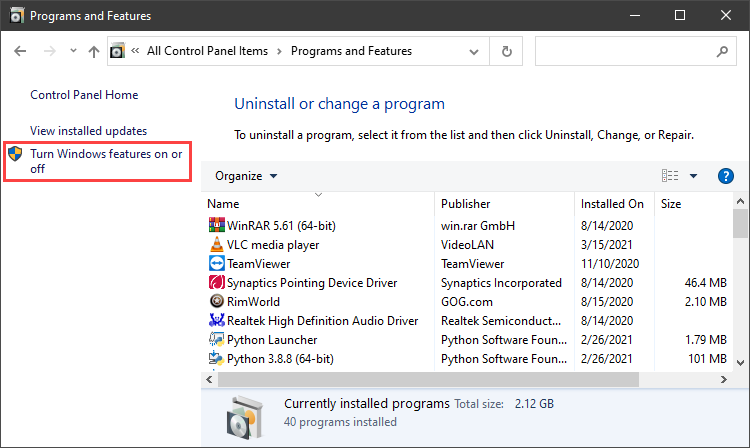
3. Locate the Telnet Client option on the list, select it and click OK to install the feature:

4. When Windows completes the requested change, click Close.
5. Open the command prompt and run telnet to open the Microsoft Telnet Client:

6. Run quit to exit the Telnet client.
Option 2: Enable Telnet Using Command Prompt
To activate the Telnet client from the command prompt:
1. In the command prompt, run:
pkgmgr /iu:"TelnetClient"2. Restart the command prompt and run telnet to open the Microsoft Telnet Client.
3. Run quit to exit the client:

How to Use Telnet in Windows to Test Open Ports
The Telnet syntax for testing open ports is:
telnet <address> <port number>The command accepts both symbolic and numeric addresses. For example:
telnet towel.blinkenlights.nl 23Or alternatively:
telnet 127.0.0.1 80After running the command, one of the following three options happen:
1. The command throws an error, indicating the port is not available for connection:

2. The command goes to a blank screen, indicating the port is available.
3. Running the command on an open port 23 displays the screen of the telnet host, confirming an established Telnet connection:

Note: Learn how Telnet differs from SSH in our comparison article Telnet vs SSH.
Conclusion
The Telnet communication protocol provides a way to establish a direct connection with a remote host. Although not a secure option for most tasks, there are use cases where Telnet is a viable option.
For further reading, check out the more secure option and learn how to use SSH to connect to a remote server in Linux or Windows.
Telnet is a network protocol that provides a command-line interpreter to communicate with a device. It’s used most often for remote management, but also sometimes for the initial setup for some devices, especially network hardware such as switches and access points.
How Does Telnet Work?
Telnet originally was used on terminals. These computers require only a keyboard because everything on the screen displays as text. The terminal provides a way to remotely log on to another device, just as if you were sitting in front of it and using it like any other computer.
Nowadays, Telnet can be used from a virtual terminal, or a terminal emulator, which is essentially a modern computer that communicates with the same Telnet protocol. One example of this is the telnet command, available from the Command Prompt in Windows that uses the Telnet protocol to communicate with a remote device or system.
Telnet commands can also be executed on other operating systems, such as Linux and macOS, in the same way that they’re executed in Windows.
Telnet isn’t the same as other TCP/IP protocols such as HTTP, which transfers files to and from a server. Instead, the Telnet protocol has you log on to a server as if you were an actual user, then grants you direct control and all the same rights to files and applications as the user that you’re logged in as.
How to Use Windows Telnet
Although Telnet isn’t a secure way to communicate with another device, there are a reason or two to use it, but you can’t just open up a Command Prompt window and expect to start executing commands.
Telnet Client, the command-line tool that executes telnet commands in Windows, works in every version of Windows, but, depending on which version of Windows you’re using, you may have to enable it first.
Enable the Telnet Client in Windows
In Windows 11, Windows 10, Windows 8, Windows 7, and Windows Vista, turn on the Telnet Client in Windows Features in Control Panel before any relevant commands can be executed.
Telnet Client is already installed and ready to use out of the box in both Windows XP and Windows 98.
-
Open Control Panel by searching for control panel in the Start menu. Or, open the Run dialog box via WIN+R and then enter control.
-
Select Programs. If you don’t see that because you’re viewing the Control Panel applet icons, choose Programs and Features instead, and then skip to Step 4.
-
Select Programs and Features.
-
Select Turn Windows features on or off from the left pane.
-
Select the check box next to Telnet Client.
-
Select OK to enable Telnet.
-
When you see the Windows completed the requested changes message, you can close any open dialog boxes.
Execute Telnet Commands in Windows
Telnet commands are easy to execute. After opening Command Prompt, enter the word telnet. The result is a line that says Microsoft Telnet>, which is where commands are entered.
If you don’t plan to follow the first telnet command with additional commands, type telnet followed by any command, such as the ones shown in the examples below.
To connect to a Telnet server, enter a command that follows this syntax:
telnet hostname port
For example, entering telnet textmmode.com 23 connects to textmmode.com on port 23 using Telnet.
The last portion of the command is used for the port number but is only necessary to specify if it’s not the default port of 23. For example, telnet textmmode.com 23 is the same as running the command telnet textmmode.com, but not the same as telnet textmmode.com 95, which connects to the same server but on port 95.
Microsoft keeps a list of telnet commands if you’d like to learn more about how to do things like open and close a Telnet connection, display the Telnet Client settings, and more.
Telnet Games & Additional Information
There are a number of Command Prompt tricks you can perform using Telnet. Some of them are in text form, but you may have fun with them.
Check the weather at Weather Underground :
telnet rainmaker.wunderground.com
Use Telnet to talk to an artificially intelligent psychotherapist named Eliza. After connecting to Telehack with the command below, enter eliza when asked to choose one of the listed commands.
telnet telehack.com
Watch an ASCII version of the full Star Wars Episode IV movie by entering this in Command Prompt:
telnet towel.blinkenlights.nl
Beyond the fun things that can be done in Telnet are a number of Bulletin Board Systems (BBS). A BBS provides a way to message other users, view news, share files, and more. The Telnet BBS Guide lists hundreds of servers that you can connect to using this protocol.
FAQ
-
How is SSH different from Telnet?
SSH is a network protocol used for remote access and uses encryption. Telnet is another network protocol used for remote access but does not use any encryption. It will display data (including usernames and passwords) in clear text.
-
How do I Telnet into my router?
Make sure Telnet is turned on, then ping your network. In Telnet, enter telnet IP address (ex. telnet 192.168.1.10). Next, enter your username and password to log in.
Thanks for letting us know!
Get the Latest Tech News Delivered Every Day
Subscribe
Is there a simple telnet command line utility for Windows 7? I am used to the telnet command that is built into UNIX, but I can’t seem to find one for Windows that can be used similarly.
![]()
Paul
58.2k18 gold badges140 silver badges166 bronze badges
asked Oct 21, 2011 at 15:06
![]()
The Telnet client in Windows 7 is disabled by default, and needs to be enabled via Windows’ Programs and Features:
Control Panel —> Programs —> Turn Windows features on or off, in the dialog that pops up check-mark «Telnet Client».
For more info see: Why isn’t Telnet enabled by default in Windows 7?
And at MS’s site you can check out Telnet: frequently asked questions.
![]()
answered Oct 21, 2011 at 15:09
![]()
Ƭᴇcʜιᴇ007Ƭᴇcʜιᴇ007
111k19 gold badges198 silver badges262 bronze badges
1
PuTTY is a free implementation of Telnet and SSH for Windows and Unix. Download the latest PuTTy for telnet.
answered Oct 21, 2011 at 19:05
![]()
kbakba
3471 gold badge4 silver badges16 bronze badges
2
A much better (and FOSS) Telnet client is PuTTY.
![]()
Gaff
18.3k15 gold badges56 silver badges68 bronze badges
answered Oct 21, 2011 at 19:04
![]()
If you need to connect using telnet from the command line, take a look at Plink. Its by the same people that make PuTTY. Plink allows you to script connections to anything PuTTY can connect to. I used plink with simple batch files and perl files on windows with fairly good results (of course you results may vary). If you are just looking to get a telnet connection from command line then the vanilla telnet client in Windows should be okay.
answered Oct 27, 2011 at 17:37
![]()
AtomicPorkchopAtomicPorkchop
3,18413 gold badges38 silver badges58 bronze badges
If you want to test a network connection, you can use with Powershell :
Test-NetConnection google.com -port 80
answered May 25, 2022 at 12:00
![]()
lolesquelolesque
3941 gold badge2 silver badges12 bronze badges
1
Telnet – представляет собой средство связи, которое устанавливается между терминальными устройствами. Пример такой связи достаточно простой: персональный компьютер и сервер, который поддерживает подобный тип соединения. Телнет не является каким-либо программным обеспечением, это протокол связи. Но необходимо отметить, что есть некоторые утилиты, которые работают посредством протокола «terminalnetwork».
В недавнем прошлом Телнет был одним из основных способов подключения к сети. Сейчас утилита практически не используется. На сегодняшний день в операционные системы установлены более совершенные протоколы, исключая какие-либо дополнительные действия от пользователя.
Этот протокол связи используется в некоторых операциях:
- подключение к удаленному рабочему столу;
- проверка портов на возможность подключения;
- использование программного обеспечения, которое доступно только на удаленных машинах;
- применение системных каталогов, которые могут быть открыты только с использованием этого типа протокола;
- отправка электронной почты без использования дополнительного софта;
- пользователи, применяя этот протокол позволяет другим юзерам получить доступ к своему персональному компьютеру.
Установка и запуск
Скачивать утилиту не нужно, Telnet встроен в Windows 7/8/10 по умолчанию.
Инструкция по установке и запуску:
- для установки клиента нужно открыть «Панель управления»;

- далее выбираем «Программы» и «Включение и отключение компонентов»;

- в списке системных компонентов следует найти «Клиент Telnet»;

- отмечаем чекбокс и щелкаем «ОК», начнется процесс установки.


Для того, чтобы запустить клиент нужно открыть командную строку:
- в меню «Пуск», в поисковой строке ввести «CMD»;

- далее запускаем командную строку от имени администратора и вводим «Telnet»;

- после этого откроется окно утилиты.


Как найти нужный торрент в интернете
Предлагаем ознакомиться с видео по установке Телнет в Windows:
Как управлять службой?
После того, как вы зайдете в службу управления терминалом Windows, необходимо знать несколько команд для возможности управления. Есть такие варианты получения списка управляющих ключей:
- нужно набрать в командной строке «telnet» для того, чтобы запустить его, а затем «help» для ознакомления с опциями;

- в Windows можно выполнить эту же функцию другим способом, набрав «telnet /h».

Если вы знакомы с опциями, можно сразу подключаться к нужному ресурсу с указанием необходимых данных. В этом случае сервер для соединения – «smatp.ya.ru» и порт – «25».

Итог:
Команда telnet очень проста в использовании и достаточно удобна. Однако в технологи её работы абсолютно не предусмотрена безопасность. Оболочка работает под Windows в полностью незащищенном режиме и без шифрования. Поэтому вместо этой функции уже достаточно давно используется ssh.
По принципу организации соединения они практически одинаковы. Но протокол ssh разрабатывался с учетом возможных технологий защиты. В некоторых случаях более простого способа соединения вполне достаточно, например, когда необходимо подключиться к оборудованию, чтобы загрузить в него новую прошивку или восстановить старую, а также для изменения конфигурации системы.
Если использовать сразу несколько протоколов для подключения, то быстрее, удобнее и безопаснее делать это через специальную программу, например «Putty».
Проверка порта
Проверка сетевого порта на наличие доступа к нему персонального компьютера в Telnet:
- в окне необходимо ввести команду telnetip;
- далее следует ввести IP адрес компьютера, например, 192.168.1.1. Посмотреть адрес можно в настройках сетевого маршрутизатора;
- в конце вводим порт FTP «21». Таким образом команда будет выглядеть так: telnet 192.168.0.1 21;
- после этого появится сообщение об ошибке, если порт недоступен или с просьбой ввести дополнительные данные, если порт открыт.
Выводы
Необходимость воспользоваться командами утилиты telnet возникает в настоящее время всё реже.
Однако знать некоторые из них стоит хотя бы для получения с их помощью доступа к сетевому оборудованию.
Например, к коммутаторам, маршрутизаторам или даже к веб-камерам.
Таким образом, даже этот сравнительно устаревший и небезопасный протокол может оказаться полезным и для обычных пользователей и, тем более, для специалистов.
Правда, для работы с ним потребуется не только знание списка команд, но и определённый опыт в работе с командной строкой.
Команды Telnet
Команды утилиты являются способом взаимодействия с ней. Для отображения списка всех команд, необходимо ввести «help». Далее подробно разберем основные команды:
- «open» — запрос позволяет выполнить подключение к удаленному серверу;
- «close» — прерывание процесса подключения к удаленному серверу;
- «set» — настройка параметров подключения к серверу;
- «term» — запрос предназначен для указания типа терминала;
- «escape» — задает управляющий символ;
- «mode» — выбор режима работы;
- «unset» — сброс ранее введенных параметров;
- «start» — запуск сервера;
- «pause» — временная остановка работы сервера;
- «continue» — продолжение работы сервера после паузы;
- «stop» — полное прекращение работы сервера.
Telnet в Linux
Как и в Виндовс, Телнет встроен в операционную систему Linux. Ранее он использовался, как стандартный протокол Telnet, теперь на его место пришел более улучшенный SSH. Как и с предыдущей ОС, утилита в Linux используется для проверки портов, маршрутизаторов и т.д.
Рассмотрим основные режимы работы:
- «построчный». Данный режим работы является рекомендованным. В этом случае редактирование запроса осуществляется на локальном ПК и отправляется на сервер только в том случае, когда она готова;
- «посимвольный». Каждый набранный символ в окне консоли отправляется на удаленный сервер. Здесь нельзя осуществить редактирование текста. При удалении символа с помощью «Backspace», он тоже будет отправлен на сервер.
Почему Windows 10 бесплатная?
Базовые команды в Linux:
- «close» — прерывание подключения;
- «encrypt» — включение шифрования;
- «logout» — выключение утилиты и закрытие соединения;
- «mode» — выбор режима работы;
- «status» — состояние соединения;
- «send» — отправка запроса телнет;
- «set» — настройка параметров сервера;
- «open» — подключение к удаленному серверу;
- «display» — отображение специальных символов.
Далее рассмотрим несколько способов применение утилиты в Linux:
- в окне консоли вводим запрос для проверки доступности сервера, например, «telnet 192.168.1.243»;
- далее проверим доступ к порту путем ввода запроса «telnet localhost 122» и «telnet localhost 21». На экране консоли появится сообщение о том принимает ли соединение какой-либо из портов;
- пример удаленного управления с помощью телнет. Для этого необходимо ввести в главном окне запрос «telnet localhost 23». «23» порт используемый по умолчанию. Чтобы произвести удаленное управление, необходимо установить на локальный компьютер «telnet-server». После этого появится сообщение с требованием ввода логина и пароля.
Введение
TELNET (сокр. от англ. teletype network) — сетевой протокол для реализации текстового терминального интерфейса по сети (в современной форме — при помощи транспорта TCP). Название «telnet» имеют также некоторые утилиты, реализующие клиентскую часть протокола. Современный стандарт протокола описан в RFC 854.
Выполняет функции протокола прикладного уровня модели OSI. Протокол telnet, наряду с ssh широко используется для удалённого администрирования различными сетевыми устройствами и программными серверами.
Telnet не является внутренней или внешней командой
Данная ошибка появляется в том случае, если данный клиент не установлен на персональном компьютере. Необходимо выполнить следующие действия:
- открываем «Панель управление»;
- переходим в «Программы» и в левом столбце «Включение или отключение компонентов Windows»;
- в открывшемся окне находим «Клиент Telnet» и отмечаем данный чекбокс, жмем «Ок».
Второй способ:
- необходимо открыть командную строку от имени администратора;
- в окне требуется ввести «dism /online /Enable-Feature /FeatureName:TelnetClient»;
- если список компонентов не отображается, выполняем правку реестра;
- сочетанием клавиш «Win+R» запускаем утилиту «Выполнить»;

- раскрываем древо и находим «HKEY_LOCAL_MACHINESYSTEMCurrentControlSetControlWindows»;
- далее находим значение «CSDVersion» и параметр «200» меняем на «0».


Способы чистки физической памяти компьютера или ноутбука
Теоретический минимум
Уязвимость CVE-2016-1000245 — это просто караул. На всех девайсах один и тот же рутовый пароль
xc3511,
который нельзя изменить
так как на системе нет команды passwd . Служба telnet включена и из настроек никак не отключается, разве что удалить инит скрипт из /etc/init.d/rcS .
/etc $ cat passwd root:absxcfbgXtb3o:0:0:root:/:/bin/sh /etc $ cat passwd- root:ab8nBoH3mb8.g:0:0::/root:/bin/sh
All internet-capable XiongMai Technology boards running the DVR/NVR CMS (Also known as NetSurveillance) enable the telnet service to run on the primary ethernet interface. This service is run via /etc/rcS and cannot be disabled. The user «root» has a hardcoded and immutable password of xc3511. These systems do not have the «passwd» tool installed and the root password cannot be changed from command line nor from the web interface.
Уязвимость CVE-2016-1000246 не уступает первой. Можно обойти ввод учетной записи и пароля, если зайти через https:///DVR.htm .
Many known XiongMai DVRs, NVRs and IP Cameras run «CMS» (also called NetSurveillance) built by XM Technologies. This software is also used by all downstream vendors of XiongMai Technologies. The login page for these devices can be bypassed by simply changing the from https://_IP_/Login.htm to https://_IP_/DVR.htm . This allows you access to view all the camera systems without authentication. Furthermore, there is no logging on the system so user management is not possible. The web-server version on all affected products is the same; “uc-httpd”. All products currently affected by CVE-2016-1000245 are also vulnerable to the authentication bypass.
Надеюсь, что в наших аэропортах не установлены эти самые XiongMai
и
Dahua
.
( 2 оценки, среднее 5 из 5 )