What command does one have to enter at the command line in Windows 7 to compile a basic C program?
Like I am literally wondering what you type in the command prompt, to compile a .c file.
I tried:
> gcc foo.c
But it says:
'gcc' is not recognized as an internal or external command,
 operable program or batch file.
I also tried:
> minGW foo.c
But I got back:
 'minGW' is not recognized as an internal or external command,
  operable program or batch file.
I have a path environment variable set to where MinGW is installed:
C:Program Files (x86)CodeBlocksMinGWbin
I can’t really find any information on where I’m going wrong, and can’t find anything in the official MinGW documentation, as it seems like this is something so simple, sort of an embarrassing question, that it’s figured people know what to do?
![]()
asked May 19, 2012 at 1:48
![]()
2
It indicates it couldn’t find gcc.exe.
I have a path environment variable set to where MinGW is installed
Maybe you haven’t set the path correctly?
echo %path%
shows the path to gcc.exe? Otherwise, compilation is similar to Unix:
gcc filename.c -o filename
![]()
answered May 19, 2012 at 2:09
![]()
8
I’ve had this problem and couldn’t find why it kept happening. The reason is simple: Once you have set up the environment paths, you have to close the CMD window, and open it again for it be aware of new environment paths.
![]()
answered Feb 24, 2014 at 11:32
![]()
Herz3hHerz3h
1011 silver badge2 bronze badges
1
First:
Add your minGW’s bin folder directory ( ex: Cmingw64bin ) in System variables => Path. visual example
Compile:
.c: gcc filename.c -o desire
.cpp: g++ filename.cpp -o desire
Run:
desire/ or ./desire
answered Jan 10, 2019 at 3:52
![]()
AharrFarisAharrFaris
911 silver badge5 bronze badges
0
Just set the environment variable to the EXACT path to gcc.exe like this:
C:Program Files (x86)CodeBlocksMinGWbingcc.exe
![]()
pb2q
57.6k18 gold badges145 silver badges146 bronze badges
answered Sep 11, 2012 at 7:44
![]()
makmak
1,3441 gold badge13 silver badges20 bronze badges
1
I encountered the same error message after unpacking MinGW archives to C:MinGW and setting the path to environment variable as C:MinGWbin;.
When I try to compile I get this error!
gcc: error: CreateProcess: No such file or directory
I finally figured out that some of the downloaded archives were reported broken while unpaking them to C:MinGW (yet I ignored this initially).
Once I deleted the broken files and re-downloaded the whole archives again from SourceForge, unpacked them to C:MinGW successfully the error was gone, and the compiler worked fine and output my desired hello.exe.
I ran this:
gcc hello.c -o hello
The result result was this (a blinking underscore):
_
![]()
answered Oct 9, 2012 at 2:54
![]()
KunleKunle
111 bronze badge
I had the same problem with .c files that contained functions (not main() of my program). For example, my header files were «fact.h» and «fact.c», and my main program was «main.c» so my commands were like this:
E:proj> gcc -c fact.c
Now I had an object file of fact.c (fact.o). after that:
E:proj>gcc -o prog.exe fact.o main.c
Then my program (prog.exe) was ready to use and worked properly. I think that -c after gcc was important, because it makes object files that can attach to make the program we need. Without using -c, gcc ties to find main in your program and when it doesn’t find it, it gives you this error.
![]()
answered Jan 19, 2015 at 10:48
![]()
You can permanently include the directory of the MinGW file, by clicking on My Computer, Properties, Advanced system settings, Environment variables, then edit and paste your directory.
![]()
jgillich
68.5k6 gold badges55 silver badges83 bronze badges
answered Apr 7, 2015 at 21:32
![]()
Instead of setting the %PATH% you may enter your msys shell. In standard msys and mingw installation gcc is in path, so you can run gcc or which gcc.
I have a batch file sh.bat on my Windows 7, in %PATH%:
C:langmsysbinsh.exe --login %*
Whenever I want to use gcc I enter cmd, then sh, then gcc. I find it very convenient.
When working with linux originated software avoid spaced directories like Program Files. Install them rather to Program_Files. The same regards to tools that you may want to run from msys environment.
answered Sep 20, 2012 at 8:58
![]()
JarekczekJarekczek
7,2763 gold badges44 silver badges66 bronze badges
If you pasted your text into the path variable and added a whitespace before the semicolon, you should delete that and add a backslash at the end of the directory (;C:Program Files (x86)CodeBlocksMinGWbin
answered Jan 4, 2013 at 17:49
![]()
I once had this kind of problem installing MinGW to work in Windows, even after I added the right System PATH in my Environment Variables.
After days of misery, I finally stumbled on a thread that recommended uninstalling the original MinGW compiler and deleting the C:MinGW folder and installing TDM-GCC MinGW compiler which can be found here.
You have options of choosing a 64/32-bit installer from the download page, and it creates the environment path variables for you too.
answered Oct 7, 2014 at 13:54
![]()
Feyisayo SonubiFeyisayo Sonubi
1,0425 gold badges15 silver badges27 bronze badges
Where is your gcc?
My gcc is in «C:Program FilesCodeBlocksMinGWbin».
"C:Program FilesCodeBlocksMinGWbingcc" -c "foo.c"
"C:Program FilesCodeBlocksMinGWbingcc" "foo.o" -o "foo 01.exe"
![]()
answered Jul 10, 2015 at 19:53
![]()
AmirAmir
1,57017 silver badges24 bronze badges
I am quite late answering this question (5 years to be exact) but I hope this helps someone.
I suspect that this error is because of the environment variables instead of GCC. When you set a new environment variable you need to open a new Command Prompt! This is the issue 90% of the time (when I first downloaded GCC I was stuck with this for 3 hours!) If this isn’t the case, you probably haven’t set the environment variables properly or you are in a folder with spaces in the name.
Once you have GCC working, it can be a hassle to compile and delete every time. If you don’t want to install a full ide and already have python installed, try this github project: https://github.com/sophiadm/notepad-is-effort
It is a small IDE written with tkinter in python. You can just copy the source code and save it as a .py file
answered May 21, 2017 at 18:37
![]()
dwmyfrienddwmyfriend
2341 silver badge10 bronze badges
In Windows 10, similar steps can be followed in other versions of windows.
Right Click on «My Computer» select Properties, Goto Advanced System Settings -> Advanced -> Select «Environment Variables..» .
Find «Path» select it and choose edit option -> Click on New and add «C:MinGWbin» (or the location of gcc.exe, if you have installed at some other location) -> Save and restart command prompt. Gcc should work.
answered Jan 18, 2018 at 5:15
![]()
| title | description | ms.custom | ms.date | helpviewer_keywords | ms.assetid | ||||
|---|---|---|---|---|---|---|---|---|---|
|
Walkthrough: Compile a C program on the command line |
Walkthrough that shows how to create a Hello World C program. |
conceptual |
05/09/2022 |
|
7e74cc2d-54b1-49de-b7ad-d3ae6b39ab8d |
Walkthrough: Compile a C program on the command line
The Visual Studio build tools include a C compiler that you can use to create everything from basic console programs to full Windows Desktop applications, mobile apps, and more. Microsoft C/C++ (MSVC) is a C and C++ compiler that, in its latest versions, conforms to some of the latest C language standards, including C11 and C17.
This walkthrough shows how to create a basic, «Hello, World»-style C program by using a text editor, and then compile it on the command line. If you’d rather work in C++ on the command line, see Walkthrough: Compiling a Native C++ Program on the Command Line. If you’d like to try the Visual Studio IDE instead of using the command line, see Walkthrough: Working with Projects and Solutions (C++) or Using the Visual Studio IDE for C++ Desktop Development.
Prerequisites
To complete this walkthrough, you must have installed either Visual Studio or the Build Tools for Visual Studio and the optional Desktop development with C++ workload.
Visual Studio is a powerful integrated development environment that supports a full-featured editor, resource managers, debuggers, and compilers for many languages and platforms. For information on these features and how to download and install Visual Studio, including the free Visual Studio Community edition, see Install Visual Studio.
The Build Tools for Visual Studio version of Visual Studio installs only the command-line toolset, the compilers, tools, and libraries you need to build C and C++ programs. It’s perfect for build labs or classroom exercises and installs relatively quickly. To install only the command-line toolset, download Build Tools for Visual Studio from the Visual Studio downloads page and run the installer. In the Visual Studio installer, select the Desktop development with C++ workload (in older versions of Visual Studio, select the C++ build tools workload), and choose Install.
When you’ve installed the tools, there’s another tool you’ll use to build a C or C++ program on the command line. MSVC has complex requirements for the command-line environment to find the tools, headers, and libraries it uses. You can’t use MSVC in a plain command prompt window without some preparation. You need a developer command prompt window, which is a regular command prompt window that has all the required environment variables set. Fortunately, Visual Studio installs shortcuts for you to launch developer command prompts that have the environment set up for command line builds. Unfortunately, the names of the developer command prompt shortcuts and where they’re located are different in almost every version of Visual Studio and on different versions of Windows. Your first walkthrough task is to find the right shortcut to use.
[!NOTE]
A developer command prompt shortcut automatically sets the correct paths for the compiler and tools, and for any required headers and libraries. Some of these values are different for each build configuration. You must set these environment values yourself if you don’t use one of the shortcuts. For more information, see Use the MSVC toolset from the command line. Because the build environment is complex, we strongly recommend you use a developer command prompt shortcut instead of building your own.
These instructions vary depending on which version of Visual Studio you’re using. To see the documentation for your preferred version of Visual Studio, use the Version selector control. It’s found at the top of the table of contents on this page.
::: moniker range=»msvc-170″
Open a developer command prompt in Visual Studio 2022
If you’ve installed Visual Studio 2022 on Windows 10 or later, open the Start menu, and choose All apps. Then, scroll down and open the Visual Studio 2022 folder (not the Visual Studio 2022 app). Choose Developer Command Prompt for VS 2022 to open the command prompt window.
::: moniker-end
::: moniker range=»msvc-160″
Open a developer command prompt in Visual Studio 2019
If you’ve installed Visual Studio 2019 on Windows 10 or later, open the Start menu, and choose All apps. Then, scroll down and open the Visual Studio 2019 folder (not the Visual Studio 2019 app). Choose Developer Command Prompt for VS 2019 to open the command prompt window.
::: moniker-end
::: moniker range=»msvc-150″
Open a developer command prompt in Visual Studio 2017
If you’ve installed Visual Studio 2017 on Windows 10 or later, open the Start menu, and choose All apps. Then, scroll down and open the Visual Studio 2017 folder (not the Visual Studio 2017 app). Choose Developer Command Prompt for VS 2017 to open the command prompt window.
::: moniker-end
::: moniker range=»msvc-140″
Open a developer command prompt in Visual Studio 2015
If you’ve installed Microsoft Visual C++ Build Tools 2015 on Windows 10 or later, open the Start menu, and choose All apps. Then, scroll down and open the Visual C++ Build Tools folder. Choose Visual C++ 2015 x86 Native Tools Command Prompt to open the command prompt window.
::: moniker-end
If you’re using a different version of Windows, look in your Start menu or Start page for a Visual Studio tools folder that contains a developer command prompt shortcut. You can also use the Windows search function to search for «developer command prompt» and choose one that matches your installed version of Visual Studio. Use the shortcut to open the command prompt window.
Next, verify that the developer command prompt is set up correctly. In the command prompt window, enter cl (or CL, case doesn’t matter for the compiler name, but it does matter for compiler options). The output should look something like this:
C:Program Files (x86)Microsoft Visual Studio2017Enterprise>cl
Microsoft (R) C/C++ Optimizing Compiler Version 19.10.25017 for x86
Copyright (C) Microsoft Corporation.  All rights reserved.

usage: cl [ option... ] filename... [ /link linkoption... ]
There may be differences in the current directory or version numbers, depending on the version of Visual Studio and any updates installed. If the above output is similar to what you see, then you’re ready to build C or C++ programs at the command line.
[!NOTE]
If you get an error such as «‘cl’ is not recognized as an internal or external command, operable program or batch file,» error C1034, or error LNK1104 when you run the cl command, then either you are not using a developer command prompt, or something is wrong with your installation of Visual Studio. You must fix this issue before you can continue.
If you can’t find the developer command prompt shortcut, or if you get an error message when you enter cl, then your Visual Studio installation may have a problem. If you’re using Visual Studio 2017 or later, try reinstalling the Desktop development with C++ workload in the Visual Studio installer. For details, see Install C++ support in Visual Studio. Or, reinstall the Build Tools from the Visual Studio downloads page. Don’t go on to the next section until the cl command works. For more information about installing and troubleshooting Visual Studio, see Install Visual Studio.
[!NOTE]
Depending on the version of Windows on the computer and the system security configuration, you might have to right-click to open the shortcut menu for the developer command prompt shortcut and then choose Run as Administrator to successfully build and run the program that you create by following this walkthrough.
Create a C source file and compile it on the command line
-
In the developer command prompt window, enter
cd c:to change the current working directory to the root of your C: drive. Next, entermd c:helloto create a directory, and then entercd c:helloto change to that directory. This directory will hold your source file and the compiled program. -
Enter
notepad hello.cat the developer command prompt. In the Notepad alert dialog that pops up, choose Yes to create a newhello.cfile in your working directory. -
In Notepad, enter the following lines of code:
#include <stdio.h>

int main()
{
    printf("Hello, World! This is a native C program compiled on the command line.n");
    return 0;
}
-
On the Notepad menu bar, choose File > Save to save
hello.cin your working directory. -
Switch back to the developer command prompt window. Enter
dirat the command prompt to list the contents of thec:hellodirectory. You should see the source filehello.cin the directory listing, which looks something like:C:hello>dir Volume in drive C has no label. Volume Serial Number is CC62-6545 Directory of C:hello 10/02/2017 03:46 PM <DIR> . 10/02/2017 03:46 PM <DIR> .. 10/02/2017 03:36 PM 143 hello.c 1 File(s) 143 bytes 2 Dir(s) 514,900,566,016 bytes freeThe dates and other details will differ on your computer. If you don’t see your source code file,
hello.c, make sure you’ve changed to thec:hellodirectory you created, and in Notepad, make sure that you saved your source file in this directory. Also make sure that you saved the source code with a.cfile name extension, not a.txtextension. -
To compile your program, enter
cl hello.cat the developer command prompt.You can see the executable program name, hello.exe, in the lines of output information that the compiler displays:
c:hello>cl hello.c
Microsoft (R) C/C++ Optimizing Compiler Version 19.10.25017 for x86
Copyright (C) Microsoft Corporation.  All rights reserved.

hello.c
Microsoft (R) Incremental Linker Version 14.10.25017.0
Copyright (C) Microsoft Corporation.  All rights reserved.

/out:hello.exe
hello.obj
[!NOTE]
If you get an error such as «‘cl’ is not recognized as an internal or external command, operable program or batch file,» error C1034, or error LNK1104, your developer command prompt is not set up correctly. For information on how to fix this issue, go back to the Open a developer command prompt section.If you get a different compiler or linker error or warning, review your source code to correct any errors, then save it and run the compiler again. For information about specific errors, use the search box at the top of this page to look for the error number.
-
To run your program, enter
helloat the command prompt.The program displays this text and then exits:
Hello, World! This is a native C program compiled on the command line.Congratulations, you’ve compiled and run a C program by using the command line.
Next steps
This «Hello, World» example is about as basic as a C program can get. Real world programs have header files and more source files, link in libraries, and do useful work.
You can use the steps in this walkthrough to build your own C code instead of typing the sample code shown. You can also build many C code sample programs that you find elsewhere. To compile a program that has more source code files, enter them all on the command line:
cl file1.c file2.c file3.c
The compiler outputs a program called file1.exe. To change the name to program1.exe, add an /out linker option:
cl file1.c file2.c file3.c /link /out:program1.exe
And to catch more programming mistakes automatically, we recommend you compile by using either the /W3 or /W4 warning level option:
cl /W4 file1.c file2.c file3.c /link /out:program1.exe
The compiler, cl.exe, has many more options you can apply to build, optimize, debug, and analyze your code. For a quick list, enter cl /? at the developer command prompt. You can also compile and link separately and apply linker options in more complex build scenarios. For more information on compiler and linker options and usage, see C/C++ Building Reference.
You can use NMAKE and makefiles, or MSBuild and project files to configure and build more complex projects on the command line. For more information on using these tools, see NMAKE Reference and MSBuild.
The C and C++ languages are similar, but not the same. The Microsoft C/C++ compiler (MSVC) uses a basic rule to determine which language to use when it compiles your code. By default, the MSVC compiler treats all files that end in .c as C source code, and all files that end in .cpp as C++ source code. To force the compiler to treat all files as C no matter the file name extension, use the /TC compiler option.
By default, MSVC is compatible with the ANSI C89 and ISO C99 standards, but not strictly conforming. In most cases, portable C code will compile and run as expected. The compiler provides optional support for the changes in ISO C11/C17. To compile with C11/C17 support, use the compiler flag /std:c11 or /std:c17. C11/C17 support requires Windows SDK 10.0.20201.0 or later. Windows SDK 10.0.22000.0 or later is recommended. You can download the latest SDK from the Windows SDK page. For more information, and instructions on how to install and use this SDK for C development, see Install C11 and C17 support in Visual Studio.
Certain library functions and POSIX function names are deprecated by MSVC. The functions are supported, but the preferred names have changed. For more information, see Security Features in the CRT and Compiler Warning (level 3) C4996.
See also
Walkthrough: Creating a Standard C++ Program (C++)
C Language Reference
Projects and build systems
Compatibility
Last updated on Jan 09,2023 476.3K Views
How to Compile C Program in Command Prompt?
We usually use a compiler with a graphical user interface, to compile our C program. This can also be done by using cmd. The command prompt has a set of steps we need to perform in order to execute our program without using a GUI compiler. In this article we would be understanding how to compile C program in command prompt.
So let us get with this article on how to compile C progam in command prompt,
How to Compile C Program in Command Prompt?
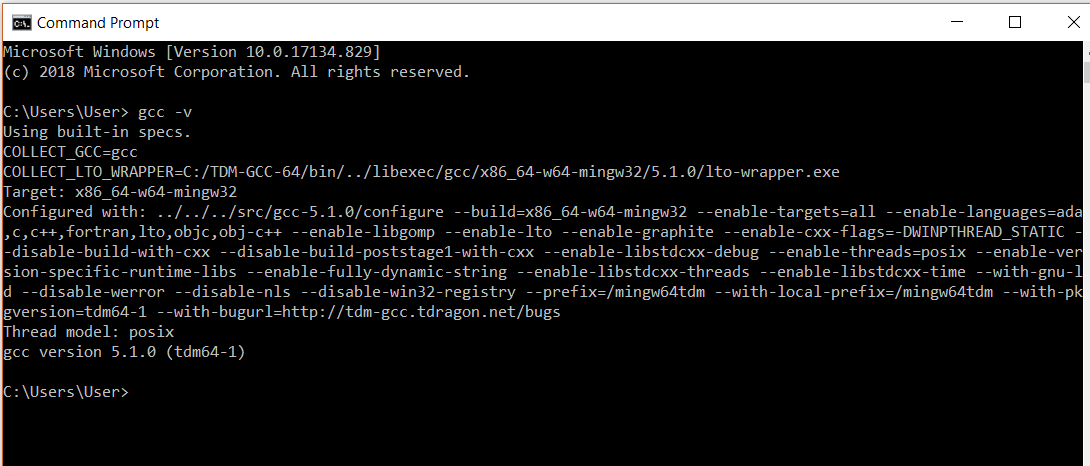
STEP 1:
Run the command ‘gcc -v’ to check if you have a compiler installed. If not you need to download a gcc compiler and install it. You can search for cmd in your windows system to open the command prompt.
 STEP 2:
Create a c program and store it in your system. I have written a program to find the Armstrong Number and store it in the directory user. We would be using following code.
#include <stdio.h>
int main()
{
int num, original, rem, sum = 0;
printf("Enter a three digit Number: ");
scanf("%d", &num);
original = num;
while (original != 0)
{
rem = original%10;
sum =sum + rem*rem*rem;
original =original/ 10;
}
if(sum == num)
printf("%d is an Armstrong number.",num);
else
printf("%d is not an Armstrong number.",num);
return 0;
}
STEP 3:
Change the working directory to where you have your C program. You can do that by using the command ‘cd’, which changes the directory. We need to pass the name of the directory in which the program is stored.
Example: >cd Desktop
Our program is already in the user directory so, we don’t need to change it.
STEP 4:
The next step is to compile the program. To do this we need to use the command gcc followed by the name of the program we are going to execute. In our case, we will use Armstrong.c.
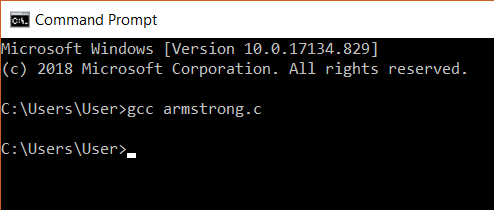
After this, an executable file will be created in the directory that your c file exists in. Eg: Armstrong.exe
STEP 5:
In the next step, we can run the program. This is done by simply giving the name of the executable file without any extension. On giving this we will get an output. Here, our Armstrong code is executed and we got output for this code.

With this we come to the end of this blog on ‘How To Compile C program in Command Prompt’. I hope you found this informative and helpful, stay tuned for more tutorials on similar topics.You may also checkout our training program to get in-depth knowledge on jQuery along with its various applications, you can enroll here for live online training with 24/7 support and lifetime access.
Got a question for us? Mention them in the comments section of this blog and we will get back to you.
Recommended videos for you

Nandan Nilekani on Entrepreneurship
Watch Now

Microsoft Azure Certifications – All You Need To Know
Watch Now
Recommended blogs for you

Automation Testing Tutorial: All You Need To Know About Automation Testing
Read Article

Vol. XIV – Edureka Career Watch – 25th May 2019
Read Article

Latest Deep Learning Projects You Need to Know About in 2023
Read Article

Instructor-Led Training: RIGHT Way To Learn Online
Read Article

Artificial Intelligence – What It Is And How Is It Useful?
Read Article

Top Amazon Interview Questions and Answers in 2023
Read Article

What is Embedded C programming and how is it different?
Read Article

Vol. XV – Edureka Career Watch – 15th June 2019
Read Article

Load Testing using JMeter : How to Measure Performance in CMD
Read Article
How To Best Utilize Scope Resolution Operator In C++?
Read Article

Edureka Success Story – Nidhi’s Journey from a Student to a DevOps Engineer
Read Article

Tech Ready, Job Ready with Edureka Learning Center
Read Article
-

1
Go to https://cygwin.com/install.html. Cygwin is a free Windows tool that allows you to use the GCC C compiler from a Unix command line.
-
2
Click the setup-x86.exe file for your Windows version. If you’re using the 64-bit version of Windows, download setup-x86_64.exe. If you have the 32-bit version, download setup-x86.exe.
Advertisement
-
3
Run the installer. Double-click the downloaded file to open the setup wizard. Downloaded files usually save to the Downloads folder.
- If prompted to give permission for the installer to run, click Yes.
-
4
Click Next on the first screen.
-
5
Select Install from Internet and click Next.
-
6
Choose where to install the app and click Next.
-
7
Select local package directory and click Next. This is where packages you download will be saved.
-
8
Choose your internet settings and click Next. The installer will connect to the internet and then display a list of download sites.
-
9
Select a download site and click Next. These sites all host the same files. This downloads the installation files to your computer.
- If there’s a problem with one site, try another on the list.
-
10
Select packages to install. Follow these steps to ensure the C compiler is installed:
- Click the + next to «Devel» to expand the options.
- Scroll down and click the down-arrow next to gcc core.
- Click the most recent (highest) version number.
-
11
Click Next. It’s at the bottom-right corner. A confirmation message will appear.
-
12
Click Next to start the installation. Cygwin will now download all selected tools and install them on your computer. Follow the on-screen instructions to complete the installation.
-
13
Open Cygwin. It’ll be in the Start menu (called either Cygwin64 or Cygwin32, depending on your version).
-
14
Use the cd command to navigate to the location of your C code. You’re looking for the file you coded with «.c» at the end. For example, if your code is located in your Documents folder, you would type cd c:Users(yourusername)Documents and press ↵ Enter.[1]
- A quick way to find the full path to your file: Press ⊞ Win+E to open the File Explorer, go to the folder that contains your file, click the file once to select it, then click Copy Path at the top of the screen. Now you can right-click the Cygwin command line and select Paste.
-
15
Type gcc yourcode.c –o yourcode.exe and press ↵ Enter. Replace «yourcode.c» with the name of the file, and «yourcode.exe» with the name of your program.[2]
Your code is now compiled.


Advertisement
-
1
Open Developer Command Prompt for VS. This app is separate than the main Visual Studio app. To find it, click the Start menu, expand the Visual Studio 2017 folder, then click Developer Command Prompt for VS 2017 (or your version number).[3]
-
2
Use the cd command to navigate to the location of your C code. You’re looking for the file you coded with «.c» at the end. For example, if your code is located in your Documents folder, you would type cd c:Users(yourusername)Documents and press ↵ Enter
- Your code must be in a file that ends with the «.c» extension to use this method.
-
3
Type cl yourcode.c and press ↵ Enter. Replace «yourcode.c» with the name of your file. This creates a file called yourcode.exe from your code file.


Advertisement
-
1
Install Xcode on your Mac.[4]
-
Mavericks (10.9) and later: Open the App Store
and search for xcode. Click GET to install, and follow any on-screen instructions.
- Lion and Mountain Lion (10.7 and 10.8): Follow the instructions for Mavericks and later. Once installed, open the app (it’s in the Applications folder), click the File menu and then Preferences. Click the Downloads tab, then click Install next to «Command Line Tools.»
-
Mavericks (10.9) and later: Open the App Store
-
2
Open Xcode. Now that it’s installed, you’ll find it in the Applications folder.
-
3
Click the File and select Open.
-
4
Select your code file and click Open. The contents of your code will appear.[5]
-
5
Click the Product menu. It’s at the top of the screen.
-
6
Click Archive. This compiles and links your C code. When it’s ready to be exported, a window containing options will appear.
-
7
Select Export as an Xcode Archive and click Next. Xcode will create a new folder (inside the folder where your code is saved) and place the executable file inside.


Advertisement
Ask a Question
200 characters left
Include your email address to get a message when this question is answered.
Submit
Advertisement
Thanks for submitting a tip for review!
References
About This Article
Thanks to all authors for creating a page that has been read 19,390 times.
Is this article up to date?
This article covers 4 simple steps to compile and run a C program in command prompt on Windows. Before you move ahead with the steps, you must complete below 2 prerequisites in order to facilitate smooth execution of these 4 steps.
Let’s get into it. At the end of this article, you will be able to execute your C program successfully using command prompt without any error.
Prerequisites before compiling and running any C program using command prompt:
To run your C program using cmd, here are the prerequisites for Windows.
Prerequisite 1: Download and Install a compiler
To compile any program, you need to have a suitable compiler installed on your development environment. For different programming languages, different compilers are available in the market. You need to choose the compiler based on the programming language you are using. Some of them are free and to use and some are paid.
As an example, we will use gcc compiler to compile C program.
You must download and Install gcc compiler on your computer by clicking here.
Prerequisite 2: C program with required file extension
You must save your C program with .c extension by using any text editor or IDE to write your program. If you use any IDE, then it will help you to resolve compilation errors easily and also increases coding efficiency.
Below is the sample C program that we will execute using command prompt.
#include <stdio.h>
int main()
{
print("Welcome to TechSupportWhale!");
return 0;
}
Here are the step by step procedure to compile and run c program using command prompt.
Step 1: Open command prompt
Go to Windows search and type cmd. Right-click on the command prompt and “Run as administrator“.
Note: It’s not mandatory to open command prompt in Administrative mode. You can open command prompt with local user rights.
Step 2: Validate availability of gcc compiler
Before compiling your program, first check whether the gcc compiler is installed on your computer or not. To check gcc compiler installation information, type the command command in the command prompt.
gcc –v
If this commands returns gcc compiler version information as below then it means gcc is installed on your machine and it is accessible from command prompt.

If you get “gcc is not recognized as an internal or external command, operable program or batch file.” error message then first resolve this error by setting correct environment variable.
Here is a article to fix: gcc is not recognized as an internal or external command
Step 3: Compile your C program
Go to the path where your C program file is located. Type the compilation command in following syntax –
gcc<program_file_name> -o <output_executable_file_name>
Type following command and hit enter key.
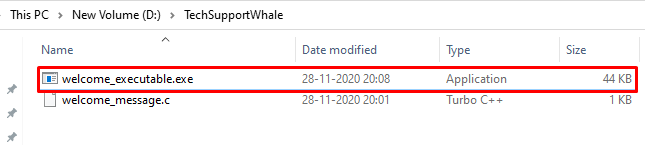
gccWelcome_Message.c -o welcome_executable

The compiler creates the executable file with welcome_executable name.
Note: If you don’t specify –o argument, then the compiler creates the executable file with a.exe name.
Step 4: Run the executable
This is the final step where you run the newly created executable file (.exe file) using command prompt.
- Go to the location where executable is placed in command prompt and type name of executable file without extension as show below.
- Press Enter key from the keyboard.

Final words:
That’s it. These are the steps you need to follow in order to compile and run a C program using command prompt (cmd). I hope it is very much clear now. If you face any issues, do let us know in the comment section.
Happy Learning. 🙂
- Remove From My Forums
-
Question
-
I tried to compile c# program from command line but I recived this message «csc is not recogrnized as an internal or external command, operable program or batch file.»
I think it’s a path problem but i don’t know how to solve it.-
Moved by
Monday, May 25, 2009 8:53 PM
Not related to BizTalk (From:BizTalk Server General)
-
Moved by
Answers
-
Hi Nadia,
This happed because you don’t have default access to the framework, or the VS/Bin directory by default. To solve this problem you have to add the one of the both directories into the system PATH parameter. I prefer to use the framework directory so it will be accessible with regardless if the VS is not installed.
You can run this command before calling csc.exe
path=%path%;%SystemRoot%Microsoft.NETFrameworkv2.0.50727
Note that you may have to change the last folder (v2.0.50727) that should reflect your target framework.
if you are using batch file (.bat, .cmd) then you can use the following variables
SET FrameworkDir=%SystemRoot%Microsoft.NETFrameworkv2.0.50727

SET FrameworkVersion=v2.0.50727

PATH %PATH%;%FrameworkDir%%FrameworkVersion%
-Firas
Please mark answers that solve your problem.
-
Marked as answer by
Figo Fei
Tuesday, May 26, 2009 3:37 AM
-
Marked as answer by