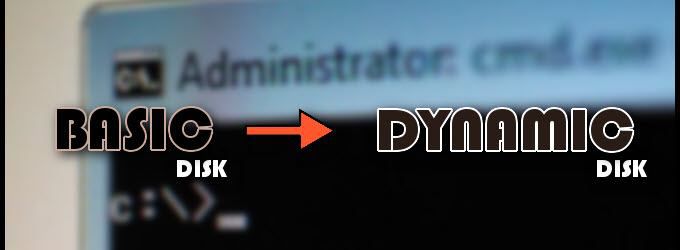
Содержание
- Способ 1: Оснастка «Управление дисками»
- Способ 2: «Diskpart»
- Способ 3: Сторонние программы
- Вопросы и ответы

Способ 1: Оснастка «Управление дисками»
Данный способ является самым простым, но он имеет один существенный недостаток – необходимость удаления томов. При этом все имеющиеся на диске данные будут удалены, поэтому если вы изберете этот вариант, позаботьтесь о создании их резервной копии.
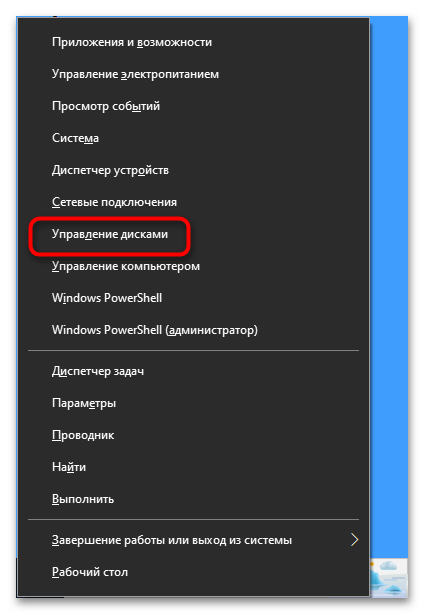
- Запустите оснастку «Управление дисками» из контекстного меню кнопки «Пуск».
- Кликните по первому же разделу правой кнопкой мыши и выберите из меню опцию «Удалить том».
- Подтвердите удаление тома. Точно так же удалите все остальные разделы. В результате диск автоматически будет преобразован в базовый.
- Если же вы имеете дело с динамическим диском, на котором разделов не было изначально, кликните по его заголовку и выберите в меню опцию «Преобразовать в базовый диск».


После конвертирования динамического диска в базовый можно будет создавать на нем разделы и логические тома с поддерживаемой Windows файловой системой.
Способ 2: «Diskpart»
Для преобразования логического диска в базовый можно также использовать встроенную в операционную систему консольную утилиту Diskpart, работающую из «Командной строки» или «PowerShell». Этот способ также предполагает удаление с диска разделов со всеми данными, не забывайте об этом.
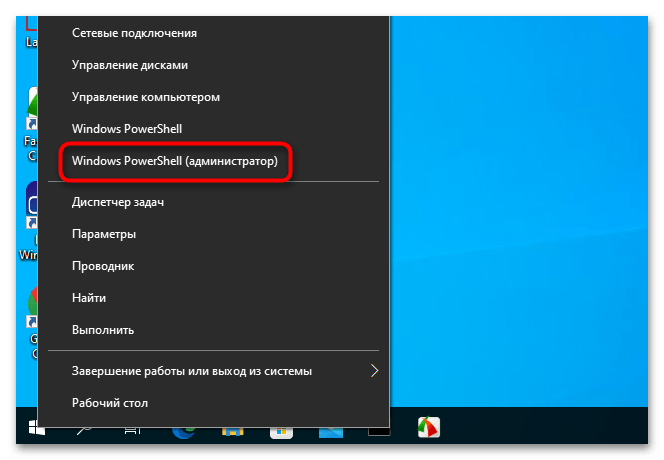
- Запустите от имени администратора консоль «PowerShell» из контекстного меню кнопки «Пуск».
- Выполните в ней одну за другой следующие команды:
- Закройте консоль.
В результате выполненных действий диск будет преобразован в базовый. Обратите внимание на пятую и шестую команды: если на динамическом диске имеется более одного раздела, то эти команды нужно будет повторить, указав номер тома.
Способ 3: Сторонние программы
Преимущество данного решения заключается в том, что оно позволяет преобразовывать динамические диски в базовые без потери данных. Используйте его, если у вас нет возможности создания резервной копии файлов. Функцию конвертирования динамического диска в базовый поддерживают многие дисковые менеджеры, среди которых имеются и бесплатные. Например, Paragon Partition Manager Free.
Скачать Paragon Partition Manager
- Скачайте программу с сайта разработчика, установите и запустите.
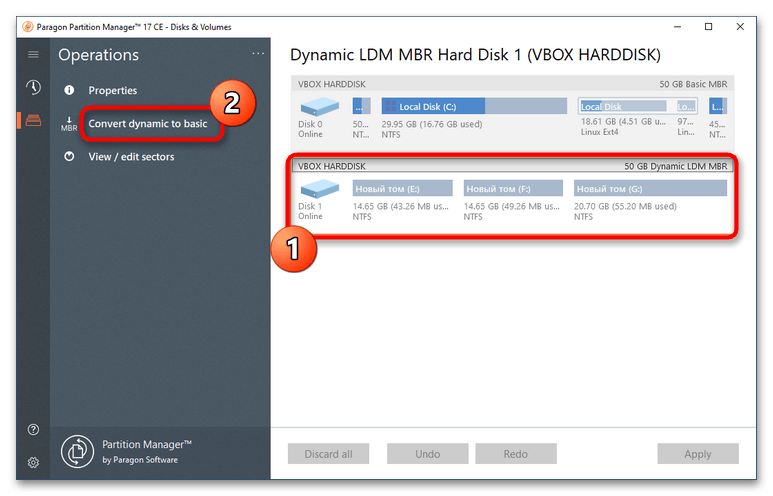
- В открывшемся окне программы выберите динамический жесткий диск и нажмите в меню слева «Convert dynamic to basic».
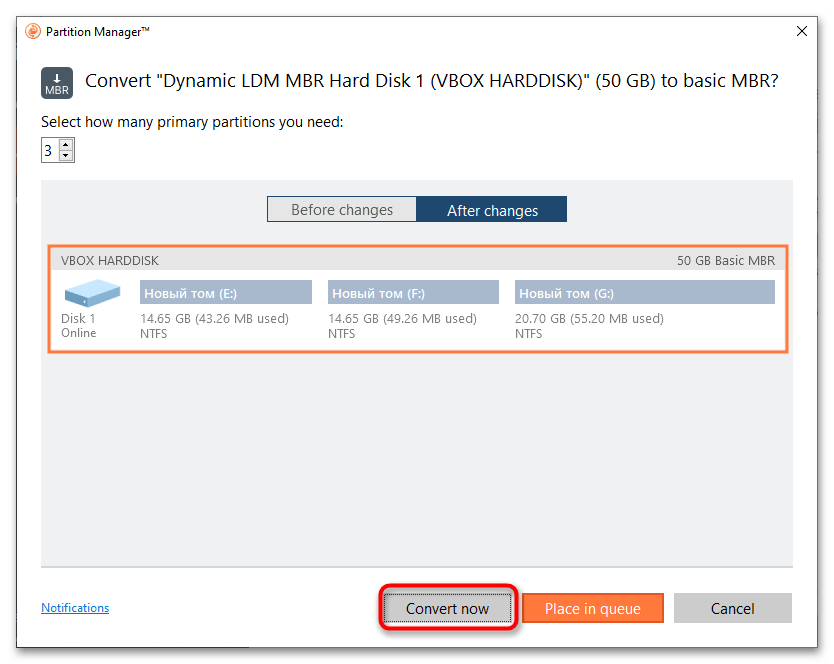
- В следующем диалоговом окне нажмите кнопку «Convert now», чтобы запустить процедуру преобразования.
- Дождитесь завершения процесса конвертирования и закройте информационное окно нажатием кнопки «Close».

Диск будет преобразован в базовый, при этом все имеющиеся на нем разделы и файлы окажутся сохранены.

Во всех трех примерах работа велась с пользовательскими жесткими дисками. Конвертировать системные динамические диски настоятельно не рекомендуется, так как это с высокой долей вероятности приведет к тому, что Windows перестанет загружаться.
Еще статьи по данной теме:
Помогла ли Вам статья?
Usually, to convert a dynamic disk to basic disk, you have to delete all dynamic volumes in Windows first unless you turn to a third-party software for help. Here MiniTool Partition Wizard is such a prefessional dynamic disk converter that can help you convert dynamic disk to basic without data loss.
«Running windows 10, due to some personal reasons want to change my dynamic disk to a basic disk. But the option for the same is grayed out in Disk Management. If anyone posts a guide to accomplish the same I would be really grateful!»
While doing hard drive maintenance, some of you may find your hard disk became dynamic in Windows Disk Management utility. Or you may regret of converting a basic disk to dynamic disk. Anyhow, now you want to convert a dynamic disk to a basic disk, what should you do?
Normally, there are 3 ways to convert disk from dynamic to basic disk. By reading this post, I guess you can find the best one for you.
If you want a straight forward and safe way, I guess you will be glad to know MiniTool Partition Wizard – the most popular disk management utility. Why is it popular? Well, this partition manager is able to deal with all kinds of dynamic disk issues, such as move/resize volume, copy volume, check file system, change volume cluster size, convert dynamic disk to basic, etc. As the best dynamic disk converter, MiniTool Partition Wizard offers 2 choices to convert dynamic disks to basic disks.
Want to know the best part? Just move on!
First Choice: Convert Dynamic Disk to Basic Disk
Note:
- MiniTool Partition Wizard can only convert dynamic disk containing simple volumes and mirrored volumes to basic disk. If you have other types of volumes on the dynamic disk, you may head down to read Way 2 and Way 3.
- Convert Dynamic Disk to Basic Disk works for both the OS disk and data disk, and is a paid feature in MiniTool Partition Wizard. Hence, you need to pay for a license to activate it. However, you can also download the Trial edition to have an experience first.
Free DownloadBuy Now
Let’s have a look at how it performs when it comes to converting dynamic disk to basic disk.
Step 1. Install and launch this dynamic disk converter. It is easy for you to find the dynamic disk you want to convert.
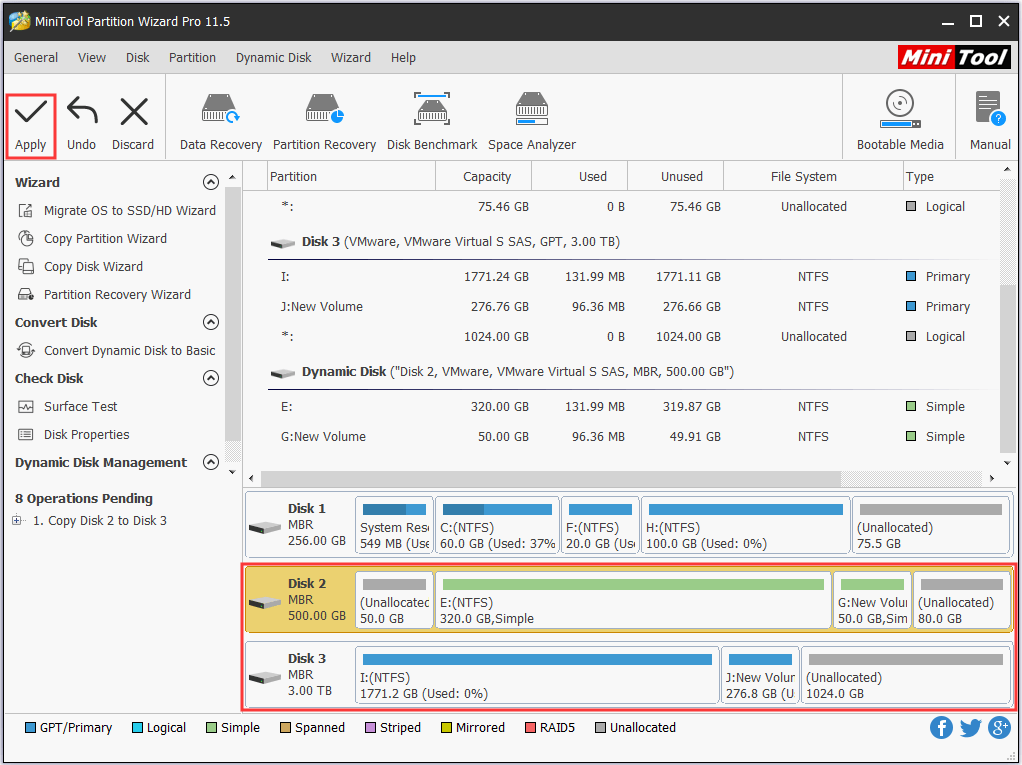
Step 2. Select the dynamic disk you need to convert, and then choose Convert Dynamic Disk to Basic from the action panel. Or you can right click the dynamic disk and choose Convert Dynamic Disk to Basic Disk from the pop-up menu.
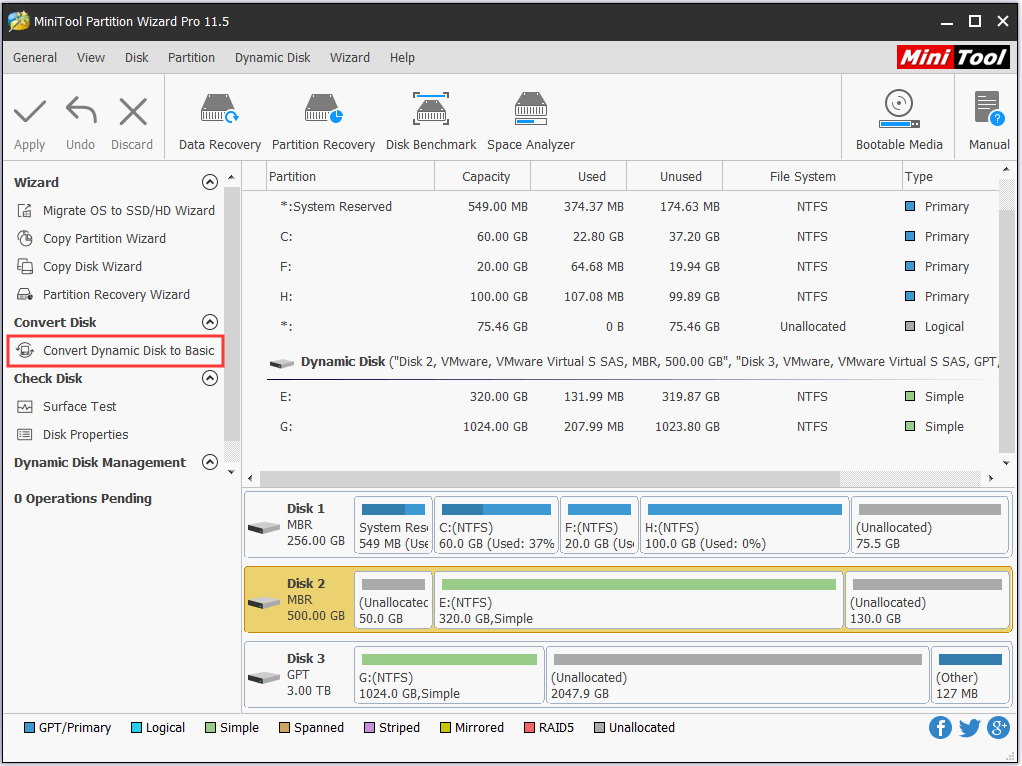
Step 3. Immediately you can see what this dynamic disk will become. In my example, disk 2 becomes basic disk and all simple volumes on it are turned into primary partitions. But this is just a preview. Finally, click Apply to start the conversion.
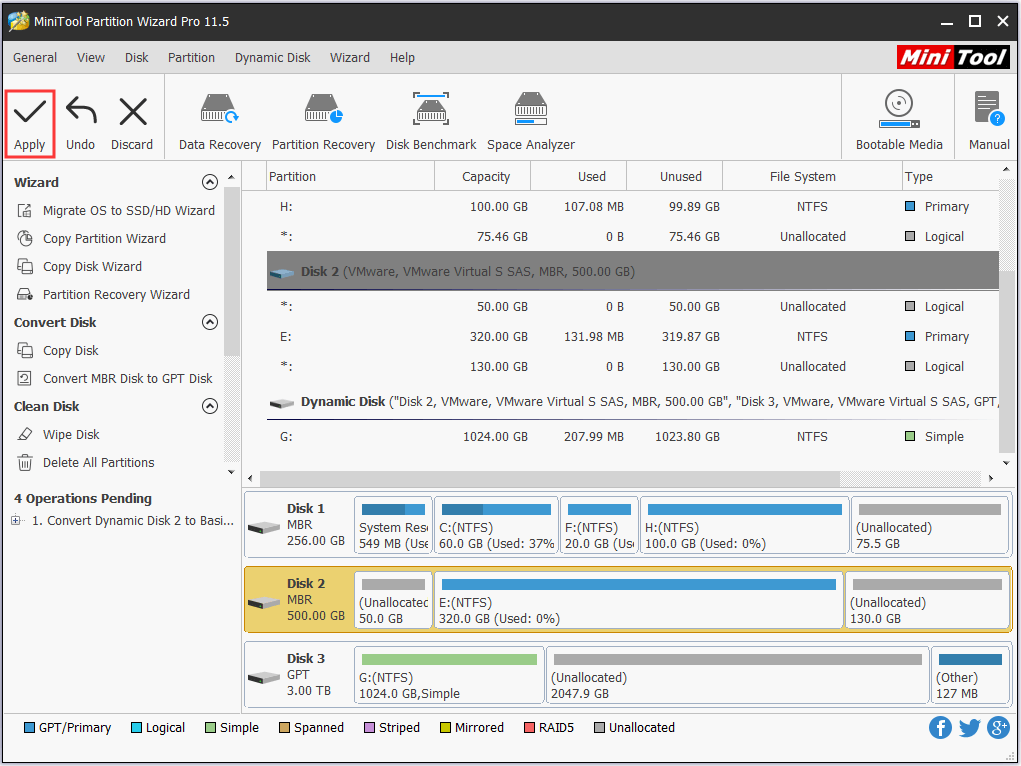
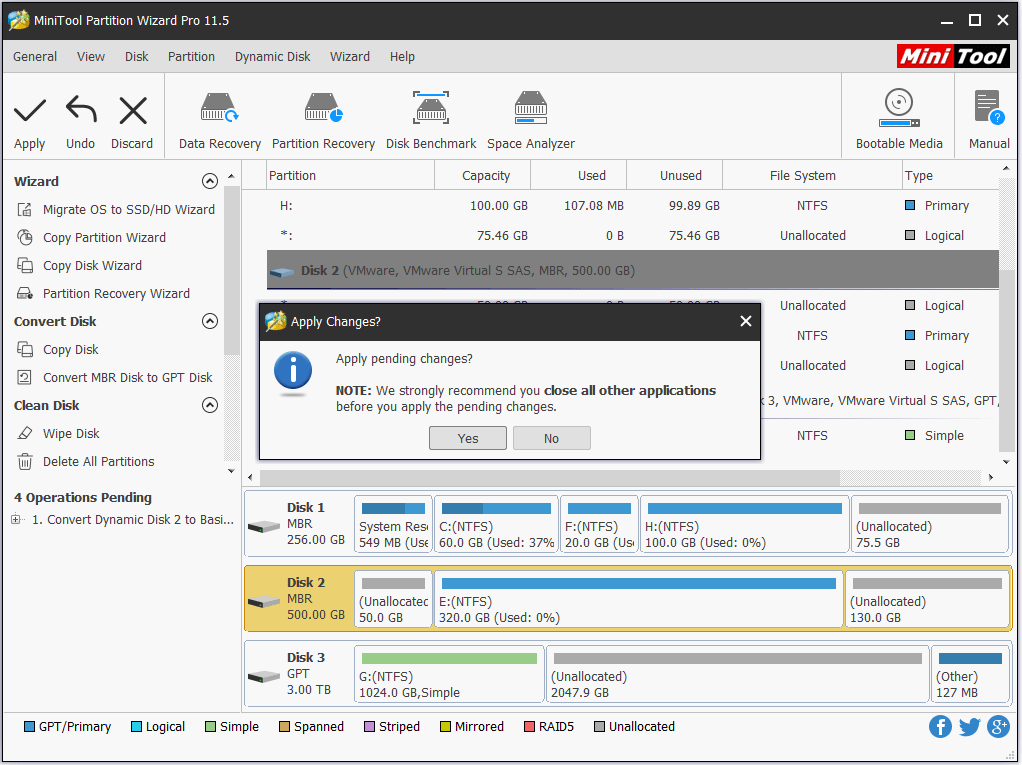
Step 4. MiniTool Partition Wizard is likely to ask you to close all other applications. Please do as your are told to let it finish.
Tip: MiniTool Partition Wizard requires a reboot to finish the conversion if you are dealing with a system disk.
«Hey! I just used MiniTool Partition Wizard to convert dynamic disk to basic in Windows 10. All goes well, and the OS is running. Guess you can have a try.»Click to Tweet
You may also like: How Can I Convert Simple Volumes to Primary Partitions Easily?
Second Choice: Copy Dynamic Disk to Basic Disk
Another suggestion is to use the Copy Disk feature. In short, this feature is very powerful, because it not only clones basic disks (such as clone HDD to SSD) but also copies dynamic disks. Please note that when it copies dynamic disk, the target disk turns into basic disk. Hence, you can use this feature to convert disk from dynamic to basic.
Note: When it comes to dynamic disk, Copy Disk only works with non-system disk. And, this is also a paid feature.
Please follow the step-by-step guide below:
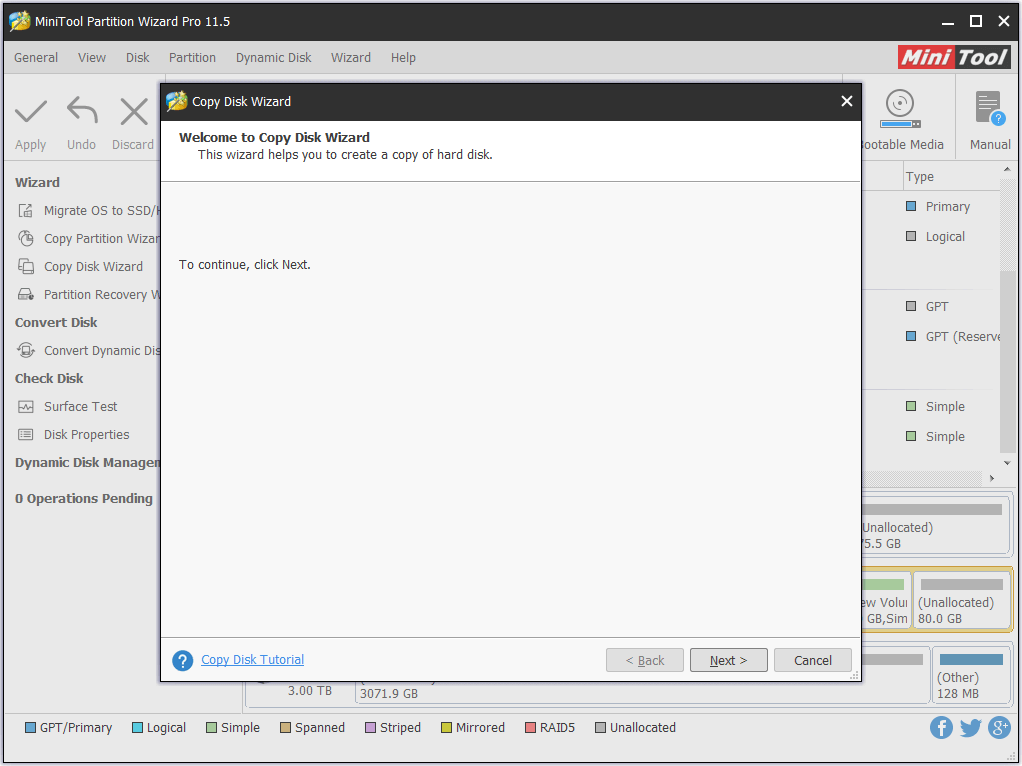
Step 1. Launch MiniTool Partition Wizard and select Copy Disk Wizard from the menu bar.
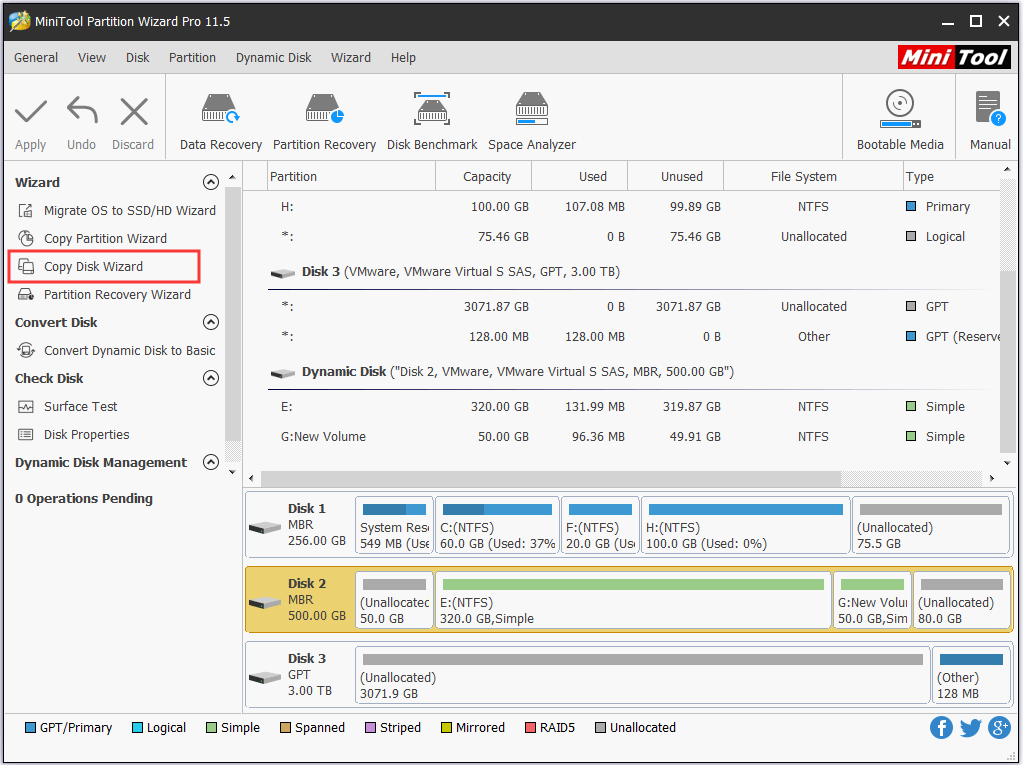
Step 2. Skip the welcome page by clicking Next.
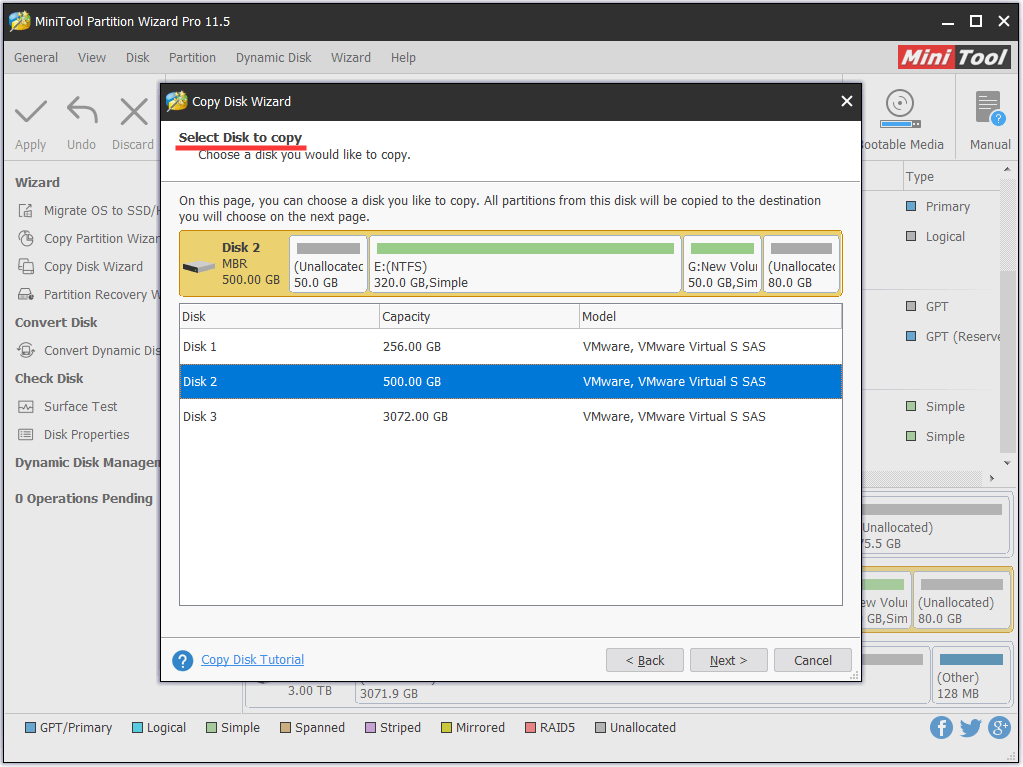
Step 3. Here you need to select the source disk. Just choose the dynamic disk you want to copy and click Next.
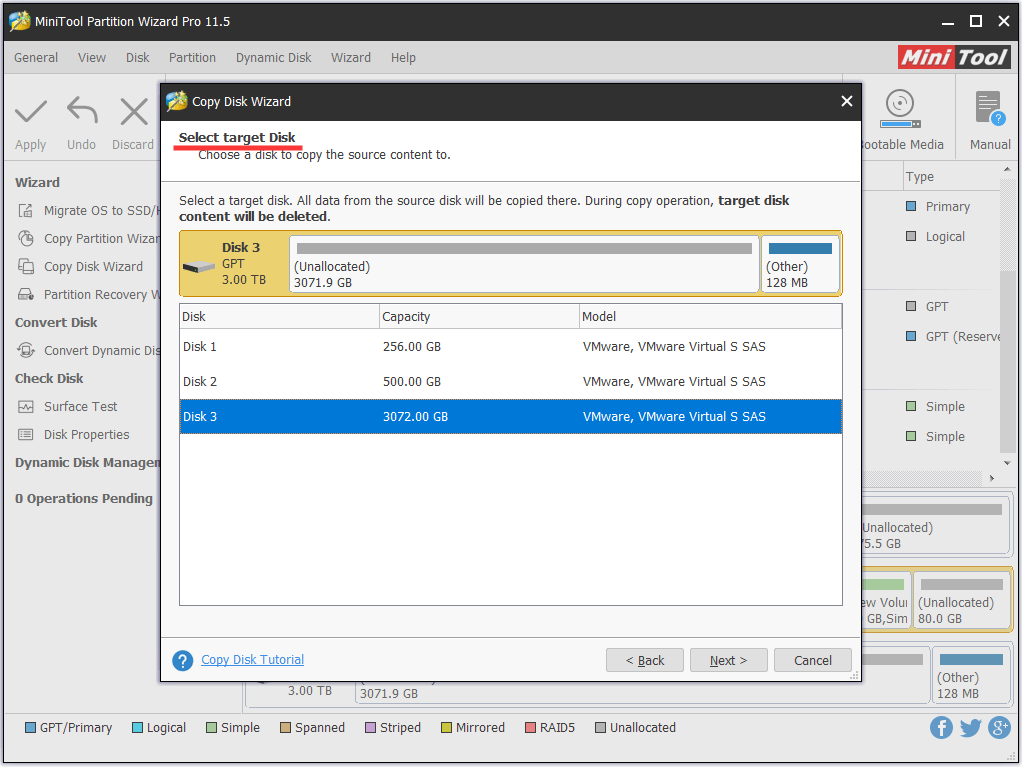
Step 4. Now choose the target disk and confirm your choice. Note that all data on the target disk will be destroyed. Hence make sure it is ready for the copy. Otherwise, make a backup immediately.
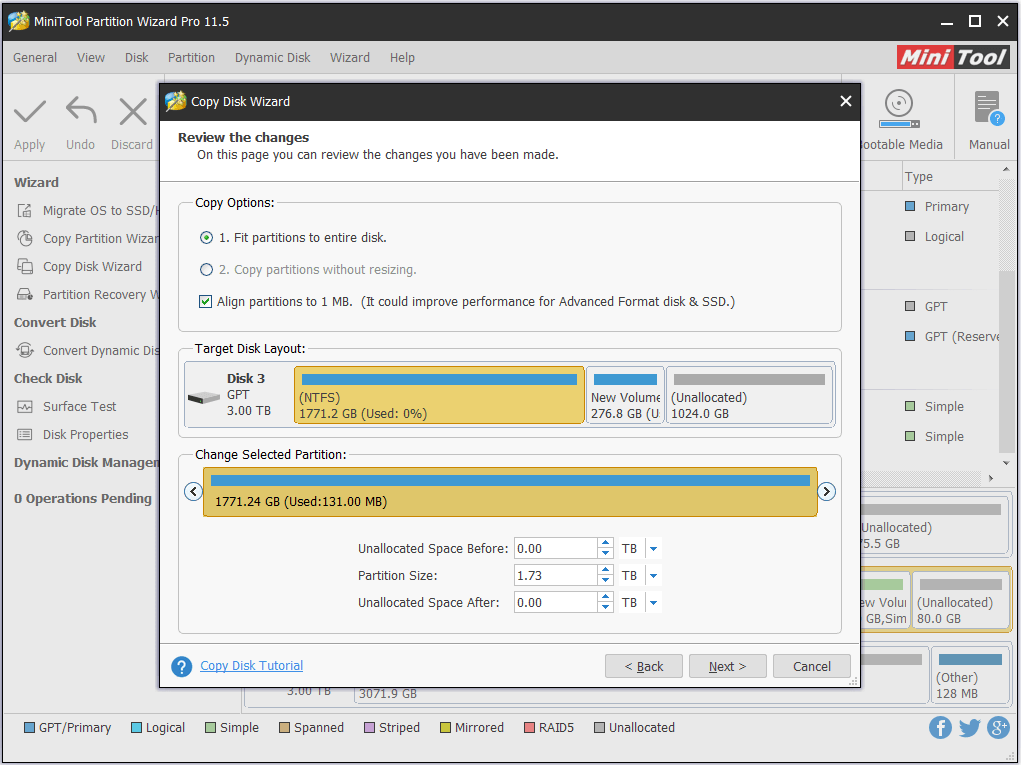
Step 5. At the Review page, you can edit the partition size before you click Next. (Please note that «Copy partitions without resize» is not available while copying a dynamic disk.)
Step 6. Ignore the «how to boot» information (since you are copying non-system disk) and click Finish.
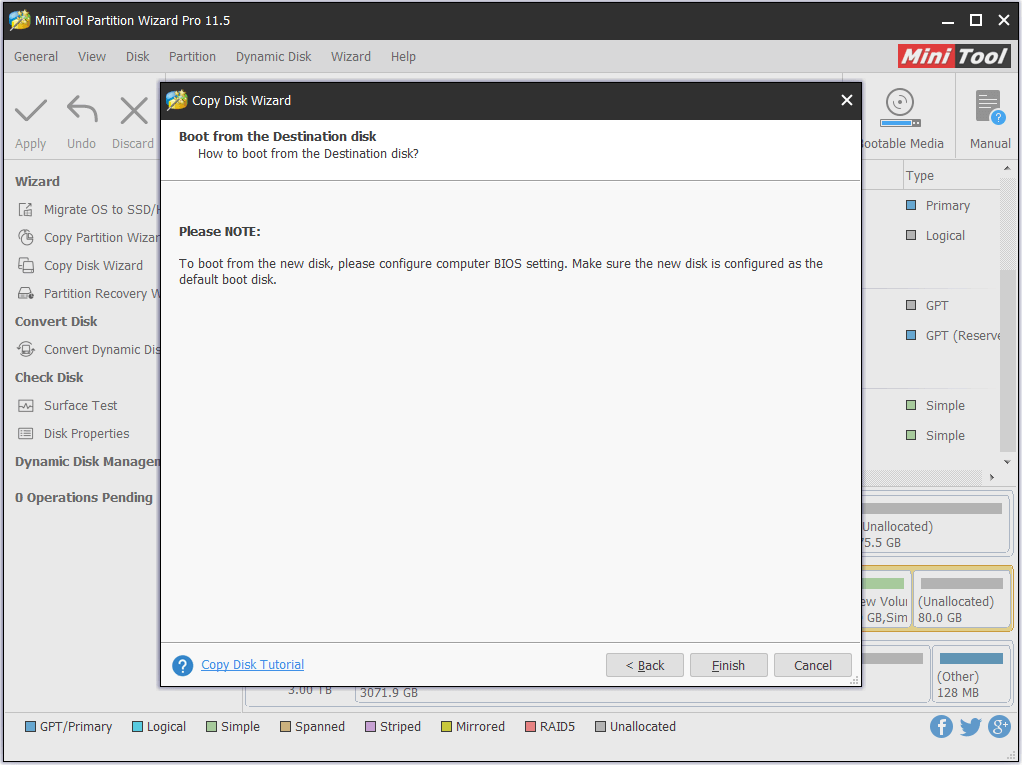
Step 7. See! The target disk will have a copy of the volumes on the dynamic disk. Finally, click Apply to start the cloning. All will be finished quickly.
«Hey! Want to convert disk from dynamic to basic? Maybe you can copy dynamic disk to basic disk, another way to address your issue.»Click to Tweet
Way 2: Using the Windows Interface
The second way to convert disk from dynamic to basic is to use Disk Management utility, which can be accessed by running «diskmgmt.msc» at Start menu.
Note: This way requires deleting all the volumes, for Convert to Basic Disk feature is invalid before the deletion. Microsoft explains that to change a dynamic disk back to a basic disk using the Windows interface, «the disk must not have any volumes nor contain any data before you can change it back to a basic disk. If you want to keep your data, back it up or move it to another volume before you convert the disk to a basic disk.»
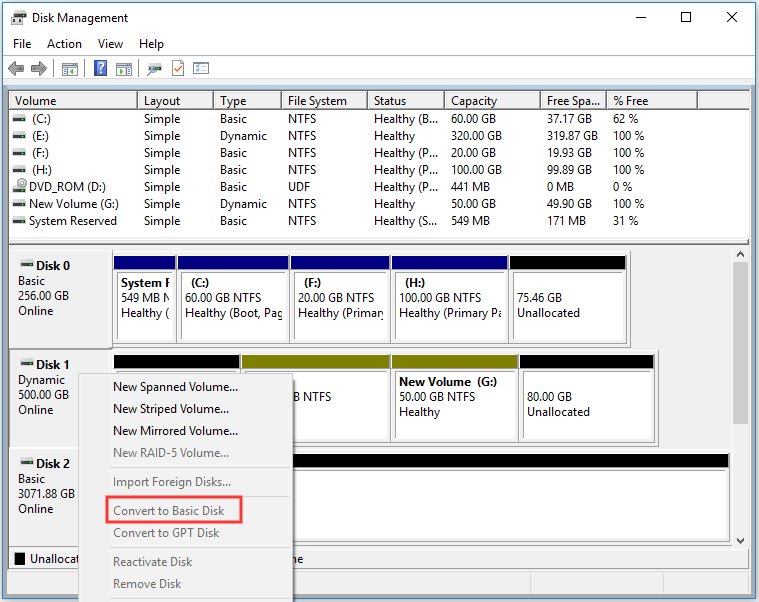
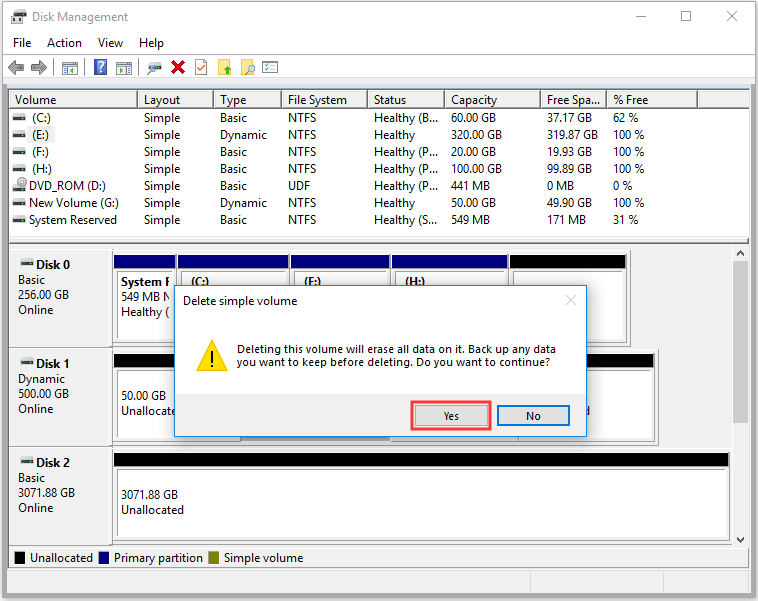
Step 1. Right click a volume on the dynamic disk and choose Delete Volume.
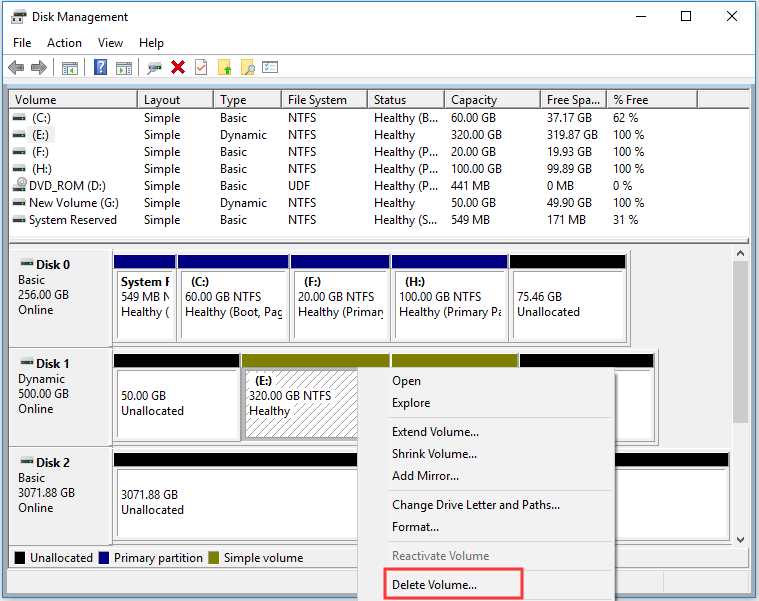
Step 2. On the new window, confirm that you want to delete the simple volume.
Step 3. The dynamic disk will turn into basic disk automatically if you are converting dynamic disk to basic disk on Windows 10. (For the older operating systems, right click the dynamic disk and choose Convert to Basic Disk which is now available.)
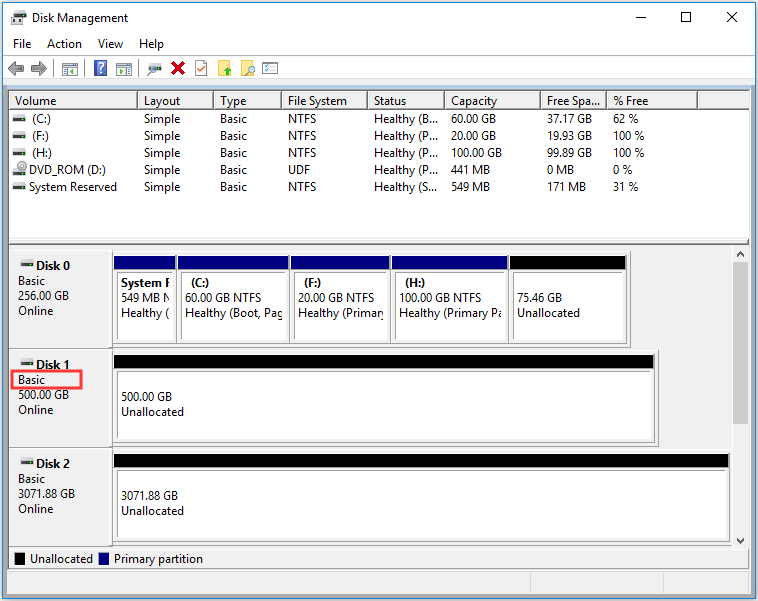
All is done! Now create partitions on the unallocated space, and then save the backup files to the new partitions.
Way 3: Using a Command Line
The third dynamic to basic disk converter I can offer is the command line, which is preferred by numerous of Windows users.
Note: To change a dynamic disk back to a basic disk using a command line, back up all volumes on the disk you want to convert from dynamic to basic.
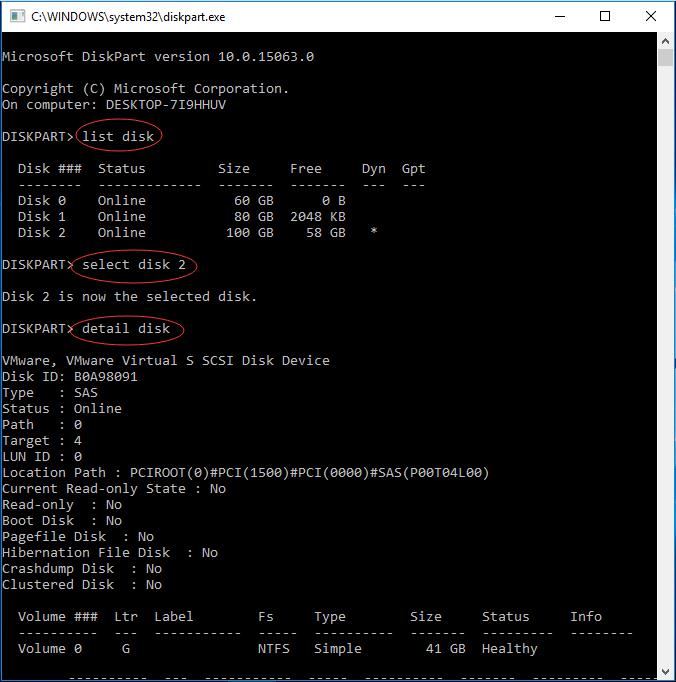
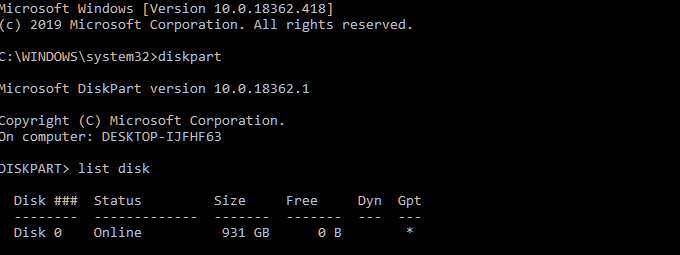
Step 1. Open a command prompt and type diskpart and press Enter.
Step 2. At the DISKPART prompt, type list disk and press Enter. Make note of the disk number you want to convert to basic.
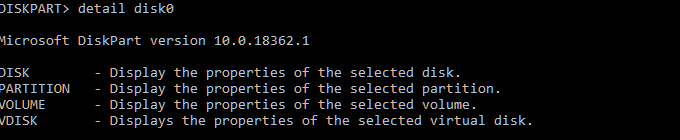
Step 3. At the DISKPART prompt, type select disk <disk number> and press Enter.
Step 4. At the DISKPART prompt, type detail disk and press Enter.
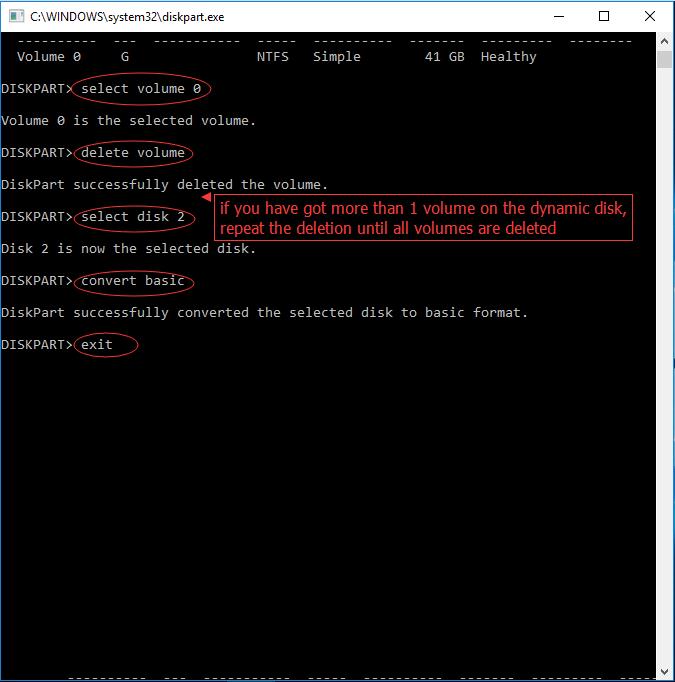
Step 5. At the DISKPART prompt, type select volume <volume number> and execute by pressing Enter. Then type delete volume and hit Enter. Make sure you have deleted all volumes on the disk.
Step 6. At the DISKPART prompt, type select disk <disk number> (should be the one you want to convert to a basic disk) and press Enter.
Step 7. At the DISKPART prompt, type convert basic and hit Enter.
Step 8. At the DISKPART prompt, type exit and press Enter.
Step 9. At the command prompt, type exit and press Enter.
See the following pictures to get a better understanding:
By comparison, I think you know the advantages of using MiniTool Partition Wizard, which does dynamic disk conversion in the real sense. Guess you can make the right choice to change dynamic disk to basic disk.
Buy Now
For Your Info: Dynamic Disk VS. Basic Disk
Knowing how to convert a dynamic disk to basic disk, I want to share the key information about Dynamic Disk VS. Basic Disk with you. Hopefully, the information can help you make out whether you need to change dynamic disk to basic disk.
1. About Basic Disk
In short, basic disks and dynamic disks are two storage types in Windows. Today basic disk is the commonly used storage type, which is supported by DOS and all Windows versions. When you install Windows on a hard drive, it would be initialized to a basic one by default. Basic disk uses a partition table to manage all partitions on the disk, and contains basic volumes, such as primary partitions, extended partition, and all logical partitions are contained in extended partition.
2. About Dynamic Disk
Dynamic disk is a separate form of volume management that allows volumes to have noncontiguous extents on one or more physical disks. Dynamic disk is supported in Windows 2000 and later operating systems. Unlike basic disk, dynamic disk uses a hidden database (LDM) to track information about dynamic volumes or dynamic partitions on the disk. Dynamic disks provide features that basic disks do not, such as the ability to create volumes that span multiple disks (spanned and striped volumes) and the ability to create fault-tolerant volumes (mirrored and RAID-5 volumes).
3. Their Differences
- Supported OS: Basic disk is supported by MS-DOS and all Windows like Win95/98/Me/NT/2000/XP/2003/2008/2011/2012/XP/Vista/7/8/8.1/10. Dynamic Disk is supported by Win2000 and the later versions but isn’t supported by MSDOS, Win95/98/Me/NT and Windows XP Home Edition.
- Supported Volumes: On a basic MBR disk, all volumes you create are called partitions. You can create at most 4 primary partition, or 3 primary partitions plus 1 extended partition which can be further divided into multiple logical partitions. On a dynamic disk, all volumes you create are called dynamic volumes. With multiple dynamic disks, you can create an unlimited number of volumes which can be simple volume, spanned volume, striped volume, mirrored volume and RAID-5 volume.
- Extend Volume: A dynamic volume can be composed of a set of noncontiguous extents on one or multiple physical disks. By contrast, a volume on a basic disk consists of one set of contiguous extents on a single disk. This means you can add more disk space to existing primary partitions and logical drives, provided that there is adjacent, contiguous unallocated space (for primary partition) or free space (for logical partition) followed on the same disk. But you don’t need to care about the location of the unallocated space when you extend dynamic volume.
- Mutual Conversion: Basic disk can be easily converted to dynamic disk without restarting and losing data. However, to convert a dynamic disk to basic disk, all volumes on the dynamic disk need to be deleted, unless you use third-party tools like MiniTool Partition Wizard to help you.
You may also like: How to Create More Partitions on a MBR Disk without Data Loss?
4. Their Similarities
- Supported File Systems: Both basic disk and dynamic disk support FAT, FAT32, and NTFS file systems. To convert FAT to NTFS, use «convert d: /fs:ntfs» in command line without losing data. To convert NTFS to FAT32, you need to format the partition (volume) with FAT32 file system, or you can use MiniTool Partition Wizard to help you without formatting.
- Label and Drive Letter: On both basic disk and dynamic disk, you can set volume label and assign a drive letter to each partition (volume).
- Resize Volume: Both basic disks and dynamic disks, you can extend and shrink both basic partitions and dynamic volumes on the condition that you are running Windows Vista/2008 and the later versions. Tip: to move a partition/volume location, you may need the help of MiniTool Partition Wizard.
You may also like: Here Is the Free Software to Convert NTFS to FAT32
Summary
Above are the 3 ways that can convert dynamic disk to basic disk. Hope you can benefit something from this article. If you have any questions on the subject of using MiniTool Partition Wizard to change dynamic disk to basic disk, let us know by typing your questions in the comment section below. Or you can contact our support team via [email protected]. All ideas are welcome.
Convert Dynamic Disk to Basic FAQ
Can you convert a dynamic disk to basic without losing data?
Windows requires deleting all volumes on the dynamic disk before converting it to basic disk. However, with professional dynamic disk converter MiniTool Partition Wizard Pro, you should have no problem converting dynamic disk to basic without data loss.
What is the difference between dynamic disk and basic disk?
A basic disk uses normal partition table while a dynamic disk does not contain partition table or logical drives. A basic disk can create on MBR and GPT partitions while a dynamic disk can create simple/mirrored/spanned/striped/RAID5 volumes. Partition extending should be made inside the same basic disk but for dynamic disks, more disks can be combined to create a bigger volume.
What does it mean to convert to dynamic disk?
If a system disk is converted to dynamic disk, Windows will only be able to boot from the current system volume. If a data drive is converted to dynamic disk, you will be able to extend dynamic volume using free space from other dynamic disks.
What is simple volume in dynamic disk?
Simple volumes are dynamic-disk equivalent of the primary partitions and logical partitions found on basic disks. Simple volumes act like partitions but can be extended by using free space from another dynamic disks.
Applies to: Windows 10/8.1/8/7/XP/Vista, and Windows Server 2000/2003/2008/2012/2016/2019.
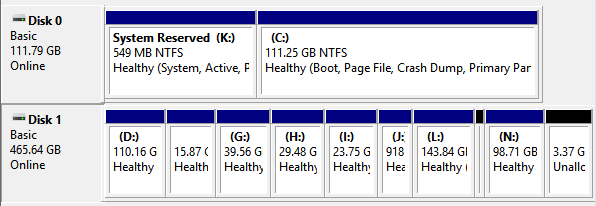
There are two types of disk storage types on Windows: basic disk and dynamic disk. Many users are dithering which one to choose before partitioning a drive. First of all, you need to understand the features of the two disk storage types.
What Is Basic and Dynamic Disk?
Basic disk refers to a disk that is initialized for basic storage. A basic disk usually contains partitions, including primary and logical volumes, for file storage. And the created partitions are formatted with a file system — NTFS by default.
Dynamic disk is more like a disk that has been initialized for dynamic storage. It provides the features that basic disk does not.
Basic vs. Dynamic, Which Is Better?
Some of you may not know the differences between Basic and Dynamic disks. Here is a comparison table that may help you understand which is better and select the right disk type:
| Comparison | Basic Disk | Dynamic Disk |
|---|---|---|
| Supported OS |
|
|
| Maximum Partition Number |
|
2,000 volumes |
| Partition Type |
|
|
| Pros (Usages) |
|
|
According to this comparison table, basic and dynamic disks mainly share differences in OS, number of partitions, partition types, usages. It’s obvious that Dynamic disk is mainly used for huge storage, while the basic disk is better for ordinary data storage.
For a secure and efficient Dynamic to Basic disk conversation tool, you can fully trust EaseUS partition manager software as shown in Method 1 below. It’ll keep your data secure and content intact during the operation.
Is It Possible to Convert Dynamic Disk to Basic Disk
Yes. You can convert a dynamic disk to a basic one.
The basic disk can be directly converted to a dynamic disk using the Windows disk management tool. However, you cannot directly convert a dynamic disk to basic when there are partitions on it.
To do so, you will need to delete all the volumes and data on the dynamic disk, which is the last thing you want to see. And the conversion is irreversible.
Then, is it possible to convert dynamic disk to basic disk without losing data? Luckily, the answer is YES. In the following, we will cover three practical solutions to help you change a dynamic disk to basic without losing any data:
- Method 1. Convert Dynamic Disk to Basic Disk using EaseUS Partition Master
- Method 2. Change Dynamic to Basic using Disk Management
- Method 3. Convert Dynamic to Basic Disk using Command Prompt
Continue reading and see the how-to tutorials.
How to Convert Dynamic Disk to Basic Disk Without Losing Data
Applies to: Windows beginners, professionals, 3-step dynamic to basic conversion, no data loss.
Third-party partition manager software — EaseUS Partition Master enables you to switch Dynamic disk to Basic or vice versa in only a few clicks. With it, you can directly execute the conversion, keeping all the volumes intact without any data loss.
How-to Tutorial: Convert Dynamic Disk to Basic Disk using EaseUS Partition Master
Step 1. Install and open EaseUS Partition Master and go to Disk Converter.
Step 2. Select the disk disk conversion mode that suits your need:
- Convert Basic to Dynamic: change a Basic disk to Dynamic.
- Convert Dynamic to Basic: change a Dynamic disk to Basic.
Step 3. Select the target disk — Basic or Dynamic, confirm you’ve select the correct disk and click «Convert» to start.
0:00 — 0:18 Convert Basic to Dynamic Disk; 0:19- 0:36 Convert Dynamic to Basic Disk.
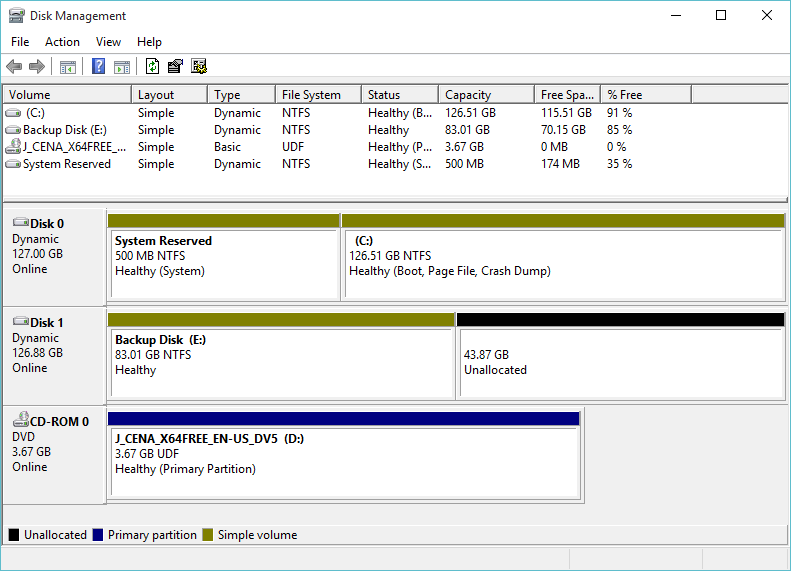
After EaseUS Partition Master applies these changes, you will see the dynamic disk has become basic in Windows Disk Management as shown below:
And then you can use «Resize/Move partition» feature to resize partitions on the basic disk. Note that, if you want to change a basic disk into a dynamic type, you can also apply this software for help.
How to Convert Dynamic Disk to Basic Disk with Disk Management
Applies to: Experienced Windows users, deleting partition is unavoidable, data loss.
As said before, if you want to use the Windows built-in disk management to convert dynamic disk to basic, you need to delete all the volumes on the dynamic disk.
- Warning
- To convert a dynamic disk back to a basic disk with disk management, you must delete all volumes, which means the data will be removed too.
- Make sure you back up all the data you want to keep before proceeding.
How-to Tutorial: Change Dynamic to Basic using Disk Management
It’s a free solution to use Windows disk management to convert dynamic disk to a basic. You can do it within three steps as demonstrated below:
1. Back up all volumes on the disk you want to convert from dynamic to basic.
2. In Disk Management, select and hold (or right-click) each volume on the dynamic disk you want to convert to a basic disk, and then click «Delete Volume».
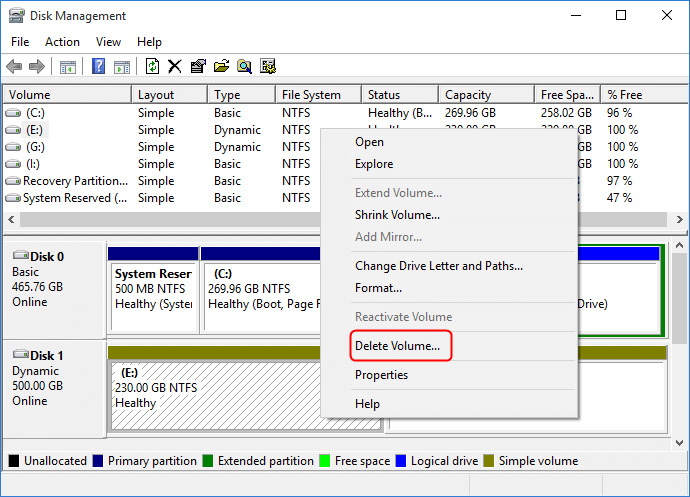
3. Click «Yes» to confirm the deletion.
4. When all volumes on the disk have been deleted, right-click the disk, and then click «Convert to Basic Disk».
On some new operating systems, the disk will automatically turn into as a Basic disk after deleting all volumes on the dynamic disk.

Bonus Tutorial — Convert Dynamic Disk with Mirror Volumes to Basic
To convert dynamic disk has mirror volumes, you need to break mirrored volumes before you can delete them.
Step 1. Right-click «My Computer/This PC» and choose «Manage» -> «Storage» -> «Disk Management».
Step 2. Right-click the mirrored volumes and choose «Break Mirrored Volume» or choose «Remove Mirror» to remove the mirror.
If the boot/system partition is on the mirrored volumes, you can only choose «Remove Mirror» to remove the mirror.
Please backup your important data before this operation.
After choosing «Break Mirrored Volume» or «Remove Mirror», the mirrored volumes will become simple volumes. Then, you can delete them through right-click shortcut.
Step 3. And then convert dynamic disk to basic disk by repeating delete all volumes on the disk.
After this, right-click the dynamic disk and select «Convert to Basic» if necessary. When your dynamic disk has been changed into a basic disk, you can then create new partitions on the disk to make use of it again.
How to Change Dynamic Disk to Basic with Command Prompt
Applies to: Experienced & professional Windows users, IT administrators.
It’s much more complex to apply Command Prompt converting dynamic to basic than using EaseUS Partition Master and Disk Management. Any false operations may cause serious data loss or program malfunction.
Be careful while you are converting the disk to basic. Note that this operation will also delete your partitions and data. Make sure that you back up data in advance.
Tutorial: Convert Dynamic to Basic Disk using Command Prompt
Step 1. Type cmd in the Search box and right-click Command Prompt, select «Run as Administrator».
Step 2. Type diskpart and hit Enter to bring up DiskPart.
Step 3. Type the following command and hit Enter each time:
- list disk
- select disk 1 (Replace 1 with the disk number of your dynamic disk)
- detail disk
- select volume 2 (Replace 2 with the volume number that you want to delete)
- delete volume 2
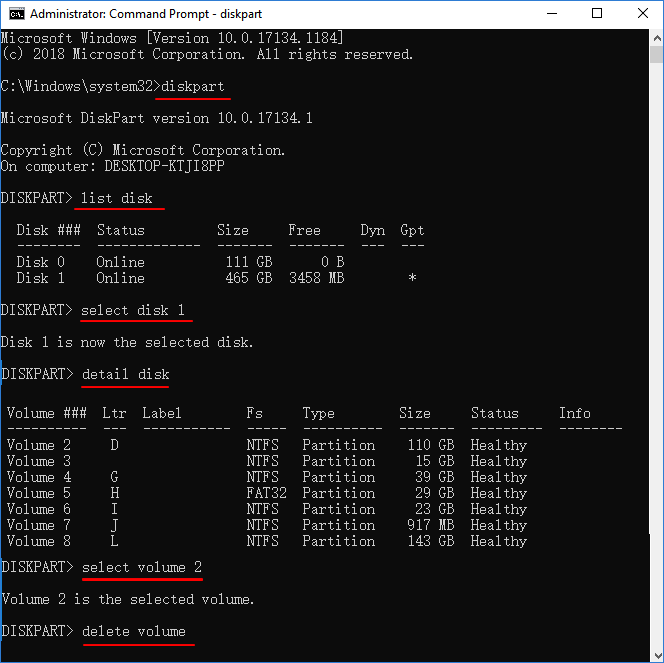
Repeat the process until you have deleted all existing volumes on the disk.
Step 4. when you finish deleting all the volumes, type the following command and hit Enter each time:
- select disk 1 (Replace 1 with the disk number of your dynamic disk)
- convert basic
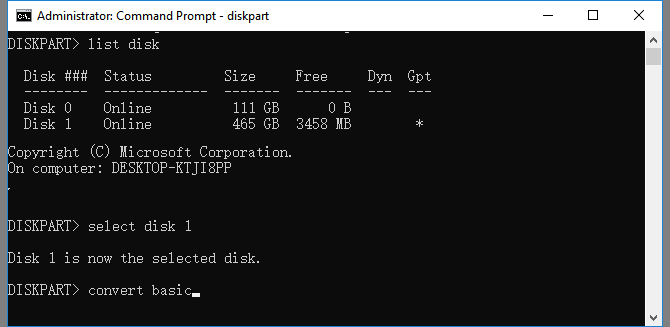
Step 5. Type exit after the process finishes.
After this, your disk is a basic disk now. And you can re-create partitions to save data on it again.
Conclusion
On this page, we compared Basic disk with Dynamic disk and provided 3 practical solutions to help Windows beginners, experienced and even professional users to efficiently convert Dynamic to MBR.
If you are looking for an all-in-one efficient resolution in converting dynamic disk to Basic without data loss, let EaseUS Partition Master help.
Common Question about Convert Dynamic Disk to Basic
1. Can you convert a dynamic disk to basic without losing data?
Yes, there are three ways to convert dynamic disk to basic. Users could back up the data to another hard drive, then you can delete all volumes and convert it.
2. How can I change dynamic to basic?
A dynamic disk has more flexibility than a basic disk. Basic and dynamic disks mainly share differences in OS, number of partitions, partition types, usages. It’s obvious that Dynamic disk is mainly used for huge storage, while the basic disk is better for ordinary data storage.
3. What happens if I convert to dynamic disk?
Converting a basic disk into a dynamic disk is an irrevocable operation. Once you convert a basic disk into a dynamic disk, you can not convert it back into a basic disk unless you delete every volume on the entire disk.
With this article, you can convert dynamic disk to basic disk in Windows 10 without losing your data. When the operating system basic disk converted to a dynamic disk, it makes trouble to install a new operating system. Because Windows doesn’t support dynamic disk for loading boot files and the system drive.
To convert dynamic disk to basic disk with Window Disk Management and Disk-Part utility will delete data from your disks. We will explain disk type conversion with three methods using Windows builtin tools and third-party apps. With third-party apps, you will not be lost your data. But the current Windows disk management and command-line tools format the disk before converting. So you will lose everything on your computer hard disk.
Converting Dynamic Disk to Basic with Disk Management
Disk management is a graphical environment tool to manage computer hard disks in Windows. Using disk management make it easy to format, create a partition, delete the partition and convert a disk. But not too powerful to convert disk without losing data.
To convert basic disk to dynamic disk, right-click the disk on Disk Management select Convert to Dynamic disk. It will prompt you the below screenshot notification.
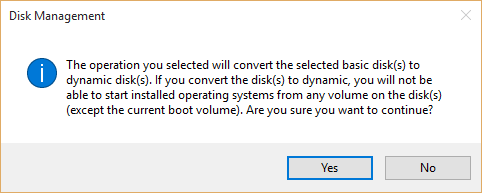
Note: Converting basic disk to dynamic disk will not delete your files but it will now allow you to install the operating system on the dynamic disk.
Let’s convert dynamic disk to basic disk using Windows disk management.
- Type “diskmgmt.msc” in Windows Run to open the disk management window.
2. To convert a dynamic disk, delete the volumes then it will automatically convert the disk to a basic disk. These are the cons of Windows disk management.
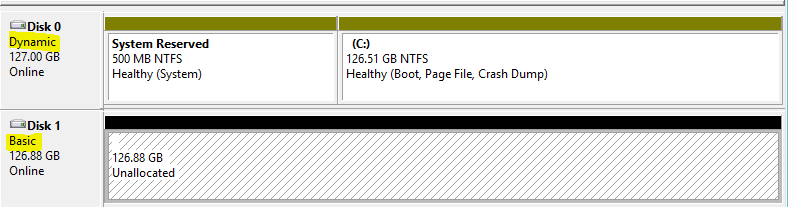
The disk converted to a basic disk successfully but the data and partitions are lost. You must re-partition your hard disk.
Convert Dynamic Disk to Basic with Diskpart Utility
The Diskpart utility can do the same task of disk management on PowerShell or Command prompt. Just run the cmd or Windows PowerShell and follow the below command to convert a dynamic disk to a basic disk.
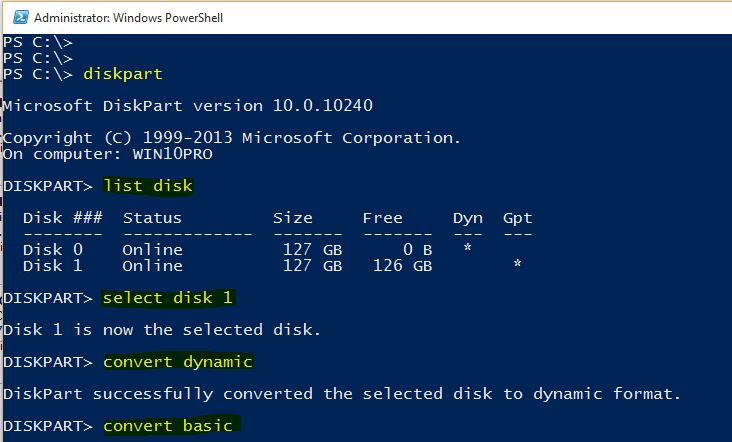
PS C:> diskpart
Microsoft DiskPart version 10.0.10240
Copyright (C) 1999-2013 Microsoft Corporation.
On computer: WIN10PRO
DISKPART> list disk
Disk ### Status Size Free Dyn Gpt
-------- ------------- ------- ------- --- ---
Disk 0 Online 127 GB 0 B *
Disk 1 Online 127 GB 126 GB *
DISKPART> select disk 1
Disk 1 is now the selected disk.
DISKPART> convert dynamic
DiskPart successfully converted the selected disk to dynamic format.
DISKPART> convert basic
DiskPart successfully converted the selected disk to basic format.
That is all, converting dynamic disk to basic and basic disk to dynamic disk. To know more about diskpart, read the manage hard disk with diskpart utility article.
Для тех из вас, кто не знаком с этой концепцией, базовый диск используется для основных логических дисков и разделов и служит типом диска хранения, наиболее часто используемого в операционной системе Windows.
Базовый диск предоставляет простое решение для хранения и позволяет создавать и удалять первичные и расширенные разделы, создавать и удалять логические диски в расширенном разделе, а также возможность форматировать раздел и помечать его как активный.
Динамический диск предоставит функции, которые невозможны на базовом диске. Они позволяют разбивать различные типы томов, такие как составные, чередующиеся, зеркальные и RAID-5. Эти диски имеют тенденцию предлагать большую гибкость для управления томами. После выпуска Windows 10 динамические диски устарели и, как правило, больше не рекомендуются для использования.
Одной из основных причин того, что динамический диск больше не считается полезным, является внедрение новой технологии Storage Spaces, которая может помочь защитить ваши данные от сбоев дисков. Давняя проблема с динамическими дисками заключается в неизбежности их неисправности, что приводит к сбоям дисков и необходимости возврата к базовому диску.
Отличительной особенностью обоих дисков является то, что они взаимозаменяемы, то есть вы можете конвертировать один в другой и наоборот. Пути, которыми это возможно, двояки; с помощью инструмента управления дисками или командной строки.
Существуют сторонние инструменты, которые вы можете использовать для оптимизации всего процесса. Вы можете найти один, если вы предпочитаете, хотя мы не можем лично рекомендовать любой.
Процесс потребует некоторой компьютерной компетентности, но относительно прост даже для новичка. Мы попытаемся упростить оба метода преобразования и помочь вам в том, как преобразовать динамический диск, неисправный или каким-либо другим образом, в базовый диск.
Прежде чем начать, важно создать резервную копию всех томов, расположенных на динамическом диске. Оба процесса преобразования полностью уничтожат все данные во время передачи.
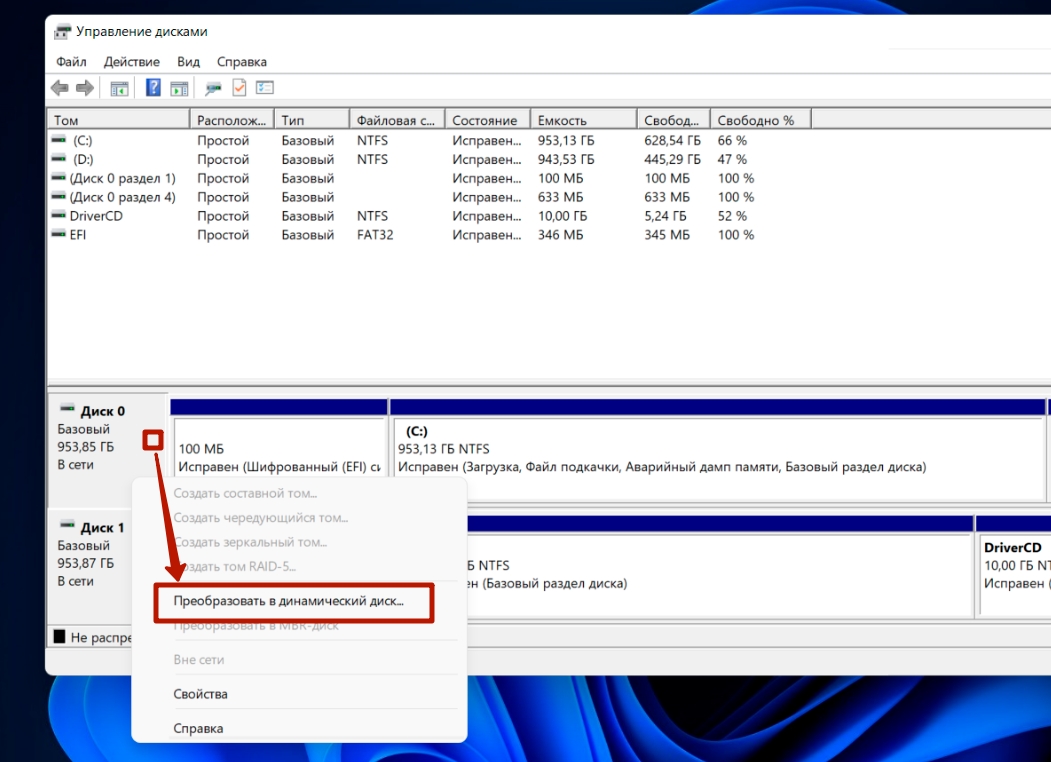
Способ преобразования 1 — Управление дисками
Вероятно, самый простой из этих двух методов из-за наименьших усилий, мы начнем преобразовывать ваш динамический диск в базовый диск с помощью инструмента «Управление дисками».
- Щелкните правой кнопкой мыши меню «Пуск» и выберите «Управление дисками».
- Вы также можете ввести управление диском в поиск на панели задач и выбрать Создать и отформатировать разделы жесткого диска.
- Находясь в окне «Управление дисками», найдите и щелкните правой кнопкой мыши все тома динамического диска, которые вы хотите преобразовать, затем выберите «Удалить том».
- После удаления томов щелкните правой кнопкой мыши на самом диске и выберите «Преобразовать в базовый диск».
Основы динамического использования инструмента управления дисками
С другой стороны, преобразование базового диска в динамический диск не потребует резервного копирования данных. Так что, если по какой-то причине вы чувствуете необходимость вернуть динамику к базовым изменениям, это так же просто, как следование инструкциям на экране.
Вы можете получить предупреждение при попытке этого изменения. Первым сообщается, что установка операционной системы с тома, который не является текущим загрузочным томом, будет невозможна. Это означает, что у вас уже есть данные или системный раздел на базовом диске, и вы не должны конвертировать. Было бы лучше использовать двойную загрузку, если вы не используете динамический диск.
Способ преобразования 2 — Командная строка

Если вы более знакомы с командной строкой, эта может быть проще для вас. Тем не менее, он требует еще одного дополнительного шага по сравнению с инструментом управления дисками. Независимо от этого, конечным результатом по-прежнему будет базовый диск, преобразованный из динамического диска.
- Начните с запуска командной строки. Вы можете сделать это, набрав cmd в поиске на панели задач и запустив результат от имени администратора.
- Находясь в окне командной строки, выполните следующую команду:

- Откроется список всех доступных дисков, которые можно найти на вашем компьютере.
- В списке будет отображаться следующая информация для каждой записи: номер диска, состояние, размер, текущий объем доступного пространства, а также Dyn (динамический DNS) и Gpt (таблица разделов GUID).
- Аннотируйте номер диска, который вы хотите конвертировать, так как мы будем использовать его на следующем шаге.
- Находясь в DISKPART, введите номер выбранного диска в следующую команду:

- Вы должны получить аналогичное подтверждающее сообщение, указывающее, что диск был выбран.
- Теперь вам нужно предварительно просмотреть и удалить каждый том, расположенный на диске, по одному.
- Введите detail disk #, где # — фактический номер выбранного диска.

- Теперь тип выберите том # .
- Затем удалите том #.

- После удаления каждого тома вы можете преобразовать динамический диск в базовый, набрав команду convert basic.


Основы динамического использования командной строки
Выполните вышеуказанные шаги до части, которую вы получите список доступных дисков в DISKPART. В этом процессе вам не нужно ничего удалять. Просто выполните команду convert dynamic, и диск сделает это.
Единственный раз, когда вы должны получить предупреждение, это когда вы пытаетесь преобразовать системный диск. В этом случае вам будет выдана ошибка службы виртуальных дисков, в которой говорится, что недостаточно места.
Друзья, приветствую вас на портале WiFiGid! Эта короткая статья будет посвящена динамическим дискам в Windows. Сразу скажу, что формат подачи постарается остаться исключительно «для новичков», никакой научности здесь ожидать не стоит.
Содержание
- Что такое динамический диск
- Как сделать динамический диск
- Что делать с динамическим диском?
- Как преобразовать динамический диск в базовый
- Задать вопрос автору статьи
Что такое динамический диск
Базово все диски в Windows получают тип «базовый». Это привычные нам во всем разделы – место четко задано и не меняется, один раздел привязан к одному физическому диску (на котором может быть несколько разделов), все файлы, включая Windows, хранятся в единственном экземпляре.
На серверных системах зачастую организуют другой тип хранения данных – в RAID-массивах. Там можно несколько физических дисков объединить в один расширяемый раздел или, наоборот, зеркалировать хранение той же операционной системы или данных на несколько разделов в нескольких копиях.
Так как обычная Windows все-таки предназначена для обычного пользователя, то большой необходимости в аппаратных RAID-массивах здесь нет, но в Windows добавили возможность программной симуляции этого режима, который по сути и называется «динамический диск».
Подведем итоги:
- Можно объединять в разделы несколько физических хранилищ (например, для целей большого файлового хранилища, хотя для этого есть лучшие решения).
- Можно изменять размер на лету (в рамках имеющегося физического пространства).
- Можно зеркалировать данные и Windows.
- Из базового раздела сделать динамический с полным сохранением данных легко. Обратный процесс здесь тягомотен и требует использования сторонних программ (например, те же Acronis Disk Director или AOMEI Dynamic Disk Manager).
- Нельзя установить несколько операционных систем.
- Динамические диски не поддерживаются редакциями Windows Home.
Как сделать динамический диск
Процесс переделки базового диска в динамический легко протекает через стандартную утилиту Windows «Управление дисками».
- Открываем «Управление дисками». Универсальный способ – открываем «Выполнить» ( + R) и запускаем команду diskmgmt.msc. Можно воспользоваться и стандартным поиском Windows. Оставляю это на вас, так как перебирать все версии Windows здесь не хотелось бы (проводили операцию на Windows 7, Windows 8, Windows 10, Windows 11).
- В «Управлении дисками» щелкаем правой кнопкой по самому диску (не разделу) и выбираем пункт «Преобразовать в динамический диск».
- Если у вас несколько дисков (как у меня), утилита сразу предложит преобразовать их все сразу. Просто отмечаем галочкой нужные.
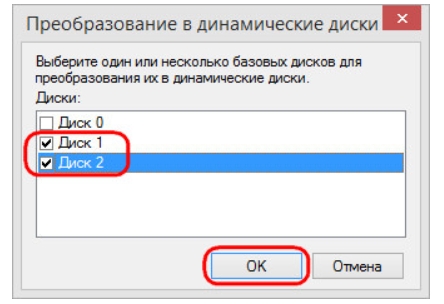
Все, диск преобразуется в динамический.
Для опытных. Если хотите использовать командную строку: активируем утилиту diskpart, выбираем наш том, выполняем команду convert dynamic.
Что делать с динамическим диском?
Цели использования уже были обозначены выше, здесь бы хотелось разобрать уже конкретные решения. Если у вас только один динамический диск (а зачем он вам нужен) – есть возможность создания только простого тома с функциями базового диска. А вот если дисков было несколько, то и функций здесь больше:
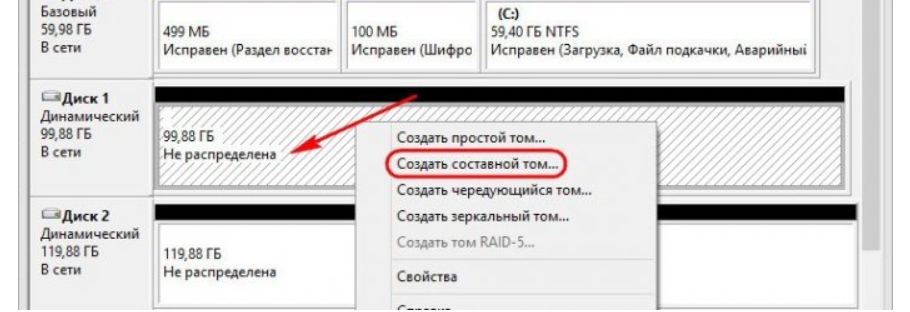
Обратите внимание, что после создания динамического диска обычно создается раздел или нераспределенная область (в случае пустого диска). Щелкаем правой кнопкой мыши уже по РАЗДЕЛУ или этой нераспределенной области и получаем вот это меню.
- Простой том. Ничем не отличается от разделов базового диска, разве что можно будет менять их размер на лету без использования сторонних программ.
- Составной том. Если вы хотите объединить несколько физических дисков в один большой логический раздел.
- Чередующийся том. Аналог RAID-0. Ваши данные при записи и чтении чередуются на несколько указанных дисков для увеличения производительности. Например, ваши ДВА диска имеют скорость чтения в 2 Гб/с, тогда при их объединении в этот один раздел скорость вырастит уже до 4 Гб/с в идеальных условиях.
- Зеркальный том. Программный аналог RAID-1. Записанные данные просто дублируются на несколько дисков. Т.е. если какой-то файл где-то повредится, то он успешно восстановится со второго диска. То же самое можно провернуть и над самой Windows.
- RAID-5. Отправляю вас за этим в википедию. На двух дисках здесь не построишь экспериментов.
Показывать сами процессы создания разделов здесь не вижу смысла, т.к. при выборе соответствующего раздела появляется понятный мастер настройки с выбором разделов или дисков. Дополню, что не обязательно использовать все место динамического диска на один раздел – можете также создавать любое разумное число разделов и делать их разными типами.
Если вы вдруг переставите свой динамический диск в другой компьютер, в «Управлении дисками» он будет отображаться как пустой, поэтому нужно будет щелкнуть правой кнопкой мыши по нему и выбрать «Импорт чужих дисков».
Как преобразовать динамический диск в базовый
Как уже писал выше, это не простой процесс. Т.е. если данные не важны, то можно сделать так:
- Через «Управление дисками» удаляем все разделы на динамическом диске (щелкаем по разделу и выбираем «Удалить том»).
- Как только все разделы будут удалены, появится возможность «Преобразовать в базовый диск» (щелкаем правой кнопкой мыши по диску).
Но можно использовать и альтернативные программы (Acronis Disk Director или AOMEI Dynamic Disk Manager).