![]() Это первая часть очередной истории о том, как можно наступить на грабли, там, где обычно этого не ожидаешь. Началось всё с того, что для очередного развёртывания нескольких однотипных виртуальных машин Hyper-V с гостевой ОС Windows Server 2012 R2 был подготовлен эталонный образ виртуального диска с установленной ОС. В эталонный образ были включены все актуальные обновления, после чего для уменьшения размера диска был применён метод очистки хранилища компонент Windows в каталоге WinSxS, а логический том системного диска по своему объему был усечён таким образом, что на нём оставалось около 5GB свободного пространства. Перед отключением ВМ в эталонной гостевой ОС по законам жанра была выполнена утилита sysprep. В дальнейшем с этого образа было успешно развёрнуто несколько ВМ, имеющих конфигурацию ВМ, сопоставимую с эталонной ВМ. Спустя некоторое время после всей этой истории с пониманием того, что ранее несколько развёртываний с образа прошли успешно, была предпринята попытка развернуть ещё пару ВМ с этого же образа.
Это первая часть очередной истории о том, как можно наступить на грабли, там, где обычно этого не ожидаешь. Началось всё с того, что для очередного развёртывания нескольких однотипных виртуальных машин Hyper-V с гостевой ОС Windows Server 2012 R2 был подготовлен эталонный образ виртуального диска с установленной ОС. В эталонный образ были включены все актуальные обновления, после чего для уменьшения размера диска был применён метод очистки хранилища компонент Windows в каталоге WinSxS, а логический том системного диска по своему объему был усечён таким образом, что на нём оставалось около 5GB свободного пространства. Перед отключением ВМ в эталонной гостевой ОС по законам жанра была выполнена утилита sysprep. В дальнейшем с этого образа было успешно развёрнуто несколько ВМ, имеющих конфигурацию ВМ, сопоставимую с эталонной ВМ. Спустя некоторое время после всей этой истории с пониманием того, что ранее несколько развёртываний с образа прошли успешно, была предпринята попытка развернуть ещё пару ВМ с этого же образа.
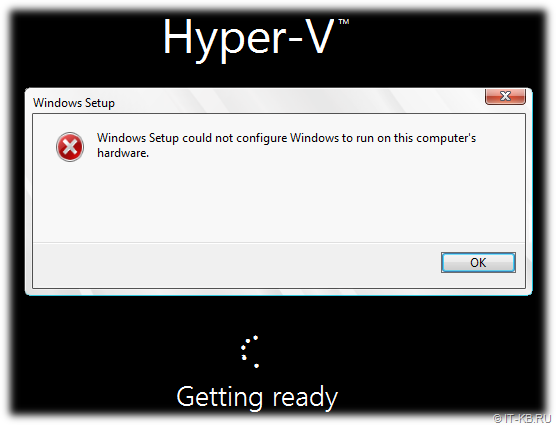
К нашему удивлению при первом же запуске новой ВМ гостевая ОС отказалась загружаться с сообщением об ошибке «Windows Setup could not configure Windows to run onthis computer’s hardware» на этапе первичной инициализации.
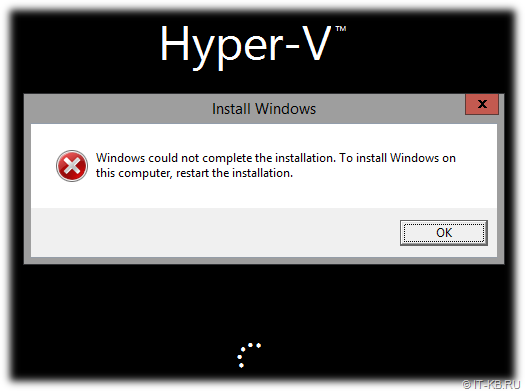
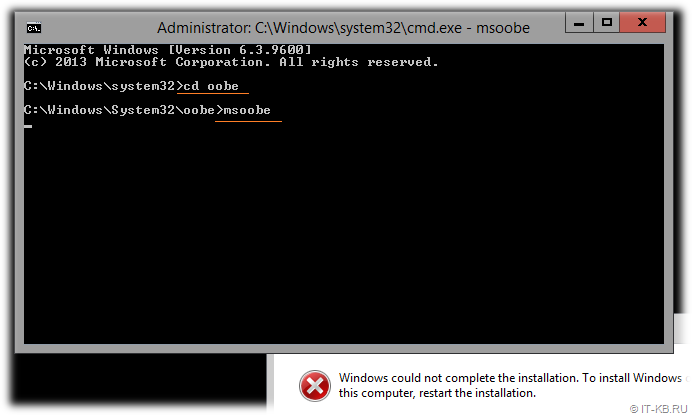
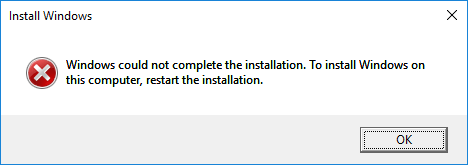
Аналогичная ситуация повторилась и на второй новой ВМ, которую мы попытались развернуть с этого же образа. Попытка повторного перезапуска на обеих ВМ привела к другому сообщению об ошибке «Windows could not complete the installation. To install Windows on this computer restart the installation«
Далее после нажатия кнопки «OK» система отправлялась в перезагрузку и при следующей загрузке ситуация со второй ошибкой повторялась.
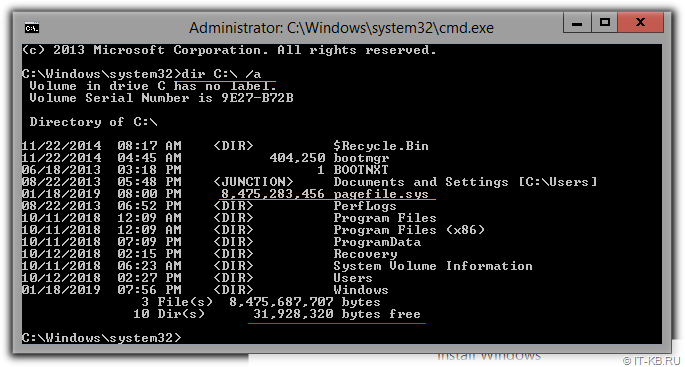
В попытках понять суть происходящего, в момент возникновения последней ошибки (не нажимая кнопки «OK» в окне сообщения об ошибке) жмём волшебную комбинацию клавиш Shift+F10 и попадаем в окно командной строки, выполняемое в контексте прав Администратора. Выполняем листинг содержимого файлов на системном диске C: …
dir C: /a
…и обнаруживаем, что свободного места на диске практически нет. При этом размер файла подкачки pagefile.sys, размещаемого по умолчанию в корне этого диска имеет внушительный размер.
И здесь мы вспоминаем про то, что предыдущие успешные развёртывания с данного образа виртуального диска выполнялись на виртуальные машины, имеющие небольшой объём ОЗУ, а последние две ВМ, где мы столкнулись с проблемой, при создании были сконфигурированы на использование большого объема ОЗУ. И предположительно, причиной невозможности корректной первичной инициализации системы стал раздутый файл подкачки.
В такой ситуации можно попробовать умерить аппетиты гостевой ОС на расширение файла подкачки, установив на время ограниченный максимальный размер файла. Для этого из уже открытой командной строки можем вызвать апплет управления свойствами системы sysdm.cpl. В открывшейся форме переходим на закладку управления расширенными настройками Advanced и в блоке Performance нажимаем кнопку Settings. В дополнительно открывшейся форме переходим на вкладку Advanced и в разделе Virtual memory используем кнопку Change чтобы изменить параметры файла подкачки.
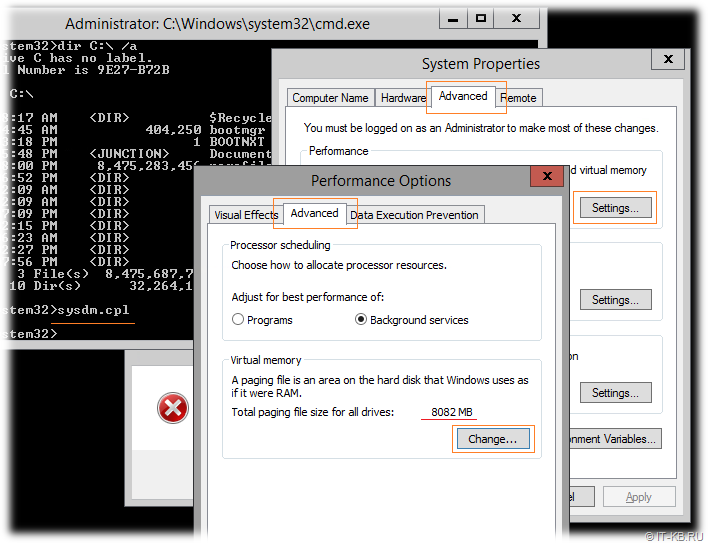
Отключим используемое по умолчанию автоматическое определение размера файла подкачки, укажем первичный и максимально допустимый размеры файла через опцию Custom size (например, от 512MB, но не больше 2GB) и нажмём Set, затем OK.

Теперь можно попробовать перезагрузить виртуальную машину, и при следующей загрузке гостевой ОС свободного места на системном диске должно быть достаточно для нормальной первичной инициализации системы. В нашем случае одна из ВМ загрузилась успешно, а вторая ВМ, не смотря на доступность места на диске продолжила выдавать ошибку «Windows could not complete the installation…«. Вероятно, в процессе первого запуска ОС с наличием проблемы с нехваткой свободного места на диске с механизмом OOBE (Out-of-Box Experience) что-то пошло не так.
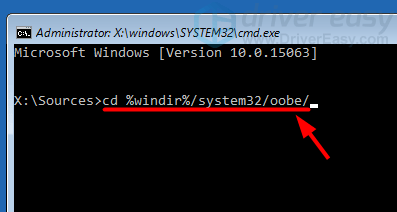
На фоне сообщения об ошибке жмём уже знакомую комбинацию клавиш Shift+F10 и, попав в командную строку, перемещаемся в каталог C:WindowsSystem32oobe , где выполняем ручной запуск утилиты msoobe.exe
cd /d C:WindowsSystem32oobe
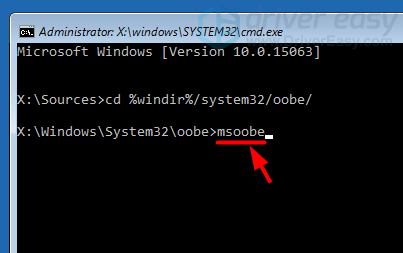
msoobe.exe
В случае успешного вызова этой утилиты перед нами должно появиться стандартное окно первичной настройки параметров системы, которое появляется при первом запуске ранее sysprep-нутой системы.
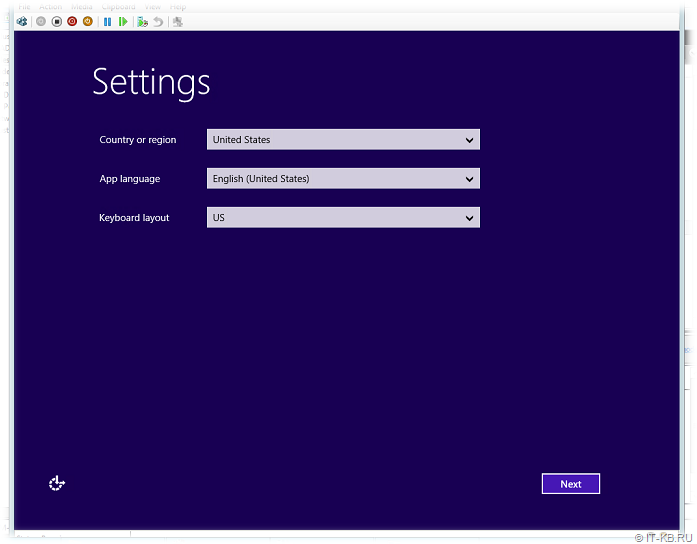
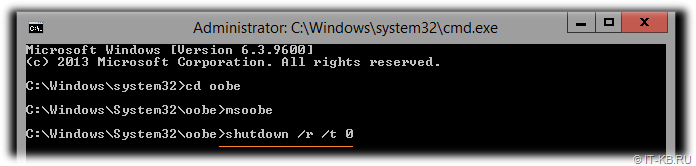
После того, как определим языковые параметры, и на следующих двух экранах примем лицензионное соглашение и укажем учётные данные администратора, мастер первичной инициализации закроется и мы снова вернёмся на первоначальный чёрный экран с открытой командной строкой, в которой вызовем команду штатной перезагрузки гостевой системы:
shutdown /r /t 0
В нашем случае после перезагрузки гостевая система успешно загрузилась.

Если ранее установили небольшой фиксированный файл подкачки, то не забываем его вернуть обратно в автоматический режим, либо указываем другой устраивающий нас размер.
Делаем вывод, что если нам заранее известно то, что внутри шаблонного виртуального диска на системном томе гостевой ОС немного свободного места, то перед первым запуском ВМ лучше установить минимальный объём ОЗУ, исходя из которого система не будет пытаться создать файл подкачки большого размера. А уже после окончания процесса первичной инициализации можно будет увеличить размер ОЗУ ВМ до нужного объёма. Ну или же при создании эталонного диска можно устанавливать небольшой фиксированный размер файла подкачки, который, возможно, потребуется после первичной инициализации новой гостевой ОС, выставлять обратно в автоматический режим либо увеличивать под свои нужды.
С другой стороны, если Вам критична стабильность и предсказуемость работы развёрнутой из шаблона гостевой ОС и Вы испытали проблемы в ходе первичной инициализации OOBE, то лучше пытаться выполнять развёртывание повторно до тех пор, пока оно не отработает штатно. То есть лучше безжалостно удалять виртуальный диск, где первичная инициализация ОС прошла с ошибками и цеплять шаблонный диск к новой ВМ повторно для получения нужного результата. В противном случае с такой «кое-как взлетевшей» системой может случиться ещё несколько историй в духе «О сколько нам открытий чудных …». Одной из таких дивных историй я поделюсь в следующей заметке.

Fix Windows Could Not Complete The Installation. To Install Windows On This Computer, Restart The Installation: If you are facing this error then it means you are using Audit Mode to install Windows which is the main cause of this error. When Windows boots for the very first time then either it can boot to Windows Welcome Mode or Audit Mode.
What is Audit Mode?
Audit Mode is a network-enabled environment where a user can add customizations to Windows images. Whenever Windows starts it shows you a Welcome screen immediately after installation, however one can skip this Welcome screen and boot directly to audit mode instead. In short Audit Mode allows you to boot directly to Desktop after Windows installation.
Windows could not complete the installation. To install Windows on
this computer, restart the installation.
Also, the main issue in this error is that you’re stuck in a Reboot loop and that’s why it’s more annoying. Now you know about Audit Mode and Welcome Mode it’s time how to fix this error, so without wasting any time let’s see how to Install Windows when in Audit Mode.
Contents
- [SOLVED] Windows Could Not Complete The Installation
- Method 1: Run Automatic Repair
- Method 2: Enable Administrator Account
- Method 3: Start Account Creation Wizard
- Method 4: Change Password Requirements
- Method 5: Registry Fix
- Method 6: Disable Audit Mode
Method 1: Run Automatic Repair
1. Insert the Windows 10 bootable installation DVD and restart your PC.
2. When prompted to Press any key to boot from CD or DVD, press any key to continue.

3. Select your language preferences, and click Next. Click Repair your computer in the bottom-left.

4. On choose an option screen, click Troubleshoot.

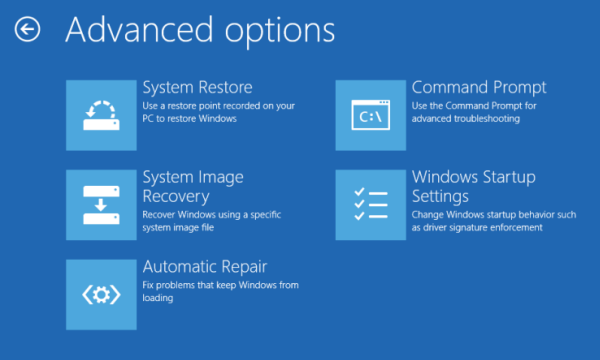
5. On Troubleshoot screen, click Advanced option.

6. On the Advanced options screen, click Automatic Repair or Startup Repair.

7. Wait till the Windows Automatic/Startup Repairs complete.
8. Restart and you have successfully Fix Windows Could Not Complete The Installation Error.
Method 2: Enable Administrator Account
1. On the error screen press Shift + F10 to open Command Prompt.
2. Type the following command and hit Enter: MMC
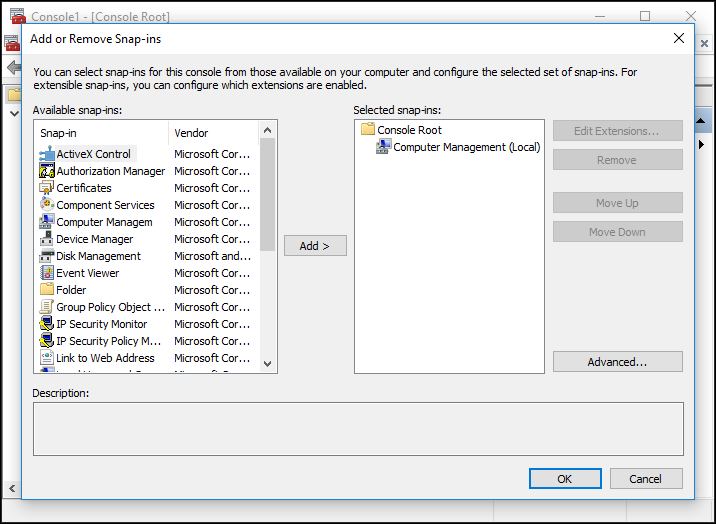
3. Next click File > Add/Remove Snap-in.

4. Select Computer Management and then double-click on it.

5. In the new window that opens select Local computer and then click Finish followed by OK.

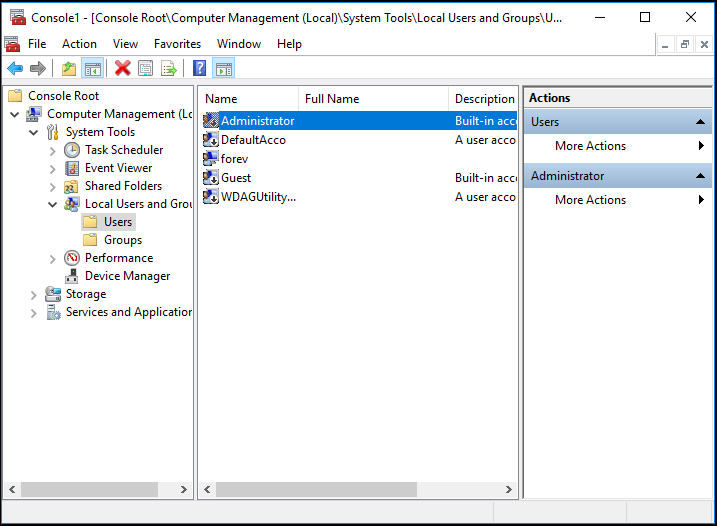
6. Then double-click Computer Management (Local) > System Tools > Local Users and Groups > Users > Administrator.
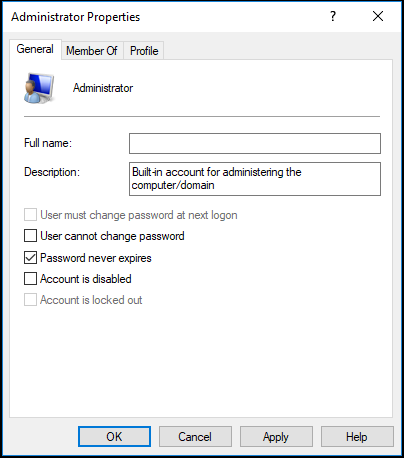
7. Make sure to Uncheck the “Account is disabled” option and click OK.

8. Next, right-click on the Administrator then select Set Password and set a strong password to get started.

9. Finally, close everything and restart your PC. After the restart, you may be able to Fix Windows Could Not Complete The Installation.
Method 3: Start Account Creation Wizard
1. Again open the Command Prompt on the error screen by pressing Shift + F10.
2. Type the following command and hit Enter: cd C:windowssystem32oobe

3. Again type “msoobe” (without quotes) and hit Enter.
4. The above will start the user account creation wizard, so create a generic account and it’s password.
Note: Keep your product key ready as sometimes it is required. If it asks for OEM/No then simply hit finish.
5. Once done hit Finish and close everything. Restart your PC you may have successfully fix Windows Could Not Complete The Installation. To Install Windows On This Computer, Restart The Installation.
Method 4: Change Password Requirements
This error tends to pop-up when in Audit Mode and the computer has just been joined to a domain. The error is caused by password requirements added to the local security policy. This typically includes a minimum password length and password complexity.
1. Open the Command prompt on the error screen.
2. Type the following the command and hit Enter: secpol.msc
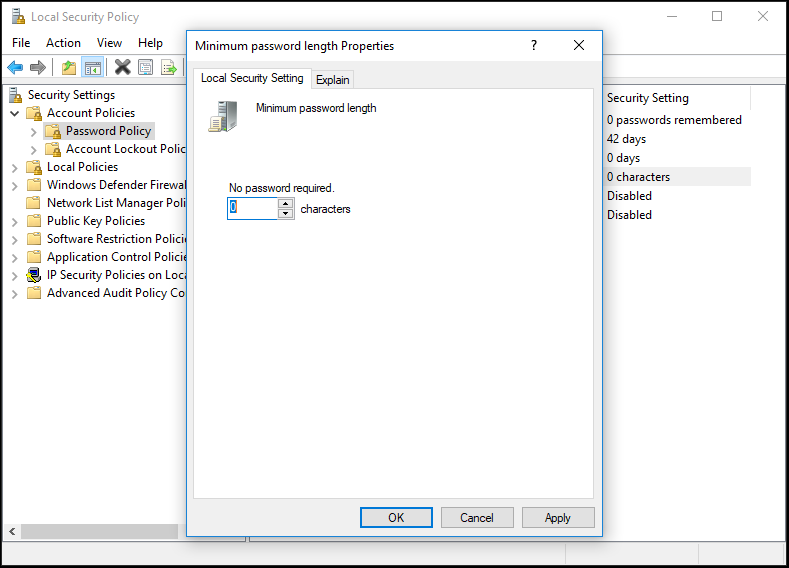
3. Navigate to Account Policies > Password Policy.

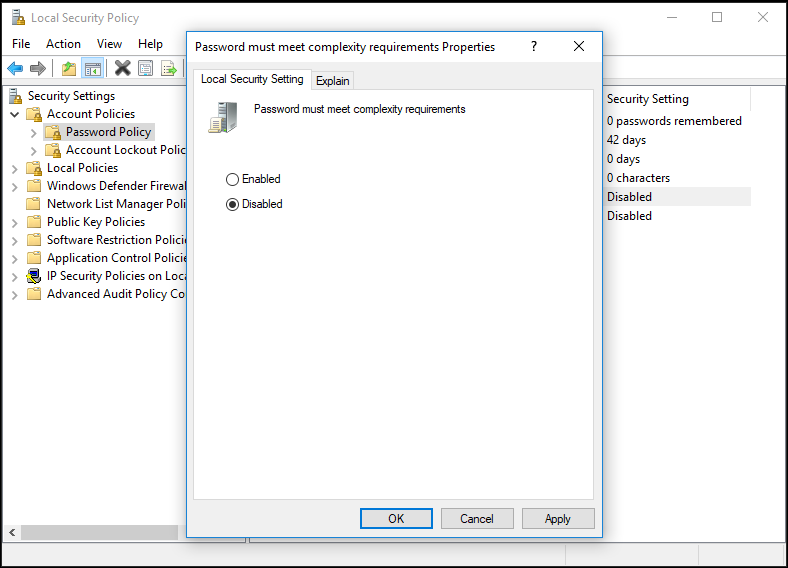
4. Now change “Minimum password length” to 0 and disable “Password must meet complexity requirements.“
5. Apply the changes and then exit the Security Policy console.
6. Click OK on the error message to reboot your PC.
Method 5: Registry Fix
1. On the same error screen press Shift + F10 to open Command Prompt.
2. Type the following command and hit Enter: regedit

3. Now in the Registry Editor navigate to the following key: ComputerHKEY_LOCAL_MACHINESYSTEMSetupStatus
4.Adjust the following values if they don’t match the following:
Note: To change the value of the below keys double click on them and then enter the new value.
HKEY_LOCAL_MACHINESYSTEMSetupStatusAuditBoot Value: 0
HKEY_LOCAL_MACHINESYSTEMSetupStatusChildCompletionsetup.exe Value: 3
HKEY_LOCAL_MACHINESYSTEMSetupStatusChildCompletionaudit.exe Value: 0
HKEY_LOCAL_MACHINESYSTEMSetupStatusSysprepStatusCleanupState Value: 2
HKEY_LOCAL_MACHINESYSTEMSetupStatusSysprepStatusGeneralizationState Value: 7
HKEY_LOCAL_MACHINESYSTEMSetupStatusUnattendPassesauditSystem Value: 0

5. After a Reboot the Audit Mode is disabled and Windows starts regularly – in the Out of Box Experience mode.
Method 6: Disable Audit Mode
Running Sysprep command each time resets Windows licensing the state to default. So if your Windows is activated and you run this command, you’ll need to reactivate Windows after executing this command.
1. Open Command Prompt on the error screen.
2. Type the following command in the cmd and hit Enter: sysprep /oobe /generalize

3. This will disable the Audit Mode.
4. Close everything and reboot your PC normally.
5. If you’re still facing this issue then again open cmd.
6. Type the following command and hit Enter: regedit
7. Navigate to the following registry key:
HKEY_LOCAL_MACHINESOFTWAREMicrosoftWindowsCurrentVersionSetupState
8. Highlight State Registry key, then right-click on ImageState in the right window pane and click on Delete.

9. Once you deleted the string, close everything and restart your PC.
Recommended for you:
- Fix The computer restarted unexpectedly or encountered an unexpected error
- Enable Dark Theme for every Application in Windows 10
- How to create empty files from the command prompt (cmd)
- Fix you don’t have permission to save in this location
That’s it you have successfully Fix Windows Could Not Complete The Installation Error but if you still have any queries regarding this guide then please feel free to ask them in the comment’s section.
If you’re encountering the error message Windows could not complete the installation on your Windows 11/10 computer, then this post is intended to help you. In this post, we will identify the possible causes, as well as provide the most appropriate solutions you can try to help you remediate this issue.
When you encounter this issue. you’ll receive the following full error message;
Windows could not complete the installation. To install Windows on this computer, restart the installation.
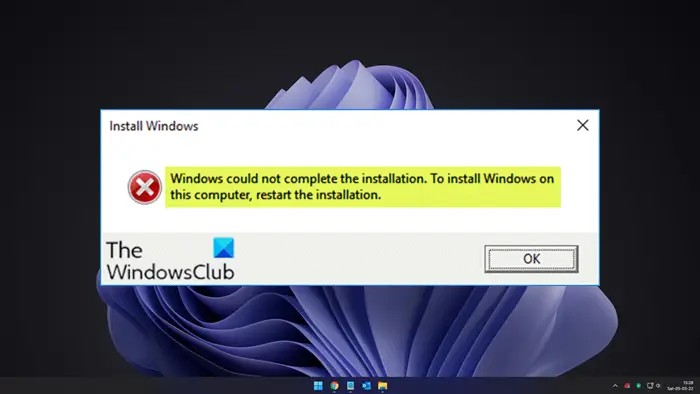
You can encounter this issue when a fresh Windows installation is interrupted before a user account is created. This error may also occur when upgrading from Windows 7/8.1/10 to Windows 10/10 or upgrading Windows 11/10 to a newer version/build. In some cases, you may encounter this issue when you try to reset Windows 11/10 as reported by some users.
However, this error essentially means you are using Audit Mode to install Windows which is the main cause of this error. When Windows boots for the very first time then either it can boot to OOBE or Audit Mode.
If you’re faced with this issue, you can try our recommended solutions below in no particular order and see if that helps to resolve the issue.
- Run Automatic Startup Repair
- Enable Administrator Account
- Start Account Creation Wizard
- Change Password Requirements
- Modify some registry key values
- Disable Audit Mode
Let’s take a look at the description of the process involved concerning each of the listed solutions.
1] Run Automatic Startup Repair
As you’re receiving the error message Windows could not complete the installation after/during updating/upgrading Windows 10, you can try running Automatic Startup Repair and see if the issue will be resolved.
2] Enable Administrator Account
Do the following:
- On the error screen press Shift + F10 to open Command Prompt.
- Type mmc and hit Enter.
- In the window that opens, click File > Add/Remove Snap-in.
- Select Computer Management and then double-click on it.
- In the new window that opens select Local computer.
- Click Finish.
- Click OK.
- Then double-click Computer Management (Local) > System Tools > Local Users and Groups > Users > Administrator.
- Make sure to uncheck the Account is disabled option.
- Click OK.
- Next, right-click on the Administrator then select Set Password and set a strong password to get started.
You can now exit MMC console and restart your computer and see if the issue is resolved or not. If the latter is the case, continue with the next solution.
3] Start Account Creation Wizard
Do the following:
- Again open the Command Prompt on the error screen by pressing Shift + F10 key combination.
- Type the directory path below and hit Enter.
cd C:windowssystem32oobe
- Next, type msoobe and hit Enter.
The above will start the user account creation wizard, so create a generic account and it’s password. Your Product Key might be required here.
- Once done hit Finish, exit everything and restart your PC.
On boot, check if the Windows could not complete the installation issue is resolved. Else, proceed with the next solution.
4] Change Password Requirements
If you’re in Audit Mode and the computer has just been joined to a domain, you’ll receive the Windows could not complete the installation error. The error is caused by password requirements added to the local security policy. This typically includes a minimum password length and password complexity.
To change password requirements, do the following:
- On the error screen press Shift + F10 to open Command Prompt.
- Type secpol.msc and hit Enter.
- Navigate to Account Policies > Password Policy.
- Now change Minimum password length to 0 and disable Password must meet complexity requirements option.
- Apply the changes and then exit the Security Policy console.
- Click OK on the error message to reboot your PC.
If the issue persists, try the next solution.
5] Modify some registry key values

Do the following:
- On the error screen press Shift + F10 key combo to open Command Prompt.
- Type regedit and hit Enter.
In the registry editor windows that opens, navigate or jump to the registry key path below and on the right pane double-click on the following registry keys one after the other and modify the Value data field accordingly:
ComputerHKEY_LOCAL_MACHINESYSTEMSetupStatus
Audit: 0
HKEY_LOCAL_MACHINESYSTEMSetupStatusChildCompletion
setup.exe: 3
HKEY_LOCAL_MACHINESYSTEMSetupStatusChildCompletion
audit.exe: 0
HKEY_LOCAL_MACHINESYSTEMSetupStatusSysprepStatus
CleanupState: 2
HKEY_LOCAL_MACHINESYSTEMSetupStatusSysprepStatus
GeneralizationState: 7
HKEY_LOCAL_MACHINESYSTEMSetupStatusUnattendPasses
auditSystem: 0
Once done, reboot your PC and the Audit Mode will be disabled and Windows 10 will start normally and boot into the Out of Box Experience mode.
6] Disable Audit Mode
Do the following:
- On the error screen press Shift + F10 key combo to open Command Prompt.
- Type the command below and hit Enter.
sysprep /oobe /generalize
This will disable the Audit Mode.
- Now exit CMD prompt and reboot your PC normally.
The Windows could not complete the installation issue should be resolved. However, If you’re still facing this issue then again open CMD prompt and do the following:
- Type regedit and hit Enter.
- Navigate to the following registry key:
HKEY_LOCAL_MACHINESOFTWAREMicrosoftWindowsCurrentVersionSetupState
- At the location, in the right pane, right-click the ImageState entry and select Delete.
- Exit CMD prompt and restart your PC.
Hope this helps!
Fix Windows Could Not Complete The Installation. To Install Windows On This Computer, Restart The Installation: If you are facing this error then it means you are using Audit Mode to install Windows which is the main cause of this error. When Windows boots for the very first time then either it can boot to Windows Welcome Mode or Audit Mode.
What is Audit Mode?
Audit Mode is a network-enabled environment where a user can add customizations to Windows images. Whenever Windows starts it shows you a Welcome screen immediately after installation, however one can skip this Welcome screen and boot directly to audit mode instead. In short Audit Mode allows you to boot directly to Desktop after Windows installation.
Windows could not complete the installation. To install Windows on
this computer, restart the installation.
Also, the main issue in this error is that you’re stuck in a Reboot loop and that’s why it’s more annoying. Now you know about Audit Mode and Welcome Mode it’s time how to fix this error, so without wasting any time let’s see how to Install Windows when in Audit Mode.
[SOLVED] Windows Could Not Complete The Installation
Method 1: Run Automatic Repair
1. Insert the Windows 10 bootable installation DVD and restart your PC.
2. When prompted to Press any key to boot from CD or DVD, press any key to continue.
3. Select your language preferences, and click Next. Click Repair your computer in the bottom-left.
4. On choose an option screen, click Troubleshoot.
5. On Troubleshoot screen, click Advanced option.
6. On the Advanced options screen, click Automatic Repair or Startup Repair.
7. Wait till the Windows Automatic/Startup Repairs complete.
8. Restart and you have successfully Fix Windows Could Not Complete The Installation Error.
Method 2: Enable Administrator Account
1. On the error screen press Shift + F10 to open Command Prompt.
2. Type the following command and hit Enter: MMC
3. Next click File > Add/Remove Snap-in.
4. Select Computer Management and then double-click on it.
5. In the new window that opens select Local computer and then click Finish followed by OK.
6. Then double-click Computer Management (Local) > System Tools > Local Users and Groups > Users > Administrator.
7. Make sure to Uncheck the “Account is disabled” option and click OK.
8. Next, right-click on the Administrator then select Set Password and set a strong password to get started.
9. Finally, close everything and restart your PC. After the restart, you may be able to Fix Windows Could Not Complete The Installation.
Method 3: Start Account Creation Wizard
1. Again open the Command Prompt on the error screen by pressing Shift + F10.
2. Type the following command and hit Enter: cd C:windowssystem32oobe
3. Again type “msoobe” (without quotes) and hit Enter.
4. The above will start the user account creation wizard, so create a generic account and it’s password.
Note: Keep your product key ready as sometimes it is required. If it asks for OEM/No then simply hit finish.
5. Once done hit Finish and close everything. Restart your PC you may have successfully fix Windows Could Not Complete The Installation. To Install Windows On This Computer, Restart The Installation.
Method 4: Change Password Requirements
This error tends to pop-up when in Audit Mode and the computer has just been joined to a domain. The error is caused by password requirements added to the local security policy. This typically includes a minimum password length and password complexity.
1. Open the Command prompt on the error screen.
2. Type the following the command and hit Enter: secpol.msc
3. Navigate to Account Policies > Password Policy.
4. Now change “Minimum password length” to 0 and disable “Password must meet complexity requirements.“
5. Apply the changes and then exit the Security Policy console.
6. Click OK on the error message to reboot your PC.
Method 5: Registry Fix
1. On the same error screen press Shift + F10 to open Command Prompt.
2. Type the following command and hit Enter: regedit
3. Now in the Registry Editor navigate to the following key: ComputerHKEY_LOCAL_MACHINESYSTEMSetupStatus
4.Adjust the following values if they don’t match the following:
Note: To change the value of the below keys double click on them and then enter the new value.
HKEY_LOCAL_MACHINESYSTEMSetupStatusAuditBoot Value: 0
HKEY_LOCAL_MACHINESYSTEMSetupStatusChildCompletionsetup.exe Value: 3
HKEY_LOCAL_MACHINESYSTEMSetupStatusChildCompletionaudit.exe Value: 0
HKEY_LOCAL_MACHINESYSTEMSetupStatusSysprepStatusCleanupState Value: 2
HKEY_LOCAL_MACHINESYSTEMSetupStatusSysprepStatusGeneralizationState Value: 7
HKEY_LOCAL_MACHINESYSTEMSetupStatusUnattendPassesauditSystem Value: 0
5. After a Reboot the Audit Mode is disabled and Windows starts regularly – in the Out of Box Experience mode.
Method 6: Disable Audit Mode
Running Sysprep command each time resets Windows licensing the state to default. So if your Windows is activated and you run this command, you’ll need to reactivate Windows after executing this command.
1. Open Command Prompt on the error screen.
2. Type the following command in the cmd and hit Enter: sysprep /oobe /generalize
3. This will disable the Audit Mode.
4. Close everything and reboot your PC normally.
5. If you’re still facing this issue then again open cmd.
6. Type the following command and hit Enter: regedit
7. Navigate to the following registry key:
HKEY_LOCAL_MACHINESOFTWAREMicrosoftWindowsCurrentVersionSetupState
8. Highlight State Registry key, then right-click on ImageState in the right window pane and click on Delete.
9. Once you deleted the string, close everything and restart your PC.
Recommended for you:
That’s it you have successfully Fix Windows Could Not Complete The Installation Error but if you still have any queries regarding this guide then please feel free to ask them in the comment’s section.

Aditya Farrad
Aditya is a self-motivated information technology professional and has been a technology writer for the last 7 years. He covers Internet services, mobile, Windows, software, and How-to guides.
24 thoughts on “Fix Windows Could Not Complete The Installation [SOLVED]”
Every single solution you provide is on the basis that you can successfully invoke the shift + F10 command. Unfortunately for me it doesn’t work, so still stuck in an irritating reboot loop.
Same! So irritating… this is happening on a new Surface Laptop and unable to do the Shift + F10 no matter how I try…
If shift + F10 does not work and you are using a laptop, make sure you also press the function button (FN) (to activate F1-F12).
So press: shift + FN + F10 and it should work.
For some reason I can click on local users and groups on step 6 of method one. What do I do?
Источник
Windows could not complete the installation
If you’re encountering the error message Windows could not complete the installation on your Windows 10 computer, then this post is intended to help you. In this post, we will identify the possible causes, as well as provide the most appropriate solutions you can try to help you remediate this issue.
When you encounter this issue. you’ll receive the following full error message;
Windows could not complete the installation. To install Windows on this computer, restart the installation.

You can encounter this issue when a fresh Windows installation is interrupted before a user account is created. This error may also occur when upgrading from Windows 7/8.1 to Windows 10 or upgrading Windows 10 to a newer version/build. In some cases, you may encounter this issue when you try to reset Windows 10 as reported by some users.
However, this error essentially means you are using Audit Mode to install Windows which is the main cause of this error. When Windows boots for the very first time then either it can boot to OOBE or Audit Mode.
Windows could not complete the installation
Let’s take a look at the description of the process involved concerning each of the listed solutions.
1] Run Automatic Startup Repair
As you’re receiving the error message Windows could not complete the installation after/during updating/upgrading Windows 10, you can try running Automatic Startup Repair and see if the issue will be resolved.
2] Enable Administrator Account
You can now exit MMC console and restart your computer and see if the issue is resolved or not. If the latter is the case, continue with the next solution.
3] Start Account Creation Wizard
On boot, check if the Windows could not complete the installation issue is resolved. Else, proceed with the next solution.
4] Change Password Requirements
If you’re in Audit Mode and the computer has just been joined to a domain, you’ll receive the Windows could not complete the installation error. The error is caused by password requirements added to the local security policy. This typically includes a minimum password length and password complexity.
If the issue persists, try the next solution.
5] Modify some registry key values
In the registry editor windows that opens, navigate or jump to the registry key path below and on the right pane double-click on the following registry keys one after the other and modify the Value data field accordingly:
Audit: 0
setup.exe: 3
audit.exe: 0
CleanupState: 2
GeneralizationState: 7
auditSystem: 0
Once done, reboot your PC and the Audit Mode will be disabled and Windows 10 will start normally and boot into the Out of Box Experience mode.
6] Disable Audit Mode
Date: August 27, 2020 Tags: Installation
Related Posts
cFosSpeed Driver preventing Windows 11 installation
Fix Office Error Code 30010-4 during Installation or Upgrade
Errors 0-1011, 3088-1015, 30183-1011 or 0-1005 when installing Office
[email protected]
Obinna Onwusobalu, has studied Information & Communication Technology and is a keen follower of the Windows ecosystem. He runs a computer software clinic. He says it’s best practice to create a System Restore Point before making any changes to your PC.
Источник
[SOLVED] Windows 10 Could Not Complete the Installation + Guide [MiniTool Tips]
By Tina | Follow | Last Updated October 20, 2021
Summary :

Have you ever gotten stuck with the Windows installation error Windows could not complete the installation when updating your operating system? This post will give you 5 ways to solve the error when Windows 10 installation has failed. Just try them one by one to get rid of the issue to use PC properly, especially try MiniTool software.
Quick Navigation :
Phenomenon
Nowadays, more and more computer users say that they have been troubled by the following Windows 10 installation error “Windows could not complete the installation. To install Windows on this computer, restart the installation.” This error shows up when they want to boot their computer after updating the operating system.

However, they don’t know how to fix the issue when Windows could not complete the installation after updating to Windows 10, so they ask for help on the Internet.
If you have the same problem, you have come into the right place now because this article will give you five solutions to fix the issue when Windows creates this database of configuration settings during installation.
In particular, the fifth method is the most effective and reliable one.
Now, we will introduce the methods one by one to fix the Windows installation failure after update.
Quick Video Guide:
Case 1: Windows Could Not Complete the Installation
Fix#1. Using Automatic Repair
If you have received an error message that says Windows 10 could not complete the installation after updating your operating system, you can try using Automatic Repair to solve Windows 10 installation error.
Step 1: Start your PC. Just as Windows attempts to load, press the Power button to turn it off immediately. Do this operation two or three times.
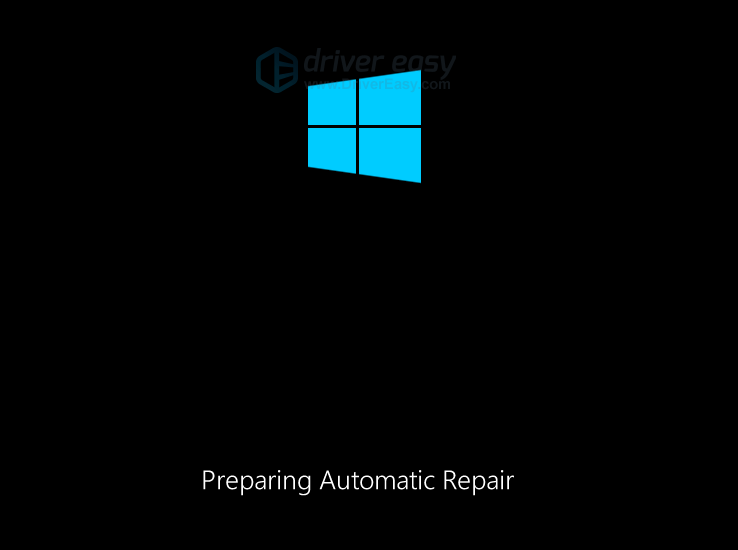
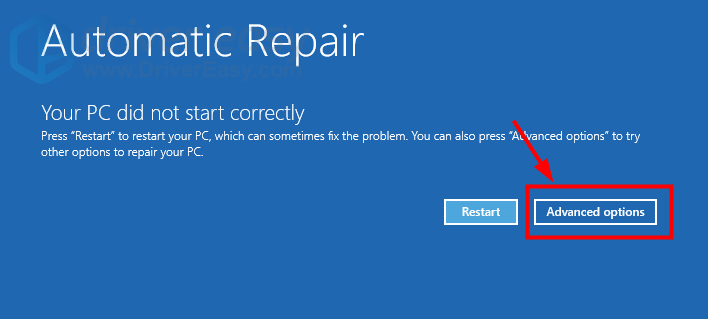
Step 2: On the third time, you can see a message that says “Preparing Automatic Repair”, then you can click “Advanced options” to repair your PC.
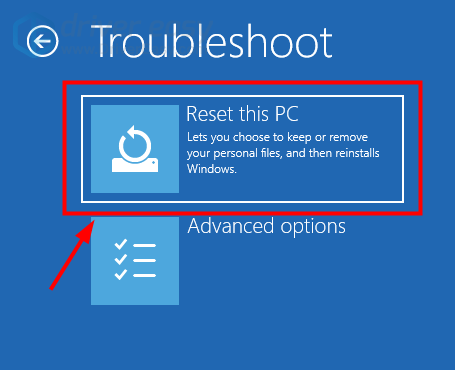
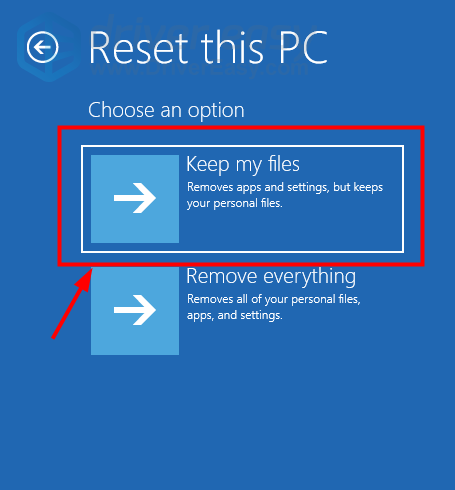
Step 3: You need to click “Troubleshoot”> “Reset this PC”> “Keep my files”.
Step 4: You need to choose one account and input your password to continue.
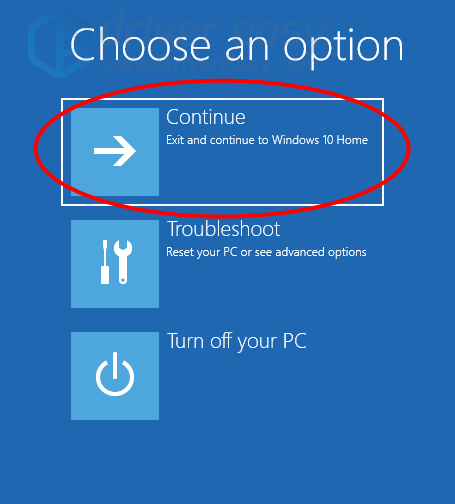
Step 5: Next, you need to click «Cancel» button. Then click «Continue» button to exit and continue to Windows 10 Home.
After that, you can try to restart your computer and check whether the issue Windows cannot complete the installation has been fixed.
Fix#2. Enable Administrator Account
The second method of solving error “Windows could not complete the installation Windows 10 Shift 10 not working” is to enable administrator account. You can try using it to fix Windows 10 installation problem.
Step 1: On the error screen, you can press “Shift” key and “F10” key together to launch Command Prompt.
Step 2: Then, type the MMC command and hit “Enter” to continue.
Step 3: In the main interface, you need to click “File” and choose “Add/Remove Snap-in” to continue.

Step 4: In the following popup window, choose “Computer Management” and double-click it.
Step 5: In the next window, you need to check the “Local computer: (the computer this console is running on)” and click “Finish” to continue.

Step 6: Then click “OK” to continue to the next step.

Step 7: After returning to the main interface, you need to click “Computer Management (Local)”> “System Tools”> “Local Users and Groups”> “Users”> “Administrator” to continue.

Step 8: Then you can open the following interface by double-click “Administrator”. After that, you need to make sure that the option “Account is disabled” is unchecked. Then click “OK” to continue.

Step 9: Next, right-click “Administrator” and choose “Set Password”. You need to set a strong password to get started.

Step 10: All steps have been finished. Now, you can restart your computer and check whether the error Windows could not complete the installation Shift 10 not working is solved.
Fix#3. Change Password Requirement
If above solutions are not effectively to solving the error “Windows could not complete the installation”, you can try changing password to solve Windows 10 installation error.
Step 1: You still need to open the Command Prompt by pressing “Shift’ and “F10” keys together on the error screen.
Step 2: Then you can input the secpol.msc command and hit «Enter» to continue.
Step 3: After that, you will see a popup window. Thus, you need to unfold “Account Policy” and choose “Password Policy”.
Step 4: You can see “Minimum password length” on the right side. You need to right-click on it, choose «Properties», and change the “Security Setting” to 0 characters. Then apply it and click “OK” to continue.

Step 5: Make sure that the “Password must meet complexity requirements” is disabled by right-clicking it, choosing “Properties” and apply it. Then click “OK” to continue.

Step 6: Then reboot your computer to check whether the Windows 10 installation failure is solved.
Fix#4. Run Account Creation Wizard
Now, we will introduce the fourth method to solve “Windows could not complete the installation Windows 10”. Of course, if the above methods are not working, you can try to use this one.
Step 1: You need to press “Shift” key and “F10” key together on the error screen to launch the Command Prompt.
Step 2: Then type the following command and hit “Enter” to continue.
CD C:windowssystem32oobe
Step 3: Then input msoobe command and hit “Enter” to continue.
Step 4: Then you will see a popup window. You need to make a generic account and password. On this popup window, then click ‘Finish” button to finish the process.
Step 5: Now, you can reboot your computer and check whether the error “Windows could not complete the installation. To install Windows on this computer, restart the installation.” is solved.
Fix#5. Restore to Different Computer
If none of above methods work, you can use the fifth solution which is to restore to different computer. As a matter of fact, this solution is effective and thousands of users have successfully solved the problem by using it.
Now, we will introduce how to restore to different computer step by step with pictures.
To restore to different computer, you need the help of a piece of third-party software. Fortunately, MiniTool Software Limited can provide you with such a kind of software, which is MiniTool ShadowMaker.
The Windows 10 backup software – MiniTool ShadowMaker has been the first choice of thousands of computer users, because it is a type of professional backup software that provides various backup services with its multiple functions, such as files backup, system backup, disk backup and so on.
Besides backup feature, it even can help you to clone hard drive and clone OS from HDD to SSD.
Before introducing how to restore to different computer, you can download MiniTool ShadowMaker Trial which can be used for 30 days without any fees from the following button or purchase an advanced one.
After you have successfully installed the free backup software, you can try restoring to different computer based on following instructions.
The precondition of restoring to different computer is that you have created a system image on a normal computer in advance by using MiniTool ShadowMaker.
Therefore, in order to solve Windows 10 installation problem, you need to install and run MiniTool ShadowMaker Trial on a normal computer and create a system image on it since your computer can’t boot due to the error “Windows could not complete the installation Windows 10”.
Thus, the following article is useful for you to create a system image.
In addition, a bootable media is necessary since your computer can’t boot normally. As a matter of fact, you can use MiniTool ShadowMaker Trial to create it.
Therefore, you need to know how to create the bootable media and how to boot your computer from it. You can take the following two articles as a reference.
Then we will show you how to solve the error of Windows 10 installation has failed through restoring to different computer step by step.
Step 1: Connect the hard drive to your computer and enter MiniTool Recovery Environment. Go to the Restore interface and click “Add Backup” to add system image to the backup list. Then choose it and click “Restore” to continue.

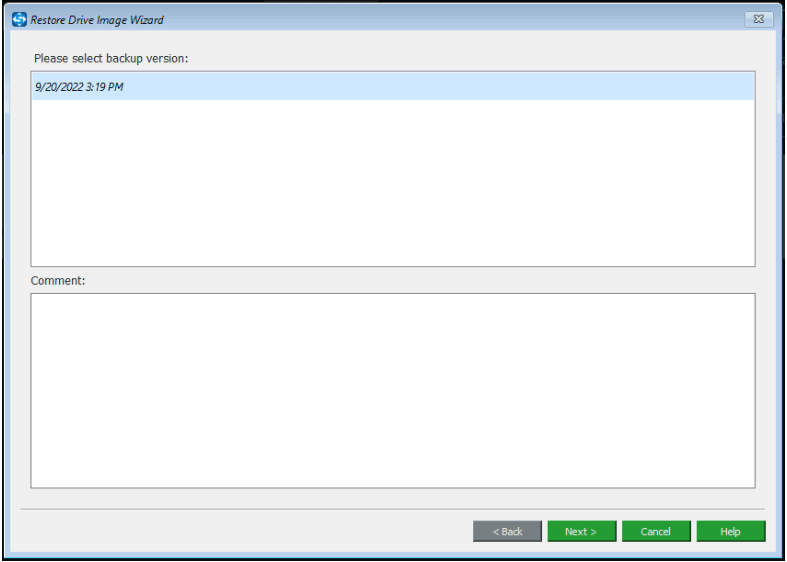
Step 2: In the popup window, you need to choose the backup version and click “Next” to continue.


Step 4: You need to choose a target disk and click “Next” to continue.


How to keep data safe? How to back up files on windows 10? This post will introduce 4 ways to back up files with ease.
Step 5: The free backup software will begin the restoration process, so you need to wait patiently.
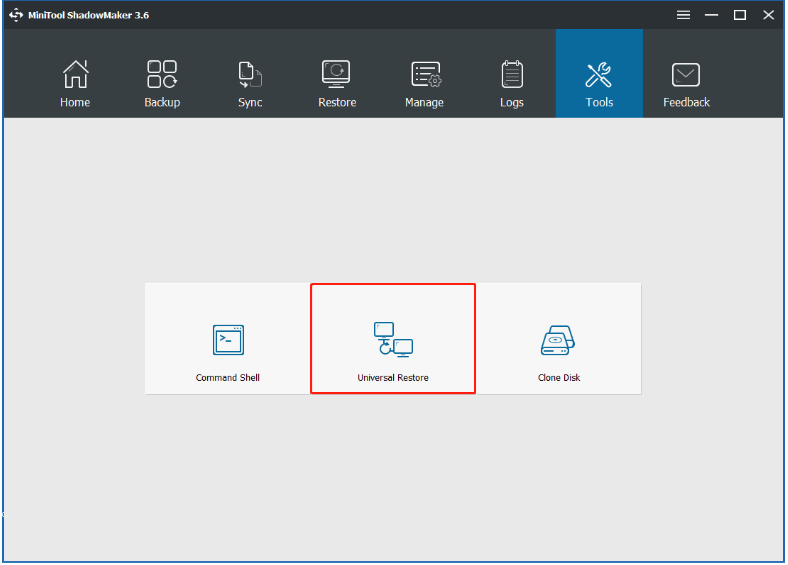
Step 6: After the restoration process is finished, you may find your computer still can’t boot normally. The reason is that the operating system is incompatible with your computer. Thus you need to boot your computer from the bootable media and go to “Tools” to choose “Universal Restore” to fix this problem.

Step 7: Then this free backup software can automatically list the operating system on the left pane and you need to click “RESTORE” button to continue.

Step 8: After a while, the restore process should be completed. Then you can exit MiniTool Recovery Environment and set your computer to boot from hard drive. Then you can check whether your computer can boot successfully.
Case 2: Windows 10 Installation Has Failed
When installing the operating system, you may come across the error Windows 10 installation has failed. This error may occur in the middle of the installation.
So, in the following section, we will show you how to fix the error that Windows 10 installation has failed.
Fix 1. Check Whether Your Computer Meets the Minimum Requirements
In order to install Windows 10 on your computer, you need to check whether your computer meets the minimum requirement. So, you need to check the following parameters.
If your computer cannot meet the above requirements, you may come across the error that Windows 10 installation has failed.
Fix 2. Clear Certain Attributes of the Installation Folder
Now, here is the tutorial.
When it is finished, check whether the error that Windows 10 installation has failed is fixed.
Fix 3. Rebuild BCD
In order to fix the error that Windows 10 installation has failed, you may try rebuilding BCD. To rebuild BCD, you can read the post: Step-by-Step Guide to Repair and Fix MBR Windows 7/8/8.1/10 to learn some more detailed solutions.
Fix 4. Run the Installation in Clean Boot
If you come across the error Windows 10 installation has failed, you can choose to install Windows 10 in Clean Boot.
Now, here is the tutorial.
After that, check whether the error that Windows 10 installation has failed is solved.
Bottom Line
In conclusion, we have introduced five ways to solve Window 10 installation issue “Windows could not complete the installation. To install Windows on this computer, restart the installation.” There is no doubt that each method has its advantage. We think the fifth way to solve Windows installation issue is more effective and more reliable.
ABOUT THE AUTHOR

Position: Columnist
Tina is a technology enthusiast and joined MiniTool in 2018. As an editor of MiniTool, she is keeping on sharing computer tips and providing reliable solutions, especially specializing in Windows and files backup and restore. Besides, she is expanding her knowledge and skills in data recovery, disk space optimizations, etc.
On her spare time, Tina likes to watch movies, go shopping or chat with friends and enjoy her life.
Источник
Если вы устанавливаете операционную систему Windows и получаете сообщение об ошибке « Windows не может завершить установку ‘, ты не одинок. Об этом сообщают многие пользователи.
Это неприятная проблема — и довольно страшная. Ваш компьютер совершенно непригоден для использования, если вы не можете установить операционную систему. Возможно, вы с тревогой думаете, что делать, чтобы избавиться от этой ошибки.
Но не волнуйтесь. Исправить эту ошибку возможно. Вот четыре исправления, которые вы можете попробовать:
- Продолжить установку с использованием расширенного восстановления
- Запустите мастер создания учетной записи Windows
- Переустановите вашу систему, не активируя ее
- Найдите другой источник установочного носителя
Способ 1. Продолжить установку с помощью автоматического восстановления
Когда процесс установки Windows останавливается из-за ошибки «не удалось завершить», одним из эффективных способов является продолжение процесса с помощью Advanced Recovery.
Этот метод взят из комментария ниже, оставленного I1t9t8o8. Это проверено многими пользователями как действительно полезно для устранения проблемы.
1) Включите компьютер, а затем, когда ваша Windows начнет загружаться, немедленно выключите его. Повторите это два-три раза, пока не увидите сообщение « Подготовка к автоматическому ремонту ‘.
2) Нажмите Расширенные настройки .
3) Выбрать Устранение неполадок .
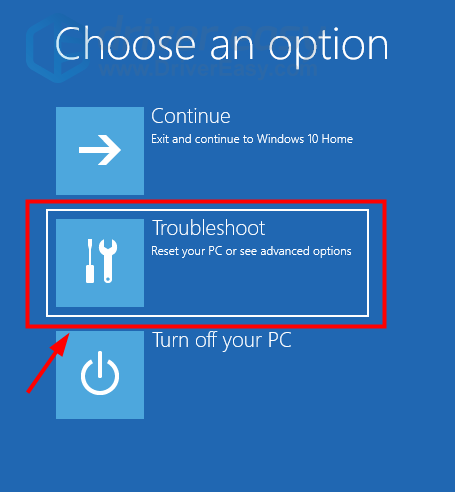
4) Выбрать Сбросить этот компьютер .
5) Выбрать Храните мои файлы .
6) Нажмите отменить . (Нет, перезагружать компьютер не нужно. Просто нажмите отменить .)
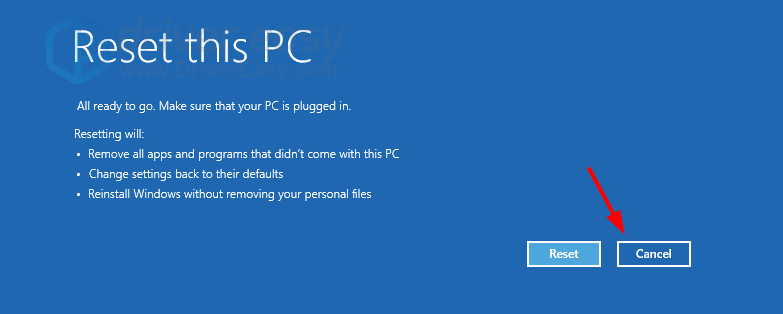
7) Выбрать Продолжить .
 Если этот метод работает для вас, он продолжит процесс установки, и вы больше не получите сообщение об ошибке.
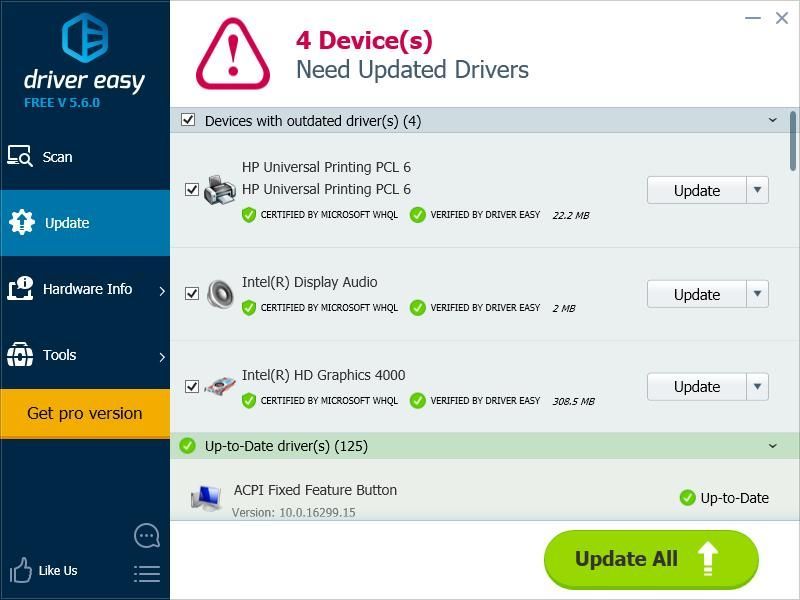
Если вы исправили ошибку, не забудьте создать точку восстановления системы и обновите все драйверы вашего устройства чтобы предотвратить больше проблем. Обновить драйверы устройства можно вручную, но это может быть очень хлопотным и трудоемким процессом. Чтобы сэкономить ваше время и силы, рекомендуем использовать Водитель Easy .
Driver Easy автоматически распознает вашу систему и найдет для нее подходящие драйверы. Вам не нужно точно знать, в какой системе работает ваш компьютер, вам не нужно беспокоиться о неправильном драйвере, который вы будете загружать, и вам не нужно беспокоиться об ошибке при установке.
Вы можете загрузить и установить драйверы, используя бесплатную или профессиональную версию Driver Easy. Но с версией Pro это занимает всего 2 клика (и вы получаете полную поддержку и 30-дневную гарантию возврата денег):
1) Скачать и установите Driver Easy.
2) Запустите Driver Easy и щелкните Сканировать сейчас кнопка. Driver Easy просканирует ваш компьютер и обнаружит проблемы с драйверами.

3) Щелкните значок Обновить рядом с каждым из ваших устройств, чтобы загрузить последнюю версию драйвера для этого устройства. Вы также можете нажать кнопку «Обновить все» в правом нижнем углу, чтобы автоматически обновить все устаревшие или отсутствующие драйверы на вашем компьютере (для этого требуется Pro версия — вам будет предложено обновить, когда вы нажмете Обновить все ).
4) Перезагрузите компьютер, тогда на вашем компьютере уже установлены последние версии драйверов.
Эта ошибка также может возникать из-за того, что учетная запись Windows не создается нормально. Вы можете запустить мастер создания учетной записи, чтобы увидеть, решит ли это проблему. Для этого:
1) На экране с ошибкой нажмите кнопку Клавиша Shift и F10 в то же время на клавиатуре, чтобы вызвать командную строку.
2) Тип ‘ cd% windir% / system32 / oobe / »И нажмите Войти на клавиатуре.
3) Тип ‘ msoobe »И нажмите Войти на клавиатуре.
4) Настройте учетную запись и пароль в появившемся мастере создания учетной записи пользователя.
5) Перезагрузите компьютер и посмотрите, устранит ли это ошибку.
Метод 3: переустановите систему, не активируя ее
Иногда ошибка возникает, когда вы пытаетесь установить определенную версию Windows (например, Windows 10 Education). В этом случае вы можете попробовать переустановить вашу систему. Но на этот раз вам следует выбрать установку Домашней версии и не активировать ее во время установки. После завершения установки используйте ключ продукта для активации вашей системы. В настоящее время он должен работать нормально.
Метод 4. Найдите другой источник установочного носителя
Ошибка может быть вызвана используемым установщиком системы — возможно, он поврежден или неверен. Вы должны убедиться, что ваш установочный носитель взят из допустимого источника. Если это не так, попробуйте получить другой надежный установочный носитель от Microsoft и запустить его на своем компьютере. Затем проверьте, исчезла ли ошибка.
Have you ever gotten stuck with the Windows installation error Windows could not complete the installation when updating your operating system? This post will give you 5 ways to solve the error when Windows 10 installation has failed. Just try them one by one to get rid of the issue to use PC properly, especially try MiniTool software.
Phenomenon
Nowadays, more and more computer users say that they have been troubled by the following Windows 10 installation error “Windows could not complete the installation. To install Windows on this computer, restart the installation.” This error shows up when they want to boot their computer after updating the operating system.
However, they don’t know how to fix the issue when Windows could not complete the installation after updating to Windows 10, so they ask for help on the Internet.
If you have the same problem, you have come into the right place now because this article will give you five solutions to fix the issue when Windows creates this database of configuration settings during installation.
In particular, the fifth method is the most effective and reliable one.
Now, we will introduce the methods one by one to fix the Windows installation failure after update.
Tip: It is recommended to create a restore point or create a system image when your computer works normally. You can take advantage of the restore point or system image to roll back to previous Windows state if some accidents occur on your computers.
Quick Video Guide:
Case 1: Windows Could Not Complete the Installation
Fix#1. Using Automatic Repair
If you have received an error message that says Windows 10 could not complete the installation after updating your operating system, you can try using Automatic Repair to solve Windows 10 installation error.
Step 1: Start your PC. Just as Windows attempts to load, press the Power button to turn it off immediately. Do this operation two or three times.
Step 2: On the third time, you can see a message that says “Preparing Automatic Repair”, then you can click “Advanced options” to repair your PC.
Step 3: You need to click “Troubleshoot”> “Reset this PC”> “Keep my files”.
Step 4: You need to choose one account and input your password to continue.
Step 5: Next, you need to click «Cancel» button. Then click «Continue» button to exit and continue to Windows 10 Home.
After that, you can try to restart your computer and check whether the issue Windows cannot complete the installation has been fixed.
Fix#2. Enable Administrator Account
The second method of solving error “Windows could not complete the installation Windows 10 Shift 10 not working” is to enable administrator account. You can try using it to fix Windows 10 installation problem.
Step 1: On the error screen, you can press “Shift” key and “F10” key together to launch Command Prompt.
Step 2: Then, type the MMC command and hit “Enter” to continue.
Step 3: In the main interface, you need to click “File” and choose “Add/Remove Snap-in” to continue.

Step 4: In the following popup window, choose “Computer Management” and double-click it.
Step 5: In the next window, you need to check the “Local computer: (the computer this console is running on)” and click “Finish” to continue.

Step 6: Then click “OK” to continue to the next step.
Step 7: After returning to the main interface, you need to click “Computer Management (Local)”> “System Tools”> “Local Users and Groups”> “Users”> “Administrator” to continue.
Step 8: Then you can open the following interface by double-click “Administrator”. After that, you need to make sure that the option “Account is disabled” is unchecked. Then click “OK” to continue.
Step 9: Next, right-click “Administrator” and choose “Set Password”. You need to set a strong password to get started.

Step 10: All steps have been finished. Now, you can restart your computer and check whether the error Windows could not complete the installation Shift 10 not working is solved.
“This method has helped me to solve Windows 10 installation failed issue. And this article is very useful.”Click to Tweet
Fix#3. Change Password Requirement
If above solutions are not effectively to solving the error “Windows could not complete the installation”, you can try changing password to solve Windows 10 installation error.
Step 1: You still need to open the Command Prompt by pressing “Shift’ and “F10” keys together on the error screen.
Step 2: Then you can input the secpol.msc command and hit «Enter» to continue.
Step 3: After that, you will see a popup window. Thus, you need to unfold “Account Policy” and choose “Password Policy”.
Step 4: You can see “Minimum password length” on the right side. You need to right-click on it, choose «Properties», and change the “Security Setting” to 0 characters. Then apply it and click “OK” to continue.
Step 5: Make sure that the “Password must meet complexity requirements” is disabled by right-clicking it, choosing “Properties” and apply it. Then click “OK” to continue.
Step 6: Then reboot your computer to check whether the Windows 10 installation failure is solved.
Fix#4. Run Account Creation Wizard
Now, we will introduce the fourth method to solve “Windows could not complete the installation Windows 10”. Of course, if the above methods are not working, you can try to use this one.
Step 1: You need to press “Shift” key and “F10” key together on the error screen to launch the Command Prompt.
Step 2: Then type the following command and hit “Enter” to continue.
CD C:windowssystem32oobe
Step 3: Then input msoobe command and hit “Enter” to continue.
Step 4: Then you will see a popup window. You need to make a generic account and password. On this popup window, then click ‘Finish” button to finish the process.
Tip: If it requires a product key and you have one, you can enter it now. If OEM or no key required, just hit “Finish”.
Step 5: Now, you can reboot your computer and check whether the error “Windows could not complete the installation. To install Windows on this computer, restart the installation.” is solved.
Fix#5. Restore to Different Computer
If none of above methods work, you can use the fifth solution which is to restore to different computer. As a matter of fact, this solution is effective and thousands of users have successfully solved the problem by using it.
Now, we will introduce how to restore to different computer step by step with pictures.
To restore to different computer, you need the help of a piece of third-party software. Fortunately, MiniTool Software Limited can provide you with such a kind of software, which is MiniTool ShadowMaker.
The Windows 10 backup software – MiniTool ShadowMaker has been the first choice of thousands of computer users, because it is a type of professional backup software that provides various backup services with its multiple functions, such as files backup, system backup, disk backup and so on.
Besides backup feature, it even can help you to clone hard drive and clone OS from HDD to SSD.
Before introducing how to restore to different computer, you can download MiniTool ShadowMaker Trial which can be used for 30 days without any fees from the following button or purchase an advanced one.
Free Download
After you have successfully installed the free backup software, you can try restoring to different computer based on following instructions.
The precondition of restoring to different computer is that you have created a system image on a normal computer in advance by using MiniTool ShadowMaker.
Therefore, in order to solve Windows 10 installation problem, you need to install and run MiniTool ShadowMaker Trial on a normal computer and create a system image on it since your computer can’t boot due to the error “Windows could not complete the installation Windows 10”.
Thus, the following article is useful for you to create a system image.
How to Back up Windows to Safeguard Your Computer? Try MiniTool!
Tip: It is recommended to create the system image on an external hard drive.
In addition, a bootable media is necessary since your computer can’t boot normally. As a matter of fact, you can use MiniTool ShadowMaker Trial to create it.
Therefore, you need to know how to create the bootable media and how to boot your computer from it. You can take the following two articles as a reference.
- How to Build Boot CD/DVD Discs and Boot Flash drive with Bootable Media Builder?
- How to Boot From MiniTool Bootable CD/DVD Discs or Flash Drive?
Then we will show you how to solve the error of Windows 10 installation has failed through restoring to different computer step by step.
Step 1: Connect the hard drive to your computer and enter MiniTool Recovery Environment. Go to the Restore interface and click “Add Backup” to add system image to the backup list. Then choose it and click “Restore” to continue.

Step 2: In the popup window, you need to choose the backup version and click “Next” to continue.
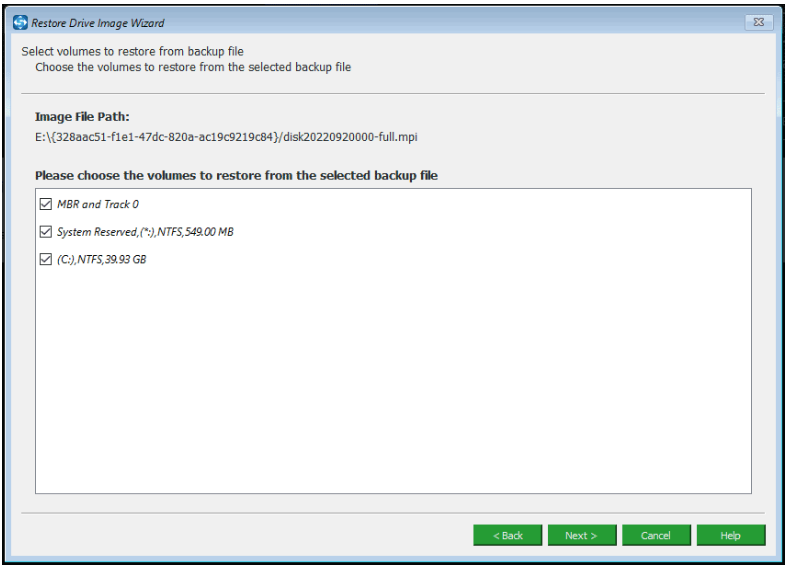
Step 3: Next, you need to choose volumes to restore from the selected backup files. Please ensure that the mbr and Track 0 should be ticked for a successful boot. Then click “Next” to continue.
Step 4: You need to choose a target disk and click “Next” to continue.
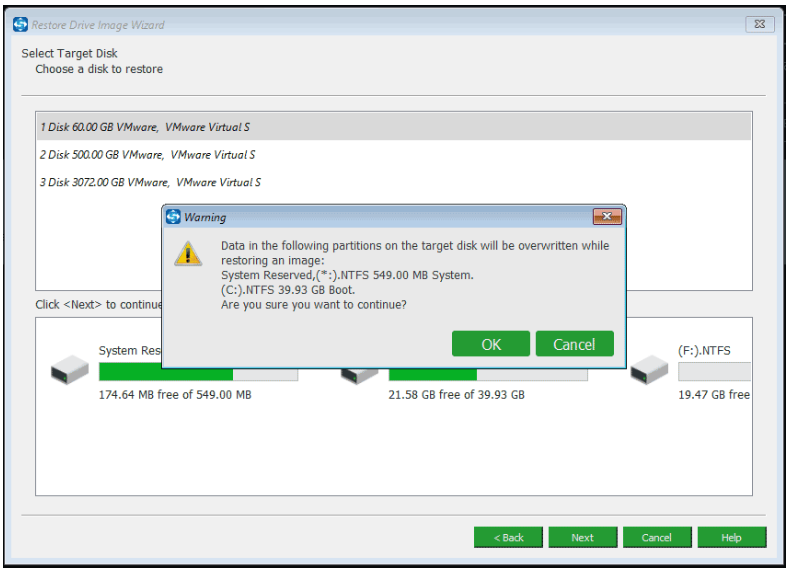
Tip: Please pay attention to that MiniTool ShadowMaker will remind you which partitions on the target disk will be overwritten during system image restoration. So please ensure that there is no important data on this drive.
Step 5: The free backup software will begin the restoration process, so you need to wait patiently.
Step 6: After the restoration process is finished, you may find your computer still can’t boot normally. The reason is that the operating system is incompatible with your computer. Thus you need to boot your computer from the bootable media and go to “Tools” to choose “Universal Restore” to fix this problem.
Step 7: Then this free backup software can automatically list the operating system on the left pane and you need to click “RESTORE” button to continue.

Tip: Besides clicking “RESTORE”, you can also click “Add Driver Folders” to add some driver folders when there is a need.
Step 8: After a while, the restore process should be completed. Then you can exit MiniTool Recovery Environment and set your computer to boot from hard drive. Then you can check whether your computer can boot successfully.
“I tried to use MiniTool ShadowMaker to create a system image and restore it to my computer to fix Window could not complete the installation issue. And the result is successful.”Click to Tweet
Case 2: Windows 10 Installation Has Failed
When installing the operating system, you may come across the error Windows 10 installation has failed. This error may occur in the middle of the installation.
So, in the following section, we will show you how to fix the error that Windows 10 installation has failed.
Fix 1. Check Whether Your Computer Meets the Minimum Requirements
In order to install Windows 10 on your computer, you need to check whether your computer meets the minimum requirement. So, you need to check the following parameters.
- RAM:1GB for 32 bit and 2GB for 64 bit
- Hard disk space:16 GB for 32 bit and 20 GB for 64 bit
- CPU:1GHz or faster
- Screen resolution:800 x 600
- Graphics:Microsoft DirectX 9 or later with WDDM 1.0 driver
- Internet access
If your computer cannot meet the above requirements, you may come across the error that Windows 10 installation has failed.
Fix 2. Clear Certain Attributes of the Installation Folder
Now, here is the tutorial.
- Boot your computer from Windows 10 installation media as usual and navigate to the last screen.
- Minimize the installer and open File Explorer by opening a folder and navigate to C drive.
- Then select the $WINDOWS.~BT folder.
- Right-click on the problematic folder and click the Properties option from the context menu. Stay in General tab and locate the Attribute section at the bottom. Uncheck the option Read-Only and System and click Apply to save the changes.
When it is finished, check whether the error that Windows 10 installation has failed is fixed.
Fix 3. Rebuild BCD
In order to fix the error that Windows 10 installation has failed, you may try rebuilding BCD. To rebuild BCD, you can read the post: Step-by-Step Guide to Repair and Fix MBR Windows 7/8/8.1/10 to learn some more detailed solutions.
Fix 4. Run the Installation in Clean Boot
If you come across the error Windows 10 installation has failed, you can choose to install Windows 10 in Clean Boot.
Now, here is the tutorial.
- Open Run dialog.
- Type msconfig in the box and click OK to continue.
- In the popup window, go to the General Then check Selective startup and uncheck the option Load startup items.
- Go to the Services tab, check Hide all Microsoft services and click Disable all.
- Go to the Startup tab, click Open Task Manager and disable all unnecessary items.
After that, check whether the error that Windows 10 installation has failed is solved.
Bottom Line
In conclusion, we have introduced five ways to solve Window 10 installation issue “Windows could not complete the installation. To install Windows on this computer, restart the installation.” There is no doubt that each method has its advantage. We think the fifth way to solve Windows installation issue is more effective and more reliable.
Now, it is your turn to have a try. Of course, if you have any better solution to Windows 10 installation failed issue, you can share it on the comment zone. Or if you have any problem with MiniTool ShadowMaker, you can contact us via the email [email protected].
In this post, I’ll describe two simple methods using which will resolve a reboot loop issue in Windows 7.
This problem usually occurs when a fresh Windows installation is interrupted before a user account is created.
The following error message is displayed
Windows could not complete the installation. To install Windows on this computer, restart the installation.
On clicking okay the system reboots and again the same error message “Windows could not complete the installation” is reported. This loop continues in the same fashion.
Method 1
- Press SHIFT + F10 to bring up the command prompt.
- Then type CD C:windowssystem32oobe
- Hit Enter
- Then type msoobe
- Hit Enter
- This will open up the windows account creation wizard
- Using the wizard create a generic user account and then reboot the system
After following these steps you will not see the error message Windows could not complete the installation. However if you still continue to see that error message head on to methods 2.
Method 2
- Again press Shift + F10 to display the command prompt
- Then type MMC
- Now Click on File -> Add/Remove Snap-in…
- Select Computer Management
- Click Add
- Select Local Computer and Click Finish and then Ok.
- Click on Computer Management -> System Tools -> Local Users and Groups -> Users
- Double Click on Administrator
- Then UnCheck Account is disabled and Click OK
- Now right click Administrator and click on Set Password…
- Set a decent password to get started.
Hope this post resolved your problem if you liked it please do share this post with your friends. That’s all for today see you next time.
Have some questions join the discussion.
Questions @ HowISolve Community

Neil Mahaseth
Hello, friends welcome to HowISolve.com, a community founded by me in June 2015. With the aim to help you solve your everyday tech problems. The motivation for starting this community was instilled from my love for technology and my nature to help others in need.
By qualification, I am a technocrat with an M.B.A. and B.Tech. from Narsee Monjee, Mumbai. I have experienced both worlds: corporate and startup. I am currently honing my entrepreneurial skills and trying to add value to people’s lives.
You can also join us by subscribing to our Newsletters & YouTube channel to be a part of this growing community.
Содержание
- Ошибка «Windows could not complete the installation. To install Windows on this computer restart the installation» при запуске клонированной виртуальной машины Hyper-V с Windows Server 2012 R2
- [FIX] Windows Could Not Complete The Installation. To Install Windows On This Computer, Restart The Installation
- Windows could not complete the installation. To install Windows on this computer, restart the installation.
- FIX : Windows Could Not Complete The Installation. To Install Windows On This Computer, Restart The Installation Error For Windows 10/8.1/8/7
- About Kapil Arya
- [SOLVED] Windows 10 Could Not Complete the Installation + Guide [MiniTool Tips]
- Summary :
- Quick Navigation :
- Phenomenon
- Case 1: Windows Could Not Complete the Installation
- Fix#1. Using Automatic Repair
- Fix#2. Enable Administrator Account
- Fix#3. Change Password Requirement
- Fix#4. Run Account Creation Wizard
- Fix#5. Restore to Different Computer
- Case 2: Windows 10 Installation Has Failed
- Fix 1. Check Whether Your Computer Meets the Minimum Requirements
- Fix 2. Clear Certain Attributes of the Installation Folder
- Fix 3. Rebuild BCD
- Fix 4. Run the Installation in Clean Boot
- Bottom Line
- ABOUT THE AUTHOR
Ошибка «Windows could not complete the installation. To install Windows on this computer restart the installation» при запуске клонированной виртуальной машины Hyper-V с Windows Server 2012 R2
 Это первая часть очередной истории о том, как можно наступить на грабли, там, где обычно этого не ожидаешь. Началось всё с того, что для очередного развёртывания нескольких однотипных виртуальных машин Hyper-V с гостевой ОС Windows Server 2012 R2 был подготовлен эталонный образ виртуального диска с установленной ОС. В эталонный образ были включены все актуальные обновления, после чего для уменьшения размера диска был применён метод очистки хранилища компонент Windows в каталоге WinSxS, а логический том системного диска по своему объему был усечён таким образом, что на нём оставалось около 5GB свободного пространства. Перед отключением ВМ в эталонной гостевой ОС по законам жанра была выполнена утилита sysprep. В дальнейшем с этого образа было успешно развёрнуто несколько ВМ, имеющих конфигурацию ВМ, сопоставимую с эталонной ВМ. Спустя некоторое время после всей этой истории с пониманием того, что ранее несколько развёртываний с образа прошли успешно, была предпринята попытка развернуть ещё пару ВМ с этого же образа.
К нашему удивлению при первом же запуске новой ВМ гостевая ОС отказалась загружаться с сообщением об ошибке » Windows Setup could not configure Windows to run onthis computer’s hardware » на этапе первичной инициализации.
Аналогичная ситуация повторилась и на второй новой ВМ, которую мы попытались развернуть с этого же образа. Попытка повторного перезапуска на обеих ВМ привела к другому сообщению об ошибке » Windows could not complete the installation. To install Windows on this computer restart the installation «
Далее после нажатия кнопки «OK» система отправлялась в перезагрузку и при следующей загрузке ситуация со второй ошибкой повторялась.
В попытках понять суть происходящего, в момент возникновения последней ошибки (не нажимая кнопки «OK» в окне сообщения об ошибке) жмём волшебную комбинацию клавиш Shift+F10 и попадаем в окно командной строки, выполняемое в контексте прав Администратора. Выполняем листинг содержимого файлов на системном диске C: …
И здесь мы вспоминаем про то, что предыдущие успешные развёртывания с данного образа виртуального диска выполнялись на виртуальные машины, имеющие небольшой объём ОЗУ, а последние две ВМ, где мы столкнулись с проблемой, при создании были сконфигурированы на использование большого объема ОЗУ. И предположительно, причиной невозможности корректной первичной инициализации системы стал раздутый файл подкачки.
В такой ситуации можно попробовать умерить аппетиты гостевой ОС на расширение файла подкачки, установив на время ограниченный максимальный размер файла. Для этого из уже открытой командной строки можем вызвать апплет управления свойствами системы sysdm.cpl. В открывшейся форме переходим на закладку управления расширенными настройками Advanced и в блоке Performance нажимаем кнопку Settings. В дополнительно открывшейся форме переходим на вкладку Advanced и в разделе Virtual memory используем кнопку Change чтобы изменить параметры файла подкачки.
Отключим используемое по умолчанию автоматическое определение размера файла подкачки, укажем первичный и максимально допустимый размеры файла через опцию Custom size (например, от 512MB, но не больше 2GB) и нажмём Set, затем OK.
Теперь можно попробовать перезагрузить виртуальную машину, и при следующей загрузке гостевой ОС свободного места на системном диске должно быть достаточно для нормальной первичной инициализации системы. В нашем случае одна из ВМ загрузилась успешно, а вторая ВМ, не смотря на доступность места на диске продолжила выдавать ошибку » Windows could not complete the installation… «. Вероятно, в процессе первого запуска ОС с наличием проблемы с нехваткой свободного места на диске с механизмом OOBE (Out-of-Box Experience) что-то пошло не так.
В случае успешного вызова этой утилиты перед нами должно появиться стандартное окно первичной настройки параметров системы, которое появляется при первом запуске ранее sysprep-нутой системы.
После того, как определим языковые параметры, и на следующих двух экранах примем лицензионное соглашение и укажем учётные данные администратора, мастер первичной инициализации закроется и мы снова вернёмся на первоначальный чёрный экран с открытой командной строкой, в которой вызовем команду штатной перезагрузки гостевой системы:
В нашем случае после перезагрузки гостевая система успешно загрузилась.
Если ранее установили небольшой фиксированный файл подкачки, то не забываем его вернуть обратно в автоматический режим, либо указываем другой устраивающий нас размер.
Делаем вывод, что если нам заранее известно то, что внутри шаблонного виртуального диска на системном томе гостевой ОС немного свободного места, то перед первым запуском ВМ лучше установить минимальный объём ОЗУ, исходя из которого система не будет пытаться создать файл подкачки большого размера. А уже после окончания процесса первичной инициализации можно будет увеличить размер ОЗУ ВМ до нужного объёма. Ну или же при создании эталонного диска можно устанавливать небольшой фиксированный размер файла подкачки, который, возможно, потребуется после первичной инициализации новой гостевой ОС, выставлять обратно в автоматический режим либо увеличивать под свои нужды.
С другой стороны, если Вам критична стабильность и предсказуемость работы развёрнутой из шаблона гостевой ОС и Вы испытали проблемы в ходе первичной инициализации OOBE, то лучше пытаться выполнять развёртывание повторно до тех пор, пока оно не отработает штатно. То есть лучше безжалостно удалять виртуальный диск, где первичная инициализация ОС прошла с ошибками и цеплять шаблонный диск к новой ВМ повторно для получения нужного результата. В противном случае с такой «кое-как взлетевшей» системой может случиться ещё несколько историй в духе «О сколько нам открытий чудных …». Одной из таких дивных историй я поделюсь в следующей заметке.
Источник
[FIX] Windows Could Not Complete The Installation. To Install Windows On This Computer, Restart The Installation
Earlier, we shared you the fix for problem where you can’t install Windows 10 while running in Audit Mode, in following article:
Today, in this article, we’re going to talk about another similar issue related to Audit Mode. In the fix shared above, we were not able to start installation of Windows 10 in Audit Mode. However, if you’re able to start the installation by following steps of that article, you may later face issues whenever your system assumes you’re in Audit Mode. Here’s the error message that can appear anytime during or after installation, if that is the case:
Windows could not complete the installation. To install Windows on this computer, restart the installation.

If you hit OK button, the system will reboot and again the error message appears, eventually creating an infinite reboot loop. The main reason behind this issue is that if your system thinks that you’re in Audit Mode, it will usually tend to use built-in administrator account and the account is disabled or doesn’t have any password associated with it. If you enable this account or assign a password to it, or simply setup an account which can be utilized in this condition, this problem can be easily solved. Here’s how:
FIX : Windows Could Not Complete The Installation. To Install Windows On This Computer, Restart The Installation Error For Windows 10/8.1/8/7
1. When the error is prompted, press Shift+F10 key combination to bring Command Prompt.
2. In the Command Prompt window, type following commands (mentioned in bold) and press Enter key after each:

3. This should fire up user account creation wizard, where you can set an user account (and more importantly its password). Once this is done, the issue should resolve finally.

About Kapil Arya
Kapil is presently a Microsoft MVP in Windows IT Pro expertise. He is Windows Insider MVP as well, and author of ‘Windows Group Policy Troubleshooting’ book. In 2015, Microsoft India accomplished him as ‘Windows 10 Champion’. Being passionate Windows blogger, he loves to help others on fixing their system issues. You can follow him for news/updates and fixes for Windows.
so i done this and i went to the startup where i created my account then after this i went back to the same error when my acc was made
^^ You’re most welcome!
I get the same error but in my computer shift+f10 doesn’t open cmd prompt what should I do now please help me
^^ Try booting into Advanced System Recovery Options and use Command Prompt to run the commands: https://www.kapilarya.com/boot-into-system-recovery-options-windows-8
Thanks for the help buddy. I am so glad there are people like yourself.
^^ Glad we could help 😎
it says “just a moment” and it didnt give me the option to make a password/username.
hi kapil, its a surface i tried doing this but i dint work also i tried doing
At the error screen shown above, press SHIFT+F10 (this should bring up a command prompt)
Type secpol.msc to open the Security Policy console
Navigate to Account Policies > Password Policy
Change “Minimum password length” to 0
Change “Password must meet complexity requirements” to Disabled
Exit the Security Policy console (File > Exit or just click the X)
Click OK on the error message
………………………………………………………………………………….
At the error screen shown above, press SHIFT+F10 (this should bring up a command prompt)
Type compmgmt.msc to open Computer Management
Navigate to System Tools > Local Users and Groups > Users
Right-click Administrator
Click Set Password… (click Proceed when prompted)
Set a password and click OK (password needs to meet the minimum requirements)
Exit Computer Management (File > Exit or just click the X)
Click OK on the error message
……………………………………………………………………………………………………………………
i tired pretty mush everything but no success i’m struck with this
Did everything you told to do. Then it just shows, country, language and time zone to select. Then a user agreement. And then it just says. “Just a moment” and loading sign for a while. Nothing happend. No user name or pass option shows up. Please help to bypass this cycle for windows 10.
while i type msoobe it says msoobe is not recognized as an internal and external command, operable program or batch file
^^ I believe you’re not in Audit mode, can you retry with ISO installation and see if it helps.
After the “msoobe” command nothing opens… it just goes to a new command line (Windows 8). help please?
Thank you it came through
I am not able to find the folder local users and groups.what should I do now
Nothing happens on typing msoobe. I think my problem is linked to some problem in Nvidia driver.
Recently, my machine had started freezing up after 5-10 minutes of starting up. I investigated the issue and tried to update drivers.. After trying to fix this for several days, I got system up and running without any issues by disabling Nvidia driver. Everything looked great and just then my machine automatically downloaded Windows 10 fall creator update and wanted me to reboot. I thought this may fix the driver issue. But, NO. That was a big mistake.
The machine almost installed and configured Windows 10 and showed login screen. But, the username window never appeared. Mouse and everything got frozen. I had to forcibly shutdown. When I restarted, I got in this infinite loop. Using Shift + F10, I tried to open device manager and found that NVidia driver was enabled again. I disabled the driver now. But, the machine still doesn’t startup and it remains in this infinite loop.
Your msoobe command doesn’t work either. Do you have any other solution?
I finally managed to fix this infinite loop and completely recovered the machine without having to lose any data. So, let me share what I did. This may be useful for others too.
That took long time and several reboots. But, the installation was finally fully successful.
As soon as windows started I quickly checked the device manager. It had installed some generic Microsoft driver in place of Nvidia driver. So, I quickly disabled again. Nevertheless, Windows still automatically downloaded and installed Nvidia driver within few minutes. I quickly disabled that as soon as I saw the notification. I will play with that driver at some other time. But, as of now my machine is fully functional without any problems. The display is as great it always was (hardly anything noticeable without Nvidia driver). But, I don’t play any games involving lot of graphics and high GPU usage. So, for normal usage, there is not much noticeable difference.
^^ Glad the issue is resolved 😊 Thanks for your inputs, Abhay!
did you choose to keep nothing? What about the serial number? I have just done this suggestion including going in and disabling things that may interfere in device manager but I may have to buy a new activation this way?
Yes that helps but i had a blue screen and i clicked reinstall windows and it poped up this sams messeage and when i do the msoobe it stuck on just a moment forever i waited over night plenty of times didnt work just stuck on just a momeny plz help
Hi I’m the same as Jake when I get to C:WINDOWSsystem32>oobe>msoobe then Enter on Command Prompt nothing but my mouse appears now to work when I close the Message Window it goes back to the loop message as it was previously.
Yeah, Still fighting this here. Installed 1709 overnight and woke up to this nightmare today. My firewall had been (thankfully) blocking the update. Silly me though I should allow it! Wish I hadn’t bothered. Machine is now inoperable. Six hours so far and minimal progress. tried the msoobe thing and I got a message about Page_Fault_in_nonpaged_area. What failed: aswStm.sys. Tried Safe Mode (won’t complete install in safe mode). Tried USB drive and can’t restore or repair. Trying to start in diagnostic mode now and just the circles going round. Managed to recover my key from shift-f10 using wmic os get “SerialNumber”. This was an online upgrade from Win7 so I can’t just wipe it and hope for the best and I am definitely not going to buy yet another key just to fix this dang mess.
Well, in the end, I kept the old drive that the 1709 update failed to finish on and installed a fresh copy on Windows 10 on a new SSD using Media Creation Tool. Somehow, Windows knew my registration and the new copy activated OK on it’s own. I qwas worried about it losing the key but it seems re-installing has come a long way since the old days. I still kept the old drive with the failed update disconnected just in case there is some data I may need in the future.
I think the original system update failure may have had something to do with my config which, to be fair, was a bit of a mess. It was a dual boot linux and Windows and the existing Win10 was already an online update from 7 and had the pagefile on a separate drive.
The re-install was much less painful than expected.
^^ Glad to hear this is sorted now, Brad 😊
I have been unable to load windows following an update either.
I am able to get the oobe: command prompt, but when I type, “msoobe” nothing fires up.
I have tried other fixes including secpol.msc and gpedit.msc, but neither of these are “recognized as an internal or external command.”
Also, I have tried to gain access through MMC, add snap in, computer management, local computer, but I do not get any drop down for users within this path.
I am having this exact same problem, only I think I might have made it worse. I have a Sony Vaio VPCF121FD and am trying to update to Windows 10.0.16299.125. Here is what I have done so far:
I tried a reinstall from a USB and I kept getting the same error message
Msoobe didn’t work for me- nothing would happen.
MMC doesn’t let me access local users and I can’t edit the users through the path it tells me (control panel, users)
I tried regedit to no avail, the auditmode values did not work.
I tried restarting in advanced recovery mode shutdown /r /o but this didn’t boot up any differently and kept getting the same error.
I unfortunately do not have any system restore points, I used to but I’m not sure what happened.
Tried all of these in both safe mode (with network and with cmd) and elevated command prompts, still nothing.
Now I am trying msconfig and restart in diagnostics mode- did not get the error but I am pretty sure I am stuck in an endless loop, it has been about 20 minutes and all I see is the rotating dots.
I do have an NVIDIA GEFORCE graphics card.
Please help. S.O.S. I’ve spent over 6 hours on this and I need to move on with my life.
hi i just did this, entered oobe and pressed return and msoobe and its gone back to
windows/systems32/oobe and nothing is happening 🙁
Thanks Kapil, fixed my problem, much appreciated.
^^ Happy to help, Michael 😎
Kapil, as with Sarah and Charles, typing msoobe at the C:WindowsSystem32oobe> prompt does nothing. It simply returns the prompt. Do you have a suggestion?
This totally worked. Thanks for the old school DOS help. 👍🏻
@Abhay – Your way did the trick for me. Created a ISO file with the Media creation tool for Windows 10. Used Rufus to burn it to a USB stick. Booted up with USB stick inserted and waited for the error to happen. shift F10 to get cmd box. In my case also I executed the setup E:setup.exe frm within C:Windowssystem32 – followed the prompt of Windows setup. Took
1.5 hours and then it failed. Rebooted the laptop and waited for the error again. shift F10 again and this time I also executed devmgmt.msc and disabled the video card driver – This is an ASUS F555B model as per sticker, Windows 10 reports it is an X555BP. Re-run setup and this time I got an error that this PC’s hardware can not be upgraded to Windows 10 – bugger. Rebooted again and this time around it actually booted normal and I was able to log into Windows 10 – go figure. All seemed OK, so I started Windows update and that in turn updated from build 1709 to 1803.
Simple with know how, but a pain when you have to look for a fix.
So, Abhay thank you very much indeed
After Shift+Fn+F10 do this to resolve issues with inactive and /or bad password on account adminitrator:
>net user administrator /active:yes.
>net user administrator *
newpassword
newpassword
close the command window, then hit OK on the “Windows could not complete the installation” dialog
Windows restarts and boots into Audit Mode, which is what I was after.
In MY case, during this last boot, it complaining again that administrator was not active, but then if finally brought up a log in screen where I could enter the new password for Administrator.
I was in at last, I could make my changes and do another sysprep
Источник
[SOLVED] Windows 10 Could Not Complete the Installation + Guide [MiniTool Tips]
By Tina | Follow | Last Updated October 20, 2022
Summary :
Have you ever gotten stuck with the Windows installation error Windows could not complete the installation when updating your operating system? This post will give you 5 ways to solve the error when Windows 10 installation has failed. Just try them one by one to get rid of the issue to use PC properly, especially try MiniTool software.
Quick Navigation :
Phenomenon
Nowadays, more and more computer users say that they have been troubled by the following Windows 10 installation error “Windows could not complete the installation. To install Windows on this computer, restart the installation.” This error shows up when they want to boot their computer after updating the operating system.
However, they don’t know how to fix the issue when Windows could not complete the installation after updating to Windows 10, so they ask for help on the Internet.
If you have the same problem, you have come into the right place now because this article will give you five solutions to fix the issue when Windows creates this database of configuration settings during installation.
In particular, the fifth method is the most effective and reliable one.
Now, we will introduce the methods one by one to fix the Windows installation failure after update.
Quick Video Guide:
Case 1: Windows Could Not Complete the Installation
Fix#1. Using Automatic Repair
If you have received an error message that says Windows 10 could not complete the installation after updating your operating system, you can try using Automatic Repair to solve Windows 10 installation error.
Step 1: Start your PC. Just as Windows attempts to load, press the Power button to turn it off immediately. Do this operation two or three times.
Step 2: On the third time, you can see a message that says “Preparing Automatic Repair”, then you can click “Advanced options” to repair your PC.
Step 3: You need to click “Troubleshoot”> “Reset this PC”> “Keep my files”.
Step 4: You need to choose one account and input your password to continue.
Step 5: Next, you need to click «Cancel» button. Then click «Continue» button to exit and continue to Windows 10 Home.
After that, you can try to restart your computer and check whether the issue Windows cannot complete the installation has been fixed.
Fix#2. Enable Administrator Account
The second method of solving error “Windows could not complete the installation Windows 10 Shift 10 not working” is to enable administrator account. You can try using it to fix Windows 10 installation problem.
Step 1: On the error screen, you can press “Shift” key and “F10” key together to launch Command Prompt.
Step 2: Then, type the MMC command and hit “Enter” to continue.
Step 3: In the main interface, you need to click “File” and choose “Add/Remove Snap-in” to continue.
Step 4: In the following popup window, choose “Computer Management” and double-click it.
Step 5: In the next window, you need to check the “Local computer: (the computer this console is running on)” and click “Finish” to continue.
Step 6: Then click “OK” to continue to the next step.
Step 7: After returning to the main interface, you need to click “Computer Management (Local)”> “System Tools”> “Local Users and Groups”> “Users”> “Administrator” to continue.
Step 8: Then you can open the following interface by double-click “Administrator”. After that, you need to make sure that the option “Account is disabled” is unchecked. Then click “OK” to continue.
Step 9: Next, right-click “Administrator” and choose “Set Password”. You need to set a strong password to get started.
Step 10: All steps have been finished. Now, you can restart your computer and check whether the error Windows could not complete the installation Shift 10 not working is solved.
Fix#3. Change Password Requirement
If above solutions are not effectively to solving the error “Windows could not complete the installation”, you can try changing password to solve Windows 10 installation error.
Step 1: You still need to open the Command Prompt by pressing “Shift’ and “F10” keys together on the error screen.
Step 2: Then you can input the secpol.msc command and hit «Enter» to continue.
Step 3: After that, you will see a popup window. Thus, you need to unfold “Account Policy” and choose “Password Policy”.
Step 4: You can see “Minimum password length” on the right side. You need to right-click on it, choose «Properties», and change the “Security Setting” to 0 characters. Then apply it and click “OK” to continue.
Step 5: Make sure that the “Password must meet complexity requirements” is disabled by right-clicking it, choosing “Properties” and apply it. Then click “OK” to continue.
Step 6: Then reboot your computer to check whether the Windows 10 installation failure is solved.
Fix#4. Run Account Creation Wizard
Now, we will introduce the fourth method to solve “Windows could not complete the installation Windows 10”. Of course, if the above methods are not working, you can try to use this one.
Step 1: You need to press “Shift” key and “F10” key together on the error screen to launch the Command Prompt.
Step 2: Then type the following command and hit “Enter” to continue.
CD C:windowssystem32oobe
Step 3: Then input msoobe command and hit “Enter” to continue.
Step 4: Then you will see a popup window. You need to make a generic account and password. On this popup window, then click ‘Finish” button to finish the process.
Step 5: Now, you can reboot your computer and check whether the error “Windows could not complete the installation. To install Windows on this computer, restart the installation.” is solved.
Fix#5. Restore to Different Computer
If none of above methods work, you can use the fifth solution which is to restore to different computer. As a matter of fact, this solution is effective and thousands of users have successfully solved the problem by using it.
Now, we will introduce how to restore to different computer step by step with pictures.
To restore to different computer, you need the help of a piece of third-party software. Fortunately, MiniTool Software Limited can provide you with such a kind of software, which is MiniTool ShadowMaker.
The Windows 10 backup software – MiniTool ShadowMaker has been the first choice of thousands of computer users, because it is a type of professional backup software that provides various backup services with its multiple functions, such as files backup, system backup, disk backup and so on.
Besides backup feature, it even can help you to clone hard drive and clone OS from HDD to SSD.
Before introducing how to restore to different computer, you can download MiniTool ShadowMaker Trial which can be used for 30 days without any fees from the following button or purchase an advanced one.
After you have successfully installed the free backup software, you can try restoring to different computer based on following instructions.
The precondition of restoring to different computer is that you have created a system image on a normal computer in advance by using MiniTool ShadowMaker.
Therefore, in order to solve Windows 10 installation problem, you need to install and run MiniTool ShadowMaker Trial on a normal computer and create a system image on it since your computer can’t boot due to the error “Windows could not complete the installation Windows 10”.
Thus, the following article is useful for you to create a system image.
In addition, a bootable media is necessary since your computer can’t boot normally. As a matter of fact, you can use MiniTool ShadowMaker Trial to create it.
Therefore, you need to know how to create the bootable media and how to boot your computer from it. You can take the following two articles as a reference.
Then we will show you how to solve the error of Windows 10 installation has failed through restoring to different computer step by step.
Step 1: Connect the hard drive to your computer and enter MiniTool Recovery Environment. Go to the Restore interface and click “Add Backup” to add system image to the backup list. Then choose it and click “Restore” to continue.
Step 2: In the popup window, you need to choose the backup version and click “Next” to continue.
Step 4: You need to choose a target disk and click “Next” to continue.
How to keep data safe? How to back up files on windows 10? This post will introduce 4 ways to back up files with ease.
Step 5: The free backup software will begin the restoration process, so you need to wait patiently.
Step 6: After the restoration process is finished, you may find your computer still can’t boot normally. The reason is that the operating system is incompatible with your computer. Thus you need to boot your computer from the bootable media and go to “Tools” to choose “Universal Restore” to fix this problem.
Step 7: Then this free backup software can automatically list the operating system on the left pane and you need to click “RESTORE” button to continue.
Step 8: After a while, the restore process should be completed. Then you can exit MiniTool Recovery Environment and set your computer to boot from hard drive. Then you can check whether your computer can boot successfully.
Case 2: Windows 10 Installation Has Failed
When installing the operating system, you may come across the error Windows 10 installation has failed. This error may occur in the middle of the installation.
So, in the following section, we will show you how to fix the error that Windows 10 installation has failed.
Fix 1. Check Whether Your Computer Meets the Minimum Requirements
In order to install Windows 10 on your computer, you need to check whether your computer meets the minimum requirement. So, you need to check the following parameters.
If your computer cannot meet the above requirements, you may come across the error that Windows 10 installation has failed.
Fix 2. Clear Certain Attributes of the Installation Folder
Now, here is the tutorial.
When it is finished, check whether the error that Windows 10 installation has failed is fixed.
Fix 3. Rebuild BCD
In order to fix the error that Windows 10 installation has failed, you may try rebuilding BCD. To rebuild BCD, you can read the post: Step-by-Step Guide to Repair and Fix MBR Windows 7/8/8.1/10 to learn some more detailed solutions.
Fix 4. Run the Installation in Clean Boot
If you come across the error Windows 10 installation has failed, you can choose to install Windows 10 in Clean Boot.
Now, here is the tutorial.
After that, check whether the error that Windows 10 installation has failed is solved.
Bottom Line
In conclusion, we have introduced five ways to solve Window 10 installation issue “Windows could not complete the installation. To install Windows on this computer, restart the installation.” There is no doubt that each method has its advantage. We think the fifth way to solve Windows installation issue is more effective and more reliable.
Position: Columnist
Tina is a technology enthusiast and joined MiniTool in 2018. As an editor of MiniTool, she is keeping on sharing computer tips and providing reliable solutions, especially specializing in Windows and files backup and restore. Besides, she is expanding her knowledge and skills in data recovery, disk space optimizations, etc.
On her spare time, Tina likes to watch movies, go shopping or chat with friends and enjoy her life.
Источник