Всем привет, никто не сталкивался с невозможностью обновления Windows ?
При попытке установить обнову, на 60% появляется ошибка — «Один или несколько компонентов Windows не удалось установить, система будет возвращена в исходное состояние», после чего компьютер перезагружается и я возвращаюсь в исходную точку
Я пробовал устанавливать через стандартную, встроенную в Windows утилиту обновления, так же «Помощник по обновлению Windows» и Windows Media Creation Tool — но итогом всех этих мытарств стал вот этот скриншот:
После чего я углубился в недра форумов Майкрософта для поиска и исправления ошибки, варианты были такие:
1. Отключить антивирус (не помогло)
2. Отключить интернет (не помогло)
3. Обновить все-все драйверы (использовал для этого сторонние утилиты, не помогло)
4. Сбросить агент центра обновления (не помогло)
5. Проверка системных ресурсов, на наличие сбоев (проблем не выявлено)
6. Отключение всех внешних устройств (отключать в целом нечего, так как у меня мониторклавиатурамышь и наушники, поэтому не делал)
7. Исправить ошибки жесткого диска (проблем не выявлено)
8. Восстановление системных файлов (не помогло)
9. Остановку служб Windows и запуск их снова (не помогло)
10. Выполнить чистую загрузку и установить чрез нее (еще не пробовал)
Никто не сталкивался с похожей проблемой? Может кто-то может подсказать решение?
Форумы майкрософта в целом безблагодатны, серебряной пули, что решит мою проблему там я к сожалению не нашел.
————————————————————————————————————————
Итак, после кучи безуспешных попыток (более 6) я наконец нашел причину, устранил проблему и успешно обновился.
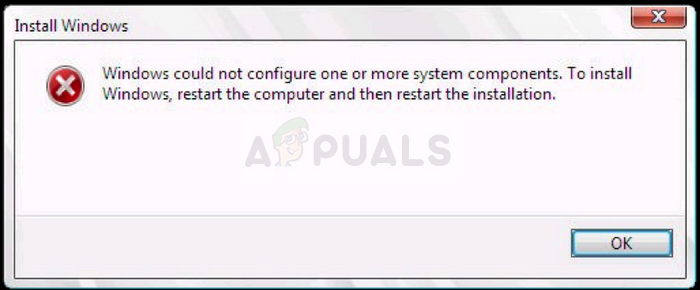
При попытке обновления Windows 10 с версии 1803 на 1903 установка доходила до 60 % и прерывалась гордой, но очень непонятной ошибкой: «Windows could not configure one or more system components«, после чего происходил успешный откат в исходную точку.
Перепробовав несколько утилит и придя в конечном итоге к Windows Media Creation Tool я смог добиться чуть более внятной текстовки после очередного неудачного обновления: «Не удалось установить Windows 10 0xC1900101 — 0x30018 Ошибка на этапе установки First_Boot во время операции SYSPREP_SPECIALIZE«. Cтало ясно куда копать дальше.
Начав рыть форумы я пробовал кучу разного (частичный список того что пробовал выше), пока не наткнулся на совет использовать SetupDiag для диагностики возможной проблемы.
После очередной неудачной попытки обновиться, запустив эту утилиту, я наконец получил адекватный лог, который прямо указывал что не дает моей винде обновиться — «Error: Found AdvancedInstaller Generic failure. Component: Microsoft-Windows-IIS-HttpProtocol, Culture=neutral«
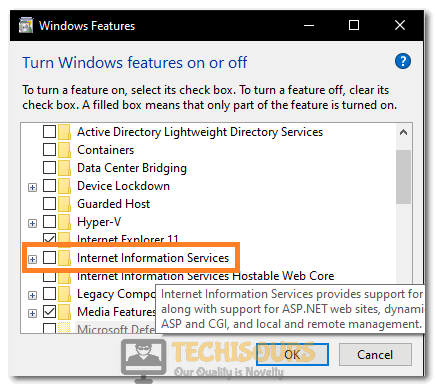
После чего осталось выяснить что с этим делать. Непродолжительное гугление подсказало, что стоит запустить панель Включения или отключения компонентов Windows (optionalfeatures.exe) и отключить в ней Службу IIS, (Internet Information Services), перезагрузиться и пробовать обновление снова.
И при попытке отключить этот компонент я поймал ошибку — 0x800F0922
Что-ж, я ожидал чего-то подобного, благо эта статья подсказала решение проблемы — загрузить компьютер в безопасном режиме переименовывать папку C:WindowsSystem32inetsrv.
После успешного переименования папки, я наконец отключил службу IIS, попробовал установить обновление вновь — и о чудо, все прошло как по маслу!
По итогу у меня смешанные чувства , но я очень рад что наконец решил эту проблему, которая мучила меня достаточно продолжительное время (да и еще эти абсолютно ненавязчивые сообщения от винды на моем рабочем столе — мол поддержка вашей версии системы заканчивается в ноябре, обновитесь уже быстрее)
Надеюсь этот способ поможет какому-нибудь страдальцу вроде меня в будущем.
This error code ‘Windows could not Configure One or More System Components‘ appears to users running Windows on their computers and it appears when trying to update their PCs to the latest available build of Windows. The full error message goes like:
"Windows could not configure one or more system components. To install windows, restart the computer and then restart the installation."
Despite the need for a restart, it has barely helped anyone and people are desperate for a real solution. We have decided to gather the most successful solutions which have actually helped people online and present them in a detailed manner. Good luck with solving your problem!
What Causes the “Windows could not configure one or more system components” Error?
There are several things to look out for if you want to stay away from this annoying error code. Here is the full list:
- Faulty or missing keys used to encrypt the configuration store for the AES Provider
- Old and outdated wireless drivers (or drivers in general)
- Misconfigured or faulty Internet Information Services tool which needs to be uninstalled
Solution 1: Remove Certain Files From Your Computer
If your computer’s keys that IIS (Internet Information Server) uses to encrypt the configuration store using the AES Provider are somehow missing or corrupted, then the provider instantiation will fail.
Because of the fact that the Window 10 installer will also try to install IIS (Internet Information Server), and this fails, the upgrade fails and is rolled back. The correct way to solve this problem is to remove certain files from your computer. They will be recreated once you run the Windows 10 installer.
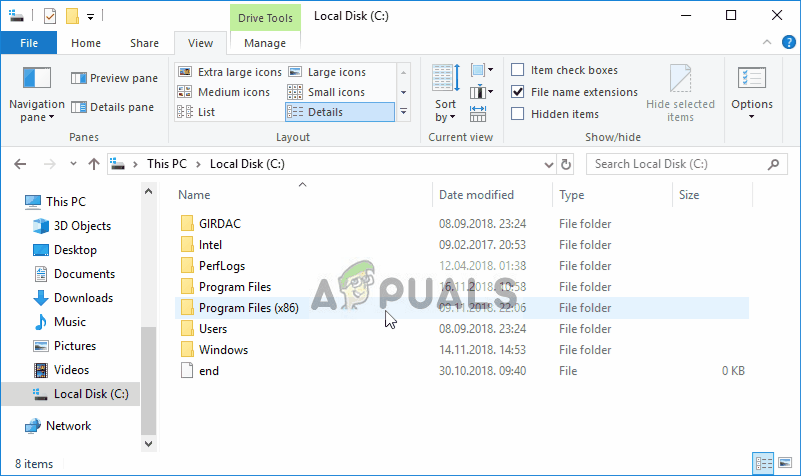
- Navigate to the following location on your computer by opening the Windows Explorer and clicking on This PC:
C:ProgramDataMicrosoftCryptoRSAMachineKeys
- If you are unable to see the ProgramData folder, you may need to turn on the option which enables you to view hidden files and folders. Click on the “View” tab on File Explorer’s menu and click on the “Hidden items” checkbox in the Show/hide section.
- Here are the files you should look for. The name of the file will begin with the first sequence of numbers and letters and end with the GUID of your machine (different for each user:
6de9cb26d2b98c01ec4e9e8b34824aa2_GUID      iisConfigurationKey

d6d986f09a1ee04e24c949879fdb506c_GUID      NetFrameworkConfigurationKey

76944fb33636aeddb9590521c2e8815a_GUID      iisWasKey
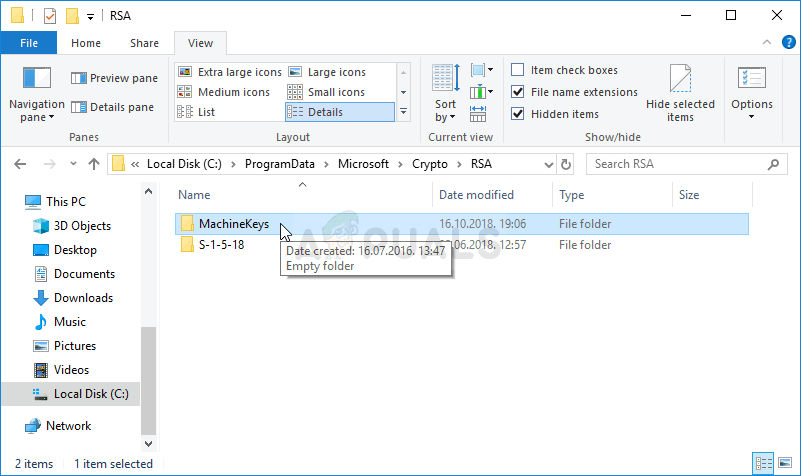
- Select these files, right-click on them, and choose the Delete option which will appear from the context menu. The files will be recreated when you run the Windows updater or Windows installation and the problem should be gone.
Solution 2: Try Using the Media Creation Tool
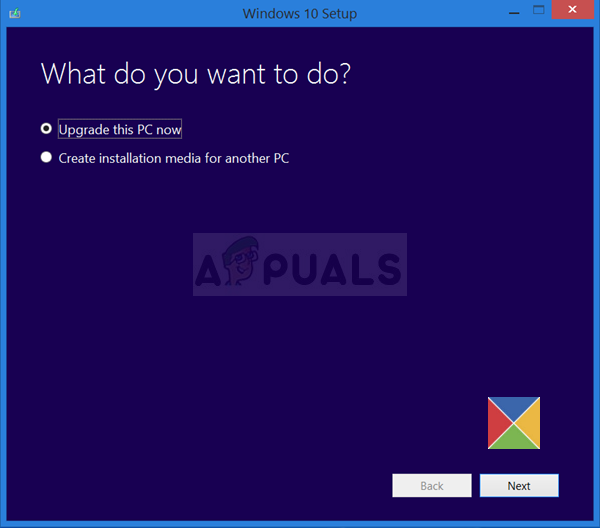
If an update was released for Windows 10 and you tried to install it the conventional way before you received the error code, you might want to try an alternative which consists of using the Windows Media Creation Tool. This is a file you download from Microsoft’s official website. You will be given the option to update Windows to the latest build after you download it.
- Download the Media Creation Tool executable from Microsoft’s website and wait for the download to complete. Double-click on the downloaded file in your Downloads folder called MediaCreationTool.exe in order to open the setup. Tap Accept at the first screen.
- Select the “Upgrade this PC now” option by enabling its radio button and click on the Next button to continue. The tool will download certain files, check for updates, and scan your PC to see if it is ready so please stay patient.
- Accept the license terms from the next window if you want to continue with the installation and wait again to communicate with Microsoft for updates (again).
- After that, you should already see the Ready to install screen with Install Windows and Keep personal files and apps options being listed. This has been chosen automatically since you are already running Windows 10 and you want to keep everything. The install should now proceed so your computer should be updated after the tool finishes with its process and the error should no longer appear.
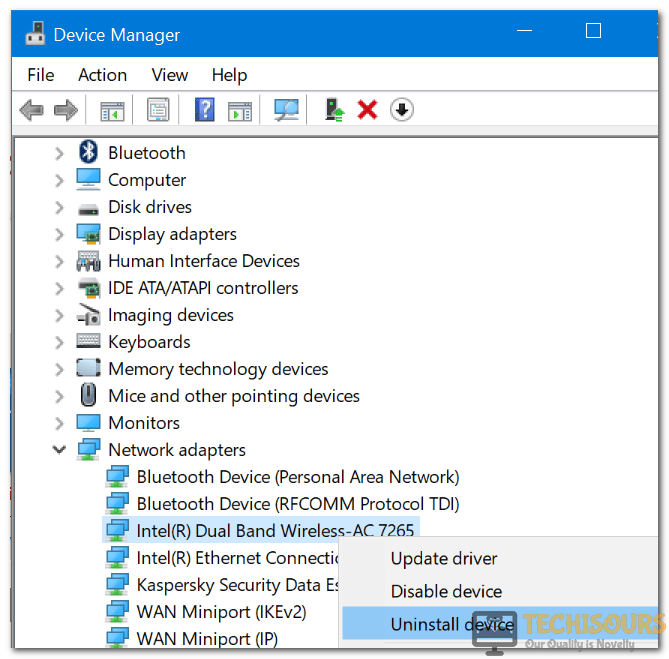
Solution 3: Uninstall Your Old Wi-Fi Drivers and Update Others
Old and outdated drivers are also a known cause for this issue. There are several different ways in which the drivers are to blame. Some users claim that their old Wi-Fi driver was to blame and they were able to solve the problem by uninstalling it.
Others claim that they needed to update all of their drivers before proceeding. Try out both of these methods and see which one works the best for you!
- Click the Start menu button at the lower left part of your screen, type in Device Manager, and click its entry from the list of results at the top.
- You can also use the Windows Key + R combination by clicking both of these keys simultaneously in order to bring up the Run dialog box. Type in “devmgmt.msc” in the box and click OK.
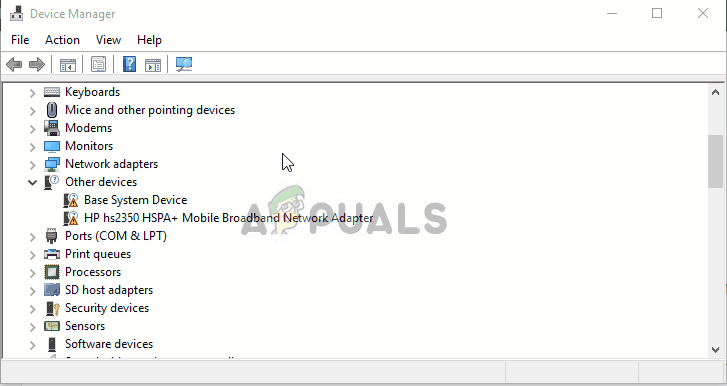
- Locate the wireless adapter driver under Network adapters, right click on it, and select Uninstall device from the drop-down menu which will appear. Confirm any prompting dialogs.
- Right-click on other devices on your computer where the driver needs to be updated and choose Update driver from the drop-down menu. There are tools which can automate the process for you if you want.
- After you have updated your drivers and gotten rid of the wireless driver, try running the installation and check to see if the “Windows could not configure one or more system components” error still appears!
https://social.technet.microsoft.com/Forums/en-US/1b5b24b7-a0f0-4955-9f44-32a977643aef/windows-10-fall-creator-upgrade-1709-stops-at-45-with-quotwindows-could-not-configure-one-or-more?forum=win10itprosetup
Solution 4: Uninstall IIS
Internet Information Services (IIS, formerly Internet Information Server) is an extensible web server created by Microsoft for use with the Windows NT family. IIS supports HTTP, HTTP/2, HTTPS, FTP, FTPS, SMTP and NNTP.
If you are not using it, you should know that it could be the culprit behind your frustrations regarding this error and you should consider uninstalling it immediately!
- On your keyboard, use the Windows Key + R key combination to open the Run dialog box. Also, you can search these directly in the Start menu if your Windows OS supports it.
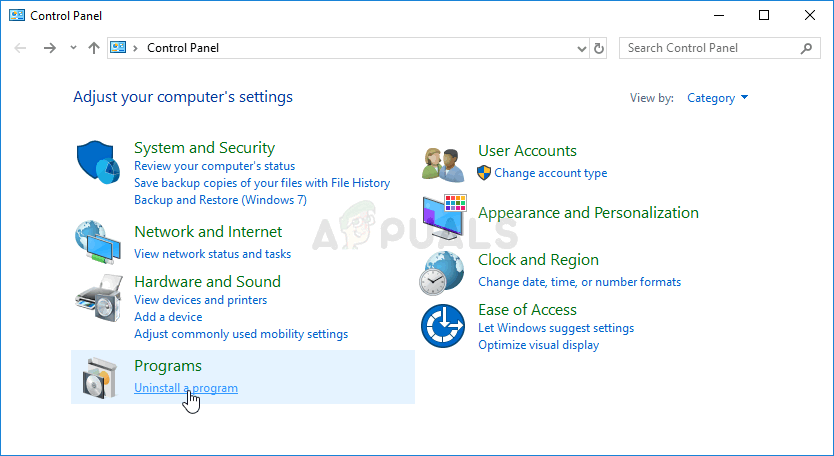
- Type in Control Panel and click OK in order to open it. Make sure you change the view in Control Panel to View by: Category and click on Uninstall a program under the Programs section.
- At the right side of the screen which opens, click on Turn Windows features on or off and locate the Internet Information Services entry on the list. Uncheck the box next to it and click the OK button in order to apply the changes. Check to see if the error is gone!
Solution 5: Unplug your SD Card Reader
This might be an odd way to solve the problem but plenty of users suggested that the problem has automatically fixed itself after users have disconnected the SD card from their respective computers. You can reconnect if after the update finishes or after you install Windows successfully!

Kevin Arrows
Kevin is a dynamic and self-motivated information technology professional, with a Thorough knowledge of all facets pertaining to network infrastructure design, implementation and administration. Superior record of delivering simultaneous large-scale mission critical projects on time and under budget.
Contents:
- Windows Could Not Configure One or More System Components Overview
- Why Couldn’t Windows Configure One or More System Components?
- 3 Ways to Fix Windows Could Not Configure One or More System Components?
- Bonus Tip
Windows Could Not Configure One or More System Components Overview
It is common that when you are upgrading Windows 10 to 1607 or 1709 version or any other, Windows 10 suddenly prompted you an error with a message indicating Windows could not configure one or more system components. To install Windows, restart the computer and then restart the installation.
Some people might find their upgrade failed at 45%, 49% with no progress.
How can this problem happen when you would like to update Windows system, the Creators update or anniversary update? This thread would fix your doubt.
Why Couldn’t Windows Configure One or More System Components?
This Windows system install error is rather complex as it is hard to figure out the exact reason for it. While the main causes can be identified, there are several major culprits are to blame.
1. The incongruence between the system to be upgraded to and the installed Windows system, such as Windows 10 1703 and 1709.
2. The external device interruption.
3. The setup log files corruption.
4. The driver incompatibility.
What you are supposed to do is following up this article and tackling this upgrading problem effectively.
How to Fix Windows Could Not Configure One or More System Components?
Regarding the principal reasons for the setup error, you can try to fix it in the following ways.
Solutions:
1: Run Windows Update Troubleshooter
2: Disconnect External Devices
3: Use SFC and DISM to Fix Windows Cannot Configure One or More System Components
Solution 1: Run Windows Update Troubleshooter
To simplify this Windows updating issue, it is advisable that you use the inbuilt troubleshooting tool to find out the installing problem.
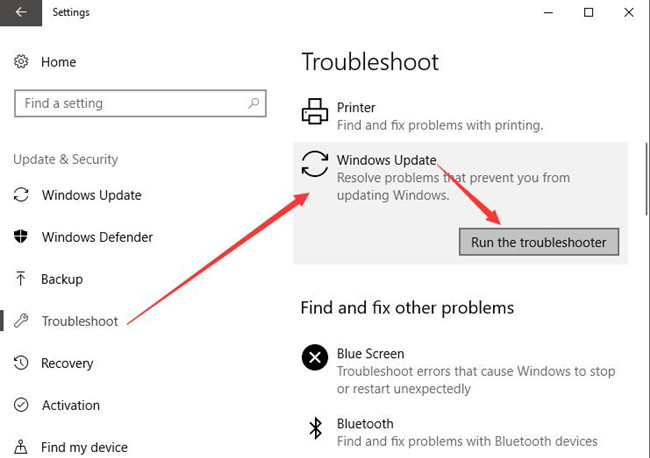
For users of Windows 10 1603 or later, to troubleshoot the Windows update problem, you can directly go to Start > Settings > Update & Security > Troubleshoot > Windows Update > Run the troubleshooter.
If possible, this troubleshooter would automatically repair Windows Could not configure your system components for you as you can see from the troubleshooting results.
Tips: Before Windows 10 1603 users, follow these steps.
1. Open Control Panel.
2. Type in Troubleshooting in Control Panel search box and choose Troubleshooting from the result.
3. In Troubleshooting window, scroll down to locate System and security.
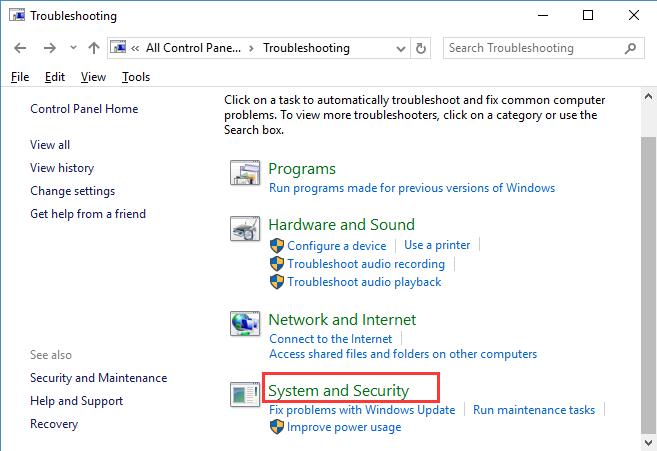
4. Select Windows Update from the list.
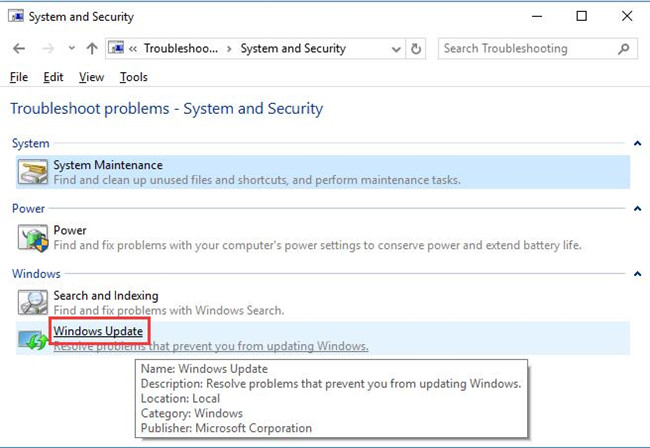
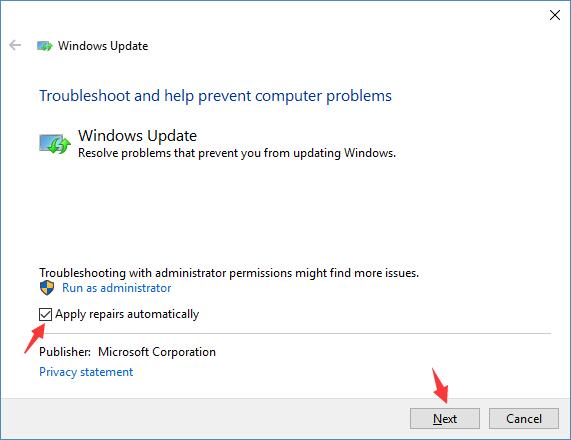
5. In Windows Update troubleshooting interface, click Advanced.
6. Tick the box of Apply repairs automatically and the hit Next to go further.
7. Windows Update Troubleshooter is Detecting problems, which would cost you several minutes.
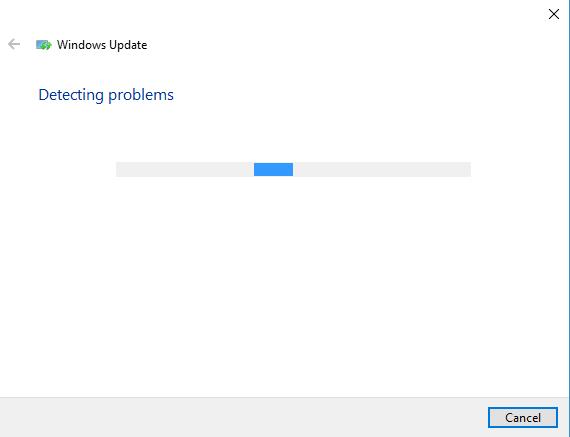
Here in the process of detecting Windows update errors, you are required to sign in with the administrator If not, Windows 10 would ask you to change to the administrator.
8. When the troubleshooting is finished, you can decide to View detailed information to check why your Windows could not configure one or more system components.
Solution 2: Disconnect External Devices
In a large sense, when the upgrading process failed at 50% or even 99%, it will also show you that Windows could not configure one or more system component.
In that case, whatever movable devices you have plugged in on Windows 10, such as USB, CD or DVD, you should plug out them to see if the set up can continue.
Solution 3: Use SFC and DISM
When you upgrade Windows 10 to 1603, 1703 or 1709 or other versions, there will be some setupact.logs along with some log files on the computer. In some way, these files may be corrupted so as to make Windows could not configure one or more system components on Windows 10.
Thus, you would better make use of the System Files Checker to scan for and correct the corruption in system files in updating.
1. Input Command Prompt in the search box and hit Enter to navigate to it.
2. Type in sfc/scannow in the Command Prompt and press Enter to run this command.
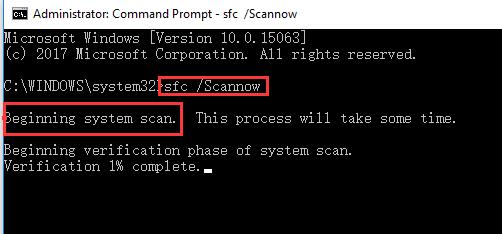
From the screenshot, you can see the SFC is running to check and correct the problematic files on your computer. As per the reports from some users, it can make the Windows update error disappear.
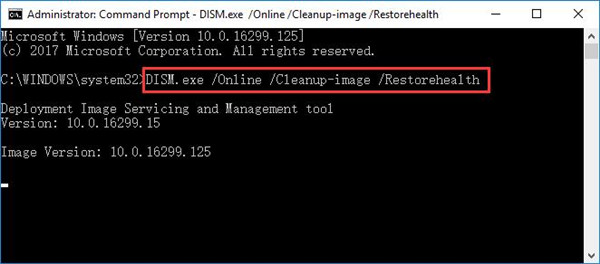
If not, you are able to try another system tool — DISM (Development Image Servicing and Management), which is capable of repairing the erroneous image that can lead to Windows could not configure one or more system components on Windows 10.
In Command Prompt, copy the command DISM /Online /Cleanup-Image /RestoreHealth and then execute it.
Now the install issue will have been removed from your PC with the help of these two tools sweeping the corrupted files and images.
Bonus Tip – Fix all the Conflicting Components Automatically
Possibly, even if you fixed the driver, file and program incompatibility, in some cases, Windows could not configure one or more system components warning message will also pop up before your sight.
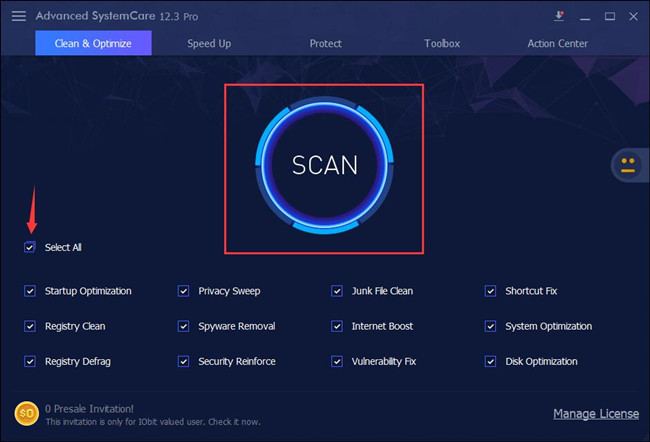
Under this circumstance, much as you tried, it can be a good choice to utilize Advanced SystemCare to scan all the items on Windows 10, including the files, registry, startup programs, disk, and so on.
Advanced SystemCare will detect the problematic items on your PC and then fix them automatically, which is an effective solution towards Windows could not configure one or more system components on Windows 10.
1. Download, install and run Advanced SystemCare.
2. Under Clean & Optimize, check the box of Select All and then Scan.
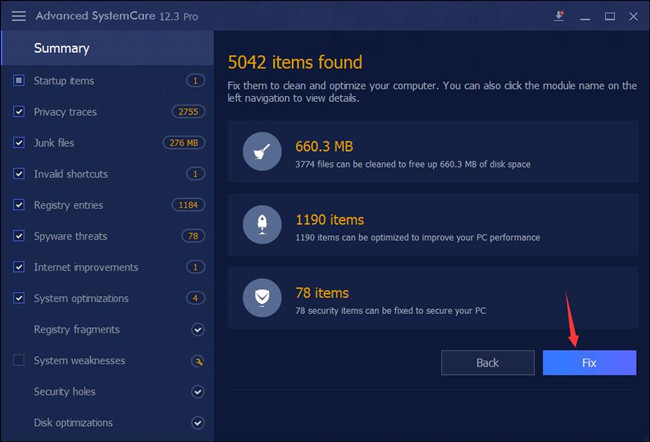
3. Hit Fix to fix all the erroneous items, including startup programs, files, and registries.
In this way, you can check whether Windows could not configure one or more system components, to reinstall Windows, restart the computer and then restart the installation.
In a nutshell, to cope with the Windows could not configure one or more system components. To install Windows, restart the computer and then restart the installation, you can select way from above or try them all, if not useless, maybe you have to clean install Windows 10 or reset Windows 10 to factory or restore your PC.
More Articles:
Some Settings are Managed by Your Organization
Fix Windows 10 Update Downloading Stuck
5 Ways to Stop Windows 10 Auto-Updates
Hi Techs,
I’m trying to upgrade my Win 10 1607 to 1709 using Windows 10 Upgrade Assistent.
It always ends with the message: «Windows could not configure one or more system components»
After reboot Win 10 is back with 1706.
The logs in C:$WINDOWS.~BTSourcesPanther go like this:
Here is a part of setuperr.log
Error                 MOUPG  CDlpActionImpl<class CDlpErrorImpl<class CDlpObjectInternalImpl<class CUnknownImpl<class IMoSetupDlpAction> > > >::Suspend(1066): Result = 0xC1800104
Error                 MOUPG  CSetupManager::ExecuteInstallMode(722): Result = 0x800705BB
Error                 MOUPG  CSetupManager::ExecuteDownlevelMode(346): Result = 0x800705BB
Error                 MOUPG  CSetupManager::Execute(236): Result = 0x800705BB
Error                 MOUPG  CSetupHost::Execute(375): Result = 0x800705BB
Error                 DU     DU::CDUSession::Search: Failed to set WU internal configuration property for targeted scans. hr = 0x80070057
CONX   Windows::Compat::Appraiser::WicaApplicationInventory::AddItemProperty (546):   App Inventory returned duplicate file c:program files (x86)<vaious locations>XXX.exe.[gle=0x8007000d]
Many more lines like above snapped.
CONX 0xd0000034 Failed to add user mode driver [C:Windowssystem32DRIVERSUMDFwbf_vfs_0011.dll] [0x0803b6] MIG Can't retrieve group information for user IIS APPPOOLDefaultAppPool. NetUserGetLocalGroups failed 0x000008AD [0x0803b6] MIG Can't retrieve group information for user IIS APPPOOLDefaultAppPool. NetUserGetLocalGroups failed 0x000008AD SP pSPRemoveUpgradeRegTree: failed to delete reg tree HKLMSYSTEMSetupUpgrade[gle=0x00000005] [0x0803b6] MIG Can't retrieve group information for user IIS APPPOOLDefaultAppPool. NetUserGetLocalGroups failed 0x000008AD CSI 00000001 (F) 80220008 [Error,Facility=FACILITY_STATE_MANAGEMENT,Code=8] #88225# from CWcmScalarInstanceCore::GetCurrentValue(options = 393216, status = '(null)', value = { type: 40972, bytes ( 12 ): 640065002d00440045000000 }) CSI 00000002 (F) 80220008 [Error,Facility=FACILITY_STATE_MANAGEMENT,Code=8] #150882# from CWcmScalarInstanceCore::GetCurrentValue(options = 393216, status = '(null)', value = { type: 40972, bytes ( 12 ): 640065002d00440045000000 }) CSI 00000003 (F) 80220008 [Error,Facility=FACILITY_STATE_MANAGEMENT,Code=8] #288608# from CWcmScalarInstanceCore::GetCurrentValue(options = 393216, status = '(null)', value = { type: 40972, bytes ( 12 ): 640065002d00440045000000 }) [0x0803b6] MIG Can't retrieve group information for user IIS APPPOOLDefaultAppPool. NetUserGetLocalGroups failed 0x000008AD [0x080831] MIG CSIAgent: Invalid xml format: FormatException: Component with display name: Plugin/{C939EC0F-2F56-4CE8-AF56-2336596A5FA7} already loaded __cdecl Mig::CMXEMigrationXml::CMXEMigrationXml(class Mig::CPlatform *,class UnBCL::String *,class UnBCL::XmlDocument *,class UnBCL::String *,class UnBCL::String *) [0x0808fe] MIG Plugin {526D451C-721A-4b97-AD34-DCE5D8CD22C5}: [shmig] Failed to get preferred homegroup with hr=0x80070490 CSetupAutomation::Resurrect: File not found: C:$WINDOWS.~BTSourcesPantherautomation.dat[gle=0x00000002] SP CSetupPlatform::ResurrectAutomation: Failed to resurrect automation: 0x80070002[gle=0x00000002] [0x0803b6] MIG Can't retrieve group information for user IIS APPPOOLDefaultAppPool. NetUserGetLocalGroups failed 0x000008AD [0x0803b6] MIG Can't retrieve group information for user IIS APPPOOLDefaultAppPool. NetUserGetLocalGroups failed 0x000008AD SP [SetupCl library] Required profile hive does not exist: [??C:$WINDOWS.~BTNewOSWINDOWSsystem32configsystemprofileNTUSER.DAT]. [0x0803b6] MIG Can't retrieve group information for user IIS APPPOOLDefaultAppPool. NetUserGetLocalGroups failed 0x000008AD [0x080831] MIG CSIAgent: Invalid xml format: FormatException: Component with display name: Plugin/{C939EC0F-2F56-4CE8-AF56-2336596A5FA7} already loaded __cdecl Mig::CMXEMigrationXml::CMXEMigrationXml(class Mig::CPlatform *,class UnBCL::String *,class UnBCL::XmlDocument *,class UnBCL::String *,class UnBCL::String *) [0x080831] MIG CSIAgent: Invalid xml format: FormatException: Component with display name: Plugin/{12bc829e-787e-48c2-a9b3-8d2e7aabf06e} already loaded __cdecl Mig::CMXEMigrationXml::CMXEMigrationXml(class Mig::CPlatform *,class UnBCL::String *,class UnBCL::XmlDocument *,class UnBCL::String *,class UnBCL::String *) [0x0803b6] MIG Can't retrieve group information for user IIS APPPOOLDefaultAppPool. NetUserGetLocalGroups failed 0x000008AD [0x080831] MIG CSIAgent: Invalid xml format: FormatException: Component with display name: Plugin/{52776FBF-403C-49cc-b7cb-dd557f36096A} already loaded __cdecl Mig::CMXEMigrationXml::CMXEMigrationXml(class Mig::CPlatform *,class UnBCL::String *,class UnBCL::XmlDocument *,class UnBCL::String *,class UnBCL::String *) MOUPG Finalize: Error reading narrator reg key: [0x80070002] [0x0803b6] MIG Can't retrieve group information for user IIS APPPOOLDefaultAppPool. NetUserGetLocalGroups failed 0x000008AD [SetupPlatform.exe] winreHashWimFile: Failed to hash [D:$WINDOWS.~BTSourcesWinRE]: 0x5 CSI 0000002b (F) Done with generic command 6; CreateProcess returned 0, CPAW returned S_OK in success? false le=0x80004005] [0x018007] CSI 0000002c (F) Failed execution of queue item Installer: Generic Command ({81a34a10-4256-436a-89d6-794b97ca407c}) with HRESULT HRESULT_FROM_WIN32(14109). Failure will not be ignored: A rollback will be initiated after all the operations in the installer queue are completed; installer is reliable[gle=0x80004005] CSI 0000010b (F) Generic Command ErrorCode: 80004005 Executable: iissetup.exe ExitCode: 9 Phase: 38 Mode: Install (first install) Component: Microsoft-Windows-IIS-SharedLibraries-GC, Culture=neutral, PublicKeyToken=31bf3856ad364e35, ProcessorArchitecture=amd64, versionScope=NonSxS[gle=0x80004005] CSI 0000010d@2017/11/1:17:10:16.087 (F) onecorebasewcpcomponentstorecomadvancedinstallerstore.cpp(580): Error HRESULT_FROM_WIN32(ERROR_ADVANCED_INSTALLER_FAILED) originated in function Windows::COM::CComponentStore::IAdvancedInstallerAwareStore_ResolvePendingTransactions expression: HRESULT_FROM_WIN32(14099L) CSI 0000010e (F) HRESULT_FROM_WIN32(ERROR_ADVANCED_INSTALLER_FAILED) #146# from Windows::COM::CComponentStore_IAdvancedInstallerAwareStore::ResolvePendingTransactions(dwFlags = (DontFailIfPrimitivesPending|IndicatePrimitiveRollback), Progress = NULL, Phase = 0, Disposition = (unknown enumerant 0)' | '0)[gle=0x80073713] CBS Startup: Failed to process advanced operation queue, startupPhase: 0. [HRESULT = 0x80073713 - ERROR_ADVANCED_INSTALLER_FAILED] [0x030149] CMI Callback_CBS_Do_OnlineInstall:Calling startup processing failed 0x80073713 [0x030153] CMI Callback_CMI_ConfigInstall: CBS startup processing failed.Here is setupact.log:
Error [0x030153] CMI Callback_CMI_ConfigInstall: CBS startup processing failed. Info [0x0640ae] IBSLIB PublishMessage: Publishing message [Windows could not configure one or more system components. To install Windows, restart the computer and then restart the installation.]Prior to attempt I started dism and sfc resulting without errors:
dism /Online / Cleanup-Image /ChechHealth
dism /Online / Cleanup-Image /ScanHealth
sfc /scannow
I also used the Windows Update TroubleShooter.
I wonder what might be the reason?
I also wonder why it is analyzing IIS Appool and what's that with SetPlatform.exe?
-
Edited by
Wednesday, November 1, 2017 9:22 PM
correction & formatting
The Windows could not Configure one or more System Components Message is seen mostly while trying to update your Windows installation to the latest version using the Windows Update Utility. This error mostly is triggered due to some incorrect configurations on the computer or sometimes due to certain disabled services.

The error might also be triggered due to some other reasons which we have explained in great detail below. Therefore, read through the reasons that we have mentioned below and move on towards implementing the solutions that we have compiled after some intense research and brainstorming.
What Causes you to see the Windows could not Configure one or more System Components message while updating Windows?
After reading through some troubleshooting techniques that worked for certain users facing this error, we devised that the following must be the reasons due to which it occurs.
- Internet Information Services: Windows has a bunch of preinstalled services that are vital for certain elements and features that it entails. However, we have discovered that some users were facing the Windows could not Configure one or more System Components error because of the Internet Information Service running on their computer. Therefore, it is recommended that you remove it from your computer using the method below.
- SD Card Reader: Weirdly enough, some users complained that they got this error because while updating their Windows, an SD Card Reader or an SD Card was inserted on their computer and this was causing the error message to appear. Therefore, removing the SD Card reader can be a good option if you are getting this on your computer.
- Outdated Drivers: Some users complained that outdated Wi-Fi drivers were the reason behind the occurrence of the Windows could not Configure one or more System Components error. Therefore, we recommend that you try and remove the drivers already installed on your system and them update them to the latest available version on the internet.
- Machine Keys: Certain Machine keys if present on your system can cause misconfiguration while a new update is being applied and to fix this, you will have to remove them from your computer. Therefore, in order to remove the Machine Keys, it is recommended that you navigate to the folders where they are stored and delete them.
- Update Misconfiguration: The Windows Update Utility on your computer might have gotten glitched or misconfigured due to which the Windows could not Configure one or more System Components error is being seen while applying a new update. Therefore, we recommend that you try and troubleshoot the Update Utility using the default Windows Troubleshooter as it can sometimes fix issues with updates.
Now that you have been made aware of most of the reasons due to which this error occurs in the first place, we can finally move on towards implementing the solutions.
Before you Start:
- If you have connected an SD Card Reader or have installed an SD Card on your computer, it is recommended to eject them and remove them physically from the computer as they can sometimes cause misconfiguration during an update and trigger the error.
- Try disconnecting all connected devices that aren’t needed during an update or Windows installation and check to see if that fixes the Windows could not Configure one or more System Components issue.
- Try using a different Installation media if you are getting the Windows could not Configure one or more System Components Windows 7 Installation error.
Fixing the Windows could not Configure one or more System Components Message while Updating Windows:
Solution 1: Uninstalling Internet Information Service
- Press “Windows +R” on your keyboard and type “Control Panel” in the Run Prompt and press “Enter”.

Typing in Control Panel - Navigate to “Uninstall a Program” under the “Uninstall” category. Click on “Turn Windows features on or off” on the left side of the window. Click on “Yes” if you are asked for any permissions.

Turn Windows features on or off - Locate the “Internet Information Services” entry in the “Windows Feature” dialogue box.
- Uncheck the box next to it and click the “OK.”

Uncheck the Internet Information Services option - After doing this, check to see if the Windows could not Configure one or more System Components error is fixed.


Solution 2: Reinstalling Wi-Fi Drivers
- Make sure to download the Wi-fi Drivers that your Wi-fi Module requires to operate as we will be uninstalling them in the steps below. Alternatively, you can use Driver Easy to scan and download them for you but they will also require internet connectivity, Make a Scan using Driver Easy and determine your Wi-Fi module, after that, search on the internet for its drivers and keep them on your computer before continuing.
- Press “Windows + R” on your keyboard to open “Run.” In the Run dialogue box, type or paste “devmgmt.msc” to open the “Device Manager.”

Typing devmgmt.msc in the Run prompt - Locate the “Wireless Adapter Driver” option under “Network Adapters”.
- Right-click on your “Wireless Driver” and select “Uninstall”.

Uninstall The Device From The Network Adapter - Make sure to uninstall all the network drivers on your computer.
- After this, install the downloaded drivers on your computer and try to run the update.
- Check to see if the Windows could not Configure one or more System Components error still occurs.

Solution 3: Update Using the Media Creation Tool
- Download the Media Creation Tool. Once downloaded, run the “setup” named “MediaCreationTool.exe.” Click on “Yes” if you are asked for any permissions.
- In the “Windows 10 Setup” dialogue box, select the “Upgrade this PC now” option and click on “Next.”
- Accept the license terms from the following window.

Upgrade this PC now - In the “Ready to install” window, select the “Install Windows and Keep personal files and apps” options. Proceed by clicking on “Next” and then “Install.”
- Wait for the process to finish and proceed like normal.
- Check to see if this has fixed the Windows could not Configure one or more System Components error and completed the update successfully.

Solution 4: Removing MachineKeys From Windows
- Launch into the File Explorer on your computer and navigate to “This PC.”
- Follow the path “C:ProgramData>Microsoft>Crypto>RSA>MachineKeys”. Click on the “View” tab on File Explorer’s menu and click on the “Hidden items” option if you are unable to see “Program Data.”

View Hidden Items - Locate the files listed below and right-click on them and select “Delete” from the drop-down menu.
6de9cb26d2b98c01ec4e9e8b34824aa2_GUID      iisConfigurationKey
d6d986f09a1ee04e24c949879fdb506c_GUID      NetFrameworkConfigurationKey
76944fb33636aeddb9590521c2e8815a_GUID      iisWasKey

Solution 5: Backup & Delete IIS Dependent Folders
- Right-click on the desktop and select “New > Folder” in the drop-down menu. Name it as “IIS Backup.”
- Press “Windows + E” on your keyboard to open the “File Explorer”, type in “*windows-iis*” in the search bar, and press “Enter.”

Typing in “windows-iis” in the search bar - Once the search is done, press “Ctrl + A” to select all the files. Press “Ctrl + X” to copy and delete them.
- Open the “IIS Backup” folder on the Desktop and press “Ctrl + P” to paste the files.
- Press “Windows + E” on your keyboard to open “File Explorer” and navigate to “This PC”. Navigate to “C:Windows > System32”.

Click on This PC - Locate the folder named “inetsrv” and press “Ctrl + X” to cut it and paste it back in the “IIS Backup folder.”


Solution 6: Running Windows Update troubleshooter
- Press “Windows + R” on your keyboard and type “Control Panel” in the Run Prompt and press “Enter”.
Typing in Control Panel - Type “Troubleshooting” in the search bar on the “Control Panel” and select “ Troubleshooting (troubleshooting history)”
- Choose “System and security” under “Troubleshoot computer problems” and select “Windows Update”.

Troubleshoot Windows Update - In the “Windows Update” dialogue box, click on “Advanced” and click on “Next.”
- Wait for the “Windows Update troubleshooter” to end to know your problem.

Solution 7: Renaming the inetsrv Folder
- Press “Windows + E” on your keyboard to open “File Explorer” and navigate to “This PC“. After that, Navigate to “C:Windows > System32″.

Click on system 32 - Locate the folder named “inetsrv”, right-click and select “Rename” and rename the file as “inetsrv.old”. Press “Enter”.
- Check to see if doing so has fixed the Windows could not Configure one or more System Components issue.

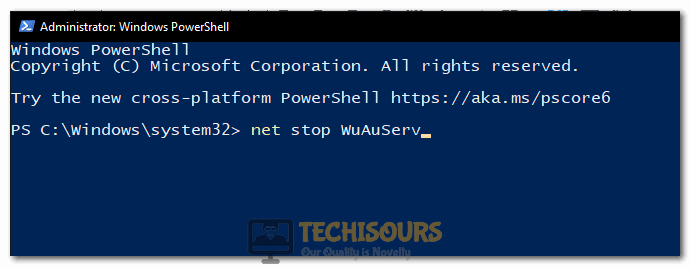
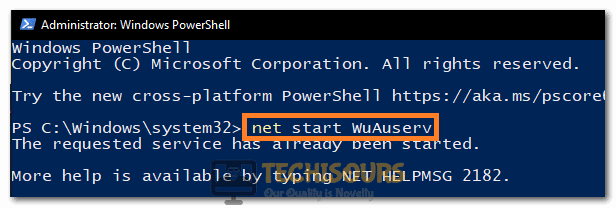
Solution 8: Deleting Pending Windows Updates
- Press “Windows” + “R” to open the Run prompt, type in “PowerShell” and press “Shift” + “Ctrl” + “Enter” to launch it with Admin Permissions.

Launching Powershell - Paste the command following commands into the PowerShell Windows one by one and press Enter after each.
net stop WuAuServ
net stop Cryptsvc
net stop bits
net stop msiserver

Typing in the command to stop the service - After executing those commands, type in and execute the following two commands to rename the folders.
ren <C:WindowsSoftwareDistribution SoftwareDistribution.old>
ren <C:WindowsSystem32catroot2 Catroot2.old>
- After this, paste in the following commands to start the stopped services once more.
net stop WuAuServ
net stop Cryptsvc
net stop bits
net stop msiserver

Starting the service back up - Restart the system and check “Windows Updates” to see if the pending updates are gone.
- If you don’t see any updates available, Navigate to “C:Windows > SoftwareDistribution”. Right-click on “SoftwareDistribution.Old” and “delete” it if you see “SoftwareDistribution” beside it.
- Now, check to see if the Windows could not Configure one or more System Components error is fixed.

Solution 9: Boot Windows 10 in Safe Mode
- Press “Windows + R” on your keyboard to open “Run.” In the Run dialogue box, type or paste “msconfig”.

Typing in “Msconfig” - Hover over to the “Boot” tab and check the “Safe Mode” option, click on “OK” and make sure to restart your system.

Boot in safe mode - Try to run the Windows Update while in the Safe Mode and check to see if it proceeds.
- If Windows Updates normally, repeat “step 1 and step 2” and uncheck the “Safe Mode” option this time to ensure Windows boots normally.
- Check to see if booting and updating in Safe Mode has fixed your Windows could not Configure one or more System Components issue.


Solution 10: Updating Windows 10 using the Update Assistant.
- Open the “Windows 10 download” site and click on “Update now”.
- The download will now begin, make sure to complete the download and then run the downloaded executable.

Running the Executable - After running, click on Upgrade Now and follow through with the on-screen instructions to start the Windows Update.
- Check to see if doing so fixes the Windows could not Configure one or more System Components error.
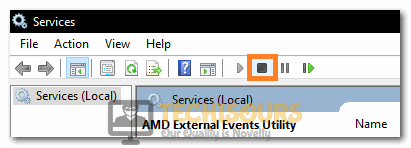
- Press “Windows + R” on your keyboard to launch into the “Run” prompt, type “services.msc” in the search box and press “OK”.

Typing in “services.msc” - Click on the “Application Host Helper Service” select the “Stop” button on the upper bar.

Clicking on the Stop button - Launch into the File Explorer and type *WinSxS* in the search bar and press “Enter.”
- Right-click on the folder and select the “Properties” option.
- From the top, select the “Security” button and click on the “Edit” option in the list of “Group or User Names”.

Tweak security settings - After that, click on “Add” and enter in your Windows Account user name.
- Click on the “Check Names” option and it will automatically accept it if you have entered in the correct user name.

Check Names - After that, click on “Apply” to add this user to the list of Group or User names and it will take you back to the list of added Groups and Usernames.
- In the list, select the username that we have just added, and from the bottom, check the “Allow” box for all permissions.
- Click on “Apply” and then on “OK’ and the permission will have been granted and the ownership is taken.
- Once done, select all the “windows-iis” folders and press “Ctrl + X” on your keyboard. Switch to “another drive (D:, E: etc.)” and press “Ctrl + V” to paste the files.
- Press “Windows’ + “R” to open the Run prompt, type in “PowerShell and press “Shift’ + “Ctrl” + “Enter” to launch into it.
Launching Powershell - Paste “net start WuAuServ” and hit “Enter” to start the updates again.
- Check for updates and install them on your computer.
- Check to see if the Windows could not Configure one or more System Components error has been resolved.


After trying out these solutions, if you have still been unable to fix the issue, feel free to contact us.
 Ошибка при обналении Windows 10 до версии 1903 довольно частое явление и сегодня мы будем разбираться в причинах появления данной ошибки и как его решить.
Windows 10 version 1903 это седьмой крупный паккет обнавления и при ее установке примерно на 40% возникает сообщение «Windows could not configure one or more system components. To install windows, restart the computer and then restart the installation» после чего происходил успешный откат в исходную точку или перезагрузка системы.
Что нужно делать до обнавления Windows 10 версия 1903
- Перед обновлением лучше всего отсоединить внешние носители, такие как USB-накопители, SD-карты. Выключите USB устройства, которые не нужны USB-принтер, беспроводная мышь USB, приемник клавиатуры, беспроводная сетевая карта USB и т. д.. они могут помешать корректной установке обновления.
- Более ранние версии программного обеспечения BattlEye могут быть несовместимы с Windows 10 версии 1903 перед обновлением лучше удалить полностью папку C:Program Files (x86)Common FilesBattlEye
- Еще перед установкой данного обновления желательно обновить драйвера для всех устройств (они должны быть совместимы с 1903) и освободить место на диске С (должно быть больше 20 ГБ)
- Если у вас есть антивирус или сторинии программы ( такие как Крипто Про, Virtualbox,TuneUp Utilities) то удалите их.
- Ошибка часто возникает из-за неправильных настроек языка. Выберите язык страны, в которой вы сейчас находитесь, означает, что вы находитесь в России, значит выберите русский язык (rus).
Способы обнавления Windows 10 до версии 1903
- Дождаться пока данное обновление автоматически будет загружено через Центр Обновлений
- Принудительно запустить поиск обновления в Центре Обновлений. Для этого откройте настройки Центра обновления Windows (Пуск-Параметры > Обновление и безопасность > Центр обновления Windows) и нажмите кнопку Проверить наличие обновлений. После появления обновления вы сможете выбрать опцию «Загрузить и установить сейчас».
- Через «Media Creation Tooll» скачиваем ее . Далее запустите данную программу и выбираете обнавить этот компьютер сейчас
- Скачиваем образ диска Windows 10 после скачивания откройте .iso образ, как обычную папку; запустите Setup.exe и выберите параметр обновления с сохранением всех данных.
- Иногда загруженные не до конца файлы обновления, могут мешать общему процессу. Для этого найдите папку SoftwareDistribution в корне системы (C:Windows) и удалите её.
Способы решения ошибки при обналении Windows 10 до версии 1903
Способ 1. Сброс кеша обновления Windows 10
Введите cmd в «Поиске» windows, нажмите в соответствиях правой кнопкой мыши и выберите «Запуск от имени администратора».

Скопируйте приведенные ниже команды, вставьте все сразу в «командную строку» и нажмите Enter.
net stop wuauserv
net stop cryptSvc
net stop bits
net stop msiserver
ren C:WindowsSoftwareDistribution SoftwareDistribution.old
ren C:WindowsSystem32catroot2 catroot2.old
net start wuauserv
net start cryptSvc
net start bits
net start msiserver pause
 Если у вас остановится процесс на строчке net start msiserver pause, нажмите Enter. Далее просто выйдите с командной строки набрав команду exit. Откройте «Параметры» > «Обновление и безопасность» и нажмите «Проверка наличия обновлений». Просмотрите, пропали ли проблема обновление функций до Windows 10 Version 1903
Способ 2. Исправляем поврежденные файлы DISM & SFC
Если ошибка не исправилась, значит нужно запустить проверку и восстановление системных файлов Windows, инструментами SFC и DISM. Sfc /scannow — это команда командной строки, которая позволяет сканировать вашу систему Windows на наличие ошибок и исправлять их.. Затем DISM проверяет работоспособность образа системы. Следовательно, следуйте инструкциям для запуска обоих инструментов один за другим по пунктам.
- Введите cmd в «Поиске» windows, нажмите в соответствиях правой кнопкой мыши и выберите «Запуск от имени администратора».
- Теперь введите команду SFC /SCANNOW и разрешите выполнение нажав клавишу Enter.

- Теперь введите DISM /ONLINE /CLEANUP-IMAGE /RESTOREHEALTH и нажмите клавишу Enter на клавиатуре.

- Перезапустите систему после завершения процесса и проверьте обновление функции.


Способ 3. Поиск ошибки обнавления Windows 10 через SetupDiag
SetupDiag — это автономный инструмент диагностики, который можно использовать для получения сведений о том, почему не удалось выполнить обновление для Windows 10. Внизу инструкция по пользованию Setupdiag
- Для работы SetupDiag.exe требуется .NET framework 4,6.
- Скачиваем утилиту SetupDiag
- После завершения загрузки запустите утелиту сетупдиаг. Нажмите кнопку Да , если вам будет предложено утвердить выполнение программы.После запуска утилита пытается найти файлы логов, которые Windows 10 создает в процесс обновления.
- После того как Сетупдиаг выполнит диагностику вашего компьютера, откроется командное окно. Дождитесь завершения этой задачи.
- По завершению будет создоно двай файла в тойже папаке где находистя сама утилита . Один — файл конфигурации, другой — файл журнала.
- Откройте файл журнала setupdiagresult. log. с помощью блокнота


Смотрим на поле Matching Profile found если там написано No match то это означает что проблем не надено а если там есть какая то надпись как на рисунке то это говорить о наличии проблемы. Данный код можно расшифровать снизу будет полный список доступных кодов .
ПРИМЕР : Спомощью SetupDiag был получен лог — «Error: Found AdvancedInstaller Generic failure. Component: Microsoft-Windows-IIS-HttpProtocol, Culture=neutral» Из кода ошибки видно что проблема в Службе IIS заначить нужно его отключить переходитм в Панель управления -> Администрирование -> Службы там ищем службу IIS и отключаем. Также нужно зажать Windows + R откроется окно выполнить нужно ввести optionalfeatures.exe откроется окно «Компанеты windows» там тоже нужно отключить Службу IIS. Если служба не будет отключаться то запустите систему в безопасно режиме и переименуйте папку C:WindowsSystem32inetsrv. После этих действий система обнавилась.
Расшифровка кодов SetupDiag
- CompatScanOnly — FFDAFD37-DB75-498A-A893-472D49A1311D — запуск установки setup.exe вызван в режиме проверки совместимости, а не обновления.
- BitLockerHardblock — C30152E2-938E-44B8-915B-D1181BA635AE — в исходной системе включен BitLocker, который не поддерживается в целевой.
- VHDHardblock — D9ED1B82-4ED8-4DFD-8EC0-BE69048978CC — система загружается в виде VHD образа (такой режим обновления Windows 10 не поддерживается).
- PortableWorkspaceHardblock — 5B0D3AB4-212A-4CE4-BDB9-37CA404BB280 — система загружается с USB устройства Windows To-Go (апгрейд системы в среде Windows To-Go не поддерживается).
- AuditModeHardblock — A03BD71B-487B-4ACA-83A0-735B0F3F1A90 — операционная система загружена в режиме аудита (Audit Mode).
- SafeModeHardblock — 404D9523-B7A8-4203-90AF-5FBB05B6579B — операционная система загружена в безопасном режиме (Safe mode).
- InsufficientSystemPartitionDiskSpaceHardblock — 3789FBF8-E177-437D-B1E3-D38B4C4269D1 — на системном разделе недостаточно места для обновления.
- CompatBlockedApplicationAutoUninstall – BEBA5BC6-6150-413E-8ACE-5E1EC8D34DD5 — найдено несовместимое приложение, которое нужно удалить перед апгрейдом версии.
- CompatBlockedApplicationDismissable — EA52620B-E6A0-4BBC-882E-0686605736D9 — при установке в тихом (с ключом /quiet), возникла ошибка, требующая взаимодействия с пользователем и препятствующая установке.
- CompatBlockedApplicationManualUninstall — 9E912E5F-25A5-4FC0-BEC1-CA0EA5432FF4 — в системе обнаружено нестандартное приложение, отсутствующее в Add/Remove Programs, файлы которого нужно удалить вручную.
- HardblockDeviceOrDriver — ED3AEFA1-F3E2-4F33-8A21-184ADF215B1B — один из установленных драйверов не совместим с новой ОС и должен быть удален.
- HardblockMismatchedLanguage — 60BA8449-CF23-4D92-A108-D6FCEFB95B45 — не совпадает язык исходной системы и целевой.
- HardblockFlightSigning — 598F2802-3E7F-4697-BD18-7A6371C8B2F8 — вы пытаетесь установить пре-релиз (в рамках программы Windows Insider) на компьютере с включённым режимом Secure Boot. В этом режиме пре-релиз не загрузится.
- DiskSpaceBlockInDownLevel — 6080AFAC-892E-4903-94EA-7A17E69E549E — в ходе операции обновления на диске закончилось место.
- DiskSpaceFailure — 981DCBA5-B8D0-4BA7-A8AB-4030F7A10191 — место на диске кончилось после перезагрузки в новый релиз.
- DeviceInstallHang — 37BB1C3A-4D79-40E8-A556-FDA126D40BC6 — в процессе установки система зависла, или упала в BSOD.
- DebugSetupMemoryDump — C7C63D8A-C5F6-4255-8031-74597773C3C6 — BSOD при установке. Для дальнейшего анализа нужно исследовать файл дампа памяти.
- DebugSetupCrash — CEEBA202-6F04-4BC3-84B8-7B99AED924B1 — ошибка установки, требующая анализа дампа памяти.
- DebugMemoryDump — 505ED489-329A-43F5-B467-FCAAF6A1264C — правило для анализа файла memory.dmp , созданного в процессе установки/обновления.
- BootFailureDetected — 4FB446C2-D4EC-40B4-97E2-67EB19D1CFB7 — ошибка загрузки на определённой фазе обновления.
- FindDebugInfoFromRollbackLog — 9600EB68-1120-4A87-9FE9-3A4A70ACFC37 — информация об BSOD без необходимости установки пакета отладки.
- AdvancedInstallerFailed — 77D36C96-32BE-42A2-BB9C-AAFFE64FCADC — фатальная ошибка установщика.
- FindMigApplyUnitFailure — A4232E11-4043-4A37-9BF4-5901C46FD781 — ошибка в модуле миграции.
- FindMigGatherUnitFailure — D04C064B-CD77-4E64-96D6-D26F30B4EE29 — подробная информация о сбойном компоненте миграции.
- CriticalSafeOSDUFailure — 73566DF2-CA26-4073-B34C-C9BC70DBF043 — ошибка при обновлении образа SafeOS.
- UserProfileCreationFailureDuringOnlineApply — 678117CE-F6A9-40C5-BC9F-A22575C78B14 — ошибка при создании или изменении профиля пользователя в режиме онлайн фазы апгрейда.
- WimMountFailure — BE6DF2F1-19A6-48C6-AEF8-D3B0CE3D4549 — при обновлении не удалось смонтировать wim файл.
- FindSuccessfulUpgrade — 8A0824C8-A56D-4C55-95A0-22751AB62F3E — выполнено успешное обновление билда Windows 10.
- FindSetupHostReportedFailure — 6253C04F-2E4E-4F7A-B88E-95A69702F7EC — сбой в начале процесса обновления при работе setuphost.exe.
- FindDownlevelFailure — 716334B7-F46A-4BAA-94F2-3E31BC9EFA55 — ошибка в SetupPlatform.
- FindAbruptDownlevelFailure — 55882B1A-DA3E-408A-9076-23B22A0472BD — информация о последней ошибке, когда записи в журнале неожиданно обрываются.
- FindSetupPlatformFailedOperationInfo — 307A0133-F06B-4B75-AEA8-116C3B53C2D1 — информация о фазе и ошибке при критическом сбое в SetupPlatform.
- FindRollbackFailure — 3A43C9B5-05B3-4F7C-A955-88F991BB5A48 — последнее действие, и сбойная фаза перед началом процедура отката к предыдущей версии Windows 10.
- AdvancedInstallerGenericFailure — 4019550D-4CAA-45B0-A222-349C48E86F71 — ошибки чтения/записи AdvancedInstaller.
- OptionalComponentFailedToGetOCsFromPackage — D012E2A2-99D8-4A8C-BBB2-088B92083D78 — информация об ошибке в опциональном компоненте при попытке получить список компонентов пакета.
- OptionalComponentOpenPackageFailed — 22952520-EC89-4FBD-94E0-B67DF88347F6 — ошибка при попытке открыть опциональный компонент.
- OptionalComponentInitCBSSessionFailed — 63340812-9252-45F3-A0F2-B2A4CA5E9317 — установщик или определенный компонент не запущены.
- UserProfileCreationFailureDuringFinalize — C6677BA6-2E53-4A88-B528-336D15ED1A64 — ошибка создания профиля на финальном этапе обновления.
- WimApplyExtractFailure — 746879E9-C9C5-488C-8D4B-0C811FF3A9A8 — ошибка образа wim при его распаковке.
- UpdateAgentExpanderFailure — 66E496B3-7D19-47FA-B19B-4040B9FD17E2 — ошибка DPX при обновлении через Windows Update.
- FindFatalPluginFailure — E48E3F1C-26F6-4AFB-859B-BF637DA49636 — ошибка в одном из подключаемых модулей.
- AdvantedStallerFiled — 77D36C96-32BE-42A2-BB9C-AAFFE64FCADC — Указывает на критическую ошибку в Адванцединсталлер при запуске пакета установщика, включает вызываемый exe, этап, режим, код компонента и ошибки.
- MigrationAbortedDueToPluginFailure — D07A24F6-5B25-474E-B516-A730085940C9 — Указывает на критическую ошибку в подключаемом модуле миграции, которая приводит к аварийному завершению процесса настройки. Будет предоставлена операция настройки, имя надстройки, действие плагина и код ошибки.
- DISMAddPackageFailed — 6196FF5B-E69E-4117-9EC6-9C1EAB20A3B9 — Указывает на критическую ошибку при выполнении операции добавления пакета DISM. Будет задано имя пакета, ошибка DISM и код ошибки пакета Add.
- PlugInComplianceBlock — D912150B-1302-4860-91B5-527907D08960 — Обнаружены все блоки совместимости с подключаемыми модулями соответствия требованиям сервера. Выводит сведения о блоке и об исправлении.
- AdvancedInstallerGenericFailure — 4019550D-4CAA-45B0-A222-349C48E86F71 — Запускает дополнительные сбои установщика в общем смысле, выводятся код вызываемого приложения, этапа, режима, компонента и кода ошибки.
- FindMigGatherApplyFailure — A9964E6C-A2A8-45FF-B6B5-25E0BD71428E — Ошибки, возникающие при сбое модуля миграции при выполнении операции сбора или применения. Указывает на объект миграции (путь к файлу или реестру), который миграция
- OptionalComponentFailedToGetOCsFromPackage — D012E2A2-99D8-4A8C-BBB2-088B92083D78 — Указывает на то, что операция миграции необязательного компонента (OC) не смогла перечислить дополнительные компоненты из пакета OC. Выводит имя пакета и код ошибки.
- OptionalComponentOpenPackageFailed — 22952520-EC89-4FBD-94E0-B67DF88347F6 — Указывает, что при выполнении миграции необязательных компонентов не удалось открыть дополнительный пакет компонентов. Выводит имя пакета и код ошибки.
- OptionalComponentInitCBSSessionFailed — 63340812-9252-45F3-A0F2-B2A4CA5E9317 — Указывает на повреждение в стеке обслуживания в системе нижнего уровня. Выводит код ошибки, обнаруженный при попытке инициализировать служебный компонент в существующей операционной системе.
- DISMproviderFailure — D76EF86F-B3F8-433F-9EBF-B4411F8141F4 — Активируется, когда поставщик DISM (плагин) не проходит критическую операцию. Выводит файл (имя надстройки), функцию с именем + код ошибки и сообщение об ошибке от поставщика.
- SysPrepLaunchModuleFailure — 7905655C-F295-45F7-8873-81D6F9149BFD — Указывает, что при выполнении критической операции произошел сбой в работе надстройки sysPrep. Указывает имя подключения, имя операции и код ошибки.
- UserProvidedDriverInjectionFailure — 2247C48A-7EE3-4037-AFAB-95B92DE1D980 — Драйвер, предоставленный для настройки (посредством ввода из командной строки), завершился сбоем некоторым образом. Выводит функцию установки драйвера и код ошибки.
- PlugInComplianceBlock — D912150B-1302-4860-91B5-527907D08960 — Эти данные предназначены только для обновления сервера, при этом будет выводиться блок соответствия требованиям и требуется исправление.
- PreReleaseWimMountDriverFound — 31EC76CC-27EC-4ADC-9869-66AABEDB56F0 — Захватывает ошибки из-за того, что в системе зарегистрирован Неизвестный драйвер WIMMount. sys.
- WinSetupBootFilterFailure — C073BFC8-5810-4E19-B53B-4280B79E096C — Обнаруживает ошибки в операциях с файлами в режиме ядра.
- WimMountDriverIssue — 565B60DD-5403-4797-AE3E-BC5CB972FBAE — Обнаруживает ошибки в регистрации WimMount. sys в системе.
- DISMImageSessionFailure — 61B7886B-10CD-4C98-A299-B987CB24A11C — Захватывает сведения об ошибках, если система DISM не может успешно запустить сеанс работы с изображениями.
- FindEarlyDownlevelError — A4CE4FC9-5E10-4BB1-8ECE-3B29EB9D7C52 — Обнаруживает ошибки на этапе нижнего уровня перед вызовом платформы настройки.
- FindSPFatalError — A4028172-1B09-48F8-AD3B-86CDD7D55852 — Захватывает сведения об ошибках, если платформа настройки обнаруживает неустранимую ошибку.
{youtube}TuEKTKsRmIc{/youtube}
{youtube}y5WZY8hZYkg?t=43{/youtube}
{youtube}QksyLVeuBR0?t=11{/youtube}
Комментарии ()
Оставьте свой комментарий
. сохраняется Обновление Windows 10 это необходимо. Даже если вас не интересуют новые функции, постоянные обновления безопасности защищают вашу систему от постороннего вмешательства. Microsoft твердо верит в это, поэтому полностью избежать автоматических обновлений для Windows 10 сложно.
К сожалению, большое количество пользователей сообщили о получении неправильное сообщение Успешно предотвратить Центр обновления Windows. Это пугающая и разочаровывающая ситуация, но ее очень легко исправить. Вот шесть способов исправить ошибку »Windows не может настроить один или несколько компонентов системы».
Насколько вы к нему обращаетесь Множественные сообщения об ошибках , но ошибка «.Windows не удалось настроить один или несколько компонентов системы. Чтобы установить Windows, перезагрузите компьютер, а затем перезапустите мастер установки.«Длинный и загадочный.
Скорее всего, вы увидите это только при обновлении своего компьютера, а поскольку Windows 10 все время выполняет автоматические обновления, нет простого способа избежать этой ошибки в какой-то момент. Хуже того, перезапуск редко решает проблему.
Есть несколько возможных причин возникновения этой ошибки. в точности как Восстановить поврежденные файлы Нет одного способа исправить это, и вам может потребоваться попробовать несколько методов, описанных в этой статье. Если вы не можете нормально загрузить компьютер, загрузитесь в Безопасный режим.
Для удобства укажу на ошибку »Windows не может настроить один или несколько компонентов системы«Как ошибка Системные компоненты в этой статье.
Удалить Internet Information Services
В Windows 10 есть функции, которые подойдут каждому. Независимо от того, являетесь ли вы обычным пользователем или опытным сетевым инженером, работающим с Windows Servers и .NET-приложения, где вы можете установить одну и ту же операционную систему и получить те же функциональные возможности, которые работают для вас прямо из коробки.
К сожалению, это может быть программное обеспечение веб-сервера Именованный Информационные службы Интернета (IIS) отвечает за ошибку компонентов системы. Следуйте каждому разделу, чтобы отключить IIS и исключить его как причину этой ошибки.
Отключить информационные службы Интернета
- Чтобы отключить IIS, нажмите клавишу. Windows И введите Особенности , и выберите Включение и отключение функций Windows Когда появится соответствующий результат.
- Ищу Информационные услуги Интернет в списке и снимите оба флажка. Нажмите «OkКогда предупреждение просит вас подтвердить. IIS будет удален автоматически.
- Если вы получили сообщение об отказе в разрешении, убедитесь, что вы используете учетную запись с правами администратора.
Удалить ключи устройства IIS
Одной из возможных причин ошибки системного компонента являются аппаратные ключи, используемые IIS для хеширования и шифрования информации. Во время обновления мастер установки находит эти ключи и дает сбой. Это потенциально неисправная функция безопасности. Самый простой способ решить эту проблему — удалить старые ключи устройства.
- Откройте окно проводника файлов.
- Перейти к C: ProgramData Microsoft Crypto RSA MachineKeys.
- Если папка кажется пустой, выберите для отображения и установите флажок скрытые предметы.
- Удалите все файлы в папке MachineKeys.
После удаления этих файлов мастер обновления может создавать на их месте новые файлы. Говорят, что это решение сработало для многих пользователей. Если обновление по-прежнему не удается, попробуйте следующий шаг.
Резервное копирование и удаление дочерних папок IIS
При удалении IIS следует удалить все связанные с ним файлы, это делается редко. Даже если функция IIS никогда не была включена, все равно есть много мест, где вы можете найти файлы, которые вы используете на своем жестком диске. Перемещение этих файлов — возможное решение системной ошибки.
- Создайте папку на рабочем столе и дайте ей имя Резервное копирование IIS.
- Откройте проводник и перейдите в C: Windows WinSxS.
- В поле поиска введите * windows-iis * И нажмите Enter.
- Выберите все файлы в результатах поиска и нажмите Ctrl + X вырезать это.
- Вернуться в папку Резервное копирование IIS на рабочем столе и нажмите Ctrl + P для вставки файлов.
- Перейти к C: Windows System32.
- Найдите папку инецрв И нажмите Ctrl + X вырезать это.
- Вставить в папку Резервное копирование IIS.
Хотя эта причина менее распространена, чем проблема с аппаратными ключами, некоторые пользователи сообщают, что они могут успешно выполнить обновление после этих шагов. После завершения обновления вы можете переместить папку резервного копирования IIS с рабочего стола в корзину.
Удалить и обновить драйверы
Другая возможная причина ошибки системных компонентов связана с сетевыми драйверами системы. Распространенное решение — удалить драйвер Wi-Fi для вашей системы и обновить все остальные сетевые драйверы. Обратите внимание, что вы должны подготовить кабель Ethernet, чтобы оставаться подключенным к Интернету во время этих шагов.
- нажмите клавишу. Windows И введите Управление устройством.
- в сетевые адаптеры щелкните правой кнопкой мыши на Адаптер Wi-Fi ваш выбор удалить.
- Для каждой другой записи в списке щелкните правой кнопкой мыши и выберите Обновление драйвера.
В некоторых случаях эти шаги позволили успешно завершить обновление. После обновления переустановка адаптера Wi-Fi не должна вызвать никаких проблем, и вы можете продолжать пользоваться компьютером в обычном режиме. узнай меня Как найти и заменить старые драйверы Windows.
Используйте инструмент создания Windows Media
Поскольку ошибка системных компонентов обычно возникает во время обновления, неудивительно, что Media Creation Tool упоминается как возможное исправление. Это доступно из Сайт Microsoft. Для его использования не требуется установка.
Когда загрузка будет завершена:
- Откройте средство создания мультимедиа.
- Согласитесь с лицензионным соглашением.
- На вопрос, чем вы хотите заниматься? Найдите Обновите этот компьютер сейчас.
- Следуйте инструкциям на экране, чтобы обновить вашу систему.
Непонятно, почему этот метод работает, а другие не работают, но, по мнению некоторых пользователей, это было идеальное решение. Ты можешь видеть Средство создания мультимедиа для обновления Windows 10.
Удалите SD-карту
Когда ничего не помогает, иногда встречаются решения, которые кажутся бессмысленными, но доказали свою эффективность для других пользователей. Как ни странно и несовместимо с другими вариантами, простое извлечение SD-карты из устройства чтения, как известно, является единственным решением для некоторых пользователей.
Для ясности, это, по-видимому, применимо как к внешним, так и к встроенным устройствам чтения SD-карт, поскольку удаление SD-карты перед повторной попыткой обновления привело к плавному завершению обновления.
Комедия ошибок
Windows печально известна своей подверженностью ошибкам. Определенно стоит научиться бороться с Наиболее частые ошибки что вы встретите.
Хотя многие пользователи считают принудительные обновления Microsoft агрессивными, это, вероятно, лучшее решение для обеспечения безопасности большинства пользователей, но это не остановит некоторых людей от Перейти на Linux которые они могут полностью контролировать.
Сталкивались ли вы с какими-либо проблемами при попытке исправить ошибку «Windows не удалось настроить один или несколько компонентов системы»? Расскажите нам об этом в разделе комментариев ниже.