If you’re going to make clean install of Windows and you’re unable to proceed to due to some error, you may want help. Today, in this article, we’re going to talk about a well known issue that might occur while installing Windows.
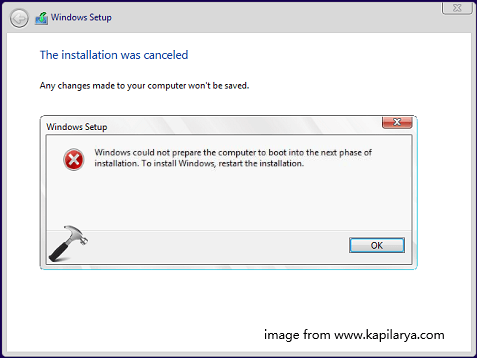
During the clean installation, we got following error which prevented the installation:
Windows could not prepare the computer to boot into the next phase of installation. To install Windows, restart the installation.
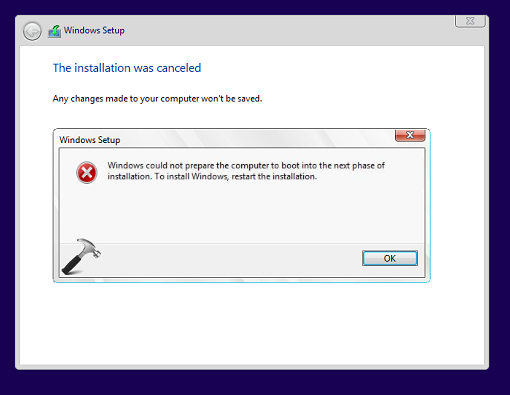
After getting this message, our next move was to restart the installation. However, even after 3 attempts, we found no change in the situation. The error keeps appearing in a loop, ultimately leading to failure of clean install. If you’re also facing this issue while installing Windows 10/8/7, try out suggestions mentioned below, see if they helps.
FIX: Windows Could Not Prepare The Computer To Boot Into The Next Phase Of Installation While Installing Windows 10/8.1/8/7
FIX 1 – General Suggestions
1. Make sure your system is not connected to any other external devices while installation.
2. Check your hard disk for errors (refer FIX 1 here), just in case.
3. If you’re getting this error while upgrading, repair the boot records first and then retry with the upgrade.
4. For upgrade users, you must temporarily disable your security software and see if this helps.
FIX 2 – Using Advanced Recovery Command Prompt
1. Boot from the installation media, let the setup wizard start, click Repair your computer link.
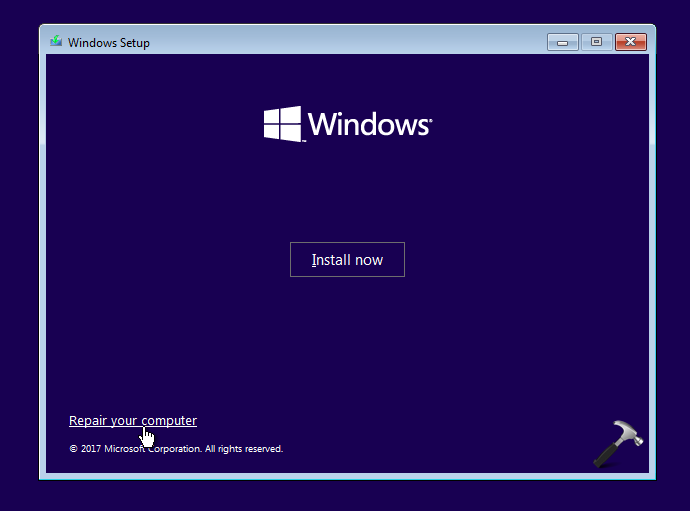
Then select Troubleshoot > and choose Command Prompt on Advanced options screen.
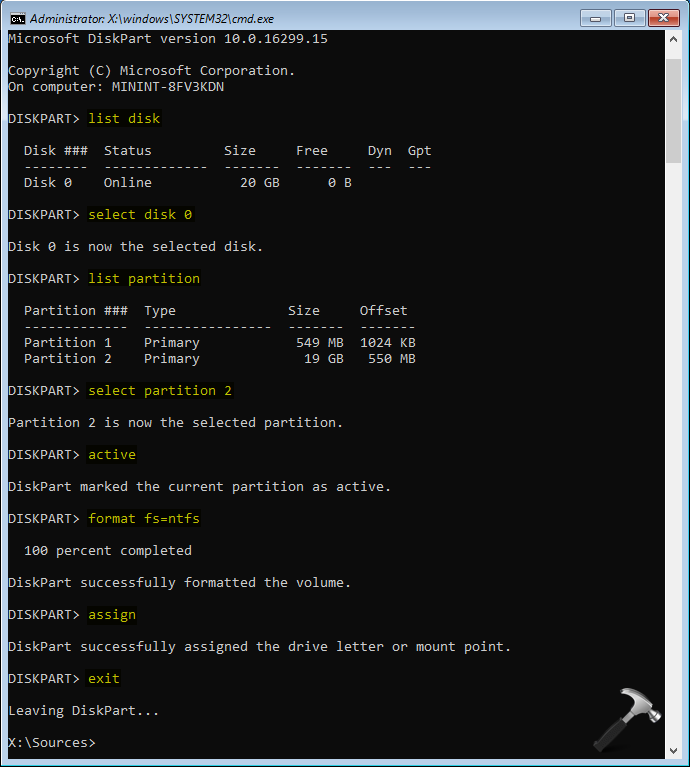
2. In the Command Prompt window, type these commands (mentioned in bold) one by one and press Enter key after each:
diskpart Opens Disk Management in command interface
list disk Lists all available disks on system
select disk # Select the system disk you're using
list partition List partitions on selected disk
select partition # Replace # with partition to which you want to install
active Marks selected partition as active
format fs=ntfs Formats selected partition. Use format fs=fat32 for UEFI systems
assign Assigns a drive letter to partition
exit Exists DiskPart
3. Close Command Prompt and restart the installation, this time you should be able to install Windows without any error.
Hope this helps!
READ THESE ARTICLES NEXT
- How to upgrade Windows 11 using ISO file
- Fix Error Code 0x80070070 while upgrading to Windows 11
- Fix: Windows 11 installation has failed
- Fix: Something went wrong OOBESETTINGS
- FIX: Windows Cannot Install Required Files (0x8007025D)
- FIX: Windows 10 Upgrade Error 0xC1900101 – 0x30018
- Understanding Windows Upgrade Error Codes
- FIX: We’re Having Trouble Determining If Your PC Can Run Windows 10
- FIX: Your PC Has A Driver Or Service That Isn’t Ready For This Version Of Windows 10
- How To Deploy Windows 10 Upgrade To Multiple Windows 7 Computers
Some users are encountering the “Windows could not prepare the computer to boot into the next phase of installation” error when trying to install Windows or trying to upgrade an existing version. The issue is not exclusive to a particular Windows version and it’s reported to occur with Windows 7, Windows 8.1 and Windows 10 installations.

What is causing the “Windows could not prepare the computer to boot into the next phase of installation” error?
We investigated this particular issue by looking at various user reports and the repair strategies that they used to get the issue resolved. Based on what we gathered, there are several common scenarios that will end up triggering this particular error message:
- Too many non-essential devices are plugged in – Certain BIOS versions are known to act up when too many unnecessary hardware is plugged in during the installation/upgrade process. A lot of affected users have managed to get the issue resolved by removing or disabling every unnecessary hardware.
- Installation media improperly prepared – A few affected users have confirmed that this particular error was occurring due to a badly created installation media. Upon recreating it properly, most users have reported that the issue was resolved.
- BIOS does not support the Windows version – This particular issue is mostly encountered with Mini-PC and similar computers. Most of the smaller motherboards models that are recently released feature a BIOS version that doesn’t support Windows 7 or under.
- System file corruption is causing the error – It’s also possible that system file corruption is what’s causing this particular error. Users in a similar situation have reported that the issue was resolved after they deleted all partitions and did a clean install.
If you’re currently looking for fixes that will allow you to get past the “Windows could not prepare the computer to boot into the next phase of installation” error, this article will provide you with several potential repair strategies.
Down below, you’ll discover several different fixes that other users in a similar situation have used to get the issue resolved. Since the methods below are ordered by efficiency and severity, we advise you to follow them in the order that they are presented in.
Method 1: Disabling all unnecessary hardware
The most effective fix when encountering the “Windows could not prepare the computer to boot into the next phase of installation” error is to remove/disable any unnecessary hardware. This is especially effective in those situations where the user tries to upgrade an existing Windows installation.
Some users are speculating that the issue is triggered by a bugged BIOS version on older computers. This is only reported to occur when there are a lot of peripherals and external devices connected to the computer.
With this in mind, remove any non-critical hardware such as Universal Serial Bus (USB) devices, network adapters, sound cards, serial cards etc. If you have multiple HDD or SDDs, disconnect those that are not needed during the installation. Also, remove any optical drives that are currently active in your computer.
Once your computer is running with the bare minimum hardware, restart your computer and start the installation again. Chances are you will be able to complete the process without seeing the error again.
Method 2: Prepare the installation media properly
Another possible culprit that might end up triggering this particular issue is a badly written installation media. Since it’s confirmed that the “Windows could not prepare the computer to boot into the next phase of installation” error might occur if the media wasn’t prepared properly, you might be able to resolve the issue by starting the process again from a different installation media.
Here are two different methods that you can follow in order to create Windows installation media. Follow whichever ones seem more convenable to your current situation:
- Creating a Windows 7 Bootable DVD or USB
- Creating a Bootable USB drive with Rufus or MediaCreation Tool
Repeat the process with the newly created media and see if you’re still encountering the “Windows could not prepare the computer to boot into the next phase of installation” error.
If the error is still persisting even with the new installation media, move down to the next method below.
Method 3: Verify whether BIOS supports the Windows version
If you’re trying to install an older Windows version on a newer laptop or desktop, there is a chance that your BIOS model does not support the Windows version that you’re trying to install. There are a lot of reported cases with this occurring on Mini-PC models. Almost all newer models will not support Windows versions older than 8.1.
If you think this scenario might be applicable to your current situation, call your warranty service or search online to see if the BIOS model present on your PC supports the Windows version that you’re trying to install.
Alternatively, try to install a newer Windows version and see if the “Windows could not prepare the computer to boot into the next phase of installation” error persists.
Method 4: Deleting all partitions
Some affected users have reported that they were finally able to go through with the installation and complete the process without the “Windows could not prepare the computer to boot into the next phase of installation” error only after they deleted all partitions and started the OS installation process from scratch.
Of course, this can be a major inconvenient if you were simply trying to upgrade an existing Windows installation, but if you’ve come this far without a result you don’t really have any other choice.
But just in case things go wrong, we advise you to create a Windows System Image backup before you proceed with the deletion of all available partitions.
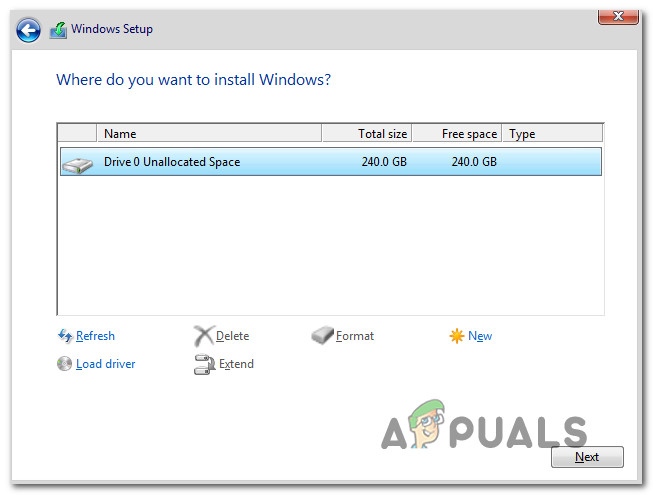
Once the backup is in place, restart your computer and force your computer to boot from the installation media. When you reach the screen where you get to select where to install the OS, delete every available partition and create new ones from the Unallocated space.
Next, proceed with the Windows installation normally and you should no longer be encountering the “Windows could not prepare the computer to boot into the next phase of installation” error.

Kevin Arrows
Kevin is a dynamic and self-motivated information technology professional, with a Thorough knowledge of all facets pertaining to network infrastructure design, implementation and administration. Superior record of delivering simultaneous large-scale mission critical projects on time and under budget.
The Windows installation process might fail with the error message “Windows could not prepare the computer to boot into the next phase of installation”. To help you get rid of this issue, MiniTool Partition Wizard develops a simple guide where some possible solutions from users are displayed.
Help! Windows Couldn’t Prepare Computer to Boot into the Next Installation Phase
Some users have reported the “Windows could not prepare the computer to boot into the next phase of installation” error on the forum. To get more details of the problem, let’s start with a real case scenario posted by the Windows user ZP9:
My PC shut off when it was updating. I created a USB boot drive and it will open to the Windows setup screen in my computer. It shows the steps “copying Windows files, getting files ready for installation, installing features, installing updates, finishing up”. When it finishes installing updates it presents an error message saying “Windows could not prepare the computer to boot into the next phase of installation. To install Windows, restart the installation.” I’ve done this multiple times. From www.windowsphoneinfo.com
As you can see, this error comes up during the process of Windows update and the user runs into an automatic repair loop due to this problem. Actually, you might also receive the “Windows couldn’t prepare the computer to boot” error message when you are installing Windows operating system on a computer.
Similar to other issues that block the process of Windows update or installation, this error has been reported to appear on various versions of Windows, including but not limited to Windows 7, 8.1 and 10.
You may ask: why does this annoying problem happen to my computer? There are plenty of possible reasons for this error, and some common factors are listed below.
- You have too many external devices connected to your computer.
- Your BIOS is not compatible with the Windows version you are installing or updating to.
- The installation media is not properly created.
- The system files are corrupted.
Whatever the cause is in your case, you can try fixing the problem by yourself. Just keep on your reading to get the details.
How to Fix Windows Could Not Prepare the Computer to Boot Issue
After learning about some basic information about the error, it’s time to fix it. If you are facing the problem unfortunately and are looking for methods to get rid of this issue, this article might be helpful for you. In the following contents, I will show you 4 methods with detailed instructions to fix the issue.
Without any ado, let’s check out these solutions one by one.
4 Solutions to Windows Could Not Prepare the Computer to Boot Issue
- Remove unnecessary hardware
- Update BIOS
- Prepare a fresh installation media properly
- Delete all the partitions and clean install Windows
Fix 1: Remove Unnecessary Hardware
Sometimes, you might add some hardware to the computer for temporary usage and keep these devices connected after that. It is a common operation for a computer user. However, certain external devices could interfere with the proper functioning of the system and trigger certain critical problems like blue screen of death error.
If you are updating or installing Windows with too many external hardware plugged in, you are very likely to receive the “Windows could not prepare the computer to boot into next phase of installation” error message. Therefore, when you fail to update or install Windows due to this error, don’t hesitate to firstly disconnect any unnecessary hardware.
After disabling or removing the peripheral devices that are physically connected to your computer, you can try Windows update or installation again and check if the error has fixed.
Fix 2: Update BIOS
If the BIOS model present on your computer might not be compatible with the Windows version you are trying to install, you will certainly encounter problems during installation. In this case, you might need to update your BIOS to the version supported by the current Windows.
Warning: The BIOS is an essential but sensitive part of a computer. It is risky to make changes for the BIOS, as any improper operation might bring unrecoverable damage to your computer. So, if you don’t familiar with the operation, you’d better skip this method and jump to the next one.
If you don’t know how to update BIOS, you can back up your computer and refer to the steps below:
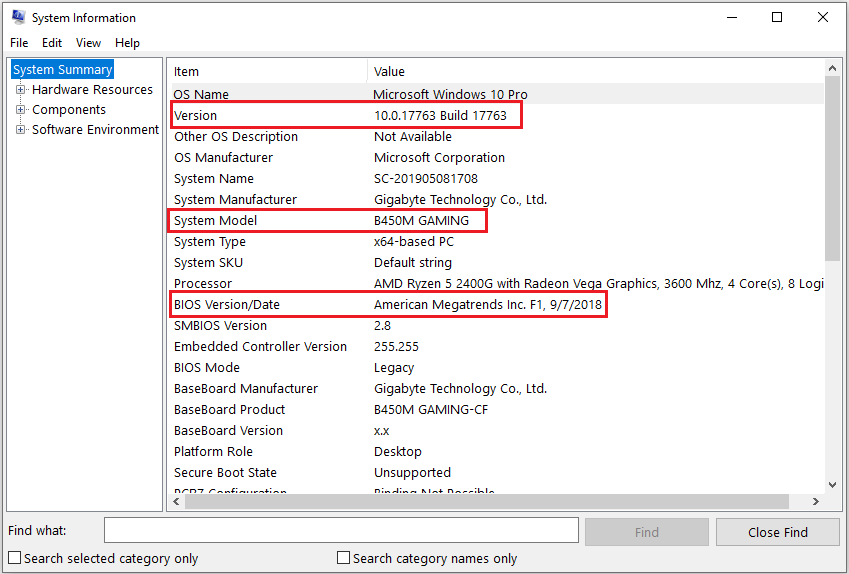
Step 1: Check the current BIOS version and some necessary system information.
Press Windows + R, input msinfo32 and press Enter to open System Information. Find the OS Version, System Model and BIOS Version/Date in the right pane and note them down. You can find this information by searching them in the search field on the bottom of the window.
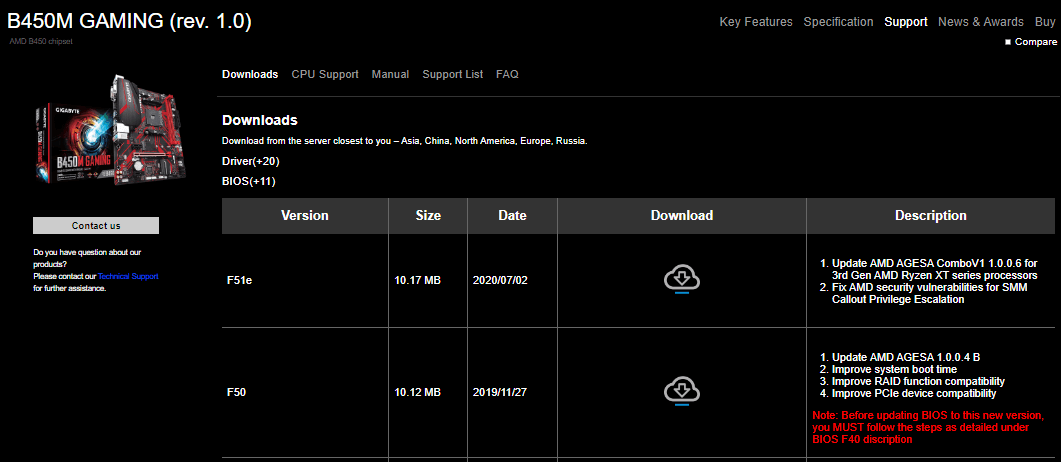
Step 2: Download the latest version of your BIOS from the official website.
Search your System Model and BIOS in the browser to find the right website. Then, go to the Support or Downloads page of the target system model and you can see a list of BIOS versions. Download the update file that is newer than your current BIOS version.
Step 3: Extract the download zip file and copy the BIOS file onto a prepared flash drive. Keep the drive connected to the computer during the update process.
Step 4: Boot into BIOS and back up the current BIOS if possible. Then, enable and use the BIOS update tool to update BIOS. Wait until the process is completed, restart your computer to apply the changes you’ve made.
Tip: You should make sure your computer is plugged into a reliable power source, as the process might take over an hour. You cannot turn off the computer during updating BIOS, or the BIOS will get corrupted. To get more detailed information about how to update BIOS, you can read this article.
Fix 3: Prepare A Fresh Installation Media Properly
Some users encounter the preparation for Windows 10 failed to boot into the next phase of installation when they are installing Windows with an installation media. It is possible that the installation media used to install Windows was not properly created or has been damaged.
If this scenario is applicable to your current situation, you can try creating a fresh installation media properly. You are recommended to use Windows 10 Media Creation Tool to make installation media if you encounter the problem in Windows 10. Here’s what you should do:
Step 1: Prepare a USB drive and connect it to a working computer. Download and launch Windows 10 Media Creation Tool on this PC.
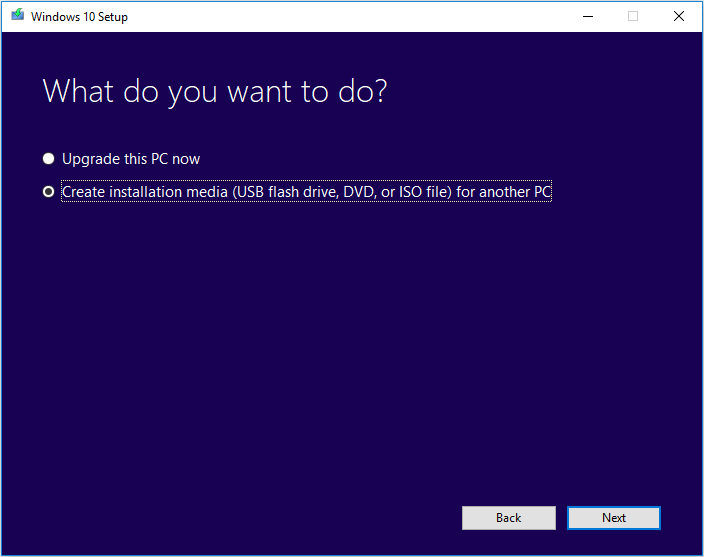
Step 2: When you get the following screen, choose Create installation media (USB flash drive, DVD, or ISO file) for another PC and click Next button.
Step 3: Set your preferences and click Next button. Then, choose USB flash drive option, select the drive you prepare and click Next to start creating installation media.
If you are using other version of Windows, you can download the ISO file from Microsoft’s website and then create corresponding installation media referring to this article: [Complete Guide] How to Make A Bootable USB
Fix 4: Delete All the Partitions and Clean Install Windows
Some users report that they have removed the preparation for Windows 10 failed issue by deleting and reconfiguring all the partitions on the disk. And they eventually complete the installation process without the mentioned problem.
This is not a complicated operation, but it will erase all your data saved on the disk. If you are still bothered by the problem after trying the above fixes, you might have no choice but to try this method. To protect your data, you can use MiniTool Partition Wizard to back up the disk before deleting partitions.
As you are making changes for the system disk, you have to use a paid edition to boot your computer into recovery environment. Keep reading to get detailed steps.
Step 1: Download MiniTool Partition Wizard Pro Ultimate and make a bootable USB drive of it. Prepare an external storage device that is large enough to save all the data on the original disk and connect it to your computer.
Buy Now
Step 2: Boot your computer from this bootable USB drive by setting it as the first boot device and go to the main interface of the program.
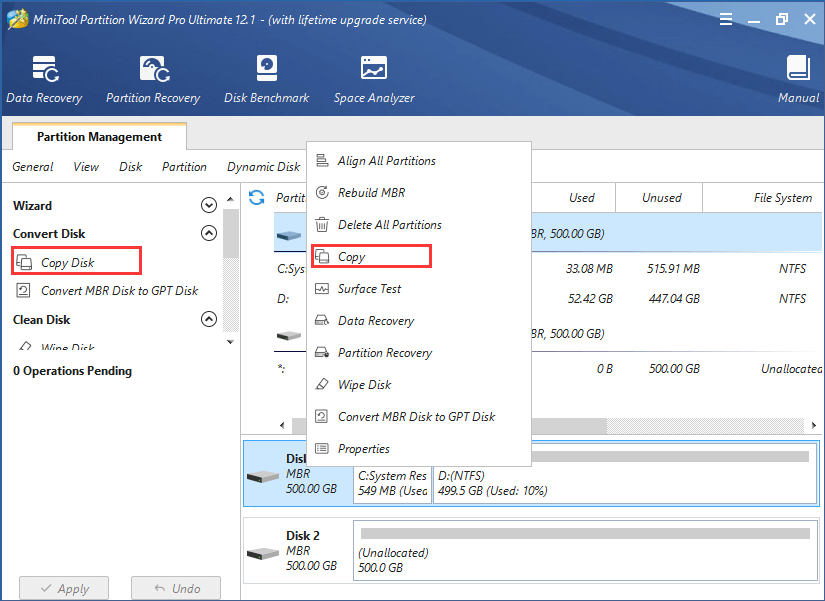
Step 3: Right-click your disk and choose Copy, or select Copy Disk feature in the left pane after highlighting the disk.
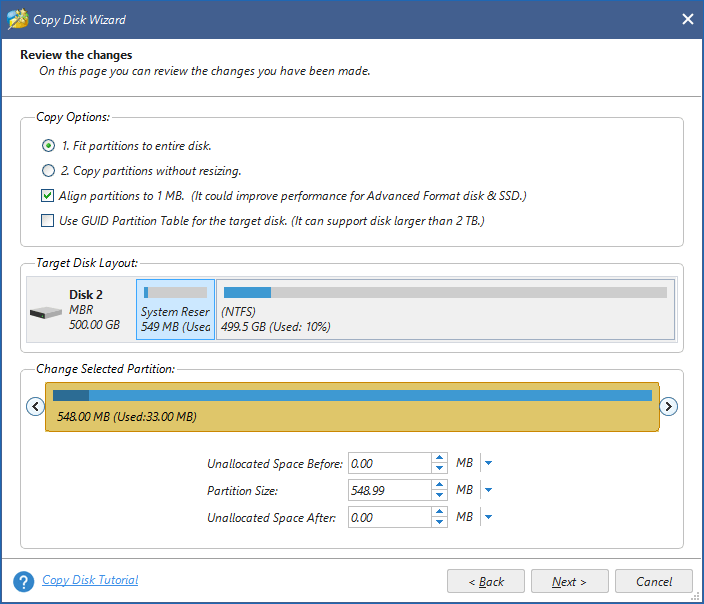
Step 4: Choose the external hard drive as the target disk and click Next. Then, choose Copy Options and configure Target Disk Layout as your needs. Click Next to continue.
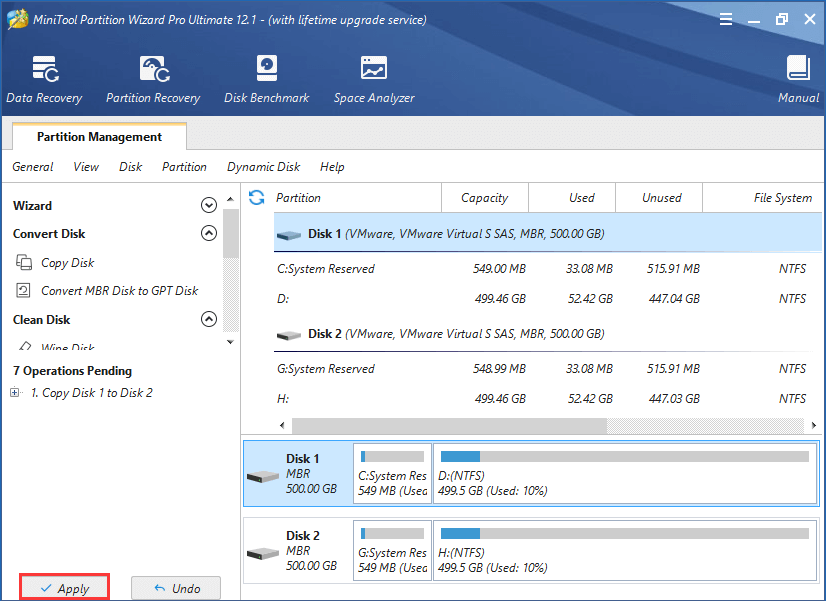
Step 5: Read the note on how to boot from the destination disk and click Finish button. When you go back to the main interface, click Apply button to execute the pending operations.
After making backup for the disk, you can delete all the created partitions and clean install Windows without any worries. For convenience, you can delete and reconfigure partitions during the Windows Setup.
When you get the following screen during Windows installation, remove all the listed partitions by selecting them and click Delete. Next, click New to create new ones on the unallocated space according to your needs.
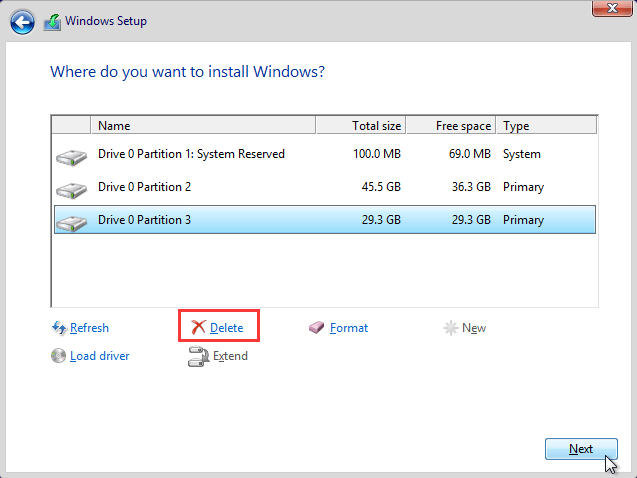
Then, you can choose a newly created partition to install OS and process with the Windows installation normally. Hopefully, you should be able to complete the process without the “Windows could not prepare the computer to boot into the next phase of installation” error.
Here are 4 feasible solutions to preparation for Windows 10 failed to boot into the next phase of installation. Share this post with you all and hope you can benefit from it.Click to Tweet
Bottom Line
Have you fixed “Windows could not prepare the computer to boot into the next phase of installation” error with the introduces solutions? If you have any better ideas, please leave a message in the comment zone below. We are eager to improve this post to help more users who are facing the problem.
For any problems in using MiniTool Partition Wizard utility, you can also contact our support team via [email protected].
Windows Could Not Prepare the Computer to Boot FAQ
How do I fix a Windows 10 installation that won’t boot?
If your Windows 10 won’t boot, perhaps there’re some problems with the hard drive, BIOS, or Windows installation files. To solve the problem, you can perform a startup repair, fix hard drive errors or reset BIOS. For more solutions and detailed instructions, you can refer to this post.
How do I fix Windows could not prepare the computer?
To fix Windows could not prepare the computer issue, you need to remove all the unnecessary hardware and make sure the BIOS can work with the Windows you are installing. Besides, you can try creating a fresh installation media or perform a clean install.
How do I make a Windows 10 install USB?
To make a Windows 10 install USB, the easiest way is using Windows 10 Media Creation Tool. Alternatively, you can download Windows 10 image file from official website and burn it to a USB drive with the help of a processional third-party program.
In today’s world, people heavily rely on technology. Many people can’t imagine going a day without their smartphones, laptops, or other devices. For some, technology is even a necessity for work or school.
Unfortunately, there are times when technology doesn’t work the way it should. This can be very frustrating for the user and often leaves them wondering what to do.
One such problem that people often experience is their computer not being able to boot up correctly. Some users are facing the error message “Windows could not prepare the computer to boot into the next phase of installation” when attempting to install Windows or upgrade an existing version. The problem is that it’s not exclusive to one particular version of Windows.
This issue has been documented to occur with Windows 7, Windows 8, Windows 10, and Windows 11 installations. This error can be very frustrating and often leaves people wondering what to do. However, there are a few steps that you can take to try and fix the problem.
The error “Windows could not prepare the computer to boot into the next phase of installation” is caused by a number of different things, such as a corrupted file, a missing file, or an incompatible driver. It can also be caused by a problem with your computer’s hardware or firmware.
Here are some main causes that will be discussed in this paragraph about this error:
- Hardware incompatibility: One possible reason for Windows could not prepare the computer to boot into the next phase of installation error is hardware incompatibility. If you are attempting to install a new operating system on a computer that has different hardware than what the OS was designed for, you may experience this error.
- Software corruption: Another possible reason for this error message is software corruption. If files or programs on your computer are damaged or corrupted, it may prevent the OS from being installed properly.
- BIOS settings: Incorrect BIOS settings can also cause the Windows could not prepare the computer to boot into the next phase of installation error. Try changing your BIOS settings to see if the problem persists.
- Too many non-essential devices are plugged in: Some BIOSs are known to get ill if they detect too many unnecessary devices during the setup upgrade procedure. Many customers have reported the problem, and experts have advised that highly detailed settings that might be to blame can be cleared out, or by uninstalling unneeded hardware.
If you have more devices connected to the computer than the OS supports, try unplugging all non-essential devices and see if the error disappears. The secure boot must be disabled If you have a UEFI BIOS, ensure that the secure boot is disabled.
Based on your present troubleshooting solutions, this article will give you a few of the possible fixes you’ll need to make your computer boot into the following system phase.
Underneath, you’ll discover several options for similar users that have successfully resolved this issue. Since the repair options presented here are ordered by method level and reliability, I request you to follow the repair instructions below and you can fix this issue in minutes.
Method 1: Remove Unnecessary Hardware Components
The average computer has a lot of extra hardware that isn’t needed. Removing this hardware can fix some common problems. For example, if Windows can’t prepare the computer to boot, it might be because there’s something blocking the path. Removing unnecessary hardware can help clear the way and get your computer up and running again.
Before you try anything else, take a look at your computer and see if there’s anything you can remove.
Some have speculated that a bug in the BIOS might trigger the error. This error is observed only when many peripheral components are attached to the computer.
Get rid of any non-critical hardware, such as Universal Serial Bus (USB) devices, network adapters, sound cards, and serial cards, from this perspective. If you have multiple hard drives or SSDs, disconnect any that aren’t needed during the installation process. Also, remove any optical drives that are still active on your computer.
If your computer is running with the bare minimum hardware, restart your machine and start the installation again. It’s relatively likely you can complete the installation without seeing the error message again.
Related: You Must Be an Administrator Running a Console Session
Method 2: Prepare the Installation Media Properly
Another possibility leading to the potential flood of this particular issue is a poorly written installation media. Prepare the installation media properly so that you can fix Windows that could not prepare the computer to boot.
This means making sure that the installation media is clean and has no errors. If you are using a USB drive, make sure that you are using a USB 2.0 port. If you are using a DVD, make sure that the disc is clean and undamaged.
Follow these steps to fix the “Windows could not prepare the computer to boot” error:
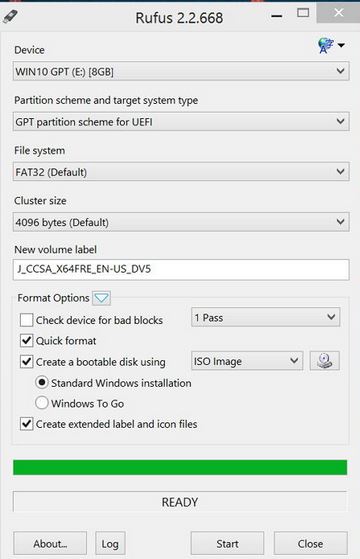
- First of all download the Rufus Tool to prepare the installation of Windows for PC.
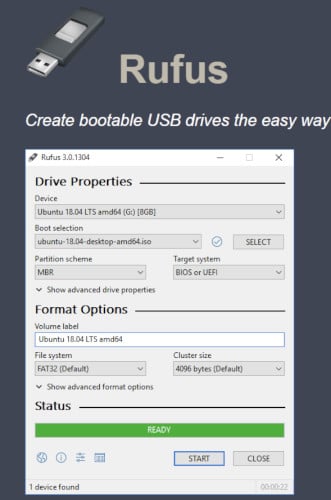
- After downloading, launch it and select the disk image file of your desired device.

- When you have selected your Windows file, you can get your USB ready for the Windows file installation by clicking the Start button.
- Once your USB is bootable, you need to install this Windows file on your computer to see if your computer’s “Windows could not prepare the computer to boot” error will be fixed.
Method 3: Verify Whether BIOS Supports the Windows Version
If your computer isn’t starting up properly, you may need to update your BIOS. However, before you do that, you should verify whether your BIOS supports the Windows version that you’re trying to fix. If it doesn’t, you won’t be able to fix the problem using the instructions on this page.
To check if your BIOS supports the Windows version that you’re trying to fix, go to your computer manufacturer’s website and look for a downloads or support section. Once you’ve found it, look for a BIOS update for your specific model of computer. Once you’ve downloaded it, double-click on the file to start the installation process.
During the installation process, you’ll be asked if you want to update your BIOS. If you do, make sure that you have a backup of your current BIOS in case something goes wrong.
Alternatively, try to install a different version of Windows on your computer, and in the event that you encounter the error message “This system cannot boot,” Windows is unable to start the installation.
Method 4: Deleting All Computer Partitions
Some affected users have said that they were eventually able to go through with the installation and finish the process without the “Windows could not prepare the computer to boot into the next stage of installation” error only after they deleted all partitions and started the OS installation process from scratch.
If your computer won’t boot, it’s likely because one or more of its partitions isn’t properly formatted. This can be fixed by deleting all the partitions on your computer, but doing so could not prepare the computer to boot. In most cases, simply reformatting the hard drive and reinstalling Windows will fix the problem.
Naturally, this can present a major problem if you’ve been merely interested in updating an existing Windows installation. However, if you have come this far with no success, you can select another method. In the event you don’t want anything to go wrong, cloning your system image first will make a Windows repair disk so you can get back to the beginning of the process.
For doing this method, you need to follow these instructions:
- Right-click on the Windows icon and click on “Device Management” from the given option list.
- Now the hard disk partitions of the computer will open in front of you. Delete all partitions except the first “C” partition. Make sure you copy your valuable data from the computer to a USB or external hard disk before deleting it.
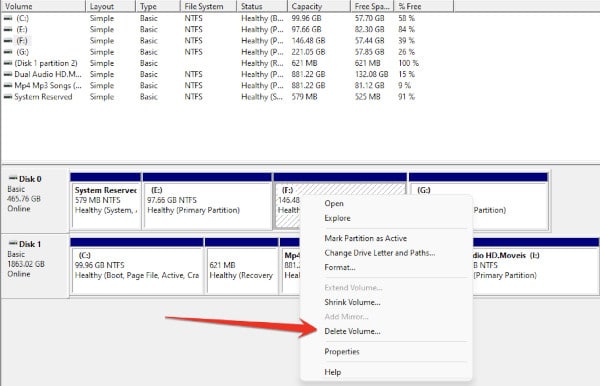
After you complete the actions, the partition and its contents will no longer be available on the drive, freeing up space to expand another partition or format the disk with a new format.
Method 5: Update the BIOS
BIOS updates can be important in keeping your computer running smoothly. In some cases, a BIOS update may be required to fix an issue that prevents your computer from booting up properly. If you are experiencing problems with Windows 10 not preparing your computer to boot, you may need to update your BIOS.
To update your BIOS, you will need to download the latest version from your motherboard manufacturer’s website. Once you have downloaded the file, double-click it to begin the installation process. The installer will guide you through the process of updating your BIOS.
Be sure to follow the instructions carefully, and backup your data before beginning the update process. If something goes wrong during the update, your computer may not be able to start up properly.
Updating your BIOS is a risky procedure, so make sure you are aware of the risks involved before proceeding.
Frequently Asked Questions
How Do I Fix A Windows 10 Installation That Won’t Boot?
There are a few things you can do to try and fix a Windows 10 installation that won’t boot. Follow these stesp:
- The first thing you should do is restart your computer, and then press F8 before the Windows logo appears. This will bring up the Advanced Boot Options menu.
- Now select “Repair Your Computer” and then click “Next.” You’ll be asked to select your language and keyboard layout.
- After that, you’ll be shown a list of options. Click “Troubleshoot.”
- Next, click “Advanced Options.” Then, click “Startup Repair.”
If that doesn’t work, you can try System Restore or a Clean Install.
How Do I Fix A Computer That Failed To Boot?
If your computer won’t boot, there are a few things you can do to try to fix it. The first thing you should do is check to make sure that your computer is properly plugged in and that the power cord is connected to an outlet.
If your computer still won’t boot, try restarting it by pressing the power button. If your computer still doesn’t boot, there may be a problem with your hard drive or with your operating system.
You can try to fix this problem by using a recovery disk or by repairing your operating system. If you’re not able to fix the problem yourself, you may need to take your computer to a technician.
How Do You Fix Windows That Could Not Update The Computer’s Boot Configuration Installation Cannot Proceed?
“Windows could not update the computer’s boot configuration installation cannot proceed?” is an error that can occur during the Windows Update process. This error can be caused by a variety of issues, including missing or damaged files, incompatible software, or a corrupted registry.
There are several ways to fix this error. One common solution is to run the Windows Update Troubleshooter. This tool can help identify and fix many common issues that can cause Windows Update errors.
Another solution is to use the Disk Cleanup utility to remove any unnecessary files from your computer. This can help resolve compatibility issues and free up disk space.
If you still cannot update your computer, you may need to repair your operating system. This can be done using the Recovery Console tool in Windows 10 or by using a recovery disk or USB drive.
How Do I Force My Computer To Boot?
There are a few ways to force your computer to boot. One way is to hold down the power button until the computer turns off. Then, turn on the computer and hold down the power button again until it turns on. Another way is to press and hold the Alt+F10 keys while the computer is starting up.
Final Thoughts
I hope that after reading this article you will find it helpful to fix your computer “Fix Windows Could Not Prepare the Computer to Boot” error. The methods described in this article are very safe to use on a computer and you can fix this error in a few minutes.
Download PC Repair Tool to quickly find & fix Windows errors automatically
While upgrading or even clean installing Windows operating system on a computer, a number of complex tasks take place under the hood. Many users have been reporting encounter the Windows could not prepare the computer to boot into the next phase of Installation error. The error states-
Windows could not prepare the computer to boot into the next phase of installation. To isntall Windows, restart the installation.
This error is not specific to a particular version of the Windows operating system and can occur on any of Windows versions. There are many causes of this issue like incompatible BIOS, System File corruption, Improper installation media, and excessive hardware plugged in and more. In this article, we will be learning how to get rid of this error.

Windows could not prepare the computer to boot into the next phase of installation
We will be undertaking the following fixes to get rid of this error on Windows 10:
- Remove the unnecessary hardware.
- Fix the BIOS.
- Reconfigure all the created partitions.
- Recreate the bootable USB drive.
1] Remove the unnecessary hardware
You might have to disable or remove newly installed hardware because external devices are no much innocent in triggering an error.
For that, I would recommend trying to physically disconnect any external device connected to your computer and check if that fixes the Error.
2] Fix the BIOS
The main solution for this that you update the system BIOS. If that does not help you may reset BIOS and see.
Start your computer and during the booting, press the F10 key to enter the BIOS – But it could be the F1, F2 or Del key too.
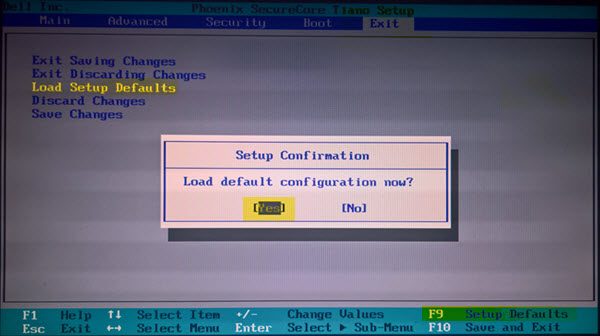
Now, hit the F9 key to get the prompt to RestoreLoad default configuration now for the BIOS.
Click on Yes and follow the on-screen instructions to set the BIOS to its default settings.
Reboot your computer and check if it boots normally.
3] Reconfigure all the created partitions
You can also try to delete and recreate all the partitions available on your computer and check if that fixes your issues.
4] Recreate the Bootable drive
To fix this issue, you will need to make a bootable Windows 10 USB drive and then boot your computer using it
Hope this helps!

Ayush has been a Windows enthusiast since the day he got his first PC with Windows 98SE. He is an active Windows Insider since Day 1 and has been a Windows Insider MVP.
The Windows could not prepare the computer to boot into the next phase of installation. To install Windows, restart the installation error occurs when you try to upgrade your Windows build or reinstall the current Windows version. Either way, unless you completely fix the cause of this error, the installation process cannot be completed.
Although the error message instructs you to restart the installation to move forward, doing so rarely works. This is because the likely culprit for a failed installation is probably your corrupted disk drive. So, if restarting the setup process doesn’t work, you have to resort to some other technical fixes.
Luckily, that’s exactly what we are here for. In this guide, we shall learn about all the methods you can use to fix this issue and continue your installation to completion.
Why Is Windows Unable to Boot Computer Into Next Phase of Installation?
As it is clearly mentioned above, the primary suspect regarding this failed installation case is your improperly configured disk drives. So, along with this, here are all the factors that might have influenced your system to reject the installation:
- Installation media not set up properly
- Outdated BIOS
- Disk drive issues
- Improper boot sequence
- Improperly configured BIOS settings
- Corrupted system files
How to Fix This Installation Error?
Now that we’ve briefly understood the causes that lead to this error, we can move on to its fixes. This guide covers all the working methods, that include steps ranging from a simple verification check to more technical fixes. By the end of this guide, we are pretty sure that your installation will be completed successfully.
Ensure the BIOS Supports Your Windows Version
Firstly, make sure that your motherboard BIOS supports the Windows version you plan to install. If you’re deciding to upgrade to Windows 11, the Legacy BIOS mode is not supported. And somehow, if you have already installed Windows 11 with the Legacy BIOS, you cannot further update your OS anymore.
So, it’s advisable to first ensure that the BIOS and your OS are compatible with each other. Surf the web and visit your manufacturer’s website to determine if they work together or not.
Ensure That the Windows Installation Media Is Configured Properly
A pretty common reason that affects the installation process is improperly configured installation media. A bad Windows setup file directly lead to various installation problems, including the one you’re facing as well.
So, if you’re unsure about the credibility of your media file, you can simply recreate it with the right steps. You can use either Rufus or the Media Creation Tool to create a bootable USB. Luckily, we do have a dedicated guide that aims to guide you with a step-to-step process on how you can create a Windows installation media the right way.
Note that if you plan to use a bootable USB drive, do so via the USB 2.0 port on your computer. However, if the issue still persists, follow all the steps listed below until one of them fixes your problem.
Disconnect the Non-Essential Peripherals
It’s important to disconnect any non-essential peripherals that might be connected to your device during the installation process. Either because of a bug or glitch, some BIOS versions have been known to act in an unwanted manner when too many unnecessary devices are connected during the installation process.
Disconnecting non-essential peripherals such as your headphones, speakers, USBs, and maybe even your extra hard disks can prevent any conflicts that might occur during setup. If you have not done so, remove unnecessary devices, restart your computer and try installing the OS once again.
Update BIOS
An outdated BIOS is known to give rise to certain compatibility issues between the operating system and the hardware devices. Also, there might currently be various security requirements that can only be resolved by updating the BIOS. So, updating BIOS can also fix the bugs present in the previous build and incorporate new patches to make the system function better.
Hence, before you begin the installation process, visit your motherboard manufacturer’s website and download the BIOS file compatible with your system. We also have a guide dedicated to how you can update your BIOS safely.
Keep in mind that the BIOS resets back to default after a fresh update. So, you will need to reconfigure all your custom settings once this is done.
Run CHKDSK
The Check Disk (CHKDSK) tool in Windows OS helps you determine hard disk errors and also tries to troubleshoot them. The main goal of CHKDSK is to ensure that your computer’s disk drives are healthy and functional. It also checks for any file corruption due to bad sectors on the hard drive and aims to repair them as well.
The CHKDSK can be run using a couple of different methods, but here, we will be doing so via the Windows Recovery Environment. For this,
- First, boot into your computer using the installation media.
- As soon as the computer beings to start up, repeatedly press the F8 key to access the safe mode options.
- Click F10 to see more options.
- Then, click either 1 or F1 to launch the Windows Recovery Environment.
- Here, click on Troubleshoot.
- Then, select Advanced Options.
- Go to the Command Prompt.
- Now firstly, you’ll have to enter the name of the drive on which the OS is installed.
For most users, it’s in the C drive. So in this case, type and enterc:. - Then, type the following commands and hit enter after each one:
chkdsk /f
This command scans for and aims to repair any errors within the disk’s file system.
After the process is complete, type,chkdsk /r
This command scans for and repairs bad sectors within your disk drive. - Finally, type and enter
exitto exit the command prompt.

Enable UEFI on BIOS
Although the UEFI firmware has been around for almost a decade, this step is a must if you’re planning to upgrade your OS to Windows 11. Also, if Windows 11 was previously installed on your computer in the Legacy BIOS mode, it’s necessary to change to UEFI. This will allow your system to update your operating system and also continue your failed installation.
The UEFI has plenty of advantages over the older Legacy BIOS and can hence be enabled with these steps:
- Restart your computer.
- Enter the BIOS during system startup by tapping the key appropriate to your motherboard.

- Once you access the BIOS, find and navigate to the Boot menu.
- Click on the option resembling Boot Mode.
- Select UEFI.

- Finally, press F10 to save your changes and exit the BIOS.


Disable CSM and Secure Boot
Although CSM and Secure Boot are useful additions to the UEFI firmware, we have dug up various forums to find out that they can be pretty troublesome during the installation process.
The CSM feature allows the UEFI firmware to access certain features of the Legacy firmware. Whereas, the Secure Boot ensures that your computer only boots up using the Original Equipment Manufacturer’s software. So, for now, disable CSM and Secure Boot, and then try to continue the installation.
Once the installation process is complete, you can then re-enable these features at a later date. The steps to disable CSM and Secure boot are as follows:
- Restart the computer.
- Enter your system BIOS.
- Find and navigate to the Boot tab.
- Click on CSM Support and select Disable.

- Now, set Secure Boot as Disabled.
- Finally, press F10 to save your changes and exit the BIOS.

Re-Configure Partition
If unfortunately, your OS setup is getting stalled due to corrupted system files, you have to delete the particular volume on which Windows is installed. This will clear all the data within the volume, including the partition details.
It’s also advisable to set the appropriate drive partition style before you begin the installation procedure. That is, if you’re using a UEFI BIOS, you have to set a GPT drive partition style. And, for legacy BIOS, you should set the MBR drive partition style.
So, for this,
- Boot into your computer using the installation media.
- When you’re on the setup window, press Shift + F10 to enter the Command Prompt.
- Type the following commands and hit enter after each one:
diskpartlist diskselect disk n. Here, replace n with the number associated with your disk.list volumeselect volume n. Replace n with the volume where your OS is installed.delete volumeconvert gpt(only if the partition style is MBR. Also, using this command will wipe your entire disk)create partition primary size=100. This command creates a system volume.create partition primary. This command creates a boot volume.list partitionselect partition n. Replace n with the number assigned to your system partition.activelist volumeselect volume n. Here, replace n with the volume where you want to install the OS.assign letter=Cformat quick
- Once this process is complete, type
exitto exit the command prompt.
Enter the setup window and continue the setup on c: drive. You’ll now notice that the installation shall proceed smoothly.
- Status
- Not open for further replies.
-
- Feb 14, 2013
-
- 68
-
- 1
-
- 18,545
- 1
-
#1
I get to the installation screen of windows, select the drive I want to install it on, and when the installation process starts I get this message:
Windows could not prepare the computer to boot into the next phase of installation. To install Windows, restart the installation.
I’ve read several different things to try in other forms and posts, but I honestly wasn’t sure where was best to start with my situation. Here is what I’ve tried so far.
— Unplugged secondary storage and all external peripherals except my keyboard and my USB drive I’m using for the installation. (I didn’t not disconnect my GPU, should I?)
I’ve read it potentially being issues with administrative rights and fixing that through command prompt, I also read a few things about settings in the bios, or even something around the disk names/assignments. I thought it would be better to ask the community rather than guessing what I should do next. I’m sure its obvious from reading this I am in over my head. I can provide whatever information is needed, I’m just not sure what is useful. I’ll list my system specs below if that helps.
One random thought. Is it possible I don’t have my SSD setup as the primary drive. When I’m viewing the drives it looks like it’s only pickup up my USB. WIN10INS (C") is my USB, and I believe Boot (X is as well. I know I’m probably not making much sense, I’m just trying to provide any info I think could help.
is my USB, and I believe Boot (X is as well. I know I’m probably not making much sense, I’m just trying to provide any info I think could help.

Here are my system specs:
MSI X570 Tomahawk
Ryzen 9 5900x
Corsair Dominator Platinum 32 (4×8) DDR 4-3200
Samsung 850 Evo Series 500GB
Samsung 850 Pro Series 256GB
Nvidia RTX 3090 FE
Corsair HXi 1000W
-
- Feb 14, 2013
-
- 68
-
- 1
-
- 18,545
- 1
-
#13
Doublecheck everything you have done here.
Thank you, @Johnwmel for your support here. There is no frustration on my part. I’m willing to try about anything at this point. Anything that I can understand that is.
So I went through the linked article you sent and double-checked that I covered everything that was covered in the 4 methods. Unfortunately, I’m still getting the same message. I’m just going to outline briefly what I did in case I’m missing something.
Method 1: Disabling all unnecessary hardware (Yes)
— I did this. unplugged everything except for my mouse, keyboard, GPU, and the SSD I’m installing to.
Method 2: Prepare the installation media properly (No)
— Unfortunately, I cannot replicate what was outlined here. I am working from a MacBook pro to create the boot media and I can’t use Rufus or MediaCreation tool since they are windows programs. I used this video to create my USB boot disk:
View: https://www.youtube.com/watch?v=A4LgzMaYCQk&t=1668s
I was thinking about trying this method out:
View: https://www.youtube.com/watch?v=7Tax450N3-M
No particular reason other than I’m lost at what else to do/try.
Method 3: Verify whether BIOS supports the Windows version (Pretty Sure)
— I had window 10 installed previously, so I assume it supports it just fine. Unless there is something else specific that I should check.
Method 4: Deleting all partitions (Yes)
— Unless I’m understanding this step incorrectly, I did delete partitions. In the video I recorded I did this, but let me know if I did it wrong or I’m misunderstanding this step.
Again, thank you for the help.

-
- Nov 7, 2011
-
- 69,624
-
- 3,198
-
- 162,240
- 6,865
-
#2
no ryzen don’t have igpu
but do unplug all your other hdd/ssd
when you said it have 3 drives, is that on the same ssd that you try to install windows to? do you need to keep the data on them?
-
- Feb 14, 2013
-
- 68
-
- 1
-
- 18,545
- 1
-
#3
when you said it have 3 drives, is that on the same ssd that you try to install windows to? do you need to keep the data on them?
Thank you for the reply. You must have read my post before I edited it. Now I’m just seeing 2 “drives”. I provided a screen shot of what I’m seeing. I don’t even know if I’m using the right technical language. What I’m seeing now is WIN10INS (C) and Boot (X). I THINK those are both on my usb thumb drive I’m trying to install from.
There isn’t any data I’m afraid of loosing. I think I’ve already cleared all my SSD‘a anyway.
-
- Nov 7, 2011
-
- 69,624
-
- 3,198
-
- 162,240
- 6,865
-
#4
did you have the latest windows 10 installation media from MS website?
-
- Feb 14, 2013
-
- 68
-
- 1
-
- 18,545
- 1
-
#5
you have 2 ssd, only plug in the one where the os going todid you have the latest windows 10 installation media from MS website?
Yes to both. I only have one of my ssds plugged in where windows will be installed. And I just downloaded and created the usb disk a few days ago.

-
- Jan 4, 2016
-
- 26,465
-
- 2,782
-
- 98,390
- 4,201
-
#6
I mistakenly deleted a partition on my SSD that had windows on it (I know, rookie mistake) and now I find myself installing windows via USB drive that I created from my Macbook.
You can probably restore deleted partition. Minitool partition wizard free has partition undelete function.
Anyway — have only single drive connected, while installing windows.
If you install in UEFI mode, drive has to be partitioned in GPT. With improperly partitioned drive you can’t install.
If you install in legacy mode, drive has to be partitioned in MBR.
It’s best to clean the drive before installing windows onto it. Then install process takes care of proper partitioning.
You can use diskpart to clean drive.

-
- Feb 14, 2013
-
- 68
-
- 1
-
- 18,545
- 1
-
#7
The boot disk/USB I made is set for UEFI. I followed this video to set it up. I THINK I have my bios setup the way that it needs to be. I have it set to boot in UEFI and disabled secure boot. I can send some screenshots/videos of my bios if it’s helpful. I’ll see if I can get that recorded this afternoon.
I also did convert my SSD to GPT. To clean my disk I’ve pretty much followed the instructions you shared in your screenshot exactly. The only additional step I took was to convert my disk to GPT after I cleaned it.
Any other thoughts or information that I can provide that would be helpful? I’m wondering if at this point I should just record exactly what I’m doing on my phone and post it here.
-
- Feb 14, 2013
-
- 68
-
- 1
-
- 18,545
- 1
-
- Jan 21, 2021
-
- 275
-
- 21
-
- 865
- 35
-
#9
It appears to be an over the top install & not a clean install.
In other words you want to save all your stuff?
-
- Feb 14, 2013
-
- 68
-
- 1
-
- 18,545
- 1
-
#10
Very good job on the video.
It appears to be an over the top install & not a clean install.
In other words you want to save all your stuff?
thanks for the reply!
I’ve “cleaned” my SSD. I showed that in the video, but maybe you are talking about something else?
but to answer your question, no, I don’t care if I loose anything on my SSD. I believe it’s already wiped.
-
- Jan 21, 2021
-
- 275
-
- 21
-
- 865
- 35
-
- Jan 21, 2021
-
- 275
-
- 21
-
- 865
- 35
-
#12
-
- Feb 14, 2013
-
- 68
-
- 1
-
- 18,545
- 1
-
#13
Doublecheck everything you have done here.
Thank you, @Johnwmel for your support here. There is no frustration on my part. I’m willing to try about anything at this point. Anything that I can understand that is.
So I went through the linked article you sent and double-checked that I covered everything that was covered in the 4 methods. Unfortunately, I’m still getting the same message. I’m just going to outline briefly what I did in case I’m missing something.
Method 1: Disabling all unnecessary hardware (Yes)
— I did this. unplugged everything except for my mouse, keyboard, GPU, and the SSD I’m installing to.
Method 2: Prepare the installation media properly (No)
— Unfortunately, I cannot replicate what was outlined here. I am working from a MacBook pro to create the boot media and I can’t use Rufus or MediaCreation tool since they are windows programs. I used this video to create my USB boot disk:
View: https://www.youtube.com/watch?v=A4LgzMaYCQk&t=1668s
I was thinking about trying this method out:
View: https://www.youtube.com/watch?v=7Tax450N3-M
No particular reason other than I’m lost at what else to do/try.
Method 3: Verify whether BIOS supports the Windows version (Pretty Sure)
— I had window 10 installed previously, so I assume it supports it just fine. Unless there is something else specific that I should check.
Method 4: Deleting all partitions (Yes)
— Unless I’m understanding this step incorrectly, I did delete partitions. In the video I recorded I did this, but let me know if I did it wrong or I’m misunderstanding this step.
Again, thank you for the help.
-
- Jan 21, 2021
-
- 275
-
- 21
-
- 865
- 35
-
#14
«I used this video to create my USB boot disk «
Mentions using usb3, does the PC have USB3.
Lets see if you can use this, instead of Rufus.
Ventoy
https://www.softpedia.com/get/System/Boot-Manager-Disk/Ventoy.shtml
Ventoy
www.ventoy.net
-
- Jan 21, 2021
-
- 275
-
- 21
-
- 865
- 35
-
- Jan 21, 2021
-
- 275
-
- 21
-
- 865
- 35
-
#16
-
- Feb 14, 2013
-
- 68
-
- 1
-
- 18,545
- 1
-
#17
I couldn’t tell you exactly why this worked instead, but it did!
Thank you for being willing to help out! I really appreciate it!
-
- Jan 21, 2021
-
- 275
-
- 21
-
- 865
- 35
-
#18
- Status
- Not open for further replies.
- Advertising
- Cookies Policies
- Privacy
- Term & Conditions
- Topics
Содержание
- Fix: Windows Could Not Prepare the Computer to Boot Into the Next Phase of Installation
- What is causing the “Windows could not prepare the computer to boot into the next phase of installation” error?
- Method 1: Disabling all unnecessary hardware
- Method 2: Prepare the installation media properly
- Method 3: Verify whether BIOS supports the Windows version
- Method 4: Deleting all partitions
- [FIX] Windows Could Not Prepare The Computer To Boot Into The Next Phase Of Installation
- Windows could not prepare the computer to boot into the next phase of installation. To install Windows, restart the installation.
- FIX: Windows Could Not Prepare The Computer To Boot Into The Next Phase Of Installation While Installing Windows 10/8.1/8/7
- FIX 1 – General Suggestions
- FIX 2 – Using Advanced Recovery Command Prompt
- About Kapil Arya
- Windows could not prepare the computer to boot into the next phase of installation
- Лучший отвечающий
- Вопрос
- Ответы
- Все ответы
- Windows could not prepare the computer to boot into the next phase of installation
- Windows could not prepare the computer to boot into the next phase of installation
- Вопрос
- Ответы
Fix: Windows Could Not Prepare the Computer to Boot Into the Next Phase of Installation
Some users are encountering the “Windows could not prepare the computer to boot into the next phase of installation” error when trying to install Windows or trying to upgrade an existing version. The issue is not exclusive to a particular Windows version and it’s reported to occur with Windows 7, Windows 8.1 and Windows 10 installations.
“Windows could not prepare the computer to boot into the next phase of installation”
What is causing the “Windows could not prepare the computer to boot into the next phase of installation” error?
We investigated this particular issue by looking at various user reports and the repair strategies that they used to get the issue resolved. Based on what we gathered, there are several common scenarios that will end up triggering this particular error message:
If you’re currently looking for fixes that will allow you to get past the “Windows could not prepare the computer to boot into the next phase of installation” error, this article will provide you with several potential repair strategies.
Down below, you’ll discover several different fixes that other users in a similar situation have used to get the issue resolved. Since the methods below are ordered by efficiency and severity, we advise you to follow them in the order that they are presented in.
Method 1: Disabling all unnecessary hardware
The most effective fix when encountering the “Windows could not prepare the computer to boot into the next phase of installation” error is to remove/disable any unnecessary hardware. This is especially effective in those situations where the user tries to upgrade an existing Windows installation.
Some users are speculating that the issue is triggered by a bugged BIOS version on older computers. This is only reported to occur when there are a lot of peripherals and external devices connected to the computer.
With this in mind, remove any non-critical hardware such as Universal Serial Bus (USB) devices, network adapters, sound cards, serial cards etc. If you have multiple HDD or SDDs, disconnect those that are not needed during the installation. Also, remove any optical drives that are currently active in your computer.
Once your computer is running with the bare minimum hardware, restart your computer and start the installation again. Chances are you will be able to complete the process without seeing the error again.
Method 2: Prepare the installation media properly
Another possible culprit that might end up triggering this particular issue is a badly written installation media. Since it’s confirmed that the “Windows could not prepare the computer to boot into the next phase of installation” error might occur if the media wasn’t prepared properly, you might be able to resolve the issue by starting the process again from a different installation media.
Here are two different methods that you can follow in order to create Windows installation media. Follow whichever ones seem more convenable to your current situation:
Repeat the process with the newly created media and see if you’re still encountering the “Windows could not prepare the computer to boot into the next phase of installation” error.
If the error is still persisting even with the new installation media, move down to the next method below.
Method 3: Verify whether BIOS supports the Windows version
If you’re trying to install an older Windows version on a newer laptop or desktop, there is a chance that your BIOS model does not support the Windows version that you’re trying to install. There are a lot of reported cases with this occurring on Mini-PC models. Almost all newer models will not support Windows versions older than 8.1.
If you think this scenario might be applicable to your current situation, call your warranty service or search online to see if the BIOS model present on your PC supports the Windows version that you’re trying to install.
Alternatively, try to install a newer Windows version and see if the “Windows could not prepare the computer to boot into the next phase of installation” error persists.
Method 4: Deleting all partitions
Some affected users have reported that they were finally able to go through with the installation and complete the process without the “Windows could not prepare the computer to boot into the next phase of installation” error only after they deleted all partitions and started the OS installation process from scratch.
Of course, this can be a major inconvenient if you were simply trying to upgrade an existing Windows installation, but if you’ve come this far without a result you don’t really have any other choice.
But just in case things go wrong, we advise you to create a Windows System Image backup before you proceed with the deletion of all available partitions. You can follow this article (here) for steps on how to create a System Image backup.
Once the backup is in place, restart your computer and force your computer to boot from the installation media. When you reach the screen where you get to select where to install the OS, delete every available partition and create new ones from the Unallocated space.
Deleting all partitions
Next, proceed with the Windows installation normally and you should no longer be encountering the “Windows could not prepare the computer to boot into the next phase of installation” error.
Источник
[FIX] Windows Could Not Prepare The Computer To Boot Into The Next Phase Of Installation
If you’re going to make clean install of Windows and you’re unable to proceed to due to some error, you may want help. Today, in this article, we’re going to talk about a well known issue that might occur while installing Windows.
During the clean installation, we got following error which prevented the installation:
Windows could not prepare the computer to boot into the next phase of installation. To install Windows, restart the installation.
After getting this message, our next move was to restart the installation. However, even after 3 attempts, we found no change in the situation. The error keeps appearing in a loop, ultimately leading to failure of clean install. If you’re also facing this issue while installing Windows 10/8/7, try out suggestions mentioned below, see if they helps.
FIX: Windows Could Not Prepare The Computer To Boot Into The Next Phase Of Installation While Installing Windows 10/8.1/8/7
FIX 1 – General Suggestions
1. Make sure your system is not connected to any other external devices while installation.
2. Check your hard disk for errors (refer FIX 1 here), just in case.
3. If you’re getting this error while upgrading, repair the boot records first and then retry with the upgrade.
4. For upgrade users, you must temporarily disable your security software and see if this helps.
FIX 2 – Using Advanced Recovery Command Prompt
1. Boot from the installation media, let the setup wizard start, click Repair your computer link.
Then select Troubleshoot > and choose Command Prompt on Advanced options screen.
2. In the Command Prompt window, type these commands (mentioned in bold) one by one and press Enter key after each:
3. Close Command Prompt and restart the installation, this time you should be able to install Windows without any error.

About Kapil Arya
Kapil is presently a Microsoft MVP in Windows IT Pro expertise. He is Windows Insider MVP as well, and author of ‘Windows Group Policy Troubleshooting’ book. In 2015, Microsoft India accomplished him as ‘Windows 10 Champion’. Being passionate Windows blogger, he loves to help others on fixing their system issues. You can follow him for news/updates and fixes for Windows.
Good One, Disk clean helped me to resolve the issue.
^^ Glad we could help 😎
thx sir, FIX 2 work easly:)
Fix 2 worked perfect for me. Past the install now and still working great! THANK YOU.
Sir I see this when I type format fs=NTFS…
Virtual disk service error :
Format is not allowed on the current boot, system, pagefile, crashdumb or hibernation volume
What should I do I can’t Install any type of operating system in this even XP …
Help me please
Hello! do this work in bot =h gpt and mbr drives? because when I typed the ‘active’ command, it says my disk is not a fixed mbr disk…
Hello! do this work in both gpt and mbr disks? because when I typed the ‘active’ command, it says my disk is not a fixed mbr disk… I’m really sorry for the typos…
^^ It should work, try it. Good luck!
Im tired of windows 10 [email protected]@@@@ only bugs. Cant install nothing cant use old devices tope al people stop using this OS
Thnks, fix2 worked, i had no clue ehwts going on, rhis saved my day thnx
^^ Glad to help Jigar 😎
have tried this to no end. Still does not work.
Источник
Windows could not prepare the computer to boot into the next phase of installation
Этот форум закрыт. Спасибо за участие!
Лучший отвечающий

Вопрос
Ответы
Как я понял это баг, так как установщик встаёт из-за того что активный диск не тот, на который устанавливается система!
Куда о нём можно сообщить?
На форуме как я вижу тема никого не заинтересовала!
Все ответы
Как я понял это баг, так как установщик встаёт из-за того что активный диск не тот, на который устанавливается система!
Куда о нём можно сообщить?
На форуме как я вижу тема никого не заинтересовала!
Что Вы понимаете под активным диском? Висту я не раз ставил на второй диск, и каких-либо проблем с этим не возникало.
Вы поменяли порядок загрузки с дисков в биосе? Некоторые матплаты выполняют эту процедуру не совсем аккуратно.
Я наверное не правильно выразился, вообщем смотрите: у меня есть 1 физический жёсткий диск, который разбит на 3 логических (на 1 WindowsXP и Windows 2003 server, на 2 Windows Vista и на 3 различные файлы) по умолчанию активным является 1 раздел (set active), тоесть сначала проверяется его загрузочный сектор, Vista ставится на 2 раздел, но инсталятор не может переключить активный раздел!
Опять что-то не так объяснил?
Слышал, что за обнаружение багов дают бесплатно финальную версию, куда запрос отправлять? Кроме этого нашёл ещё один. И пожалуйста, не игнорируйте тему, если что не так, поправте меня.
Есть подозрение. Разделы на диске, случаем, не с помощью PM создавали?
Чтобы за сообщение об ошибке получить экземпляр висты, надо было, во-первых, предварительно попасть в число бета-тестеров, во вторых, отправить сообщение до 8 ноября.
Программа установки не меняет активный раздел. Какой был активным до установки, тот и после останется.
Вообще-то есть некоторые проблемы и с RTM
» Кажется, Microsoft и в этот раз напутала: volume-подписчикам были переданы неправильные релизы Windows Vista Business и Enterprise Edition.
C релизом, который состоялся ранее в этом месяце, появились проблемы с установочным DVD, а также с установленными версиями Vista.
Источник
Windows could not prepare the computer to boot into the next phase of installation
OSOnlineUpgradeGatherWork
2007-07-08 20:50:14, Info Leaving MigShutDown method
2007-07-08 20:50:14, Info [0x080087] MIG Migrate: Done
2007-07-08 20:50:14, Info [0x08008d] MIG Migrate : Finished (1)
2007-07-08 20:50:14, Info MIG UpgGather: Migrating to (C:$UPGRADE.
OSOnlineUpgradeStore) finished.
2007-07-08 20:50:14, Info MIG Upgrade progress (MigGatherStatus): 1000 / 1000
2007-07-08 20:50:14, Info MIG Upgrade progress (MigGatherStatus): finished
2007-07-08 20:50:14, Info [0x0a0024] UI progress task ProgressInfoMigGather : EndProgress
2007-07-08 20:50:14, Info [0x0805c5] MIG Leaving Callback_GatherOldSysMachineSpecific (success)
2007-07-08 20:50:14, Info [0x06050f] IBS Entering Callback_Rollback_InitializeRollback
2007-07-08 20:50:14, Info [0x060510] IBS Leaving Callback_Rollback_InitializeRollback (success)
2007-07-08 20:50:14, Info [0x0806db] MIG Entering Callback_Rollback_DownlevelCheckpoint
2007-07-08 20:50:14, Info [0x064147] IBSLIB RollbackInitialize in progress.
2007-07-08 20:50:15, Info [0x064148] IBSLIB RollbackInitialize finished.
2007-07-08 20:50:15, Info [0x06414c] IBSLIB RollbackSetCheckpoint(StartPhaseCleanUpCheckpoint) in progress.
2007-07-08 20:50:15, Info [0x06412c] IBSLIB SetCheckpoint: Checkpoint(«StartPhaseCleanUpCheckpoint») in progress.
2007-07-08 20:50:15, Info [0x06412e] IBSLIB SetCheckpoint: Checkpoint «StartPhaseCleanUpCheckpoint» successfully set.
2007-07-08 20:50:15, Info [0x06414f] IBSLIB RollbackSetCheckpoint(StartPhaseCleanUpCheckpoint) finished
2007-07-08 20:50:15, Info [0x06414c] IBSLIB RollbackSetCheckpoint(StartPhaseSystemVolumeSelectedCheckpoint) in progress.
2007-07-08 20:50:15, Info [0x06412c] IBSLIB SetCheckpoint: Checkpoint(«StartPhaseSystemVolumeSelectedCheckpoint») in progress.
2007-07-08 20:50:16, Error [0x06420c] IBSLIB ReadOrWriteSectorsWinNt: Couldn’t set file pointer to 0x0[gle=0x00000003]
2007-07-08 20:50:16, Error [0x06420b] IBSLIB ReadOrWriteSectors: Failed to read sectors (start sector = 0xI64x, sector count = 0x0, sector size = 0x0)
2007-07-08 20:50:16, Error [0x0641ff] IBSLIB CheckSysPartAndReadBootCode: Error reading NTFS boot sectors!
2007-07-08 20:50:16, Error [0x064133] IBSLIB SaveBootSector: CheckSysPartAndReadBootCode failed to get boot sector.
2007-07-08 20:50:16, Info [0x064157] IBSLIB CSystemVolumeSelectionCheckpoint: Successfully saved Boot Sector.
2007-07-08 20:50:16, Info IBSLIB GetSystemDiskNTPath: Found system disk at [DeviceHarddisk0DR0].
2007-07-08 20:50:16, Info IBSLIB GetSystemDiskNumber: Disk [0] is the system disk.
2007-07-08 20:50:16, Info [0x064159] IBSLIB CSystemVolumeSelectionCheckpoint: Successfully saved MBR.
2007-07-08 20:50:16, Info [0x06415e] IBSLIB CSystemVolumeSelectionCheckpoint: Successfully copied «C:boot.ini» to «C:$WINDOWS.
BTSourcesRollbackboot.ini».
2007-07-08 20:50:16, Info [0x06415e] IBSLIB CSystemVolumeSelectionCheckpoint: Successfully copied «C:ntldr» to «C:$WINDOWS.
BTSourcesRollbackntldr».
2007-07-08 20:50:16, Info [0x06415e] IBSLIB CSystemVolumeSelectionCheckpoint: Successfully copied «C:NTDETECT.COM» to «C:$WINDOWS.
BTSourcesRollbackNTDETECT.COM».
2007-07-08 20:50:16, Info [0x06415e] IBSLIB CSystemVolumeSelectionCheckpoint: Successfully copied «C:bootmgr» to «C:$WINDOWS.
BT
2007-07-08 20:50:18, Info IBS PrepareImageTransfer:Drive type requires that media is present for image application.
2007-07-08 20:50:18, Info IBS PrepareImageTransfer:Media Validation: [0]
2007-07-08 20:50:20, Info [0x0a0023] UI progress task ProgressInfoTransferPeImage : StartProgress
2007-07-08 20:50:20, Info [0x06009b] IBS LayDownImage:Calling WIMSetTemporaryPath with C:$WINDOWS.
BT as temp path
2007-07-08 20:50:20, Info [0x06009c] IBS LayDownImage:Calling WIMLoadImage with index [1]
2007-07-08 20:50:20, Info [0x06009e] IBS LayDownImage:CallBack_ImageTransfer:Calling WIMApplyImage.
2007-07-08 20:51:03, Info [0x06009f] IBS LayDownImage:Successfully Restored the image. Image index is [1] and Destination is [C:$WINDOWS.
LSSources], Destination path is [C:]
2007-07-08 20:51:03, Info IBS CopyOEMFolderToLocalSourcesFolder:$OEM$ folder does not exist under [D:Sources]
2007-07-08 20:51:03, Info IBS CallBack_CopyPrivates:Successfully copied any privates and optional directories.
2007-07-08 20:51:03, Info [0x0603b6] IBS CallBack_CopyPrivates:Failed to publish the COPY_PRIVATES_DONE event.
2007-07-08 20:51:04, Info [0x060228] IBS Callback_CopyBootFiles:Successfully moved windows boot files.
2007-07-08 20:51:04, Info IBSLIB ModifyBootEntriesLegacy: Not in first boot. No actions to perform. SetupPhase[1]
2007-07-08 20:51:04, Info IBSLIB ModifyBootEntries:Setup phase is [1]
2007-07-08 20:51:04, Info IBSLIB ModifyBootEntriesBCD:System BCD Store does exist.
2007-07-08 20:51:04, Info IBSLIB ModifyBootEntriesBCD:Boot Manager is valid in system BCD store.
2007-07-08 20:51:04, Info IBSLIB SetupOpenTargetBcdStore for C:$WINDOWS.
BTWindowssystem32configBCD-Template
2007-07-08 20:51:04, Info IBSLIB ModifyBootEntries:Patching Windows boot objects
2007-07-08 20:51:04, Info IBSLIB SetupPatchLocationInformation: NTPath is DeviceHarddiskVolume2
2007-07-08 20:51:08, Info IBSLIB SetupPatchLocationInformation: NTPath is DeviceHarddiskVolume2
2007-07-08 20:51:08, Info IBSLIB SetupPatchBcdObject for $WINDOWS.
Источник
Windows could not prepare the computer to boot into the next phase of installation
Вопрос
On my Laptop Dell 7559 Skylake I’ve plugged an SSD EVO 850 M2 500GB where I’ve succesfully transferred the OS by using the Samsung utility. Then I’ve made a second partition on the same drive, by using Paragon Partition Manager Free.
Now I’m trying to install Windows 7 pro 64 bit (Microsoft ISO, edited by following instructions by Dell on http://www.dell.com/support/article/us/en/04/SLN300564) on this new partition, but the installation fails with the message
«Windows could not prepare the computer to boot into the next phase of installation».
Ответы
Based on your situation, are you trying to setup dual boot Windows 10 and Windows 7?
I found that you cloned this Windows 10 system using the Samsung utility, considering that it is a third party utility, cloning Windows system is not in our support scope, Microsoft does not provide support for cloning system.
But here is something we could do it for you, it seems that there is Windows 10 already installed on your system, to setup dual boot, we need install older versions of Windows before Windows 10. Install Windows 10 before older versions of Windows will broke BCD store and cause unbootable issue.
Please check the following link about how to dual boot Windows 10 and older versions of Windows.
How to dual boot Windows 10 and older versions of Windows
http://answers.microsoft.com/en-us/insider/wiki/insider_wintp-insider_install/how-to-dual-boot-windows-10-and-older-versions-of/9695dfc7-1c13-4d8d-b10b-587e78c6ac36
or
http://www.howtogeek.com/197647/how-to-dual-boot-windows-10-with-windows-7-or-8/
NOTE: This response contains a reference to a third party World Wide Web site. Microsoft is providing this information as a convenience to you. Microsoft does not control these sites and has not tested any software or information found on these sites.
Kindly notice there is a possibility you may meet incompatible issue between Window 7 and Windows 10, it is not suggested to setup dual boot.
Please mark the reply as an answer if you find it is helpful.
Источник