Не удалось завершить процесс установки.
Windows не удалось завершить процесс установки. Всем привет, в этой статье мы попробуем исправить проблему инсталляции Windows 10 на физический компьютер. Её признаки заключаются в том, что та при попытке её установить или обновить отказывается это сделать, показывая ошибку типа
Не удалось завершить процесс установки. Чтобы установить Windows, перезапустите процесс установки.

Наиболее частой причиной такой ошибки является невозможность для Windows выйти из режима аудита. Её решение изначально и описывалось в статье Наиболее частые ошибки Sysprep . Однако проблема иногда подстерегает пользователей и при переходе с Windows 7 на Windows 10. Так что есть смысл вынести решение проблемы в отдельную статью.
Не удалось завершить процесс установки: какие варианты решения у нас есть?
Итак, пользователь может столкнуться с ошибкой на этапе формирования учётной записи. И, как уже указывалось, иногда так происходит при обновлении Windows 7 или Windows 8 до Windows 10. А иногда и при переходе Windows 10 на новую сборку. Однажды мне пожаловались на ошибку при попытке сбросить настройки Windows до заводских через консоль восстановления. Исходя из этого можно было бы попытаться решить проблему такими способами:
Запускаем восстановление запуска…
…если проблема вас подстерегла именно в момент обновления Windows 10. При появлении окна с ошибкой можете перейти в меню дополнительных опций Windows. До него легко добраться, выбрав Перезагрузку с кнопки Пуск, зажав при этом клавишу Shift:


выберите Автоматическое восстановление
Активируем учётку Администратора
- запускаем консоль команд cmd, набрав Shift + F10
- набираем команду mmc, вызвав консоль MMC
- в панели действий выбираем Файл – Добавить или удалить оснастку…
- выберем последовательно Управление компьютером – Локальным компьютером
- Согласитесь с выбираемым и ждите появления пункта Управление компьютером (локальным). Выбрав его, проходим далее по пути
Служебные программы – Локальные пользователи и группы – Пользователи
выбирая справа Администратора.
Убедитесь, что чек-бокс у пункта Отключить учётную запись снят . Если это не так, снимите, затем нажмите ОК и по выходу из окна задайте пароль , проходя через диалоговые окна с предупреждениями:
Консоль можно закрыть и после перезагрузки проверить решена ли проблема. Если нет, продолжаем.
Ещё одна учётная запись
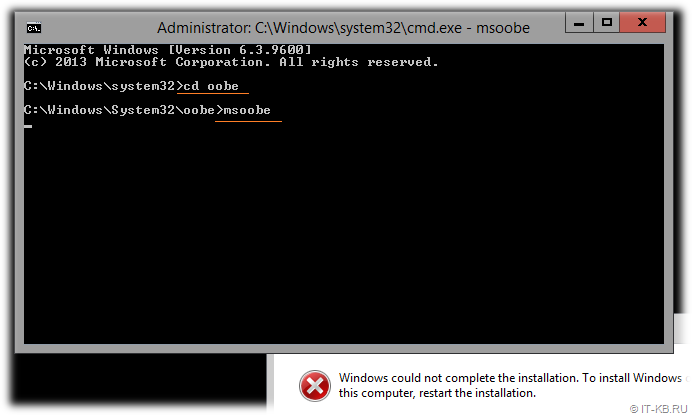
Если ошибка Не удалось завершить процесс установки снова здесь, опять запускаем консоль cmd клавишами Shift + F10 и вводим последовательно две команды
Запустится установщик создания учётной записи Windows. Пройдите все этапы, включая создание пароля. Вполне вероятно, что вам понадобится информация по активации Windows. Перезагружайте Windows и проверяйте.
Не удалось завершить процесс установки: слабый пароль учётной записи.
Нередко причиной появления ошибки является неприемлемый с точки зрения настроек домена пароль к учётке. Так происходит нередко при присоединении к домену в работе в режиме Аудита. Виной тому настройки локальных политик. Повторим процедуру запуска командной строки через Shift + F10. На этот раз введём команду
и выйдем на настройки Локальной политики безопасности по пути
Политики учётных записей – Политика пароля
Сбросьте настройки требований к паролю как у меня на рисунке (или удостоверьтесь, что у вас аналогичные):
Если вы что-то изменили в описанных настройках, перезагрузите компьютер и проверьте сделанное.
Настройки реестра: что там делает Sysprep?
Ну… вы поняли: Shift + F10 с выходом на консоль cmd. Теперь запускаем редактор реестра regedit.exe с выходом на ключ и его разделы, выставляя параметры как указано ниже. Если какой-то из параметров отсутствует, проходите мимо к следующему:
Audit: 0
HKEY_LOCAL_MACHINESYSTEMSetupStatusChildCompletion
setup.exe: 3
HKEY_LOCAL_MACHINESYSTEMSetupStatusChildCompletion
audit.exe: 0
HKEY_LOCAL_MACHINESYSTEMSetupStatusSysprepStatus
CleanupState: 2
HKEY_LOCAL_MACHINESYSTEMSetupStatusSysprepStatus
GeneralizationState: 7
HKEY_LOCAL_MACHINESYSTEMSetupStatusUnattendPasses
auditSystem: 0

Нужно выйти из режима Аудита
Затёртые до мозолей пальцы снова зажимают Shift + F10, вызывая консоль cmd. Оттуда мы покидаем режим Аудита принудительно:
Если после перезагрузки Windows окно с ошибкой снова появилось удалите в реестре через редактор regedit.exe параметр ImageState в разделе
Перезагружайтесь. Теперь, думаю, всё. Успехов.
Источник
Ошибка «Windows could not complete the installation. To install Windows on this computer restart the installation» при запуске клонированной виртуальной машины Hyper-V с Windows Server 2012 R2
 Это первая часть очередной истории о том, как можно наступить на грабли, там, где обычно этого не ожидаешь. Началось всё с того, что для очередного развёртывания нескольких однотипных виртуальных машин Hyper-V с гостевой ОС Windows Server 2012 R2 был подготовлен эталонный образ виртуального диска с установленной ОС. В эталонный образ были включены все актуальные обновления, после чего для уменьшения размера диска был применён метод очистки хранилища компонент Windows в каталоге WinSxS, а логический том системного диска по своему объему был усечён таким образом, что на нём оставалось около 5GB свободного пространства. Перед отключением ВМ в эталонной гостевой ОС по законам жанра была выполнена утилита sysprep. В дальнейшем с этого образа было успешно развёрнуто несколько ВМ, имеющих конфигурацию ВМ, сопоставимую с эталонной ВМ. Спустя некоторое время после всей этой истории с пониманием того, что ранее несколько развёртываний с образа прошли успешно, была предпринята попытка развернуть ещё пару ВМ с этого же образа.
К нашему удивлению при первом же запуске новой ВМ гостевая ОС отказалась загружаться с сообщением об ошибке » Windows Setup could not configure Windows to run onthis computer’s hardware » на этапе первичной инициализации.
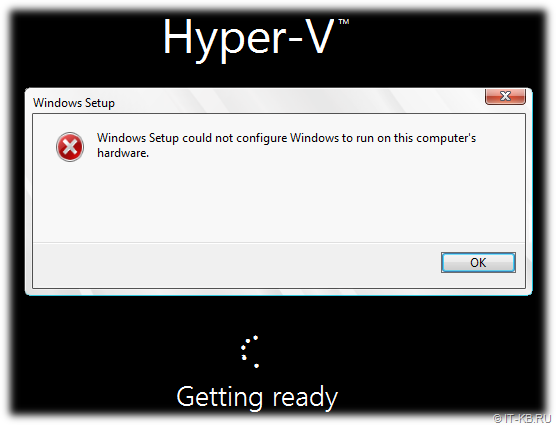
Аналогичная ситуация повторилась и на второй новой ВМ, которую мы попытались развернуть с этого же образа. Попытка повторного перезапуска на обеих ВМ привела к другому сообщению об ошибке » Windows could not complete the installation. To install Windows on this computer restart the installation «
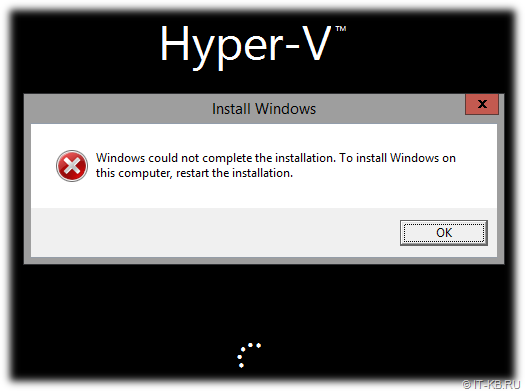
Далее после нажатия кнопки «OK» система отправлялась в перезагрузку и при следующей загрузке ситуация со второй ошибкой повторялась.
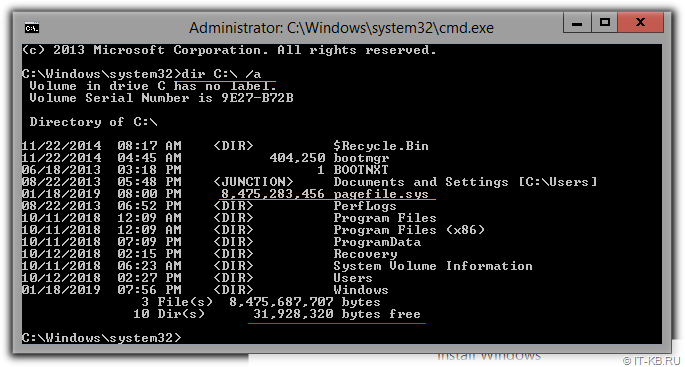
В попытках понять суть происходящего, в момент возникновения последней ошибки (не нажимая кнопки «OK» в окне сообщения об ошибке) жмём волшебную комбинацию клавиш Shift+F10 и попадаем в окно командной строки, выполняемое в контексте прав Администратора. Выполняем листинг содержимого файлов на системном диске C: …
…и обнаруживаем, что свободного места на диске практически нет. При этом размер файла подкачки pagefile.sys , размещаемого по умолчанию в корне этого диска имеет внушительный размер.
И здесь мы вспоминаем про то, что предыдущие успешные развёртывания с данного образа виртуального диска выполнялись на виртуальные машины, имеющие небольшой объём ОЗУ, а последние две ВМ, где мы столкнулись с проблемой, при создании были сконфигурированы на использование большого объема ОЗУ. И предположительно, причиной невозможности корректной первичной инициализации системы стал раздутый файл подкачки.
В такой ситуации можно попробовать умерить аппетиты гостевой ОС на расширение файла подкачки, установив на время ограниченный максимальный размер файла. Для этого из уже открытой командной строки можем вызвать апплет управления свойствами системы sysdm.cpl. В открывшейся форме переходим на закладку управления расширенными настройками Advanced и в блоке Performance нажимаем кнопку Settings. В дополнительно открывшейся форме переходим на вкладку Advanced и в разделе Virtual memory используем кнопку Change чтобы изменить параметры файла подкачки.
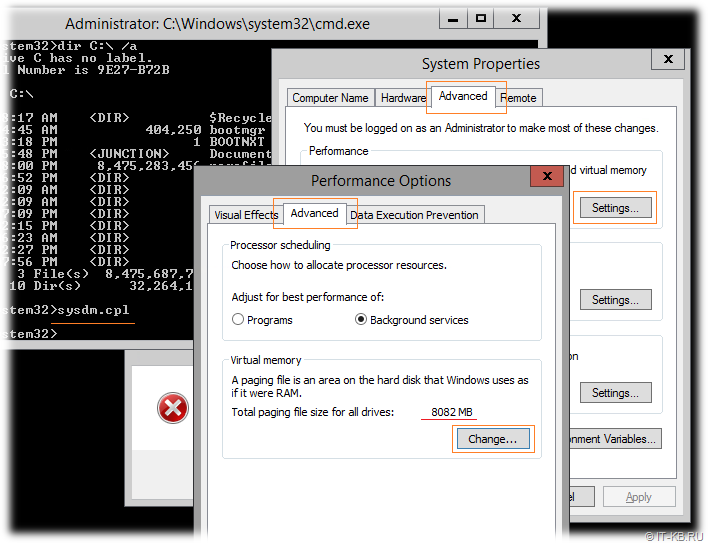
Отключим используемое по умолчанию автоматическое определение размера файла подкачки, укажем первичный и максимально допустимый размеры файла через опцию Custom size (например, от 512MB, но не больше 2GB) и нажмём Set, затем OK.

Теперь можно попробовать перезагрузить виртуальную машину, и при следующей загрузке гостевой ОС свободного места на системном диске должно быть достаточно для нормальной первичной инициализации системы. В нашем случае одна из ВМ загрузилась успешно, а вторая ВМ, не смотря на доступность места на диске продолжила выдавать ошибку » Windows could not complete the installation… «. Вероятно, в процессе первого запуска ОС с наличием проблемы с нехваткой свободного места на диске с механизмом OOBE (Out-of-Box Experience) что-то пошло не так.
На фоне сообщения об ошибке жмём уже знакомую комбинацию клавиш Shift+F10 и, попав в командную строку, перемещаемся в каталог C:WindowsSystem32oobe , где выполняем ручной запуск утилиты msoobe.exe
В случае успешного вызова этой утилиты перед нами должно появиться стандартное окно первичной настройки параметров системы, которое появляется при первом запуске ранее sysprep-нутой системы.
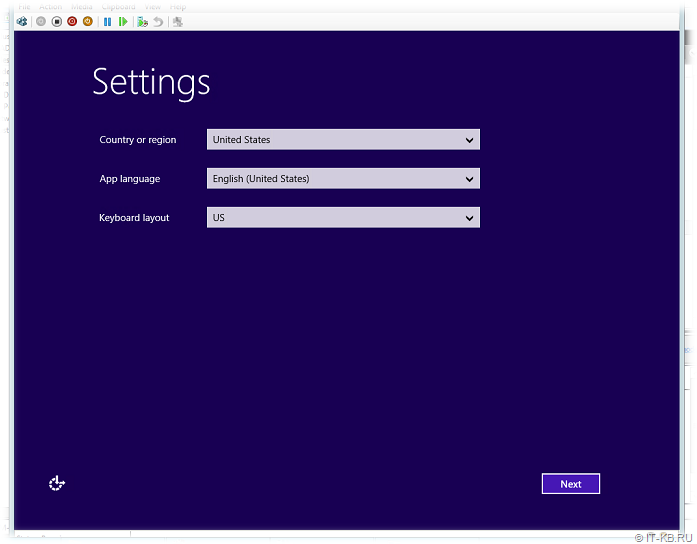
После того, как определим языковые параметры, и на следующих двух экранах примем лицензионное соглашение и укажем учётные данные администратора, мастер первичной инициализации закроется и мы снова вернёмся на первоначальный чёрный экран с открытой командной строкой, в которой вызовем команду штатной перезагрузки гостевой системы:
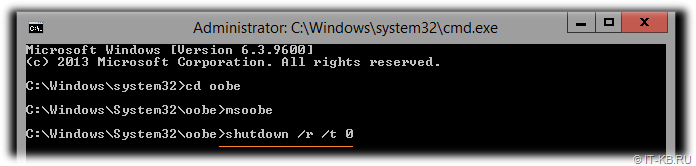
В нашем случае после перезагрузки гостевая система успешно загрузилась.

Если ранее установили небольшой фиксированный файл подкачки, то не забываем его вернуть обратно в автоматический режим, либо указываем другой устраивающий нас размер.
Делаем вывод, что если нам заранее известно то, что внутри шаблонного виртуального диска на системном томе гостевой ОС немного свободного места, то перед первым запуском ВМ лучше установить минимальный объём ОЗУ, исходя из которого система не будет пытаться создать файл подкачки большого размера. А уже после окончания процесса первичной инициализации можно будет увеличить размер ОЗУ ВМ до нужного объёма. Ну или же при создании эталонного диска можно устанавливать небольшой фиксированный размер файла подкачки, который, возможно, потребуется после первичной инициализации новой гостевой ОС, выставлять обратно в автоматический режим либо увеличивать под свои нужды.
С другой стороны, если Вам критична стабильность и предсказуемость работы развёрнутой из шаблона гостевой ОС и Вы испытали проблемы в ходе первичной инициализации OOBE, то лучше пытаться выполнять развёртывание повторно до тех пор, пока оно не отработает штатно. То есть лучше безжалостно удалять виртуальный диск, где первичная инициализация ОС прошла с ошибками и цеплять шаблонный диск к новой ВМ повторно для получения нужного результата. В противном случае с такой «кое-как взлетевшей» системой может случиться ещё несколько историй в духе «О сколько нам открытий чудных …». Одной из таких дивных историй я поделюсь в следующей заметке.
Источник
Windows can not start the installation process
Windows can not start the installation process = O windows não pode iniciar o processo de instalação
I’m desperate, I asked in several forums and nobody can solve this problem.
I already researched Google just that I do not find anything about this error, both in English and in Portuguese, only similar installation errors appear but they are not exactly the same.
I have tried to go in windows / system32 / obbe and run msoobe.exe only that there is no file called msoobe.exe.
I was using Windows 10 when I decided to go back to 7. I installed using setup.exe from the image and had never experienced this problem before
Replies (8)
![]()
Unable to start Windows 7 installation process could be due to some software conflicts or system file issues.
We would like to know some information to better isolate the problem.
- Are you trying to rollback to Windows 7?
- What Windows 7 service pack are you trying to install?
- Does your computer came up with pre-installed Windows 7 OS?
In the meantime, you can check this article about going back to older Windows OS version.
We will wait for your response.
1 person was helped by this reply
Did this solve your problem?
Sorry this didn’t help.
Great! Thanks for marking this as the answer.
How satisfied are you with this reply?
Thanks for your feedback, it helps us improve the site.
How satisfied are you with this response?
Thanks for your feedback.
If you have your Windows 7 install disc or USB, configure your BIOS to boot from it then perform a custom install.
See the Windows 7 section of the following article how to do that:
2 people were helped by this reply
Did this solve your problem?
Sorry this didn’t help.
Great! Thanks for marking this as the answer.
How satisfied are you with this reply?
Thanks for your feedback, it helps us improve the site.
How satisfied are you with this response?
Thanks for your feedback.
Unable to start Windows 7 installation process could be due to some software conflicts or system file issues.
We would like to know some information to better isolate the problem.
- Are you trying to rollback to Windows 7?
- What Windows 7 service pack are you trying to install?
- Does your computer came up with pre-installed Windows 7 OS?
In the meantime, you can check this article about going back to older Windows OS version.
We will wait for your response.
1. Yes
2. Windows 7 Ultimate SP1
Did this solve your problem?
Sorry this didn’t help.
Great! Thanks for marking this as the answer.
How satisfied are you with this reply?
Thanks for your feedback, it helps us improve the site.
How satisfied are you with this response?
Thanks for your feedback.
![]()
We would like to clarify, what specific task are you trying to accomplish? What troubleshooting steps have you tried so far? Have you tried to follow the suggested workaround by Andre Da Costa from the post above? If not yet, we recommend that you do as that can help us to resolve the issue.
We look forward to your response.
Did this solve your problem?
Sorry this didn’t help.
Great! Thanks for marking this as the answer.
How satisfied are you with this reply?
Thanks for your feedback, it helps us improve the site.
How satisfied are you with this response?
Thanks for your feedback.
We would like to clarify, what specific task are you trying to accomplish? What troubleshooting steps have you tried so far? Have you tried to follow the suggested workaround by Andre Da Costa from the post above? If not yet, we recommend that you do as that can help us to resolve the issue.
We look forward to your response.
I tried, but nothing happened.
Did this solve your problem?
Sorry this didn’t help.
Great! Thanks for marking this as the answer.
How satisfied are you with this reply?
Thanks for your feedback, it helps us improve the site.
How satisfied are you with this response?
Thanks for your feedback.
![]()
We would appreciate if you provide answers to the questions that we asked in our previous post. This is for us to determine the solution appropriate for the issue that you’re experiencing.
We look forward to your updates.
Did this solve your problem?
Sorry this didn’t help.
Great! Thanks for marking this as the answer.
How satisfied are you with this reply?
Thanks for your feedback, it helps us improve the site.
How satisfied are you with this response?
Thanks for your feedback.
We would appreciate if you provide answers to the questions that we asked in our previous post. This is for us to determine the solution appropriate for the issue that you’re experiencing.
We look forward to your updates.
1 person was helped by this reply
Did this solve your problem?
Sorry this didn’t help.
Great! Thanks for marking this as the answer.
How satisfied are you with this reply?
Thanks for your feedback, it helps us improve the site.
How satisfied are you with this response?
Thanks for your feedback.
![]()
We are sorry if we took long to provide a reply as we are thoroughly checking this case.
We would like to verify some details again for us to narrow down the issue. Kindly answer the following questions:
- How did you obtain Windows 7? Did it come pre-installed on your computer or you purchased it separately?
- How are you trying to install Windows 7, through installation CD or using an ISO file?
- Which Windows 7 edition (Starter, Home Basic, Home Premium, Professional, Ultimate, Enterprise) do you have?
- Is your Windows 7 a personal or organization/company-provided program?
We appreciate your patience. Looking forward to your response.
Did this solve your problem?
Sorry this didn’t help.
Great! Thanks for marking this as the answer.
How satisfied are you with this reply?
Thanks for your feedback, it helps us improve the site.
Источник
If you’re encountering the error message Windows could not complete the installation on your Windows 11/10 computer, then this post is intended to help you. In this post, we will identify the possible causes, as well as provide the most appropriate solutions you can try to help you remediate this issue.
When you encounter this issue. you’ll receive the following full error message;
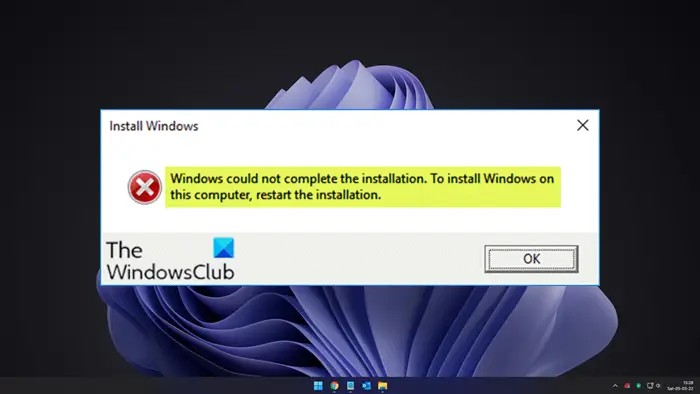
Windows could not complete the installation. To install Windows on this computer, restart the installation.
You can encounter this issue when a fresh Windows installation is interrupted before a user account is created. This error may also occur when upgrading from Windows 7/8.1/10 to Windows 10/10 or upgrading Windows 11/10 to a newer version/build. In some cases, you may encounter this issue when you try to reset Windows 11/10 as reported by some users.
However, this error essentially means you are using Audit Mode to install Windows which is the main cause of this error. When Windows boots for the very first time then either it can boot to OOBE or Audit Mode.
If you’re faced with this issue, you can try our recommended solutions below in no particular order and see if that helps to resolve the issue.
- Run Automatic Startup Repair
- Enable Administrator Account
- Start Account Creation Wizard
- Change Password Requirements
- Modify some registry key values
- Disable Audit Mode
Let’s take a look at the description of the process involved concerning each of the listed solutions.
1] Run Automatic Startup Repair
As you’re receiving the error message Windows could not complete the installation after/during updating/upgrading Windows 10, you can try running Automatic Startup Repair and see if the issue will be resolved.
2] Enable Administrator Account
Do the following:
- On the error screen press Shift + F10 to open Command Prompt.
- Type mmc and hit Enter.
- In the window that opens, click File > Add/Remove Snap-in.
- Select Computer Management and then double-click on it.
- In the new window that opens select Local computer.
- Click Finish.
- Click OK.
- Then double-click Computer Management (Local) > System Tools > Local Users and Groups > Users > Administrator.
- Make sure to uncheck the Account is disabled option.
- Click OK.
- Next, right-click on the Administrator then select Set Password and set a strong password to get started.
You can now exit MMC console and restart your computer and see if the issue is resolved or not. If the latter is the case, continue with the next solution.
3] Start Account Creation Wizard
Do the following:
- Again open the Command Prompt on the error screen by pressing Shift + F10 key combination.
- Type the directory path below and hit Enter.
cd C:windowssystem32oobe
- Next, type msoobe and hit Enter.
The above will start the user account creation wizard, so create a generic account and it’s password. Your Product Key might be required here.
- Once done hit Finish, exit everything and restart your PC.
On boot, check if the Windows could not complete the installation issue is resolved. Else, proceed with the next solution.
4] Change Password Requirements
If you’re in Audit Mode and the computer has just been joined to a domain, you’ll receive the Windows could not complete the installation error. The error is caused by password requirements added to the local security policy. This typically includes a minimum password length and password complexity.
To change password requirements, do the following:
- On the error screen press Shift + F10 to open Command Prompt.
- Type secpol.msc and hit Enter.
- Navigate to Account Policies > Password Policy.
- Now change Minimum password length to 0 and disable Password must meet complexity requirements option.
- Apply the changes and then exit the Security Policy console.
- Click OK on the error message to reboot your PC.
If the issue persists, try the next solution.
5] Modify some registry key values

Do the following:
- On the error screen press Shift + F10 key combo to open Command Prompt.
- Type regedit and hit Enter.
In the registry editor windows that opens, navigate or jump to the registry key path below and on the right pane double-click on the following registry keys one after the other and modify the Value data field accordingly:
ComputerHKEY_LOCAL_MACHINESYSTEMSetupStatus
Audit: 0
HKEY_LOCAL_MACHINESYSTEMSetupStatusChildCompletion
setup.exe: 3
HKEY_LOCAL_MACHINESYSTEMSetupStatusChildCompletion
audit.exe: 0
HKEY_LOCAL_MACHINESYSTEMSetupStatusSysprepStatus
CleanupState: 2
HKEY_LOCAL_MACHINESYSTEMSetupStatusSysprepStatus
GeneralizationState: 7
HKEY_LOCAL_MACHINESYSTEMSetupStatusUnattendPasses
auditSystem: 0
Once done, reboot your PC and the Audit Mode will be disabled and Windows 10 will start normally and boot into the Out of Box Experience mode.
6] Disable Audit Mode
Do the following:
- On the error screen press Shift + F10 key combo to open Command Prompt.
- Type the command below and hit Enter.
sysprep /oobe /generalize
This will disable the Audit Mode.
- Now exit CMD prompt and reboot your PC normally.
The Windows could not complete the installation issue should be resolved. However, If you’re still facing this issue then again open CMD prompt and do the following:
- Type regedit and hit Enter.
- Navigate to the following registry key:
HKEY_LOCAL_MACHINESOFTWAREMicrosoftWindowsCurrentVersionSetupState
- At the location, in the right pane, right-click the ImageState entry and select Delete.
- Exit CMD prompt and restart your PC.
Hope this helps!

Fix Windows Could Not Complete The Installation. To Install Windows On This Computer, Restart The Installation: If you are facing this error then it means you are using Audit Mode to install Windows which is the main cause of this error. When Windows boots for the very first time then either it can boot to Windows Welcome Mode or Audit Mode.
What is Audit Mode?
Audit Mode is a network-enabled environment where a user can add customizations to Windows images. Whenever Windows starts it shows you a Welcome screen immediately after installation, however one can skip this Welcome screen and boot directly to audit mode instead. In short Audit Mode allows you to boot directly to Desktop after Windows installation.
Windows could not complete the installation. To install Windows on
this computer, restart the installation.
Also, the main issue in this error is that you’re stuck in a Reboot loop and that’s why it’s more annoying. Now you know about Audit Mode and Welcome Mode it’s time how to fix this error, so without wasting any time let’s see how to Install Windows when in Audit Mode.
Contents
- [SOLVED] Windows Could Not Complete The Installation
- Method 1: Run Automatic Repair
- Method 2: Enable Administrator Account
- Method 3: Start Account Creation Wizard
- Method 4: Change Password Requirements
- Method 5: Registry Fix
- Method 6: Disable Audit Mode
Method 1: Run Automatic Repair
1. Insert the Windows 10 bootable installation DVD and restart your PC.
2. When prompted to Press any key to boot from CD or DVD, press any key to continue.

3. Select your language preferences, and click Next. Click Repair your computer in the bottom-left.

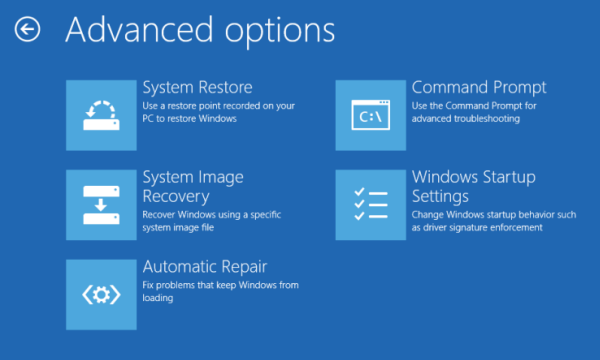
4. On choose an option screen, click Troubleshoot.

5. On Troubleshoot screen, click Advanced option.

6. On the Advanced options screen, click Automatic Repair or Startup Repair.

7. Wait till the Windows Automatic/Startup Repairs complete.
8. Restart and you have successfully Fix Windows Could Not Complete The Installation Error.
Method 2: Enable Administrator Account
1. On the error screen press Shift + F10 to open Command Prompt.
2. Type the following command and hit Enter: MMC
3. Next click File > Add/Remove Snap-in.

4. Select Computer Management and then double-click on it.

5. In the new window that opens select Local computer and then click Finish followed by OK.

6. Then double-click Computer Management (Local) > System Tools > Local Users and Groups > Users > Administrator.
7. Make sure to Uncheck the “Account is disabled” option and click OK.

8. Next, right-click on the Administrator then select Set Password and set a strong password to get started.

9. Finally, close everything and restart your PC. After the restart, you may be able to Fix Windows Could Not Complete The Installation.
Method 3: Start Account Creation Wizard
1. Again open the Command Prompt on the error screen by pressing Shift + F10.
2. Type the following command and hit Enter: cd C:windowssystem32oobe

3. Again type “msoobe” (without quotes) and hit Enter.
4. The above will start the user account creation wizard, so create a generic account and it’s password.
Note: Keep your product key ready as sometimes it is required. If it asks for OEM/No then simply hit finish.
5. Once done hit Finish and close everything. Restart your PC you may have successfully fix Windows Could Not Complete The Installation. To Install Windows On This Computer, Restart The Installation.
Method 4: Change Password Requirements
This error tends to pop-up when in Audit Mode and the computer has just been joined to a domain. The error is caused by password requirements added to the local security policy. This typically includes a minimum password length and password complexity.
1. Open the Command prompt on the error screen.
2. Type the following the command and hit Enter: secpol.msc
3. Navigate to Account Policies > Password Policy.

4. Now change “Minimum password length” to 0 and disable “Password must meet complexity requirements.“
5. Apply the changes and then exit the Security Policy console.
6. Click OK on the error message to reboot your PC.
Method 5: Registry Fix
1. On the same error screen press Shift + F10 to open Command Prompt.
2. Type the following command and hit Enter: regedit

3. Now in the Registry Editor navigate to the following key: ComputerHKEY_LOCAL_MACHINESYSTEMSetupStatus
4.Adjust the following values if they don’t match the following:
Note: To change the value of the below keys double click on them and then enter the new value.
HKEY_LOCAL_MACHINESYSTEMSetupStatusAuditBoot Value: 0
HKEY_LOCAL_MACHINESYSTEMSetupStatusChildCompletionsetup.exe Value: 3
HKEY_LOCAL_MACHINESYSTEMSetupStatusChildCompletionaudit.exe Value: 0
HKEY_LOCAL_MACHINESYSTEMSetupStatusSysprepStatusCleanupState Value: 2
HKEY_LOCAL_MACHINESYSTEMSetupStatusSysprepStatusGeneralizationState Value: 7
HKEY_LOCAL_MACHINESYSTEMSetupStatusUnattendPassesauditSystem Value: 0

5. After a Reboot the Audit Mode is disabled and Windows starts regularly – in the Out of Box Experience mode.
Method 6: Disable Audit Mode
Running Sysprep command each time resets Windows licensing the state to default. So if your Windows is activated and you run this command, you’ll need to reactivate Windows after executing this command.
1. Open Command Prompt on the error screen.
2. Type the following command in the cmd and hit Enter: sysprep /oobe /generalize

3. This will disable the Audit Mode.
4. Close everything and reboot your PC normally.
5. If you’re still facing this issue then again open cmd.
6. Type the following command and hit Enter: regedit
7. Navigate to the following registry key:
HKEY_LOCAL_MACHINESOFTWAREMicrosoftWindowsCurrentVersionSetupState
8. Highlight State Registry key, then right-click on ImageState in the right window pane and click on Delete.

9. Once you deleted the string, close everything and restart your PC.
Recommended for you:
- Fix The computer restarted unexpectedly or encountered an unexpected error
- Enable Dark Theme for every Application in Windows 10
- How to create empty files from the command prompt (cmd)
- Fix you don’t have permission to save in this location
That’s it you have successfully Fix Windows Could Not Complete The Installation Error but if you still have any queries regarding this guide then please feel free to ask them in the comment’s section.

Во время обновления Windows 10 до Creators Update, моргнул свет и отключился компьютер, после чего вышла ошибка:
The computer restarted unexpectedly or encountered an unexpected error. Windows installation cannot proceed. To install Windows, click “OK” to restart the computer, and then restart the installation.

Дословно текст ошибки можно перевести так:
Компьютер неожиданно перезапускается или возникла непредвиденная ошибка. Невозможно продолжить установку Windows. Чтобы установить Windows, нажмите кнопку “ОК” для перезагрузки компьютера, а затем перезапустите установку.
Не забудьте подписаться на наш Дзен
В следствие чего машина ушла в циклическую перезагрузку и не стартовала. Для решения проблемы, можно поковырять реестр, предварительно сделав его копию, через «Файл»-«Экспорт».
Замена значения в реестре
- после появления ошибки жмите Shift + F10 (если ноутбук, возможно дополнительно нужно нажать Fn), откроется командная строка;
- в командной строке введите «regedit» (без кавычек) и нажмите ввод, откроется редактор реестра;
- сделайте копию реестра;
- в редакторе реестра проходим по ветке HKEY_LOCAL_MACHINESYSTEMSetupStatusChildCompletion;
- в правой части окна дважды кликните на setup.exe, значение 1 изменяем на 3;
- закрывайте редактор реестра, закрывайте командную строку, кликайте на кнопку «OK» в окне ошибки;
- после перезагрузки установка должна продолжиться.

Способ работает с Windows 7, 8 и 10. В комментариях пишите помог ли способ, если нет, попытаюсь помочь советом.
In this post, I’ll describe two simple methods using which will resolve a reboot loop issue in Windows 7.
This problem usually occurs when a fresh Windows installation is interrupted before a user account is created.
The following error message is displayed
Windows could not complete the installation. To install Windows on this computer, restart the installation.
On clicking okay the system reboots and again the same error message “Windows could not complete the installation” is reported. This loop continues in the same fashion.
Method 1
- Press SHIFT + F10 to bring up the command prompt.
- Then type CD C:windowssystem32oobe
- Hit Enter
- Then type msoobe
- Hit Enter
- This will open up the windows account creation wizard
- Using the wizard create a generic user account and then reboot the system
After following these steps you will not see the error message Windows could not complete the installation. However if you still continue to see that error message head on to methods 2.
Method 2
- Again press Shift + F10 to display the command prompt
- Then type MMC
- Now Click on File -> Add/Remove Snap-in…
- Select Computer Management
- Click Add
- Select Local Computer and Click Finish and then Ok.
- Click on Computer Management -> System Tools -> Local Users and Groups -> Users
- Double Click on Administrator
- Then UnCheck Account is disabled and Click OK
- Now right click Administrator and click on Set Password…
- Set a decent password to get started.
Hope this post resolved your problem if you liked it please do share this post with your friends. That’s all for today see you next time.
Have some questions join the discussion.
Questions @ HowISolve Community

Neil Mahaseth
Hello, friends welcome to HowISolve.com, a community founded by me in June 2015. With the aim to help you solve your everyday tech problems. The motivation for starting this community was instilled from my love for technology and my nature to help others in need.
By qualification, I am a technocrat with an M.B.A. and B.Tech. from Narsee Monjee, Mumbai. I have experienced both worlds: corporate and startup. I am currently honing my entrepreneurial skills and trying to add value to people’s lives.
You can also join us by subscribing to our Newsletters & YouTube channel to be a part of this growing community.