![]()
Download Article
![]()
Download Article
Do you need to add new users to a Windows PC? If you’re writing a script, signed in remotely, or just prefer the command line, you can use simple commands to add new users, set passwords, and even grant administrator permissions using CMD, or the command prompt. This wikiHow guide will teach you the easiest way to add local users to Windows from the command prompt.
Things You Should Know
- You’ll need to run the Command Prompt as an administrator to add and manage users.
- Use the command net user username password /add to create a new user from the command line.
- To give a new user administrative rights, use net localgroup administrators username /add.
Steps
-

1
Open Start
. Click the Windows logo in the bottom-left corner of the screen.
-
2
Search for Command Prompt. Type in command prompt to do so.
Advertisement
-
3
Right-click
Command Prompt. It should be at the top of the Start window. Right-clicking it prompts a drop-down menu.
-
4
Click Run as administrator. This is in the drop-down menu.
-
5
Click Yes when prompted. Doing so opens the Command Prompt window.
-
6
Type in the «add user» command. The «add user» command uses the net user username password /add format, where «username» is the name you want to use for the user and «password» is the password you want to assign to the account.
- For example, to add a user named «Michael» with the password «hello123», you would enter net user Michael hello123 /add here.
- If you don’t want to use a password for the account, don’t type in a password—just enter net user username /add instead.
-
7
Press ↵ Enter. Doing so runs the command and begins creating the user account.
- Once you see the phrase «The command completed successfully» appear, your user has been added.
-
8
Grant the user administrator permissions. If you want to turn the user account into an administrator account, type net localgroup administrators username /add into Command Prompt—making sure to replace «username» with the name of the account you want to change—and press ↵ Enter.
- For example, to make a user account named «Michael» an administrator, you would type in net localgroup administrators Michael /add and press ↵ Enter.


Advertisement
Add New Question
-
Question
How do I open a laptop password?

Access that account to reset your password.
Boot your computer and press F8 repeatedly.
Access Safe Mode.
Key in «Administrator» in Username, with no password.
Go to Control Panel, then User Accounts.
Select the account you want to reset the password.
Change the password. -
Question
When I type user name and password it says access is denied. What should I do?
You have to run command prompt as an administrator. Right click the icon and click run as administrator.
-
Question
Why am I seeing a message that says my local group isn’t there if I am being stopped at the point of entering the command line into the second stage of this process?
Check which language you are using. The local group is probably a bit different.
See more answers
Ask a Question
200 characters left
Include your email address to get a message when this question is answered.
Submit
Advertisement
-
Using Command Prompt to create a user will always create a standard (non-administrator) user by default.
Thanks for submitting a tip for review!
Advertisement
-
If you aren’t on an administrator account, you cannot use Command Prompt to add a user.
Advertisement
About This Article
Article SummaryX
1. Open Command Prompt in Administrator mode.
2. Type in net user username password /add where «username» is the name and «password» is the password.
3. Press ↵ Enter.
Did this summary help you?
Thanks to all authors for creating a page that has been read 917,924 times.
Is this article up to date?
 В этой инструкции для начинающих о том, как создать нового пользователя Windows 10 несколькими способами, как сделать его администратором или наоборот, создать ограниченную учетную запись пользователя компьютера или ноутбука. Также может пригодиться: Как удалить пользователя Windows 10.
В Windows 10 присутствуют два типа учетных записей — учетные записи Майкрософт (требующие адреса электронной почты и синхронизирующие параметры онлайн) и локальные учетные записи пользователей, не отличающиеся от тех, которые могут быть вам привычны по ранним версиям Windows. При этом одну учетную запись всегда можно «превратить» в другую (например, Как удалить учетную запись Майкрософт). В статье будут рассмотрено создание пользователей с обоими типами учетных записей. Также может быть полезным: Как сделать пользователя администратором в Windows 10.
- Создание нового пользователя в Параметрах Windows 10
- Как создать пользователя в командной строке
- Локальные пользователи и группы Windows 10
- Добавление пользователя в control userpasswords2
- Видео инструкция
Создание пользователя в параметрах Windows 10
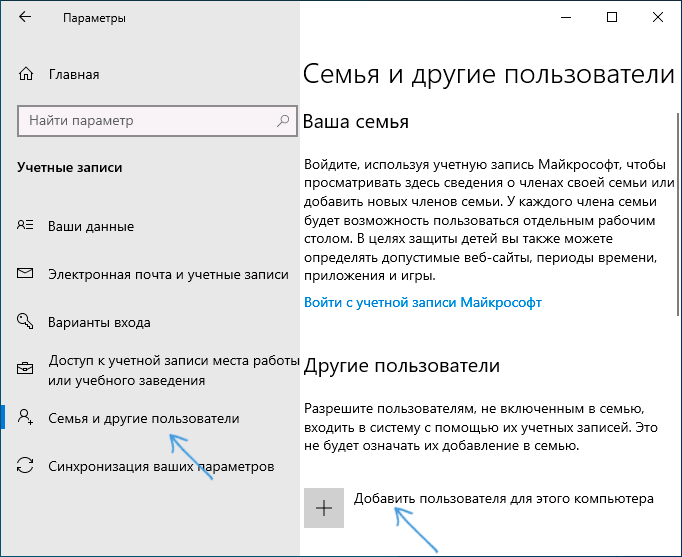
Основной способ создания нового пользователя в Windows 10 — использование пункта «Учетные записи» нового интерфейса настроек, доступного в «Пуск» — «Параметры». В указанном пункте настроек откройте раздел «Семья и другие пользователи».
- В разделе «Ваша семья» вы сможете (при условии, что используете учетную запись Майкрософт) создать учетные записи для членов семьи (также синхронизируемые с Майкрософт), подробнее о таких пользователях я писал в инструкции Родительский контроль Windows 10.
- Ниже, в разделе «Другие пользователи» можно добавить «простого» нового пользователя или администратора, учетная запись которого не будет контролироваться и являться «членом семьи», можно использовать как учетные записи Майкрософт, так и локальные учетные записи. Этот вариант будет рассматриваться далее.
Для создания нового пользователя, не входящего в семью и без возможностей родительского контроля, выполните следующие шаги:
- В разделе «Другие пользователи» нажмите «Добавить пользователя для этого компьютера».

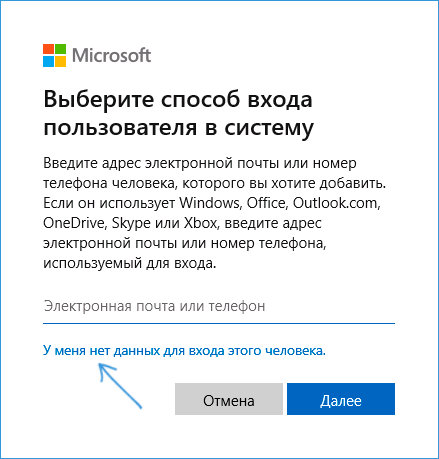
- В следующем окне вам будет предложено указать адрес электронной почты или номер телефона — введите их, при условии, что вы хотите добавить пользователя с уже существующей учетной записью Майкрософт.
- Если вы собираетесь создавать локальную учетную запись (или даже учетную запись Майкрософт, но пока не зарегистрировали e-mail для нее), нажмите «У меня нет данных для входа этого человека» внизу окна.

- В следующем окне будет предложено создать учетную запись Майкрософт. Вы можете заполнить все поля для создания пользователя с такой учетной записью или нажать «Добавить пользователя без учетной записи Майкрософт» внизу.

- В следующем окне останется ввести имя пользователя, пароль (если требуется пользователь без пароля, просто не вводите ничего в соответствующие поля), подсказку для пароля и указать вопросы для восстановления пароля, на случай, если он будет забыт. Этого достаточно, чтобы новый пользователь Windows 10 появился в системе и под его учетной записью был возможен вход.


По умолчанию, новый пользователь имеет права «обычного пользователя». Если нужно сделать его администратором компьютера, выполните следующие шаги (при этом, вы для этого также должны быть администратором):
- Зайдите в Параметры — Учетные записи — Семья и другие пользователи.
- В разделе «Другие пользователи» нажмите по пользователю, которого нужно сделать администратором и кнопку «Изменить тип учетной записи».
- В списке выберите «Администратор» и нажмите Ок.


Войти под новым пользователем можно, нажав по имени текущего пользователя вверху меню пуск или с экрана блокировки, предварительно выйдя из текущей учетной записи.

Как создать нового пользователя в командной строке
Для того, чтобы создать пользователя с помощью командной строки Windows 10, запустите ее от имени администратора (например, через меню правого клика по кнопке «Пуск»), после чего введите команду (если имя пользователя содержит пробелы, используйте кавычки, пароль брать в кавычки не нужно):
net user имя_пользователя пароль /add
И нажмите Enter.
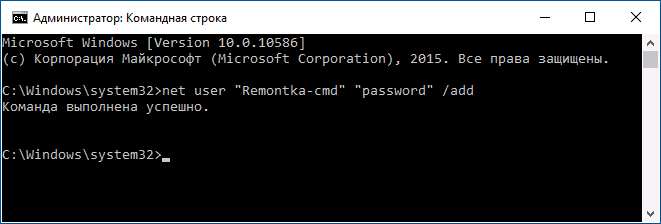
После успешного выполнения команды, в системе появится новый пользователь. Также вы можете сделать его администратором, используя следующую команду (если команда не сработала, а у вас не лицензия Windows 10, попробуйте вместо Администраторы писать administrators):
net localgroup Администраторы имя_пользователя /add
Вновь созданный таким образом пользователь будет иметь локальную учетную запись на компьютере.
Создание пользователя в «Локальные пользователи и группы» Windows 10
И еще один способ создания локальной учетной записи с помощью элемента управления «Локальные пользователи и группы»:
- Нажмите клавиши Win+R, введите lusrmgr.msc в окно «Выполнить» и нажмите Enter.
- Выберите «Пользователи», а затем в списке пользователей кликните правой кнопкой мыши и нажмите «Новый пользователь».

- Задайте параметры для нового пользователя.


Чтобы сделать созданного пользователя администратором, кликните по его имени правой кнопкой мыши, выберите пункт «Свойства». Затем, на вкладке «Членство в группах» нажмите кнопку «Добавить», наберите «Администраторы» и нажмите «Ок».
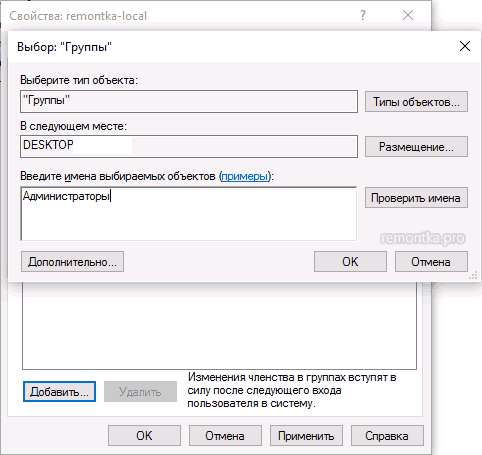
Готово, теперь выбранный пользователь Windows 10 будет иметь права администратора.
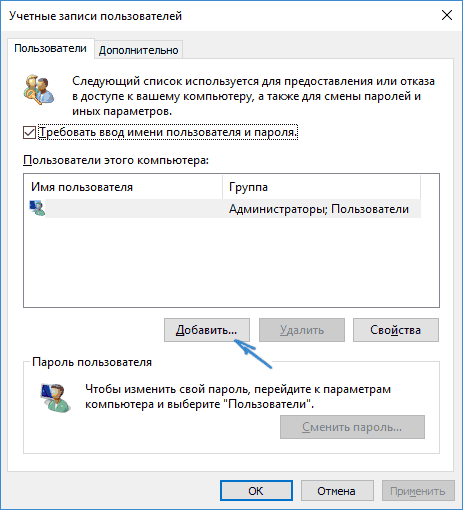
Добавление учетной записи в control userpasswords2
И еще один очень простой способ добавления новой учетной записи пользователя Windows 10:
- Нажмаем клавиши Win+R, вводим control userpasswords2

- В списке пользователей нажимаем кнопку добавления нового пользователя

- Дальнейшее добавление нового пользователя (доступны как учетная запись Майкрософт, так и локальная учетная запись) будет выглядеть тем же самым образом, что и в первом из описанных способов.


Видео инструкция
Если остались какие-либо вопросы или что-то не получается так просто, как это описано в инструкции — пишите, постараюсь помочь.
В версиях Windows, отличных от Professional (например Windows 10 Home Basic) отсутствует раздел «Локальные пользователи и группы» в оснастке «Управление компьютером». Однако иногда возникает необходимость создать/удалить/изменить ещё одного пользователя в данной операционной системе. Разберём, как это сделать.
Самым простым вариантом создать пользователя в не-Pro редакциях Windows – через командную строку.
Открытие командной строки
Для следующих манипуляций необходимо запустить командную строку от имени администратора.
Открыть командную строку можно несколькими способами:
-
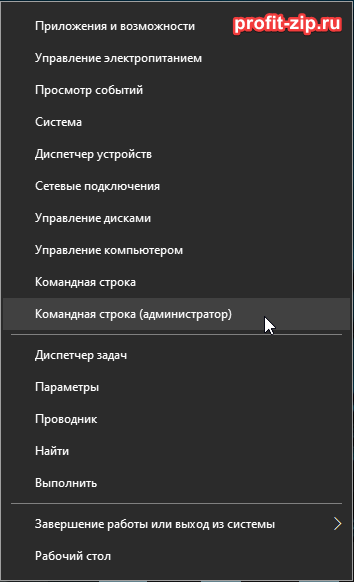
Для версий Windows 8-11
Нажмите по кнопке «Пуск» правой кнопкой мыши и выберите «Командная строка (администратор)», «Powershell (администратор)» или «Терминал (администратор»).
При появлении диалога UAC – согласитесь на запуск.
-
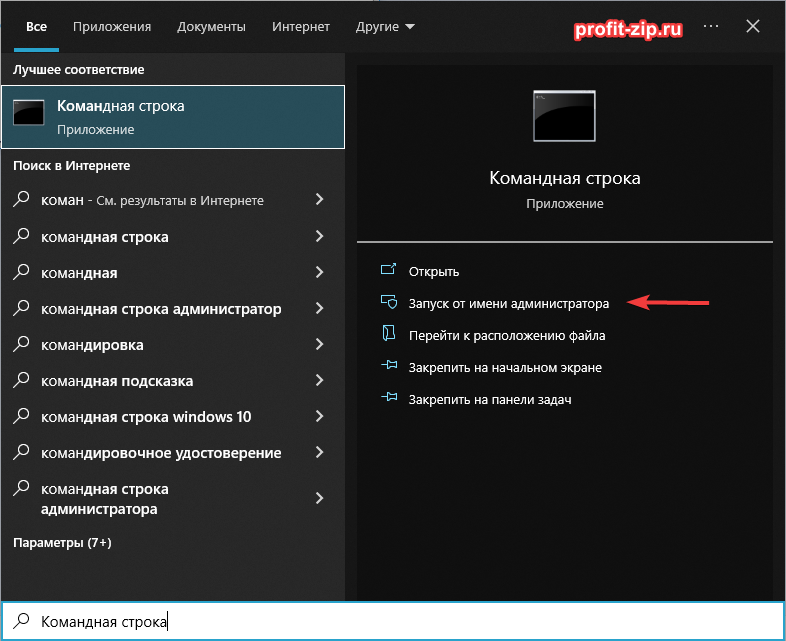
Для всех версий Windows
Найдите «Командная строка» в списке программ в меню «Пуск» или через Поиск среди приложений. Нажмите правой кнопкой мыши по приложению «Командная строка» и/или в контекстном меню выберите «Запуск от имени администратора».
-
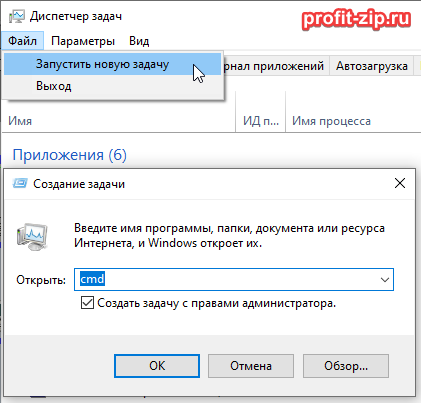
Для всех версий, через Диспетчер задач
Запустите Диспетчер задач. Сверху нажмите Файл – Запустить новую задачу.
В появившемся окне «Создание задачи» введите напротив поля «Открыть» –cmd, установите галочку «Создать задачу с правами администратора» и нажмите «ОК»
Создание пользователя через CMD
Для создания пользователя достаточно одной простой команды:
net user "Пользователь 1" /add
При создании пользователя, пользовательский каталог (по умолчанию C:UsersUsername) не создаётся. Создание каталога происходит при первом входе в учётную запись.
Если пользователю необходимо установить пароль, используйте следующий синтаксис команды:
net user USERNAME PASSWORD /add
Соответственно вместо Пользователь 1/USERNAME введите предпочитаемое имя пользователя, вместо PASSWORD – пароль. Если в имени пользователя или пароле есть пробелы – использование кавычек обязательно.
Дополнительные операции с пользователем
Следующие команды не обязательны, однако иногда могут пригодиться:
Отключить обязательную смену пароля при первом входе пользователя:
net user "Пользователь 1" /passwordreq:no
Установить срок действия пароля пользователя – неограниченным (убрать срок действия пароля):
wmic useraccount where name="Пользователь 1" set passwordexpires=false
Запретить смену пароля пользователем:
net user "Пользователь 1" /passwordchg:no
Удалить пользователя:
net user "Пользователь 1" /delete
Обратите внимание: при удалении пользователя через CMD, папка пользователя (по умолчанию C:UsersUsername) не удаляется, а всё содержимое папки остаётся доступно администраторам ПК. При создании пользователя с тем же именем, желательно предварительно удалить или переименовать папку старого пользователя.
Изменить пароль пользователя:
net user "Пользователь 1" НовыйПароль
Добавить пользователя в локальную группу Администраторы:
net localgroup "Администраторы" "Пользователь 1" /add
Удалить пользователя из локальной группы Пользователи:
net localgroup "Пользователи" "Пользователь 1" /delete
 Обновлено: 18.10.2022
Опубликовано: 09.11.2016
В инструкции описаны способы создания локальной учетной записи для входа в Windows 10. Методы с использованием командной строки также подойдут для Windows 8 и 7.
Оконный интерфейс
Командная строка (cmd)
Powershell
Графический интерфейс
Кликаем по Пуск — Параметры:

В открывшемся окне выбираем Учетные записи:

В меню слева переходим в Другие пользователи:

В разделе «Другие пользователи» кликаем по Добавить пользователя для этого компьютера:

Если откроется окно «Выберите способ входа пользователя в систему», кликаем по У меня нет данных для входа этого человека:

И в следующем окне по Добавить пользователя без учетной записи Майкрософт:

Должно открыться окно с возможностью ввода имени учетной записи и пароля — необходимо заполнить все поля:

* если поля с паролем оставить пустыми, учетная запись будет создана без пароля.
и затем нажимаем кнопку Далее. В списке пользователей появится еще один:

Кликнув по нему, появится возможность сменить тип учетной записи на администратора:

Командная строка (cmd)
Для начала запускаем командную строку от имени администратора.
Для этого кликаем по значку поиска (1) и вводим cmd (2) — среди результатов в разделе «Приложения» кликаем правой кнопкой мыши по Командная строка (3) и выбираем Запустить от имени администратора (4):

Теперь вводим команду:
> net user «Дмитрий Моск» password /add
где «Дмитрий Моск» — имя учетной записи; password — пароль, который будет использоваться для входа в систему.
Чтобы выдать административные права учетной записи, вводим следующую команду:
> net localgroup Администраторы «Дмитрий Моск» /add
* в английской версии Windows группа будет назваться administrators.
Powershell
Для начала, запускаем Powershell от имени администратора.
Создать пользователя
Задаем пароль:
$Password = Read-Host -AsSecureString
***********
Создаем запись:
New-LocalUser «dmosk» -Password $Password -FullName «Дмитрий Моск» -Description «Моя локальная учетная запись»
* где dmosk — логин; $Password — переменная с паролем, которую мы создали на предыдущем шаге.
В ответ должны увидеть что-то на подобие:
Name Enabled Description
—- ——- ————
dmosk True Моя локальная учетная запись
Чтобы пользователь появился и под ним можно было войти в систему, добавляем его в группу.
а) В качестве администратора:
Add-LocalGroupMember -Group «Администраторы» -Member «dmosk»
б) Обычный пользователь:
Add-LocalGroupMember -Group «Пользователи» -Member «dmosk»
Другие полезные команды
Несколько команд на Powershell, которые могут оказаться полезными.
1. Список пользователей:
Get-LocalUser
2. Список групп:
Get-LocalGroup
3. Члены группы:
Get-LocalGroupMember «Администраторы»
4. Переименовать учетную запись.
Логин:
Rename-LocalUser -Name «dmosk» -NewName «dmosk2»
Full Name:
Set-LocalUser -Name «dmosk» -FullName «Дмитрий Моск 2»
5. Поменять пароль пользователя.
Задаем пароль:
$Password = Read-Host -AsSecureString
***********
Меняем пароль:
Set-LocalUser -Password $Password dmosk
* в данном примере для пользователя dmosk.
6. Удалить пользователя:
Remove-LocalUser -Name «dmosk»
![]()
Была ли полезна вам эта инструкция?
Да Нет
The command Net User allows you to manage your local and even your domain users from the command line. It’s mainly used to quickly add, delete or disable user accounts from the command line. But it can do more than just that. The tool can be used in both command prompt and PowerShell.
For managing domain users, I recommend using the PowerShell ActiveDirectory module. It comes with more options and allows you to filter, copy and search users and set or change all properties. But as mentioned, you can also perform basic tasks with the Net User command for domain users.
In this article
1
In this article, we are going to take a closer look at the Net User command. I will explain how you can add, and remove accounts, change passwords, and more.
The Net User command is a command-line utility that you can run in any terminal on Windows. But to use it you will need to have Administrator permissions on the computer. Without it, you won’t be able to create new user accounts for example. Also, make sure that you open Windows PowerShell or Windows Terminal in Admin mode.
Note
If you get the error “System error 5 has occurred. Access is denied” Then you haven’t start the command prompt or PowerShell with administrator privileges.
The most important parameters of the Net User command are:
| Parameter | Description |
|---|---|
| <username> | Specify the username to the account you want to perform the action on |
| <password> | Set or change the password for the specified user account. Use * to get a prompt for the password. |
| /domain | Used for managing domain accounts |
| /add | Create a new user account |
| /delete | Delete a user account |
| /active | Enable or disable the user account. Options are yes or no. |
| /expire | Set the date when the account expires |
| /time | Specifies the times that a user is allowed to log in |
| /homedir | Set the home directory path of the user account. |
List all users
When you enter the command Net User without any parameters, then it will list all user accounts on the computer. If you run the command on the Domain Controller, then it will list all domain accounts.
Net User

# Or you can also type
Net Users
In the first screenshot above you will see the results on a local computer, the second one are all the users from the local domain.
When you specify the username you will see all the details from the user account
# Get the user details for Zoe Tucker
net user ztucker
Net User Add Account
The Net User command can be used to create new user accounts on your computer and in your domain. To create a user account you will need to add the /add parameter and specify the username. A password is by default not required on a local computer. For domain accounts, however, you will need to specify the password as well.
# Create a new local user account with the login name lazyadmin
Net User /Add lazyadmin
For entering the password you have two options, you can type it in plain text in the command line or use the * which will show you a prompt to enter the password.
# Create a new domain user with username testusr and passswd123
Net User /add /domain testusr passwd123

# Prompt for the password
Net User /add /domain testusr *
The new domain user is placed in the built-in OU “Users”.
When creating a user we can also specify login details, home directory path, etc of the user. I will explain each command later in the article. But to give you an idea of the possible options, we are going to create a user with the following details:
- Username: testusr
- Password: prompt
- Full name: Test User
- Password required: yes
- Allowed to login between: Monday to Friday between 08:00 and 17:00
- Home folder directory: \lazyadmin.localhometestusr
- Script path: \lazyadmin.localnetlogonwelcome.bat
Net User /add /domain testusr * /fullname:"Test User" /passwordreq:yes /time:M-F,08:00-17:00 /homedir:"\lazyadmin.localhometestusr" /scriptpath:"\lazyadmin.localnetlogonwelcome.bat"
Net User Delete User Account
We can also use the command line tool to delete user accounts, both local and from the domain. For this, you will need to use the parameter /delete and enter the username. Important to note is that the command tool won’t ask for confirmation. So be careful when using the delete option.
# Delete the local user Lazyadmin
Net User /delete lazyadmin

# Delete a domain user
Net User /delete /domain testusr
Net User Change or Set Password
One of the common tasks for an IT Helpdesk is to reset a user’s password. Of course, you can reset the password in the Active Directory. But it’s also possible with the command Net User. Resetting passwords is not limited to domain accounts, you can also use this method for local computer accounts.
To reset a password you will need to specify the username and then either type in the password or type * after which you can securely type the password:
# Set the password for LazyAdmin to passwd123
Net User LazyAdmin passwd123

# Pormpt for the new password
Net User LazyAdmin *
When it’s a domain user, then just add the /domain parameter. Make sure that the password meets the complexity requirements of the domain
# Reset the password for the domain user tesusr
Net User /domain testusr *
Enable or Disable User accounts
We can also use the command-line tool to enable and disable accounts. This is particularly useful when a user is locked out or when you quickly need to disable an account. To do this we are going to use the parameter /Active:yes|no
The command can be used for local computer accounts as for domain accounts:
# Disable local account
Net User lazyadmin /active:no

# Disable domain user account
Net User tesusr /Domain /Active:no
To enable an account, simply replace /Active:no with /Active:yes
Set Expire date for User Account
If you know the data that an employee leaves the organization then it’s a good idea to set the expired date for the account. This way the account is automatically locked after the specified data. The date format depends on your region settings, but the options are:
- MM/DD/YYYY
- DD/MM/YYYY
- mmm,dd,YYYY
Account expiration settings are not limited to a domain account, you can also set the expired date on a local Windows 10 or 11 user account.
# Set expire date for local user
Net User lazyadmin /expires:21/09/2022

# Set expire data for domain user
Net User testusr /domain /expires:09/20/2022
Set login times for User Account
Some accounts are only allowed to be used between specific hours, office hours for example. We can specify these hours with the /time parameter. To specify the time we will need to enter the days and hours between the account is allowed to log in.
You can use different notions for the days and hours (12-hour or 24-hour notation), and we can specify multiple time blocks by separating them with the semi-column ;.
# Allow login during office hours only
Net User lazyadmin /time:M-F,08:00-17:00

# Or in 12-hour notation
Net User lazyadmin /time:M-F,8am-5pm

# Specify multiple blocks
Net User lazyadmin /time:M,08:00-17:00;W,08:00-13:00;F,08:00-17:00
Net User Password settings
When you create a new account you can set a password for the account as well. But when it comes to passwords we have two other interesting parameters, passwordchg and passwordreg. The first determines if the user can change the password. This setting is really useful for kiosk accounts. The user can’t change the password when this is set to no.
# User lazyadmin can't change it's password
net user lazyadmin /passwordchg:no
The parameter passwordreg is used to specify it a user account must have a password. If this is set to no, then the user can remove their password, making the device vulnerable.
net user lazyadmin /passwordreg:yes
Home Directory Path
The last parameter that I want to mention is the home directory path. If you want to store the home directory of the user on a network share then you can set the path to the folder with the parameter /homedir. But make sure that the full path, including the user’s folder, exists.
# Set the home directory for testusr
net user testusr homedir:"\lazyadmin.localhometestusr"
Wrapping Up
The Net User command is great when wanting to quickly enable or disable a user account or reset a password. Also, it’s great to manage local computer accounts on small networks. When working with domain accounts I prefer to use the Active Directory module in PowerShell.
I hope you found this article useful, if you have any questions, just drop a comment below.