 Некоторые пользователи Windows сталкиваются с тем, что каждый раз при входе в систему появляется окно свойств системы с текстом «Создан временный файл подкачки, поскольку при запуске была обнаружена неполадка с конфигурацией файла подкачки» и не всегда повторное появление этого окна легко предотвратить.
В этой инструкции подробно о способах убрать сообщение «Создан временный файл подкачки» при загрузке Windows 11 и Windows 10, сначала простой и быстрый метод, а затем, если первый вариант не сработает — более сложный подход.
Простое отключение создания временного файла подкачки

Самый быстрый, но не всегда срабатывающий способ — включить автоматическое определение размеров файла подкачки:
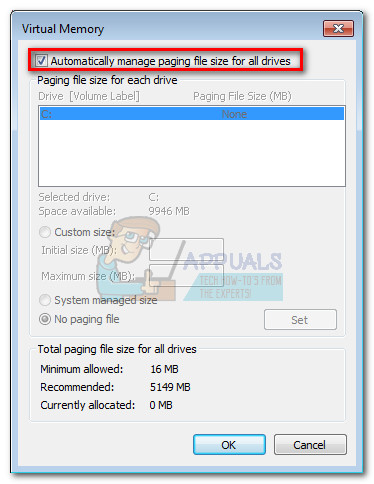
- В появившемся окне с сообщением о временном файле подкачки нажмите «Ок», это откроет вкладку «Дополнительно» окна «Параметры быстродействия».
- Если вы уже закрыли окно и не можете выполнить первый шаг, нажмите правой кнопкой мыши по кнопке «Пуск», выберите пункт «Выполнить», введите команду sysdm.cpl и нажмите Enter. В открывшемся окне перейдите на вкладку «Дополнительно», в разделе «Быстродействие» нажмите кнопку «Параметры» и откройте вкладку «Дополнительно».
- Нажмите кнопку «Изменить» в разделе «Виртуальная память».

- Отметьте пункт «Автоматически выбирать объем файла подкачки» и нажмите «Ок» для применения настроек.


После этого достаточно перезагрузить компьютер и проверить, решит ли это проблему.
В случае, если этот метод сработал и после перезагрузки временный файл подкачки больше не создается, при этом вы хотите настроить его размер вручную, обычно это можно сделать — повторно ошибка появиться не должна. Подробнее про файл подкачки и его настройку в Windows.
Исправление ошибок для отключения создания временного файла подкачки
Если проблема сохраняется, есть ещё один подход. Учитывайте, что он включает в себя правку реестра и потенциально может вызвать какие-либо проблемы. Рекомендую предварительно создать точку восстановления системы. Шаги будут следующими:
- Нажмите клавиши Win+R на клавиатуре, введите sysdm.cpl и нажмите Enter. В открывшемся окне свойств системы перейдите на вкладку «Дополнительно» и нажмите кнопку «Параметры» в разделе «Быстродействие».

- В параметрах быстродействия откройте вкладку «Дополнительно» и нажмите кнопку «Изменить» в разделе «Виртуальная память».

- В параметрах виртуальной памяти снимите отметку «Автоматически выбирать размер файла подкачки», если она установлена, а затем для каждого диска установите «Без файла подкачки» и нажмите кнопку «Задать». По завершении отключения файла подкачки нажмите «Ок». При запросе на перезагрузку компьютера, выполните её.
- Включите показ скрытых и системных файлов в параметрах проводника: учитывайте, что это два отдельных пункта. Подробнее: Как включить показ скрытых и системных файлов в Windows 11 (подойдет и для Windows 10).
- Проверьте, чтобы в корне локальных дисков не было файла с именем pagefile.sys, а если такой файл найдётся — удалите его.
- Нажмите клавиши Win+R, введите regedit и нажмите Enter для запуска редактора реестра.
- Перейдите к разделу реестра
HKEY_LOCAL_MACHINESYSTEMCurrentControlSetControlSession ManagerMemory Management
- В правой панели редактора реестра выберите все значения кроме «По умолчанию», нажмите правой кнопкой мыши и выберите пункт «Удалить». Подтвердите удаление.

- Закройте редактор реестра и перезагрузите компьютер.


Обычно после этого сообщение о создании временного файла подкачки исчезает, при этом вы можете заново настроить файл подкачки с автоматическим или ручным определением его размера в параметрах быстродействия системы.
В дальнейшем он должен работать исправно при условии отсутствия аппаратных проблем с диском, оперативной памятью и программ, вмешивающихся в реестр Windows.
Видео инструкция
В случае, если остаются вопросы или требуется помощью с исправлением, оставьте комментарий ниже с подробным описанием ситуации, возможно, решение найдётся.
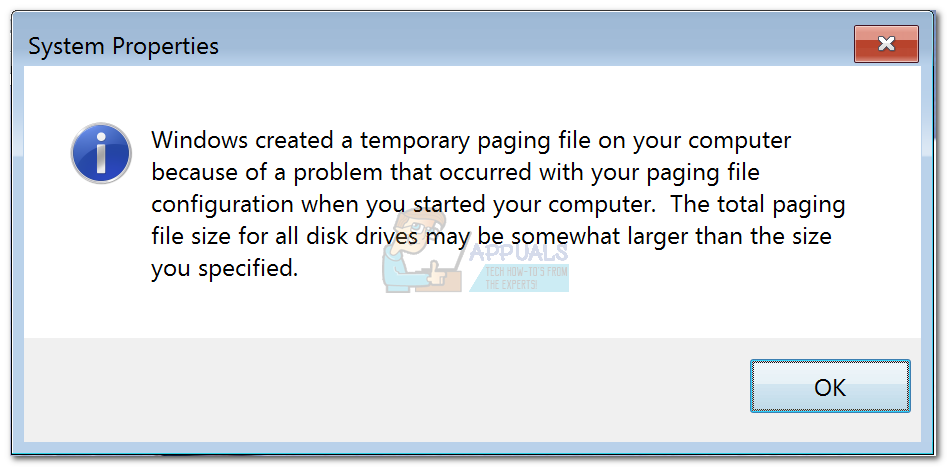
Windows created a temporary paging file on your computer because of a problem that occurred with your paging file configuration when you started your computer. The total paging file size for all disk drives may be somewhat larger than the size you specified. Do you have this error message pops up as soon as you login to Windows ? Let’s fix this!
Happy New Year everyone! Welcome to P&T IT BROTHER’s blog. It is our first blog post of the year 2017! We are starting the blog with Windows troubleshooting of course.. Personally, this error message is rare. We have never seen this until today. 😀 😀 😀 When we first saw this, we tried to turn on and off the Windows virtual memory, and we tried to set memory manually, but we couldn’t get rid of this long error message at Windows startup. It was very annoying, but we found a solution for this. We don’t guarantee that this will work for all of you, but we wish that this little tip is very helpful for some of you.
How to fix this “Windows created a temporary paging file on your computer..”
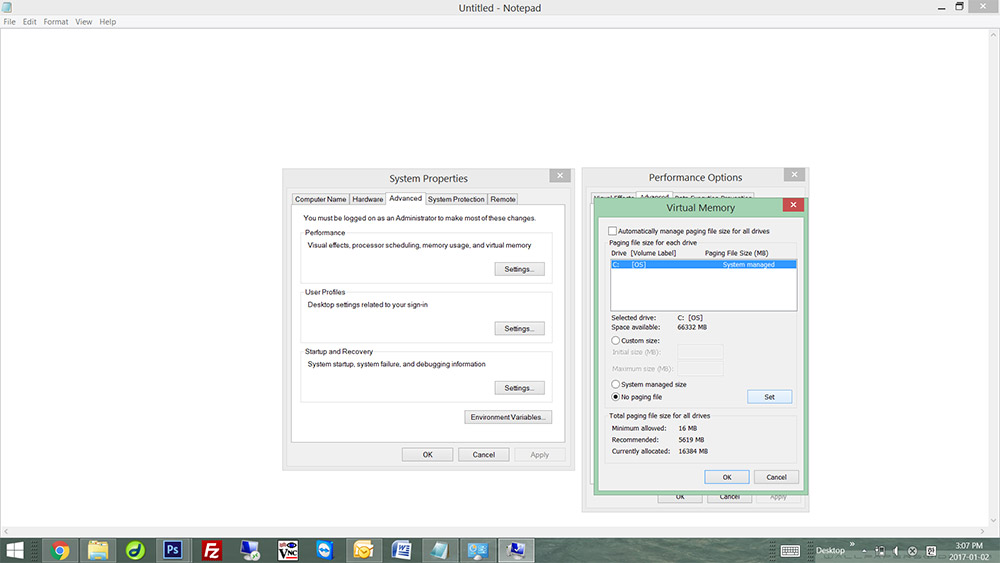
Let’s try this first. Click on “Computer” (in Windows 7) or click on “This PC” (in Windows 8 and Windows 10) then, right-click it. Select “Properties“. In here, click “Advanced system settings“. Click “Settings” under Performance tab. Now, click “Change…” under Virtual memory.
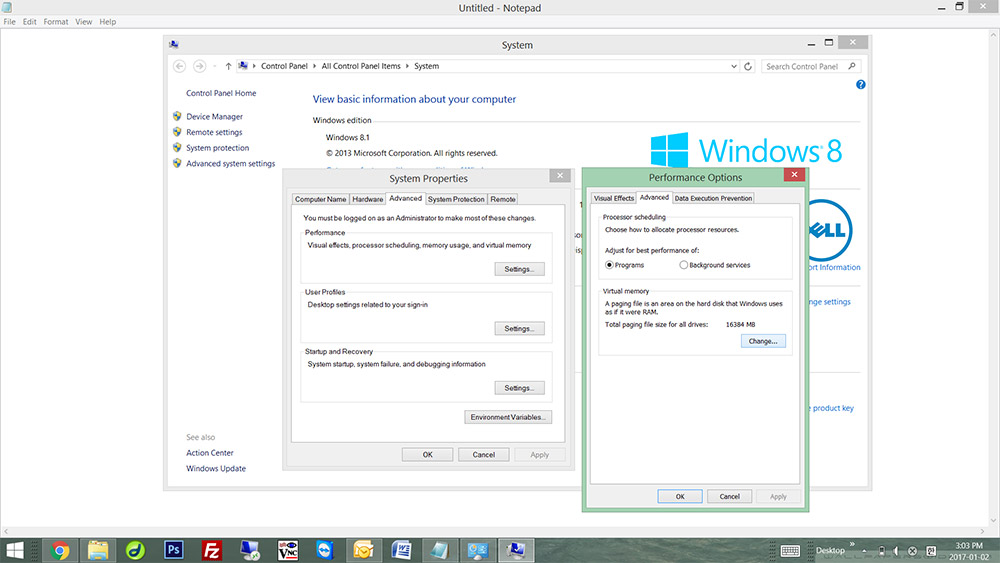
In here, if the “Automatically manage paging file size for all drives” option is turned on, try to turn it off by clicking it, then choose “No paging file“. Click “Set“, then you can click “OK” to finish. You must restart the computer to see the effect.
If the “Automatically manage paging file size for all drives” is turned off, try to turn this option on by clicking it. Click “OK” and restart the computer to find out if the paging error message exists.
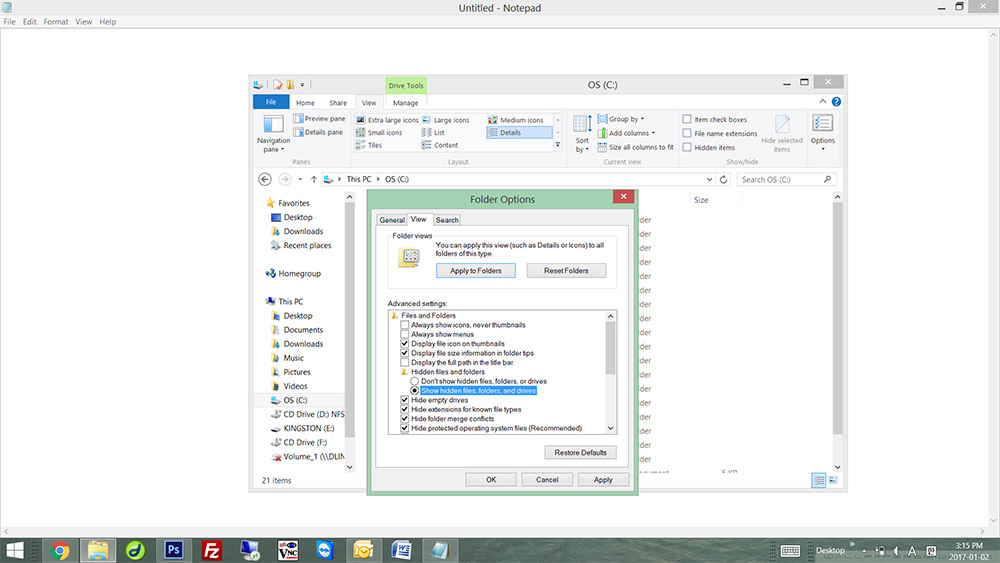
Still have the issue after you have completed the above instructions ? Don’t worry. There is one more thing we can try. Let’s go to your main system disk folder. If your system drive is c:, go to the drive. We are now looking for a hidden file named “pagefile.sys“. Since this is a hidden file, you will not able to see the file. Let’s open “Folder Options” and select “Show hidden files, folders, and drives“, then unselect “Hide protected operating system files (Recommended)”. Normally, you can access the “Folder Options” on the top menu of file explorer, but you can also find it in “Control Panel“.

Look for “pagefile.sys” and delete the file. After deleting the file, restart your computer. In our case, removing the “pagefile.sys” resolved the “Windows created a temporary paging file on your computer because of a problem that occurred with your paging file configuration when you started your computer. The total paging file size for all disk drives may be somewhat larger than the size you specified“. error message at Windows startup. Our operating system was Windows 7 Home Premium 64 Bit version. We hope that you have fixed the problem too! If you have any difficulties or problems, leave a comment here, and we will try to help you to solve your computer problem.
Happy New Year !!! 😀 😀 😀
Do you see the “Windows created a temporary paging file” error every time you boot up your computer or try to modify some settings? This error message can be very annoying, however, it’s not impossible to fix.
The issue itself is related to a system file called pagefile.sys. Most of the time, the issue is that this file is corrupted. Due to a bug, it’s also possible that your system falsely thinks it has to create a new one each time you start your computer.
“Windows created a temporary paging file on your computer because of a problem that occurred with your paging file configuration when you started your computer. The total paging file size for all disk drives may be somewhat larger than the size you specified.”
Most users report this error on Windows 7 operating systems but can happen on Windows 10 as well. By reading our article, you can learn about the file causing the error, as well as fix it within minutes.
What is the pagefile.sys File?
SYS is a file extension used for system files. These are responsible for managing device drivers, hardware configuration and your system settings. Pagefile.sys is used by Windows as a Virtual Memory. It’s used whenever your computer runs out of physical memory.
For example, imagine that you’re working on something that requires a large number of system resources. Your RAM (physical memory) will be unable to keep up with the amount of information. This leads to some information to end up being stored in a paging file (pagefile.sys).
As time goes by, this paging file has the potential to store a large amount of data. If it becomes too big, it might end up corrupting itself, causing all sorts of issues on your device. This is more likely on older systems, such as Windows 7, but in some cases can happen on Windows 10 as well.
Now that you know what causes the error itself, we can start troubleshooting. It’s important to note that our article was written using Windows 10’s language and wording, however, the methods will all work on Windows 7 as well.
For some of these methods, you will be required to use an administrator account. You can learn how to make one by watching this video from StrowmWind Studios. This is important because administrative permissions are needed to perform specific tasks in Windows.
Once you’re ready, follow our steps to get rid of the “Windows created a temporary paging file” error on Windows 7 and Windows 10.
Run the System File Checker
As mentioned above, there’s a possibility that the error originates from messed up system files. In this case, running the integrated System File Checker (SFC scan) can easily find and restore errors automatically.
This tool is widely used to find issues in your system by scanning all protected files. Once it finds any irregularities, it replaces the incorrect file with a previously stored clean version.
To do this, we’re going to use the Command Prompt.
Additionally, we recommend forcing Windows Update to fix any other corrupted files on your PC. You can do this by also using the RestoreHealth command (steps included below).
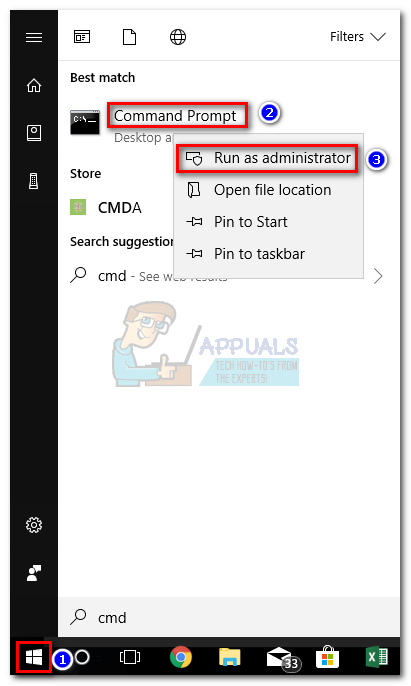
- Use the search function in your taskbar and look for Command Prompt. You can bring up the search bar by clicking on its icon or pressing the Windows and S keys on your keyboard.
- Right-click on the matching result and select Run as administrator. If prompted, enter your account password.
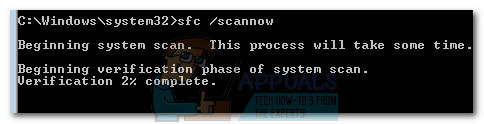
- Once the Command Prompt is open, type in the sfc /scannow command and hit Enter. This will start the System File Checker scan.
- Wait for the scan to finish. Depending on your system and the found errors, this can take up to several hours. Make sure that you don’t turn your computer off during this time. If the scan is interrupted, you’ll have to start over.
- Restart your computer and see if you get the error message again. If it still shows up, continue with the steps below, even if the SFC scan didn’t find any errors.
- Repeat Step 1. and Step 2. to open the elevated Command Prompt again. Once open, type in Dism /Online /Cleanup-Image /RestoreHealth and hit Enter. This command starts another scan.
- Wait for the scan to finish. Make sure you have a stable connection to the internet and your system won’t shut down while the scan is running.
- Regardless of the outcome of the RestoreHealth scan, run another SFC scan (sfc /scannow) in the same Command Prompt.
- When the third scan is complete, restart your computer and check if the error still happens. If you’re still experiencing the “Windows created a temporary paging file” error, try another one of our methods!
Run Disk Cleanup
There is a possibility that the issue is piled up junk on your computer taking up way too much space. As you’re using your PC day to day, many unnecessary files are created which don’t get removed from your system automatically. Examples of this would be temporary files, cache, image previews and much more.
These files can slowly eat away the storage on your PC, affecting the Virtual memory as well. You can clear this junk from your computer with the Disk Cleanup utility.
Tip: Not everything will be caught by the Disk Cleanup tool, but it can help remove most temporary files on your computer. For more thorough cleaning, we recommend using an application such as CCleaner after Disk Cleanup.
Follow the steps below to perform a cleaning:
- Use the search function in your taskbar and look for Disk Clean-up. You can bring up the search bar by clicking on its icon or pressing the Windows and S keys on your keyboard.
- Open the Disk Cleanup utility from the matching results.
- If prompted, select the drive you want to clear and press OK. Select the drive Windows was installed on first. If desired, you can come back and clean other drives in the future.
- Wait for the scan to complete. This might take a long time depending on the specs of your computer and the number of files you have.
- Select the type of files you want to delete under the “Files to delete” section. Here is a list of things we recommend cleaning in order to free up space:
- Windows Update Clean-up
- Temporary Internet Files
- Windows error reports and feedback diagnostics
- Delivery Optimization Files
- Device driver packages
- Recycle bin
- Temporary files
- Thumbnails
- Press OK and wait for the Disk Cleanup to finish. Once again, this might take a long time. Don’t turn your computer off during the process.
Disable the Audio File System
The Audio File System (AFS) driver allows Windows to read CD’s with music on it and show the tracks as individual files.
Due to a bug, Windows might wrongly think that an audio CD is mounted as a fixed disk. Because it can’t read the disk and create a paging file (pagefile.sys), it leads to the “Windows created a temporary paging file” error.
This is only going to work if you already have an AFS driver installed on your PC. If you’re okay with giving up the ability to listen to music from a CD on your computer, try this method. Just in case, we’ve included the steps to turning the Audio File System back on if you change your mind or the method was ineffective.
- Use the search function in your taskbar and look for Command Prompt. You can bring up the search bar by clicking on its icon or pressing the Windows and S keys on your keyboard.
- Right-click on the matching result and select Run as administrator. If prompted, enter your account password.
- Once the Command Prompt is open, type or copy then paste the following command and hit Enter: sc config afs start= disabled. If you’re typing in the command manually, make sure to include all spaces and characters.
- Close the Command Prompt and restart your computer. If you don’t get the same error again, you’ve successfully resolved the issue!
How to turn the Audio File System back on
If you want to turn the Audio File System drivers back on, repeat Step 1. and Step 2. from the previous section to open an elevated Command Prompt. Type or paste in the following command and hit Enter: sc config afs start= enabled.
If your system returns a message saying that “The specified service does not exist as an installed device”, you didn’t have an AFS driver installed. In this case, try one of our other methods.
Force Windows to make a fresh copy of pagefile.sys
If all of the previous methods failed in restoring your PC, you can delete the existing pagefile.sys file and force Windows to create a new replacement. You’ll have to temporarily disable Virtual Memory, delete the paging file and allow Windows to build a new one from scratch.
This method is safe to do, as deleting the pagefile.sys file doesn’t impact your computer or operating system in a bad way. If successfully deleted, it can even free up some space and speed your system up.
You’re required to have an administrator account for this method.
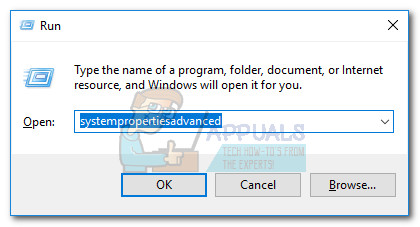
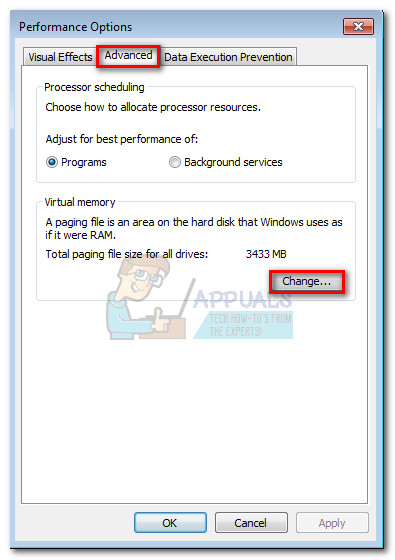
- Press the Windows and R keys on your keyboard at the same time. This will bring up a utility called Run. Type in systempropertiesadvanced and click on the OK button.
- By default, you should be on the Advanced tab. Click on the Settings button in the Performance section to bring up the Performance Settings window.
- Switch to the Advanced tab, then click on the Change button under Virtual memory.
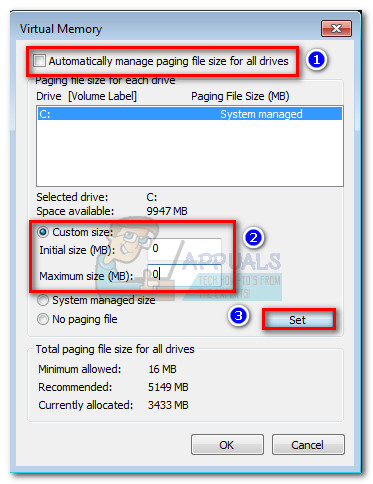
- First, remove the checkmark from “Automatically manage paging file size for all drives”. When you do this, select the now available Custom size option, and enter a 0 for both Initial size and Maximum size. Click on Set.
- Now, Windows will be unable to use the Virtual memory. After you confirm the changes, restart your computer and sign into the same administrator account you just used.
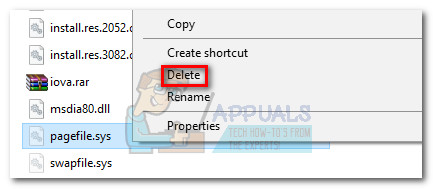
- Open your File Explorer and click on Hard drive (C:) under This PC. Find and delete the pagefile.sys file by right-clicking on it and choosing Delete.
Note: There’s a possibility that you won’t see pagefile.sys right away. In this case, you need to enable “Show hidden files, folders and drives” in your Folder options. If you don’t know how to do this, watch this video by Sydkrieg (Windows 7) or this video by TechZain (Windows 10). - Repeat Step 1. to Step 3. to navigate to the Virtual memory window again. This time, place a checkmark next to “Automatically manage paging file size for all drives” and click the OK button.
- Restart your computer. Windows should automatically create a new pagefile.sys, fixing any corruptions with the old one you deleted.
We hope that by following our methods, you were able to get rid of the “Windows created a temporary paging file” error on Windows 7 and Windows 10. If it ever returns in the future, feel free to repeat our solutions!
What if you receive the Windows created a temporary paging file error when starting your PC or changing some settings? Don’t worry and it is easy to fix this issue as long as you follow these solutions offered by MiniTool in this post.
Windows Create a Temporary Paging File Windows 10
When booting up your computer or trying to change some settings every time, you may get a paging file error that is very annoying. The detailed error message is:
“Windows created a temporary paging file on your computer because of a problem that occurred with your paging file configuration when you started your computer. The total paging file size for all disk drivers may be somewhat larger than the size you specified”.
The error is related to pagefile.sys. In most cases, the system file is corrupted. As a result, Windows thinks it has to create a new pagefile.sys file every time you start the machine.
According to users, this error often happens on Windows 7 but it may occur in Windows 10. Luckily, you can fix the issue and the methods are introduced below.
How to Fix Windows Created a Temporary Paging File
Disable AFS
AFS, the Audio File System driver, allows Windows to read Audio CD’s and show the tracks as individual files. However, due to the existence of a bug, Windows may incorrectly think the audio CD is installed as a fixed hard drive since it cannot read the disk and create the pagefile.sys file. As a result, Windows has created a temporary paging file.
To fix this issue, disabling AFS is helpful. If you haven’t installed the driver, this way is not available.
Step 1: Run Command Prompt (CMD) as administrator.
Step 2: Type sc config afs start= disabled and press Enter.
Step 3: Reboot your PC and see if the Windows created a temporary paging file error doesn’t appear.
Tip: To re-enable the AFS driver, you can use the command sc config afs start= enabled.
If you receive the information “The specified service does not exist as an installed device”, this means you don’t install an AFS driver. In this case, try other methods.
Run System File Checker
The pagefile.sys error may be caused by messed system files. To fix this issue, you can try System File Checker to detect and fix errors in system files.
Step 1: Also, run Command Prompt with admin rights.
Step 2: Type sfc /scannow and press Enter. Then, wait a few minutes until the scan finishes.

Step 3: Restart the PC to see if you still receive the paging file error. If yes, continue with the steps below.
Step 4: In Command Prompt window, type Dism /Online /Cleanup-Image /RestoreHealth and press Enter. Wait until the scan is completed. Make sure the Internet connection is stable.
Step 5: Then, run another SFC scan, regardless of the DSIM scan result.
Step 6: Restart the PC after the third scan completes. If you still get the Windows created a temporary paging file error, try another way.
Force Windows to Make a Copy of Pagefile.sys
If the above 2 ways fail to fix your issue, you can choose to delete the pagefile.sys file and let Windows create a new one from scratch. This way is safe and won’t impact your system. Inversely, it can free up some free space to speed up the system.
Note: You are required to temporarily disable virtual memory, or else, you cannot delete pagefile.sys. Besides, this method requires you to own an administrator account.
Step 1: Open the Run window, type systempropertiesadvanced, and click OK.
Step 2: Under the Advanced tab, click Settings from the Performance section.
Step 3: Go to Advanced > Change.

Step 4: Uncheck Automatically manage paging file size for all drivers, click Custom size, and enter 0 for Initial size and Maximum size.
Step 5: Confirm the change and restart your computer.
Step 6: Go to C drive in Windows Explorer and locate pagefile.sys. By default, it is hidden and you need to unhide it by going to the Folders Options tab and checking Show hidden files, folders, and drivers. Then, delete the system file.

Step 7: Repeat step 1-3 to go to the Virtual Memory window again and check Automatically manage paging file size for all drivers.
Step 8: Reboot the PC and Windows will create a new pagefile.sys. Now, the issue should be removed.
Bottom Line
Windows created a temporary paging file? It is easy to fix this issue if you follow these solutions mentioned above. We hope this post is helpful to you. Just have a try.
The Windows created a temporary paging file error is displayed every time Windows boots up or the user tries to manually access the System Settings. This particular error happens because the pagefile.sys that is used by Windows for virtual memory has become corrupted or because Windows is fooled into believing that it needs to create a pagefile.sys file on an Audio CD.
Users mainly report this issue on Windows 7, but there are some scarce occurrences on Windows 10.
What is Pagefile.sys?
Pagefile.sys (also known as the swap file), is a Windows paging file that the operating system uses as Virtual Memory. Whenever it runs out of physical memory (or RAM), Windows will resort to virtual memory.
If your computer is performing a premium activity in which all of your system resources are required, some of the information stored on RAM will be written to the paging file (pagefile.sys). In the event that the information that was just transferred to the paging file is needed again, the system will write other contents in the paging file and the previously written information is read back in.
Over time, this paging file can grow so large to the point where it ends up corrupting itself. Windows has gotten more efficient at managing the pagefile.sys file, but there are still occurrences where the paging file needs to be recreated from scratch.
Fixing the pagefile.sys issue
If you’re looking to troubleshoot this issue, there are actually three potential fixes that have helped a lot of users resolve the issue. We are going to break down each method and discuss the steps and effects in detail. Please follow each potential solution in order until you encounter a fix that resolves your issue.
Method 1: Disabling AFS via elevated Command Prompt
AFS is the Audio File System driver. Its purpose is to allow Windows to read Audio CD’s and present the tracks as individual files. Under certain conditions, Windows 7 is fooled into believing that an Audio CD is mounted as a fixed disk – because it cannot read the disk and create a pagefile.sys file on it, it causes the system to fail with the Windows created a temporary paging file error.
This method is the easiest out of the bunch, and it involves disabling the audio file system driver. This might have repercussions if you ever decide to listen to an Audio CD on your computer. But since Audio CD’s are almost completely dead, the chances of this method causing underlying issues is minimal. But keep in mind that this method might not be applicable if you don’t have the AFS driver installed.
In any case, we are also going to feature the steps of re-enabling the Audio File System driver in case the method was not effective or you want to listen to an Audio CD on your computer.
Follow the steps below to disable the AFS driver:
- Acess the Windows Start bar (bottom-left corner) and search for “cmd“. Then, right-click on Command Prompt and choose Run as Administrator.
 Note: You can also run Command Prompt as Administrator by selecting it and pressing Ctrl + Shift + Enter.
 - In the elevated Command Prompt, type or paste the following command and press Enter:
sc config afs start= disabled
 Note: If you’re typing the command manually, make sure you get the syntax of this command right. Keep in mind that there’s no space after start, but there is one after the = sign (start= disabled).
 - If the service is disabled successfully, you can safely close the elevated Command Prompt and reboot your system.
 Note: You can also run Command Prompt as Administrator by selecting it and pressing Ctrl + Shift + Enter.
 Note: If you’re typing the command manually, make sure you get the syntax of this command right. Keep in mind that there’s no space after start, but there is one after the = sign (start= disabled).
If the Windows created a temporary paging file error doesn’t resurface after the restart, you have successfully resolved your issue.
Note: In case you ever need to mount or listen to an Audio CD after following this method, you can re-enable the AFS driver by opening another elevated Command Prompt (step 1) and running the sc config afs start= enabled command.
In the event that the system returned “The specified service does not exist as an installed device”, move to the method below.
Method 2: Using the System File Checker tool
The Windows created a temporary paging file error can actually originate from a system file error, in which case running a couple of diagnostics might resolve the issue automatically.
Some users have been able to eliminate the issue by running an SFC scan. The System File Checker tool will scan all protected system files and replace all corrupted files with a cached, clean copy of them. We are going to complement this scan with a DISM /Restorehealth command in order to use Windows Update to fix any remaining corrupted files. Finally, we’re going to run the sfc /scannow once again and restart the PC.
Note: The sfc /scannow command will attempt to fix any corrupted files by using the Windows Component Store – hence, it doesn’t require an internet connection. However, running the Dism /Online /Cleanup-Image /RestoreHealth command relies on WU (Windows Update) to replace corruption, so internet access is required. With this in mind, make sure you have a stable internet connection before going through the steps below.
Keep in mind that it’s a common occurrence for the System File Checker to identify and fix errors without reporting them. Regardless of the outcome of the first SFC scan, please go through all the steps provided below (SFC scan > RestoreHealth > SFC scan)
When ready, follow the steps below to run the required diagnostics:
- Acess the Windows Start bar (bottom-left corner) and search for “cmd“. Then, right-click on Command Prompt and choose Run as Administrator.
Note: You can also run Command Prompt as Administrator by selecting it and pressing Ctrl + Shift + Enter. - In the elevated Command Prompt, type sfc /scannow and hit Enter to run the System File Checker.
 Note: Keep in mind that depending on the level of corruption found on your system, this process can take anywhere from around 10 minutes to a few hours to finish.
 - Once the scan is complete, restart your system and see if the issue is resolved at the next boot. If it isn’t, continue with the steps below.
Note: If the issue is not resolved, go through all the steps below even if the first SFC scan hasn’t reported any system file errors. - Open another elevated Command Prompt (step 1), paste Dism /Online /Cleanup-Image /RestoreHealth and hit Enter to initiate the RestoreHealth scan.
 Note: Make sure you don’t lose the connection to the internet during this time and wait until the scan is finished. Then, check the results section to see whether it manages to fix any errors.
 - Regardless of the outcome of the RestoreHealth command, run another SFC scan (sfc /scannow) in the same elevated Command prompt and let the process complete.
- Once the third scan completes, close the elevated Command prompt and reboot your device.
 Note: Keep in mind that depending on the level of corruption found on your system, this process can take anywhere from around 10 minutes to a few hours to finish.
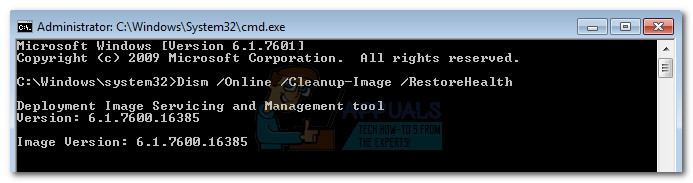 Note: Make sure you don’t lose the connection to the internet during this time and wait until the scan is finished. Then, check the results section to see whether it manages to fix any errors.
The next time your system boots up, check if the issue has been resolved. If you’re still experiencing the same Windows created a temporary paging file error, continue with the method below.
Method 3: Forcing Windows to make a fresh copy of pagefile.sys
If the first two methods have been unsuccessful, let’s take a more direct route and delete the paging file. The following steps will instruct you how to temporarily disable virtual memory – this will allow you the (possibly corrupted) paging file. After we delete the pagefile.sys file, Windows will be forced to build a new paging file from scratch, thus solving any corruption-related problem automatically.
Note: Although pagefile.sys is located at C:pagefile.sys, you won’t be able to see it unless you instruct your Windows Explorer to show hidden operating system files. However, you won’t be able to delete it until you force your OS to stop using your file (by disabling virtual memory).
Keep in mind that deleting the pagefile.sys file will not have any negative impact on your system whatsoever. On the contrary, it will help free up some valuable disk space and speed up certain processes once the new paging file is created.
Follow the steps down below to force your operating system to create a new pagefile.sys file:
- Log in with a local account with administrative privileges. Keep in mind that you will be required to restart several times during this method. Remember log in with the Administrator account at every startup.
- Press Windows key + R to open a Run window and type “systempropertiesadvanced“. Hit Enter to open the Advanced tab of System Properties.

- In the Advanced tab, click the Settings button located under the Performance section.

- In the Performance Options window, select the Advanced tab and click the Change button under Virtual memory.

- Uncheck the checkbox next to Automatically manage paging file size for all drives. Then, select Custom size to an Initial size of 0 MB and a Maximum size of 0 MB and click on Set.
 Note: We’re setting the custom sizes to 0 in order to prevent your OS from dumping information on it.
 - When prompted to confirm by System Properties, choose Yes. Then, close all dialog boxes and reboot your computer. Remember to log in with the administrator account again like we did in step 1.
- Once the startup is complete, navigate to your C: drive and locate the pagefile.sys file. If it’s not visible by default, that’s because it’s hidden by default. In this case, you’ll need to do an extra step – refer to the Note paragraph below for instructions on making the pagefile.sys file visible.
Note: If you don’t see the pagefile.sys file, open a Run window (Windows key + R), type “control.exe folders” and hit Enter to open Folder Options. In Folder Options, access the View tab and select Show hidden files, folders, or drives under Advanced settings.

- Then, scroll down through the Advanced Settings list and disable the checkbox next to Hide Protected Operating System files. You will immediately see an additional Warning window – click Yes to continue. Finally, hit Apply to save your folder modifications. The pagefile.sys file should now be visible.

- Now that pagefile.sys is visible, you should be able to delete it without problems. Do so by right-clicking on it and choosing Delete.

- Next, re-follow steps 1 to 4 to return to the Virtual Memory window. Once you’re back there again, check the box next to Automatically manage paging file size for all drives to re-enable virtual memory.

- Click Ok, close all dialog boxes and perform a final restart. You no longer need to use an account with administrator privileges. Windows should automatically recreate a new paging file at the next startup and the issue should now be resolved.

 Note: We’re setting the custom sizes to 0 in order to prevent your OS from dumping information on it.
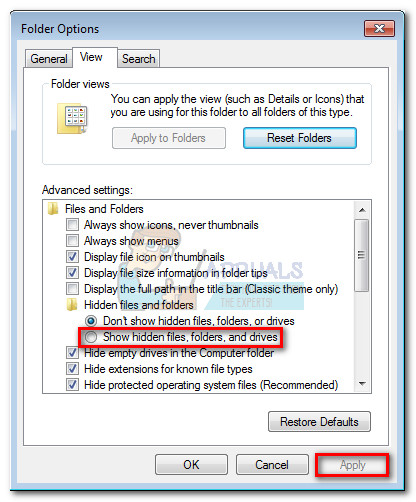

Содержание
- Memory allocation errors can be caused by slow page file growth
- Symptoms
- Cause
- Workaround
- Status
- More information
- Fix: Windows created a temporary paging file on your computer because of a problem that occurred … Windows 10 & 8 & 7
- Windows created a temporary paging file on your computer because of a problem that occurred with your paging file configuration when you started your computer. The total paging file size for all disk drives may be somewhat larger than the size you specified. Do you have this error message pops up as soon as you login to Windows ? Let’s fix this!
- How to fix this “Windows created a temporary paging file on your computer..”
- Don’t forget to Like | Share | Subscribe !
- How to Fix Windows Created a Temporary Paging File Error? [MiniTool Tips]
- Windows Create a Temporary Paging File Windows 10
- How to Fix Windows Created a Temporary Paging File
- Disable AFS
- Run System File Checker
- Force Windows to Make a Copy of Pagefile.sys
- Bottom Line
- About The Author
- Fix: Windows created a temporary paging file
- What is Pagefile.sys?
- Fixing the pagefile.sys issue
- Method 1: Disabling AFS via elevated Command Prompt
- Method 2: Using the System File Checker tool
- Method 3: Forcing Windows to make a fresh copy of pagefile.sys
Memory allocation errors can be caused by slow page file growth
This article provides a workaround for errors that occur when applications frequently allocate memory.
Applies to: В Windows 10 — all editions
Original KB number: В 4055223
Symptoms
Applications that frequently allocate memory may experience random «out-of-memory» errors. Such errors can result in other errors or unexpected behavior in affected applications.
Cause
Memory allocation failures can occur due to latencies that are associated with growing the size of a page file to support additional memory requirements in the system. A potential cause of these failures is when the page file size is configured as «automatic.» Automatic page-file size starts with a small page file and grows automatically as needed.
The IO system consists of many components, including file system filters, file systems, volume filters, storage filters, and so on. The specific components on a given system can cause variability in page file growth.
Workaround
To work around this issue, manually configure the size of the page file. To do this, follow these steps:
- Press the Windows logo key + the Pause/Break key to open System Properties.
- Select Advanced system settings and then select Settings in the Performance section on the Advanced tab.
- Select the Advanced tab, and then select Change in the Virtual memory section.
- Clear the Automatically manage paging file size for all drives check box.
- Select Custom size, and then set the «Initial size» and «Maximum size» values for the paging file. We recommend that you set the initial size to 1.5 times the amount of RAM in the system.
- Select OK to apply the settings, and then restart the system. If you continue to receive «out-of-memory» error messages, increase the «initial size» of the page file.
Status
Microsoft has confirmed that this is a problem in Windows 10.
More information
You might see intermittent build errors like the following if you encounter this problem when using the Microsoft Visual C++ compiler (cl.exe):
- Fatal error C1076: compiler limit: internal heap reached; use /Zm to specify a higher limit
- Fatal error C1083: cannot opentypefile: ‘file’: message
- Fatal error C1090: PDB API call failed, error code ‘code’: ‘message’
- Compiler error C3859: virtual memory range for PCH exceeded; please recompile with a command line option of ‘-ZmXXX’ or greater
For more information about the Visual C++ compiler errors and how to work around them, see Precompiled Header (PCH) issues and recommendations.
Источник
Fix: Windows created a temporary paging file on your computer because of a problem that occurred … Windows 10 & 8 & 7
Windows created a temporary paging file on your computer because of a problem that occurred with your paging file configuration when you started your computer. The total paging file size for all disk drives may be somewhat larger than the size you specified. Do you have this error message pops up as soon as you login to Windows ? Let’s fix this!
Happy New Year everyone! Welcome to P&T IT BROTHER’s blog. It is our first blog post of the year 2017! We are starting the blog with Windows troubleshooting of course.. Personally, this error message is rare. We have never seen this until today. 😀 😀 😀 When we first saw this, we tried to turn on and off the Windows virtual memory, and we tried to set memory manually, but we couldn’t get rid of this long error message at Windows startup. It was very annoying, but we found a solution for this. We don’t guarantee that this will work for all of you, but we wish that this little tip is very helpful for some of you.
How to fix this “Windows created a temporary paging file on your computer..”
Let’s try this first. Click on “Computer” (in Windows 7) or click on “This PC” (in Windows 8 and Windows 10) then, right-click it. Select “Properties“. In here, click “Advanced system settings“. Click “Settings” under Performance tab. Now, click “Change…” under Virtual memory.
In here, if the “Automatically manage paging file size for all drives” option is turned on, try to turn it off by clicking it, then choose “No paging file“. Click “Set“, then you can click “OK” to finish. You must restart the computer to see the effect.
If the “Automatically manage paging file size for all drives” is turned off, try to turn this option on by clicking it. Click “OK” and restart the computer to find out if the paging error message exists.
Still have the issue after you have completed the above instructions ? Don’t worry. There is one more thing we can try. Let’s go to your main system disk folder. If your system drive is c:, go to the drive. We are now looking for a hidden file named “pagefile.sys“. Since this is a hidden file, you will not able to see the file. Let’s open “Folder Options” and select “Show hidden files, folders, and drives“, then unselect “Hide protected operating system files (Recommended)”. Normally, you can access the “Folder Options” on the top menu of file explorer, but you can also find it in “Control Panel“.
Look for “pagefile.sys” and delete the file. After deleting the file, restart your computer. In our case, removing the “pagefile.sys” resolved the “Windows created a temporary paging file on your computer because of a problem that occurred with your paging file configuration when you started your computer. The total paging file size for all disk drives may be somewhat larger than the size you specified“. error message at Windows startup. Our operating system was Windows 7 Home Premium 64 Bit version. We hope that you have fixed the problem too! If you have any difficulties or problems, leave a comment here, and we will try to help you to solve your computer problem.
Thank you for visiting our blog. Have a nice day 🙂
Источник
How to Fix Windows Created a Temporary Paging File Error? [MiniTool Tips]
What if you receive the Windows created a temporary paging file error when starting your PC or changing some settings? Don’t worry and it is easy to fix this issue as long as you follow these solutions offered by MiniTool in this post.
Windows Create a Temporary Paging File Windows 10
When booting up your computer or trying to change some settings every time, you may get a paging file error that is very annoying. The detailed error message is:
“Windows created a temporary paging file on your computer because of a problem that occurred with your paging file configuration when you started your computer. The total paging file size for all disk drivers may be somewhat larger than the size you specified”.
The error is related to pagefile.sys. In most cases, the system file is corrupted. As a result, Windows thinks it has to create a new pagefile.sys file every time you start the machine.
According to users, this error often happens on Windows 7 but it may occur in Windows 10. Luckily, you can fix the issue and the methods are introduced below.
How to Fix Windows Created a Temporary Paging File
Disable AFS
AFS, the Audio File System driver, allows Windows to read Audio CD’s and show the tracks as individual files. However, due to the existence of a bug, Windows may incorrectly think the audio CD is installed as a fixed hard drive since it cannot read the disk and create the pagefile.sys file. As a result, Windows has created a temporary paging file.
To fix this issue, disabling AFS is helpful. If you haven’t installed the driver, this way is not available.
Step 2: Type sc config afs start= disabled and press Enter.
Step 3: Reboot your PC and see if the Windows created a temporary paging file error doesn’t appear.
If you receive the information “The specified service does not exist as an installed device”, this means you don’t install an AFS driver. In this case, try other methods.
Run System File Checker
The pagefile.sys error may be caused by messed system files. To fix this issue, you can try System File Checker to detect and fix errors in system files.
Step 1: Also, run Command Prompt with admin rights.
Step 2: Type sfc /scannow and press Enter. Then, wait a few minutes until the scan finishes.
Step 3: Restart the PC to see if you still receive the paging file error. If yes, continue with the steps below.
Step 4: In Command Prompt window, type Dism /Online /Cleanup-Image /RestoreHealth and press Enter. Wait until the scan is completed. Make sure the Internet connection is stable.
Step 5: Then, run another SFC scan, regardless of the DSIM scan result.
Step 6: Restart the PC after the third scan completes. If you still get the Windows created a temporary paging file error, try another way.
Force Windows to Make a Copy of Pagefile.sys
If the above 2 ways fail to fix your issue, you can choose to delete the pagefile.sys file and let Windows create a new one from scratch. This way is safe and won’t impact your system. Inversely, it can free up some free space to speed up the system.
Step 1: Open the Run window, type systempropertiesadvanced, and click OK.
Step 2: Under the Advanced tab, click Settings from the Performance section.
Step 3: Go to Advanced > Change.
Step 4: Uncheck Automatically manage paging file size for all drivers, click Custom size, and enter for Initial size and Maximum size.
Step 5: Confirm the change and restart your computer.
Step 6: Go to C drive in Windows Explorer and locate pagefile.sys. By default, it is hidden and you need to unhide it by going to the Folders Options tab and checking Show hidden files, folders, and drivers. Then, delete the system file.
Step 7: Repeat step 1-3 to go to the Virtual Memory window again and check Automatically manage paging file size for all drivers.
Step 8: Reboot the PC and Windows will create a new pagefile.sys. Now, the issue should be removed.
Bottom Line
Windows created a temporary paging file? It is easy to fix this issue if you follow these solutions mentioned above. We hope this post is helpful to you. Just have a try.

Vera is an editor of the MiniTool Team since 2016 who has more than 5 years’ writing experiences in the field of technical articles. Her articles mainly focus on disk & partition management, PC data recovery, video conversion, as well as PC backup & restore, helping users to solve some errors and issues when using their computers. In her spare times, she likes shopping, playing games and reading some articles.
Источник
Fix: Windows created a temporary paging file
The Windows created a temporary paging file error is displayed every time Windows boots up or the user tries to manually access the System Settings. This particular error happens because the pagefile.sys that is used by Windows for virtual memory has become corrupted or because Windows is fooled into believing that it needs to create a pagefile.sys file on an Audio CD.
Users mainly report this issue on Windows 7, but there are some scarce occurrences on Windows 10.
What is Pagefile.sys?
Pagefile.sys (also known as the swap file), is a Windows paging file that the operating system uses as Virtual Memory. Whenever it runs out of physical memory (or RAM), Windows will resort to virtual memory.
If your computer is performing a premium activity in which all of your system resources are required, some of the information stored on RAM will be written to the paging file (pagefile.sys). In the event that the information that was just transferred to the paging file is needed again, the system will write other contents in the paging file and the previously written information is read back in.
Over time, this paging file can grow so large to the point where it ends up corrupting itself. Windows has gotten more efficient at managing the pagefile.sys file, but there are still occurrences where the paging file needs to be recreated from scratch.
Fixing the pagefile.sys issue
If you’re looking to troubleshoot this issue, there are actually three potential fixes that have helped a lot of users resolve the issue. We are going to break down each method and discuss the steps and effects in detail. Please follow each potential solution in order until you encounter a fix that resolves your issue.
Method 1: Disabling AFS via elevated Command Prompt
AFS is the Audio File System driver. Its purpose is to allow Windows to read Audio CD’s and present the tracks as individual files. Under certain conditions, Windows 7 is fooled into believing that an Audio CD is mounted as a fixed disk – because it cannot read the disk and create a pagefile.sys file on it, it causes the system to fail with the Windows created a temporary paging file error.
This method is the easiest out of the bunch, and it involves disabling the audio file system driver. This might have repercussions if you ever decide to listen to an Audio CD on your computer. But since Audio CD’s are almost completely dead, the chances of this method causing underlying issues is minimal. But keep in mind that this method might not be applicable if you don’t have the AFS driver installed.
In any case, we are also going to feature the steps of re-enabling the Audio File System driver in case the method was not effective or you want to listen to an Audio CD on your computer.
Follow the steps below to disable the AFS driver:
- Acess the Windows Start bar (bottom-left corner) and search for “cmd“. Then, right-click on Command Prompt and choose Run as Administrator.
 Note: You can also run Command Prompt as Administrator by selecting it and pressing Ctrl + Shift + Enter.
 - In the elevated Command Prompt, type or paste the following command and press Enter:
sc config afs start= disabledNote: If you’re typing the command manually, make sure you get the syntax of this command right. Keep in mind that there’s no space after start, but there is one after the = sign (start= disabled). - If the service is disabled successfully, you can safely close the elevated Command Prompt and reboot your system.
If the Windows created a temporary paging file error doesn’t resurface after the restart, you have successfully resolved your issue.
Note: In case you ever need to mount or listen to an Audio CD after following this method, you can re-enable the AFS driver by opening another elevated Command Prompt (step 1) and running the sc config afs start= enabled command.
In the event that the system returned “The specified service does not exist as an installed device”, move to the method below.
Method 2: Using the System File Checker tool
The Windows created a temporary paging file error can actually originate from a system file error, in which case running a couple of diagnostics might resolve the issue automatically.
Some users have been able to eliminate the issue by running an SFC scan. The System File Checker tool will scan all protected system files and replace all corrupted files with a cached, clean copy of them. We are going to complement this scan with a DISM /Restorehealth command in order to use Windows Update to fix any remaining corrupted files. Finally, we’re going to run the sfc /scannow once again and restart the PC.
Note: The sfc /scannow command will attempt to fix any corrupted files by using the Windows Component Store – hence, it doesn’t require an internet connection. However, running the Dism /Online /Cleanup-Image /RestoreHealth command relies on WU (Windows Update) to replace corruption, so internet access is required. With this in mind, make sure you have a stable internet connection before going through the steps below.
Keep in mind that it’s a common occurrence for the System File Checker to identify and fix errors without reporting them. Regardless of the outcome of the first SFC scan, please go through all the steps provided below (SFC scan > RestoreHealth > SFC scan)
When ready, follow the steps below to run the required diagnostics:
- Acess the Windows Start bar (bottom-left corner) and search for “cmd“. Then, right-click on Command Prompt and choose Run as Administrator. Note: You can also run Command Prompt as Administrator by selecting it and pressing Ctrl + Shift + Enter.
- In the elevated Command Prompt, type sfc /scannow and hit Enter to run the System File Checker.Note: Keep in mind that depending on the level of corruption found on your system, this process can take anywhere from around 10 minutes to a few hours to finish.
- Once the scan is complete, restart your system and see if the issue is resolved at the next boot. If it isn’t, continue with the steps below.
Note: If the issue is not resolved, go through all the steps below even if the first SFC scan hasn’t reported any system file errors. - Open another elevated Command Prompt (step 1), paste Dism /Online /Cleanup-Image /RestoreHealth and hit Enter to initiate the RestoreHealth scan. Note: Make sure you don’t lose the connection to the internet during this time and wait until the scan is finished. Then, check the results section to see whether it manages to fix any errors.
- Regardless of the outcome of the RestoreHealth command, run another SFC scan (sfc /scannow) in the same elevated Command prompt and let the process complete.
- Once the third scan completes, close the elevated Command prompt and reboot your device.
The next time your system boots up, check if the issue has been resolved. If you’re still experiencing the same Windows created a temporary paging file error, continue with the method below.
Method 3: Forcing Windows to make a fresh copy of pagefile.sys
If the first two methods have been unsuccessful, let’s take a more direct route and delete the paging file. The following steps will instruct you how to temporarily disable virtual memory – this will allow you the (possibly corrupted) paging file. After we delete the pagefile.sys file, Windows will be forced to build a new paging file from scratch, thus solving any corruption-related problem automatically.
Note: Although pagefile.sys is located at C:pagefile.sys, you won’t be able to see it unless you instruct your Windows Explorer to show hidden operating system files. However, you won’t be able to delete it until you force your OS to stop using your file (by disabling virtual memory).
Keep in mind that deleting the pagefile.sys file will not have any negative impact on your system whatsoever. On the contrary, it will help free up some valuable disk space and speed up certain processes once the new paging file is created.
Follow the steps down below to force your operating system to create a new pagefile.sys file:
- Log in with a local account with administrative privileges. Keep in mind that you will be required to restart several times during this method. Remember log in with the Administrator account at every startup.
- Press Windows key + R to open a Run window and type “systempropertiesadvanced“. Hit Enter to open the Advanced tab of System Properties.
- In the Advanced tab, click the Settings button located under the Performance section.
- In the Performance Options window, select the Advanced tab and click the Change button under Virtual memory.
- Uncheck the checkbox next to Automatically manage paging file size for all drives. Then, select Custom size to an Initial size of 0 MB and a Maximum size of 0 MB and click on Set. Note: We’re setting the custom sizes to 0 in order to prevent your OS from dumping information on it.
- When prompted to confirm by System Properties, choose Yes. Then, close all dialog boxes and reboot your computer. Remember to log in with the administrator account again like we did in step 1.
- Once the startup is complete, navigate to your C: drive and locate the pagefile.sys file. If it’s not visible by default, that’s because it’s hidden by default. In this case, you’ll need to do an extra step – refer to the Note paragraph below for instructions on making the pagefile.sys file visible.
Note: If you don’t see the pagefile.sys file, open a Run window (Windows key + R), type “control.exe folders” and hit Enter to open Folder Options. In Folder Options, access the View tab and select Show hidden files, folders, or drives under Advanced settings. - Then, scroll down through the Advanced Settings list and disable the checkbox next to Hide Protected Operating System files. You will immediately see an additional Warning window – click Yes to continue. Finally, hit Apply to save your folder modifications. The pagefile.sys file should now be visible.
- Now that pagefile.sys is visible, you should be able to delete it without problems. Do so by right-clicking on it and choosing Delete.
- Next, re-follow steps 1 to 4 to return to the Virtual Memory window. Once you’re back there again, check the box next to Automatically manage paging file size for all drives to re-enable virtual memory.
- Click Ok, close all dialog boxes and perform a final restart. You no longer need to use an account with administrator privileges. Windows should automatically recreate a new paging file at the next startup and the issue should now be resolved.
Источник
Hello All,
I’ve started to see this error on my 2008 R2 server that we use as a remote desktop server for our users.
we’ve recently made some changes:
the server went from 8 sockets 1 core to 2 sockets 4 cores in VMWare. (misconfiguration from previous administration.)
we changed the server to have 24 GB RAM
we changed the page file to be «recommended» and started getting this error.
then i set the page file to be 36 GB min to 48 GB Max.
I, plus all of my users, are now seeing this message when logging in. i checked the page file usage in perfmon and it was sitting at around 12-20% throughout the morning.
I’ve since restarted the server and now am seeing 4% pagefile usage, but still getting the same error. there’s plenty of space available on that drive (i added an additional 20 GB and extended the volume during the last restart as well, there’s 83200
MB free space.
when i look under System Properties > Advanced it says the page file size is 24575 MB, but when i click «Change…» it’s showing «custom size» selected with the values i put in: 36864 to 49152.
below that «total page file size for all drives:»
recommended: 36862
currently allocated: 24575
Really appreciate any help you all can answer — been chasing this problem all morning. thanks in advance!

On the Advanced tab, under Performance, click Settings. Click the Advanced tab, and then, under Virtual memory, click Change. Clear the Automatically manage paging file size for all drives check box. Under Drive Volume Label, click the drive that contains the paging file you want to change.
How do I fix the pagefile on Windows 10?
Step 1: Open the Run window, type systempropertiesadvanced, and click OK. Step 2: Under the Advanced tab, click Settings from the Performance section. Step 3: Go to Advanced > Change. Step 4: Uncheck Automatically manage paging file size for all drivers, click Custom size, and enter 0 for Initial size and Maximum size.
Where is the paging file created?
Pagefile in Windows 10 is a hidden system file with the . SYS extension that is stored on your computer’s system drive (usually C:). The Pagefile allows the computer to perform smoothly by reducing the workload of the physical memory, or RAM.
How do I clear the paging file in Windows?
Locate the “Shutdown: Clear virtual memory pagefile” option in the right pane and double-click it. Click the “Enabled” option in the properties window that appears and click “OK”. Windows will now clear the page file each time you shut down.
What causes paging file error?
Most of the time, the issue is that this file is corrupted. Due to a bug, it’s also possible that your system falsely thinks it has to create a new one each time you start your computer. … The total paging file size for all disk drives may be somewhat larger than the size you specified.”
What is paging in OS?
In Operating Systems, Paging is a storage mechanism used to retrieve processes from the secondary storage into the main memory in the form of pages. The main idea behind the paging is to divide each process in the form of pages. The main memory will also be divided in the form of frames.
How do I delete pagefile?
Right click on pagefile. sys and choose ‘Delete’. If your pagefile is particularly large, the system may have to delete it immediately without sending it to the Recycle Bin. Once the file has been removed, restart your PC.
How do I change my paging file?
Set a Specific Pagefile Amount
- Go to the Start Menu and click on Settings.
- Type performance.
- Choose Adjust the appearance and performance of Windows.
- In the new window, go to the Advanced tab and under the Virtual memory section, click on Change.
Should I clear page file?
Because pagefile contains important information about your PC state and running programs, deleting it could have serious consequences and tank your system’s stability. Even if it takes up a large amount of space on your drive, pagefile is absolutely necessary for the smooth operation of your computer.
Should I clear page file at shutdown?
While it is generally not necessary for most users, some people want to clear the pagefile on shutdown. Windows uses this file as virtual memory / extra ram. When you load this document it is loaded into ram. …
What is a paging error?
Most of the time, the issue is that this file is corrupted. … “Windows created a temporary paging file on your computer because of a problem that occurred with your paging file configuration when you started your computer. The total paging file size for all disk drives may be somewhat larger than the size you specified.”
How do you fix low RAM?
How to Make the Most of Your RAM
- Restart Your Computer. The first thing you can try to free up RAM is restarting your computer. …
- Update Your Software. …
- Try a Different Browser. …
- Clear Your Cache. …
- Remove Browser Extensions. …
- Track Memory and Clean Up Processes. …
- Disable Startup Programs You Don’t Need. …
- Stop Running Background Apps.
Why is paging done?
Paging is used for faster access to data. When a program needs a page, it is available in the main memory as the OS copies a certain number of pages from your storage device to main memory. Paging allows the physical address space of a process to be noncontiguous.
Why paging is necessary for an operating system?
Paging is a storage mechanism that allows OS to retrieve processes from the secondary storage into the main memory in the form of pages. … The biggest advantage of paging is that it is easy to use memory management algorithm. Paging may cause Internal fragmentation.
Should I clear pagefile at shutdown?
While it is generally not necessary for most users, some people want to clear the pagefile on shutdown. Windows uses this file as virtual memory / extra ram. With some effort, the pagefile can then be opened and the document can be extracted as well as any other open program or files. …
What does a pagefile do?
Page files enable the system to remove infrequently accessed modified pages from physical memory to let the system use physical memory more efficiently for more frequently accessed pages.
Is paging file necessary?
You need to have a page file if you want to get the most out of your RAM, even if it is never used. It acts as an insurance policy that allows the operating system to actually use the RAM it has, rather than having to reserve it for possibilities that are extraordinarily unlikely.
How much virtual memory should I set for 4GB RAM?
Microsoft recommends that you set it to be a minimum of 1.5 times and a maximum of 3 times of the physical RAM. If your computer has 4GB RAM, the minimum paging file should be 1024x4x1. 5=6,144MB and the maximum is 1024x4x3=12,288MB.
Symptom: Every time you boot your Windows 7 machine or access system settings, you receive the following error:
Windows created a temporary paging file on your computer beause of a problem that occurred with your paging file configuration when you started your computer. The total paging file size for all disk drives may be somewhat larger than the size you specified.

Solution: In this case, the page file had grown too large and corrupted itself. I was able to resolve the issue by deleting the pagefile.sys file and having Windows recreate it from scratch. Here are the steps on how to complete this task.
- Click Start, right-click Computer, and select Properties
- In the left pane, select Advanced system settings
- On the Advanced tab, click the Settings button under Performance
- On the Advanced tab, click the Change button under Virtual memory
- Clear the Automatically manage paging file size for all drives check box and check No paging file
- Click Set button next to No paging file
- Click OK on all open windows and restart your machine
- Open up Windows Explorer
- Navigate to the root of your system drive (C:)
- Enable the showing of System Files
- On the View menu, click Options
- On the View tab, click Show All Files, and then click OK
- Delete the pagefile.sys file
- Click Start, right-click Computer, and select Properties
- In the left pane, select Advanced system settings
- On the Advanced tab, click the Settings button under Performance
- On the Advanced tab, click the Change button under Virtual memory
- Check the Automatically manage paging file size for all drives checkbox and click OK
- Restart your machine