| title | description | ms.prod | ms.localizationpriority | author | manager | ms.topic | ms.date | ms.reviewer | ms.author | ms.technology | appliesto | |||||
|---|---|---|---|---|---|---|---|---|---|---|---|---|---|---|---|---|
|
Windows Defender Firewall with Advanced Security Administration with Windows PowerShell (Windows) |
Windows Defender Firewall with Advanced Security Administration with Windows PowerShell |
windows-client |
medium |
paolomatarazzo |
aaroncz |
conceptual |
09/08/2021 |
jekrynit |
paoloma |
itpro-security |
|
Windows Defender Firewall with Advanced Security Administration with Windows PowerShell
The Windows Defender Firewall with Advanced Security Administration with Windows PowerShell Guide provides essential scriptlets for automating Windows Defender Firewall management. It’s designed for IT pros, system administrators, IT managers, and others who use and need to automate Windows Defender Firewall management in Windows.
You can use Windows PowerShell to manage your firewall and IPsec deployments. This object-oriented scripting environment will make it easier for you to manage policies and monitor network conditions than was possible in netsh. Windows PowerShell allows network settings to be self-discoverable through the syntax and parameters in each of the cmdlets. This guide demonstrates how common tasks were performed in netsh and how you can use Windows PowerShell to accomplish them.
In future versions of Windows, Microsoft might remove the netsh functionality for Windows Defender Firewall. Microsoft recommends that you transition to Windows PowerShell if you currently use netsh to configure and manage Windows Defender Firewall.
Windows PowerShell and netsh command references are at the following locations.
- Netsh Commands for Windows Defender Firewall
Scope
This guide doesn’t teach you the fundamentals of Windows Defender Firewall, which can be found in Windows Defender Firewall. It doesn’t teach the fundamentals of Windows PowerShell, and it assumes that you’re familiar with the Windows PowerShell language and the basic concepts of Windows PowerShell. For more info about Windows PowerShell concepts and usage, see the reference topics in the Additional resources section of this guide.
Audience and user requirements
This guide is intended for IT pros, system administrators, and IT managers, and it assumes that you’re familiar with Windows Defender Firewall, the Windows PowerShell language, and the basic concepts of Windows PowerShell.
In this topic
| Section | Description |
|---|---|
| Set profile global defaults | Enable and control firewall behavior |
| Deploy basic firewall rules | How to create, modify, and delete firewall rules |
| Manage Remotely | Remote management by using -CimSession |
| Deploy basic IPsec rule settings | IPsec rules and associated parameters |
| Deploy secure firewall rules with IPsec | Domain and server isolation |
| Other resources | More information about Windows PowerShell |
Set profile global defaults
Global defaults set the device behavior in a per-profile basis. Windows Defender Firewall supports Domain, Private, and Public profiles.
Enable Windows Defender Firewall with Advanced Security
Windows Defender Firewall drops traffic that doesn’t correspond to allowed unsolicited traffic, or traffic that is sent in response to a request by the device. If you find that the rules you create aren’t being enforced, you may need to enable Windows Defender Firewall. Here’s how to enable Windows Defender Firewall on a local domain device:
Netsh
netsh advfirewall set allprofiles state on
Windows PowerShell
Set-NetFirewallProfile -Profile Domain,Public,Private -Enabled True
Control Windows Defender Firewall with Advanced Security behavior
The global default settings can be defined through the command-line interface. These modifications are also available through the Windows Defender Firewall with Advanced Security console.
The following scriptlets set the default inbound and outbound actions, specifies protected network connections, and allows notifications to be displayed to the user when a program is blocked from receiving inbound connections. It allows unicast response to multicast or broadcast network traffic, and it specifies logging settings for troubleshooting.
Netsh
netsh advfirewall set allprofiles firewallpolicy blockinbound,allowoutbound
netsh advfirewall set allprofiles settings inboundusernotification enable
netsh advfirewall set allprofiles settings unicastresponsetomulticast enable
netsh advfirewall set allprofiles logging filename %SystemRoot%System32LogFilesFirewallpfirewall.log
Windows PowerShell
Set-NetFirewallProfile -DefaultInboundAction Block -DefaultOutboundAction Allow –NotifyOnListen True -AllowUnicastResponseToMulticast True –LogFileName %SystemRoot%System32LogFilesFirewallpfirewall.log
Disable Windows Defender Firewall with Advanced Security
Microsoft recommends that you don’t disable Windows Defender Firewall because you lose other benefits provided by the service, such as the ability to use Internet Protocol security (IPsec) connection security rules, network protection from attacks that employ network fingerprinting, Windows Service Hardening, and boot time filters.
Disabling Windows Defender Firewall with Advanced Security can also cause problems, including:
- Start menu can stop working
- Modern applications can fail to install or update
- Activation of Windows via phone fails
- Application or OS incompatibilities that depend on Windows Defender Firewall
Microsoft recommends disabling Windows Defender Firewall only when installing a third-party firewall, and resetting Windows Defender Firewall back to defaults when the third-party software is disabled or removed.
If disabling Windows Defender Firewall is required, don’t disable it by stopping the Windows Defender Firewall service (in the Services snap-in, the display name is Windows Defender Firewall and the service name is MpsSvc).
Stopping the Windows Defender Firewall service isn’t supported by Microsoft.
Non-Microsoft firewall software can programmatically disable only the parts of Windows Defender Firewall that need to be disabled for compatibility.
You shouldn’t disable the firewall yourself for this purpose.
The proper method to disable the Windows Defender Firewall is to disable the Windows Defender Firewall Profiles and leave the service running.
Use the following procedure to turn off the firewall, or disable the Group Policy setting Computer Configuration|Administrative Templates|Network|Network Connections|Windows Defender Firewall|Domain Prolfile|Windows Defender Firewall:Protect all network connections.
For more information, see Windows Defender Firewall with Advanced Security deployment guide.
The following example disables Windows Defender Firewall for all profiles.
Set-NetFirewallProfile -Profile Domain,Public,Private -Enabled False
Deploy basic firewall rules
This section provides scriptlet examples for creating, modifying, and deleting firewall rules.
Create firewall rules
Adding a firewall rule in Windows PowerShell looks a lot like it did in Netsh, but the parameters and values are specified differently.
Here’s an example of how to allow the Telnet application to listen on the network. This firewall rule is scoped to the local subnet by using a keyword instead of an IP address. Just like in Netsh, the rule is created on the local device, and it becomes effective immediately.
Netsh
netsh advfirewall firewall add rule name="Allow Inbound Telnet" dir=in program= %SystemRoot%System32tlntsvr.exe remoteip=localsubnet action=allow
Windows PowerShell
New-NetFirewallRule -DisplayName “Allow Inbound Telnet” -Direction Inbound -Program %SystemRoot%System32tlntsvr.exe -RemoteAddress LocalSubnet -Action Allow
The following scriptlet shows how to add a basic firewall rule that blocks outbound traffic from a specific application and local port to a Group Policy Object (GPO) in Active Directory. In Windows PowerShell, the policy store is specified as a parameter within the New-NetFirewall cmdlet. In Netsh, you must first specify the GPO that the commands in a Netsh session should modify. The commands you enter are run against the contents of the GPO, and the execution remains in effect until the Netsh session is ended or until another set store command is executed.
Here, domain.contoso.com is the name of your Active Directory Domain Services (AD DS), and gpo_name is the name of the GPO that you want to modify. Quotation marks are required if there are any spaces in the GPO name.
Netsh
netsh advfirewall set store gpo=domain.contoso.comgpo_name
netsh advfirewall firewall add rule name="Block Outbound Telnet" dir=out program=%SystemRoot%System32telnet.exe protocol=tcp localport=23 action=block
Windows PowerShell
New-NetFirewallRule -DisplayName “Block Outbound Telnet” -Direction Outbound -Program %SystemRoot%System32tlntsvr.exe –Protocol TCP –LocalPort 23 -Action Block –PolicyStore domain.contoso.comgpo_name
GPO Caching
To reduce the burden on busy domain controllers, Windows PowerShell allows you to load a GPO to your local session, make all your changes in that session, and then save it back at all once.
The following command performs the same actions as the previous example (by adding a Telnet rule to a GPO), but we do so by applying GPO caching in PowerShell. Changing the GPO by loading it onto your local session and using the -GPOSession parameter aren’t supported in Netsh
Windows PowerShell
$gpo = Open-NetGPO –PolicyStore domain.contoso.comgpo_name
New-NetFirewallRule -DisplayName “Block Outbound Telnet” -Direction Outbound -Program %SystemRoot%System32telnet.exe –Protocol TCP –LocalPort 23 -Action Block –GPOSession $gpo
Save-NetGPO –GPOSession $gpo
This command doesn’t batch your individual changes, it loads and saves the entire GPO at once. So if any other changes are made by other administrators, or in a different Windows PowerShell window, saving the GPO overwrites those changes.
Modify an existing firewall rule
When a rule is created, Netsh and Windows PowerShell allow you to change rule properties and influence, but the rule maintains its unique identifier (in Windows PowerShell, this identifier is specified with the -Name parameter).
For example, you could have a rule Allow Web 80 that enables TCP port 80 for inbound unsolicited traffic. You can change the rule to match a different remote IP address of a Web server whose traffic will be allowed by specifying the human-readable, localized name of the rule.
Netsh
netsh advfirewall firewall set rule name="Allow Web 80" new remoteip=192.168.0.2
Windows PowerShell
Set-NetFirewallRule –DisplayName “Allow Web 80” -RemoteAddress 192.168.0.2
Netsh requires you to provide the name of the rule for it to be changed and we don’t have an alternate way of getting the firewall rule. In Windows PowerShell, you can query for the rule using its known properties.
When you run Get-NetFirewallRule, you may notice that common conditions like addresses and ports don’t appear. These conditions are represented in separate objects called Filters. As shown before, you can set all the conditions in New-NetFirewallRule and Set-NetFirewallRule. If you want to query for firewall rules based on these fields (ports, addresses, security, interfaces, services), you’ll need to get the filter objects themselves.
You can change the remote endpoint of the Allow Web 80 rule (as done previously) using filter objects. Using Windows PowerShell, you query by port using the port filter, then assuming other rules exist affecting the local port, you build with further queries until your desired rule is retrieved.
In the following example, we assume the query returns a single firewall rule, which is then piped to the Set-NetFirewallRule cmdlet utilizing Windows PowerShell’s ability to pipeline inputs.
Windows PowerShell
Get-NetFirewallPortFilter | ?{$_.LocalPort -eq 80} | Get-NetFirewallRule | ?{ $_.Direction –eq “Inbound” -and $_.Action –eq “Allow”} | Set-NetFirewallRule -RemoteAddress 192.168.0.2
You can also query for rules using the wildcard character. The following example returns an array of firewall rules associated with a particular program. The elements of the array can be modified in subsequent Set-NetFirewallRule cmdlets.
Windows PowerShell
Get-NetFirewallApplicationFilter -Program "*svchost*" | Get-NetFirewallRule
Multiple rules in a group can be simultaneously modified when the associated group name is specified in a Set command. You can add firewall rules to specified management groups in order to manage multiple rules that share the same influences.
In the following example, we add both inbound and outbound Telnet firewall rules to the group Telnet Management. In Windows PowerShell, group membership is specified when the rules are first created so we re-create the previous example rules. Adding rules to a custom rule group isn’t possible in Netsh.
Windows PowerShell
New-NetFirewallRule -DisplayName “Allow Inbound Telnet” -Direction Inbound -Program %SystemRoot%System32tlntsvr.exe -RemoteAddress LocalSubnet -Action Allow –Group “Telnet Management”
New-NetFirewallRule -DisplayName “Block Outbound Telnet” -Direction Outbound -Program %SystemRoot%System32tlntsvr.exe -RemoteAddress LocalSubnet -Action Allow –Group “Telnet Management”
If the group isn’t specified at rule creation time, the rule can be added to the rule group using dot notation in Windows PowerShell. You can’t specify the group using Set-NetFirewallRule since the command allows querying by rule group.
Windows PowerShell
$rule = Get-NetFirewallRule -DisplayName “Allow Inbound Telnet”
$rule.Group = “Telnet Management”
$rule | Set-NetFirewallRule
With the help of the Set command, if the rule group name is specified, the group membership isn’t modified but rather all rules of the group receive the same modifications indicated by the given parameters.
The following scriptlet enables all rules in a predefined group containing remote management influencing firewall rules.
Netsh
netsh advfirewall firewall set rule group="Windows Defender Firewall remote management" new enable=yes
Windows PowerShell
Set-NetFirewallRule -DisplayGroup “Windows Defender Firewall Remote Management” –Enabled True
There’s also a separate Enable-NetFirewallRule cmdlet for enabling rules by group or by other properties of the rule.
Windows PowerShell
Enable-NetFirewallRule -DisplayGroup “Windows Defender Firewall Remote Management” -Verbose
Delete a firewall rule
Rule objects can be disabled so that they’re no longer active. In Windows PowerShell, the Disable-NetFirewallRule cmdlet will leave the rule on the system, but put it in a disabled state so the rule no longer is applied and impacts traffic. A disabled firewall rule can be re-enabled by Enable-NetFirewallRule. This cmdlet is different from the Remove-NetFirewallRule, which permanently removes the rule definition from the device.
The following cmdlet deletes the specified existing firewall rule from the local policy store.
Netsh
netsh advfirewall firewall delete rule name=“Allow Web 80”
Windows PowerShell
Remove-NetFirewallRule –DisplayName “Allow Web 80”
Like with other cmdlets, you can also query for rules to be removed. Here, all blocking firewall rules are deleted from the device.
Windows PowerShell
Remove-NetFirewallRule –Action Block
It may be safer to query the rules with the Get command and save it in a variable, observe the rules to be affected, then pipe them to the Remove command, just as we did for the Set commands. The following example shows how you can view all the blocking firewall rules, and then delete the first four rules.
Windows PowerShell
$x = Get-NetFirewallRule –Action Block
$x
$x[0-3] | Remove-NetFirewallRule
Manage remotely
Remote management using WinRM is enabled by default. The cmdlets that support the CimSession parameter use WinRM and can be managed remotely by default.
The following example returns all firewall rules of the persistent store on a device named RemoteDevice.
Windows PowerShell
Get-NetFirewallRule –CimSession RemoteDevice
We can perform any modifications or view rules on remote devices by using the –CimSession parameter. Here we remove a specific firewall rule from a remote device.
Windows PowerShell
$RemoteSession = New-CimSession –ComputerName RemoteDevice
Remove-NetFirewallRule –DisplayName “AllowWeb80” –CimSession $RemoteSession -Confirm
Deploy basic IPsec rule settings
An Internet Protocol security (IPsec) policy consists of rules that determine IPsec behavior. IPsec supports network-level peer authentication, data origin authentication, data integrity, data confidentiality (encryption), and replay protection.
Windows PowerShell can create powerful, complex IPsec policies like in Netsh and the Windows Defender Firewall with Advanced Security console. However, because Windows PowerShell is object-based rather than string token-based, configuration in Windows PowerShell offers greater control and flexibility.
In Netsh, the authentication and cryptographic sets were specified as a list of comma-separated tokens in a specific format. In Windows PowerShell, rather than using default settings, you first create your desired authentication or cryptographic proposal objects and bundle them into lists in your preferred order. Then, you create one or more IPsec rules that reference these sets. The benefit of this model is that programmatic access to the information in the rules is much easier. See the following sections for clarifying examples.

Create IPsec rules
The following cmdlet creates basic IPsec transport mode rule in a Group Policy Object. An IPsec rule is simple to create; all that is required is the display name, and the remaining properties use default values. Inbound traffic is authenticated and integrity checked using the default quick mode and main mode settings. These default settings can be found in the console under Customize IPsec Defaults.
Netsh
netsh advfirewall set store gpo=domain.contoso.comgpo_name
netsh advfirewall consec add rule name="Require Inbound Authentication" endpoint1=any endpoint2=any action=requireinrequestout
Windows PowerShell
New-NetIPsecRule -DisplayName “Require Inbound Authentication” -PolicyStore domain.contoso.comgpo_name
Add custom authentication methods to an IPsec rule
If you want to create a custom set of quick-mode proposals that includes both AH and ESP in an IPsec rule object, you create the associated objects separately and link their associations. For more information about authentication methods, see Choosing the IPsec Protocol .
You can then use the newly created custom quick-mode policies when you create IPsec rules. The cryptography set object is linked to an IPsec rule object.

In this example, we build on the previously created IPsec rule by specifying a custom quick-mode crypto set. The final IPsec rule requires outbound traffic to be authenticated by the specified cryptography method.
Netsh
netsh advfirewall set store gpo=domain.contoso.comgpo_name
netsh advfirewall consec add rule name="Require Outbound Authentication" endpoint1=any endpoint2=any action=requireinrequestout qmsecmethods=ah:sha1+esp:sha1-3des
Windows PowerShell
$AHandESPQM = New-NetIPsecQuickModeCryptoProposal -Encapsulation AH,ESP –AHHash SHA1 -ESPHash SHA1 -Encryption DES3
$QMCryptoSet = New-NetIPsecQuickModeCryptoSet –DisplayName “ah:sha1+esp:sha1-des3” -Proposal $AHandESPQM –PolicyStore domain.contoso.comgpo_name
New-NetIPsecRule -DisplayName “Require Inbound Authentication” -InboundSecurity Require -OutboundSecurity Request -QuickModeCryptoSet $QMCryptoSet.Name –PolicyStore domain.contoso.comgpo_name
IKEv2 IPsec transport rules
A corporate network may need to secure communications with another agency. But, you discover the agency runs non-Windows operating systems and requires the use of the Internet Key Exchange Version 2 (IKEv2) standard.
You can apply IKEv2 capabilities in Windows Server 2012 by specifying IKEv2 as the key module in an IPsec rule. This capability specification can only be done using computer certificate authentication and can’t be used with phase-2 authentication.
Windows PowerShell
New-NetIPsecRule -DisplayName “Require Inbound Authentication” -InboundSecurity Require -OutboundSecurity Request –Phase1AuthSet MyCertAuthSet -KeyModule IKEv2 –RemoteAddress $nonWindowsGateway
For more info about IKEv2, including scenarios, see Securing End-to-End IPsec Connections by Using IKEv2.
Copy an IPsec rule from one policy to another
Firewall and IPsec rules with the same rule properties can be duplicated to simplify the task of re-creating them within different policy stores.
To copy the previously created rule from one policy store to another, the associated objects must also be copied separately. There’s no need to copy associated firewall filters. You can query rules to be copied in the same way as other cmdlets.
Copying individual rules is a task that isn’t possible through the Netsh interface. Here’s how you can accomplish it with Windows PowerShell.
Windows PowerShell
$Rule = Get-NetIPsecRule –DisplayName “Require Inbound Authentication”
$Rule | Copy-NetIPsecRule –NewPolicyStore domain.costoso.comnew_gpo_name
$Rule | Copy-NetPhase1AuthSet –NewPolicyStore domain.costoso.comnew_gpo_name
Handling Windows PowerShell errors
To handle errors in your Windows PowerShell scripts, you can use the –ErrorAction parameter. This parameter is especially useful with the Remove cmdlets. If you want to remove a particular rule, you’ll notice that it fails if the rule isn’t found. When rules are being removed, if the rule isn’t already there, it’s acceptable to ignore that error. In this case, you can do the following to suppress any “rule not found” errors during the remove operation.
Windows PowerShell
Remove-NetFirewallRule –DisplayName “Contoso Messenger 98” –ErrorAction SilentlyContinue
The use of wildcards can also suppress errors, but they could potentially match rules that you didn’t intend to remove. These wildcards can be a useful shortcut, but should only be used if you know there aren’t any extra rules that will be accidentally deleted. So the following cmdlet will also remove the rule, suppressing any “not found” errors.
Windows PowerShell
Remove-NetFirewallRule –DisplayName “Contoso Messenger 98*”
When using wildcards, if you want to double-check the set of rules that is matched, you can use the –WhatIf parameter.
Windows PowerShell
Remove-NetFirewallRule –DisplayName “Contoso Messenger 98*” –WhatIf
If you only want to delete some of the matched rules, you can use the –Confirm parameter to get a rule-by-rule confirmation prompt.
Windows PowerShell
Remove-NetFirewallRule –DisplayName “Contoso Messenger 98*” –Confirm
You can also just perform the whole operation, displaying the name of each rule as the operation is performed.
Windows PowerShell
Remove-NetFirewallRule –DisplayName “Contoso Messenger 98*” –Verbose
Monitor
The following Windows PowerShell commands are useful in the update cycle of a deployment phase.
To allow you to view all the IPsec rules in a particular store, you can use the following commands. In Netsh, this command doesn’t show rules where profile=domain,public or profile=domain,private. It only shows rules that have the single entry domain that is included in the rule. The following command examples will show the IPsec rules in all profiles.
Netsh
netsh advfirewall consec show rule name=all
Windows PowerShell
Show-NetIPsecRule –PolicyStore ActiveStore
You can monitor main mode security associations for information such as which peers are currently connected to the device and which protection suite is used to form the security associations.
Use the following cmdlet to view existing main mode rules and their security associations:
Netsh
netsh advfirewall monitor show mmsa all
Windows PowerShell
Find the source GPO of a rule
To view the properties of a particular rule or group of rules, you query for the rule. When a query returns fields that are specified as NotConfigured, you can determine which policy store a rule originates from.
For objects that come from a GPO (the –PolicyStoreSourceType parameter is specified as GroupPolicy in the Show command), if –TracePolicyStore is passed, the name of the GPO is found and returned in the PolicyStoreSource field.
Windows PowerShell
Get-NetIPsecRule –DisplayName “Require Inbound Authentication” –TracePolicyStore
It’s important to note that the revealed sources don’t contain a domain name.
Deploy a basic domain isolation policy
IPsec can be used to isolate domain members from non-domain members. Domain isolation uses IPsec authentication to require that the domain-joined devices positively establish the identities of the communicating devices to improve security of an organization. One or more features of IPsec can be used to secure traffic with an IPsec rule object.
To implement domain isolation on your network, the devices in the domain receive IPsec rules that block unsolicited inbound network traffic that isn’t protected by IPsec. Here we create an IPsec rule that requires authentication by domain members. Through this authentication, you can isolate domain-joined devices from devices that aren’t joined to a domain. In the following examples, Kerberos authentication is required for inbound traffic and requested for outbound traffic.
Netsh
netsh advfirewall set store gpo=domain.contoso.comdomain_isolation
netsh advfirewall consec add rule name=“Basic Domain Isolation Policy” profile=domain endpoint1=”any” endpoint2=”any” action=requireinrequestout auth1=”computerkerb”
Windows PowerShell
$kerbprop = New-NetIPsecAuthProposal –Machine –Kerberos
$Phase1AuthSet = New-NetIPsecPhase1AuthSet -DisplayName "Kerberos Auth Phase1" -Proposal $kerbprop –PolicyStore domain.contoso.comdomain_isolation
New-NetIPsecRule –DisplayName “Basic Domain Isolation Policy” –Profile Domain –Phase1AuthSet $Phase1AuthSet.Name –InboundSecurity Require –OutboundSecurity Request –PolicyStore domain.contoso.comdomain_isolation
Configure IPsec tunnel mode
The following command creates an IPsec tunnel that routes traffic from a private network (192.168.0.0/16) through an interface on the local device (1.1.1.1) attached to a public network to a second device through its public interface (2.2.2.2) to another private network (192.157.0.0/16). All traffic through the tunnel is checked for integrity by using ESP/SHA1, and it’s encrypted by using ESP/DES3.
Netsh
netsh advfirewall consec add rule name="Tunnel from 192.168.0.0/16 to 192.157.0.0/16" mode=tunnel endpoint1=192.168.0.0/16 endpoint2=192.157.0.0/16 localtunnelendpoint=1.1.1.1 remotetunnelendpoint=2.2.2.2 action=requireinrequireout qmsecmethods=esp:sha1-3des
Windows PowerShell
$QMProposal = New-NetIPsecQuickModeCryptoProposal -Encapsulation ESP -ESPHash SHA1 -Encryption DES3
$QMCryptoSet = New-NetIPsecQuickModeCryptoSet –DisplayName “esp:sha1-des3” -Proposal $QMProposal
New-NetIPSecRule -DisplayName “Tunnel from HQ to Dallas Branch” -Mode Tunnel -LocalAddress 192.168.0.0/16 -RemoteAddress 192.157.0.0/16 -LocalTunnelEndpoint 1.1.1.1 -RemoteTunnelEndpoint 2.2.2.2 -InboundSecurity Require -OutboundSecurity Require -QuickModeCryptoSet $QMCryptoSet.Name
Deploy secure firewall rules with IPsec
In situations where only secure traffic can be allowed through the Windows Defender Firewall, a combination of manually configured firewall and IPsec rules are necessary. The firewall rules determine the level of security for allowed packets, and the underlying IPsec rules secure the traffic. The scenarios can be accomplished in Windows PowerShell and in Netsh, with many similarities in deployment.
Create a secure firewall rule (allow if secure)
Configuring firewalls rule to allow connections if they’re secure requires the corresponding traffic to be authenticated and integrity protected, and then optionally encrypted by IPsec.
The following example creates a firewall rule that requires traffic to be authenticated. The command permits inbound Telnet network traffic only if the connection from the remote device is authenticated by using a separate IPsec rule.
Netsh
netsh advfirewall firewall add rule name="Allow Authenticated Telnet" dir=in program=%SystemRoot%System32tlntsvr.exe security=authenticate action=allow
Windows PowerShell
New-NetFirewallRule -DisplayName “Allow Authenticated Telnet” -Direction Inbound -Program %SystemRoot%System32tlntsvr.exe -Authentication Required -Action Allow
The following command creates an IPsec rule that requires a first (computer) authentication and then attempts an optional second (user) authentication. Creating this rule secures and allows the traffic through the firewall rule requirements for the messenger program.
Netsh
netsh advfirewall consec add rule name="Authenticate Both Computer and User" endpoint1=any endpoint2=any action=requireinrequireout auth1=computerkerb,computerntlm auth2=userkerb,userntlm,anonymous
Windows PowerShell
$mkerbauthprop = New-NetIPsecAuthProposal -Machine –Kerberos
$mntlmauthprop = New-NetIPsecAuthProposal -Machine -NTLM
$P1Auth = New-NetIPsecPhase1AuthSet -DisplayName “Machine Auth” –Proposal $mkerbauthprop,$mntlmauthprop
$ukerbauthprop = New-NetIPsecAuthProposal -User -Kerberos
$unentlmauthprop = New-NetIPsecAuthProposal -User -NTLM
$anonyauthprop = New-NetIPsecAuthProposal -Anonymous
$P2Auth = New-NetIPsecPhase2AuthSet -DisplayName “User Auth” -Proposal $ukerbauthprop,$unentlmauthprop,$anonyauthprop
New-NetIPSecRule -DisplayName “Authenticate Both Computer and User” -InboundSecurity Require -OutboundSecurity Require -Phase1AuthSet $P1Auth.Name –Phase2AuthSet $P2Auth.Name
Isolate a server by requiring encryption and group membership
To improve the security of the devices in an organization, you can deploy domain isolation in which domain-members are restricted. They require authentication when communicating among each other and reject non-authenticated inbound connections. To improve the security of servers with sensitive data, this data must be protected by allowing access only to a subset of devices within the enterprise domain.
IPsec can provide this extra layer of protection by isolating the server. In server isolation, sensitive data access is restricted to users and devices with legitimate business need, and the data is additionally encrypted to prevent eavesdropping.
Create a firewall rule that requires group membership and encryption
To deploy server isolation, we layer a firewall rule that restricts traffic to authorized users or devices on the IPsec rule that enforces authentication.
The following firewall rule allows Telnet traffic from user accounts that are members of a custom group called “Authorized to Access Server.” This access can additionally be restricted based on the device, user, or both by specifying the restriction parameters.
A Security Descriptor Definition Language (SDDL) string is created by extending a user or group’s security identifier (SID). For more information about finding a group’s SID, see: Finding the SID for a group account.
Restricting access to a group allows administrations to extend strong authentication support through Windows Defender Firewall and/or IPsec policies.
The following example shows you how to create an SDDL string that represents security groups.
Windows PowerShell
$user = new-object System.Security.Principal.NTAccount (“corp.contoso.comAdministrators”)
$SIDofSecureUserGroup = $user.Translate([System.Security.Principal.SecurityIdentifier]).Value
$secureUserGroup = "D:(A;;CC;;;$SIDofSecureUserGroup)"
By using the previous scriptlet, you can also get the SDDL string for a secure computer group as shown here:
Windows PowerShell
$secureMachineGroup = "D:(A;;CC;;;$SIDofSecureMachineGroup)"
For more information about how to create security groups or how to determine the SDDL string, see Working with SIDs.
Telnet is an application that doesn’t provide encryption. This application can send data, such as names and passwords, over the network. This data can be intercepted by malicious users. If an administrator would like to allow the use of Telnet, but protect the traffic, a firewall rule that requires IPsec encryption can be created. This firewall rule is necessary so that the administrator can be certain that when this application is used, all of the traffic sent or received by this port is encrypted. If IPsec fails to authorize the connection, no traffic is allowed from this application.
In this example, we allow only authenticated and encrypted inbound Telnet traffic from a specified secure user group through the creation of the following firewall rule.
Netsh
netsh advfirewall set store gpo=domain.contoso.comServer_Isolation
netsh advfirewall firewall add rule name=“Allow Encrypted Inbound Telnet to Group Members Only” program=%SystemRoot%System32tlntsvr.exe protocol=TCP dir=in action=allow localport=23 security=authenc rmtusrgrp ="D:(A;;CC;;; S-1-5-21-2329867823-2610410949-1491576313-1735)"
Windows PowerShell
New-NetFirewallRule -DisplayName "Allow Encrypted Inbound Telnet to Group Members Only" -Program %SystemRoot%System32tlntsvr.exe -Protocol TCP -Direction Inbound -Action Allow -LocalPort 23 -Authentication Required -Encryption Required –RemoteUser $secureUserGroup –PolicyStore domain.contoso.comServer_Isolation
Endpoint security enforcement
The previous example showed end to end security for a particular application. In situations where endpoint security is required for many applications, having a firewall rule per application can be cumbersome and difficult to manage. Authorization can override the per-rule basis and be done at the IPsec layer.
In this example, we set the global IPsec setting to only allow transport mode traffic to come from an authorized user group with the following cmdlet. Consult the previous examples for working with security groups.
Windows PowerShell
Set-NetFirewallSetting -RemoteMachineTransportAuthorizationList $secureMachineGroup
Create firewall rules that allow IPsec-protected network traffic (authenticated bypass)
Authenticated bypass allows traffic from a specified trusted device or user to override firewall block rules. This override is helpful when an administrator wants to use scanning servers to monitor and update devices without the need to use port-level exceptions. For more information, see How to enable authenticated firewall bypass.
In this example, we assume that a blocking firewall rule exists. This example permits any network traffic on any port from any IP address to override the block rule, if the traffic is authenticated as originating from a device or user account that is a member of the specified device or user security group.
Netsh
netsh advfirewall set store gpo=domain.contoso.comdomain_isolation
netsh advfirewall firewall add rule name="Inbound Secure Bypass Rule" dir=in security=authenticate action="bypass" rmtcomputergrp="D:(A;;CC;;;S-1-5-21-2329867823-2610410949-1491576313-1114)" rmtusrgrp="D:(A;;CC;;; S-1-5-21-2329867823-2610410949-1491576313-1735)"
Windows PowerShell
New-NetFirewallRule –DisplayName “Inbound Secure Bypass Rule" –Direction Inbound –Authentication Required –OverrideBlockRules $true -RemoteMachine $secureMachineGroup –RemoteUser $secureUserGroup –PolicyStore domain.contoso.comdomain_isolation
Other resources
For more information about Windows PowerShell concepts, see the following topics.
-
Windows PowerShell Getting Started Guide
-
Windows PowerShell User Guide
-
Windows PowerShell About Help Topics
-
about_Functions
-
about_Functions_Advanced
-
about_Execution_Policies
-
about_Foreach
-
about_Objects
-
about_Properties
-
about_While
-
about_Scripts
-
about_Signing
-
about_Throw
-
about_PSSessions
-
about_Modules
-
about_Command_Precedence
Во всех версиях Windows, начиная с Windows XP, присутствует встроенный брандмауэр, который можно использовать для защиты операционной системы и фильтрации сетевого трафика. По своему функционалу и возможностям он не уступает многим сторонним коммерческим программным межсетевым экранам: позволяет ограничить доступ к компьютеру из внешней сети, а также разрешить или заблокировать доступ в Интернет для различных приложений. В Windows 10 1709 встроенный брандмауэре называется Windows Defender Firewall with Advanced Security. В этой статье мы покажем, как настроить брандмауэр Windows Defender в Windows 10.
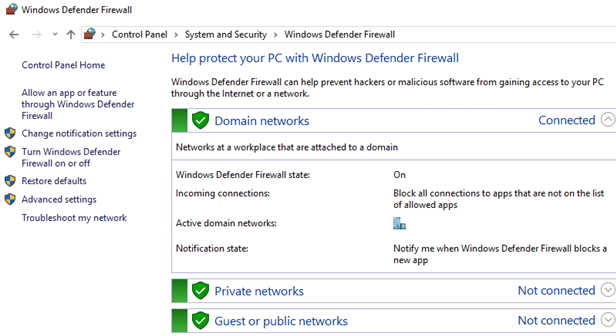
Чтобы открыть панель настройки Windows Defender Firewall, откройте классическую Панель управления (Control Panel) и перейдите в раздел System and Security -> Windows Defender Firewall. На скриншоте ниже видно, что Windows Defender Firewall включен и защищает ваш компьютер.
Чтобы полностью включить/отключить Firewall в Windows 10 используется кнопка Turn Windows Defender Firewall on or off.
Совет. Также вы можете включить/отключить брандмауэр Windows с помощью PowerShell или такими командами:
netsh advfirewall set allprofiles state off
или
netsh advfirewall set allprofiles state on
Если вы некорректно настроили правила в брандмауэре защитника Windows, и полностью заблокировали сетевой доступ для одной программы или операционной системы, можно сбросить все ваши настройки с помощью кнопки Restore defaults.
Обратите внимание что в Windows Defender Firewall есть три сетевых профиля:
- Domain profile – используется, если компьютер присоединен к доменной сети Active Directory;
- Private profile – профиль для частной сети, в которой вы хотите разрешить обнаруживать ваш другими устройствами, и разрешить общий доступ к файлам и принтерам;
- Public (Guest) profile – настройки этого профиля максимально ограничивают доступ к вашему компьютеру из сети и его обнаружения. Этот профиль используется в общедоступных местах, где вы не доверяете другим устройствам в сети (гостиница, аэропорт, кафе)
Сетевой профиль брандмауэра выбирается пользователем при первом подключении к новой сети или назначается автоматически (в случае домена).
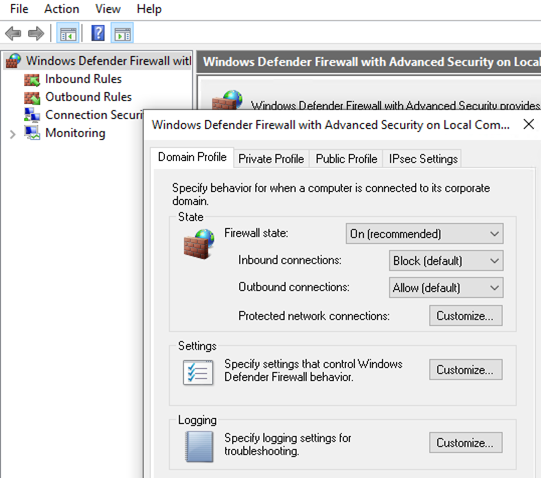
Чтобы разрешить или заблокировать входящее/исходящее подключение для конкретного профиля, нажмите Advanced Setting, щелкните провой кнопкой по корню Windows Defender Firewall with Advanced Security -> Properties.
Вы можете управлять настройками каждого профиля на отдельной вкладке.
Обратите внимание, что по-умолчанию Windows Defender Firewall в Windows 10 блокирует все входящие подключения и разрешает все исходящие.
Если вы хотите полностью заблокировать доступ в Интернет с вашего компьютера, на всех трех вкладка выберите Outbound Connection -> Block. При этом исходящие подключения будут запрещены для всех программ, кроме разрешенных (в Windows 10 есть несколько преднастроенных правил для системных процессов: доступ к Windows Updates, Windows Store, обновление антивирусных баз Windows Defender и т.д.)
Попробуем добавить браузер Mozilla Firefox в список разрешенных программ.
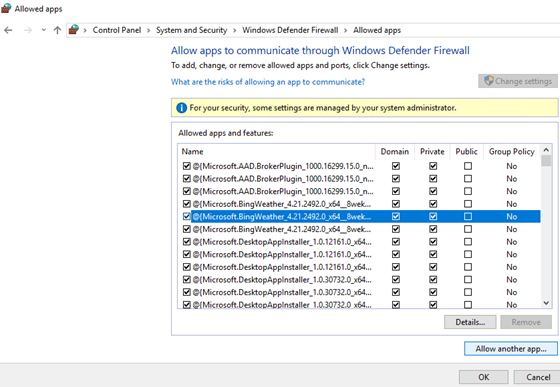
Нажмите на кнопку Allow an app or feature through Windows Defender Firewall в левой панели. Появится список разрешенных приложений и служб Windows. Чтобы добавить новое приложение, нажмите Allow another app.
С помощью кнопки Browse укажите исполняемый файл прилежания, которому нужно разрешить доступ в Интернет. Я выбрал исполняемый файл браузера C:Program FilesMozilla Firefoxfirefox.exe
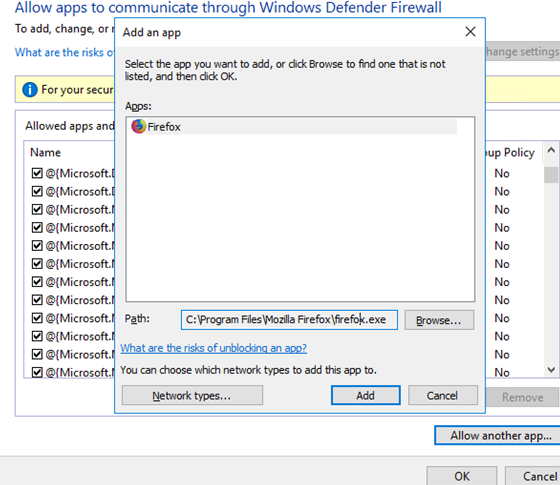
Нажмите OK и на следующей вкладке выберите, для каких сетевых профилей должно быть активно данное правило.
![]()
Более тонко вы можете настроить правила Windows Defender Firewall из консоли wf.msc. Здесь вы можете создать отдельные разрешающие или запрещающие правила для конкретной программы, протокола (TCP/UDP/ICMP/IPsec), IP адреса или номера порта.
Чтобы создать новое правило для исходящего трафика, щелкните правой кнопкой по Inbound rules -> New Rule.
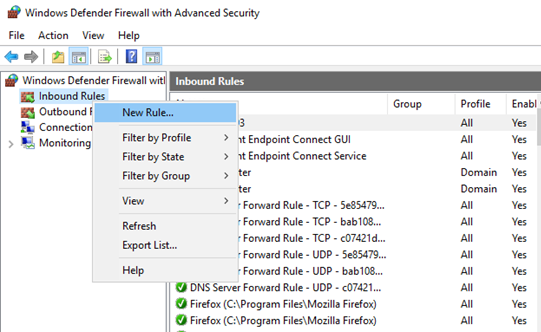
Далее следуйте простому мастеру, который поможет создать новое собственное правило в брандмауэре Windows.

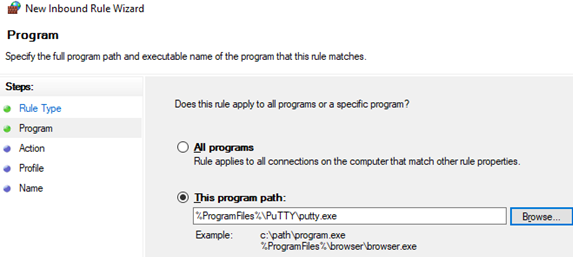
В этом примере я разрешил исходящие подключения для putty.exe.
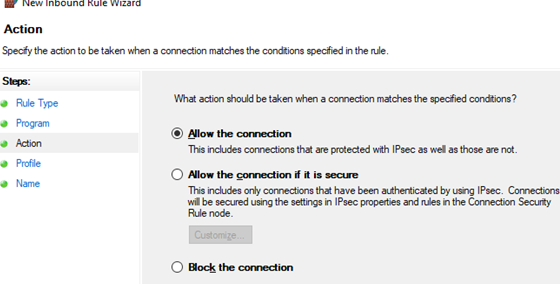
Выберите Allow the connection и укажите имя правила.
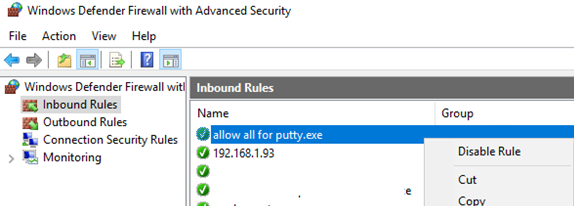
Новое правило появится в консоли Inbound rules. Вы можете отключить его через контекстное меню Disable rule. При этом правило не удаляется, а становится неактивным (его цвет сменится с зеленый на серый).
All versions of Windows starting from XP have a built-in firewall that can be used to protect the operating system and filter all network traffic. The functionality and capabilities of the built-in Windows Firewall are not inferior to many third-party commercial firewall software: it allows you to restrict access to a computer from an external network, as well as allow or block Internet access for installed apps and services. Starting from Windows 10 1709, the built-in firewall is called Windows Defender Firewall with Advanced Security. In this article, we will show you how to set up Windows Defender Firewall on Windows 10.
In order to open the Windows Defender Firewall settings panel, run the classic Control Panel and go to System and Security > Windows Defender Firewall.
The screenshot below shows that Windows Defender Firewall is enabled and protects your computer.
To completely enable/disable Firewall in Windows 10, use the Turn Windows Defender Firewall on or off button.
Hint. Also you can enable Windows Defender Firewall using Powershell or from the elevated command prompt using the following command:
netsh advfirewall set allprofiles state offor
netsh advfirewall set allprofiles state on

If you incorrectly configured your Defender Firewall and completely blocked network access, you can reset Windows Firewall settings using the button Restore defaults.
Note that Windows Defender Firewall has three network profiles types:
- Domain profile – used if your computer joined to the Active Directory domain network;
- Private profile – your computer will be discovered on the network by other devices and will be available to share files and printers (used in home networks or in a workgroup);
- Public (Guest) profile – the settings of this profile limit access to your computer from the network and its detection as much as possible. This profile is usually used in public places – hotel, airport, café.
The profile is selected by the user when connecting to a new network for the first time, or is selected automatically (in the case of a domain).
To allow/block inbound or outbound connections for a specific profile, click Advanced Setting, right-click on the root of Windows Defender Firewall with Advanced Security > Properties.
You can manage the settings for each profile on a separate tab.
Please note that by default Windows Defender Firewall in Windows 10 blocks all incoming connections and allows all outgoing ones.

If you want to block Internet access from your computer, select Outbound Connection -> Block on all three tabs. In this case, outgoing connections will be denied for all programs except those allowed (Windows 10 has several pre-configured rules for system processes: access to Windows Update, Windows Store, updating the Windows Defender antivirus signatures, etc.).
Let’s try to add the Mozilla Firefox browser to the list of allowed programs.
Click on the Allow an app or feature through Windows Defender Firewall button in the left pane. A list of allowed Windows applications and services appears in the list. To add a new rule, click Allow another app.

Use the Browse button to specify the path to the executable file that you want to allow access to the Internet. We selected our browser’s executable file C:Program FilesMozilla Firefoxfirefox.exe

Click OK and select for which network profiles this rule should be active.

You can configure Windows Defender Firewall rules more finely from the wf.msc console. Here you can create separate allowing or blocking rules for a specific program, protocol (TCP/UDP/ ICMP/IPsec), IP address or port number.
To create a new outbound rule, right-click on Outbound Rules > New Rule.

Next, follow a simple wizard to help you to create your own rule in Windows Defender Firewall.

In this example, we’ve enabled outbound connections for the putty.exe client.

Select Allow the connection and provide a name for the rule.

The new rule will appear in the Outbound rules list. You can disable it via the Disable rule option in context menu. This does not delete the rule, but it becomes inactive.

- About
- Latest Posts

I enjoy technology and developing websites. Since 2012 I’m running a few of my own websites, and share useful content on gadgets, PC administration and website promotion.
СКАЧАТЬ
Описание
Отзывы

Выберите вариант загрузки:
- скачать с сервера SoftPortal (установочный exe-файл)
- скачать с официального сайта (установочный exe-файл)
Windows Firewall Control — небольшая бесплатная утилита, которая обеспечивает комфортный доступ пользователю к наиболее часто используемым опциям встроенного брандмауэра операционных систем Windows (полное описание…)

Рекомендуем популярное
![]() Defender Control 2.1
Defender Control 2.1
С помощью небольшой программки Defender Control вы в один клик сможете отключать, включать и…
![]() TaskbarX 1.7.8.0
TaskbarX 1.7.8.0
Небольшая портативная программа, которая позволяет настроить панель задач Windows 10,…
![]() StartIsBack++ 2.9.17
StartIsBack++ 2.9.17
StartIsBack++ — полезная утилита для всех пользователей «десятки», которая вернет в интерфейс операционки привычное и знакомое меню Пуск из Windows 7…
![]() Volume² 1.1.7.449 / 1.1.8.458 beta
Volume² 1.1.7.449 / 1.1.8.458 beta
Volume2 — очень удобная программа, дающая пользователю возможность управлять уровнем…
![]() Punto Switcher 4.4.4.489
Punto Switcher 4.4.4.489
Punto Switcher — нужная программа, которая автоматически исправит текст, набранный не в той…
![]() DroidCam Windows Client 6.5.2
DroidCam Windows Client 6.5.2
Простая и удобная в использовании программа, которая позволяет использовать мобильное…