Антивирусная программа Microsoft Defender регулярно сканирует устройство, чтобы обеспечить его безопасность. Мы стараемся это делать в те моменты, когда вы не пользуетесь устройством, чтобы не мешать вашей работе. Вы также можете установить любое удобное время и периодичность проверки, проводимой антивирусной программой Microsoft Defender.
-
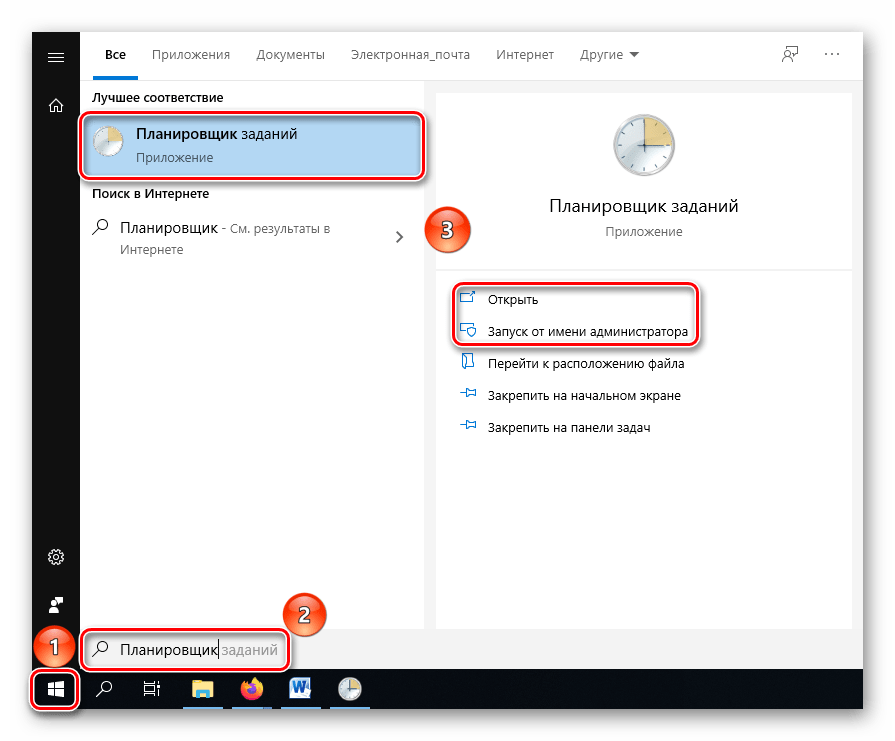
В поле поиска на панели задач введите Планировщик заданий и откройте приложение.
-
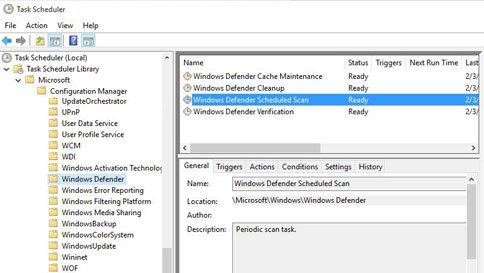
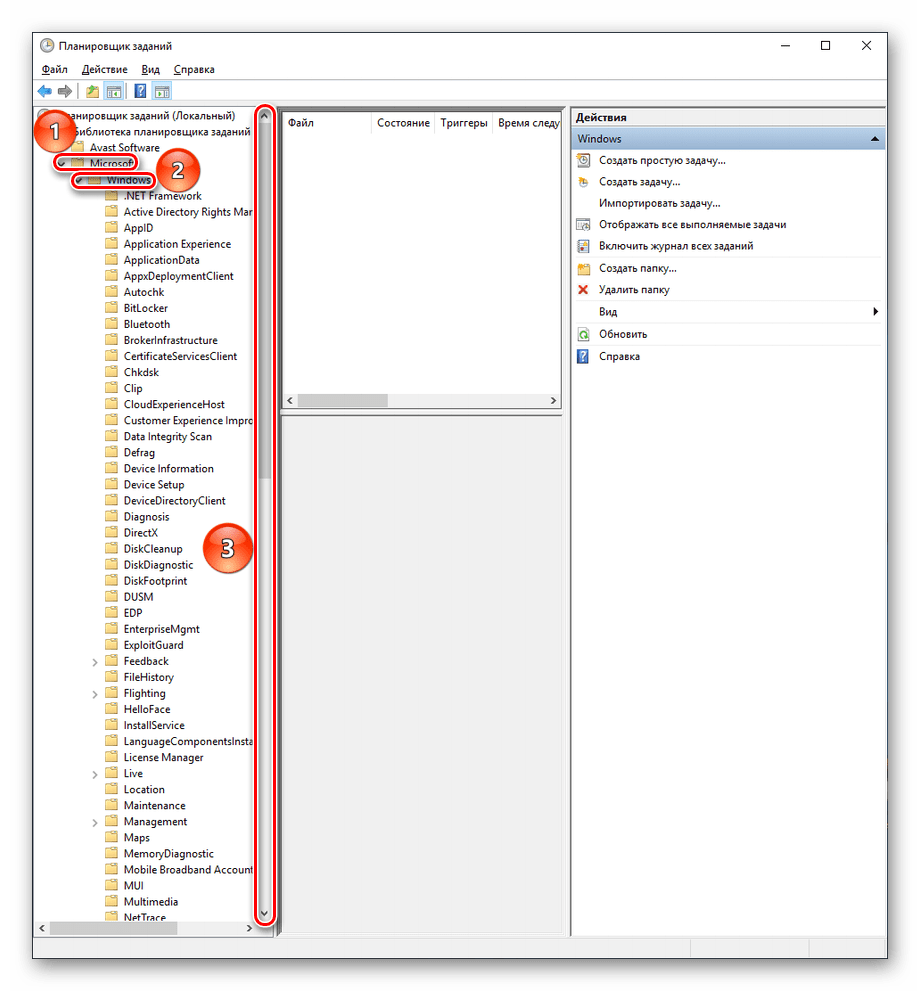
На левой панели разверните узел Библиотека планировщика заданий > Microsoft > Windows, а затем прокрутите вниз и выберите папку Windows Defender.
-
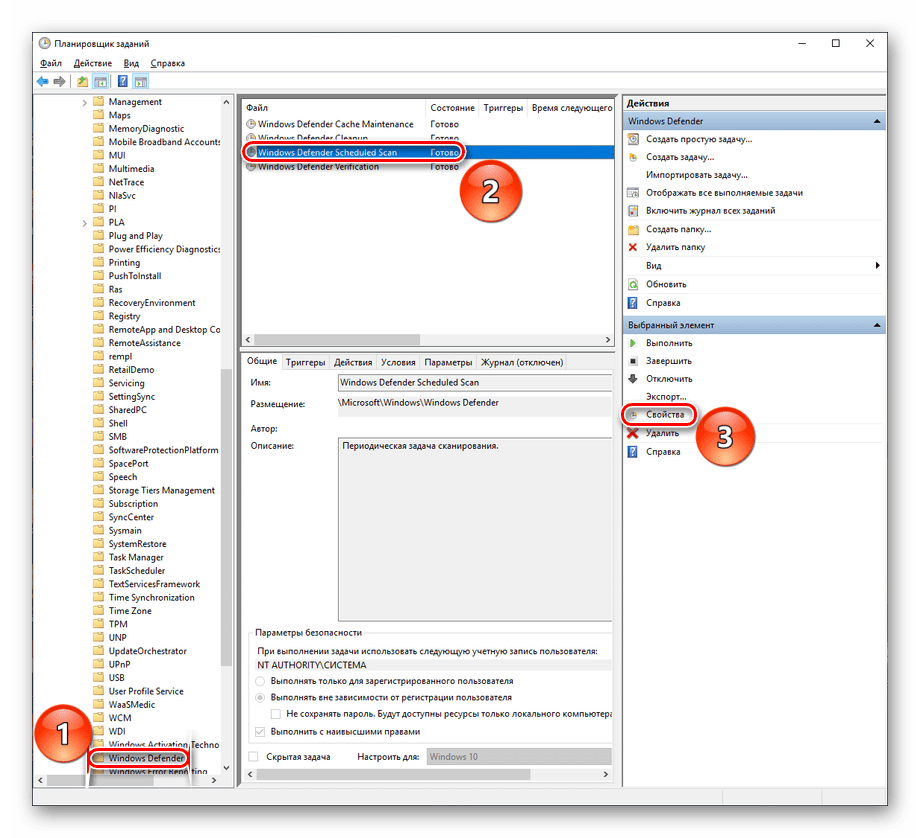
На центральной панели дважды щелкните пункт Windows Defender Scheduled Scan.

-
В окне Свойства запланированной проверки Защитником Windows (локальный компьютер) откройте вкладку Триггеры, перейдите в нижнюю часть окна и выберите Новый.
-
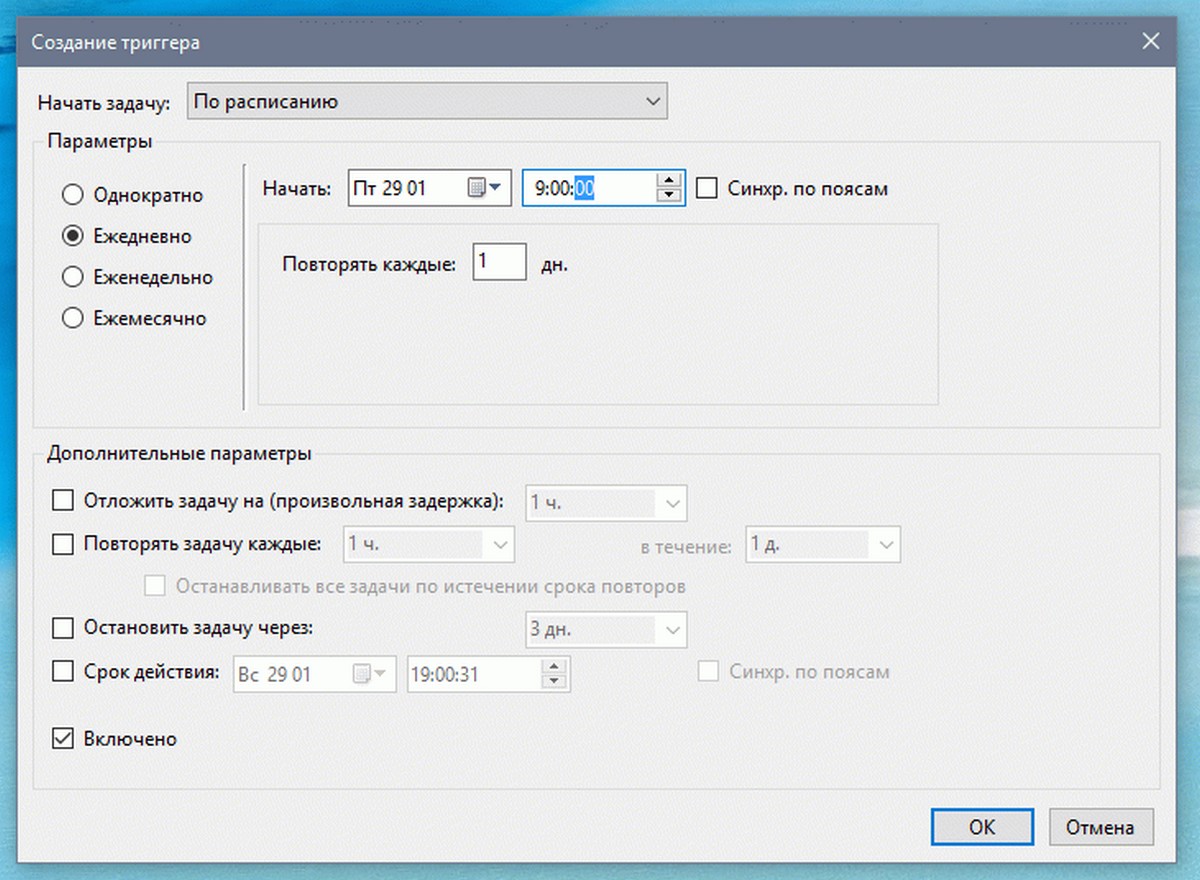
Укажите периодичность проверок и желаемое время начала.
Нужна дополнительная помощь?
Не так давно многие пользователи задавались вопросом как удалить Windows Defender в Windows 10, пользователи которых устраивает базовая зашита от Microsoft продолжают пользоваться Защитником Windows. Новые данные, опубликованные в AV-Test показывают неплохие результаты защиты от вредоносных программ,вирусов и шпионского ПО в последних версиях Windows.
В Windows 10 — Защитник Windows не имеет настроек сканирования по расписанию в интерфейсе программы, как же тогда настроить Сканирование по расписанию для быстрой или полной проверки системы?
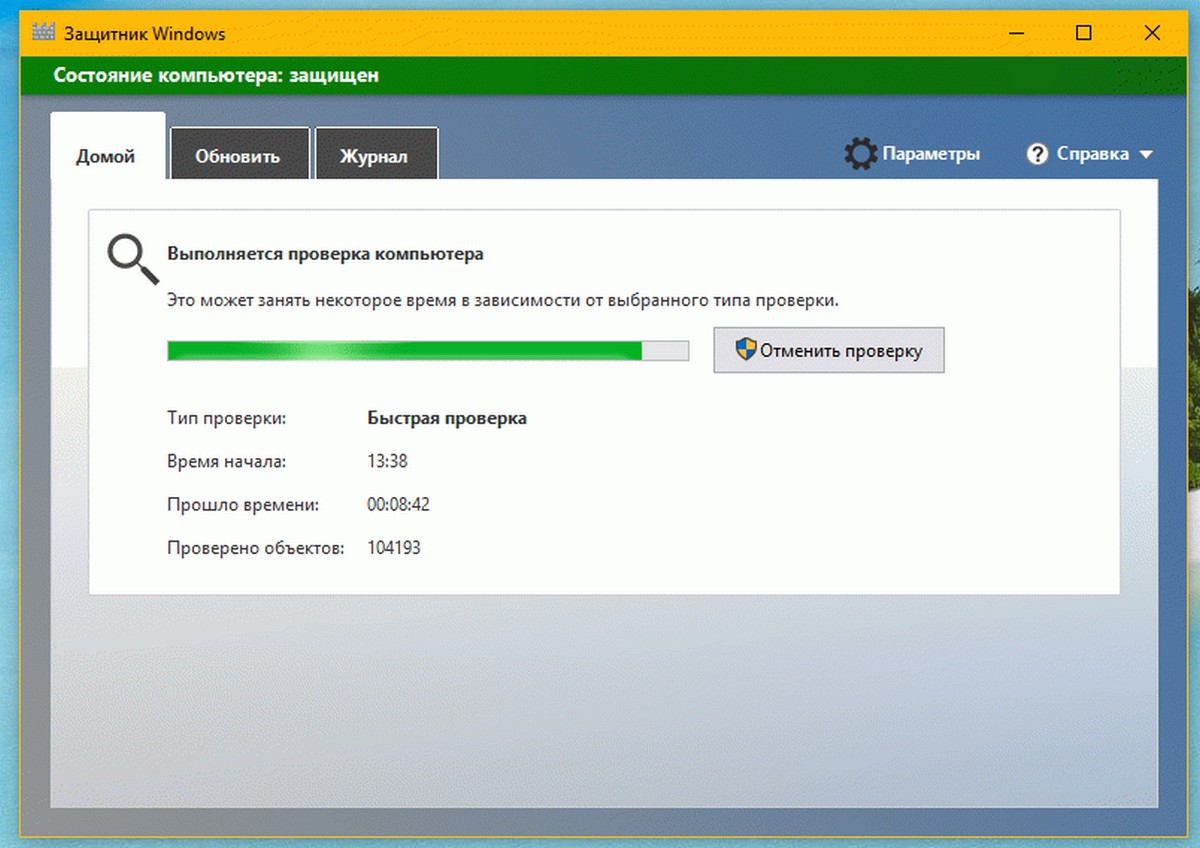
Быстрое сканирование выполняется ежедневно (система сама решает когда) одновременно с обновлениями компонентов Windows или другими задачами.
Если все же вы не хотите полагаться на то когда система решит запустить сканирование, или Сканирование Windows Defender запускается не в самый подходящий для вас момент, а возможно что автосканирование не запускается вовсе и вы видите предупреждение что ваш ПК давно не проверялся, вы можете настроить автоматическое сканирование на наличие вредоносных программ по расписанию в Windows 10.
Защитник Windows 10 настройка Сканирования по расписанию.
1. Воспользуйтесь Поиском Windows 10, наберите в строке поиска “Планировщик заданий”

- В открывшимся окне планировщика, с левой стороны перейдите по следующему пути-
Библиотека планировщика заданий->Microsoft->Windows->Windows Defender
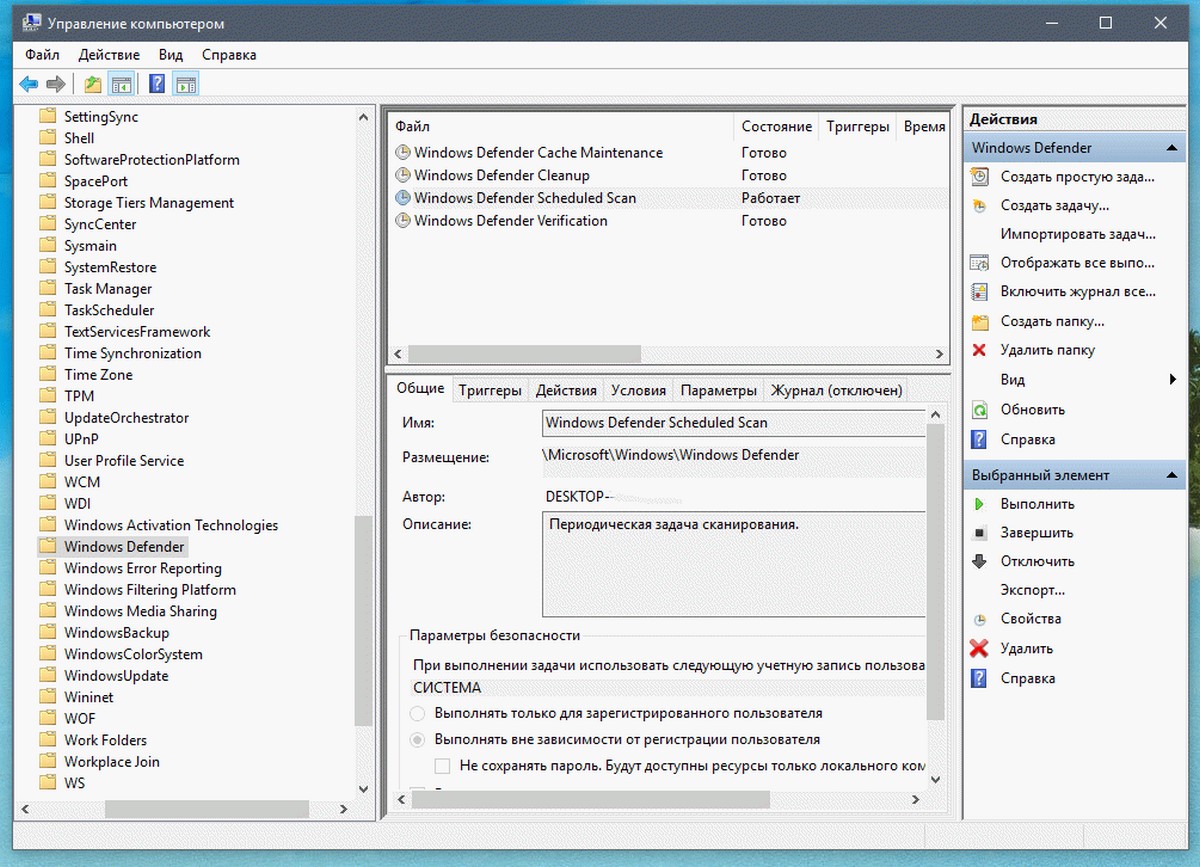
Вы должны увидеть Периодическую задачу сканирования с именем- Windows Defender Scheduled Scan
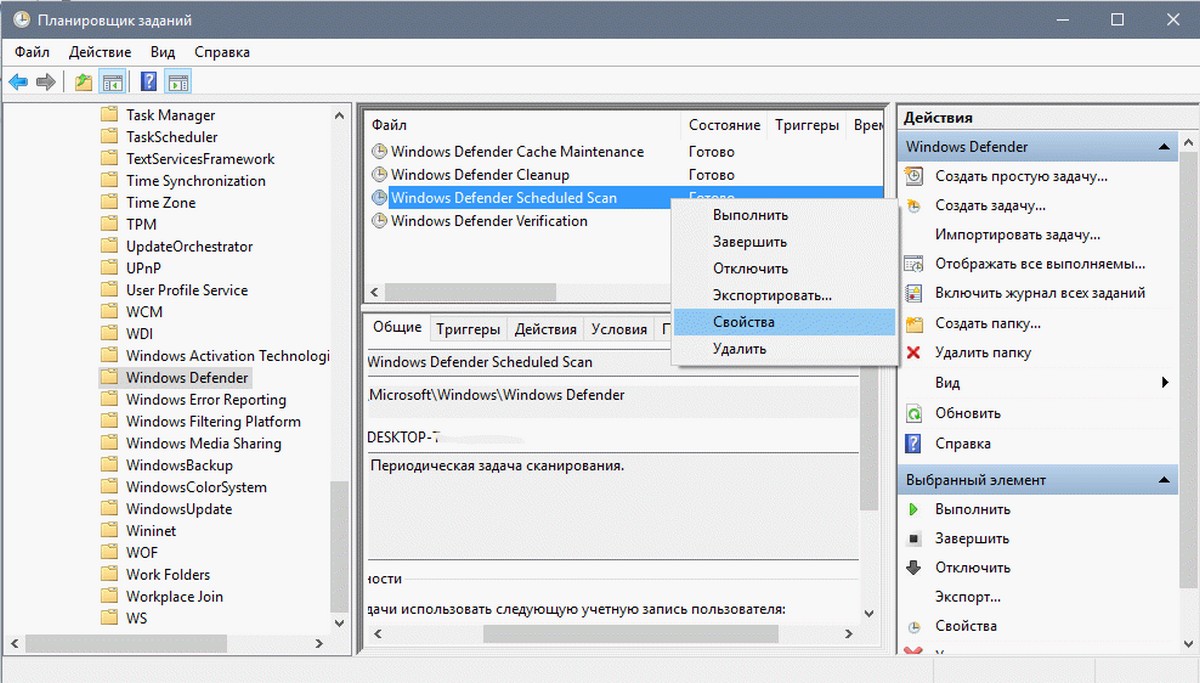
- Откройте задачу Windows Defender Scheduled Scan, двойным кликом или с помощью правой кнопки мыши выбрав в контекстном меню- Свойства.
В свойствах задачи для Защитника Windows нам нужны две вкладки Триггеры и Действия.
- Триггеры
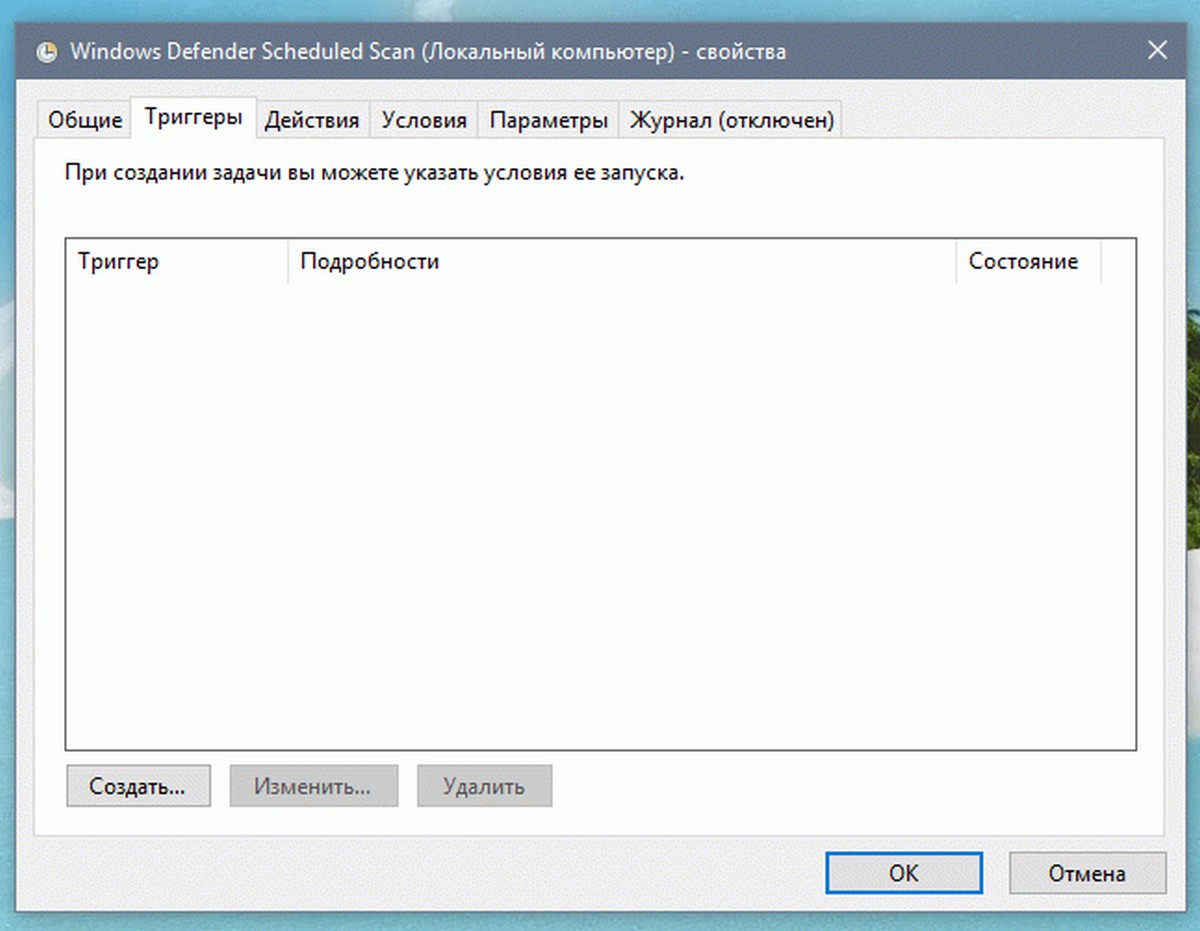
Вкладка триггеры позволяет нам настроить условия запуска нашей задачи
Выберите Создать
Настроим выполнение задачи «Сканирование Windows Defender» ежедневно в 9.00 утра и
нажимаем кнопку ОК.
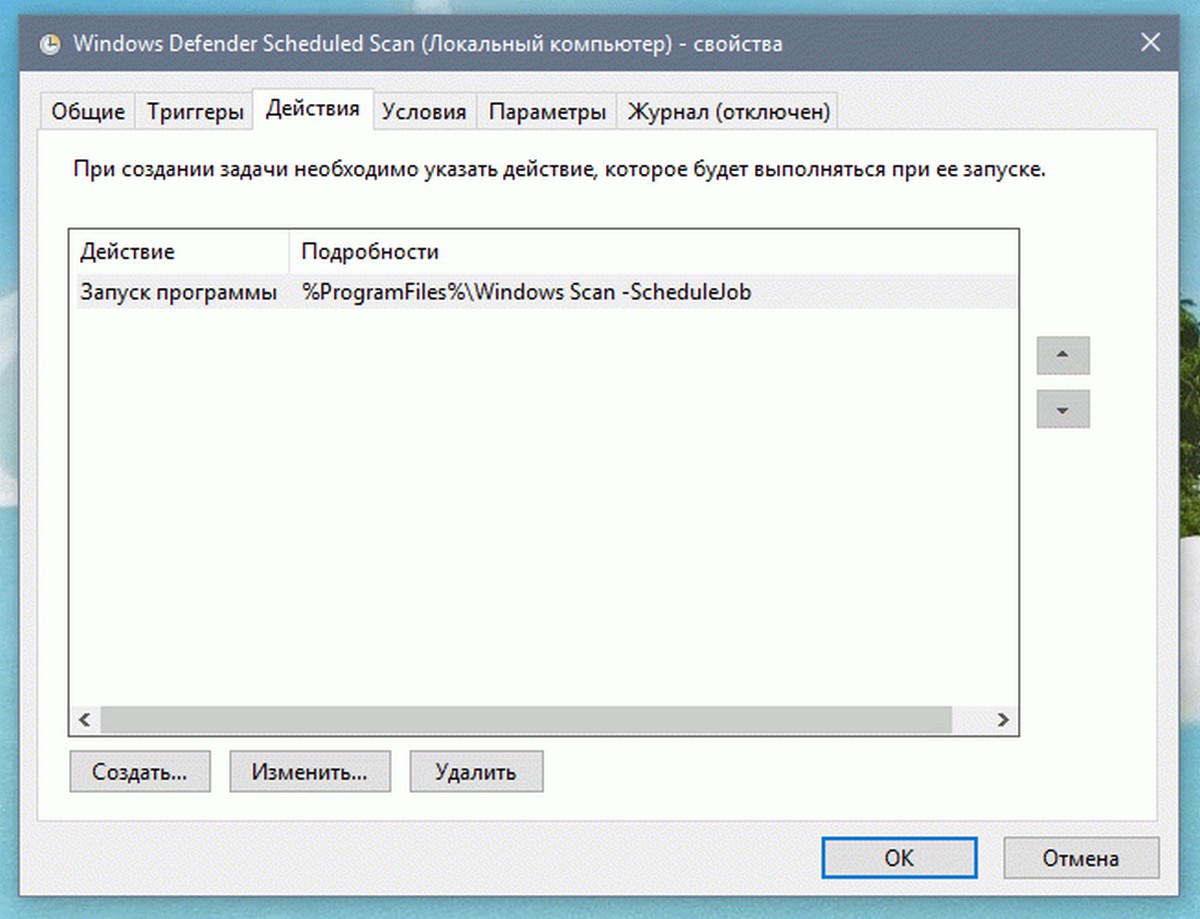
- Действия
Эта вкладка позволяет настроить действие которое будет выполнятся.
В этой вкладке мы видим что одно действие уже есть, — нажмем Изменить
В поле Программа или сценарий скопируйте или наберите:
«%ProgramFiles%Windows DefenderMpCmdRun.exe»
В поле Добавить аргументы скопируйте или наберите:
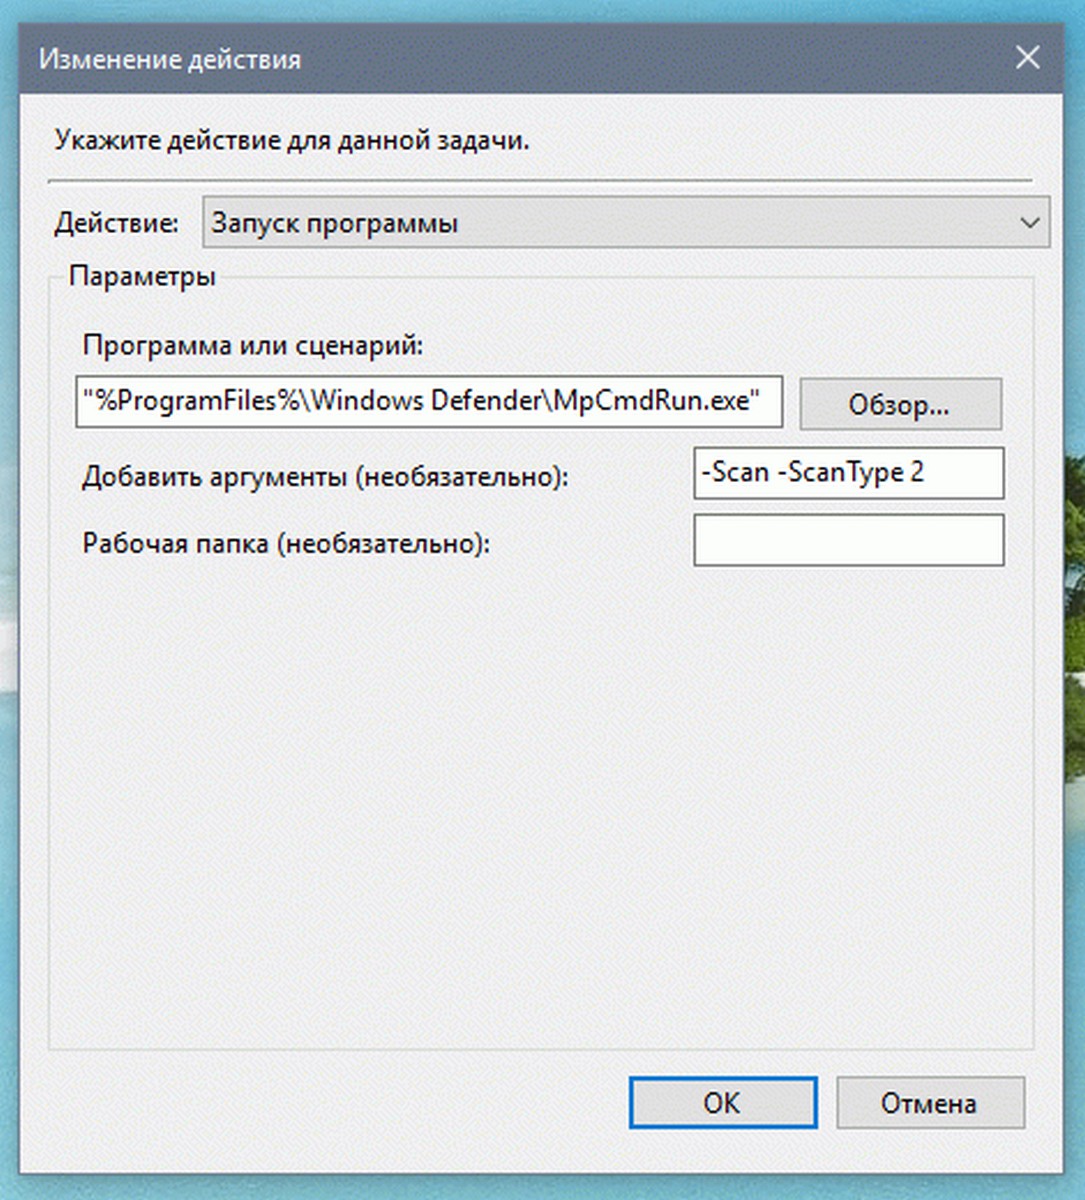
Для быстрой проверки
-Scan -ScanType 1
Для полной проверки
-Scan -ScanType 2
Сохраняем настройки нажав на кнопку ОК
Вот и все вы успешно настроили Сканирование по расписанию Защитника Windows.
Изучив интерфейс Windows Defender на Windows 8, вы вероятно, заметите, что в нем отсутствует функция запланированного сканирования. Однако эта функция имеется в «Планировщике заданий», и в этом руководстве речь пойдет как раз о том, как запланировать проверку через него. Процесс довольно продолжительный, так что запаситесь терпением.

Нажмите Win + R, введите команду taskschd.msc и нажмите на кнопку «OK» (или клавишу Enter на клавиатуре).

Далее на экране появится инструмент «Планировщик заданий», который своим видом может напугать многих рядовых пользователей. Тем не менее, Microsoft почему-то не хочет сделать его интерфейс более дружелюбным, но сейчас не об этом.

Теперь, когда «Планировщик заданий» запущен, нам нужно найти одну задачу в списке предварительно сконфигурированных задач. Используйте дерево папок в левой части окна, чтобы найти папку «Windows Defender» (вам нужно проследовать по следующему пути:
«Библиотека планировщика заданий» — > «Microsoft» — > «Windows» — > «Windows Defender»
). В разделе «Windows» придется прокрутить довольно много записей, чтобы добраться до папки «Windows Defender», но все они расположены в алфавитном порядке, так что вы легко сориентируетесь.
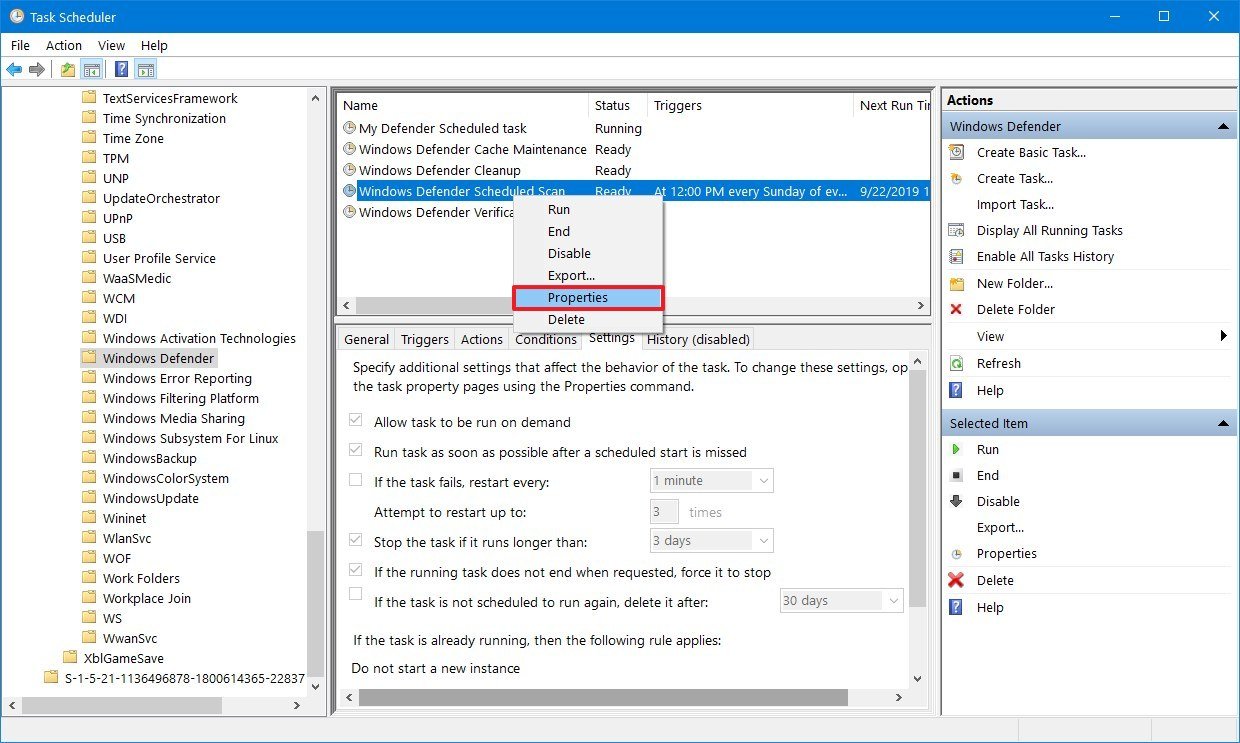
Как только папка «Windows Defender» будет найдена, выделите ее, а затем в центре окна щелкните правой кнопкой мыши по задаче с названием «Windows Defender Scheduled Scan» и в контекстном меню выберете «Свойства».

Свойства задачи разбиты на несколько вкладок.

Для настройки выполнения задачи мы будем использовать первые пять вкладок.
Общие настройки
Во-первых, убедитесь, что на вкладке «Общие» в разделе «Параметры безопасности» в качестве учетной записи пользователя указана «СИСТЕМА».

Также убедитесь в том, чтобы у вас была выбрана опция «Выполнять с наивысшими правами».
Настройка триггера
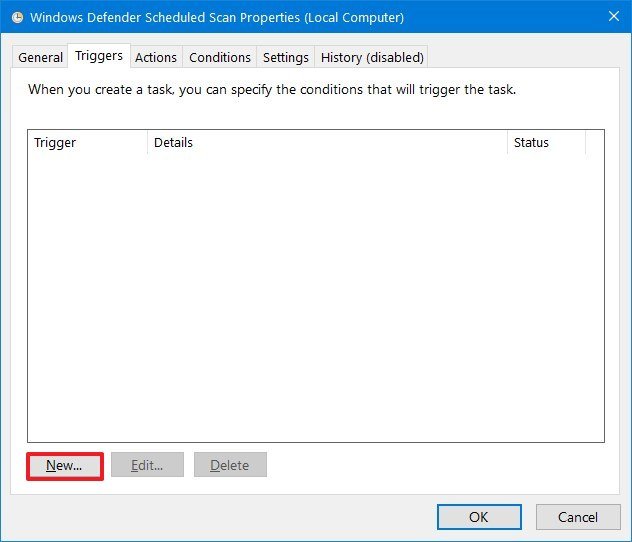
Вкладка «Триггеры» позволяет настроить запуск сканирования по расписанию. По умолчанию там не будет никаких триггеров, так что задача будет работать только если ее запускать вручную.
Чтобы создать триггер, нажмите на кнопку «Создать».

В раскрывающемся списке выберете «По расписанию», как показано на скриншоте ниже.

Если вы хотите, чтобы задача выполнялась ежедневно или раз в несколько дней, выберете «Ежедневно» и введите соответствующую цифру в поле «Повторять каждые». Также не забудьте установить время и дату начала.

Также вы можете выбрать опцию «Еженедельно», если хотите, чтобы задача запускалась в определенный день каждую неделю. Просто выберете нужный день и при необходимости введите цифру в поле «Повторять каждую». Я рекомендую выполнять задачу один раз в неделю и не рекомендую использовать триггеры «Однократно» или «Ежемесячно».

Когда закончите с настройкой расписания, убедитесь, что у вас активирована опция «Включено» в разделе «Дополнительные параметры». Остальные параметры можете не трогать.

Еще раз проверьте расписание, и если вы уверены, что все в порядке, нажмите «OK».
Настройка действия
Когда вы перейдете на вкладку «Действия», вы увидите действие по умолчанию. Вы можете оставить значение нетронутым, так что смело переходите к следующему шагу.

Настраиваем условия для запланированной проверки на вирусы
Вкладка «Условия» позволяет задать условия, при которых задача будет выполняться только тогда, когда этого хотите вы.
Если вы беспокоитесь, что выполнение задачи будет мешать вашей работе на компьютере, выберете опцию «Запускать задачу при простое компьютера» и укажите период времени.

Если вы используете портативное устройство, рекомендую вам выбрать условия «Запускать только при питании от электросети» и «Останавливать при переходе на питание от батареи».
Если вы хотите, чтобы задача выполнялась даже если компьютер в это время находится в спящем режиме, выберете условие «Пробуждать компьютер для выполнения этой задачи».
Параметры запланированной проверки на вирусы
На вкладке «Параметры» я рекомендую вам оставить включенной опцию «Немедленно запускать задачу, если пропущен плановый запуск». Это гарантирует, что проверка будет выполнена, например, если компьютер был выключен во время запланированного запуска. Кроме этого, убедитесь, что в выпадающем списке в нижней части окна выбрана опция «Не запускать новый экземпляр». Так компьютер не запустит сразу две проверки. Для оставшейся части этих параметров можно оставить значения по умолчанию.

Далее нажмите «OK», чтобы сохранить все внесенные настройки. В основном окне «Планировщика заданий» проверьте наличие вашего триггера и время следующего запуска. Если информацию присутствует, значит проверка будет выполняться.
На этом все. Если вы сделали все правильно, встроенный в Windows 8 антивирус будет выполнять плановые проверки. К сожалению, все это нельзя сделать непосредственно в интерфейсе Windows Defender, но будем надеется, что в будущем Microsoft исправит это недоразумение.
Источник
Содержание
- Настройка запланированного быстрого или полного сканирования антивирусной программы в Microsoft Defender
- Что нужно сделать
- Имейте в виду следующие точки
- Быстрое сканирование, полное сканирование и настраиваемая проверка
- Как узнать, какой тип сканирования выбрать?
- Что еще нужно знать о быстром и полном сканировании?
- Configure scheduled quick or full Microsoft Defender Antivirus scans
- What do you want to do?
- Keep the following points in mind
- Quick scan, full scan, and custom scan
- How do I know which scan type to choose?
- What else do I need to know about quick and full scans?
- Configure Microsoft Defender Antivirus scanning options
- Use Microsoft Intune to configure scanning options
- Use Microsoft Endpoint Manager to configure scanning options
- Use Group Policy to configure scanning options
- Settings and locations
- Use PowerShell to configure scanning options
- Use WMI to configure scanning options
- Email scanning limitations
- Scanning mapped network drives
- Schedule Scan in Windows Defender in Windows 10
- Author: Sergey Tkachenko
- 2 thoughts on “Schedule Scan in Windows Defender in Windows 10”
- How to Schedule Windows Defender to Perform Full Scan on a Windows PC
- Schedule Windows Defender
- Never Miss Out
- 3 comments
Настройка запланированного быстрого или полного сканирования антивирусной программы в Microsoft Defender
Область применения:
Помимо постоянной, защиты в режиме реального времени и проверки антивирусов по запросу можно настроить регулярные регулярные проверки антивирусов. Вы можете настроить тип сканирования, когда должно произойти сканирование, и если сканирование должно происходить после обновления защиты или когда конечная точка не используется. Вы также можете настроить специальные проверки для выполнения действий по исправлению, если это необходимо.
Что нужно сделать
Имейте в виду следующие точки
По умолчанию антивирусная программа в Microsoft Defender для обновления за 15 минут до времени запланированного сканирования. Для переопределения этого по умолчанию можно управлять расписанием загрузки обновлений защиты.
Если устройство отключено и работает на батарее во время запланированного полного сканирования, запланированное сканирование остановится с событием 1002, в котором говорится, что проверка остановлена до завершения. антивирусная программа в Microsoft Defender будет выполнить полное сканирование в следующее запланированное время.
Быстрое сканирование, полное сканирование и настраиваемая проверка
При настройках запланированных сканов можно указать, должно ли сканирование быть полным или быстрым. В большинстве случаев рекомендуется быстрое сканирование.
| Быстрое сканирование | Полное сканирование | Настраиваемая проверка |
|---|---|---|
| (Рекомендуется) Быстрое сканирование позволяет просмотреть все расположения, в которых может быть зарегистрировано вредоносное ПО, например ключи реестра и известные папки Windows запуска.
В сочетании с постоянной защитой в режиме реального времени, которая проверяет файлы при их открытиях и закрытии, а также при переходе пользователя в папку, быстрое сканирование помогает обеспечить надувную защиту от вредоносных программ, которые начинаются с системной и вредоносной программы на уровне ядра. В большинстве случаев достаточно быстрой проверки, что является рекомендуемой возможностью для запланированных сканирований. |
Полное сканирование начинается с быстрого сканирования, а затем продолжается последовательной проверкой файлов всех установленных фиксированных дисков и съемных/сетевых дисков (если для этого настроено полное сканирование).
Полное сканирование может занять несколько часов или дней в зависимости от количества и типа данных, которые необходимо отсканировать. По завершению полного сканирования будет доступна новая разведка безопасности, и затем необходимо выполнить новое сканирование, чтобы убедиться, что с помощью новой разведки безопасности другие угрозы не будут обнаружены. Из-за времени и ресурсов, участвующих в полной проверке, в общем, Корпорация Майкрософт не рекомендует планирование полного сканирования. |
Настраиваемая проверка — это быстрое сканирование, которое выполняется на файлах и папках, которые вы указываете. Например, вы можете выбрать для сканирования USB-накопителя или определенной папки на локальном диске устройства. |
По умолчанию быстрые проверки запускаются на установленных съемных устройствах, например USB-накопителях.
Как узнать, какой тип сканирования выбрать?
Чтобы выбрать тип сканирования, используйте следующую таблицу.
| Сценарий | Рекомендуемый тип сканирования |
|---|---|
| Необходимо настроить регулярные запланированные проверки | Быстрое сканирование
Быстрое сканирование проверяет процессы, память, профили и определенные расположения на устройстве. В сочетании с постоянной защитойв режиме реального времени быстрое сканирование позволяет обеспечить широкое освещение вредоносных программ, которые начинаются с вредоносных программ на уровне системы и на уровне ядра. Защита в режиме реального времени проверяет файлы, когда они открываются и закрываются, а также при переходе пользователя в папку. |
| Угрозы, такие как вредоносные программы, обнаруживаются на отдельном устройстве | Быстрое сканирование
В большинстве случаев быстрое сканирование будет ловить и очищать обнаруженные вредоносные программы. |
| Необходимо выполнить проверку по запросу | Быстрое сканирование |
| Необходимо убедиться, что портативное устройство, например USB-накопитель, не содержит вредоносных программ | Настраиваемая проверка
Настраиваемая проверка позволяет выбирать определенные расположения, папки или файлы и выполняет быстрое сканирование. |
Что еще нужно знать о быстром и полном сканировании?
Вредоносные файлы можно хранить в местах, не включенных в быстрое сканирование. Однако защита всегда в режиме реального времени проверяет все открытые и закрытые файлы, а также все файлы, которые находятся в папках, к ним имеет доступ пользователь. Сочетание защиты в режиме реального времени и быстрого сканирования помогает обеспечить надувную защиту от вредоносных программ.
Защита от доступа с облачной защитой обеспечивает проверку всех файлов, доступных в системе, с помощью новейших моделей аналитики безопасности и облачного машинного обучения.
Если защита в режиме реального времени обнаруживает вредоносные программы и размер затронутых файлов не определяется изначально, антивирусная программа в Microsoft Defender в рамках процесса восстановления начинается полное сканирование.
Полное сканирование может обнаруживать вредоносные файлы, которые не были обнаружены другими сканами, например быстрым сканированием. Однако полное сканирование может занять некоторое время и использовать ценные системные ресурсы для завершения.
Если устройство находится в автономном режиме в течение длительного периода времени, полное сканирование может занять больше времени.
Источник
Configure scheduled quick or full Microsoft Defender Antivirus scans
Applies to:
In addition to always-on, real-time protection and on-demand antivirus scans, you can set up regular, scheduled antivirus scans. You can configure the type of scan, when the scan should occur, and if the scan should occur after a protection update or when an endpoint is not being used. You can also set up special scans to complete remediation actions if needed.
What do you want to do?
Keep the following points in mind
By default, Microsoft Defender Antivirus checks for an update 15 minutes before the time of any scheduled scans. You can Manage the schedule for when protection updates should be downloaded and applied to override this default.
If a device is unplugged and running on battery during a scheduled full scan, the scheduled scan will stop with event 1002, which states that the scan stopped before completion. Microsoft Defender Antivirus will run a full scan at the next scheduled time.
Quick scan, full scan, and custom scan
When you set up scheduled scans, you can specify whether the scan should be a full or quick scan. In most cases, a quick scan is recommended.
| Quick scan | Full scan | Custom scan |
|---|---|---|
| (Recommended) A quick scan looks at all the locations where there could be malware registered to start with the system, such as registry keys and known Windows startup folders.
Combined with always-on, real-time protection, which reviews files when they are opened and closed, and whenever a user navigates to a folder, a quick scan helps provide strong protection against malware that starts with the system and kernel-level malware. In most cases, a quick scan is sufficient and is the recommended option for scheduled scans. |
A full scan starts by running a quick scan and then continues with a sequential file scan of all mounted fixed disks and removable/network drives (if the full scan is configured to do so).
A full scan can take a few hours or days to complete, depending on the amount and type of data that needs to be scanned. When the full scan is complete, new security intelligence is available, and a new scan is then required to make sure that no other threats are detected with the new security intelligence. Because of the time and resources involved in a full scan, in general, Microsoft does not recommend scheduling full scans. |
A custom scan is a quick scan that runs on the files and folders you specify. For example, you can opt to scan a USB drive, or a specific folder on your device’s local drive. |
By default, quick scans run on mounted removable devices, such as USB drives.
How do I know which scan type to choose?
Use the following table to choose a scan type.
| Scenario | Recommended scan type |
|---|---|
| You want to set up regular, scheduled scans | Quick scan
A quick scan checks the processes, memory, profiles, and certain locations on the device. Combined with always-on real-time protection, a quick scan helps provide strong coverage both for malware that starts with the system and kernel-level malware. Real-time protection reviews files when they are opened and closed, and whenever a user navigates to a folder. |
| Threats, such as malware, are detected on an individual device | Quick scan
In most cases, a quick scan will catch and clean up detected malware. |
| You want to run an on-demand scan | Quick scan |
| You want to make sure a portable device, such as a USB drive, does not contain malware | Custom scan
A custom scan enables you to select specific locations, folders, or files, and runs a quick scan. |
What else do I need to know about quick and full scans?
Malicious files can be stored in locations that are not included in a quick scan. However, always-on real-time protection reviews all files that are opened and closed, and any files that are in folders that are accessed by a user. The combination of real-time protection and a quick scan helps provide strong protection against malware.
On-access protection with cloud-delivered protection helps ensure that all the files accessed on the system are being scanned with the latest security intelligence and cloud machine learning models.
When real-time protection detects malware and the extent of the affected files is not determined initially, Microsoft Defender Antivirus initiates a full scan as part of the remediation process.
A full scan can detect malicious files that were not detected by other scans, such as a quick scan. However, a full scan can take a while and use valuable system resources to complete.
If a device is offline for an extended period of time, a full scan can take longer to complete.
Источник
Configure Microsoft Defender Antivirus scanning options
Applies to:
Use Microsoft Intune to configure scanning options
Use Microsoft Endpoint Manager to configure scanning options
For details on configuring Microsoft Endpoint Manager (current branch), see How to create and deploy antimalware policies: Scan settings.
Use Group Policy to configure scanning options
On your Group Policy management computer, open the Group Policy Management Console.
Right-click the Group Policy Object you want to configure, and then select Edit.
In the Group Policy Management Editor go to Computer configuration and click Administrative templates.
Expand the tree to Windows components > Microsoft Defender Antivirus, and then select a location (refer to Settings and locations in this article).
Edit the policy object.
Click OK, and repeat for any other settings.
Settings and locations
| Policy item and location | Default setting (if not configured) | PowerShell Set-MpPreference parameter or WMI property for MSFT_MpPreference class |
|---|---|---|
| Email scanning |
Scan > Turn on e-mail scanning
See Email scanning limitations (in this article) Disabled -DisableEmailScanning Scan reparse points
Scan > Turn on reparse point scanning Disabled Not available
See Reparse points Scan mapped network drives
Scan > Scan archive files Enabled -DisableArchiveScanning
The extensions exclusion list will take precedence over this setting. Scan files on the network
Scan > Scan network files Disabled -DisableScanningNetworkFiles Scan packed executables
Scan > Scan packed executables Enabled Not available Scan removable drives during full scans only
Scan > Scan removable drives Disabled -DisableRemovableDriveScanning Specify the level of subfolders within an archive folder to scan
Scan > Specify the maximum depth to scan archive files Not available Specify the maximum CPU load (as a percentage) during a scan.
Scan > Specify the maximum percentage of CPU utilization during a scan 50 -ScanAvgCPULoadFactor
NOTE: The maximum CPU load is not a hard limit, but is guidance for the scanning engine to not exceed the maximum on average. Manually run scans will ignore this setting and run without any CPU limits. Specify the maximum size (in kilobytes) of archive files that should be scanned.
Scan > Specify the maximum size of archive files to be scanned No limit Not available
The default value of 0 applies no limit Configure low CPU priority for scheduled scans
Scan > Configure low CPU priority for scheduled scans Disabled Not available
If real-time protection is turned on, files are scanned before they are accessed and executed. The scanning scope includes all files, including files on mounted removable media, such as USB drives. If the device performing the scan has real-time protection or on-access protection turned on, the scan will also include network shares.
Use PowerShell to configure scanning options
For more information on how to use PowerShell with Microsoft Defender Antivirus, see
Use WMI to configure scanning options
Email scanning limitations
Email scanning enables scanning of email files used by Outlook and other mail clients during on-demand and scheduled scans. Embedded objects within email (such as attachments and archived files) are also scanned. The following file format types can be scanned and remediated:
PST files used by Outlook 2003 or older (where the archive type is set to non-unicode) are also scanned, but Microsoft Defender Antivirus cannot remediate threats that are detected inside PST files.
If Microsoft Defender Antivirus detects a threat inside an email message, it will show you the following information to assist you in identifying the compromised email, so you can remediate the threat manually:
Scanning mapped network drives
On any OS, only the network drives that are mapped at system level, are scanned. User-level mapped network drives aren’t scanned. User-level mapped network drives are those that a user maps in their session manually and using their own credentials.
Источник
Schedule Scan in Windows Defender in Windows 10
Windows Defender is the built-in security solution in Windows 10. It provides basic protection against threats. Earlier versions of Windows like Windows 8.1, Windows 8, Windows 7 and Vista also had it but it was less efficient previously as it only scanned spyware and adware. In Windows 8 and Windows 10, Defender is based on the Microsoft Security Essentials app which offers better protection by adding full blown protection against all kinds of malware. Today, we will see how to schedule a scan in Windows Defender Antivirus in Windows 10.
Don’t be confused between Windows Defender and its related user interfaces such as Windows Defender Security Center. Windows Defender remains the built-in anti-virus software which provides real-time protection against threats based on malware definition files/signatures.
Whereas Windows Defender Security Center app is only a dashboard which allows you to track the protection state of several other Windows security technologies. It can be used to configure various security options like SmartScreen. Defender Security Center is what opens now when you click its icon in the system tray.
To schedule a new scan in Windows Defender in Windows 10, do the following.
Alternatively, you can create a custom scheduled task with a custom schedule.
Use one of following commands:
This will start Windows Defender in console mode.
To see the GUI during the scan, use the command:
Refer to the following article for details:
Winaero greatly relies on your support. You can help the site keep bringing you interesting and useful content and software by using these options:
If you like this article, please share it using the buttons below. It won’t take a lot from you, but it will help us grow. Thanks for your support!
Sergey Tkachenko is a software developer from Russia who started Winaero back in 2011. On this blog, Sergey is writing about everything connected to Microsoft, Windows and popular software. Follow him on Telegram, Twitter, and YouTube. View all posts by Sergey Tkachenko
2 thoughts on “Schedule Scan in Windows Defender in Windows 10”
Источник
How to Schedule Windows Defender to Perform Full Scan on a Windows PC

Starting with Windows 8, Microsoft introduced Windows Defender as a standalone antivirus module. Though it is not the best for an antivirus software, it does the job by providing basic protection against all the well-known threats using its real-time protection. And if you know what you are doing on your PC, Windows Defender is a good low profile antivirus software.
For those who are not aware, the only thing that is missing in Windows Defender is that there is no way you can schedule antivirus scans. Despite lacking the scheduled scan feature, Windows Defender displays a big red warning message letting you know that you forgot to scan your system last week.
So, if you want, here is how you can schedule Windows Defender to perform a full or quick scan on your Windows 8 PC.
Schedule Windows Defender
Since Windows Defender doesn’t provide any built-in option to schedule the scans, we are going to use the good old Task Scheduler. First off, search for the Task Scheduler in the start menu/screen and open it.

In Task Scheduler, click on the link “Create Basic Task” on the left pane to start creating a new scheduled task.

The above action will open the Basic Task Creation Wizard. Here, enter a meaningful name and description and click on the “Next” button to continue. The name and description you entered here will help you in easily finding the task in the future.

Now select the radio button “Weekly” to set the scan to run weekly and click on the “Next” button. If you want, you can select the other options like Daily or Monthly.

Select the date, time, and the recurring week. Make sure that the “Recur every” is set to “1” so that the task will recur every week.

In this window select the radio button “Start a program” and click on the “Next” button.


The above action will take you to the Summary window. Check all the configurations you just made, select the checkbox “Open the Properties dialog for this task when I click Finish” and click on the “Finish” button to complete the setup process.

Once the Properties window has been opened, navigate to the Conditions tab and deselect the checkbox “Stop if the computer switches to battery power” and click on the “Ok” button to save the changes. If you don’t want to stop the task when you switch to the battery power, then leave the default option as it is.
Moreover, if you want to run the task at the highest privileges, make sure that you have selected the checkbox “Run with highest privileges” in the General tab.

Once you are done with everything, you can see your scheduled task in the main window.

That’s all there is to do, and it is that simple to schedule Windows Defender to scan your computer weekly.
Hopefully that helps, and do comment below sharing your thoughts and experiences about using the above method to schedule Windows Defender.
Never Miss Out
Receive updates of our latest tutorials.
Vamsi is a tech and WordPress geek who enjoys writing how-to guides and messing with his computer and software in general. When not writing for MTE, he writes for he shares tips, tricks, and lifehacks on his own blog Stugon.
Definition Update does not seem to happen all the time and had to update it manually. How about scheduling the Windows Defender update? Is this possible
Navigate to the directory and run MpCmd.exe /? for help
The option for for updates:
-SignatureUpdate Checks for new definition updates
Usage and all options listed below:
C:Program FilesWindows Defender>MpCmdRun.exe /?
Windows Defender Command Line Utility (c)2006-2008 Microsoft Corp
Use this tool to automate and troubleshoot Windows Defender
Usage:
MpCmdRun.exe [command] [-options]
Support information will be in the following directory:
C:ProgramDataMicrosoftWindows DefenderSupport
-Scan [-ScanType]
0 Default, according to your configuration
1 Quick scan
2 Full system scan
-Trace [-Grouping value] [-Level value]
Begins tracing Windows Defender’s actions.
You can specify the components for which tracing is enabled and
how much information is recorded.
If no component is specified, all the components will be logged.
If no level is specified, the Error, Warning and Informational levels
will be logged. The data will be stored in the support directory
as a file having the current timestamp in its name and bearing
the extension BIN.
[-Grouping]
0x1 Service
0x2 Malware Protection Engine
0x4 User Interface
0x8 Real-Time Protection
0x10 Scheduled actions
[-Level]
0x1 Errors
0x2 Warnings
0x4 Informational messages
0x8 Function calls
0x10 Verbose
-GetFiles
Gathers the following log files and packages them together in a
compressed file in the support directory
– Any trace files from Windows Defender
– The Windows Update history log
– All WinDefend or WinDefendRtp events from the
System and Application event log
– All relevant Windows Defender registry locations
– The log file of this tool
– The log file of the signature update helper tool
-RemoveDefinitions
Restores the last set of signature definitions
[-All]
Removes any installed signature and engine files.Use this
option if you have difficulties trying to update signatures.
-RestoreDefaults
Resets all configuration options to their default values; this is the
equivalent of running Windows Defender setup
unattended.
Thanks! Works great! Why is history disabled?
Источник
Содержание
- Процесс Antimalware Service Executable
- Способ 1: Изменение настроек в Планировщике заданий
- Способ 2: Внесение папки с файлами антивируса в исключения
- Способ 3: Отключение Windows Defender
- Способ 4: Смена антивируса
- Способ 5: Проверка сторонним ПО
- Вопросы и ответы

Системные процессы обеспечивают функционирование как глубинных, так и поверхностных возможностей системы. Ярким образцом из таких является Antimalware Service Executable, являющийся компонентом встроенного антивируса ОС Виндовс. В статье мы рассмотрим, как прекратить непомерную нагрузку данного процесса ЦПУ.
Antimalware Service Executable – это часть фирменного антивирусного ПО от Microsoft, важный элемент «Windows Defender» или же «Защитника Windows». Этот компонент отвечает за сканирование компьютера и в штатном режиме не вызывает нагрузки, но сбой или некорректно выставленные настройки могут стать причиной того, что сканирование будет запускаться вновь и вновь, постоянно используя процессор. Чтобы это исправить, следует изменить настройки и/или внести файлы системного антивируса в исключения. Как радикальные варианты можно рассмотреть отключение Windows Defender и замену стандартного ПО на стороннее, а также неплохо будет проверить компьютер отдельными лечащими и восстанавливающими утилитами.
Способ 1: Изменение настроек в Планировщике заданий
Для начала стоит подкорректировать настройки самого сканирования, чтобы сами адекватные параметры процесса не давали ему «хулиганить». К сожалению, они скрыты и находятся не в самом Windows Defender, а глубже, в системном приложении «Планировщик заданий». Чтобы его открыть и отладить, руководствуйтесь таким алгоритмом:
- Через поиск панели «Пуск» найдите «Планировщик заданий» и откройте его. Предпочтительнее «Запустить от имени администратора» для бесконфликтной работы приложения.
- Поочередно раскройте папки «Microsoft» и «Windows», после чего прокрутите ползунок до папки «Windows Defender».
- Кликните по папке «Windows Defender», после чего выделите файл «Windows Defender Scheduled Scan», а затем в области действий «Выбранный элемент» нажмите на «Свойства».
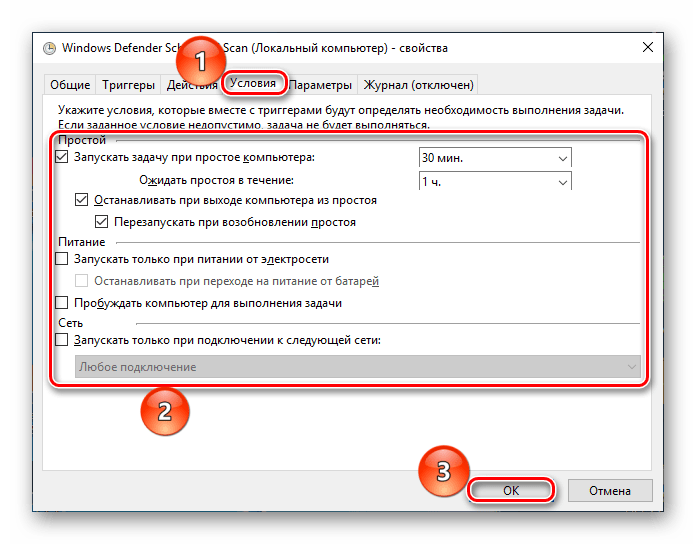
- Перейдите на вкладку «Условия» и настройте время сканирования так, как считаете нужным для личного комфорта. Система может активировать процесс во время простоя, который задаёте вы. Но также возможно и вовсе снять отовсюду галочки, что фактически отключает периодический мониторинг, переведя его в ручной режим. После изменения параметров нажмите «ОК».
Читайте также:
Запуск «Планировщика заданий» в ОС Windows 10
«Планировщик заданий» в Windows 7
Таким образом вы сможете ограничить время, когда процесс сканирования сможет занимать ресурсы компьютера, однако не убрать его полностью, чтобы не затрагивать функциональность Защитника.
Способ 2: Внесение папки с файлами антивируса в исключения
Одной причин из тех, что вызывает бесконечное сканирование, может быть затрагивание файлов самого антивируса им же. То ли это реакция на несанкционированное вторжение, то ли случайная реактивация. Для того чтобы прекратить рекурсию работы Защитника, следует поступить так:
Шаг 1: Поиск папки
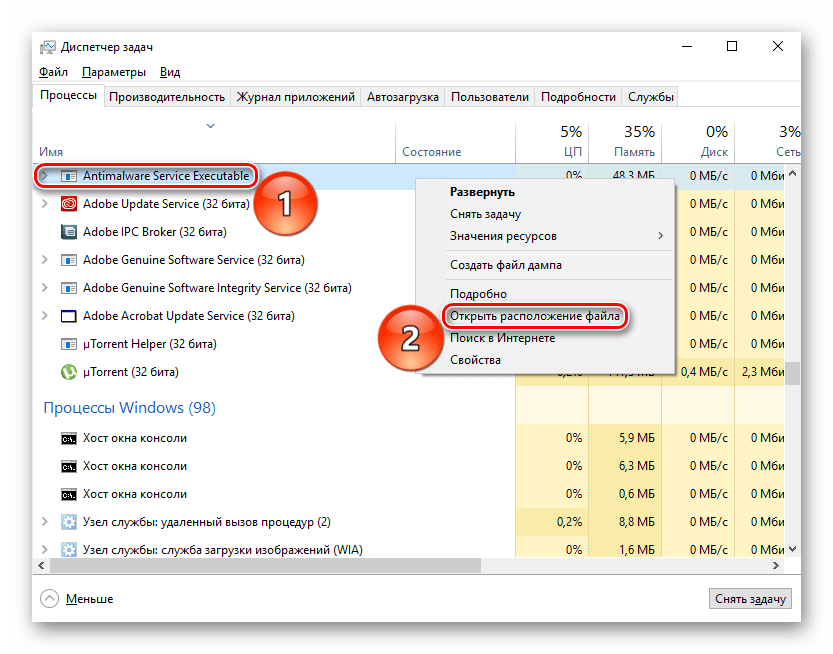
- Откройте «Диспетчер задач» любым удобным способом, например, нажав комбинацию клавиш «Ctrl + Alt + Esc».
- Найдите упоминаемый ресурсоёмкий процесс, щёлкните по нему правой кнопкой мыши, а затем из выпавшего списка контекстного меню выберите «Открыть расположение файла».
- Зафиксируйте где-нибудь путь к открывшейся папке системных файлов Защитника — именно её понадобится добавить в перечень исключений.
Читайте также: Методы запуска «Диспетчера задач» в Windows 10

Скорее всего, папка будет скрыта, так что вам придётся вначале сделать её видимой, перед выполнением следующего этапа.
Подробнее: Отображение скрытых папок в Windows 10

Шаг 2: Добавление исключения
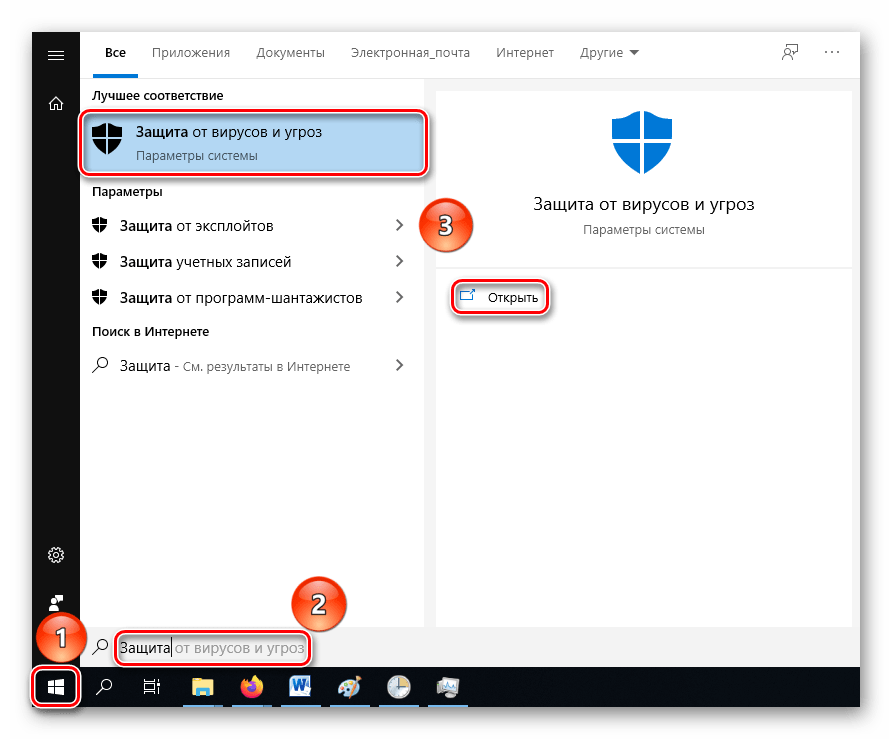
- Кликните по кнопке «Пуск» и с помощью поиска найдите параметры системы «Защита от вирусов и угроз», после чего откройте их, щёлкнув по соответствующему значку или по «Открыть».
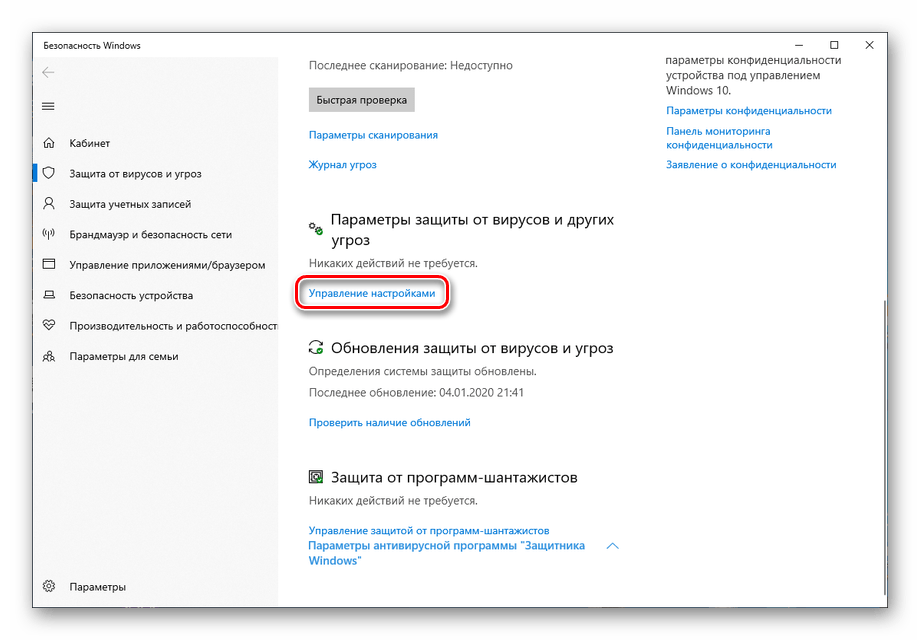
- Перейдите в «Управление настройками».
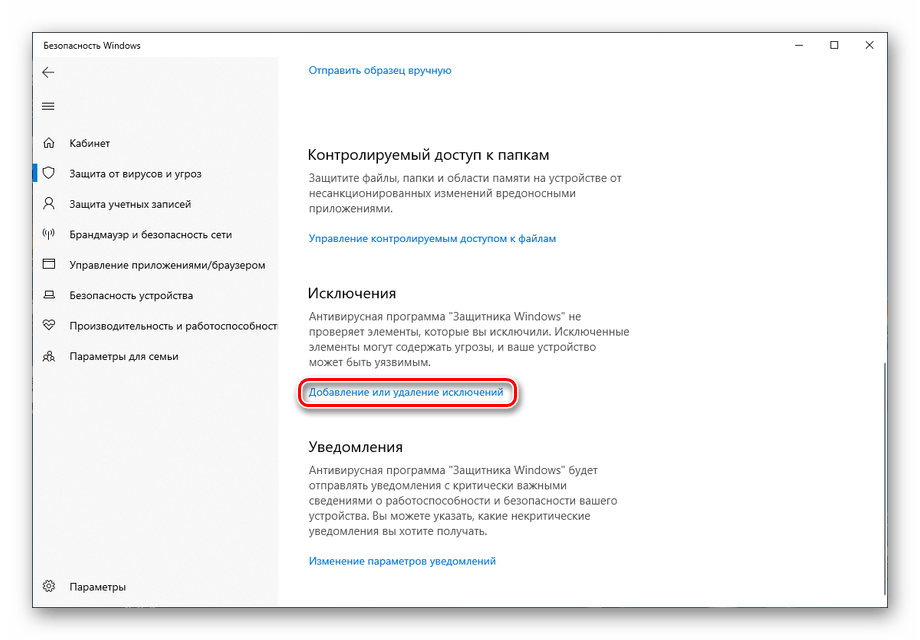
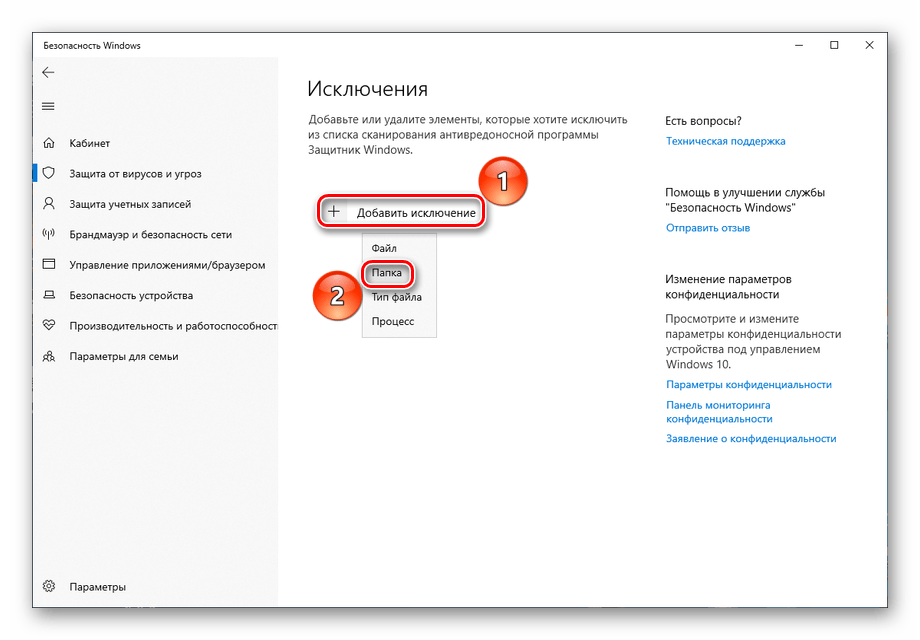
- Нажмите на «Добавление или удаление исключений».
- Последовательно нажмите на «Добавить исключение», а затем на «Папка» и укажите путь к файлам Windows Defender, найденным ранее.
Этот метод эффективен, когда Защитник некорректно проверяет сам себя, однако такой сбой не очень распространён. И не стоит забывать, что чаще всего папка системного антивируса скрыта.
Способ 3: Отключение Windows Defender
Первым радикальным вариантом из рассматриваемых следует рассмотреть отключение Защитника. Имейте в виду, он опасен тем, что после его осуществления ваш ПК останется беззащитным от вирусов, но он будет действенным, если вышеописанные не помогли. Для деактивации системного антивируса нужно отключить его защиту в реальном времени и внести изменение в реестр.
Подробнее: Как удалить Защитник Windows
Способ 4: Смена антивируса
Как альтернатива предыдущему способу (или его логичное продолжение) рассмотрим замену стандартного Windows Defender на сторонний антивирус. Когда вы установите другое защитное ПО на компьютер, Защитник автоматически передаст ему функции обеспечения безопасности и сканирования системы. Произойдёт автоматическая измена параметров, и процесс «Antimalware Service Executable» больше не будет вас беспокоить. Можем порекомендовать бесплатные антивирусы от компаний Avast и Kaspersky.
Подробнее: Сравнение антивирусов Avast Free Antivirus и Kaspersky Free
Способ 5: Проверка сторонним ПО
Не будет лишним произвести проверку с помощью сторонних лечащих утилит, чтобы убедиться в том, что сам антивирус не стал жертвой заражения и/или пропустил вредоносный файл. Хорошо себя показывает утилита от Dr.Web, а также инструмент от Касперского.
Подробнее: Борьба с компьютерными вирусами
После этого рекомендуется задействовать CCleaner для проверки и исправления реестра.
Подробнее: Чистка реестра с помощью CCleaner
Неплохо будет запустить системную проверку и восстановление с помощью консольного инструмента «DISM».
Подробнее: Использование и восстановление проверки целостности системных файлов в Windows 10
Используя один или несколько рассмотренных в статье способов калибровки, ограничения или радикальной деактивации Windows Defender, а также проверки компьютера сторонним средством, вы сможете избавиться от излишней нагрузки на CPU, создаваемой процессом Antimalware Service Executable.
Windows Defender Antivirus is the security solution available on every installation of Windows 10 to protect your device and files from unwanted viruses, spyware, ransomware, and other types of malware and online threats.
The antimalware offers real-time protection functionality to detect and remove malware proactively, and you even get the option to start a scan manually. You can also schedule a Windows Defender Antivirus scan at your preferred day of the month and time to create an extra layer of security. However, it’s not an option that you can enable through the Windows Security app. Instead, it’s something that you have to configure manually using the Task Scheduler.
In this Windows 10 guide, we’ll walk you through the steps to schedule a manual scan of Windows Defender Antivirus on your computer.
- How to schedule a Windows Defender Antivirus scan using Task Scheduler
- How to schedule a Windows Defender Antivirus custom scan using Task Scheduler
How to schedule a Windows Defender Antivirus scan using Task Scheduler
To schedule a Windows Defender Antivirus scan manually on your device, use these steps:
- Open Start.
- Search for Task Scheduler, and click the top result to open the app.
- Browse the following path:
Task Scheduler Library > Microsoft > Windows > Windows Defender - Right-click the «Windows Defender Scheduled Scan» task, and select the Properties option.
- Click the Triggers tab.
- Click the New button.
- Use the «Begin the task» drop-down menu to select one of the many triggers, including «On a schedule,» «At startup,» «On workstation unlock,» and many others. For this guide, select the On a schedule option.
- Select the Weekly option from the left side (or the option that best suits your situation).
- Using the «Start» settings, specify when the task should start running and the time (very important).
- Specify the number of weeks when to recur the task.
- Check the day of the week that you want the scan to take place.
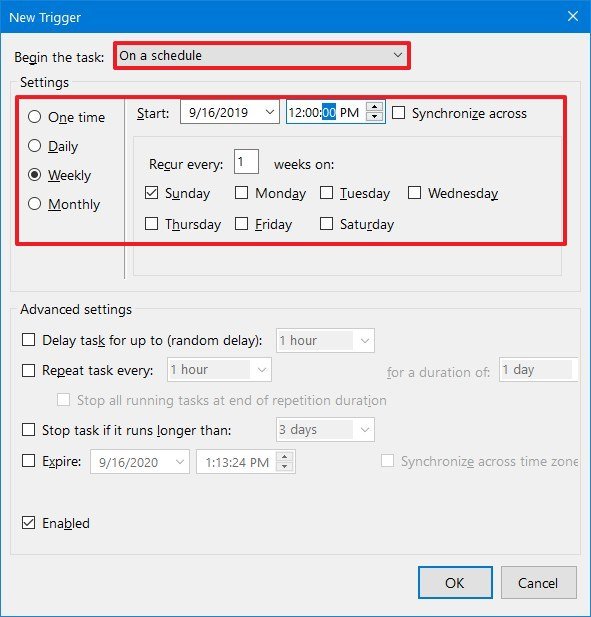
- Click the OK button.
- (Optional) Click the Conditions tab.
- Under the «Power» section, check the Stop if the computer switches to battery power option to prevent affecting the battery life on your laptop.
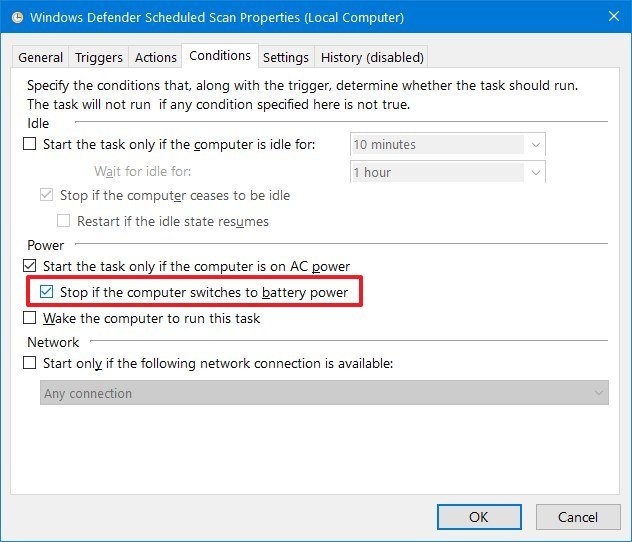
- Click the OK button.
Once you complete the steps, the built-in antivirus will run automatically using the schedule that you specified.
How to schedule a Windows Defender Antivirus custom scan using Task Scheduler
If using the built-in task doesn’t work, or you see the error 0x2, under the «Last Run Result» column, you can set up a custom schedule using a new task.
To create a custom malware scan using Task Scheduler, use these steps:
- Open Start.
- Search for Task Scheduler, click the top result to open the app.
- Right-click the «Task Scheduler Library» branch, and select the New Folder option.
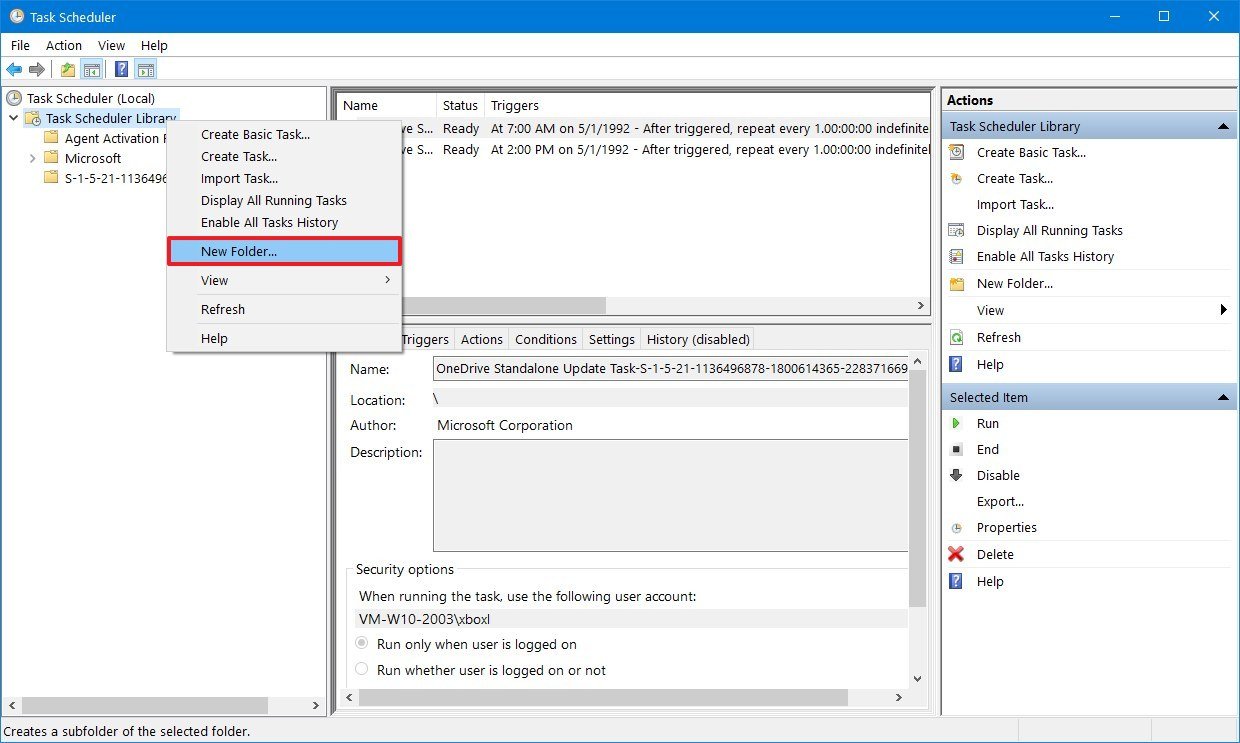
- Type a name for the folder. For example, MyTasks. (This step isn’t a requirement, but it’s a recommended step to keep your tasks separate from the system tasks.)
- Click the OK button.
- Expand the «Task Scheduler Library» branch, and select the MyTasks folder.
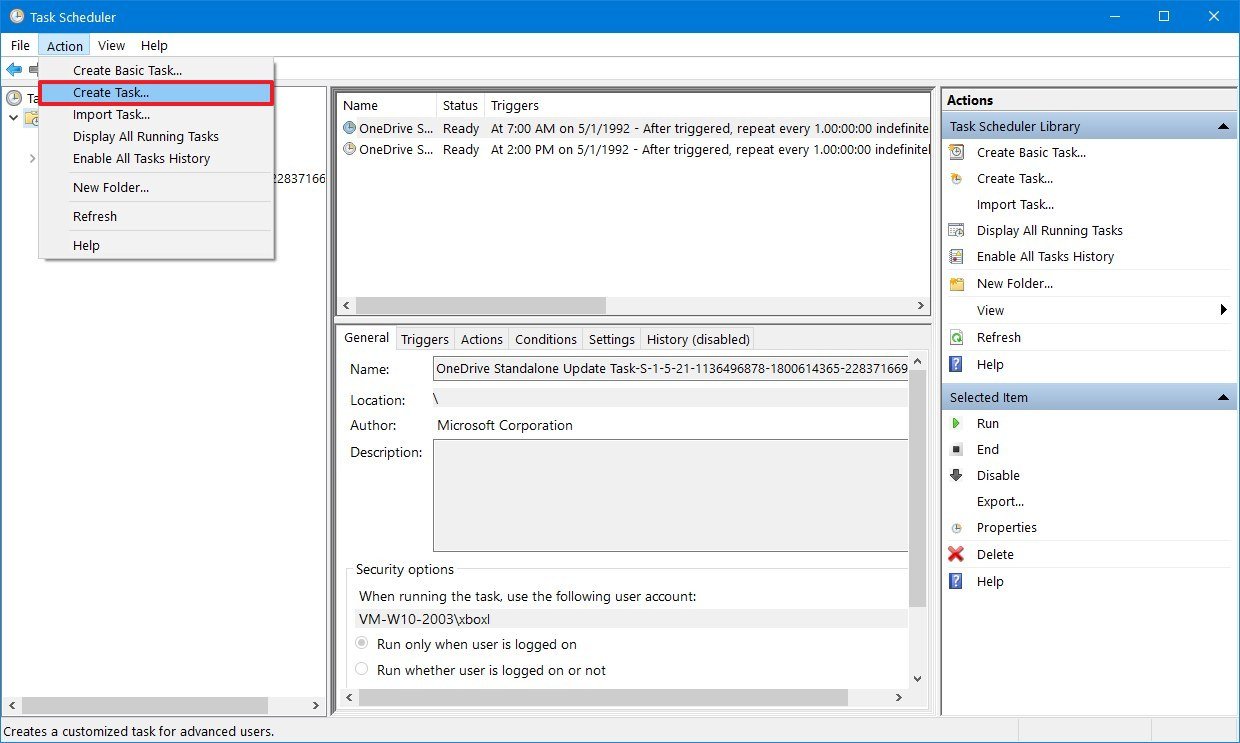
- Click the Action menu.
- Select the Create Task option.
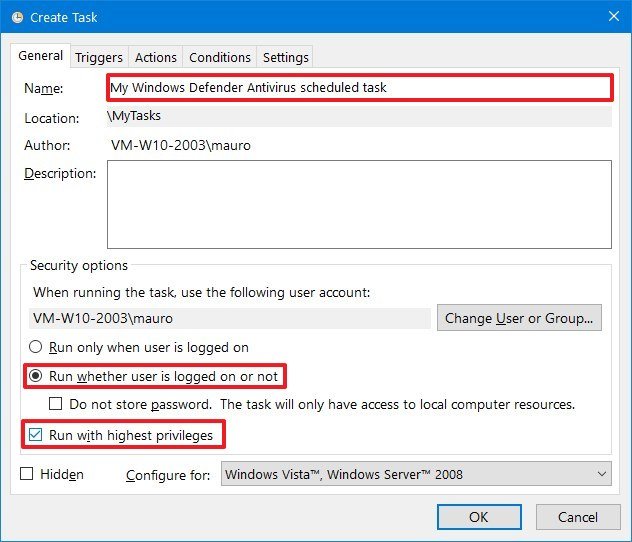
- In the «Name» field, type a descriptive name for the task. For example, My Windows Defender Antivirus scheduled task.
- In the «Security options» section, you can configure which administrator account can run the task.Quick tip: If you’re using an account with administrative privileges, the default user should be fine.
- Check the Run with highest privileges option.
- Click the Triggers tab.
- Click the New button.
- Use the «Begin the task» drop-down menu to select one of the many triggers, including «On a schedule,» «At startup,» «On workstation unlock,» and many others. For this guide, select the On a schedule option.
- Select the Weekly option from the left side (or the option that best suits your situation).
- Using the «Start» settings, specify when the task should start running and the time (very important).
- Specify the number of weeks when to recur the task.
- Check the day of the week that you want the scan to take place.
- (Optional) In the «Advanced settings» section, you can select options to delay, repeat, stop, and expire a task. Also, leave the Enabled option checked.
- Click the OK button.
- Click the Action tab
- Click the New button.
- Use the «Action» drop-down menu and select the Start a program option.
- Under the «Settings» section, in the «Program/script» field, specify the path for the Windows Defender Antivirus program:
"%ProgramFiles%Windows DefenderMpCmdRun.exe"
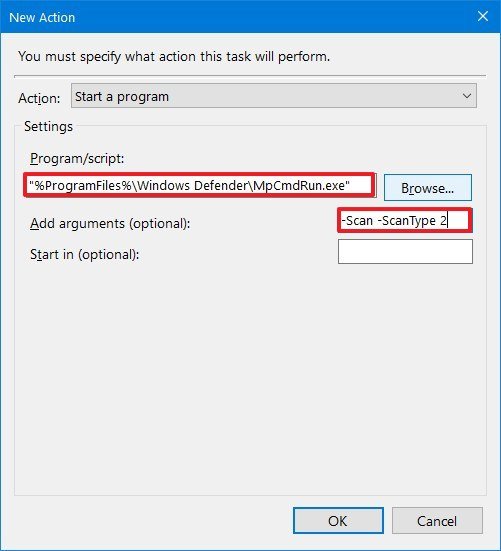
- In the «Add arguments» field, specify the type of scan you want to run:
-Scan -ScanType 2The above argument performs a full malware scan, but you can use the-Scan -ScanType 1argument to specify a quick scan, or you can use the-Scan -ScanType 3 -File PATH/TO/FILE/OR/FOLDERto scan a particular location or file. - Click the OK button.
- (Optional) Click the Conditions tab.
- Under the «Power» section, check the Stop if the computer switches to battery power option to prevent affecting the battery life on your laptop.
- Click the OK button.
After you complete the steps, authenticate with your account credentials, and then the Windows Defender Antivirus will run automatically on schedule.
Get the best of Windows Central in in your inbox, every day!
Mauro Huculak is technical writer for WindowsCentral.com. His primary focus is to write comprehensive how-tos to help users get the most out of Windows 10 and its many related technologies. He has an IT background with professional certifications from Microsoft, Cisco, and CompTIA, and he’s a recognized member of the Microsoft MVP community.