TL;DR
This warning is shown if your app doesn’t have enough reputation with Microsoft SmartScreen yet. In order to gain reputation, you can either
- submit your app for malware analysis to Microsoft,
- buy an «Extended Validation» code signing certificate,
- buy a standard code signing certificate, or
- just wait for a long time.
Read on for the details about these different options.
Option 1: Submit your app for malware analysis to Microsoft
Microsoft allows software developers to submit a file for malware analysis. According to Microsoft, this will help developers to «validate detection of their products». If the review was successful, the Microsoft SmartScreen warnings will go away faster, or sometimes even instantly (it worked instantly for one of my own apps). You need to have a Microsoft account to submit your app for review.
However, note that if you release an updated version of your app, then you’ll also have to request a new review again. To overcome this problem, you’ll either have to use an «Extended Validation» or a standard code signing certificate (see below).
Option 2: Buy an «Extended Validation» code signing certificate
A guaranteed way to immediately and permanently get rid of the Microsoft SmartScreen warnings is to buy an «Extended Validation» (EV) code signing certificate from one of the Microsoft-approved certificate authorities (CA’s), and to sign your app with that EV certificate.
Such an EV certificate will cost you somewhere between 250 and 700 USD per year, and will only be issued to registered businesses. If you’re a single developer, you must be a sole proprietor and have an active business license. You can read more about the formal requirements for EV code signing certificates in the EV Code Signing Certificate Guidelines.
An EV certificate will typically be shipped to you by physical delivery on a hardware token.
Option 3: Buy a standard code signing certificate
You can also buy a cheaper «standard» (i.e. non-EV) code signing certificate, and sign your app with that certificate. This will also permanently, but not instantly, make the Microsoft SmartScreen warnings disappear. Standard code signing certificates will cost you between 100 and 500 USD per year, and can also be issued to private developers without an active business license. Some CA’s also offer discounts for open source projects.
No instant solution
The problem with standard code signing certificates is that they do not instantly silence Microsoft SmartScreen. Instead, some time will be needed for your certificate to build reputation before the warning will go away. However, once your certificate has built enough reputation, all applications signed with that certificate will be permanently trusted by Microsoft SmartScreen and won’t trigger the warning anymore.
How long will it take?
So, how long will it take until the Microsoft SmartScreen warning will disappear when using a standard code signing certificate? Unfortunately, this is difficult to answer, since Microsoft itself refuses to publish any details about this. According to inofficial numbers reported by various sources (see below), it usually takes between 2 and 8 weeks until the warning will permanently go away. It seems that the exact duration also depends on the reputation of the website from which your app is downloaded.
The inofficial numbers are:
18 daysand about430 app installs. Source: one of my own certificates (Dec 2022)42 daysand about1.400 app installs. Source: one of my own certificates (Feb 2021)16 daysand about2.000 app installs. Source: one of my own certificates (May 2020)One monthand more than10.000 downloads. Source: here (Jan 2020)- Between
a few weeksanda month. Source: here (Dec 2019) - About
2-3 weeks. Source: here (Dec 2019) - About
3.000 downloads. Source: here (Dec 2013)
The problem of certificate rollover
Certificate rollover occurs when your old certificate expires and you begin signing your code with a renewed certificate.
It’s a good idea to buy your standard code signing certificate with the longest possible validity period because when you renew your certificate, the reputation will unfortunately not automatically carry over to the renewed certificate (not even if it’s signed against the same private key as the old certificate).
However, you can mitigate the rollover problem by getting your renewed code signing certificate before your old certificate expires, and then using both the old (but not yet expired!) and the renewed certificate to sign your code, resulting in two signatures. The signature from your old certificate will continue to bypass SmartScreen and, at the same time, the new signature will help the new certificate to build up trust. So, the idea is that your new certificate becomes trusted before your old certificate expires.
If your old certificate should already have expired, then you can (and should!) still add the signature from your renewed certificate to an already released version of your app, in order to gain reputation for the renewed certificate.
To correctly dual-sign your app, first sign your code with the old certificate, and then sign it again with the renewed certificate, using the /as command line option of Microsoft’s SignTool to append an additional signature to the first one (instead of replacing it).
Option 4: Just wait for a long time
If you don’t take any measures at all, the Microsoft SmartScreen warning will also go away eventually. This might however take a ridiculous amount of time (months) and / or downloads (tens of thousands). Another big problem is that each time you’ll release an updated version of your app, the waiting period will start all over again. So, this probably isn’t the solution you’re looking for.
Download PC Repair Tool to quickly find & fix Windows errors automatically
In this post, we will show you how to bypass the warning Microsoft Defender SmartScreen prevented an unrecognised app from starting, Running this app might put your PC at risk warning in Windows 11 or Windows 10, when you try to open a file on your computer.
Why has Defender SmartScreen prevented an unrecognized app from starting?
You may see this warning message Microsoft Defender SmartScreen prevented an unrecognized app from starting if the antivirus software does not have the files signatures stored in its data bank. This can happen if a program executable file is new to Windows SmartScreen or if it has not been so commonly downloaded or used.

If you see this screen, the first thing you can do is click on the More info link. A new Run anyway will appear Click on Run anyway and the program will start.
If you continue seeing this screen, you may need to unblock the file.
If you are sure that the file you have downloaded is safe like say our just-released Ultimate Windows Tweaker v5 – then to bypass this warning on your Windows 11 or Windows 10 computer, do the following:
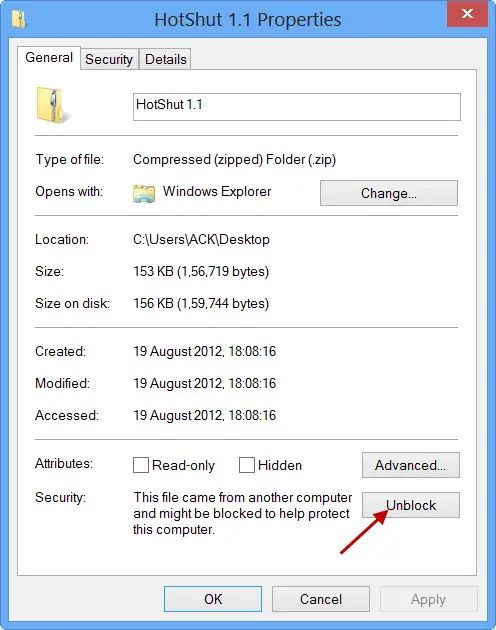
- Right-click on the file
- Select Properties
- Make sure you are in the General tab
- Press the Unblock button.
- Click Apply/OK and exit.
- The file will be unblocked.
But after clicking the Unblock button, you will now be able to access or open the downloaded file.
Similar messages you may see when a file is blocked are:
- This file came from another computer and might be blocked to help protect this computer.
- Windows found that this file is potentially harmful. To help protect your computer, Windows has blocked access to this file.
This post will show you how to add a File or Process Exclusion to Windows Security or Microsoft Defender and this one, how to Disable SmartScreen Filter in Windows 11/10, should you wish to.
Anand Khanse is the Admin of TheWindowsClub.com, a 10-year Microsoft MVP (2006-16) & a Windows Insider MVP (2016-2022). Please read the entire post & the comments first, create a System Restore Point before making any changes to your system & be careful about any 3rd-party offers while installing freeware.
На чтение 2 мин. Просмотров 1.5k. Опубликовано 03.09.2019
Защитник Windows – очень хороший встроенный инструмент безопасности. Однако из-за частых уведомлений и действий иногда это может быть довольно неприятным. Microsoft может сказать, что это для вашего же блага, но это то, что пользователь должен решить. Давайте возьмем SmartScreen Защитника Windows, который работает со сторонними приложениями. Многие пользователи не в восторге от частой превентивной блокировки приложений в Windows 10.
Мы постарались объяснить, почему это так и как отключить SmartScreen по своему усмотрению.
Содержание
- Что делать, если Защитник Windows блокирует нераспознанные приложения
- Что означает эта подсказка
- Как отключить SmartScreen
Что делать, если Защитник Windows блокирует нераспознанные приложения
Что означает эта подсказка
Windows SmartScreen является частью Защитника Windows, который работает с неизвестными (несертифицированными) приложениями. Если стороннее приложение не сертифицировано или известно как вредоносное программное обеспечение, Windows будет препятствовать его установке или запуску. Если вы загрузили стороннее приложение из ненадежного источника, есть вероятность, что оно будет заблокировано.
- ЧИТАЙТЕ ТАКЖЕ: «Эта небезопасная загрузка была заблокирована SmartScreen» [Исправить]
Это первая линия защиты от вредоносного программного обеспечения, и мы не рекомендуем его отключать. По крайней мере, если вы не уверены на 100%, что установленные вами приложения не представляют угрозы для вашей системы. Или есть альтернативный способ найти возможные угрозы.
Разрешение запуска приложения и отклонение приглашения – довольно простая задача. Просто нажмите «Еще» под предупреждением. Затем в любом случае нажмите на Run и все готово. После этого вы сможете запустить приложение. Теперь для некоторых приложений это касается только установочной части. Если вы хотите избежать блокировки во время использования, щелкните правой кнопкой мыши по ярлыку и откройте Свойства. В нижней части вкладки «Общие» установите флажок «Разблокировать».
Как отключить SmartScreen
С другой стороны, если вы устали от методов SmartScreen или у вас есть сторонний инструмент для борьбы с такого рода угрозами, вы можете отключить его навсегда. С момента появления Windows Security Center вы можете легко отключить эту функцию. Мы убедились, что предоставили вам необходимые шаги ниже.
- ЧИТАЙТЕ ТАКЖЕ: Исправлено: «Ваш администратор заблокировал эту программу» в Windows 10, 8.1 и 7
- Откройте Защитник Windows в области уведомлений.
-
Выберите Управление приложениями и браузером .
-
В разделе Проверить приложения и файлы выберите Выкл. .
После этого вы больше не должны видеть подсказки SmartScreen. Обязательно сообщите нам, было ли это полезным прочитать в разделе комментариев ниже.
by Aleksandar Ognjanovic
Aleksandar’s main passion is technology. With a solid writing background, he is determined to bring the bleeding edge to the common user. With a keen eye, he always… read more
Updated on May 19, 2021
- Windows Defender SmartScreen prevented the opening of an unrecognized app is a common warning but after a while it gets annoying.
- The blockage of certain suspicious apps is great, but you can disable such warnings quickly.
- You can do that by changing this option in the App & browser control settings.
- If you’re tired of the built-in antivirus’ warnings and errors, you should get a better solution.
XINSTALL BY CLICKING THE DOWNLOAD FILE
This software will keep your drivers up and running, thus keeping you safe from common computer errors and hardware failure. Check all your drivers now in 3 easy steps:
- Download DriverFix (verified download file).
- Click Start Scan to find all problematic drivers.
- Click Update Drivers to get new versions and avoid system malfunctionings.
- DriverFix has been downloaded by 0 readers this month.
Windows Defender is a very good built-in security tool. However, it can occasionally be quite a bothersome experience due to frequent notifications and actions.
We’re talking especially about the Microsoft Defender SmartScreen prevented an unrecognized app from starting message.
Microsoft can say that’s for your own good, but that’s something a user needs to decide. Let’s take Windows Defender’s SmartScreen which deals with third-party apps.
Lots of users are not thrilled by the frequent preventive blockage of apps in Windows 10. We gave our best to explain why this is the case and how to disable SmartScreen on your own accord.
What can I do when Windows Defender blocks apps?
1. What does this prompt mean
Windows SmartScreen is part of Windows Defender which deals with unknown (uncertified) apps.
If a third-party application is not certified or it’s known as a malicious piece of software, Windows will prevent it from installing or executing.
When you download a third-party application from an untrusted source, chances are that it will get blocked.
This is the first line of defense against malicious software, and we wouldn’t recommend disabling it.
At least, if you’re not 100% sure that the applications you install are not a threat to your system. Or have an alternative way to locate possible threats.
Allowing the app to run and dismissing the prompt is a rather simple task. Just click More below the warning. Then click on the Run anyway option and you’re good to go.
After that, you should be able to run the application. Now, for some applications, this stands only for the installation part.
If you want to avoid blocking during the usage, right-click on the shortcut and open Properties. Under the General tab, at the bottom, check the Unblock box.
2. How to disable SmartScreen
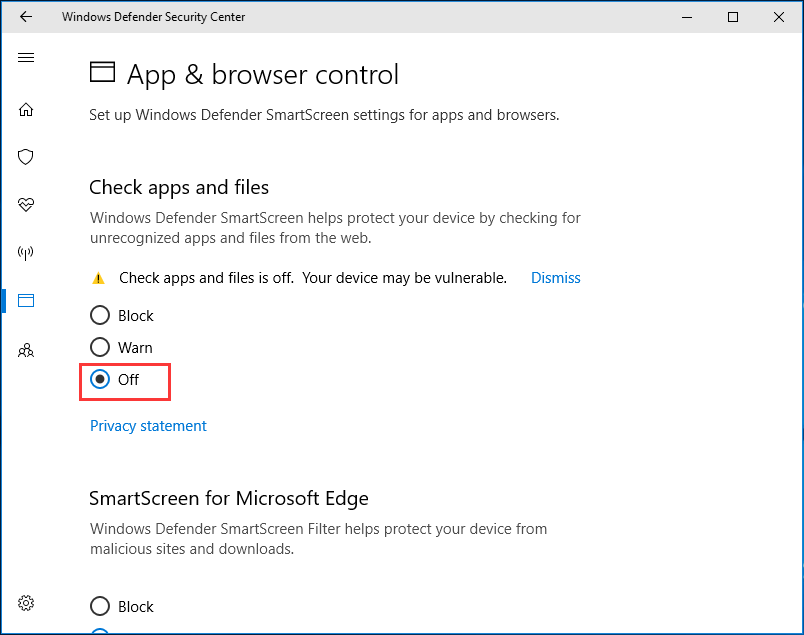
- Open Windows Defender from the notification area.
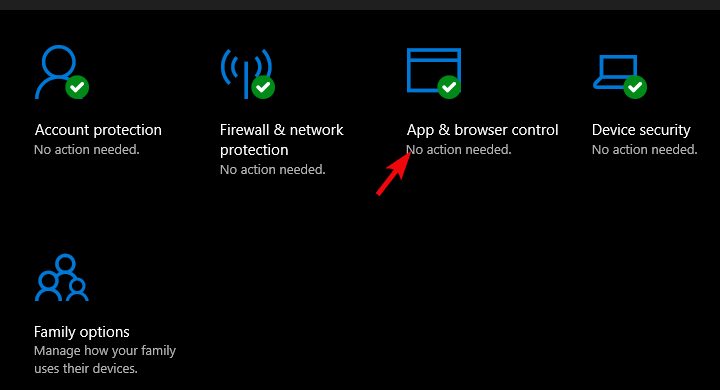
- Select App & browser control.
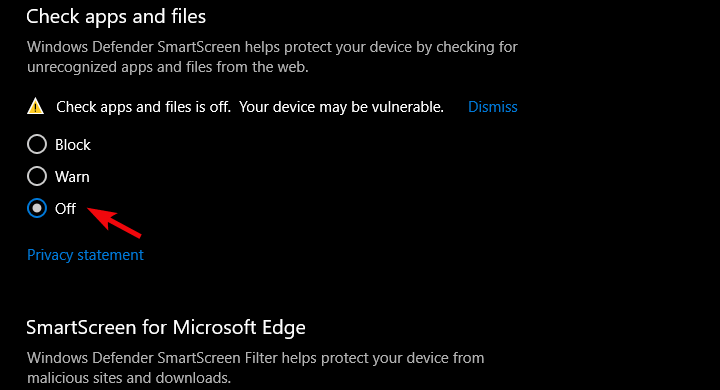
- Under the Check apps and files section, select Off.
On the other hand, if you’re tired of SmartScreen’s methods or have a third-party tool that deals with this kind of threat, you can disable it for good.
Since the introduction of Windows Security Center, you can disable this feature with ease. We made sure to provide you with the required steps above.
3. Install a better antivirus
Windows Defender is a first line of defense against any threats and it’s doing a decent job on that. However, as you can see, you can experience such annoyances and errors.
After you finish tweaking it by using our solutions, you should think about getting yourself a better third-party antivirus that will not bother you with these kinds of problems.
The tool recommended below is trusted by over 110 million users who installed it, so you know it’s a reliable solution.
Moreover, this software is focused on securing all your online transactions and will even take care of your privacy by blocking the access to your webcam to any wrongdoers.

ESET Internet Security
Forget about Windows Defender’s errors and notifications and get yourself a trusted antivirus now!
We hope that you managed to deal with the Windows Defender SmartScreen prevented an unrecognized app from starting warning and got rid of the annoying prompts that were distracting you.
If this built-in security solution is still giving you headaches, it’s worth installing one of the best antiviruses with unlimited licenses for higher protection.
Make sure to tell us whether this was a helpful read in the comments section below.
Still having issues? Fix them with this tool:
SPONSORED
If the advices above haven’t solved your issue, your PC may experience deeper Windows problems. We recommend downloading this PC Repair tool (rated Great on TrustPilot.com) to easily address them. After installation, simply click the Start Scan button and then press on Repair All.
Newsletter
Smart Screen is a security module that was introduced by Microsoft and integrated into several Microsoft utilities such as Internet Explorer 8, 9, 10, 11 with a main focus to improve security. When you try to install a certain software or an app that is not included in the windows store, a warning message pops up automatically to notify you that it may not be a safe choice to install; but on a gentler note it still gives you an option to run the program anyway.
In addition to this, Smart Screen automatically checks the websites we visit so as to continuously update a list of reported phishing sites and malicious software websites. All this may seem annoying at times but it basically keeps the PCs safe from malicious viruses or malware.
In this guide we will explore ways of sorting out the Smart Screen issue. At some point it just starts getting on your nerves; after all you are aware of what you install as well as the sites you visit.
Turning off the Smart Screen filter
First things first, if you want to turn the Smart Screen filter ensure that you have a powerful antivirus program installed on your PC. This will protect you from the different malware and viruses that may accompany the programs that you want to install. Here are a few steps to get you there.
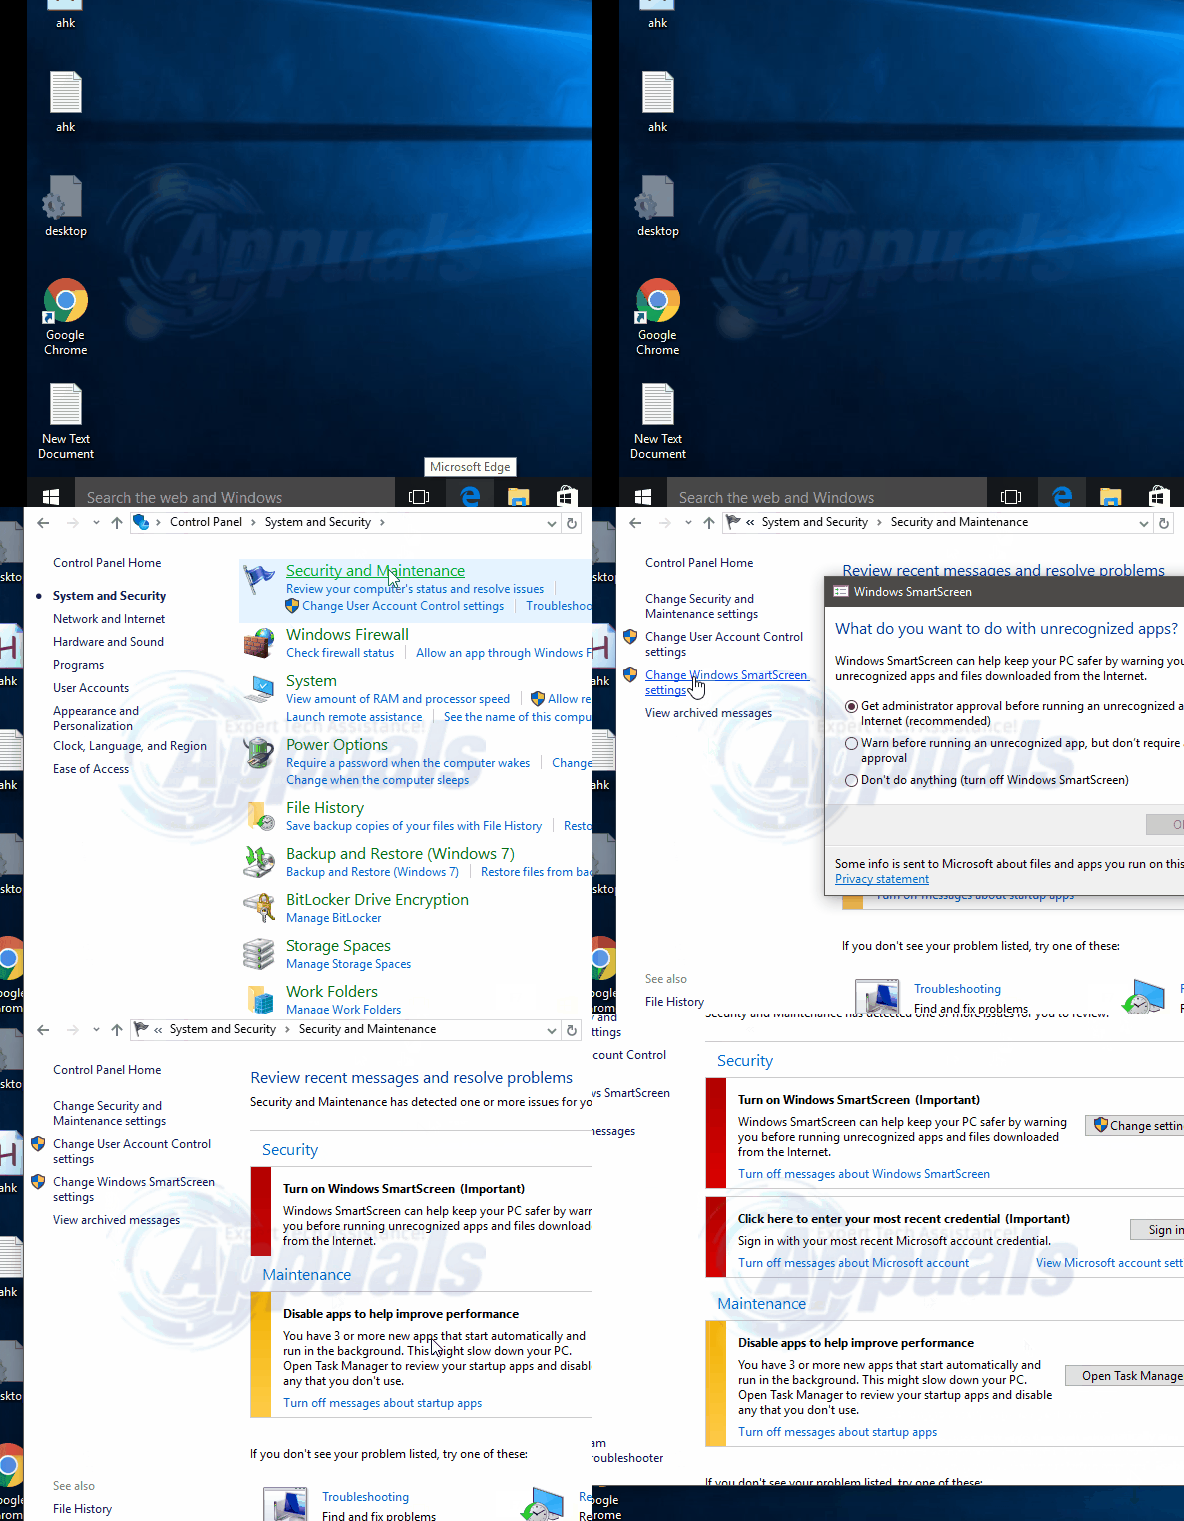
Hold the Windows Key and Press X. Choose Control Panel
Now click on System and Security -> Go to Security and Maintenance. On the left hand side of the screen choose Change Windows Smart Screen Settings.
Now choose “Don’t do anything” (Turn off Windows Smart Screen). Make sure that you save/apply the changes that you have effected.
In case you need the Smart Screen up and running the same steps apply. However at step five make sure you choose “turn on windows Smart Screen”. There you go, Smart Screen has been disabled.
You still have some options open to you once Smart Screen is off. Once Smart Screen has been disabled, you may still get a warning or prompt with the wording “The publisher could not be verified. Are you sure you want to run this software?” You may probably also want to completely stop Windows from adding the zone info in the file’s substitute stream; so that you no longer receive such warnings. Here’s how:
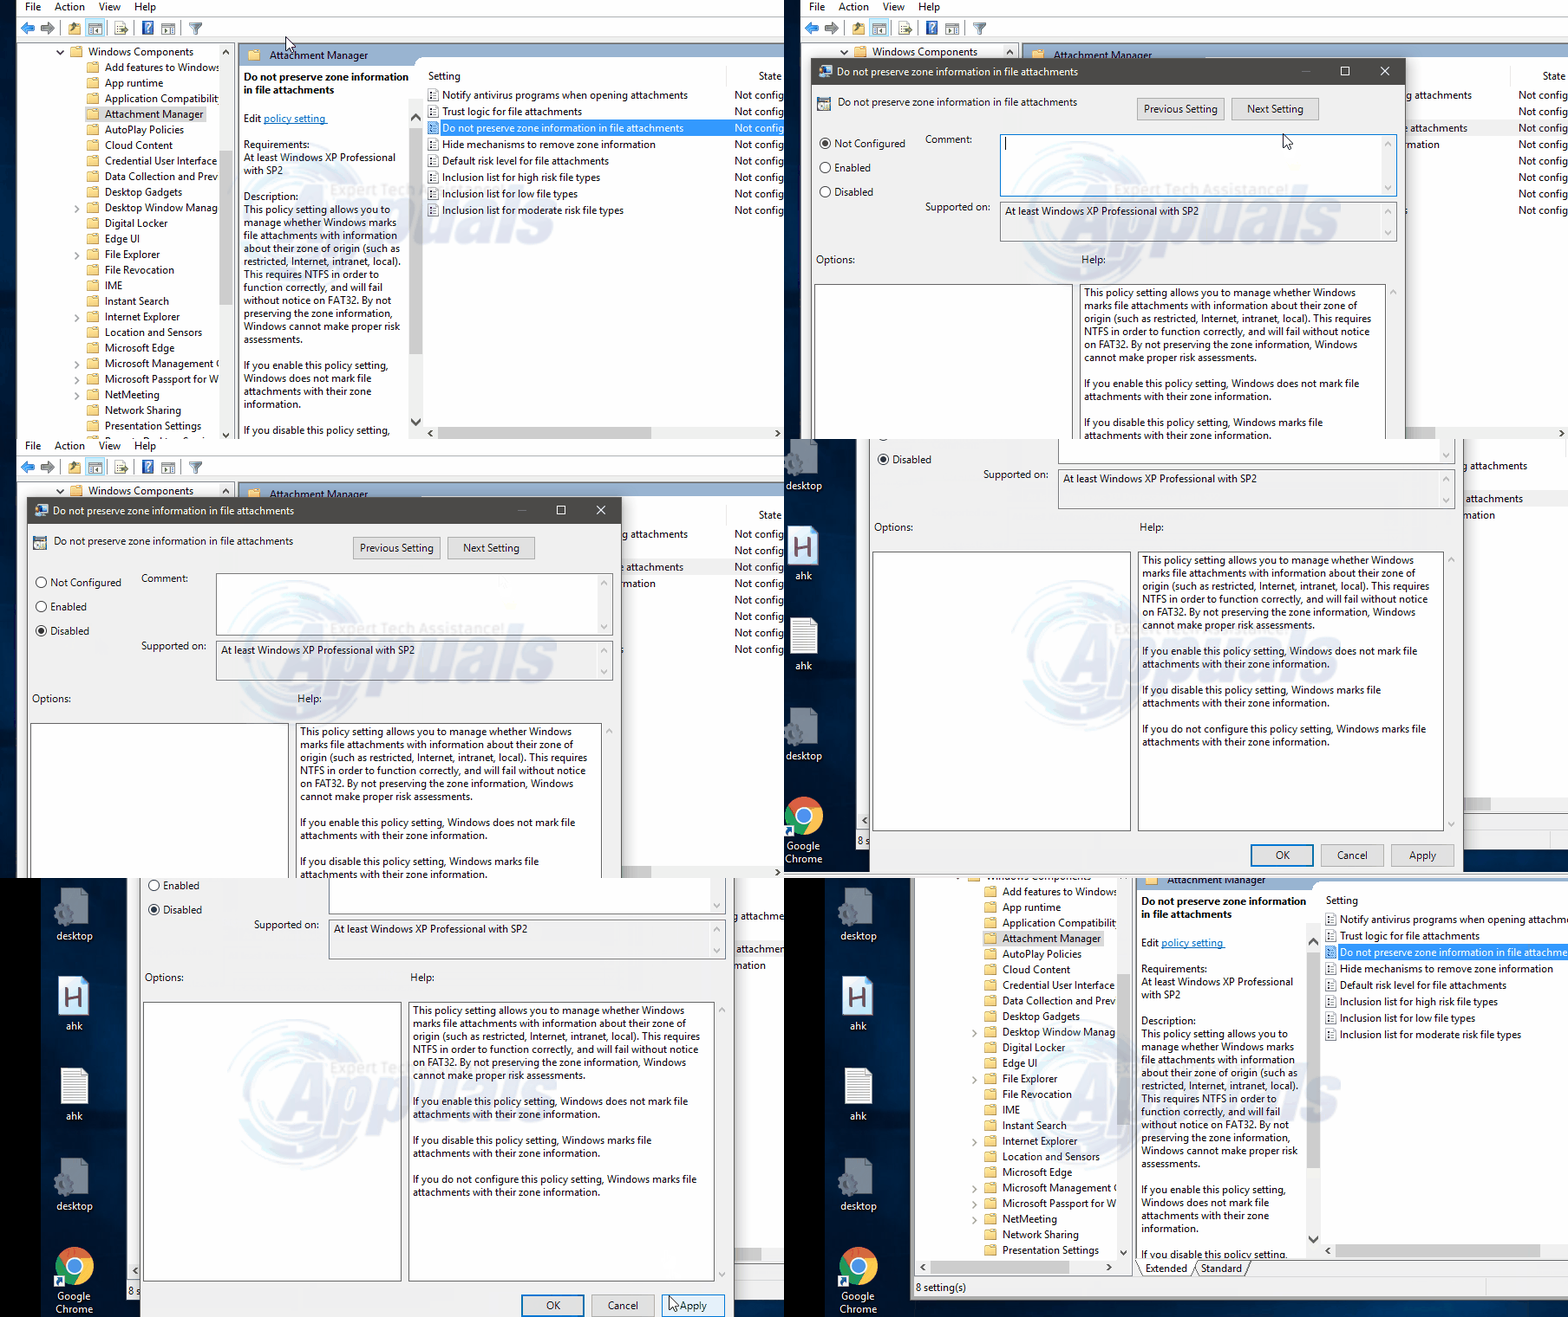
Press Windows + R and type gpedit.msc. You can just as well type that right at the start menu, it will automatically appear.
Navigate to User Configuration, then to Administrative Templates. Next, select Windows components and then Attachment manager.
Double click on the policy entry that reads “Do not preserve zone information in file attachments” Activate it and then click/tap on OK.
The same can be achieved via editing system registry editor.
- Go to the Registry Editor (type regedit on the Run window)
- Navigate to this key:
“HKEY_CURRENT_USERSoftwareMicrosoftWindowsCurrentVersionPoliciesAttachments”
- If this key does not exist, create one yourself.
- Make a new DWORD and name it “SaveZoneInformation”. Set it to 1.
From hereinafter, you will not be required to unblock files downloaded via your browsers and downloader apps so long as they adhere to this setting.
Kevin Arrows
Kevin is a dynamic and self-motivated information technology professional, with a Thorough knowledge of all facets pertaining to network infrastructure design, implementation and administration. Superior record of delivering simultaneous large-scale mission critical projects on time and under budget.
If you run a program, Windows 10 may give you a pop-up window saying “Windows protected your PC”. This message may appear when you are in a browser. The former is the warning given by Microsoft and the latter is a tech support scam. In this post, you can know how to disable the SmartScreen protection and remove the scam, as well as data protection offered by MiniTool Software.
Now, let’s see two cases on the “Windows protected your PC” pop-up window.
In Windows 10, there are some built-in security features designed to protect your PC from a number of malicious apps and criminal websites. Among these features, the Windows Defender SmartScreen feature is representative.
It is enabled by default and runs in the background to prevent you from running certain apps that are unrecognized by the Windows software database or known to be malicious. This could be a good protective measure for your PC.
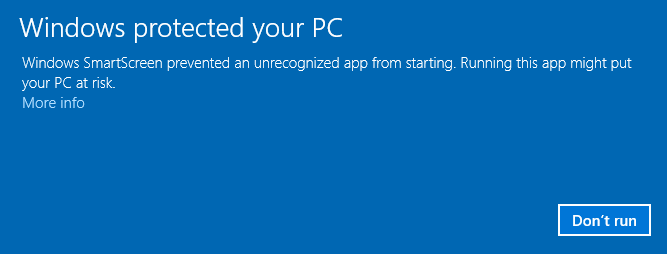
Usually, you will receive a popup if you attempt to run or install an application that Windows doesn’t recognize. The warning is “Windows protected your PC. Windows SmartScreen prevented an unrecognized app from starting…”
However, this warning sometimes is annoying. For example, you know this app is secure, obtained from a trustworthy source and won’t damage your system. Besides, it seems to show an only option – Don’t run. What should you do? Now, let’s go to the following part.
Things to Do When “Windows Protected Your PC” Appears in Windows 10
Allow App to Bypass the Windows Defender SmartScreen Message
When receiving the above warning screen, please make sure the app is absolutely safe. To know some new information and options, you can click the More info link that is displayed beneath the warning message.
In the pop-up window, you can know the app name and publisher. You may note that the publisher is unknown. Don’t panic since not every developer registers with Microsoft and the absence of this field information doesn’t imply the application is risky.
Of course, you can check again carefully and make sure the app comes from the correct source. Then, click the Run anyway button to bypass the Windows Defender SmartScreen warning and continue using the app.
Disable Windows SmartScreen
Some of you may don’t like the protection features offered by Windows SmartScreen since they are not as excellent as expected. According to reports, it could slow down your system greatly and cannot offer any additional security possibly if you run a professional antivirus program. Additionally, Windows SmartScreen can collect your private data.
Of course, disabling the SmartScreen feature can avoid the “Windows protected your PC” warning in Windows 10.
Method 1: Disable Windows Defender SmartScreen Security Software
- Go to Start > Settings > Update & Security.
- Navigate to Windows Defender and click Open Windows Defender Security Center.
- Click the App & browser control section, scroll down, find Check apps and files and turn it off.
Now, you won’t receive the “Windows protected your PC” message when running an unrecognized app in Windows 10.
Method 2: Use Registry Editor to Disable Windows SmartScreen
If you are a home computer user, you can turn off SmartScreen via Registry Editor in Windows 10 to remove the message – Windows SmartScreen prevented an unrecognized app from starting.
Tip: Modifying registry keys is a dangerous operation since the incorrect operation could cause the system to be not bootable. So, back up your registry keys before you do.
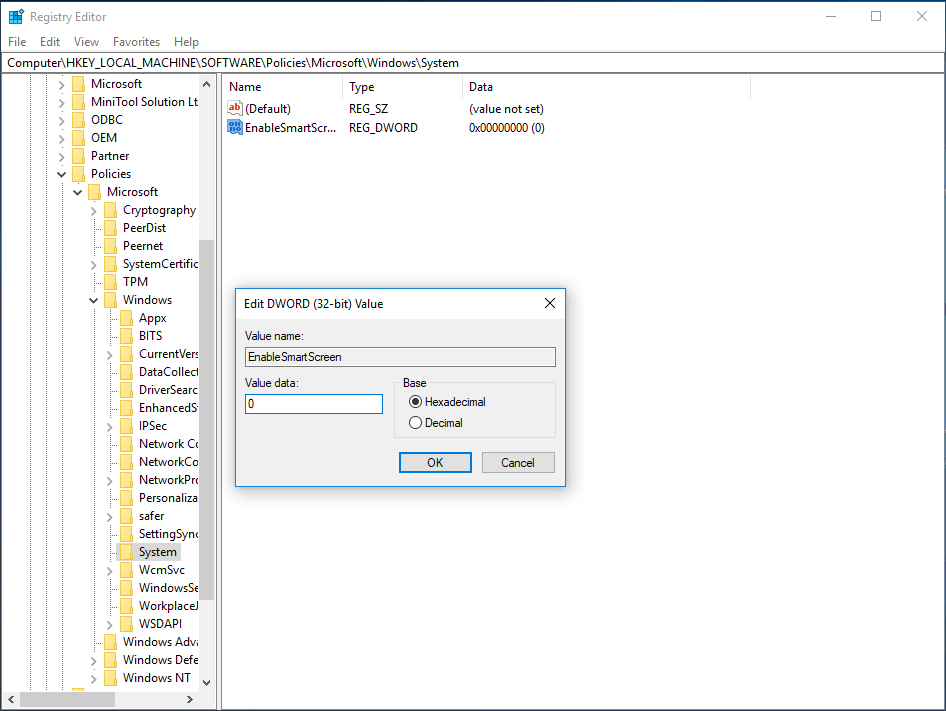
- Input regedit.exe in the Windows 10’s search box and click the exact result to launch Registry Editor.
- Head to the path: HKEY_LOCAL_MACHINESOFTWAREPoliciesMicrosoftWindowsSystem.
- Double-click on EnableSmartScreen and set its value to 0 (disabled).
- Exit the tool and restart your computer.
Method 3: Use Group Policy to Disable SmartScreen
If you are a Pro user, you can turn off the feature to remove the “Windows protected your PC” message. Here is how to do it:
- Search for gpedit.msc in the search bar and click Edit group policy.
- Head to Computer Configuration > Administrative Templates > Windows Components > File Explorer.
- Double-click Configure Windows Defender SmartScreen and set it to Disabled.
- Click OK to save the change.
Disable SmartScreen Filter in IE and Edge
Sometimes, the warning may appear in Internet Explorer (IE) or Microsoft Edge. To remove it, you should open IE, go to Settings > Safety and turn Windows Defender SmartScreen off. In Edge, go to Settings > View advanced settings > Privacy and services to turn off the toggle – Help protect me from malicious sites and downloads with Windows Defender SmartScreen.
Warning: Disabling Windows SmartScreen could let your computer be vulnerable, so it is best to not turn it off. Or you only do so if you encounter the SmartScreen protection while running an unknown app. To avoid data loss caused by a virus and ensure your data safe, we suggest backing up your important files with MiniTool ShadowMaker. This will be described in detail subsequently.
Case 2: Windows Protected Your PC Virus Scam
The above paragraphs show you the actual SmartScreen protection on the desktop screen in Windows 10. Actually, you may also receive the “Windows protected your PC” warning when using a browser. The warning is not real but only a tech support scam.
Usually, the warning message gives you a phone number and tricks you into a call for help. Then, scammers ask for payment to get a purported support service. As it is just a scam, the website doesn’t really know what is running on your computer. So, don’t call any listed phone number.
In fact, Microsoft never sends unsolicited email message giving phone calls to request personal information. Besides, errors from Microsoft also never include a phone number.
Tip: In addition to this scam, you may encounter another scam – Windows Defender Zeus Virus. For more information, refer to our previous article — Remove “Windows Defender Alert Zeus Virus” from Your PC Now!
When encountering this fake error message, you should try to remove it. Now, let’s go to see the following operations.
Steps to Remove “Windows Protected Your PC” Scam
Step 1: Close the Browser Tab
Firstly, you can try closing the browser tab based tech support scam. Usually, you couldn’t close it directly but you can do this via Task Manager.
- Right-click the taskbar and choose Task Manager.
- Find your browser from the Processes tab and click End task after selecting it.
Tip: When opening your browser next time, do not open the latest opened page.
Step 2: Uninstall Malicious Programs from Windows 10
In your computer, some apps are installed without your consent; some are added to the add-ons of your browser or hidden in other installers. Perhaps malicious viruses are included, so you should remove these apps.
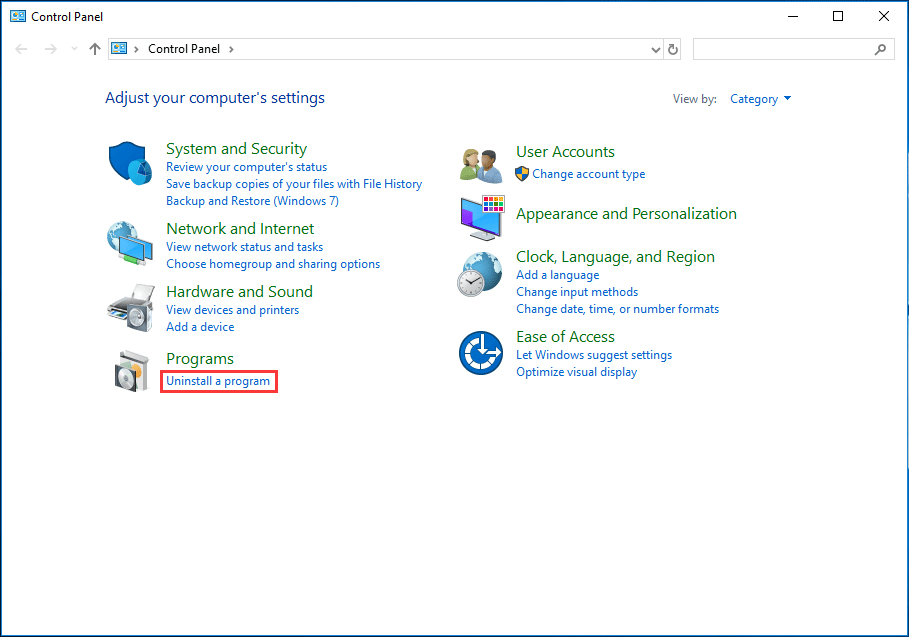
1. Search for control panel in the search bar and then click the result.
2. In the Control Panel interface, view items by category and then choose Uninstall a program.
3. Scroll down the app list, find and right-click the malicious program and click Uninstall.
Step 3: Use Anti-Malware to Remove “Windows Protected Your PC” Adware
It is important to use an anti-malware or antivirus program to scan your system and remove malicious programs and viruses. On the market, Malwarebytes can be worthy of being recommended since it is able to destroy many types of malware that other software tends to miss.
Of course, you can try other programs, for example, HitmanPro, AdwCleaner, etc. to scan your computer for badware or remove adware from a computer.
Step 4: Reset Browser Settings to Default
If you have tried the above operations, now you can consider resetting the browser settings to their default configuration to remove the “Windows protected your PC” tech support scam from your Windows 10 computer.
Tip: This method will remove all extensions, add-ons, toolbars, and other customizations but will keep your bookmarks.
Google Chrome
1. Open Chrome, click on the main menu, represented by three horizontal lines and click Settings.
2. Go to the Advanced link.
3. In the Reset and clean up section and click Restore settings to their original defaults.
4. To complete the reset process, click on the Reset Settings button.
Mozilla Firefox
- Click the menu and choose Help > Troubleshooting Information.
- In the pop-up window, click Refresh Firefox to remove add-ons, customizations and restore the browser settings to defaults to remove “Windows protected your PC” fake error message.
Internet Explorer
1. Click the gear icon and choose Internet options.
2. Under the Advanced tab, click Reset.
3. In the pop-up window, check the Delete personal settings option and click Reset.
4. Click Close finally.
Now, after doing the above operations, your computer should be free of the “Windows protected your PC” fake error message.
“Here is all the information on the Windows protected your PC warning on a computer. You can share these two cases on Twitter to let more people know.”Click to Tweet
Back up Your PC to Avoid Data Loss
Viruses, malware, malicious adware, spyware, etc are always ubiquitous. To keep your computer protected really, you should do some things, for example, run a powerful antivirus program or anti-malware, do not install an unrecognized program, don’t open unknown attachment or emails, back up your computer, etc.
Computers are easily attacked by malicious software or viruses, causing data loss. So, the important thing you should do is to make a backup for your important files.
MiniTool ShadowMaker, a third-party free backup software, can be your good assistant since it is designed to back up your operating system, disks, partitions and files & folders within simple clicks. To back up your computer well, you can make an automatic backup. Besides, you can use it to perform a fast disaster recovery.
For file backup, you can also try file sync. Furthermore, this backup program allows you clone disk to another disk. Now, download MiniTool ShadowMaker Free Edition for free and install in on your computer to start file backup.
Free Download
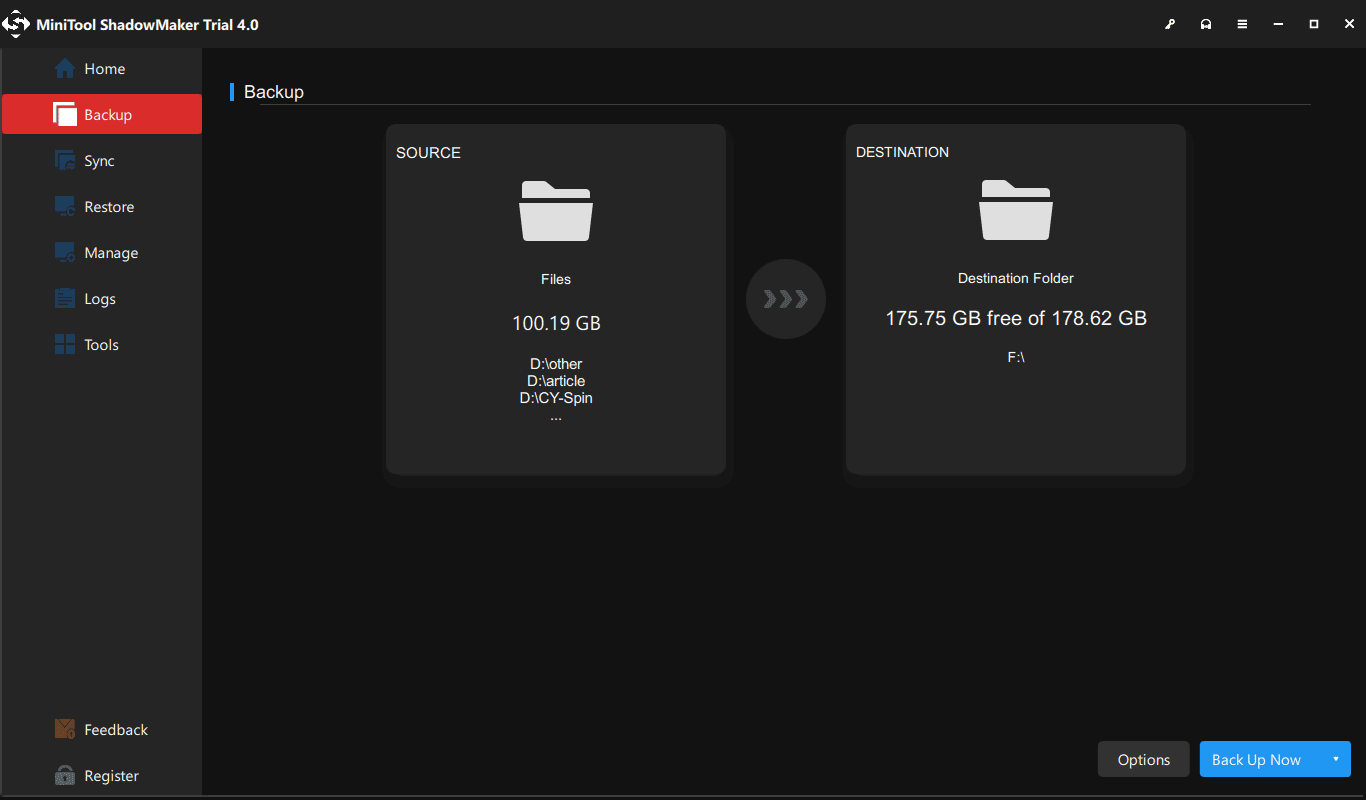
1. Run MiniTool ShadowMaker.
2. Go to the Backup tab, choose the files to back up.
3. Decide which place you want to store the backup to.
4. Finally, click Back Up Now to start the file backup at once.
Tip: If you want to sync files for backup, you can read our previous post — 2 Best File Synchronization Software in Windows 10/8/7.
Bottom Line
Have you got the warning “Windows protected your PC” in Windows 10? If yes, don’t panic and this post gives you two cases. Just do what you should do based on your actual situation by following the steps mentioned above. What’s more, we suggest backing up your files to avoid data loss since viruses and malicious programs are rampant.
As for other suggestions or questions to this post or our software, you can let us know by leaving a comment below or sending an email to our support team: [email protected].
Windows Protected Your PC FAQ
How do I remove protected Windows from my computer?
To turn off “Windows protected your PC” on Windows 10, you can choose to disable SmartScreen via Windows Settings, Registry Editor and Local Group Policy Editor. If you encounter a scam with the same error message, close your web browser, uninstall a malicious program, use antivirus software, and reset your browser to default settings.
What is Windows SmartScreen?
SmartScreen, also called Windows SmartScreen and Windows Defender SmartScreen, is an important component that helps protects systems from malicious programs downloaded from the Internet. It is included in many Microsoft products, including Windows operating systems (Windows 8 and later), Microsoft Edge, Internet Explorer, and Outlook.com.
How do I disable SmartScreen on Windows 10?
Three methods are offered for you:
- Change the setting of Windows Defender
- Use Registry Editor to disable Windows SmartScreen
- Edit Group Policy to Disable SmartScreen
How do I get past Windows Defender SmartScreen?
- Go to Settings > Update & Security > Windows Defender.
- After opening Windows Defender Security Center, click the App & browser control button.
- Click Off in these three sections — Check apps and files, SmartScreen for Microsoft Edge and SmartScreen for Windows Store apps.

