Can I delete all partitions on SSD at one time in Windows 10? Is there a free tool that can completely remove all partitions and wipe a drive at one time? Yes, Windows built-in disk utility tool — DiskPart can fulfill the task.
Here this guide will assist you in cleaning up a drive for free using DiskPart. Here, besides deleting volumes, you’ll also learn more command lines of creating, extending, formatting volumes with this utility. Let’s start.
There are two commands in DiskPart that can be used to delete all partitions on a Windows computer. And each command is designed for different purposes that are listed here:
| Comparison |
DiskPart Clean Command |
DiskPart Clean All Command |
|---|---|---|
| Designed to | Delete all partitions at one time, quickly clean a drive data. | Delete all partitions and wipe hard drive at one time, erase and reset the hard drive. |
| Result | Deleted partitions and data are recoverable. | Deleted partitions and data are permanently erased, unrecoverable. |
So how to use these two command lines? Let’s start.
Before you start, remember to open disk management and confirm the number of your target disk on which you want to remove all partitions:
Right-click Windows icon > Disk Management > Disk number.
- Notice:
- Diskpart clean and clean all command will delete all partitions, removing all saved data from your disk. Before you start, make sure that you back up all essential data in advance.
#1. Delete All Partitions Using DiskPart Clean Command — Clean Disk
Step 1. Press Windows + R keys to open the search menu, type cmd, right-click Command Prompt and select Run as Administrator.

Step 2. Click Yes to let Windows run Command Prompt in Admin right.
Step 3. Type diskpart and hit Enter.
Step 4. Type the following command lines one by one and hit Enter each time:
- list disk
- select disk # (Replace # with the number of your target disk.)
- clean
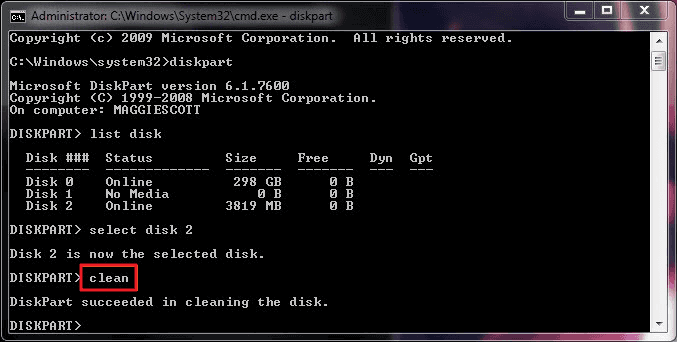
Step 5. Type exit to close the DiskPart command window when the cleaning process completes.
Now, you may see that your disk is showing unallocated in the disk management.
#2. Delete All Partitions Using Diskpart Clean All Command
Also works to: wipe a hard drive, reset the hard drive.
Step 1. Open DiskPart by pressing Windows + R keys, type cmd, and right-click Command Prompt.
Click Run as Administrator > Type diskpart and hit Enter.
Step 2. Click Yes to allow DiskPart to run on Windows as Admin.
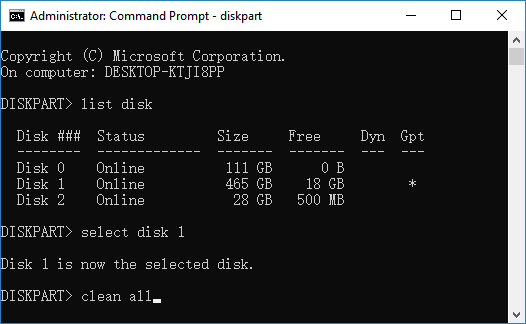
Step 3. Type the following command lines and hit Enter each time:
- list disk
- select disk 1 (Replace 1 with the disk number that you want to wipe.)
- clean all
Step 4. When the process completes, type exit to close the DiskPart window.
Now your drive is reset as a new disk. All your data are gone.
Two DiskPart Alternatives to Delete All Partitions on a Hard Drive
According to some Windows beginners, it’s a bit complex for them to use DiskPart command lines in managing hard drives. Here, we included two DiskPart alternative tools that are even easier and more efficient in deleting all partitions on your disks.
#1. Using Third-party Partition Manager Software
When you Google partition manager software online, at least hundreds of disk managing software and utilities are showing up in the searching result. To most Windows users, executing an operation deleting all partitions on a drive in only a few clicks will be perfect.
EaseUS partition manager software — Partition Master with its Delete All feature can help.
Step 1. Launch EaseUS Partition Master, and click «Partition Manager».
Make sure that you’ve backed up the important data before deleting any partition on your disk.
Step 2. Select to delete partition or delete all partitions on hard drive.
- Delete single partition: right-click on a partition that you want to delete and choose «Delete«.
- Delete all partitions: right-click a hard drive that you want to delete all partitions, and select «Delete All«.
Step 3. Click «Yes» to confirm the deletion.
Step 4. Click «Execute xx Task» and then click «Apply» to save the change.
0:00 — 0:26 Delete single volumes; 0:27 — 0:53 Delete all partitions.
#2. Using Disk Management
The other tool that Windows beginners think is easy to use in deleting partitions in Disk Management. It’s free to delete all partitions. The only shortcoming of this tool is that you cannot delete all partitions are one time.
The operating process needs to be repeated several times. Here is how to delete all partitions on your drive:
Step 1. Right-click the Windows icon and select Disk Management.
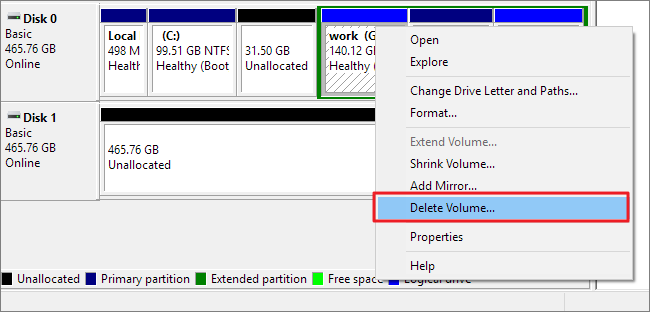
Step 2. On the target disk, right-click a partition and select Delete Volume.
Step 3. Select Yes to remove the selected volume.

Step 4. Repeat the process to delete all partitions on the target disk.
What Is the Fastest Way to Remove All Partitions from a Drive
DiskPart is a command interpreter that helps Windows users to manage computer disk drives. It works equally as third-party partition manager software and disk management in managing hard drives in these aspects:
- Create new volume
- Extend partition
- Format volumes
- Clean drive by deleting one partition or delete all partitions, etc.
But which is the fastest way to remove all partitions on a disk? Here we tested these three methods on a 2TB hard drive with 4 volumes, and here is the result that you may be interested in:
| Comparison | DiskPart: Clean Command | Disk Management: Delete Volume | EaseUS Partition Master: Delete All |
|---|---|---|---|
| Steps to Delete All Partitions | At least 5 steps. | More than 5 steps. | 3 steps. |
| Duration | 45s | 40s | 35s |
| Pros |
|
|
|
| Suitable users | Experienced & professional users. | Beginners. | All levels of users. |
According to the table, it’d clear that all three tools work to delete volumes on a computer, and EaseUS Partition Master with its Delete All feature is the easiest solution to clean a disk. Also, if you intend to clean an OS drive, EaseUS Partition Master is the best option.
DiskPart Delete Command FAQs
We offered a complete guide to help you delete all partitions using DiskPart command lines on Windows hard drives, SSD, and even external storage disks. If you have more questions, go and check the answers here below.
1. Can I Stop DiskPart Clean All?
No, you can’t stop or pause the DiskPart clean all command once you hit the Enter key.
Even if you closed the DiskPart command windows, the operating system will continue executing the command in the background. All your partitions will be removed.
Therefore, we suggest that you execute the operation with cautiousness as it will permanently remove all your partitions and data, making them unrecoverable in an unstoppable procedure.
2. How Do I Delete a Partition Using Diskpart?
To DiskPart delete a volume, be sure that you have backed up useful files to an external disk before executing the following operations:
Step 1. Press Windows + R keys, type cmd, right-click Command Prompt, and select Run as Administrator.
Step 2. Type the following command lines one by one and hit Enter each time:
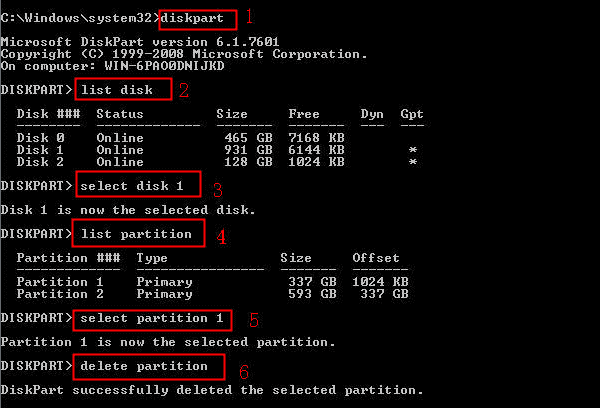
- diskpart
- list disk
- selected disk #
- list partition
- select partition #
- delete partition
Step 3. Type exit to close DiskPart.
3. How to Delete All Primary Partitions on Windows 10 from Diskpart
Step 1. Right-click Windows icon > Select disk management > Check all primary partition numbers on your target disk.
Step 2. Open DiskPart and type the following command lines one by one and hit Enter each time:
- diskpart
- list disk
- selected disk #
- list partition
- select partition #
- delete partition
Repeat to select and delete all primary partitions on your PC.
Step 3. Type exit to close DiskPart.
4. Hot Diskpart Commands
As mentioned, DiskPart is a hot disk utility that experienced Windows users would use to manage partitions. Here are some hot DiskPart commands that you can apply to set or make changes to your hard drives:
Use DiskPart to Format Device:
- list disk
- select disk #
- list volume
- select volume #
- format fs=ntfs quick or format fs=fat32 quick
Use DiskPart to Create Partition:
- list disk
- select disk #
- create partition primary
- format fs=ntfs
- assign
Use DiskPart to Extend Partition:
- list disk
- select disk # (Replace # with the disk number of your target disk.)
- list volume
- select volume # (Replace # with the partition number of your target drive.)
- extend size =number (Normally, the default size unit is MB.)
- exit
5. How Do I Delete All Partitions and Format My Hard Drive
Step 1. Open DiskPart.
Step 2. Type the following command lines and hit Enter each time:
- list disk
- select disk #
- clean
- create partition primary
- format fs=ntfs
- assign
Step 3. Repeat the process to complete creating more partitions on a hard drive.
Step 4. Type exit to close DiskPart.
6. Use sfdisk to Delete All Partitions in Linux
Step 1. Open terminal on Linux computer.
Step 2. Type the following command lines one by one and press Enter each time:
- sudo su
- fdisk-l
- fdisk /dev /sdx (replace x with your target drive letter.)
- d
- 1 (replace 1 with the partition number.)
- d
Step 3. Repeat the process to delete more partitions in Linux.
-
Partition Wizard
-
Partition Manager
- How to Delete All Partitions with Ease in Windows 10/8/7?
By Tina | Follow |
Last Updated December 11, 2020
Do you know how to delete all partitions with ease? Is there any easy way to delete all partitions with ease in Windows 10/8/7? In fact, to delete all partitions, the professional partition magic – MiniTool Partition Wizard would be a great tool. And we will show you how to delete all partitions in the following paragraphs.
How to Delete All Partitions with Ease in Windows 10/8/7?
As is well known, the Disk Management of Windows is a tool to manage the disk and partitions. However, if you want to delete all partitions, the Disk Management is unable to complete that. Thus, is there any other way to delete all partitions?
Of course, the answer is positive. You can delete all partitions diskpart. And we will show you how to delete partition in this post with two ways.
Delete All Partitions by MiniTool Partition Wizard
As for partition delete, you can take advantage of a piece of the professional partition manager. Thus, MiniTool Partition Wizard is strongly recommended.
It is designed to optimize partition and disk use with its powerful features, such as extending partition, resizing partition without data loss, analyzing disk space, checking partition error, and so on.
So to delete all partitions, MiniTool Partition Wizard is also competent. And we will show you how to remove partition Windows 10 with MiniTool Partition Wizard.
Free Download
After installing MiniTool Partition Wizard, it is time to delete all partitions.
Note: Before going on, you had better back up all your important files because deleting all partitions will destroy all data on the selected disk.
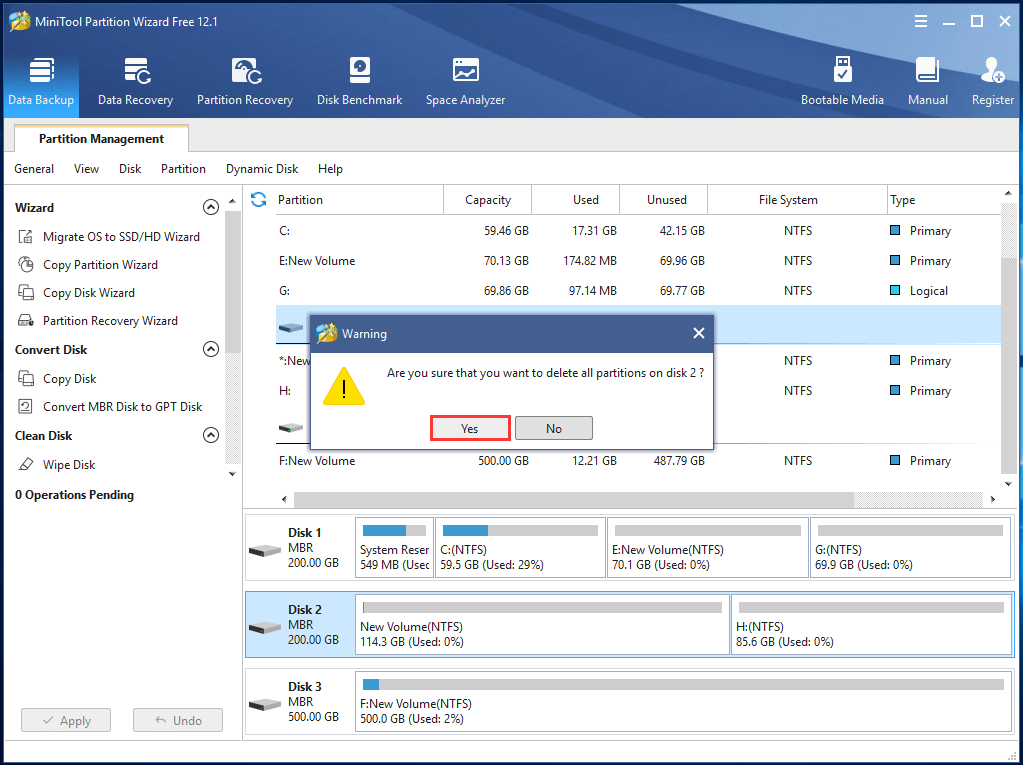
Step 1: Launch MiniTool Partition Wizard to enter its main interface. Select the disk which you want to delete all partitions and choose Delete All Partitions from the context menu to continue.
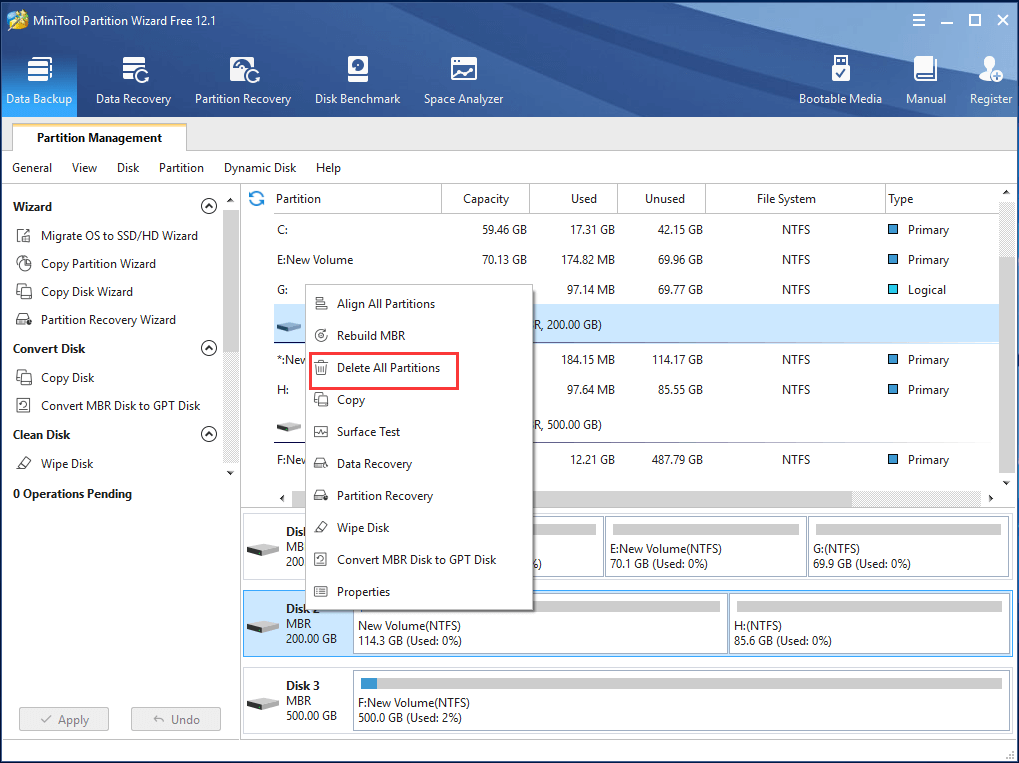
Step 2: Then you will receive a warning message which tells you all data on this disk will be destroyed and click Yes to continue.
Step 3: Then you can preview the changes and click Apply to confirm the change.
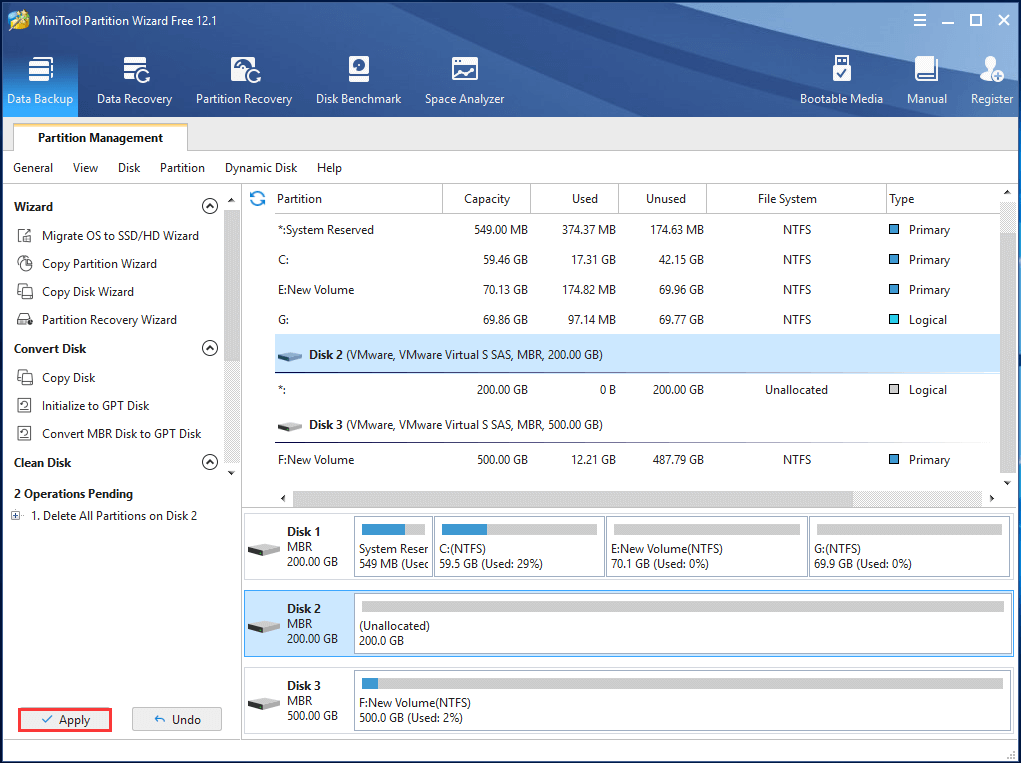
When all steps are finished, you can successfully delete all partitions. And you can see that it is very easy to delete all partition with MiniTool Partition Wizard since just three steps are required. So if you want to delete all partitions, try MiniTool Partition Wizard.
Free Download
Besides deleting all partition, MiniTool Partition Wizard also has many other features, such as wiping a hard drive, resizing RAID partition without data loss, merging partition, etc.
Delete All Partitions by Diskpart
To delete all partitions, you can also use the diskpart tool and type the command to go on. And here, we will show you how to delete all partitions by diskpart step by step.
Step 1: Type command prompt in the search box of Windows and right-click the best-matched one to choose Run as administrator to continue.
Step 2: Input diskpart and hit Enter to continue.
Step 3: Type list disk and hit Enter to continue.
Step 4: Then, you can see all disks on your computer are listed here and you can choose the disk that you want to delete all partitions by inputting the command select disk 1. Here, the disk 1 is just an example.
Step 5: Then type the command clean and hit Enter to delete all partitions.
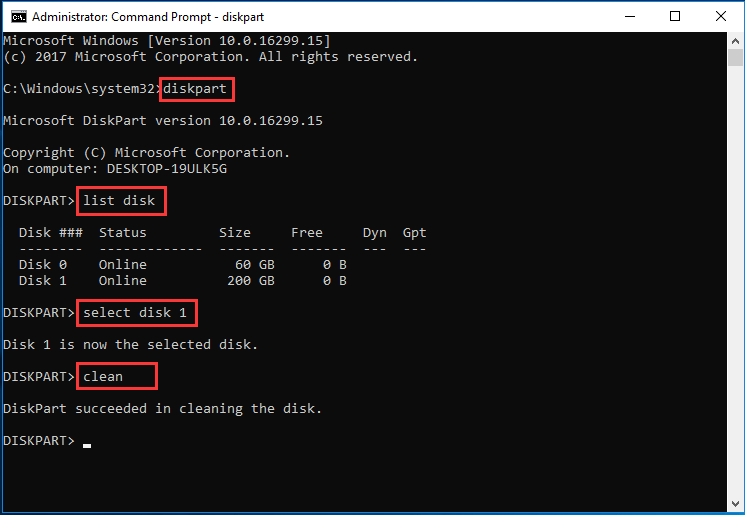
Now, you can see you have deleted all partitions through diskpart.
Related article: Clean on Wrong Disk? Undo Diskpart Clean Command Now!
I have deleted all partitions by using MiniTool Partition Wizard. It is a user-friendly and amazing tool. I’d like to recommend it to you. Click to Tweet
Bottom Line
In conclusion, we have introduced how to delete all partitions with two ways in this post. In my opinion, MiniTool Partition Wizard is easier and more effective to delete all partitions.
And if you have any problem about MiniTool Partition Wizard, please contact us via the email [email protected].
Delete All Partitions Windows 10 FAQ
Can I delete all partitions?
If you don’t want to use the hard drive any more or if you want to perform a clean install of operating system, you can choose to delete all partitions.
How do I delete partitions in Windows 10?
There are 3 different ways to delete partitions in Windows 10.
- Delete partitions via MiniTool Partition Wizard.
- Delete partitions via Disk Management.
- Delete partitions via Diskpart.
Should I delete all partitions when installing Windows 10?
If you want to perform a clean installation of Windows 10, you can choose to delete all partitions on Windows 10. But before that, please back up your important files because clean installation will lead to data loss.
How do you unpartition a hard drive?
- Open Disk Management.
- Right-click the drive you want to unpartition.
- Select the Delete Volume… from the context menu.
- Then click Yes to execute the changes.
About The Author

Position: Columnist
Tina is a technology enthusiast and joined MiniTool in 2018. As an editor of MiniTool, she is keeping on sharing computer tips and providing reliable solutions, especially specializing in Windows and files backup and restore. Besides, she is expanding her knowledge and skills in data recovery, disk space optimizations, etc.
On her spare time, Tina likes to watch movies, go shopping or chat with friends and enjoy her life.
Если мы захотим избавиться от текущей структуры жёсткого диска – убрать все разделы на нём и вернуть ему исходное нераспределённое пространство, в среде активной Windows с использованием её штатных средств сможем сделать это при соблюдении двух условий. Во-первых, в качестве оперируемого диска — того, на котором хотим убрать все разделы, естественно, не должно выступать хранилище текущей ОС.
Под хранилищем понимаются либо все разделы системы, либо как минимум один из них, например, загрузочный. Во-вторых, на таком оперируемом диске не должно существовать защищённых от удаления разделов. Если ранее оперируемый диск имел стиль разметки MBR, с помощью утилиты diskmgmt.msc в составе Windows мы без проблем удалим все пользовательские и системные разделы.
И превратим дисковое пространство в нераспределённое, на базе которого сможем создать новую структуру разделов под другие задачи.
А вот пространство GPT-дисков, на которых ранее была установлена Windows, таким образом мы полностью не сможем очистить. Для скрытого системного EFI-раздела не будут доступны ни функция удаления, ни любые иные возможности.
Даже если избавиться от всех остальных разделов, EFI-раздел останется.
Подобно последнему, на носителях OEM-устройств могут также существовать неудаляемые служебные Recovery-разделы, необходимые для отката Windows до заводских настроек.
Как очистить жёсткий диск с защищёнными разделами от структуры — удалить все разделы, убрать стиль разметки, чтобы он стал таким, как до инициализации? Рассмотрим несколько вариантов, как это можно осуществить.
1. Командная строка
Проводить очистку носителей данных от их структуры умеет штатный Windows-инструмент – командная строка. Важный нюанс: запущена она должна быть от имени администратора.
В её окне вводим последовательно:
diskpart
list disk
Увидим перечень всех носителей компьютера. В этом перечне нужно узнать, под каким порядковым номером значится оперируемый диск. И здесь ориентироваться нужно на его объём. В нашем тестовом случае это Диск 0.
От порядкового номера будет зависеть следующая команда:
select disk 0
Здесь вместо нуля каждый должен подставить свой порядковый номер.
Последний шаг – ввод команды для очистки носителя от структуры:
clean
Всё – диск очищен от разделов и инициализации. После этого можем снова обратиться к утилите diskmgmt.msc, чтобы сформировать структуру по новой.
Осуществляем инициализацию.
Выбираем GPT— или MBR-стиль разметки.

И далее уже можем формировать новую структуру.
2. Процесс установки Windows
Удалять скрытые разделы диска умеет процесс установки Windows. Если к компьютеру подключён установочный носитель системы, можно загрузиться с него и на этапе выбора места её установки убрать разделы. А затем прекратить установку и перезагрузить компьютер.
Правда, этот вариант подойдёт только для пользователей, которые хорошо знают оперируемый диск. Поскольку установочный процесс отображает дисковое пространство в виде перечня разделов, высока вероятность ошибочно повредить структуру неоперируемого носителя.
***
Хейтеры командной строки могут прибегнуть к стороннему софту для работы с дисковым пространством типа Acronis Disk Director 12. Это более функциональный, более юзабильный и даже в каком-то смысле более безопасный способ проведения операций с разметкой носителей данных.
3. Acronis Disk Director 12
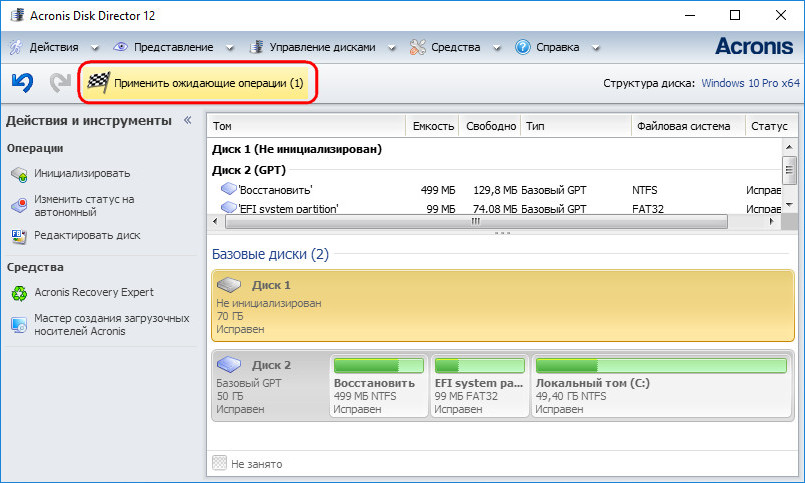
И менеджер работы с дисками от компании Acronis, и его аналоги примечательны чёткой и понятной подачей структуры дисков. Более того, подобного рода программы в составе LiveDisk – это единственный способ решить поставленную в статье задачу, если оперируемый носитель является единственным таковым в составе компьютера. Чтобы с помощью Acronis Disk Director 12 избавиться от структуры диска, выбираем его, например, в визуальном представлении.
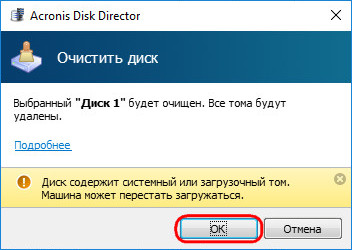
И задействуем функцию «Очистить диск».
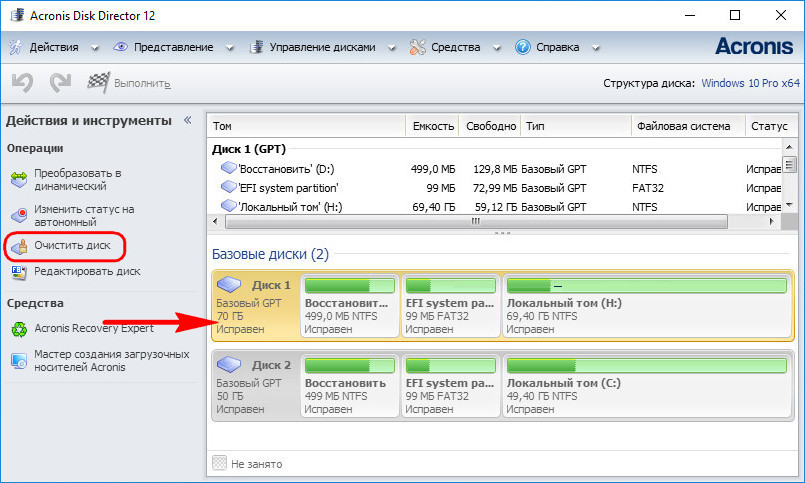
Acronis нас предупреждает, что на очищаемом носителе есть загрузочные разделы. И таким образом защищает нас от необдуманных решений. Дело в том, что у двух Windows, установленных на разных дисках, могут быть как свои загрузчики, так и один общий. Важно проверить этот момент: у оставляемой Windows должны быть свои разделы загрузки:
• Либо «Зарезервировано системой» (MBR);
• Либо «Восстановить» и «EFI» (GPT).
Проверяем, если всё в порядке, жмём «Ок».
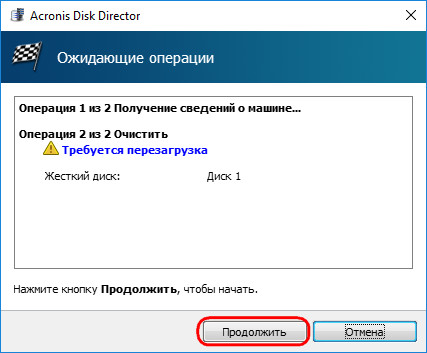
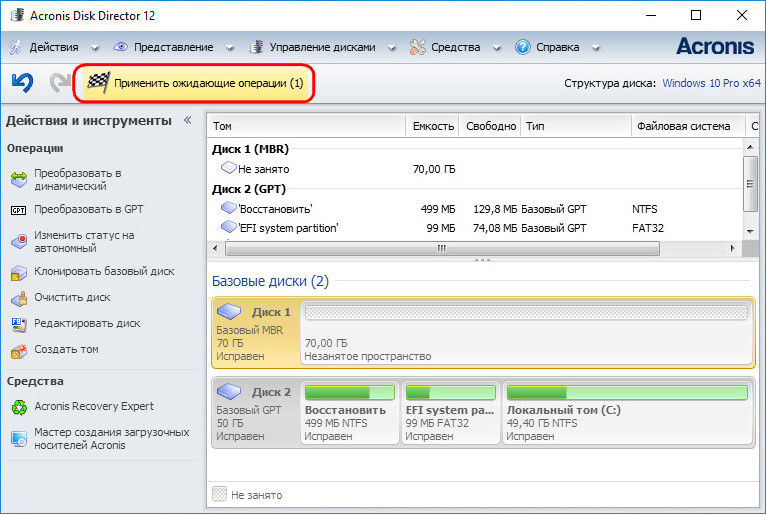
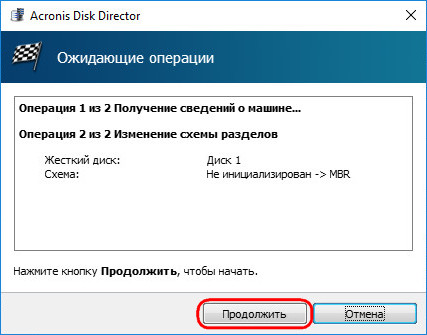
Применяем запланированное.
Если работаем не с LiveDisk, а внутри Windows, потребуется перезагрузка.
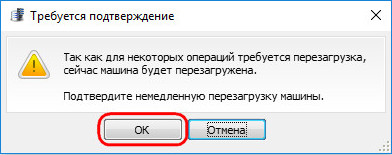
Как только Acronis завершит свою работу, и компьютер перезапустится, можем приступать к формированию новой структуры оперируемого диска.
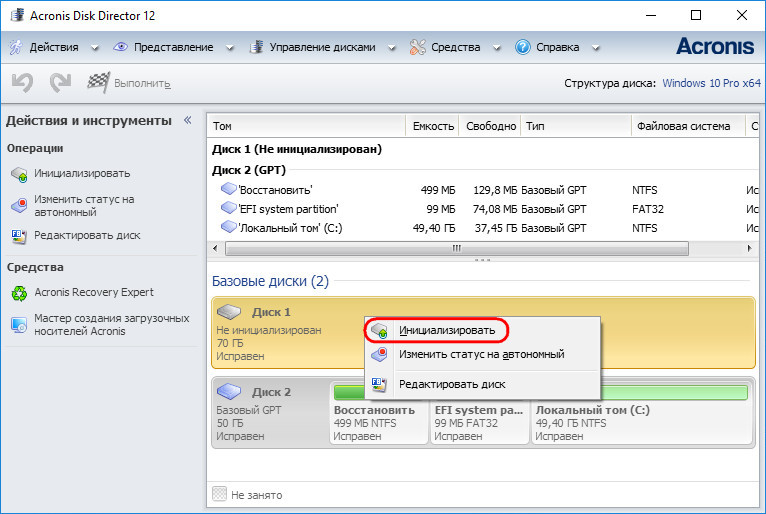
Инициализируем его.
Выбираем стиль разметки.

Применяем.
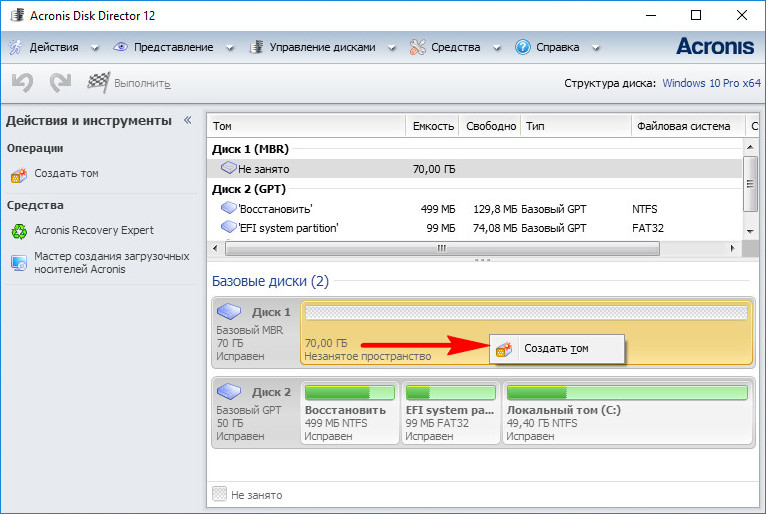
Формируем разделы под новые цели применения.
![]() Загрузка…
Загрузка…
Diskpart Delete Partition (Force, Override, delete system partition etc)
Diskpart delete disk can be done in cmd by clean all, what’s more, diskpart can delete partition (recovery/system) too. Here are more about information related with diskpart delete volume command.
Caution: Diskpart delete partition/disk will remove all files on the disk, please backup files if necessary.
Before we move to the key part of this article, we would like to let you that delete disk or partition can be done under disk management easily.
Deleted wrong disk volume? Get help here -> Undo diskpart delete volume
How do I delete a disk or all partitions? -> Open disk management, right click the disk instead of the volume, and then click ‘Delete’. (All data and partition scheme will be removed.)
If a partition cannot be deleted in disk management, try diskpart to delete partition or disk.
Content Navi
- Diskpart delete partition/volume force
- Diskpart delete volume VS delete disk
- Diskpart delete partition override (delete efi system partition included)
- Diskpart delete recovery partition
How to delete partition/disk with diskpart and force delete?
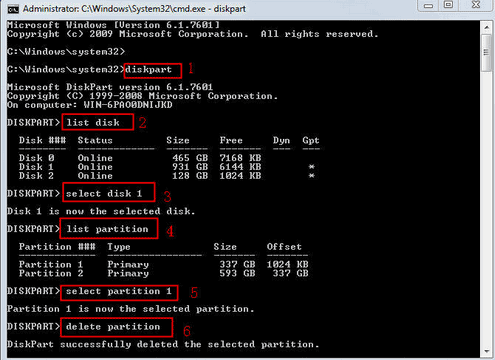
Diskpart delete partition shall be in the following order
- Start cmd in admin mode, and type ‘diskpart’
- type ‘list disk’
- type ‘select disk *’
- type ‘list partition’
- type ‘select partition *’
- type ‘delete partition’ (you may also try ‘delete partition override’ to force delete partition with diskpart cmd)
Video — how to delete partition using cmd
Diskpart delete partition VS delete disk
Diskpart delete disk shall be in the following order
- Start cmd in admin mode, and type ‘diskpart’
- type ‘list disk’
- type ‘select disk *’
- type ‘list partition’
- type ‘select partition *’
- type ‘delete partition override’
If there are more than 1 partition on your disk, you need to delete them one by one if you want to delete the whole disk information and partition scheme.
The difference between delete partition and delete disk is delete partition by diskpart can be done with ‘delete partition’ or ‘delete partition overide’, the later one is force delete partition, while delete disk needs to delete partition several times when the disk contains several partitions.
Diskpart delete partition override including efi system partition
Video — How To Delete All Partitions Disk/SSD Using Windows 10 including the system partition
To delete the EFI system partition, you just need to select it in diskpart cmd, and then use cmd ‘delete partition override’ and then it could be deleted. You may go back to disk management to check if the system partition efi volume was deleted.
Diskpart delete recovery partition
If you want to delete recovery partition in Windows 11/10/8/7, you may try the following steps. Here is also a video that shows the details.
- Start cmd and type ‘diskpart’
- type ‘list disk’
- type ‘select disk *’
- type ‘list part’ or ‘list partition’
- type ‘select partition *’ or ‘sel par *’ (replace the * with the number of your system partition number)
- type ‘del par override‘ or ‘delete partition override’
Video — how to delete recovery partition on Windows pc
Also read: diskpart clean to remove partition and data
Deleted wrong disk volume? Get help here -> Undo diskpart delete disk
Related Articles
- format fs=ntfs quick
- format fs=ntfs quick there is no volume selected
- format fs=fat32 quick
- diskpart format sd
- diskpart format usb
- diskpart fix raw partition
Содержание
- Способ 1: «Управление дисками»
- Способ 2: «Командная строка»
- Способ 3: Сторонняя программа
- Способ 4: При установке Windows 10
- Вопросы и ответы
Способ 1: «Управление дисками»
В операционной системе Windows 10 предусмотрено встроенное средство для работы с разделами жесткого диска, с помощью которого можно не только распределять место, но и удалять или переименовывать тома:
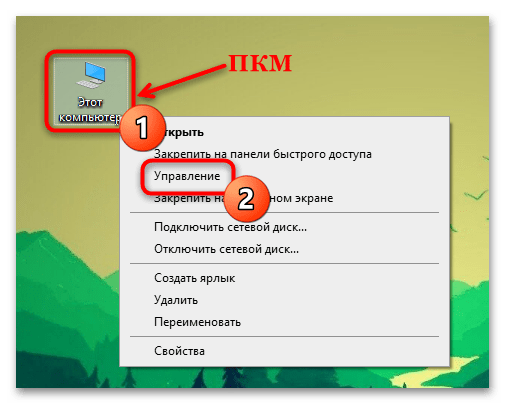
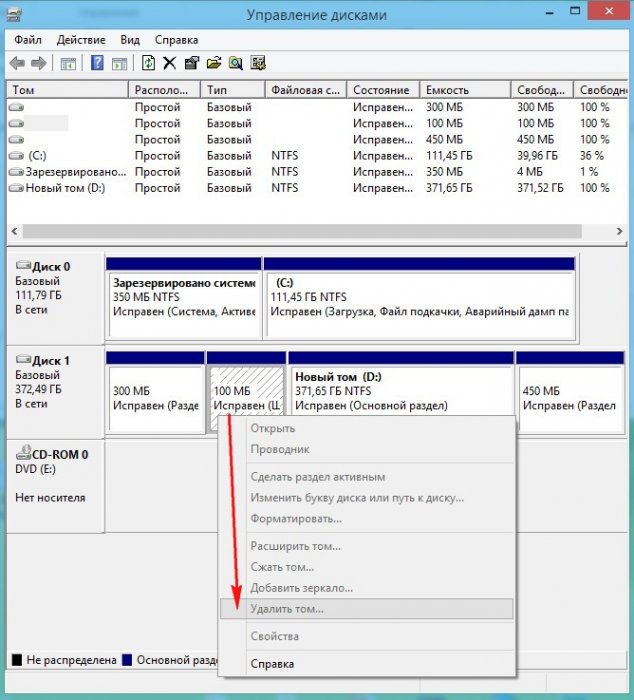
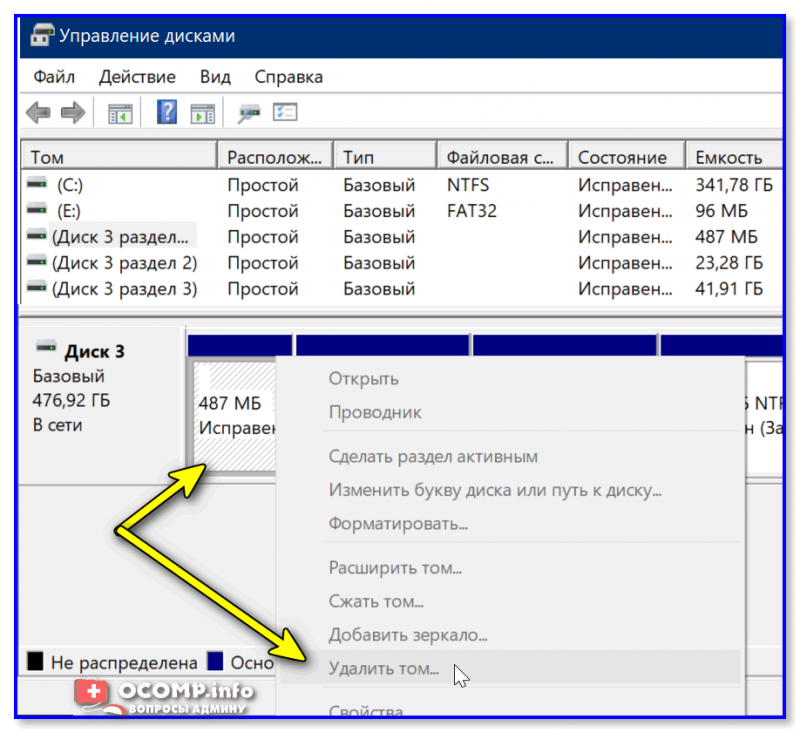
- Кликните правой кнопкой мыши по иконке «Этот компьютер» на рабочем столе. Выберите из меню пункт «Управление».
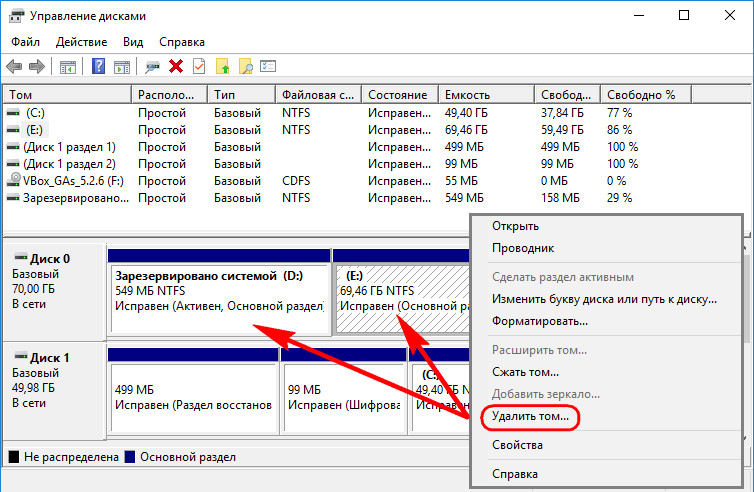
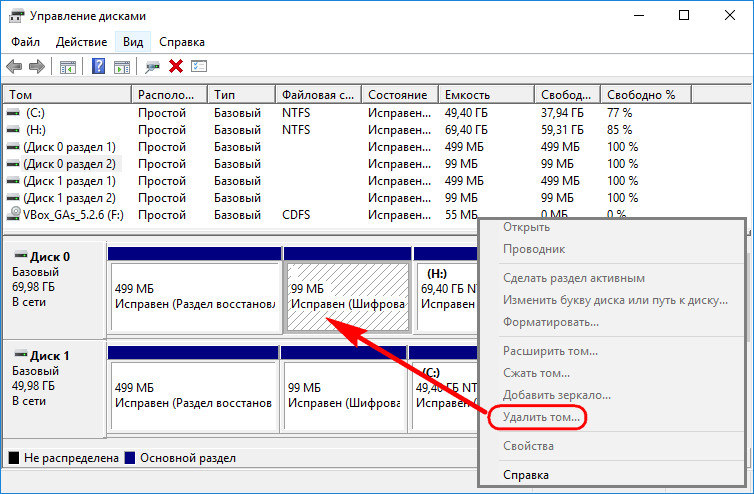
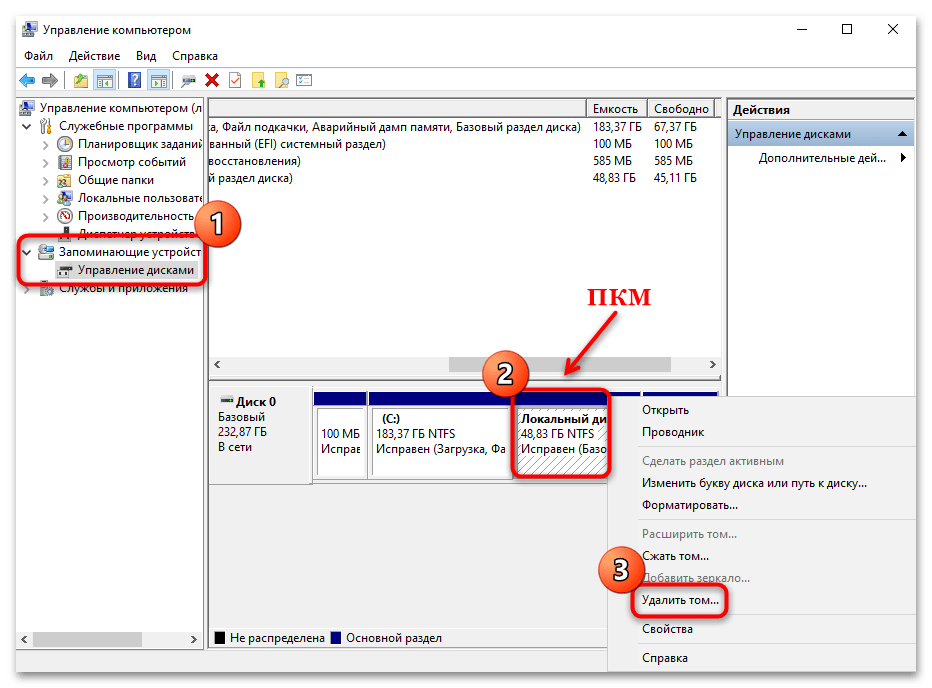
- В окне «Управление компьютером» на панели слева в меню «Запоминающие устройства» нажмите на «Управление дисками». В главном окне выберите тот раздел, который нужно удалить. Щелкните по нему правой кнопкой мыши и щелкните по строчке «Удалить том».
- Кнопкой «Да» в системном окне с предупреждением подтвердите, что соглашаетесь безвозвратно удалить все данные с выбранного раздела.
Читайте также: Включение ярлыка «Этот компьютер» в Windows 10
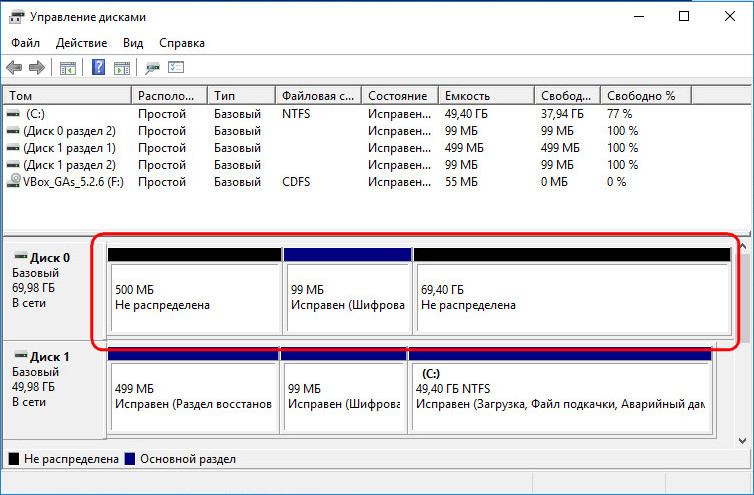
После этого появится свободное пространство, которое можно самостоятельно распределить по различным разделам.
Читайте также: Способы объединения разделов на жестком диске
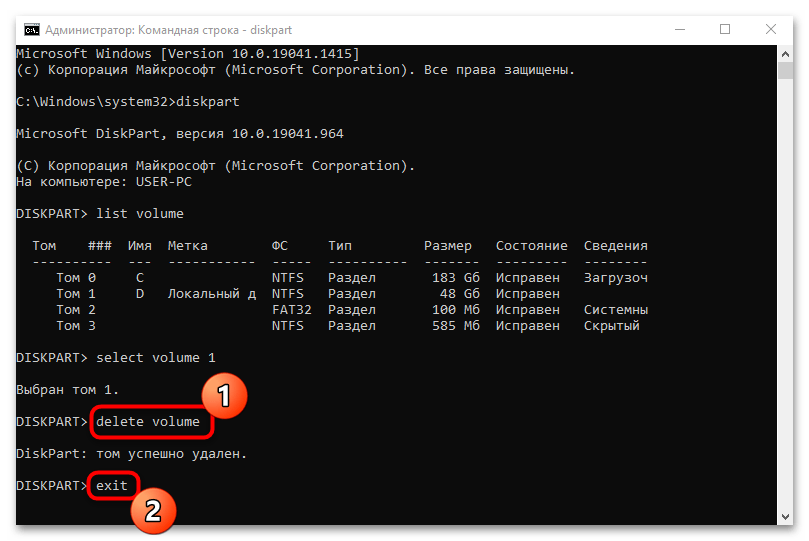
Способ 2: «Командная строка»
Еще один способ удалить разделы диска в Windows 10 – это использование классической консоли «Командная строка», причем пользователь будет проводить процедуру с помощью специальных команд:
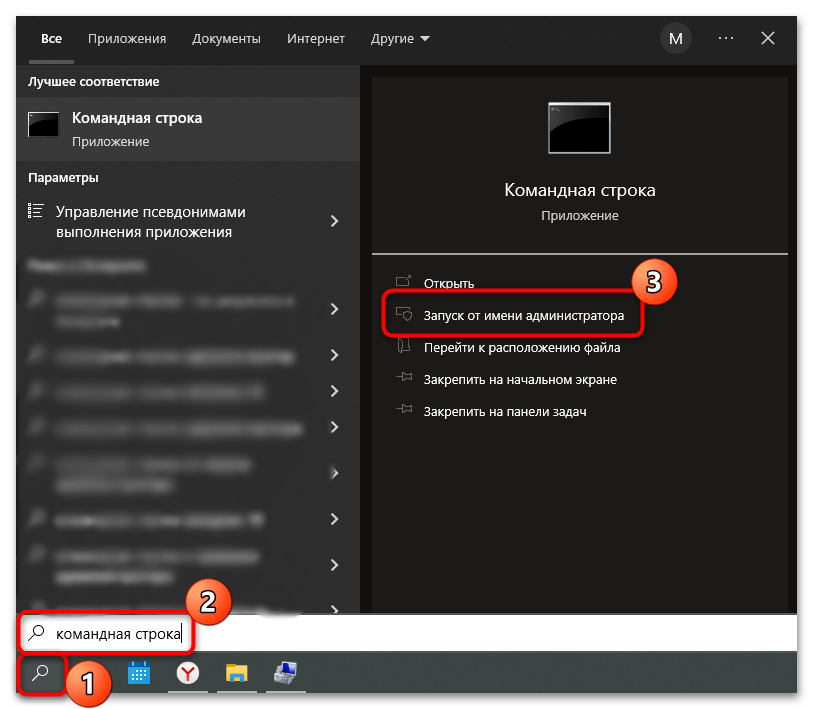
- Запустите «Командную строку» от имени администратора. Для этого впишите соответствующий запрос в системной поисковой строке и выберите тип запуска.
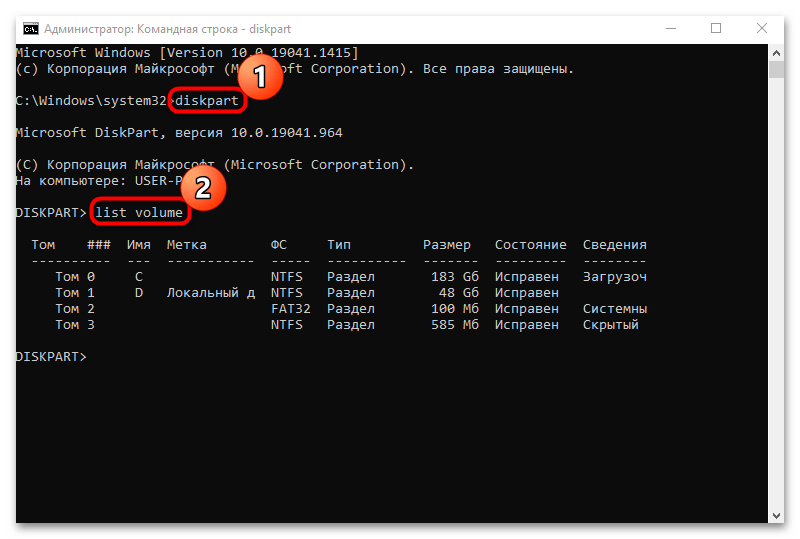
- Чтобы открыть утилиту по работе с дисками, введите команду
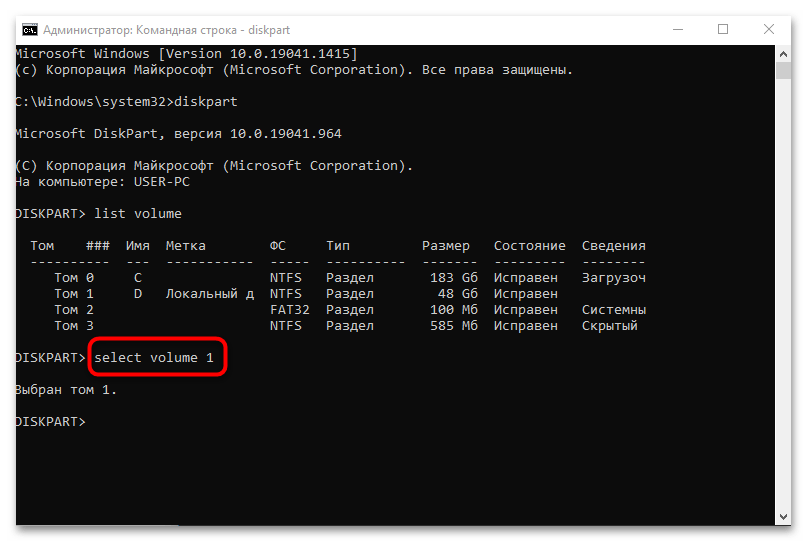
diskpartи нажмите на клавишу «Enter». Для упорядочивания разделов по номерам напишитеlist volume, затем снова нажмите на «Enter». Здесь надо отыскать тот раздел, который следует удалить, отталкиваясь от размера, и определить его порядковый номер (столбец «Том»). - В этом шаге необходимо выбрать логический диск, чье удаление планируется. Для этого наберите
select volumeи номер диска. Подтвердите действие клавишей «Enter». - Следующая команда удаляет выбранный раздел. Введите
delete volumeи подтвердите ввод клавишей «Enter». Командаexitозначает закрытие консоли и завершение работы с дисками.
Если команда для удаления диска delete volume не сработала, можно попробовать другую — delete volume override.
Способ 3: Сторонняя программа
Для взаимодействия с разделами жестких дисков имеются специальные программы, алгоритм работы которых напоминает встроенное средство Windows. Но отличие в том, что они предоставляют расширенные функции, например копирование данных с одного тома на другой или быстрое конвертирование диска в другую файловую систему.
Одним из таких приложений является Macrorit Partition Expert. Несмотря на то, что его интерфейс не русифицирован, он интуитивно понятный и простой.
Скачать Macrorit Disk Partition Expert
- Скачайте и установите программу — она бесплатная. После первого запуска она соберет информацию об используемых дисках. В главном окне выберите тот раздел, который нужно удалить, затем нажмите на функцию «Delete Volume», расположенную на левой панели инструментов.
- В новом окне подтвердите действие.


На этом удаление раздела завершено, а освободившееся место станет нераспределенным. К слову, с помощью средств программы его можно добавить к другим дискам.
Помимо Macrorit Disk Partition Expert, есть и другой софт для управления дисками. Их принцип работы схож, но приложения могут отличаться по функциям и возможностям. Некоторые распространяются бесплатно, за другие потребуется заплатить, чтобы воспользоваться всеми функциями в полной мере.
Читайте также: Программы для работы с разделами жесткого диска
Еще один способ для опытных пользователей – это удаление раздела на этапе установки Windows. В этом случае нужно точно знать, где и какой раздел, чтобы случайно не повредить другой том, например системный.
Для удаления раздела используйте установочный носитель, к примеру флешку, и на этапе выбора логического диска для инсталляции ОС укажите тот, который нужно убрать, после чего нажмите на кнопку «Удалить».
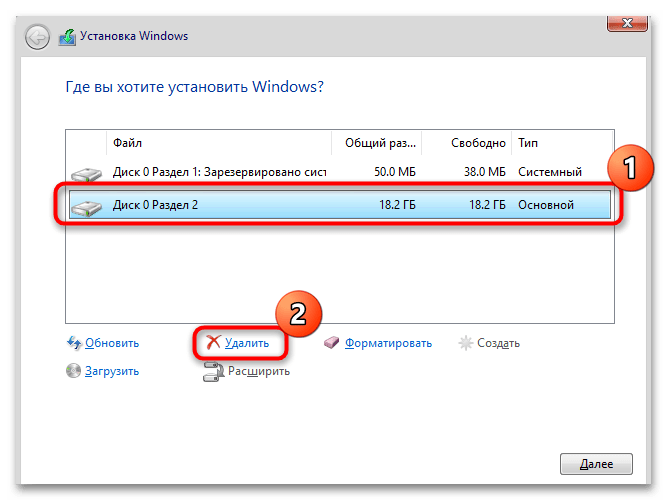
Если дальнейшие манипуляции с установкой Windows не планируются, прервите ее, извлеките загрузочный носитель и запустите систему в обычном режиме.
Читайте также: Руководство по созданию загрузочной флешки с Windows 10
Еще статьи по данной теме:
Помогла ли Вам статья?
Как удалить все разделы на жёстком диске в командной строке
Привет всем! Предлагаю небольшой рассказ, в котором мне пришлось разрешить одну небольшую задачу с помощью командной строки, думаю он будет нелишним в вашей копилке знаний.
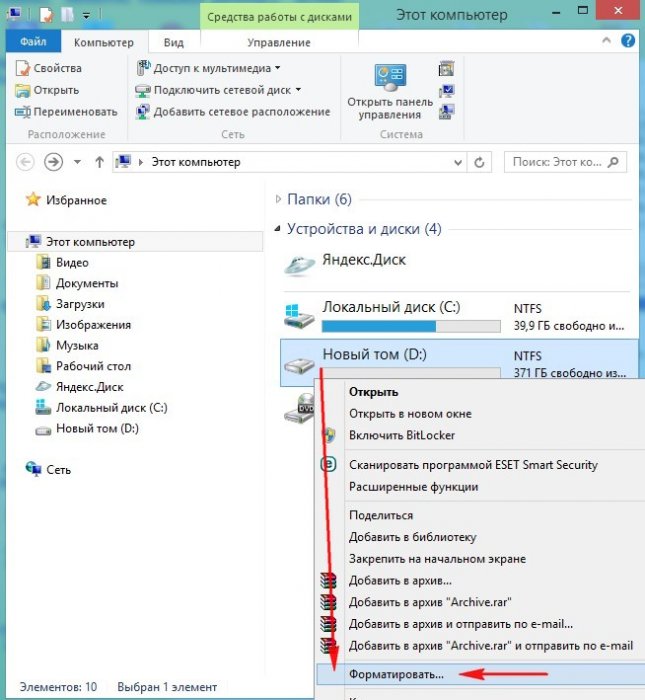
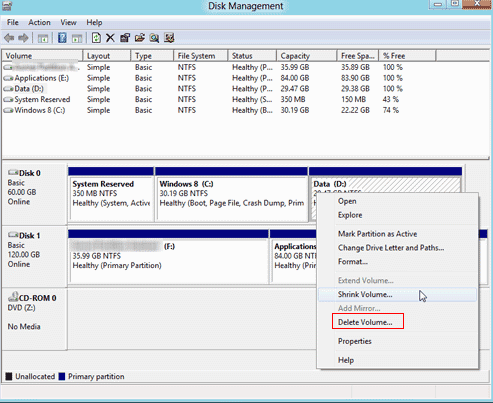
Купил мой приятель компьютер с твердотельным накопителем (объём 120 ГБ) вместо жёсткого диска, на простой винчестер элементарно не хватило денег (все знаем, что цены на комплектующие сейчас поднялись). Наш общий знакомый решил его выручить и предложил ему на время для хранения файлов не совсем старый жёсткий диск SATA II объёмом 400 ГБ. Вместе они подсоединили жёсткий диск к компьютеру, вошли в Управление дисками и увидели, что на диске имеется четыре раздела и из всех четырёх нормально удаляется только один. Дело в том, что на этом жёстком диске была раньше установлена заводская Windows 8.1 со всеми служебными разделами. Если щёлкнуть на первом, втором и последнем разделе правой мышью, то из всех вариантов будет предложена только «Справка»

Недолго думая, они решили, что если форматировать диск (D:) в окне «Компьютер», то удалятся все разделы. Войдя в окно «Компьютер», они щёлкнули правой кнопкой мыши на диске (D:) и просто форматировали его.
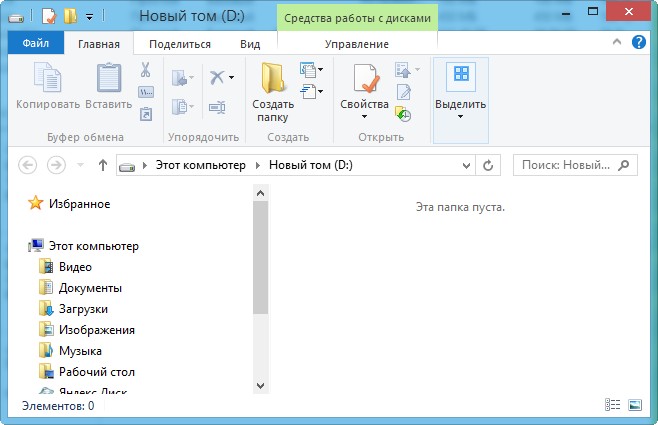
Опять войдя в управление дисками они увидели, что все разделы целые и невредимые, тогда они просто удалили диск (D:). В очередной раз увидев, что с другими разделами ничего не произошло, терпенье их закончилось и они позвонили мне.
Как удалить все разделы на жёстком диске в командной строке
Запускаем командную строку от имени администратора.
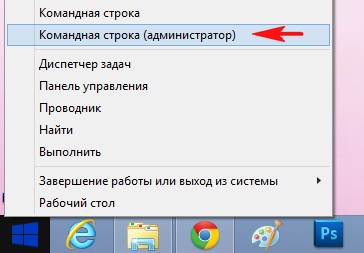
Для управлением дисковым пространством вводим команду diskpart.
Отображаем список всех дисков командой list disk, нажимаем Enter.
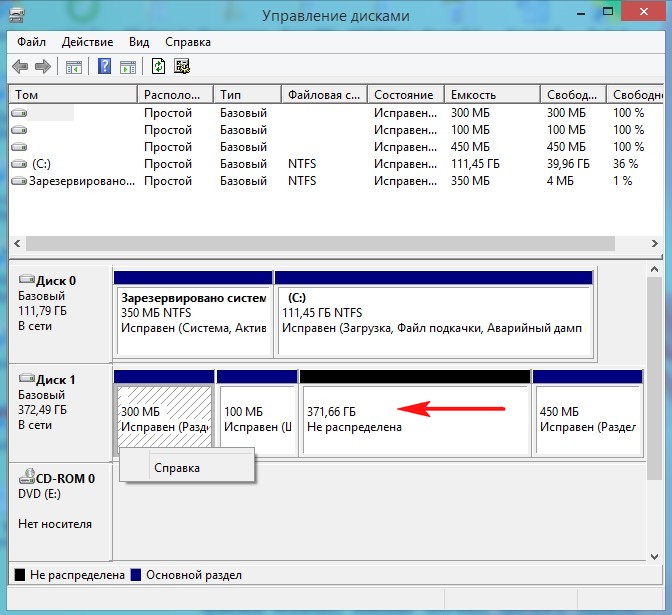
Выходит список всех дисков подключенных к компьютеру. Будьте внимательны, ошибаться здесь нельзя. По объёму можно догадаться, что Диск 0 (111 Gбайт) это твердотельный накопитель SSD, а Диск 1 (372 Gбайт), это есть наш второй жёсткий диск, на котором нужно удалить все разделы.
Выбираем для удаления всех разделов Диск 1 (372 Gбайт), вводим команду select disk 1. (Осторожно! В вашем случае цифра в команде может быть другой).
Вводим команду clean и жмём Enter, происходит полное удаление всех разделов на втором жёстком диске.
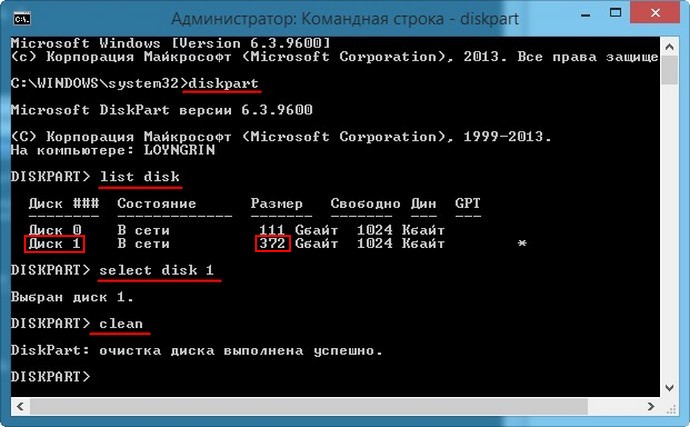
Всё готово, закрываем командную строку.
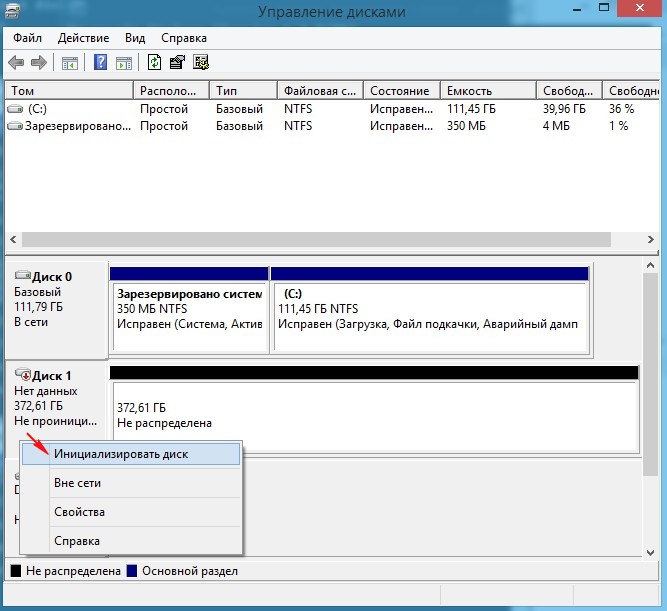
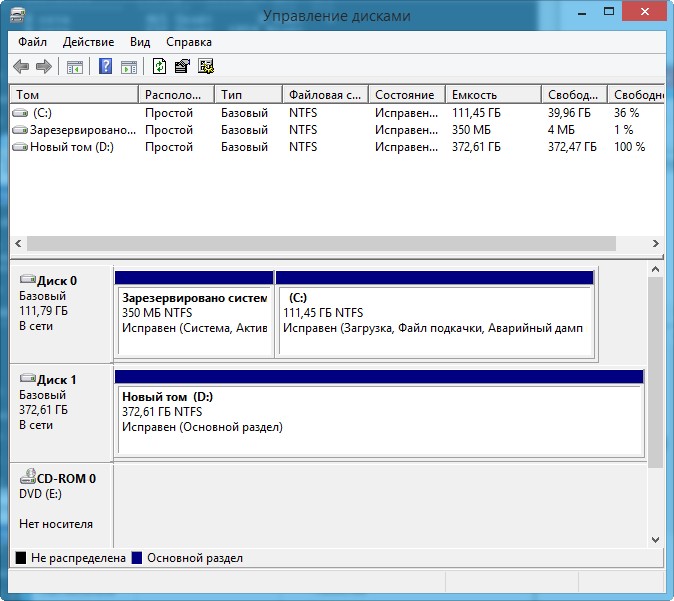
Входим в управление дисками и видим, что все разделы на винчестере удалены.
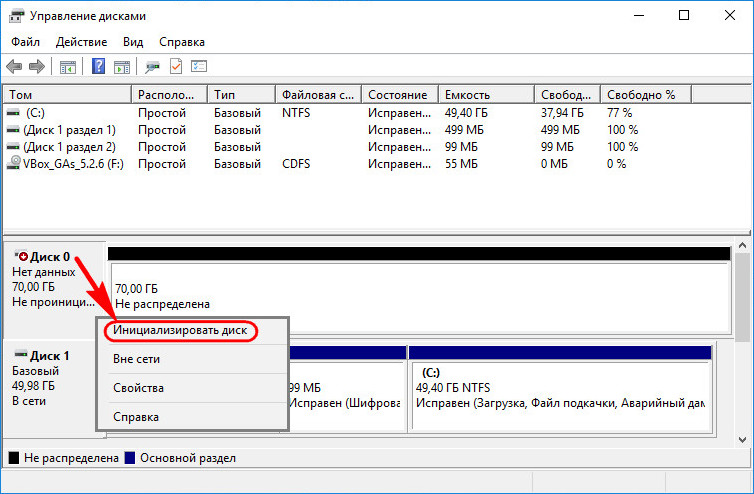
Перед созданием одного единственного раздела диск нужно инициализировать. Щёлкаем на Диске 1 правой мышью и выбираем Инициализировать диск.
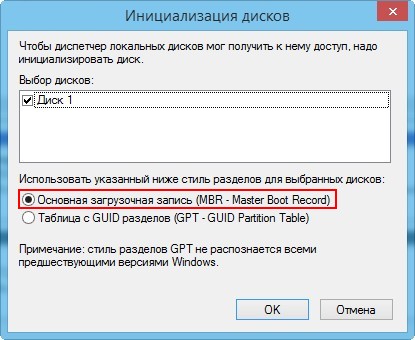
Если вы не знаете что такое GPT, то выберите Основная загрузочная запись MBR и нажмите ОК..
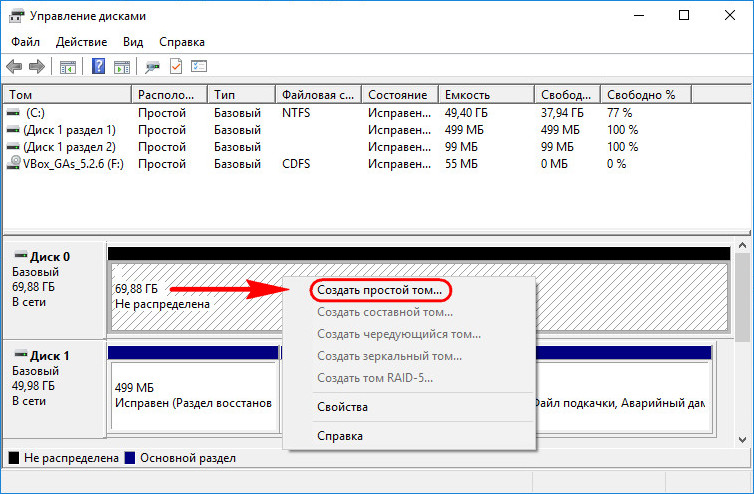
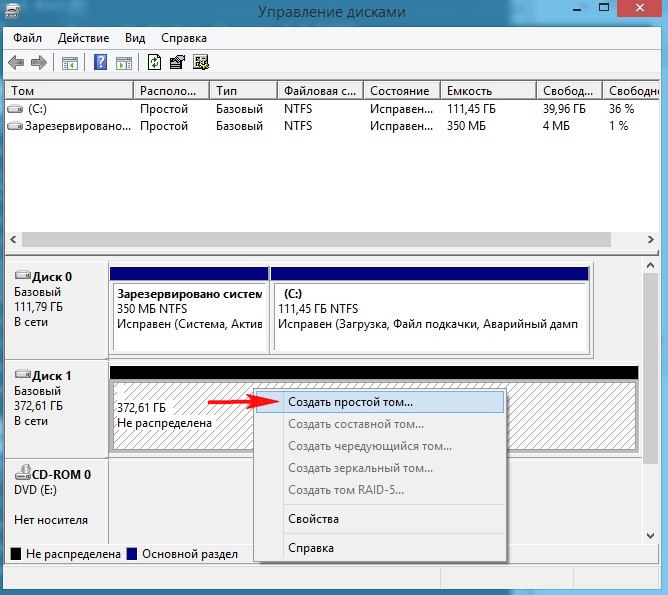
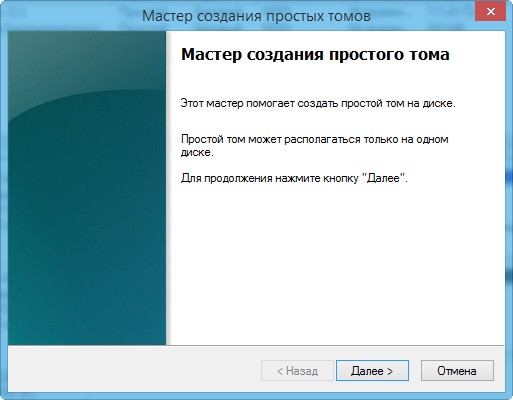
Теперь создаём простой том. Щёлкаем правой мышью на нераспределённом пространстве и выбираем Создать том.
Далее
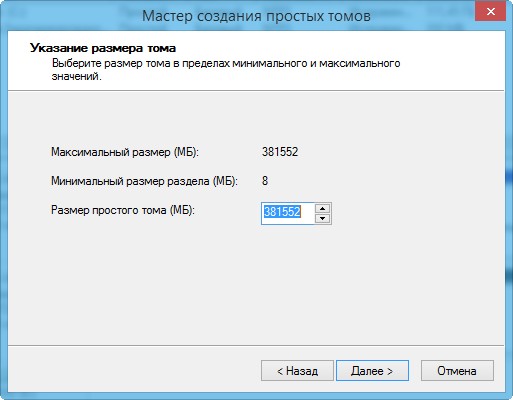
Далее
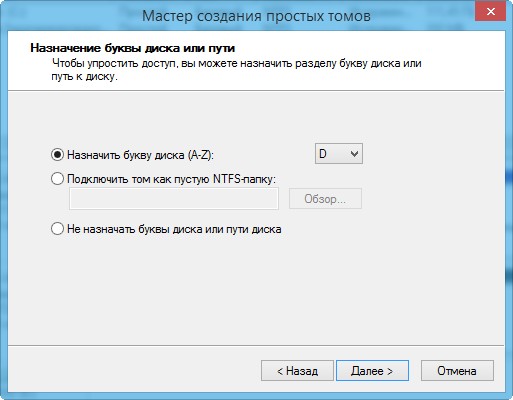
Выбираем букву диска или оставляем предложенную системой.
Файловая система NTFS.
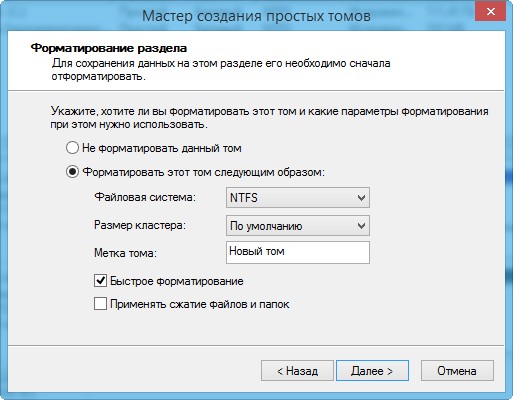
Готово.
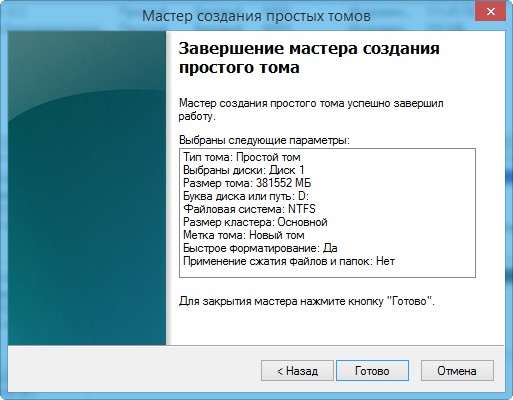
Результат.
Статьи по этой теме:
1. Как удалить Windows или любой другой раздел (в том числе и служебный) жёсткого диска или SSD.
2. Как удалить в командной строке любой раздел жёсткого диска (включая системные и служебные)
3. Как форматировать или удалить диск C:
4. Что содержат скрытые разделы ноутбука с Windows 10

Вопрос от пользователя
Здравствуйте.
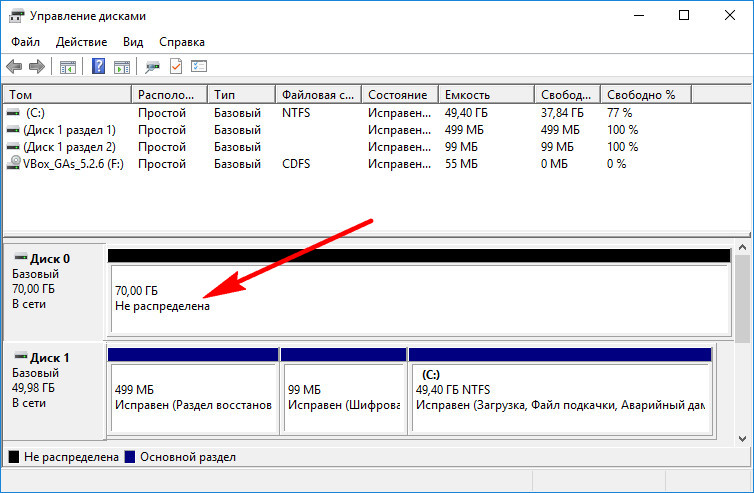
Подключил старый диск от ноутбука к ПК (на нем раньше была установлена Windows). Мне нужно полностью удалить с него всю информацию и очистить. Но сделать это не получается, т.к. «удалить том» в управлении дисками горит серым (не нажимается).
Хотел через установку Windows всё почистить, но установщик при попытке удаления раздела сообщает, что операция не может быть выполнена, т.к. ошибка… (и там длинная строка с нулями и единицами). Что можно сделать?
Здравствуйте.
Для начала хочу сразу же всех предупредить — перед удалением разделов с диска, проверьте, все ли нужные файлы вы с него скопировали (прим.: ведь данные на нем после этой операции станут недоступными!).
Кроме этого, с помощью способов, приведенных мной ниже — можно легко очистить и диск с вашей текущей ОС Windows (поэтому, будьте аккуратны и не торопитесь, особенно, если слабо представляете, как и что…).
Теперь к теме…
*
👉 Важно!
На всякий случай перед процедурой очистки диска — рекомендую подготовить парочку аварийных флешек. Они могут очень пригодиться!
Удалить том недоступен… (функция не активна). Управление дисками в Windows 10
*
Содержание статьи
- 1 Способы удаления всех разделов с диска
- 1.1 Через командную строку (Diskpart)
- 1.2 С помощью загрузочной флешки
- 1.2.1 LiveCD
- 1.2.2 Установочной (с Windows)

→ Задать вопрос | дополнить
Способы удаления всех разделов с диска
Пару слов о том, почему управление дисками не позволяет удалить разделы.
Дело в том, что на дисках, на которых была установлена Windows — помимо локального и под ОС разделов, создается и скрытый системный раздел EFI на 100-512 МБ (для GPT-дисков). Разумеется, он явл. защищенным и приложение управление дисками не позволяет его удалить (т.к. есть вероятность, что не искушенный пользователь «снесет» загрузчик ОС Windows).
Кроме этого, если говорим о ноутбуках, — то на них могут быть разделы с бэкапом (резервной копией). При помощи них пользователь (якобы) может откатить устройство к базовому состоянию (прим.: в ряде случаев, правда, функция не работает… — поэтому это место «расходуется» в пустую).
Само собой, все эти скрытые системные разделы не всегда просто удалить. Однако, нет ничего невозможного… (если диск исправен!). 👌
*
Через командную строку (Diskpart)
Итак, сначала нужно запустить 👉 командную строку от имени администратора.
Далее в ней нужно последовательно ввести нижеперечисленные команды, я их выделил коричневым (после каждой нажимать Enter):
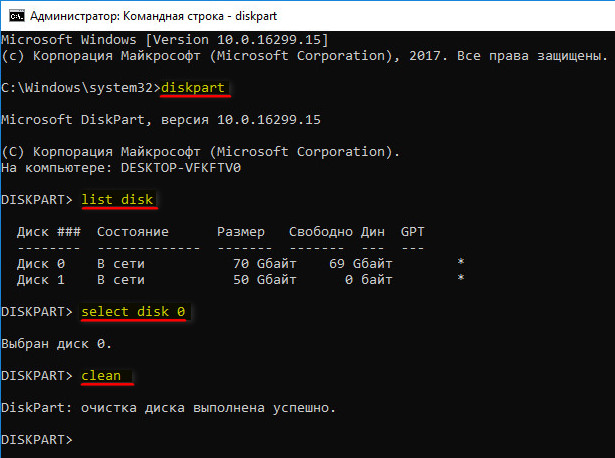
- diskpart (этим мы запускаем спец. утилиту для работы с дисками);
- list disk (эта команда покажет нам список накопителей, подключенных к ПК);
- select disk 1 (выбор диска для работы. Будьте внимательны: вместо «1», как у меня на скрине ниже 👇, вам нужно будет указать свой номер диска из списка накопителей);
- clean (после этой команды вся информация на выбранном диске будет удалена. В моем случае — на диске «1»! 👇)
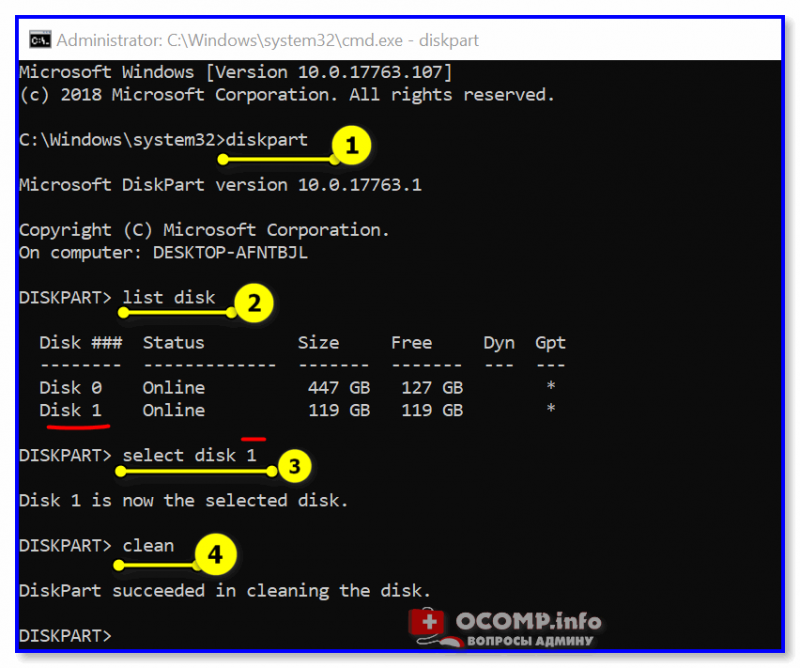
4-ре команды для очистки диска
Затем командную строку можно закрыть и запустить 👉 управление дисками — первое, что потребуется сделать — проинициализировать накопитель. Для этого просто кликните ПКМ (правой кнопкой мыши) по аббревиатуре «Disk…». См. пример ниже. 👇
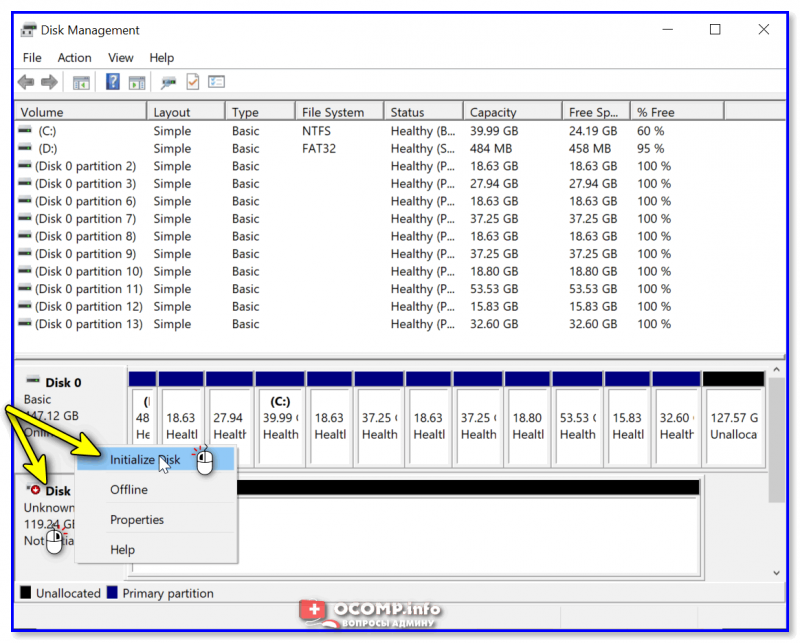
Инициализация диска
После указать разметку: GPT / MBR.
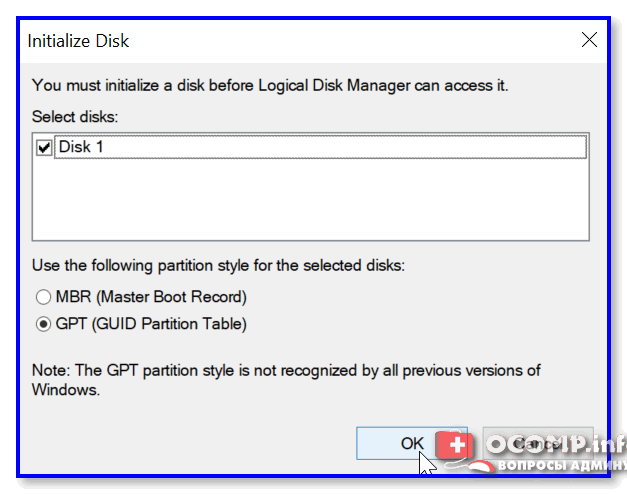
Выбор GPT (MBR)
Далее на диске можно создать раздел и отформатировать его. С этим, как правило, никаких проблем уже не возникает… 👌

Создание нового раздела NTFS — можно пользоваться
*
С помощью загрузочной флешки
Этот способ актуален для любых накопителей: защищенных, системных и т.д. и т.п. Будьте аккуратны, т.к. можно легко удалить и разметку с диска, на котором установлена ваша рабочая Windows (никаких ограничений в этом планет нет).
*
LiveCD
Как подготовить LiveCD: 👉 см. инструкцию
После загрузки с подготовленной LiveCD-флешки — рекомендую запустить утилиту MiniTool Partition Wizard (она позволяет выполнять весь спектр самых необходимых операции с HDD/SSD, флешками и пр. накопителями).
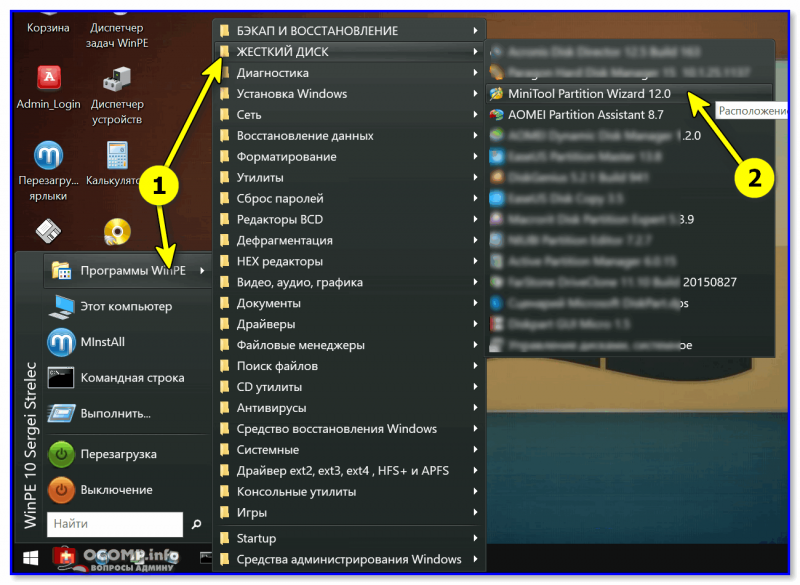
Запускаем программу MiniTool Partition Wizard
После запуска, программа представит список накопителей: нужно найти тот, с которого вы хотите удалить разметку, кликнуть по нему ПКМ и выбрать пункт «Удалить все разделы».
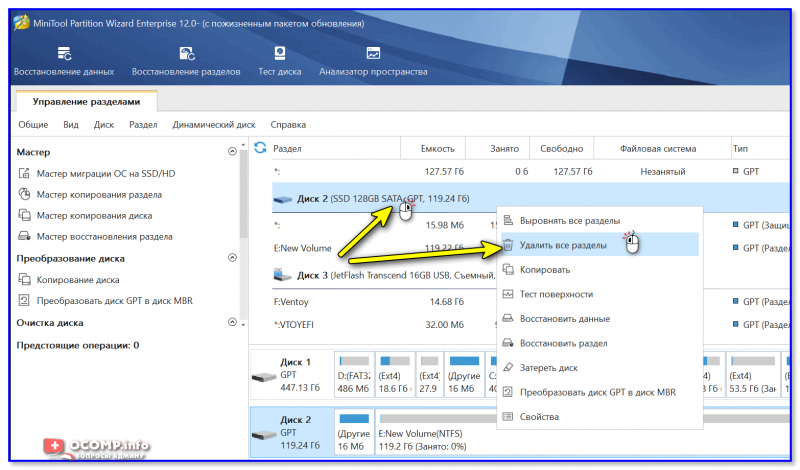
MiniTool Partition Wizard — удалить все разделы
Далее MiniTool Partition Wizard «попросит» подтвердить операцию, и нажать по кнопке «Применить».
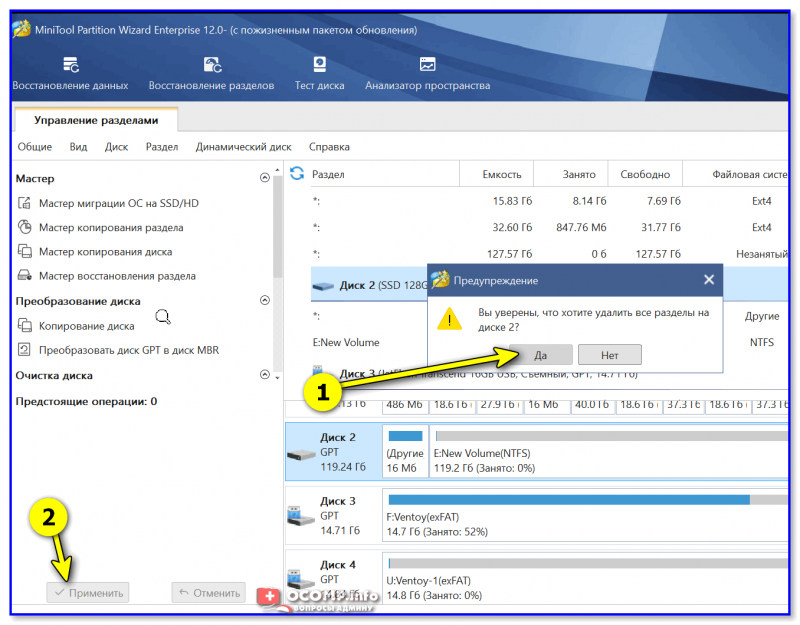
Подтверждаем операцию
Собственно, далее на этом диске можно создать новые разделы и начать его использование… См. скрины ниже. 👇
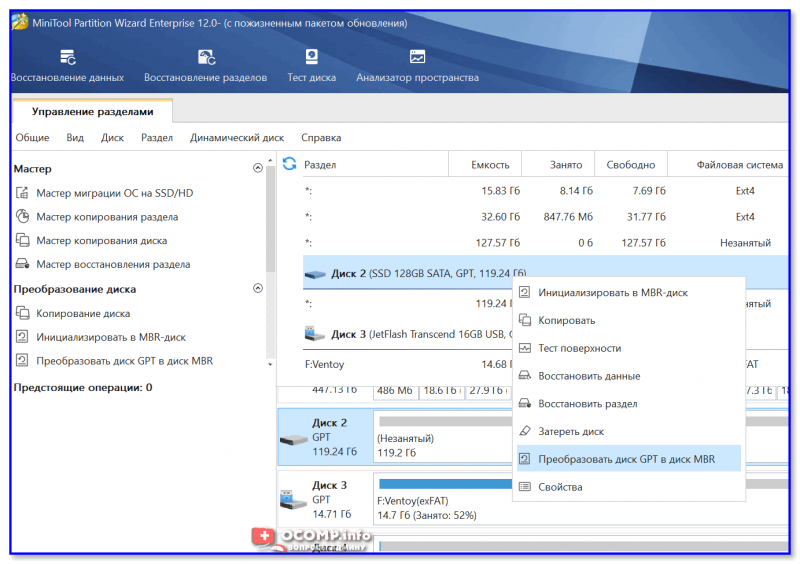
Преобразование (или создание нового раздела)

NTFS-раздел
*
Установочной (с Windows)
Вместо LiveCD можно загрузиться с обычной установочной флешки с Windows (правда, этот способ не всегда работает — поэтому предыдущий вариант предпочтительнее).
Собственно, для начала необходимо начать типовую установку Windows.
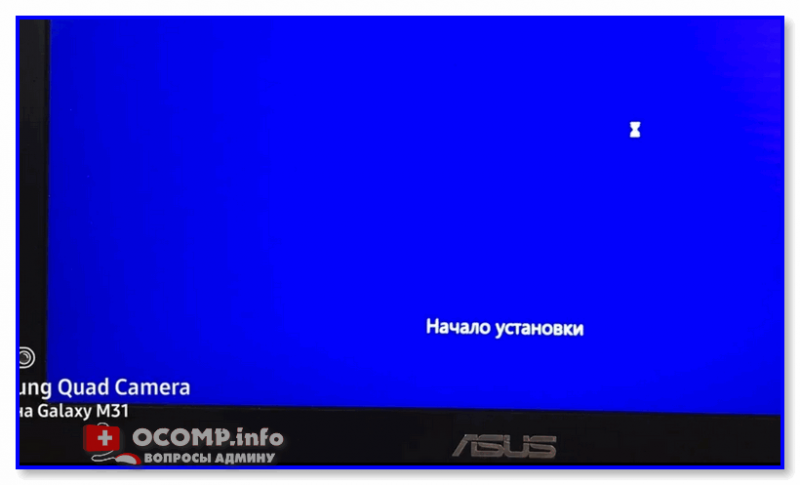
Запуск начала установки ОС Windows
Когда дойдете до окна «Выберите тип установки» — укажите второй вариант «Выборочная…». См. пример ниже. 👇
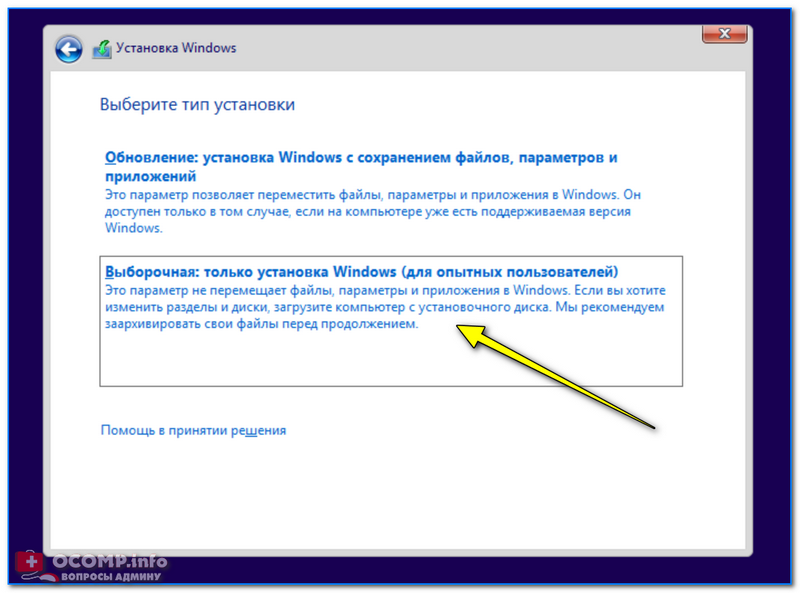
Выборочная установка!
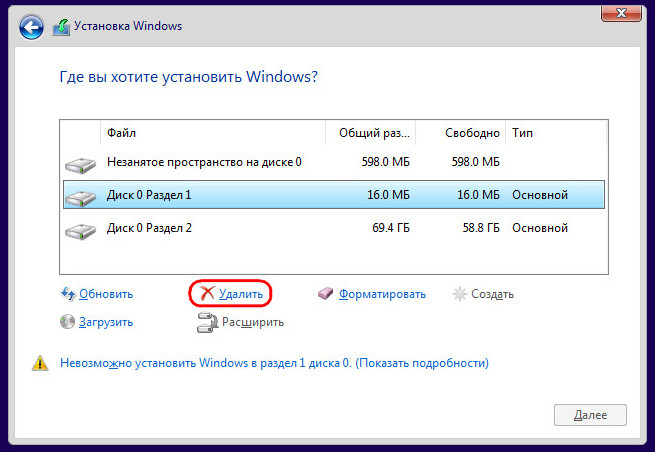
Далее установщик представит вам список накопителей (и разделы на них): выбираете ненужный, и кликаете по меню «Удалить».

Удаление раздела (где хотите установить Windows)
👉 Дополнение
Если на данном этапе возникнет ошибка — попробуйте запустить командную строку, нажав на сочетание Shift+F10. А далее проделать процедуру, описанную выше в статье (с Diskpart).
👉 Важно!
Если вы случайно удалили нужный раздел — не торопитесь! В большинстве случаев его можно восстановить, и все файлы будут на месте. Не так давно у меня была заметка по этой теме.
*
Дополнения по теме — приветствуются!
Успехов!
😉


Полезный софт:
-

- Видео-Монтаж

Отличное ПО для создания своих первых видеороликов (все действия идут по шагам!).
Видео сделает даже новичок!
-
- Ускоритель компьютера
Программа для очистки Windows от «мусора» (удаляет временные файлы, ускоряет систему, оптимизирует реестр).
Sometimes, you may want to delete all partitions on a hard disk on Windows XP, 7, 8, 10. For example, you may want to delete all partitions to clean up a disk. Or you may attempt to delete all partitions when you want to erase all data permanently on a disk of your computer. This article will introduce free methods to delete all partitions on Windows 10, 8, 7 and XP.
Free to Delete All Partitions on Internal Disk of Windows 10 8 7 XP
You may want to delete all partitions on an internal hard drive or an external USB drive on Windows. If you need to delete all partitions on an internal hard drive, you can use any of following methods:
Method1: Disk Management to Delete All Partitions in Windows for Free
No matter how many partitions it has on a hard disk, you can open Disk Management to delete all partitions on Windows computer. Before performing deleting in Windows Disk Management, please pay attention to following points:
1. You cannot delete a system partition on any Windows computer.
2. All data on the deleted partition would be erased permanently.
Now, follow the steps below to delete all partitions except system partition on Windows PC:
Step1. Open Disk Management on Windows computer. Right click any partition except system partition and select Delete Partition option. On Windows 7, 8, 10, you may select Delete Volume option.
Step2. Confirm to delete the selected partition, after which the selected partition would show as free space under Disk Management.
Step3. Repeat Step1 and Step2 to delete other partitions on the hard disk.
Well, Disk Management is only able to delete each partition one by one. You cannot delete all partitions on a disk at the same time.
Method2: Free Delete All Partitions Using Diskpart
Diskpart is a little more complex than Disk Management to delete all partitions on a computer because it does not have a user-friendly interface. However, if you have a little knowledge about computer, you will also find it easy to handle. Please follow the guide below:
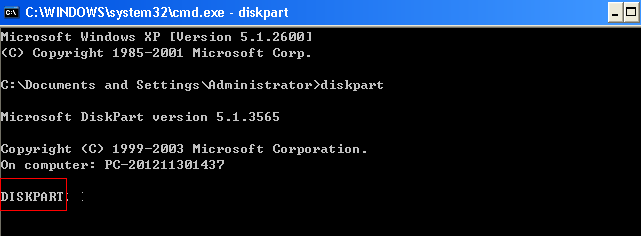
Step1. Open Command Line on Windows computer and then type diskpart
Step2. Type list disk
Step3. Type select disk number
e.g. Type select disk 0, select disk 1…It depends on which disk you want to delete.
Step4. Type list partition
Step5. Type select partition number (e.g. select partition 1, select partition 2)
Step6. Type delete partition
Method3: Delete All Partitions with Freeware for Windows XP 7 8 10
Whether you use Disk Management or Diskpart in Command Prompt, you need to delete every partition one by one. If there are several partitions on a disk, sometimes it may waste of time. If you want to delete all partitions on a disk at the same time with easier solution, you can use IM-Magic Partition Resizer. It is a free partition tool which is compatible with Windows XP, Vista, 7, 8, and 10 to delete all partitions within two simple steps:
Step1. Right click the target partition, and go to Delete Partition in the pop up option to remove one partition.
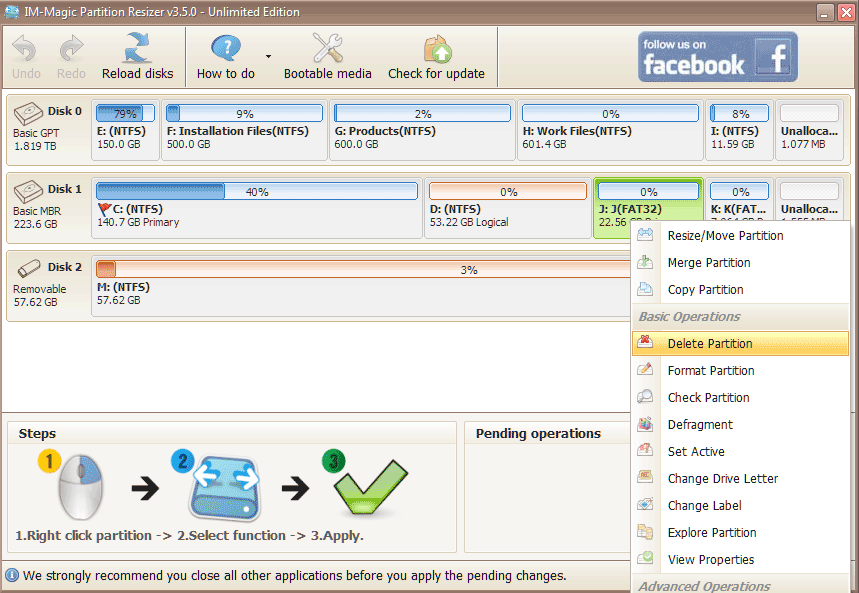
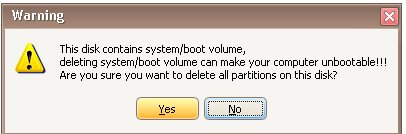
Note: If you want to delete all partitions on one disk, right click the disk (.e.g. disk 1) instead of partition and select «Delete All Partitions».
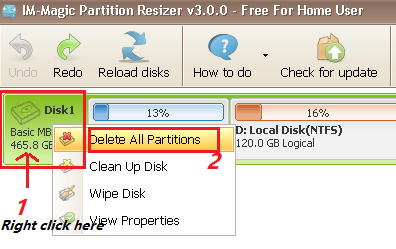
Step2. Confirm to delete the selected disk and then click «Apply Changes» button.
Delete All Partitions and Overwrite All Sectors
After deleting all partitions on a disk, the disk would show as unallocated space and all data has been erased forever. However, deleting partition does not overwrite all sectors on the disk. You may format the unallocated space to create new volume and redistribute sectors.
Delete All Partitions on USB Drive External HDD Windows XP 7 8 10
If you need to delete all partitions on a USB drive or external HDD, the method is a little different from that of deleting partitions on an internal hard disk.
You can connect a USB drive or external hard drive to Windows computer to save or transfer data. A USB flash drive or portable HDD works similarly to internal hard drive. You can partition a USB drive or removable hard drive into several partitions and even install Windows operating system on it. If you want to delete all partitions on a USB thumb drive or USB hard drive, please follow the steps below:
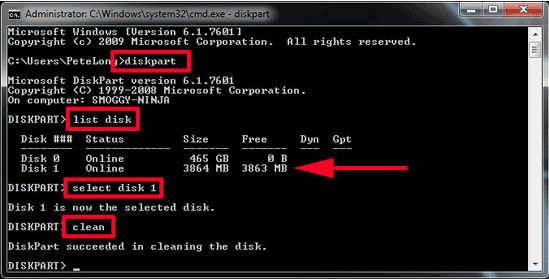
Step1. Open CMD and type diskpart
Step2. Type list disk > select disk number (e.g. select disk 2) > clean
Step3. Open Disk Management on your computer and you can see the USB or external hard drive shows as unallocated space. Right click the unallocated space and select New Simple Volume
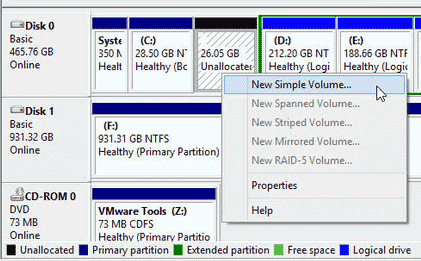
Step4. Follow the New Simple Volume Wizard and format the drive, after which you will see that the USB or external hard drive shows as a removable disk.
Download Proper Version of IM-Magic Partition Resizer
For Windows 11/10/8/7/Vista/XP/2000 ==> Download IM-Magic Partition Resizer Free
For Windows Server All versions ==> Download IM-Magic Partition Resizer Server
On Windows 10, a partition (or volume) is a logical division of the space on a physical storage drive with a specific file system and settings the system shows to the user as a separate drive.
Since a drive can hold many partitions, and sometimes, you may need to organize them, Windows 10 includes multiple tools to ease the process of removing those partitions you no longer need to make more space available to increase the size of another partition. Or you can also use the tools to clean the storage to prepare it with a different partition scheme and file system.
This guide will walk you through the steps to delete a partition on an internal or external drive using Disk Management, PowerShell, and Command Prompt.
Warning: These instructions will erase all the data stored inside the partition. If you have any important files you want to preserve, creating a backup of that data is recommended before proceeding.
How to delete a partition from Disk Management
To delete a partition (or volume) with Disk Management on Windows 10, use these steps:
- Open Start.
- Search for Disk Management.
- Select the drive with the partition you want to remove.
- Right-click (only) the partition you want to remove and select the Delete Volume option.
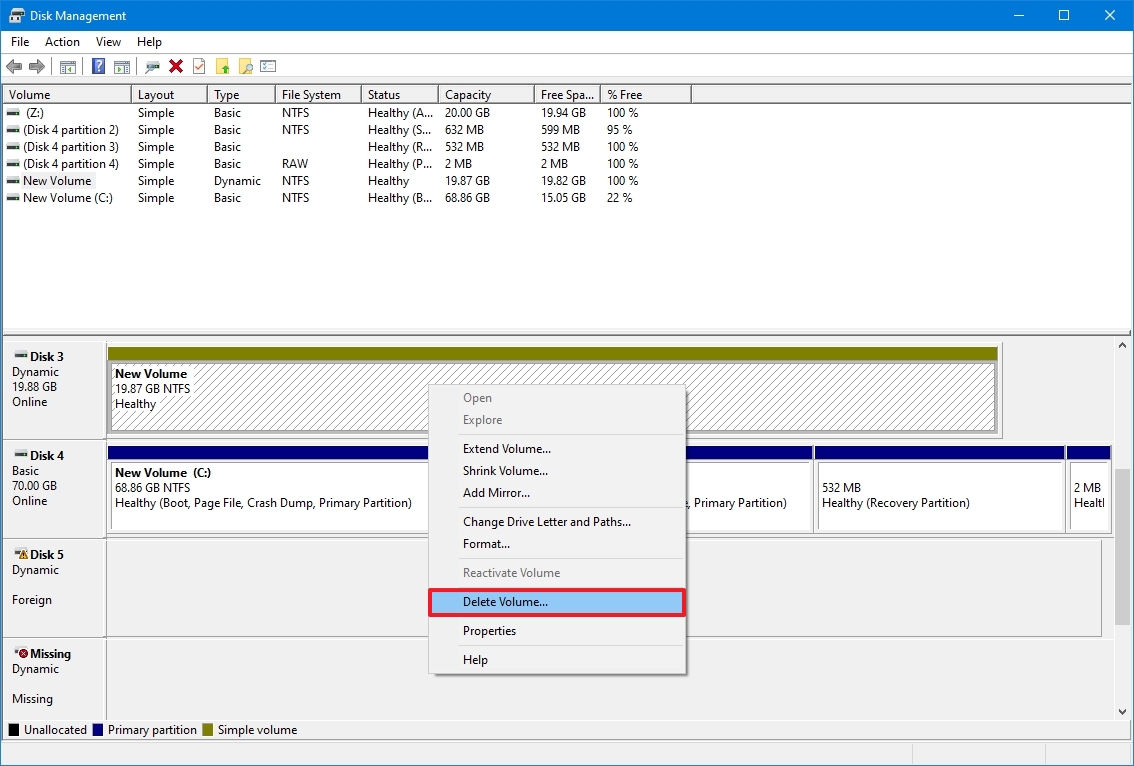
- Click the Yes button to confirm all the data will be erased.
Once you complete the steps, the partition and its contents will no longer be available on the drive making space available to expand another partition or format the drive with a new scheme.
How to delete a partition from PowerShell
On PowerShell, you have at least two different methods to remove a partition, including using the drive letter or partition number with different commands.
Delete partition with an assigned drive letter
To delete a partition that has an assigned letter, use these steps:
- Open Start.
- Search for PowerShell, right-click the top result, and select the Run as administrator option.
- Type the following command to get a list of all the available partitions and press Enter: Get-Volume
- Type the following command to delete the partition (and its contents) and press Enter: Remove-Partition -DriveLetter PARTITION-LETTER
In the command, make sure to replace «PARTITION-LETTER» with the letter of the partition you want to delete. For example, this command deletes the Z partition: Remove-Partition -DriveLetter Z
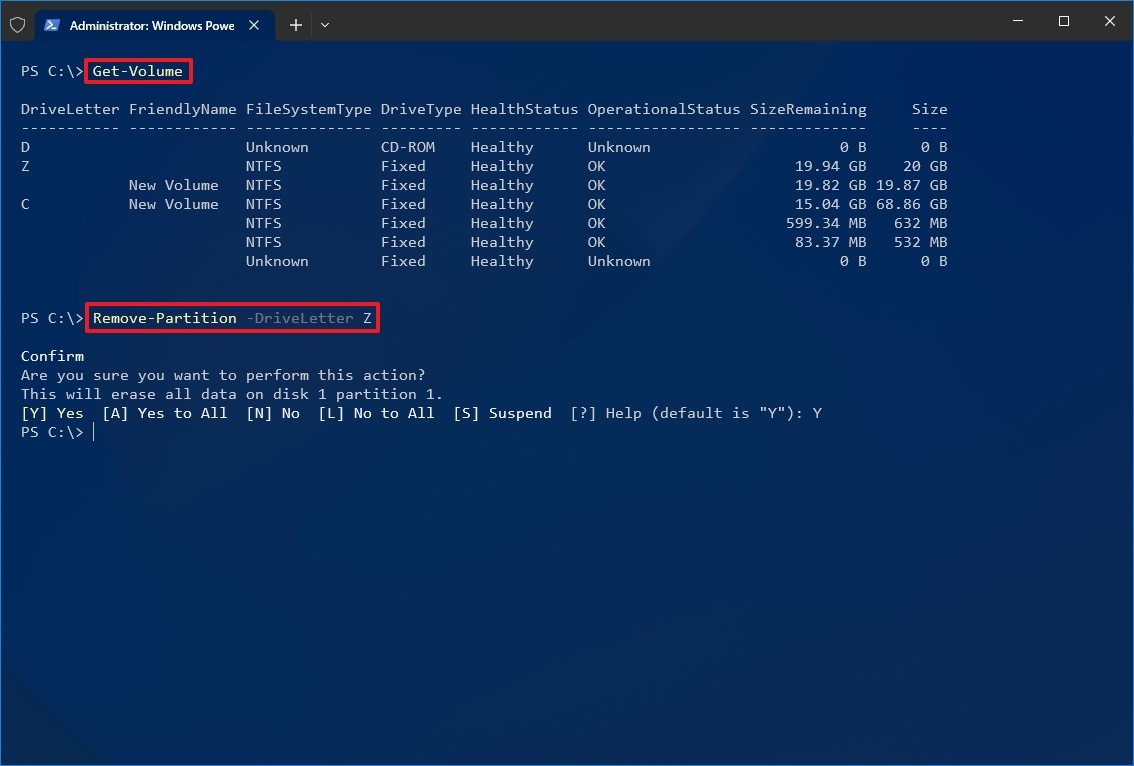
- Type Y and press Enter to confirm the deletion.
After you complete the steps, the partition will be removed, and the space on the drive will show as unallocated.
Delete partition without an assigned drive letter
To delete a partition without a drive letter on Windows 10, use these steps:
- Open Start.
- Search for PowerShell, right-click the top result, and select the Run as administrator option.
- Type the following command to get a list of all the available drives and press Enter: Get-Disk
- Type the following command to get a list of all the available partitions on the drive and press Enter: Get-Partition -DiskNumber DRIVE-NUMBER
In the command, make sure to replace «DRIVE-NUMBER» for the number of the drive with the partition you want to erase (see step 3). For example, this command lists the partitions of drive 5: Get-Partition -DiskNumber 5
- Type the following command to delete the partition (and its contents) and press Enter: Remove-Partition -DiskNumber DRIVE-NUMBER -PartitionNumber PARTITION-NUMBER
In the command, make sure to replace «DRIVE-NUMBER» and «PARTITION-NUMBER» with the number of the drive and partition you want to delete. For example, this command deletes partition number 1 in drive 2: Remove-Partition -DiskNumber 1 -PartitionNumber 2
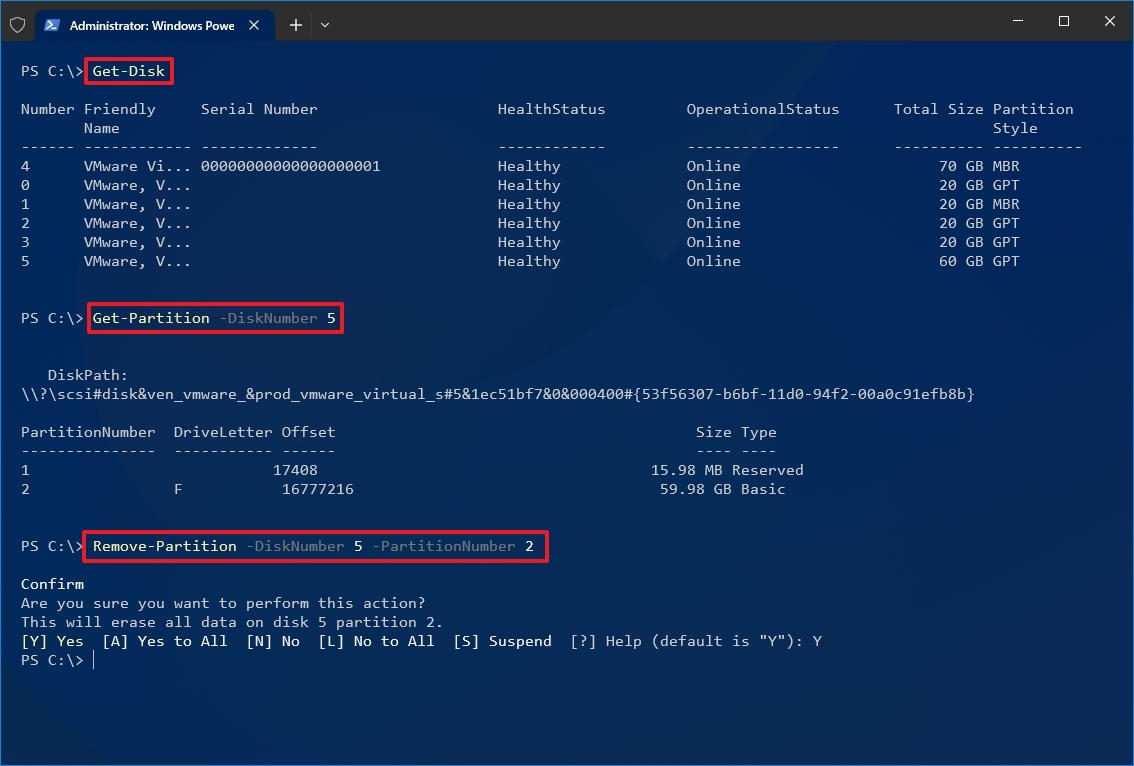
- Type Y and press Enter to confirm the deletion.
Once you complete the steps, the command will erase the partition from the hard drive you specified in the command.
How to delete a partition from Command Prompt
Alternatively, you can use the DiskPart command line with Command Prompt to delete a storage partition in at least two different ways.
Delete partition with volume command
To quickly delete a partition with the volume command, use these steps:
- Open Start.
- Search for Command Prompt, right-click the top result, and select the Run as administrator option.
- Type the following command to start diskpart and press Enter: diskpart
- Type the following command to get a list of all the available volumes and press Enter: list volume
- Type the following command to select the volume you want to delete and press Enter: select volume VOLUME-NUMBER
In the command, make sure to replace «VOLUME-LETTER» for the letter of the volume you want to delete. For example, this command deletes the volume number 6: select volume 6
- Type the following command to delete the volume from the drive and press Enter: delete volume
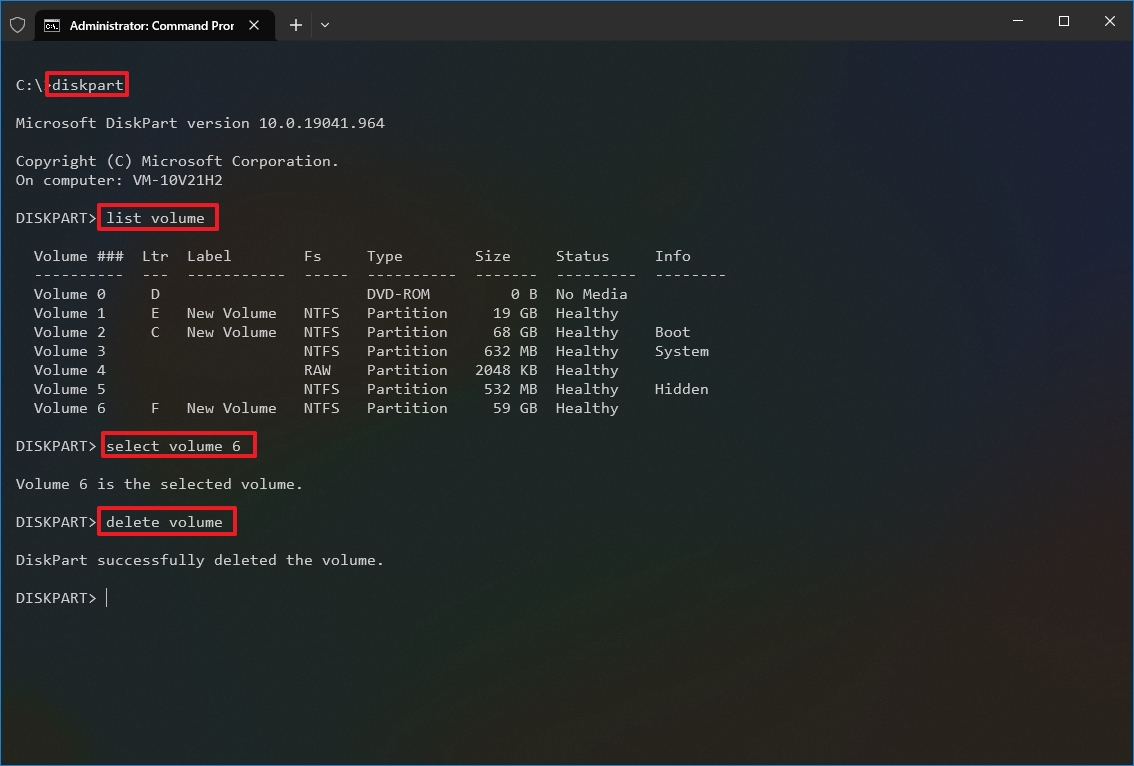
After you complete the steps, the volume and its data will no longer be available on the drive.
Delete partition with partition command
To delete a specific storage partition with a variant of the DiskPart command, use these steps:
- Open Start.
- Search for Command Prompt, right-click the top result, and select the Run as administrator option.
- Type the following command to start diskpart and press Enter: diskpart
- Type the following command to get a list of all the available drives and press Enter: list disk
- Type the following command to select the drive with the partition you want to delete and press Enter: select disk DRIVE-NUMBER
In the command, make sure to replace «DRIVE-NUMBER» for the number of the drive with the partition you want to delete (see step 4). For example, this command selects disk number 5: select disk 5
- Type the following command to list all the available partitions in the drive and press Enter: list partition
- Type the following command to select the partition you want to delete and press Enter: select partition PARTITION-NUMBER
In the command, make sure to replace «PARTITION-LETTER» with the letter of the partition you want to delete. For example, this command deletes partition number 1: select partition 2
- Type the following command to delete the partition from the drive and press Enter: delete partition
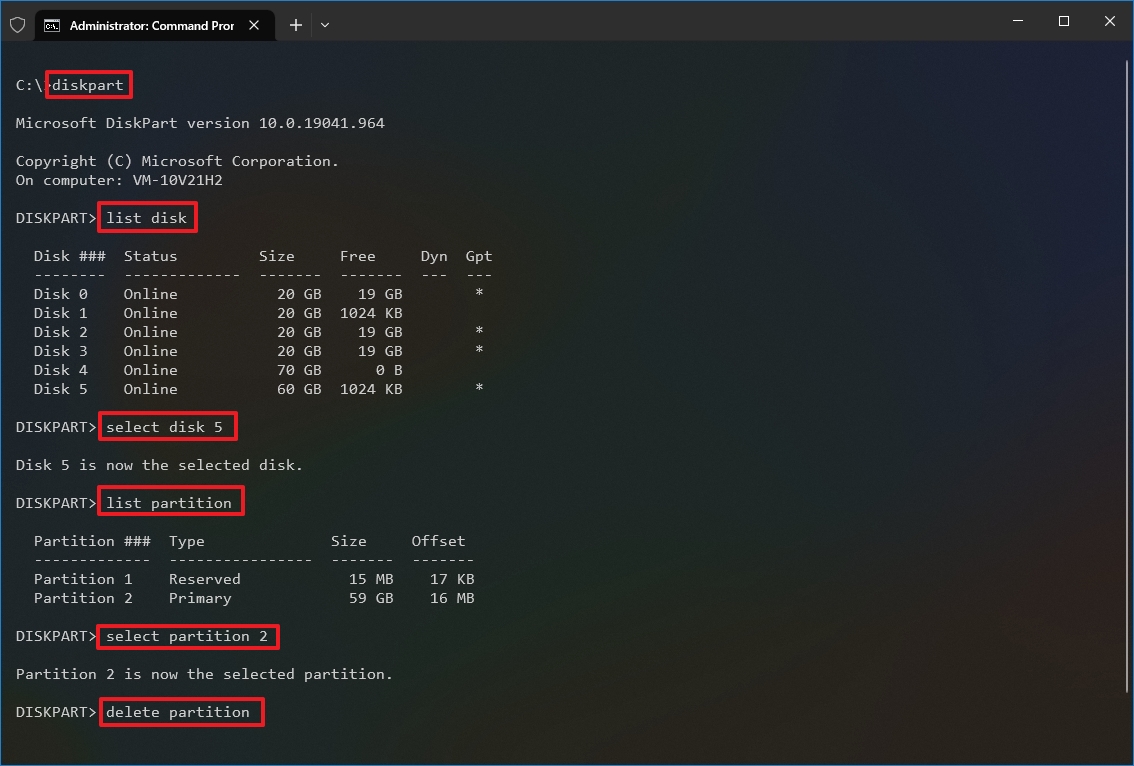
Once you complete the steps, the partition will be erased from the drive, making available the space to create a new partition with a different file system or extend another volume.
More resources
For more helpful articles, coverage, and answers to common questions about Windows 10 and Windows 11, visit the following resources:
- Windows 11 on Windows Central — All you need to know
- Windows 10 on Windows Central — All you need to know

(opens in new tab)
Cutting-edge operating system
A refreshed design in Windows 11 enables you to do what you want effortlessly and safely, with biometric logins for encrypted authentication and advanced antivirus defenses.
Get the best of Windows Central in in your inbox, every day!
Mauro Huculak is technical writer for WindowsCentral.com. His primary focus is to write comprehensive how-tos to help users get the most out of Windows 10 and its many related technologies. He has an IT background with professional certifications from Microsoft, Cisco, and CompTIA, and he’s a recognized member of the Microsoft MVP community.