Содержание
- Убираем предупреждение о неполадках диска
- Способ 1: Проверка диска
- Способ 2: Отключение отображения ошибки
- Заключение
- Вопросы и ответы
Жесткие диски имеют свойство приходить в негодность из-за повышенной нагрузки, некачественного исполнения или по другим, в том числе и не зависящим от пользователя причинам. В некоторых случаях операционная система может сообщить нам о возникших неполадках с помощью окна с предупреждением. Сегодня мы поговорим о том, как исправить такую ошибку.
Убираем предупреждение о неполадках диска
Решить проблему с появляющимся системным предупреждением можно двумя способами. Смысл первого заключается в проверке и исправлении ошибок, а второго – в отключении самой функции вывода этого окна.
При появлении данной ошибки в первую очередь необходимо выполнить резервное копирование всех важных данных на исправный носитель – другой «хард» или флешку. Это обязательное условие, так как при проверке и других манипуляциях диск может «умереть» окончательно, забрав с собой всю информацию.
Читайте также: Программы для резервного копирования
Способ 1: Проверка диска
В операционную систему Windows встроена утилита для проверки установленных дисков на наличие ошибок. С ее помощью также можно и восстановить проблемные сектора, если они возникли по программным причинам («софтовые бэды»). В том же случае, если имеют место физические повреждения поверхности или неисправность контроллера, то данные действия не приведут к желаемому результату.
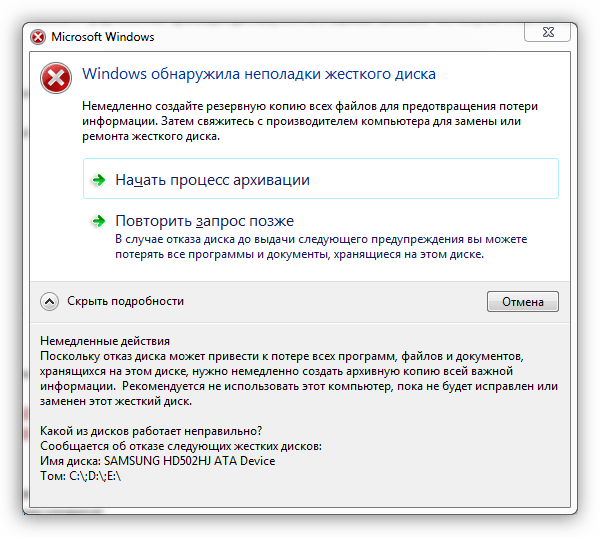
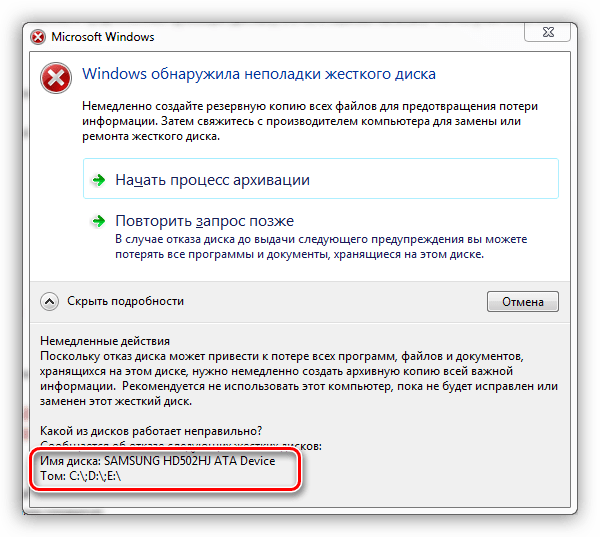
- Для начала определим, с каким «хардом» или разделом случилась беда. Сделать это можно, кликнув по кнопке возле слов «Показать подробности». Нужная нам информация находится в самом низу.

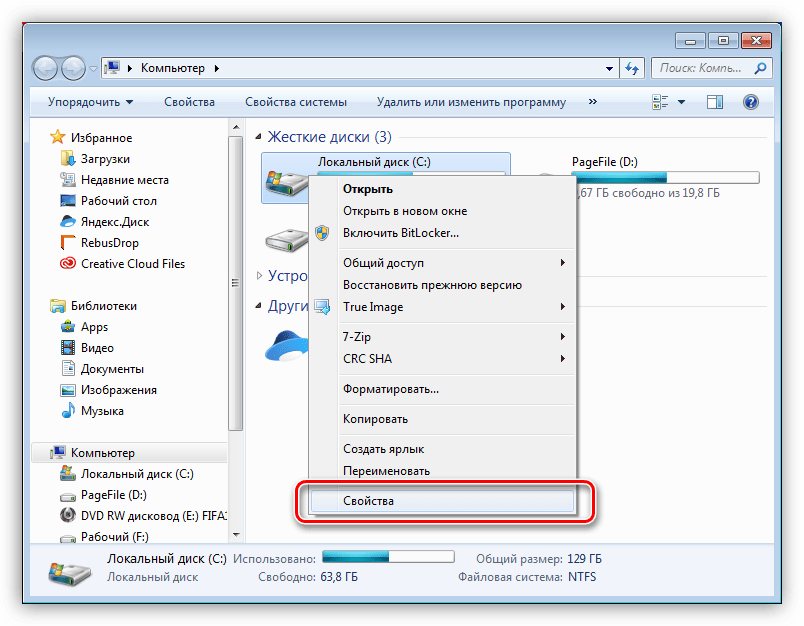
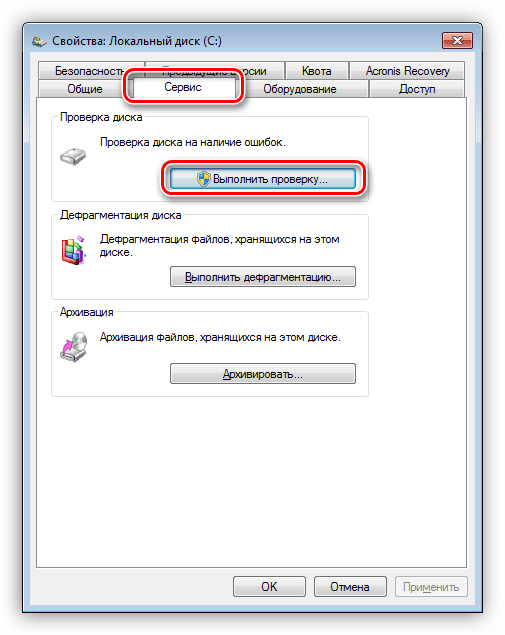
- Открываем папку «Компьютер», кликаем ПКМ по проблемному диску и выбираем пункт «Свойства».

- Переходим на вкладку «Сервис» и в блоке с названием «Проверка диска» нажимаем кнопку, указанную на скриншоте.

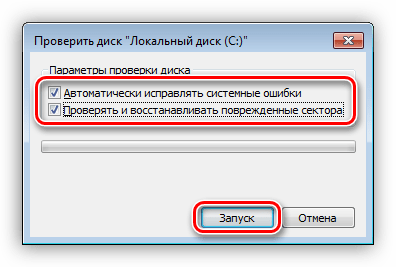
- Ставим все флажки и жмем «Запуск».

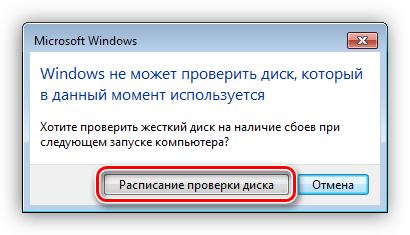
- Если данный «хард» в настоящее время используется, то система выдаст соответствующее предупреждение, а также предложение выполнить проверку при загрузке. Соглашаемся, нажав «Расписание проверки диска».

- Повторяем вышеуказанные действия для всех разделов, которые мы определили в пункте 1.
- Перезагружаем машину и ждем окончания процесса.
Если после окончания работы утилиты предупреждение продолжает появляться, то переходим к следующему способу.
Способ 2: Отключение отображения ошибки
Перед тем как отключать данную функцию, необходимо убедиться в том, что система ошиблась, а с «хардом» на самом деле все в порядке. Для этого можно воспользоваться специальными программами – CrystalDiskInfo или HDD Health.
Подробнее:
Как пользоваться CrystalDiskInfo
Как проверить жесткий диск на работоспособность
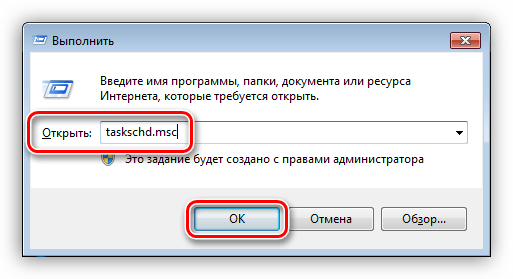
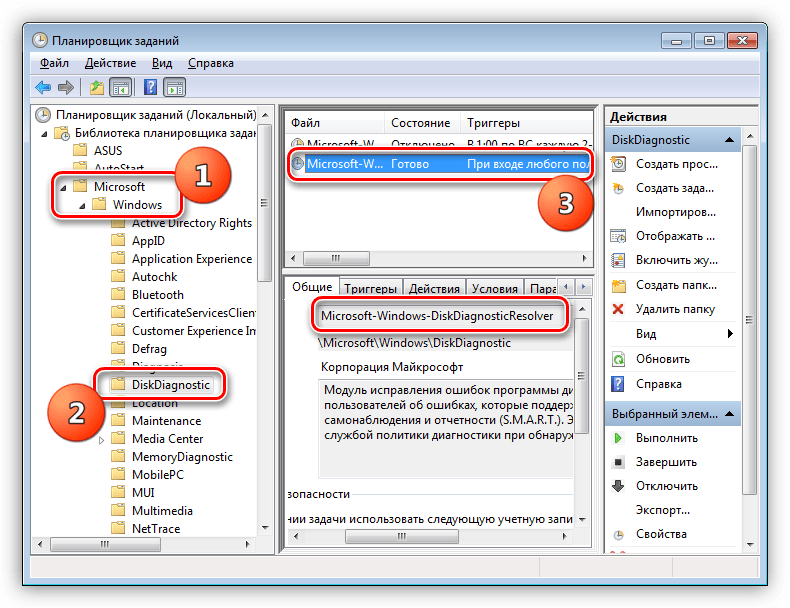
- Переходим к «Планировщику заданий» с помощью строки «Выполнить» (Windows + R) и команды
taskschd.msc
- Открываем по очереди разделы «Microsoft» и «Windows», кликаем по папке «DiskDiagnostic» и выбираем задачу «Microsoft-Windows-DiskDiagnosticResolver».

- В правом блоке нажимаем на пункт «Отключить» и перезагружаем компьютер.
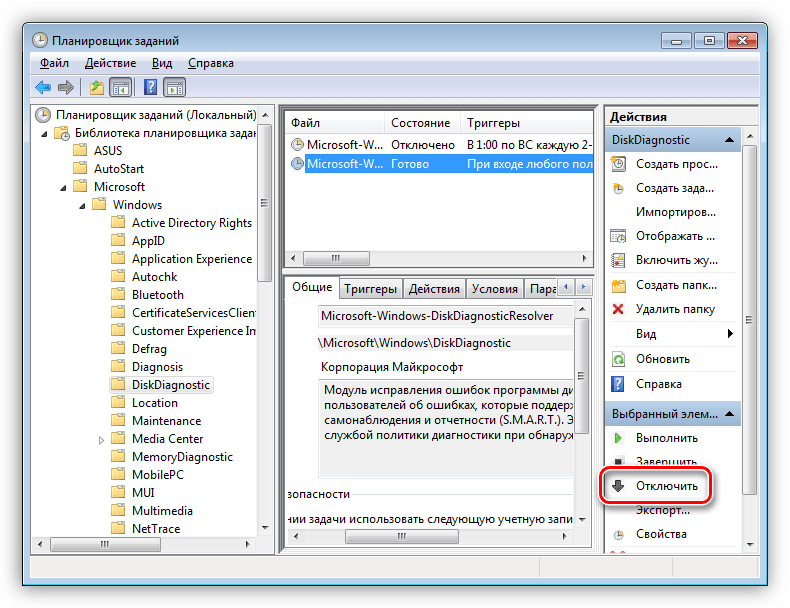
Этими действиями мы запретили системе показывать окно с обсуждаемой сегодня ошибкой.
Заключение
С жесткими дисками, а точнее, с информацией, записанной на них, нужно быть предельно внимательным и осторожным. Всегда делайте резервные копии важных файлов или храните их в облаке. Если же проблема вас настигла, то эта статья поможет ее решить, в противном же случае придется купить новый «хард».
Еще статьи по данной теме:
Помогла ли Вам статья?
| Workable Solutions | Step-by-step Troubleshooting |
|---|---|
| Fix 1. Use system file checker to fix hard disk error | Step 1: Type cmd in the search bar and click Enter; Step 2:Type sfc /scannow and hit Enter…Full steps |
| Fix 2. Run CHKDSK to fix the hard disk problem |
Method 1: Step 1: Press «Win+R» keys to open Run and type cmd and hit Enter to open Command Prompt…Full steps (Clean Genius) Method 2: Step 1: Click «File Showing» to enter the next step…Full steps |
| Fix 3. Use partition manager software to check and repair hard disk/drive errors | Step 1: Right-click the target partition that has a problem; Step 2: Choose «Advanced» > «Check File System»….Full steps |
Windows Detected a Hard Disk Problem, Help!
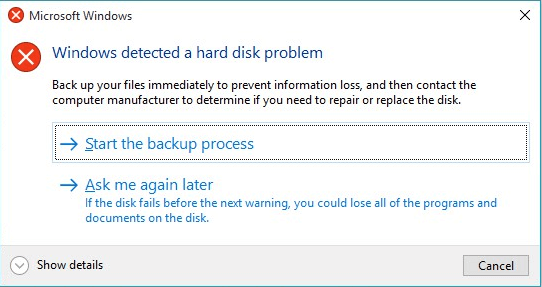
«Have you ever met this issue that your computer suddenly pops up an error message, warning you ‘Windows detected a hard disk problem’?
This morning after I started my PC, the error message keeps popping up, telling me that ‘Windows detected a hard disk problem’ and asking me to start the backup process. It was quite confusing, and I don’t know how did this problem happen to my computer. And I’m wondering what reasons can cause a hard disk problem and how to fix this issue. Please do help me if you know how to fix the hard disk problem on Windows PC. And I’m using Windows 8. Thank you in advance.»
It seems that the hard disk error/problem is no longer a new question. Instead, this problem has been bothering almost all Windows users for quite a long period. Even Windows 10 users also have ‘Windows detected a hard disk problem’ issue in their PCs. So how to fix such an issue? Let’s find the reasons and causes of why hard disk problems occurred and solutions to fix hard disk problems right here now.
Why Hard Disk Problem/Error Occurs?
Before finding solutions to fix the hard disk problem, we highly recommend you find out the causes of the problem. This would be very helpful for you to avoid a similar issue from happening again.
1. Causes of hard disk problem — How did problems occur?
- Hard drive/disk failure;
- System errors such as registry error etc;
- Logical/mechanical error;
- File system corruption/damaged;
- Bad sectors occur on hard disk partition;
- Virus attack;
- False operation/human error etc.
If any one of those issues mentioned above happens to your hard drive on PC, Windows would detect the problems and remind you of the error message — ‘Windows detected a hard disk problem’.
3 Fixes to ‘Windows Detected a Hard Disk Problem’ Error
So how can you exactly fix the error in your PC? If you are looking for methods to fix the hard disk problem, continue reading and you’ll get what you want here now.
1. Use system file checker to fix hard disk error
Windows provides some basic tools to help repair errors, for example, the system file checker. This simple tool can help users check the system file status and solve many other seemingly serious problems. Most important, it is not complicated to use. Here are the detailed steps of how to use the Windows system file checker:
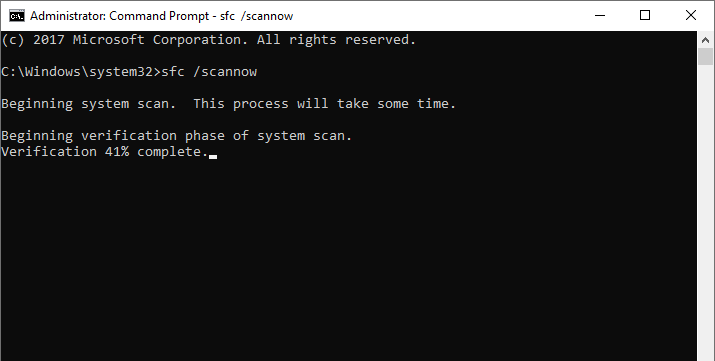
- Type: cmd in the search bar and click Enter.
- Type: sfc /scannow and hit Enter.

This command will scan all protected system files and replace all corrupted files with a backup copy. After the process is finished, your hard disk would work properly again.
2. Run CHKDSK to fix the hard disk problem
CHKDSK is a system tool and command in computer operating systems. It verifies the file system integrity of a volume and attempts to fix logical file system errors. To run chkdsk command to check and fix your system problems, please follow the steps below.
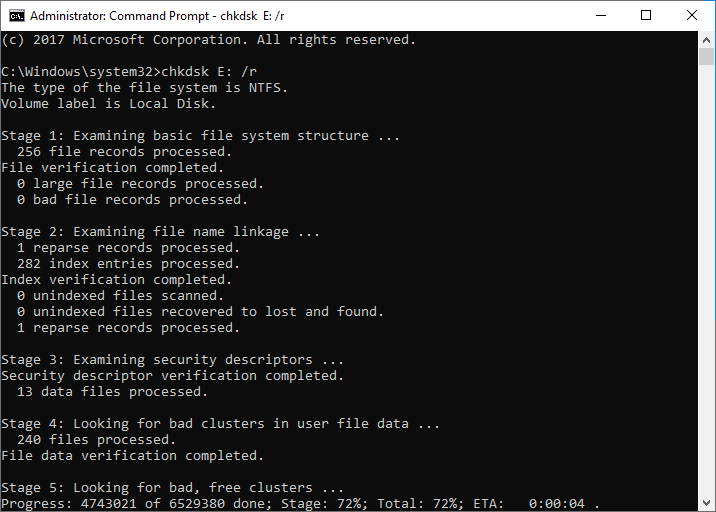
- Press «Win+R» keys to open Run and type: cmd and hit Enter to open Command Prompt.
- Type: chkdsk C: /f /r /x and hit Enter.

CHKDSK alternative
Download EaseUS CleanGenius and install it on your computer. Let’s start checking and refixing file system error on your device now.
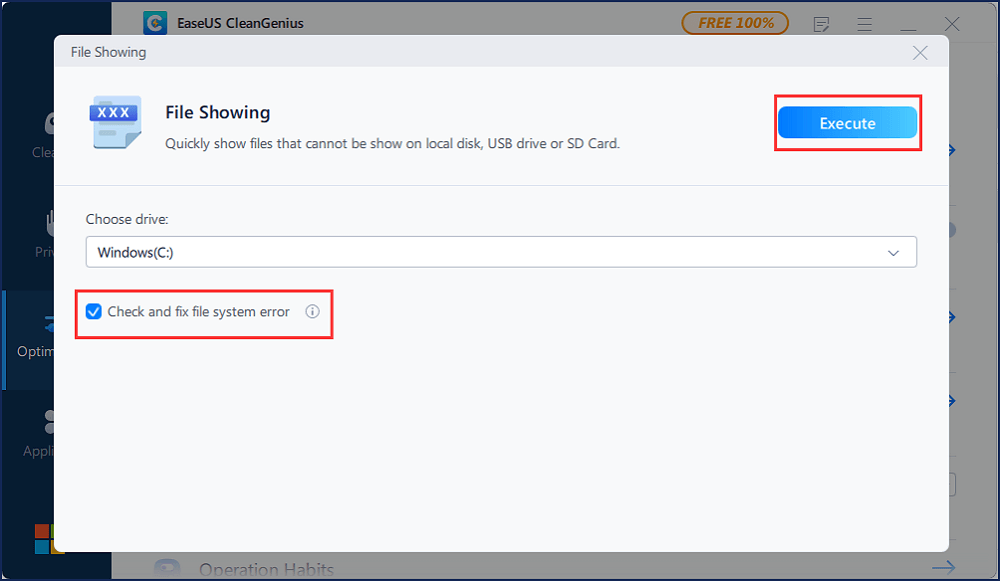
Step 1. Click «File Showing» to enter the next step.
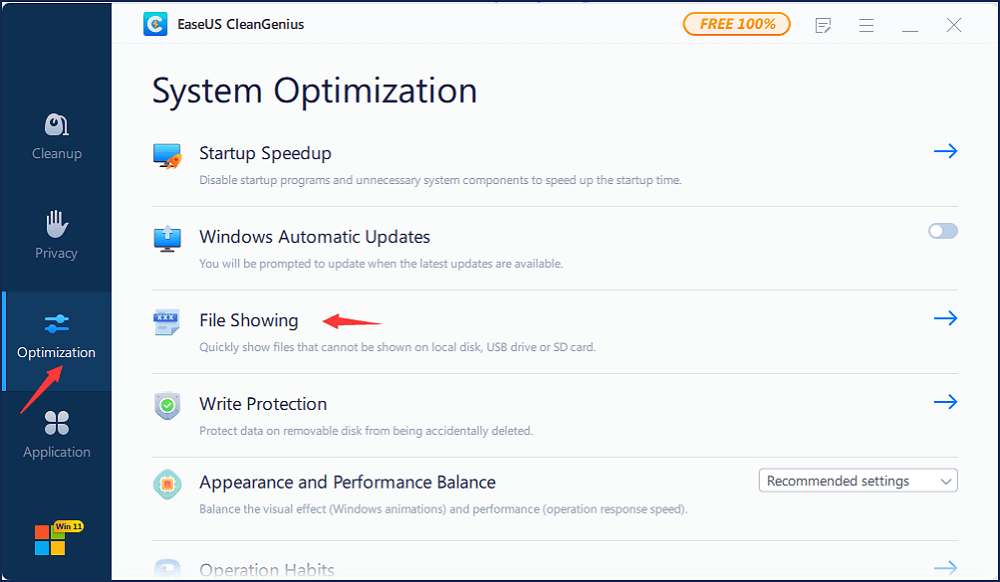
Step 2. Choose the target device and tick the box of «Check and fix file system error». Click «Execute» to start fixing the problematic device.
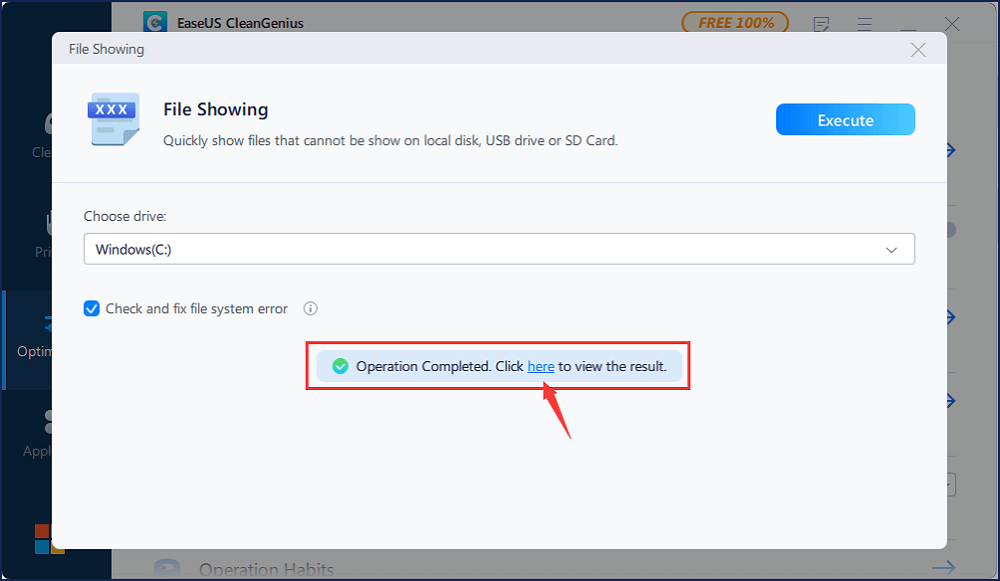
Step 3. When the fixing process completes, click «here» to open and use your device.
3. Use partition manager software to check and repair hard disk/drive errors
If you are not familiar with Windows administration, you can try a free and professional partition manager software from EaseUS. It is named EaseUS Partition Master Free, which supports you to check, find and repair bad sectors in hard disk/drive.
Download this tool for free and follow the below tips to check and fix hard disk drive errors/problems right now:
Step 1. Right-click the target partition that has a problem.
Step 2. Choose «Advanced» > «Check File System».
Step 3. Confirm if you want to hide the partition or not.
Step 4. In the Check File System window, check the «Try to fix errors if found» option.
Step 5. Click «Start» to check errors on your partition.
Now that you’ve successfully fixed the hard disk partition problem and all data are securely saved.
Stop Computer Reporting Error Message if No Hard Disk Error Exists
The reason why Windows pops up error messages is when the system deems an existing or potential error exist on your hard disk, it will remind you to backup data. But if no hard disk error or problem exists at all, you can follow the tips below to stop the computer from reporting error message:
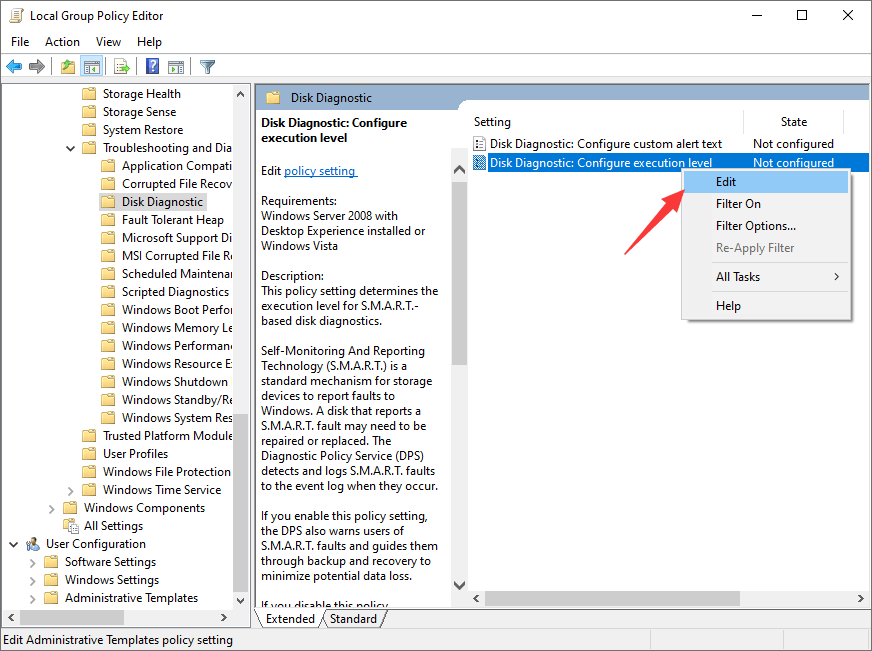
Step 1. Type: gpedit.msc in the search bar and hit Enter.
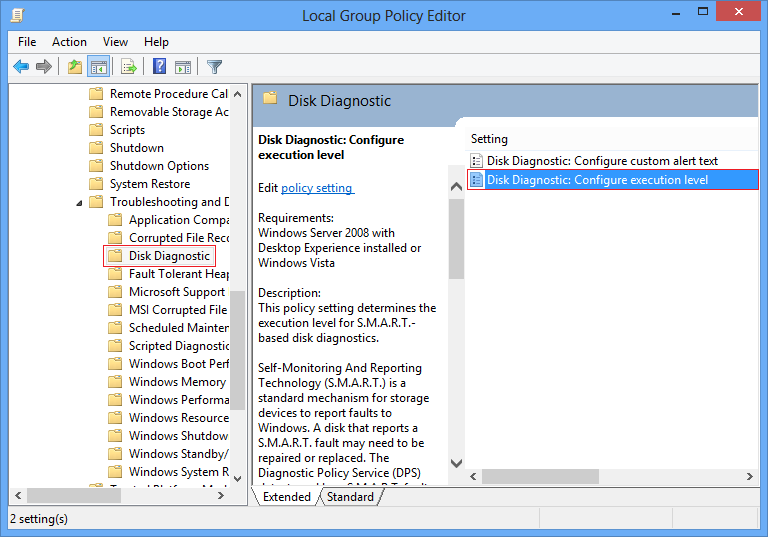
Step 2. Go to «Administrative Templates» > «System» > «Troubleshooting and Diagnostics» > «Disk Diagnostics».
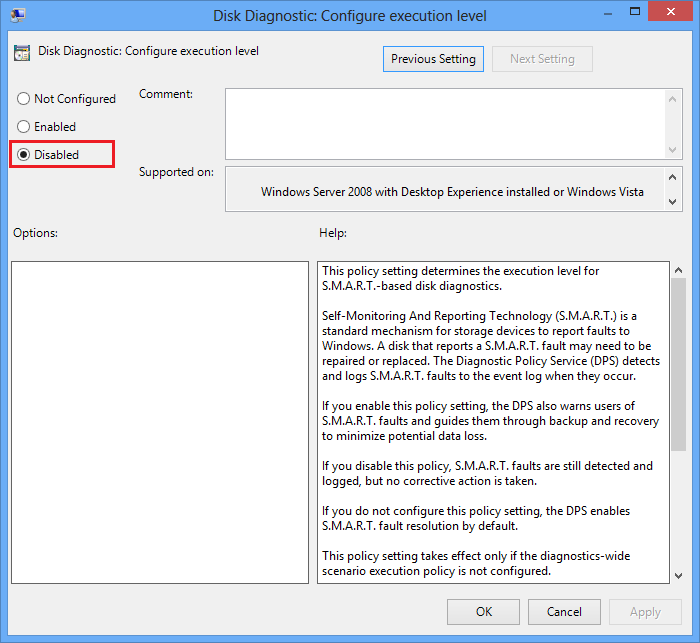
Step 3. Click Disk Diagnostic: Configure execution level and disable it.
Step 4. Click «Apply» and «OK».
Step 5. Restart the computer, and the error message won’t pop up again.

What Can You do When an Unexpected Hard Disk Problem Happen?
So you may wonder what can I do if a hard disk problem happens? What Windows reminds you of an error message? The computer would pop up this message to ask you: Windows detected a hard disk problem. Start the backup process or Ask me later?
Yes, it is to backup data in advance. You can selectively copy and paste single files and documents one by one into another secure storage device.
But if you think it’s too slow or you need to back up the entire hard disk data, you can try third-party software to clone/copy disk data with ease. Here you can also apply EaseUS Partition Master. With its disk copy/clone feature, you can clone the data on one disk to another.

Position: How Tos — Disk Utilities — How to fix «Windows detected a hard disk problem»?
Overview of the problem
Here is one of the stories which may sound familiar to you:
«Hi, there guys, about a week ago I started receiving an error message after system booted. The error keeps popping up saying ‘Windows has detected a hard drive error…’ The hard drive is 500GB Seagate Barracuda. Yesterday, I got all my important photos, documents and other stuff backed up to an external disk. My computer slows down gradually and froze once and still reports the error, so I think it’s time to fix it. Any advice?»
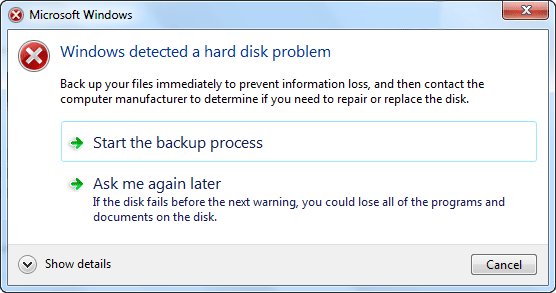
This is one of the frequently asked questions online and it may happen to anyone of us. If your computer is running Windows with the version which is after Windows XP, then you might come across an error message «Windows deleted a hard disk problem» (see picture below) suggesting to backup files immediately to prevent information loss and then contact the computer manufacturer to determine if you need to repair or replace the disk.

This is because hard drive has problem or computer gets other severe errors such as Windows becomes corrupted, operating system slows down or even crashes and freezes. What’s more, it’s really annoying to get this error as it reports continuously after every 5 or ten minutes. In many cases, this error message is the omen of hard disk falling, system crash, file loss, etc. It’s necessary to attach importance to the issue and find out reasons and solutions. This article is going to make a thorough analysis of the problem and come up with solutions. So keep reading.
Possible reasons of error message
There are many reasons why the error happens.
Usually, this error is caused by hard drive failure and yet it can be the generated by system error, such as registry error, RAM decline, fragmented files, excessive startup entries, redundant program installations, virus, malware, system error, etc. As to system problem, we can try a system restore, cleaning system junk files, update, etc. Let’s see what causes hard drive failure.
Mechanical or logical error happens to hard disk.
It’s very likely that hard drive gets problems, say file system corruption, bad sectors, mechanical issue and more. Hard drive is the brain of computer responsible for data storage and hard disk problem threats data security. System reports this message to remind potential information issue to help users prevent file loss.
Virus damage is one if the main reasons.
Once computer infects virus, it becomes different even after anti-virus software has removed virus. Theoretically, your computer won’t infect virus as long as anti-virus is powerful enough, but that doesn’t mean your computer frees from error. Moreover, anti-virus cannot repair damages caused by virus in most case and those damages my harm system. Then system may report message wrongly.
System files damage also should be included.
There are indeed many cases which may lead to system file error, for example, an incomplete program uninstallation, deletion of important system files by mistake, improper computer shutdown, etc. All these actions may give rise to corruption of entries of vital system files. The damaged system file will further result in incorrect or missing link data and information required by system for proper working.
Human error can’t be neglected.
Many improper operations are carried out by users unintentionally, which may bring about serious problem to system though users are trying to improving computer performance. For instance, some users modify system registry setting, change system file properties or location, install improper plugins, etc. Since many users are not very good at maintaining system or computer components, they are more likely to follow wrong instruction and perform incorrect operations. Some false actions will damage system or even hardware.
It’s hard to tell the reason simply judging from the error message. It is not necessary hard disk gets damaged, and system or partition problem also causes the problem. Thus here lists several solutions aiming at different causes and you can try them one by one.
Solution #1: Use system file checker
Windows provides basic tools to help fix errors, which is not known to many common users. Many problems appearing serious can be fixed by this simple tool and it’s not complicate to use. Users have no idea which system file is vital and whether it is damaged. System File Checker will check system file and handle integrity issue.
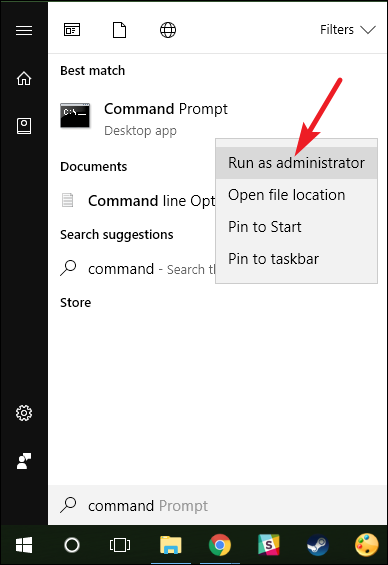
Click start button and enter cmd in the searching box. Then right click it and select the item «Run as administrator»
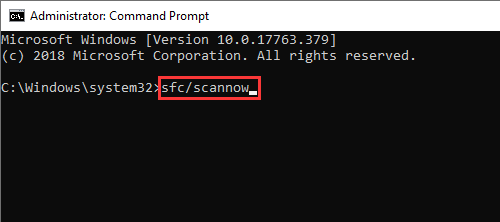
In the command prompt type sfc /scannow and press Enter key.
The process is fast and the result will tell whether there is interiority violation. This command scans all protected system files and replaces those corrupted files with a backup copy. Do not close the window before the verification is 100% complete.
Solution #2: Run Chkdsk
The most important thing to solve any problem is keeping calm. If the first method doesn’t work on your case, then you can perform a disk checking.
Still, we need to get the Command Prompt, then enter partition drive letter (c:/d:/e: and so on) you want to chkdsk. If you want to test the default partition, then just leave it as it is.
Type «chkdsk» and press «Enter» key. Then Chkdsk begins working.
The main function of chkdsk is checking and repairing errors for NTFS and FAT file systems. Thus, if the error «Windows detected a hard disk problem» is caused by file system error, then the issue will be fixed after chkdsk. You’ll get a better understanding of what is going on with file system or hard disk.
The risk of performing chkdsk is losing data, as the file allocation table will be modified during the process. Thus it’s recommended to backup data before trying the command.
Solution #3: Check bad sectors for hard disk with DiskGenius Free Edition
The first method is testing and repairing system error and the second file system problem. If there is no problem with system or partition file system, then you need to test hard drive health condition. Bad sectors may happen to all hard drive and threat data security. How to check bad sectors?
DiskGenius is free partition manager, file recovery tool and system backup software. It includes the function for bad sector checking and repairing. This is third-party tool and you need to download and install it first.
Step 1. Launch the program and you can see hard drives and partitions clearly displayed on the main interface with detailed information. Click menu item «Disk» and click «Verity or Repair Bad Sectors».
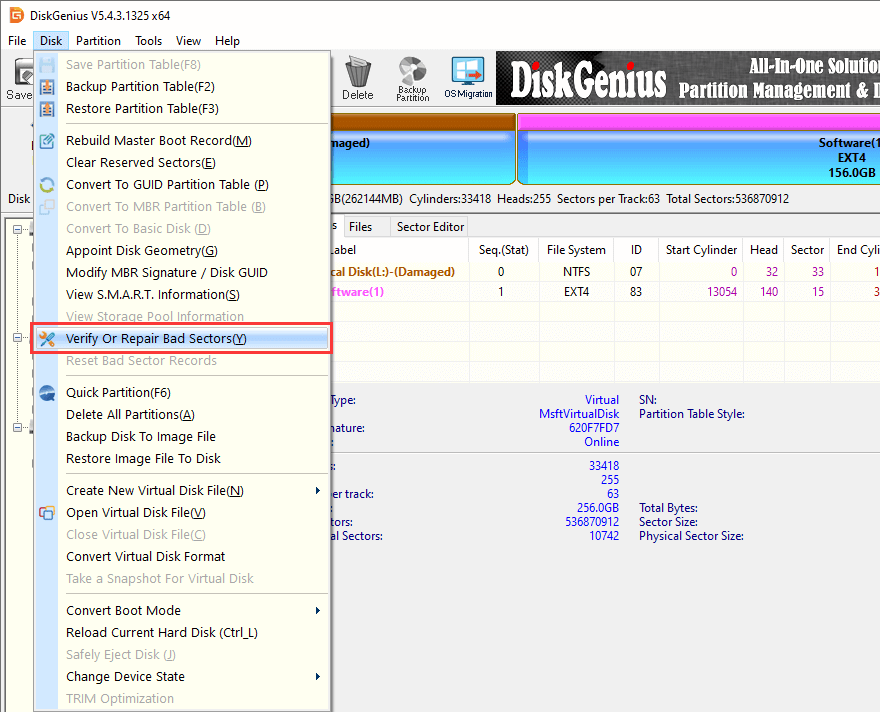
Step 2. Click «Start Verify» button to check bad sectors.
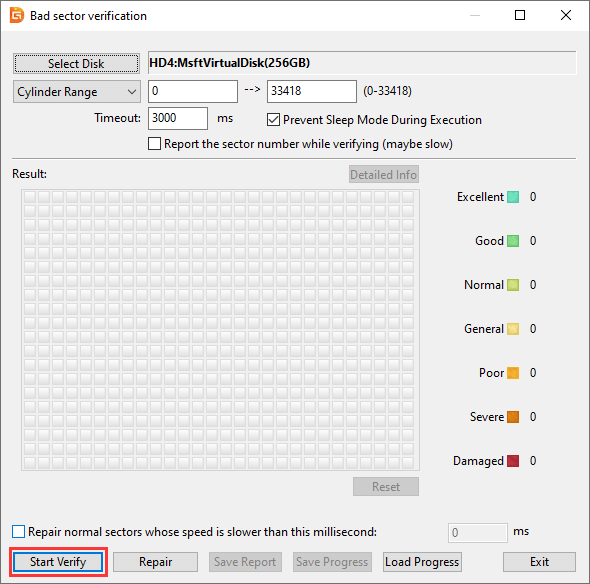
The checking process may take a while if the drive or partition being scanned has large capacity. After the process is done, DiskGenius gives a report of bad sector conditions.
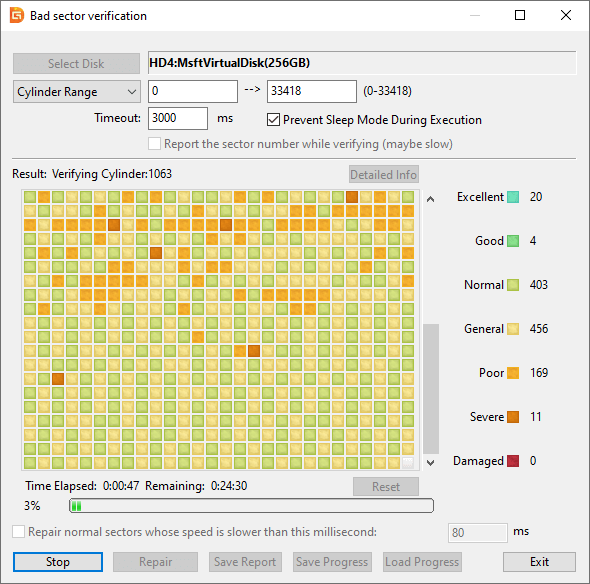
Bad sector repairing damages data stored on and near bad sectors, thus you need to backup important data before starting repairing. The limitation of this feature is that it is unable to repair physical bad sectors.
Solution #4: Contact hard disk support or find a professional repair center
The last thing we want is sending hard drive to repair center or contact support team. Disk repairing needs special machines and some damaged disks can’t be repaired. It’s suggested to contact support team if the drive is within the warranty period.
How to disable the feature that reports error message?
The error message pops up when system deems your hard drive has problem and reminds you to backup data. But there are real cases that hard drive has no problem but Windows just reports the message. So the message will be annoying and we can disable the feature with following steps:
Step 1. Get Run window from Start menu and type in «gpedit.msc«.
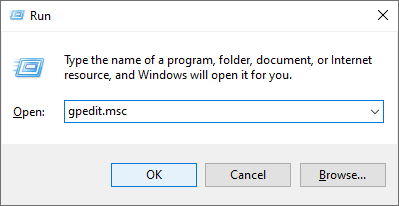
Step 2. Click «Ok» or hit Enter key and you’ll get a new window where you can find Disk Diagnostics: Administrative Templates > System > Troubleshooting and Diagnostics > Disk Diagnostics
Step 3. Click «Disc Diagnostic: Configure execution level» on the right part and a configuration menu will pop up. Modify the execution level to Disable and click «Apply» and «OK». Then restart computer the error message won’t popup.
These steps keep Windows from reporting the message only but it can’t repair or fix hard disk or system error. So please make sure your hard drive is indeed in good health.
What to do when computer reports «Windows detected a hard disk problem»?
Potential hard disk or system failure may cause serious file loss problem, for instance, your installed program, documents, photos, movies, songs, email and other personal information will lose. Therefore, it is highly advised to make backup copy for important data once your Windows detects a hard disk problem.
It’s easy to backup data from one drive to another or from partition to partition. Simply, the Copy and Paste operation can backup most data except Windows. DiskGenius provides flexible and overall backup solutions and all solutions are free of charge. It allows you to backup any partition including system partition to an image file, clone partition or entire hard drive to another, migrate Windows to SSD, etc. This backup tool offers three modes for each cloning or imaging feature, for example, it’s able to copy partition or drive sector by sector, which means sectors of the target partition or drive are the same with the original one. Here is a guide of cloning / copying hard drive.
Step 1. Click menu item «Tools» and select «Clone Disk».
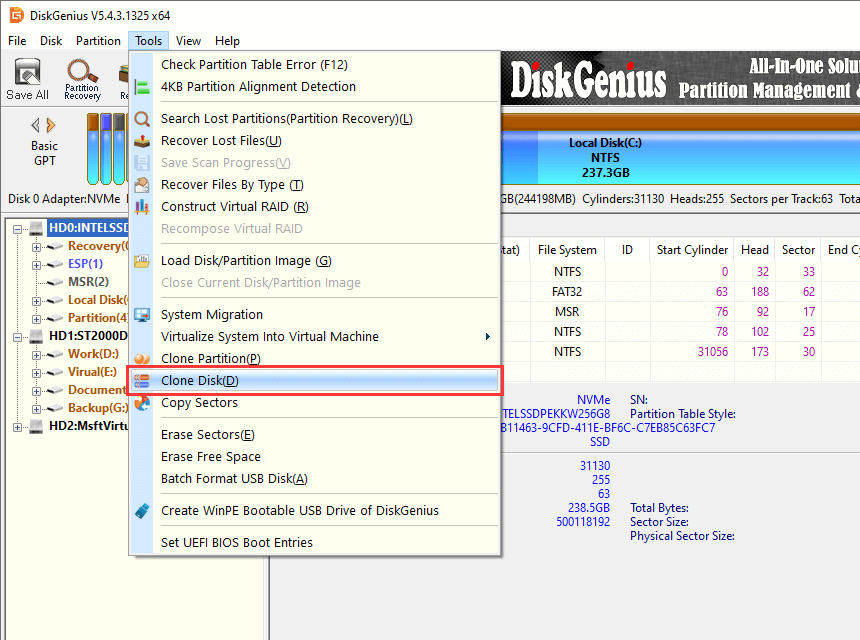
Step 2. On the popup window select source disk and target disk and clone mode. Click «Start» button and disk copy starts.
DiskGenius supports to clone larger hard drive to smaller disk, and yet you need to prepare a hard drive whose capacity shouldn’t be smaller than the used space of source disk. Then install DiskGenius and launch it.
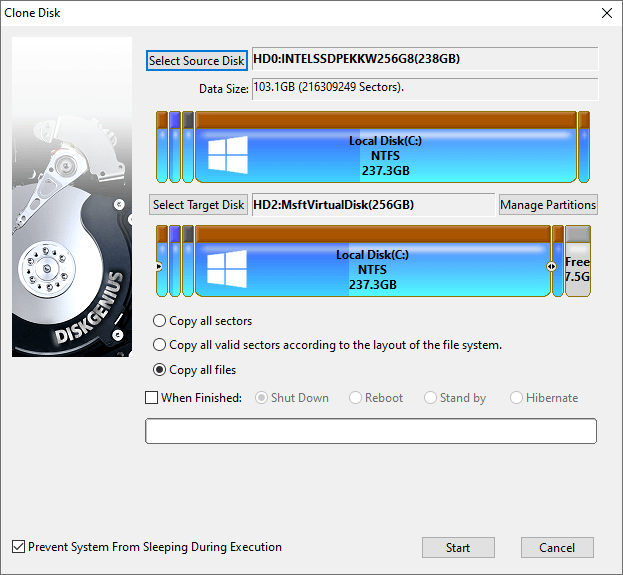
DiskGenius supports file system used by Windows only for the moment, but it’s able to clone hard drives with other file systems such as HFS. The backup module «Copy all sectors» can be used to backup drive with any kind of file system formats. The clone speed mainly counts on disk’s speed, clone mode you choose and the amount of data to be cloned.
Conclusion
We should pay attention to «Windows detected a hard disk problem» but do not have to be frightened. Calm down first and then follow solutions above to backup data and fix the problem.
Сегодня мы рассмотрим причины и методы исправления ошибки «Windows обнаружила неполадки жесткого диска», приводящей к критическим неполадкам с системой.

Содержание:
- Возможные причины ошибки.
- Как исправить ошибку «Windows обнаружила неполадки жесткого диска»?
- Проверка диска chkdsk.
- Оценка состояния носителя.
- Проверка и исправление системных файлов.
- Как убрать сообщение об ошибке «Windows обнаружила неполадки жесткого диска»?
- Что делать, если в результате ошибки были утеряны файлы?
Ошибка «Windows обнаружила неполадки жесткого диска» является достаточно серьезным сигналом, который свидетельствует о неполадках в работе системы или жесткого диска. Данная ошибка может возникать с некоторой периодичностью, что значительно снижает удобство использования компьютером. Помимо этого, после ошибки может возникать «мертвое» зависание ПК, синий экран или другие проблемы.
Если пользователь хотя бы раз увидел подобную ошибку, следует немедленно обезопасить себя и произвести резервное копирование всей важной информации на другой носитель. Если под рукой ничего не оказалось, следует загрузить резервные копии в любой облачный сервис. Такие меры предосторожности обусловлены тем, что появление ошибки говорит о возможной поломке жесткого диска.
Возможные причины ошибки
Ошибка «Windows обнаружила неполадки жесткого диска» может быть вызвана целым списком причин, в который входят:
- Физические поломки HDD или SSD.
- Логические проблемы с файловой системой, разделами, загрузочной записью.
- Проблемы с реестром операционной системы.
- Действие вредоносного вирусного ПО.
- Неправильный «разгон» компонентов компьютера.
- Неисправность компонентов.
- Перегруженность системы требовательными программами и другими утилитами.
- Проблемы с системными файлами, отвечающими за работу жесткого диска.
Как исправить ошибку «Windows обнаружила неполадки жесткого диска»?
Вне зависимости от причины возникновения ошибки, следует обязательно сделать резервные копии важной информации, после чего можно приступать к различным манипуляциям, способных решить проблему.
Не перезагружайте компьютер при возникновении ошибки, поскольку возможно система не сможет запуститься в следующий раз! Стоит отметить, что в некоторых случаях ошибка может возникать при сильном износе или неисправности жесткого диска. В таком случае ошибку можно исправить лишь с помощью замены накопителя на новый.
Проверка диска chkdsk
Поскольку ошибка может быть вызвана проблемным жестким диском, первым делом следует проверить диск встроенной утилитой для проверки дисков chkdsk.
Для ёё активации необходимо:
Шаг 1. Нажать правой кнопкой мыши по «Пуск» и выбрать пункт «Windows PowerShell (администратор)» или «Командная строка (администратор)».

Шаг 2. В открывшемся окне следует ввести команду «chkdsk C: /f» и Enter (вместо диска C может быть любой другой. Если установлен один диск, разбитый на логические разделы, следует провести проверку для всех отдельных разделов). В некоторых случаях система попросит подтвердить действие буквой Y.

После выполнения данных действий система автоматически проверит диск и попробует исправить его проблемы.
Более детально узнать про команду chkdsk можно в статье «Команда CHKDSK».
Оценка состояния носителя
Чтобы исключить проблему с накопителем следует воспользоваться утилитами для оценки состояния накопителя. Для этого следует получить и самостоятельно проанализировать показания SMART. Проверка и получение показаний, зачастую, выполняются при помощи сторонних программ.
Одной из самых популярных является утилита для проверки дисков Victoria. В статье «Как протестировать и исправить жесткий диск используя бесплатную программу Victoria» Вы сможете найти детальное описание работы программы, а также способы исправления ошибок, удаления плохих секторов и других манипуляций, которые позволят вернуть накопителю работоспособность.
Проверка и исправление системных файлов
Возможно причина ошибки кроется в системных файлах, неправильная работы которых вызывает проблемы.
Что проверить и исправить это, следует также открыть командную строку, подобно первому способу, и ввести команду «sfc /scannow».

Проверка системных файлов может занимать значительное время. Результат станет доступен после проверки, поэтому рекомендуем внимательно ознакомиться с текстом, который выдаст утилита sfc. Если в тексте проверки будет обнаружено, что программа не может восстановить некоторые файлы, это может говорить о серьезных логических неполадках или поражении системы.
Пример сообщения после проверки, при котором системные файлы работают корректно:

Если присутствует сообщение, о невозможности исправления, в таком случае лучшим выходом станет переустановка операционной системы.
Как убрать сообщение об ошибке «Windows обнаружила неполадки жесткого диска»?
Если причиной ошибки стал выходящий из строя жесткий диск с плохими показателями SMART, избавиться от ошибки можно, но стоит понимать, что такое действие не является исправлением проблемы, а просто маскирует её.
Также следует помнить, что диск с замаскированным сообщением об ошибке может выйти из строя в любую минуту, поэтому рекомендуем не хранить на таком носителе важную информацию или сделать резервные копии данных.
Для отключения сообщения об ошибке следует:
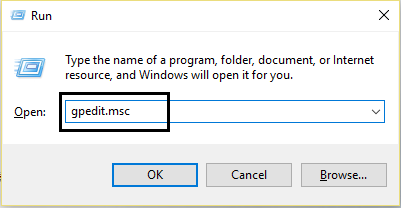
Шаг 1. Нажимаем правой кнопкой мыши по «Пуск», выбираем пункт «Выполнить», в открывшемся окне вводим команду «gpedit.msc» и нажимаем «Ок».

Шаг 2. Переходим по пути: «Конфигурация компьютера», «Административные шаблоны», «Система», «Диагностика», «Диагностика диска». В последнем каталоге следует найти раздел «Диагностика диска. Настроить пользовательский текст оповещения» и дважды кликнуть по нему.

Шаг 3. В открывшемся окне выбираем «Отключено» и подтверждаем действие кнопкой «Применить».

После этого уведомление больше не будет демонстрироваться системой.
Что делать, если в результате ошибки были утеряны файлы?
Проблемы с жестким диском являются частой причиной утери ценной информации, которая храниться на компьютере, поэтому к любым сообщениям с ошибками винчестера следует относиться со всей серьезностью. Мы настоятельно рекомендуем создавать резервные копии важных файлов при любых подозрениях неисправности накопителя. Странные звуки, заторможенная работа, ошибки, «мертвые зависания» при копировании или считывании информации – все это лишь небольшая часть симптомов, свидетельствующих о скорой поломке.
Если в ходе работы Вы заметили, что некоторые важные данные исчезли или не сохранились, рекомендуем воспользоваться специальной утилитой для восстановления данных с проблемных жестких дисков RS Partition Recovery.
Данная программа сможет вернуть все возможные для восстановления данные даже в самых трудных случаях. Для быстрой работы RS Partition Recovery не требуется мощных ресурсов компьютера, поэтому программа отлично справляется с восстановлением любых файлов даже на офисных системах и слабых нетбуках. Отметим, что RS Partition Recovery сможет вернуть данные после форматирования, случайного удаления, проблем с физическим или программным состоянием накопителя, уничтожения вирусами и т.д.
Помимо этого, RS Partition Recovery превосходно подходит для восстановления файлов с флешек, HDD и SSD жестких дисков, карт памяти и любых других носителей. Это позволяет получить максимально широкий спектр применения для самых различных ситуаций.
Часто задаваемые вопросы
Ошибка «Windows обнаружила неполадки жесткого диска» может возникать из-за физических проблем с диском, логических проблем, проблем с реестром Windows, действий вирусов, слишком большого количества требовательных программ, проблем с системными файлами или неправильного разгона компонентов компьютера.
Проверить и исправить ошибки на жестком диске можно выполнив в командной строке команду chkdsk /f /r
Воспользуйтесь программой RS Partition Recovery. Программа позволяет восстанавливать данные, утерянные после случайного удаления файлов, форматирования накопителя и во многих других случаях. А встроенный мастер восстановления файлов позволяет восстановить файлов в несколько кликов мышки.
Ни в коем случае нельзя, поскольку система может не загрузится в следующий раз. Настоятельно рекомендуется исправить ошибку «Windows обнаружила неполадки жесткого диска» используя инструкцию на нашем сайте.
Запустите командную строку или среду Windows PowerShell от имени администратора и выполните команду «sfc /scannow».
В этом руководстве мы покажем вам различные способы исправления ошибки Windows «Обнаружена проблема с жестким диском». Из всех ошибок, с которыми мы обычно сталкиваемся, эта должна быть одной из самых пугающих. Поскольку это напрямую связано с проблемой жесткого диска, всегда существует риск потери данных. Что касается причин этой проблемы, то их может быть довольно много.
К ним относятся, например, плохие сектора на диске, повреждение системных файлов или вмешательство стороннего приложения или службы. [in rare instances, it might even be a hardware issue]. Итак, на этой ноте давайте рассмотрим многочисленные способы исправления ошибки «Windows Detected a Hard Disk Problem». Следуйте вместе.
Рекомендуется попробовать каждый из перечисленных ниже обходных путей, а затем посмотреть, какой из них принесет вам успех. Итак, имея это в виду, давайте начнем.
ИСПРАВЛЕНИЕ 1. Используйте команду CheckDisk
CheckDisk — это утилита командной строки, которая сканирует ошибки файловой системы FAT и NTFS, а также логические и физические ошибки, а затем исправляет их соответствующим образом. На данный момент мы будем использовать эту команду вместе со следующими тремя параметрами:
/F: исправляет ошибки на диске /R: находит сбойные сектора на диске и восстанавливает читаемую информацию /X: сначала принудительно отключает том, а затем исправляет ошибку
- Запустите командную строку от имени администратора из меню «Пуск».
- Затем выполните приведенную ниже команду и нажмите Enter. [we are performing this test on the C drive]chkdsk C:/F/R/X
- Теперь дождитесь завершения процесса. После этого проверьте, устраняет ли Windows проблему с жестким диском.
ИСПРАВЛЕНИЕ 2. Загрузитесь в безопасном режиме
В некоторых случаях стороннее приложение также может конфликтовать с функциональностью ОС. Лучший способ проверить и, следовательно, исправить эту проблему — загрузить компьютер в безопасном режиме. Это отключит все сторонние приложения и даст вам стандартную среду только с системными приложениями. Если вы можете выбрать несколько файлов в этом режиме, виновником является приложение или программное обеспечение. Поэтому вам следует подумать об удалении недавно установленных приложений, после которых впервые возникла проблема. Вот как:
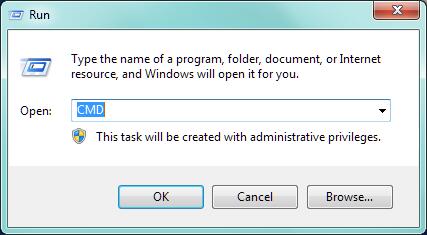
- Откройте диалоговое окно «Выполнить» с помощью сочетания клавиш Windows + R.
- Затем введите приведенную ниже команду и нажмите Enter, чтобы открыть менюmsconfig конфигурации системы.
- Теперь перейдите на вкладку «Загрузка» и установите флажок «Безопасный режим» в разделе «Параметры загрузки».
- Наконец, нажмите «ОК», а затем «Перезагрузить» в диалоговом окне подтверждения.
- Теперь ваш компьютер загрузится в среду восстановления Windows.
- Перейдите в раздел «Устранение неполадок»> «Дополнительные параметры»> «Параметры запуска»> «Перезагрузить»> «Нажмите 4», чтобы загрузиться в безопасном режиме.
- Теперь проверьте, исправляет ли он ошибку Windows Detected a Hard Disk Problem.
ИСПРАВЛЕНИЕ 3. Отключить стороннюю службу
Сторонний сервис также может создать несколько препятствий для работы этой функции. Поэтому вам следует подумать об отключении всех служб, не связанных с Microsoft, а затем проверить результаты. Вот как это можно сделать
- Перейдите в меню «Пуск», найдите «Конфигурация системы» и откройте его.
- Затем перейдите на вкладку «Службы», установите флажок «Скрыть все службы Microsoft» и нажмите кнопку «Отключить все».
- Затем перейдите на вкладку «Автозагрузка» и нажмите «Открыть диспетчер задач».
- Теперь выберите процесс из списка и нажмите «Отключить». Сделайте это для всех запущенных служб.
- После этого перезагрузите компьютер и проверьте, устраняет ли он ошибку «Windows Detected a Hard Disk Problem».
ИСПРАВЛЕНИЕ 4. Используйте команды SFC и DISM
Средство проверки системных файлов и система обслуживания и управления образами развертывания — это два служебных инструмента командной строки, которые сканируют поврежденные файлы Windows, а затем заменяют их рабочими аналогами. Основное различие между ними заключается в том, что SFC заменяет поврежденные файлы рабочими из кэшированного каталога на вашем ПК, а DISM делает это, загружая рабочие файлы с онлайн-серверов Microsoft. И на данный момент мы будем использовать оба этих инструмента для решения основной проблемы.
- Перейдите в меню «Пуск», найдите командную строку и запустите ее от имени администратора.
- Затем скопируйте и вставьте приведенную ниже команду, чтобы открыть инструмент SFC: sfc /scannow
- После завершения сканирования SFC пришло время использовать инструмент DISM. Поэтому скопируйте и вставьте следующую команду: DISM/Online/Cleanup-Image/RestoreHealth.
- После того, как DISM завершит сканирование, рекомендуется перезагрузить компьютер.
- Теперь проверьте, устраняет ли это ошибку Windows Detected a Hard Disk Problem.
ИСПРАВЛЕНИЕ 5. Используйте точку восстановления
Если ни один из вышеупомянутых методов не увенчался успехом, вам следует подумать о восстановлении вашей системы до более ранней точки, когда в ней не было этой проблемы. Вот как это можно сделать
- Для начала откройте страницу настроек с помощью сочетания клавиш Windows+I.
- Затем перейдите на вкладку «Система» в левой строке меню, прокрутите до конца и нажмите «О программе».
- После этого щелкните параметр «Защита системы», присутствующий на вкладке «Связанные ссылки».
- Это запустит диалоговое окно «Свойства системы». Перейдите на вкладку «Защита системы» и нажмите «Восстановление системы».
- Теперь Windows откроет резервную копию в разделе «Рекомендуемое восстановление». Это резервная копия, которую он считает наиболее подходящей в соответствии с текущим состоянием вашего ПК.
- Если вас это устраивает, включите параметр «Рекомендуемое восстановление» и нажмите «Далее».
- Однако, если вы хотите выбрать любую другую пользовательскую резервную копию, выберите «Выбрать другую точку восстановления» и нажмите «Далее».
- Теперь выберите нужную пользовательскую точку восстановления и нажмите «Далее».
- Теперь Windows откроет окончательный экран, показывающий все ваши варианты. Вы можете щелкнуть параметр «Сканировать на наличие уязвимых программ» и получить список всех программ, которые будут удалены/переустановлены после этого восстановления.
- Если все соответствует вашим требованиям, нажмите кнопку «Готово» и дождитесь завершения восстановления.
- После этого ваш компьютер автоматически загрузится с этой точки восстановления системы. Проверьте, исправляет ли это ошибку Windows Detected a Hard Disk Problem.
ИСПРАВЛЕНИЕ 6: проверьте аппаратную проблему
Если ни один из вышеупомянутых методов не дал вам успеха, возможно, это проблема с оборудованием. Чтобы проверить то же самое, воспользуйтесь помощью техника и извлеките жесткий диск из вашего ПК. Затем вставьте его в другую систему и проверьте результаты. Если он по-прежнему показывает ту же ошибку, то это действительно случай аппаратного сбоя, и вам нужно будет отремонтировать или заменить его в зависимости от того, что вы считаете нужным.
Итак, на этом мы завершаем руководство о том, как исправить ошибку «Windows Detected a Hard Disk Problem». Мы перечислили шесть различных методов для одного и того же. Дайте нам знать в разделе комментариев, какой из них принес вам успех. Кроме того, все ваши вопросы приветствуются в комментариях ниже.
There are many users out there who are encountering the “Windows detected a hard disk problem” error. Even I have seen the same question asked by various users on several forums and community websites.
Since this problem is increasing day by day, that’s why I have decided to share information on how to fix hard disk errors Windows 10.
Here in this article, you’re going to learn how to troubleshoot a problem with hard drive is detected in Windows using the 9 best ways.
However, while applying the solutions mentioned here, if you find that all your essential data gets deleted, then you can use the best Hard Drive Data Recovery Tool.
Rated Excellent on Trustpilot
Free Hard Drive Data Recovery Tool.
Recover data from USB drives, Pen drives, SSDs, HDDs, and other devices on Windows. Try now!
But before that let’s understand more about this issue and why users face such a problem.
What Does Windows Detected A Hard Disk Problem Mean?
The “Windows detected a hard disk problem” is one of the common error messages that Windows users encounter. This error generally occurs on the Windows desktop after booting up the PC.
The below-shown error can cause due to several unexpected factors and can lead to system crashes, disk failures, and even dreadful data loss.
Hence, before knowing the solutions to resolve Windows detected hard disk problem virus issue, let’s find out What Are The Symptoms Of Hard Disk Failure?.
What Are The Symptoms Of Hard Disk Failure?
Here are some of the common HDD Failure Signs:
- Strange noises.
- Overheating of the disk.
- Stuck spindle motor.
- Blue Screen Death errors.
- Bad sectors avoid data access.
- The inability for a device in order to boot.
Why “A Problem With The Hard Drive Has Been Detected Windows 10” Occurs?
Before finding the fixes to solve hard disk error Windows 10, it is highly recommended to find out the major factors behind the issue.
- Due to hard drive or disk failure
- Because of the file system damaged or corruption
- Bad sectors occur on hard disk partition;
- Logical or mechanical error
- Virus/malware attack
- False operation or human error etc.
As you have learned the most common cause of the “Windows has detected a hard disk problem” error occurs. Now without wasting any time let’s watch the video and solve this problem.
After figuring out the major factors behind a problem with the hard drive has been detected Windows 10 error, now you must be curious to know the solutions.
Below I’ve listed the best ways to troubleshoot this issue in a hassle-free manner.
Quick Solutions |
Step-By-Step Solutions Guide |
|
Fix 1: Check The System File |
Most of the time, the damaged or corrupted file system can cause…Complete Steps |
|
Fix 2: Run Disk Error Checking Tool |
An error-checking utility checks & repairs the hard disk errors and issues…Complete Steps |
|
Fix 3: Run an Antivirus Program |
Sometimes, the virus/spyware can also lead to several errors and bugs…Complete Steps |
|
Fix 4: Reinstall the Windows |
If the above three solutions fail to fix the hard drive has been detected…Complete Steps |
|
Fix 5: Run The System Restore |
Another option that you can try to fix a problem with hard drive is detected…Complete Steps |
|
Fix 6: Disable The SMART In BIOS To Disable Alerting |
SMART (Self-Monitoring Analysis and Reporting Technology) is a technology that is…Complete Steps |
|
Fix 7: Run the CHKDSK |
Another solution that you can try to fix windows has detected a hard disk problem…Complete Steps |
|
Fix 8: Check The Hard Disk For Bad Sector |
When you face such an annoying error or issue then you need to check…Complete Steps |
|
Fix 9: Visit To Service Center |
If nothing works then one last option left for you that is to take your disk…Complete Steps |
Fix #1: Check The System File
Most of the time, the damaged or corrupted file system can cause “Windows detected a hard disk problem Windows 7”. At that time, you can run the System File Checker (SFC) on your Windows system to check the system file integrity. To run the SFC scan, follow these steps:
Step 1: Open the Start menu, then find & right-click the Command Prompt
Step 2: Next, choose the Run as administrator option and click on YES when prompted by (User Account Control) UAC.
Step 3: Now, type the SFC /scannow in a Command Prompt & hit Enter. Don’t close a Window until the Verification 100% complete.
After completion of the above steps, the SFC would repair all the damaged files automatically.
Fix #2: Fix The Problem By Running Disk Error Checking Tool
An error-checking utility checks & repairs the hard disk errors and issues in the Windows 10, 8.1, 8, and 7 for FAT (FAT16/FAT32) and NTFS file systems. To do so, try the below instructions and solve how to fix hard disk problem Windows 7:
- First, close all the applications that are open.
- In the second step, press Win + E Key together to open File Explorer.
- Next, right-click on an affected hard drive & open the ‘Properties’.
- Under the properties window, you need to click on the ‘Tools’ tab
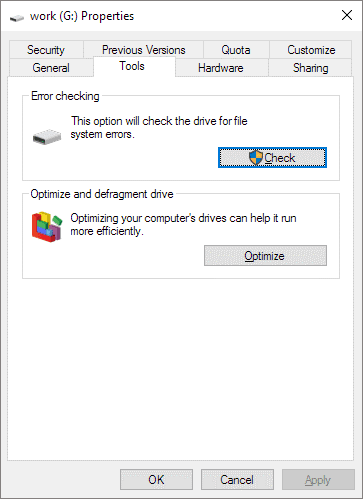
- After this, make a tap on the ‘Check’ option from the appearing list.
- At last, click on option ‘Scan Drive’.
Fix #3: Run an Antivirus Program
Sometimes, the virus/spyware can also lead to several errors and bugs. Thus, removing the virus can potentially help you to fix the problem. To do so, you are required to use trustworthy antivirus software or an anti-malware app. With the help of the antivirus, you can scan your hard disk volume to eliminate the virus or malicious content.
Fix #4: Reinstall the Windows
If the above three solutions fail to fix the hard drive has been detected in Windows 8, then you have another solution to solve it. Yes, for all the unsolved & re-occurring system issues, you can try the best option that is to reinstall the Windows OS.
Make sure the complete system backup & system partition has sufficient free space before reinstalling the Windows.
Fix #5: Run The System Restore
Another option that you can try to fix a problem with hard drive is detected in Windows is to run the system restore. Here are the easy steps to do so:
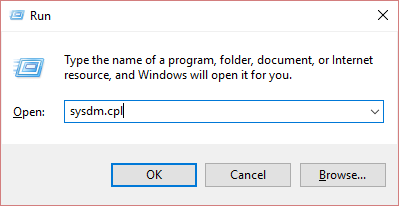
Step 1: Just press the Windows + R key & then type the “sysdm.CPL” and hit enter
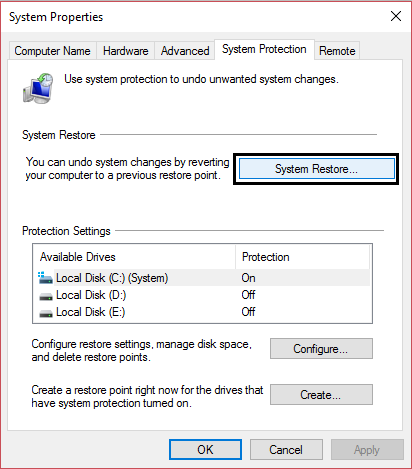
Step 2: Select the System Protection tab >> System Restore.
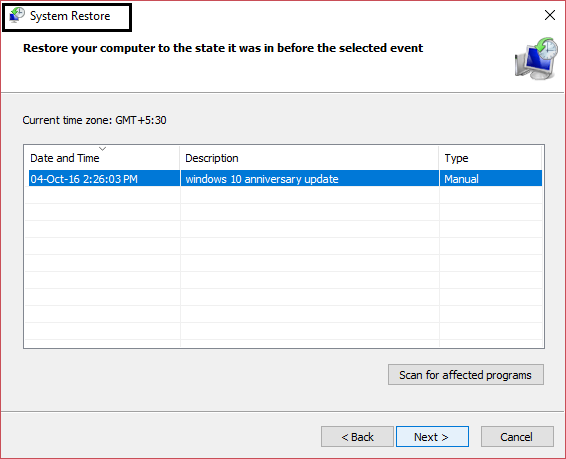
Step 3: Then, click on Next & select the preferred System Restore point.
Step 4: Now, follow the on-screen instruction to finish the system restore.
Step 5: Lastly, reboot the system, after doing so you might be able to solve your issue.
Fix #6: Disable The SMART In BIOS To Disable Alerting
SMART (Self-Monitoring Analysis and Reporting Technology) is a technology that is used in today’s hard disk. However, you can switch off a SMART in the BIOS to stop Windows from reporting the warning messages.
Here are the easy steps which you can try to disable the BIOS to avoid warning messages.
- Restart your PC and access the BIOS setup while the computer shows a screen like the following image:
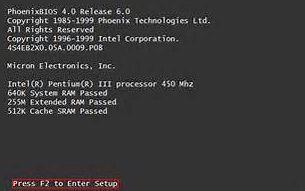
The methods to access BIOS settings are different when the computer is in a different brand. It depends on the motherboard of your computer. Usually, there are 4 basic ways to access BIOS settings, namely press Del, ESC, F1, or F2 key. Please follow the alert to press the proper key when restarting your computer to enter the BIOS setup.
- Find the SMART in BIOS and switch the Enabled option to Disabled.
Please Note: Disabling the SMART will not only this warning message but also stop other SMART attributes to your hard disk.
Fix #7: Run the CHKDSK to Solve Windows Detected A Hard Disk Problem
Here is how to fix hard disk problem Windows 7/8/10 issue using CHKDSK command:
- Firstly, you need to press the “Win + R” keys at the same time to open the Run
- Next, type the cmd & hit the Enter to simply open the Command Prompt.
- After that, type in chkdsk C: /f /r /x & hit Enter.
If this method won’t solve your problem then try the next one.
Solution #8: Check The Hard Disk For Bad Sector
When you face such an annoying error or issue then you need to check the hard disk health condition. If you’re not able to find out any system file problem, then just try it out. The bad sector checking is done by the tools that work for this purpose. Therefore just open the bad sector program, and you can get detailed information.
Solution #9: Visit To Service Center
If nothing works then one last option left for you that is to take your disk to the service center. Repairing the hard disk needs special equipment & spare parts which normal users don’t have.
How To Disable The Feature That Reports Error Windows Hard Disk Problem?
By following the below steps, you can simply avoid/disable the feature which reports hard drive problem:
Step 1: First of all, go to “Run”.
Step 2: Then, type the gpedit.MSC & hit enter.
Step 3: After that, a new window will open, there you need to click on Disk Diagnostics: Administrative Templates
Step 4: Next, you have to select System and then Troubleshooting & Diagnostics option
Step 5: Click on Disk Diagnostics, then “Disc Diagnostic: Configure execution level” on the right side.
Step 6: At this time, you will find a configuration menu, click on execution level & Disable it.
Step 7: Now, restart your PC.
Recover Data From Hard Disk After Fixing Windows Detected A Hard Disk Problem
After performing the above fixes, if you ever found that the saved data on your hard disk has been deleted, then you can use the Hard Data Recovery Tool.
It is a perfect software that will definitely help you to restore stuff from problematic hard disk, write-protected or read-only hard drives, etc. with its powerful restoring ability.
The best thing about this program is that – it is available for both Windows and Mac.
emid emid
emid
* Free version of the program only scans and previews recoverable items.
Let’s below find out it’s more amazing features:
- Restore inaccessible or lost images, videos, and audio files from numerous storage devices.
- Preview recoverable files within software before you proceed further to save them on your system.
- 100% read-only program. Safe & secure to use.
Follow the step-by-step guide of this tool that will definitely help you to recover data from non-detecting hard disks with ease.
FAQ (Frequently Asked Questions)
How Do I Fix Windows Has Detected A Hard Disk Problem?
You can fix Windows has detected a hard disk problem trying the below tricks:
- Run the SFC scan to resolve system files
- Scan & kill viruses
- Run the disk surface test
- Use the CHKDSK command, etc.
What Is Causes A Hard Drive Failure?
Though, a hard disk failure occurs because of several reasons such as power issues, hardware failure, firmware corruption, human error, mechanical/internal failure, PC overheating, damaged file system, and more.
How Do I Check My Hard Drive For Problems?
In order to check your hard disk for glitches, you need to fix the errors & bad sectors by using the CHKDSK tool. Here are the simple steps, how you can do so:
- Step 1: At first, right-click the disk which you need to check for the errors >> click on the Properties.
- Step 2: Go to the Tools >> click on a Check option to begin the operations.
[Quick Tip] Avoid Windows Detected Hard Disk Problem
- Always eject your volume before releasing an external storage drive.
- Keep the backup of your important files. If possible, create a backup of your stuff in two places – one on local external storage and the other on the cloud.
- Make sure proper ventilation in order to prevent the drive from overheating.
- Install reliable anti-virus software to protect from harmful viruses.
Final Verdict
As you have seen, hard disk error Windows 10 is not as difficult as you think. All, you need to do is to follow the methods provided in this article. You have the best troubleshooting solutions on how to fix error in hard disk Windows system. Although it’s totally up to you to choose any of these ways.
Unfortunately, while trying the above fixes if you found that your hard disk data gets deleted then you can easily bring back data from the hard disk by using the best Hard Drive Data Recovery tool. You need to just download & install this software and try the step-by-step guide given in this article.
You Might Also Like:
1. Fix “Windows Was Unable To Complete The Format”
The error “Windows was unable to complete the format” can be easily fixed by removing the write protection from the disk.
2. Fix Initialize Disk Without Losing Data In Windows
An adequate tactic to resolve initialize disk without losing data in Windows is to back up the data and then initialize it by running chkdsk command or error checking utility.

Taposhi is an expert technical writer with 5+ years of experience. Her in-depth knowledge about data recovery and fascination to explore new DIY tools & technologies have helped many. She has a great interest in photography and loves to share photography tips and tricks with others.
На чтение 4 мин Просмотров 1 Опубликовано 13.07.2022
Недавно я столкнулся с сообщением об ошибке » Windows обнаружила проблему с жестким диском » на моем ПК с Windows 10. Эта ошибка говорит о том, что ваш жесткий диск может скоро выйти из строя, поэтому создайте резервную копию данных, чтобы предотвратить их потерю. Эта ошибка обычно возникает из-за неисправного жесткого диска или плохих секторов на жестком диске. Это может замедлить работу операционной системы или вызвать серьезные проблемы с производительностью . Самое неприятное, что эта ошибка выскакивает каждые 5-10 минут. Прежде чем начать, давайте выясним некоторые факты.
Плохие сектора — это поврежденная часть пластины жесткого диска, что означает, что она постоянна и жесткий диск начинает выходить из строя. Некоторые плохие сектора можно исправить, в то время как другие исправить невозможно. Поэтому единственный способ окончательно исправить жесткий диск — заменить его.
Поэтому, если есть возможность, попробуйте заменить жесткий диск. В противном случае вы можете попробовать следующие методы.
Содержание
- Как решить проблему «Windows обнаружила проблему жесткого диска»
- Запустите сканирование SFC
- Запустите CHKDSK на всех дисках
- Fix Bad Sectors using HDD Repair Tools
- Отключить сообщение об ошибке?
- YouTube video: Как windows обнаружила проблему с жестким диском
Как решить проблему «Windows обнаружила проблему жесткого диска»
 Сообщение об ошибке Windows обнаружила проблему жесткого диска
Запустите сканирование SFC
Инструмент проверки системных файлов (SFC) используется для проверки поврежденных или отсутствующих системных файлов windows и восстановления их прежнего состояния. Если некоторые из системных файлов повреждены, компьютер может зависать или тормозить, а также может возникнуть ошибка Windows при обнаружении жесткого диска. Вот как исправить поврежденные файлы Windows с помощью инструмента SFC.
- SFC — это инструмент, основанный на командах, поэтому для его запуска вам понадобится командная строка.
- Откройте командную строку, найдя cmd в меню Пуск, щелкните ее правой кнопкой мыши и выберите Запуск от имени администратора.
- Теперь в командной строке введите следующую команду: SFC /scannow
- Нажмите enter и начнется сканирование поврежденных файлов windows.

- Она автоматически исправит поврежденные файлы, если таковые будут найдены. Если вы не нашли поврежденных файлов, перейдите к следующему методу.
Запустите CHKDSK на всех дисках
Проверка диска (CHKDSK) — это утилита, используемая для поиска и исправления ошибок на жестком диске. Это встроенный инструмент, который поставляется вместе с Windows. Чтобы проверить диск на наличие ошибок, выполните следующие действия.
- Перейдите на компьютер и щелкните правой кнопкой мыши на любом диске, который вы хотите проверить, и выберите свойства.
- Перейдите на вкладку Инструменты и в разделе Проверка ошибок нажмите кнопку Проверить.

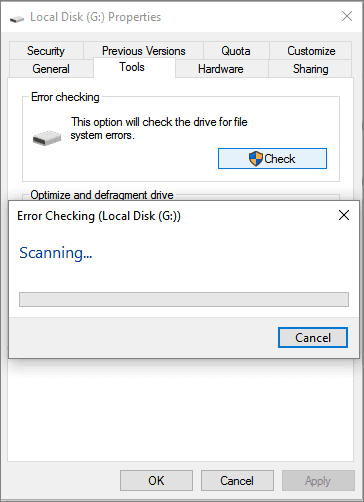
- Появится небольшое окно. Проверьте обе опции и нажмите кнопку Пуск.

- После этого начнется сканирование жесткого диска на наличие ошибок.
- Если вы получите сообщение об ошибке, в котором говорится, что Windows не может проверить диск, пока он используется. Тогда нажмите на schedule disk check, чтобы запланировать проверку диска при следующей перезагрузке.
- Обычно это происходит, когда вы пытаетесь сканировать диски, которые используются системой.
Fix Bad Sectors using HDD Repair Tools
Если вы обнаружили некоторые ошибки диска, а Windows не может их исправить, тогда вы можете использовать некоторые сторонние инструменты для исправления ошибок диска. Я уже описывал руководство по исправлению плохих секторов с помощью HDD regenerator.
Отключить сообщение об ошибке?
Если вы выполнили все вышеперечисленные задачи и считаете, что ваш жесткий диск здоров, то вы можете отключить сообщение об ошибке «Windows обнаружила проблему жесткого диска» через редактор локальной групповой политики.
- Нажмите Windows + R, чтобы открыть окно запуска.
- В окне запуска введите gpedit.msc и нажмите enter.

- Теперь на L.H.S в разделе конфигурации компьютера перейдите в Administrative Templates > System > Troubleshooting and Diagnostics > Disk Diagnostics.
- Теперь на R.H.S дважды щелкните «Disc Diagnostic: Configure execution level».

- В разделе Disc Diagnostic: Configure execution level выберите Disable и нажмите Ok.

YouTube video: Как windows обнаружила проблему с жестким диском
- Перезагрузите компьютер и Windows обнаружила проблему с жестким диском ошибка больше не появится.