Table of Contents
- Introduction
- Quick Notes to Sys Admin
- Step By Step Guide to Enabling «Disk Cleanup Utility»
- 1. Open The Roles and Features Wizard
- 2. Click on Add role and Feature
- 3. Choose installation Type
- 4. Click Next all the way to features
- 5. Proceed with the installation and Reboot
- 6. Verify that the Utility is indeed installed
- Disk Cleanup in Action
Introduction
This tool allows you to cleanup unnecessary file both on a windows server environment andor a desktop PC.
This utility is not enabled by default in windows 8 and Windows Server 2012 and you have to enable it manually.
Sometimes its not easy particularly if the O.S. is new to you.
«Disk Cleanup (cleanmgr.exe) is a computer maintenance utility included in Microsoft Windows designed to free up disk space on a computer’s hard drive. The utility first searches and analyzes the hard drive for files that are no longer
of any use, and then removes the unnecessary files. There are a number of different file categories that Disk Cleanup targets when performing the initial disk analysis» Wikipedia
Quick Notes to Sys Admin
This activity will require reboot.
Step By Step Guide to Enabling «Disk Cleanup Utility»
1. Open The Roles and Features Wizard
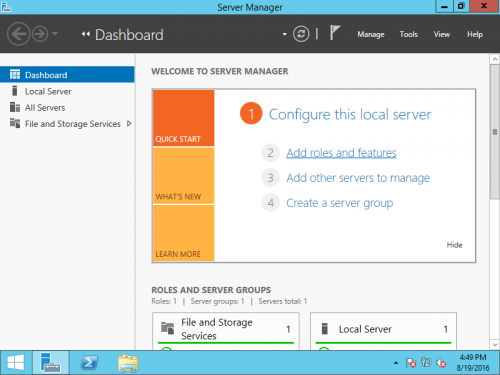
To open the roes and feauture wizard. Lauch the «server manager» by pressing the Windows key
and clicking on the server manage please see Screenshot as shown.

2. Click on Add role and Feature
Click on add role and feture to launch the add role and feature wizard.

3. Choose installation Type
Choose rolebase or feature based installation to install to local machine.

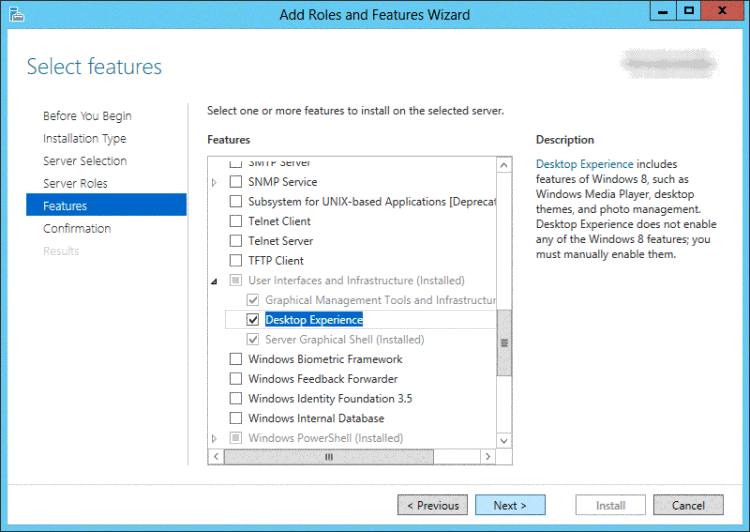
4. Click Next all the way to features
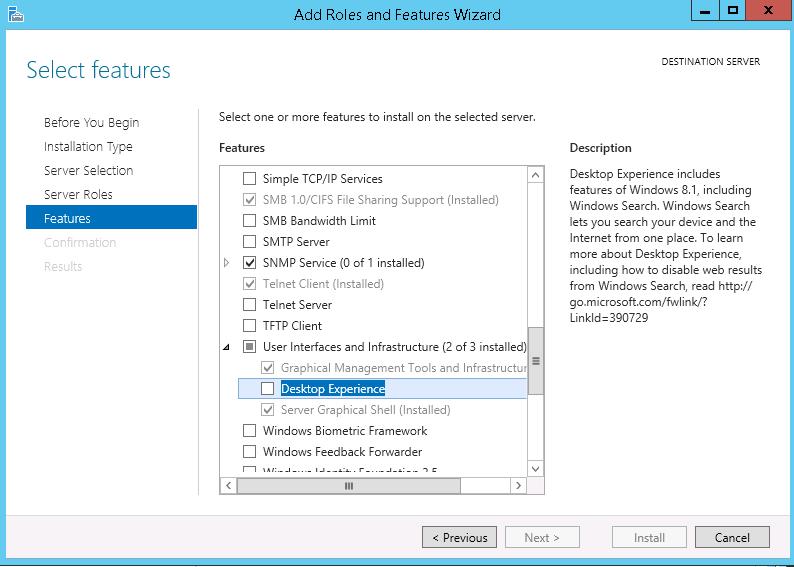
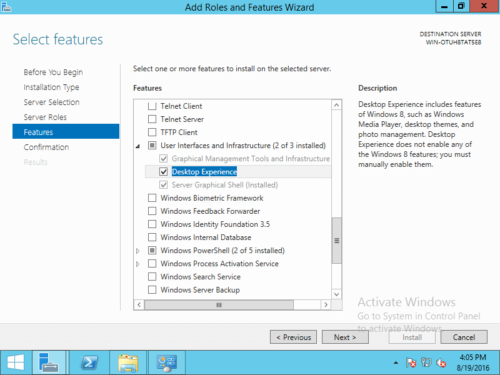
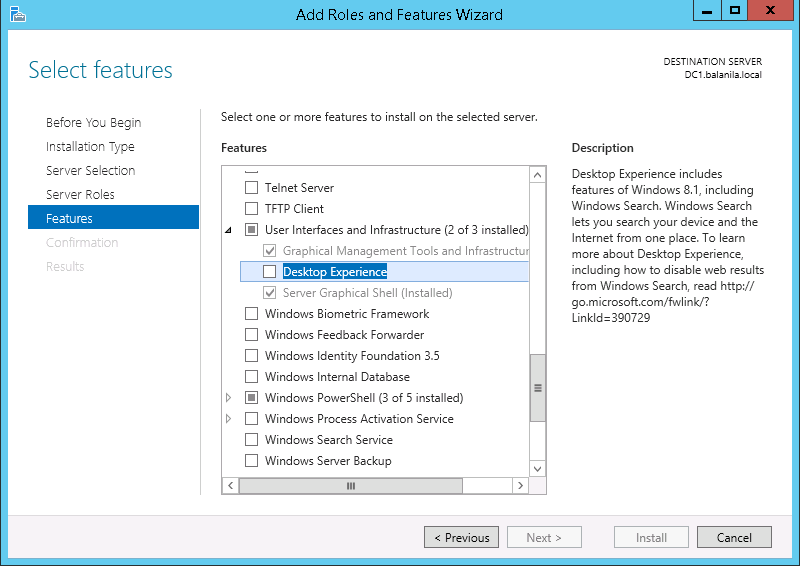
Click «next» all the way to features. Locate «User Interface and Infrastructure». Click on «Desktop Experience»
and install additional required feature.

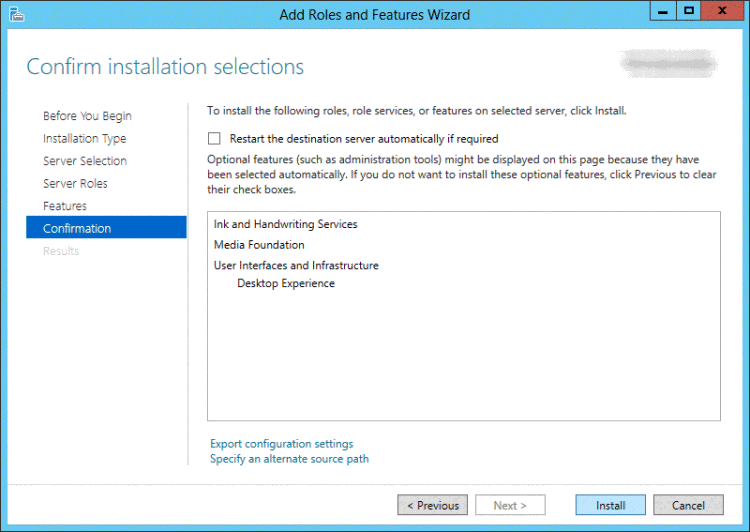
5. Proceed with the installation and Reboot
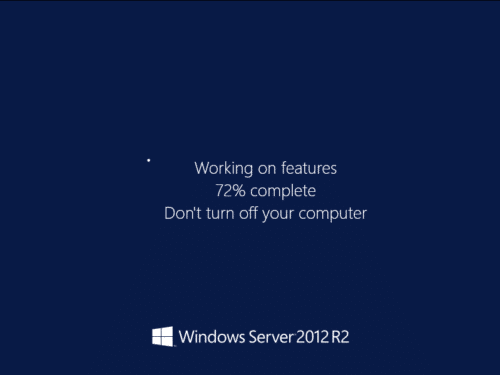
Make it sure that you reboot the system
6. Verify that the Utility is indeed installed
Ready to run diskcleanup. See screen shot below.

Disk Cleanup in Action
Below is a sample snapshot of disk cleanup in action.

Утилита очистки диска (Disk Cleanup) позволяет администратору быстро очистить системный диск Windows Server, удалив ненужные и временные файлы, в том числе очистить каталог WinSxS от файлов устаревших компонентов, которые остались после установки обновлений. Утилита Disk Cleanup (cleanmgr.exe) по умолчанию уже установлена в графической версии Windows Server 2016/2019 (Desktop Experience), однако в предыдущих версиях Windows Server (2012 R2/ 2012/ 2008 R2) утилита cleanmgr.exe по-умолчанию отсутствует.
Содержание:
- Очистка диска с помощью Disk Cleanup в Windows Server 2016
- Очистка диска с помощью cleanmgr.exe из командной строки
- Запуск cleanmgr в Windows Server 2012 R2/ 2008 R2 без установки Desktop Experience
- Использование Disk Cleanup в Windows Server Core
Очистка диска с помощью Disk Cleanup в Windows Server 2016
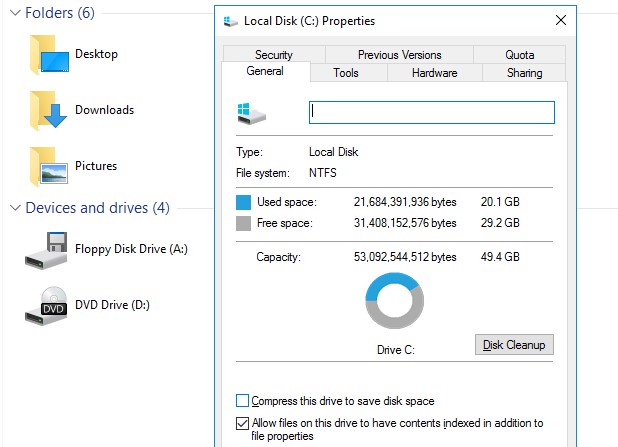
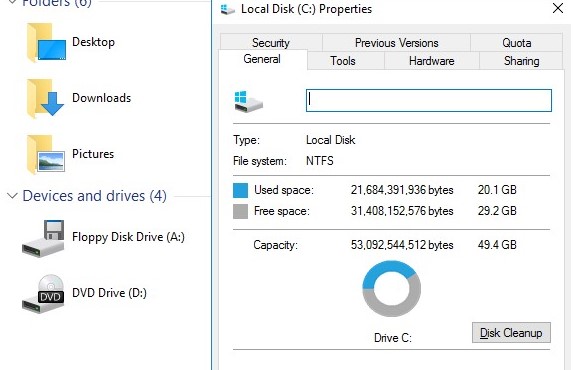
Чтобы очистить системный диск от ненужных файлов в Windows Server 2016 с помощью утилиты Disk Cleanup, нужно в File Explorer открыть свойства диска и нажать кнопку Disk Cleanup.
Также можно в поисковой строке набрать «disk cleanup» или cleanmgr.exe.
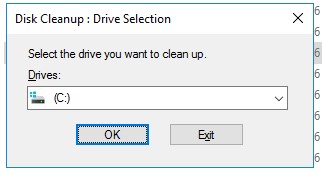
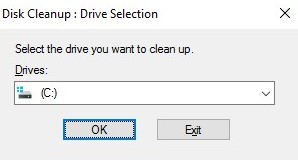
Выберите диск, который вы хотите очистить.
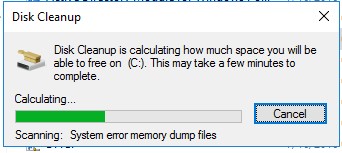
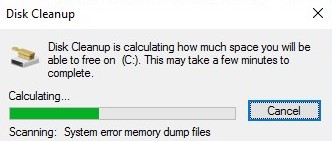
Дождитесь пока мастер очистки проверит ваш диск и найдет ненужные файлы, которые можно безболезненно удалить.
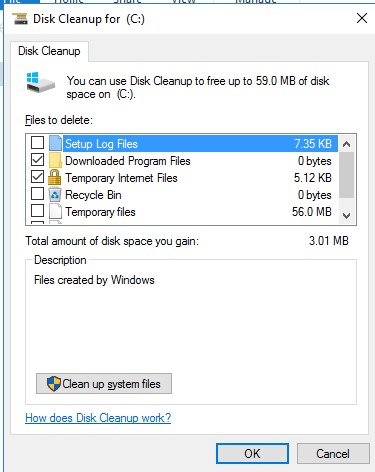
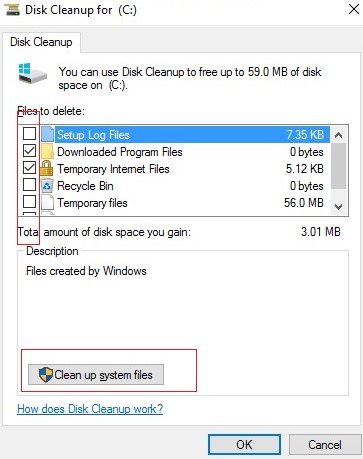
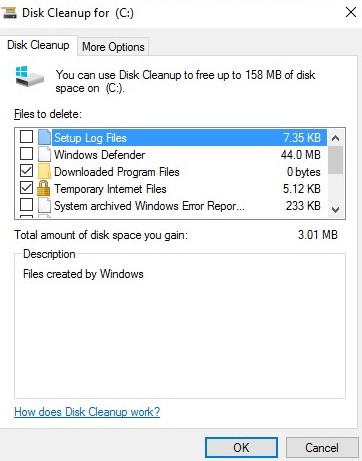
Вы можете выбрать компоненты, файлы которых можно удалить. Вам предлагается удалить следующие временные файлы:
- Setup Log Files
- Downloaded Program Files
- Temporary Internet Files
- Recycle Bin
- Temporary files
- Thumbnails
Чтобы удалить ненужные системные файлы нажмите на кнопку Clean up system files.
Дополнительно предлагается очистить:
- Устаревшие файлы Windows Defender
- System archived Windows Error Reporting (каталог C:ProgramDataMicrosoftWindowsWERReportQueue)
- System queued Windows Error Reporting
- Device driver packages
- Windows Update Cleanup — при этом выполняется очистка хранилища компонентов в каталоге WinSxS. Удаляются старые версии компонентов, которые остались после установки обновленных версий.
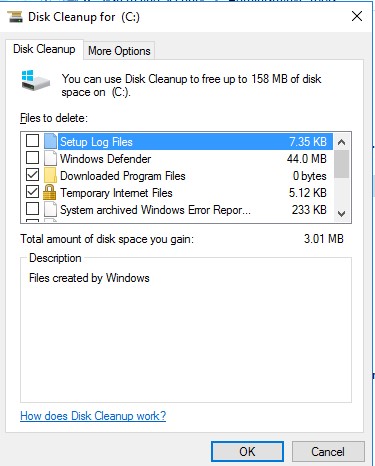
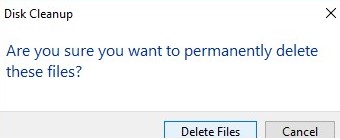
Выберите нужные опции, при этом Disk Cleanup покажет количество места, которое освободится. Нажмите Ок и подтвердите удаление временных файлов.
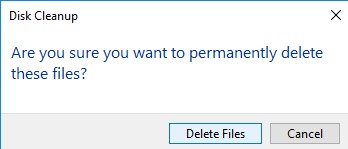
Дождитесь, пока утилита cleanmgr.exe удалит ненужные файлы.
Очистка диска с помощью cleanmgr.exe из командной строки
Утилита
cleanmgr.exe
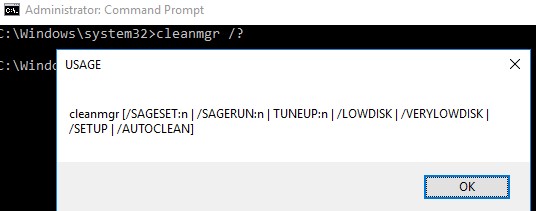
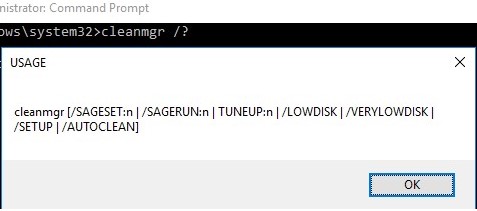
имеет различные параметры командной строки, которые позволяют использовать ее в различных сценариях автоматической очистки системного диска. Их можно использовать как в Windows Server, так и на рабочих станциях пользователей с Windows 10.
cleanmgr [/d driveletter] [/SAGESET:n | /SAGERUN:n | TUNEUP:n | /LOWDISK | /VERYLOWDISK | /SETUP | /AUTOCLEAN]
Ключ
/AUTOCLEAN
используется для очистки старых файлов, оставшихся после апгрейда билда Windows. Параметр
/SETUP
позволяет удалить файлы, оставшиеся от предыдущей версии Windows (если вы выполняли in-place upgrade).
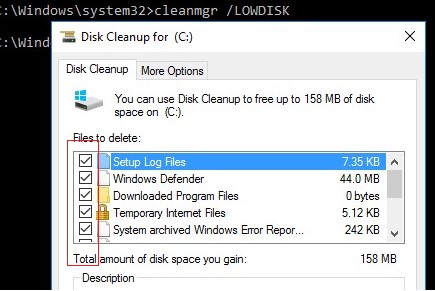
Команда
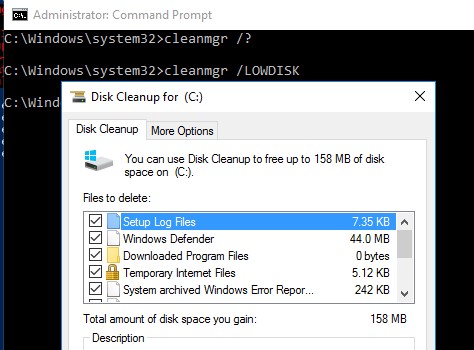
cleanmgr /LOWDISK
– запускает графический интерфейс Disk Cleanup с уже выбранными параметрами очистки.
Команда
cleanmgr /VERYLOWDISK
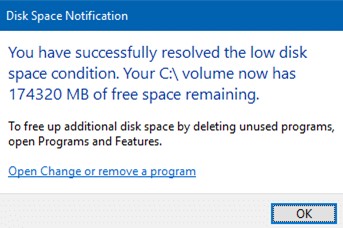
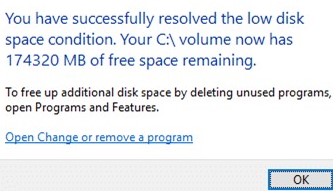
выполняет автоматическую очистку, а после окончания оторажает информацией о выполненных действиях и свободном месте.
You have successfully resolved the low disk space condition. Your C: volume now has 10000 Mb of free space remaining.
С помощью параметров
/sageset:n
и
/sagerun:n
вы можете создать и выполнить настроенный набор параметров очистки.
Например, выполните команду
cleanmgr /sageset:11
. В открывшемся окне выберите компоненты и файлы, которые нужно автоматически очищать (я выбрал все опции).
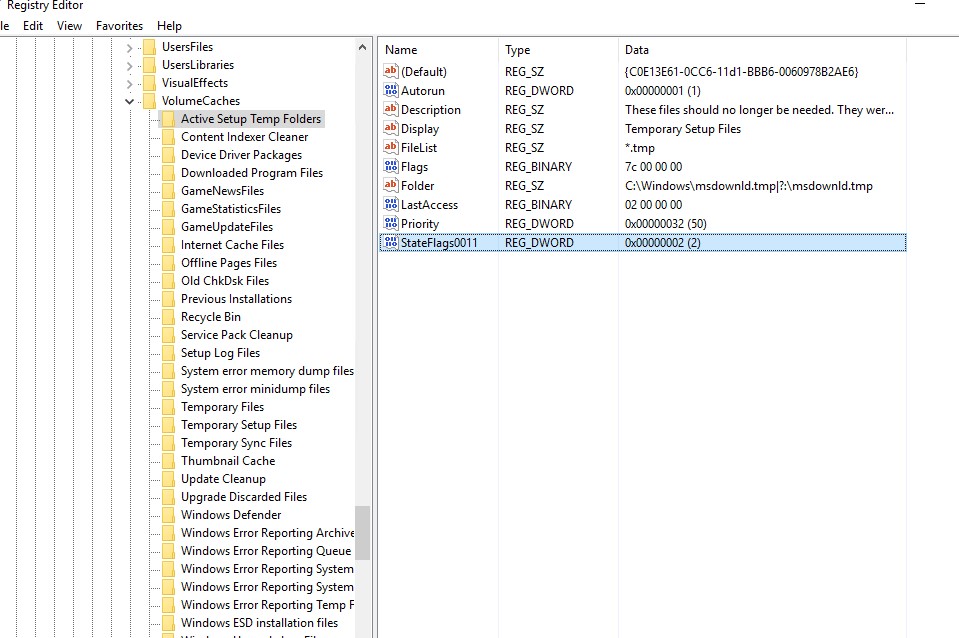
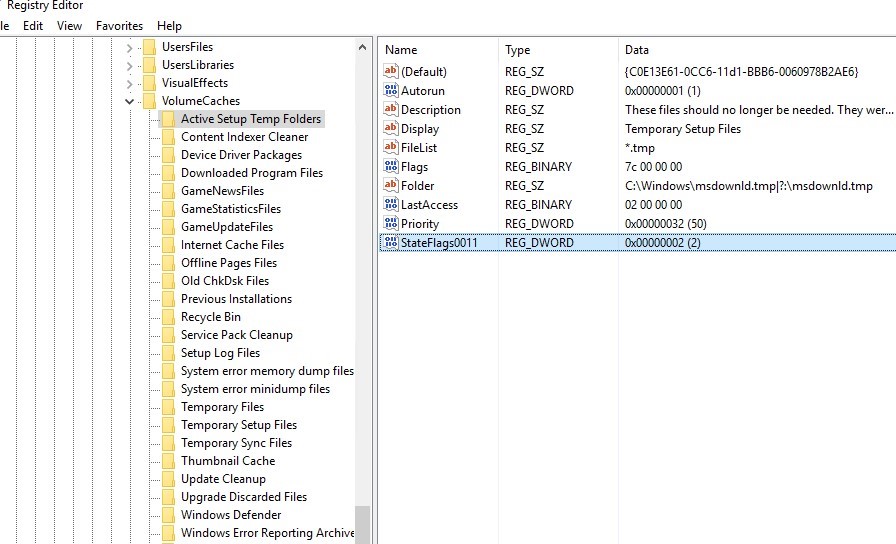
Эти настройки сохраняются в ветке реестра HKEY_LOCAL_MACHINESOFTWAREMicrosoftWindowsCurrentVersionExplorerVolumeCaches. В этой ветке перечислены все компоненты Windows, которые можно очистить с помощью Disk Cleanup. Для каждой опции, которую вы выбрали создается параметр типа DWORD с именем StateFlags0011 (
0011
это число, которое вы указали в параметре sageset).
Чтобы запустить процесс очистки с выбранными параметрами, выполните команду:
cleanmgr /sagerun:11
Если вам нужно настроить автоматическую очистку дисков на компьютерах (или серверах) в домене, вам достаточно экспортировать эту ветку реестра и распространить ее через GPO.
Для автоматического запуска очистки системного диска на рабочих станциях с Windows 10 можно создать задание в планировщике со следующим PowerShell скриптом:
Start-Process -FilePath CleanMgr.exe -ArgumentList '/sagerun:11' -WindowStyle Hidden -Wait
Запуск cleanmgr в Windows Server 2012 R2/ 2008 R2 без установки Desktop Experience
В Windows Server 2012 / R2 и 2008 /R2 по умолчанию не установлена утилита очистки диска Disk Cleanup (cleanmgr.exe). Чтобы воспользоваться утилитой cleanmgr сначала нужно установить отдельный компонент сервера Desktop Experience (Возможности рабочего стола) с помощью Server Manager или PowerShell (
Install-WindowsFeature Desktop-Experience
).
Но вместе с Desktop Experience устанавливается множество других компонентов, которые абсолютно не нужны на сервере:

- Windows Media Player
- Темы рабочего стола
- Поддержка AVI для Windows
- Windows SideShow
- Windows Defender
- Disk Cleanup
- Sync Center
- Запись звука
- Character Map
- Snipping Tool
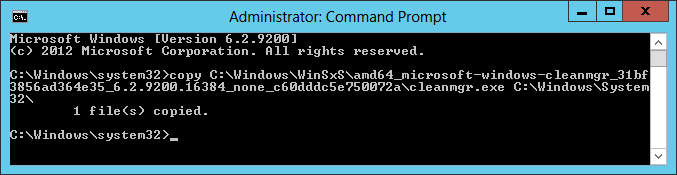
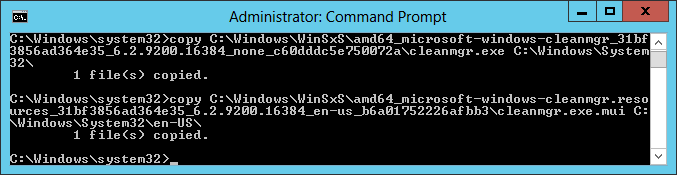
Для запуска мастера очистки дисков в Windows Server можно воспользоваться более простым методом: достаточно скопировать в системный каталог два файла из каталога WinSxS: Cleanmgr.exe и Cleanmgr.exe.mui. Ниже представлены команды для копирования файлов cleanmgr из каталога WinSxS для разных версий Windows Server (во всех случаях используется путь для английских редакций ОC).
| ОС | Команда копирования файлов cleanmgr |
| Windows Server 2008 R2 x64 |
copy C:Windowswinsxsamd64_microsoft-windows-cleanmgr_31bf3856ad364e35_6.1.7600.16385_none_c9392808773cd7dacleanmgr.exe C:WindowsSystem32
|
| Windows Server 2008 x64 |
copy C:Windowswinsxsamd64_microsoft-windows-cleanmgr_31bf3856ad364e35_6.0.6001.18000_none_c962d1e515e94269cleanmgr.exe C:WindowsSystem32
|
| Windows Server 2012 x64 |
copy C:WindowsWinSxSamd64_microsoft-windows-cleanmgr_31bf3856ad364e35_6.2.9200.16384_none_c60dddc5e750072acleanmgr.exe C:WindowsSystem32
|
Windows Server 2012 R2 x64
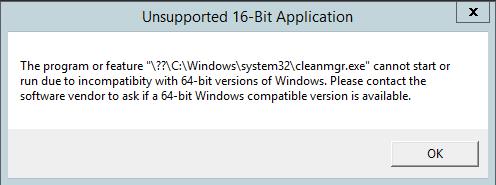
Рассмотренный выше трюк не работает в Windows Server 2012 R2 из-за изменений, внесенных обновлением KB2821895. Дело в том, что после установки данного обновления для хранения бинарных файлов компонентов стала использоваться компрессия. При попытке запустить скопированный cleanmgr.exe появляется ошибка:
The Program or feature ??C:Windowssystem32cleanmgr.exe cannot start or run due to incompatibility with 64-bit version of Windows

В качестве обходного решения можно воспользоваться такой методикой:
- Установить компонент Windows Desktop Experience:
Install-WindowsFeature Desktop-Experience - Перезагрузить сервер;
- Скопировать файлы %windir%system32cleanmgr.exe и %windir%system32en-UScleanmgr.exe.mui в произвольный каталог (c:temp)
- Удалить компонент:
Uninstall-WindowsFeature Desktop-Experience - Перезагрузка;
- Скопировать файлы cleanmgr.exe и cleanmgr.exe.mui в указанные выше каталоги
В дальнейшем эти два файла можно скопировать и на все другие сервера или интегрировать в шаблоны виртуальных машин с Windows Server 2012 R2.
Ссылка на скачивание готового комплекта файлов cleanmgr.exe.mui + cleanmgr.exe для Windows Server 2012 R2 на ЯндексДиске (thks Alex Kornev).
Для запуска утилиты очистки диска теперь достаточно выполнять с правами администратора команду
cleanmgr.exe
.

Совет. Для очистки устаревших файлов компонентов, оставшихся после установки обновлений, в Windows Server R2 можно воспользоваться командой DISM:
dism.exe /online /Cleanup-Image /StartComponentCleanup /ResetBase
В Windows Server 2008 R2, чтобы cleanmgr могла удалять устаревшие файлы обновлений нужно установить отдельный патч KB2852386.
Использование Disk Cleanup в Windows Server Core
В Windows Server Core 2016, в котором отсутствует полноценный графический интерфейс, утилита Disk Cleanup также не установлена. Если вы хотите использовать cleanmgr.exe для очистки диска в Server Core, достаточно скопировать следующие файлы из каталога WinSXS:
copy C:WindowsWinSxSamd64_microsoft-windows-cleanmgr_31bf3856ad364e35_10.0.14393.0_none_9ab8a1dc743e759acleanmgr.exe C:WindowsSystem32
copy C:WindowsWinSxSamd64_microsoft-windows-cleanmgr.resources_31bf3856ad364e35_10.0.14393.0_en-us_8b4adb68af596a23cleanmgr.exe.mui C:WindowsSystem32en-US
C диск мало места на диске это общая проблема в Windows Server 2012 и R2. Чтобы решить эту проблему, сначала лучше освободить место на диске. Чтобы выполнить эту задачу, Windows Server 2012 имеет родной Очистка диска инструмент. Но в отличие от других версий, этот инструмент не включен по умолчанию. Это причина, по которой многие люди сообщают, что очистка диска отсутствует в Windows Server 2012 (г2). В этой статье я расскажу, как добавить, установить и включить очистку диска в Windows Server 2012 R2, и как запустить Server 2012 Очистка диска (cleanmgr.exe) для освобождения места на диске.
Содержание:
- О нас Windows Server 2012 Утилита очистки диска
- Как установить и включить очистку диска в Windows Server 2012
- Добавить/включить очистку диска в Server 2012 без перезагрузки
- Установите очистку диска на Server 2012 с возможностями рабочего стола
- Как запустить очистку диска (cleanmgr) в Server 2012 R2
О нас Windows Server 2012 Утилита очистки диска
То же самое с другими версиями, Windows Server 2012 система C: диск переполняется после запуска сервера в течение определенного периода времени. Одним из решений является очистка диска C, удаление ненужных и ненужных файлов, чтобы освободить место на диске. Для этого Microsoft предоставляет собственный Очистка диска утилита, которую можно запустить через cleanmgr команда или с мастером графического интерфейса.
Чтобы очистить диск C Server 2012 (R2), родная утилита очистки диска является первым выбором, поскольку она проста, быстра и способна безопасно удалить наиболее распространенные типы ненужных файлов. Существуют сторонние программы оптимизации, но родная утилита очистки достаточно безопасна и мощна. Не нужно бороться за 1 ГБ свободного места, но подвергайте сервер опасности.
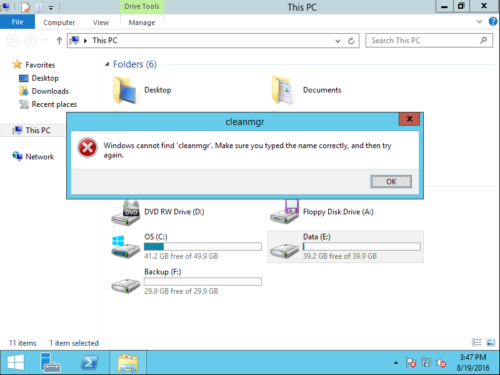
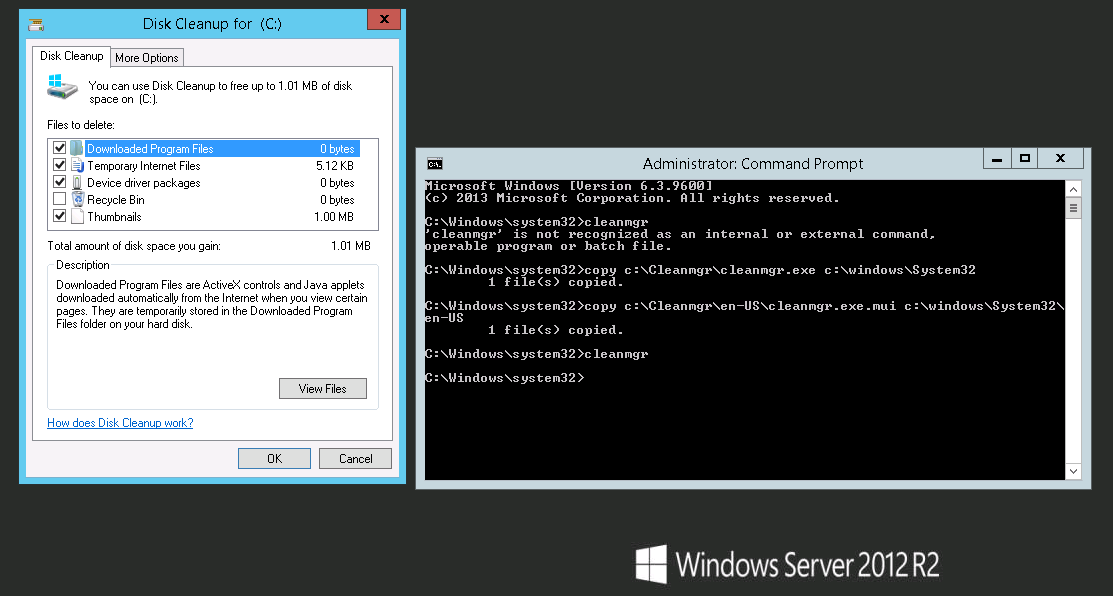
Как я сказал в начале, очистка диска в Server 2012 (R2) есть не активирован по умолчанию. Это причина, по которой некоторые люди сообщают, что очистка диска отсутствует в Server 2012 (R2), или получите сообщение об ошибке: Windows не могу найти ‘cleanmgr’. Убедитесь, что вы правильно ввели имя, а затем повторите попытку.
Перед очисткой места на диске C в Windows Server 2012 (R2), вы должны установить или включить эту утилиту самостоятельно.
Как установить/включить очистку диска в Windows Server 2012 R2
Существует два варианта включить очистку диска в Server 2012 (R2): скопируйте файлы из WinSxS и установите с функцией Desktop Experience.
Это легко и быстро, копируя файлы в определенную папку, но в некоторых средах очистка диска не работает. После установки функции «Возможности рабочего стола» очистка диска становится полностью функциональной, но для завершения установки требуется перезагрузка. Кроме того, вместе с Desktop Experience на сервере будет установлено множество других ненужных компонентов, таких как:
- Windows медиа-плеер
- Темы рабочего стола
- Поддержка AVI для Windows
- Windows Сайдшоу
- Windows защитник
- Центр синхронизации
- аудиозапись
- Таблица символов
- Ножницы
Я представлю оба метода для включения очистки диска в Windows Server 2012 (R2) один за другим выберите тот, который соответствует вашим потребностям.
1. Добавить/включить очистку диска в Server 2012 без перезагрузки
Вам просто нужно скопировать два файла Cleanmgr.exe и Cleanmgr.exe.mui из WinSxS в системный каталог.
к Server 2012 R2, этот метод копирования недействителен, и вам необходимо установить Desktop Experience. Если вы не уверены в своей версии, просто нажмите Windows + R вместе на клавиатуре, чтобы начать Run, напишите WINVER и нажмите Enter Проверять.
Как включить очистку диска в Windows Server 2012 без перезагрузки:
Шаг 1: Нажмите Windows + X вместе на клавиатуре и выберите Командная строка (Администратор)
Шаг 2: Скопируйте приведенную ниже команду, вставьте в окно командной строки и нажмите Enter выполнить.
копия C: Windows WinSxS amd64_microsoft-windows-cleanmgr_31bf3856ad364e35_6.2.9200.16384_none_c60dddc5e750072acleanmgr.exe C:Windows System32
Шаг 3: Скопируйте, вставьте и выполните вторую команду:
копия C: Windows WinSxS amd64_microsoft-windows-cleanmgr.resources_31bf3856ad364e35_6.2.9200.16384_en-us_b6a01752226afbb3cleanmgr.exe.mui C:Windows System32 EN-US

2. Установите программу очистки диска на Server 2012 (R2) с возможностями рабочего стола
Как я уже говорил выше, вы не можете включить очистку диска в Windows Server 2012 R2, просто скопировав файлы, вам необходимо выполнить следующие шаги, чтобы установить утилиту очистки диска с возможностями рабочего стола.
Как установить очистку диска в Windows Server 2012 R2:
Шаг 1: Нажмите Диспетчер серверов в нижнем левом углу, а затем выберите второй вариант «Добавить роли и функции«.

Шаг 2: Просто нажмите Далее в следующих 4 windows.
Шаг 3: Нажмите на треугольник, чтобы развернуть Пользовательский интерфейс и инфраструктура, а затем установите флажок напротив «Рабочий стол«.
Появится окно с просьбой добавить дополнительные функции, нажмите Добавить функции внизу

Шаг 4: Установите флажок напротив «Рабочий стол«еще раз, а затем нажмите Далее. Затем нажмите Установить в следующем окне.
Шаг 5: Нажмите Закрыть по окончании требуется перезагрузка, чтобы завершить установку и вступить в силу.
Как запустить очистку диска в Windows Server 2012 и R2
Существуют два способа открыть Очистку диска в Windows Server 2012 (R2).
Вариант 1: запустить cleanmgr (действует после копирования файлов и установки)
- Нажмите Windows + R на клавиатуре введите cleanmgr и нажмите Enter.
- Выберите диск C: (или другой) в раскрывающемся списке и нажмите OK.

Вариант 2: через проводник (действует только после установки)
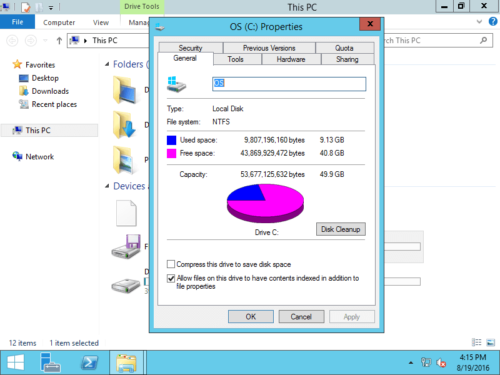
- Откройте проводник, щелкните правой кнопкой мыши диск C и выберите Свойства.
- Нажмите Очистка диска Кнопка в этой середине.
Независимо от того, каким образом, очень легко освободить дисковое пространство с помощью Disk Cleanup в Windows Server 2012 (R2), просто установите флажок напротив файлов, которые вы хотите удалить, а затем нажмите OK выполнить.

Мой тестовый сервер установлен недавно, поэтому я могу освободить немного места. Серверам, которые никогда или давно не освобождали дисковое пространство, Server 2012 Утилита очистки диска может помочь вам восстановить несколько ГБ дискового пространства.
Как почистить диск в Windows Server 2012 (R2) с командой cleanmgr
Есть 3 способа запуска команда cleanmgr in Server 2012 (R2), выберите тот, который соответствует вашим потребностям.
① Все ненужные файлы выбираются и подтверждаются самостоятельно
- Нажмите Windows и R вместе на клавиатуре.
- вход cleanmgr /LOWDISK и нажмите Enter.
- Появится диалоговое окно «Очистка диска» со всеми типами файлов, выбранных по умолчанию, поэтому вам просто нужно нажать «ОК» для подтверждения.
② Очистить все ненужные файлы автоматически
- Нажмите Windows и R вместе на клавиатуре.
- вход cleanmgr /VERYLOWDISK и нажмите Enter.
Затем Очистка диска удалит все ненужные файлы автоматически, а затем покажет вам диалоговое окно с результатом.
③ Очистить указанные ненужные файлы автоматически
- Нажмите Windows и R вместе на клавиатуре, чтобы открыть Run.
- вход cleanmgr /sageset:1 и нажмите Enter. (Вы можете указать значение от 0 до 65535).
- Появится диалоговое окно «Очистка диска», выберите файлы для удаления и нажмите «ОК».
- В будущем вам просто нужно запустить cleanmgr /sageset:1 и нажмите Enter, предварительно выбранных ненужные файлы будут удалены автоматически. Если вы хотите удалить файлы разных типов, введите cleanmgr /sageset:2 на шаге 2 и запустить cleanmgr / Sageset: 2 на этапе 4.
Если у вас мало места при очистке диска в Windows Сервер 2012, или диск системы C создан маленький, вам лучше расширить диск C в больший размер. В противном случае диск C будет снова заполнен в ближайшее время. Фактически, даже если вы получите 10 ГБ свободного места, оно будет быстро уничтожено новыми сгенерированными ненужными файлами.
Работы С Нами программное обеспечение серверного раздела, вы можете сжать любой объем данных на том же диске, чтобы получить нераспределенное пространство, а затем добавить его на диск C. Таким образом, на диске С будет больше свободного места. Операционная система, программы и все остальное осталось прежним. Этот шаг является наиболее важным, чтобы помочь решить эту проблему.
Скачать NIUBI Partition Editor и следуйте инструкциям в видео, чтобы добавить больше свободного места на диске C.

Помимо сокращения и расширения разделов без потери данных, NIUBI Partition Editor помогает выполнять многие другие операции по управлению дисками и разделами.
The Disk Cleanup tool allows the administrator to quickly clean up the Windows Server system drive by deleting unnecessary and temporary files, including cleaning the WinSxS directory from files of outdated components that remained after installing the latest cumulative updates. The Disk Cleanup utility (cleanmgr.exe) is installed by default on the GUI editions of Windows Server 2016/2019 (Desktop Experience). However, in previous versions of Windows Server (2012 R2/2012/2008 R2), the cleanmgr.exe tool is missing.
Contents:
- Using Disk Cleanup Tool on Windows Server 2016
- Cleanmgr.exe: Disk Cleanup Command-Line Options
- How to Enable Disk Cleanup on Windows Server 2012 R2/2008 R2 without Installing Desktop Experience?
- Using Disk Cleanup on Windows Server Core Edition
Using Disk Cleanup Tool on Windows Server 2016
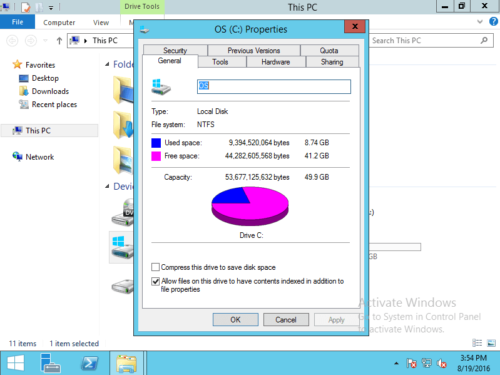
To clean the system disk from unneeded files on Windows Server 2016 using the Disk Cleanup utility, you need to open the disk properties in File Explorer and click the Disk Cleanup button.
You can also type the “disk cleanup” or cleanmgr.exe in the search box.
Select the drive you want to clean.
Wait until the cleaning wizard checks your disk and finds unnecessary files that can be safely deleted.
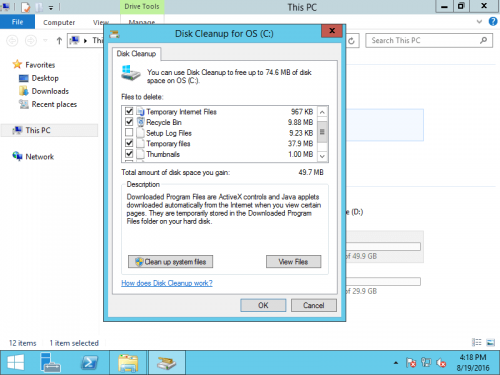
You can select components whose files can be deleted. You are prompted to delete the following temporary files:
- Setup Log Files;
- Downloaded Program Files;
- Temporary Internet Files;
- Recycle Bin;
- Temporary files;
- Thumbnails.
To remove unneeded system files, click on the Clean up system files button.
Additionally, it is proposed to clean up:
- Outdated Windows Defender files;
- System archived Windows Error Reporting files (the folder C:ProgramDataMicrosoftWindowsWERReportQueue);
- System queued Windows Error Reporting;
- Device driver packages (see How to Remove Unused Drives from Driver Store);
- Windows Update Cleanup — this allows you to clean up the component store in the WinSxS directory. Old versions of components files that remain after installing updated ones are removed.
Select the options you need, and Disk Cleanup will show the amount of disk space you gave. Click OK and confirm the deletion of files.
Wait for the cleanmgr.exe tool to remove the unnecessary files.
Cleanmgr.exe: Disk Cleanup Command-Line Options
The cleanmgr.exe tool has several command-line options that allow it to be used in various automatic drive cleaning scenarios. They can be used both on Windows Server and on user desktop workstations running Windows 10.
cleanmgr.exe [/d driveletter] [/SAGESET:n | /SAGERUN:n | TUNEUP:n | /LOWDISK | /VERYLOWDISK | /SETUP | /AUTOCLEAN]
The /AUTOCLEAN parameter is used to delete old files left after upgrading a Windows build. The /SETUP option allows you to delete files left from a previous version of Windows (if you performed an in-place upgrade).
The cleanmgr /LOWDISK command runs the Disk Cleanup GUI with the already selected cleaning options.
The cleanmgr /VERYLOWDISK command performs automatic drive cleanup (without showing GUI), and after the end it displays information about the actions performed and available free space.
You have successfully resolved the low disk space condition. Your C: volume now has 10000 Mb of free space remaining.
Using the /sageset:xx and /sagerun:xx options, you can create and run a customized set of cleanup options.
For example, run the command: cleanmgr /sageset: 11. In the window that opens, select the components and files that you want to automatically cleanup (I selected all the options).
These settings are saved to the registry key HKEY_LOCAL_MACHINESOFTWAREMicrosoftWindowsCurrentVersionExplorerVolumeCaches. This registry section lists all the Windows components that can be cleaned using the Disk Cleanup tool. For each option you select, a DWORD parameter is created with the name StateFlags0011 (0011 is the number you specified in the sageset parameter).
To start the drive cleanup task with the selected parameters, run the command:
cleanmgr /sagerun:11
If you need to configure automatic disk cleanup task on computers (or servers) in an Active Directory domain, you just need to export this registry key and deploy it on computers through the GPO.
To automatically cleanup the system drive on workstations with Windows 10, you can create a simple scheduled task with the following PowerShell code:
Start-Process -FilePath CleanMgr.exe -ArgumentList '/sagerun:11' -WindowStyle Hidden -Wait
How to Enable Disk Cleanup on Windows Server 2012 R2/2008 R2 without Installing Desktop Experience?
By default, in Windows Server 2012/R2 and 2008/R2 the Disk Cleanup (cleanmgr.exe) tool is not installed by default. To use the cleanmgr utility, first you have to install a separate server Desktop Experience feature using either Server Manager or PowerShell (Install-WindowsFeature Desktop-Experience).
Together with Desktop Experience, many other unnecessary components are installed on the server:
- Windows Media Player;
- Desktop themes;
- AVI support for Windows;
- Windows SideShow;
- Windows Defender Antivirus;
- Disk Cleanup;
- Sync Center;
- Audio recording;
- Character Map;
- Snipping Tool.
To run the Disk Cleanup on Windows Server, you can use a simple method: just copy two files Cleanmgr.exe and Cleanmgr.exe.mui from WinSxS to the system32 directory. Below you can see commands to copy cleanmgr files in different Windows versions (in all cases, the path is used for Windows Server English language editions).
| OS version | Command to copy cleanmgr bin files |
| Windows Server 2008 R2 x64 | copy C:Windowswinsxsamd64_microsoft-windows-cleanmgr_31bf3856ad364e35_6.1.7600.16385_none_c9392808773cd7dacleanmgr.exe C:WindowsSystem32 |
| Windows Server 2008 x64 | copy C:Windowswinsxsamd64_microsoft-windows-cleanmgr_31bf3856ad364e35_6.0.6001.18000_none_c962d1e515e94269cleanmgr.exe C:WindowsSystem32 |
| Windows Server 2012 x64 | copy C:WindowsWinSxSamd64_microsoft-windows-cleanmgr_31bf3856ad364e35_6.2.9200.16384_none_c60dddc5e750072acleanmgr.exe C:WindowsSystem32 |
Windows Server 2012 R2 x64
The trick described above doesn’t work on Windows Server 2012 R2 due to the changes made by KB2821895 update. The matter is that after you install this update, compression is used to store the binary component files. When you trying to run the copied cleanmgr.exe, the following error appears:
Unsupported 16-Bit Application The Program or feature ??C:Windowssystem32cleanmgr.exe cannot start or run due to incompatibility with 64-bit version of Windows.
As a workaround, you can use this method:
- Install Desktop Experience feature using PowerShell:
Install-WindowsFeature Desktop-Experience - Restart your server;
- Copy the files %windir%system32cleanmgr.exe and %windir%system32en-UScleanmgr.exe.mui to any directory (c:temp);
- Uninstall the feature:
Uninstall-WindowsFeature Desktop-Experience - Reboot;
- Copy the files cleanmgr.exe and cleanmgr.exe.mui to the directories mentioned above.
Later both of the files can be copied to other servers or integrated into your Windows Server 2012 R2 virtual machine template.
To start the Disk Cleanup tool, run the cleanmgr.exe command with the administrator privileges. 
Tip. You can use the DISM command to delete outdated component files left after installing updates on Windows Server R2:
dism.exe /online /Cleanup-Image /StartComponentCleanup /ResetBase
To use cleanmgr.exe to delete old update files on Windows 2008 R2 / Windows 7 SP1, you need to install a separate patch KB2852386.
Using Disk Cleanup on Windows Server Core Edition
In Windows Server Core 2016, which lacks full-fledged GUI capabilities, Disk Cleanup tool is also not installed. If you want to use cleanmgr.exe to clean up the disk on Server Core, just copy the following files from the WinSXS directory:
copy C:WindowsWinSxSamd64_microsoft-windows-cleanmgr_31bf3856ad364e35_10.0.14393.0_none_9ab8a1dc743e759acleanmgr.exe C:WindowsSystem32copy C:WindowsWinSxSamd64_microsoft-windows-cleanmgr.resources_31bf3856ad364e35_10.0.14393.0_en-us_8b4adb68af596a23cleanmgr.exe.mui C:WindowsSystem32en-US
Over time, as your Windows Server runs longer, more and more disk space is eaten. Simply gone! Investigating the disk usage leaves you clueless; there are no large log files, crash dumps, or there is no software to be removed. Where did that space go? Here is how to free-up diskspace using DISM.
This post also shows you how to move the Windows Server SoftwareDistribution folder and user’s Documents folder to a different partition.
The Windows disk cleanup utility cleanmgr is not available in Windows Server 2012 if the Desktop Experience-feature is not installed. This makes cleaning up used disk space a bit harder. You can utilize your cmd.exe or PowerShell command-line, and use Deployment Image Servicing and Management (DISM) to clean up the Windows Component Store (WinSxS) in Windows Server 2012 and up.
The WinSxS folder is located in the Windows folder, for example C:WindowsWinSxS. It’s the location for Windows Component Store files.
The Windows Component Store contains all the files that are required for a Windows installation. And, any updates to those files are also held within the component store as the updates are installed (source: KB 2795190 – and do read Manage the Component Store). The WinSxS folder will become large…
Dism disk cleanup: Deployment Image Servicing and Management (DISM) is a command-line tool that allows you to install, uninstall, configure, and update Windows features, packages, drivers, and international settings. The /Cleanup-Image parameter of dism.exe provides advanced users more options to further reduce the size of the WinSxS folder.
The Dism.exe /Online /Cleanup-Image has a few extra parameters (or switches):
/AnalyzeComponentStore/StartComponentCleanup/ResetBasewith/StartComponentCleanup/SPSuperseded
Throughout this article, I assume you’ll read help options, just add /?, like: dism.exe /Online /Cleanup-Image /?.
If you enjoyed this, you might also enjoy the following post summing up 5 extra ways to clean up disk space in Windows Server!
Analyze WinSxS folder (Component Store) with /AnalyzeComponentStore
First you can use the /AnalyzeComponentStore parameter. This analyzes the size of the Component Store in Windows. The AnalyzeComponentStore option is available in Windows 8.1 Windows Server 2012 R2, and it’ll notify you whether a Component Store Cleanup is recommended or not.
dism.exe /Online /Cleanup-Image /AnalyzeComponentStore
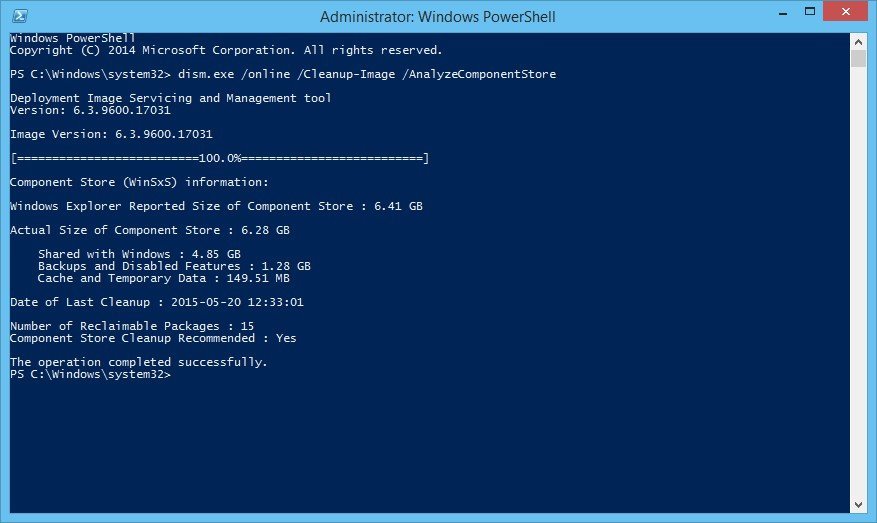
In the above image, AnalyzeComponentStore recommends a Component Store Cleanup. Let’s do so.
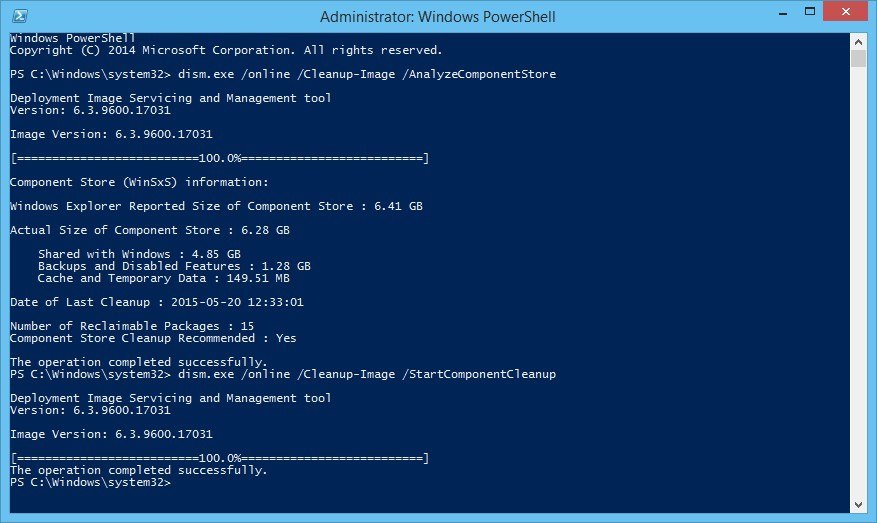
/StartComponentCleanup parameter
Dism.exe removes superseded and unused system files from a system with the /StartComponentCleanup parameter.
dism.exe /Online /Cleanup-Image /StartComponentCleanup
There is also a registered scheduled task called StartComponentCleanup. You can start this task from the command line:
Code language: JavaScript (javascript)
schtasks.exe /Run /TN "MicrosoftWindowsServicingStartComponentCleanup"
The /StartComponentCleanup parameter is supported on Windows 8, Windows Server 2012 and up.
Using the /StartComponentCleanup parameter of Dism.exe on Windows 10 gives you similar results to running the StartComponentCleanup task in Task Scheduler, except previous versions of updated components will be immediately deleted (without a 30 day grace period) and you will not have a 1-hour timeout limitation.
From an elevated command prompt, type the following:
Dism.exe /online /Cleanup-Image /StartComponentCleanup
/ResetBase switch with /StartComponentCleanup parameter
Using the /ResetBase switch with the /StartComponentCleanup parameter of dism.exe, all superseded versions of every component in the component store is removed.
Dism.exe /Online /Cleanup-Image /StartComponentCleanup /ResetBase
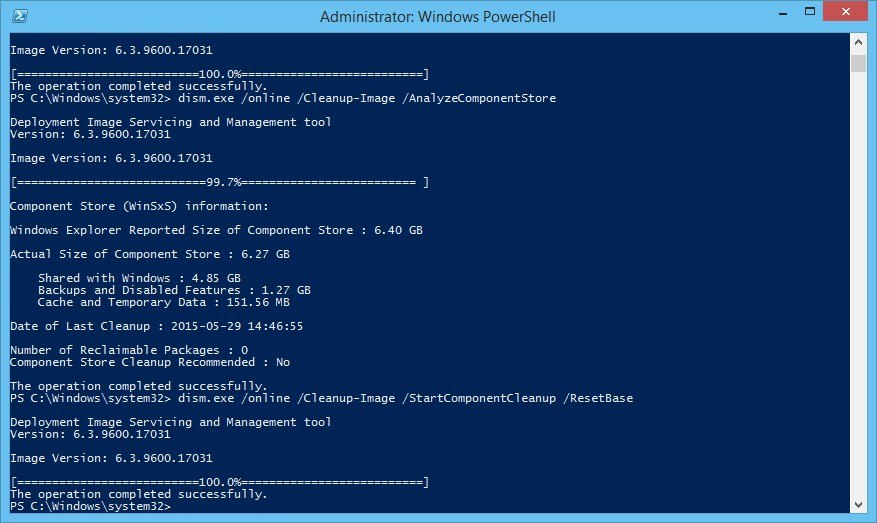
All existing service packs and updates cannot be uninstalled after this command is completed. This will not block the uninstallation of future service packs or updates.
The /ResetBase parameter is supported on Windows 8.1 and Windows Server 2012 R2.
/SPSuperseded parameter
The /SPSuperseded parameter removes any backup components needed for de-installation of a service pack. The service pack cannot be uninstalled after this command is completed.
Dism.exe /Online /Cleanup-Image /SPSuperseded
The Service Pack cannot be uninstalled after this command is completed.
The /SPSuperseded parameter is supported on Windows 7 or Windows Server 2008 R2 Service Pack 1, 2012, 2012 R2.
The
/AnalyzeComponentStoreoption is available in Windows 8.1 and Windows Server 2012 R2. Use this to analyze the size of the Component Store (WinSxS folder) in Windows.
Disk Cleanup Tool is available on Windows Server 2012 but not Windows Server 2012 R2
As said at the beginning of this article, the Disk Cleanup Tool is available in Windows Server 2012, if you install the Desktop Experience-feature.
In some versions of Windows Server, you can simply copy cleanmgr.exe and cleanmgr.exe.mui to C:Windowssystem32 and C:Windowssystem32en-Us from an old Windows 2008 R2 server, if you don’t want to install the Desktop Experience feature.
The following steps to install (copy) cleanmgr may not work on all versions of Windows Server. Try for yourself.
Disk Cleanup Wizard addon on Windows Server 2008 R2
Microsoft KB2852386 adds a Disk Cleanup option on Windows Server 2008 R2, similar to the Windows 7 update. I’ve tested this on Windows Server 2012. It may not clean up everything, but at least a lot.
Here’s how to make cleanmgr.exe available on Windows Server 2012 Standard (Windows version 6.2.9200), without installing the Desktop Experience feature:
Code language: PHP (php)
Microsoft Windows [Version 6.2.9200] (c) 2012 Microsoft Corporation. All rights reserved. PS C:Usersjan> $osversion = [System.Environment]::OSVersion.Version PS C:Usersjan> write-host $osversion 6.2.9200.0 C:WindowsSystem32>cd .. C:Windows>copy WinSxSamd64_microsoft-windows-cleanmgr.resources_31bf3856ad364e35_6.2.9200.16384_en-us_b6a01752226afbb3cleanmgr.exe.mui Windowssystem32en-US 1 file(s) copied. C:Windows>copy WinSxSamd64_microsoft-windows-cleanmgr_31bf3856ad364e35_6.2.9200.16384_none_c60dddc5e750072acleanmgr.exe Windowssystem32 1 file(s) copied. C:Windows>system32cleanmgr.exe C:Windows>
Unfortunately, this no longer works on Windows Server 2012 R2 (6.3.9600), probably due to KB2821895. As Aaron pointed out in the comments, the above solution to copy over the cleanmgr.exe and cleanmgr.exe.mui files doesn’t always work well. Therefore I removed this information for Windows Server 2012 R2.
Fortunately, the Disk Cleanup functionality is back in Windows Server 2016 (at least TP5).
After cleaning up the disk, a server reboot is required. Don’t forget to reboot your computer – or server – afterwards! The actual cleanup of the WinSxs directory occurs during the next reboot.
Error 0x800f0906 with DISM /Online /Cleanup-Image, PowerShell Install-WindowsFeature and SFC /scannow
Some reports are available explaining Microsoft Security Bulletin MS14-046 broke DISM /Online /Cleanup-Image /RestoreHealth, PowerShell Install-WindowsFeature with -Source parameter, and SFC /scannow. Yes, it broke a lot…
An update is made available by Microsoft: KB3005628
Update for the .NET Framework 3.5 on Windows 8, Windows 8.1, Windows Server 2012, and Windows Server 2012 R2. This update resolves an issue that prevents the optional Microsoft .NET Framework 3.5 feature from being enabled after you install security update 2966827 or 2966828 (described in Microsoft Security Bulletin MS14-046) for the Microsoft .NET Framework 3.5.
Move Windows Server SoftwareDistribution folder
Over time, your Windows Updates SoftwareDistribution folder in c:WindowsSoftwareDistribution can become quite large, for example when multiple updates were not installed successfully.
Windows Update files are downloaded to this folder and removed after successful installation. When you find yourself in a situation where your C: partition is rather small, and SoftwareDistribution folder eats up too much disk space, follow these steps to move the SoftwareDistribution folder to a different location.
All in a cmd.exe shell (Start > Run > cmd and press enter). In this example the new location is D:Windows-SoftwareDistribution.
- Stop the Windows Update service:
net stop wuauserv - Rename the folder
c:WindowsSoftwareDistributiontoc:WindowsSoftwareDistribution.old:rename c:windowsSoftwareDistribution SoftwareDistribution.old - Create a link using Windows Sysinternals Junction, or Windows mklink
- Create the new directory:
mkdir D:Windows-SoftwareDistribution - Create the Junction:
c:>junction C:WindowsSoftwareDistribution "D:Windows-SoftwareDistribution", or:c:>mklink /J C:WindowsSoftwareDistribution "D:Windows-SoftwareDistribution"
- Create the new directory:
- Restart the Windows Update Service:
net start wuauserv
When, after a while, everything seems to run and update fine, you can delete your SoftwareDistribution.old folder safely.
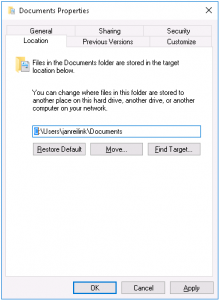
Move User Documents folder
Another way for you to gain some extra free space is to move the User Documents folder (and others, like Downloads), for instance from C:Users$USER$Documents to D:User$USER$Documents (substitute $USER$ with the username whose Documents folder you want to move). Here are the steps for you to follow (screenshots taken from Windows Server 2016 TP5):
- Open Explorer and right click on the Documents folder and then Properties
- Choose Location
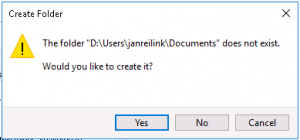
- Change the location where files are stored
- When the destination does not exist, Windows asks to create the folder for you
- After completion, files are moved to their new location.

Conclusion
Yes, the Windows component store (WinSxS folder) can become large, very large. But fortunately, Microsoft provides us the tools to monitor, manage and clean up the WinSxS folder to regain that used disk space.
If you are comfortable with installing the Desktop Experience Windows feature on your system, you can have the Disk Cleanup utility on your system. Otherwise, you can use the DISM (Deployment Image Servicing and Management) command for various clean up tasks.
To gain some extra free space, you can also move the Windows SoftwareDistribution folder to a different partition.
Overview:
- What is Disk Cleanup
- Windows Server 2012 Disk Cleanup is missing
- Enable Disk Cleanup in Windows Server 2012
- Enable Server 2012 disk cleanup without reboot
- Install disk cleanup with desktop experience
- Important step after cleaning up disk
What is Disk Cleanup
Disk Cleanup (cleanmgr.exe) is a computer maintenance utility first introduced with Windows 98 and included in all subsequent releases of Windows. It is designed to free up disk space by removing files that are no longer needed or that can be safely deleted.
There are a number of different file categories that Disk Cleanup targets when performing the initial disk analysis:
- Compression of old files
- Temporary Internet files
- Temporary Windows files
- Downloaded program files
- Recycle Bin
- Removal of unused applications or optional Windows components
- Setup log files
- Offline web pages (cached)
The above list is not exhaustive.
Disk Cleanup is missing in Windows Server 2012
Windows Disk Cleanup is very useful utility and I’ve used it to free up disk space from Server 2003. It helps remote most of junk and unnecessary files safely and easily. Many people feedback that Disk Cleanup is missing in Server 2012 (R2).
If you try to run Disk Cleanup in Server 2012 from Run with command, you’ll receive the error: Windows cannot find ‘cleanmgr’. Make sure you typed the name correctly, and then try again.
This is because that Disk Cleanup is not enabled in Server 2012 by default, before running it to free up disk space, you must enable or install this tool.
Enable Disk Cleanup in Windows Server 2012
There are two ways to enable Disk Cleanup in Windows Server 2012 (R2):
- Copy files from WinSxS
- Install Desktop Experience
The first option is easy and fast, but in some environment Disk Cleanup won’t work. The second option make sure Disk Cleanup work in most conditions, but it requires reboot to complete installing the Desktop Experience feature. Furthermore, together with Desktop Experience, many other unnecessary components are installed on the server, such as:
- Windows Media Player
- Desktop themes
- AVI support for Windows
- Windows SideShow
- Windows Defender
- Sync Center
- Audio recording
- Character Map
- Snipping Tool
1. Enable disk cleanup in Server 2012 without reboot
Note: This method is invalid for Server 2012 R2.
All you need to do is copying two files Cleanmgr.exe and Cleanmgr.exe.mui from WinSxS to system directory, steps:
1. Locate files:
- C:WindowsWinSxSamd64_microsoft-windows-cleanmgr_31bf3856ad364e35_6.2.9200.16384_none_c60dddc5e750072acleanmgr.exe
- C:WindowsWinSxSamd64_microsoft-windows-cleanmgr.resources_31bf3856ad364e35_6.2.9200.16384_en-us_b6a01752226afbb3cleanmgr.exe.mui
2. Move files:
- Copy Cleanmgr.exe to %systemroot%System32
- Copy Cleanmgr.exe.mui to %systemroot%System32en-US
You can now launch the Disk cleanup tool by running Cleanmgr.exe from the command prompt.
2. Install disk cleanup in Server 2012 (R2) with desktop experience
Step 1: Click Server Manager on bottom left, click the 2nd option “Add roles and features“.
Step 2: Click Next till you see the Features.
Step 3: Click the check-box in front of “Desktop Experience” and click Next.
Step 4: Within several minutes, the installation complete, click Close.
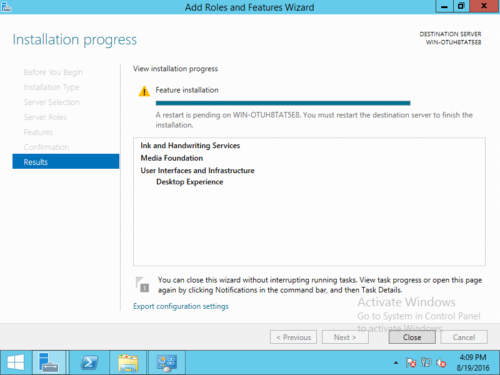
Step 5: Restart the server to finish adding features.
After booting to desktop, when you right click C drive in Explorer, you’ll see Disk Cleanup.
How to run Disk Cleanup in Windows 2012 server
If you installed Disk Cleanup in Windows 2012 server, there are 2 ways to start this uility:
- Press Windows + R keys together, type cleanmgr and press Enter.
- Press Windows + E to open File Explorer, right click C drive and click Disk Cleanup.
If you enable Server 2012 Disk Cleanup by simply copying files, only method 1 is valid.
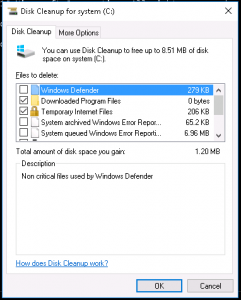
No matter which method you use, a dialog-box will be pop up, you just need to select the files to remove and confirm the operation.
Important step after cleaning up disk
Disk Cleanup is a good tool to help free up disk space, but in most cases you cannot reclaim large amount of free space. Therefore, C drive will become full again shortly. To completely solve this problem, you’d better add more free space to C drive from other partitions.
Step 1: Download NIUBI Partition Editor, right click D: drive (the adjacent volume behind C drive) and select “Resize/Move Volume“.
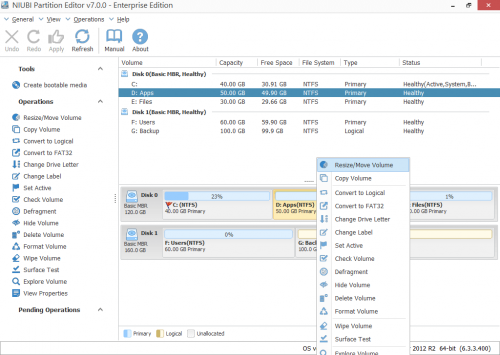
Step 2: In the pop-up window, drag the left border rightwards or enter an amount in the box of “Unallocated space before”.

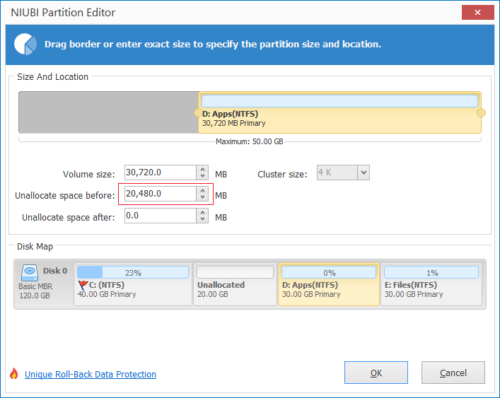
Click OK and back to the main window, D drive is shrunk and Unallocated space is made on the left. A new pending operation is added on bottom left.
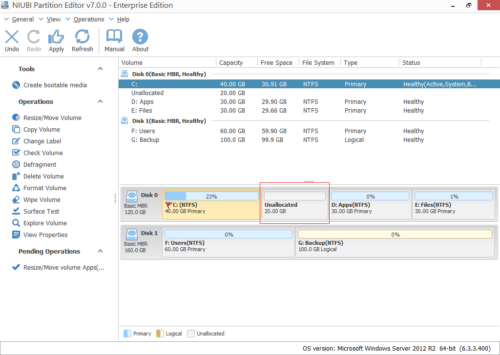
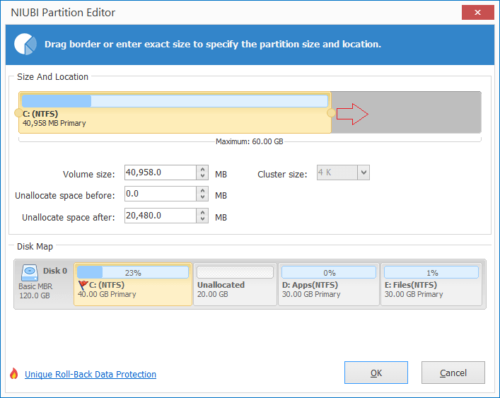
Step 3: Right click C: drive in NIUBI and run “Resize/Move Volume”, drag the right border rightwards to combine this Unallocated space.
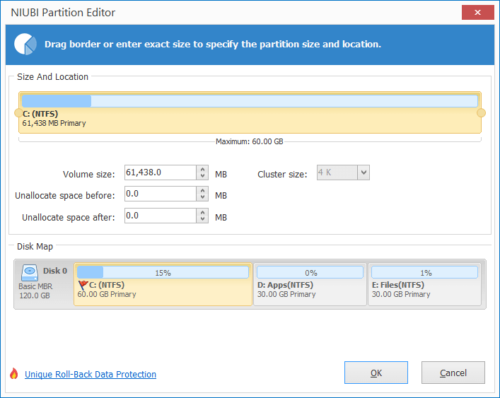
Step 4: The second pending operation is added, click Apply on top left to take effect.
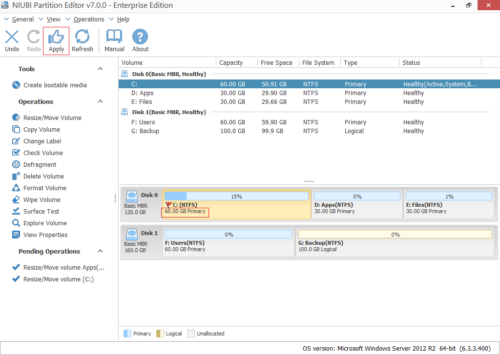
In most cases, there’s plenty of free space in other partitions on the same disk, so you can move free space to C drive. In this way, operating system, programs and anything else (except partition size) keep the same with before. Better than other tools, NIUBI Partition Editor has Virtual Mode, Cancel-at-well and 1-Second Rollback technologies to protect system data. Besides shrinking and extending partition without losing data, this tool helps you do many other disk partition management operations.
Tips: you’d better expand C drive as large as possible with NIUBI and run Disk Cleanup in Windows Server 2012 (R2) monthly to remove new generated junk files.
Learn More Download to try
| title | description | ms.reviewer | author | ms.author | manager | ms.topic | ms.date |
|---|---|---|---|---|---|---|---|
|
Using Disk Cleanup on Windows Server |
Learn how to use command-line options to configure the Disk Cleanup tool (Cleanmgr.exe) to automatically clean up certain files. |
cosmosdarwin |
iangpgh |
jgerend |
daveba |
article |
06/20/2019 |
Using Disk Cleanup on Windows Server
Applies to: Windows Server 2022, Windows Server 2019, Windows Server 2016, Windows Server 2012 R2, Windows Server 2012, Windows Server 2008 R2
The Disk Cleanup tool clears unnecessary files in a Windows Server environment. This tool is available by default on Windows Server 2019 and Windows Server 2016, but you might have to take a few manual steps to enable it on earlier versions of Windows Server.
To start the Disk Cleanup tool, either run the Cleanmgr.exe command, or select Start, select Windows Administrative Tools, and then select Disk Cleanup.
You can also run Disk Cleanup by using the cleanmgr Windows command and use command-line options to specify that Disk Cleanup cleans up certain files.
[!NOTE]
If you’re just looking to free up disk space, consider using Azure File Sync with cloud tiering enabled. This allows you to cache your most frequently accessed files locally and tier your least frequently accessed files to the cloud, saving local storage space while maintaining performance. For details, see Planning for an Azure File Sync deployment.
Enable Disk Cleanup on an earlier version of Windows Server by installing the Desktop Experience
Follow these steps to use the Add Roles and Features Wizard to install the Desktop Experience on a server running Windows Server 2012 R2 or earlier, which also installs Disk Cleanup.
-
If Server Manager is already open, go on to the next step. If Server Manager is not already open, open it by doing one of the following.
-
On the Windows desktop, start Server Manager by clicking Server Manager in the Windows taskbar.
-
Go to Start and select the Server Manager tile.
-
-
On the Manage menu, select add Roles and Features.
-
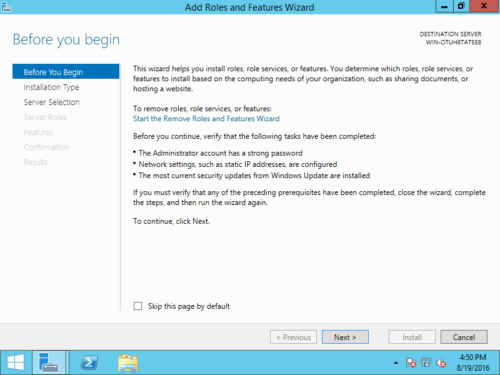
On the Before you begin page, verify that your destination server and network environment are prepared for the feature that you want to install. Select Next.
-
On the Select installation type page, select Role-based or feature-based installation to install all parts features on a single server. Select Next.
-
On the Select destination server page, select a server from the server pool, or select an offline VHD. Select Next.
-
On the Select server roles page, select Next.
-
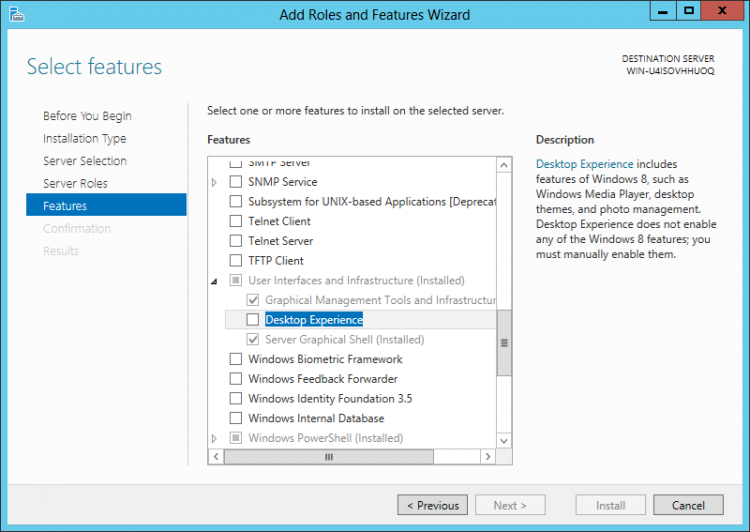
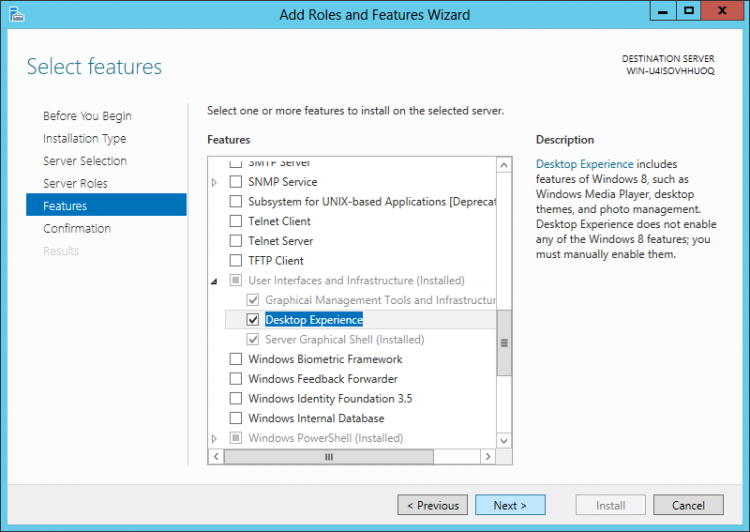
On the Select features page, select User Interface and Infrastructure, and then select Desktop Experience.
-
In Add features that are required for Desktop Experience?, select Add Features.
-
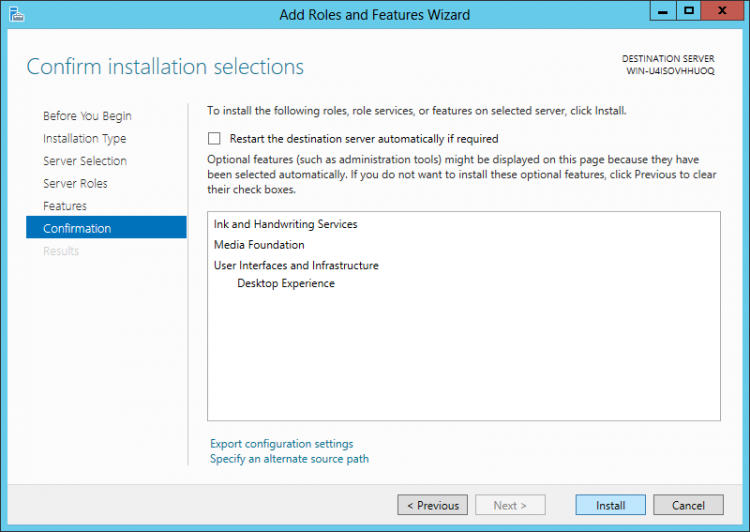
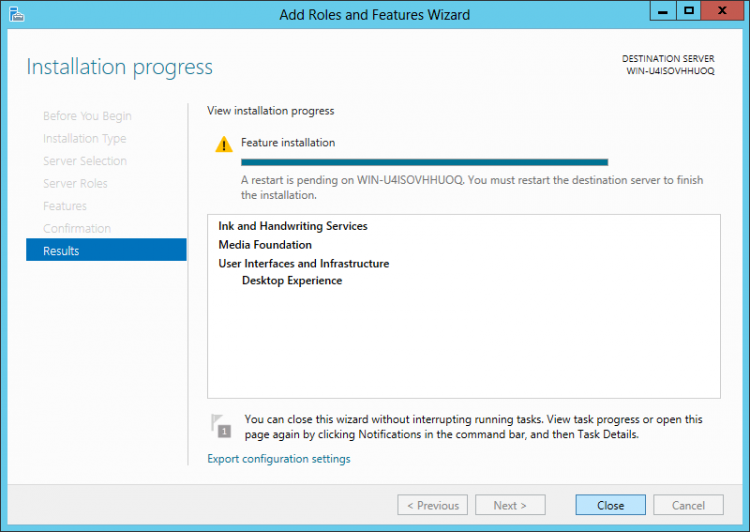
Proceed with the installation, and then reboot the system.
-
Verify that the Disk Cleanup option button appears in the Properties dialog box.


Manually add Disk Cleanup to an earlier version of Windows Server
The Disk Cleanup tool (cleanmgr.exe) isn’t present on Windows Server 2012 R2 or earlier unless you have the Desktop Experience feature installed.
To use cleanmgr.exe, install the Desktop Experience as described earlier, or copy two files that are already present on the server, cleanmgr.exe and cleanmgr.exe.mui. Use the following table to locate the files for your operating system.
| Operating System | Architecture | File Location |
|---|---|---|
| Windows Server 2008 R2 | 64-bit | C:Windowswinsxsamd64_microsoft-windows-cleanmgr_31bf3856ad364e35_6.1.7600.16385_none_c9392808773cd7dacleanmgr.exe |
| Windows Server 2008 R2 | 64-bit | C:Windowswinsxsamd64_microsoft-windows-cleanmgr.resources_31bf3856ad364e35_6.1.7600.16385_en-us_b9cb6194b257cc63cleanmgr.exe.mui |
Locate cleanmgr.exe and move the file to %systemroot%System32.
Locate cleanmgr.exe.mui and move the files to %systemroot%System32en-US.
You can now launch the Disk cleanup tool by running Cleanmgr.exe from Command Prompt, or by clicking Start and typing Cleanmgr into the search bar.
To have Disk Cleanup button appear on a disk’s Properties dialog, you will also need to install the Desktop Experience feature.
Additional references
Free up drive space in Windows 10
cleanmgr
Summary
Want to know how to enable disk cleanup server 2008/2012 r2 without reboot? This article will show you how to enable disk cleanup in server 2012 r2, and also show you how to free up your disk space, extend your disk partitions.

Updated on Sept 11, 2022
by Andrew Wright
Follow @IM-Magic
Table of Contents
- Enable/Install disk cleanup server 2012 r2
- Solution 1 to Enable Disk Cleanup Server 2008 R2 without a reboot
- Solution 2 to Enable Disk Cleanup Server 2012 without a reboot
- Third Party Disk Management: IM-Magic Partition Resizer
The added features and useful updates are the main reason why people go for Windows Server series at the first place. Windows Server is an amazing operating system specially designed for small to medium enterprises. However, many people experience low disk space on Windows server 2008 and 2012 R2. And if you’re reading this article, there are greater chances that you’re experiencing low disk system space and unable to find the disk cleanup tool in the server.
Enable/Install disk cleanup Windows Server 2012 r2
I’m amazed myself because they didn’t add the disk cleanup tool (cleanmgr.exe) in Windows Server 2008/2012 R2 by default. But you can still enable this option by using a Server feature known as “Desktop Experience”. However, after enabling the Desktop Experience, you must reboot your system. Moreover, it installs many other components, tools, and updates on the computer. Anyways, if you are willing to reboot the system, follow the steps below
Step 1 — Click Server Manager on bottom left, and then click the 2nd option «Add roles and features». And confirm the following steps that come along and leave everthing as default settings.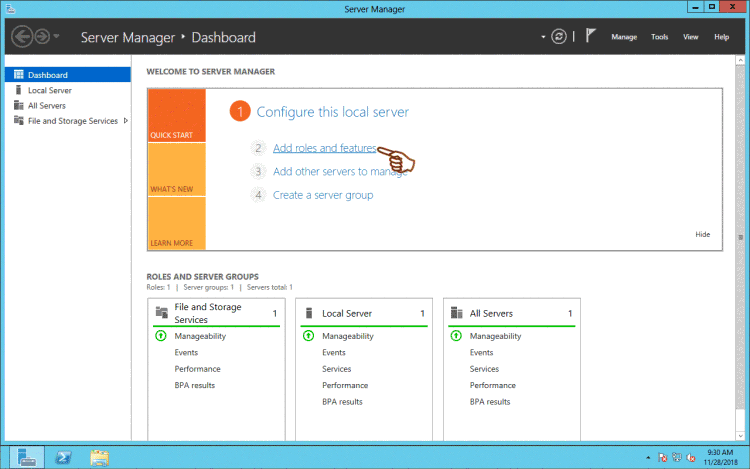
Step 2 — Click the triangle to unfold User Interface and Infrastructure, and then click the check-box in front of «Desktop Experience».

Step 3 -Get ‘Desktop Experience’ selected
Step 4 — Click ‘Include management tools’, and click Add Features button
Step 5 — Confirm the installation by clicking ‘Install’
Or you may use this following steps if possible
- Simply go to Programs and Features
- Under the Features Section click on Enable Desktop Experience
- Done!
Solution 1 to Enable Disk Cleanup Server 2008 R2 without a reboot
Copy the files at the following location
- C:Windowswinsxsamd64_microsoft-windows-cleanmgr_31bf3856ad364e35_6.1.7600.16385_none_c9392808773cd7dacleanmgr.exe
- C:Windowswinsxsamd64_microsoft-windows-cleanmgr.resources_31bf3856ad364e35_6.1.7600.16385_en-us_b9cb6194b257cc63cleanmgr.exe.mui
After you have found the files, copy the file cleanmgr.exe to C:WindowsSystem32, and copy the cleanmgr.exe.mui to C:WindowsSystem32en-US. After this
- Press Windows+R
- Type “cleanmgr” and press enter
- Disk cleanup will pop-up
- It’s that simple
Solution 2 to Enable Disk Cleanup Server 2012 without a reboot (Not R2)
Note: Windows Server 2012 R2 needs an another method which is included in the following part. This one just works for Windows Server 2012.
STEP 1: Press Windows and X together on the keyboard and select Command Prompt (Admin), or PowerShell (Amdin)
STEP 2: Copy and paste the command text in the command prompt window and press Enter to execute.
copy C:WindowsWinSxSamd64_microsoft-windows-cleanmgr_31bf3856ad364e35_6.2.9200.16384_none_c60dddc5e750072acleanmgr.exe C:WindowsSystem32

STEP 3: Copy, paste and execute the second command:
copy C:WindowsWinSxSamd64_microsoft-windows-cleanmgr.resources_31bf3856ad364e35_6.2.9200.16384_en-us_b6a01752226afbb3cleanmgr.exe.mui C:WindowsSystem32en-US
Unfortunately, Windows Server 2012 R2 does not support the above method and shows an error message if applied. Therefore, you must use the Desktop Experience feature to install/enable the Disk Cleanup utility.
You can use the following method to enable disk cleanup on Windows Server 2012 R2.
- Install Desktop Experience
- Reboot the computer
- Copy these files %windir%system32en-UScleanmgr.exe.mui and %windir%system32cleanmgr.exe and paste them to any directory
- Uninstall the Desktop feature
- Reboot the server
- And then copy the above files to the same directories as in Windows Server 2008 R2
Third Party Disk Management: IM-Magic Partition Resizer
If the Disk Cleanup utility does not help you to free up enough disk space, then you can resize the system partition to make space for new programs. IM-Magic partition resizer lets you shrink, extend, create, delete, format, and resize partitions without any data loss risks. Here is how you can resize disk drive using IM-Magic Partition Resizer without data loss.

- Install and open the IM-Magic Partition Resizer Server or Unlimited Edition
- Right click on the data partition with enough free space and click on “Resize/Move”
- Drag the cursor to left over the bar indicating used/free space
 Steps to shrink large disk space in Windows server 2012
- The shrink space will be grayed-out and marked as unallocated space
- Open each partition and move the unallocated space to the left until it reaches right next to c drive
- Skip the above step if unallocated space is already adjacent to c drive
- Open the c-drive and acquire the unallocated space
 Steps to extend c disk space in Windows server 2012
Note that all the system and application files remain untouched during the whole process. IM-Magic partition resizer will not harm your computer or its content in any way. And if you still fail to free up disk space, add a new hard disk or change to a bigger one.
New added disk can be combined to the Server volumes using RAID array and then you can reditribute disk space from new disk to old disk.
В Windows Server 2008 /R2 и 2012 / R2 по умолчанию не установлена утилита очистки диска — Disk Cleanup (cleanmgr.exe), позволяющая удалить ненужные файлы и очистить каталог WinSxS от файлов старых обновлений. Для ее запуска нужно сначала установить отдельный компонент сервера Desktop Experience (Возможности рабочего стола) с помощью Server Manager или с помощью PowerShell (Install-WindowsFeature Desktop-Experience).
В Windows 2008 R2 для возможности использовать cleanmgr для удаления устаревших обновлений нужно установить обновление KB2852386.
Но вместе с Desktop Experience устанавливается множество других компонентов, которые абсолютно не нужны на сервере:
- Windows Media Player
- Темы рабочего стола
- Поддержка AVI для Windows
- Windows SideShow
- Windows Defender
- Disk Cleanup
- Sync Center
- Запись звука
- Character Map
- Snipping Tool
Если весь этот мусор в сервере не нужен, то можно пойти более простым способом.
Для запуска мастера очистки дисков в Windows Server можно воспользоваться более простым методом: достаточно скопировать в системный каталог из каталога WinSxS два файла Cleanmgr.exe и Cleanmgr.exe.mui.
Ниже показаны пути расположения файлов в зависимости от архитектуры и версии сервера.
| ОС | Архитектура | Расположение файла |
| Windows Server 2008 R2 | 64-bit | C:Windowswinsxsamd64_microsoft-windows-cleanmgr_31bf3856ad364e35_6.1.7600.16385_none_c9392808773cd7dacleanmgr.exe |
| Windows Server 2008 R2 | 64-bit | C:Windowswinsxsamd64_microsoft-windows-cleanmgr.resources_31bf3856ad364e35_6.1.7600.16385_en-us_b9cb6194b257cc63cleanmgr.exe.mui |
| Windows Server 2008 | 64-bit | C:Windowswinsxsamd64_microsoft-windows-cleanmgr.resources_31bf3856ad364e35_6.0.6001.18000_en-us_b9f50b71510436f2cleanmgr.exe.mui |
| Windows Server 2008 | 64-bit | C:Windowswinsxsamd64_microsoft-windows-cleanmgr_31bf3856ad364e35_6.0.6001.18000_none_c962d1e515e94269cleanmgr.exe.mui |
| Windows Server 2008 | 32-bit | C:Windowswinsxsx86_microsoft-windows-cleanmgr.resources_31bf3856ad364e35_6.0.6001.18000_en-us_5dd66fed98a6c5bccleanmgr.exe.mui |
| Windows Server 2008 | 32-bit | C:Windowswinsxsx86_microsoft-windows-cleanmgr_31bf3856ad364e35_6.0.6001.18000_none_6d4436615d8bd133cleanmgr.exe |
Папки назначения у файлов:
- Cleanmgr.exe в %systemroot%System32.
- Cleanmgr.exe.mui в %systemroot%System32en-US.
И команды, что б скопировать
Windows Server 2008 R2 x64
copy C:Windowswinsxsamd64_microsoft-windows-cleanmgr_31bf3856ad364e35_6.1.7600.16385_none_c9392808773cd7dacleanmgr.exe C:WindowsSystem32

copy C:Windowswinsxsamd64_microsoft-windows-cleanmgr.resources_31bf3856ad364e35_6.1.7600.16385_en-us_b9cb6194b257cc63cleanmgr.exe.mui C:WindowsSystem32en-US
Windows Server 2008 x64
copy C:Windowswinsxsamd64_microsoft-windows-cleanmgr.resources_31bf3856ad364e35_6.0.6001.18000_en-us_b9f50b71510436f2cleanmgr.exe.mui C:WindowsSystem32en-US
Для Windows Server 2012 x64 не всё так просто. После обновления KB2821895 пропала возможность копировать файлы из winsxs, так как стала использоваться компрессия.
Просто скопировать файлы не удастся, так как система будет ругаться на несоответствие архитектуры. Если установить Desktop Experience, то видно, что файлы бóльшего размера чем те, что из папки winsxs.
Но их можно скопировать отдельно и развернуть на другом сервере простым копированием.
Архив с файлами, взятыми из Windows Server 2012 R2 ENU можно скачать отсюда.
Распаковываем и копируем их так же, как и для других систем, только заменив папку источник. Папка назначения остаётся той же.
Далее же утилиту очистки можно запустить командой cleanmgr из-под администратора.
Так же, для удаления старых обновлений в Windows Server 2012 R2 можно воспользоваться командой DISM:
dism.exe /online /Cleanup-Image /StartComponentCleanup /ResetBaseНо я встречался, что и dism может отсутствовать в 2012 сервере.