How to Fix the DNS Server Not Responding Error on Windows 10
When connecting a device to your home network, you may get the «The DNS server isn’t responding» error. The troubleshooting steps in this article are dedicated to helping you fix this issue.
The Domain Name System (DNS) is a hierarchical decentralized naming system for computers, services, and other resources connected to the Internet or a private network. This system translates hostnames to IP addresses.
An example of a hostname is www.pcrisk.com. An IP address looks like this: 215.57.216.55. If DNS did not exist, surfing the web would not be easy since we would have to enter IP addresses for each website. A DNS server is like a translator between an IP address and the hostname.
When you connect a device to your home network or another network with Internet access, the connection may fail with a «DNS server isn’t responding» error. There could be several reasons for this error.
How to Fix the DNS Server Not Responding Error
You can fix DNS problems by troubleshooting your current connection, disabling extra connections, flushing the DNS cache, changing your computer’s default DNS server, and simply resetting your router.
This article describes possible solutions to the «DNS server isn’t responding» error that you may use to resolve the issue.
Video Showing How to Fix «The DNS server isn’t responding» Error
Table of Contents:
- Introduction
- Change the DNS Server
- Disable IPv6
- Reset Your Router
- Enter MAC Address Manually
- Reset Your IP and Clear DNS Cache
- Start Your Computer In Safe Mode
- Update Your Drivers
- Disable Your Antivirus
- Disable Secondary Connections
- Disable Windows Update Peer-to-peer Feature
- Video Showing How to Fix «The DNS server isn’t responding» Error
Change the DNS Server
If there is a problem with your IP DNS server, you can try to change your DNS server to Google’s Public DNS, a free alternative Domain Name System (DNS) service offered to Internet users around the world. The public DNS service and servers are maintained and owned by Google.
It functions as a recursive name server providing domain name resolution for any host on the Internet. You will have to change the DNS manually.
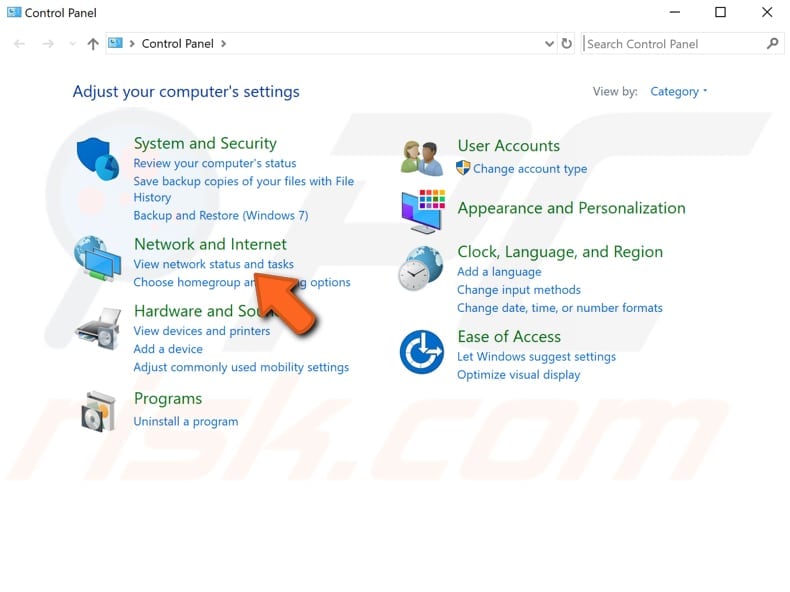
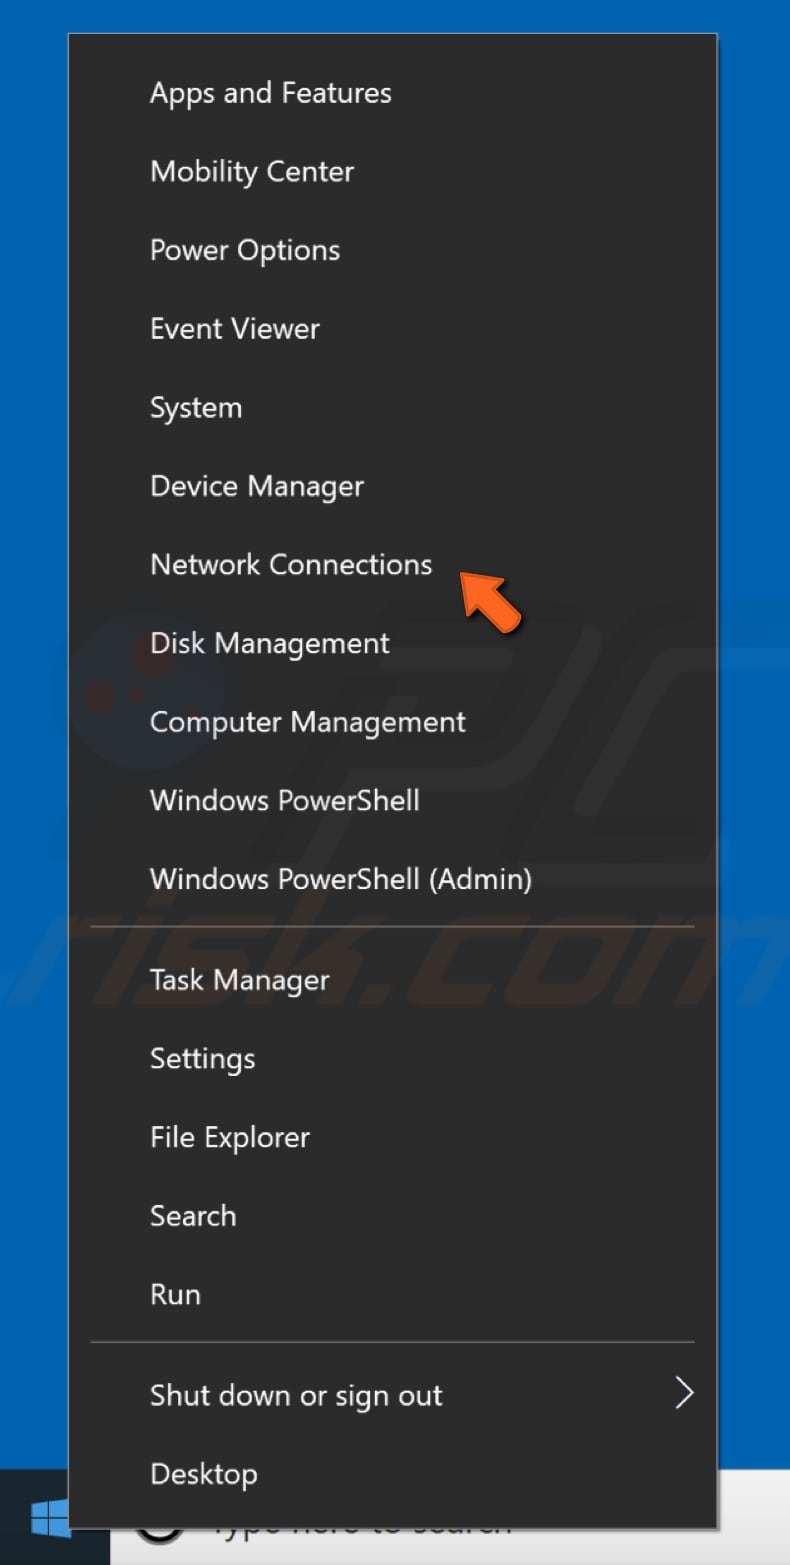
To change your DNS server to Google’s DNS server, go to your Network Connections settings. Right-click the Start menu and select «Network Connections», or go to Settings and click» Network & Internet».
In the Network & Internet settings window, select your connection type (in our case, «Ethernet») on the left pane and then click «Change adapter options» on the right pane.
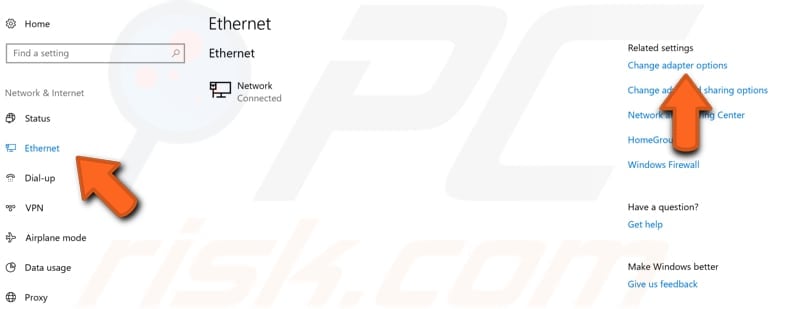
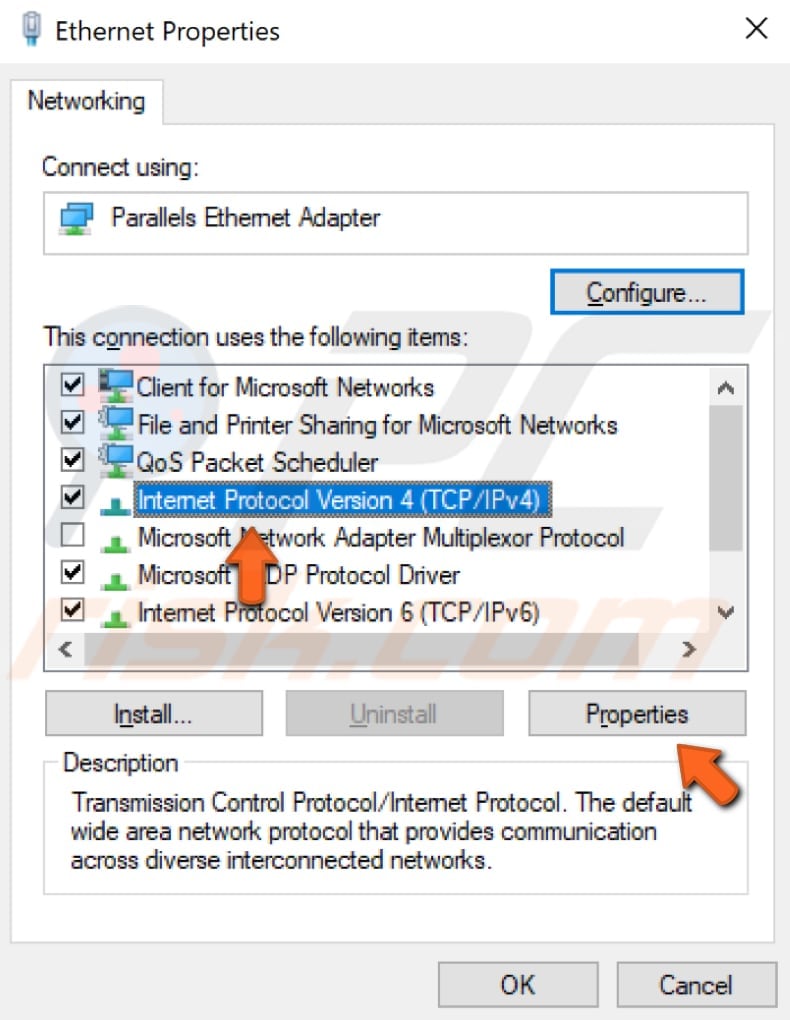
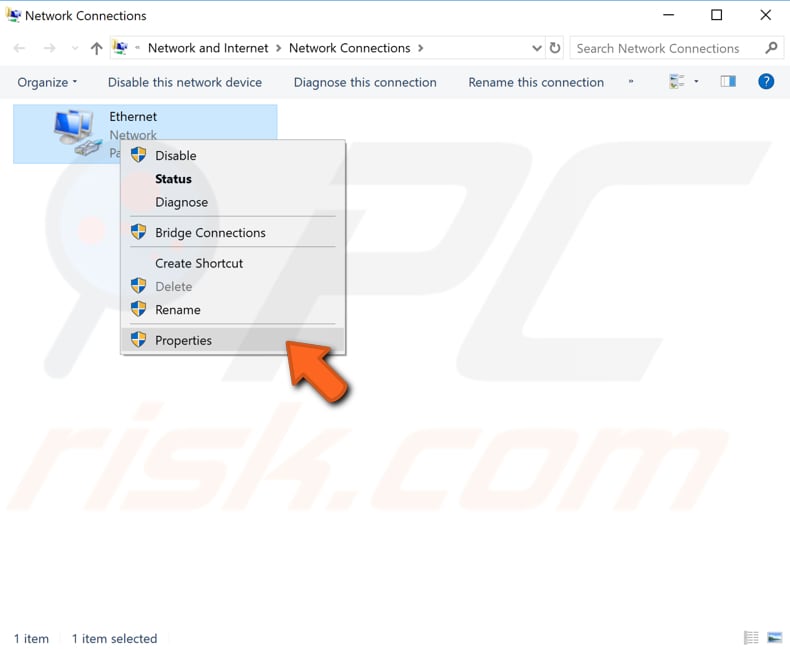
Right-click on your connection and select «Properties» from the drop-down menu.

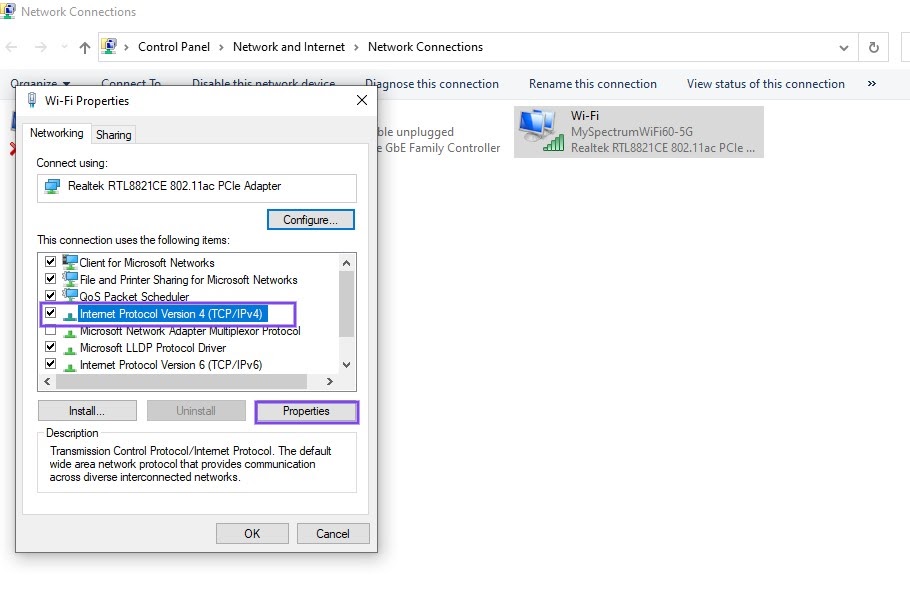
Select «Internet Protocol Version 4 (TCP/IPv4)» and click «Properties».
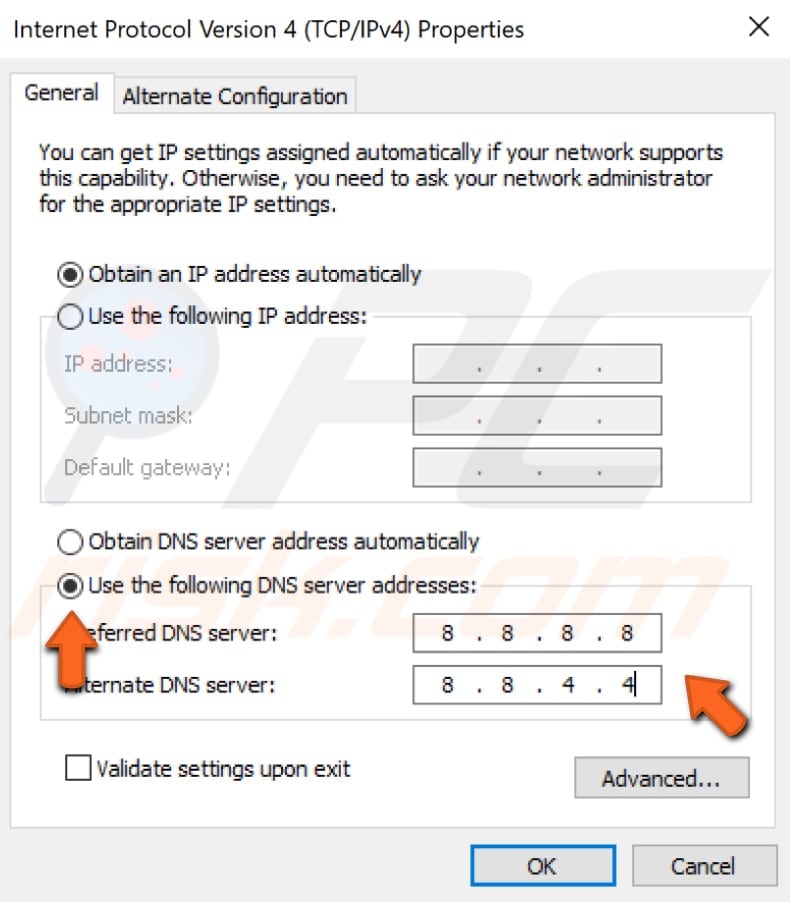
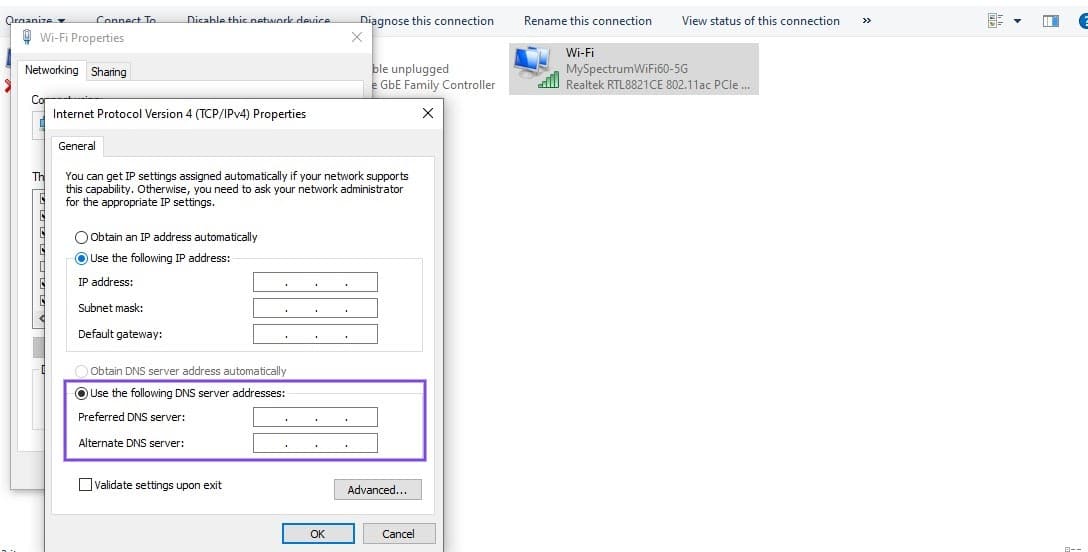
In the Internet Protocol Version 4 (TCP/IPv4) Properties window, select «Use the following DNS server addresses», enter 8.8.8.8 as the «Preferred DNS server» and 8.8.4.4 as the «Alternate DNS server».
Click «OK» to save changes and check if this helps fix the problem with the «DNS server is not responding» error.
[Back to Table of Contents]
Disable IPv6
Internet Protocol version 6 (IPv6) is the most recent Internet Protocol (IP) version. This communications protocol provides an identification and location system for computers on networks and routes traffic across the Internet.
IPv6 was developed to deal with the long-anticipated problem of IPv4 address exhaustion. Disabling the IPv6 feature might help fix the «DNS server is not responding» error.
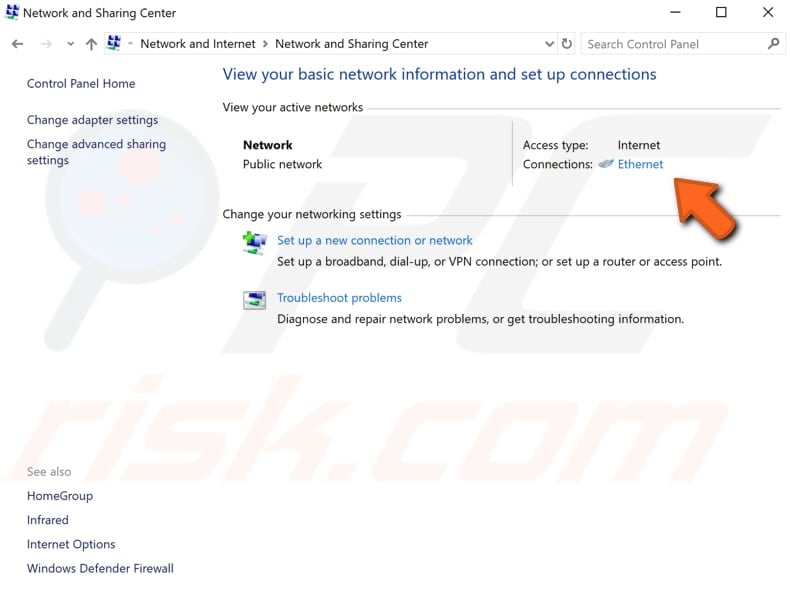
The easiest way to disable IPv6 on the Windows operating system is via the Network and Sharing Center. To open it, go to Control Panel and click «View network status and tasks» under «Network and Internet».
Click your connection (in our case, «Ethernet»).
In your connection status window, click «Properties».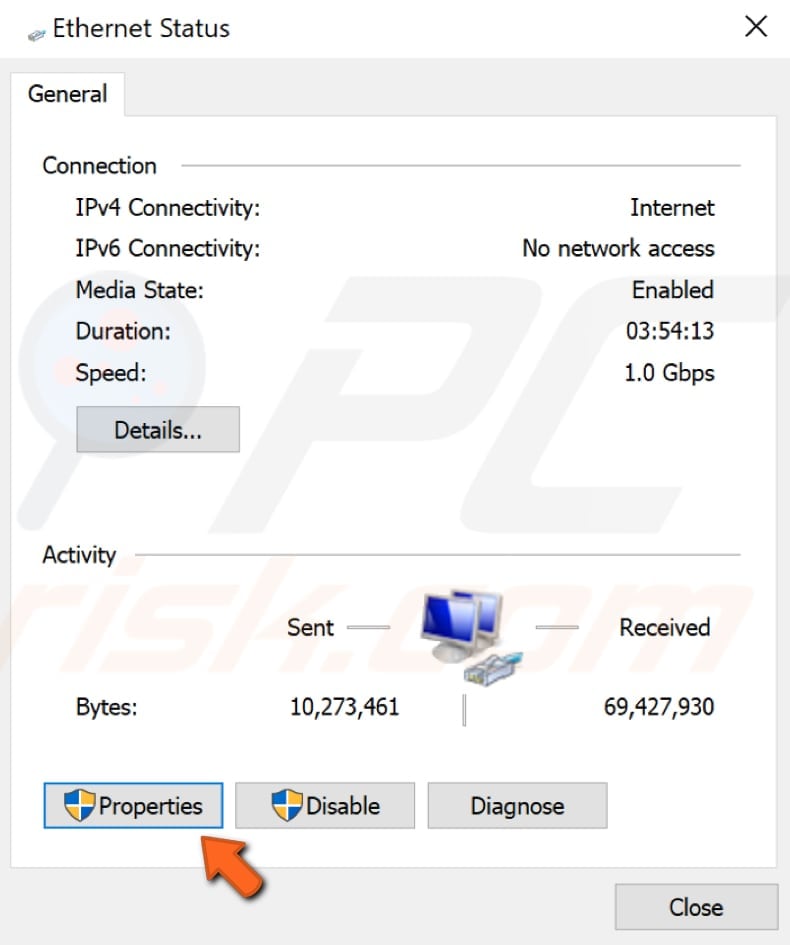
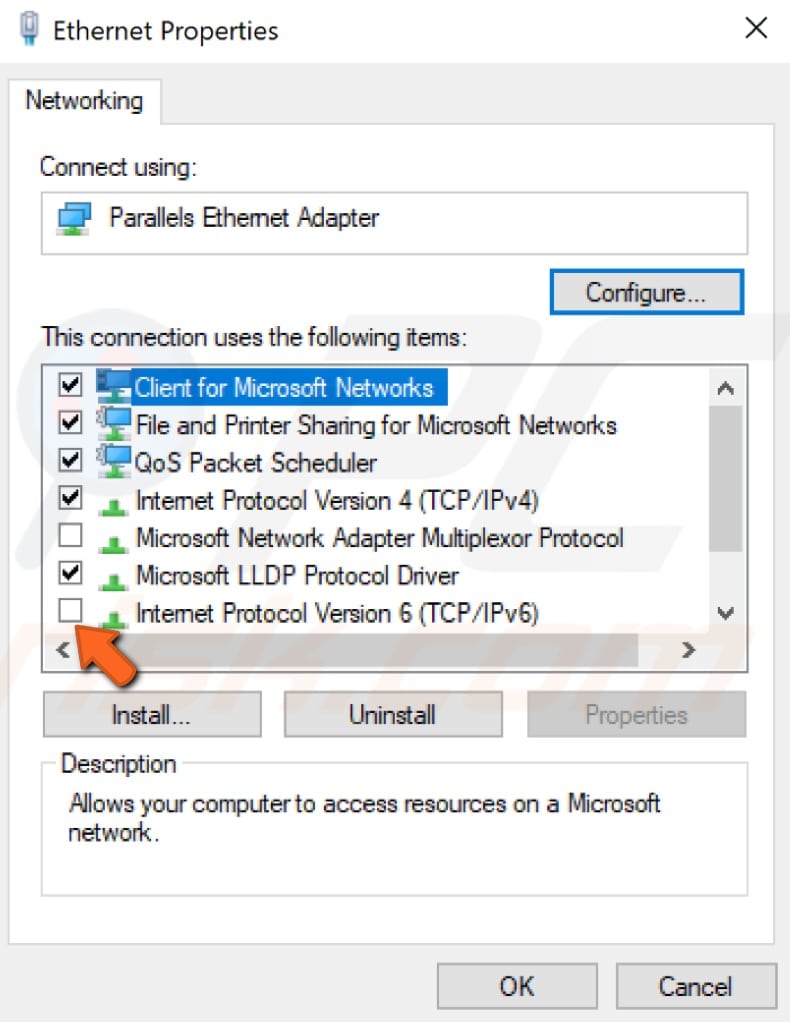
Find «Internet Protocol Version 6 (IPv6)» in your connections properties window and unmark the checkbox to disable it. Click «OK» to save changes and see if this helps fix the «DNS server is not responding» error.
[Back to Table of Contents]
Reset Your Router
Simply restarting your router or modem may help to fix this problem. We suggest you try this possibility first. If there is an «On/Off» button on your router, simply press it to turn off your router, wait a while, and then turn it on again.
If there is no button on your router, disconnect it from the power supply. When your router has restarted, try restarting your computer as well and see if this helps.
There might be a problem with your router configuration — this can also cause this «DNS server is not responding» error. To fix it, reset the router to its default settings. Open your router’s configuration web page and find the «Reset» option.
If you cannot access the router’s web-based setup page and want to reset it to its default factory settings, press and hold the Reset button for 10 seconds. Remember that resetting your router to its default factory settings will also reset your router’s password.
[Back to Table of Contents]
Enter MAC Address Manually
A Media Access Control address (MAC address) of a device is a unique identifier assigned to network interfaces for communications at the data link layer of a network segment. MAC addresses are used as a network address for most IEEE 802 network technologies, including Ethernet and Wi-Fi.
MAC addresses are used in the media access control protocol sublayer of the OSI reference model. These MAC addresses are often assigned by the manufacturer of a network interface controller and stored in its hardware, such as the card’s read-only memory or other firmware mechanism.
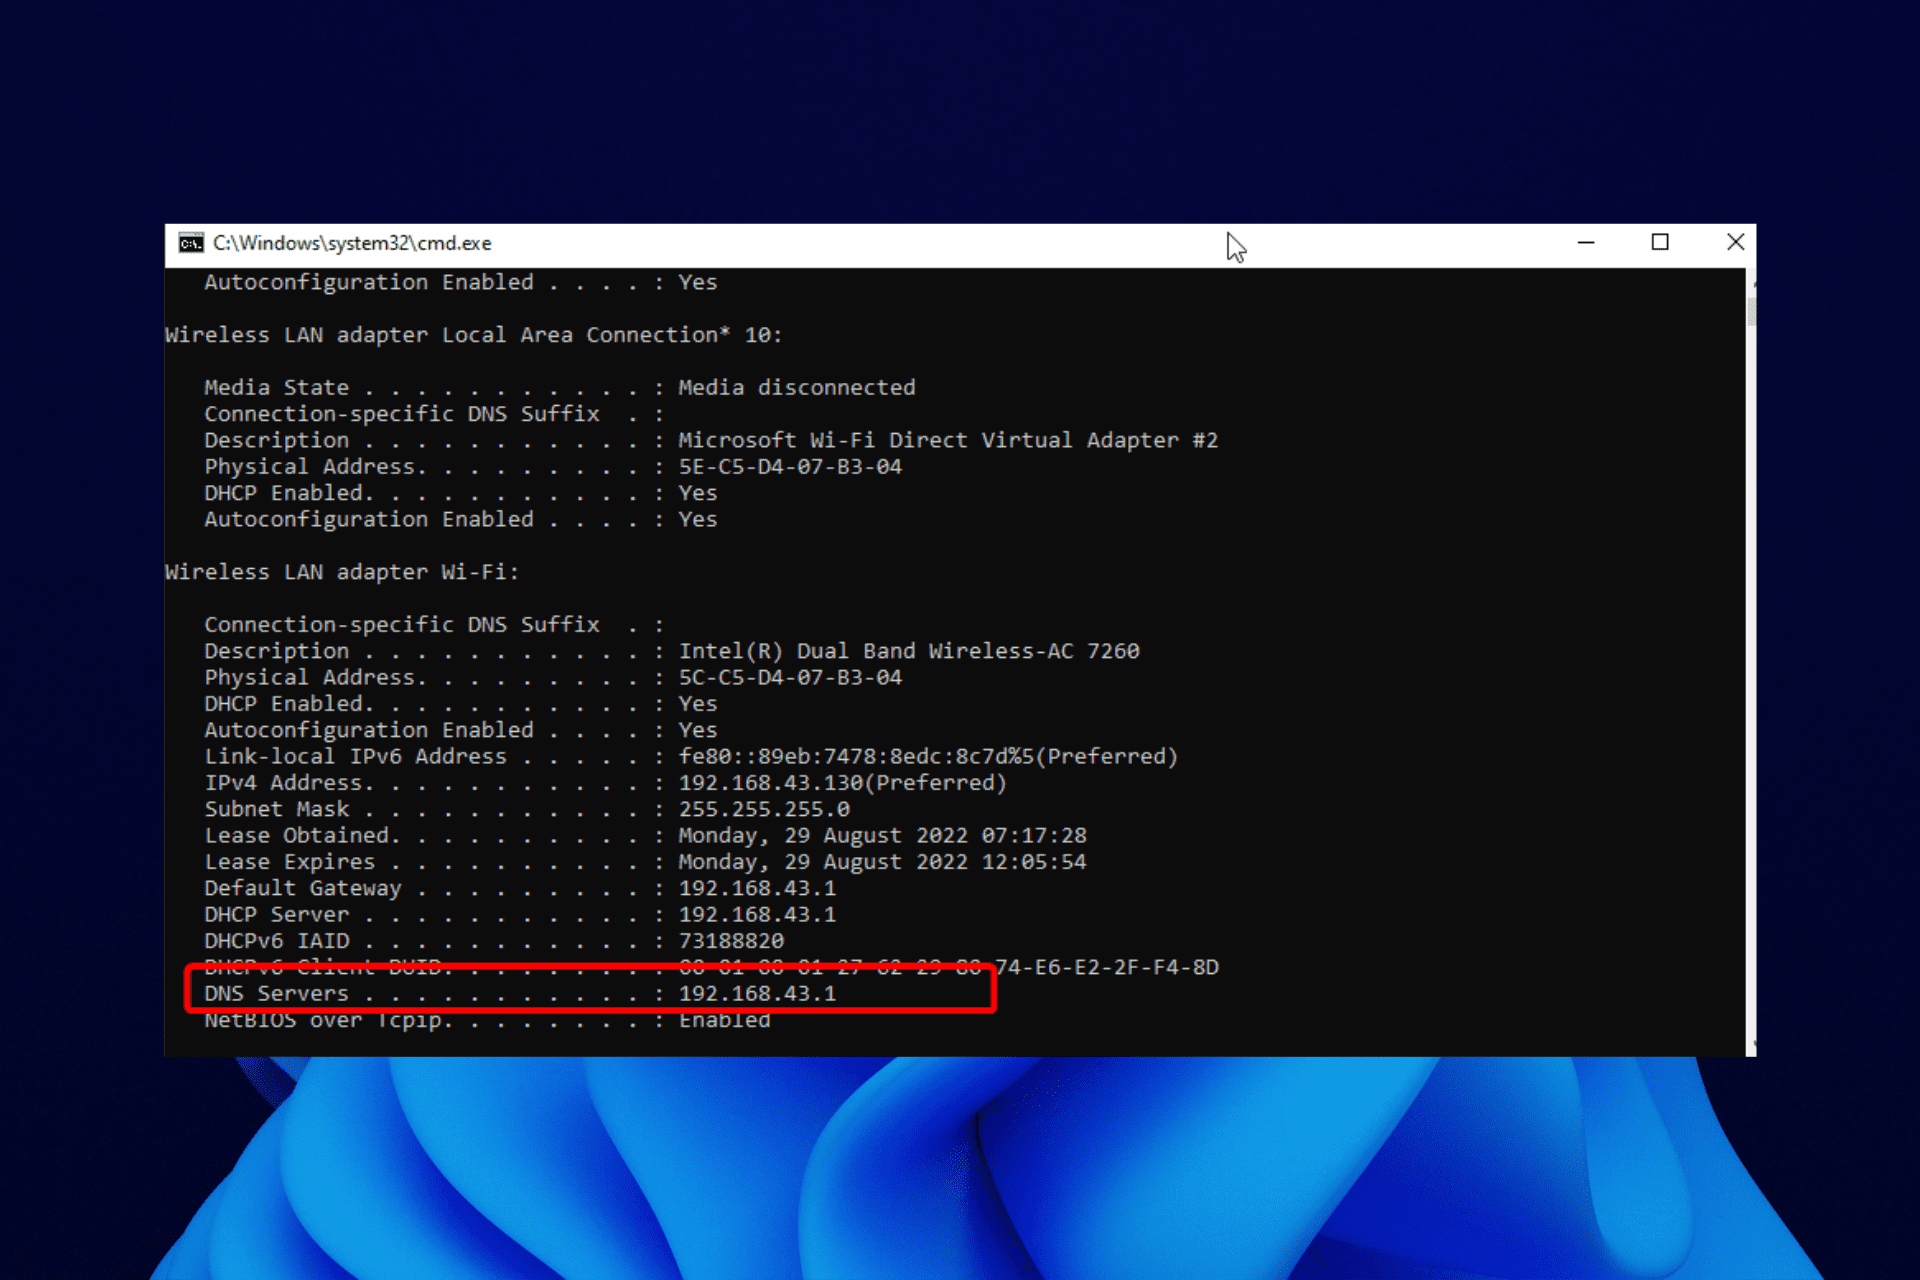
To fix the «DNS server is not responding» error, you will need to enter the MAC address manually, but first, you need to find it using an elevated Command Prompt and one of the commands.
To use Command Prompt, you must enter a valid command along with any optional parameters. Some commands available in Windows require that you run them from an elevated Command Prompt i.e. with administrator-level privileges.
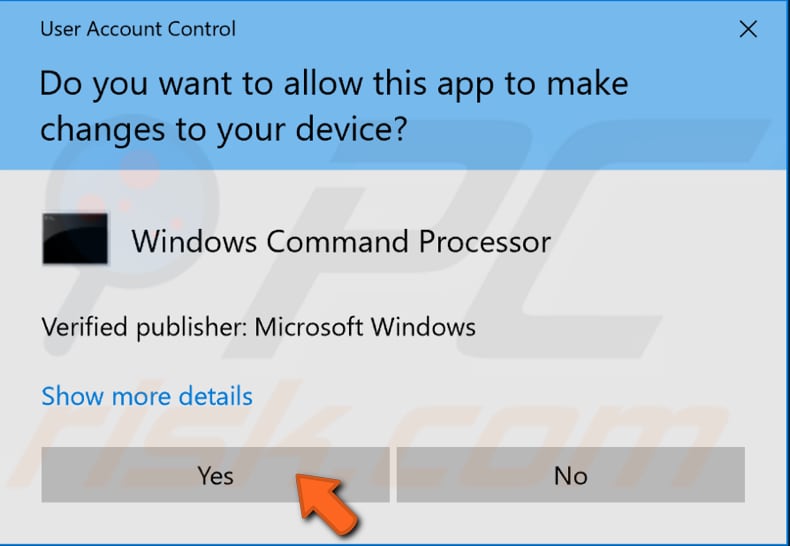
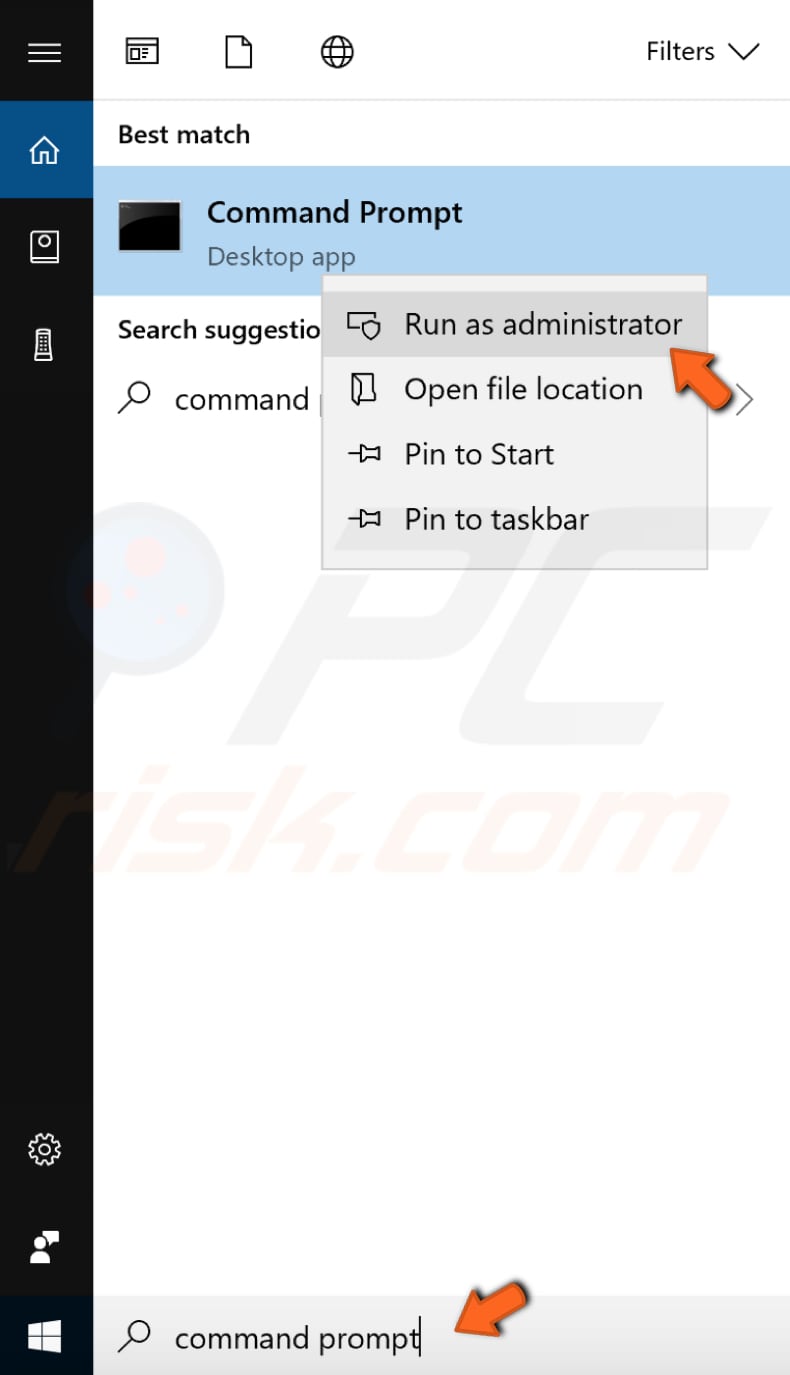
The command we need to use requires an elevated Command Prompt to be opened with administrator privileges. To open an elevated Command Prompt, type «command prompt» in Search and right-click the «Command Prompt» result. Choose «Run as administrator» to run it with administrative privileges.

When you select «Run as administrator», a User Account Control prompt will appear asking if you allow the Command Prompt to make changes to your computer. Click «Yes».
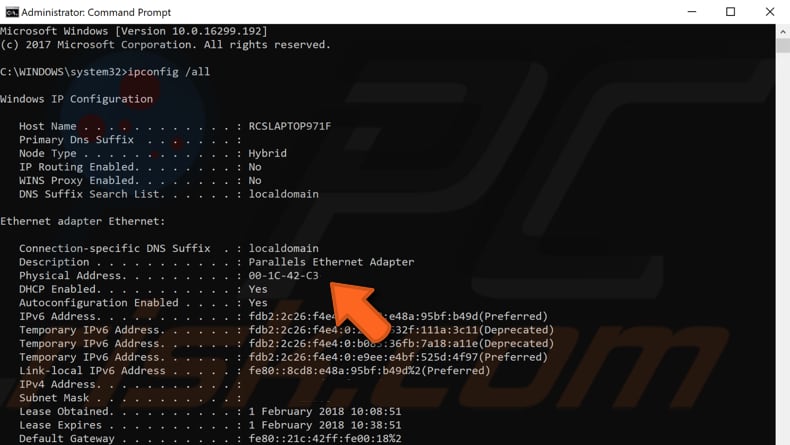
Elevated Command Prompt will appear. Type the «ipconfig /all» command in the Command Prompt window and press Enter on your keyboard.
You will see a list of information about the configuration. Find «Physical Address» and take a note of it somewhere — you will need it to proceed to the next step.
Now that you have your MAC address, you can configure your network connection manually. To do so, Right-click on the Start menu and select «Network Connections», or go to Settings and click «Network & Internet».
In the Network & Internet settings window, select your connection type (in our case, «Ethernet») on the left pane and then click on «Change adapter options» on the right pane.

Right-click on your connection and select «Properties» from the drop-down menu.
In the Properties window, select «Client for Microsoft Networks» (it should be selected automatically) and click «Configure».
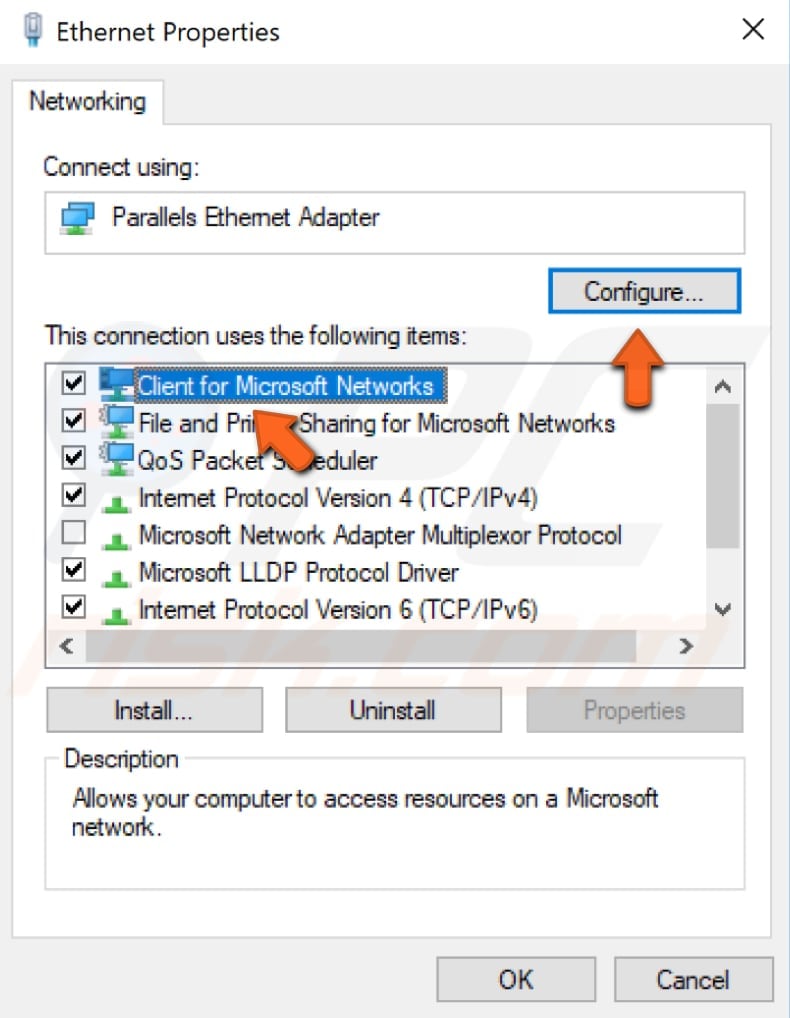
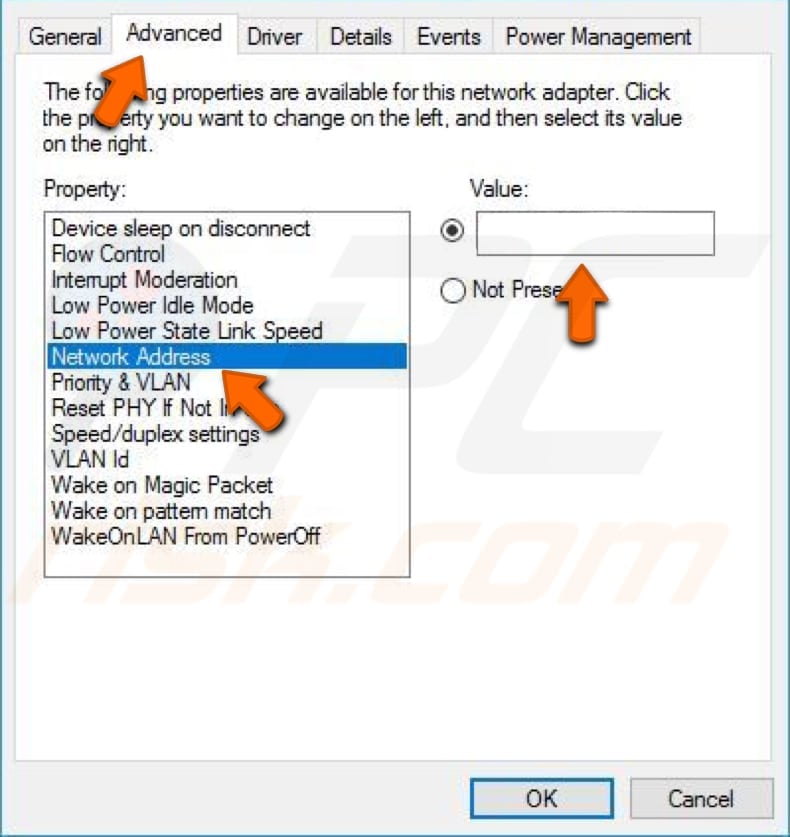
Now select the «Advanced» tab and then select «Network Address» under «Property:» Select «Value:» on the right pane and enter your MAC address (Physical Address), which you received when you entered the «ipconfig/ all» command in Command Prompt.
Click «OK» to save the changes and see if this helps to fix the «DNS server is not responding» error. There is a higher chance that it will be fixed if you were using Google DNS before entering the MAC address manually.
[Back to Table of Contents]
Reset Your IP and Clear DNS Cache
This method includes entering and executing «netsh» and «ipcofig» commands into Command Prompt.
Netsh is a command-line scripting utility that allows you to, either locally or remotely, display or modify the network configuration of a computer that is currently running. Netsh also provides a scripting feature to run a group of commands in batch mode against a specified computer.
Ipconfig is a command-line tool that displays the current configuration of the installed IP stack on a networked computer. Using the tool, we can flush and reset the contents of the DNS client resolver cache and renew the DHCP configuration.
The commands require an elevated Command Prompt opened with administrator privileges. To open an elevated Command Prompt, type «command prompt» in Search and right-click on the «Command Prompt» result. Choose «Run as administrator» to run it with administrative privileges.
When you select «Run as administrator», a User Account Control prompt will appear asking if you allow the Command Prompt to make changes to your computer. Click «Yes».

Elevated Command Prompt will appear. In the Command Prompt window, type these commands:
netsh int ip reset
netsh winsock reset
ipconfig /flushdns
ipconfig /renew
Press Enter on your keyboard after entering each command. When all commands are executed, restart your computer and see if this helps fix the «DNS server is not responding» error.
[Back to Table of Contents]
Start Your Computer in Safe Mode
Safe Mode is a diagnostic start-up mode in Windows operating systems used to obtain limited access to Windows when the operating system does not start or function normally. It is the opposite of Normal Mode, which starts Windows in the usual manner.
One of the most common steps when troubleshooting a computer is to boot into Safe Mode. Safe Mode starts Windows in a basic state, using a limited set of files and drivers. It can help to troubleshoot problems on your computer. Read this article about how to boot your Windows 10 into Safe Mode.
Check if you are still having network connection problems when Windows starts in Safe Mode. If there are no problems with the network connection, you probably have third-party software installed in Windows that is causing the problem.
Third-party applications can affect the DNS — almost any network-related or security application can interfere with your DNS, so find the problematic software and uninstall (or re-install) it.
[Back to Table of Contents]
Update Your Drivers
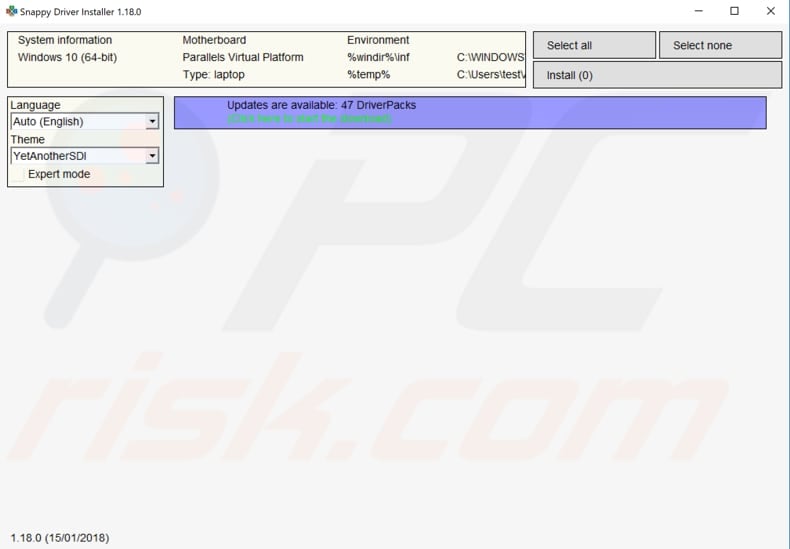
This problem might be caused by an old or incorrect driver. In this case, you need to get an updated/new driver for your network adapter. There is an easy way to do this automatically with Snappy Driver Installer. You will need a computer with a working internet connection to download it.
Snappy Driver Installer (SDI) is a powerful free driver updater tool for Windows that can store its entire collection of drivers offline. Having offline drivers gives Snappy Driver Installer the ability to have access to fast driver updates, even if there is no active internet connection.
Snappy Driver works with 32-bit and 64-bit versions of Windows 10, Windows 8, Windows 7, Windows Vista, and XP. Drivers are downloaded through Snappy Driver Installer in driverpacks, which are just collections (packs) of drivers for various hardware like sound devices, video cards, network adapters etc.
It can also show duplicate drivers and invalid drivers, and it separates the updates that require you to restart your computer so it would be easier to distinguish them from the rest. You can download Snappy Driver Installer from here.
After you have finished updating and installing drivers, restart Windows 10 for them to take effect and try to connect to the Internet to see if it works.
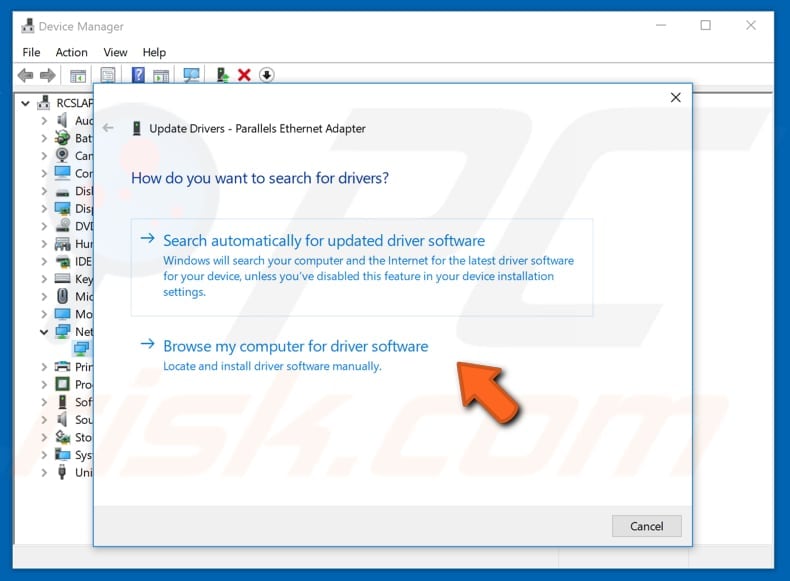
You can also update your drivers manually, but you will need a computer with a working Internet connection. Go to the network adapter manufacturer’s website and download the latest driver. Copy it onto your USB drive. Go to Device Manager (type «device manager» in Search and open it). Expand the «Network adapters» section, select your network adapter, right-click on it, and then choose «Update Driver».
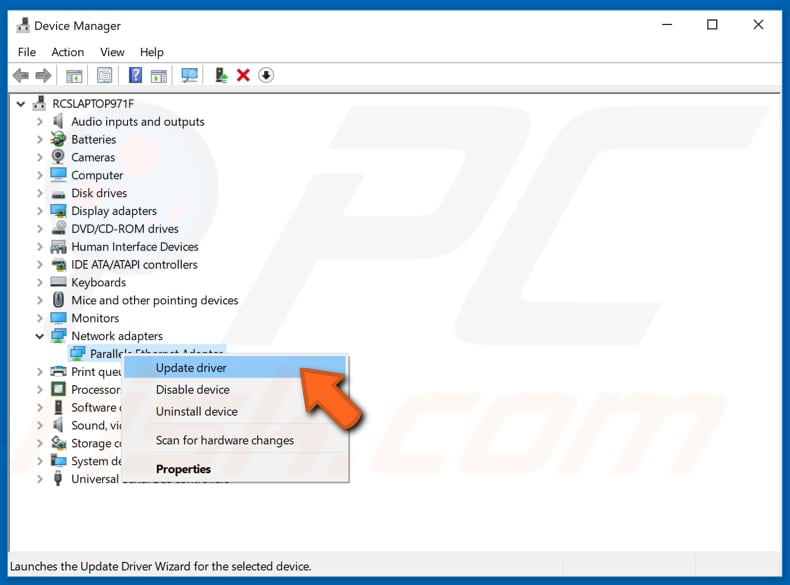
You will be asked how to search for drivers and given two options: 1) to search automatically for updated driver software, and; 2) to browse your computer for driver software. The first option requires an Internet connection. Since you have problems with your Internet connection, choose the second option. Locate the driver on your USB drive and follow the instructions.
When you have finished installing the new/updated driver, restart your computer for the changes to take effect and see if the network connectivity problem is fixed.
[Back to Table of Contents]
Disable Your Antivirus
«The DNS server is’nt responding» error can occur due to installed antivirus software. Temporarily disabling it might help to fix the problem. If disabling the antivirus software fixes the problem, you might want to consider switching to a different antivirus program. This error usually occurs when you have installed third-party antivirus software, but you should not be concerned about your safety since the built-in Windows Defender software should be adequate.
[Back to Table of Contents]
Disable Secondary Connections
If you have more than one network connection available on your computer, try disabling the other connections and leave only the current connection enabled. Go to Network Connection settings. Right-click the Start menu and select «Network Connections», or go to Settings and click «Network & Internet».

In the Network & Internet settings window, select your connection type (in our case, «Ethernet») on the left pane and then click «Change adapter options» on the right pane.

Right-click on the other connection and select «Disable» from the drop-down menu. Apply this to all secondary connections.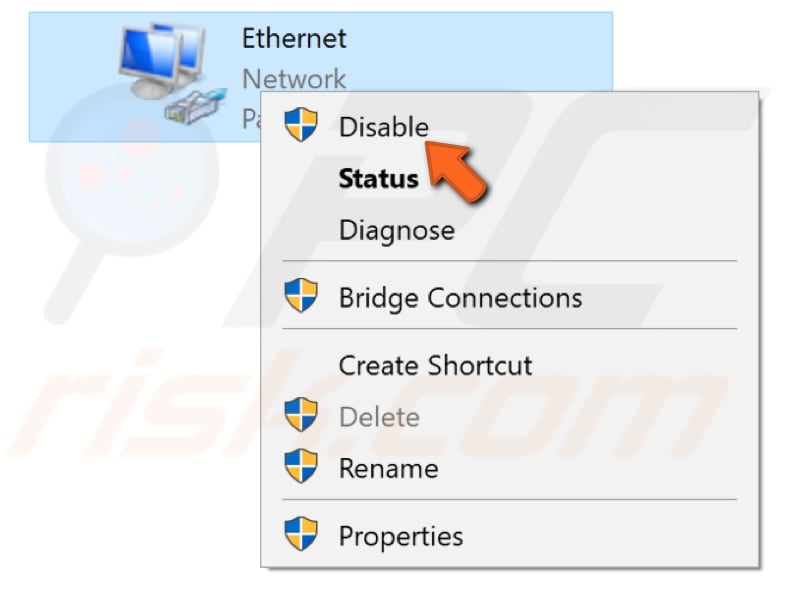
[Back to Table of Contents]
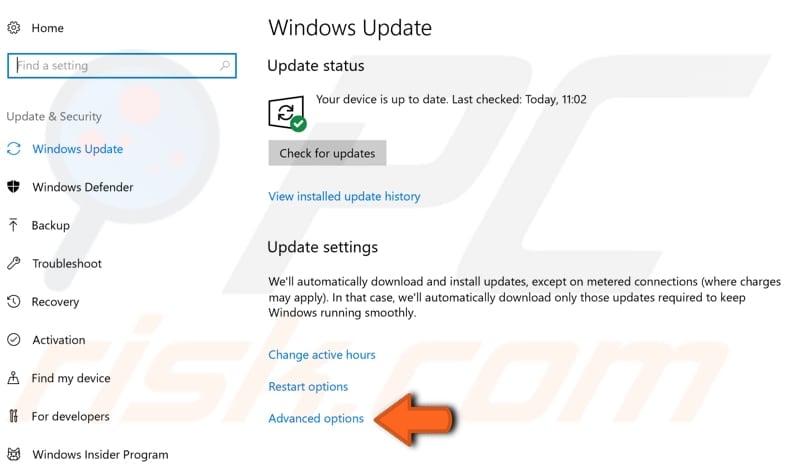
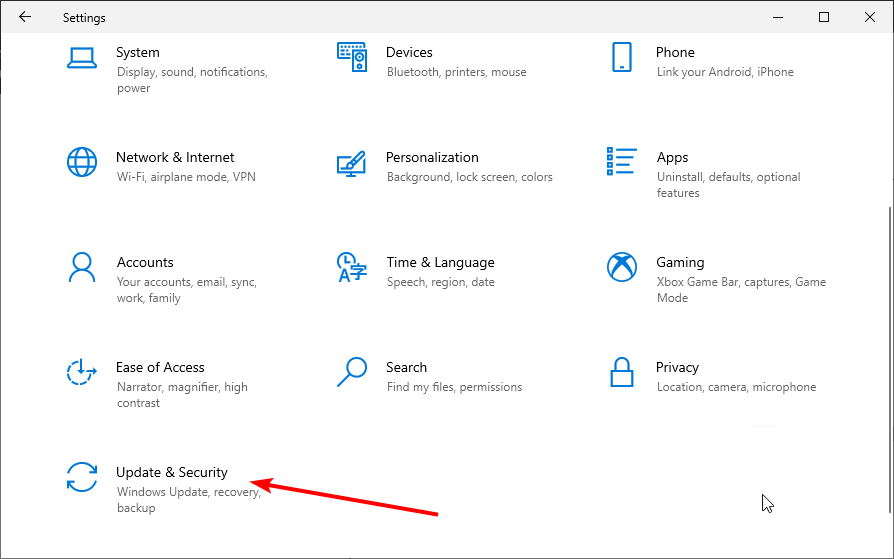
Disable Windows Update Peer-to-peer Feature
Windows 10 has a new feature that helps to save download bandwidth. It is a new peer-to-peer (P2P) delivery update mechanism. Using the P2P option, you can download a Windows update once and then use that machine to spread the update to all computers on your local network. You can also download Windows updates from other users in your area.
This feature can interfere with the DNS, and disabling it might fix «The DNS server isn’t responding» error. To disable this feature, go to Settings and select «Update & Security».
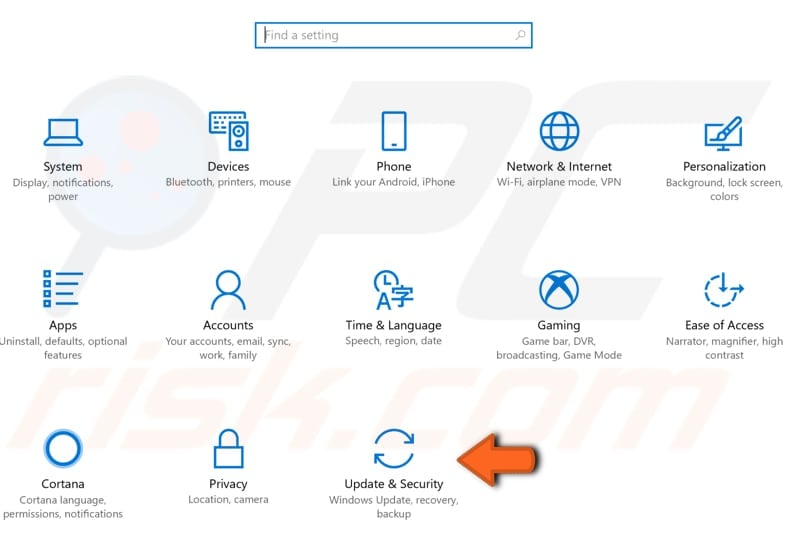
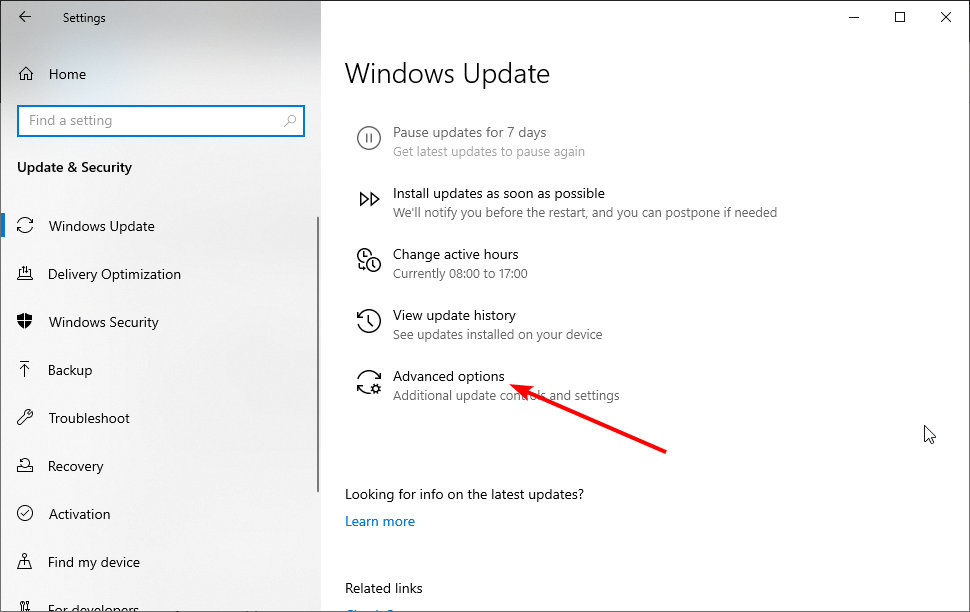
Locate «Advanced options» under «Update settings» and click it.
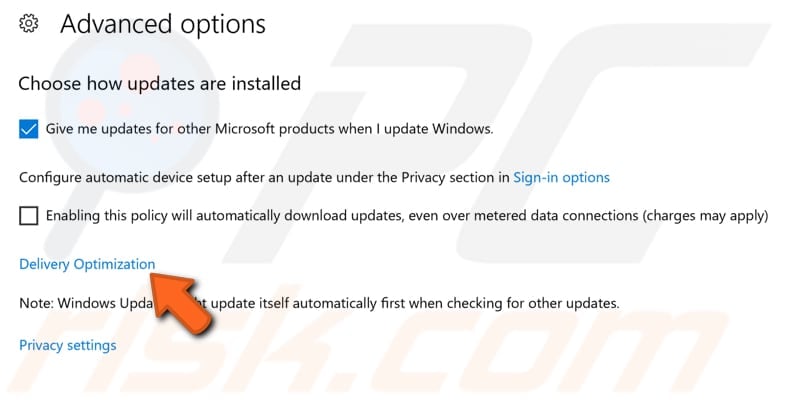
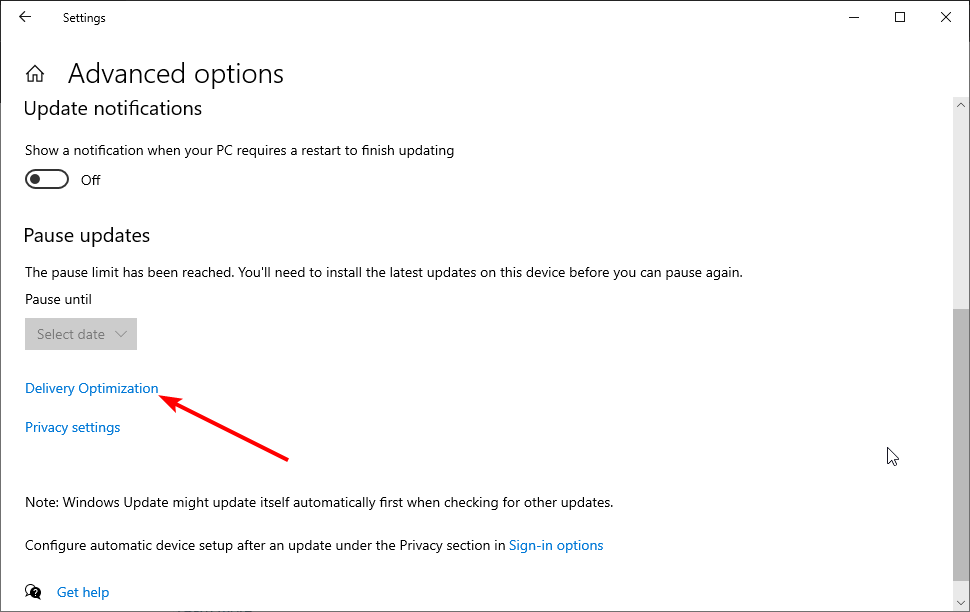
In the Advanced options window, click «Delivery Optimization».
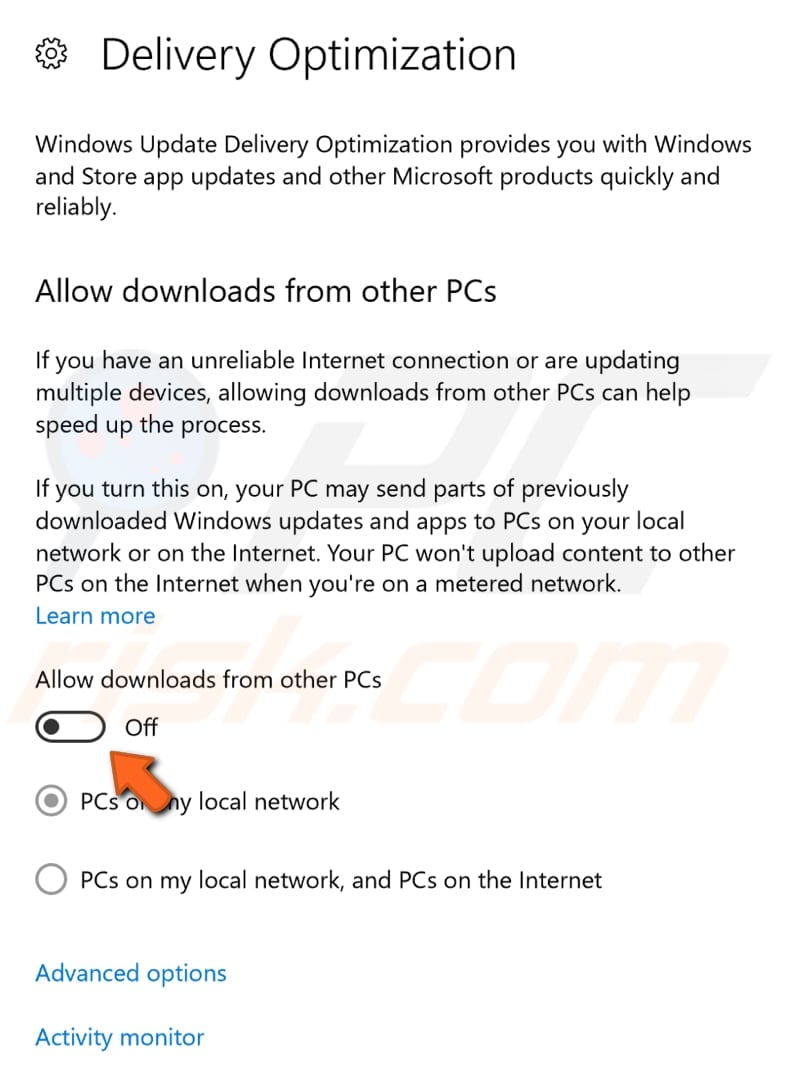
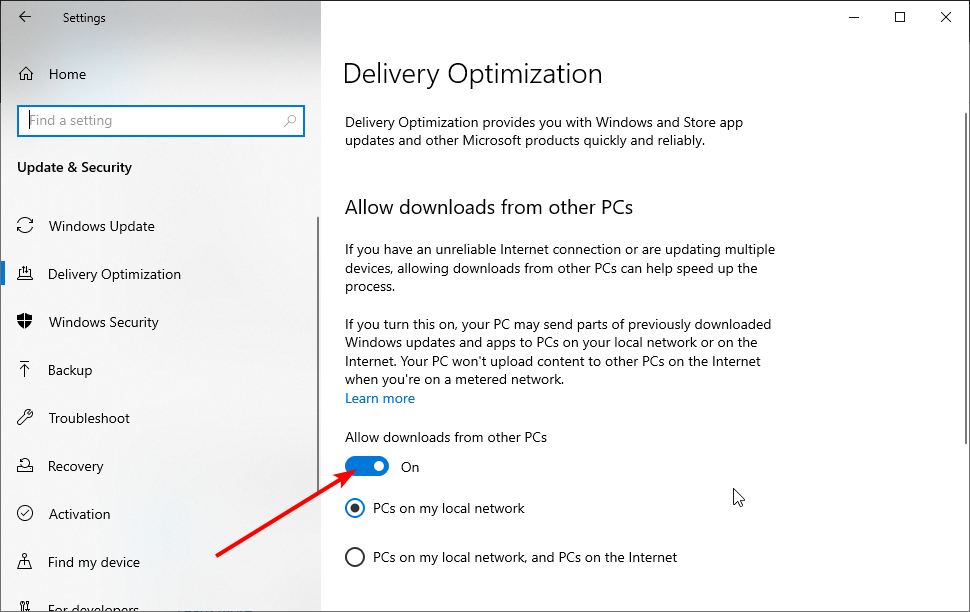
Turn off the «Allow downloads from other PCs» option in the Delivery Optimization window by toggling the switch. Check if the «DNS server is not responding» error persists.
We hope that the methods described above helped you fix «The DNS server isn’t responding» error, and you can connect to the Internet without any network connection problems.
If none of the above solutions worked, the error might be caused by your Internet service provider. Wait until your Internet service provider fixes the technical issues, and try connecting to the Internet after a few hours.
[Back to Top]
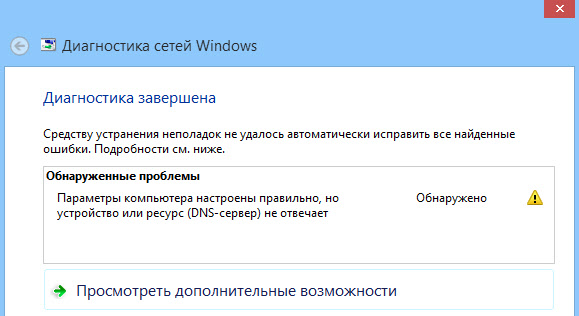
Одной из самых частых ошибок связанных с подключением к интернету в Windows, является ошибка: «DNS-сервер не отвечает». При этом, пропадает доступ к интернету. На значке подключения скорее всего будет желтый треугольник, а в браузере, при попытке открыть сайт, вы скорее всего увидите ошибку «Не удается найти DNS-адрес», «err name not resolved «, или что-то в этом роде. Проблема эта вызвана сбоем в работе DNS-сервера, который отвечает за перенаправленные IP-адреса на домен. Если говорить о причинах возникновения этой ошибки, то виновником может быть как сам компьютер, так и маршрутизатор, или оборудование на стороне провайдера.
Сама ошибка «DNS-сервер не отвечает» появляется в результате диагностики сетей Windows. Запустить диагностику очень просто. Достаточно нажать правой кнопкой мыши на значок подключения к интернету, и выбрать «Диагностика неполадок».

Иногда, может появляться ошибка: «Параметры компьютера настроены правильно, но устройство или ресурс (DNS-сервер) не отвечает».
Вот такие ошибки. Если вы не знаете что делать, то сейчас мы рассмотрим несколько эффективных советов, которые должны помочь избавится от данных ошибок. В итоге, интернет на вашем компьютере заработает, и сайты начнут открываться. Решения будут одинаковыми для Windows 10, Windows 8, и Windows 7.
Как исправить ошибку «DNS-сервер не отвечает»?
Для начала, я советую выполнить несколько простых решений. Есть шанс, что они помогут, и вам не придется разбираться с более сложными настройками.
- Если у вас интернет подключен через роутер, или модем (по Wi-Fi, или по кабелю), и вы наблюдаете ошибку «DNS-сервер не отвечает», то попробуйте просто перезагрузить роутер. Отключите питание роутера где-то на минуту, и включите обратно. Не важно какой у вас роутер, TP-Link, D-link, ASUS, или еще какой-то.
- Перезагрузите свой компьютер, или ноутбук. В данном случае не важно, интернет у вас идет через роутер, или кабелем напрямую от провайдера. Просто выполните перезагрузку.
- Если интернет подключен через роутер, то проверьте, работает ли интернет на других устройствах. Нет ли там ошибки с ответом DNS-сервера.
- При подключении через маршрутизатор, если есть возможность, можно подключить интернет напрямую к компьютеру. Для проверки.
- Постарайтесь вспомнить, после чего появилась ошибка DNS, и проблемы с доступом к интернету. Может после смены каких-то настроек, или установки программ.
Если эти советы не помогли, то попробуйте применить решения, о которых я напишу ниже.
Проверяем службу DNS-клиент
Прежде чем что-то менять, я рекомендую посмотреть, работает ли служба «DNS-клиент». Нажмите на клавиатуре сочетание клавиш Win + R. В появившемся окне введите команду services.msc, и нажмите Ok.

В новом окне ищем службу «DNS-клиент», нажимаем на нее правой кнопкой мыши, и выбираем «Свойства».
Тип запуска должен быть «Автоматически». И если у вас кнопка «Запустить» будет активной, то нажмите на нее. Дальше: «Применить» и «Ok».

Если служба у вас была отключена, и вы ее включили, то после перезагрузки компьютера интернет должен заработать.
Меняем настройки DNS-серверов в свойствах подключения
Дальше мы проверим настройки DNS-серверов в свойствах подключения, через которое компьютер подключен к интернету. Если там прописаны какие-то адреса, то можно попробовать выставить автоматическое получение, либо прописать DNS-адреса от Google. Этот способ очень часто позволяет избавится от ошибки «DNS-сервер не отвечает».
Нам нужно открыть окно со всеми подключениями. Для этого можно нажать правой кнопкой мыши на значок подключения к интернету, и выбрать «Центр управления сетями…». Дальше переходим в «Изменение параметров адаптера».
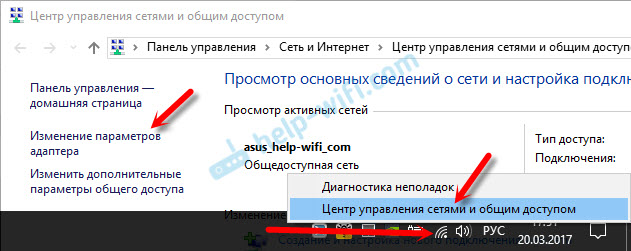
Дальше правой кнопкой мыши нажимаем на то подключение, через которое вы подключены к интернету (к роутеру), и выбираем «Свойства». Если подключение по Wi-Fi, то это подключение «Беспроводная сеть», если по кабелю, то «Ethernet» (Подключение по локальной сети).
У меня, например, проблема с DNS при подключении по Wi-Fi сети через роутер.

В новом окне выделите «IP версии 4 (TCP/IPv4)», и нажмите «Свойства». Если в новом окне у вас прописан какой-то DNS-сервер, то можно попробовать выставить автоматическое получение адресов, и проверить подключение к интернету после перезагрузки компьютера.
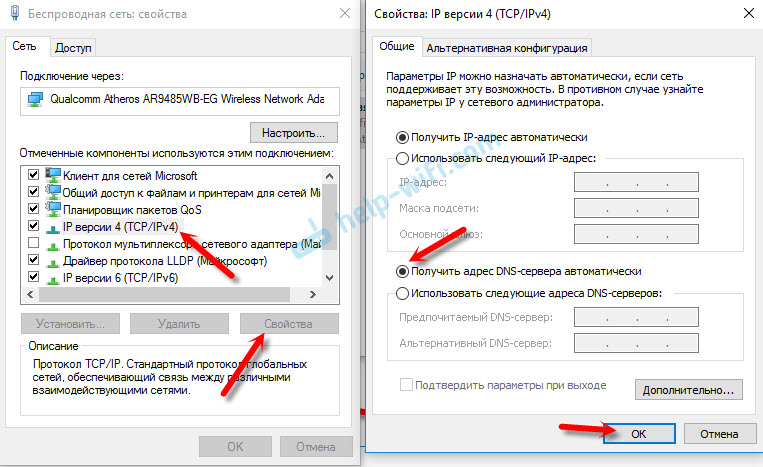
Но чаще всего помогает следующее: ставим переключатель возле «Использовать следующие адреса DNS-серверов», и прописываем DNS от Google:
8.8.8.8
8.8.4.4
Нажимаем «Ok» и перезагружаем компьютер.

Такое решение помогает очень часто. Если у вас проблема с получение DNS на всех устройствах, которые подключены через один роутер, то эти адреса можно прописать в настройках роутера, тогда они будут применяться для всех устройств. Как правило, сделать это можно в настройках вашего роутера, в разделе «Интернет», или «WAN». Где задаются параметры для подключения к провайдеру.
Для примера, покажу как это сделать на роутере TP-Link:

Не забудьте сохранить настройки.
Очищаем кэш DNS и другие сетевые параметры
Нужно просто запустить командную строку, и по очереди выполнить несколько команд, которые выполнять очистку кэша DNS-адресов, и других сетевых настроек. Этот способ подойдет как для Windows 10, так и для Windows 7 (8).
Командную строку нужно запустить от имени администратора. Если у вас Windows 10, то просто нажмите правой кнопкой мыши на меню пуск, и выберите «Командная строка (администратор)». В Windows 7, в поиске можно набрать «cmd», нажать правой кнопкой на «cmd» в результатах поиска, и выбрать «Запустить от имени администратора».
По очереди копируем и выполняем такие команды:
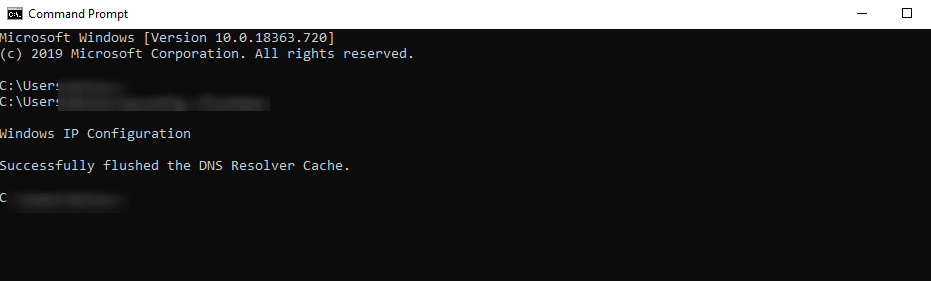
ipconfig /flushdns
ipconfig /registerdns
ipconfig /renew
ipconfig /release
Вот так:

В Windows 10 можно еще попробовать выполнить сброс сетевых настроек. Это практически то же самое.
После этого перезагрузите компьютер.
Обновление: отключаем или удаляем антивирус Avast
В комментариях Сергей написал, что ему помогло только удаление антивируса Avast. Если у вас установлен именно этот антивирус, то возможно он стал причиной того, что DNS-сервер перестал отвечать.
По своему опыту могу сказать, что антивирус Avast очень часто вмешивается в сетевые настройки Windows, из-за чего появляются разные проблемы с подключением к интернету. То интернет перестает работать после удаления антивируса, то ошибка DNS, или сетевой адаптер не имеет допустимых параметров настройки IP.
Можно попробовать для начала полностью остановить работу антивируса. Если это не решит проблему, то удалить его. Можно переустановить его, только без дополнительных модулей. Как это сделать, я писал в статье по ссылке выше (о решении проблемы с параметрами IP).
Что делать, если не получилось исправить ошибку?
Если вы все проделали правильно, но Windows по прежнему пишет что DNS-сервер не отвечает, то у меня есть еще пару советов:
- Смените статус сети с общественной на частную. У нас на сайте есть подробная инструкция.
- Попробуйте на время полностью отключить антивирус, или встроенный в него брандмауэр (веб-антивирус, сетевой экран).
- Если никак не можете исправить эту ошибку, то позвоните в поддержку своего интернет-провайдера. Не редко проблемы с DNS бывают по их вине.
Обязательно напишите, если у вас получилось избавится от этой ошибки. Напишите какой способ помог. Может у вас сработало какое-то другое решение, которого нет в статье. Ну и оставляйте свои отзывы в комментариях.
You can’t visit a website without first accessing a Domain Name Server (DNS). In the process, you might be met with a message such as “DNS server not responding.” This means that the decentralized naming systems responsible for turning hostnames into IP addresses failed to respond.
There are a variety of reasons these types of DNS errors can occur. Fortunately, most of them have simple resolutions. In fact, fixing the issue could be as easy as restarting your computer or changing web browsers.
In this post, we’ll explain what the “DNS Server Not Responding” message means and some common causes for it. Then we’ll walk you through several solutions for how to fix it, both on Windows and macOS devices.
Let’s get started!
What Does “DNS Server Not Responding” Mean?
A DNS is a naming system that takes alphanumeric domain names (or “hostnames”) and turns them into numeric IP addresses. Essentially, DNS servers act as translators.
When you input a web address into your browser, it is forwarded to a DNS server from your router, where it’s then dissolved and returned as an IP address. However, if the DNS server is unable to properly complete this name resolution process, the end result is usually a message indicating that the DNS server is not responding.
“DNS Server Not Responding” means that your browser was unable to establish a connection to the internet. Typically, DNS errors are caused by problems on the user end, whether that’s with a network or internet connection, misconfigured DNS settings, or an outdated browser. They can also be attributed to a temporary server outage that renders the DNS unavailable.
Therefore, it’s possible that you might be able to resolve the problem simply by switching browsers. In other cases, you may need to disable connections, change DNS servers, or flush the DNS cache.
How to Fix the “DNS Server Not Responding” Error in Windows and macOS (10 Methods)
Now that you understand what this message means and are familiar with some potential causes, it’s time to get to work resolving it. Let’s take a look at ten potential ways you can fix “DNS Server Not Responding” on Windows and Mac devices.
1. Switch to a Different Browser
The first step is to troubleshoot the issue by testing your DNS connections. Fixing this problem might be as simple as switching or updating your web browser.
How Do I Switch to a Different Browser?
To do this, try accessing the web from a different browser. For example, if your default browser is Safari or Google Chrome, visit the desired website from Mozilla Firefox or Microsoft Edge instead.
If switching browsers works, you’ll likely need to update your default browser to the latest version or uninstall and reinstall it. However, if you still see the “DNS Server Not Responding” message, you can rule out your browser as the source of the issue.
2. Start Your Computer in Safe Mode
If your operating system is not functioning properly, it can result in the “DNS Server Not Responding” error message. Therefore, you may want to try booting your Windows device in Safe Mode to see whether this resolves this issue.
Doing so will limit the files and resources used for running Windows, and can be an effective way to troubleshoot problems.
How Do I Start My Computer in Safe Mode?
To start your Windows 10 computer in Safe Mode, first select the Windows button, and then hover over the Power icon:

Next, while you’re holding down the Shift key, select Restart:
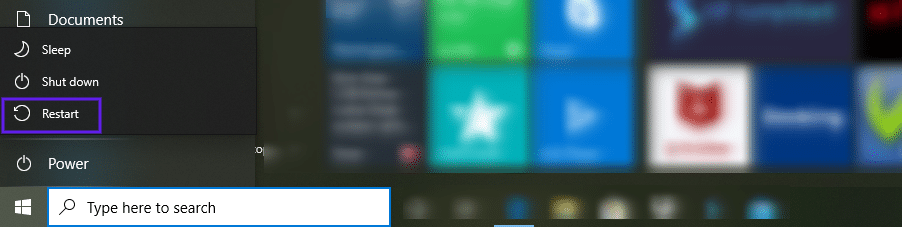
In the window that appears, click on Troubleshoot > Advanced. Under Advanced options, select Start-Up Settings, followed by Restart. More options will appear. You can press 4 or 5 to Enable Safe Mode or Enable Safe Mode with Networking respectively. Your computer will then restart in Safe Mode.
If you’re using Windows 7 or earlier, you can restart it in Safe Mode by going to Power > Restart. Then, while it’s booting up, hold down the F8 key.
The process is similar on macOS devices.
While the machine is restarting and booting up, hold down the Shift key. Once the Apple logo appears, you can release it. Your device will then start in Safe Mode.
Once your computer is in Safe Mode, try to access the website again. If there doesn’t seem to be a network connection issue, the source of the problem may be a third-party software or installation, such as an antivirus application.
3. Temporarily Disable Your Antivirus Software and Firewall
If switching browsers doesn’t resolve the “DNS Server Not Responding” issue, the next step is to temporarily deactivate your firewall. Antivirus software and firewalls are critical for safeguarding your devices, but they can sometimes cause issues that interfere with network connections.
How Do I Temporarily Disable My Antivirus Software and Firewall?
For Windows users, you can do this by going to your control panel and navigating to Update & Security > Windows Security > Virus & Threat Protection > Manage Settings.
Mac users can find this option by navigating to System Preferences > Security & Privacy > Firewall.
Once your firewall is deactivated, try visiting the website again from your browser. If this resolved the issue, you might consider switching antivirus programs or reconfiguring the settings of your existing application. Either way, remember to reactivate your firewall once you’re done.
4. Disable Secondary Connections
If disabling your antivirus software or firewall didn’t do the trick, another potential solution is to disable any secondary connections available on your device. You want to make sure that only the connection you’re currently using is active.
How Do I Disable Secondary Connections?
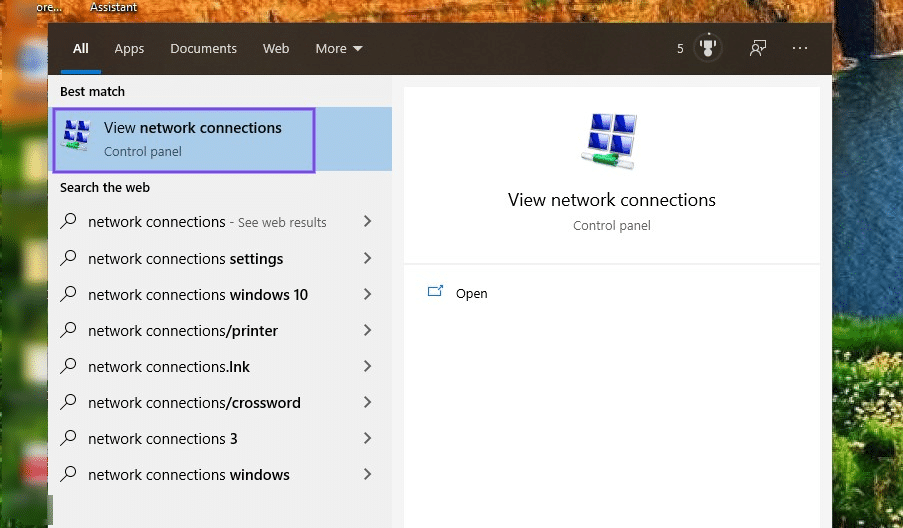
To do this in Windows, type “Network connections” into the search box of your desktop taskbar. Next, click on View network connections:

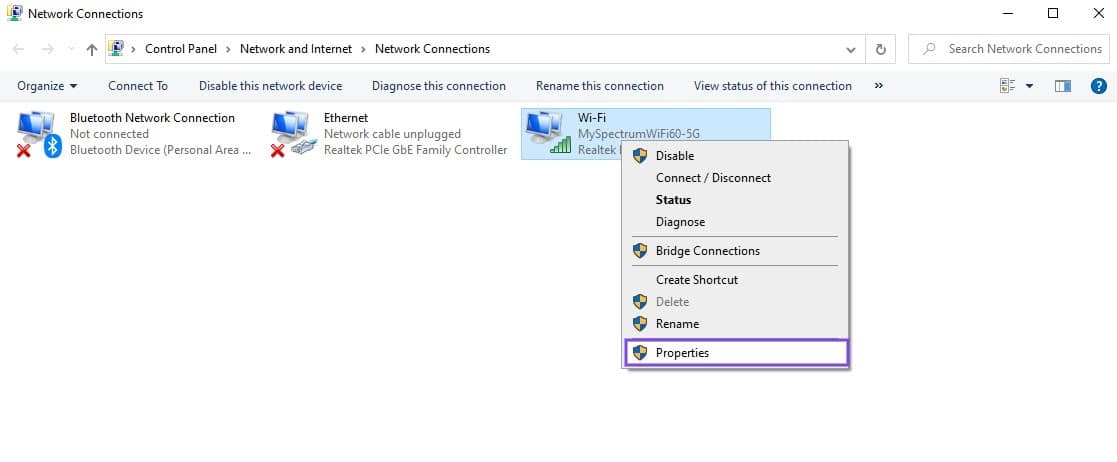
This will bring you to the Network Connections page. Any connections you’re not currently using will have a red (X) next to them. Right-click on one, and then select Disable:
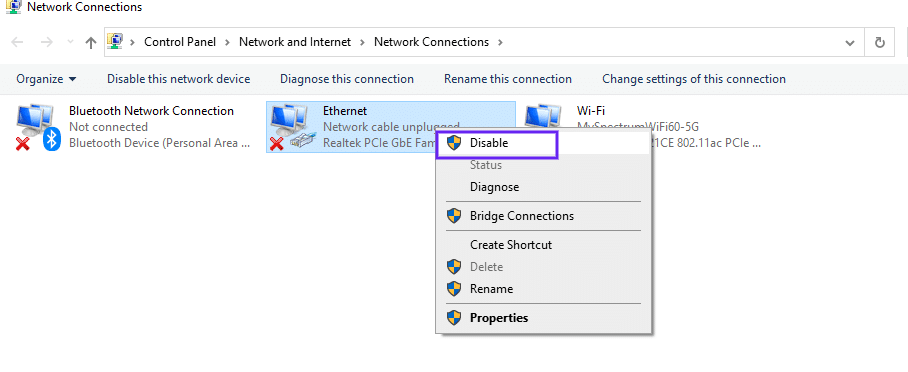
Repeat this for any other connections that are not currently active. When you’re done, restart your browser and try visiting the website again.
If you’re using a macOS, you can do this by clicking on the Apple icon, then navigating to System Preferences > Network. Your connections will be listed on the left side of the window.
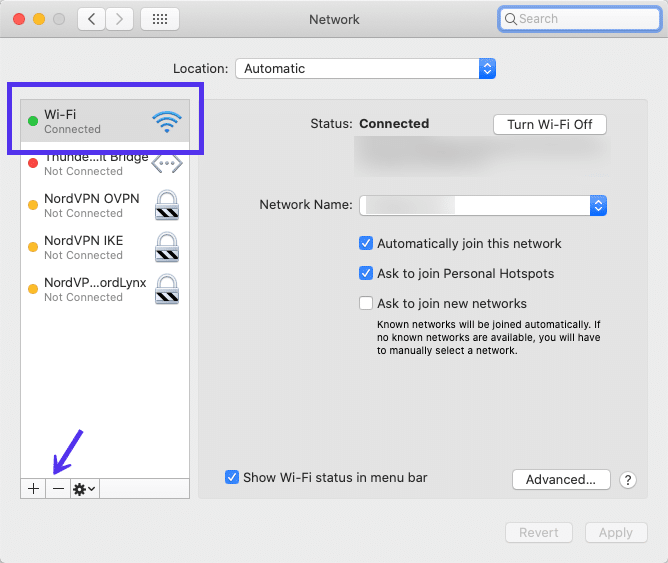
To disconnect or disable one, select it, and then click on the (–) sign at the bottom of the window.
5. Disable the Windows Peer-to-Peer Feature
If you’re using Windows, and disabling your firewall or secondary connections hasn’t resolved the “DNS Server Not Responding” error message, there’s one more option you can try: the Peer-to-Peer (P2P) feature. Note: This is something you’ll only find in Windows 10.
This feature helps preserve your device’s download bandwidth. Essentially, it lets you download a Windows update one time, then use your device to spread or share the updated version across other computers included in your local network.
Unfortunately, it can also sometimes interrupt DNS processes. Therefore, it’s worth disabling to see if this resolves the error message you’re currently facing.
How Do I Disable the Windows Peer-to-Peer Feature?
To do so, click on the Windows icon, followed by the Settings (gear icon) > Update & Security:
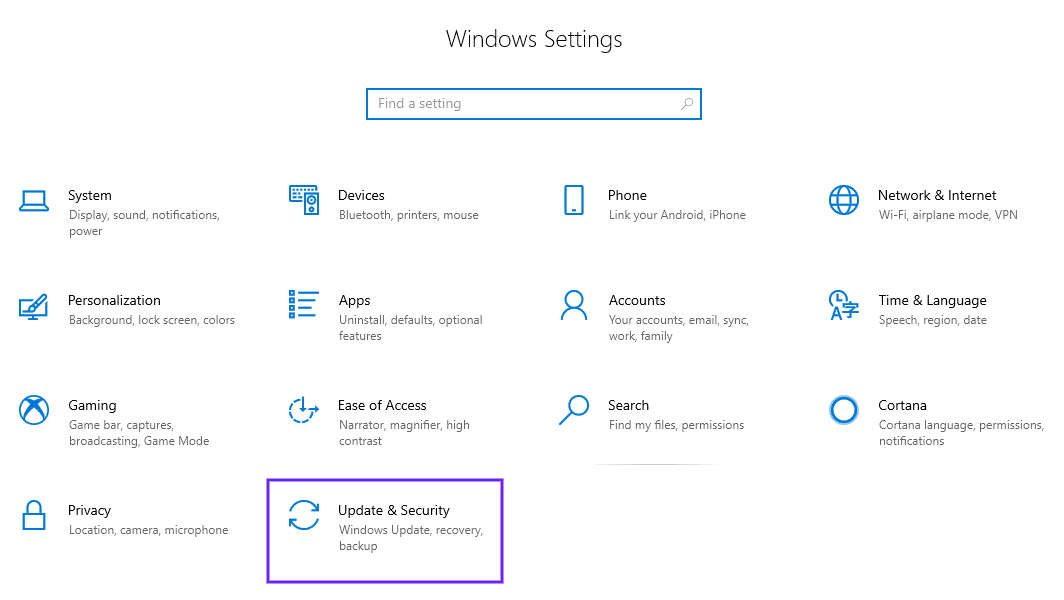
In the window that opens along the left-hand side, select Delivery Optimization:
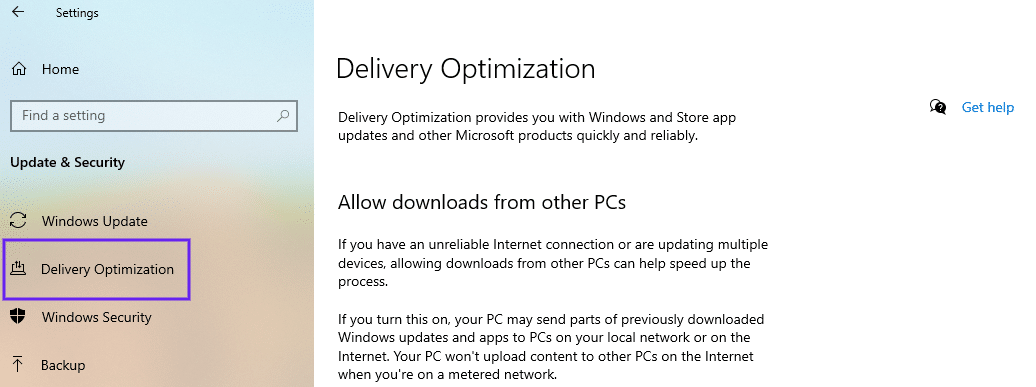
Next to the ‘Allow downloads from other PCs’ option, toggle the switch to disable it:

When you’re done, restart your computer and try accessing the website again. If this doesn’t work, don’t worry. We still have more solutions to try.
6. Restart Your Router
The next troubleshooting step is to restart your router. Doing so will flush your router’s cache and could be the solution for resolving the “DNS Server Not Responding” message.
How Do I Restart My Router?
Most modems come with a power button that enables you to quickly power them off. After a minute or so, turn your modem back on and wait for it to re-establish a connection. Once it does, check to see whether you’re able to access the internet from your browser.
Note that sometimes simply restarting the router isn’t enough. You may want to reboot it by unplugging it entirely, and then waiting at least 30 seconds before plugging it back in and powering it on again.
7. Install Updated Network Adapter Drivers on Your Computer
Another reason you may be seeing the “DNS Server Not Responding” message is if your current Windows network adapter driver is old or outdated. If this is the case, getting a new adapter driver or updating yours may be the solution you need.
How Do I Install Updated Network Adapter Drivers?
There are a couple of ways to update your network adapter driver. One is to do it manually, which you should only do if you are at least somewhat familiar working with drivers. Alternatively, you can do it using an automated tool such as Driver Easy or Snappy Driver Installer (SDI):

Either of these solutions will automatically recognize your system and locate the appropriate drivers for you to use with it. We recommend this method because it eliminates the risk of human error, such as downloading or installing the wrong driver on your device.
Once you download SDI and finish installing the updated drivers, restart your computer. Then try reconnecting to the internet, to determine whether this resolved the issue.
8. Flush Your DNS Cache and Reset Your IP
If you’ve eliminated your browser, antivirus software, and router as the source of the issue, it’s time to turn your attention to your DNS settings. As with the router cache, it may be that your DNS needs to be cleared before it can properly make a connection to the internet, or your IP might need a reset.
How Do I Flush the DNS Cache and Reset My IP?
If you’re using Windows, start by typing “cmd” into the search field along the taskbar, and then selecting the Command Prompt app:
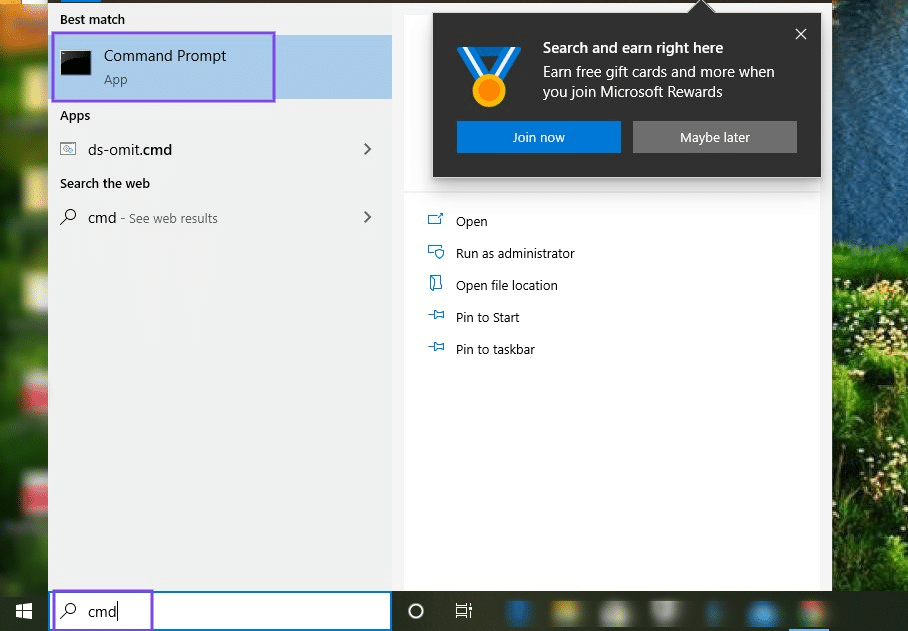
In the window that opens, enter “ipconfig/flushdns” (no quotations), and hit Enter:
When the process is finished, it will display a message letting you know that the DNS cache was successfully flushed. Repeat this process for the following commands:
ipconfig /registerdns
ipconfig /release
ipconfig /renew
If you’re using a Mac device, you can flush your DNS cache by opening the Terminal application (press the Command + Space keys, and then type “Terminal” into Spotlight). In the Terminal application window, enter the following:
dscacheutil -flushcachePress the Enter key. There won’t be a success message as there is on Windows devices. However, simply running this command will flush the DNS cache. For further guidance, you can refer to our full guide on how to flush your DNS cache in Windows, Mac, and Chrome.
9. Disable IPv6
IPv6 is the latest Internet Protocol version that helps route traffic between networks and the internet. Unfortunately, it may also be behind the “DNS Server Not Responding” message you’re currently seeing.
Therefore, another potential solution to try is disabling IPv6 on your computer.
How Do I Disable IPv6?
To do this in Windows, open your Network Connections control panel, then right-click on your current connection. In the drop-down menu, select Properties:

Under the Networking tab of the panel that opens, scroll down until you see Internet Protocol Version 6 (TCP/IPv6):
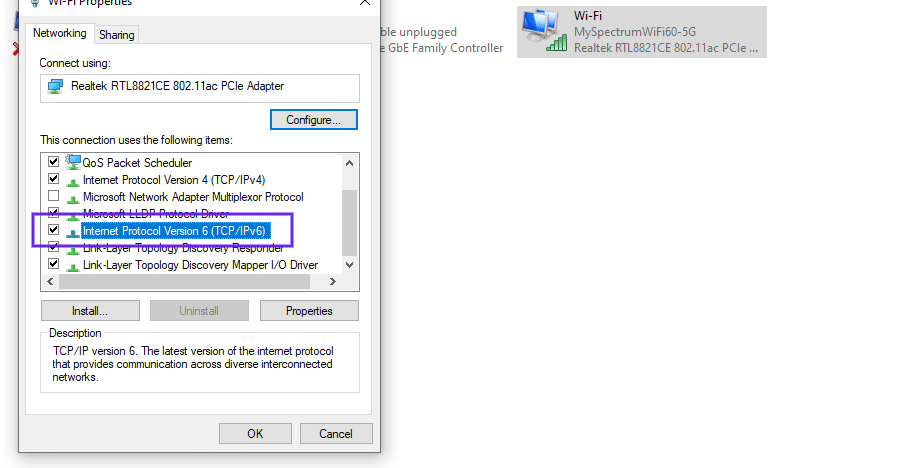
If it’s selected, unselect the box, then click on OK. Refresh your browser and try connecting to the internet again.
To disable IPv6 in macOS, you first need to determine what network interface you’re using. To do this, open the Terminal application, then issue the following command:
networksetup -listallnetworkservicesIf you want to disable IPv6 for a wireless connection, you would use the following command:
networksetup -setv6off Wi-FiFor an Ethernet connection, you would use:
networksetup -setv6off EthernetThen hit the Enter key, and refresh your browser to see if the issue is resolved.
10. Change the Default DNS Server on Your Windows Computer
Another solution you can try in order to fix “DNS Server Not Responding” in Windows is to change your default DNS server. To do this in Windows 7, 8, or 10, the first step is to access your network connection properties.
How Do I Change the Default DNS Server?
Start by clicking on the Windows button in the bottom-left corner of the task bar. In the search field, type “Network connections”, and then select View network connections in the menu that appears:
Next, choose the internet adapter you’re currently using (WLAN for wireless network connections or LAN for ethernet cable connections). Right-click on the internet adapter, followed by Properties:
In the window that opens, choose Internet Protocol Version 4 (TCP/IPv4), and then click on the Properties button:
To manually assign a different DNS server address, select Use the following DNS server addresses and input the address of an alternative server:
For example, you can enter Google’s DNS server, which is “8.8.8.8”, under Preferred DNS server. Then you can add “8.8.4.4” under Alternative DNS server, and hit OK.
If you’re running macOS, you can locate these settings by clicking on the Apple icon followed by System Preferences:

Next, select the Network icon. Choose your current network, and then click on the Advanced button:
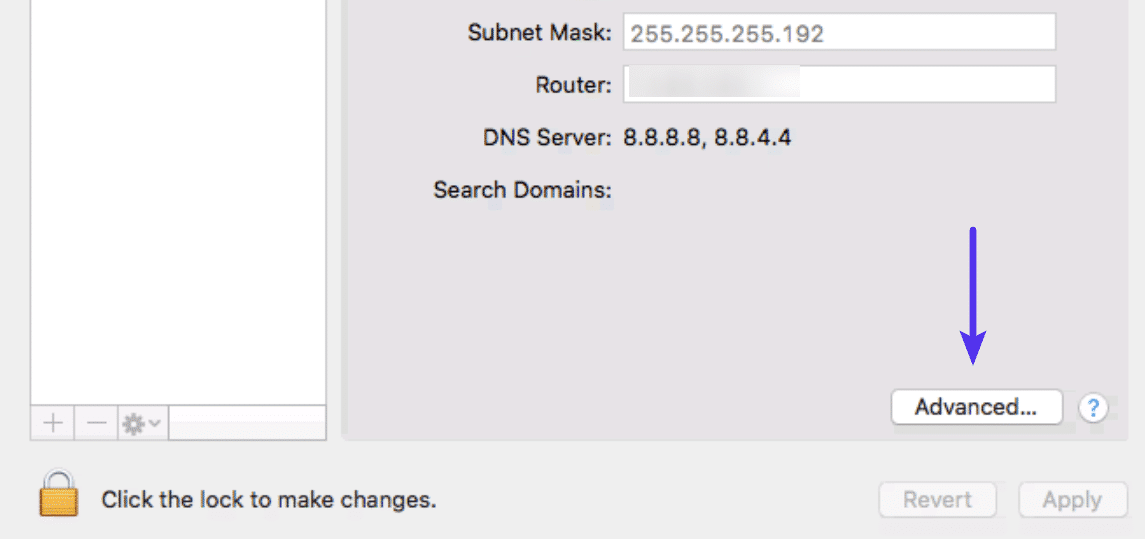
Under the DNS tab, click the (+) button next to “IPv4 or IPv6 addresses”, and hit Enter:
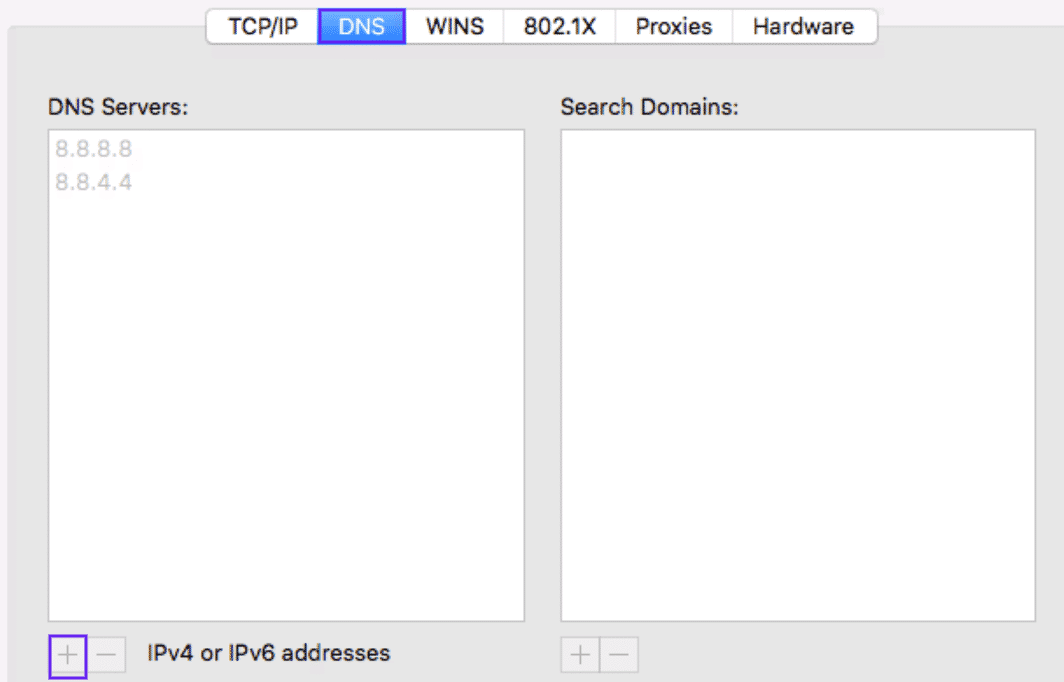
After you enter the new DNS information, click on OK followed by Apply. Restart your web browser, and then visit the website you were trying to access. You should find that the “DNS Server Not Responding” issue is now resolved.
Summary
Trying to access a website only to be met with a “DNS Server Not Responding” message can be both frustrating and concerning. While there are a variety of reasons this error may occur, the good news is that most have simple resolutions.
As we discussed in this article, there are ten potential solutions you can use to fix a “DNS Server Not Responding” message, in both Windows and macOS:
- Switch to a different browser, and if necessary, update your default browser to the latest version.
- Start your computer in Safe Mode.
- Temporarily disable your antivirus software and firewalls.
- Disable secondary connections.
- Disable the Windows Peer-to-Peer feature.
- Restart your router.
- Install updated network adapter drivers on your computer.
- Flush your DNS cache and reset your IP.
- Disable IPv6.
- Change the default DNS server on your computer.
Suggested reading:
How to Fix the DNS_PROBE_FINISHED_BAD_CONFIG Error Code.
How to Fix DNS_PROBE_FINISHED_NXDOMAIN Error Code
Get all your applications, databases and WordPress sites online and under one roof. Our feature-packed, high-performance cloud platform includes:
- Easy setup and management in the MyKinsta dashboard
- 24/7 expert support
- The best Google Cloud Platform hardware and network, powered by Kubernetes for maximum scalability
- An enterprise-level Cloudflare integration for speed and security
- Global audience reach with up to 35 data centers and 275+ PoPs worldwide
Test it yourself with $20 off your first month of Application Hosting or Database Hosting. Explore our plans or talk to sales to find your best fit.
Если сервер «потерялся»
Столкнувшись с проблемами в DNS, многие пользователи описывают приблизительно одну и ту же ситуацию. Приведу пример: «Я установил компьютер DC1 с адресом 192.168.1.4 для тестирования AD. На компьютере стоит операционная система Windows 2000 Server, машина играет роль сервера DNS и первичного контроллера домена моего тестового домена, который я назвал acme.com. Контроллер домена работает прекрасно — я могу создавать учетные записи пользователей и запускать все программы администрирования AD. Затем я установил второй компьютер DC2 с Windows 2000 Server и адресом 192.168.1.5 и запустил команду Dcpromo, чтобы сделать второй компьютер вторичным контроллером домена acme.com. Неожиданно я получаю сообщение Dcpromo о том, что подключиться к домену и сделать DC2 контроллером домена acme.com невозможно. При этом я могу выполнить команду ping между DC1 и DC2 и наоборот (оба компьютера находятся в одной и той же подсети). Не могу понять, что мешает им увидеть друг друга».
Из-за чего же возникает проблема? Чтобы в этом разобраться, необходимо реконструировать события.
Поиск сервера DNS
При запуске Dcpromo для настройки дополнительного контроллера домена программа выводит диалоговое окно Network Credentials. В нем запрашиваются имя, домен и пароль учетной записи, обладающей достаточными полномочиями для добавления контроллеров домена в существующий домен (в нашем случае, acme.com). Далее Dcpromo обращается к контроллеру домена acme.com и пытается зарегистрироваться в домене с этими именем и паролем. Но сначала программе Dcpromo требуется найти первичный контроллер домена.
Тут необходимо вспомнить, что служба именования в доменах AD основана на DNS. Одна из основных задач DNS в сети Windows 2000 — помочь компьютерам найти свои контроллеры домена. Для успешной работы DNS в системе должны присутствовать серверная часть (сервер DNS) и клиентская часть. Клиент DNS исполняется на рабочей станции и необходим для разрешения имен. Но он не может выполнять свою работу до тех пор, пока не найдет сервер DNS. Так что в поисках контроллера домена, который выполнит аутентификацию компьютера, Dcpromo обращается к клиентской части DNS: «Разыщи сервер DNS для домена acme.com и узнай у него имена и адреса IP-контроллеров для этого домена». Чтобы выполнить запрос, клиент DNS обращается к серверу DNS для получения записей типа SRV.
Чтобы понять, к какому серверу DNS обращается конкретная система, достаточно из командной строки выполнить команду:
ipconfig /all
Результатом работы будет список адресов IP всех серверов DNS домена. Когда клиенту DNS требуется разрешить запрос к DNS, он пытается обратиться к первому в списке серверу DNS. Если сервер отозвался, он становится предпочтительным, и все последующие запросы клиент DNS будет передавать ему. Клиент не будет обращаться к другим серверам DNS до тех пор, пока не перестанет получать ответы от сервера, выбранного в качестве предпочтительного.
Когда компьютер Windows 2000 выполняет поиск контроллера домена AD, чтобы произвести регистрацию, система пытается найти локальный контроллер домена. В первую очередь выполняется запрос на поиск локального контроллера домена acme.com. Если этот запрос не проходит, система осуществляет поиск всех контроллеров домена acme.com.
Проблемы с аутентификацией в AD
Для отладки процесса аутентификации AD лучше всего воспользоваться утилитой Nslookup, которая имитирует поведение системы Windows 2000 при попытке регистрации в домене AD. В командной строке следует ввести команду
nslookup
В качестве ответа на этот запрос будет получено имя и адрес сервера DNS, назначенного по умолчанию. Такой результат означает, что, во-первых, Nslookup связалась с сервером DNS и, во-вторых, запросила у сервера обратное преобразование адреса IP в символьное имя сервера. Обратное преобразование адреса в имя при регистрации в домене AD не требуется, но, если сервер DNS не сможет выполнить эту операцию, Nslookup вернет сообщение об ошибке. Данное сообщение послужит сигналом, что в настройках имеются проблемы.
DNS request timed out.
timeout was 2 seconds.
*** Can't find server name for address
200.200.10.10:
Timed out
*** Default servers are not available
Default Server:  UnKnown
Address:  200.200.10.20
При этом можно ввести имя известного сервера в Internet (скажем, www.win2000mag.com) в приглашении Nslookup, и Nslookup легко справится с задачей:
www.win2000mag.com
Server:  ns1.yourisp.com
Address:  200.200.10.10

Name:    www.win2000mag.com
Address:  63.88.172.66
Nslookup также может выдать подобное сообщение, если есть проблемы с сервером DNS, на который настроен клиент DNS:
*** Can't find server name for address
200.200.10.10:
No response from server
*** Default servers are not available
Default Server:  UnKnown
Address:  200.200.10.10
Кто-нибудь заметил существенные отличия между этим текстом и сообщением о невозможности обратного преобразования адреса в символьное имя? Я нет. Как же тогда различить ситуации, когда возникла реальная проблема с сервером, а когда Nslookup не может выполнить обратное преобразование имени? Проще всего попытаться разрешить адрес сервера Internet. В случае проблемы с сервером сообщение будет выглядеть несколько иначе:
Server:  UnKnown
Address:  200.200.10.20
*** UnKnown can't find
www.win2000mag.com: No
response from server
Теперь попробуем с помощью Nslookup смоделировать процесс регистрации на локальном контроллере домена. Для этого необходимо знать имя домена и имя сайта AD. По крайней мере один сайт имеется всегда: при создании первого контроллера домена в лесу программа Dcpromo создает сайт, названный по умолчанию Default-First-Site-Name. Из командной строки следует вызвать Nslookup. В приглашении нужно ввести две команды, используя предложенный синтаксис:
set type=srv
_kerberos._tcp.
._sites.dc._msdcs.
Все символы подчеркивания должны быть введены в точности так, как здесь указано, причем вторая команда не должна содержать пробелов. Например, для сайта с названием HQ в домене acme.com команды будут выглядеть следующим образом:
set type=srv
_kerberos._tcp.hq._sites.dc
._msdcs.acme.com
Если команда введена правильно, результат будет подобен тому, который изображен на Экране 1. Если не получилось — не стоит беспокоиться, в конце концов, мы же занимаемся устранением неполадок. Но если эти команды не сработали, тогда и Dcpromo не сможет выполнить регистрацию в домене. В этом случае Dcpromo обращается к серверу DNS: «Сообщи мне обо всех существующих для acme.com контроллерах доменов». Для эмуляции этого запроса можно воспользоваться Nslookup:
_kerberos._tcp.dc._msdcs
.acme.com
Но если первый запрос потерпел неудачу, вероятно, со вторым произойдет то же самое, причем система выдаст сообщение типа ns1.yourisp.com can’t find kerberos._tcp.dc._msdcs. acme.com: Non-existent domain (ns1.yourisp.com не может обнаружить kerberos._tcp.dc._msdcs.acme.com: домена не существует).
Причина большинства проблем тестовых сетей заключается в том, что имя домена AD (в нашем случае acme.com) совпадает с зарегистрированным именем домена в Internet, т. е. возникает конфликт имен. Чтобы понять причины происходящего, следует вспомнить, какие действия выполнялись при создании первого контроллера домена в тестовом лесу AD.
Причины неполадок
При вызове Dcpromo для создания нового домена под названием acme.com, Dcpromo требуется внести некоторые записи в открытую для записи копию зоны acme.com, размещенную на первичном сервере DNS. Таким образом, Dcpromo запрашивает у локального сервера DNS адрес первичного сервера DNS домена acme.com. Поскольку мы просто экспериментировали, то сервер Windows 2000, вероятнее всего, обратится в Internet по линии DSL или через кабельный модем, и, что естественно, вернет адрес какого-нибудь сервера DNS в Internet. Если «повезло» и найденный сервер DNS знает зарегистрированное доменное имя acme.com, он честно отвечает, что первичным сервером домена acme.com является какой-то сервер Unix в Internet.
Затем Dcpromo сообщает найденному серверу Unix: «Я собираюсь записать в область динамического DNS (DDNS) несколько записей SRV. Не возражаете?» Сервер Unix отвечает: «Ни за что! Я тебя знать не знаю и не позволю записывать ничего в мою зону!» Понятно, что такой ответ приводит Dcpromo в замешательство.
Вместо того чтобы сообщить, что найденный сервер DNS домена acme.com не позволяет выполнить обновление, Dcpromo пытается обмануть и сообщает, что сервер DNS для acme.com не найден. При этом Dcpromo предлагает альтернативу: «Не желаете ли настроить сервер DNS для этого домена?» Вы, конечно, соглашаетесь, радуясь, какая прекрасная программа Dcpromo, как много она умеет делать. Dcpromo настраивает будущий контроллер домена сервером DNS, создает на сервере зону acme.com, настраивает эту зону для установки acme.com и перезапускает компьютер.
Именно в этот момент и начинаются проблемы.
Регистрация в AD и раздельная обработка запросов DNS
И большие корпоративные домены, и крохотные тестовые домены часто сталкиваются с одной и той же проблемой — создавая домены AD с именами существующих в Internet доменов (это может быть конкретный корпоративный домен в Internet), администратор вводит службу DNS в заблуждение. Это то, что я называю «раздвоением личности» DNS. Допустим, к примеру, что создан тестовый домен AD под названием acme.com. В Internet доменным именем acme.com владеет кто-то другой, и поиск домена acme.com с помощью службы DNS выдает адрес постороннего сервера DNS под управлением Unix. Если Dcpromo спросит у найденного сервера, допускает ли тот динамическое обновление (а эту функцию должен поддерживать каждый сервер DNS в домене AD), обычный сервер DNS в Internet, как легко догадаться, ответит: «Нет, ни за что!»
Сбитый с толку Dcpromo спрашивает, что делать? Вместо того чтобы сообщить, что найденный сервер не разрешает динамическое обновление, Dcpromo сообщает о невозможности найти сервер DNS для домена acme.com. Затем Dcpromo предлагает установить службы сервера DNS на том сервере Unix в Internet и настроить его в качестве сервера DNS для локального домена acme.com. Большинство пользователей принимают это предложение, и, как я уже говорил, здесь-то и начинаются проблемы.
При настройке локального сервера DNS программа Dcpromo создает зону с именем, совпадающим с именем домена, — в нашем примере, acme.com. Таким образом, после создания нового домена AD компьютер начинает выполнять две функции: он является одновременно первым контроллером домена и сервером DNS для домена. Но поскольку Dcpromo не сообщает программному обеспечению контроллера домена, что программное обеспечение сервера DNS работает на том же компьютере, контроллер домена не может найти сервер DNS, который бы допускал динамическое обновление для acme.com.
Другими словами, Dcpromo настраивает службу сервера DNS и создает зону acme.com, но не сообщает стеку TCP/IP, что при поиске сервера DNS необходимо обращаться к самому себе. Сервер DNS функционирует, но ни один компьютер, включая и тот, на котором он работает, «не знает», что при поиске домена к данному компьютеру необходимо обращаться в первую очередь. Вот и получается, что Dcpromo выполняет базовую настройку домена, а затем, с разрешения пользователя, перезапускает компьютер.
После перезапуска компьютер настраивает стек TCP/IP в таком виде, в каком он был перед назначением ком-пьютера контроллером домена. А в тот момент либо использовался DHCP для конфигурирования стека, либо устанавливался статический адрес. При использовании DHCP обращение происходило к серверу DHCP провайдера, или к корпоративному серверу DHCP. В любом случае вряд ли используемый сервер DHCP сообщит компьютеру, что в качестве предпочтительного сервера DNS он (данный компьютер) должен использовать себя самого. Если с самого начала применялась статическая настройка стека TCP/IP, то, вероятнее всего, компьютеру также забыли сообщить, что предпочтительным сервером DNS является он сам.
В результате после перезагрузки компью-тера его конфигурация DHCP или статическая конфигурация сообщают компьютеру, что надо использовать какой-то посторонний сервер DNS — возможно, один из серверов Internet. В этот момент начинает работу служба Netlogon.
Как и в Windows NT 4.0, в Windows 2000 служба Netlogon является важной службой, которая выполняется только на контроллерах домена. Одной из основных функций службы Netlogon является поиск первичного сервера DNS для своего домена (т. е. ac-me.com). После обнаружения первичного сервера DNS Netlogon, используя динамический DNS, вносит в зону домена идентификационную запись сервера (SRV) и запись имени хоста (A) для Netlogon. На каждом контроллере домена службы Netlogon периодически выполняют повторное представление себя зоне DNS своего домена, так что DNS знает о существовании этих контроллеров домена. После того как в зоне acme.com становится известно о существовании контроллера домена, рабочие станции и другие контроллеры домена получают возможность обращаться к нему.
Но когда стек TCP/IP контроллера домена acme.com указывает на сервер DNS, отличный от самого себя, запрос к первичному серверу DNS заканчивается обнаружением какого-то сервера DNS в Internet. Тогда запрос возвращает в качестве результата сервер DNS зарегистрированного домена acme.com. Когда Netlogon пытается внести изменения в записи работающего под управлением Unix сервера DNS, сервер не позволяет внести эти изменения, и Netlogon сообщает в системном реестре о событии ID 5773: The DNS server for this DC does not support dynamic DNS. Add the DNS records from the file ‘%SystemRoot%System32Config
etlogon.dns’ to the DNS server serving the domain referenced in that file («Сервер DNS для данного контроллера домена не поддерживает динамический DNS. Добавьте записи DNS из файла ‘%Sys-temRoot%System32Config
etlogon.dns’ на сервер DNS, обслуживающий указанный в данном файле домен.»).
Если нельзя заставить рабочую станцию зарегистрироваться в новом домене AD или если Dcpromo не работает на втором компьютере, который планировалось назначить вторым контроллером домена, проверьте системный журнал на присутствие в нем событий с ID 5773. Если Dcpromo сообщает, что может настроить DNS, то наличие событий с ID 5773 в системном журнале говорит о том, что настройку стека TCP/IP для контроллера домена администратору придется выполнить самостоятельно.
Для большей уверенности необходимо запустить встраиваемый модуль DNS в Microsoft Management Console (MMC), дважды щелкнуть мышью на значке сервера, открыть папку Forward Lookup Zones и дважды щелкнуть на папке домена. Если в папке содержится всего пара-тройка записей, и вложенные папки отсутствуют, это означает, что Netlogon не может обнаружить сервер DNS, работающий на том же ком-
пьютере, что и Netlogon. Параметры TCP/IP компьютера следует настроить так, чтобы он являлся первичным сервером DNS, затем нужно перезапустить Netlogon и снова проверить папку домена. В папке домена теперь должны находиться четыре вложенные папки, содержащие сведения о местонахождении контроллера домена.
Добавление второго контроллера домена
Но пока проблема окончательно не решена. Первый контроллер домена теперь может находить самого себя, но его пока не может найти второй контроллер домена. Когда Windows 2000 установлена на второй компьютер, и он включен в домен acme.com, необходимо настроить стек TCP/IP для обращения к первому компьютеру как к главному серверу DNS. Возможно, такую настройку TCP/IP придется выполнить для всех компьютеров, которые решено сделать дополнительными контроллерами домена.
Если сеть требуется расширять, может понадобиться еще несколько серверов Windows 2000, используемых в качестве серверов DNS для домена acme.com. Поскольку Dcpromo автоматически делает зону acme.com интегрированной в AD, можно задействовать в качестве серверов DNS только контроллеры домена acme.com. Если интегрированная зона не используется, например, потому что не хочется применять контроллеры домена в качестве серверов DNS, можно преобразовать интегрированную в AD зону в стандартную первичную зону. Замечательно, что для этого достаточно несколько раз щелкнуть мышью. Требуется открыть встраиваемый модуль DNS, дважды щелкнуть на значке сервера DNS, затем открыть папку Forward Lookup Zones. В этой папке есть папка с названием созданного домена. Щелкнув правой кнопкой мыши на значке папки, нужно выбрать Properties и перейти на вкладку General (Общие). Затем следует нажать Change (Изменить) и выбрать Standard Primary вместо Active Directory-Integrated.
Теперь наша инфраструктура DNS находится в хорошей форме. Как же расширить ее для больших сетей? Вместо использования Dcpromo для обнаружения проблем с DNS, убедимся, что DNS функционирует нормально с самого начала.
Предположим, что мы действительно работаем в корпорации acme.com и собираемся настроить AD для своей компании. Облегчит ли это нашу задачу? Нам необходимо только заменить существующие серверы DNS серверами, которые допускают динамическое обновление, правильно? Возможно, и нет. AD хранит информацию в зоне DNS, которую, может быть, не захочется делать доступной из Internet. Так что, даже если домен должен действительно называться acme.com, потребуется обмануть AD таким образом, чтобы служба AD пользовалась только внутренними серверами DNS и не пыталась обращаться к «внешним», общедоступным серверам DNS. Такая настройка называется «раздвоением DNS», она необходима для обеспечения безопасности корпоративной сети. Пусть провайдер корпорации Acme поддерживает доступную публично зону acme.com. Далее я расскажу, как настроить только внутренний DNS для AD acme.com.
Во-первых, необходимо создать по крайней мере, один дополнительный сервер DNS для сети acme.com. На первом сервере надо сформировать стандартную первичную зону acme.com и разрешить в ней динамические обновления. На всех последующих серверах необходимо настроить ac-me.com в качестве стандартной вторичной зоны. В качестве вторичных серверов DNS в AD можно даже использовать серверы с Windows NT 4.0 и установленным пакетом обновлений SP6a. Необходимо настроить стек TCP/IP на каждом компьютере и рабочей станции в сети так, чтобы они использовали один из внутренних серверов DNS в качестве предпочтительного и другой внутренний сервер — в качестве альтернативного сервера DNS.
Теперь при запуске Dcpromo найдет тот сервер DNS для домена acme.com, который нужен, — внутренний сервер DNS, и корректно настроит AD. Рабочие станции и серверы смогут находить этот DC и регистрироваться на нем, а при запуске Dcpromo на другой системе для создания дополнительных контроллеров домена Dcpromo будет работать нормально. После установки AD можно будет преобразовать зону в AD-интегрированную.
Теперь, после настройки параметров DNS, остается учесть только одно. Если какой-либо пользователь acme.com попытается найти www.acme.com, он всегда будет находить зоны на сервере внутренней сети и не сможет выйти в общедоступный Internet. Так что необходимо вручную скопировать записи о публичной зоне в зоны внутренней сети.
Learn to get your Ethernet & WiFi working properly again
by Milan Stanojevic
Milan has been enthusiastic about technology ever since his childhood days, and this led him to take interest in all PC-related technologies. He’s a PC enthusiast and he… read more
Published on October 10, 2022
Reviewed by
Vlad Turiceanu

Passionate about technology, Windows, and everything that has a power button, he spent most of his time developing new skills and learning more about the tech world. Coming… read more
- The DNS server not responding error in Windows 10 will prevent you from browsing the Internet.
- If the DNS server isn’t responding in Windows 10, you can try changing the server manually.
- You can also reconfigure your connection to fix this discomforting error.
- Installing the latest drivers can be also a great solution for this problem.
XINSTALL BY CLICKING THE DOWNLOAD FILE
This software will repair common computer errors, protect you from file loss, malware, hardware failure and optimize your PC for maximum performance. Fix PC issues and remove viruses now in 3 easy steps:
- Download Restoro PC Repair Tool that comes with Patented Technologies (patent available here).
- Click Start Scan to find Windows issues that could be causing PC problems.
- Click Repair All to fix issues affecting your computer’s security and performance
- Restoro has been downloaded by 0 readers this month.
The DNS server is a crucial component of the Internet. Unfortunately, DNS issues on Windows 10 are prevalent, with a few users reporting a DNS server is not responding error message on their PCs.
If you want to access any Internet website, you must first access the DNS server. After the DNS server receives your request, you’ll be directed to the desired website.
If the error persists, use the additional troubleshooting methods listed below to learn how to fix the DNS server in Windows 10.
What causes a DNS server not to respond?
There are various reasons for the DNS server not responding error messages. It can be caused by issues with your DNS settings or some problems with your PC.
Below are some of the common causes:
- Outdated or faulty drivers
- Issues with DNS server address
- Antivirus interference
- Outdated router firmware
How do I fix the DNS server not responding Windows 10 error?
What to do if the DNS server is not responding Windows 10? The quickest fix is to change the DNS server settings manually. Then disable your firewall, reset your router and test the connection again.
- What causes a DNS server not to respond?
- How do I fix the DNS server not responding Windows 10 error?
- 1. Change the DNS server manually
- 2. Enter your MAC address manually
- 2.1. Locate the physical address of your PC
- 2.2. Configure your network connection
- 3. Install the latest drivers
- 3.1. Update your drivers manually
- 3.2. Update drivers automatically
- 4. Disable your antivirus and firewall
- 5. Update your router’s firmware
- 6. Use the netsh command
- 7. Restart your modem
- 8. Start your PC in Safe Mode
- 9. Disable Microsoft Virtual WiFi Miniport Adapter
- 10. Disable Internet Protocol Version 6
- 11. Disable all additional connections
- 12. Check for third-party applications
- 13. Change the DNS address on your router
- 14. Reset your router
- 15. Turn off the peer-to-peer update feature
- 16. Wait for your ISP to fix the problem
- 17. Fix Comcast DNS server not responding
- What can I do if Windows 11 DNS server is not responding?
- Is it safe to flush DNS cache?
- How do I find my DNS server?
- How do you check if DNS is working?
1. Change the DNS server manually
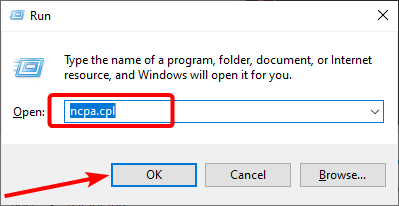
- Press Windows key + R, type ncpa.cpl, and click the OK button.

- Right-click your network and choose Properties.

- Select Internet Protocol Version 4 (TCP/IPv4) and click the Properties button.

- Now, select the Use the following DNS server addresses option.
- Set the Preferred DNS server to 8.8.8.8. and the Alternate DNS server to 8.8.4.4.
- You can also use 208.67.222.222 as Preferred and 208.67.220.220 as the Alternate DNS server.
- After you’re done, click OK to save the changes.

- Optional: Disconnect from the Internet and connect back again.


When you try to access a particular website, you’ll automatically connect to your ISP’s DNS server.
However, it can happen that your DNS server is not available. If that’s the case, you’ll see the DNS server is not responding error on Lenovo and other PCs.
One way to fix this problem is to change your DNS server to OpenDNS or Google DNS. This is a simple procedure that you can perform it by following the steps above.
After changing the DNS server, check if the problem is resolved. You should be able to browse the Internet without any issues.
Remember that changing your DNS server might make your Internet connection a bit slower depending on your location, so you might want to experiment with different servers.
2. Enter your MAC address manually
2.1. Locate the physical address of your PC
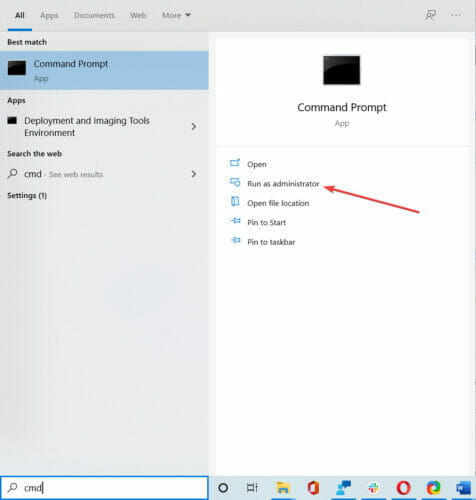
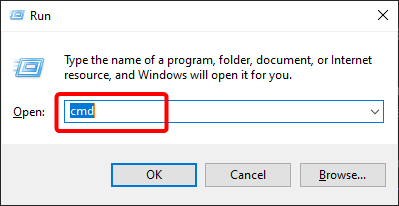
- Type cmd in the search tab and click on Run as administrator under Command Prompt.

- Enter ipconfig /all and press Enter.

- Locate the Physical Address and write it down.
- Close Command Prompt.


2.2. Configure your network connection
- Open the Network Connections window.
- Locate your connection and open its properties.
- When the Properties window opens, click on Configure.

- Go to the Advanced tab and select Network Address from the Property list.
- Now select Value and enter the MAC address you got from Command Prompt (Be sure not to enter any dashes while entering your MAC address).

- Click OK to save the changes.


According to users, you can sometimes have DNS failure simply by manually entering your network adapter’s MAC address.
This is a simple procedure. To enter your MAC address, you need to find it first. To do that, follow the steps above.
Users report that this solution works best after switching to Google DNS or OpenDNS, so be sure to try it.
If you need to change your MAC address, you can use one of these MAC address changer tools.
3. Install the latest drivers
3.1. Update your drivers manually
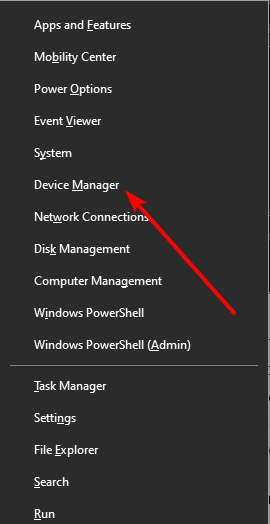
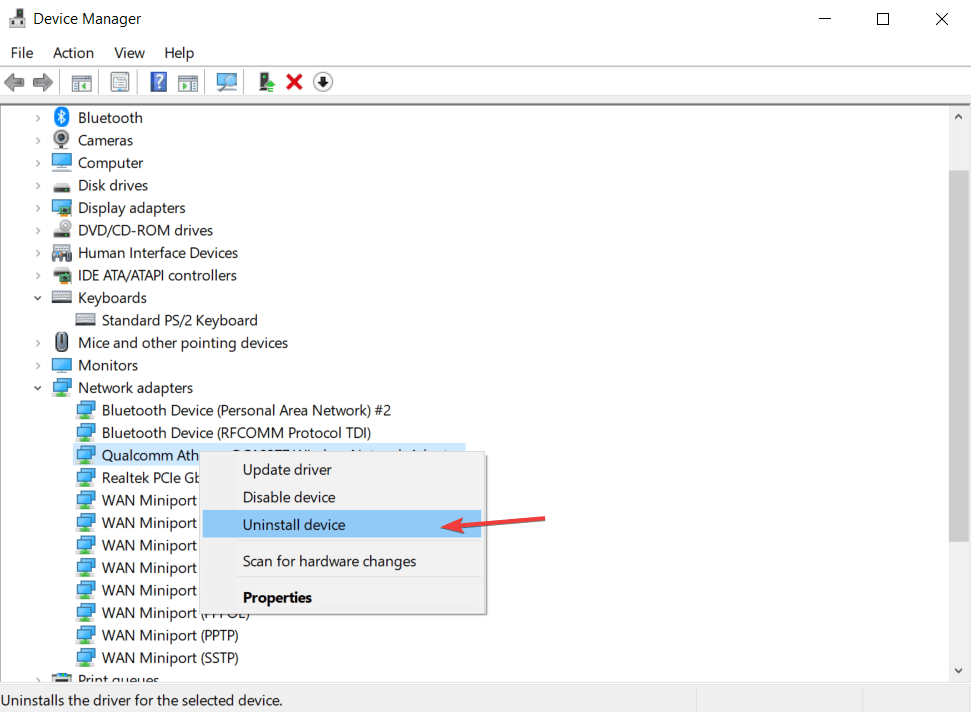
- Press Windows key + X and choose Device Manager from the list.

- When Device Manager opens, locate your network adapter, right-click on it and choose Uninstall.

- If available, click on Delete driver software for this device, followed by Uninstall.

- After you delete the driver, restart your PC.
- When your PC restarts, the default network driver will be installed.

Your network adapter relies on drivers to work correctly, and if you have any problems with it, it might be due to your drivers.
To fix DNS server errors on Windows 10, you need to visit your network adapter manufacturer’s website, download the latest drivers and install them on your PC.
If you can’t access the Internet at all, it might be caused by the DNS server not being unavailable, so download the drivers on a different device and install them on your PC.
Some users also recommend uninstalling your network drivers before installing the new drivers.
3.2. Update drivers automatically
Downloading drivers manually can cause damage to your computer in case you download the wrong version. We strongly suggest doing it automatically by using a third-party tool.
The tool recommended below is exceptionally light and will automatically repair or update your drivers in just a few seconds and in just one go. You only need to invest a few clicks, and the problem will disappear.
⇒ Get Driverfix
4. Disable your antivirus and firewall
Antivirus and firewall solutions are necessary to protect your PC from malicious users, but sometimes your antivirus and firewall can interfere with your Internet connection.
To fix DNS server connection issues on Windows 10, try temporarily disabling your antivirus and firewall client.
Remember that your PC will still be protected by Windows Defender even if you disable your antivirus, so there’s no need to worry about your safety.
If your antivirus or firewall client was causing this issue, be sure to change its configuration or switch to a different client.
Users reported that Bitdefender Total Security could sometimes cause this problem to appear. If you’re using Bitdefender, you need to go to Firewall settings and disable the Block Internet connection sharing option.
After that, the problem should be resolved. Users reported that Avast could also cause this problem. To fix it, open Avast settings and disable the Secure DNS option.
You can also try disabling the firewall on your router. This is a bit advanced and potentially dangerous solution, so keep that in mind. By disabling your router’s firewall, your PC will be completely vulnerable.
If you decide to do that, temporarily disable your router’s firewall and check if that fixes the problem.
If the problem was your firewall, you need to turn it back on again and check your firewall configuration for the source of the problem.
To see how to disable your router’s firewall, be sure to check its instruction manual.
5. Update your router’s firmware
A few users reported that DNS servers might not respond while using wireless networks like WiFi. However, you can fix that simply by updating your router’s firmware.
We must warn you that this is an advanced process, so you must be extra cautious to avoid causing damage.
Before updating your router’s firmware, you must back up its settings. We advise you to check your instruction manual to see how to update the firmware correctly.
If your DNS server is not responding on WiFi/wireless, you may also want to check the channels you’re using.
6. Use the netsh command
- Open Command Prompt as administrator.
- Type the commands below and press Enter after each:
netsh int ip resetnetsh winsock resetipconfig /flushdnsipconfig /renew - After all the commands are executed, restart your computer.
According to users, you can fix DNS failure simply by running a few commands from Command Prompt. To do that, follow the steps above.
You’ll reset your IP and clear the DNS cache by performing these commands, so be sure to try this method.
7. Restart your modem
One way to fix the DNS server not responding error on Windows 10 is by restarting your modem. To do that, press the power button on your modem to turn it off.
Some PC issues are hard to tackle, especially when it comes to corrupted repositories or missing Windows files. If you are having troubles fixing an error, your system may be partially broken.
We recommend installing Restoro, a tool that will scan your machine and identify what the fault is.
Click here to download and start repairing.
Wait 30 seconds and press the power button again to turn it on. Wait until the modem turns on entirely and check if the problem persists.
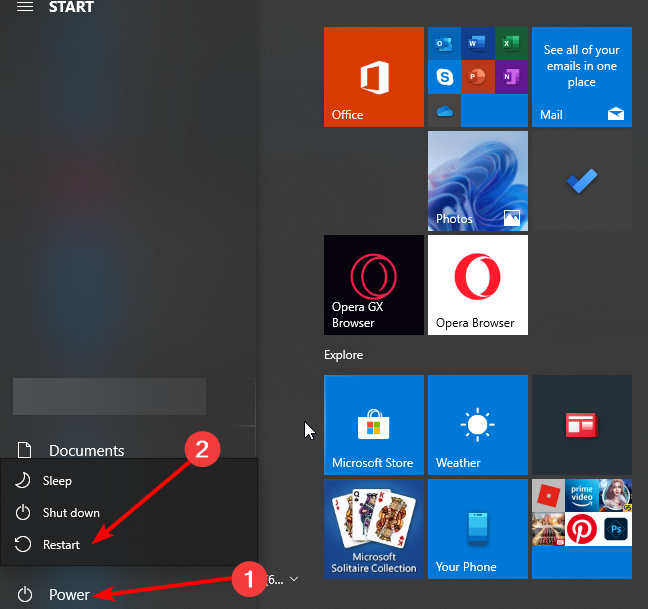
8. Start your PC in Safe Mode
- Open the Start Menu and click the Power button.
- Hold down the Shift key on your keyboard and click Restart.

- Choose Troubleshoot.
- Select Advanced options, select Startup Settings, and click the Restart button.
- When your PC restarts, you’ll see a list of options available. Select Safe Mode with Networking by pressing F5 on the keyboard.
- Safe Mode will now start.
Sometimes third-party applications such as antivirus or VPN can interfere with your Internet connection.
To fix the DNS server not responding error on Windows 10, try accessing the Internet from Safe Mode.
If you’re not familiar, Safe Mode is a special mode in Windows that runs only with essential software and drivers.
When Safe Mode starts, check if your network connection is working. If there are no problems with your Internet connection in Safe Mode, third-party software interferes with your network connection.
You need to find and remove the problematic application from your PC to fix this issue.
9. Disable Microsoft Virtual WiFi Miniport Adapter
- Open Device Manager.
- When Device Manager opens, go to View and select Show hidden devices.

- Locate Microsoft Virtual W-iFi Miniport Adapter, right-click it, and choose Disable. Repeat this step for all available Virtual Miniport Adapters.
- After you’re done, close Device Manager and check if the problem is resolved.
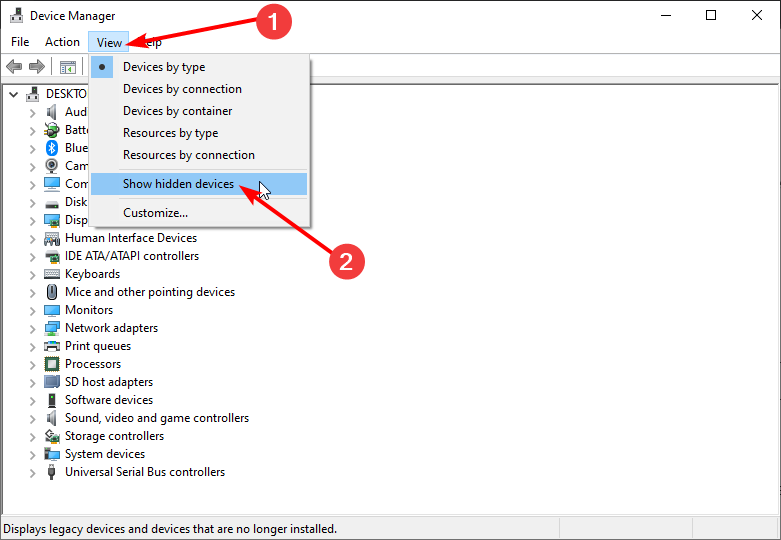
If the DNS server is not responding on WiFi connections, the problem might be caused by Microsoft Virtual WiFi Miniport Adapter. To fix this issue, you need to find and disable these adapters.
10. Disable Internet Protocol Version 6
- Open Network Connections.
- Right-click your connection and choose Properties.
- Now, locate Internet Protocol Version 6 (TCP/IPv6) and unmark it.

- Click the OK button to save changes.

There are two types of IP addresses, v4 and v6. If your DNS server is not responding on your PC, you might be able to fix it by disabling Internet Protocol Version 6.
Disabling IPv6 won’t affect your computer negatively, but hopefully, it should fix the problem with the DNS server.
11. Disable all additional connections
- Open the Network Connections window.
- Right-click the connection that you want to disable.
- Choose Disable from the menu.

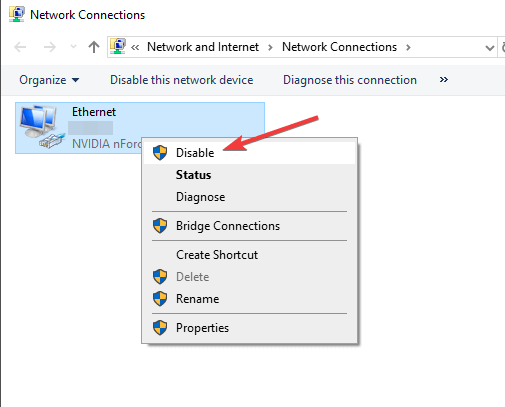
You might have multiple connections on your PC, which can sometimes cause DNS server issues while using WiFi connections.
To fix this issue, you need to disable those connections from the Network Connections window.
12. Check for third-party applications
Some third-party applications can affect your DNS and cause this problem to appear. Users reported that their DNS changes automatically to a specific address.
The problem was caused by a third-party application called ColdTurkey.
After disabling or uninstalling the problematic application, the DNS server is not responding error was resolved entirely.
Remember that almost any network-related or security application can interfere with your DNS, so keep a close eye on all installed applications.
- How to Fix The Network Security Key Isn’t Correct on Windows
- How to Completely Flush & Reset DNS on Windows 11
- WiFi Shows No Internet But Internet Works: 11 Easy Solutions
- This WiFi Uses An Older Security Standard: Quick Fixes
- None of the Networks Previously Connected to Are in Range: Fix
13. Change the DNS address on your router
According to users, you might be able to fix this problem by setting a different DNS address on your router. To do that, you need to access your router’s configuration page and look for the DNS setting.
Change the DNS server to Google DNS or OpenDNS and check if the problem is resolved. For detailed instructions on how to change your DNS, be sure to check your router’s instruction manual.
14. Reset your router
Your router configuration can sometimes cause DNS problems to appear. If the DNS server is not responding on the router, you need to reset your device to default settings.
To do that, you need to open your router’s configuration page and select the Reset option.
You can export your configuration if you want, so you don’t have to configure wireless networks again.
Another way to reset your router is to hold the reset button on it for a few seconds. Both methods work the same, and you should use the one you’re most comfortable with.
If you’re unsure how to reset your router, check your instruction manual for step-by-step instructions.
15. Turn off the peer-to-peer update feature
- Open the Settings app by pressing the Windows key + I.
- Navigate to the Update & security section.

- Click on Advanced options.

- Click the Delivery optimization option.
- Toggle the switch for Allow downloads from other PCs backward to set it Off.
Windows 10 has a great feature that allows you to download updates using peer-to-peer technology.
This feature allows you to download Windows updates directly from other users in your area.
This is a valuable and innovative feature, but it seems that this feature can sometimes cause DNS failure. One potential solution for DNS problems is to disable this feature.
After turning this feature off, check if the problem with the DNS server is resolved.
16. Wait for your ISP to fix the problem
Sometimes DNS server is not responding error can be caused by your ISP. Your ISP might have some problems, so you might have to wait a few hours while your ISP resolves technical difficulties.
The DNS server is not responding error will prevent you from accessing the Internet, but you should be able to fix it by using one of our solutions.
17. Fix Comcast DNS server not responding
We noticed many reports about the Comcast DNS server not responding when users try to get online using WiFi.
To fix this issue as quickly as possible, go to the GW GUI, select Troubleshooting and then Reset/Restore Gateway. Reset your WiFi router and check if the problem persists.
What can I do if Windows 11 DNS server is not responding?
The DNS server is not responding on Windows 11 issue is caused by issues with antivirus and drivers. Also, it might be caused by problems with your DNS server address.
You can fix the issue effectively by applying the solutions listed guide.
Is it safe to flush DNS cache?
Any invalid addresses, whether they are obsolete or have been altered, will be removed by clearing the DNS server. It’s also crucial to remember that clearing the cache has no unfavorable consequences.
So yes, if you are wondering how safe it is, it is indeed safe.
- How to Fix The Network Security Key Isn’t Correct on Windows
- How to Completely Flush & Reset DNS on Windows 11
How do I find my DNS server?
- Press the Windows key + R to open the Run utility.
- Type cmd and hit Enter.
- Type the command below and press Enter:
ipconfig/all - Look for DNS servers from the list.


How do you check if DNS is working?
- Go to the DNS leak test website.
- Click the Standard test button.

- Check the ISP column if it contains the correct DNS.

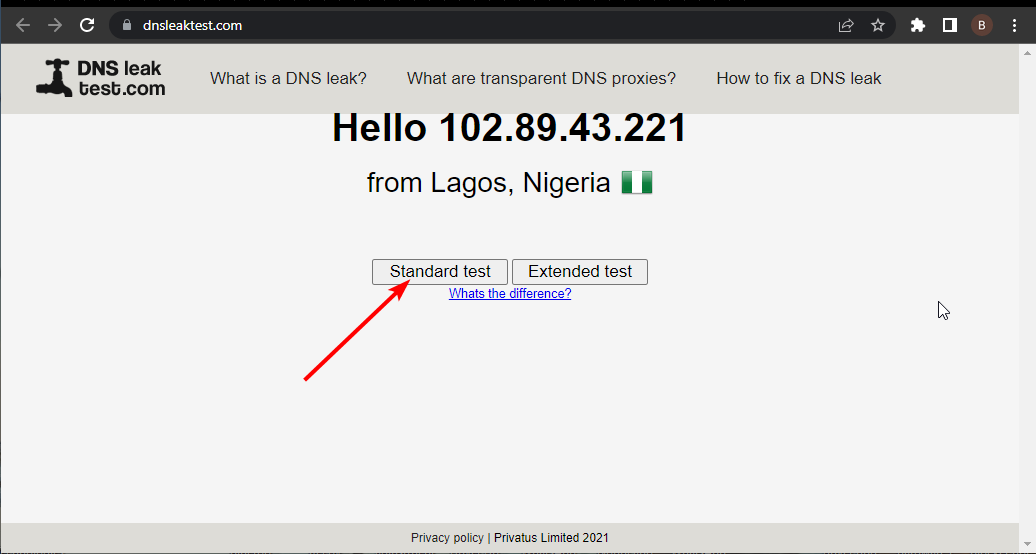
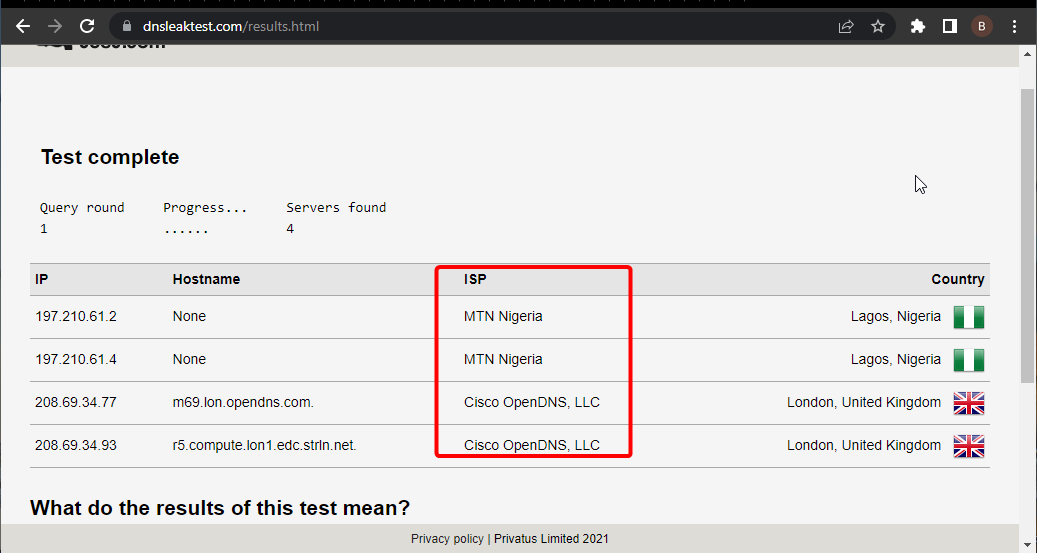
If the DNS shown on the site above is correct, it means your DNS is working perfectly. Using Command Prompt as admin, you can also check whether your DNS server is working.
You only need to run the command below: nslookup <client name> <server IP address>
Note that you need to replace the client name and server IP address with the correct value. If the command returns Request to server timed out or No response from server, your DNS server is probably not working.
That’s it! We hope you fixed the DNS server not responding error on Windows 10 by using one of our solutions.
If you face other issues like the DNS server unavailable error on Windows 11, check our detailed guide to fix it quickly.
Do you have other suggestions or thoughts regarding the DNS not responding Windows 10 issue? Write them in a comment below.
![]()
Newsletter
- Remove From My Forums
-
Вопрос
-
I have two AD DNS servers: dns1.example.local and dns2.example.local. Dns1 is running Windows Server 2016, while Dns2 is running Server 2012 R2.
My Windows 10 (1809) workstation is able to make DNS lookups from the dns1 server:
Non-authoritative answer:
Name: purple.com
Addresses: 2606:4700:10::6814:37eb
2606:4700:10::6814:38eb
104.20.55.235
104.20.56.235However, when I try the same query against dns2 from my Win 10 workstation:
*** dns2.example.local can’t find purple.com: No response from server
But if I try the same query for purple.com against dns2 from itself, another Server 2012 R2 machine or even a MacOS 10.14.1 client, it will successfully return the results. Unfortunately, I don’t have an exact time frame as to when this issue began
showing up as dns1 is my primary server on my workstation. I just received my first user complaint today (Wednesday). I just did the March round of patches on this server over the weekend.I also had one of my co-workers try the query from her Windows 10 (1803) machine, but it also gets no response from dns2. I checked around and found another workstation running Windows 10 (1709) and found it can successfully query dns2.
Ответы
-
Hi,
- Please force NSLookup to use the IPv4 address on the clients.
Nslookup
>server 192.168.88.12
- Please check if the DNS server is listening on the IPv6 interface.

Best regards,
Travis
Please remember to mark the replies as an answers if they help.
If you have feedback for TechNet Subscriber Support, contact
tnmff@microsoft.com-
Помечено в качестве ответа
1 апреля 2019 г. 15:51
-
Ok, that did the trick. Forcing NSLookup to use the IPv4 address resolved the «no response» error. I then configured the server to only listen to the IPv4 address and restarted the DNS service. I was then able to have NSLookup
use the server name instead of forcing the explicit IPv4 address.-
Помечено в качестве ответа
Castaway Kid
1 апреля 2019 г. 15:55
-
Помечено в качестве ответа